Original Link: https://www.anandtech.com/show/5675/gigabyte-gaa55ms2v-review
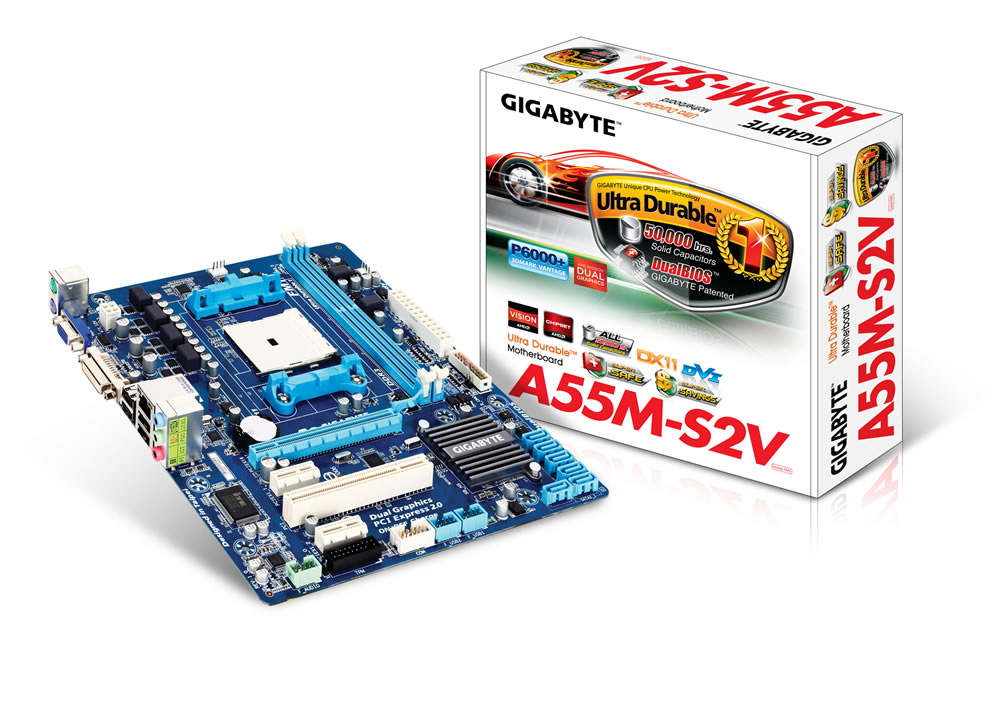
Gigabyte GA-A55M-S2V Review
by Brendan van Varik on March 21, 2012 9:00 PM EST- Posted in
- Gigabyte
- Motherboards
- Llano
- A55
Today we are looking at the Gigabyte GA-A55M-S2V, the first A55 motherboard to hit the AnandTech test beds. In comparison to the A75 platform which we have covered extensively, although the A55 lacks a few features such as USB 3.0, SATA 6 Gbps and a second full length PCIe slot, the A55 motherboards are usually aimed at low end, low budget system builders. The Gigabyte GA-A55M-S2V comes in at a smaller than mATX form factor for just such occasions.
A75 vs A55
Desktop Llano builders are often looking for a couple of exploitable capabilities – the currently superior iGPU performance that is coupled with the APUs available, and a low but affordable cost. As mentioned previously, the A55 chipset is somewhat reduced, having no USB 3.0 nor any SATA 6 Gbps compared to A75, but this is ultimately not the aim of the chipset. Low budget systems will perhaps not require any USB 3.0 (and to be honest, here in the UK we’re not seeing much of a shift towards USB in the low end consumer space due to production and licensing) nor SATA 6 Gbps (a cheap system would not be paired with an SSD that costs as much as the rest of the system). But the options are there and in our personal opinion, for a motherboard in the sub $75 region, it makes sense. These are not performance systems; they are for family email or basic gaming devices.
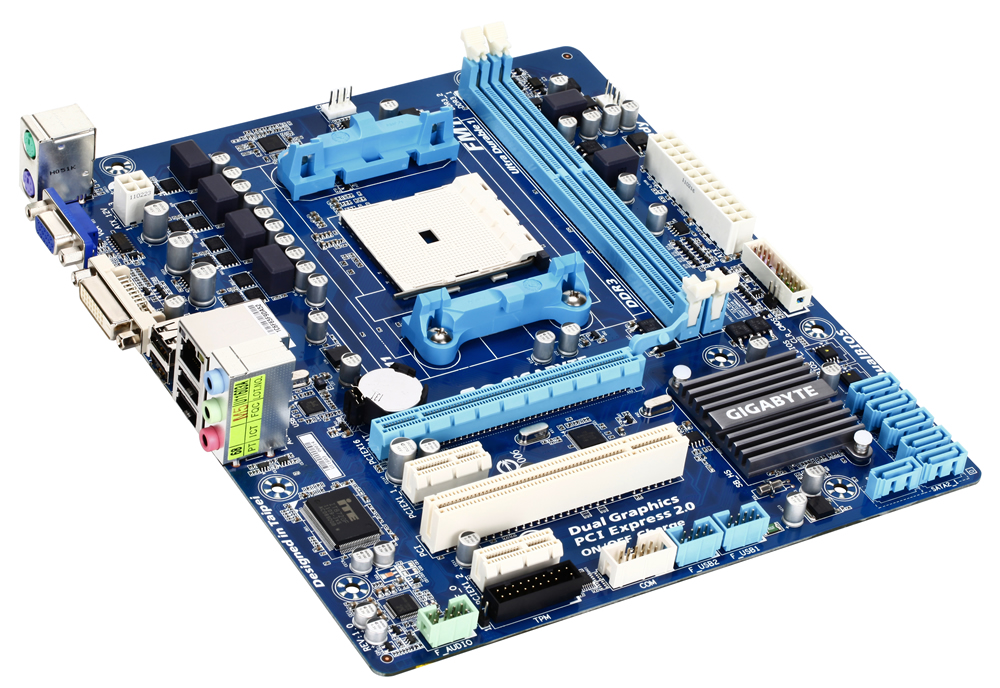
Visual Inspection
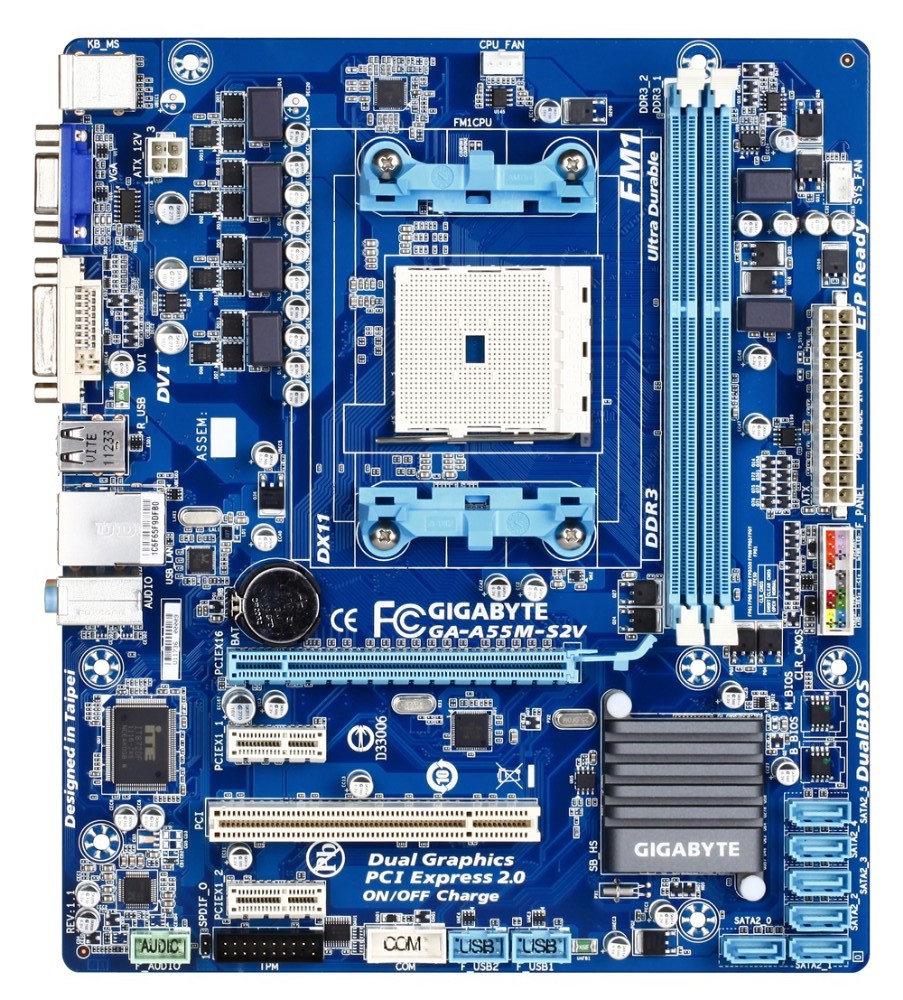
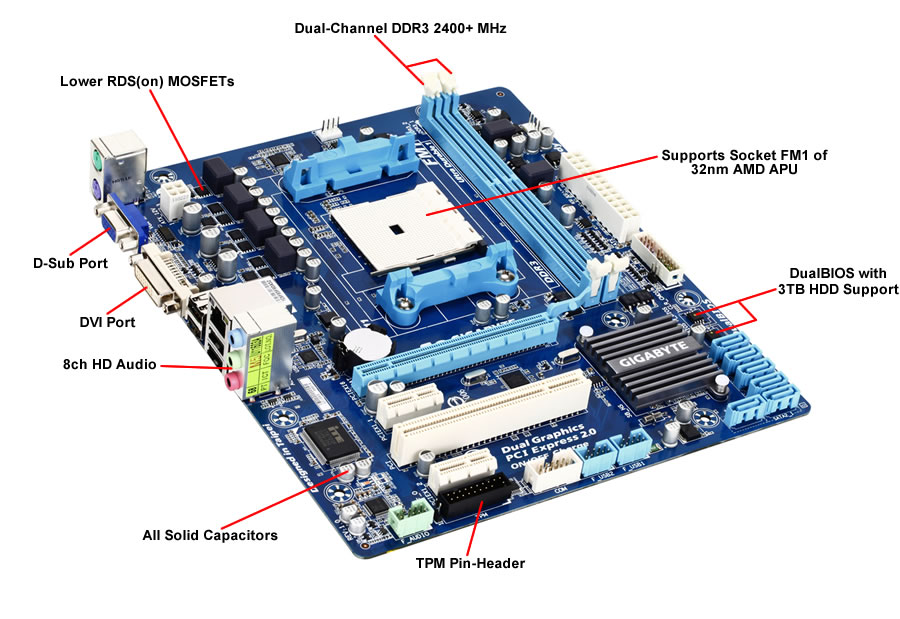
The blue PCB which the GA-A55M-S2V is built on is a typical sighting from the current Gigabyte budget segment. Keen eyes will notice the lack of VRM heatsinks, despite this board being certified to run 100W processors. This will undoubtledly lead to little room in terms of pushing the platform (but that’s not really what A55 is all about). Personally, I would feel more secure with at least something on there. In contrast, there is a heatsink on the FCH to help dissipate chipset heat (~7W) and to provide some extra on-board brand recognition. This is arguably common practice for any motherboard, and it is worth noting that this heatsink does get very warm to the touch when in use.
We are treated to two DIMM slots on the board, supporting a dual channel mode and up to 16 GB if appropriate memory modules are used. Of note on board is the use of the TPM module in the lower left of the board, which is commonplace on all Gigabyte boards but almost no other manufacturers’ products. This is a feature that Gigabyte implements at little cost and, as I have been told, is listed as a requirement by some of their partners. The inclusion of this is of course to widen the sales potential of the board, however the downside is the extra routing and the PCB real estate it takes up.
In terms of fans, we only have two fan connections available on this particular model from Gigabyte – one for the CPU and one for the chassis. It is a little disappointing as there is typically more than a single system fan installed in a case. Both the CPU and the system fans are PWM based. The CPU fan header is located above the socket, but the system fan is in a rather remote location – we find it in the top right hand side of the motherboard. This does not seem like a logical place to put it as most users will require the header on the left to use it for an exhaust fan.
There is just one PCIe x16 slot on this board along with two PCIe x1 slots and a single PCI slot. There are two USB 2.0 headers at the bottom of the board to provide expansion for up to four extra USB 2.0 ports in your system should you require them. The six SATA 3 Gbps headers have not been put at a 90 degree angle but there should not be any obstructions from a large graphics card due to their positioning. The direction of the SATA ports though would hinder attempts to remove a locking HDD cable from the top of the set meaning that the four below it would have to be removed.
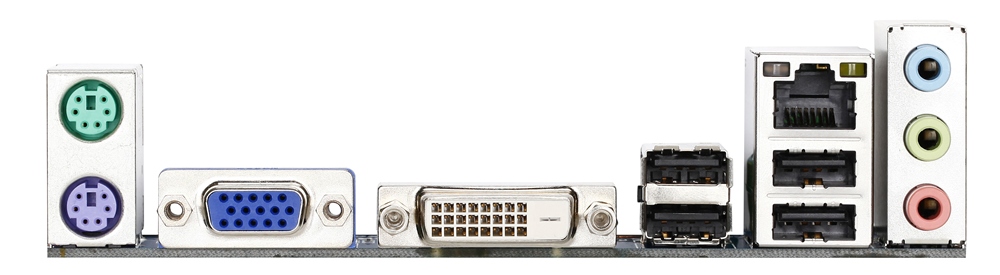
The inputs and outputs of the A55M-S2V are very basic compared to the whole A75 range we have tested. While there are two PS2 ports for legacy mice and keyboards, we have only D-SUB and DVI for video outputs – no HDMI here. There are four USB 2.0 ports, a gigabit LAN port and three audio ports.
BIOS
Upon first glance, you will instantly notice that Gigabyte has not used a graphical based BIOS for this motherboard. This is perhaps due to Gigabyte’s late entry into the graphical arena for BIOSes, but the feel of the BIOS could be considered somewhat backdated compared to most motherboards today. Nevertheless, it is built on the functionality and ease of use of the past ten-plus years, so it should work.
First thing to note is the front screen, which due to the old-style nature, does not have any of the information we would generally want the minute we enter the BIOS. We would like to see, inter alia, what CPU is in the board, what speed it is running at, how much memory is in the system (and how fast it is running), CPU temps, voltages, and fan speeds. For any of this information, the user has to delve into the MB Intelligent Tweaker or PC Health Status options from the front menu.
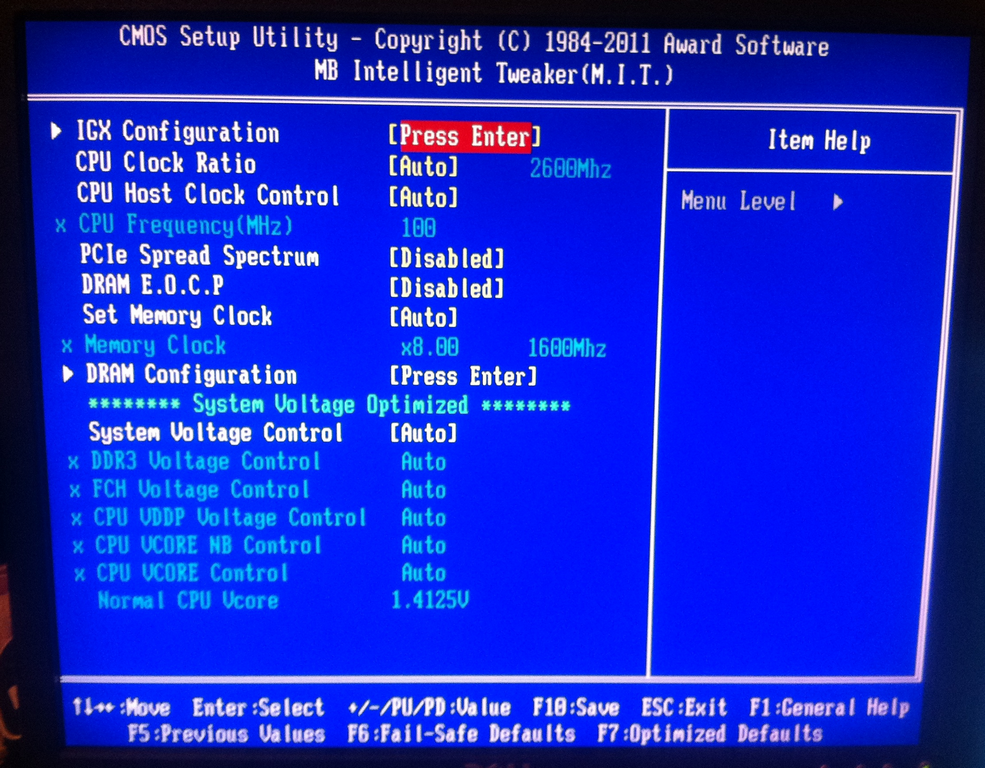
The overclocking options are located under the MB Intelligent Tweaker (M.I.T) section. Within this submenu you can change everything to do with the system clocks, memory ratios and voltages. The IGX (integrated graphics) configuration is where you can tweak the onboard GPU of the Llano APUs (even if the GPU is locked – the options will actually just do nothing) and the rest within this menu is fairly self-explanatory. The one gripe I have with this BIOS is the voltage options. It does not give you the voltage which you are setting but instead it uses the offset (+/-0.0125 V) style. It is not an issue with the BIOS but more a personal preference.
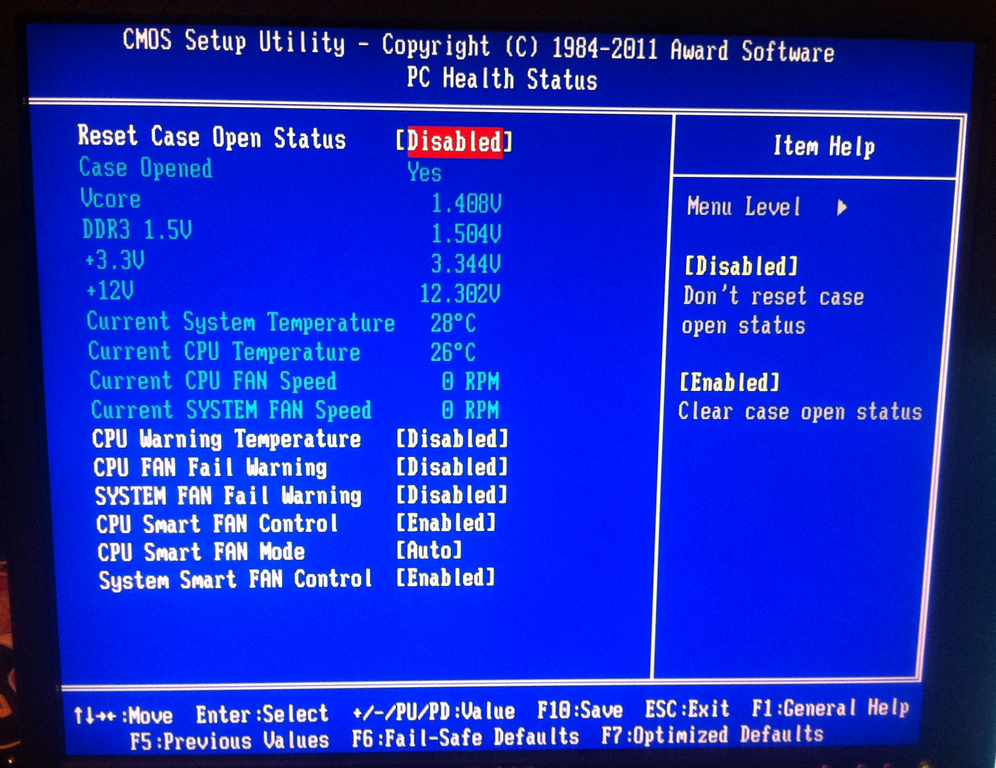
The fan settings are located under the PC Health Status menu. There are not very many options for the fan settings at all. When it comes down to you wanting to choose whether you would like the system fans to be on the SMART fan option, there are only two options to choose from and they consist of ‘Enabled’ or ‘Disabled’. Just like the CPU fan, the system fans, which when set to enabled, will slow the fans down when the system is in idle and they will subsequently speed up when the system starts to warm up. The CPU fan controls are very limited as well. You can choose from either a voltage for the fan to run at or you can choose the PWM feature. In our case when the motherboard was tested, auto was used.
There are no noticeable changes between the F2 BIOS which was first installed on this motherboard compared to the F6 BIOS which was installed and used for our testing. It was easily updated via a USB stick (FAT32 formatted) by using Q-Flash, which can be started by pressing F8 whilst in the BIOS. The only major changes to the BIOS would involve the CPU compatibility codes and possible improvements to the system stability.


Overclocking
For the Gigabyte GA-A55M-S2V and the BIOS system, there are no automatic overclocking features available. As a result, users will have to perform manual overclocks to increase performance – I will reiterate that the VRM solution on this board isn’t designed to dissipate heat as much as the A75 boards we’ve tested, and your mileage may vary.
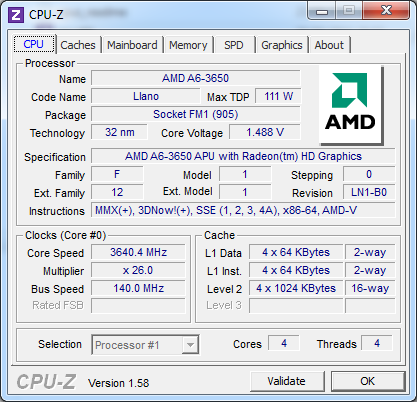
I dived straight into the deep end. Due to overclocks with this particular processor being successful on other motherboards, I started off with a 125 MHz bus which is a 25% overclock and it booted straight into Windows without any issues. These overclocks were achieved using the auto settings for the voltages. I continued to push higher until the motherboard would no longer boot up and I eventually ended up on a final clock speed of 3640 MHz. This was achieved using a 140 MHz bus speed with 1.5 V on the CPU, whilst keeping the RAM as close to 1333 MHz as possible by adjusting the straps as I went along to ensure that the RAM was not holding the overclock back. This gave a fully stable Blender test.
In The Box
With a budget board such as this one, the accessories list is small. You only get the very basics to get your system up and running and they consist of the following:
IO shield
2x SATA cables, one of which has a 90° right angled connector
Drivers DVD
Users manual

Image courtesy of Newegg
Considering that this is a budget motherboard, I would not have expected to get much more in the box.
Board Features
| Gigabyte GA-A55M-S2V | |
| Market Segment | |
| Size | Micro ATX |
| CPU Interface | FM1 |
| CPU Support | Desktop Llano |
| Chipset | A55 |
| Base Clock Frequency | 100 MHz by Default, 90 to 300 MHz in 1 MHz increments |
| DDR3 Memory Speed | 1333 MHz by Default, 800 MHz to 1866 MHz supported |
| Core Voltage | 0.800 V to 1.700 V in 0.0125V increaments |
| CPU Clock Multiplier | CPU Dependent, Fixed unless Black Edition processors used |
| DRAM Voltage | 1.35 V to 2.30 V in 0.01 V increments |
| DRAM Command Rate | 1 or 2 |
| Memory Slots |
Two DDR3-DIMM Maximum 16 GB, Non-ECC Unbuffered 1066 MHz to 1866 MHz selectable |
| Expansion Slots |
1 x PCIe x16 2 x PCIe x1 1 x PCI |
| Onboard SATA/RAID | 6 x SATA 3 Gbps (RAID 0, 1, 10, JBOD) |
| Onboard |
6 x SATA 3 Gbps 2 x Fan Headers 2 x USB 2.0 header 1 x S/PDIF Out header 1 x Front Panel Connector 1 x Front Panel Audio Connector |
| Onboard LAN | RealTek RTL8111E Gigabit Fast Ethernet Controller |
| Onboard Audio | Realtek ALC887 codec High Definition Audio |
| Power Connectors |
1 x 24-pin ATX 1 x 4-pin 12V |
| Fan Headers |
1 x CPU (4-pin) 1 x CHA (4-pin) |
| IO Panel |
4 x USB 2.0 Ports 2 x PS/2 Port 1 x Gigabit Ethernet 1 x Optical SPDIF output 3 x Audio Jacks VGA/DVI-D Video Outputs |
| Warranty Period | 3 Years |
As mentioned previously, with A55 we do not get USB 3.0 or SATA 6 Gbps as standard, but this all helps drive down the cost. The Realtek audio+network combo which is sold to manufacturers at a discount when paired together would also help lower the overall cost. We would have liked another fan header on board at minimum, perhaps with better fan controllers too.
Software
The installation of the drivers and the software for this motherboard was straightforward. Overall, the software itself personally did not feel as feature packed as some of the other manufacturers, nor does it look quite as nice but it does what it says on the tin.
The main software to use is EasyTune6 – an all in one affair which offers an array of options view information about your CPU and memory as well as your graphics card, and sections to apply overclocking options.
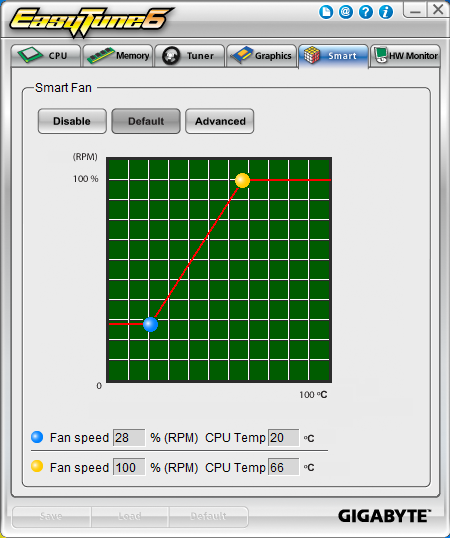
Within EasyTune6, the fan controls are limited but they do work. To change the fan speed, you alter the position of the blue or yellow circle on the graph to make the fans spin at a certain percentage of their maximum speed for at that particular CPU temperature. All you are doing is plotting the graph which the software will interpret and change the fan speeds accordingly.


Test Setup
| Processor |
AMD A6-3650 (Llano) 4 Cores, 4 Threads, 2.6 GHz |
| Motherboards | Gigabyte GA-A55M-S2V |
| Cooling | Corsair H50 |
| Power Supply | OCZ 1250W ZX Series Gold |
| Memory | Patriot Memory 2x2 GB DDR3-2133 9-11-9 Kit |
| Memory Settings | DDR3-1866 |
| Video Cards | Sapphire 5850 1GB Xtreme |
| Video Drivers | Catalyst 11.8 |
| Hard Drive | Micron RealSSD C300 256GB |
| Optical Drive | LG GH22NS50 |
| Case | Dimastech Test Bed |
| Operating System | Windows 7 64-bit |
| SATA Testing | Micron RealSSD C300 256GB |
| USB 2/3 Testing | Patriot 64GB SuperSonic USB 3.0 |
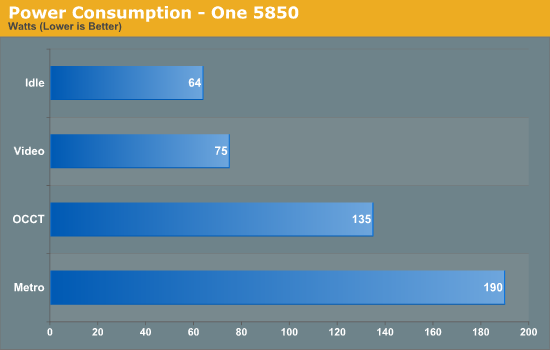
Power Consumption
Power consumption was tested on the system as a whole with a wall meter connected to the power supply, while in a single GPU configuration. This method allows us to compare the power management of the UEFI and the board to supply components with power under load, and includes typical PSU losses due to efficiency. These are the real world values that consumers may expect from a typical system (minus the monitor) using this motherboard.
CPU Temperatures
With most users’ running boards on purely default BIOS settings, we are running at default settings for the CPU temperature tests. This is, in our outward view, an indication of how well (or how adventurous) the vendor has their BIOS configured on automatic settings. With a certain number of vendors not making CPU voltage, turbo voltage or LLC options configurable to the end user, which would directly affect power consumption and CPU temperatures at various usage levels, we find the test appropriate for the majority of cases. This does conflict somewhat with some vendors' methodology of providing a list of 'suggested' settings for reviewers to use. But unless those settings being implemented automatically for the end user, all these settings do for us it attempt to skew the results, and thus provide an unbalanced 'out of the box' result list to the readers who will rely on those default settings to make a judgement.

USB Speed
For this benchmark, we run CrystalDiskMark to determine the ideal sequential read and write speeds for the USB port using our 64GB Patriot SuperSpeed USB 3.0 drive. Then we transfer a set size of files from the SSD to the USB drive, and monitor the time taken to transfer. The files transferred are a 1.52 GB set of 2867 files across 320 folders – 95% of these files are small typical website files, and the rest (90% of the size) are the videos used in the Sorenson Squeeze test.
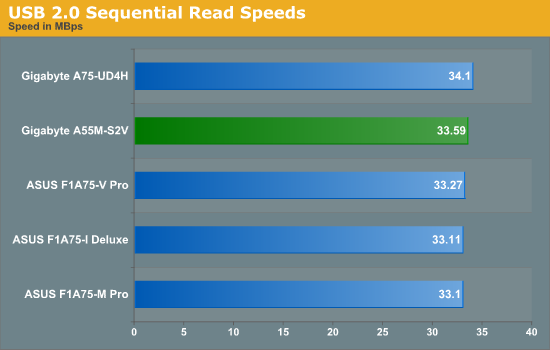
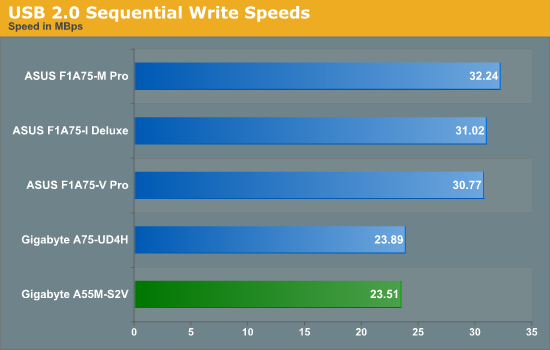
Read speeds on the A55M-S2V are good and they are above average – the write speeds on the other hand are not great.
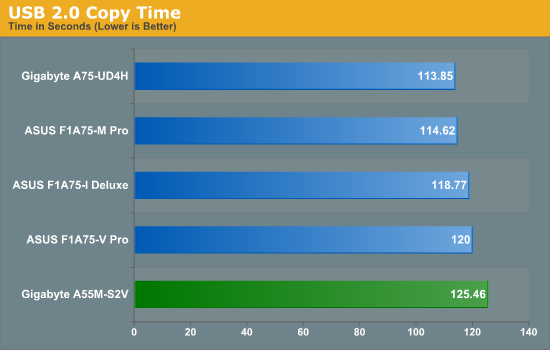
Due to the write speeds being low, the copy time is naturally affected by this.
SATA Testing
We also use CrystalDiskMark for SATA port testing. The operating system is installed on the SSD, and the sequential test is run at the 5 x 1000 MB level. This test probes the efficiency of the data delivery system between the chipset and the drive, or in the case of additional SATA ports provided by a third party controller, the efficiency between the controller, the chipset and the drive.
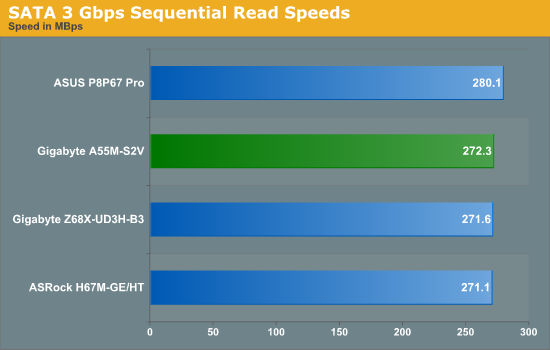
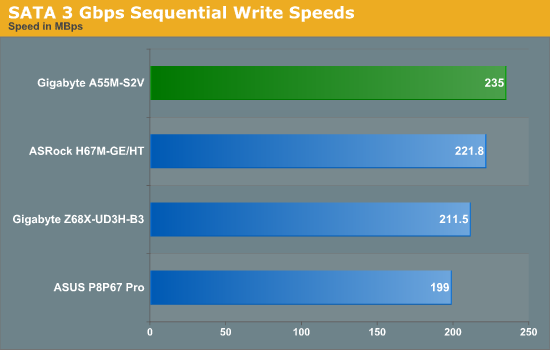
As SATA 3 Gbps is not on the A75 platform due to it being SATA 6 Gbps native, I have decided to compare it to the mid ranged, H67 platform.
DPC Latency
Deferred Procedure Call latency is a way in which Windows handles interrupt servicing. In order to wait for a processor to acknowledge the request, the system will queue all interrupt requests by priority. Critical interrupts will be handled as soon as possible, whereas lesser priority requests, such as audio, will be further down the line. So if the audio device requires data, it will have to wait until the request is processed before the buffer is filled. If the device drivers of higher priority components in a system are poorly implemented, this can cause delays in request scheduling and process time, resulting in an empty audio buffer – this leads to characteristic audible pauses, pops and clicks. Having a bigger buffer and correctly implemented system drivers obviously helps in this regard. The DPC latency checker measures how much time is processing DPCs from driver invocation – the lower the value will result in better audio transfer at smaller buffer sizes. Results are measured in microseconds and taken as the peak latency while cycling through a series of short HD videos - under 500 microseconds usually gets the green light, but the lower the better.
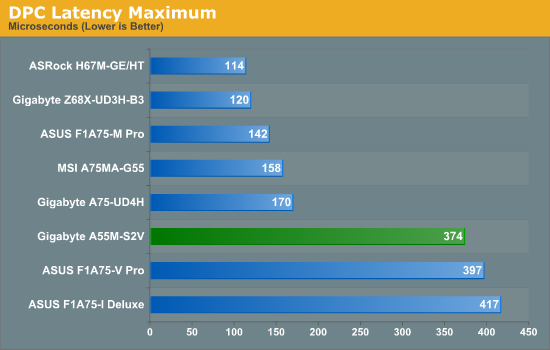
The result for this motherboard comes in the middle of the five Llano boards we have currently tested. There seems to be an effect here on certain types of boards with the DPC Latency as well, but nonetheless they all come in at under the golden marker of 500 microseconds.
3D Movement Algorithm Test
The algorithms in 3DPM employ both uniform random number generation or normal distribution random number generation, and vary in various amounts of trigonometric operations, conditional statements, generation and rejection, fused operations, etc. The benchmark runs through six algorithms for a specified number of particles and steps, and calculates the speed of each algorithm, then sums them all for a final score. This is an example of a real world situation that a computational scientist may find themselves in, rather than a pure synthetic benchmark. The benchmark is also parallel between particles simulated, and we test the single thread performance as well as the multi-threaded performance.
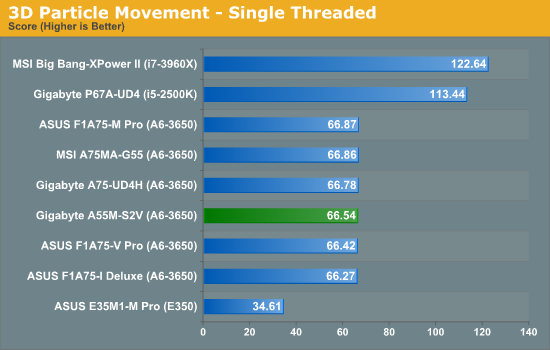
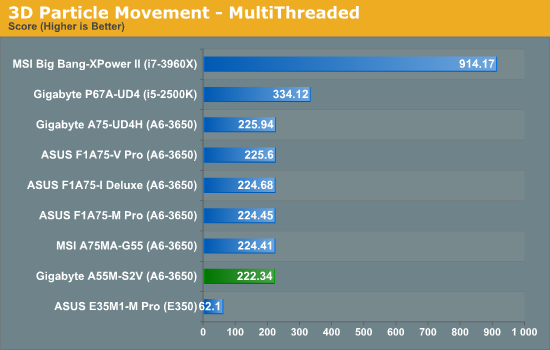
While single threaded performance is average, the performance in a multithreaded environment leaves this motherboard standing in last place in the Llano section. Nevertheless, the board is within statistical variations.
WinRAR x64 3.93 - link
With 64-bit WinRAR, we compress the set of files used in the USB speed tests. WinRAR x64 3.93 attempts to use multithreading when possible.
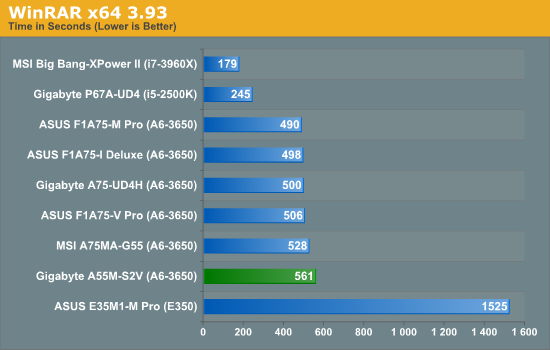
WinRAR attempts to use multithreading as much as possible and as demonstrated in our previous tests with the 3D Movement benchmark, multithreaded applications are not the strong point of this motherboard and it has given us a much slower result.
FastStone Image Viewer 4.2 - link
FastStone Image Viewer is a free piece of software I have been using for quite a few years now. It allows quick viewing of flat images, as well as resizing, changing color depth, adding simple text or simple filters. It also has a bulk image conversion tool, which we use here. The software currently operates only in single-thread mode, which should change in later versions of the software. For this test, we convert a series of 170 files, of various resolutions, dimensions and types (of a total size of 163MB), all to the .gif format of 640x480 dimensions.
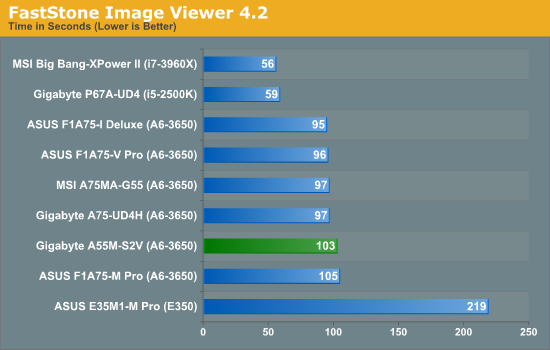
The S2V is not the slowest of the bunch but it is by no means the quickest either.
Sorenson Squeeze 6.0 - link
Sorenson Squeeze is a professional video encoder, complete with a vast array of options. For this test, we convert 32 HD videos, each a minute long and approximately 42 MB in size, to WMV 512KBps format. Squeeze can encode multiple videos at once, one for each thread.

Our Squeeze test is heavily multithreaded and this result proves yet again that the multithreaded aspect of this motherboard is not strong enough to compete.
Aliens vs. Predator Benchmark
Aliens vs. Predator is a DirectX 11 science fiction first-person shooter video game, developed by Rebellion Developments. Available as a standalone benchmark, on default settings the benchmark uses 1920x1080 with high AF settings. Results are reported as the average frame rate across 4 runs.
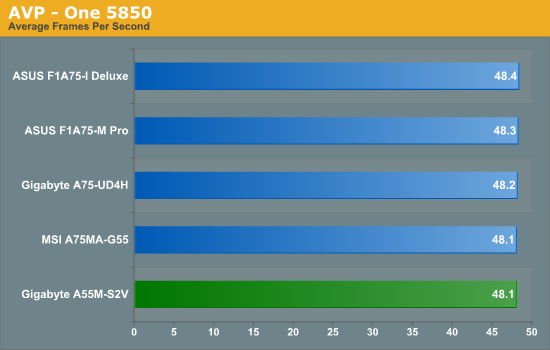
As with most of our results, the differences are minuscule. There is only a 0.3 FPS difference between this motherboard and the top motherboard.
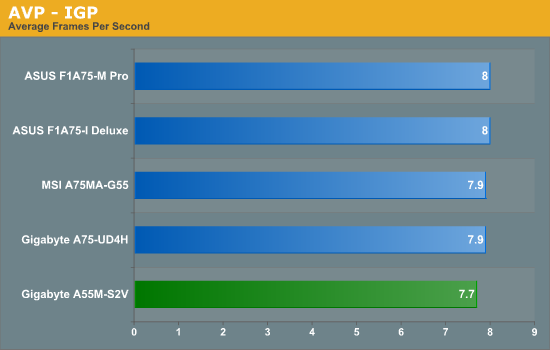
The motherboard appears to be able to hold its ground against the A75 chipset.
Metro2033
Metro 2033 is a challenging DX11 benchmark that challenges every system that tries to run it at any high-end settings. Developed by 4A Games and released in March 2010, we use the inbuilt DirectX 11 Frontline benchmark to test the hardware at 1920x1080 with full graphical settings. Results are given as the average frame rate from 10 runs.
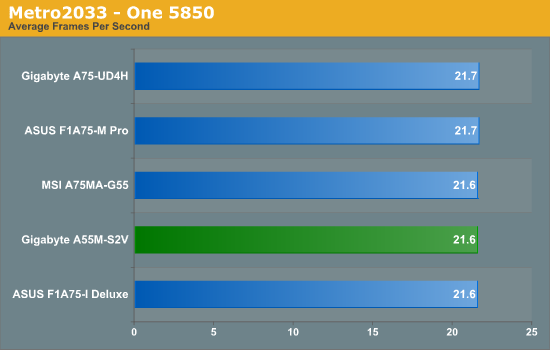
There is very little difference between this motherboard and other motherboards which cost twice the price.
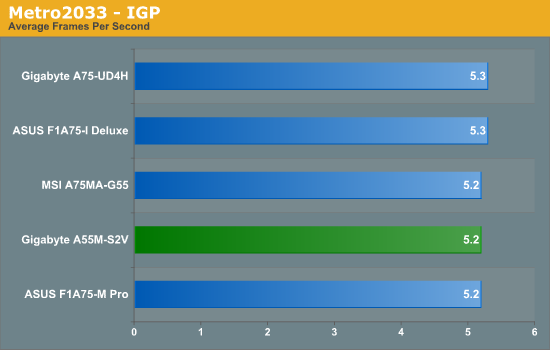
Metro is a very demanding game and the board does well to keep up with other more expensive motherboards on the market.
Final Words
Price is quite clearly a key part of this motherboard as it is aimed at the budget end of the market. Overall, considering it costs $65 at Newegg.com, the motherboard performs well and it does manage to give some of the more expensive boards a run for their money.
The layout of the motherboard is fairly standard and it is just like most other boards on the market today. There are only a few little niggles which I have with the boards layout and they are the one fan connector and the positioning of the front panel headers. It may be down to personal preference, but to me, the fan header should have been located on the left hand side of the motherboard and the front panel headers should have been put at the bottom of the motherboard.
As previously mentioned, the BIOS is still an old styled system and there is no graphical implementation. It is reasonably easy to navigate around but it would be nice to have a change from the traditional BIOS layout and get that all important information straight to the user the minute they enter the system.
There is next to no difference in terms of the overclocking abilities of this motherboard. It manages to hold a 140 MHz bus speed which is not far behind the more expensive, A75 alternatives. The overclock is going to be fairly similar across all of our motherboards which are tested due to the voltage limits which we impose.
Performance wise the GA-A55M-S2V was not setting any records, and in some cases it was struggling to keep up with its beefier A75 cousins. No doubt that if we get in more A55 boards to review, the Gigabyte will prove to be an interesting data point across our benchmark suite.