Original Link: https://www.anandtech.com/show/5271/gigabyte-gax79ud3-review
Gigabyte GA-X79-UD3 Review
by Ian Cutress on December 26, 2011 4:37 PM EST- Posted in
- Gigabyte
- Motherboards
- X79
- Sandy Bridge E
Over the years, Gigabyte has given us some interesting products. More recently in the past 18 months, Rajinder gave their H55N-USB3 motherboard a well deserved recommendation, and more recently, I have scrutinized their Sandy Bridge range. For X79, Gigabyte is uncharacteristically launching only a few motherboards, of which we are looking at their cheapest model, the X79-UD3. We are also for the first time introduced to what Gigabyte believe should be a graphical BIOS compared to their competitors. Read on for the full review.
The full Gigabyte X79 range consists of a UD3, a UD5, an overclock oriented UD7-OC and a gamer G1 Assassin 2. Typically we see Gigabyte jump at the more esoteric features of a chipset, always willing to take advantage of newer features, but sometimes at the expense of the in-the-box package or memory compatibility.
Overview
It is hard to have a unique overview on the UD3, especially if we compare it to other boards on the market. The price ($270 MSRP) suggests it should sit square between the ASUS P9X79 Pro ($330) and the ASRock X79 Extreme4 ($235), both of which we have reviewed recently, so the expectation should be that it falls between the two:
| ASUS P9X79 Pro |
Gigabyte GA-X79-UD3 |
ASRock X79 Extreme4 |
|
| Price (MRSP) | $330 | $270 | $235 |
| Memory Slots | 8 | 4 | 4 |
| PCIe |
2 x PCIe x16 2 x PCIe x8 2 x PCIe x1 |
2 x PCIe x16 2 x PCIe x8 2 x PCIe x1 1 x PCI |
2 x PCIe x16 1 x PCIe x8 2 x PCIe x1 2 x PCI |
|
SATA 6 Gbps SATA 3 Gbps |
4 4 |
6 4 |
5 4 |
|
USB 3.0 USB 2.0 |
6 14 |
4 14 |
4 12 |
| Power/Reset Buttons | Yes | No | Yes |
| Fan Headers | 6 | 5 | 6 |
| VRM | 8+2 | 8+1 | 6+2 |
| Clear CMOS | Button | Header | Button |
| LAN | Intel 82579V | Intel 82579V | Broadcom BCM57781 |
| Audio | Realtek ALC898 | Realtek ALC898 | Realtek ALC898 |
| In The Box |
IO Shield Manual Driver CD 6 x SATA cables Long SLI Cable 3-way Bridge |
IO Shield Manual Driver CD 4 x SATA Cables Long SLI Cable Long CFX Cable 3-way SLI Bridge 4-way SLI Bridge |
IO Shield Driver CD 4 x SATA Cables Long SLI Cable 3-way SLI Bridge |
| Warranty | 3 Years | 3 Years | Depends on Region |
Overall, we could consider this review in two ways. One, in terms of performance and features, which for a $270 fits reasonably well in the X79 schema, but comes up against stiff competition from ASRock offerings we have reviewed. Or two, in terms of my experience with the board, which wasn't the most positive experience. I initially had memory problems which required another memory kit, which worked fine the first time to get results, then not any other subsequent time, suggesting a BIOS update will be needed for memory compatibility. I also had an issue with the PCIe bandwidth, which didn't impact to any noticeable degree with results (it only affected certain dual GPU tests) which Gigabyte assure me was more a hardware anomaly rather than par-for-the course.
I see a lot of system bundles here in the UK that offer Gigabyte boards, and no doubt this is a board that should sell well for people looking to move to X79/Sandy Bridge-E on not a lot of money. It has a couple of unique features that other vendors have the option to use but do not (TPM being the prime example), as well as a substantial number of SATA 6 Gbps ports to use, as long as you're not in quad-GPU land.
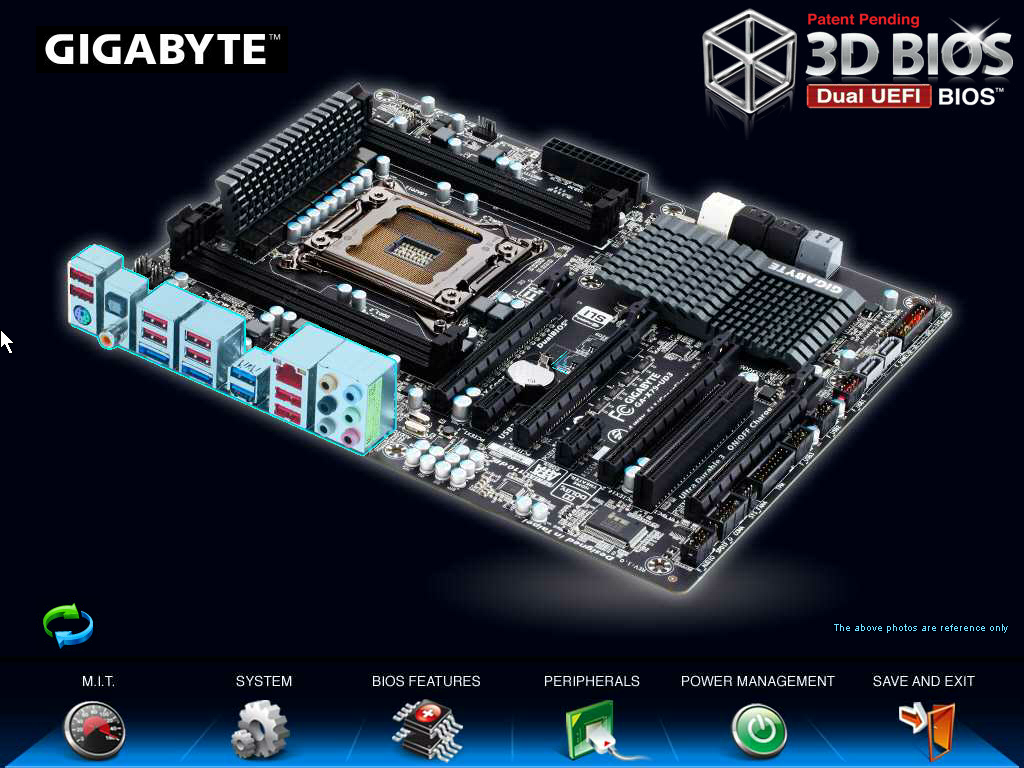
Visual Inspection
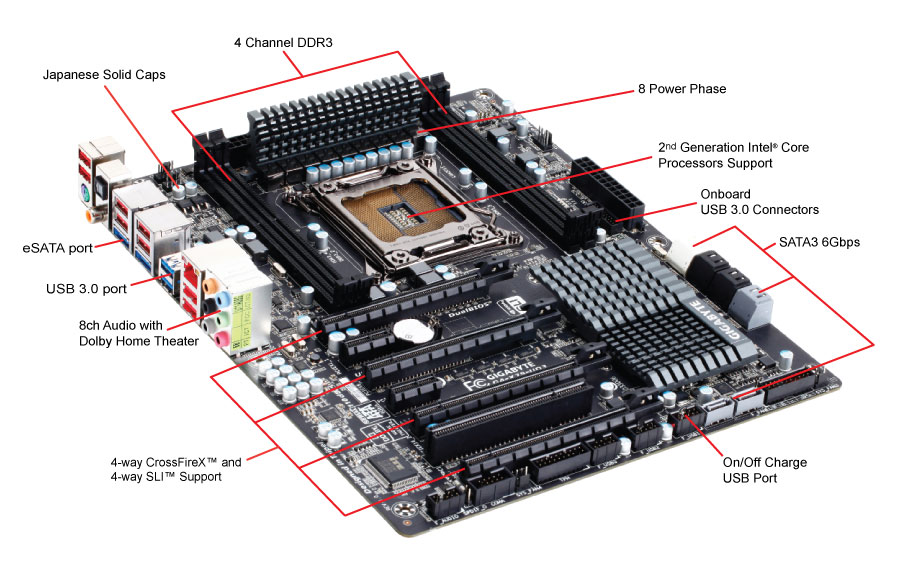
This first image of the board is one I pulled directly from the Gigabyte website - a schematic of the X79-UD3 indicating various features. The CPU socket area is surrounded on either side by two DIMM slots, for quad-channel memory support. The UD3 has one DIMM per channel, which in the 'budget' land of X79 is standard. The 8+1 CPU VRM is below a grey spiky heatsink that doesn't seem to heat up significantly under CPU load, suggesting it is efficient at heat dissipation. Three of the motherboard fan headers are in this area - there are CPU and a SYS fan headers on the top left (both 4-pin), and another SYS fan header to the right of the memory, also 4-pin. The other two SYS headers are on the bottom of the board, and are both 3-pin.
The SATA ports are numerous but slightly abnormal. The pair of white ports don't fit in to the color scheme of the board, but are the two SATA 6 Gbps ports from the PCH. Underneath, are the four black ports, which are the four SATA 3 Gbps, also from the PCH. The two grey ports underneath are a pair of SATA 6 Gbps from a Marvell 88SE9172 controller - there are two more grey SATA 6 Gbps ports from another Marvell controller, but these are located on the south end of the board, with the other headers. Gigabyte have at least done a bit of thinking here - even though these two ports stick out of the board and are at the bottom, the only way to block them is when a user is in quad-GPU mode with four dual slot discrete GPUs. These two ports are ideal to fit in some more drives at the bottom of a case, for example when the SSD is bolted to the bottom rather than the mechanical HDDs which could be to the side.
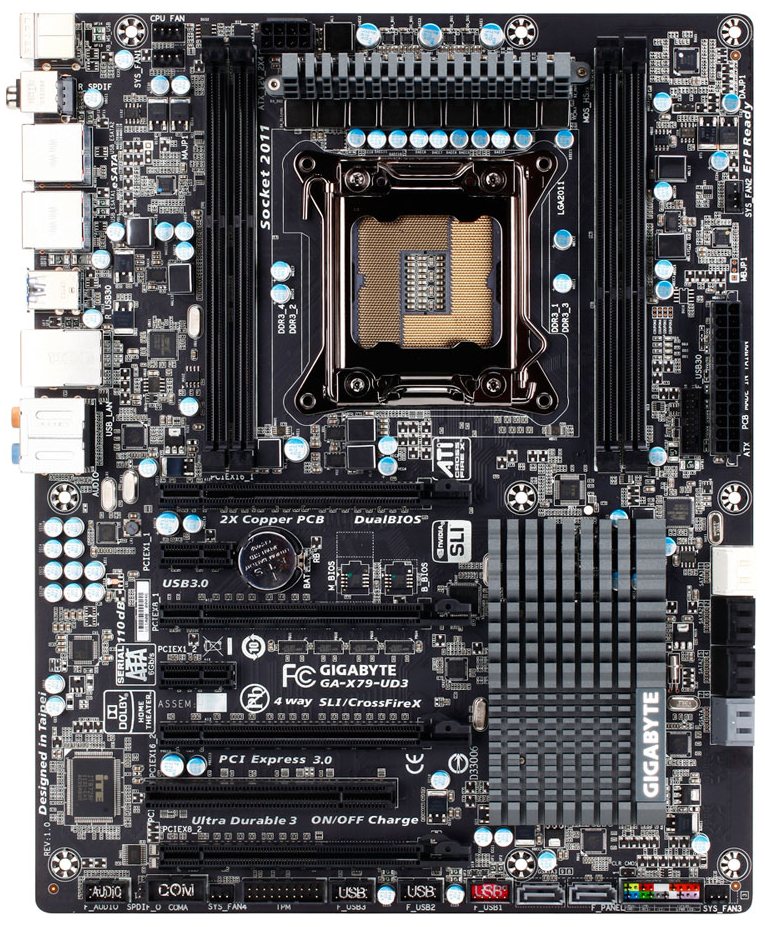
The PCH/chipset cooler is low profile and multi-ridged so allow for maximum airflow. Normally on some of the higher end boards, we see this heatsink attached to another heatsink via a heatpipe. Gigabyte's large but low profile negates the need for this, however it does get a tad warm to touch during high throughput scenarios.
So far we have seen most X79 motherboards having power/reset/Clear CMOS buttons on board and a Debug LED - useful for reviewers when coming up against hardware limits but also for consumers if a certain error has arisen. Unfortunately we don't see these on the UD3, perhaps for different goals (compared to the ASRock X79 Extreme4, which does have them and is cheaper), which is unfortunate. Users will have to short two pins to get a Clear CMOS, which given the initial graphical BIOS implementation and overclock issues I had, is also a little frustrating.
The PCIe layout is as simple as can be, with (from the top) an x16, x1, x8, x1, x16, x1, x8 - when the bottom x8 is populated, the second x16 reduces to x8, as these slots are multiplexed. All the x16 are PCIe 3.0 to help with PCIe bandwidth limited scenarios, but again I have to credit Gigabyte for their thought in layout - I always envisage the scenario when I have two full length, double slot GPUs, and an x1 card. In the X79-UD3, I'd populate the two x16 slots with GPUs, and the x1 card in the available x1 slot (the second x1 on board). This gives both GPUs at least one slot width for airflow. Some motherboard manufacturers still can't get this right, so kudos to Gigabyte.
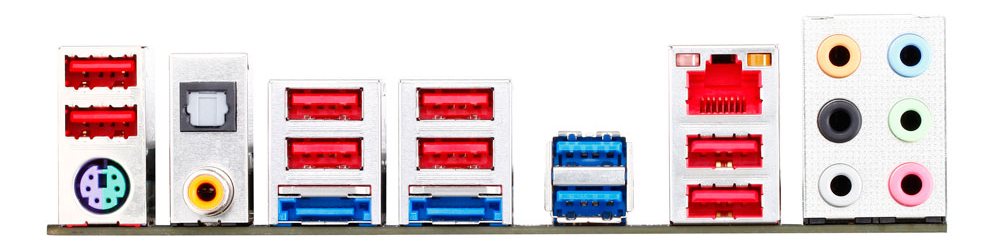
The back panel as awash with USB ports - eight USB 2.0 ports in red and two USB 3.0 ports in blue. There are also two blue eSATA 6 Gbps ports, a solitary PS/2 port, optical and coaxial SPDIF outputs, an Intel gigabit Ethernet connector, and audio jacks from a Realtek ALC898. Overall, this is a little simple - no Clear CMOS button, and no Firewire ports.
BIOS
Up until this point, Gigabyte had not released a graphical BIOS for any recent consumer level chipset, if at all. One of the major criticisms of most reviews at the launch of P67 and Sandy Bridge was that while some manufacturers had embraced the zeitgeist of the graphical interface, Gigabyte hadn't, citing that using the old style suited a lot of their customers, and they were able to retain stability of a mature design. So when Anand got a sneak preview from Gigabyte [1,2] , we knew things would change significantly for X79.
Gigabyte call their graphical implementation a '3D BIOS', which to all intents and purposes, isn't 3D at all. The front screen shows the board at an oblique angle (to 'look' 3D), whereby different areas of the board are clickable to see a quick list of certain options.
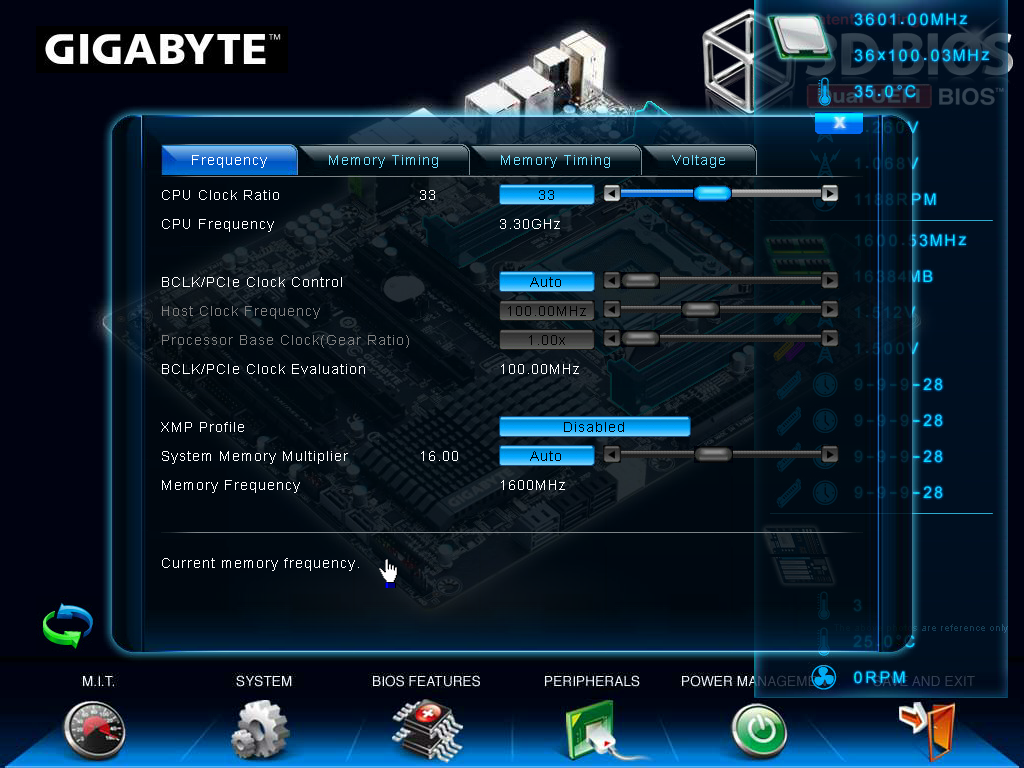
So for example, if the mouse was moved over the CPU socket, the socket and VRM would turn blue, a little description comes up, and when this is clicked, a screen showing the most obvious BIOS values which can be adjusted. Note, to the right of this is a small list of CPU speed, temperature, voltage, and memory info. In a perfect world, I'd like to see that menu before clicking the board itself. The '3D' board and the menus are all navigable with the keyboard as well, although in 3D mode, the F10 button to save and exit does not do anything, and you will have to navigate to 'Save and Exit' to exit.
By clicking any of the other buttons at the bottom of the screen, we are taken to a more recognizable menu system for a BIOS, with menus and simple selection options.
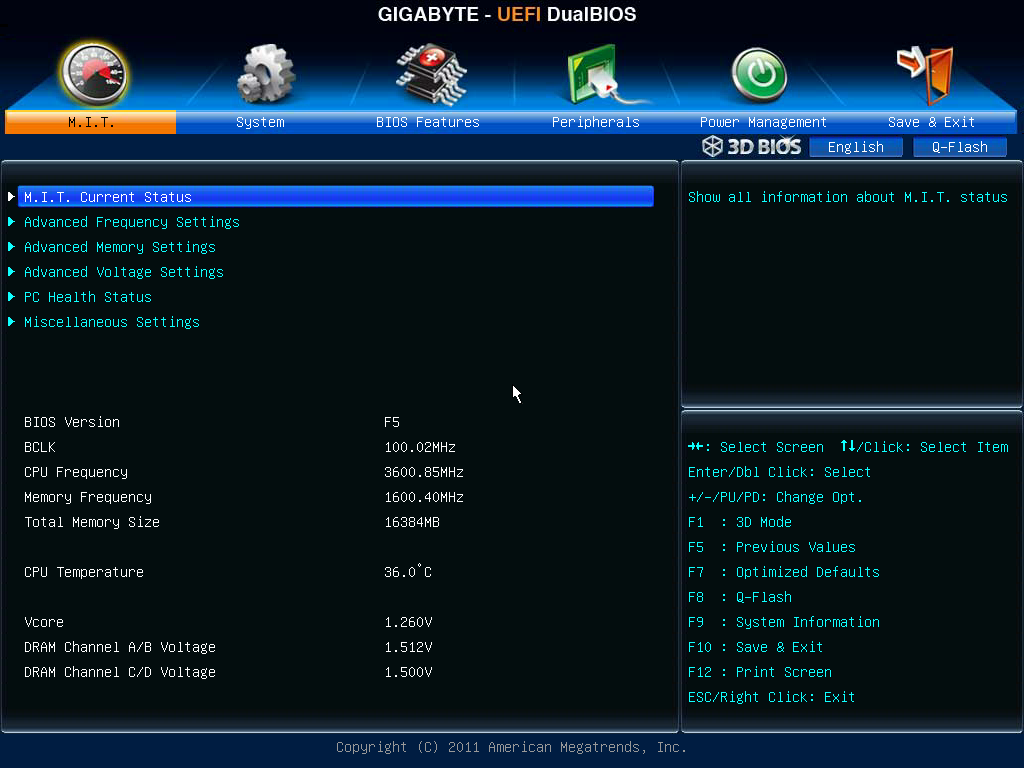
The main screen is listed as M.I.T., and offers sub menus for the variety of clocking options - frequency, memory, voltage and general health. For the large majority of consumers, the only options worth modifying are the CPU multiplier and the memory divider/XMP profiles. For enthusiasts, there is a wide range of power/PWM controls, current protection modifiers, voltages and sub timings available. I found a couple of things rather frustrating - I really needed one set of options for simple overclocking to be a single menu - CPU Multiplier, Gear Ratio, BCLK, CPU + VTT Voltage, Memory strap, Memory timings, and Memory voltage. I often found myself going in and out of menus to set these - having them all in one menu would be easier to digest.
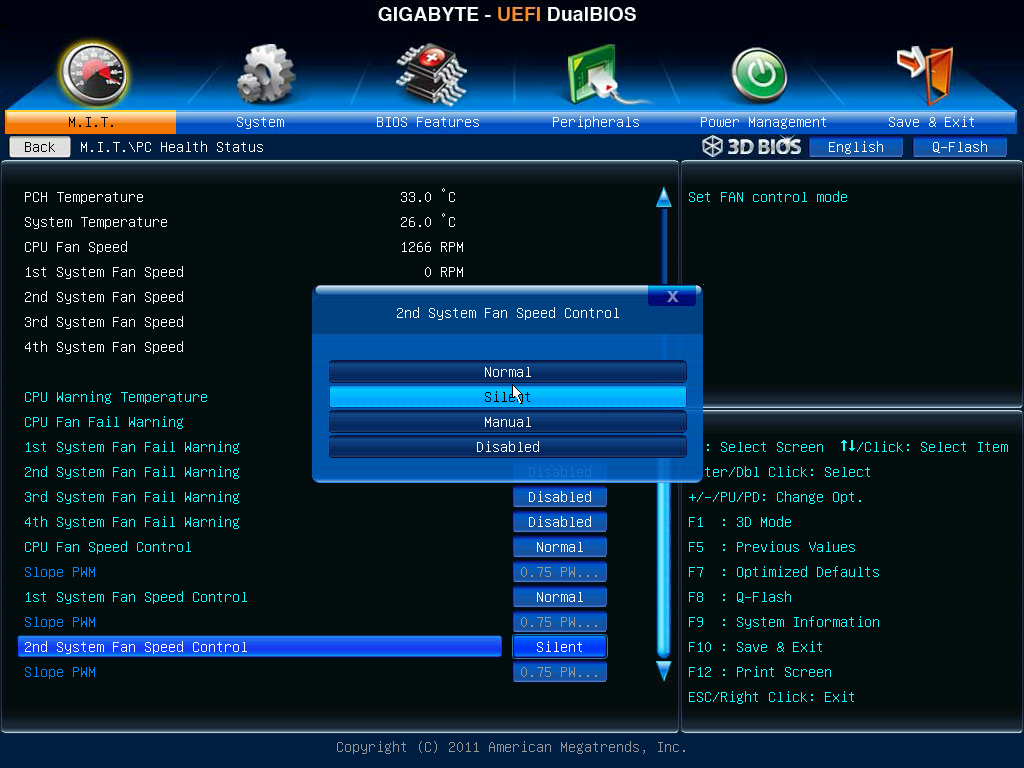
Fan controls are set in the PC Health Status menu. On the whole, these are ultimately confusing. Only the CPU fan header and the two four-pin fan headers are given adjustment options - either Normal, Silent, Manual or Disabled. In manual mode, the fan speed ramp is adjustable in terms of PWM value / ºC, which in the real world to most people means nothing. The fact that other manufacturers can provide a full range of ramping and selections could either lay at Gigabyte's lack of integration with the fan controllers, or simply they use slightly cheaper ones than some of their competitors. There's scope for improvement here, as a lot of users would prefer a finely grained control over their fans.
By default, users will notice several things: the boot-up Num Lock option is set to disabled, which I found rather odd given that the tendency is to have it enabled. Also, as with other X79 products, we are set to AHCI by default as well, so that users can take advantage of AHCI features. All the boot options are found in the BIOS Features menu, with boot override found in the Save & Exit menu.


Overclocking
For the X79-UD3, overclocking was a little hit and miss. I had trouble with the OC profiles as per the OS software (sometimes it would work), but the CPU overclocking from the BIOS was very easy. The memory overclocking was a one hit wonder however, as for some reason there is a variety of issues. Let us go through them one by one.
For automatic overclocking, we have no options in the BIOS, but in the OS the EasyTune6 software (or via the Smart6 software), there are turbo modes available - either 4.1 GHz, 4.3 GHz or 4.5 GHz (one part of the software says 4.5 GHz, another says 4.68 GHz, but it means 4.5 GHz). By clicking on one, the BIOS is adjusted and the system asks for a reboot to apply the new overclock. Initially, this didn't work for me at all - the software would just crash, or it would reboot with no change. Then, at some random point, it did start to work. By selecting the turbo mode, the speed was correctly selected and it applied the XMP profile of the memory being used. On the 4.5 GHz setting, the board set the peak load voltage to be 1.392 V, and the CPU reached 75ºC during 3DPM. This is a lot better than other vendors' implementations, where they put another 0.1 V into the CPU for equivalent clocks!
In terms of manual overclocks, I purely sat there raising the multiplier. Up to 46x was stable, with the automatic voltage giving 1.392 V. At 47x, the system would BSOD on loading Windows. By going into the BIOS and fixing the voltage at 1.4 V, the board successfully booted and ran, but failed a Blender test. At the 46x setting, a maximum temperature of 78ºC was seen during a Blender test.
For the memory, initially the board was easily able to go into XMP on my new high end G.Skill kit, rated DDR3-2400 9-11-11-31 2T at 1.65 V. The next memory strap was for DDR3-2666, which would not run at 1.65 V even with looser timings (11-14-13). The ability to put it on XMP worked initially over successive reboots, then after a BIOS reset it would not work at all. I tried various combinations, to no avail. Then after a series of resets, it worked again when I applied the automatic overclock setting.
Combined, I believe that if a user can get the 4.5 GHz auto overclock setting to work, which automatically applies the XMP, then we are on to a winner.
Board Features
As mentioned previously, the abundance of SATA 6 Gbps ports is nice to see, especially in comparison to the competition. We have a high end Realtek codec, and Intel NIC as well. Gigabyte still insist on putting a Trusted Platform Module on their boards, but as I learned in a previous Gigabyte review, this is because Gigabyte have had positive feedback from customers who use this functionality. We are missing though some onboard power/reset/clear CMOS buttons which would make testing and error checking easier on all fronts.
| Gigabyte GA-X79-UD3 | |
| Size | ATX |
| CPU Interface | LGA2011 |
| CPU Support | Intel Second Generation Core i7 Sandy Bridge E |
| Chipset | Intel X79 |
| Base Clock Frequency | 100.0 MHz |
| Core Voltage | Default, 0.8 V to 1.735 V |
| CPU Clock Multiplier | Auto, 12x to 59x |
| DRAM Voltage | Auto, 1.1 V to 2.1 V |
| DRAM Command Rate | Auto, 1N to 3N |
| Memory Slots |
Four DDR3 DIMM slots supporting up to 32 GB Up to Quad Channel Support for DDR3, 800-3200 MHz |
| Expansion Slots |
2 x PCIe Gen 3 x16 2 x PCIe Gen 3 x8 2 x PCIe x1 2 x PCI |
| Onboard SATA/RAID |
2 x SATA 6 Gbps, Support for RAID 0, 1, 5, 10 4 x SATA 3 Gbps, Support for RAID 0, 1, 5, 10 4 x SATA 6 Gbps, Support for RAID 0, 1 |
| Onboard |
4 x SATA 3 Gbps (PCH) 6 x SATA 6 Gbps (2 PCH, 4 Controller) 5 x Fan Headers 1 x 4-pin Molex CFX/SLI Power Connector 1 x HDMI_SPDIF Header 1 x Front Panel Header 1 x Front Panel Audio Header 3 x USB 2.0 Headers 1 x USB 3.0 Header 1 x Serial Port Header 1 x Trusted Platform Module Header |
| Onboard LAN | Intel Gigabit 82579V |
| Onboard Audio |
Realtek ALC898 7.1 Ch HD, Supports Dolby Home Theater |
| Power Connectors |
1 x 24-pin ATX connector 1 x 8-pin 12V connector |
| Fan Headers |
1 x CPU Fan Header 4 x SYS Headers |
| IO Panel |
1 x PS/2 Mouse Port 1 x PS/2 Keyboard Port 1 x Optical S/PDIF Out Port 1 x Coaxial S/PDIF Out Port 8 x USB 2.0 2 x USB 3.0 2 x eSATA 6 Gbps 1 x Gigabit Ethernet Audio Jacks |
| BIOS Version | F5 |
| Warranty Period | 3 Years from date of manufacture |
In The Box
IO Shield
Manual
Driver CD
4 x SATA Cables
Long SLI Cable
Long CFX Cable
3-way SLI Bridge
4-way SLI Bridge
Gigabyte typically are not all encompassing with their box contents - previous boards I have reviewed tend to have the bare minimum (IO shield, manual, CD, 2 SATA cables, perhaps more). In this case, we have more cables, and an array of SLI connectors for the multi-GPU enthusiast. Perhaps this is more what Gigabyte are aiming with the UD3?
Software
Gigabyte software over the past 12 months has not changed much - we still have EasyTune6 with basic OC functionality and a limited series of fan controls (when compared to their main competitors that can set dual ramping); Smart6 with various BIOS functionality, QuickBoost, QuickBoot, Timelock and SmartRecovery2; and @BIOS for updating the BIOS. Rather than go through them again, I will direct you to our previous reviews [1,2].
What is new though, is 3DPower. In essence, it is a very basic utility that allows a user to adjust the power delivery to the PWM on the board for power saving or on-the-fly overclocking. The software is a bit slow and unresponsive, and the majority of consumers will not understand what the options mean. However, it is there if a user wants it.
Many thanks to...
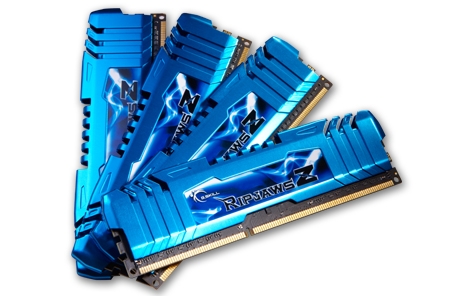
Many thanks go to G.Skill once again, for providing us with their latest RipjawsZ kit, after an accident caused one of my previous review memory kit DIMMs to no longer work. The kit G.Skill sent us is their F3-19200CL9Q-16GBZMD, a 4x4 GB kit for X79, rated at DDR3-2400 CL9 11-11-31 at 1.65V. This makes it a very fast kit on the market, which is represented in its large price tag.
Test Setup
| Processor |
Intel Sandy Bridge-E i7-3960X 6 Cores, 12 Threads, 3.3 GHz (3.9 GHz Turbo) |
| Motherboards | Gigabyte GA-X79-UD3 |
| Cooling | Intel All-In-One Liquid Cooler, made by Asetek |
| Power Supply | Silverstone 1000W 80 PLUS Silver |
| Memory | G.Skill RipjawsZ DDR3-2400 CL9 11-11-31 4x4 GB Kit 1.65V |
| Memory Settings | XMP |
| Video Cards |
XFX HD 5850 1GB ECS GTX 580 1536MB |
| Video Drivers |
Catalyst 11.8 NVIDIA Drivers 285.62 |
| Hard Drive | Micron RealSSD C300 256GB |
| Optical Drive | LG GH22NS50 |
| Case | Open Test Bed - CoolerMaster Lab V1.0 |
| Operating System | Windows 7 64-bit |
| SATA Testing | Micron RealSSD C300 256GB |
| USB 2/3 Testing | Patriot 64GB SuperSonic USB 3.0 |
Power Consumption
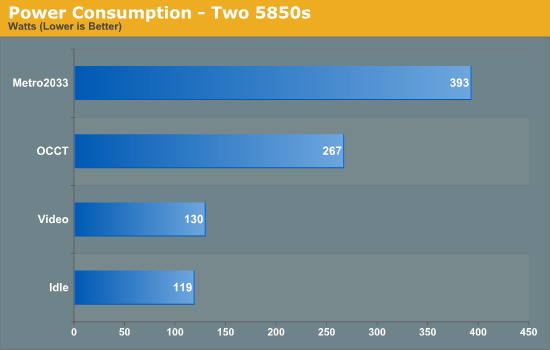
Power consumption was tested on the system as a whole with a wall meter connected to the power supply, while in a dual GPU configuration. This method allows us to compare the power management of the UEFI and the board to supply components with power under load, and includes typical PSU losses due to efficiency. These are the real world values that consumers may expect from a typical system (minus the monitor) using this motherboard.
CPU Temperatures
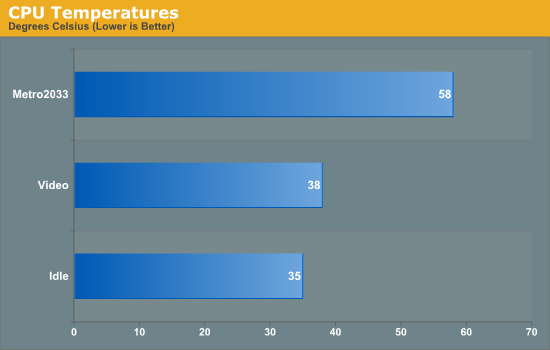
With most users’ running boards on purely default BIOS settings, we are running at default settings for the CPU temperature tests. This is, in our outward view, an indication of how well (or how adventurous) the vendor has their BIOS configured on automatic settings. With a certain number of vendors not making CPU voltage, turbo voltage or LLC options configurable to the end user, which would directly affect power consumption and CPU temperatures at various usage levels, we find the test appropriate for the majority of cases. This does conflict somewhat with some vendors' methodology of providing a list of 'suggested' settings for reviewers to use. But unless those settings being implemented automatically for the end user, all these settings do for us it attempt to skew the results, and thus provide an unbalanced 'out of the box' result list to the readers who will rely on those default settings to make a judgment. CPU Temperatures are not really indicative of quality or performance, even though one would postulate that worse parts may produce higher temperatures. However, if a manufacturer uses more conductive material in the power plane, this reduces resistance and increases the voltage at the CPU, causing a higher temperature but potentially better stability.
USB Speed
For this benchmark, we run CrystalDiskMark to determine the ideal sequential read and write speeds for the USB port using our 64GB Patriot SuperSpeed USB 3.0 drive. Then we transfer a set size of files from the SSD to the USB drive, and monitor the time taken to transfer. The files transferred are a 1.52 GB set of 2867 files across 320 folders – 95% of these files are small typical website files, and the rest (90% of the size) are the videos used in the Sorenson Squeeze test.
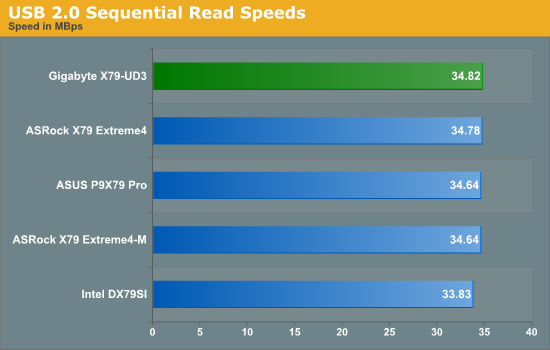
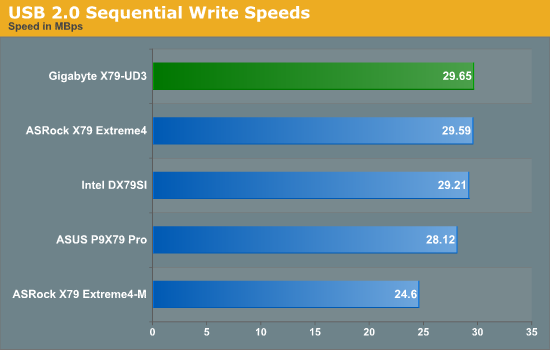
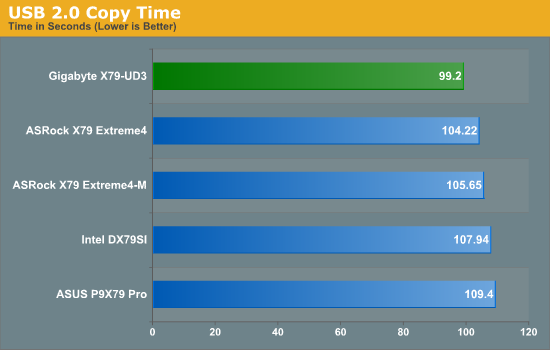
By default, one of the Gigabyte's best showings is in the USB 2.0 tests. It comprehensively is ahead, especially in the USB copy test. Unfortunately, with my USB 3.0 device and the Gigabyte's USB 3.0 Fresco controller, there were compatibility issues preventing any USB 3.0 testing. Should we get a driver update, we will update the graphs.
SATA Testing
We also use CrystalDiskMark for SATA port testing. The operating system is installed on the SSD, and the sequential test is run at the 5 x 1000 MB level. This test probes the efficiency of the data delivery system between the chipset and the drive, or in the case of additional SATA ports provided by a third party controller, the efficiency between the controller, the chipset and the drive.
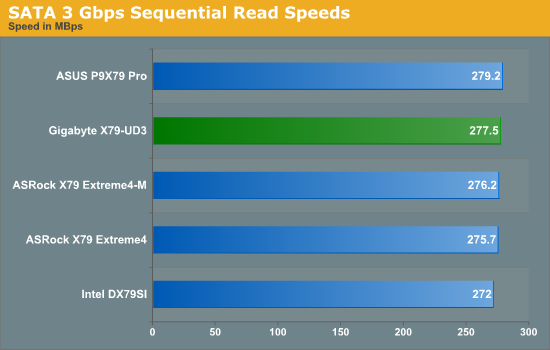
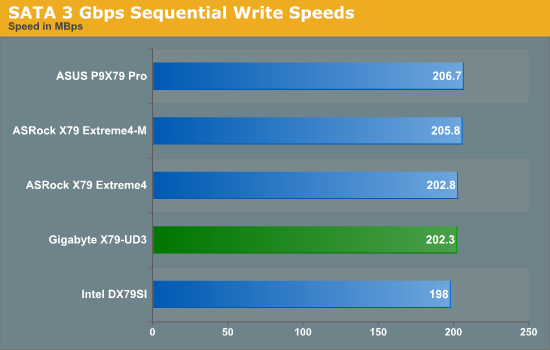
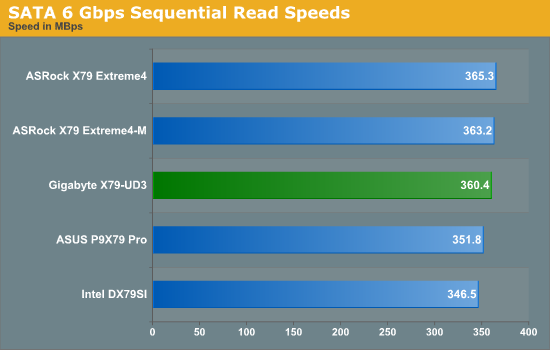
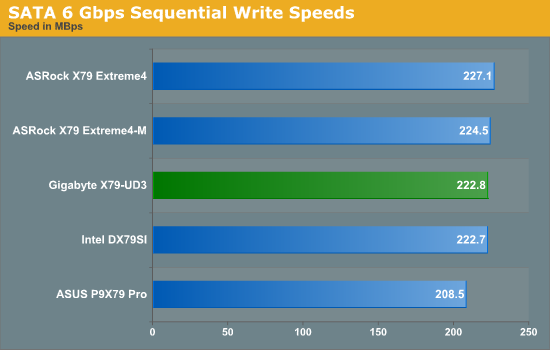
SATA testing of the PCH ports reveals nothing special, with the Gigabyte UD3 being in the middle of the road on average.
DPC Latency
Deferred Procedure Call latency is a way in which Windows handles interrupt servicing. In order to wait for a processor to acknowledge the request, the system will queue all interrupt requests by priority. Critical interrupts will be handled as soon as possible, whereas lesser priority requests, such as audio, will be further down the line. So if the audio device requires data, it will have to wait until the request is processed before the buffer is filled. If the device drivers of higher priority components in a system are poorly implemented, this can cause delays in request scheduling and process time, resulting in an empty audio buffer – this leads to characteristic audible pauses, pops and clicks. Having a bigger buffer and correctly implemented system drivers obviously helps in this regard. The DPC latency checker measures how much time is processing DPCs from driver invocation – the lower the value will result in better audio transfer at smaller buffer sizes. Results are measured in microseconds and taken as the peak latency while cycling through a series of short HD videos - under 500 microseconds usually gets the green light, but the lower the better.
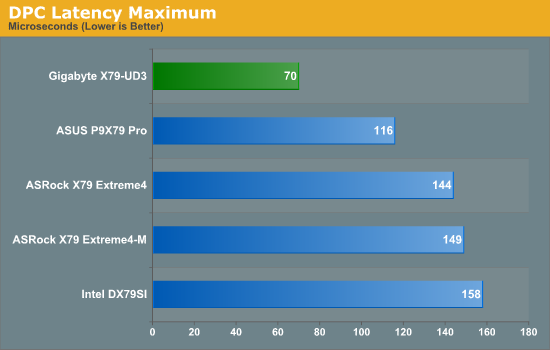
By far one of the best results we had with the Gigabyte board is the DPC testing, where it beat our previous best (an ASUS P8P67) by 25+ microseconds. Getting a score of 70 microseconds is indicative of very clever driver and BIOS programming. However, as with many boards we've seen for X79, to get this result, any voltage/fan monitoring software must be turned off - in this case, EasyTune6.
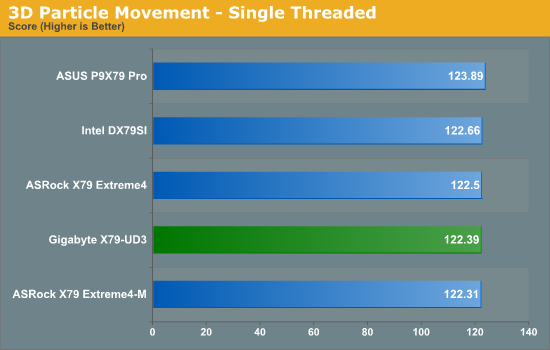
3D Movement Algorithm Test
The algorithms in 3DPM employ both uniform random number generation or normal distribution random number generation, and vary in various amounts of trigonometric operations, conditional statements, generation and rejection, fused operations, etc. The benchmark runs through six algorithms for a specified number of particles and steps, and calculates the speed of each algorithm, then sums them all for a final score. This is an example of a real world situation that a computational scientist may find themselves in, rather than a pure synthetic benchmark. The benchmark is also parallel between particles simulated, and we test the single thread performance as well as the multi-threaded performance.
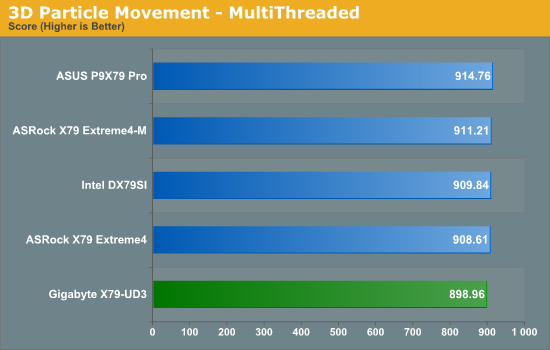
One of the more disappointing results by the Gigabyte board was in the 3D Particle Movement MultiThreaded result. It is comprehensively lower in this test, despite it being a wholly CPU bound benchmark. This is somewhat seen in the other multi-threaded benchmarks as well.
WinRAR x64 3.93 - link
With 64-bit WinRAR, we compress the set of files used in the USB speed tests. WinRAR x64 3.93 attempts to use multithreading when possible.
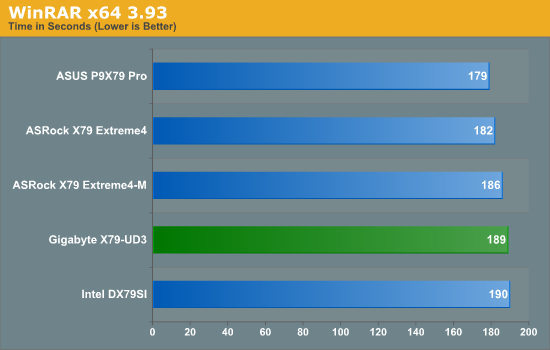
Again with this test, the Gigabyte is still behind its main competitors.
FastStone Image Viewer 4.2 - link
FastStone Image Viewer is a free piece of software I have been using for quite a few years now. It allows quick viewing of flat images, as well as resizing, changing color depth, adding simple text or simple filters. It also has a bulk image conversion tool, which we use here. The software currently operates only in single-thread mode, which should change in later versions of the software. For this test, we convert a series of 170 files, of various resolutions, dimensions and types (of a total size of 163MB), all to the .gif format of 640x480 dimensions.
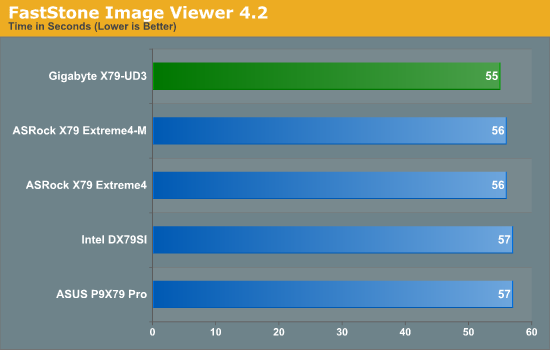
Real-world single thread performance seems fine on the board though, with the Gigabyte achieving the best time we've ever seen for our FastStone benchmark.
Sorenson Squeeze 6.0 - link
Sorenson Squeeze is a professional video encoder, complete with a vast array of options. For this test, we convert 32 HD videos, each a minute long and approximately 42 MB in size, to WMV 512KBps format. Squeeze can encode multiple videos at once, one for each thread.
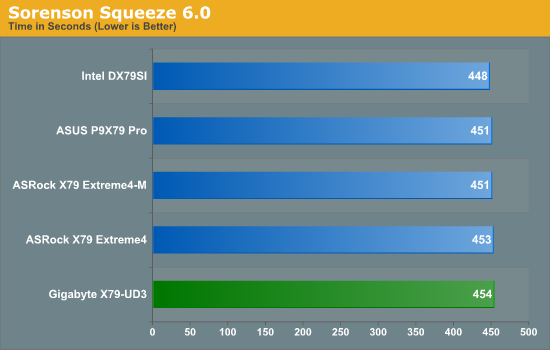
While for the Squeeze benchmark we have the lowest X79 result again for the Gigabyte board, this time the differences are not so large between the other boards.
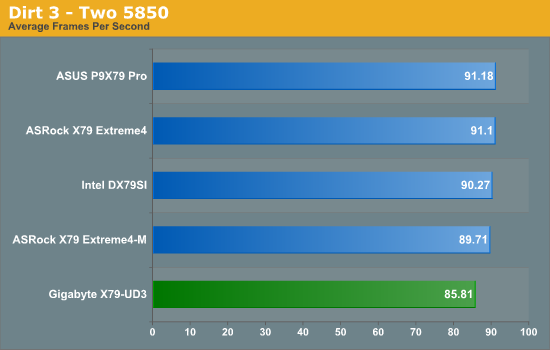
Unfortunately with our gaming benchmarks, I came up against a small issue with the board. The first PCIe which is rated at x16 would not run in x16 mode, only giving me x8 bandwidth. After confirming with Gigabyte, this seems to be more a manufacturing anomaly than anything else. I was able to use the second x16 slot for single-GPU testing at x16, however dual-GPU testing was limited to x16/x8. Overall, this only really showed in Dirt3, as shown below.
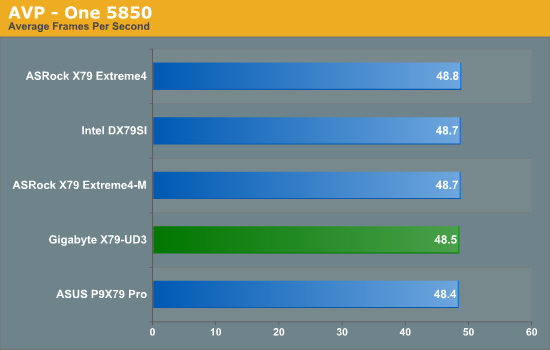
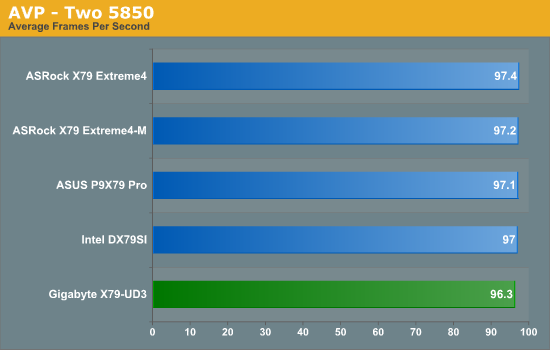
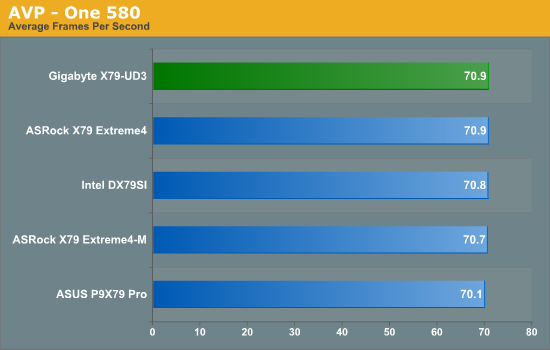
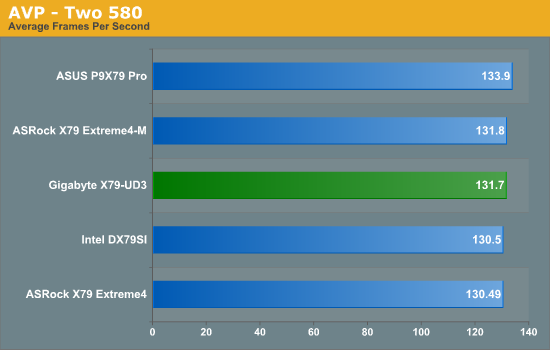
Aliens vs. Predator Benchmark
Aliens vs. Predator is a DirectX 11 science fiction first-person shooter video game, developed by Rebellion Developments. Available as a standalone benchmark, on default settings the benchmark uses 1920x1080 with high AF settings. Results are reported as the average frame rate across 4 runs.
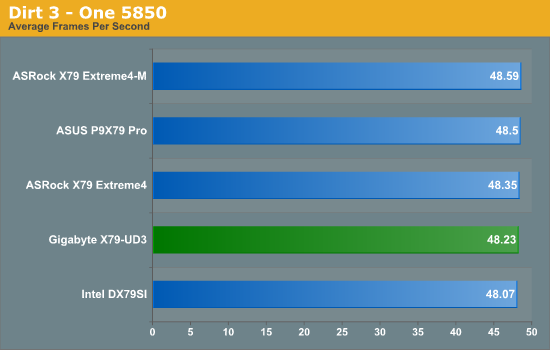
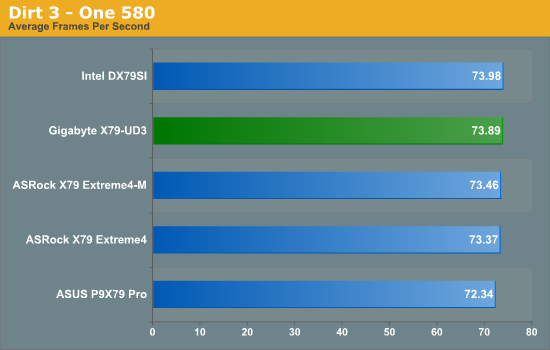
Dirt 3
Dirt 3 is a rallying video game and the third in the Dirt series of the Colin McRae Rally series, developed and published by Codemasters. Using the in game benchmark, Dirt 3 is run at 1920x1080 with full graphical settings. Results are reported as the average frame rate across 4 runs.

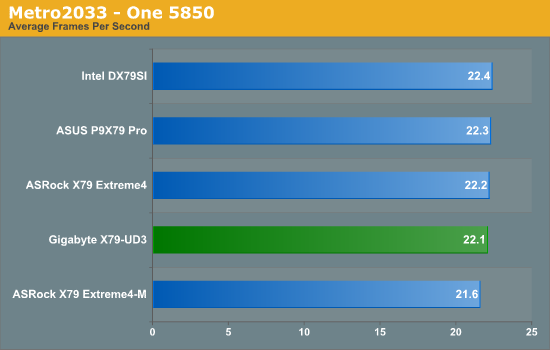
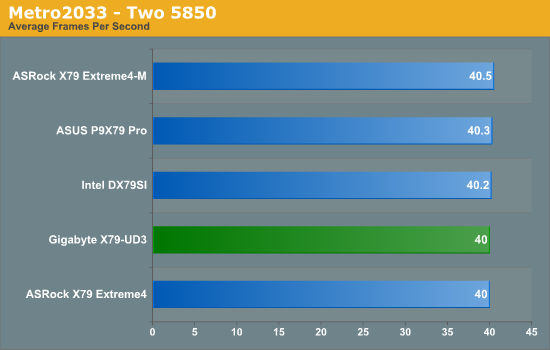
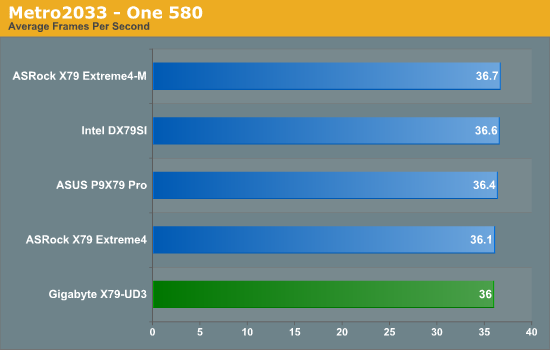
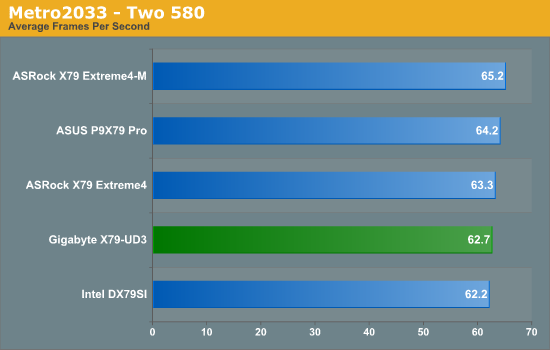
Metro2033
Metro 2033 is a challenging DX11 benchmark that challenges every system that tries to run it at any high-end settings. Developed by 4A Games and released in March 2010, we use the inbuilt DirectX 11 Frontline benchmark to test the hardware at 1920x1080 with full graphical settings. Results are given as the average frame rate from 10 runs.
Conclusions
There's nothing much special about the GPU performance, as to be expected.
In terms of pure price, the Gigabyte GA-X79-UD3 sits in-between the seriously cheap mATX and ATX boards at sub $250, but below the more established price range for 'regular' X79 boards around $300-$325. As a result, the question becomes whether the GA-X79-UD3 is a cheaper regular board, or a more expensive budget board (whatever 'budget' means on X79).
First of all, the board has a variety of plus points - we have six SATA 6 Gbps ports as well as four SATA 3 Gbps ports, allowing various RAID combinations or just a simple JBOD. We have quad-GPU support via four full length PCIe lanes, labeled at x16, x8, x16, x8, but filled by the first, then the third, then the second, then the fourth, which results in x16, x8, x8, x8 operation. Gigabyte have been clever in their design, making sure that you only lose part functionality on the board (TPM, some USB headers, and two SATA ports) when a fourth GPU is added. The design is also handy for dual-GPU users with a PCIe x1 card, as the design leaves each GPU with at least one slot length of airflow.
There are some negative points as well - there are only five fan headers compared to its main competitors which have six, and these fan headers don't have the easiest or most in-depth fan control system either in the BIOS or the OS software. I also had some memory and USB issues, however that could purely be down to compatibility which could be fixed by a BIOS update. As Gigabyte are new to the graphical BIOS arena (in terms of products released with it), we may have to wait a small while for the design to mature, like ASRock's and MSI's designs have done over 2011.
In terms of performance, we are not seeing anything stellar with the GA-X79-UD3. It is functional, but does not perform at the top end of many benchmarks compared to the boards we've previously tested. On that basis, we'd have to consider the UD3 as a more expensive 'budget' board, however the auto overclock options, when they worked, gave a great combined CPU+memory overclock, bringing the board back into the game.
While X79 and Sandy Bridge-E is the talk of the performance town, the UD3 is an odd board which fits in the middle of 'budget' and 'mainstream'. It has the features, perhaps not the software or the stock performance, but X79 is still young and in a maturity phase. If it were my money on the line, it would be a hard choice between the UD3 and the ASRock X79 Extreme4. The ASRock had overclock and heating issues, but it felt a little more polished and performed better at stock. So the question becomes, do you overclock, and are you looking for a board from $235-$270? If you overclock, the Gigabyte seems the better choice.


