Original Link: https://www.anandtech.com/show/10818/the-asus-x99-e-10g-ws-motherboard-review-10g-networking-intel-x550-at2
The ASUS X99-E-10G WS Motherboard Review: 10GBase-T Networking with Intel’s X550-AT2
by Ian Cutress on November 7, 2016 9:00 AM EST- Posted in
- Intel
- Motherboards
- Asus
- 10G Ethernet
- X99
- 10GBase-T
- X99-E-10G WS
- X550
- X550-AT2

One significant motherboard update that has been drawn out over time has been the integration of 10 Gigabit Ethernet on consumer level motherboards, and specifically copper based 10GBase-T that is backward compatible with the majority of home networks using RJ-45. While the traction of 10G is scaling in business and enterprise, cost remains a big barrier to home and prosumer networking, but also consumer based implementations. We recently posted a news update with the current 10GBase-T motherboards on the market, and this is the second review of that list: today we are testing ASUS' new high-end LGA2011-3 workstation refresh model, the ASUS X99-E-10G WS. The motherboard uses Intel’s latest 10GBase-T controller, the X550, which runs as a PCIe 3.0 x4 implementation.
Other AnandTech Reviews for Intel’s LGA2011-3 Platform
The Intel Core i7-6950X, i7-6900K, i7-6850K and i7-6800K Broadwell-E Review
The Intel Core i7-5960X, i7-5930K and i7-5820 Haswell-E Review
The Intel Xeon E5 v3 Fourteen-Core Review (E5-2695 v3, E5-2697 v3)
The Intel Xeon E5 v3 Twelve-Core Review (E5-2650L v3, E5-2690 v3)
The Intel Xeon E5 v3 Ten-Core Review (E5-2650 v3, E5-2687W v3)
X99 Series Motherboard Reviews:
Prices Correct at time of each review
$750: The ASRock X99 WS-E 10G Review [link]
$600: The ASUS X99-E-10G WS Review (this review)
$600: The ASRock X99 Extreme11 Review [link]
$500: The ASUS Rampage V Extreme Review [link]
$400: The ASUS X99-Deluxe Review [link]
$340: The GIGABYTE X99-Gaming G1 WiFi Review [link]
$330: The ASRock X99 OC Formula Review [link]
$323: The ASRock X99 WS Review [link]
$310: The GIGABYTE X99-UD7 WiFi Review [link]
$310: The ASUS X99 Sabertooth Review [link]
$300: The GIGABYTE X99-SOC Champion Review [link]
$300: The ASRock X99E-ITX Review [link]
$300: The MSI X99S MPower Review [link]
$275: The ASUS X99-A Review [link]
$241: The MSI X99S SLI PLUS Review [link]
The State of the 10GBase-T Market
Current integration of 10GBase-T onto a motherboard is an expensive process. In order to get full bandwidth, at the bare minimum, either a PCIe 2.0 x4 or PCIe 3.0 x2 connection per port is needed, and it depends on the controller used. This controller would traditionally interface with the CPU, reducing the PCIe lanes available for other large PCIe devices and co-processors, such as GPUs, storage cards or professional compute cards. In the last generation of consumer chipsets, the ability to run them direct from the large PCIe bandwidth on the 100-series chipsets is a future potential play, although technically the 100-series chipset connects to the CPU via a PCIe 3.0 x4 equivalent link which may be a future bottleneck.
There are three main commercial controllers currently on offer that are used in both PCIe cards and motherboard integration. First, and what we’ve seen so far, is the Intel X540 family of controllers which require x8 lanes and runs at PCIe 2.0 speeds (i.e. in a PCIe 3.0 environment, it still needs x8 as the controller is only PCIe 2.0). The upgrade to this, the Intel X550 family, makes that leap to PCIe 3.0 and requires an x4 link which makes it easier to integrate into a modern platform but might be a touch more expensive by virtue of it being new. Third is an Aquantia / Tehuti Networks solution, which we’ve seen on 10GBase-T PCIe cards bundled with certain motherboard configurations or by third-parties for sale on their own. The Intel X540/X550 parts are families of controllers, offering single and dual port designs, and to our knowledge are better supported and use less motherboard area (but are more expensive) than the Tehuti solution. All these chips output up to 15W on their own, requiring a motherboard built to disperse the extra heat generated.
As a result, any user looking at an integrated 10GBase-T solution has only a few options, and will have to find a way to justify the cost (which is easier in a business perspective). Aside from the 10GBase-T switch cost (cheapest is a 2-port unmanaged switch for $250 from ASUS, an 8-port previous generation Netgear X708 for $700, or a 16-port Netgear for ~$1400), the previous motherboard we reviewed with an integrated X540-T2 controller still runs at $700, over a year after its release. The controller cost is around $100-$200, depending on the motherboard manufacturers deal with Intel, which leads to a direct bill-of-materials (BOM) increase in the base cost. The PCIe cards with single or dual ports can be purchased for around $250-$400, depending on sales, support, and if they are new. (For those looking outside copper, there are also solutions available, but are less likely to be integrated into a home/current SMB setup without prior planning).
For anyone looking to migrate a home network to 10GBase-T has to be aware of this outlay, and a number of users (myself included) are waiting diligently until the cost of such an ecosystem comes down. I do wonder exactly what the tipping point would be for a number of enthusiasts to make the jump, especially with a number of networking technologies in the works (such as 2.5G/5G, or 802.11ad wireless routers now coming into the market for consumers offering gigabit line-of-sight connectivity). I have had some companies ask me what that tipping point is, and to be honest I still think it’s the switch – a 4x10G + 4x1G port managed switch for $250 would sell like hot cakes, regardless of the cost of controllers.
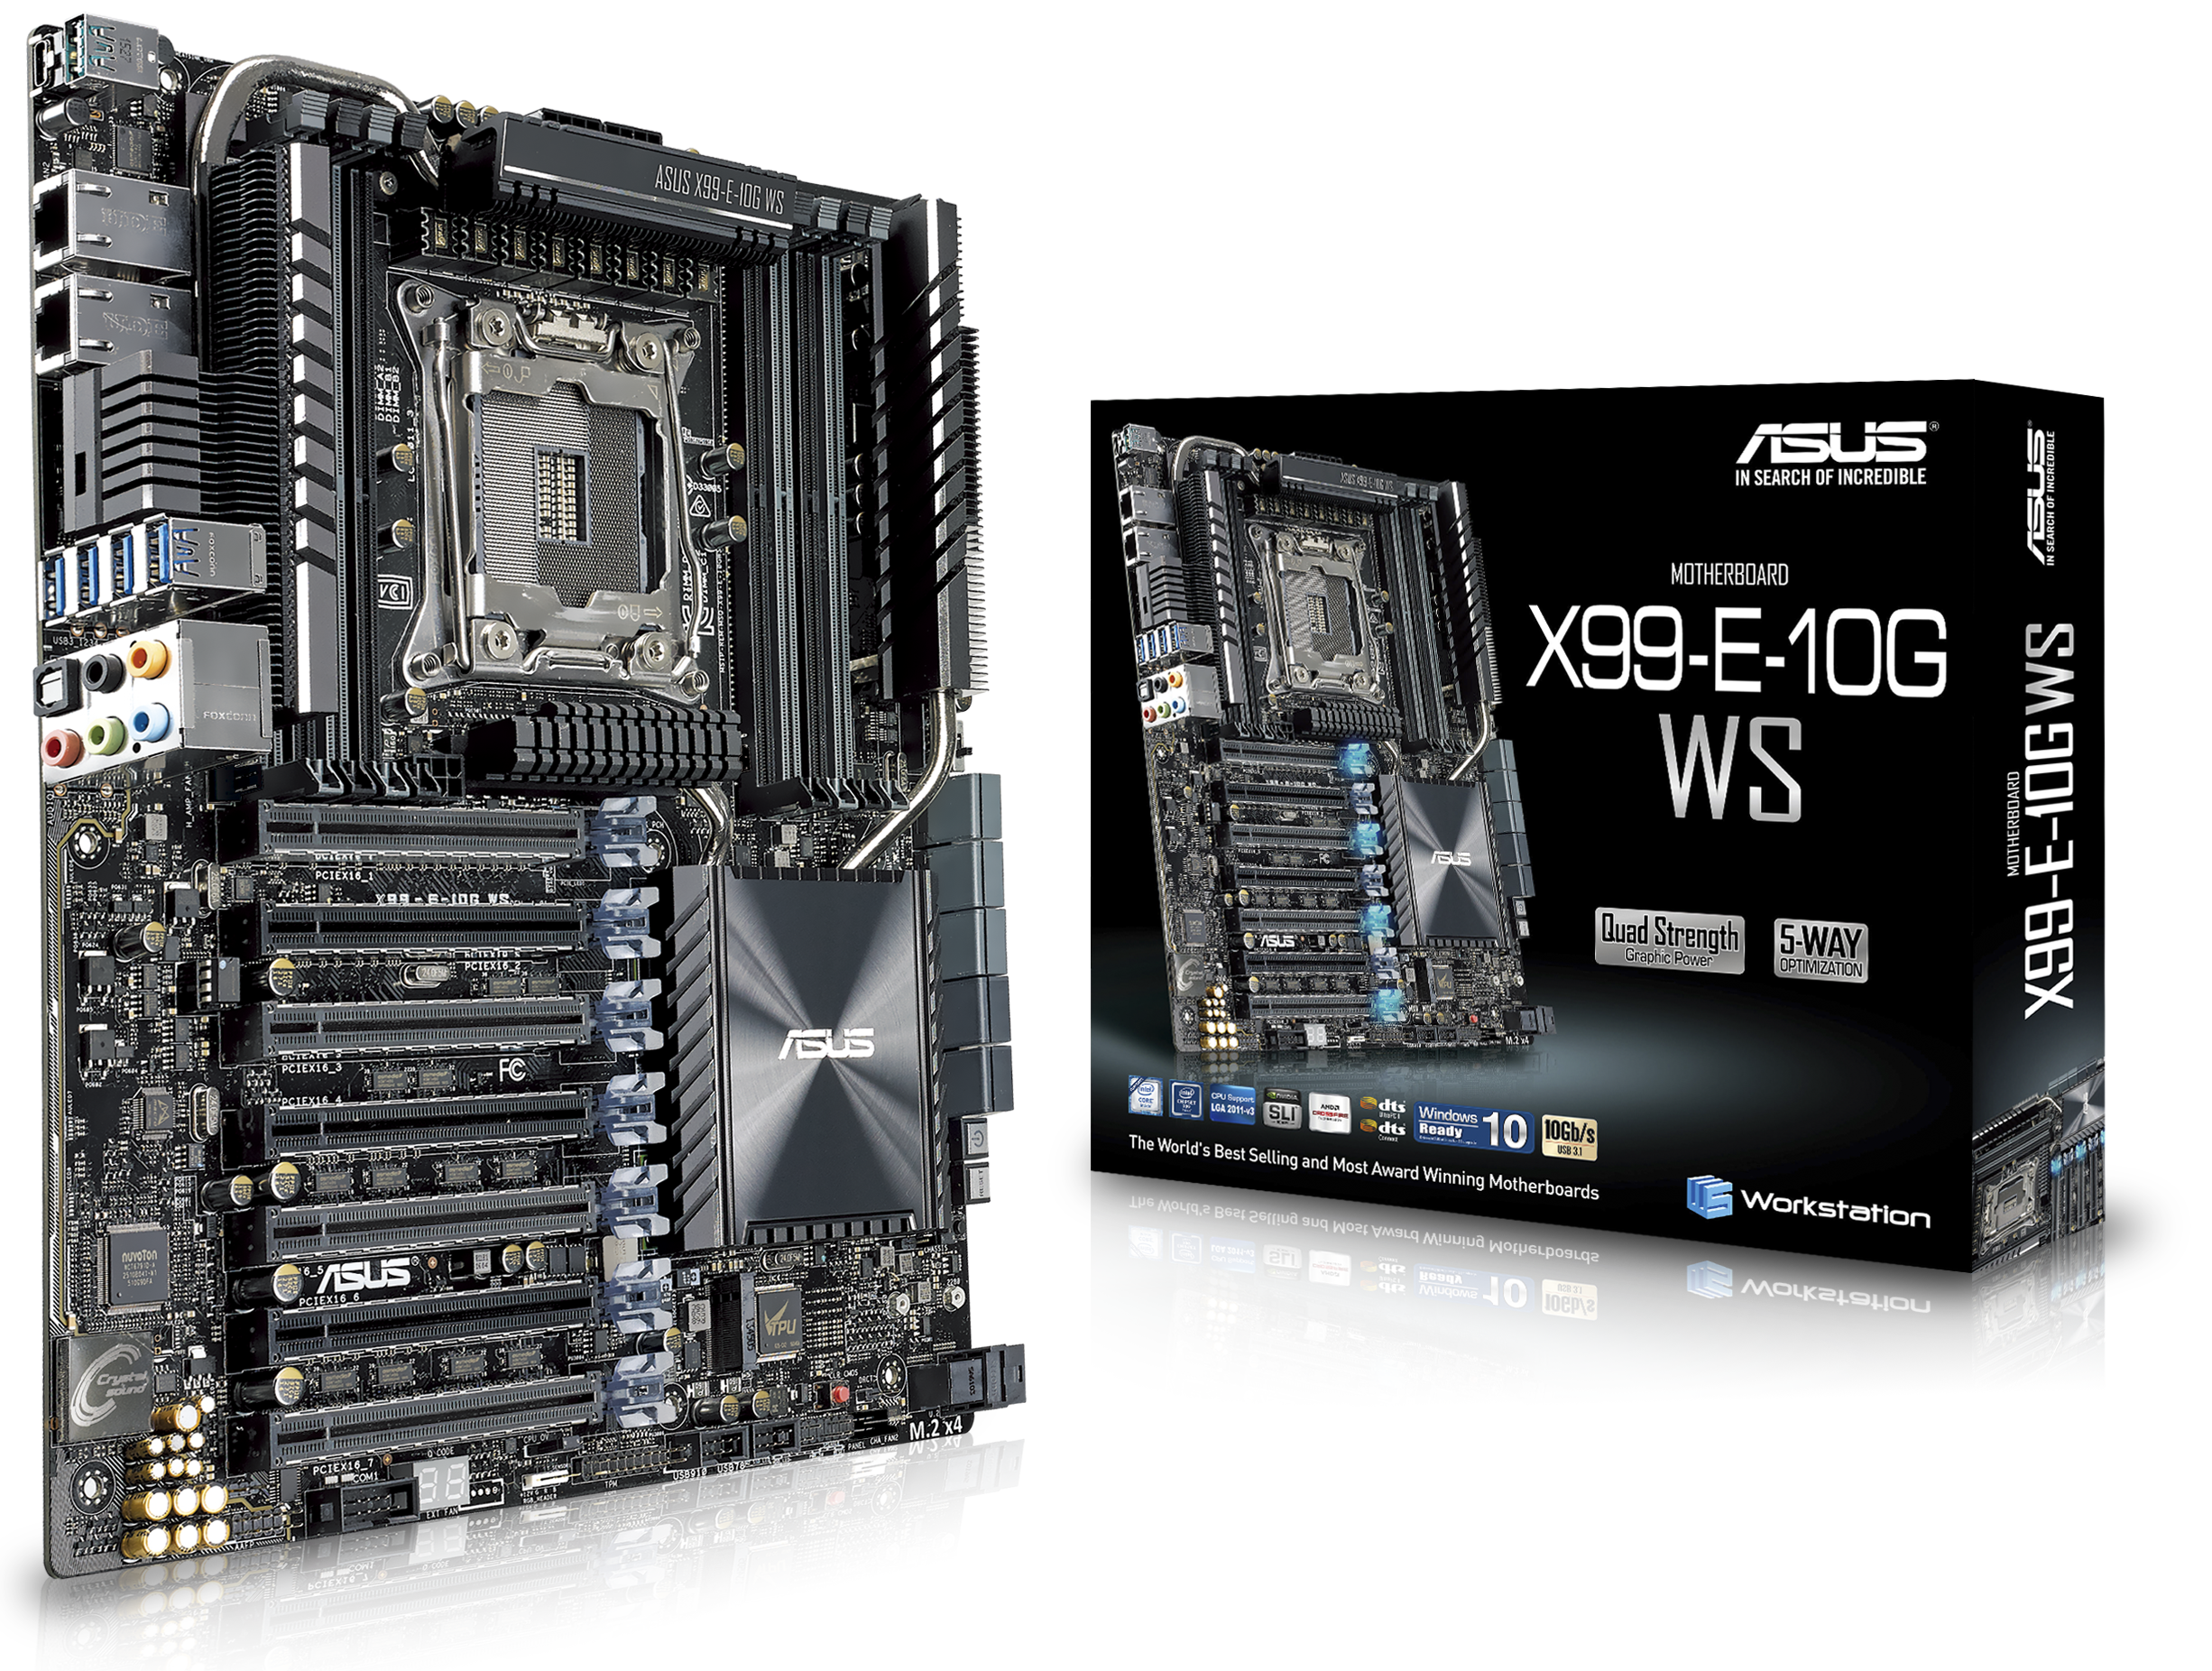
The ASUS X99-E-10G WS Overview
The feature that’s hard to ignore is the 10G ports, and to be honest buying this motherboard relies on needing to use these ports (or trying to be ‘futureproof’ when building a 3-5 year system). Adding in the capability for a motherboard to also support x16/x16/x16/x16 with its main PCIe ports means that extra and expensive hardware is needed for full bandwidth support.
This ability comes through PCIe switches, namely a pair of Avago PLX8747 switches. These ~$50ea final cost add-ons convert (mux/demux) sixteen lanes of PCIe 3.0 from the processor into thirty-two (32) lanes that are converted to x16/x16. As the main processors for this motherboard, such as the Intel Core i7-6950X, offer 40 lanes of PCIe, taking 32 away leaves eight lanes. This final eight lanes is split into four for the 10G controller and four for the U.2/M.2 PCIe 3.0 x4 slot at the bottom of the board. ASUS intends to make this motherboard the single port of call for all your PCIe needs.
One of the benefits of the PCIe configuration is that the board can support a full complement of GPUs for 4-way SLI or 4-way Crossfire (or even more for compute tasks, depending on GPU size or riser cables). One of the main criticisms of using PCIe switches is that there is a small amount of overhead which could reduce peak performance, but in gaming as we’ve tested before, it is sub 1%. In fact, this is the only way to support 4-way x16, and allows for faster GPU-to-GPU communication (for adjacent GPUs), which can be required for compute tasks.
As this is a premium motherboard, ASUS didn’t skip on the ‘regular’ features either. Starting their OC socket for premium LGA2011-3 platforms, the power delivery is enforced using ASUS’ high-end chokes as well as an extended heatsink arrangement for the high powered ICs present. The X99-E-10G WS will support 128GB of DDR4-2133, including up to ECC registered memory with the appropriate Xeon E5 v4 processor, and will have profiles up to DDR4-3333 for non-ECC gaming memory. Aside from the 10 SATA ports, U.2 and M.2, ASUS’ WS line is designed to be verified with a longer list of workstation-like hardware, such as RAID cards and FPGAs, to ensure compatibility. Thus given seven 16-way RAID cards, the motherboard makes an interesting storage proposition. Or add in more 10G ports.
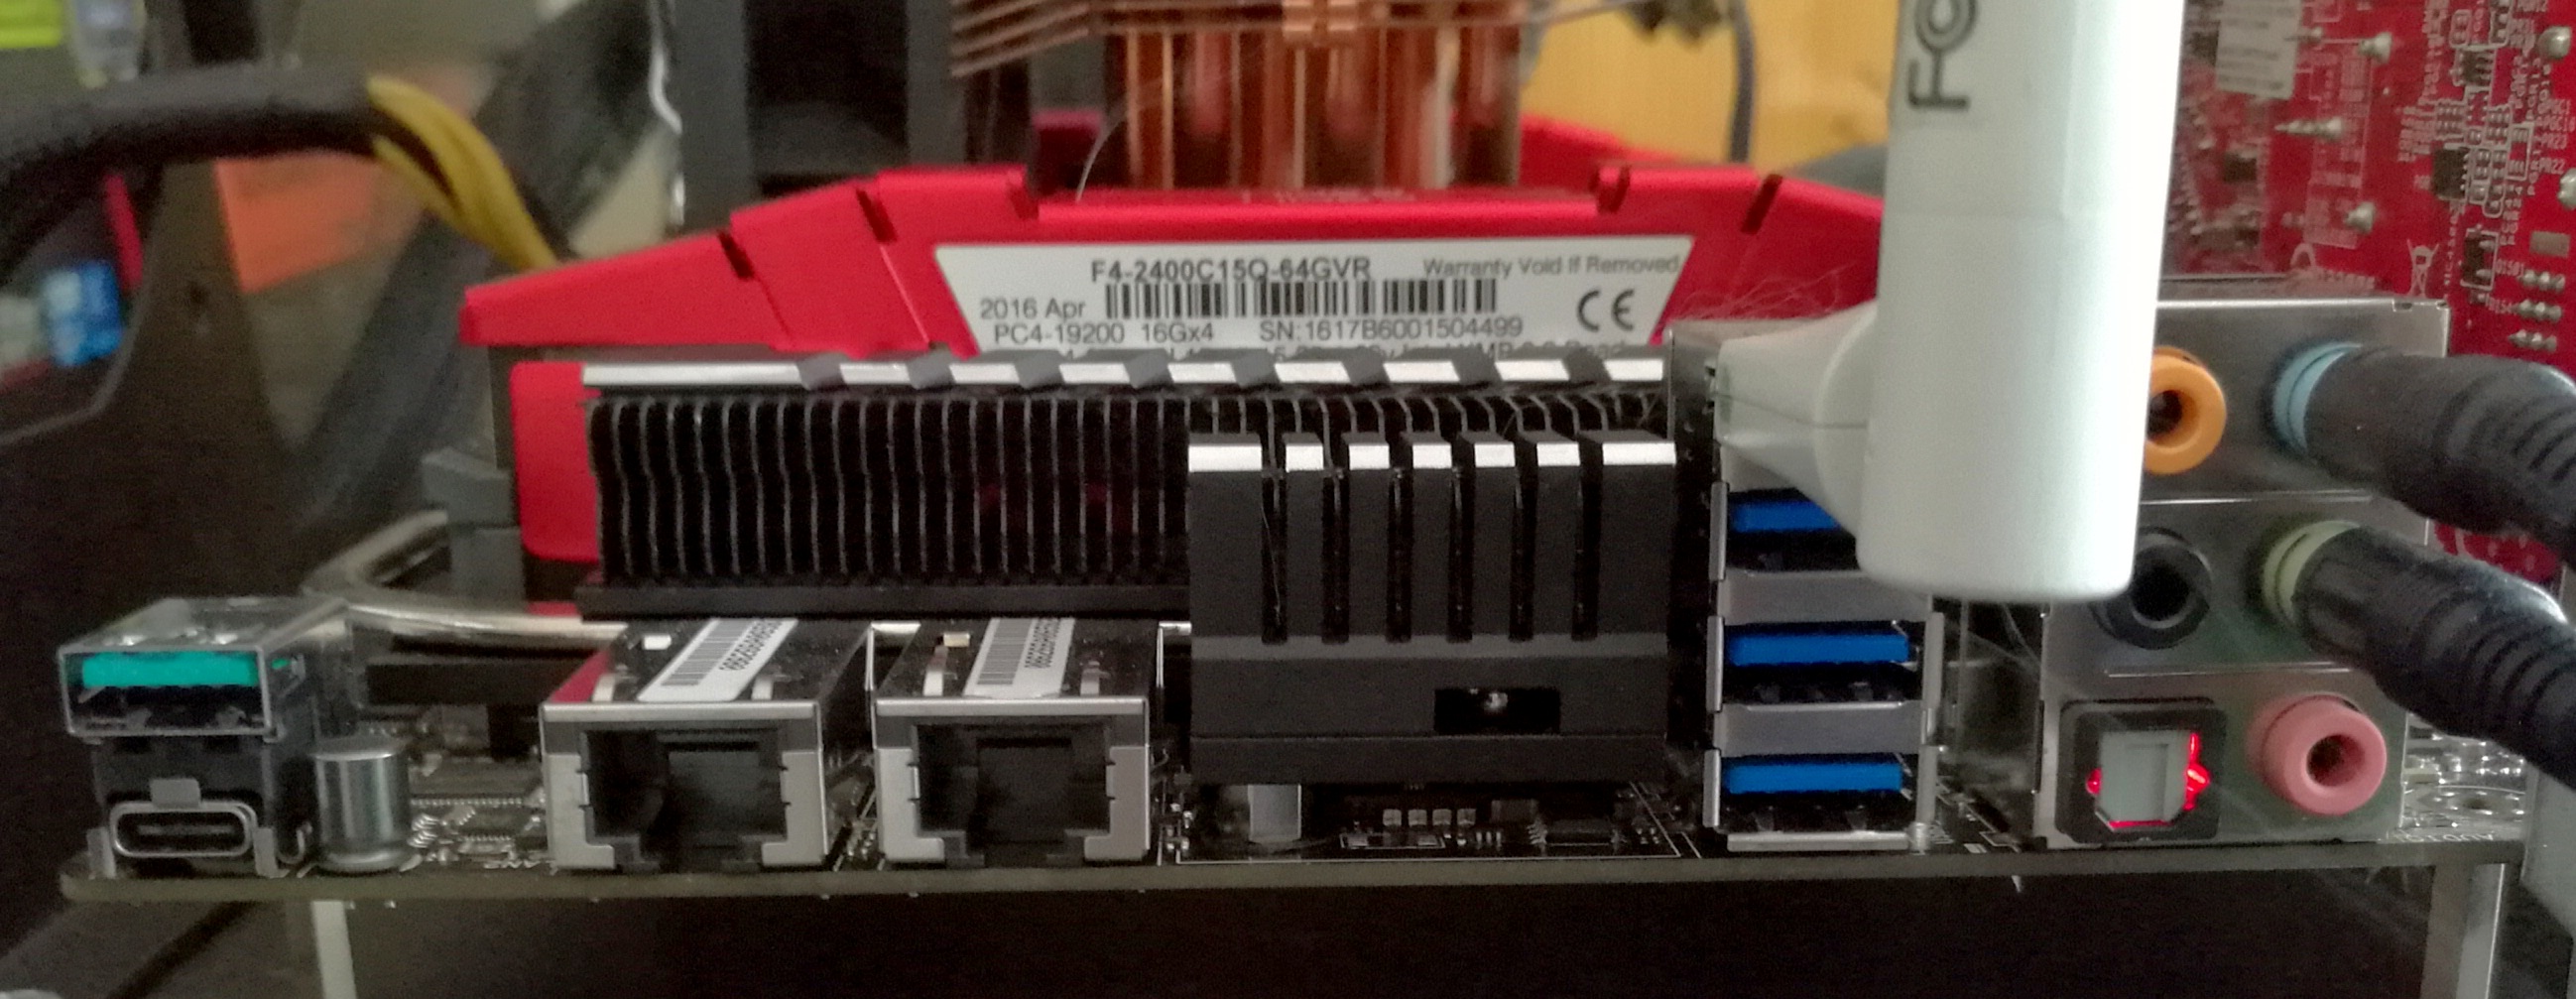
Due to the 10G ports, ASUS does not include any 1G ports, however the 10G ports do work at 1G speeds. For the audio, ASUS has their upgraded Realtek ALC1150 solution with filter caps, PCB separation and additional audio software. On the rear panel, ASUS has removed any USB 2.0 ports and left a pair of USB 3.1 (one A, one C) and a set of four USB 3.0 ports.
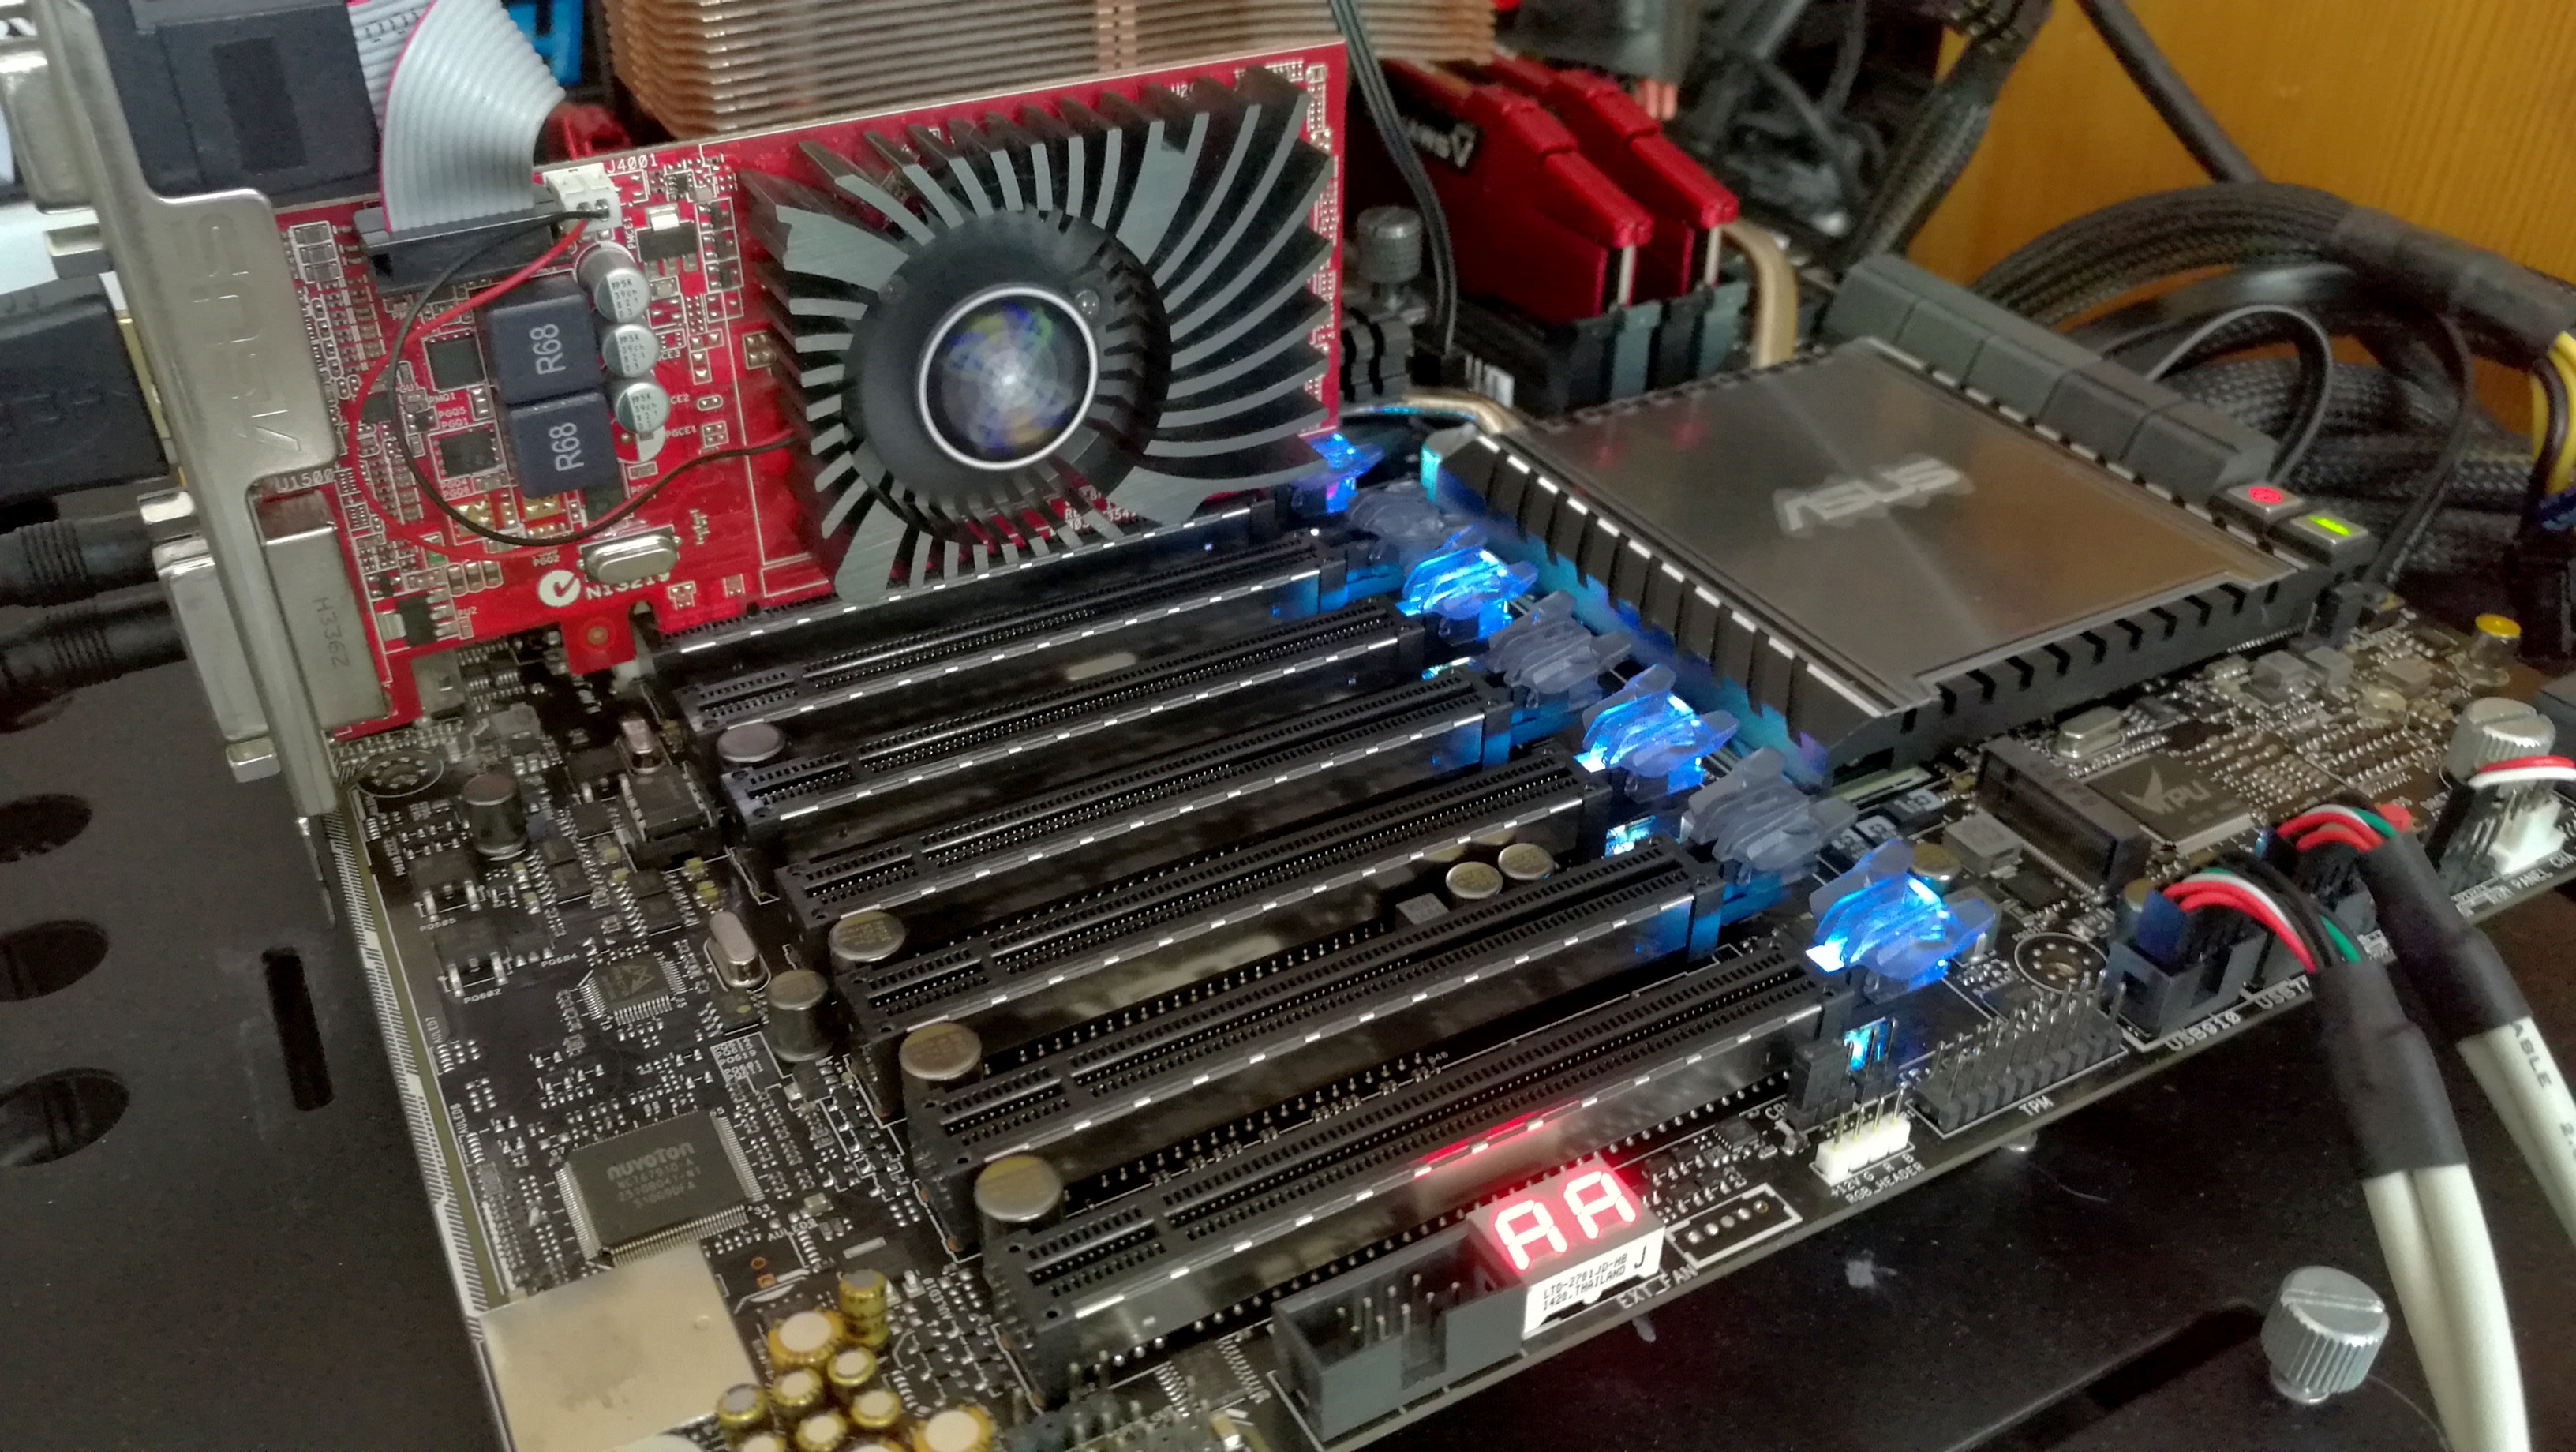
The PCIe slots also get an upgrade here, with the four main GPU slots featuring semi-transparent latches that the user can light up via a DIP switch to indicate which slots are needed to maximize 2-way, 3-way or 4-way GPU use. Each of the seven slots also has extra metallic reinforcement embedded into the slot itself, designed to maintain rigidity when heavy PCIe devices are used or PCIe devices are installed during bumpy transit.
Performance wise it is sufficient to say that the idle power of this WS board is higher than that of standard X99 motherboards however for consumer CPUs Multi-Core Turbo is enabled by default, giving a little extra speed (at the expense of a bit of power). Metrics such as DPC Latency and Audio Quality are both in the better halves of the tables for the tests, but with most WS boards with extra features there is a little more POST time than normal. We tested the board up to 3-way SLI (I didn’t have a fourth GTX 980, sorry), seeing game-dependent enhancements at 4K.
Quick Links to Other Pages
In The Box and Visual Inspection
Test Bed and Setup
Benchmark Overview
BIOS
Software
System Performance (Audio, USB, Power, POST Times on Windows 7, Latency)
CPU Performance, Short Form (Office Tests and Transcoding)
Single GPU Gaming Performance (R7 240, GTX 770, GTX 980)
Testing up to 3xGTX 980 and 10G
Conclusions
Board Features
ASUS is promoting the X99-E-10G WS as their highest-end SKU for X99 platforms. As a result, it costs a fair bit, given that the 10G controller and dual PCIe switches are not cheap individually, let alone a set.
| ASUS X99-E-10G WS | |
| Warranty Period | 3 Years |
| Product Page | Link |
| Price | US |
| Size | CEB (12 in x 10.5 in, 30.5 cm x 26.7 cm) |
| CPU Interface | LGA2011-3 |
| Chipset | Intel X99 |
| Memory Slots | Eight DDR4 DIMM slots supporting up to 128 GB Up to Quad Channel, 2133-3333 MHz (Xeon) Support for 128GB DDR4-2400 ECC Un-buffered (Xeon) Support for 128GB DDR4-2400 ECC RDIMM |
| Video Outputs | None |
| Network Connectivity | 2 x 10GBase-T (Intel X550-AT2) |
| Onboard Audio | Realtek ALC1150 |
| Expansion Slots | 7 x PCIe x16 (up to x16/x8/x8/x8/x8/x8/x8) via PLX8747 Support NVIDIA 4-way SLI Support AMD 4-way Crossfire Support 7-way Crazy OpenCL Configs. Probably |
| Onboard Storage | 6 x SATA 6 Gbps, RAID 0/1/5/10 4 x S_SATA 6 Gbps, no RAID 1 x U.2 (PCIe 3.0 x4) * switch with M.2 1 x M.2-2280 (PCIe 3.0 x4) * switch with U.2 |
| USB 3.0 / USB 3.1 | 1 x USB 3.1-A via ASM1142 1 x USB 3.1-C via ASM1142 8 x USB 3.0 (4 x back panel, two headers) |
| Power Connectors | 1 x 24-pin ATX 2 x 8-pin 12V EPS for CPU 1 x 6-pin PCIe for VGA |
| Fan Headers | 1 x CPU (4-pin) 1 x CPU OPT (4-pin, for water cooling fans) 2 x CHA/SYS (4-pin) |
| IO Panel | 2 x 10GBase-T (Intel X550-AT2) 4 x USB 3.0 1 x USB 3.1 Type-A 1 x USB 3.1 Type-C Audio Jacks |
| Other Features | TPM Header EZ XMP Switch Front Panel Header DirectKey Header MemOK Button CPU Overvolt Header Power/Reset Buttons Clear CMOS Button SLI/CFX Light Switch USB BIOS Flashback Button COM Header High AMP Fan Header Temperature Sensor Header |
One of the interesting things to note is the storage, whereby due to the PCIe lane allocation the motherboard only has suffcient PCIe lanes for either the M.2 or the U.2 slot - users cannot have both enabled simultaneously. At this point of the ecosystem, this is perhaps not a limiting thing given the sole U.2 commercial drive is the Intel SSD 750, however as this is a workstation motherboard chances are that OEMs who use this board will have access to enterprise level U.2 drives as well. We will have to wait until the HEDT chipsets enable more PCIe lanes in order to get multi-PCIe native functionality.
In The Box
We get the following:
IO Shield
User Manual
Driver DVD
10 x SATA 6 Gbps cables
1 x COM Port Cable
1 x 2-way SLI Bridge
1 x 3-way SLI Bridge
1 x 4-way SLI Bridge
1 x Q-Connector
1 x 2-port USB 2.0 Module
1 x 80cm Extension Cable for RGB
With an expensive product comes an expensive box set – having a full array of SATA cables for an X99 motherboard is rare. The 2-port USB 2.0 addition is a good one, allowing users to install an OS via non-xHCI chipset based ports rather than controller based ports (which can sometimes be an issue when it comes to drivers on the OS installer).
Visual Inspection
One of the things that it immediately noticeable on the X99-E-WS 10G as you pick it up is the weight. I wouldn’t be surprised if this is one of the heaviest motherboards we’ve ever tested, and this comes down to a large feature set which requires sufficient cooling. The addition of the X550-AT2 ten gigabit Ethernet controller for the network ports and the dual PLX8747 PCIe switches adds a peak 30W+ to the base chipset design and needs appropriate heatsinks as a result (ASUS recommends active cooling on the CPU to assist). This means that the typical power delivery and chipset heatsinks are extended and/or connected via heatpipes – one combination heatsink takes care of the power delivery and the Ethernet controller, while another does the PCIe switches and the chipset but also has an extension up the side of the DRAM slots to provide more mass and surface area for cooling.
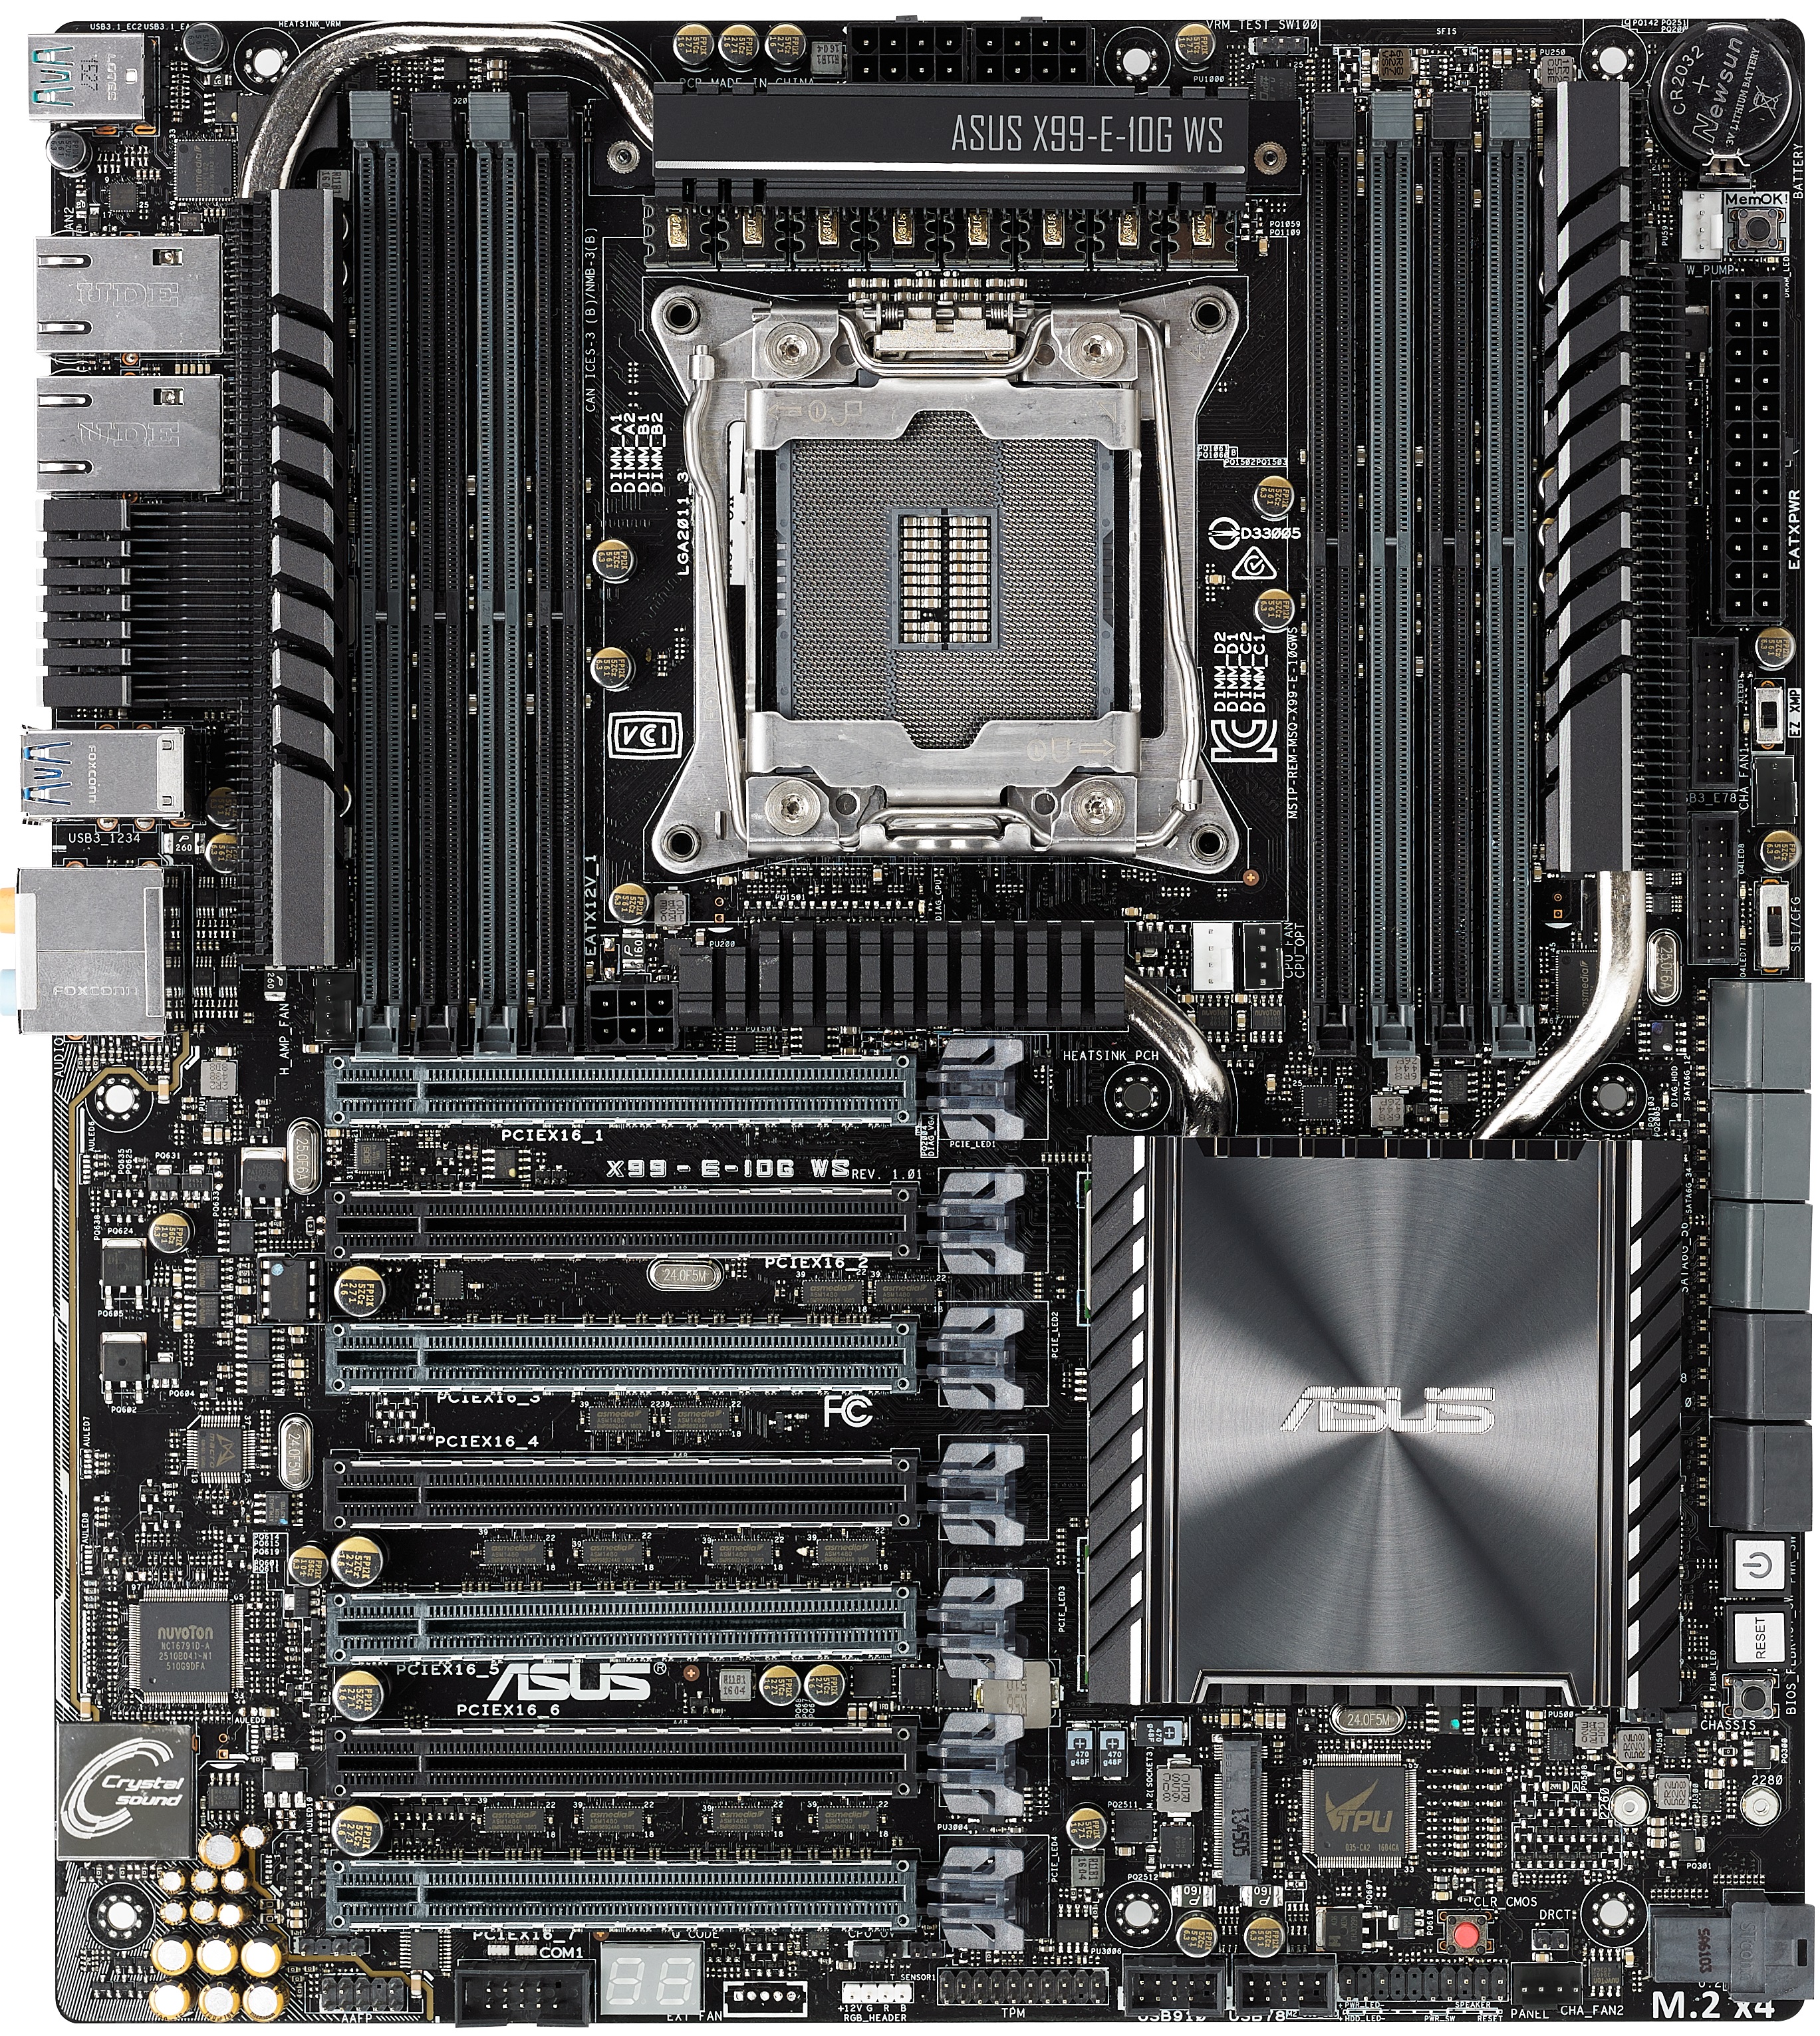
Mass and heatsinks aside, the socket area is where we typically start and despite this being a CEB sized motherboard, the socket is barely bigger than Intel’s minimum specifications as given by the white border in the socket area. Above the LGA2011-3 socket are eight power phases using premium chokes, which are supplied via dual 8-pin EPS 12V connectors (although only one is needed for stock use). The socket has five 4-pin fan headers for immediate use – two below the socket to the right (one white for the main CPU, one black for water cooling fans), one 4-pin to the far right next to the USB 3.0 headers, one in the top right for water cooling pumps, and a fifth 4-pin to the left of the socket just above the first PCIe slot. This fifth header is listed as a high-amp fan header, thus any enthusiast who wants to invest in a powerful or high static pressure fan can use this header. The final 4-pin fan header is at the bottom of the board. It is worth nothing that while there is a pad at the bottom of the board for ASUS’ fan extension board we’ve seen in other products, it seems to be removed for this version.
Moving clockwise around the motherboard, the DRAM slots are next. ASUS uses single-sided latch DDR4 slots, with the single-sided latch making it easier to change memory with a large GPU installed but users will have to make sure that memory is firmly pushed into place for connectivity. The DRAM slots use alternating colors to indicate the primary and secondary memory slots for the four channel design – in this case the grey slots are the primary memory slots and should be filled first.
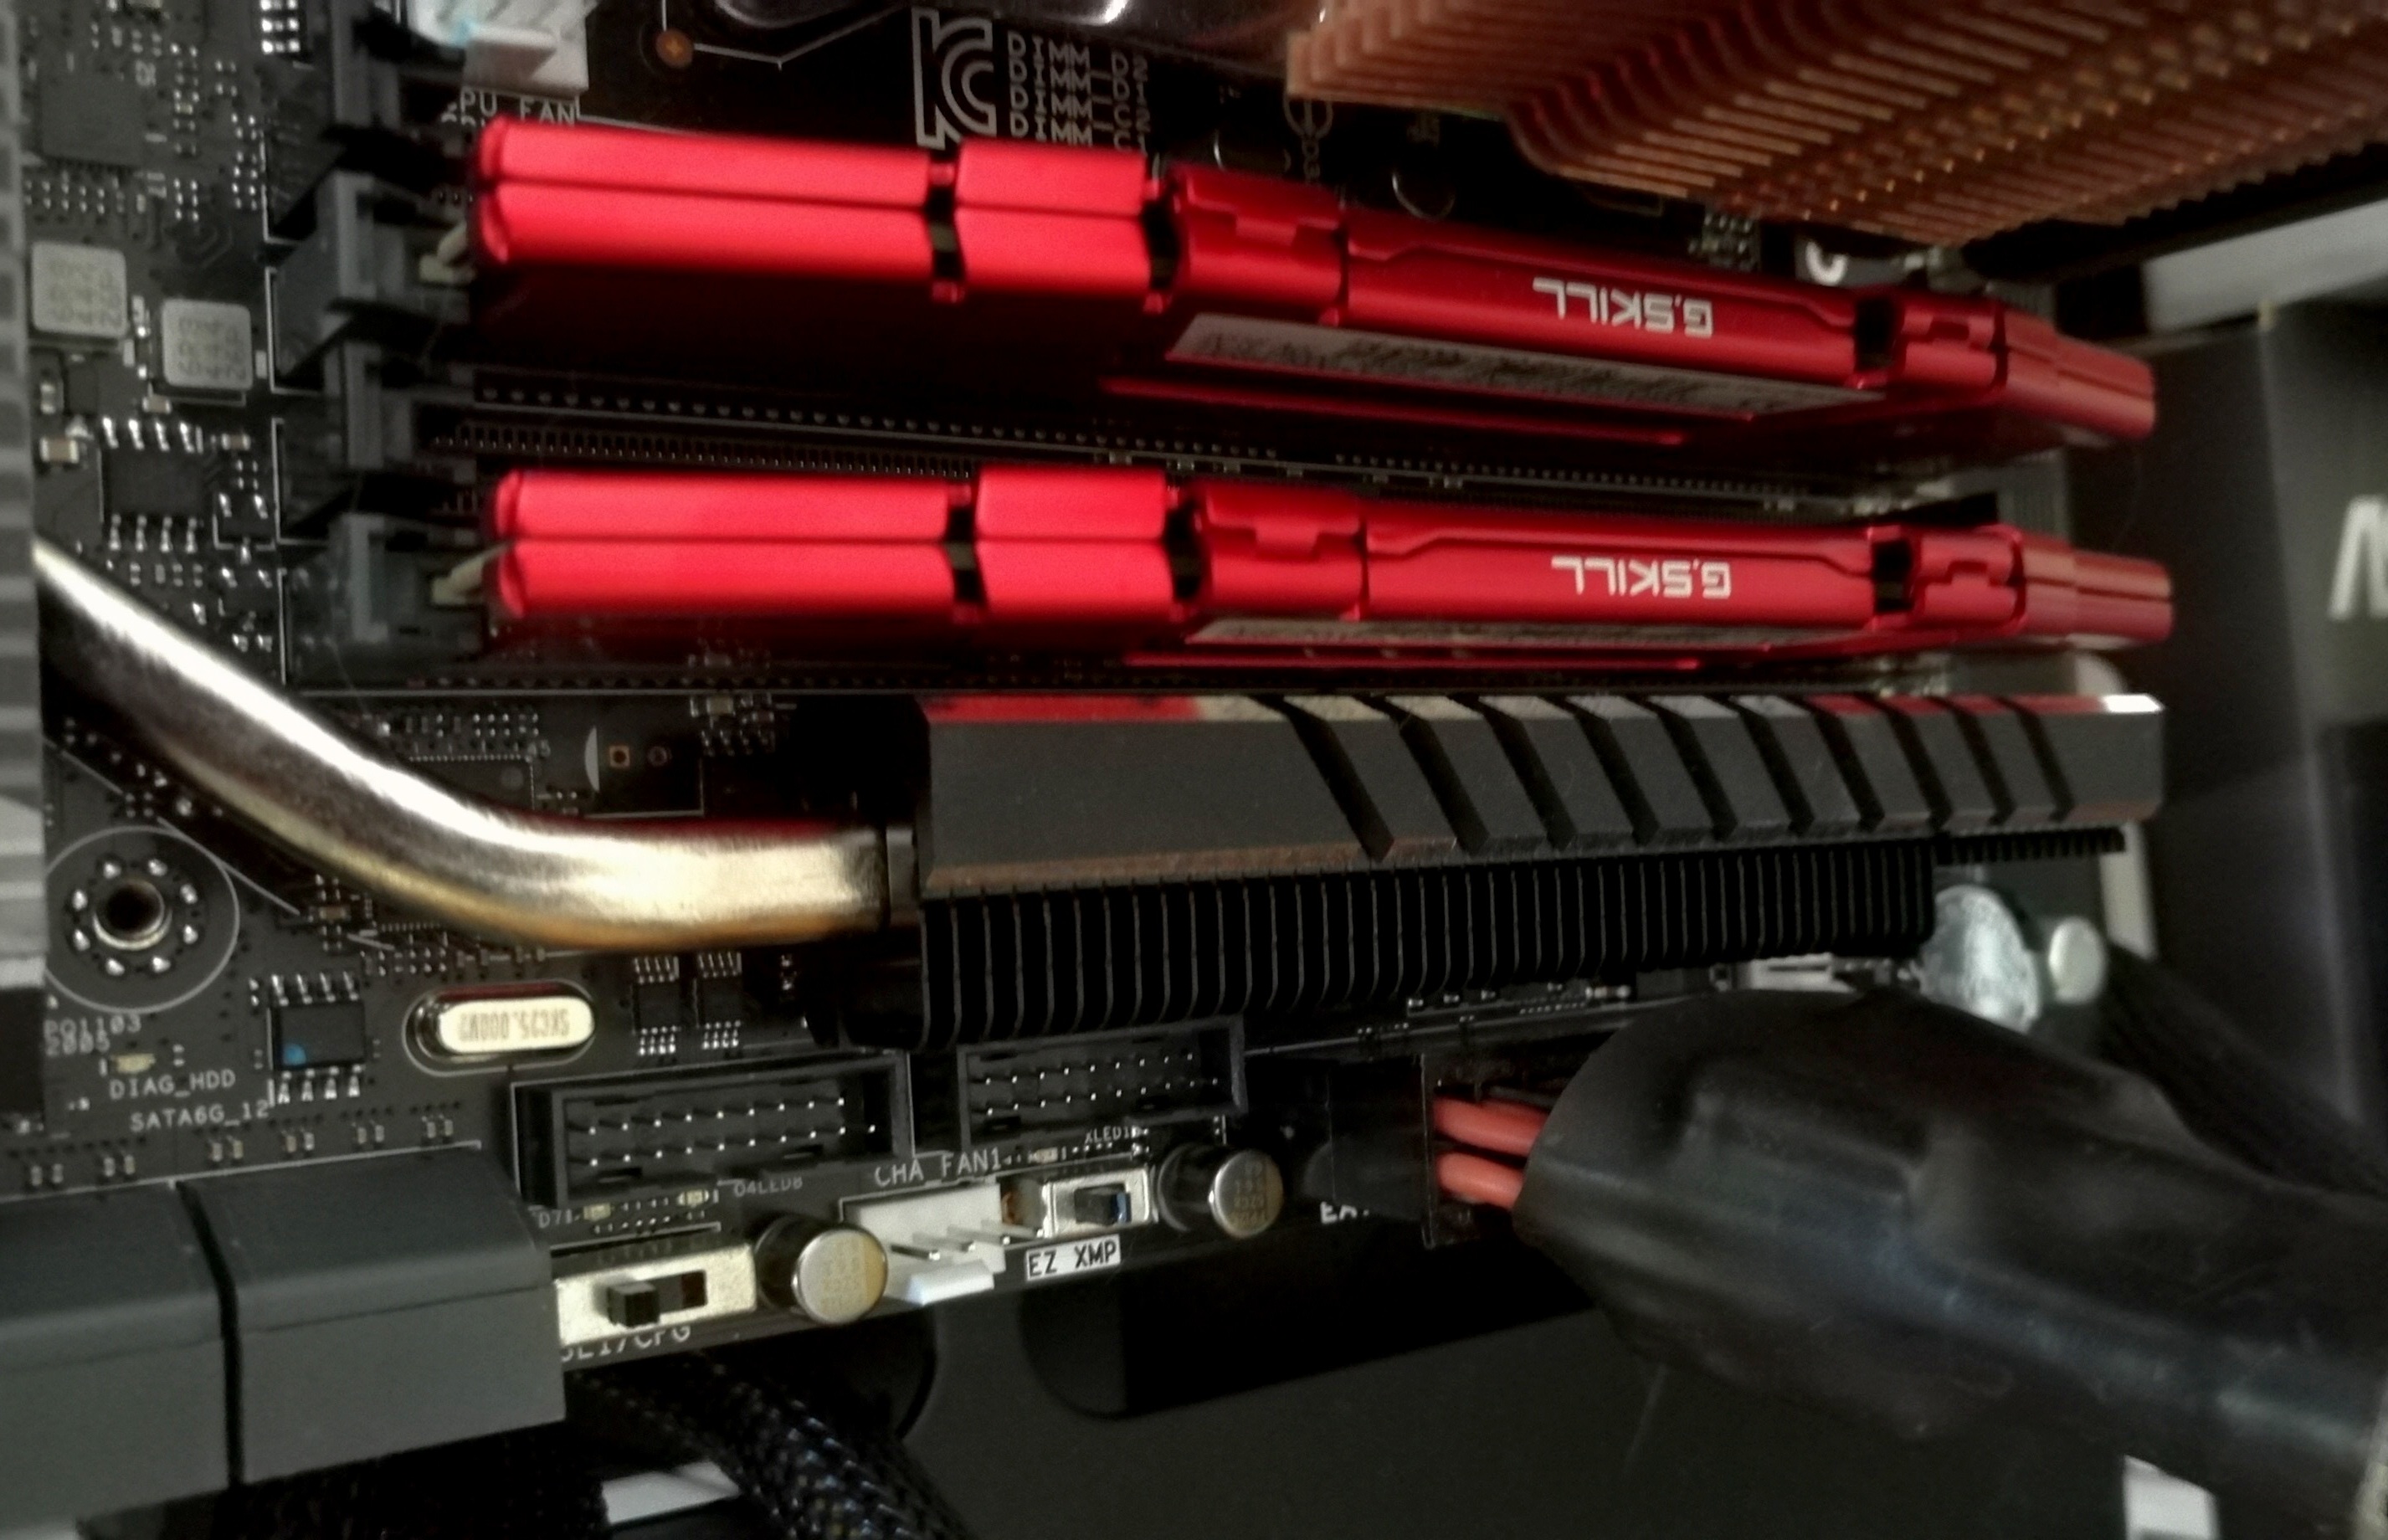
At the top right of the board is the CR2032 battery, which is a particularly odd place for the battery that keeps the internal clock and BIOS operational (normally we see the battery nearer the BIOS chip and by the chipset, but as it requires to be ‘open’ for replacement and this board has little space, it looks like this is the only place ASUS could put it). Beneath the 24-pin ATX connector are two USB 3.0 headers powered by the PCH, and two DIP switches. The top switch is an EZ XMP switch, allowing users for most XMP enabled memory to apply the extreme profile without altering the BIOS. Tools like this are designed to work most of the time with the majority of kits, however with obscure or super-high performance memory your mileage may vary (users should not mix and match kits/speeds either). The second switch is labeled as SLI/CFG which is used to light up the various PCIe latches with where GPUs should be installed for the best performance in 2-way, 3-way and 4-way SLI. For seasoned enthusiasts, knowing which are the best slots should be second nature, but ASUS has received feedback that sometimes working it out is a bit complicated, hence this switch with visual feedback via LEDs.
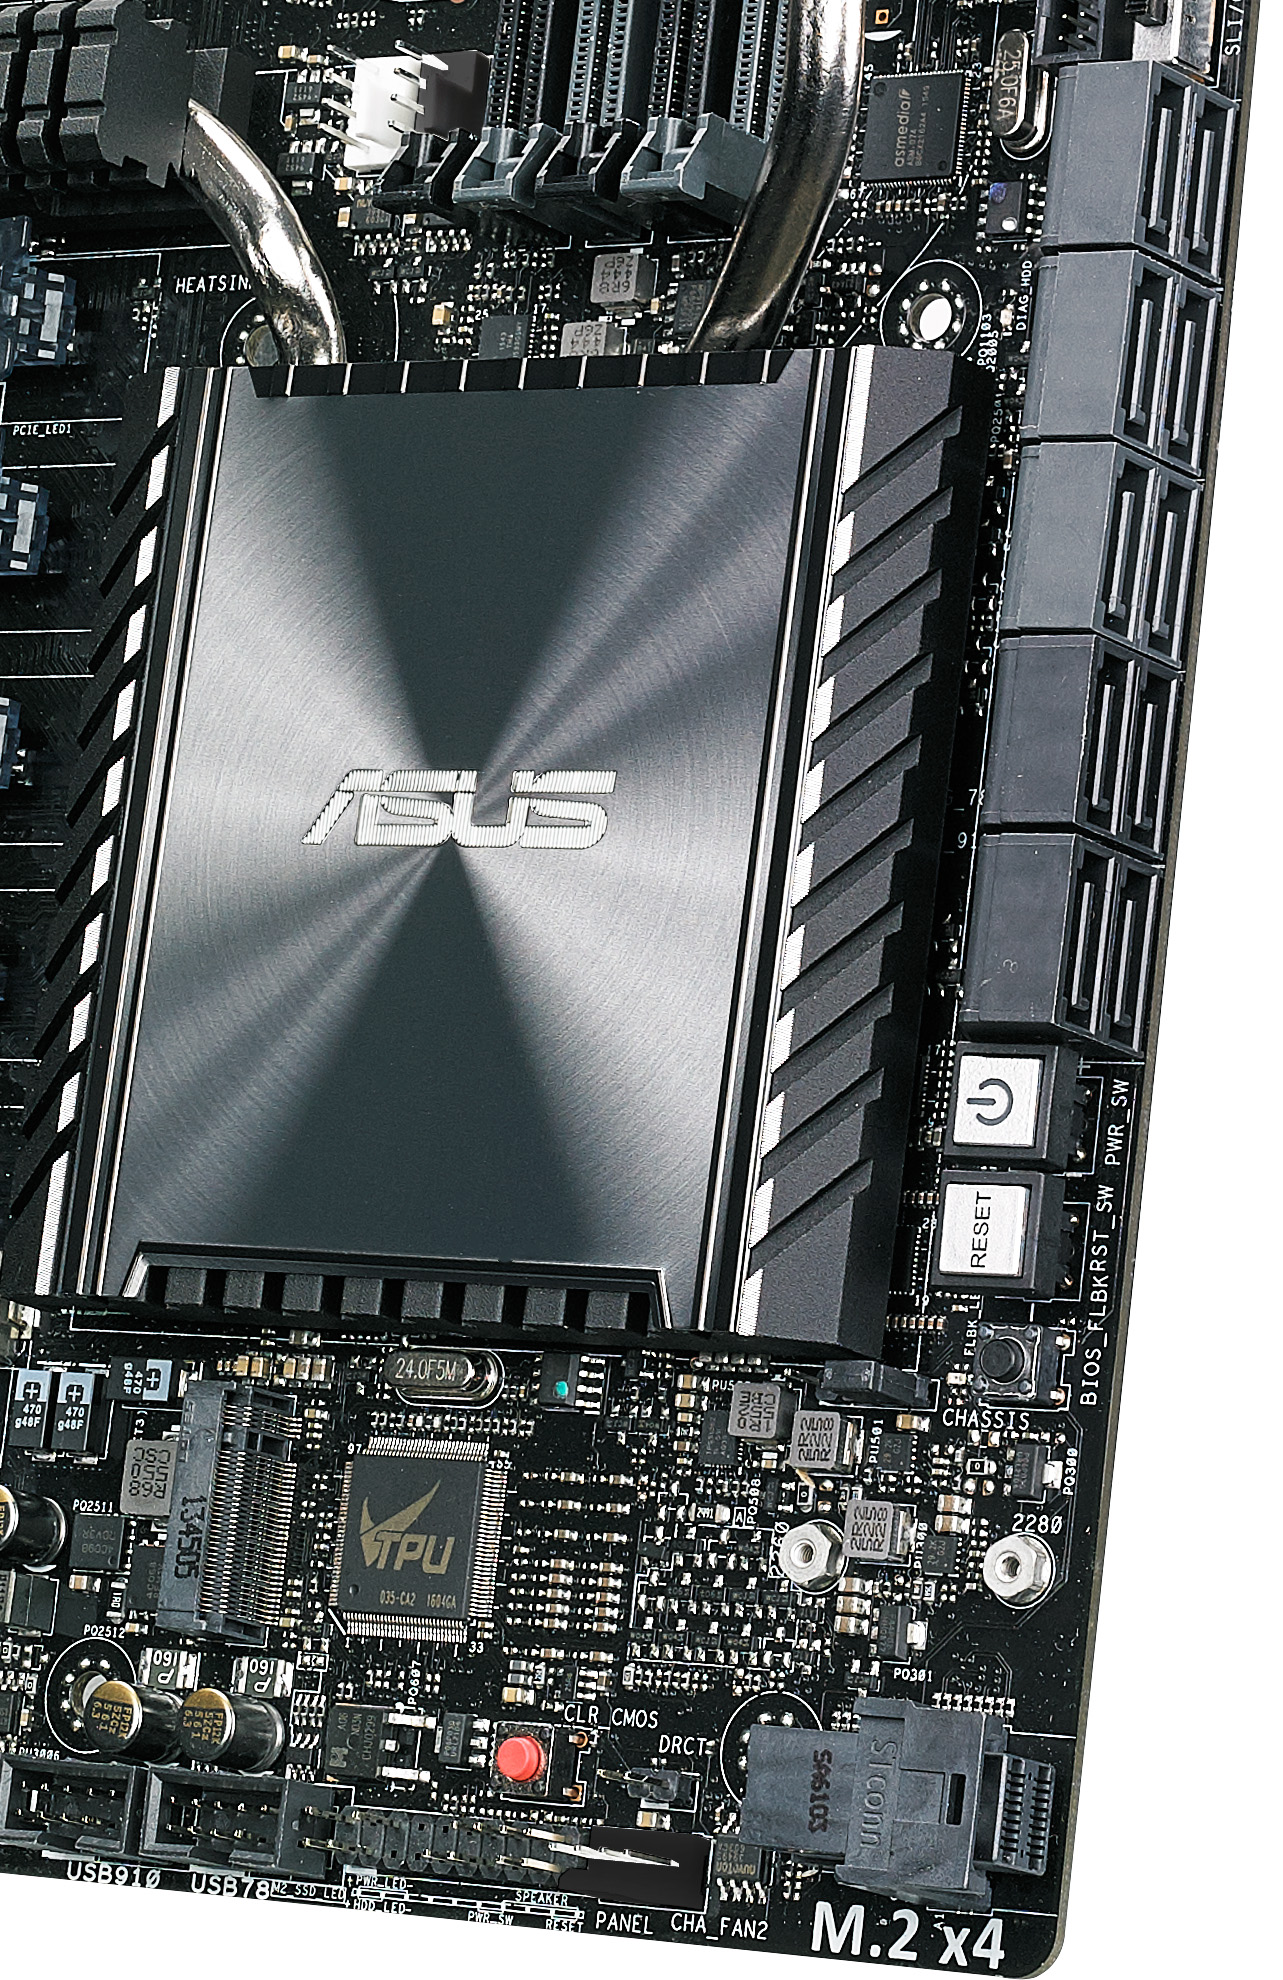
Beneath the switches are our SATA ports, with the X99-E-WS 10G implementing all ten from the chipset. The first six in light gray are from the primary SATA controller, and allow for RAID, while the other four in dark gray will not. For storage ASUS also has an M.2 PCIe 3.0 x4 slot further down for 2280 drives and a U.2 connector for drives like Intel’s SSD 750. Even when using a 40 lane PCIe CPU, only one of these PCIe storage options will work at once. In between the U.2 and the SATA ports are our power/reset buttons, along with a BIOS Flashback button.

Moving to the bottom of the board and it gets very crowded. From right to left is the U.2 connector, one of the aforementioned 4-pin fan headers, above that is a DirectKey (reboot to BIOS) header, then a front panel header, and above this is a Clear CMOS button. Next are two USB 2.0 headers, a TPM header, and a header for an RGB LED strip (adjustable by using the OS software). Above the RGB header is a thermal temperature sensor header, for anyone with a two-pin thermistor who wants an additional thermal monitoring point in their system, and a CPU Overvolt jumper. This jumper allows an extreme overclocker, typically one using sub-zero cooling methods such as dry-ice or liquid nitrogen, to push the processor beyond the ‘safe’ limits imposed in the BIOS by ASUS. Finally, to the left of this jumper, is a two-digit debug LED, a COM header, and the front panel audio header.
Moving to the PCIe slots, and we have an interesting discussion on our hands. Here are seven full-length PCIe slots, alternating in electrical connectivity as x16 and x8 respectively. Technically this motherboard will support PCIe 3.0 x16/x16/x16/x16 up to PCIe 3.0 x16/x8/x8/x8/x8/x8/x8, both of which are well beyond the 40 PCIe lanes provided by the CPU (and that’s not factoring in the PCIe storage or 10G Ethernet either). While not the best analogy, PCIe is almost like a freeway – some parts are wider than others but a 2-lane can become a 4-lane with an appropriate conversion. Same thing happens with PCIe using PCIe switches – using a PLX8747 IC, an 8-lane or 16-lane uplink can become a 32-lane to 80-lane downlink (depends on which version of the PLX IC, but each PLX IC has other features too, such as more device ‘ports’ for more hardware). So while communication on the downlink of the IC is up to 32-80 lanes, any devices on those lanes may compete for bandwidth in the x8/x16 uplink. We’ve covered the operation of PCIe switches many times before, with the original article back in 2012 (link), and ASUS uses similar techniques.
In order to get enough lanes in the right direction, ASUS does the following with the PCIe switches:
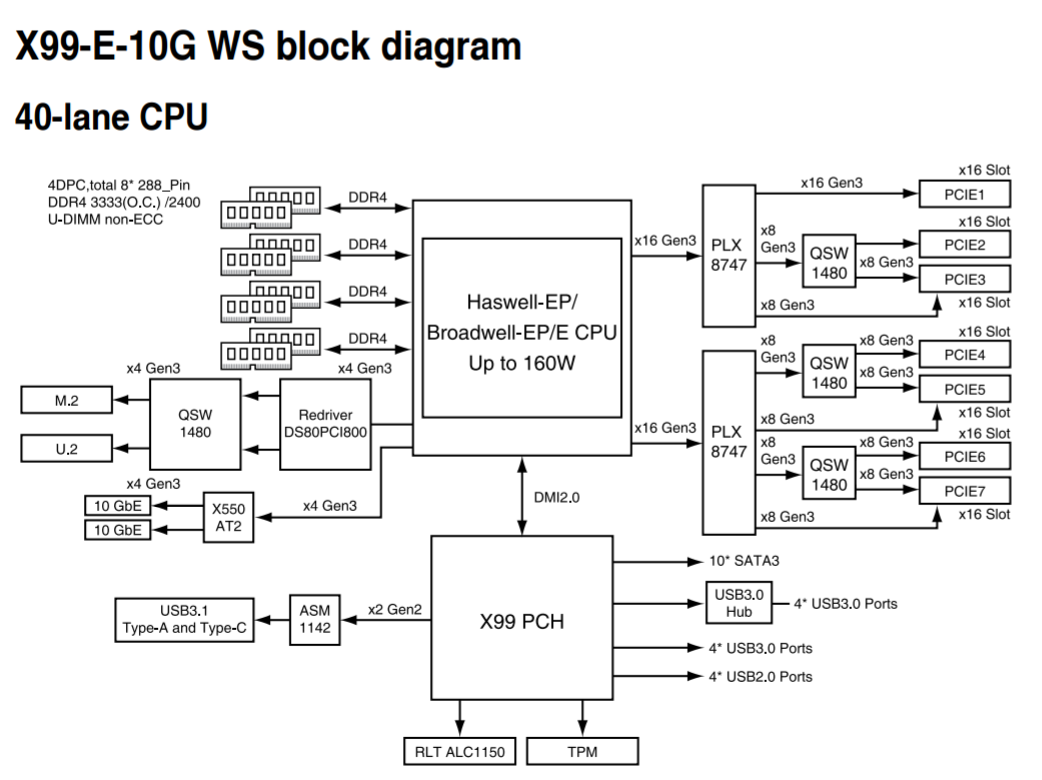
The 40 lanes from the CPU are split into three PEG (PCIe Graphics) links of x16, x16 and x8. The two x16 links are each fed into a PLX8747 which provides two x16 downlinks on each chip. Each downlink uses a quick-switch (QSW) to implement either a single slot x16 or dual x8 configuration. There are only seven slots on the board, so one of the downlink x16 stays at x16 (this is the top slot on the board). The final x8 from the CPU is split into two x4 links, one for the 10G controller providing the two ports of 10G and the other or PCIe storage at the bottom of the motherboard. All other PCIe related controllers (such as the ASMedia ASM1142 USB 3.1 controller) are derived from the chipset as it supports x1/x2 functionality.
Each PCIe slot on the board has embedded rigidity rails, which is a relatively new feature for high-end motherboards. The idea here is that PCIe devices, such as large GPUs, are often heavy due to the cooling causing the PCIe device to sag based on the weight. This puts the PCIe slot under stress and increased torque, and may increase failure rate (especially if the PCIe device is installed and then the system is shipped. While a user can invest in a frame to prop up the GPU, the motherboard manufacturers have taken the initiative and reinforced the slots themselves to reduce RMA rates (and offer another tick for marketing to promote/differentiate). The rails inside the plastic housing are also bonded to the PCB to ensure the PCIe slot doesn’t separate as easily under the increased stress.

The rest of the motherboard comes down to the audio and the rear panel. The audio implementation uses ASUS’ Crystal Sound branding, reserved for boards where an improved ALC1150 solution is needed but audio is not necessarily the focus of the board. This means we get PCB separation, additional filter caps for the front panel audio, an EM shield to reduce interference, and additional software. ASUS has historically been good at audio performance in our testing, and we see this again in the Crystal Voice design.

The rear panel starts with a pair of USB 3.1 ports from an ASMedia ASM1142 controller, and we get one Type-A and one Type-C. These can both take advantage of ASUS’ USB 3.1 boost technology, which we’ve tested for the benchmarking portion of the review. Following that are two 10GBase-T ports from the Intel X550-AT2 controller, which requires a section of the rear IO to be dedicated to heatsink as a result. It is worth noting that with all the current 10G implementations on consumer motherboards available, none of them put the 10G ports on top of one another, or pair with other ports on the same module. Next to the heatsink are the four USB 3.0 ports, followed by the audio jacks.
 Audio_thumb.png)
 Left_thumb.png)
 Top_thumb.jpg)
 Oblique_thumb.png)
 Rear IO 2_thumb.jpg)
 Rear IO_thumb.jpg)
Test Bed and Setup
As per our testing policy, we take a high-end CPU suitable for the motherboard that was released during the socket’s initial launch, and we equip the system with a suitable amount of memory running at the processor maximum supported frequency. This is also typically run at JEDEC subtimings where possible. It is noted that some users are not keen on this policy, stating that sometimes the maximum supported frequency is quite low, or faster memory is available at a similar price, or that the JEDEC speeds can be prohibitive for performance. While these comments make sense, ultimately very few users apply memory profiles (either XMP or other) as they require interaction with the BIOS, and most users will fall back on JEDEC supported speeds - this includes home users as well as industry who might want to shave off a cent or two from the cost or stay within the margins set by the manufacturer. Where possible, we will extend out testing to include faster memory modules either at the same time as the review or a later date.
| Test Setup | |
| Processor | Intel Core i7-5960X ES 8 Cores, 16 Threads, 3.0 GHz (3.5 GHz Turbo) |
| Motherboards | ASUS X99-E-10G WS |
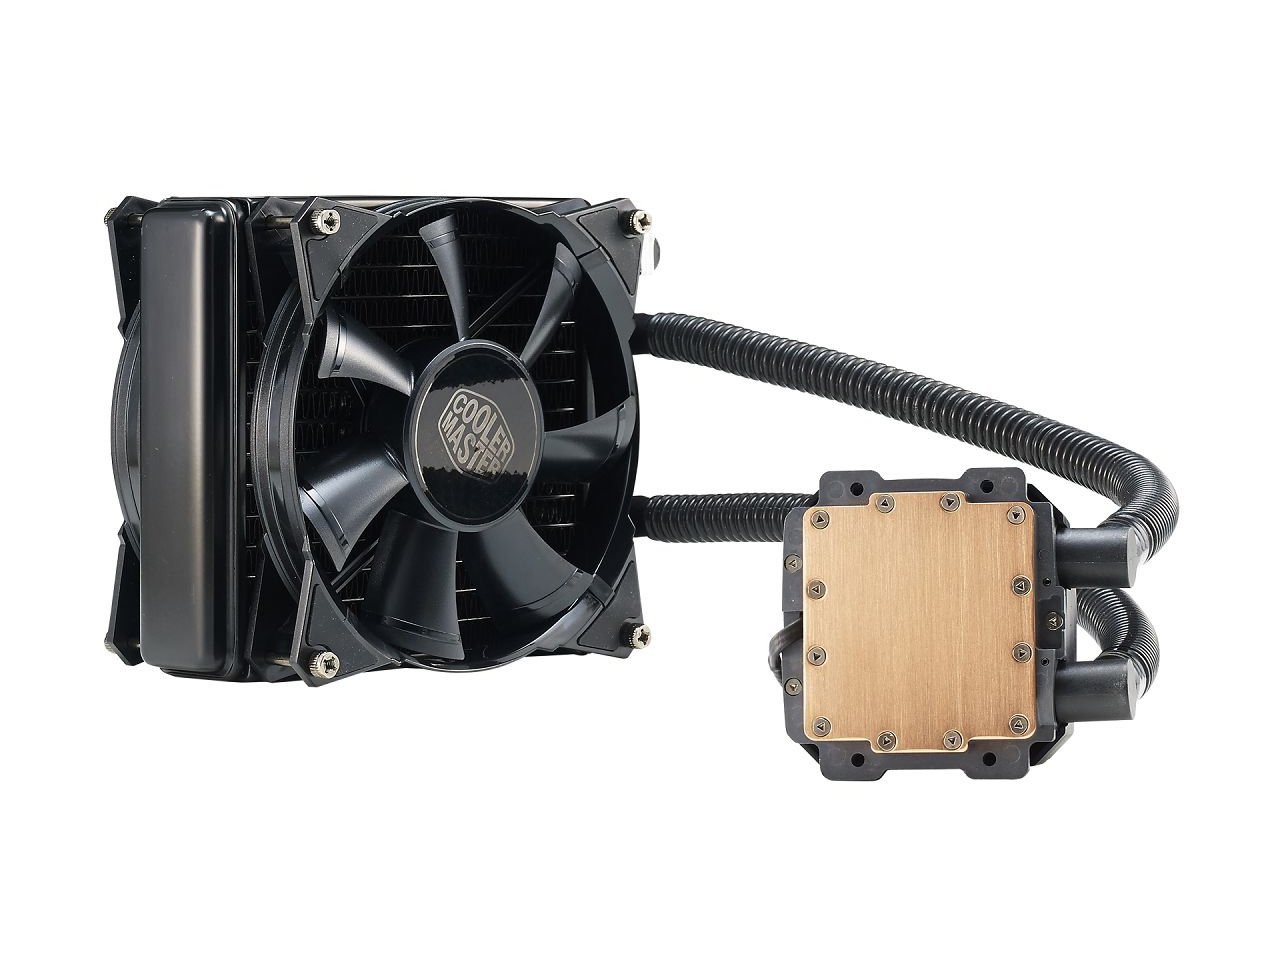
| Cooling | Cooler Master Nepton 140XL |
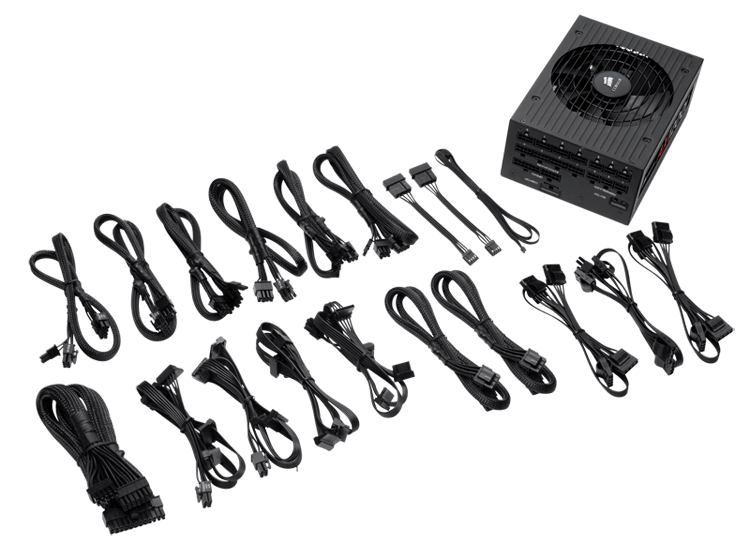
| Power Supply | OCZ 1250W Gold ZX Series Corsair AX1200i Platinum PSU |
| Memory | Corsair DDR4-2133 C15 4x8 GB 1.2V or G.Skill Ripjaws 4 DDR4-2133 C15 4x8 GB 1.2V |
| Memory Settings | JEDEC @ 2133 |
| Video Cards | ASUS GTX 980 Strix 4GB MSI GTX 770 Lightning 2GB (1150/1202 Boost) ASUS R7 240 2GB |
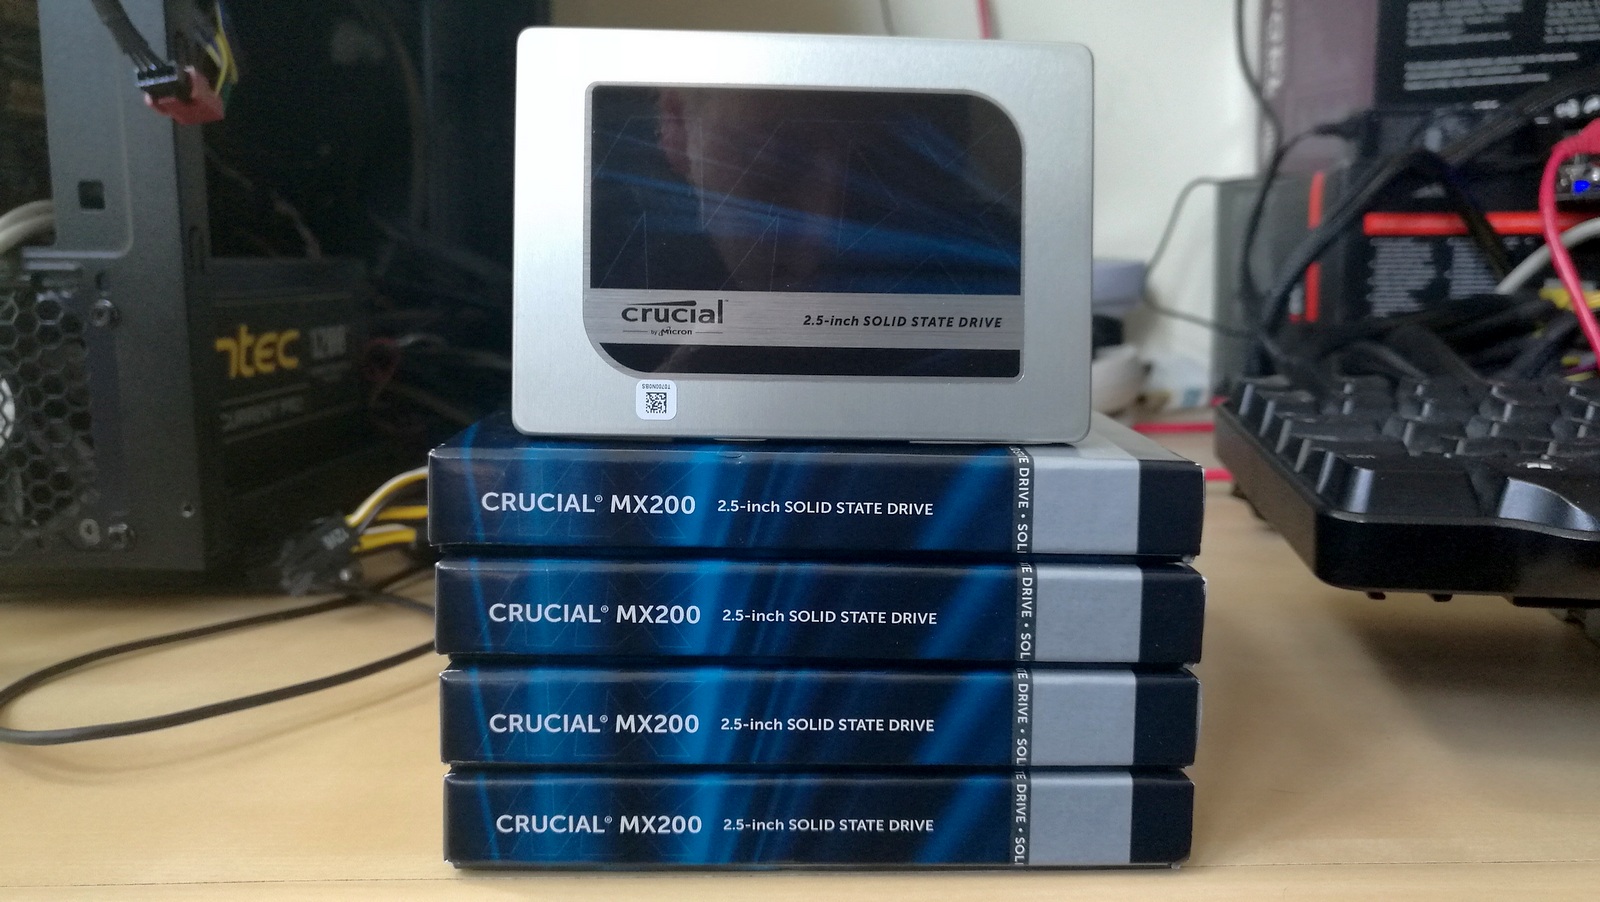
| Hard Drive | Crucial MX200 1TB |
| Optical Drive | LG GH22NS50 |
| Case | Open Test Bed |
| Operating System | Windows 7 64-bit SP1 |
Readers of our motherboard review section will have noted the trend in modern motherboards to implement a form of MultiCore Enhancement / Acceleration / Turbo (read our report here) on their motherboards. This does several things, including better benchmark results at stock settings (not entirely needed if overclocking is an end-user goal) at the expense of heat and temperature. It also gives an essence of an automatic overclock which may be against what the user wants. Our testing methodology is ‘out-of-the-box’, with the latest public BIOS installed and XMP enabled, and thus subject to the whims of this feature. It is ultimately up to the motherboard manufacturer to take this risk – and manufacturers taking risks in the setup is something they do on every product (think C-state settings, USB priority, DPC Latency / monitoring priority, overriding memory sub-timings at JEDEC). Processor speed change is part of that risk, and ultimately if no overclocking is planned, some motherboards will affect how fast that shiny new processor goes and can be an important factor in the system build.
For reference, the ASUS X99-E-10G WS, on our testing BIOS 0402, MCT was enabled by default. In the event that users buy a board and the BIOS is still a development version (under 0402), we suggest that users update to at least 0402, as before this we experienced sub-optimal performance on development versions before 0402.
Many thanks to...
We must thank the following companies for kindly providing hardware for our multiple test beds. Some of this hardware is not in this test bed specifically, but is used in other testing.
Thank you to AMD for providing us with the R9 290X 4GB GPUs. These are MSI branded 'Gaming' models, featuring MSI's Twin Frozr IV dual-fan cooler design and military class components. Bundled with the cards is MSI Afterburner for additional overclocking, as well as MSI's Gaming App for easy frequency tuning.
The R9 290X is a second generation GCN card from AMD, under the Hawaii XT codename, and uses their largest Sea Islands GPU die at 6.2 billion transistors at 438mm2 built at TSMC using a 28nm process. For the R9 290X, that means 2816 streaming processors with 64 ROPs using a 512-bit memory bus to GDDR5 (4GB in this case). The official power rating for the R9 290X is 250W.
The MSI R9 290X Gaming 4G runs the core at 1000 MHz to 1040 MHz depending on what mode it is in (Silent, Gaming or OC), and the memory at 5 GHz. Displays supported include one DisplayPort, one HDMI 1.4a, and two dual-link DVI-D connectors.
Further Reading: AnandTech's AMD R9 290X Review

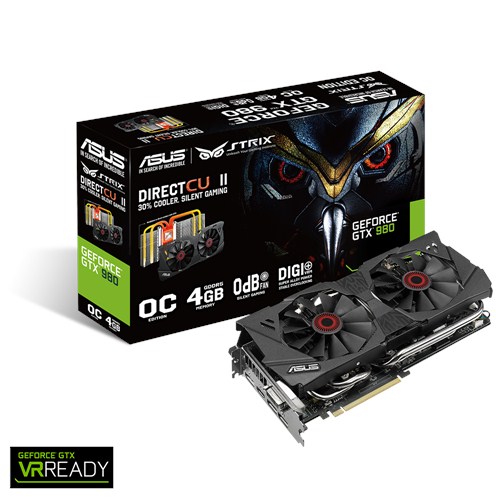
Thank you to ASUS for providing us with GTX 980 Strix GPUs. At the time of release, the STRIX brand from ASUS was aimed at silent running, or to use the marketing term: '0dB Silent Gaming'. This enables the card to disable the fans when the GPU is dealing with low loads well within temperature specifications. These cards equip the GTX 980 silicon with ASUS' Direct CU II cooler and 10-phase digital VRMs, aimed at high-efficiency conversion. Along with the card, ASUS bundles GPU Tweak software for overclocking and streaming assistance.
The GTX 980 uses NVIDIA's GM204 silicon die, built upon their Maxwell architecture. This die is 5.2 billion transistors for a die size of 298 mm2, built on TMSC's 28nm process. A GTX 980 uses the full GM204 core, with 2048 CUDA Cores and 64 ROPs with a 256-bit memory bus to GDDR5. The official power rating for the GTX 980 is 165W.
The ASUS GTX 980 Strix 4GB (or the full name of STRIX-GTX980-DC2OC-4GD5) runs a reasonable overclock over a reference GTX 980 card, with frequencies in the range of 1178-1279 MHz. The memory runs at stock, in this case 7010 MHz. Video outputs include three DisplayPort connectors, one HDMI 2.0 connector and a DVI-I.
Further Reading: AnandTech's NVIDIA GTX 980 Review
Thank you to Cooler Master for providing us with Nepton 140XL CLCs. The Nepton 140XL is Cooler Master's largest 'single' space radiator liquid cooler, and combines with dual 140mm 'JetFlo' fans designed for high performance, from 0.7-3.5mm H2O static pressure. The pump is also designed to be faster, more efficient, and uses thicker pipes to assist cooling with a rated pump noise below 25 dBA. The Nepton 140XL comes with mounting support for all major sockets, as far back as FM1, AM2 and 775.
Further Reading: AnandTech's Cooler Master Nepton 140XL Review
Thank you to Corsair for providing us with an AX1200i PSU. The AX1200i was the first power supply to offer digital control and management via Corsair's Link system, but under the hood it commands a 1200W rating at 50C with 80 PLUS Platinum certification. This allows for a minimum 89-92% efficiency at 115V and 90-94% at 230V. The AX1200i is completely modular, running the larger 200mm design, with a dual ball bearing 140mm fan to assist high-performance use. The AX1200i is designed to be a workhorse, with up to 8 PCIe connectors for suitable four-way GPU setups. The AX1200i also comes with a Zero RPM mode for the fan, which due to the design allows the fan to be switched off when the power supply is under 30% load.
Further Reading: AnandTech's Corsair AX1500i Power Supply Review
Thank you to Crucial for providing us with MX200 SSDs. Crucial stepped up to the plate as our benchmark list grows larger with newer benchmarks and titles, and the 1TB MX200 units are strong performers. Based on Marvell's 88SS9189 controller and using Micron's 16nm 128Gbit MLC flash, these are 7mm high, 2.5-inch drives rated for 100K random read IOPs and 555/500 MB/s sequential read and write speeds. The 1TB models we are using here support TCG Opal 2.0 and IEEE-1667 (eDrive) encryption and have a 320TB rated endurance with a three-year warranty.
Further Reading: AnandTech's Crucial MX200 (250 GB, 500 GB & 1TB) Review
Thank you to G.Skill for providing us with memory. G.Skill has been a long-time supporter of AnandTech over the years, for testing beyond our CPU and motherboard memory reviews. We've reported on their high capacity and high-frequency kits, and every year at Computex G.Skill holds a world overclocking tournament with liquid nitrogen right on the show floor. One of the most recent deliveries from G.Skill was their 4x16 GB DDR4-3200 C14 Kit, which we are planning for an upcoming review.
Further Reading: AnandTech's Memory Scaling on Haswell Review, with G.Skill DDR3-3000
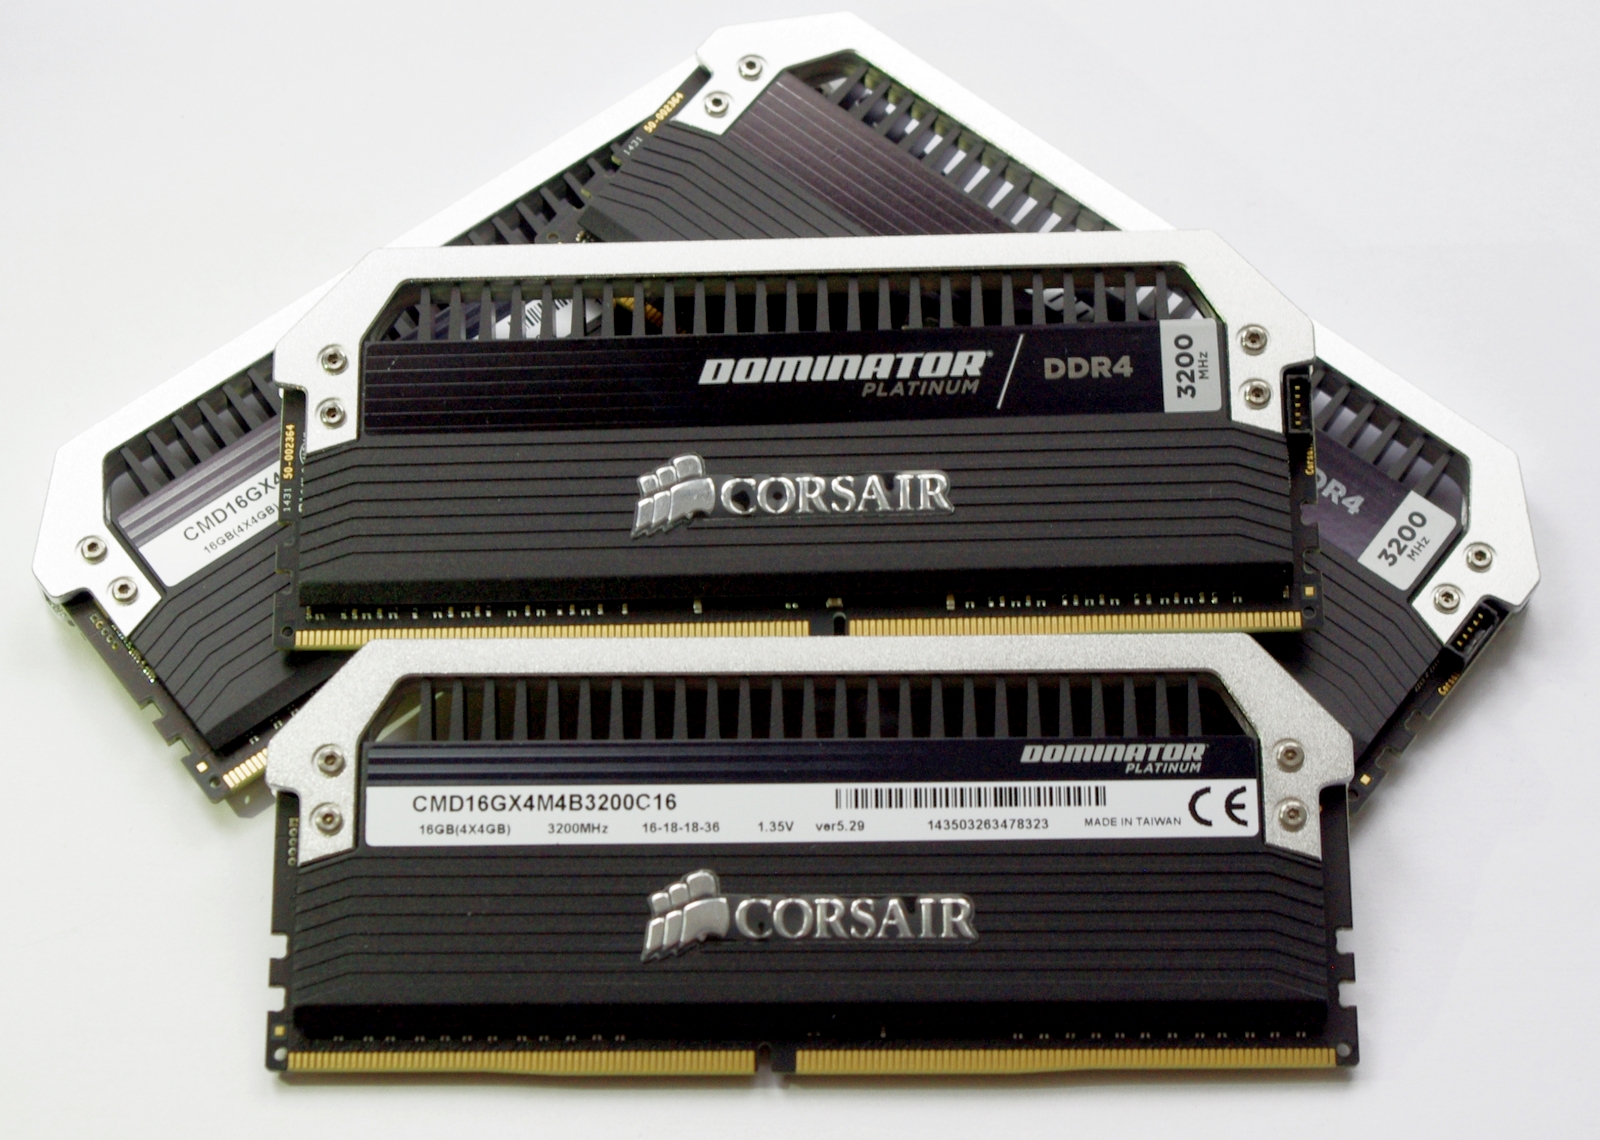
Thank you to Corsair for providing us with memory. Similarly, Corsair (along with PSUs) is also a long-time supporter of AnandTech. Being one of the first vendors with 16GB modules for DDR4 was a big deal, and now Corsair is re-implementing LEDs back on its memory after a long hiatus along with supporting specific projects such as ASUS ROG versions of the Dominator Platinum range. We're currently looking at our review pipeline to see when our next DRAM round-up will be, and Corsair is poised to participate.
Further Reading: AnandTech's Memory Scaling on Haswell-E Review
Benchmark Overview
For our testing, depending on the product, we attempt to tailor the presentation of our global benchmark suite down into what users who would buy this hardware might actually want to run. For CPUs, our full test suite is typically used to gather data and all the results are placed into Bench, our benchmark database for users that want to look at non-typical benchmarks or legacy data. For motherboards we run our short form CPU tests, the gaming tests with half the GPUs of our processor suite, and our system benchmark tests which focus on non-typical and non-obvious performance metrics that are the focal point for specific groups of users.
The benchmarks fall into several areas:
Short Form CPU
Our short form testing script uses a straight run through of a mixture of known apps or workloads, and requires about four hours. These are typically the CPU tests we run in our motherboard suite, to identify any performance anomalies.
| CPU Short Form Benchmarks | ||
| Three Dimensional Particle Movement (3DPM) | v1 | 3DPM is a self-penned benchmark, derived from my academic research years looking at particle movement parallelism. The coding for this tool was rough, but emulates the real world in being non-CompSci trained code for a scientific endeavor. The code is unoptimized, but the test uses OpenMP to move particles around a field using one of six 3D movement algorithms in turn, each of which is found in the academic literature. This test is performed in single thread and multithreaded workloads, and uses purely floating point numbers. The code was written in Visual Studio 2008 in Release mode with all optimizations (including fast math and -Ox) enabled. We take the average of six runs in each instance. |
| v2 | The second version of this benchmark is similar to the first, however it has been re-written in VS2012 with one major difference: the code has been written to address the issue of false sharing. If data required by multiple threads, say four, is in the same cache line, the software cannot read the cache line once and split the data to each thread - instead it will read four times in a serial fashion. The new software splits the data to new cache lines so reads can be parallelized and stalls minimized. As v2 is fairly new, we are still gathering data and results are currently limited. |
|
| WinRAR 5.01 | WinRAR is a compression based software to reduce file size at the expense of CPU cycles. We use the version that has been a stable part of our benchmark database through 2015, and run the default settings on a 1.52GB directory containing over 2800 files representing a small website with around thirty half-minute videos. We take the average of several runs in this instance. | |
| POV-Ray 3.7 beta | POV-Ray is a common ray-tracing tool used to generate realistic looking scenes. We've used POV-Ray in its various guises over the years as a good benchmark for performance, as well as a tool on the march to ray-tracing limited immersive environments. We use the built-in multithreaded benchmark. | |
| HandBrake | HandBrake is a freeware video conversion tool. We use the tool in to process two different videos - first a 'low quality' two hour video at 640x388 resolution to x264, then a 'high quality' ten minute video at 4320x3840. The low quality video scales at lower performance hardware, whereas the buffers required for high-quality can stretch even the biggest processors. At current, this is a CPU only test. | |
| 7-Zip | 7-Zip is a freeware compression/decompression tool that is widely deployed across the world. We run the included benchmark tool using a 50MB library and take the average of a set of fixed-time results. | |
System Benchmarks
Our system benchmarks are designed to probe motherboard controller performance, particularly any additional USB controllers or the audio controller. As general platform tests we have DPC Latency measurements and system boot time, which can be difficult to optimize for on the board design and manufacturing level.
Gaming
Our Gaming test suite is still our 2015 implementation, which remains fairly solid over gaming title updates. We are still working on a 2017 suite update, with a move to Windows 10. This will allow most of the titles to be replaced with DirectX 12, indie and eSports games.
| Gaming Benchmarks | |
| Alien: Isolation | If first person survival mixed with horror is your sort of thing, then Alien: Isolation, based off of the Alien franchise, should be an interesting title. Developed by The Creative Assembly and released in October 2014, Alien: Isolation has won numerous awards from Game Of The Year to several top 10s/25s and Best Horror titles, ratcheting up over a million sales by February 2015. Alien: Isolation uses a custom built engine which includes dynamic sound effects and should be fully multi-core enabled. |
| Total War: Attila | The Total War franchise moves on to Attila, another The Creative Assembly development, and is a stand-alone strategy title set in 395AD where the main story line lets the gamer take control of the leader of the Huns in order to conquer parts of the world. Graphically the game can render hundreds/thousands of units on screen at once, all with their individual actions and can put some of the big cards to task. |
| Grand Theft Auto V | The highly anticipated iteration of the Grand Theft Auto franchise finally hit the shelves on April 14th 2015, with both AMD and NVIDIA in tow to help optimize the title. GTA doesn’t provide graphical presets, but opens up the options to users and extends the boundaries by pushing even the hardest systems to the limit using Rockstar’s Advanced Game Engine. Whether the user is flying high in the mountains with long draw distances or dealing with assorted trash in the city, when cranked up to maximum it creates stunning visuals but hard work for both the CPU and the GPU. |
| GRID: Autosport | No graphics tests are complete without some input from Codemasters and the EGO engine, which means for this round of testing we point towards GRID: Autosport, the next iteration in the GRID and racing genre. As with our previous racing testing, each update to the engine aims to add in effects, reflections, detail and realism, with Codemasters making ‘authenticity’ a main focal point for this version. |
| Middle-Earth: Shadow of Mordor | The final title in our testing is another battle of system performance with the open world action-adventure title, Shadow of Mordor. Produced by Monolith using the LithTech Jupiter EX engine and numerous detail add-ons, SoM goes for detail and complexity to a large extent, despite having to be cut down from the original plans. The main story itself was written by the same writer as Red Dead Redemption, and it received Zero Punctuation’s Game of The Year in 2014. |
ASUS X99-E-10G WS BIOS
Part of this BIOS overview mirrors that of our ASUS X99-A review and recent 100-series reviews due to the extreme similarity in options, aesthetics and features.
The ASUS BIOS for X99 is on parity with Z170, given the unified nature of the brand message. The main difference will be catering for the X99 specific features, such as eight DIMMs and the dual AHCI controllers in the chipset. While I would assume that very few users are upgrading from Z170 to X99, those that coming from the 9-series or 8-series motherboards should feel at home as the ASUS BIOS at this stage is a continual evolution, rather than jumping from one interface to another. Users coming from the latest X79 builds will notice a slight change towards something more user friendly. First screen up is the EZ mode:
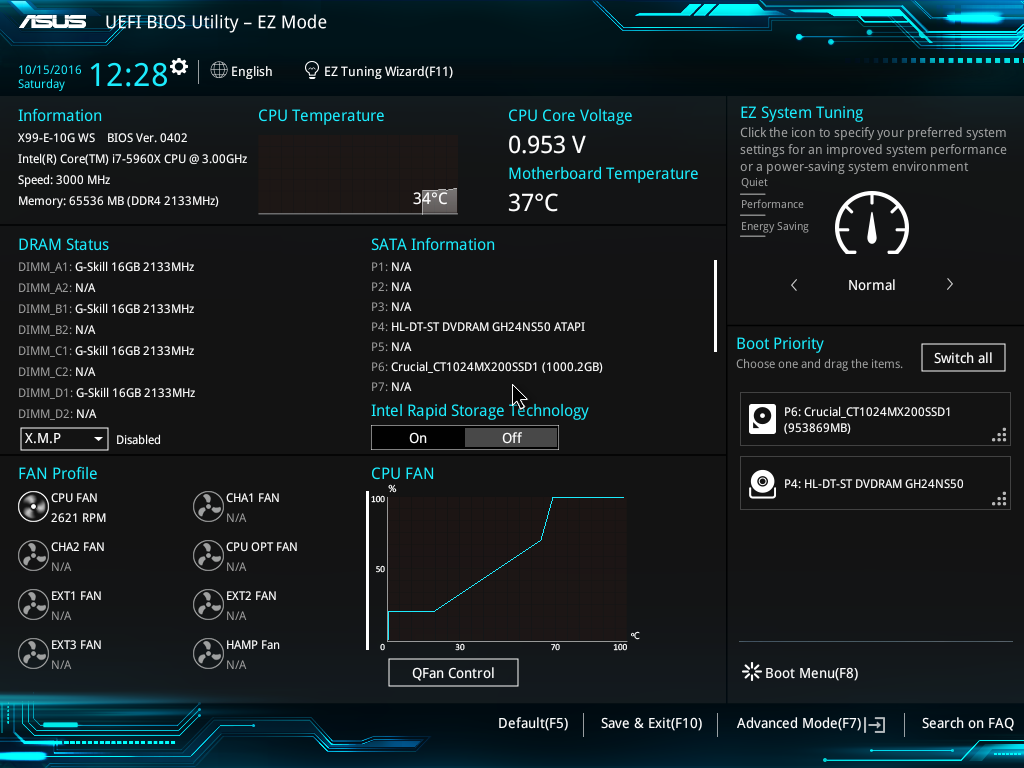
Due to the increased info placed in this first screen, the font size has been reduced slightly, especially when detailing all the DRAM and SATA slots ports that are connected. In this front screen we are told the name of the motherboard, the CPU used, the speed of the CPU, where the DRAM is populated and how much, only with the speed and options for XMP. The CPU and motherboard temperatures are here, with the CPU getting a graph in real time showing how the temperature changes. Voltages and fan speeds are here as well, with a point-to-point graph showing the fan profile of the CPU fan. On the right hand size is an EZ System Tuning icon for performance or energy saving modes as well as a Boot Priority list. On the top of the screen is an option for the EZ Tuning Wizard.
For the fan profiles, selecting QFan Control allows the user to adjust the three point fan gradient:
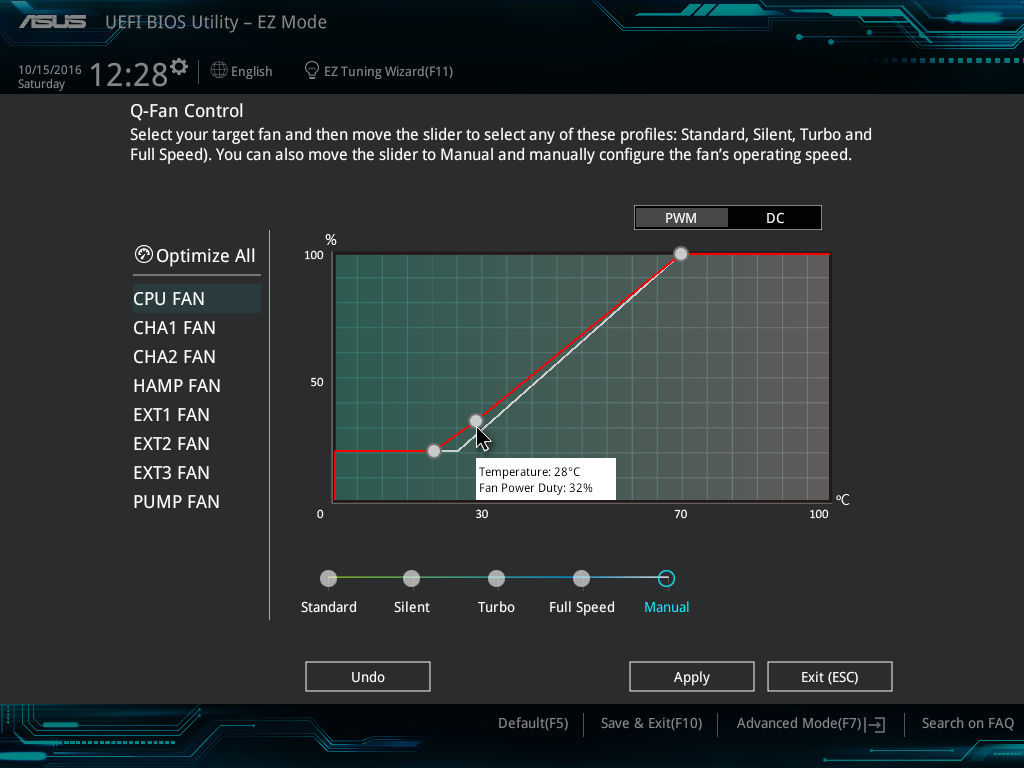
Each of the fan headers can be controlled by in either DC or PWM mode, with several presets at the bottom and a choice of fan headers on the right. This is ASUS’ most interactive BIOS fan control system within a BIOS to date, however I would suggest a an add-ons: text showing the current fan speed of the fan selected along with the temperature associated with that fan. There is an optimize all feature, which does per-fan testing to find the right fan profiles for each.
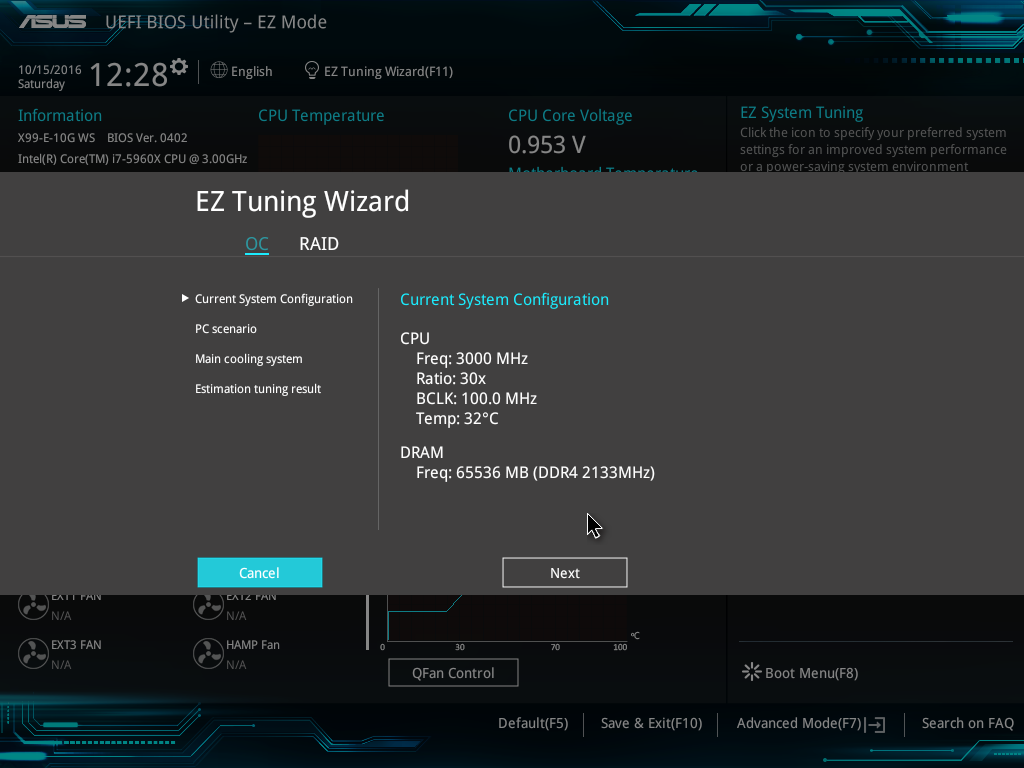
The EZ Tuning Wizard at the top is the new auto tuning mechanism in the BIOS to apply overclocks. As with other ASUS chipsets, this system detects the current outlay, asks what cooling is being used and what the system is for, and then goes back into its internal database to suggest an overclock. This overclock can then be applied automatically:
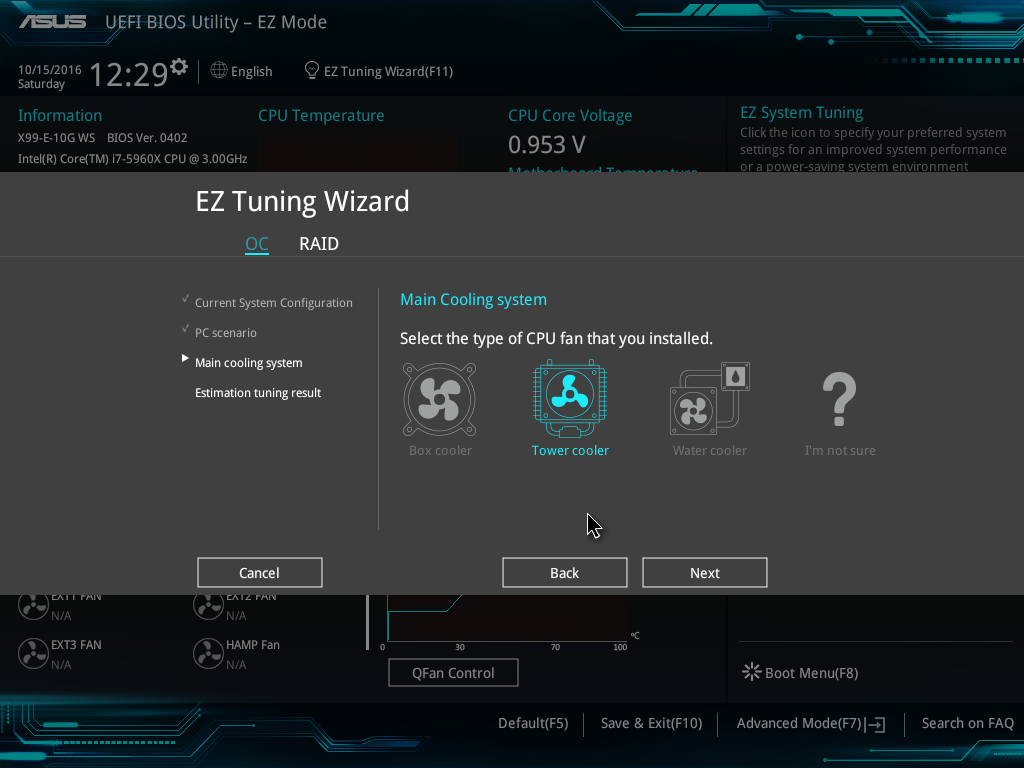
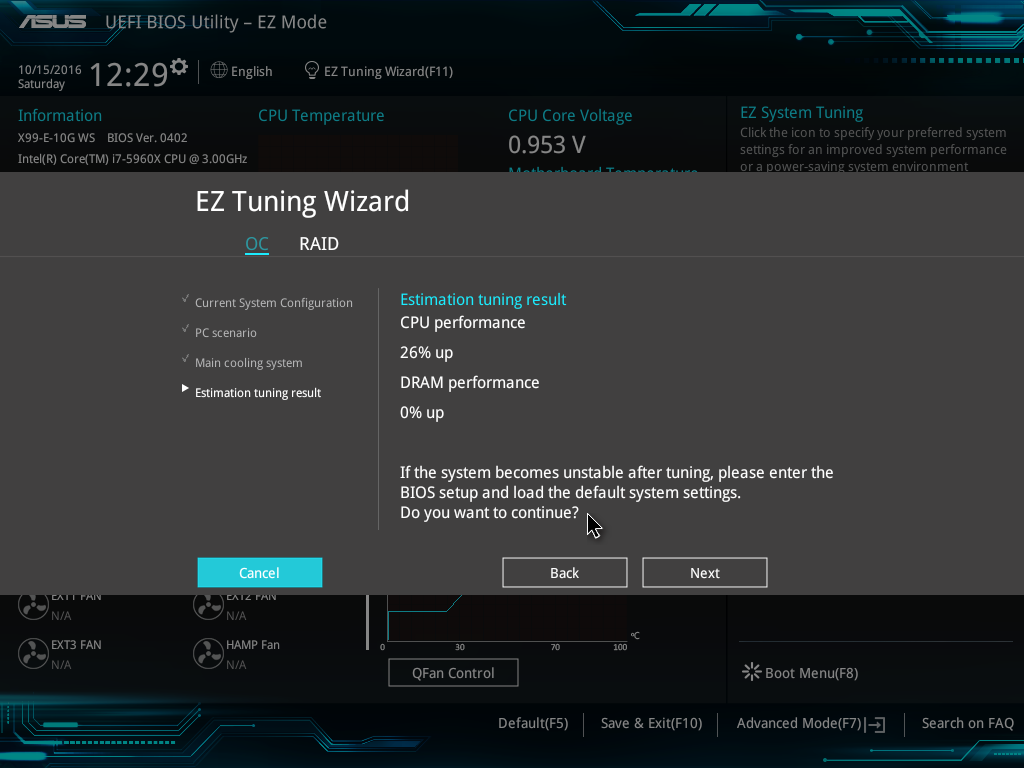
So here the system is suggesting a 26% overclock, from 3.0 GHz to 3.8 GHz when I selected that I had tower cooling. The reason why the system asks about different types of intended use should come down to single core turbo modes – users interested more in day-to-day responsiveness will want a high single-core turbo, whereas gamers and media editors will want all the cores boosted to the maximum.
Alongside the EZ Mode, the ASUS BIOS offers its characteristic Advanced Mode:

Options here are a little more in-depth and clinical, although ASUS has taken on board suggestions and added both an information section at the bottom and a list of information on the right hand side telling the user what the current state is. Users jumping into X99 from very old systems might be interested in the My Favorites menu, which allows users to select certain options from the BIOS for a custom menu interface or use ASUS’ defaults for easier manual overclocking.
My Favorites is aimed more at overclockers than anything else, allowing these enthusiasts access to frequent settings while bypassing others that are present but might not make a difference in line with the overclocking skill of the individual.

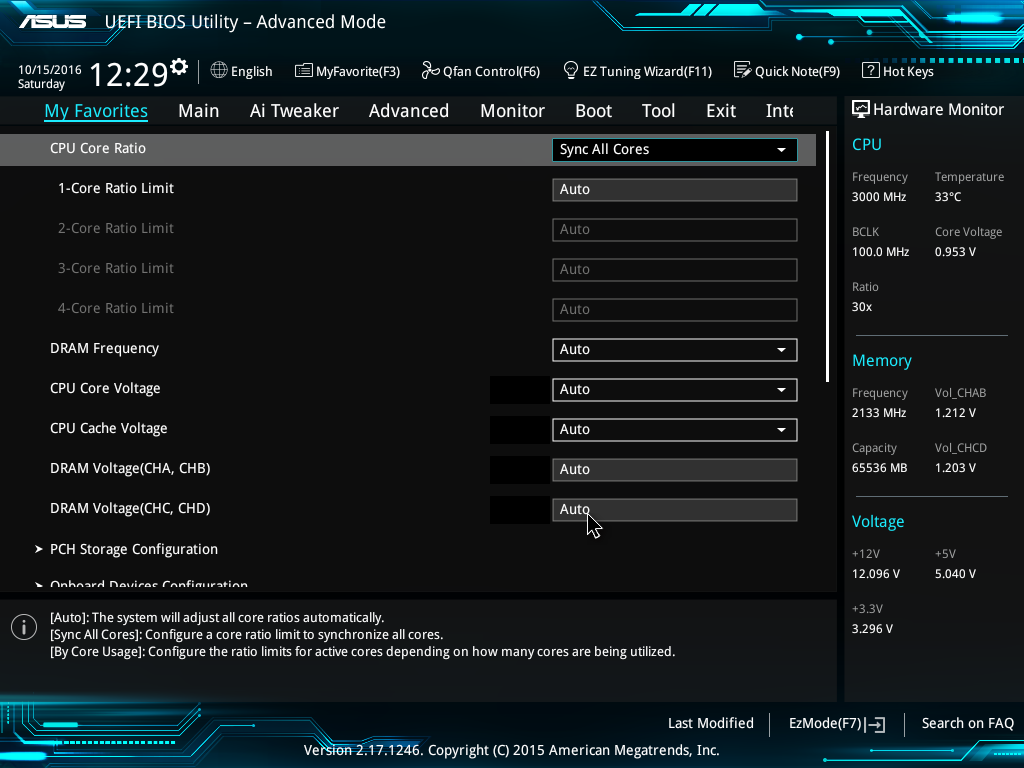
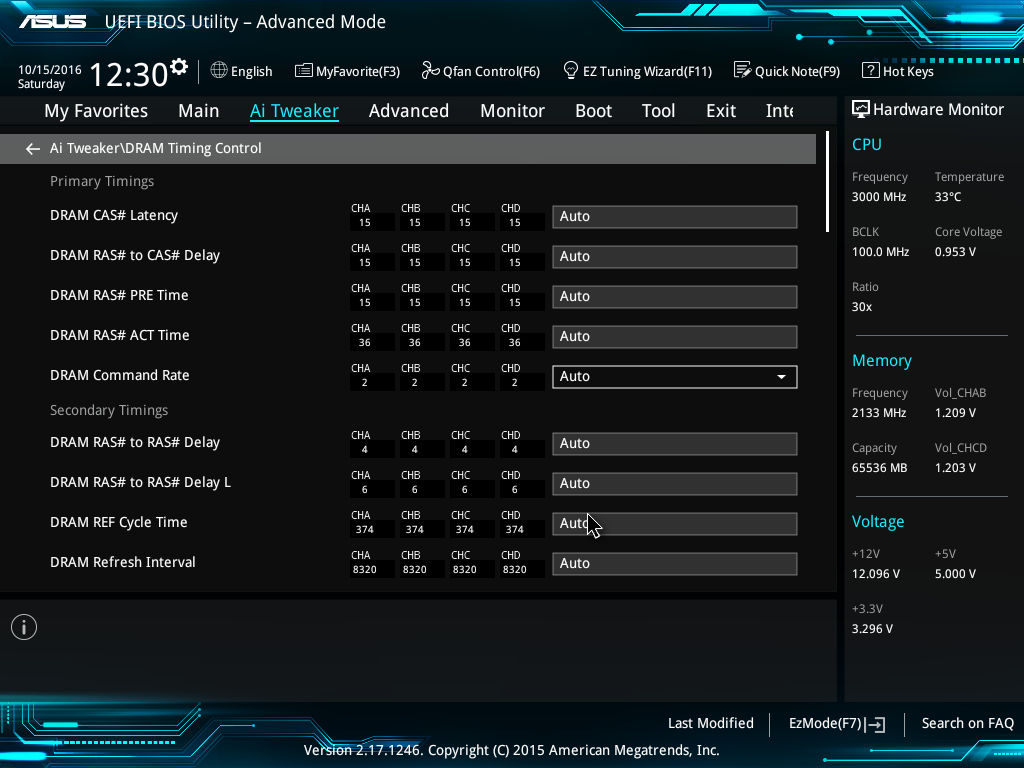
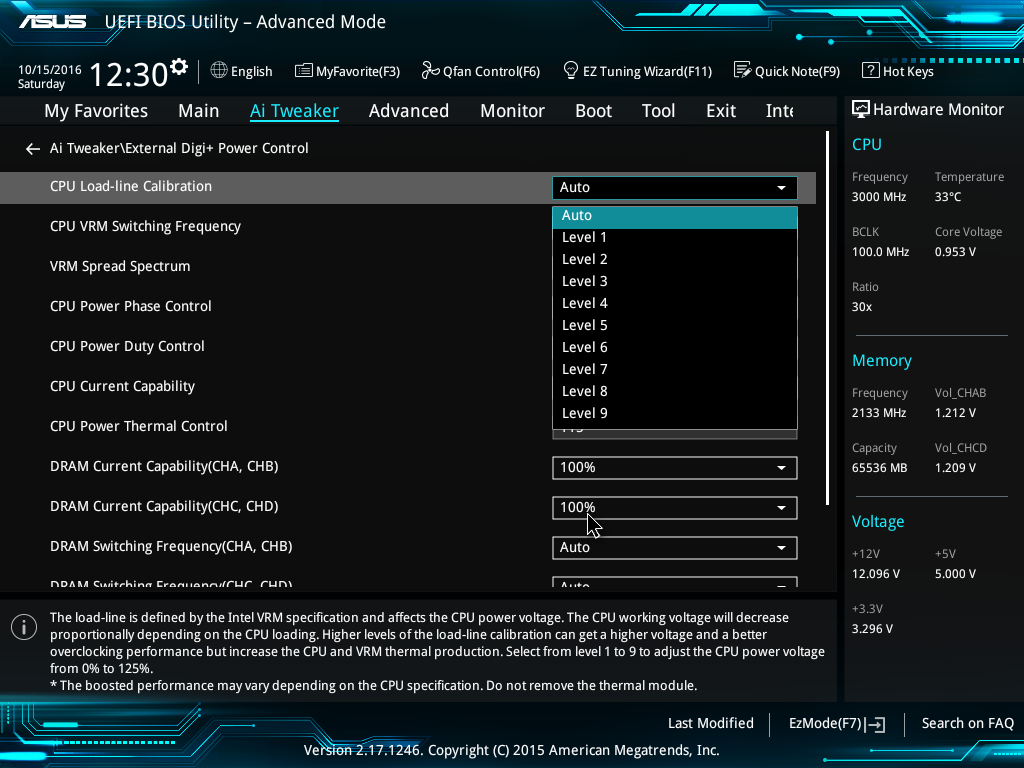
ASUS still keeps the full-fat overclocking menu on hand, giving a full set of options for CPU, DRAM, DIGI+ Power, voltages and power management.
The Advanced Menu gives the usual array of CPU, PCH and Onboard Devices set of configuration menus. A few changes from previous platforms are worth mentioning, such as individual core selection for overclockers:

Because not all cores are created equal, the new topology allows users to select specific cores for frequency records.
The onboard devices configuration menu gives the option for adjusting the bandwidth between the controllers onboard that share data paths:
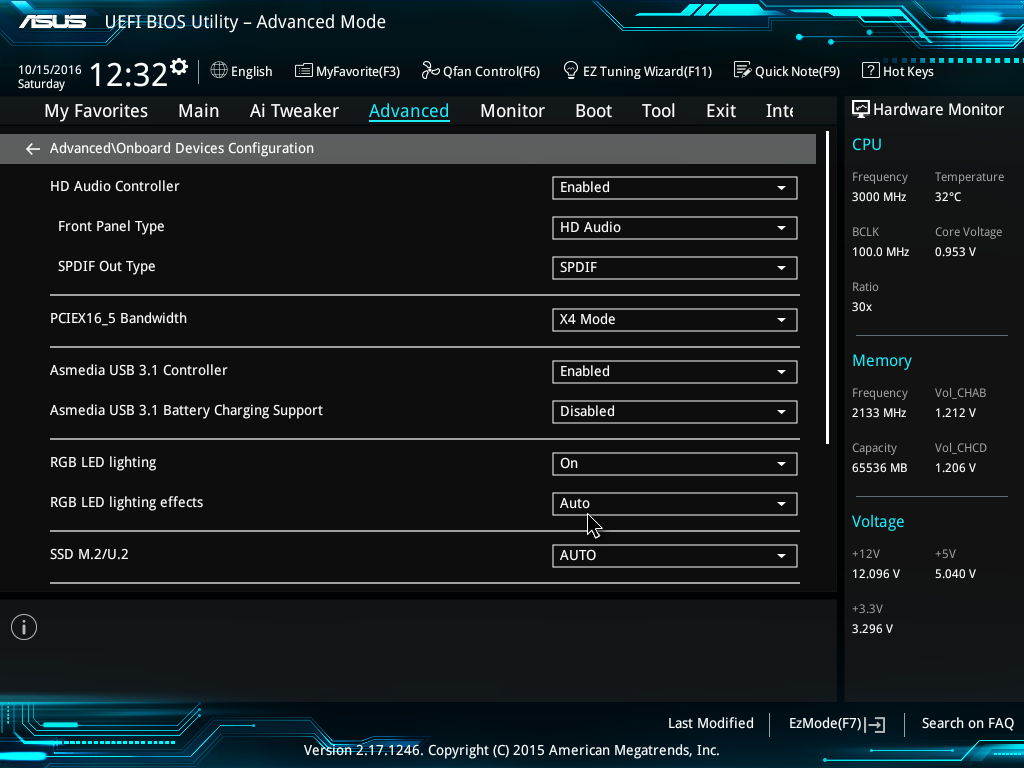
This is particularly pertinent if a user wants to manually switch between M.2 and U.2, or adjust some of the PCIe bandwidth.
The Monitor tab gives all the temperature and fan speed data, along with options for the fan headers in a less-interactive but classic implementation:
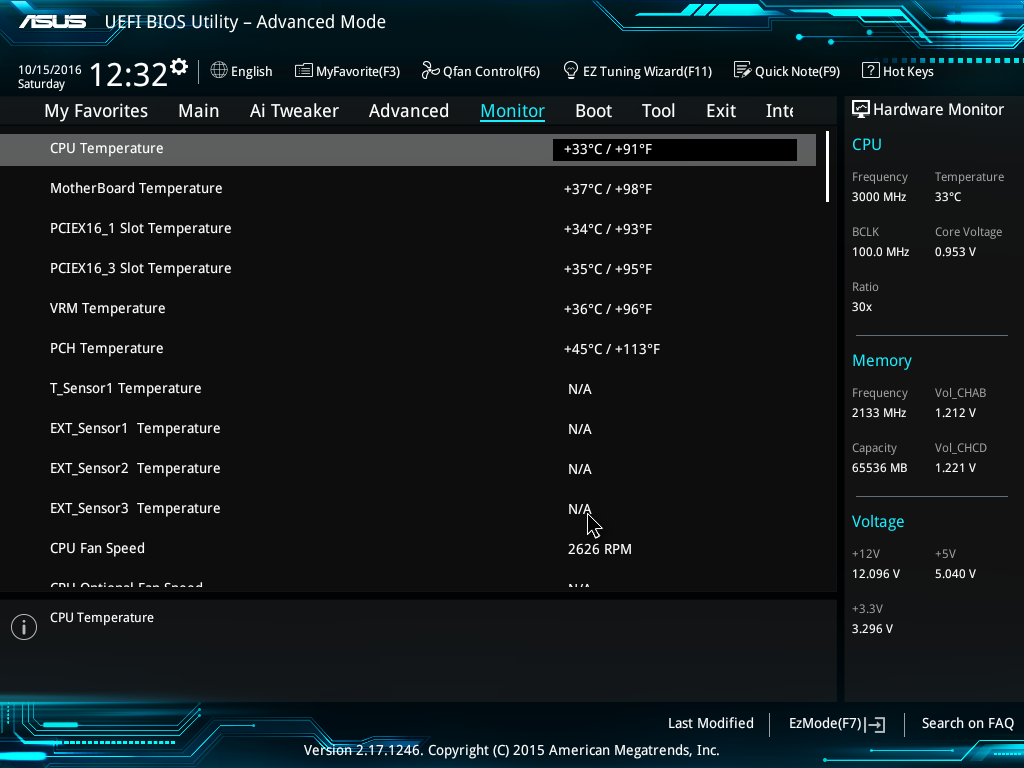
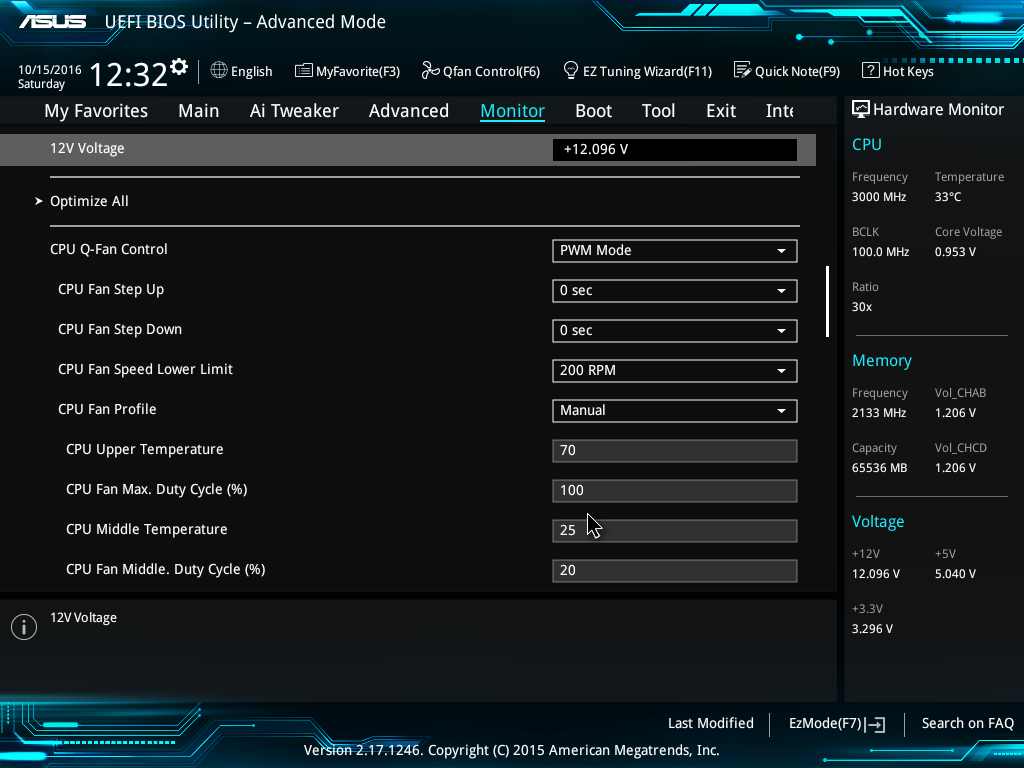
Users can select different modes for each header (PWM or DC), different preset profiles (Standard, Silent, Turbo), adjust which temperature sensor is relevant or adjust a two point gradient manually. The QFan Tuning option provides insight into the workings of each fan by detecting the low-end dead points.
The rest of the BIOS is the standard array of booting options, fast boot options, BIOS flashing tools, OC profiles and SPD information. There is one last feature to mention, the GPU Post screen:
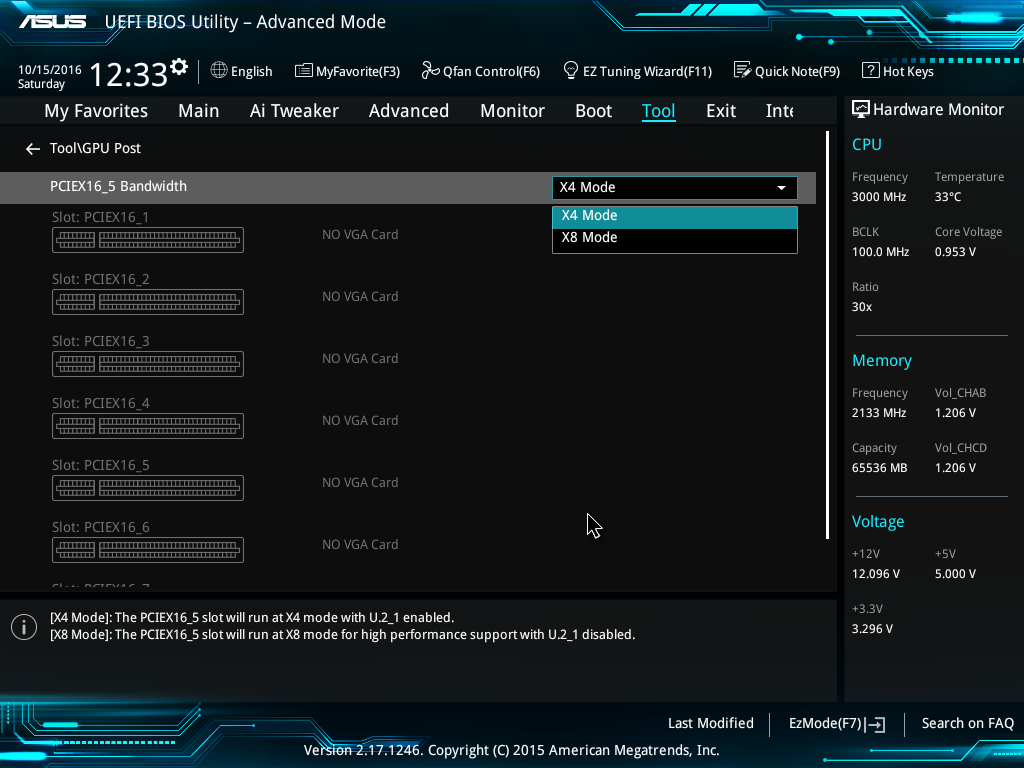
This shows each of the PCIe slots, what is installed and at what speed they are running. Interestingly on our test BIOS it didn’t detect the R7 240 graphics card.
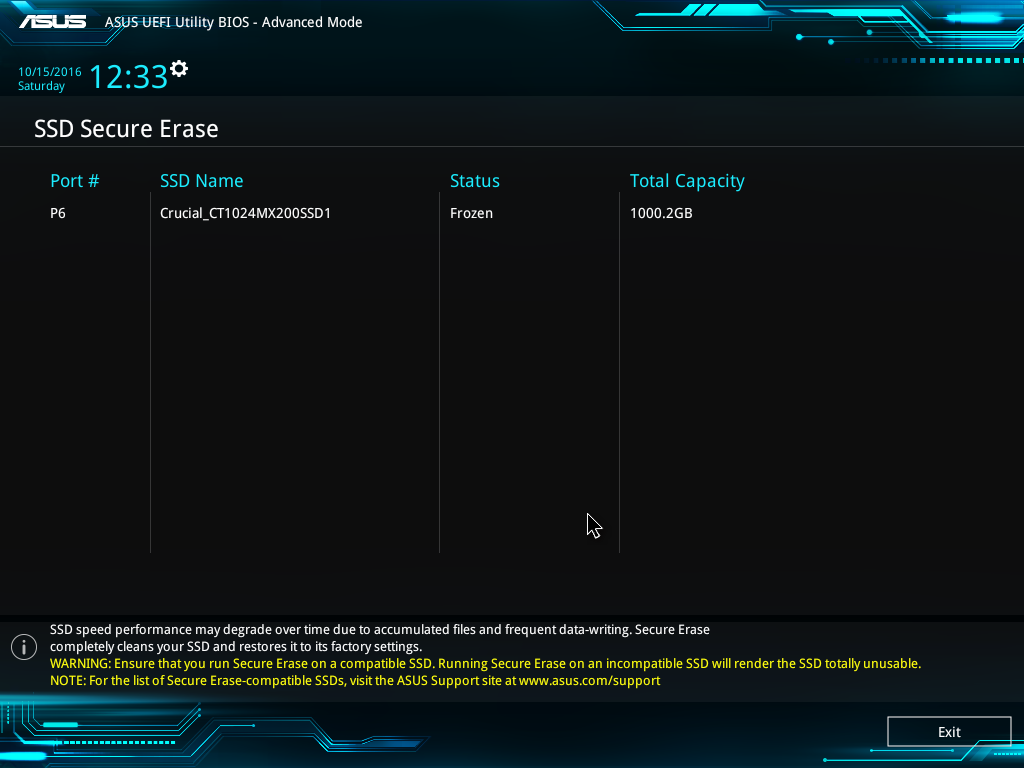
Secure Erase, to restore SSDs to their factory state, is now part of the high-end channel line, previously being an ROG exclusive feature.
There is one aspect where ASUS is lagging behind the other manufacturers, although GPU Post is part of the way there. ASRock and MSI now implement a ‘Board Explorer’ type function that shows a 2D representation of the motherboard and tells the user what is installed at each point. ASUS should think about this going forward.


ASUS X99-E-10G WS Software
Part of this Software overview mirrors that of our ASUS X99-A review and recent 100-series reviews due to the extreme similarity in options, aesthetics and features.
The software stack comes under the AI Suite 3 naming convention, where ASUS’ main play in this area comes from the Dual Intelligent Processors 5 (DIP5) interface. The dual intelligent processors part refers to the onboard EPU and TPU ICs which are an ASUS custom designed IC for monitoring and adjusting both the energy and turbo parts of the system. The 5 at the end of the name refers to both the version and the number of sub-apps within the DIP5 interface.

The five sub-apps are the TPU, Fan Xpert, DIGI+ Power Control, EPU and Turbo App. Alongside these is the 5-Way Optimization option that provides a series of settings to help users perform automatic overclocking.

The TPU part of DIP5 offers the CPU overclock settings for ratios, base frequencies, and voltages in terms of offsets and base values. The graphs showing how the voltage adjusts with the CPU ratio are nice touches as they provide direct feedback to the user based on what they are changing.
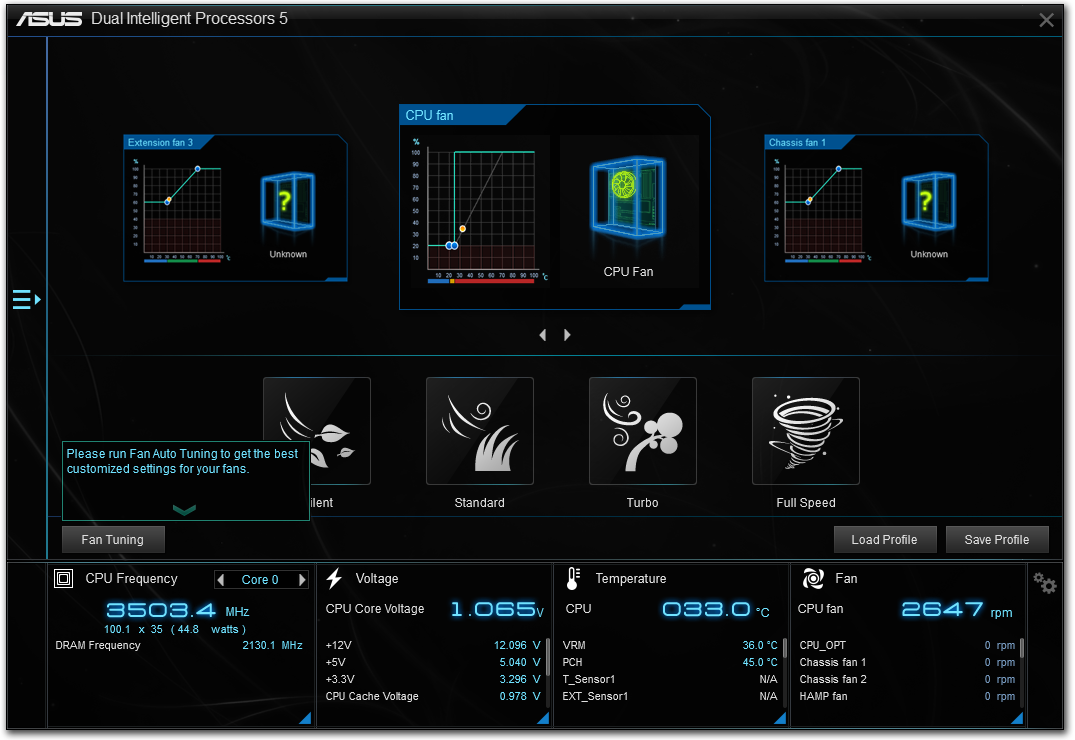
The fan settings allow users to apply a bulk fan mode to all the fans or go in and adjust them manually. The Fan Tuning button on the left provides a way for the system to analyze the characteristics of each fan attached by applying different fan power levels and measuring the RPM.

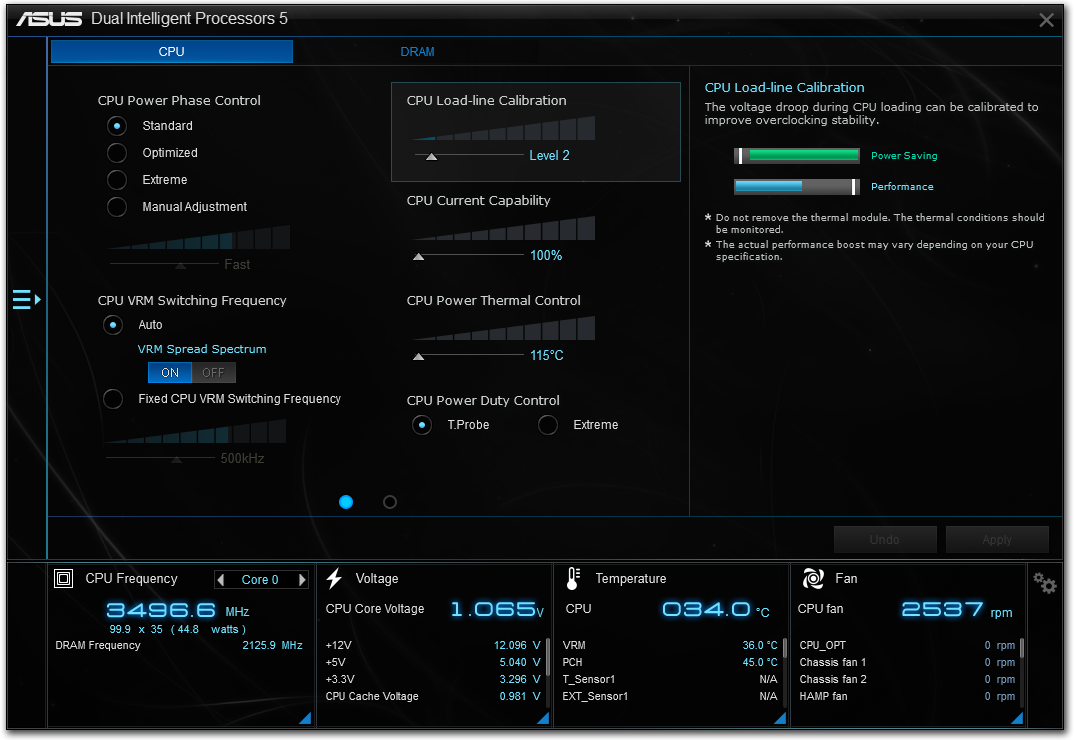
The digital power controls are for enthusiasts willing to push the system a little further. The automatic overclock options also adjust these settings slightly, giving extra CPU load-line calibration or placing the power phases into extreme performance mode. There are digital power options for both the CPU and the DRAM on hand.
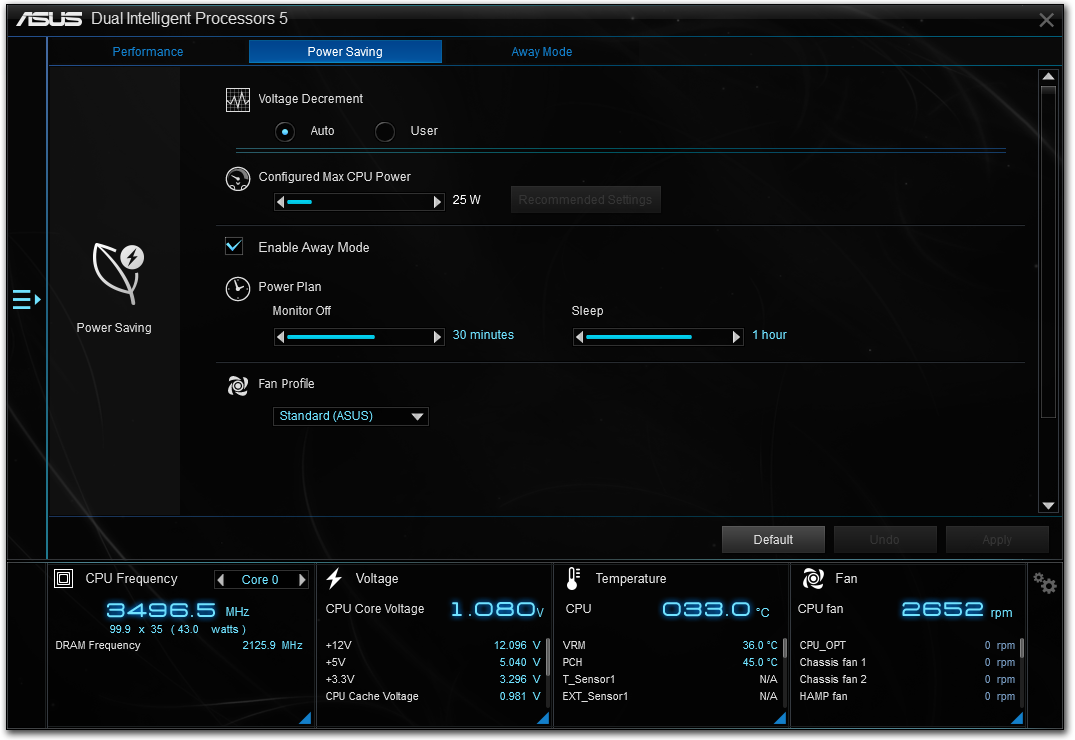
The EPU part of AI Suite allows the user to adjust what is enabled when the system is in a low power mode. This includes a target power consumption for the CPU by reducing clocks and voltage, but also by disabling fast-charging USB ports and turning down CPU fan speeds.
The final part of 5WO is Turbo App, which is the newest addition to the interface. This allows the user to adjust overclocks and settings depending on what software is currently loaded. This means for a linear workload, a user can have the fans turned down but the single thread speed high, or when a game is played we have a full-core overclock with fast fans and LAN priority for the game in question:
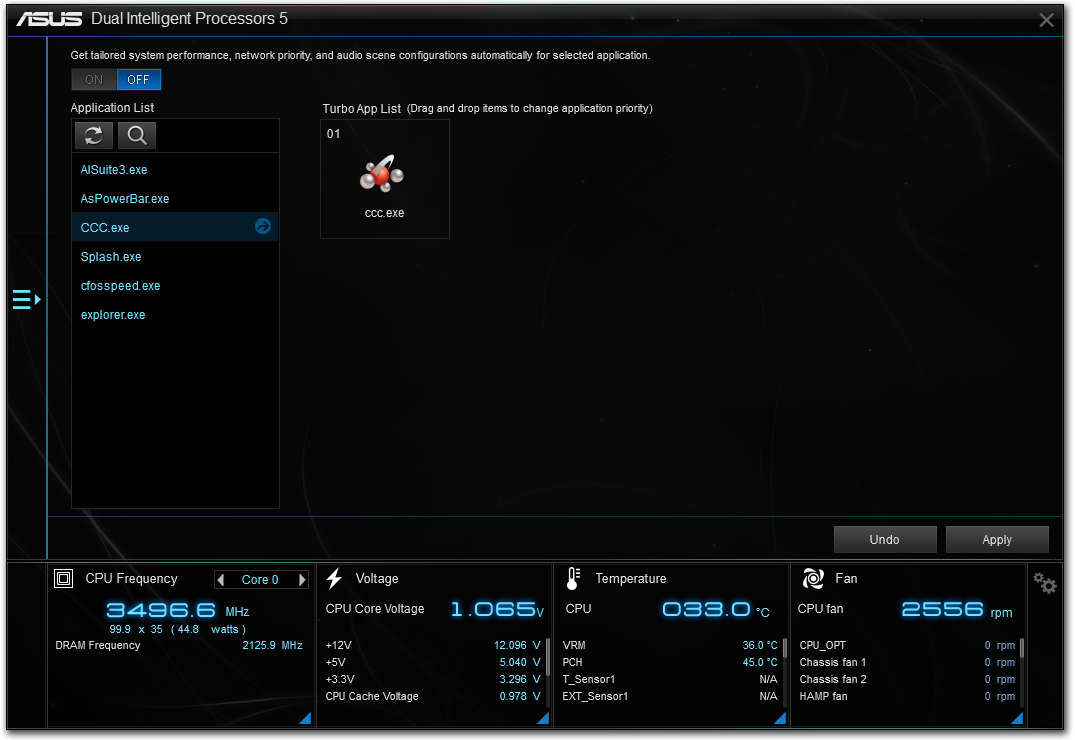
The interface allows each program to be adjusted for importance, so if two software packages are opened and both have a Turbo App profile, the settings of the more important one will take precedence.
The rest of AI Suite is similar to previous generations on the mainstream platform:
Ai Charger: Gives USB 3.0 charging to BC1.1 compliant devices.
USB 3.1 Boost: Gives a Turbo mode to compatible USB devices.
EZ Update: Online updating software, although still has issues.
System Information
USB BIOS Flashback:Arrange a USB for BIOS Flashback.
USB Charger: Allows charging from certain USB ports in sleep, hibernate or shutdown mode.
Push Notice: Synchronize a tablet or smartphone to receive notifications if system parameters (temperature, fan controls) go beyond a specified range.
One element of the software is TurboLAN, which is a reskinned version of cFos that implements software priority over the network:
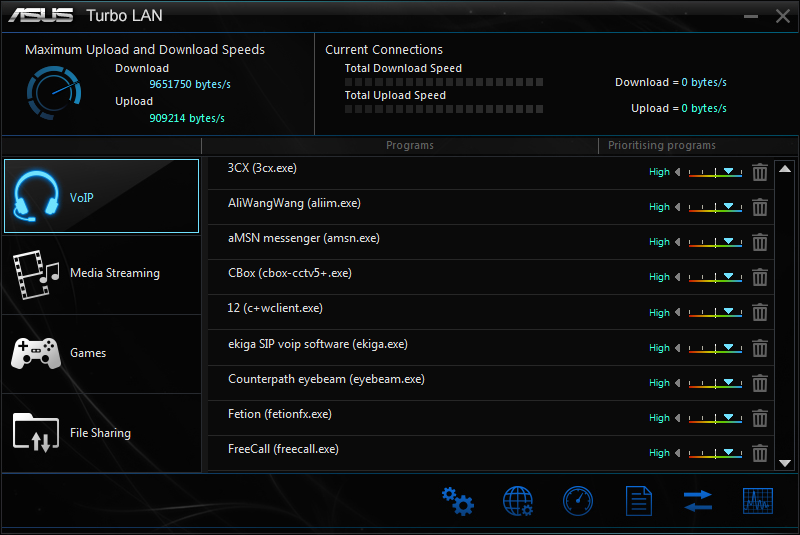
ASUS has preinstalled settings for VoIP, Media, Games or File Sharing, although users can adjust these as required.
One point I would like to request from ASUS is for the Update software to receive an update. As far as it has been part of the ASUS software ecosystem, from the UK it has only ever worked once for me. This is a system that MSI had solved a while ago, with ASRock and GIGABYTE implementing their own systems that work. ASUS is still far behind in this regard.
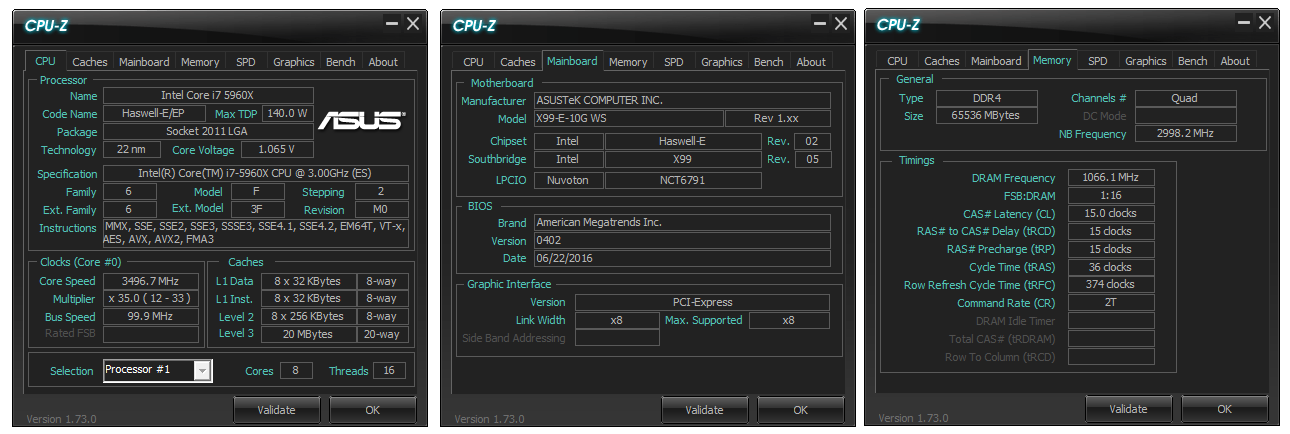
The software package also comes with CPU-Z in order to identify the system:
As well as Boot Setting to allow for easy entry into the BIOS or enabling Fast Boot modes:

 Webstorage_thumb.png)
 Boot Setting_thumb.png)
 Aura_thumb.png)
 Turbo LAN_thumb.png)
 Turbo LAN_thumb.png)
 CPUz_thumb.png)
System Performance
Not all motherboards are created equal. On the face of it, they should all perform the same and differ only in the functionality they provide - however this is not the case. The obvious pointers are power consumption, but also the ability for the manufacturer to optimize USB speed, audio quality (based on audio codec), POST time and latency. This can come down to manufacturing process and prowess, so these are tested.
Power Consumption
Power consumption was tested on the system while in a single MSI GTX 770 Lightning GPU configuration with a wall meter connected to the OCZ 1250W power supply. This power supply is Gold rated, and as I am in the UK on a 230-240 V supply, leads to ~75% efficiency > 50W, and 90%+ efficiency at 250W, suitable for both idle and multi-GPU loading. This method of power reading allows us to compare the power management of the UEFI and the board to supply components with power under load, and includes typical PSU losses due to efficiency. These are the real world values that consumers may expect from a typical system (minus the monitor) using this motherboard.
While this method for power measurement may not be ideal, and you feel these numbers are not representative due to the high wattage power supply being used (we use the same PSU to remain consistent over a series of reviews, and the fact that some boards on our test bed get tested with three or four high powered GPUs), the important point to take away is the relationship between the numbers. These boards are all under the same conditions, and thus the differences between them should be easy to spot.
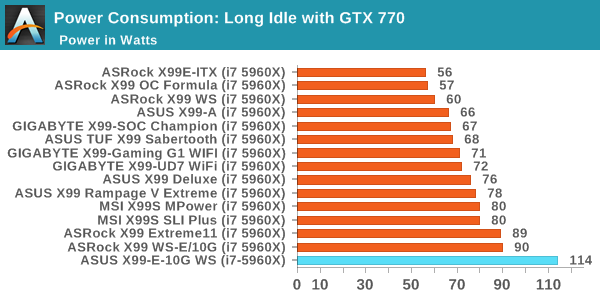
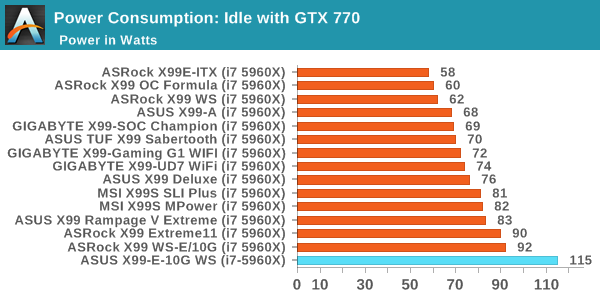
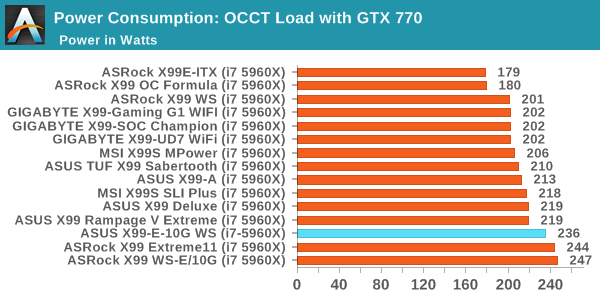
As was perhaps expected, the motherboards with the mode controllers end up drawing the most power. At idle and long idle, the X99-E-10G (at the wall) seems to consume a good portion of power, but during load the other big controller boards seem to draw more, making the CPU efficiency of the ASUS board quite good.
Non-UEFI POST Time
Different motherboards have different POST sequences before an operating system is initialized. A lot of this is dependent on the board itself, and POST boot time is determined by the controllers on board (and the sequence of how those extras are organized). As part of our testing, we look at the POST Boot Time using a stopwatch. This is the time from pressing the ON button on the computer to when Windows 7 starts loading. (We discount Windows loading as it is highly variable given Windows specific features.)
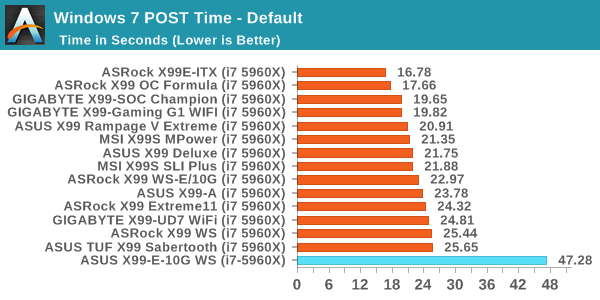

With extra controllers comes extra POST time, so moving nearer 50 seconds for a stock POST is not unexpected.
Rightmark Audio Analyzer 6.2.5
Rightmark:AA indicates how well the sound system is built and isolated from electrical interference (either internally or externally). For this test we connect the Line Out to the Line In using a short six inch 3.5mm to 3.5mm high-quality jack, turn the OS speaker volume to 100%, and run the Rightmark default test suite at 192 kHz, 24-bit. The OS is tuned to 192 kHz/24-bit input and output, and the Line-In volume is adjusted until we have the best RMAA value in the mini-pretest. We look specifically at the Dynamic Range of the audio codec used on board, as well as the Total Harmonic Distortion + Noise.
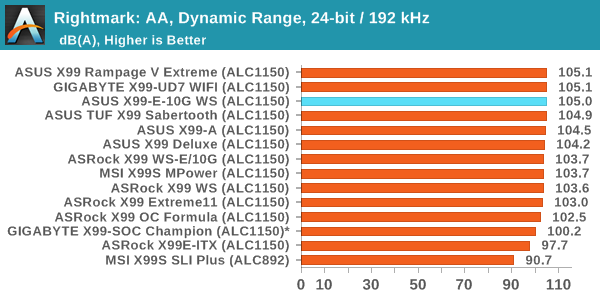
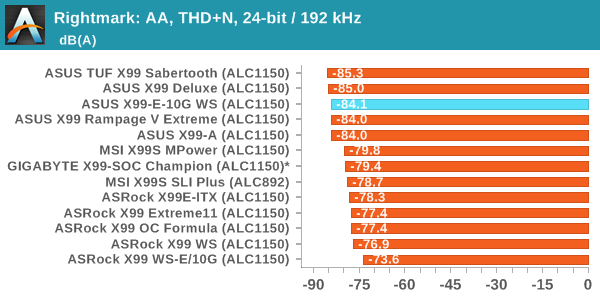
Despite audio not being a primary feature of the X99-E-10G WS, the performance (as with most ASUS boards) is in the top half of our testing and right ner the top. The fact that ASUS holds the top five spots in our X99 THD+N testing is rather impressive.
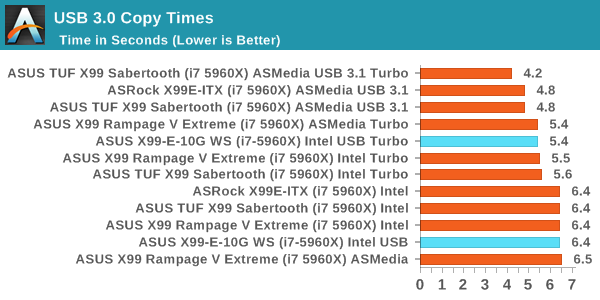
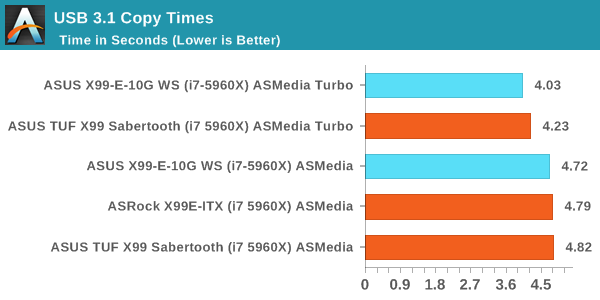
USB Backup
For this benchmark, we transfer a set size of files from the SSD to the USB drive using DiskBench, which monitors the time taken to transfer. The files transferred are a 1.52 GB set of 2867 files across 320 folders – 95% of these files are small typical website files, and the rest (90% of the size) are small 30 second HD videos. In an update to pre-Z87 testing, we also run MaxCPU to load up one of the threads during the test which improves general performance up to 15% by causing all the internal pathways to run at full speed.
Due to the introduction of USB 3.1, as of June 2015 we are adjusting our test to use a dual mSATA USB 3.1 Type-C device which should be capable of saturating both USB 3.0 and USB 3.1 connections. We still use the same data set as before, but now use the new device. Results are shown as seconds taken to complete the data transfer.
DPC Latency
Deferred Procedure Call latency is a way in which Windows handles interrupt servicing. In order to wait for a processor to acknowledge the request, the system will queue all interrupt requests by priority. Critical interrupts will be handled as soon as possible, whereas lesser priority requests such as audio will be further down the line. If the audio device requires data, it will have to wait until the request is processed before the buffer is filled.
If the device drivers of higher priority components in a system are poorly implemented, this can cause delays in request scheduling and process time. This can lead to an empty audio buffer and characteristic audible pauses, pops and clicks. The DPC latency checker measures how much time is taken processing DPCs from driver invocation. The lower the value will result in better audio transfer at smaller buffer sizes. Results are measured in microseconds.
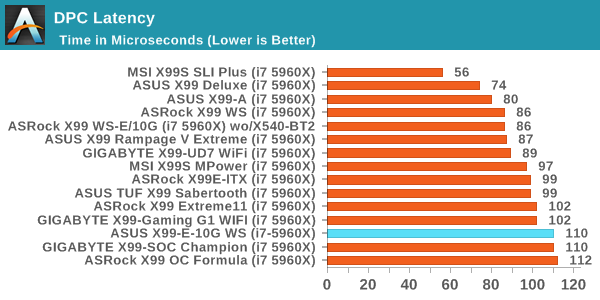
While a result of 110 is not the best X99 result, given the recent set of 250 microsecond results we've been seeing on the 100-series board, anything below that is pretty good.
CPU Performance, Short Form
For our motherboard reviews, we use our short form testing method. These tests usually focus on if a motherboard is using MultiCore Turbo (the feature used to have maximum turbo on at all times, giving a frequency advantage), or if there are slight gains to be had from tweaking the firmware. We leave the BIOS settings at default and memory at JEDEC (DDR4-2133 C15) for these tests, making it very easy to see which motherboards have MCT enabled by default.
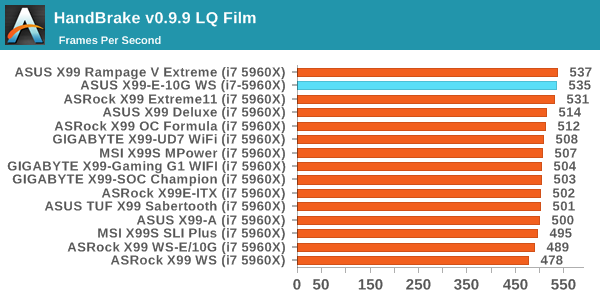
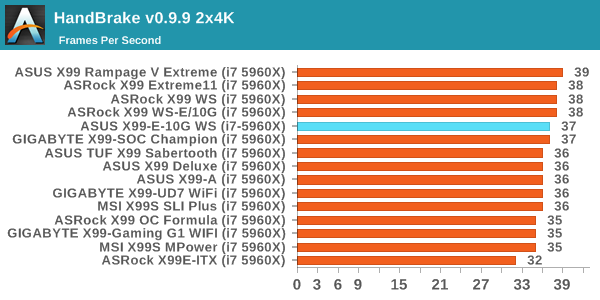
Video Conversion – Handbrake v0.9.9: link
Handbrake is a media conversion tool that was initially designed to help DVD ISOs and Video CDs into more common video formats. For HandBrake, we take two videos (a 2h20 640x266 DVD rip and a 10min double UHD 3840x4320 animation short) and convert them to x264 format in an MP4 container. Results are given in terms of the frames per second processed, and HandBrake uses as many threads as possible.
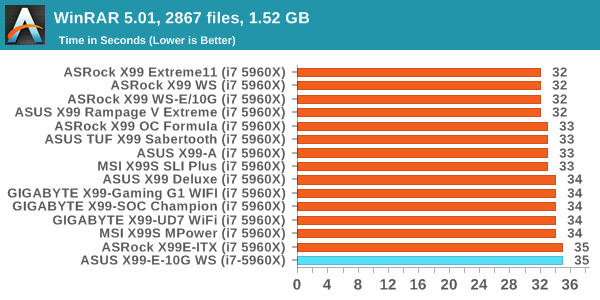
Compression – WinRAR 5.0.1: link
Our WinRAR test from 2013 is updated to the latest version of WinRAR at the start of 2014. We compress a set of 2867 files across 320 folders totaling 1.52 GB in size – 95% of these files are small typical website files, and the rest (90% of the size) are small 30 second 720p videos.
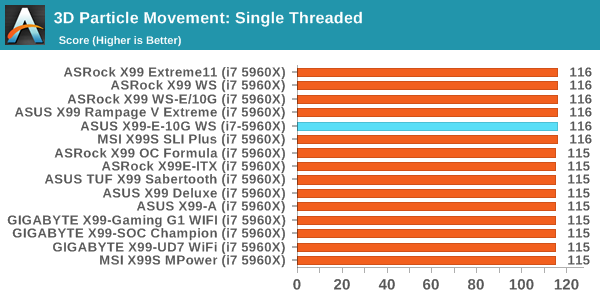
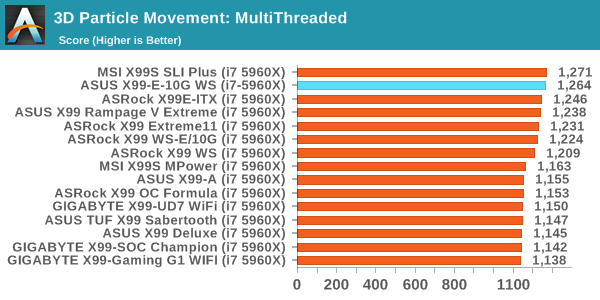
Point Calculations – 3D Movement Algorithm Test: link
3DPM is a self-penned benchmark, taking basic 3D movement algorithms used in Brownian Motion simulations and testing them for speed. High floating point performance, MHz and IPC wins in the single thread version, whereas the multithread version has to handle the threads and loves more cores. For a brief explanation of the platform agnostic coding behind this benchmark, see my forum post here.
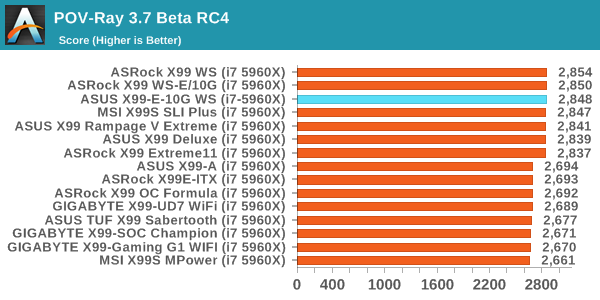
Rendering – POV-Ray 3.7: link
The Persistence of Vision Ray Tracer, or POV-Ray, is a freeware package for as the name suggests, ray tracing. It is a pure renderer, rather than modeling software, but the latest beta version contains a handy benchmark for stressing all processing threads on a platform. We have been using this test in motherboard reviews to test memory stability at various CPU speeds to good effect – if it passes the test, the IMC in the CPU is stable for a given CPU speed. As a CPU test, it runs for approximately 2-3 minutes on high end platforms.
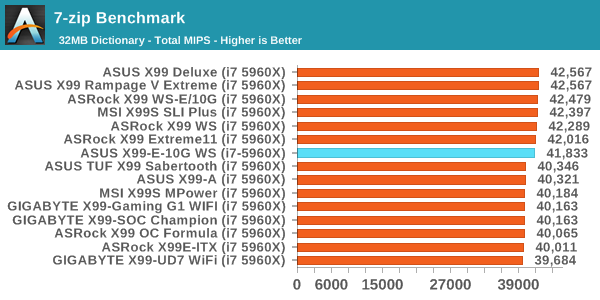
Synthetic – 7-Zip 9.2: link
As an open source compression tool, 7-Zip is a popular tool for making sets of files easier to handle and transfer. The software offers up its own benchmark, to which we report the result.
Single GTX 980 Gaming Performance
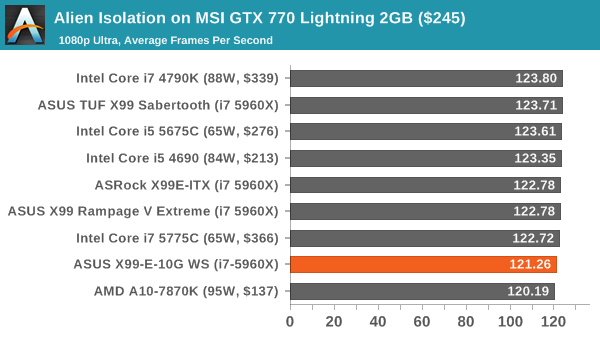
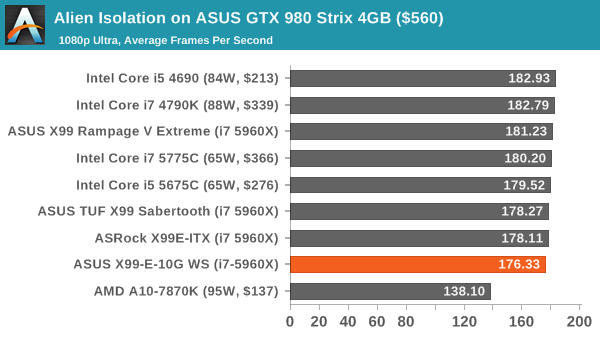
Alien: Isolation
If first person survival mixed with horror is your sort of thing, then Alien: Isolation, based off of the Alien franchise, should be an interesting title. Developed by The Creative Assembly and released in October 2014, Alien: Isolation has won numerous awards from Game Of The Year to several top 10s/25s and Best Horror titles, ratcheting up over a million sales by February 2015. Alien: Isolation uses a custom built engine which includes dynamic sound effects and should be fully multi-core enabled.
For low-end graphics, we test at 720p with Ultra settings, whereas for mid and high range graphics we bump this up to 1080p, taking the average frame rate as our marker with a scripted version of the built-in benchmark.
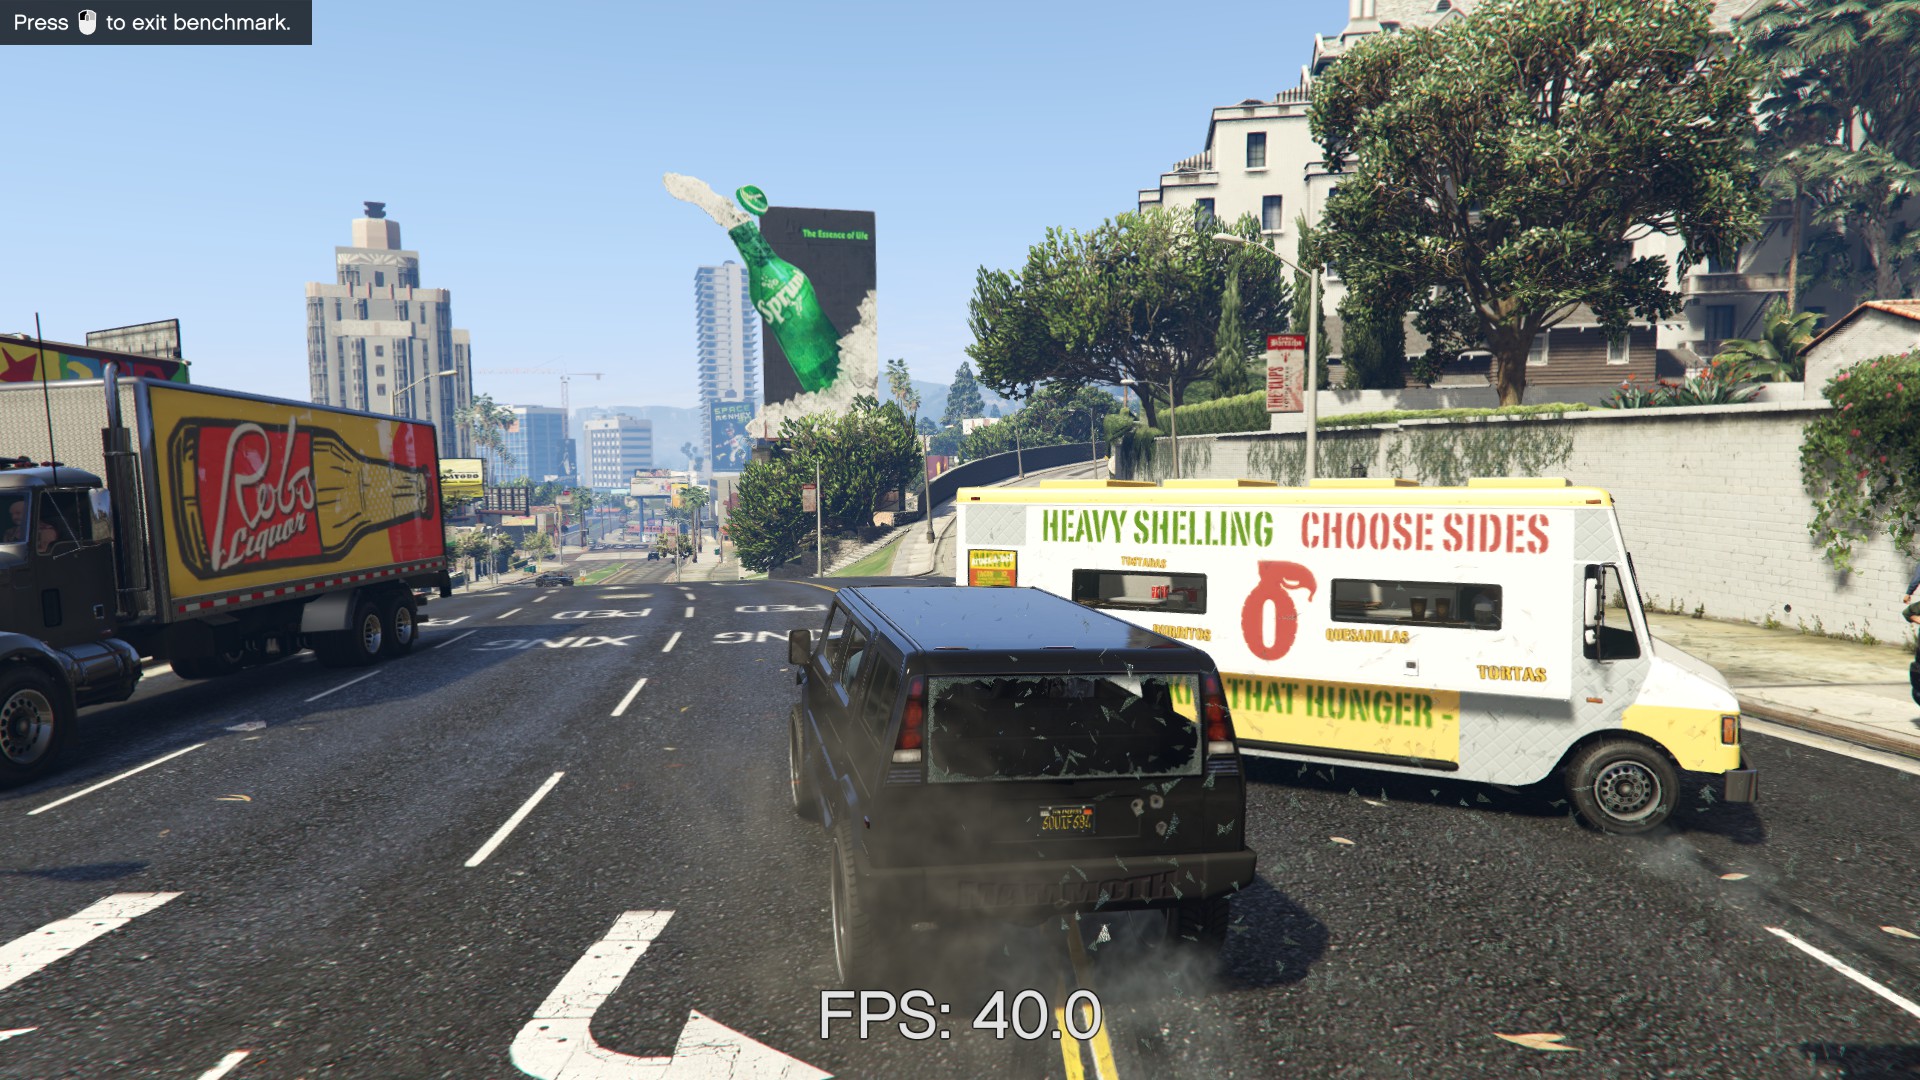
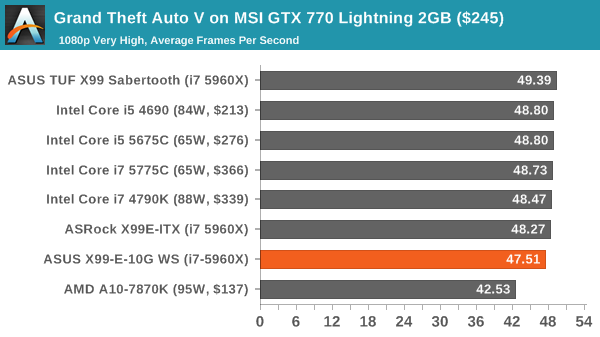
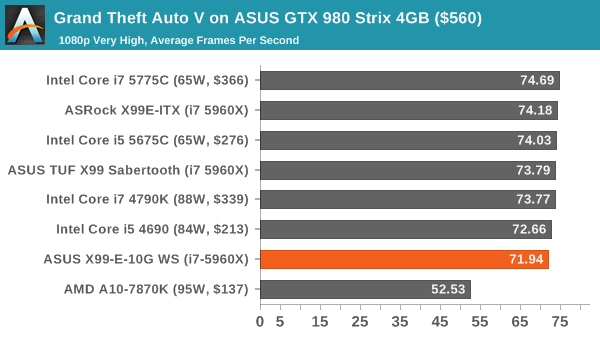
Grand Theft Auto V
The highly anticipated iteration of the Grand Theft Auto franchise finally hit the shelves on April 14th 2015, with both AMD and NVIDIA in tow to help optimize the title. GTA doesn’t provide graphical presets, but opens up the options to users and extends the boundaries by pushing even the hardest systems to the limit using Rockstar’s Advanced Game Engine. Whether the user is flying high in the mountains with long draw distances or dealing with assorted trash in the city, when cranked up to maximum it creates stunning visuals but hard work for both the CPU and the GPU.
For our test we have scripted a version of the in-game benchmark, relying only on the final part which combines a flight scene along with an in-city drive-by followed by a tanker explosion. For low end systems we test at 720p on the lowest settings, whereas mid and high end graphics play at 1080p with very high settings across the board. We record both the average frame rate and the percentage of frames under 60 FPS (16.6ms).
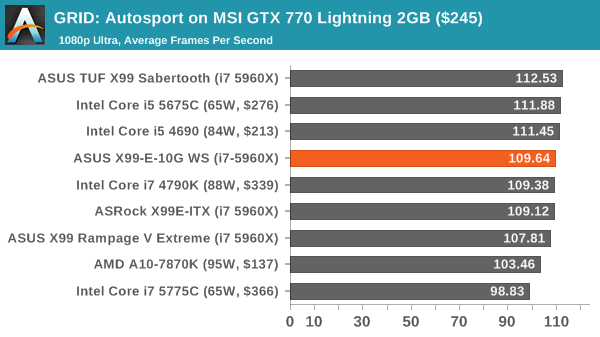
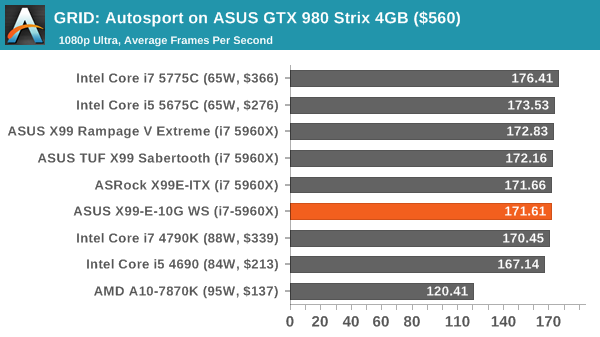
GRID: Autosport
No graphics tests are complete without some input from Codemasters and the EGO engine, which means for this round of testing we point towards GRID: Autosport, the next iteration in the GRID and racing genre. As with our previous racing testing, each update to the engine aims to add in effects, reflections, detail and realism, with Codemasters making ‘authenticity’ a main focal point for this version.
GRID’s benchmark mode is very flexible, and as a result we created a test race using a shortened version of the Red Bull Ring with twelve cars doing two laps. The car is focus starts last and is quite fast, but usually finishes second or third. For low end graphics we test at 1080p medium settings, whereas mid and high end graphics get the full 1080p maximum. Both the average and minimum frame rates are recorded.

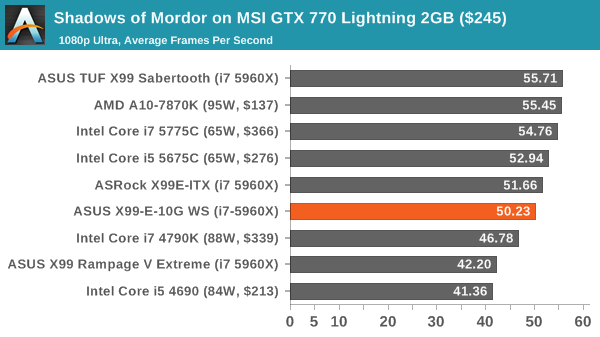
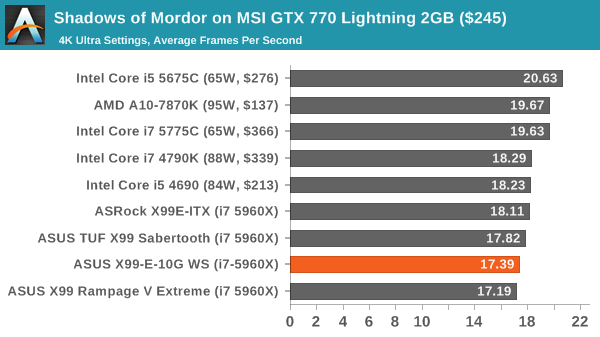
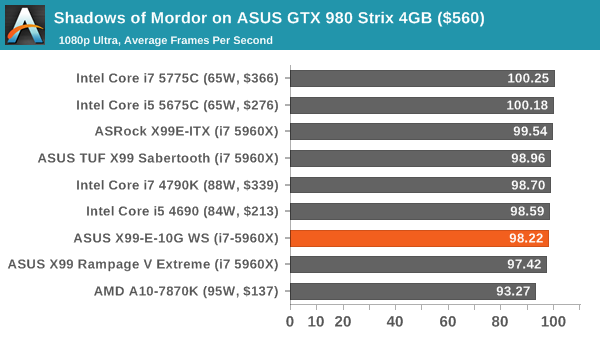
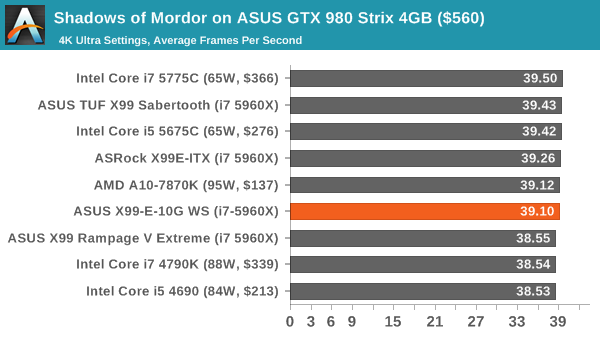
Middle-Earth: Shadow of Mordor
The final title in our testing is another battle of system performance with the open world action-adventure title, Shadow of Mordor. Produced by Monolith using the LithTech Jupiter EX engine and numerous detail add-ons, SoM goes for detail and complexity to a large extent, despite having to be cut down from the original plans. The main story itself was written by the same writer as Red Dead Redemption, and it received Zero Punctuation’s Game of The Year in 2014.
For testing purposes, SoM gives a dynamic screen resolution setting, allowing us to render at high resolutions that are then scaled down to the monitor. As a result, we get several tests using the in-game benchmark. For low end graphics we examine at 720p with low settings, whereas mid and high end graphics get 1080p Ultra. The top graphics test is also redone at 3840x2160, also with Ultra settings, and we also test two cards at 4K where possible.

SLI, SLI, SLI
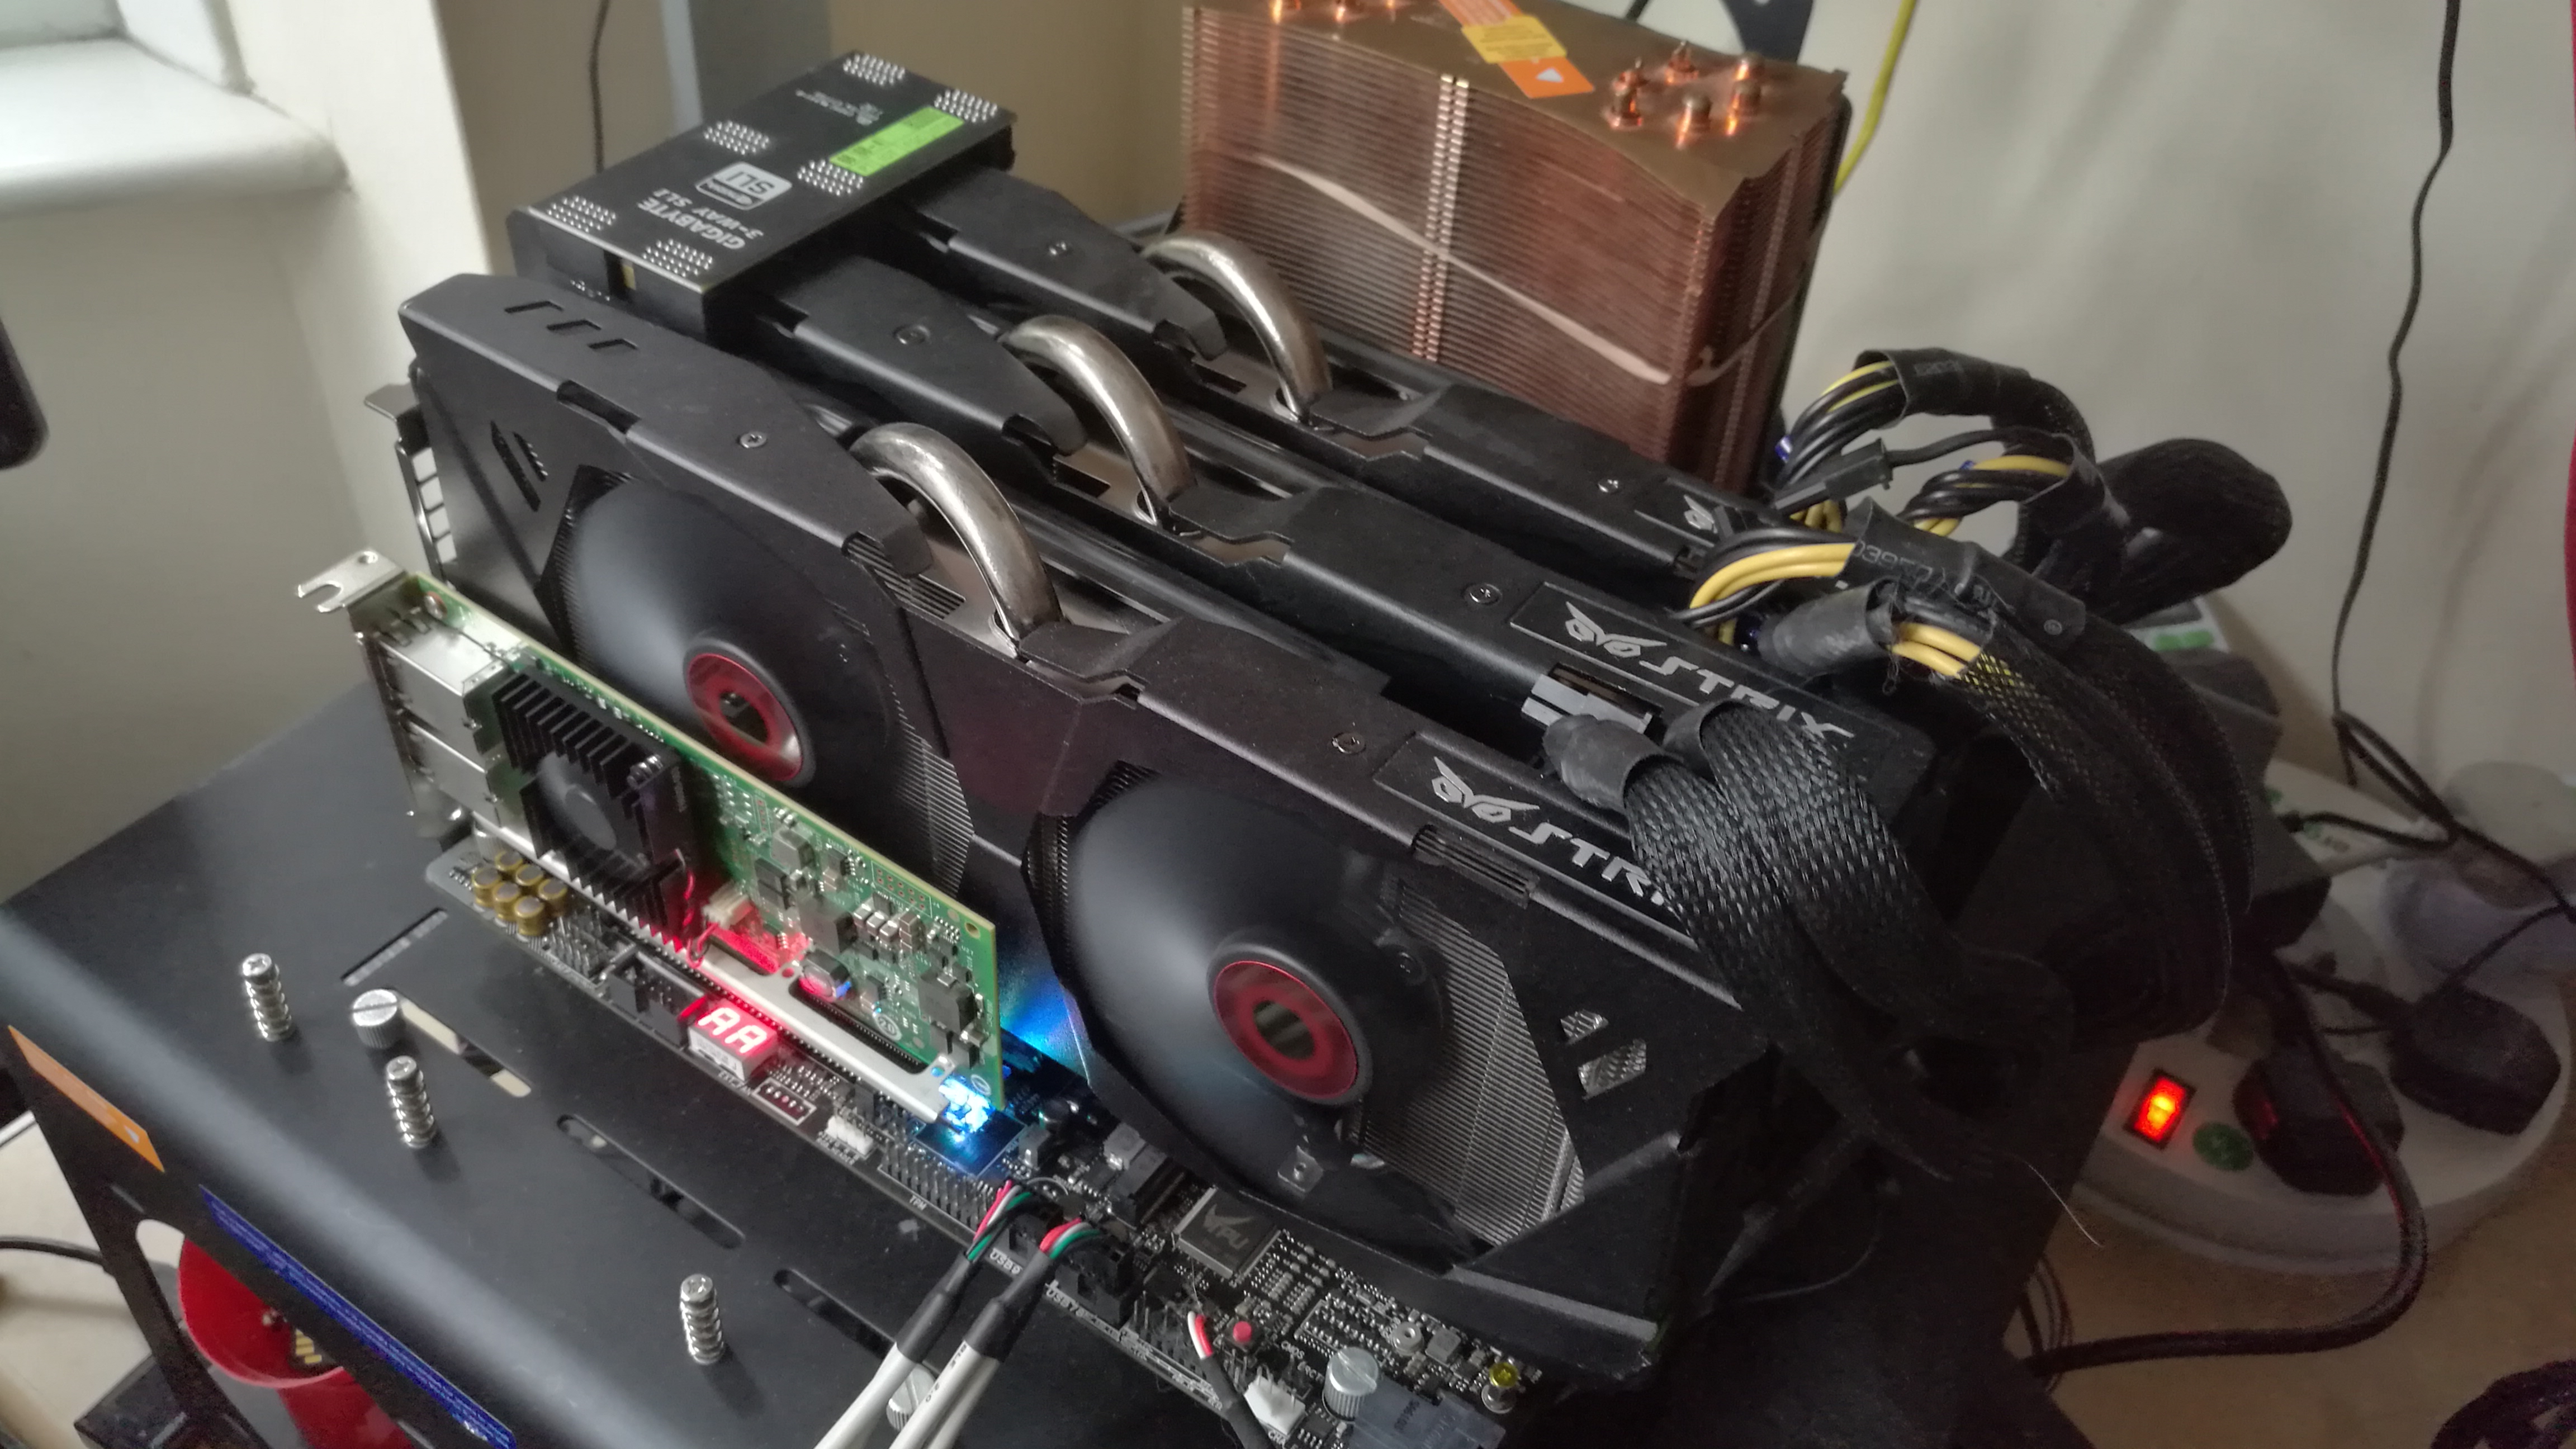
In our last review of a motherboard capable of 4-way GPU gaming, it was eloquently stated that our failure to test the feature was an indication of AnandTech’s current path on quality. I would have preferred a discourse in actually being able to source four identical GPUs at the time (and then showing ‘wow, it works’ in the review). There are plenty of things we don’t test as rigorously on each product that some users might like, such as PCIe x1 slot bandwidth latency, or USB 2.0 performance on CentOS, either due to time, relevance, or as was the case before, a lack of hardware. This is still the case - I do not have four expensive and high profile GPUs and I live a whole continent and an ocean away from our GPU testing facility. I have procured a third identical GTX 980 however, and will show you that at least 3-way GPU works in our test suite.
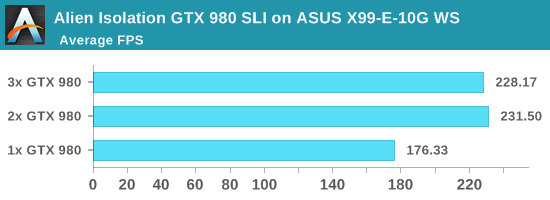
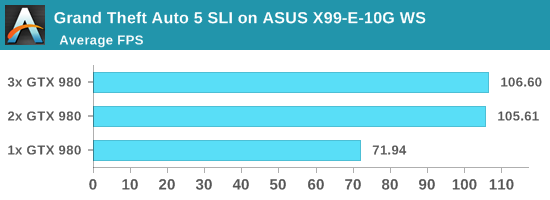
GPU scaling beyond two cards depends on the game engine and the drivers, or if the game has implemented specific multi-GPU modes to accelerate game features. For some titles, the GPU is not the bottleneck, and it might either be CPU performance, PCIe bandwidth, DRAM, or the fact that the game doesn’t scale and we’re relying on the performance of a single card.
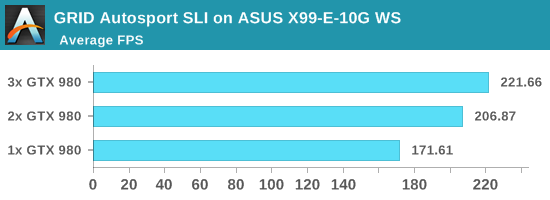
Both GTA5 and Alien Isolation scaled to two cards with our hardware setup, but failed to move going to three. GRID is typically a title that scales with almost anything, however the jump from two to three cards was only 7%.
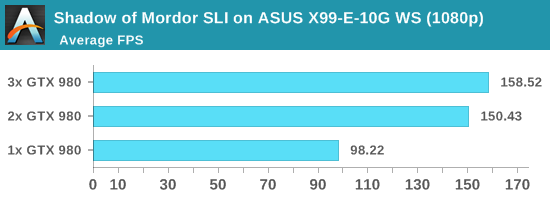
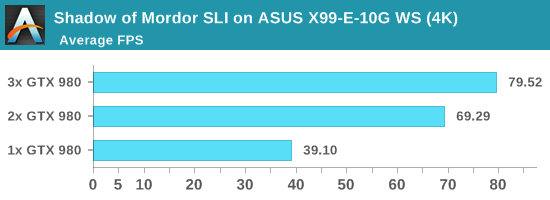
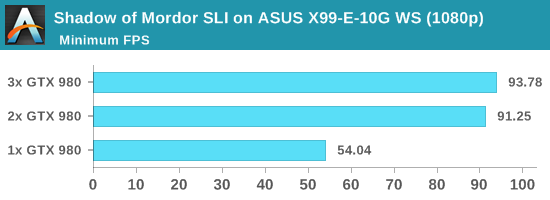
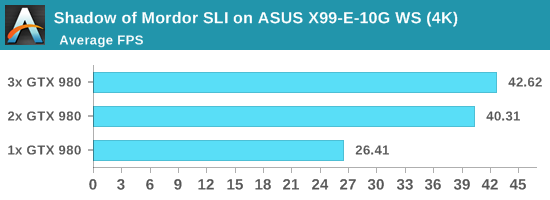
Shadow of Mordor gets the best scaling, but only at 4K and not at 1080p. At 1080p the move from 1 GPU (98 FPS) to 2 GPUs (150 FPS) is significant, but 3 GPUs (158 FPS) is not. For 4K, the scaling keeps going from 1 GPU (39 FPS) to 2 GPUs (69 FPS) and 3 GPUs (80 FPS), although not as much for that last jump. At 4K we are running at our Ultra preset, indicating that some other hard compute part of frame rendering might be the limiting factor in AFR modes.
Testing 10GBase-T and X550-AT2
Similar to our GPU testing, we have not the ideal hardware for Ethernet testing. In our previous 10G motherboard review, we implemented an ESXi 6 platform and used two Windows Server VMs, each with 8 threads, 16GB of DRAM, and one of the 10G ports. As a result each VM had a direct OS-to-OS 10G connection with a custom configured IP and testing was done.
Testing 10G with ESXi was actually more difficult this time around. The X550 series of drivers are not supporting in the default image, requiring the admin to install the relevant plug-in. While this enabled the ports to work in the Windows Server 2016 VMs, ESXi would not allow them under VSXNET mode, which is typically the high-performance mode. I was unable to find a quick solution, and along with the X550 controller being newer, deciphering what needed to be done was also a minefield of frustration.
It is interesting then to note that our results for the ASUS board and X550 are similar to previous results with the ASRock board using X540. This is ultimately because the chips are mostly similar, with the primary difference in the way they communicate with the CPU – the X540 requires PCIe 2.0 x8, while the X550 requires PCIe 3.0 x4. The X550 also introduces some professional level features, but the 10G copper market remains in Intel’s hands without another major player (or that professional environments turn to fiber).
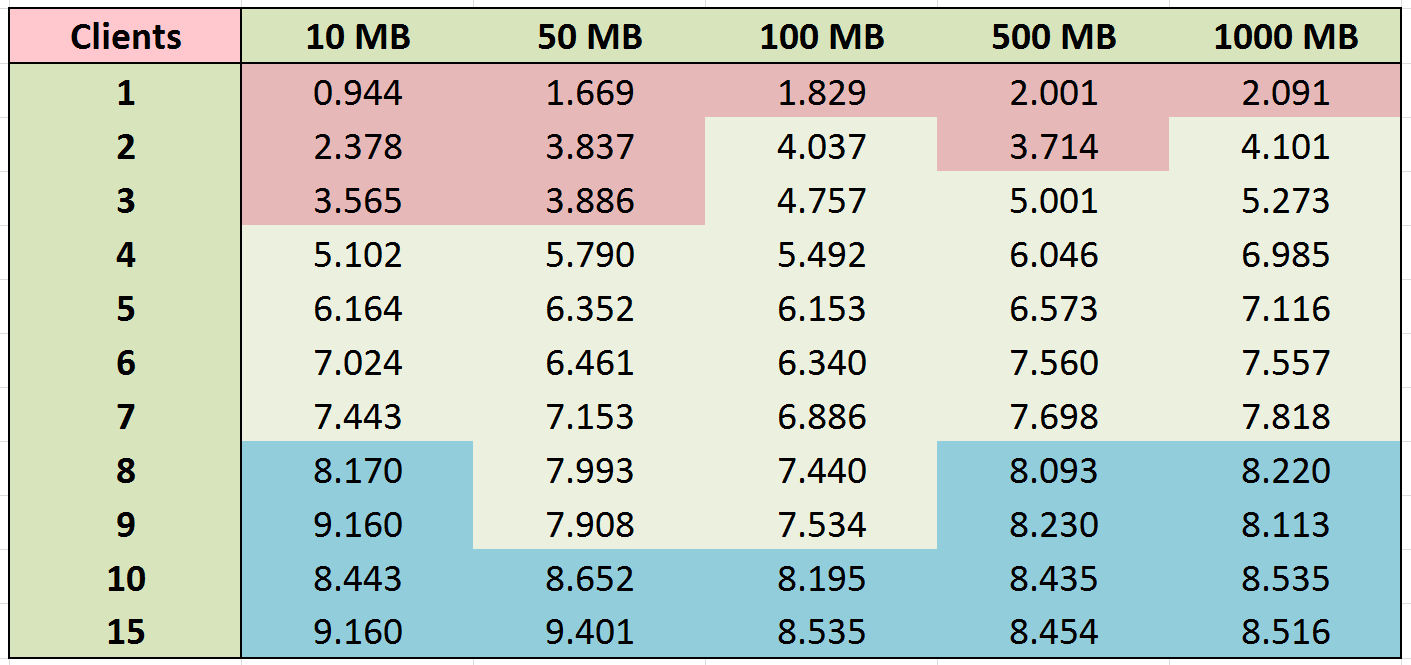
When we last performed this with the ASRock X99 WS-E/10G, and a number of our readers were very helpful in describing ways in which 10G network performance (with the right hardware and knowledge) could be improved. As our test is point-to-point without a managed switch, and the frustrating element of learning to debug the environment, I highly recommend you read the post by Jammrock back in that review. But the 10G ports do both work, I can tell you that.
ASUS X99-E-10G WS Conclusion
As ASUS’ newest high-end desktop motherboard model, the X99-E-10G WS comes out with almost all guns blazing. It is hard to escape how much functionality is present, from a full complement of PCIe lanes (x16/x16/x16/x16) to dual 10G copper Ethernet ports to a full set of DRAM (and support for ECC Registered for Xeons) as well as PCIe storage for either M.2 or U.2 and USB 3.1 ports. Pretty much everything you need, except perhaps Thunderbolt 3, is here.
Ultimately this also pigeon holes the X99-E-10G WS into a highly specific market. Providing all this functionality isn’t cheap with the motherboard having to use two expensive Avago PCIe switches (PLX8747) and Intel’s newest PCIe 3.0 x4 X550-AT2 controller. This squares the motherboard down to users who needed 10G ports but were already lacking PCIe space. The numbers of users who qualify in that margin are set to be very low. Here’s an example of a use case: three GTX 980s with another 10G card (X540, PCIe 2.0 x8) attached in the bottom slot.
For performance, ASUS implements Multi-Core Turbo with the Core i7-5960X which gives our CPU benchmark results in the top half, but due to the PLX chip incurring a ~1% performance penalty, our gaming tests are the lowest we’ve seen for this set of tests on X99. For system benchmarks, the use of extra controllers does add to the POST time, but the audio performance is very good as well as USB 3.0/3.1 (with Turbo) and DPC Latency (one of ASUS’ recent strong points).
The BIOS and software side of the equation is ASUS’ usual consumer fare, and despite the X99-E-10G WS being a workstation focused board, aside from ECC Registered DRAM support with Xeons, there is nothing (nothing on the software side at least) that is specifically derived for workstations or prosumers that isn’t already on consumer platforms. That being said, fan controls, power and USB features are still relevant for most users.
The ASUS X99-E-10G WS does one thing really well – it offers the best single-socket option for integrated 10G support in the current market, and we will hopefully see more down the line (or at lower price points). As mentioned in our 10GBase-T motherboard overview earlier in the year, aside from the ASUS and ASRock boards available, and MSI’s C236 board with a single 10G port, options for integrated solutions are few and far between. Aside from switch pricing the ecosystem for home use, even as a prosumer play, needs to be driven by either switch availability (something like ASUS’ XG-U2008 at $250) or motherboard/PC adoption. So even at $600, the ASUS X99-E-10G WS shows how easy it can be to integrate 10G copper in the form of 10GBase-T.
Other Intel X99 Motherboard Reviews by AnandTech:
Prices Correct at time of each review
$750: The ASRock X99 WS-E 10G Review [link]
$600: The ASUS X99-E-10G WS Review (this review)
$600: The ASRock X99 Extreme11 Review [link]
$500: The ASUS Rampage V Extreme Review [link]
$400: The ASUS X99-Deluxe Review [link]
$340: The GIGABYTE X99-Gaming G1 WiFi Review [link]
$330: The ASRock X99 OC Formula Review [link]
$323: The ASRock X99 WS Review [link]
$310: The GIGABYTE X99-UD7 WiFi Review [link]
$310: The ASUS X99 Sabertooth Review [link]
$300: The GIGABYTE X99-SOC Champion Review [link]
$300: The ASRock X99E-ITX Review [link]
$300: The MSI X99S MPower Review [link]
$275: The ASUS X99-A Review [link]
$241: The MSI X99S SLI PLUS Review [link]


