Original Link: https://www.anandtech.com/show/9060/the-asrock-x99-extreme11-review-eighteen-sata-ports-with-haswelle
The ASRock X99 Extreme11 Review: Eighteen SATA Ports with Haswell-E
by Ian Cutress on March 11, 2015 8:00 AM EST- Posted in
- Storage
- ASRock
- Motherboards
- X99
- LGA2011-3

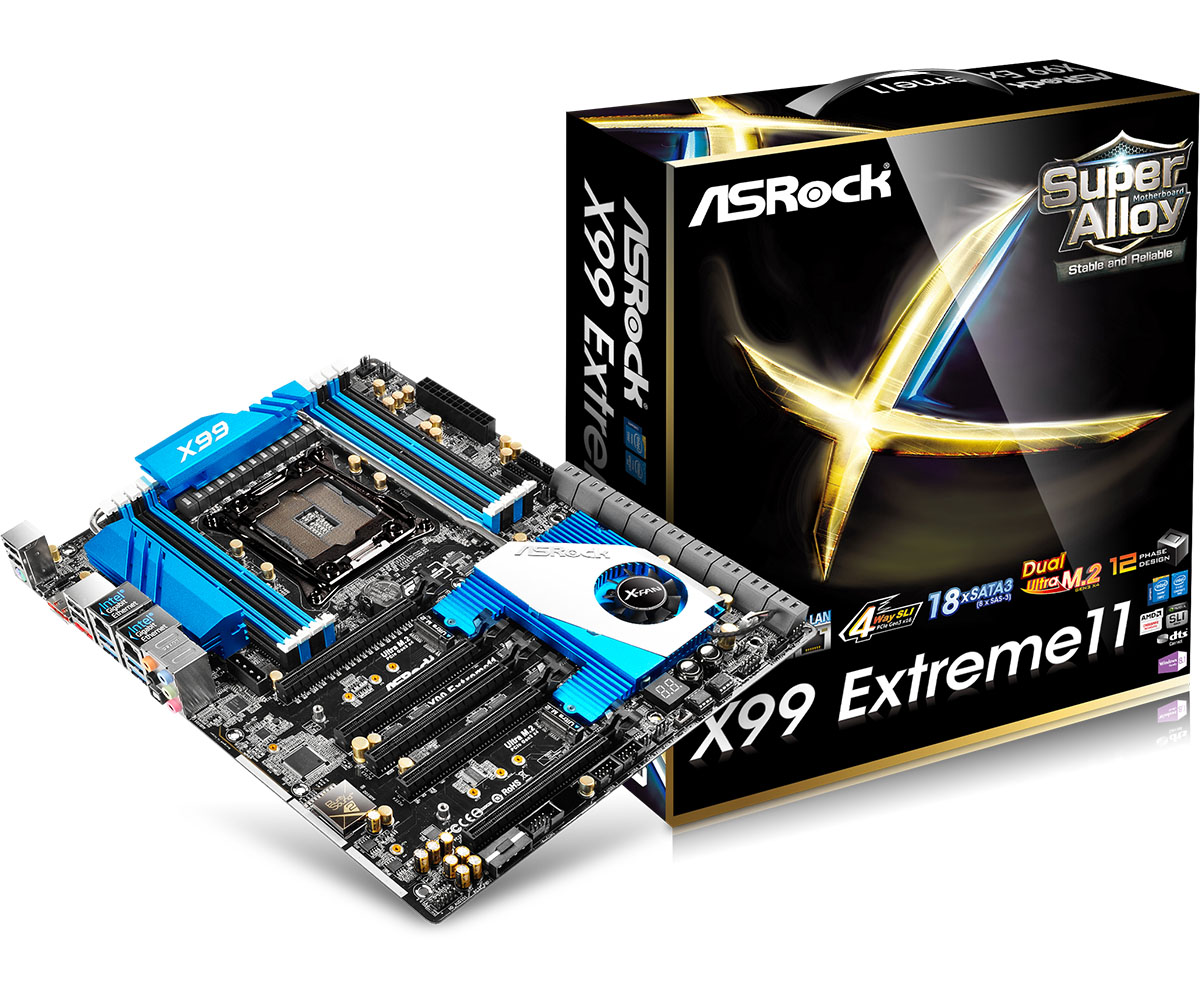
If there is one thing I like about ASRock, it is their ability to do something different in an increasingly difficult market to differentiate. One of these elements is the Extreme11 series, using an LSI RAID controller to provide more SAS/SATA ports on the high end model. Today we have the X99 Extreme11 in for review.
ASRock X99 Extreme11 Overview
Our last review of an Extreme11 model was back in the X79 era, featuring the six SATA ports from the PCH and eight from the bundled LSI 3008 onboard controller. Our sample back then used eight PCIe lanes for the controller and achieved 4 GBps maximum read and write sequential speeds when using an eight drive SSD RAID-0 SF-2281 array. Between the X79 and the X99 model came the Z87 Extreme11/ac which used the same LSI controller but bundled it with a port multiplier, giving sixteen SAS/SATA ports plus the six from the chipset for 22 total. When we come to the X99 Extreme11 in this review, we get the same 3008 controller without the multiplier) which adds eight ports to the ten from the PCH, giving eighteen in total.
One of the criticisms from the range is the lack of useful hardware RAID modes with the LSI 3008. It only gives RAID 0 and 1 (also 1E and 10) with no scope for RAID 5/6. This is partly because the controller comes without any cache (or albeit a very small one) which cannot help with managing such an array. ASRock's line on this is partly due to controller cost and complexity of implementation, suggesting that users who require these modes should use a software RAID solution. Users who want a hardware solution will have to buy a controller card that supports it, and ASRock is keen to point out that the Extreme11 range has plenty of PCIe bandwidth to handle it.
The amount of PCIe bandwidth brings up another interesting element to the Extreme11 range. ASRock feels that their high end motherboard range must support four-way GPU configurations, preferably in x16/16/16/16 lane allocation. In order to do this, along with having enough lanes for the LSI 3008 controller that needs eight, for the X99 Extreme11 there are two PLX8747 PCIe switches on board. We covered the PLX8747 during its prominent use during Z77, but a base summary is that due in part to its FIFO buffer it can multiplex 8 or 16 PCIe lanes into 32. Thus for the X99 Extreme11 and its dual PLX8747 arrangement, each PLX switch takes 16 lanes from the CPU to give two PCIe 3.0 x16 slots, totaling four PCIe 3.0 x16 slots overall. The final eight lanes from the CPU go to the LSI controller, accounting for 40 lanes from the processor. (28 lane CPUs behave a little differently, see the review below.)
As you might imagine, two PLX8747 switches and an LSI controller onboard does not come cheap, and that is why the Extreme11 is one of the most expensive X99 Motherboards on the market at $630+, only to be bested in this competition by the ASRock X99 WS-E/10G which comes with a dual port 10GBase-T controller for $670. Aside from the four PCIe 3.0 x16 slots and 18 SATA ports, the Extreme11 also comes with support for 128GB of RDIMMs, LGA2011-3 Xeon compatibility, dual Intel network ports, upgraded audio and dual PCIe 3.0 x4 M.2 slots. The market ASRock aims for with this board needs high storage and compute requirements in their workstation - typically with these builds the motherboard cost is not that important, but the feature set is. That makes the X99 Extreme11 an entertaining product in an interesting market segment.
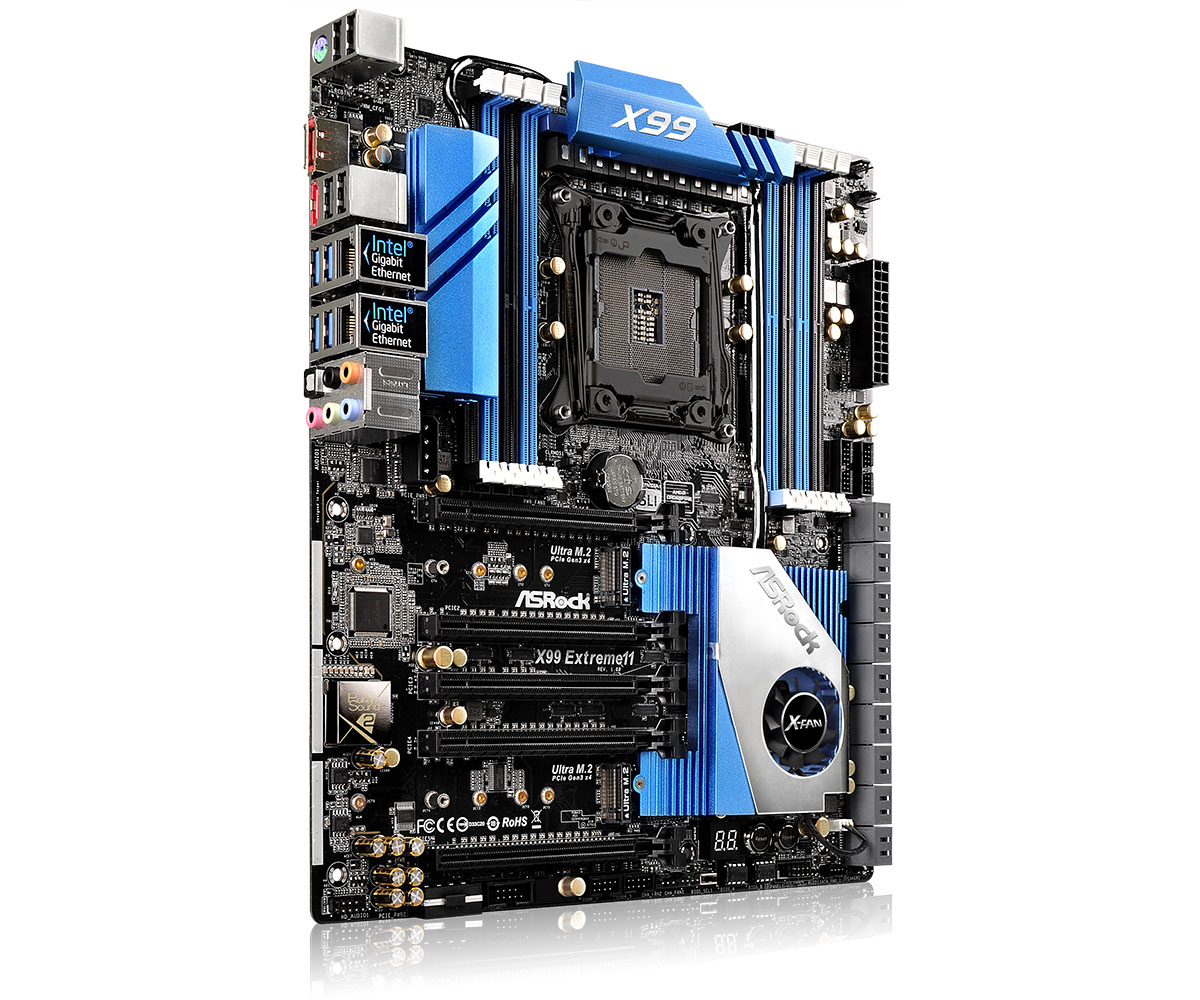
Visual Inspection
With the extra SATA ports and controller chips onboard, the Extreme11 expands into the EATX form factor, which means an extra inch or so horizontally for motherboard dimensions. Aside from the big block of SATA ports, nothing looks untoward on the board, giving an extended heatsink around the power delivery down to the chipset heatsink which has an added fan to deal with the two PLX8747 chips and the LSI 3008 controller.

The socket area is fairly crammed up to Intel’s specifications, with ASRock’s Super Alloy based power delivery packing in twelve phases in an example of over engineering. The DRAM slots are color coded for the black slots to be occupied first. Within the socket area there are four fan headers to use – two CPU headers in the top right (4-pin and 3-pin), a 3-pin header just below the bottom left of the socket (above the PCIe slot) and another 3-pin near the top of the SATA ports. The other two fan headers at the bottom of the board are one 4-pin and another 3-pin, with the final fan header provided for the chipset fan. This can be disabled if required by removing the cable.
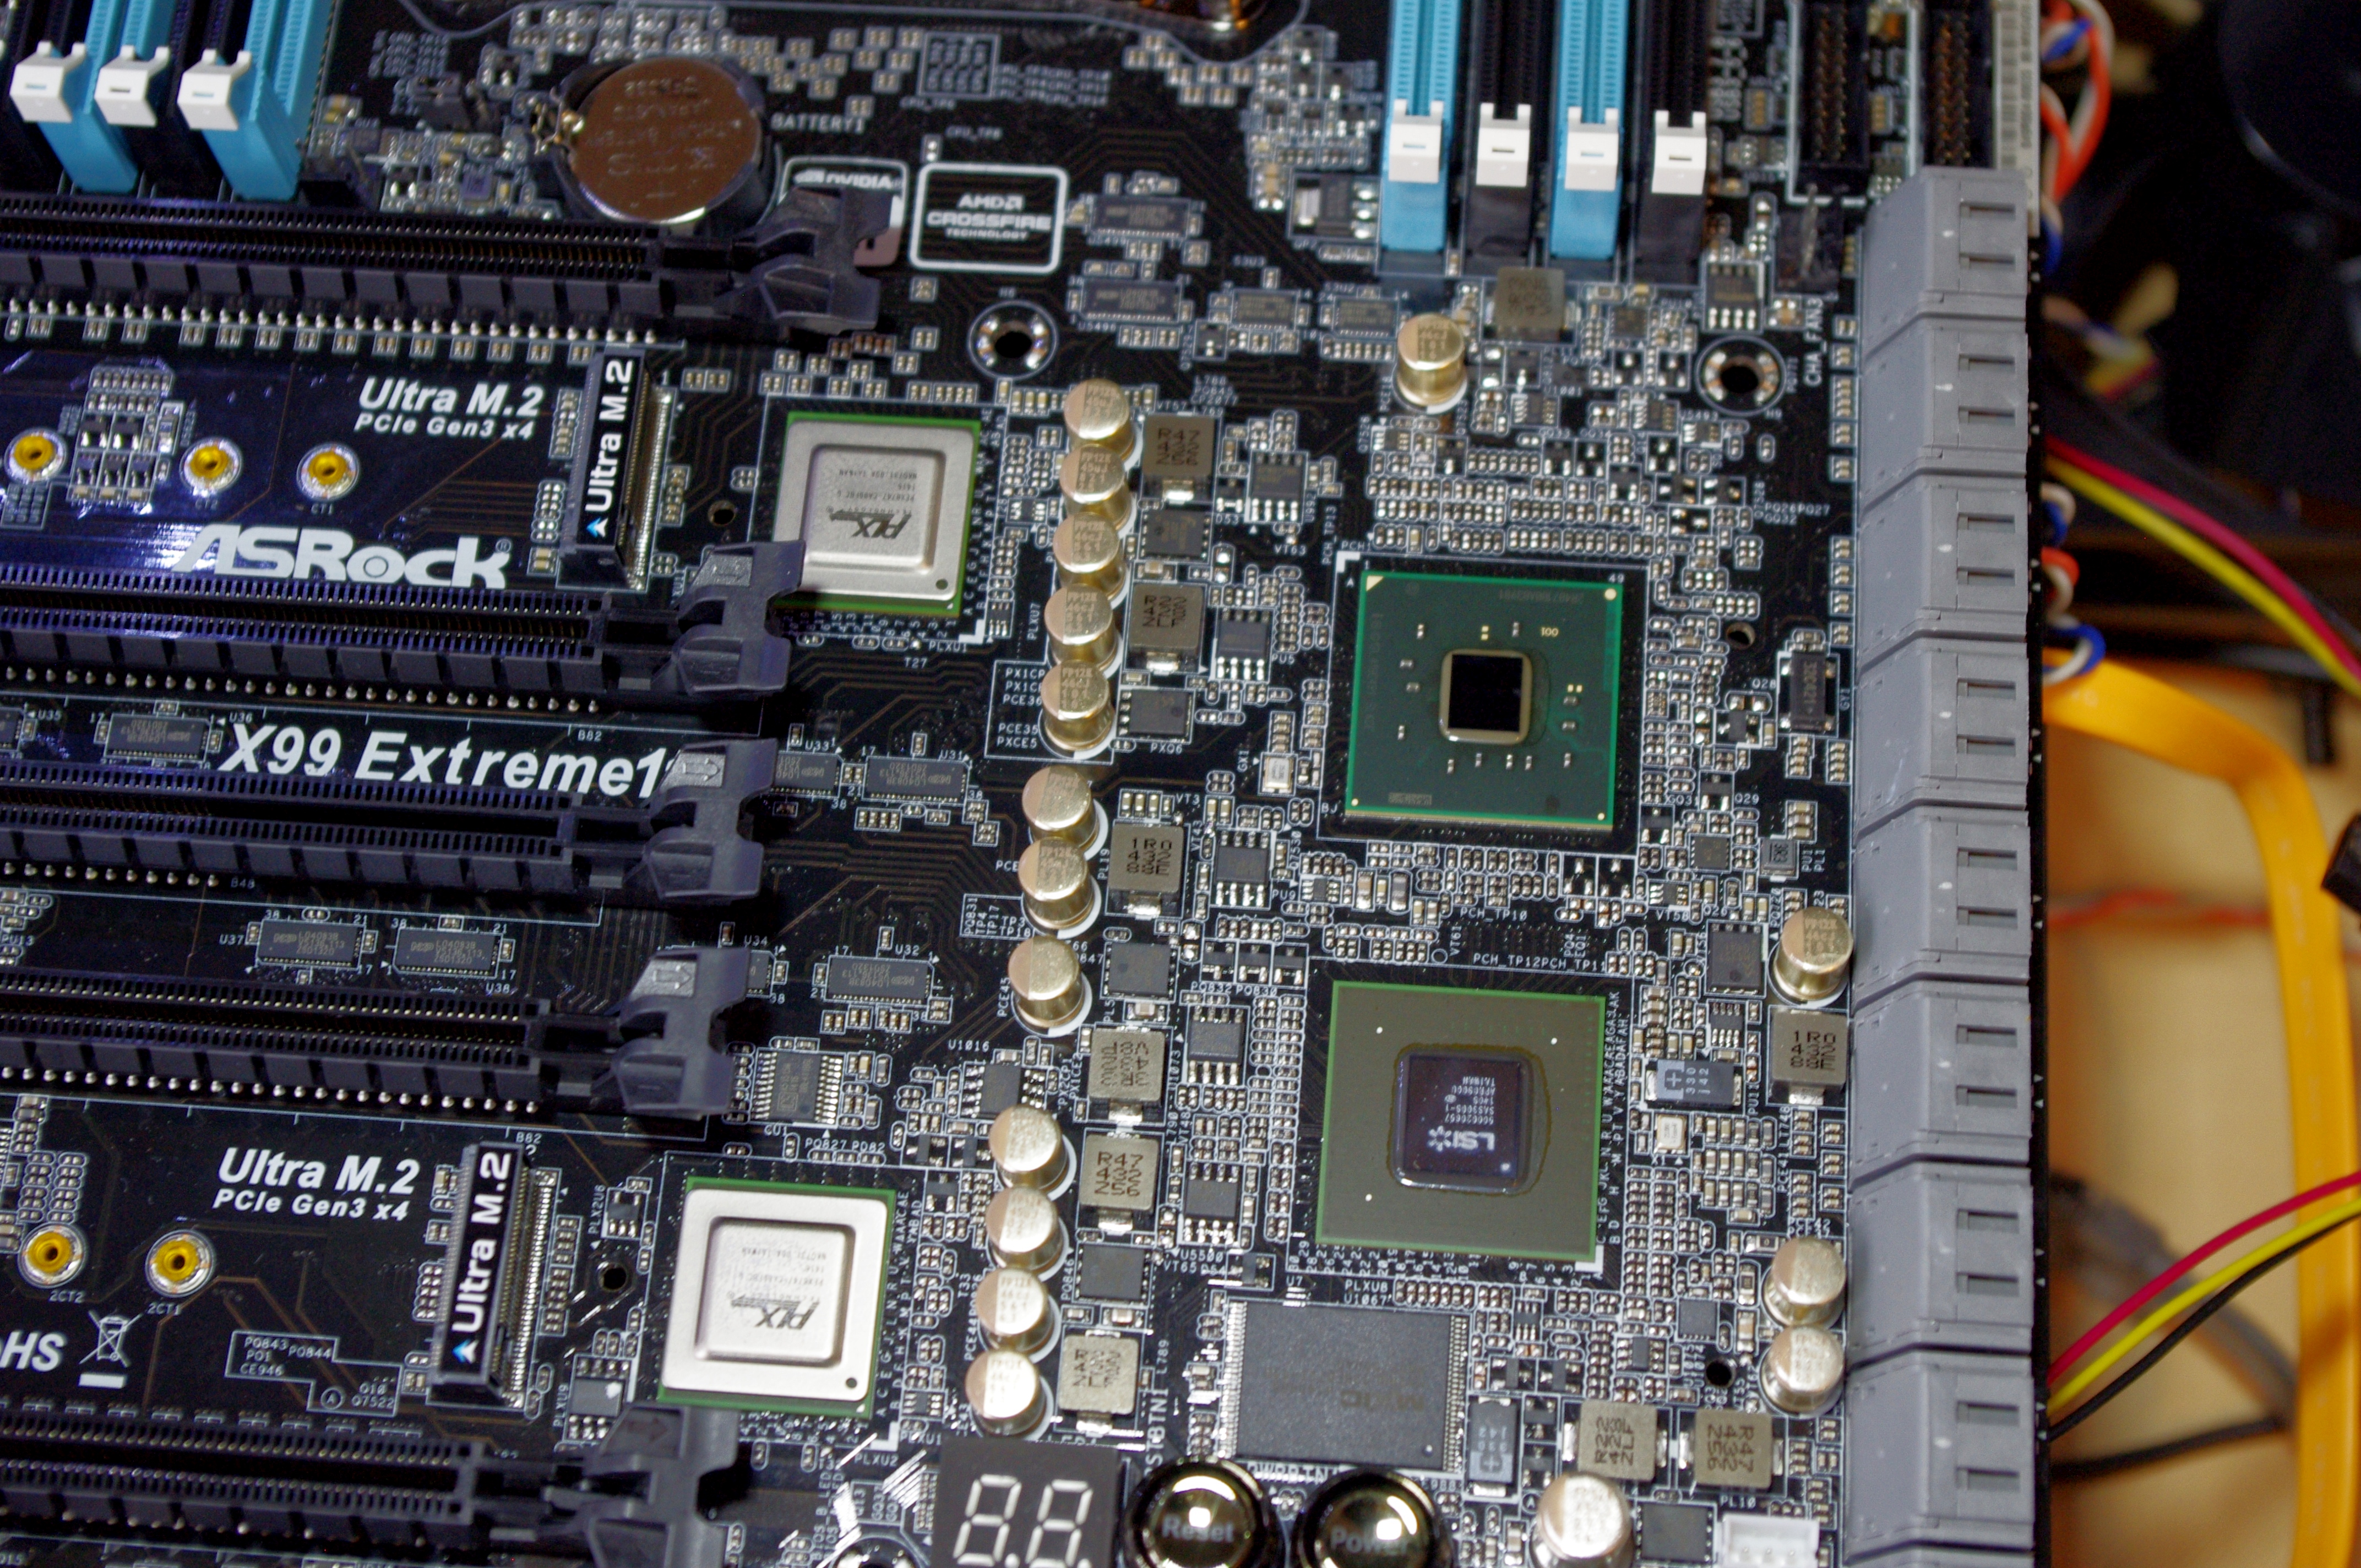
The bottom right of the motherboard next to the SATA ports and under the chipset heatsink hides the important and costly controller chips. Combining the two PLX8747 on the left, the LSI RAID controller and the chipset comes north of 30W in total for power use, hence the extra fan on the chipset.
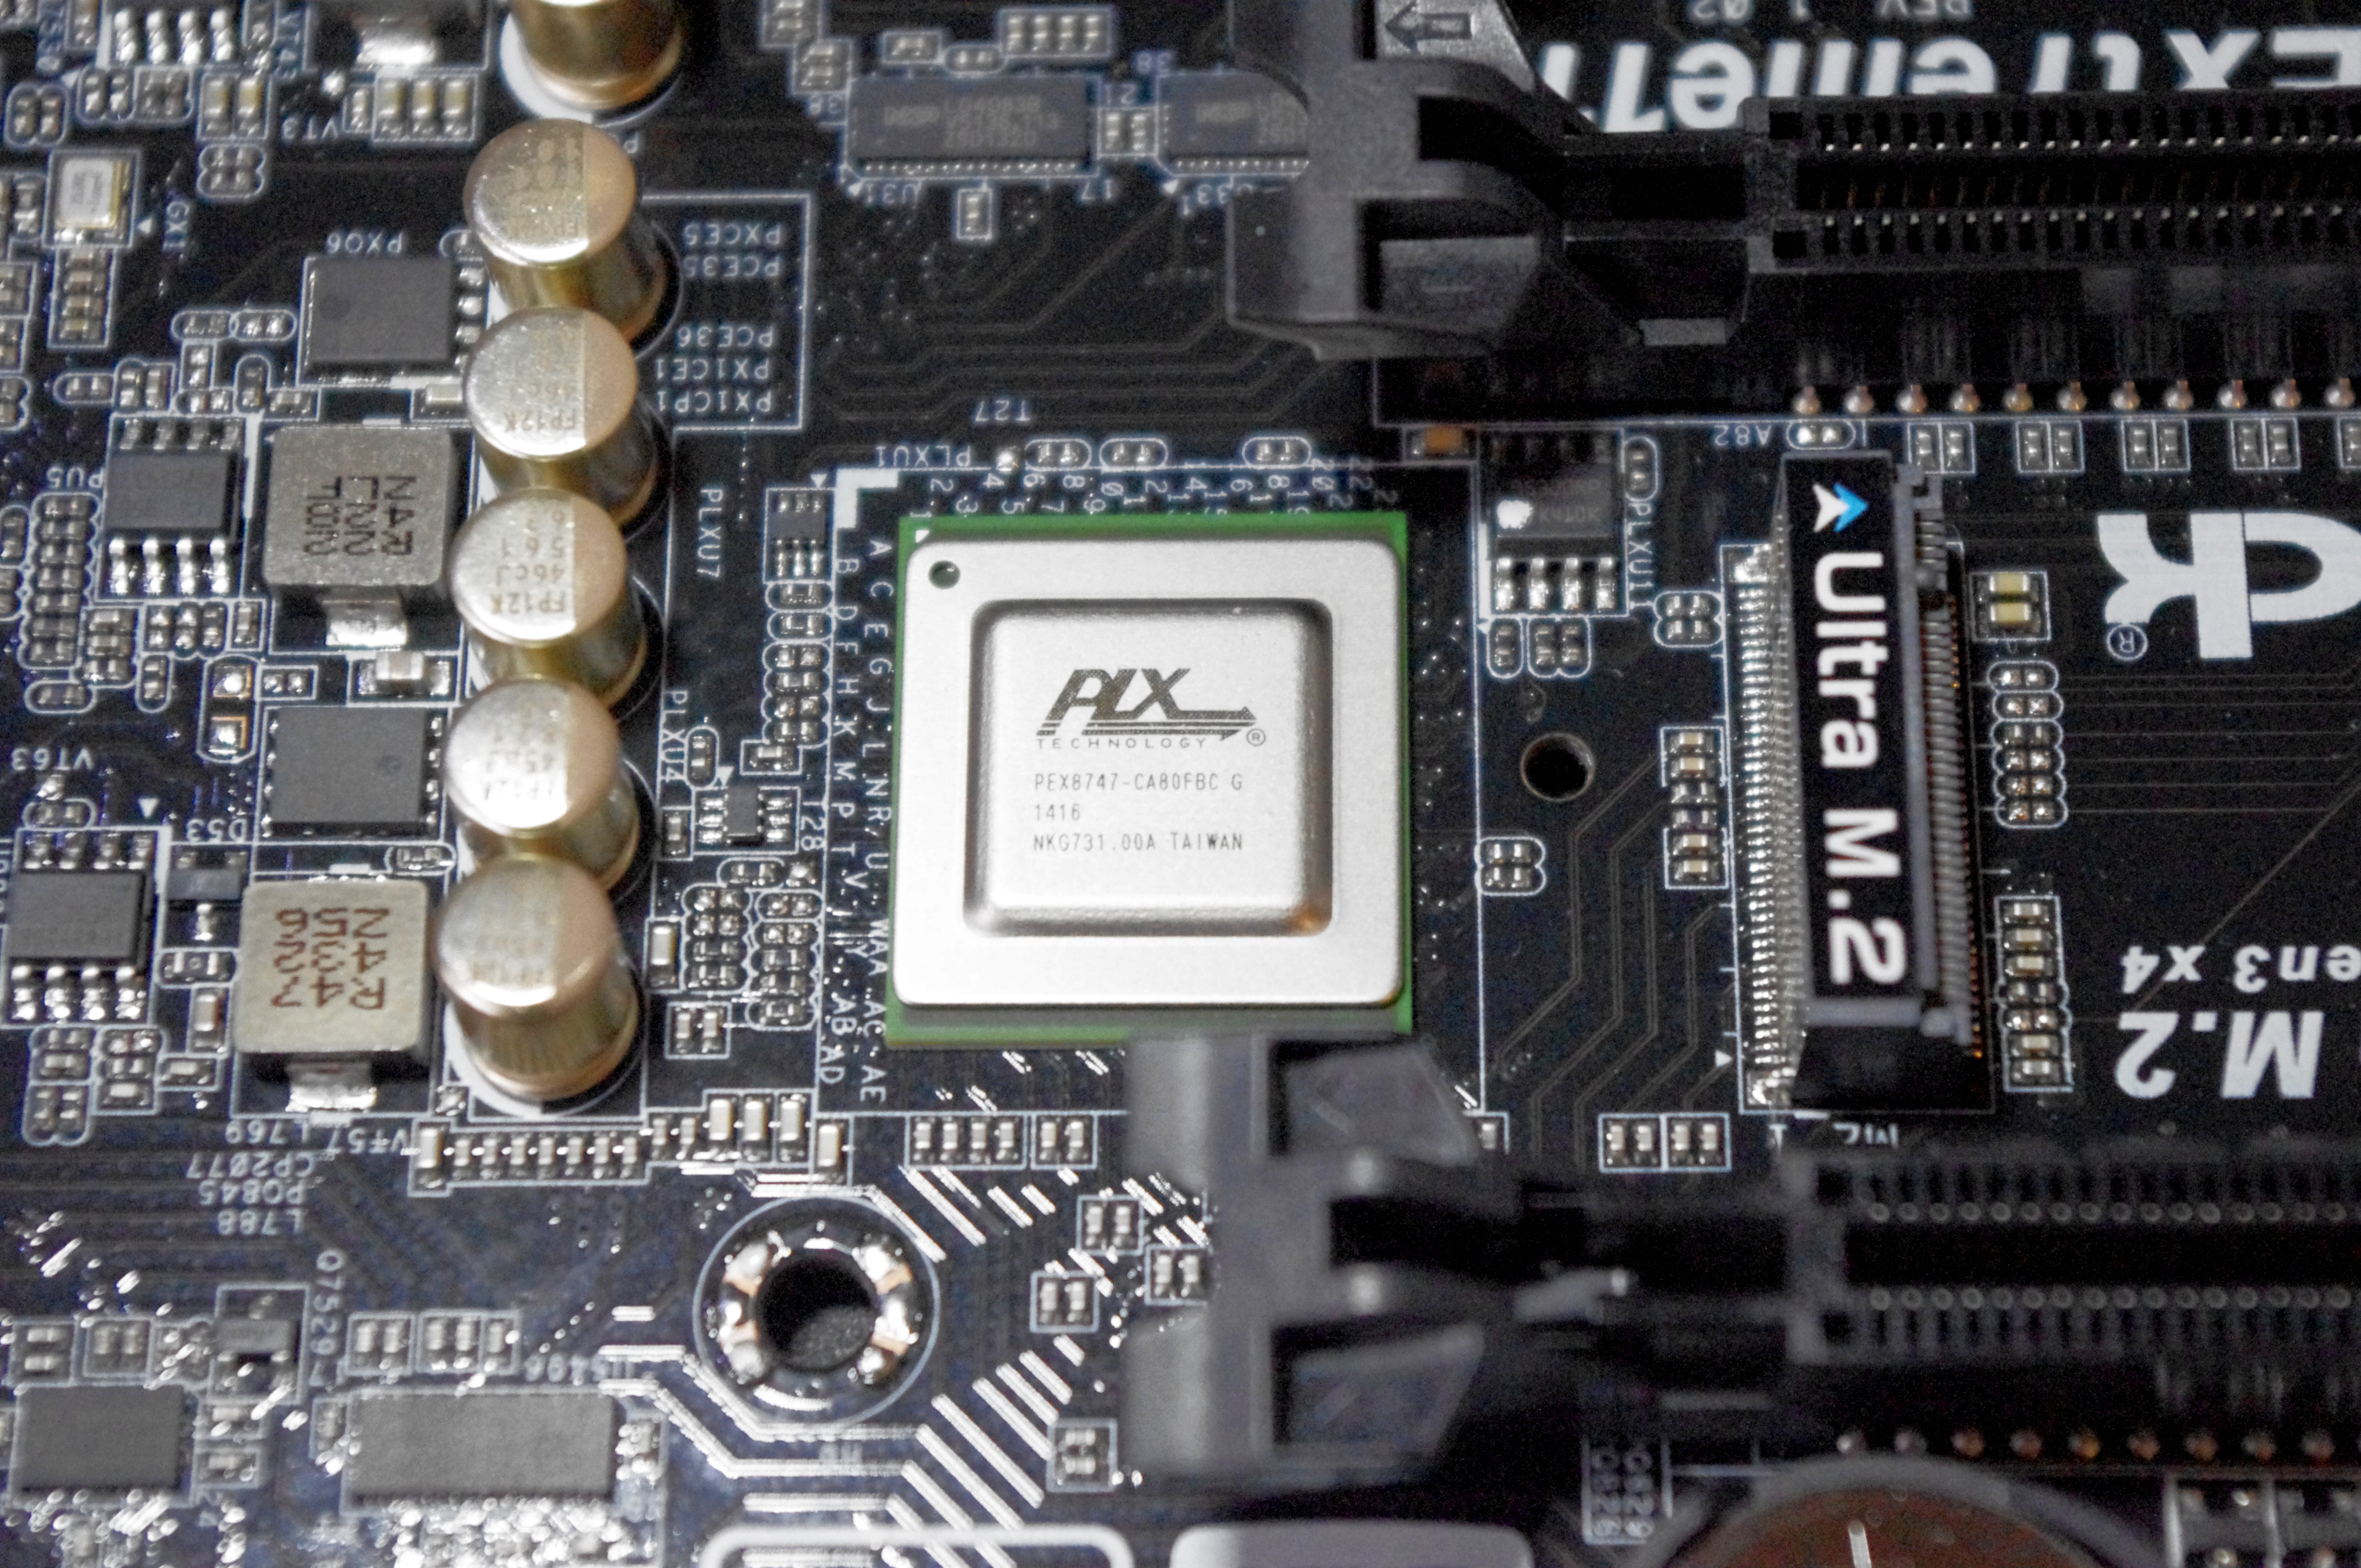
Each PLX8747 PCIe switch can take in eight or sixteen PCIe 2.0 or PCIe 3.0 lanes, then by using a combination of a FIFO buffer and multiplexing output 32 PCIe 3.0 lanes. Sometimes this sounds like magic, but it is best to think of it as a switching FPGA – between the PCIe slots, we have full PCIe 3.0 x16 bandwidth, but if we go up the pipe back to the CPU, we are still limited by that 8/16 lane input. The benefit of the FIFO buffer is a fill twice/pour once scenario, coalescing commands and shooting them up the data path together rather than performing a one in/one out. In our previous testing the PLX8747 gave a sub 1% performance deficit in gaming, but aids compute users that need inter-GPU bandwidth. It also surpasses the SLI fixed limitation of needing eight PCIe lanes, ensuring that the NVIDIA configurations are happy.
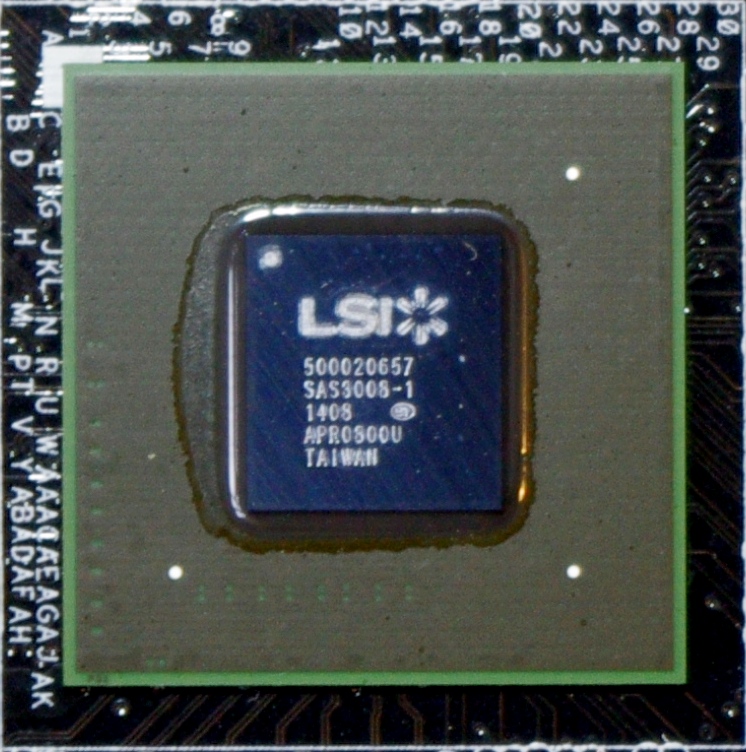
The LSI 3008 is a little long in the tooth having been on the X79 and Z87 Extreme11 products, but it does what ASRock wants it to do – provide extra storage ports for those that need it. In order to get a case that can support 18 drives is another matter – we often see companies like Lian Li do them at Computex, and some cost as much as the motherboard. The next cost is all the drives, but I probably would not say no to an 18*6 TB system. The lack of RAID 5/6 for redundancy offerings is still a limitation, as is the lack of a cache. Moving up the LSI stack to a controller that does offer RAID 5/6 would add further cost to the product, and at this point ASRock has little competition in this space.
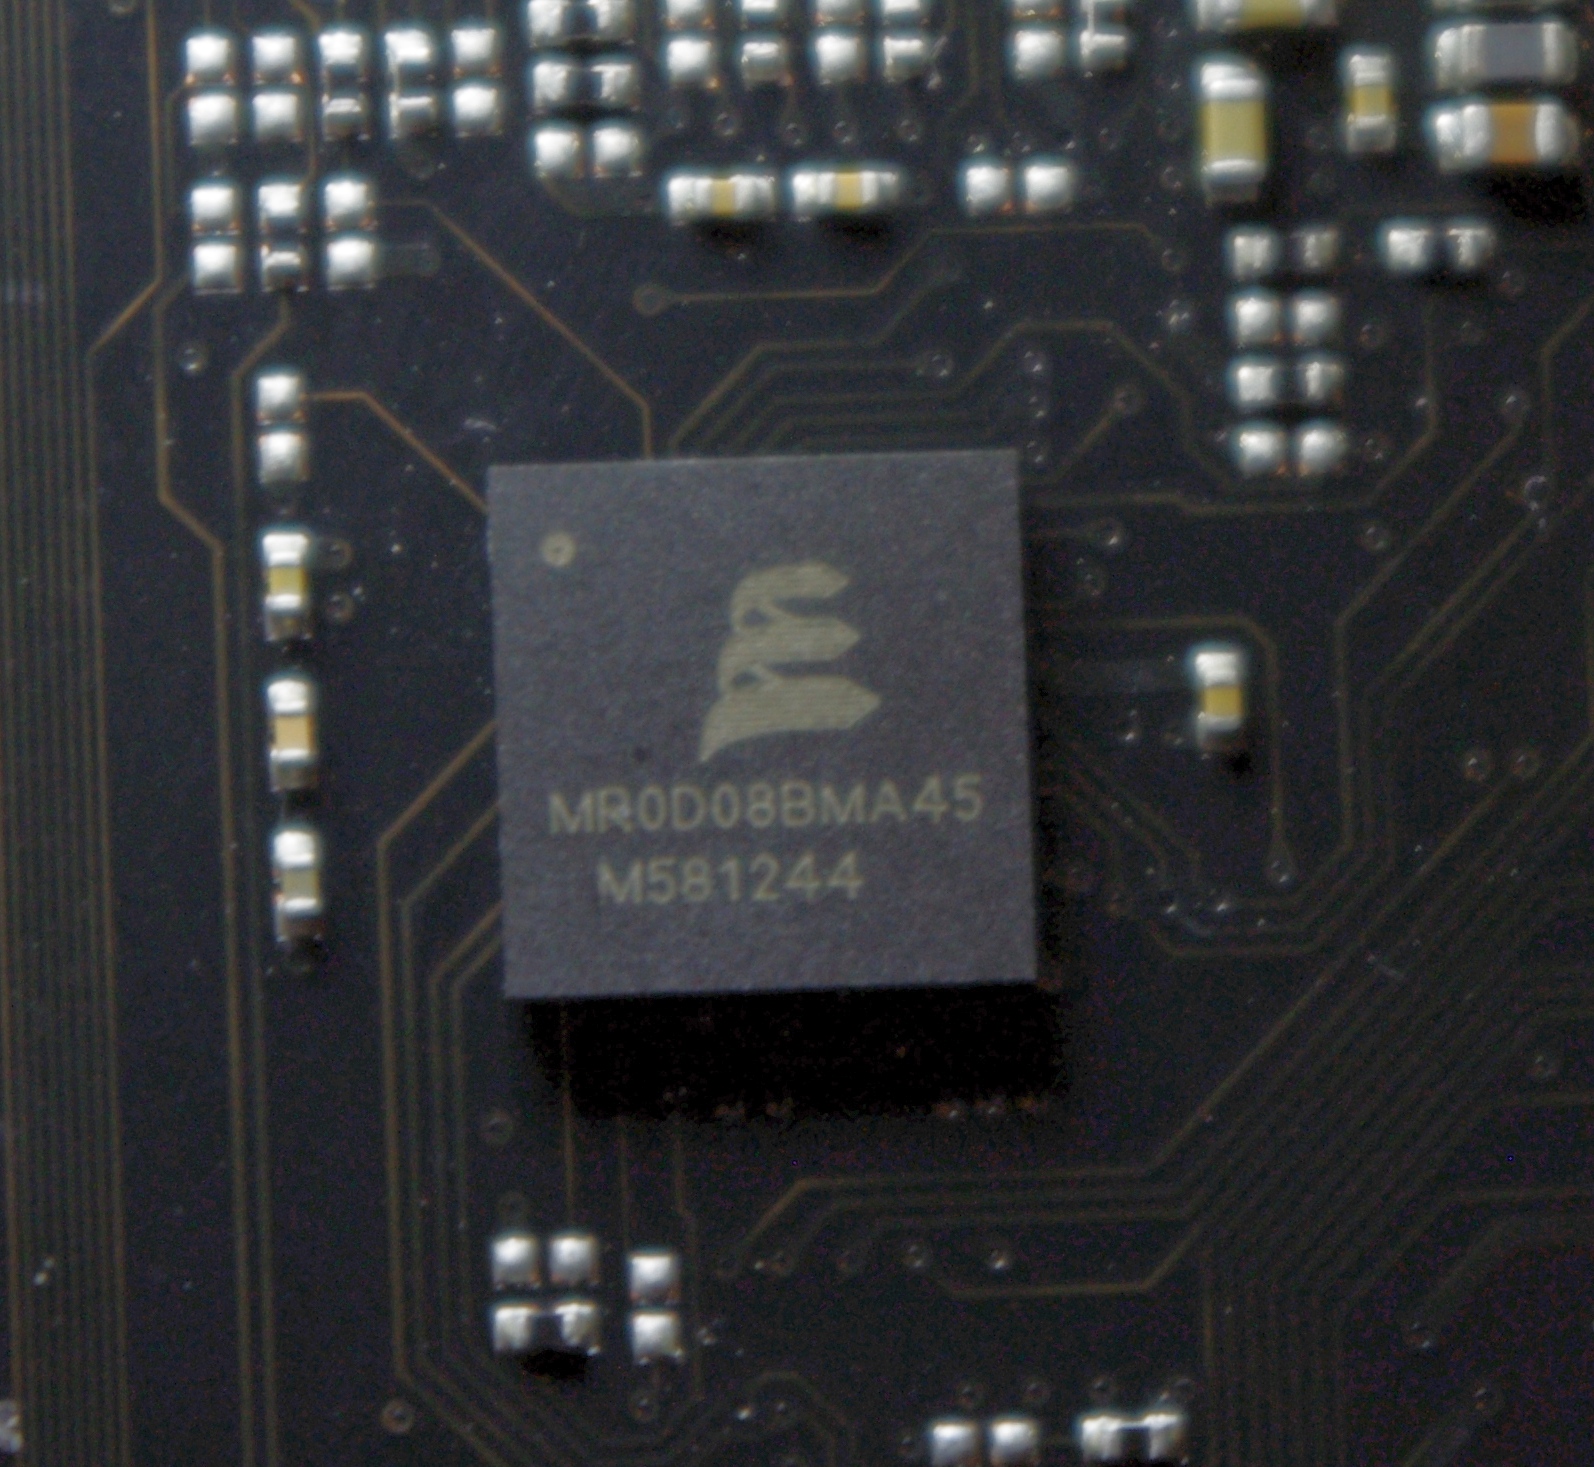
On the back of the motherboard is this interesting IC from Everspin, which turns out to be 1MB of cache for the LSI controller. There is scope for ASRock to put extra cache on the motherboard, allowing for higher up RAID controllers, but the cost/competition scenario falls into play again.

The final part of the RAID controller is this MXIC chip, which looks to be a 128Mbit flash memory IC with 110ns latency.

Aside from the fancier features, the motherboard has two USB 3.0 headers above the SATA ports (both from the PCH), power/reset buttons, a two digit debug display, two BIOS chips with a selector switch, two USB 2.0 headers, a COM header, and the usual front panel/audio headers. Bang in the middle of the board, between the PCIe slots and the DRAM slots, there is a 4-pin molex to provide extra power to the PCIe slots when multiple hungry GPUs are in play. There is also another power connector below the PCIe slots, but ASRock has told us that only one is needed to be occupied at any time. I have mentioned to ASRock that the molex connector is falling out of favor with PSU manufacturers and very few users actually need one in 2015, as well as the fact that these connectors are both in fairly awkward places. The response was that the molex is the easiest to apply (compared to SATA power or 6-pin PCIe power), and the one in the middle of the board is for users that have smaller cases. I have a feeling that ASRock won’t shift much on this design philosophy unless they develop a custom connector.
The PCIe slots give x16/x16/x16/x16, with the middle slot using eight PCIe 3.0 lanes when in use causing the slot underneath to split causing an x8/x8 arrangement. With sufficiently sized cards, this gives five cards in total possible. Normally we see the potential for a seven card setup, but ASRock has decided to implement two PCIe 3.0 x4 M.2 slots in-between a couple of the PCIe slots. The bandwidth for these slots comes from the CPUs PCIe lanes, and thus do not get hardware RAID capabilities. However, given the PM951 is about to be released, two of them in a software RAID for 2800 MBps+ sequentials along with an 18*6 TB setup would be a super storage platform.
For users wanting to purchase the 28-lane i7-5820K for this motherboard, the PCIe allocation is a little harder to explain. The CPU gives 8 lanes each to the PLX controllers, giving a full x16/x16/x16/x16 solution still applies, with another 8 lanes for the LSI controller. The first M.2 x4 port gets the last four lanes and the second M.2 slot is disabled.
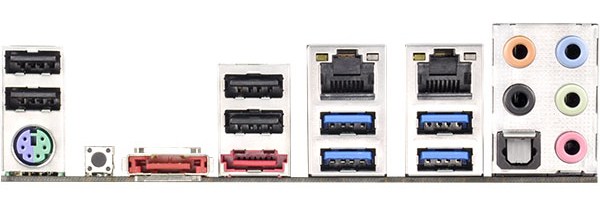
The rear panel gives four USB 2.0 ports, a combination PS/2 port, a Clear CMOS button, two eSATA ports, two USB 3.0 from the PCH, two USB 3.0 from an ASMedia controller, an Intel I211-AT network port, an Intel I218-V network port and audio jacks from the Realtek ALC1150 audio codec.


Board Features
| ASRock X99 Extreme11 | |
| Price | US |
| Size | E-ATX |
| CPU Interface | LGA2011-3 |
| Chipset | Intel X99 |
| Memory Slots | Eight DDR4 DIMM slots, up to Quad Channel 1600-3200 MHz Supporting up to 64 GB UDIMM Supporting up to 128 GB RDIMM |
| Video Outputs | None |
| Network Connectivity | Intel I211-AT Intel I218-V |
| Onboard Audio | Realtek ALC1150 (via Purity Sound 2) |
| Expansion Slots | 4 x PCIe 3.0 x16 1 x PCIe 3.0 x8 |
| Onboard Storage | 6 x SATA 6 Gbps, RAID 0/1/5/10 4 x S_SATA 6 Gbps, no RAID 8 x SAS 12 Gbps/SATA 6 Gbps via LSI 3008 2 x PCIe 3.0 x4 M.2 up to 22110 |
| USB 3.0 | 6 x USB 3.0 via PCH (2 headers, 2 rear ports) 2 x USB 3.0 via ASMedia ASM1042 (2 rear ports) |
| Onboard | 18 x SATA 6 Gbps Ports 2 x USB 3.0 Headers 2 x USB 2.0 Headers 7 x Fan Headers HDD Saver Header Front Panel Audio Header Front Panel Header Power/Reset Buttons Two-Digit Debug LED BIOS Selection Switch COM Header |
| Power Connectors | 1 x 24-pin ATX 1 x 8-pin CPU 2 x Molex for PCIe |
| Fan Headers | 2 x CPU (4-pin, 3-pin) 3 x CHA (4-pin, 2 x 3-pin) 1 x PWR (3-pin) 1 x SB (3-pin) |
| IO Panel | 1 x PS/2 Combination Port 2 x eSATA Ports 4 x USB 2.0 2 x USB 3.0 via PCH 2 x USB 3.0 via ASMedia 1 x Intel I211-AT Network Port 1 x Intel I218-V Network Port Clear CMOS Button Audio Jacks |
| Warranty Period | 3 Years |
| Product Page | Link |
One of the upsides of using a consumer grade motherboard for a prosumer system is the capability of both the BIOS and the features of the software compared to the normal workstation equipment. Normal workstations still use a dull black/white on blue BIOS implementation with no interactivity and mindless lists of features. With motherboards that come from the commercial lines of the major motherboard manufacturers, they bundle in both functionality and user experience, recognising that while the main user might not be interested, the local admin might need to go in sometime.
ASRock's X99 BIOS uses enhanced visuals, as well as a nicely laid out options list. It certainly beats the old style for sure, with the help system giving information when required. The goal here is to get motherboard manufacturers to increase the interactivity of such an interface, making it akin to software, but that remains difficult. ASRock uses icons and images, but we still have a fixed width font as well as merely selecting options. My hope is that this evolves - we live in the future after all.
Much of the detail of the ASRock X99 BIOS is similar to that of our previous ASRock X99 Motherboards. As a result we have copied the description and included it here for clarity, updated on note for the Extreme11 specific options.
ASRock X99 Extreme11 BIOS
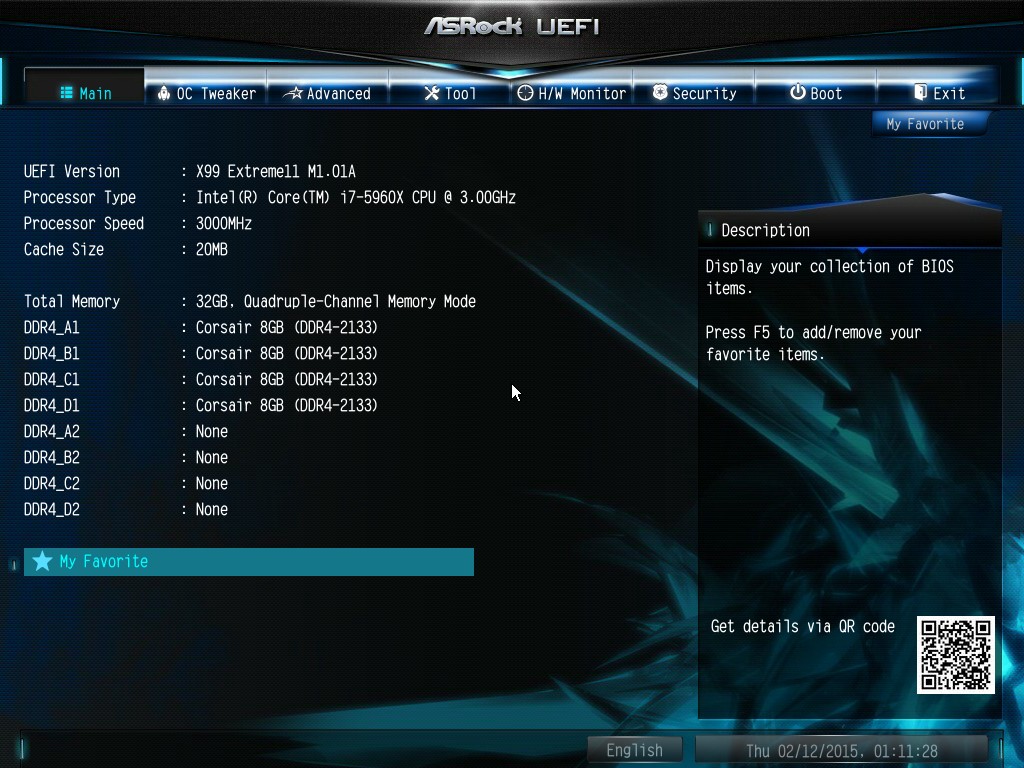
The ASRock BIOS shifted slightly between Z87 and Z97, and it is the Z97 implementation we get on X99. This means the starry background is gone, replaced with a dark and blue-crystalline image. The icons are also reduced to mere text with a small image, and unlike the ASUS BIOS the menu sections are of equal size, which I prefer. There is also an adjustment to the OC Tweaker layout, which we will come to.
There is no ‘Easy Mode’ for the ASRock BIOS, with entry direct into this first Main screen. The right hand side of the BIOS is for description of the option selected, and the main segment shows information such as the BIOS version, CPU installed, CPU speed and memory installed. As mentioned in previous reviews, having some set of information relating to CPU voltages, temperatures and fan speeds might be useful here. If ASRock was to do an Easy Mode, it would make sense to have a one-button overclock option as well.
OC Tweaker takes heed of one of my previous complains about the ASRock overclock options. Previously there used to be a long list of options that continuously grew, depending on what options were left open to the user. For X99, ASRock has condensed these options into separate submenus similar in design to those we see on a GIGABYTE motherboard. Note that ASUS and MSI BIOSes currently go half-way between these extremes, offering some basic options with the more advanced ones in separate menus.
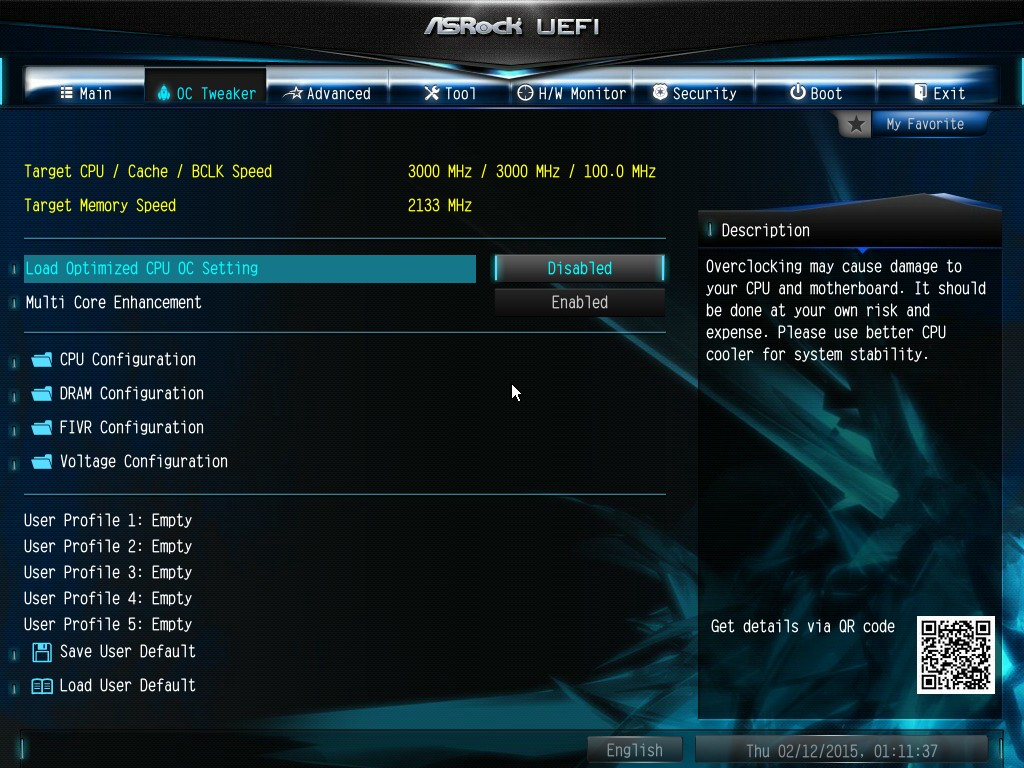
ASRock cuts straight to the chase – the first two options deal with overclocking. We have touched on features like Multi Core Enhancement many times previously, but it is interesting to have it so high up on the list of options. The Optimized CPU OC Setting gives some easy selections for overclocks based on ASRock’s internal testing:

In line with our overclock testing, 4.0 GHz and 4.2 GHz should be achievable by all CPUs, with 4.4 GHz by most and 4.5 GHz by around half, given sufficient cooling methods.
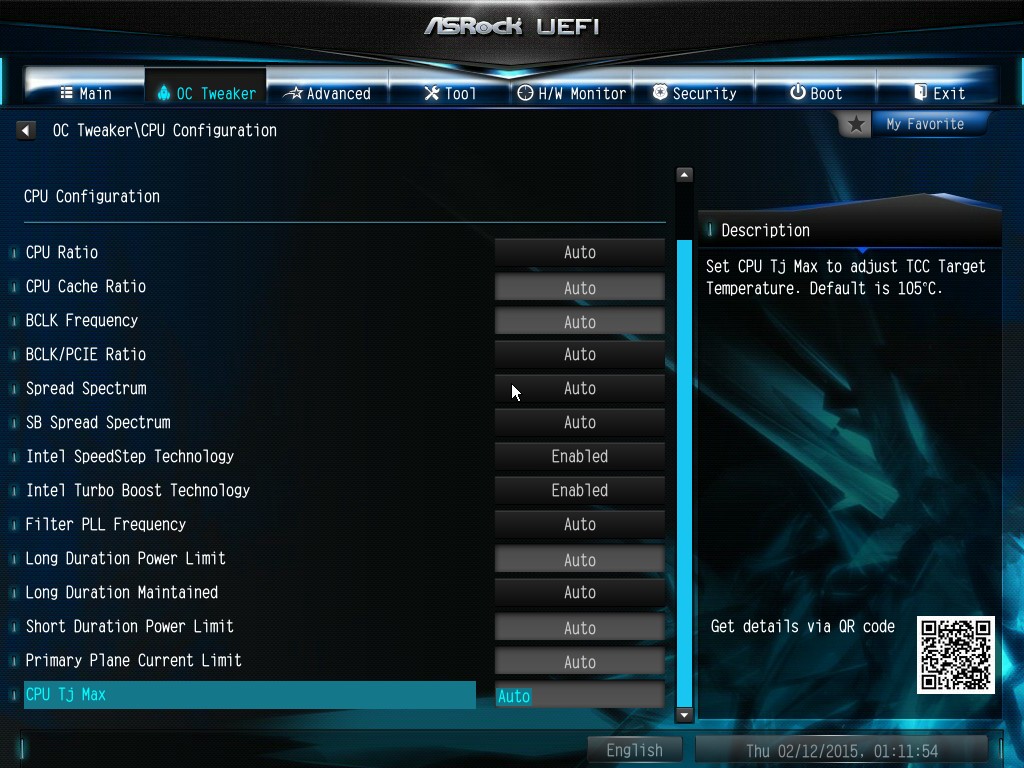
The OC Tweaker menu is split into four sections. CPU Configuration gives options for CPU Ratio, multiplier, frequency, turbo boost and power limits:
DRAM Configuration allows for XMP application, DRAM strap adjustment, DRAM voltage and sub-timing adjustment, all the way through primary timings, secondary timings, tertiaries and others.
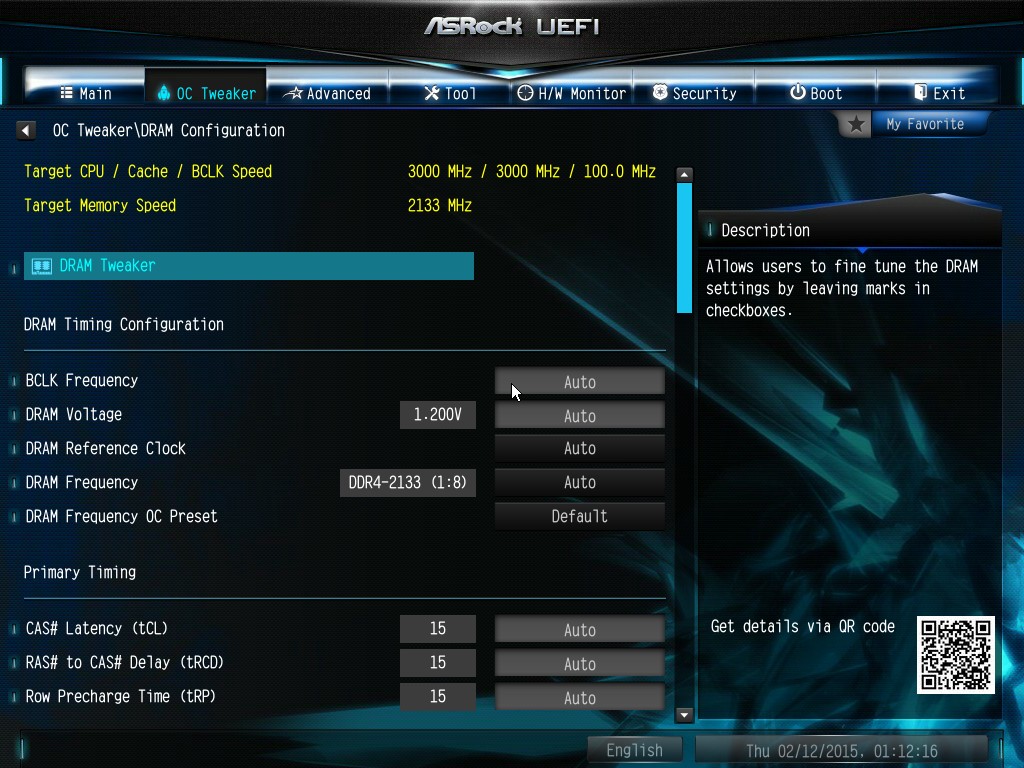
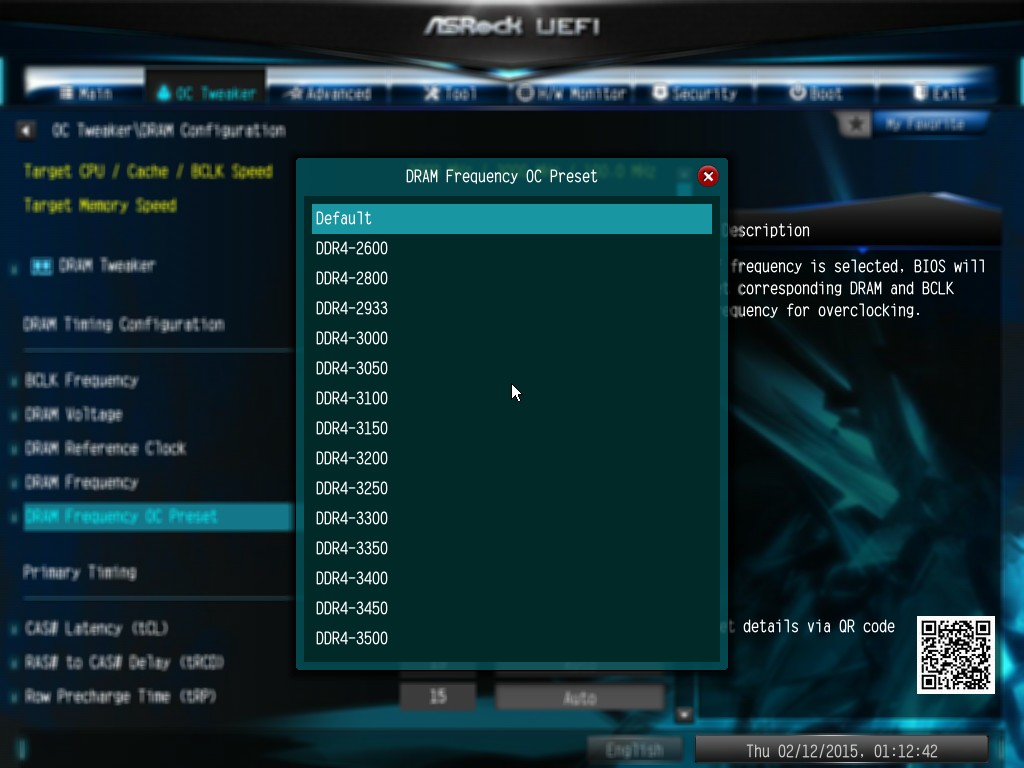
ASRock still uses the DRAM Tweaker function to fine tune the JEDEC and XMP responses to each memory kit. The ASRock BIOS also offers a DRAM Frequency overclocking preset list which will adjust the CPU strap and BCLK frequency needed to achieve various speeds.
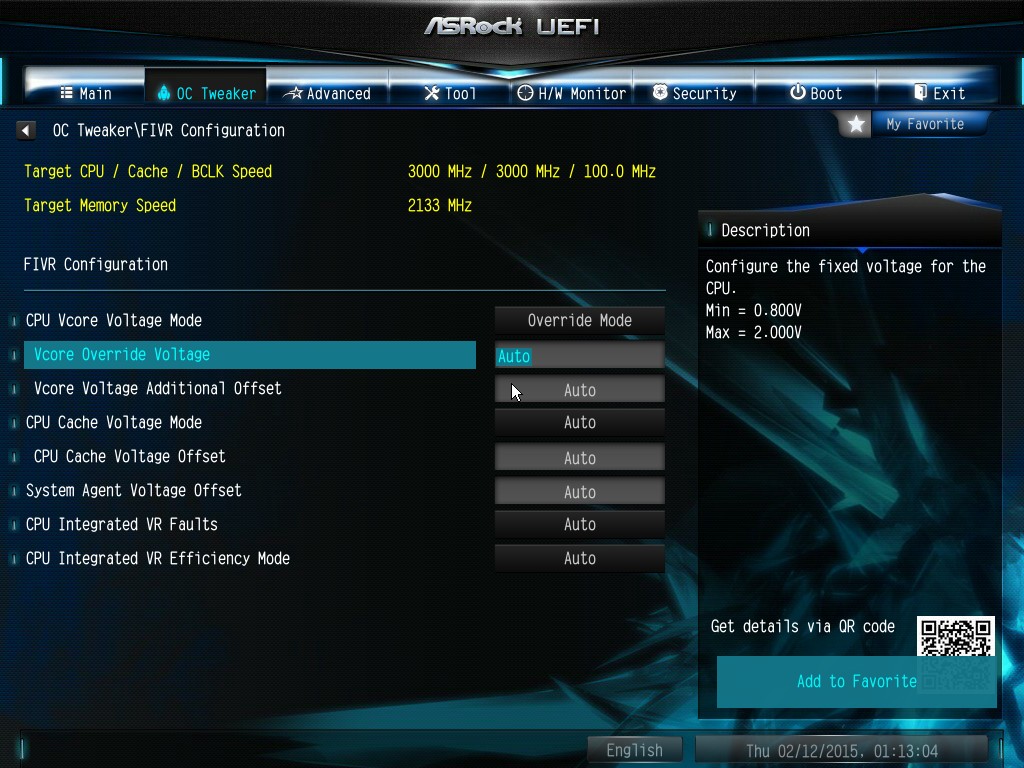
The FIVR Configuration menu from the OC Tweaker page deals primarily with the CPU and CPU Cache/uncore voltages.
The Voltage Configuration menu has the other voltages on the system, including VCIN to the FIVR and load line calibration. The Load Line Calibration option also comes with a handy graph showing what each setting means:
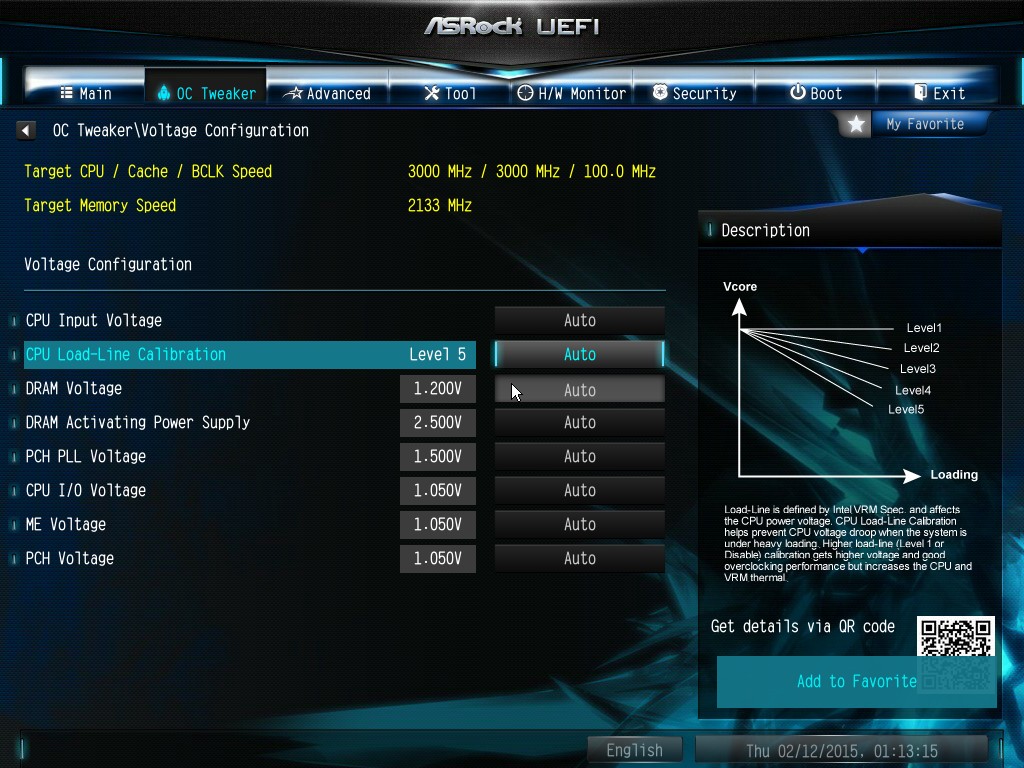
Unfortunately this arrangement of voltages is mildly confusing. Typically an overclocker will adjust the CPU voltage and the Load Line Calibration settings enough to get the right combination, and ASRock has placed these options in two different menus. If the CPU VCore option could be duplicated in the Voltage Configuration menu, this would be preferable.
The Advanced tab deals with other elements of the system configuration, such as the chipset, storage and super IO calibrations. This includes fixing power modes, PCIe linking speeds, disabling or enabling onboard controllers and adjusting RAID configurations.
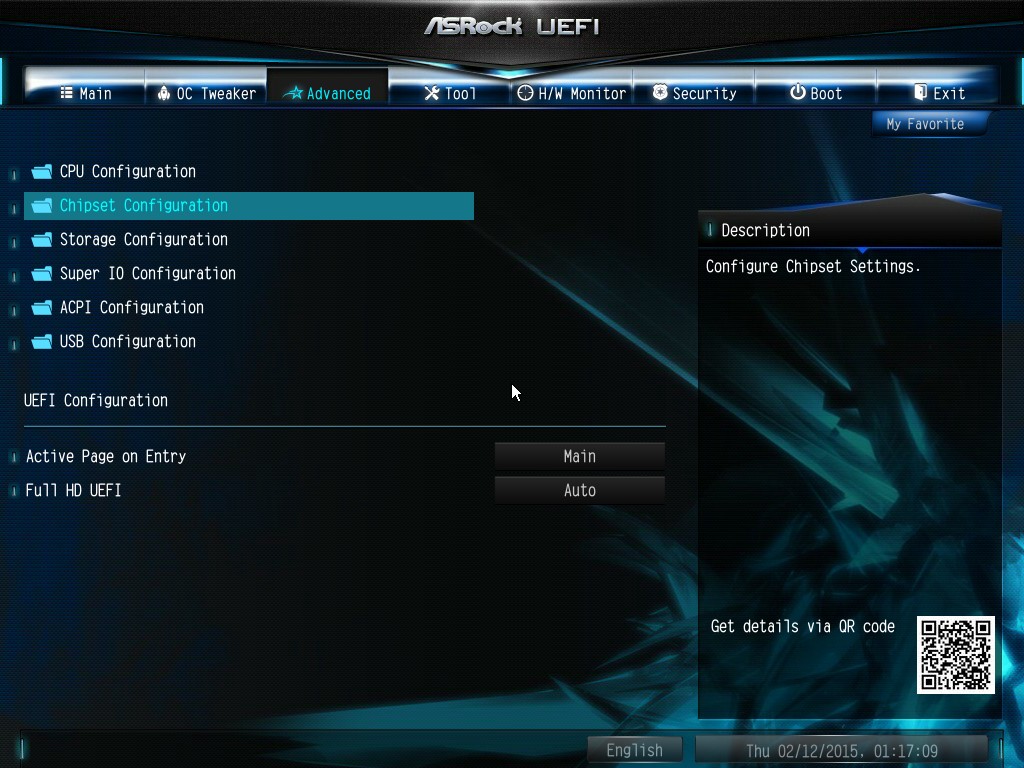
An adjustment to the X99 Extreme11 BIOS is that the Active Page on Entry setting has been moved here.
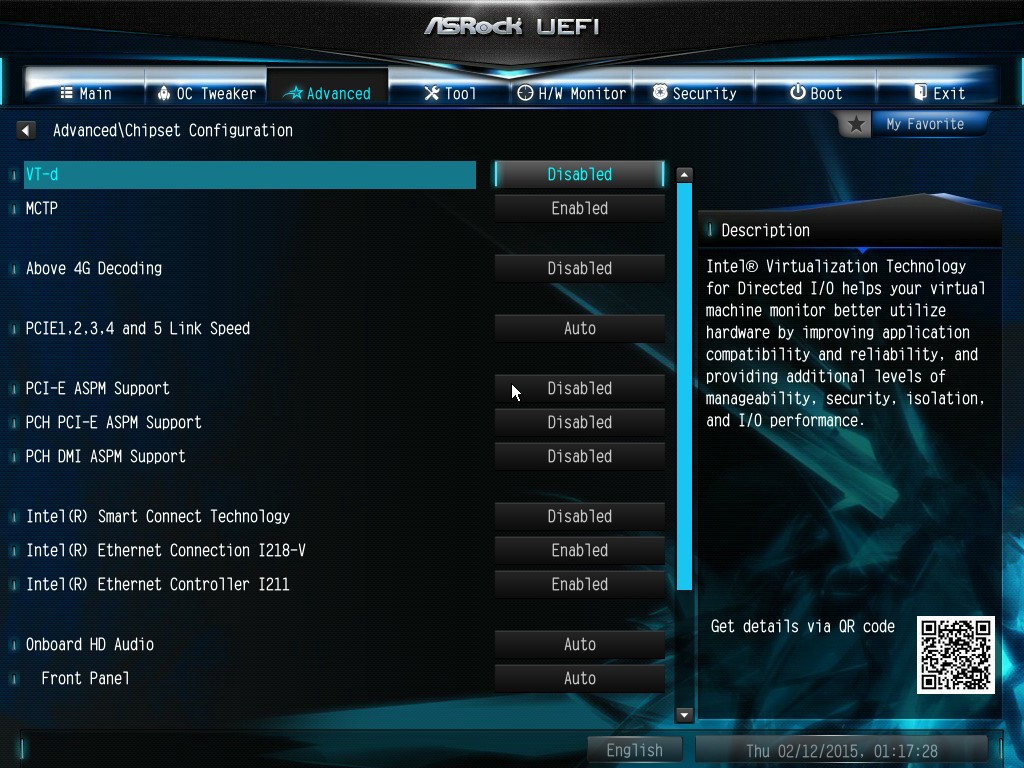
By default the ‘Above 4G Decoding’ inside the Chipset Configuration menu is disabled, for users that want PCIe coprocessors that require this feature.
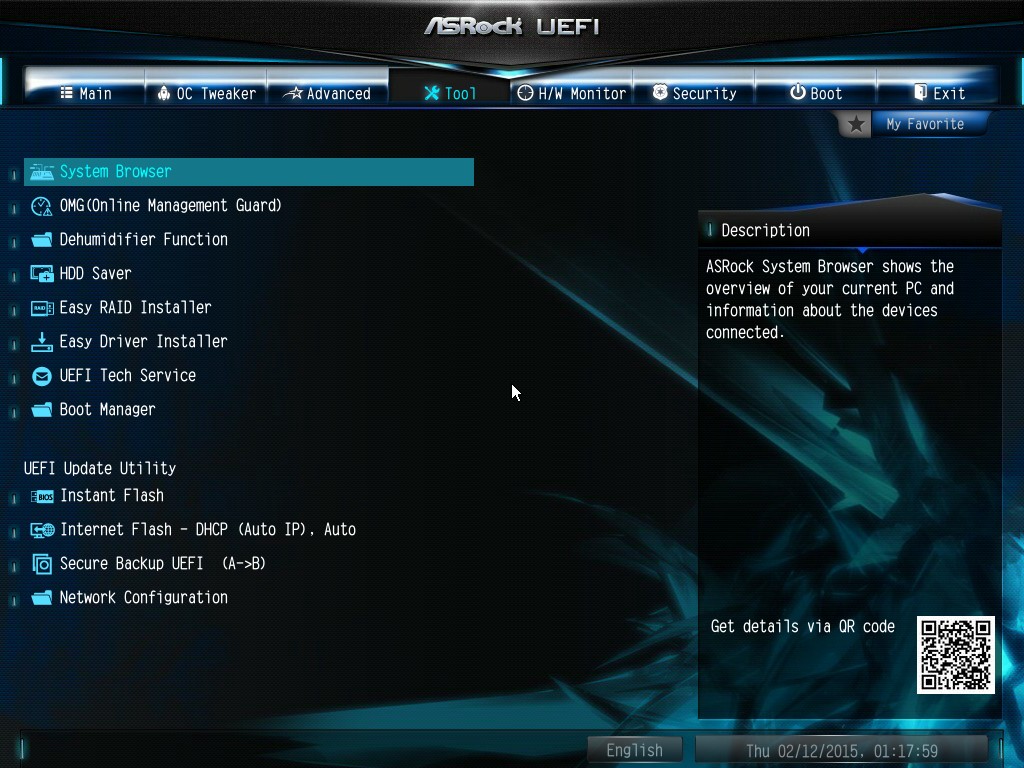
The Tools menu is typically where ASRock tries out its more unusual ideas, although we do not get anything new for X99 that we have not seen on Z97 already. The System Browser shows the different elements of the motherboard and what is detected:

The Online Management Guard (OMG) allows the user to enable or disable the network ports at various times of the day, as determined by the system time:
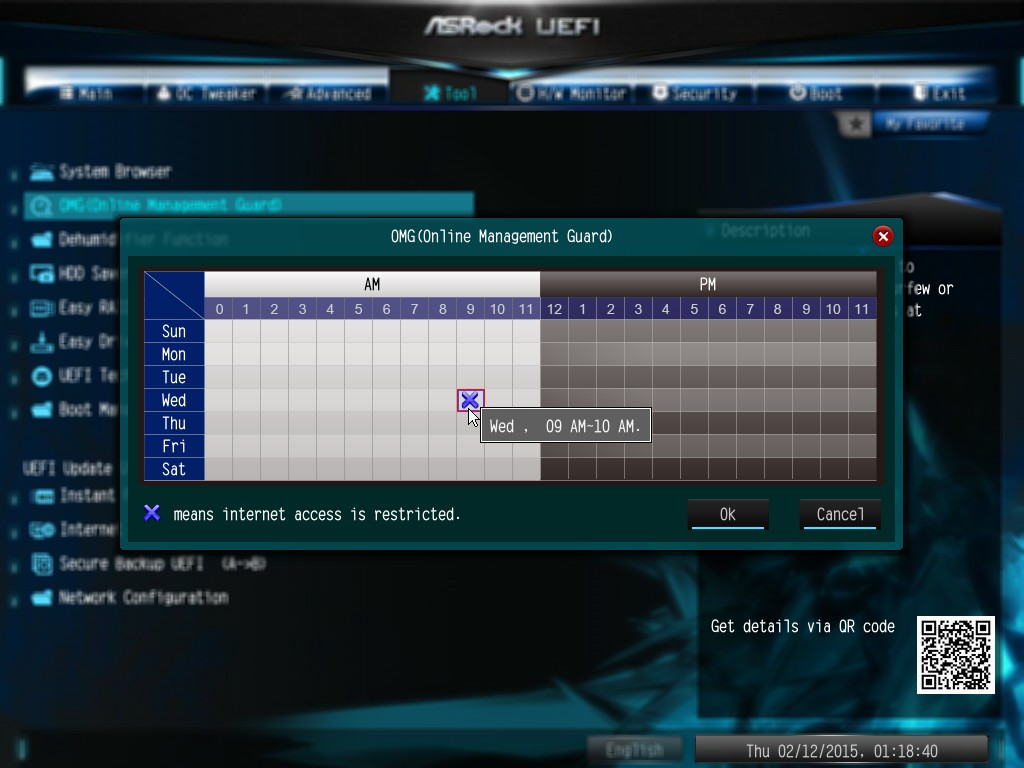
(It is amusing that this feature is aimed more at controlling when a child is allowed online, but X99 is not exactly a system configuration used as secondary machines.)
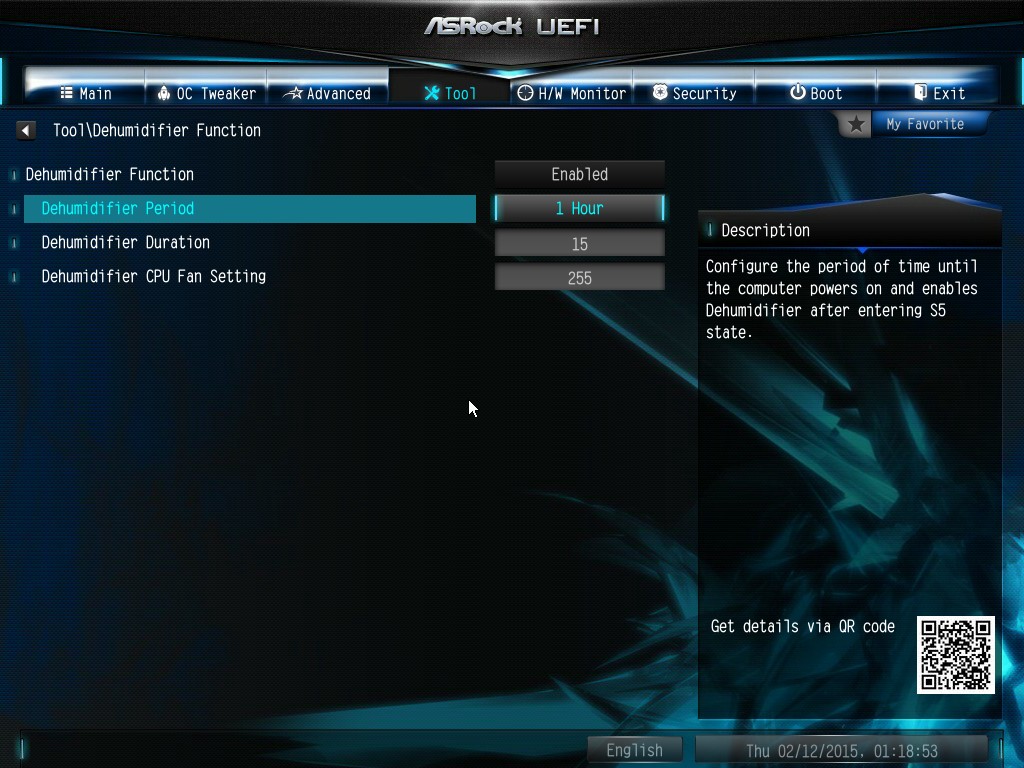
The Dehumidifier function now gets its own sub menu, allowing fans to spin for a fixed time after the machine is in S5:
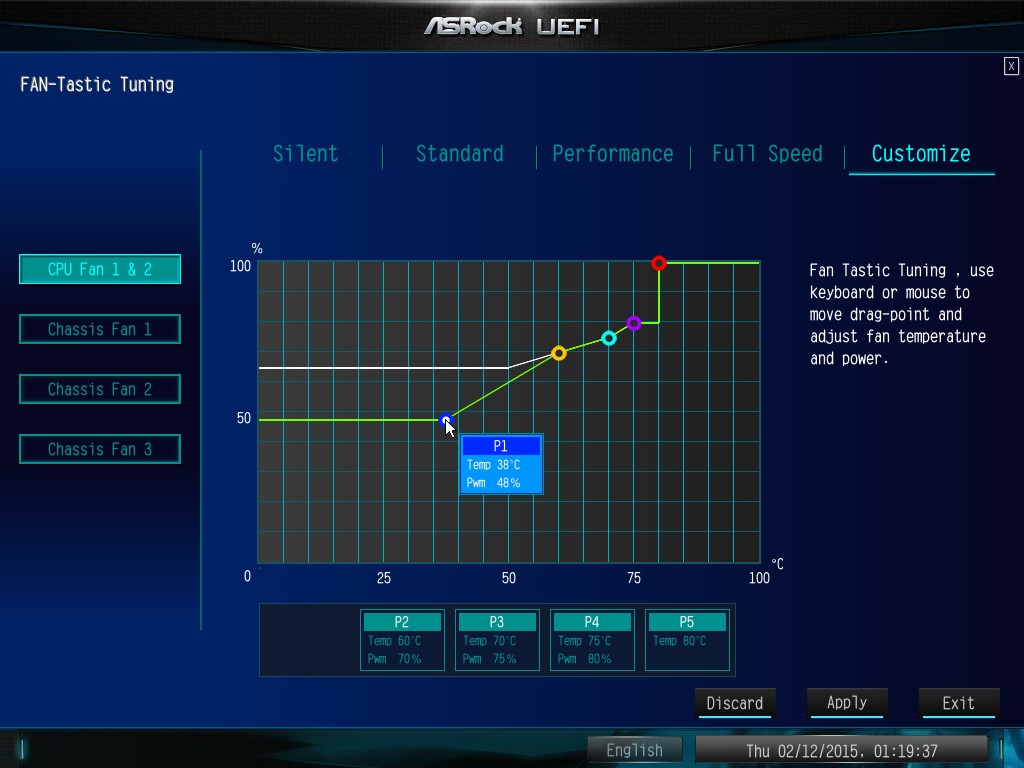
The H/W Monitor tab is where the temperatures, fan speeds and voltage monitoring tools are all kept, and we have seen an effort by the other manufacturers to improve the fan control situation. ASRock now joins them with the FAN-Tastic tuning option, moving into a more interactive type of scenario. This extends the multi-point gradient options into something more clickable, similar to the ASUS implementation. For example, a user can put a fan into one of five modes or customize the profile:
Rather than using the interface, users can do it the older way:
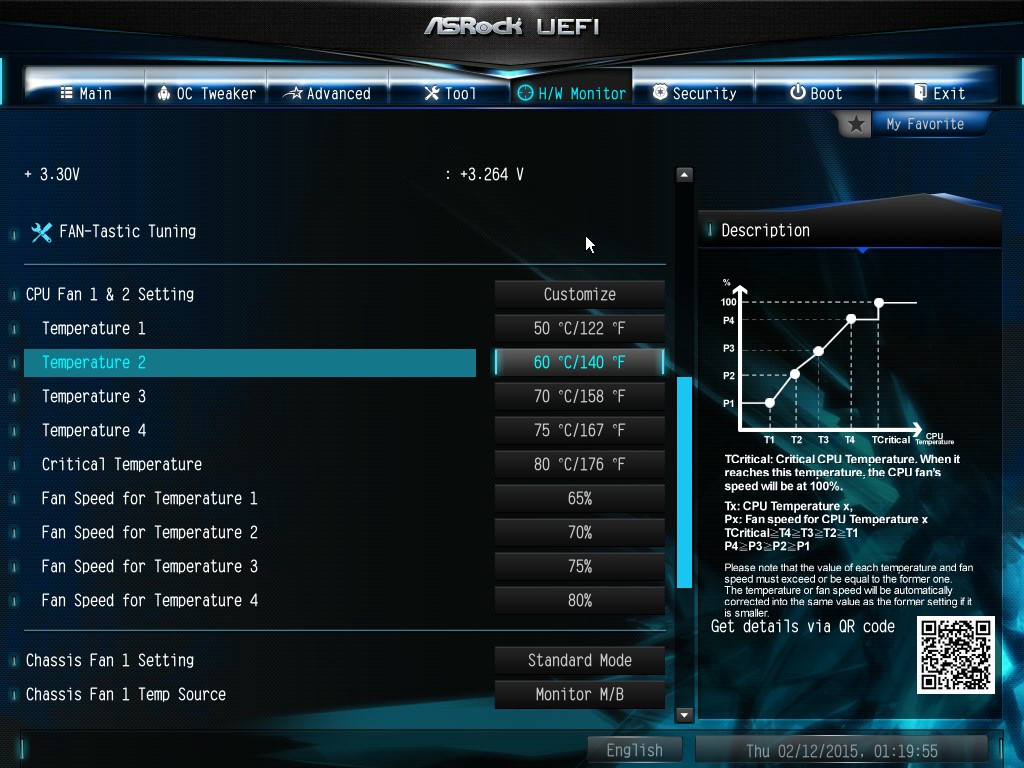
There is also an option to select which temperature sensor is being read from to make these adjustments.
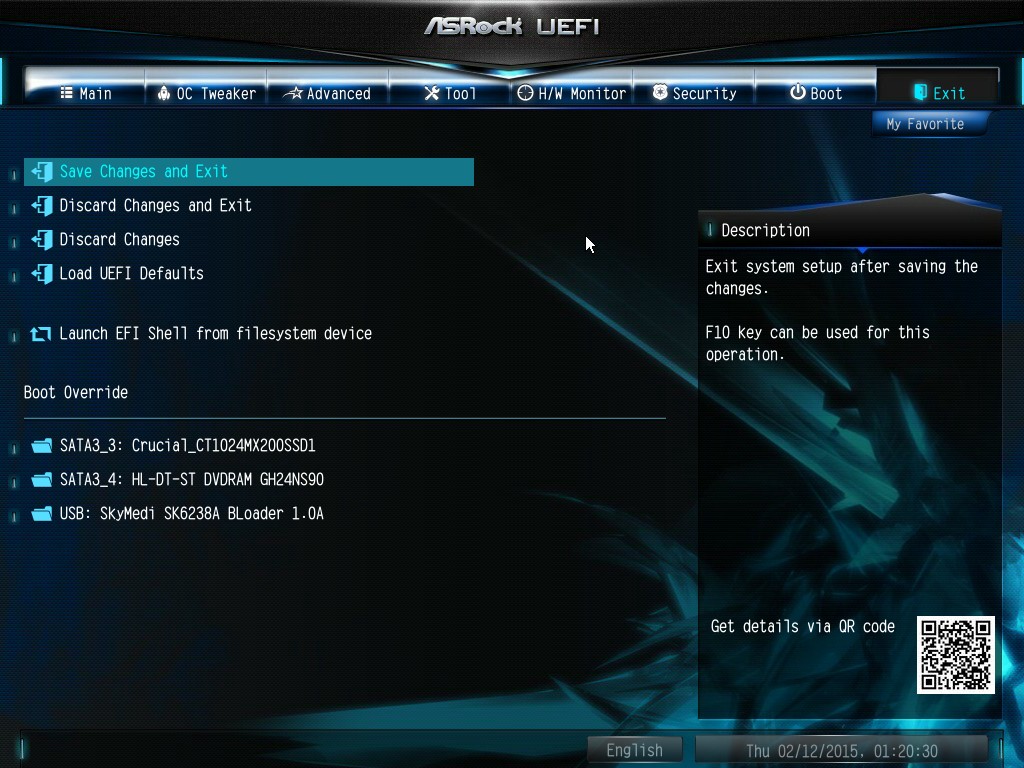
The rest of the BIOS deals with security, boot order and fast boot options. In the Save and Exit menu we do get options for Boot Override:


Much like the BIOS, the software for a consumer business unit motherboard often surpasses that provided by the professional market for functionality. Perhaps the only element missing that you would find on a server motherboard is one of delocalized control, but this is something I am putting to the motherboard manufacturers that focus on workstation level products. Nevertheless, features such as overclocking, fan controls and RAMDisk software comes as standard with the X99 Extreme11.
ASRock X99 Extreme11 Software
The software package from ASRock has gone through a slow evolution since Z77 into a single interface for all of ASRock’s functionality called A-Tuning. With the overclocking and gaming models the interface is slightly adjusted, but the green tint follows the majority of ASRock’s motherboard range. However the newest element to ASRock’s like is the APP Shop. This is essentially ASRock’s curated version of the Play Store/Microsoft Store, with only software ASRock feels is suited to their motherboard range.
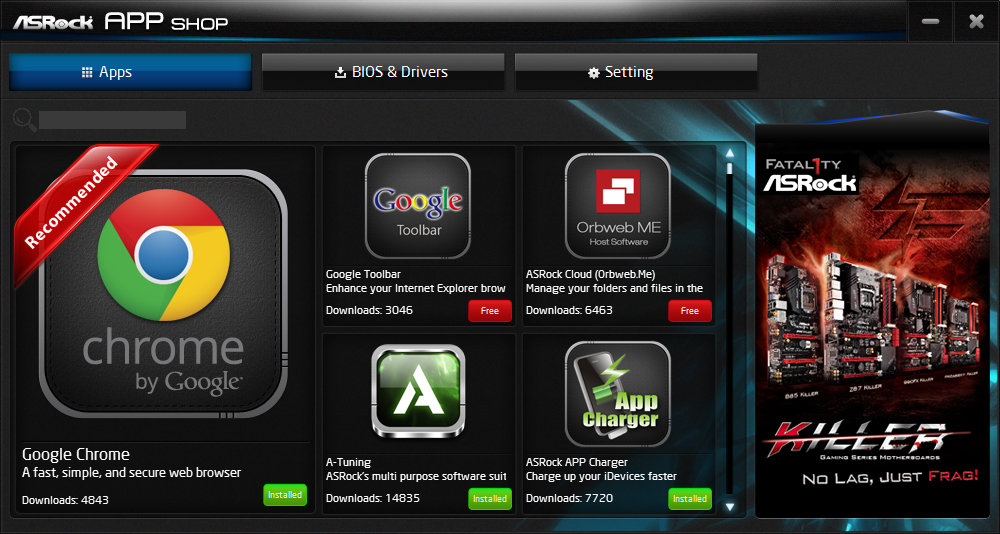
Currently the software is fairly limited to Chrome, ASRock’s own software programs and a few Asian free-to-play titles. While offering this method to obtain software is interesting, it does open up a lot of questions. Will there be to-pay titles? What happens if one element of the store is filled with malware?
The APP Shop also offers a BIOS and Drivers section to update the system, but as of yet we have not had it working properly in our testing.
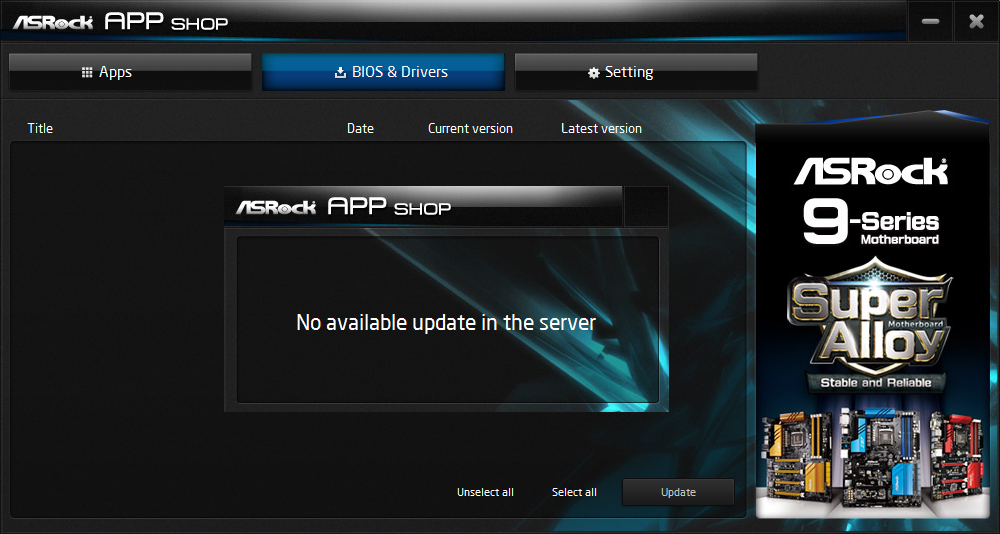
One suggestion has been that this software will only update the packages it downloads. There is another update tool in A-Tuning.
A-Tuning
The initial interface revolves around overclocking, giving the following three modes for automatic frequency adjustments:
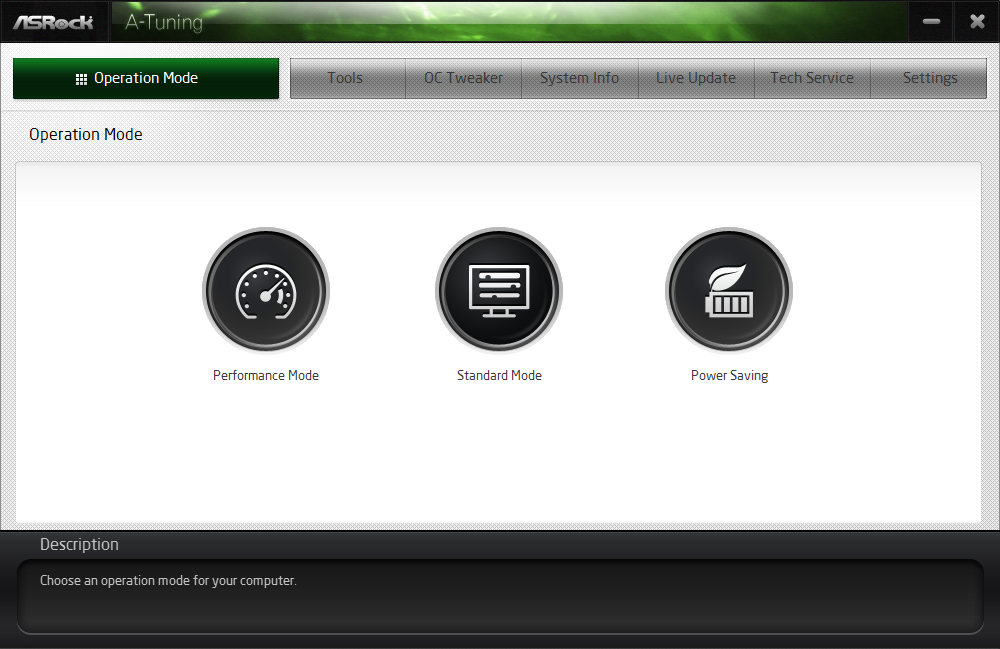
Power Saving puts the CPU into a low power mode (1.2 GHz on the 5960X) and requires the system have full CPU load before slowly ramping up the speed over the next 6-10 seconds. This keeps power consumption down, but perhaps decreases the responsiveness of the system by not having that initial high single core frequency. Standard mode is the default setting, and Performance mode puts the CPU into high frequency mode for any loading. Performance Mode also opens up the Advanced menu:
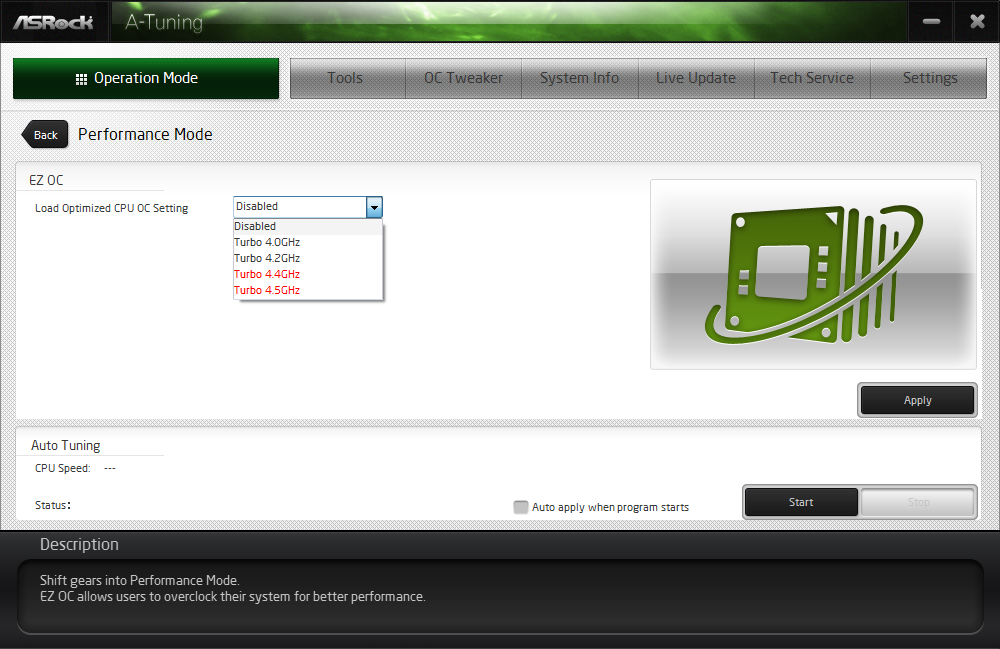
Here we have a list of Optimized CPU OC Settings similar to the BIOS and an auto tuning section. There is no list of auto tuning options similar to ASUS, for adjusting the stress tests or the optimum CPU temperature, although I would imagine that all the manufacturers might move in that direction at some point in the future.
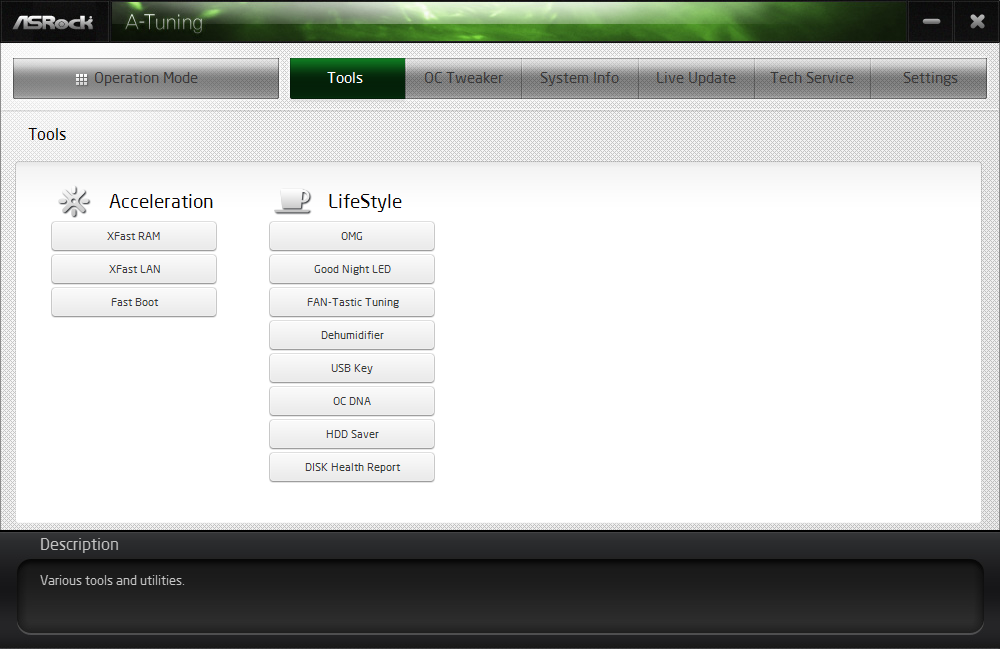
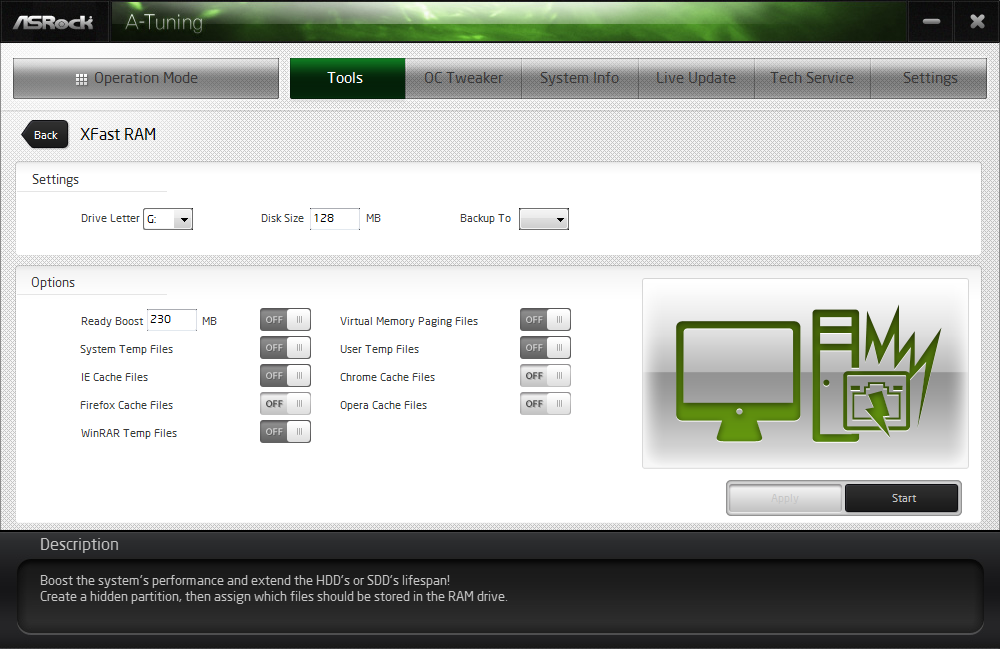
The tools menu has a lot of space for ASRock to add in future features, but currently houses the ones they do have. XFast RAM allows the system to partition some of the RAM into a RAMDisk while also providing some RAMCache options:
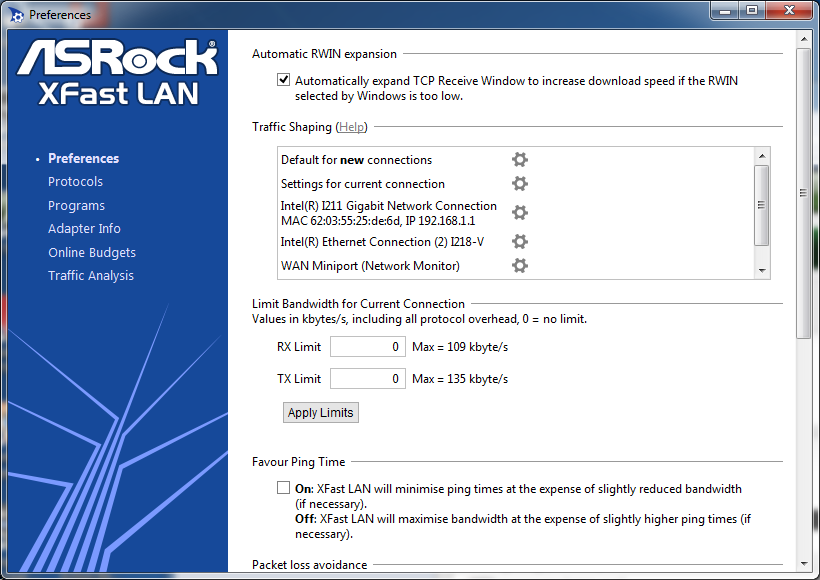
XFast LAN is a customized interface for cFos, allowing users to prioritize certain applications over others:
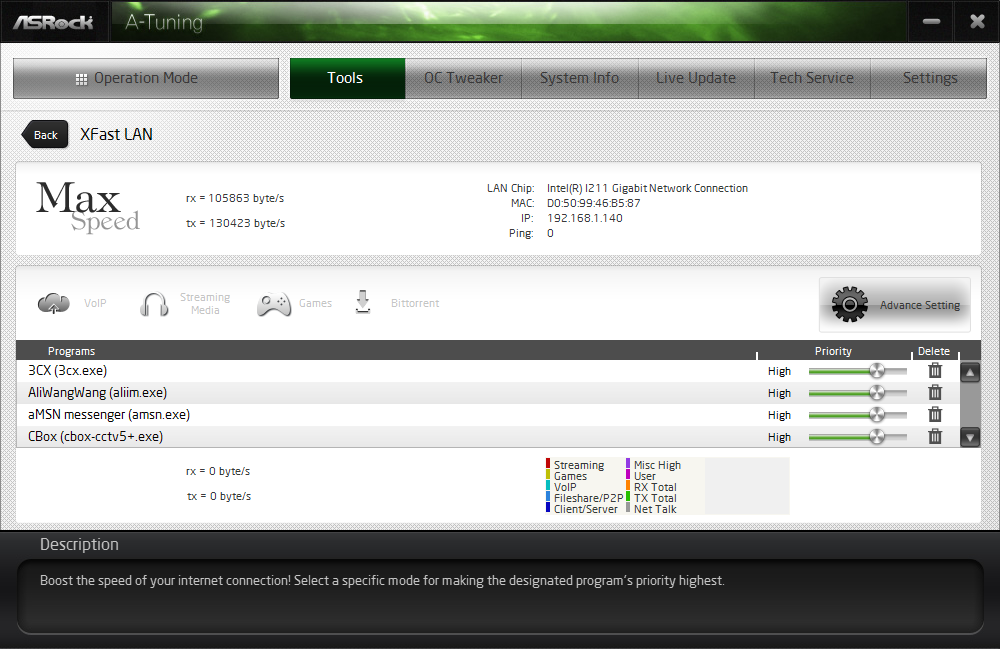
Personally I find this interface extremely cumbersome, especially if there are a lot of applications to deal with. ASRock could design something with less white space and a more efficient amalgamation of the A-Tuning visual dimensions to make the process a lot easier. There is access to cFos directly with the Advance Setting button:
The software works with all the network ports on board.
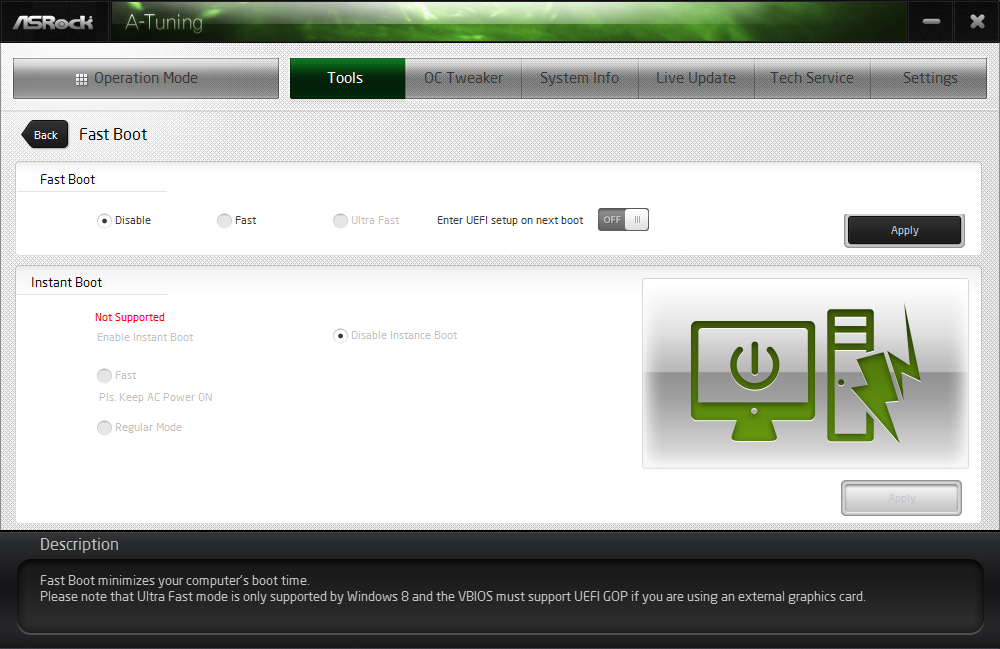
Fast Boot enables options relating to UEFI quick booting by disabling certain options until the OS is loaded:
The Online Management Guard (OMG [!]) has been around for several generations of ASRock motherboards now, and offers the user the ability to disable the networking ports during certain times of the day.

ASRock’s Fan software in the software now mirrors that in the BIOS, giving a better sense for the user in what to adjust:
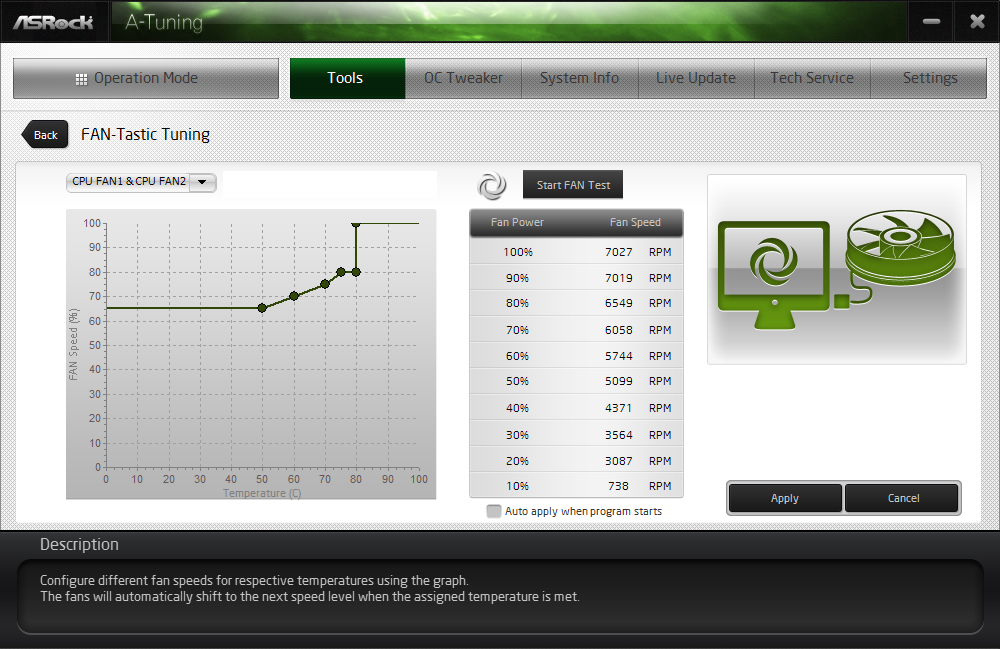
The FAN Test will detect the RPM for a given fan power, although the graph on the left is misnamed – what ASRock calls ‘FAN Speed (%)’ is actually deceptive because it means ‘Fan Power’ and the user has to do the mathematics in their head to adjust based on the table in the middle. If ASRock was on the ball, they would do the conversion in software and adjust the graph to read ‘Fan Speed (RPM)’ and adjust the axis appropriately from lowest Fan Speed to highest Fan Speed. Note that the high fan speeds above are actually the speeds from my liquid cooling pump.
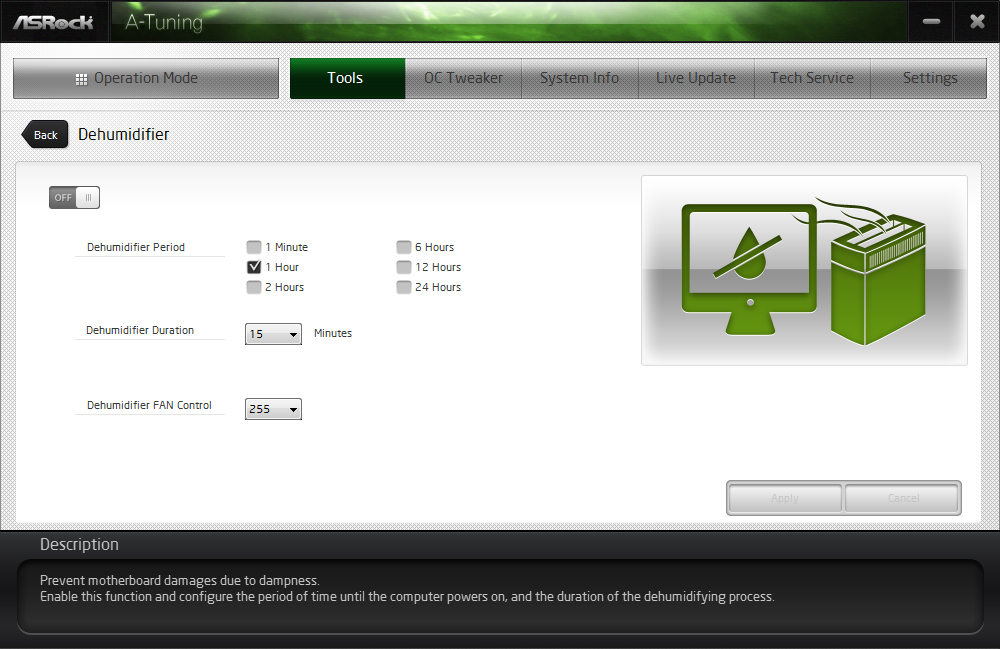
The Dehumidifier tool in the software is identical to that in the BIOS, allowing the system to enable the fans after the system has been shut off in order to equalize the air temperature inside and outside the case. This has benefits in humid environments where the moisture in the air may condense inside the case during a cool night after a hot day.

The USB Key tool allows users to assign a particular USB drive with login data for particular Windows users. This means that users need not remember a particular long password to log in, and only specified users are allowed to log in. Though lose the USB drive and lose the ability to log in.
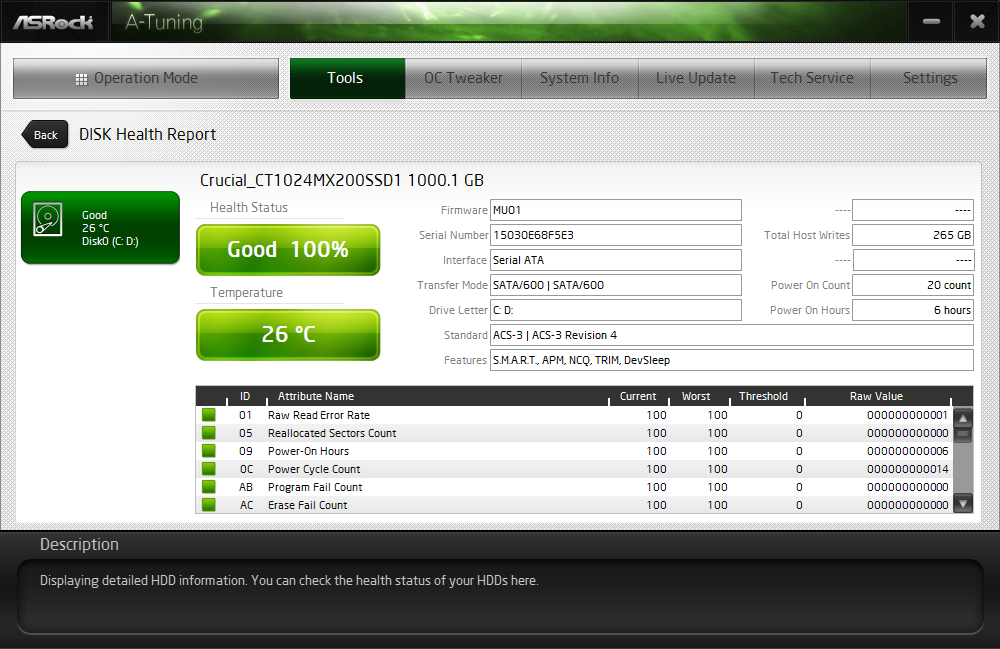
One of the newer tools in ASRock’s list is the DISK Health Report. This gives the critical information on the drives attached to the system, allowing SSD users to see the life of their drive. This drive is very new for my motherboard test beds, as represented by only a few hours in actual operation.
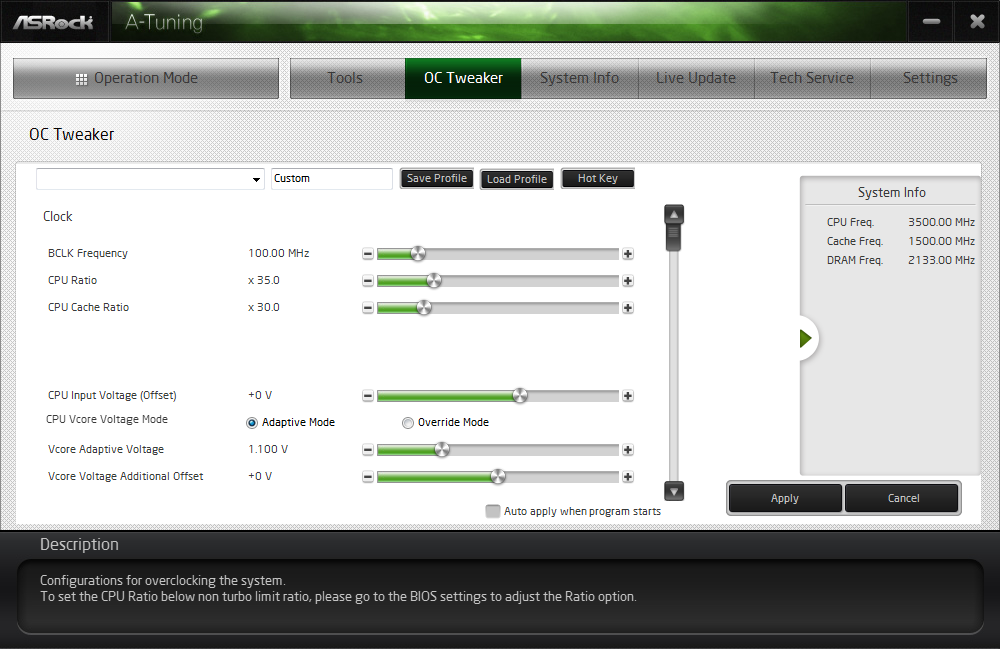
The next tab along the top is the OC Tweaker, featuring the more critical options from the BIOS for manual overclocking along with some options to save overclock profiles. The way this is shown in ASRock’s software is quite user-unfriendly, and I would suggest that the next iteration of the software gives an experienced user an easier way to adjust frequencies and voltages without dealing with sliding bars and scrolling.
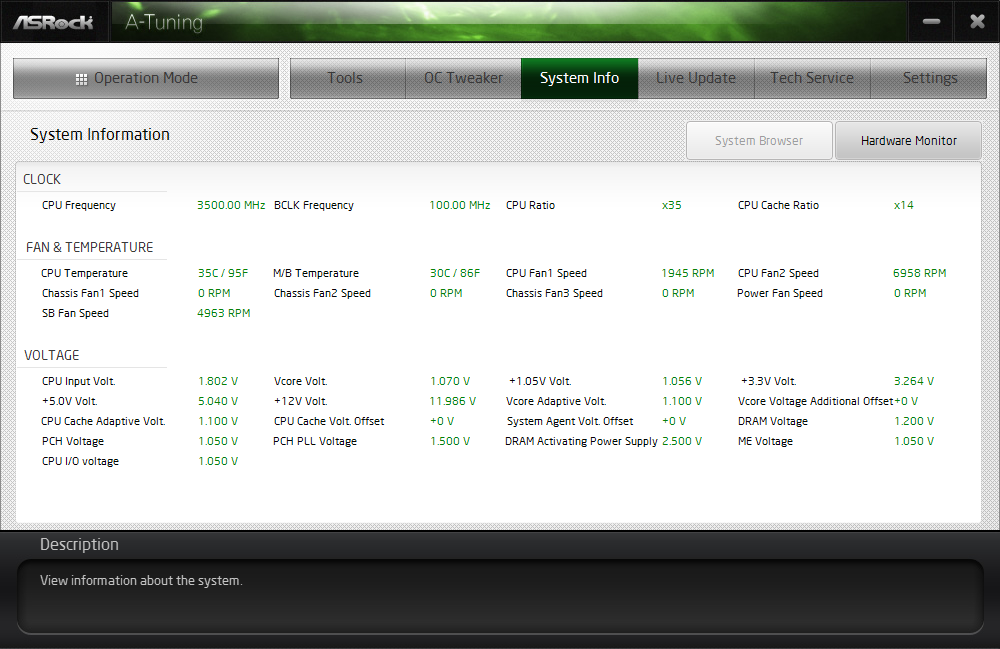
The System Info tab gives the hardware monitor page by default, giving information about the frequencies, fan speeds and voltages in the system. Most other manufacturers have a way of recording this data, or seeing it plotted on a graph while running a stress test, but ASRock is behind on this front at this time.
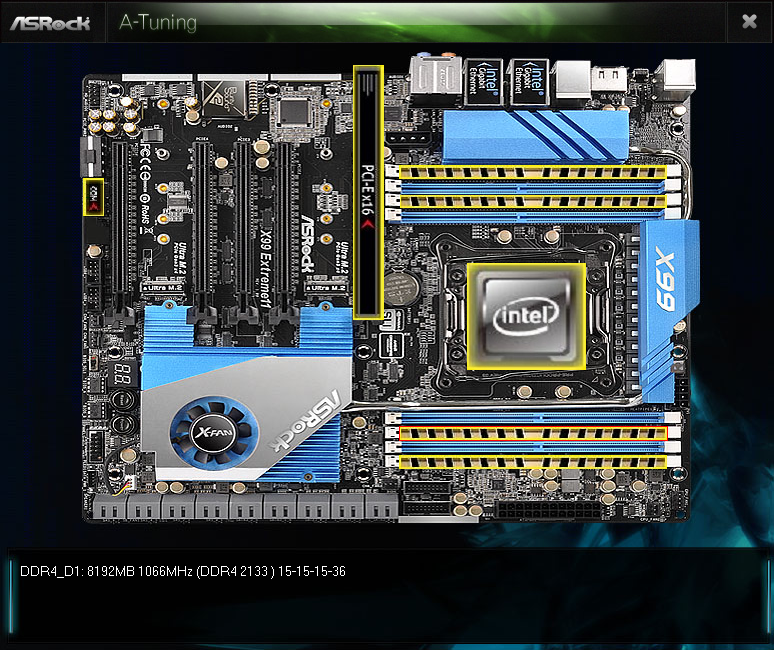
The Hardware Monitor section of System Info is identical to that in the BIOS, showing where hardware is installed with a mouse over giving basic details. This is handy for investigating which memory stick, USB or PCIe device is not being detected.
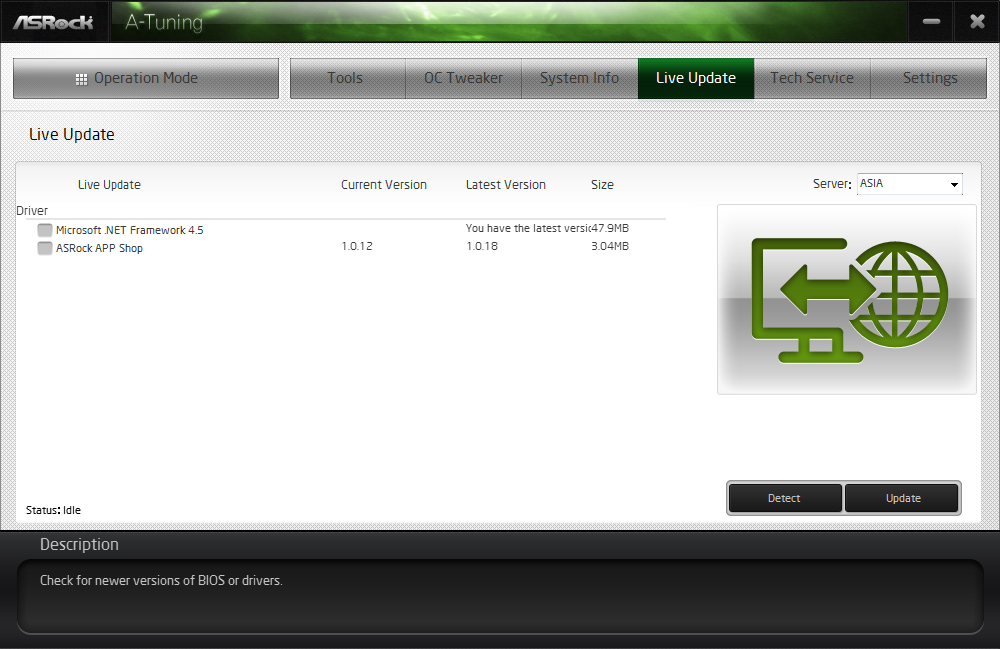
The Live Update tab is, by comparison to MSI, limited. Although I knew there were updates to the platform when I run this software, it failed to find the updated drivers. There has been a mini-update since the first implementation - it also does now mentions how big each download is. If a user is on a limited or slow bandwidth package having to download 300MB of audio or graphics drivers can be detrimental, so having this information is vital.


ASRock X99 Extreme11 In The Box
With money-is-no-object type motherboards, the package has to consider the market. Do prosumers want 18 SATA cables, or are they using a system with a backplane that comes with it all? Are buyers going to want to game, or are they Xeon Phi users for compute and don't need SLI bridges? One could argue that given the cost of the package, it should all be bundled anyway to encompass all users, but event at this price bracket if the manufacturer can save a few cents, they might do so.
In the ASRock X99 Extreme11 box we get the following:
Driver DVD
User Manuals
Rear IO Shield
HDD Saver Cable
Six SATA Cables
Two Rigid 2-way dual-slot SLI connectors
One Rigid 2-way quad-slot SLI connector
One Rigid 4-way SLI connector
Two M.2 Screws
A Carry Bag
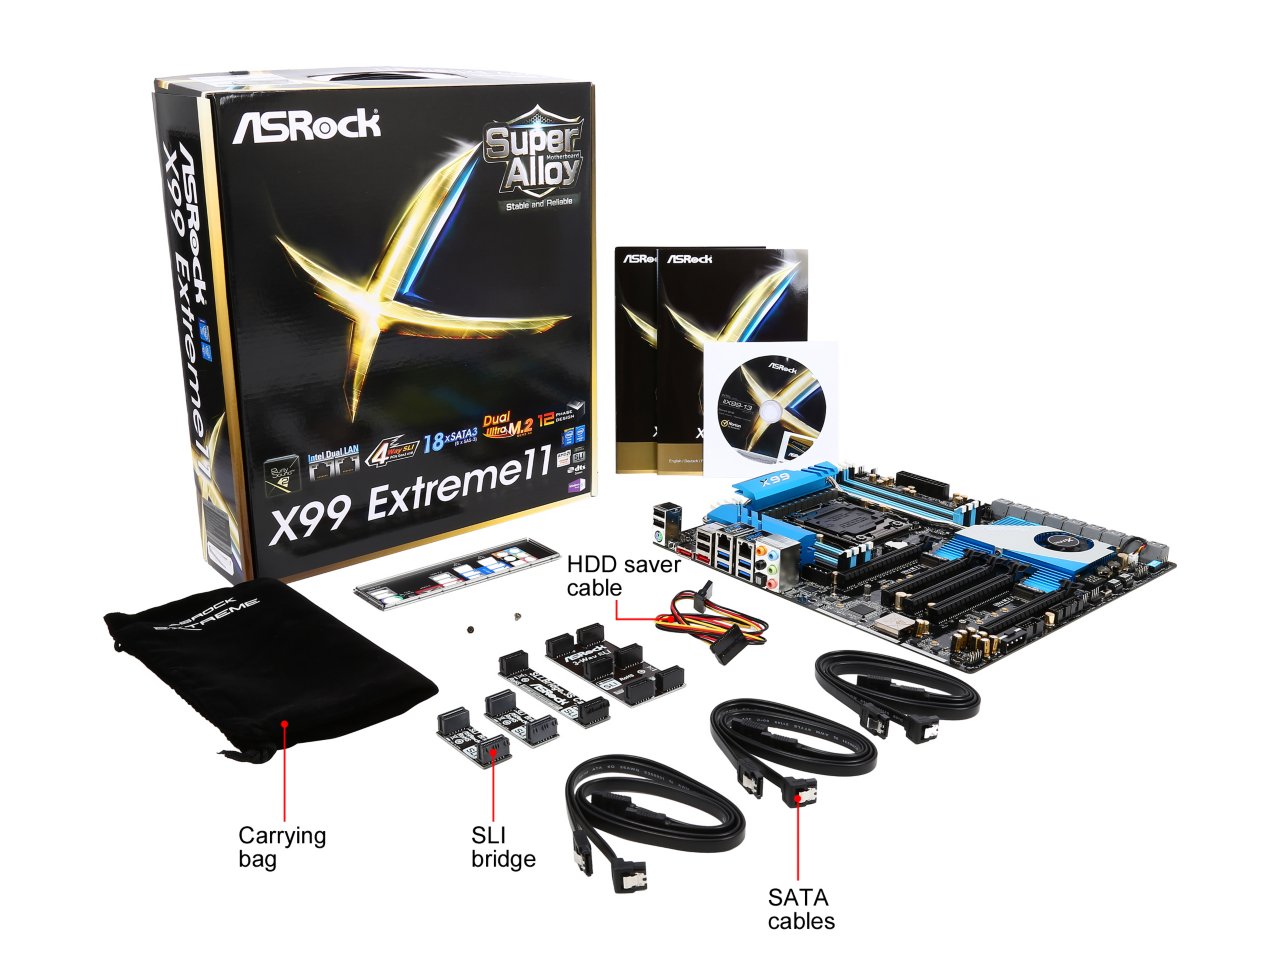
This is pretty much what I would have expected from a motherboard like this. As it does not fall under the gaming or overclocking lines, there are no gaming or OC add-ons: just cables and SLI bridges. It might have been interesting to have included a drive bay for the two onboard USB 3.0 headers, especially one that might fit a boot drive also. Perhaps because in 2015 a lot of cases come with at least one USB 3.1 header now, ASRock sees little need.
Many thanks to...
We must thank the following companies for kindly providing hardware for our test bed:
Thank you to OCZ for providing us with PSUs and SSDs.
Thank you to G.Skill for providing us with memory.
Thank you to Corsair for providing us with an AX1200i PSU.
Thank you to MSI for providing us with the NVIDIA GTX 770 Lightning GPUs.
Thank you to Rosewill for providing us with PSUs and RK-9100 keyboards.
Thank you to ASRock for providing us with some IO testing kit.
Thank you to Cooler Master for providing us with Nepton 140XL CLCs.
Test Setup
| Test Setup | |
| Processor | Intel Core i7-5960X ES 8 Cores, 16 Threads, 3.0 GHz (3.5 GHz Turbo) |
| Motherboards | ASRock X99 Extreme11 |
| Cooling | Cooler Master Nepton 140XL |
| Power Supply | OCZ 1250W Gold ZX Series Corsair AX1200i Platinum PSU |
| Memory | Corsair DDR4-2133 C15 4x8 GB 1.2V G.Skill Ripjaws 4 DDR4-2133 C15 4x8 GB 1.2V |
| Memory Settings | JEDEC @ 2133 |
| Video Cards | MSI GTX 770 Lightning 2GB (1150/1202 Boost) |
| Video Drivers | NVIDIA Drivers 332.21 |
| Optical Drive | LG GH22NS50 |
| Case | Open Test Bed |
| Operating System | Windows 7 64-bit SP1 |
ASRock X99 Extreme11 Overclocking
Experience with ASRock X99 Extreme11
While the positioning of the Extreme11 indicates it is a board more so for functionality rather than overclocking, it does offer ASRock’s base array of overclocking options in both the BIOS and software. This includes the Optimized CPU OC Configuration drop downs in both the BIOS and software, although it should be noted that Xeons cannot overclock via the multiplier.
With our mediocre CPU, the automatic overclocks at 4.4 GHz and beyond caused BSODs when under AVX load, but manual overclocking did give 4.4 GHz at a rather high voltage. There is not much to conclude, due to our processor not being the best, but other motherboards have achieved around the same result with the CPU we have.
Methodology
Our standard overclocking methodology is as follows. We select the automatic overclock options and test for stability with PovRay and OCCT to simulate high-end workloads. These stability tests aim to catch any immediate causes for memory or CPU errors.
For manual overclocks, based on the information gathered from previous testing, starts off at a nominal voltage and CPU multiplier, and the multiplier is increased until the stability tests are failed. The CPU voltage is increased gradually until the stability tests are passed, and the process repeated until the motherboard reduces the multiplier automatically (due to safety protocol) or the CPU temperature reaches a stupidly high level (100ºC+). Our test bed is not in a case, which should push overclocks higher with fresher (cooler) air.
Overclock Results

Power delta between the stock and highest overclocked performance gives +152W, and when allowing for the 140W TDP gives an estimated total power consumption at 292W when overclocked to 4.4 GHz.
System Performance
Power Consumption
Power consumption was tested on the system while in a single MSI GTX 770 Lightning GPU configuration with a wall meter connected to the OCZ 1250W power supply. This power supply is Gold rated, and as I am in the UK on a 230-240 V supply, leads to ~75% efficiency > 50W, and 90%+ efficiency at 250W, suitable for both idle and multi-GPU loading. This method of power reading allows us to compare the power management of the UEFI and the board to supply components with power under load, and includes typical PSU losses due to efficiency. These are the real world values that consumers may expect from a typical system (minus the monitor) using this motherboard.
While this method for power measurement may not be ideal, and you feel these numbers are not representative due to the high wattage power supply being used (we use the same PSU to remain consistent over a series of reviews, and the fact that some boards on our test bed get tested with three or four high powered GPUs), the important point to take away is the relationship between the numbers. These boards are all under the same conditions, and thus the differences between them should be easy to spot.
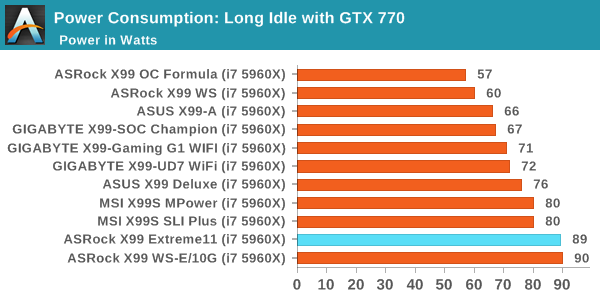
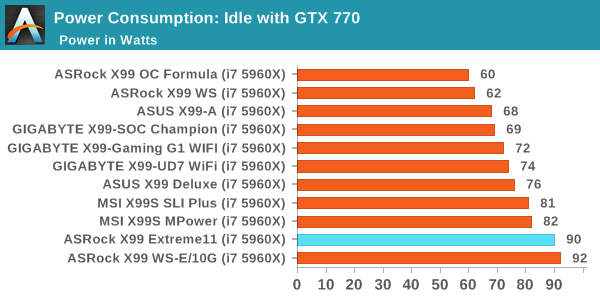
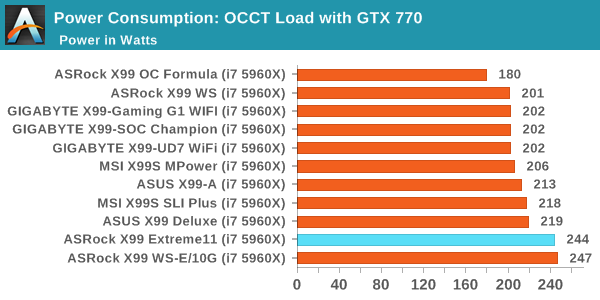
With the added PLX switches and LSI RAID controller, the Extreme11 was from the outset not going to be overly great when it came to power consumption. The same conclusions came from the ASRock X99 WS-E/10G with its power hungry 10G chip, and as a result these boards match each other both at idle and CPU load.
Windows 7 POST Time
Different motherboards have different POST sequences before an operating system is initialized. A lot of this is dependent on the board itself, and POST boot time is determined by the controllers on board (and the sequence of how those extras are organized). As part of our testing, we look at the POST Boot Time using a stopwatch. This is the time from pressing the ON button on the computer to when Windows 7 starts loading. (We discount Windows loading as it is highly variable given Windows specific features.)
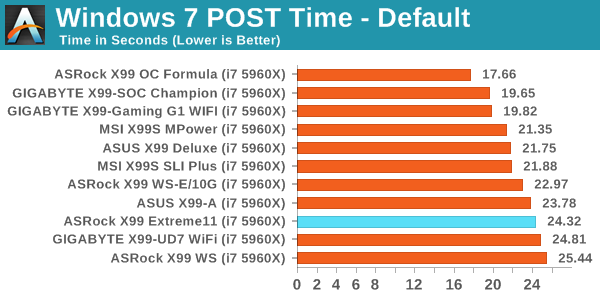
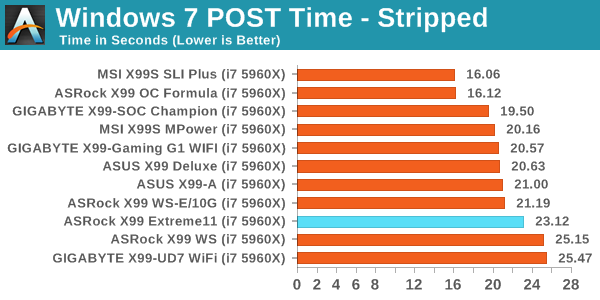
The extra controllers cause a small bump in POST time, with the final result being near the bottom of our testing results.
Rightmark Audio Analyzer 6.2.5
Rightmark:AA indicates how well the sound system is built and isolated from electrical interference (either internally or externally). For this test we connect the Line Out to the Line In using a short six inch 3.5mm to 3.5mm high-quality jack, turn the OS speaker volume to 100%, and run the Rightmark default test suite at 192 kHz, 24-bit. The OS is tuned to 192 kHz/24-bit input and output, and the Line-In volume is adjusted until we have the best RMAA value in the mini-pretest. We look specifically at the Dynamic Range of the audio codec used on board, as well as the Total Harmonic Distortion + Noise.
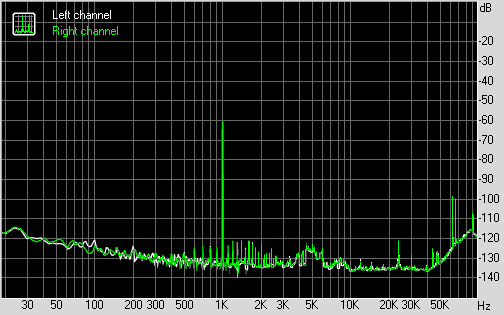
Dynamic Range of X99 Extreme11 at 100% volume
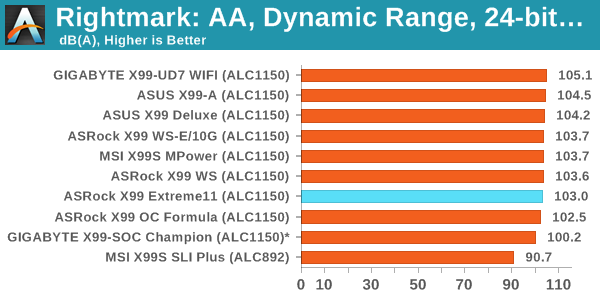
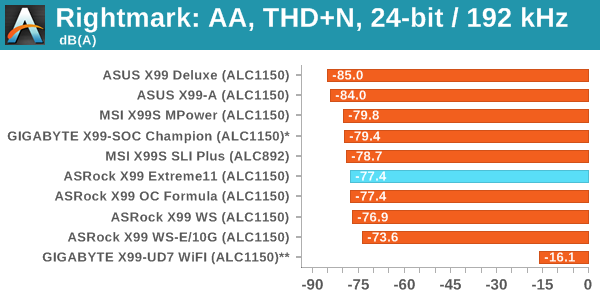
The Extreme11 results match what we have seen before on other ASRock X99 boards with Realtek ALC1150 audio codecs – around 103 dB for dynamic range and above -78 dB for THD+N.
USB Backup
For this benchmark, we transfer a set size of files from the SSD to the USB drive using DiskBench, which monitors the time taken to transfer. The files transferred are a 1.52 GB set of 2867 files across 320 folders – 95% of these files are small typical website files, and the rest (90% of the size) are small 30 second HD videos. In an update to pre-Z87 testing, we also run MaxCPU to load up one of the threads during the test which improves general performance up to 15% by causing all the internal pathways to run at full speed.
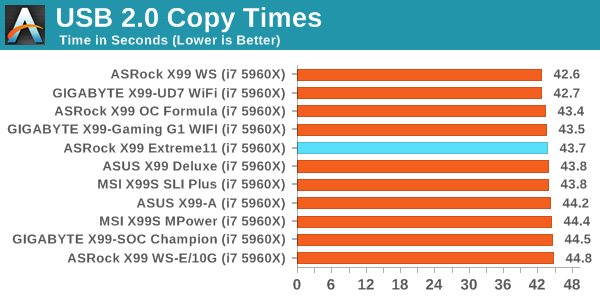
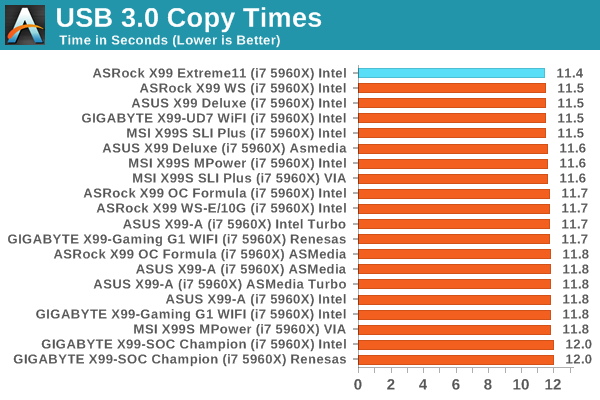
USB 2.0 performance is somewhat middling, but USB 3.0 performance on the PCH is some of the best we have seen.
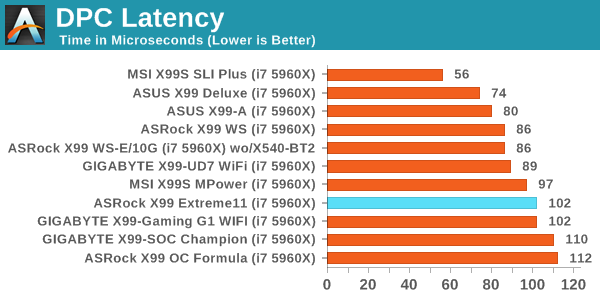
DPC Latency
Deferred Procedure Call latency is a way in which Windows handles interrupt servicing. In order to wait for a processor to acknowledge the request, the system will queue all interrupt requests by priority. Critical interrupts will be handled as soon as possible, whereas lesser priority requests such as audio will be further down the line. If the audio device requires data, it will have to wait until the request is processed before the buffer is filled.
If the device drivers of higher priority components in a system are poorly implemented, this can cause delays in request scheduling and process time. This can lead to an empty audio buffer and characteristic audible pauses, pops and clicks. The DPC latency checker measures how much time is taken processing DPCs from driver invocation. The lower the value will result in better audio transfer at smaller buffer sizes. Results are measured in microseconds.
LSI 3008 Performance
Unlike our X79 Extreme11 review, I unfortunately did not have a series of SSDs on hand to test in a similar manner. Nevertheless, the implementation for the X99 version is the same as the X79, and to recap our X79 Extreme11 results gives the following for peak sequential read speeds. The legend gives our X79 setup in terms of SATA 6 Gbps ports + SATA 3 Gbps ports (thus 2+0 gives a RAID-0 array of two SATA 6 Gbps ports), with the final eight being solely populated on the LSI controller.
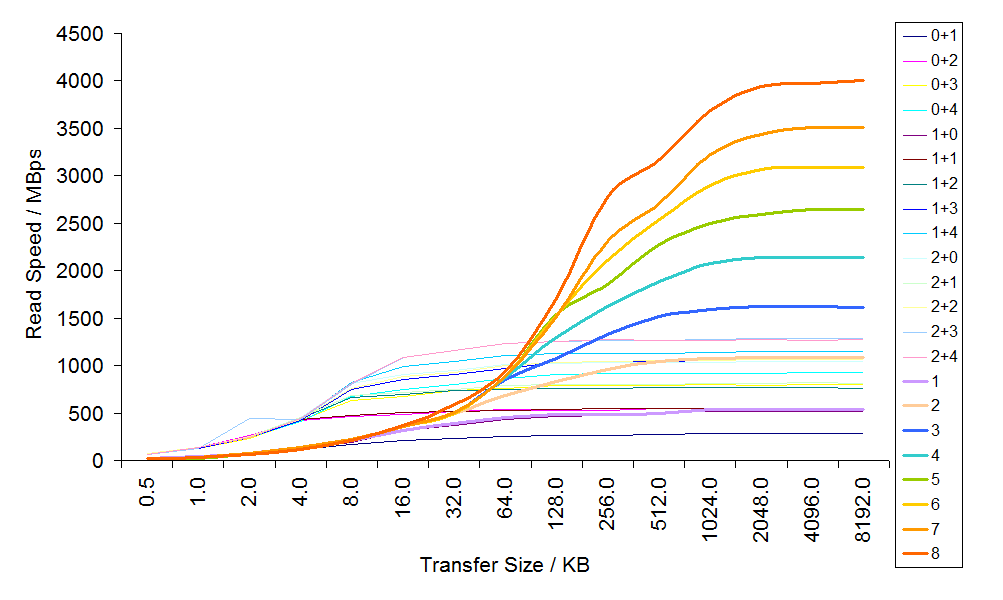
This in order to match the best PCH performance in this setup, it required three drives in RAID-0 on the LSI ports. Similar results can be extrapolated for X99 whereby six of the 10 SATA ports on the PCH are capable of RAID, and a similar number on the LSI would be needed to match it. Unfortunately any RAID array that crosses both the PCH and the LSI ports needs to be from software.
CPU Performance
Readers of our motherboard review section will have noted the trend in modern motherboards to implement a form of MultiCore Enhancement / Acceleration / Turbo (read our report here) on their motherboards. This does several things, including better benchmark results at stock settings (not entirely needed if overclocking is an end-user goal) at the expense of heat and temperature. It also gives in essence an automatic overclock which may be against what the user wants. Our testing methodology is ‘out-of-the-box’, with the latest public BIOS installed and XMP enabled, and thus subject to the whims of this feature. It is ultimately up to the motherboard manufacturer to take this risk – and manufacturers taking risks in the setup is something they do on every product (think C-state settings, USB priority, DPC Latency / monitoring priority, memory subtimings at JEDEC). Processor speed change is part of that risk, and ultimately if no overclocking is planned, some motherboards will affect how fast that shiny new processor goes and can be an important factor in the system build.
For reference, the X99 Extreme11 does implement MultiCore Turbo on the M1.01A BIOS we used.
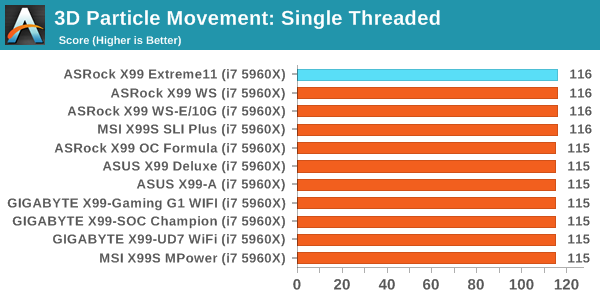
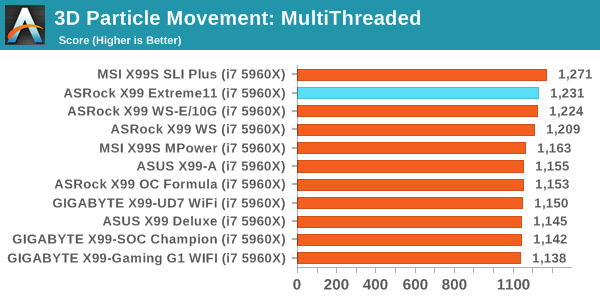
Point Calculations – 3D Movement Algorithm Test: link
3DPM is a self-penned benchmark, taking basic 3D movement algorithms used in Brownian Motion simulations and testing them for speed. High floating point performance, MHz and IPC wins in the single thread version, whereas the multithread version has to handle the threads and loves more cores. For a brief explanation of the platform agnostic coding behind this benchmark, see my forum post here.
Compression – WinRAR 5.0.1: link
Our WinRAR test from 2013 is updated to the latest version of WinRAR at the start of 2014. We compress a set of 2867 files across 320 folders totaling 1.52 GB in size – 95% of these files are small typical website files, and the rest (90% of the size) are small 30 second 720p videos.
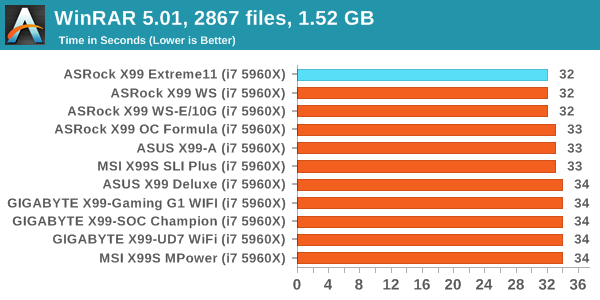
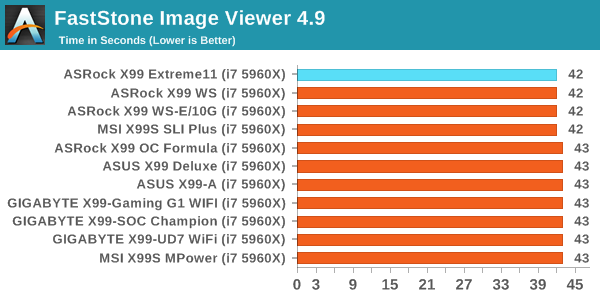
Image Manipulation – FastStone Image Viewer 4.9: link
Similarly to WinRAR, the FastStone test us updated for 2014 to the latest version. FastStone is the program I use to perform quick or bulk actions on images, such as resizing, adjusting for color and cropping. In our test we take a series of 170 images in various sizes and formats and convert them all into 640x480 .gif files, maintaining the aspect ratio. FastStone does not use multithreading for this test, and thus single threaded performance is often the winner.
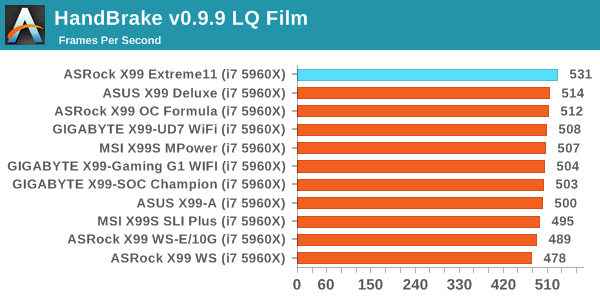
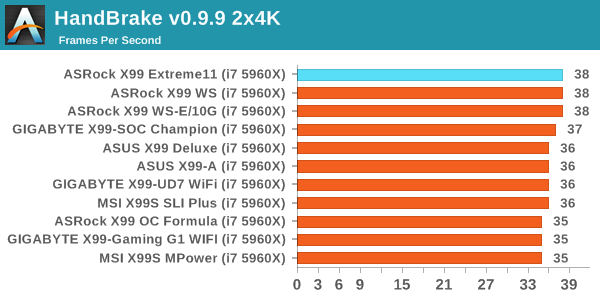
Video Conversion – Handbrake v0.9.9: link
Handbrake is a media conversion tool that was initially designed to help DVD ISOs and Video CDs into more common video formats. The principle today is still the same, primarily as an output for H.264 + AAC/MP3 audio within an MKV container. In our test we use the same videos as in the Xilisoft test, and results are given in frames per second.
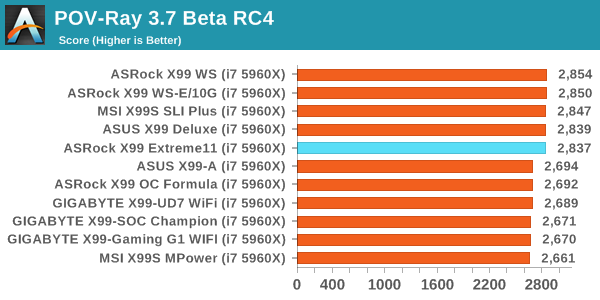
Rendering – PovRay 3.7: link
The Persistence of Vision RayTracer, or PovRay, is a freeware package for as the name suggests, ray tracing. It is a pure renderer, rather than modeling software, but the latest beta version contains a handy benchmark for stressing all processing threads on a platform. We have been using this test in motherboard reviews to test memory stability at various CPU speeds to good effect – if it passes the test, the IMC in the CPU is stable for a given CPU speed. As a CPU test, it runs for approximately 2-3 minutes on high end platforms.
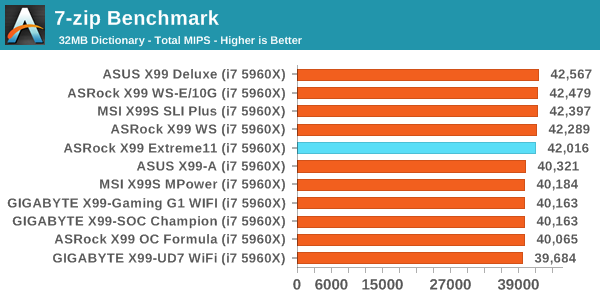
Synthetic – 7-Zip 9.2: link
As an open source compression tool, 7-Zip is a popular tool for making sets of files easier to handle and transfer. The software offers up its own benchmark, to which we report the result.
Gaming Performance on GTX 770s
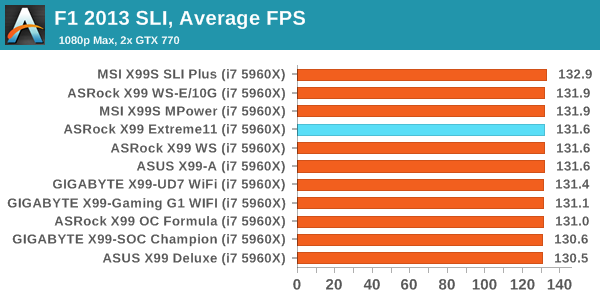
F1 2013
First up is F1 2013 by Codemasters. I am a big Formula 1 fan in my spare time, and nothing makes me happier than carving up the field in a Caterham, waving to the Red Bulls as I drive by (because I play on easy and take shortcuts). F1 2013 uses the EGO Engine, and like other Codemasters games ends up being very playable on old hardware quite easily. In order to beef up the benchmark a bit, we devised the following scenario for the benchmark mode: one lap of Spa-Francorchamps in the heavy wet, the benchmark follows Jenson Button in the McLaren who starts on the grid in 22nd place, with the field made up of 11 Williams cars, 5 Marussia and 5 Caterham in that order. This puts emphasis on the CPU to handle the AI in the wet, and allows for a good amount of overtaking during the automated benchmark. We test at 1920x1080 on Ultra graphical settings.

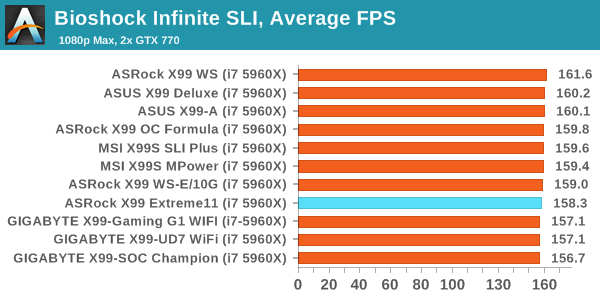
Bioshock Infinite
Bioshock Infinite was Zero Punctuation’s Game of the Year for 2013, uses the Unreal Engine 3, and is designed to scale with both cores and graphical prowess. We test the benchmark using the Adrenaline benchmark tool and the Xtreme (1920x1080, Maximum) performance setting, noting down the average frame rates and the minimum frame rates.

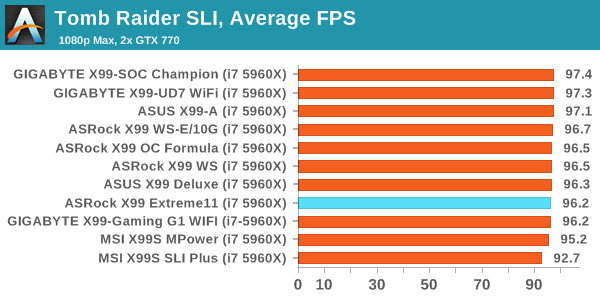
Tomb Raider
The next benchmark in our test is Tomb Raider. Tomb Raider is an AMD optimized game, lauded for its use of TressFX creating dynamic hair to increase the immersion in game. Tomb Raider uses a modified version of the Crystal Engine, and enjoys raw horsepower. We test the benchmark using the Adrenaline benchmark tool and the Xtreme (1920x1080, Maximum) performance setting, noting down the average frame rates and the minimum frame rates.

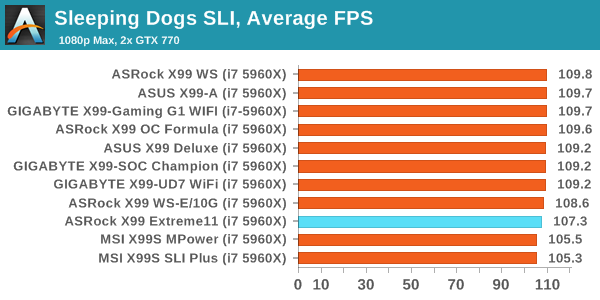
Sleeping Dogs
Sleeping Dogs is a benchmarking wet dream – a highly complex benchmark that can bring the toughest setup and high resolutions down into single figures. Having an extreme SSAO setting can do that, but at the right settings Sleeping Dogs is highly playable and enjoyable. We run the basic benchmark program laid out in the Adrenaline benchmark tool, and the Xtreme (1920x1080, Maximum) performance setting, noting down the average frame rates and the minimum frame rates.

The ASRock X99 Extreme11 Conclusion
There are particular areas of each electronics market that the general consumer doesn't see or might have difficulty understanding. If a general consumer is concerned primarily about cost, then seeing a market where money-is-no-object offers a strange perspective. Ultimately, the ASRock X99 Extreme11 is in one of these brackets. Most home users would agree that $600+ for a motherboard feels insane, but for the storage and compute markets to which it is focused, $600 can be a drop in the ocean of total system cost. It may even save a few $$$ if it has the required features already onboard.
The reason for the cost of the X99 Extreme11 stems from two PLX8747 PCIe 3.0 switches providing x16/x16/x16/x16 for four-way PCIe coprocessor action as well as an LSI 3008 SAS/SATA controller giving eight more storage ports. These eight ports combine with the ten from the chipset for a total of eighteen.
In the hierarchy of reasons to buy a motherboard, having a particular functionality rates high and it is the functionality that will cause users to buy the Extreme11, similar to the X99 WS-E/10G we reviewed previously. Alongside the to-buy features, the motherboard also comes with dual Intel network ports (I218-V and I211-AT), support for Intel Xeons and 128GB of RDIMMs and a boosted Realtek ALC1150 audio solution in the form of Purity Sound 2.
A key metric in our tests for such a board is power consumption, and given the extra components it perhaps comes as no surprise that under load the Extreme11 draws 244W at CPU load and comes in as nearly the most power hungry out of the X99 boards we have tested. The extra components pushes POST times nearer 25 seconds also. One surprising outcome was the PCH USB 3.0 speed, coming top in our test.
While the Extreme11 is not necessarily bought for performance, the base BIOS we tested with implemented a form of multi-core turbo, giving it high marks across almost all of our CPU suite. Overclocking performance on our mediocre CPU matched that of other X99 motherboards, with the range of automatic options providing suitable feedback to place a manual set of parameters.
In the past, I have always said that the first thing users consider when purchasing a motherboard is if it has a certain feature they need. (Next in the order of narrowing down the options, assuming no prior experience with a brand, is usually price, then looks, then performance, extras and support.) The ASRock X99 Extreme11 sits in that niche for users who want Haswell-E or Xeon E5 v3 as well as storage and multiple PCIe coprocessors - a niche with only few motherboardsin the self-build community, making the Extreme11 a straightforward option.


