Original Link: https://www.anandtech.com/show/8804/gigabyte-x99-soc-champion-motherboard-review-low-cost-x99-overclocking
GIGABYTE X99-SOC Champion Motherboard Review: Low Cost X99 Overclocking
by Ian Cutress on January 5, 2015 4:00 PM EST- Posted in
- Intel
- Gigabyte
- Motherboards
- Overclocking
- X99
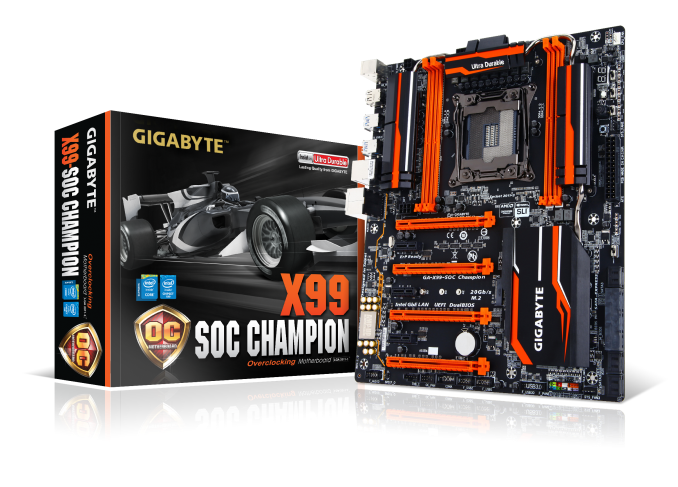
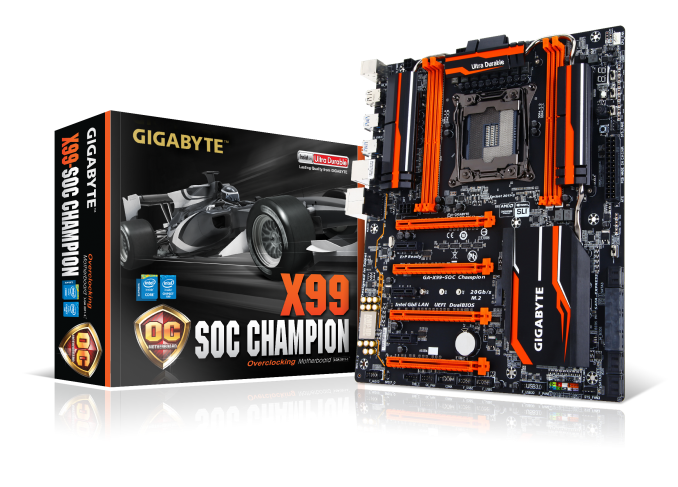
When we ask the motherboard manufacturers about overclocking, most of them say that it is an integral part of their hardware line-up as well as a point to distinguish themselves from the competition. I have been a big fan of the cheaper overclocking oriented models in the mainstream markets, and in order to emulate the success that GIGABYTE has made in that area today they are releasing the X99-SOC Champion aimed at the Haswell-E overclocking crowd. We managed to get a sample in for a launch day review.
Haswell-E Overclocking on the Cheap?
The terms Haswell-E and cheap are rarely seen together. When the base processor in a stack costs $390, nothing is ever that cheap. Nonetheless, users will still build budget type systems and extreme overclockers that are not blessed with sponsorship will want a way in to the most expensive (but highest performing) platform. I say extreme overclockers, such as those with multiple GPUs under water for a home system or competition class under liquid nitrogen, because that is GIGABYTE's market aim with the X99-SOC Champion.
At its heart, this board is a stripped version of the X99-SOC Force, and aims to hit a price point with a feature set that both new and old extreme overclockers can be comfortable with. As part of the marketing campaign for the motherboard, in December GIGABYTE invited several high performing extreme overclockers to their OC Lab at the Taiwan HQ to join in-house overclockers HiCookie and Sofos to break as many records as possible. They came out with 9 world records and 17 other firsts in various benchmark/hardware categories, which is a sizable run for any user familiar with the extreme overclocking scene.
The Issue over an Overclocking Socket
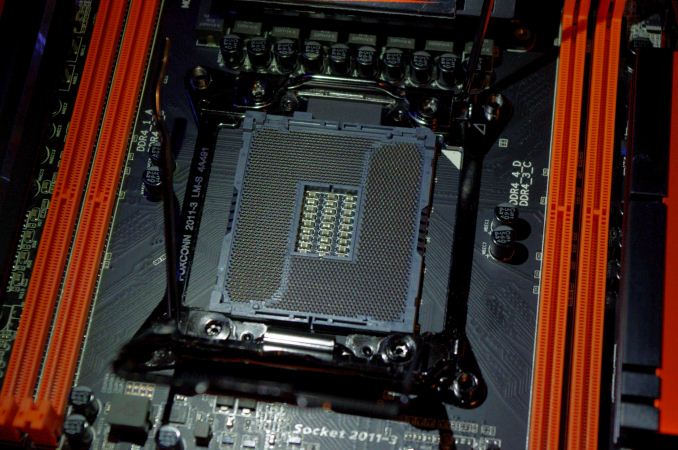
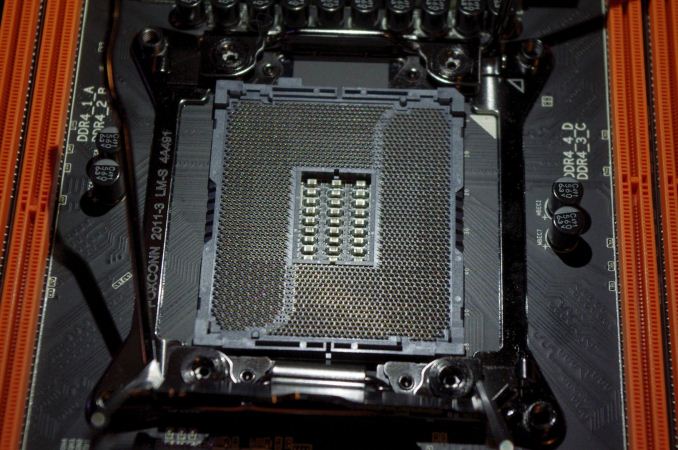
One of the biggest features that extreme overclockers will notice with the X99-SOC Champion is the use of a different socket, similar to the OC Socket used by their biggest competitors. Using the regular LGA2011-3 mountings, this socket contains 2083 pins rather than the standard 2011 and offers several new options for adjusting specific voltages in the BIOS, bypassing the FIVR.
These extra pins are enabled via a DIP Switch onboard, but their relevance is only really towards the liquid nitrogen users. There is also the issue that a form of the OC Socket is in the patent pending stage by ASUS, and we are not sure if GIGABYTE's version infringes on it. Given how rare it is to patent a design in the motherboard industry (compared to the smartphone space, for example), I wonder how aggressively this would be pursued.
GIGABYTE X99-SOC Champion Overview
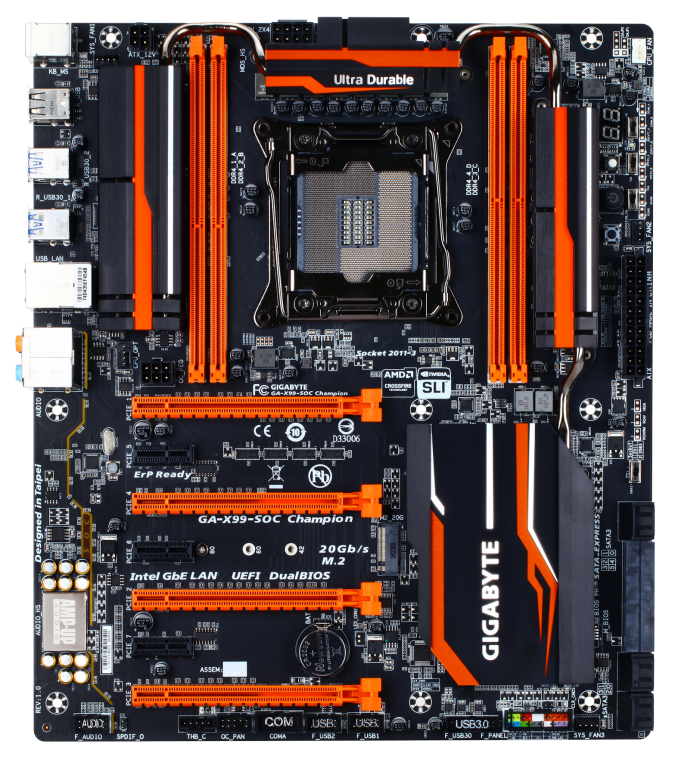
Aside from the OC socket, the X99-SOC Champion is still well equipped due to the nature of the X99 platform. For extreme overclocking this means an easy to insulate socket area and motherboard rear, with the onboard buttons allowing for quick resets, voltage checking and BIOS adjustment. New to the GIGABYTE overclocking range is an onboard header for GIGABYTE's X99 overclock panel, although this is sold separately.
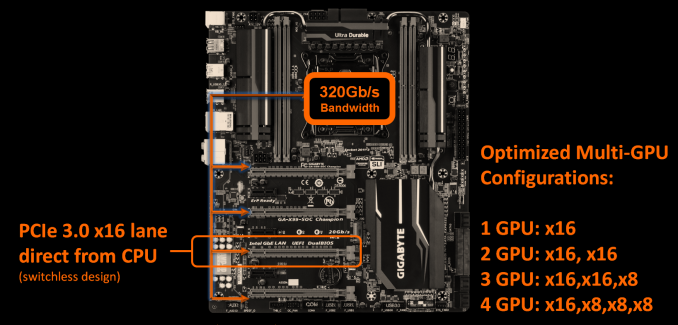
For regular users looking for a board to push 24/7, these features may help during the initial setup phase, along with the double width screw safety areas, but the meat of day-to-day functionality will revolve around the IO. GIGABYTE implements a full bandwidth four-way GPU setup, giving x16/x16/x8 and x8/x8/x16/x8, along with the full set of 10 PCH SATA ports, a SATA Express port and an M.2 2.0 x4 slot. The board also gets six USB 3.0 in total, a Thunderbolt header and three PCIe 2.0 x1 slots, although some of these share bandwidth with the M.2. On the networking and audio front, an Intel I218-V network port is teamed with GIGABYTE's AMP-UP audio solution, giving an upgraded Realtek ALC1150 experience. This area of the motherboard also lights up to enhance the aesthetic of the product.
My main concern with GIGABYTE is still the BIOS - while the classic mode has been updated, the HD mode is still somewhat difficult to use at speed based on color clash. It speaks volumes when overclockers still use the classic mode instead. The enabling of the LGA2083 pins offers several new voltage options, which GIGABYTE states that they help with DRAM and uncore overclocking. On the plus side, I like GIGABYTE's software package - it has been steadily evolving and the App Center approach does simplify some tasks that other manufacturers make convoluted.
In our benchmark results, the lack of multicore turbo on our early BIOS resulted in less than stellar stock performance, although for an overclocking board this doesn't matter that much. On the system benchmark side, unlike the other GIGABYTE X99 boards tested we managed to get an audio result although at a lower output volume. USB performance was not that impressive, but the GIGABYTE X99-SOC Champion does well in power consumption and POST times compared to other X99 motherboards we have tested with ~200W at CPU load and under 20 seconds respectively.
A big deciding factor for the X99-SOC Champion will be the price - at the time of writing the MSRP has not been set. For the Z97 platform, $200 is around the budget OC market, so X99 will be above that. At $250 the Champion will be a winner, and at $300 it will still be a reasonable consideration for extreme overclockers. But I would assume that the full-bandwidth four-way design, the LGA2083 socket variant and extra gold content in the socket and slots does not come cheap.
Visual Inspection
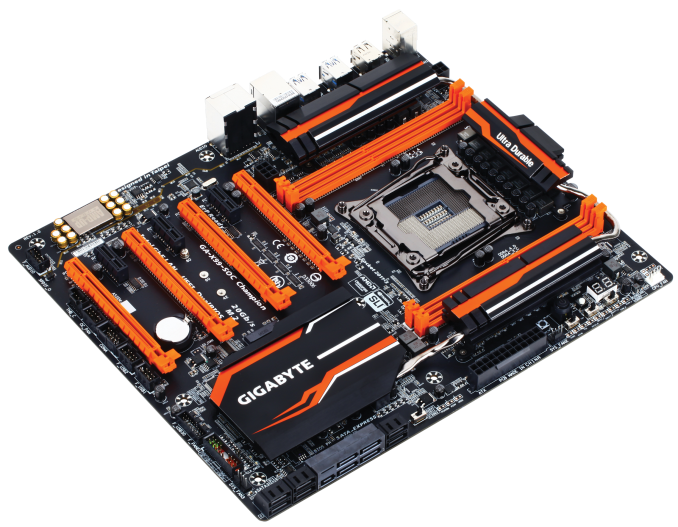
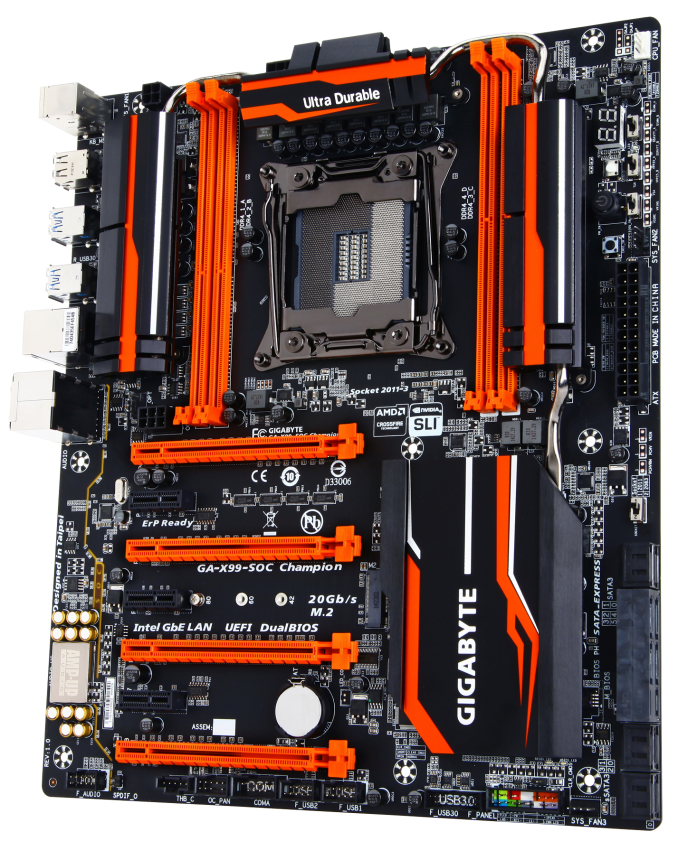
Part of moving towards a liquid cooling system or even sub-zero cooling is the lack of airflow around the motherboard. In sub-zero cooling usually a fan is added to help move away moisture and LN2 vapor, but with water cooling unless the case has some form of airflow there is little flow focused specifically on the motherboard. For this purpose, it is useful to have large motherboard heatsinks connected via heatpipes, and this is what the X99-SOC Champion has. There are four separate heatsinks in total, with two of them taking advantage of the fewer DDR4 memory slots on the system. While the heatsinks are optimized for looks and one could argue that the surface area is not as optimum as it could be, the fact that they are joined together helps the overall performance between them.
The socket area is relatively clean for sub-zero preparation, and for those that do want fans then the socket area has access to four in its immediate vicinity: the 4-pin CPU header at the top right, a 4-pin CPU-OPT header below the heatsink on the left, a 4-pin SYS header on the top left and another 4-pin SYS header above the 24-pin ATX connector. The final four-pin header is on the bottom of the motherboard. Due to the OC styling all the heatsinks and slots are in orange with the PCB separation indicator of the audio side of the motherboard also orange with underside LEDs shining through when the system is powered on.
On the top right of the motherboard a cut down version of GIGABYTE’s OC Buttons are here, including power/reset buttons, a two-digit debug, voltage read points, a BIOS selection switch, a DualBIOS enabling switch, an OC Trigger Switch (LN2 Mode) and to the far left is the LGA2083 enabling switch.
To the left of the LGA2083 enabling switch are the SATA storage options giving the top six as part of the first AHCI controller and being RAID capable with the bottom four on the second AHCI controller and therefore not RAID capable. In the middle of this is a SATA Express port, using two lanes from the PCH.
The bottom of the motherboard gives front panel audio, the Thunderbolt header, GIGABYTE’s OC Panel header, a COM header, two USB 2.0 headers, a USB 3.0 header and the front panel header. Above these are the PCIe slots, which use a full-bandwidth layout to maximize non-PLX enhanced GPU bandwidth.
A standard four-way design, due to the way the LGA2011-3 CPUs are designed, limits the bandwidth to x8/x8/x8/x8 without additional timing circuits. Adding these circuits enables a full 320 Gbps from the CPU, but obviously incurs a little extra cost.
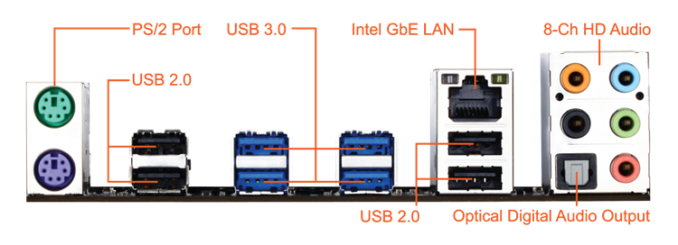
The rear panel gives separate PS/2 ports for mouse and keyboard (used by some overclockers to avoid installing USB drivers), four USB 2.0 ports, four USB 3.0 ports, the Intel I218-V network port and the Realtek audio jacks.
Board Features
| GIGABYTE X99-SOC Champion | |
| Price | US (Newegg) |
| Size | E-ATX (305mm x 264mm) |
| CPU Interface | LGA2011-3 with LGA2083 socket |
| Chipset | Intel X99 |
| Memory Slots | Four DDR4 DIMM slots supporting up to 32 GB Up to Quad Channel, 1600-3200 MHz |
| Video Outputs | None |
| Network Connectivity | Intel I218-V |
| Onboard Audio | Realtek ALC1150 with AMP-UP |
| Expansion Slots | 2 x PCIe 3.0 x16 2 x PCIe 3.0 x8 3 x PCIe 2.0 x1 |
| Onboard Storage | 6 x SATA 6 Gbps, RAID 0/1/5/10 4 x S_SATA 6 Gbps, no RAID 1 x SATA Express (shares bandwidth with two SATA and M.2) 1 x M.2 2.0 x4 (disabled when SATAe in use) |
| USB 3.0 | Two via Onboard Header (PCH) 4 x Rear Panel Ports (PCH via Renesas Hub) |
| Onboard | 10 x SATA Ports 1 x SATA Express 1 x M.2 x4 (PCIe 2.0) 5 x Fan Headers 1 x USB 3.0 Header 2 x USB 2.0 Headers Thunderbolt Header COM Header OC Panel Connector Power/Reset Buttons Two Digit Debug Clear CMOS Button LGA2011-3 / LGA2083 Switch OC Trigger Siwtch BIOS Switch Voltage Measurement Points Front Panel Header Front Audio Header |
| Power Connectors | 1 x 24-pin ATX 1 x 8-pin CPU 1 x 4-pin CPU 1 x 6-pin for VGA |
| Fan Headers | 1 x CPU (4-pin) 1 x CPU-OPT (4-pin) 3 x SYS (4-pin) |
| IO Panel | 1 x Keyboard PS/2 Port 1 x Mouse PS/2 Port 4 x USB 2.0 Ports 4 x USB 3.0 Ports Intel Network Port Audio Jacks |
| Warranty Period | 3 Years |
| Product Page | Link |
Due to the level of consistency between BIOSes and software packages within the same chipset from the same company, our overview of the X99-SOC Champion almost mirrors the one of the X99-UD7 WIFI package that we reviewed during the launch of X99. The full run down is added here for completeness, with the specific SOC Champion details added.
GIGABYTE X99-SOC Champion BIOS
For X99, several things have changed for the BIOS. The classic mode gets a facelift and moves to a cleaner but blockier interface with a good contrast between text and background. In the HD mode, the text now all fits in the boxes and there is some improvement to adjust the visual differentiation between background and text, but more could still be done. Interactivity is still quite minimal, with classic and HD mode featuring many of the same options slightly rearranged.
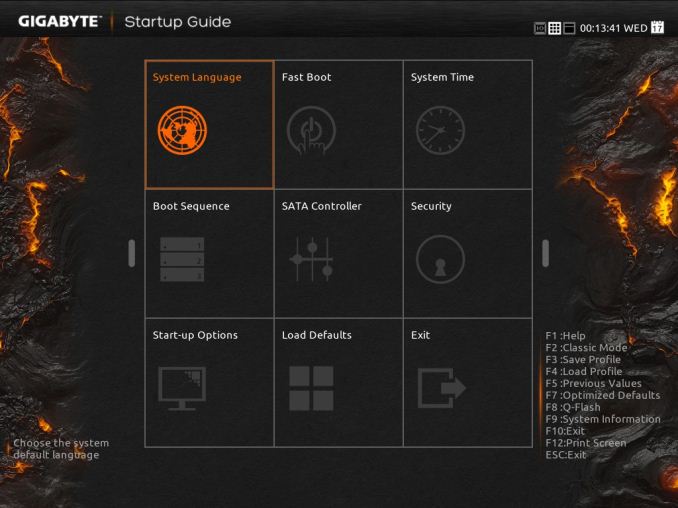
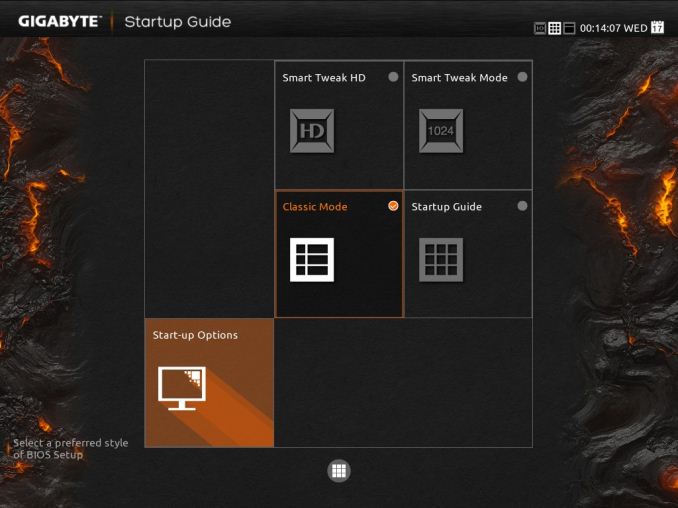
The first entry screen is the Startup Guide which is the main recipient of text adjustment, but we also get a few more options to fill up this 3x3 grid.
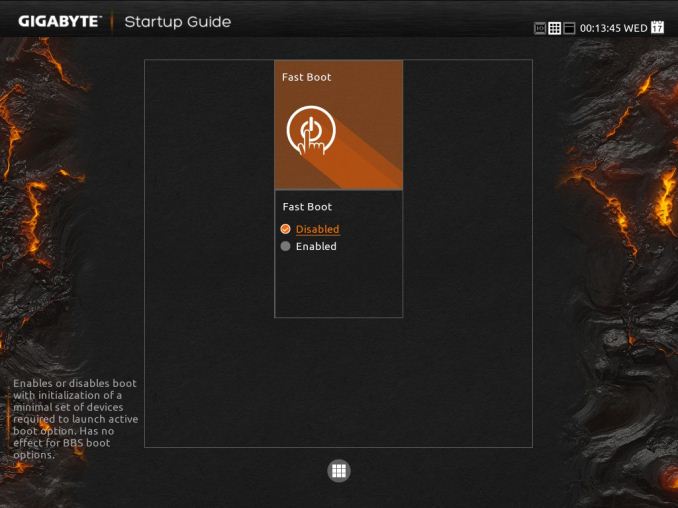
Most of these are self-explanatory. Fast boot gives options related to Windows 8 such that devices are not initialized until later in the OS boot process, speeding up overall POST time:
The SATA controller option text now all fits nicely into each of its boxes, although due to the dual AHCI controller nature of the chipset and only six SATA ports having access to RAID, it does not help the user much if the drives are plugged in the wrong ports. Ideally we would see an explanation giving SATA versus sSATA ports on the motherboard used, and what drives are installed where.
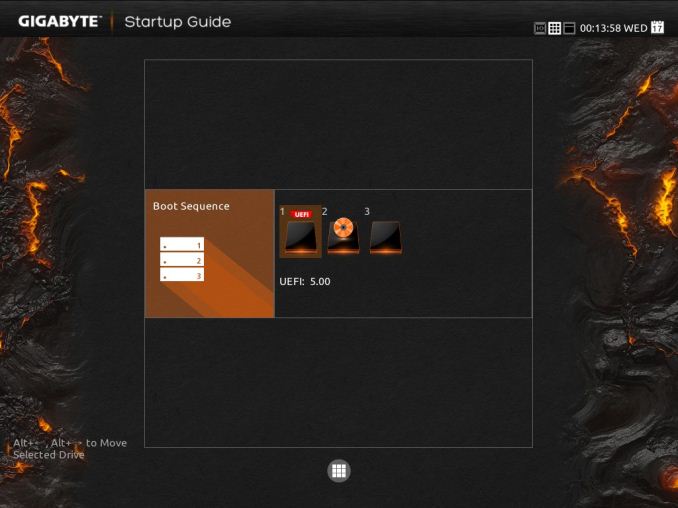
Although we also get a Boot Sequence selector:
The Startup Options allows the user to boot into any of the four modes available. The HD mode does offer a smaller sized version with less information if the monitor is not capable of 1920x1080.
Despite a nice start guide for users, it would help if the initial screen detailed the system, perhaps in the top left. We want to see the name of the motherboard, the BIOS used, the CPU installed, the DRAM installed and frequencies where possible. That way any user trying to debug the system without having access to the insides will be able to see immediately what is at hand.
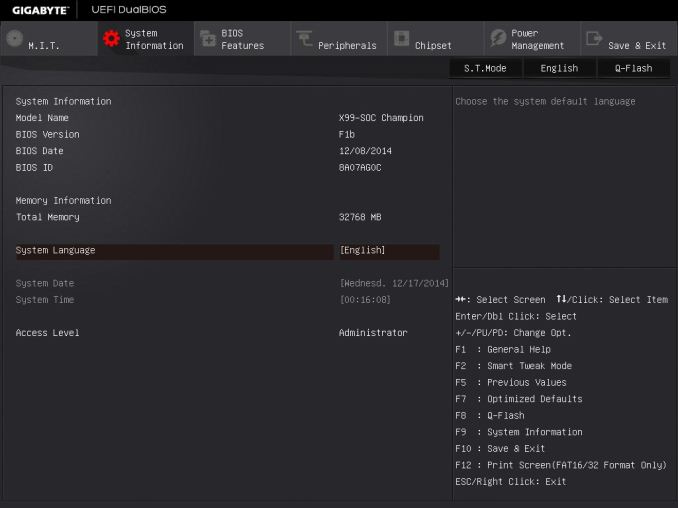
The standard classic mode gets an update from the blue interface to a sleeker grey and white menu system.
The layout is pretty much the same as before, along with the information provided. For example, the entry point offers the model name of the motherboard and the BIOS version, but no mention of the CPU installed.
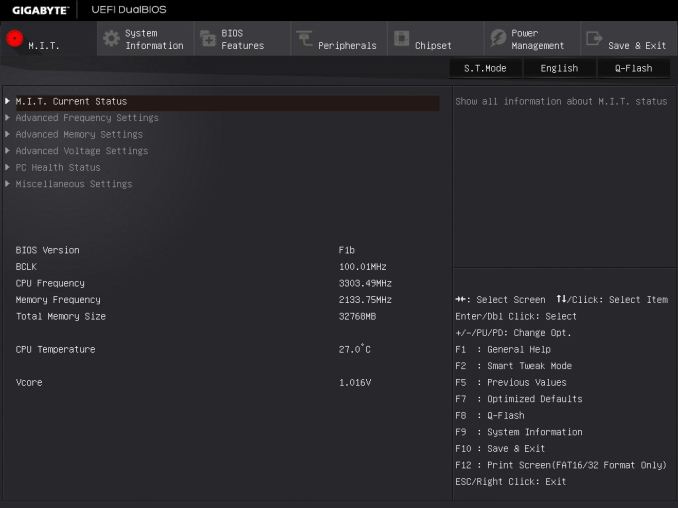
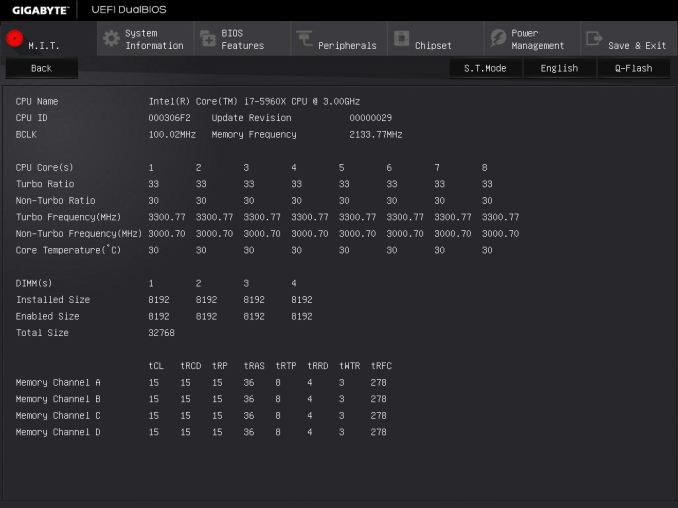
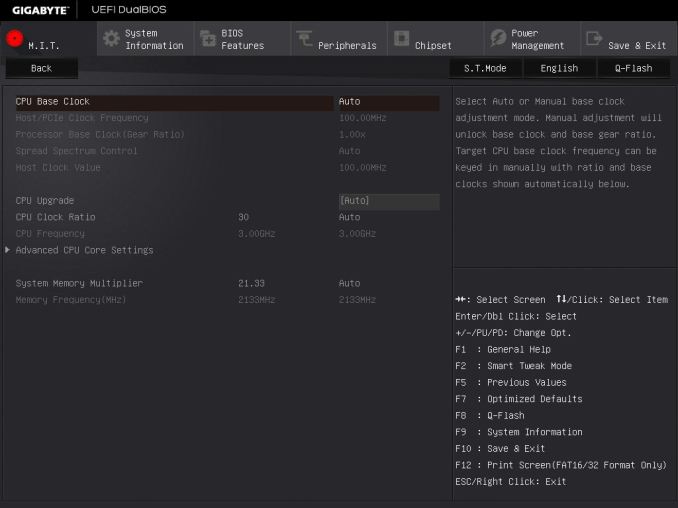
The overclocking options in the GIGABYTE BIOS are for automatic and manual overclocking, and split into several sub-menus coming from MIT. The Frequency menu allows the user to adjust the CPU and DRAM as well as select automatic overclocks via the CPU Upgrade option:
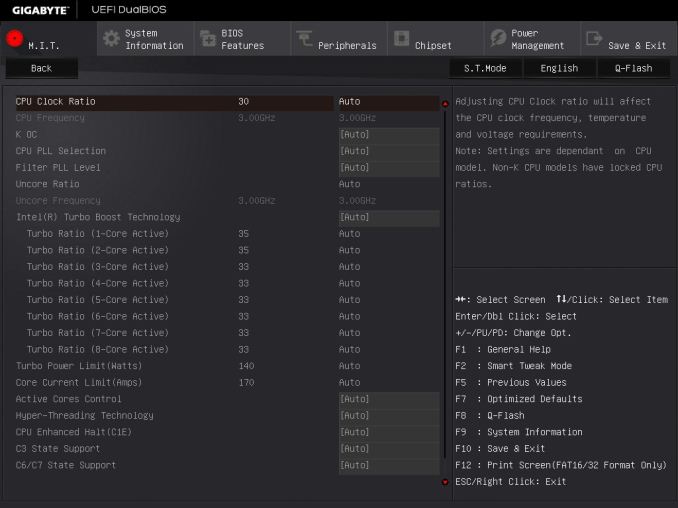
In order to adjust the per-core ratios or the Uncore and C-states, the CPU Core Settings menu is provided:
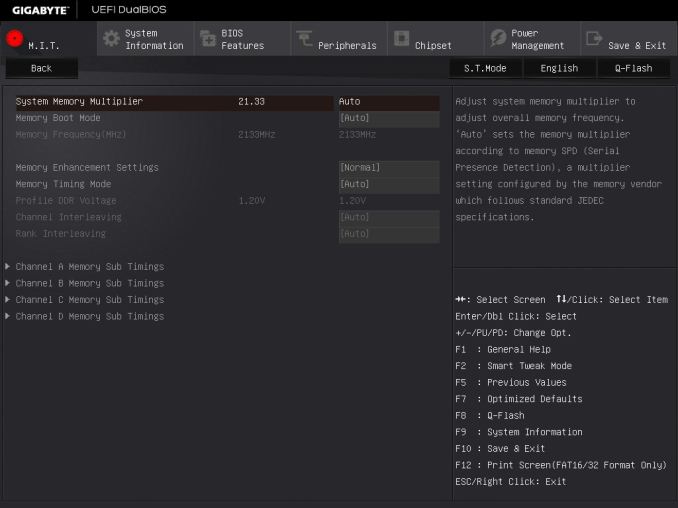
Note that there are no voltage options in either of these menus. GIGABYTE’s reasoning is that the voltage options are solely for the voltage menu, but I differ. Motherboard manufacturers can place the same option in multiple menus, but often choose not to for reasons of layout or space or to avoid confusion. I do not see that as an issue – if anything, I believe it would enhance the experience especially for an enthusiast wanting to adjust these settings. So while the voltage settings are not duplicated, the DRAM frequency strap is – we see it here in the Advanced Frequency menu and also in the Advanced Memory menu:
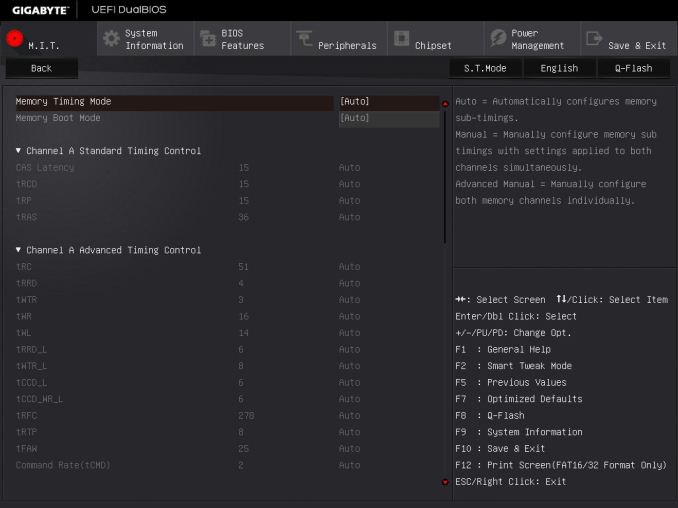
In order to adjust sub-timings for the memory, as with previous GIGABYTE motherboards, the memory timing mode must be changed to ‘Manual’ to set a rule for all modules or ‘Advanced Manual’ to set per-module timings.
GIGABYTE has adjusted how the BIOS communicates what each option means to the user in the top right of the screen. I remember one of my contacts at GIGABYTE was writing the initial drafts for these info texts earlier in the year, and remarking that it was no small feat especially after several iterations and then sending it to the translators for other languages and making sure no subtleties were lost.
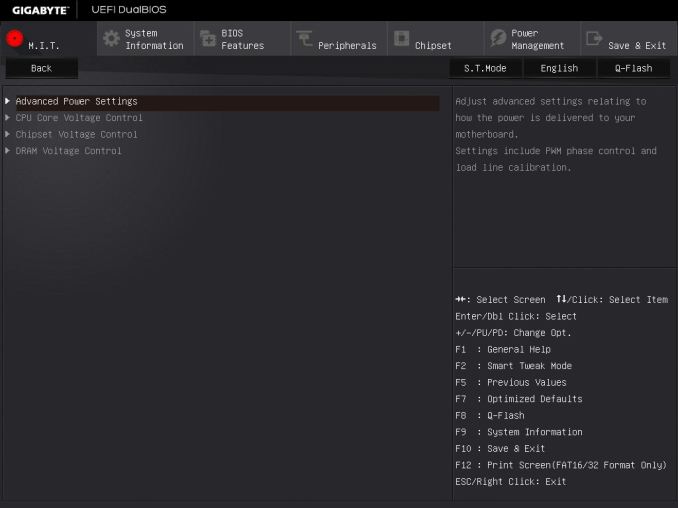
The Advanced Voltage Setting menu is split into several sub-options.
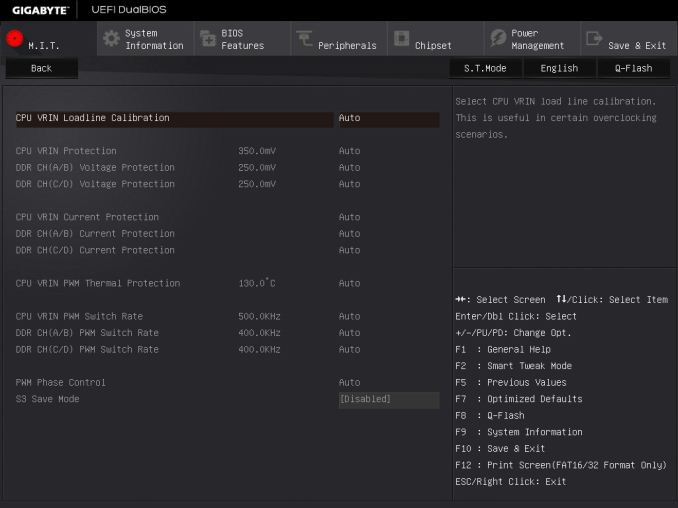
The Power Settings menu is for voltage protection options, current protection and switch rate adjustment. The most important option though is the Load Line Calibration for the FIVR:
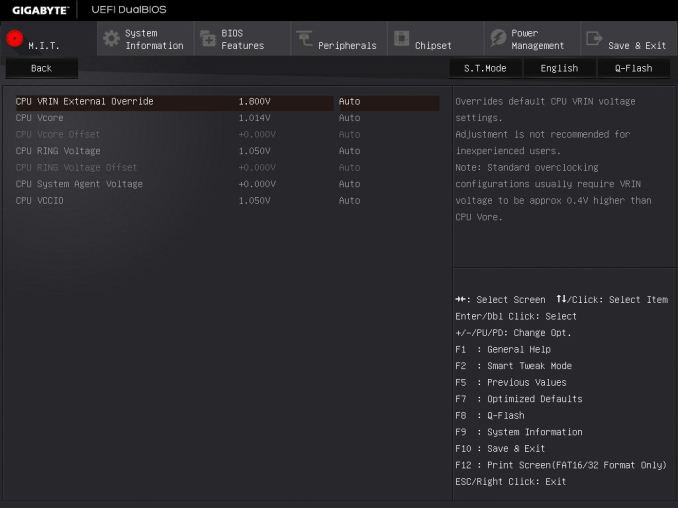
The Core Voltage menu is where the CPU voltage options are:
Adjustments to the VRIN (FIVR), VCore and Cache voltages are here, with only absolute values allowed. Other manufacturers offer both offset and absolute choices for these values although I find offset values more applicable for automatic overclocking options.
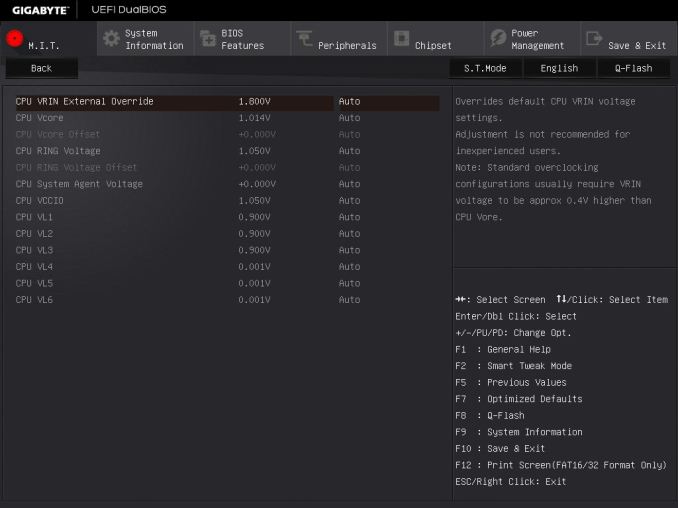
When the LGA2083 switch is enabled, we get the following additional options:
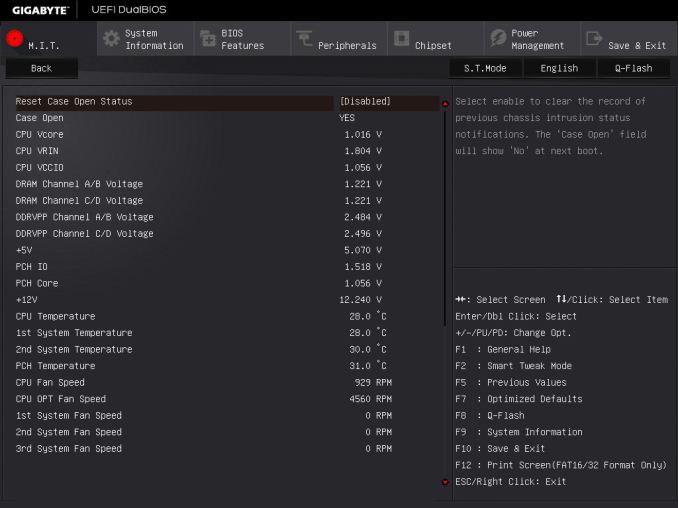
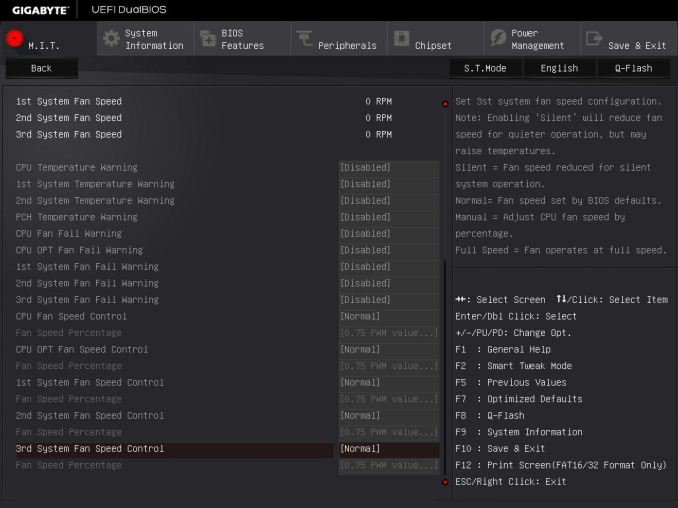
The fan controls in the classic mode are in the PC Health option from the MIT tab.
While the system has four temperature sensors and five fan headers, the level of fan speed options in the BIOS is very basic.
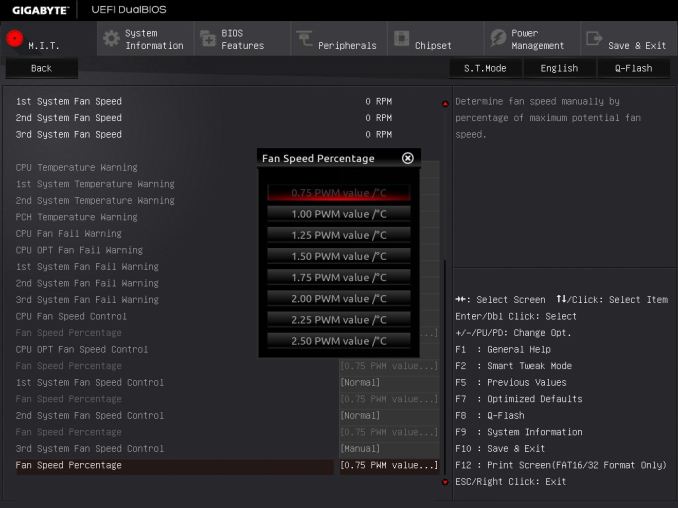
For anyone not used to a value describing how one variable adjusts with another, the options here might make no sense. The power applied to a fan is a ‘PWM’ number from zero to 255. GIGABYTE’s options allow you to adjust that value based on the temperature, in terms of ‘PWM per ºC’. So a CPU temperature of 50ºC at 2 PWM per ºC will give a value of 100, which means that 100/255 = 39.2% of the full power of the fan is used. To confuse the matter even more, a fan does not respond linearly to power increases, and GIGABYTE does not mention of this value has a base number.
Other manufacturers have the fan controls in the BIOS at a state where they are a lot easier to follow, and GIGABYTE has fallen behind in adapting their controls to a more interactive interface that is easier to understand.
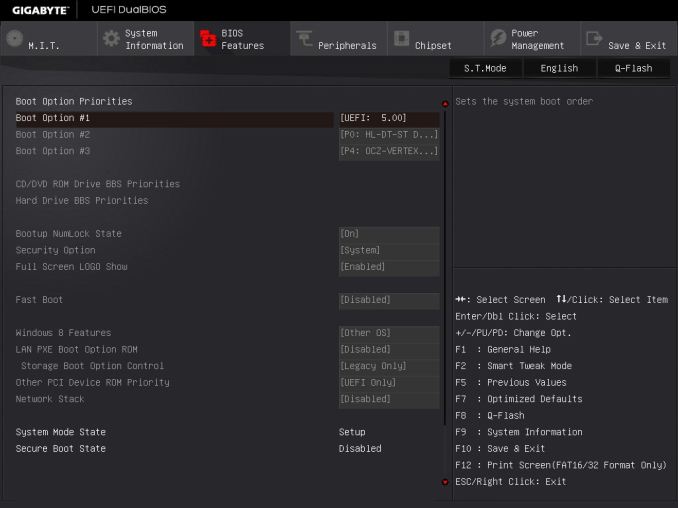
The BIOS Features tab relates to the boot order and fast boot options:
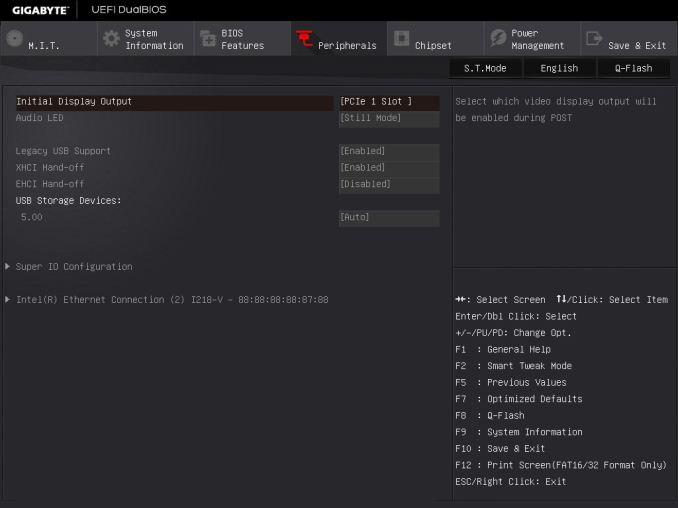
The Peripherals tab involves LED options, enabling onboard controllers:
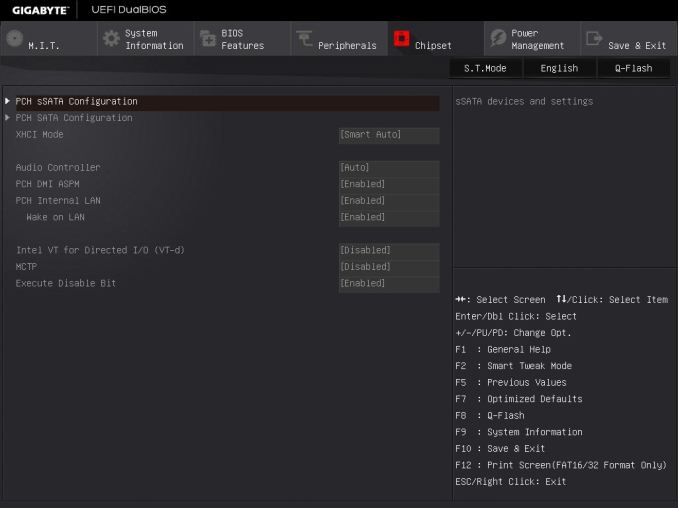
The Chipset tab is for SATA adjustments, with GIGABYTE offering different menus for the sSATA (non-RAID) and SATA (RAID) AHCI controllers:
The rest of the classic BIOS allows for power management and BIOS flashing, with the Save and Exit menu giving boot override possibilities.
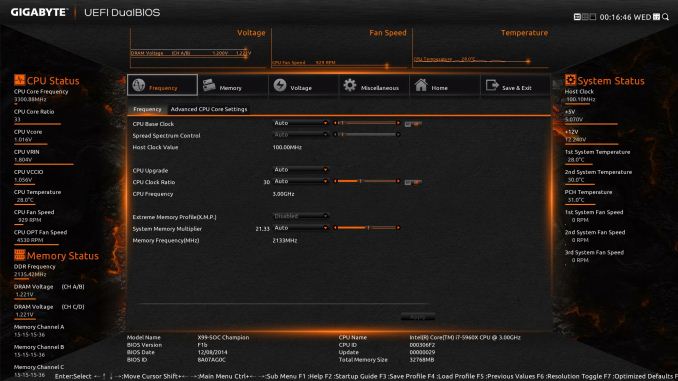
The full HD mode uses a similar sort of option arrangement in the middle of the screen with as much information as you can pack into the surrounding edges. Most BIOSes need something like this around the edge to tell the user about the system, although I might suggest that having bars underneath values such as ‘CPU VRIN’ are ultimately not necessary and could be cleaned up. The ideal BIOS is one that displays everything succinctly without wasted space but still visually effective. For example, perhaps graphing the voltage change over time in the BIOS is not particularly helpful.
GIGABYTE X99-SOC Champion Software
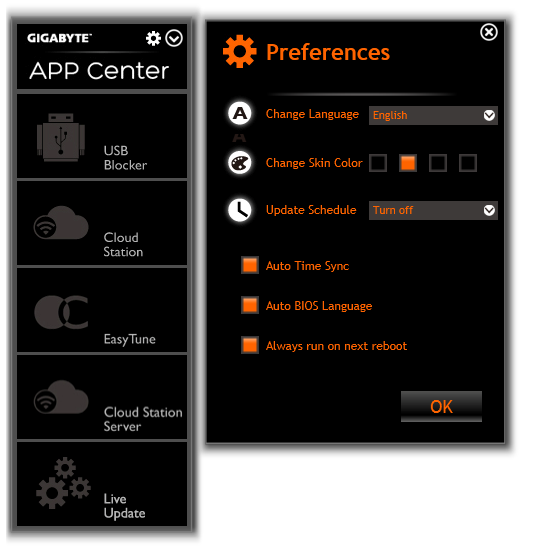
Similarly to the BIOS, the software has been upgraded over the past 18 months. Easy Tune 6 is out, and the new interface is a sleek color-on-black design. This allows GIGABYTE to alter the color palette depending on what motherboard is being used – blue for Ultra Durable, orange for SOC and yellow/green for gaming. So the accents on our X99-SOC Champion are orange and the software has the default orange OC style, but this can be adjusted in the preferences.
The base menu system is called APP Center which shows the various ‘apps’ in a scrollable window. The Live Update element on the bar is fixed, while the rest are sorted in alphabetical order and can be adjusted into the place that the user wants.
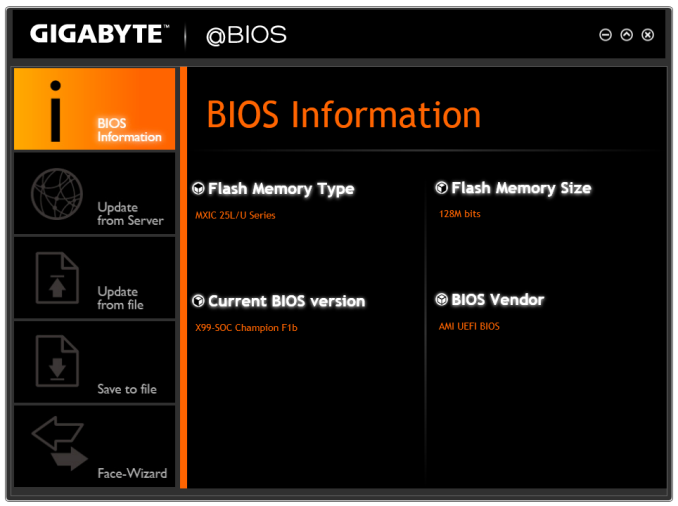
@BIOS is the interface for updating the BIOS through the operating system. This front screen shows the details of the motherboard (note the 128 Mb BIOS chip), and the tabs on the side allow the BIOS to be updated by directly downloading the BIOS from the server or via a file. The bottom selection, Face-Wizard, allows a user to adjust the POST image on startup.
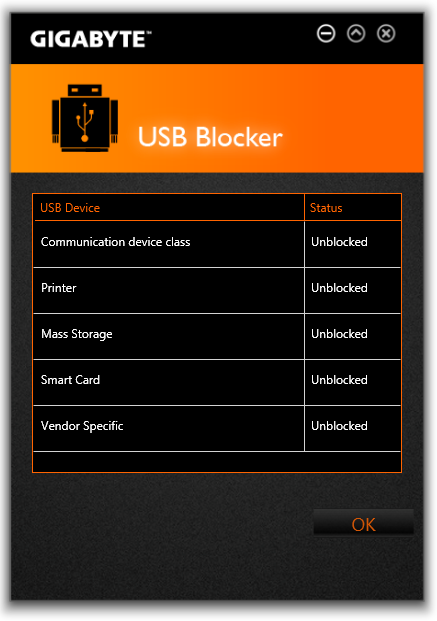
USB Blocker allows the administrator to block different types of devices used in the USB ports. GIGABYTE’s main use for this is in an office environment to stop employees using mass storage, or for public machines such as in libraries.
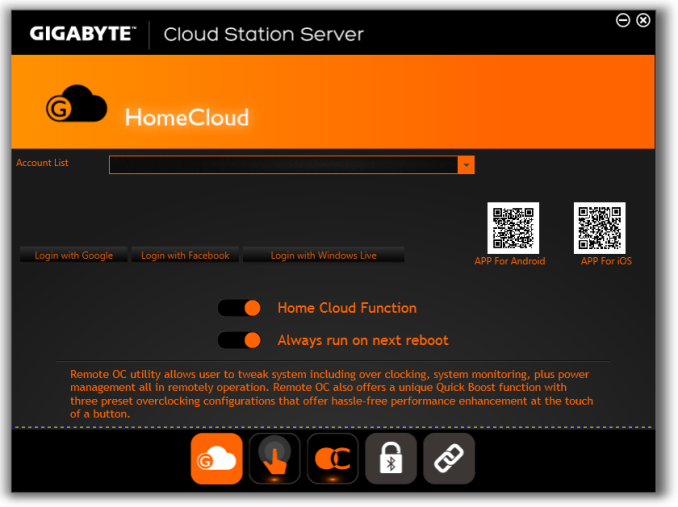
The Cloud Station Server is a relatively new part of GIGABYTE’s software package, allowing for overclocking, remote control, hotspot functionality and adjusting use based on proximity to a Bluetooth device (such that the system hibernates if >10m from a paired Bluetooth phone).
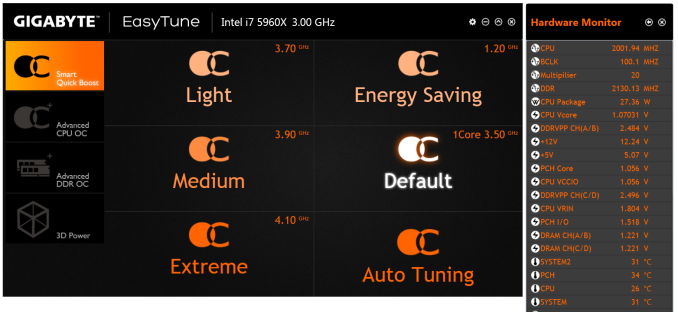
EasyTune is the big one for overclocking, and GIGABYTE offers several tools to help with automatic overclocks. We tested each of these and with a sufficient CPU 4.1 GHz should be a walk in the park. The Auto Tuning aspect also hit 4.1 GHz on our sample.
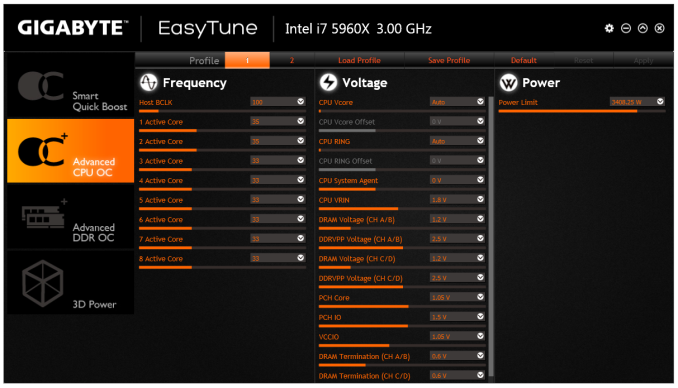
Manual overclocking can also be performed, and here GIGABYTE allows voltages by offset rather than the absolutes given in the BIOS.
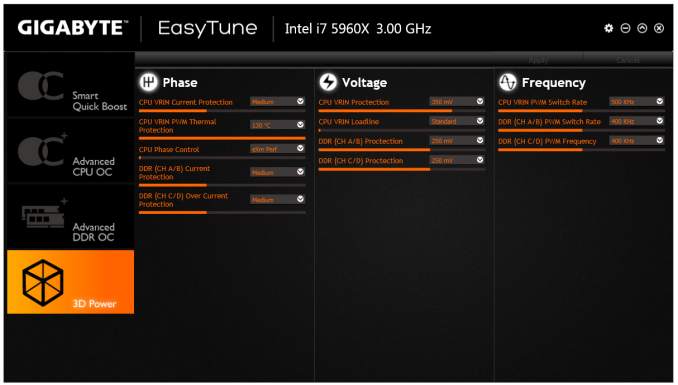
Users can also adjust the phase control and load line calibration in the 3D Power tab.
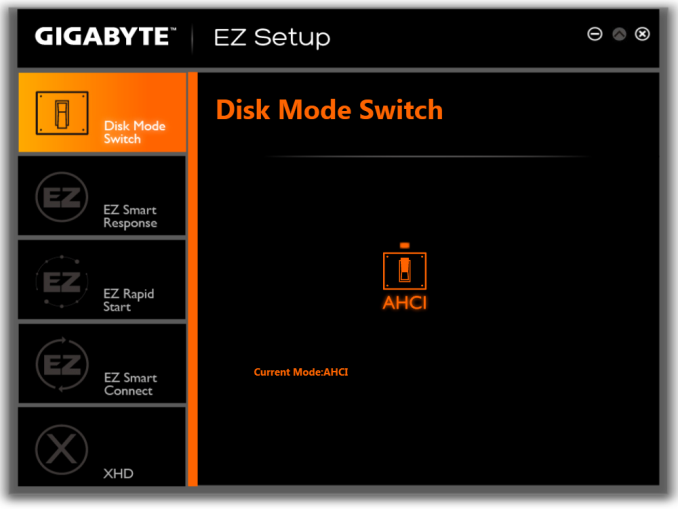
For users wanting to create RAID arrays using the chipset based solution, EZ Setup provides the tabs:
Ideally I would have liked this software to detect all the devices I have connected and list them, in case they were plugged into the wrong SATA ports for RAID.
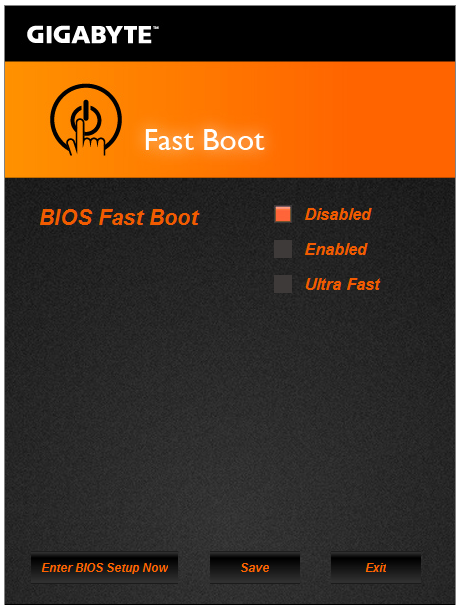
The Fast Boot application does what it says on the tin, with an extra option to allow users to restart and enter the BIOS directly.
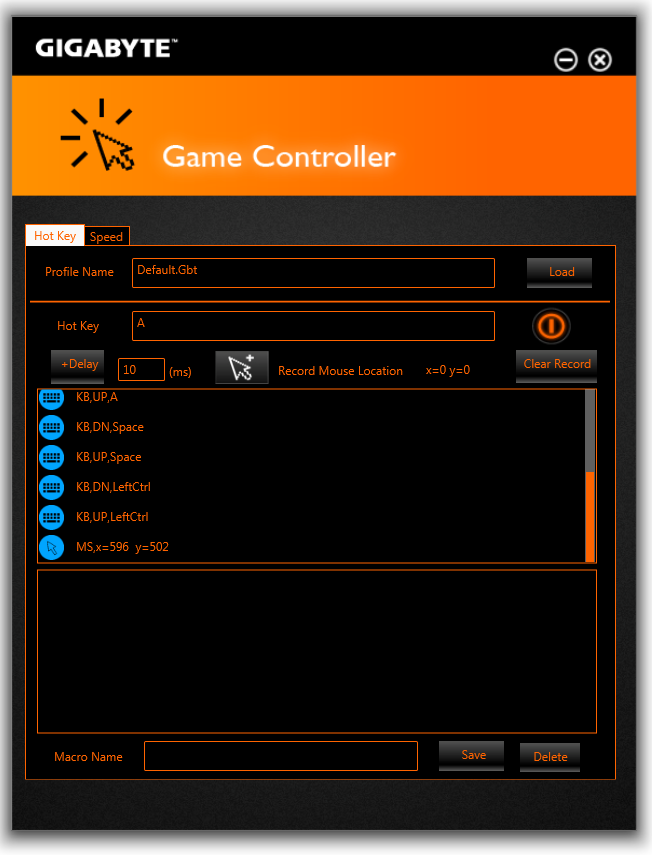
One of the newer tools in GIGABYTE’s arsenal is Game Controller, which allows both macro generation and introduces a ‘Sniper Mode’ for improved mouse accuracy. We have played with the macro generator before, and nothing much has changed – it needs some form of tutorial as well as the ability to adjust and move individual elements of the macro. Currently, if you make a mistake in making the macro, there is no way of adjusting a single element.
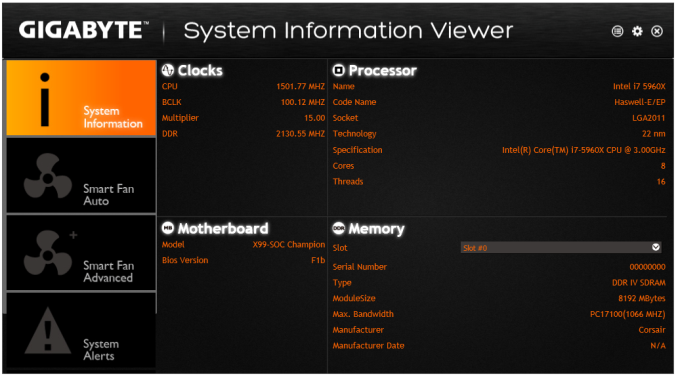
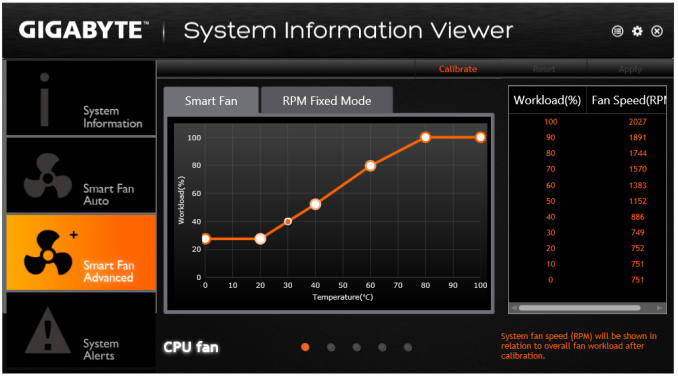
The System Information Viewer shows what the system has in it in terms of the processor, motherboard and memory, although the main use of this app is for the fan controls.
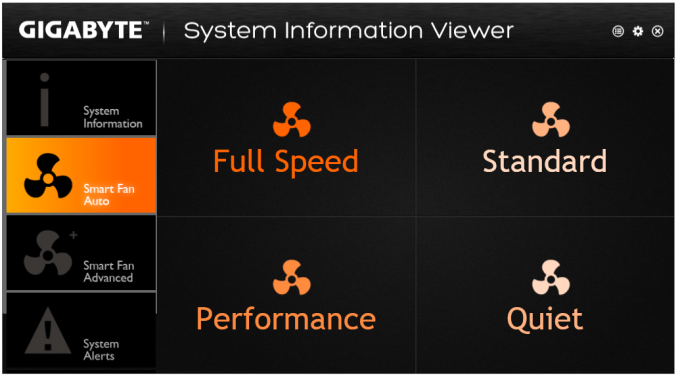
The software comes with four general fan settings which are applied to all the fans when selected.
The advanced tab offers a calibration button that tests each fan in the system then the user can use that data to adjust the multi-point graph. That being said, I am unsure why the software does not to the mathematics for the user such that we get a graph of fan speed (RPM) against temperature – it would be really easy to do. GIGABYTE should also consider adding hysteresis to the fan configuration, as this allows the fan to remain at high mode when cooling down in order to speed up the process.
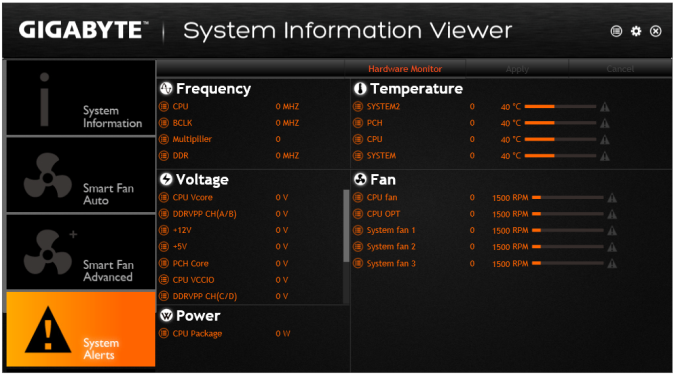
A user can also adjust the system to provide alerts when the temperatures or fans reach a maximum value. Other manufacturers provide similar alert systems, although typically users can select a high and a low value to produce a warning. The Hardware Monitor button here unfortunately did not work in our test system.
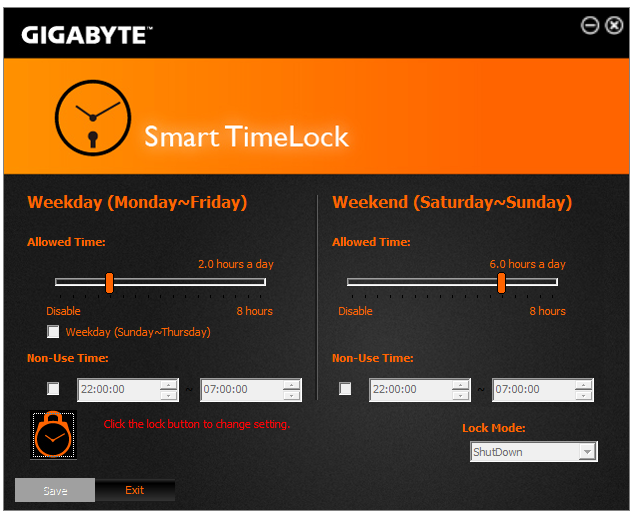
The Smart Time Lock feature is a super upgraded version of ASRock’s Online Management Guard but completely shuts down the system when the specified time limit is reached, or the system is in non-use time. This has applications for parents who want to limit the time their children use the computer for non-school activities.
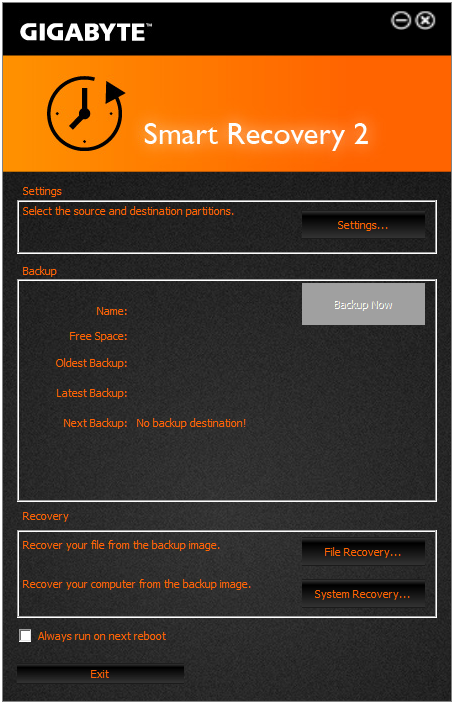
Smart Recovery will take an image of a drive for safe keeping and allow a user to restore he image should the system be compromised. Perhaps not ideal is that the user must install this software in order to restore the image – it would make sense if part of the software was baked into the image so it could self-extract and apply to the system it is run on.
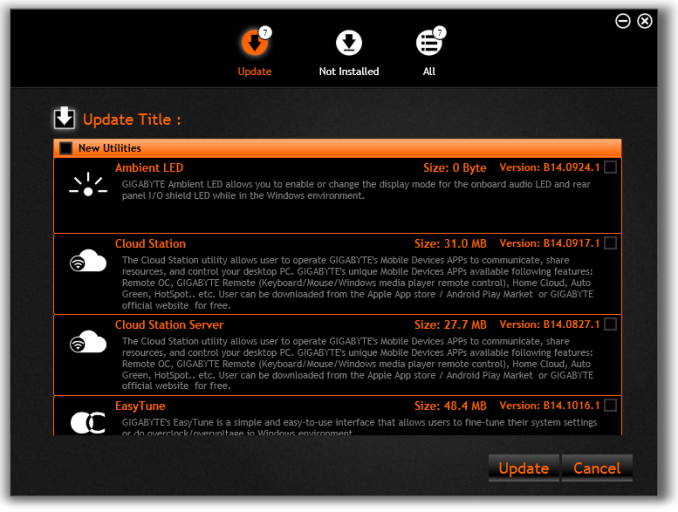
The last app for GIGABYTE is its update software. Compared to previous iterations we have tested, this successfully finds software that needs updating and performs the process of uninstalling and reinstalling as required. One issue that has been addressed now is the size of each update is listed and made available to the user before it is selected to download. Previously those on slow or limited connections might be stranded with a 600MB update of audio drivers without any way of knowing, so I am glad GIGABYTE has pushed this update.
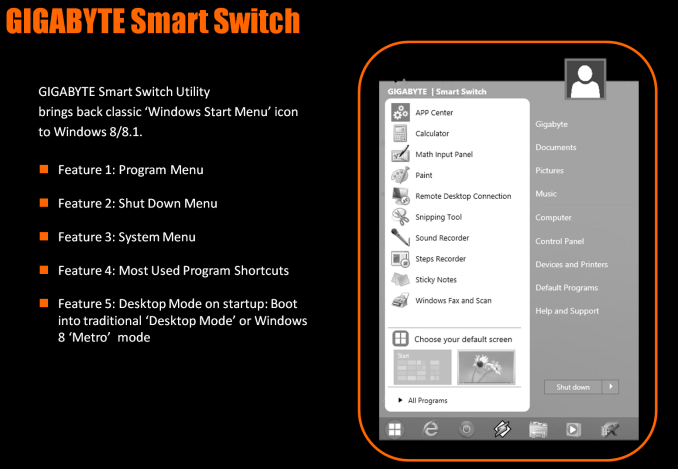
A new feature for GIGABYTE software is the Smart Switch, offering users a Start-Menu like application for Windows 8.
GIGABYTE X99-SOC Champion In The Box
The Champion falls in between a rock and hard place when it comes to the box bundle. As an overclocking board, anything extra in the box to help with that is more than welcome, but as GIGABYTE is aiming for the more cost conscious extreme overclocker for X99, there is the thought that a stripped bare bundle would help push the price down. The other serious overclocking products in this price range include the X99S MPower which we have in to review at a later date, but this will also have a similar issue.
In the box of the GIGABYTE X99-SOC Champion we get the following:
Driver Disk
User Manuals
Rear IO Shield
Four SATA Cables
Two-way flexi Crossfire Bridge
Two-way flexi SLI Bridge
Three-way short rigid SLI Bridge
Three-way long rigid SLI Bridge
Four-way rigid SLI Bridge
Equipping the product with a Crossfire bridge is a little irregular but welcome for all those not using the latest AMD cards. The combination if SLI bridges is also most welcome, given how expensive they can be purchased individually.
Many thanks to...
We must thank the following companies for kindly providing hardware for our test bed:
Thank you to OCZ for providing us with PSUs and SSDs.
Thank you to G.Skill for providing us with memory.
Thank you to Corsair for providing us with an AX1200i PSU.
Thank you to MSI for providing us with the NVIDIA GTX 770 Lightning GPUs.
Thank you to Rosewill for providing us with PSUs and RK-9100 keyboards.
Thank you to ASRock for providing us with some IO testing kit.
Thank you to Cooler Master for providing us with Nepton 140XL CLCs.
Test Setup
| Test Setup | |
| Processor | Intel Core i7-5960X ES 8 Cores, 16 Threads, 3.0 GHz (3.5 GHz Turbo) |
| Motherboards | GIGABYTE X99-SOC Champion |
| Cooling | Cooler Master Nepton 140XL |
| Power Supply | OCZ 1250W Gold ZX Series Corsair AX1200i Platinum PSU |
| Memory | Corsair DDR4-2133 C15 4x8 GB 1.2V G.Skill Ripjaws 4 DDR4-2133 C15 4x8 GB 1.2V |
| Memory Settings | JEDEC @ 2133 |
| Video Cards | MSI GTX 770 Lightning 2GB (1150/1202 Boost) |
| Video Drivers | NVIDIA Drivers 332.21 |
| Hard Drive | OCZ Vertex 3 256GB |
| Optical Drive | LG GH22NS50 |
| Case | Open Test Bed |
| Operating System | Windows 7 64-bit SP1 |
| USB 2/3 Testing | OCZ Vertex 3 240GB with SATA->USB Adaptor |
GIGABYTE X99-SOC Champion Overclocking
Experience with GIGABYTE X99-SOC Champion
Enabling the LGA2083 switch onboard gives more voltage options in the BIOS, although the only change we could find is these six additional settings:
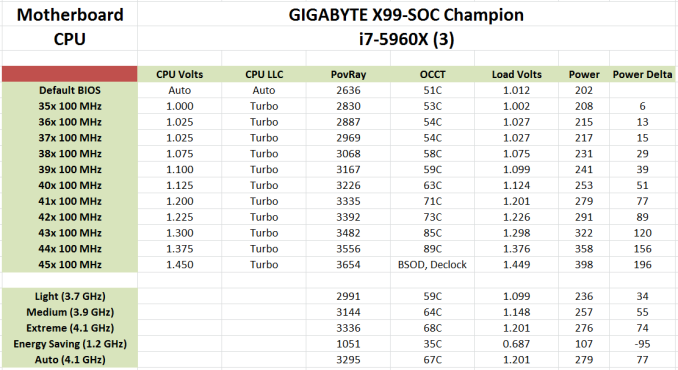
For manual overclocking, most users will head to the classic BIOS which gives GIGABYTE's regular array of overclock options. There is also extra downloadable software designed for a small footprint that offers on the fly adjustments. While we do not have the facilities to test sub-zero, I strapped on a good CLC and did basic overclocking adjustments to achieve 4.4 GHz on our mediocre CPU. The system seemed relatively happy at 4.5 GHz, but the system reduced frequency due to the high temperatures at this setting. With a better CPU there is clearly more to give, but my luck with review samples these past two years has not been that great (!).
Methodology
Our standard overclocking methodology is as follows. We select the automatic overclock options and test for stability with PovRay and OCCT to simulate high-end workloads. These stability tests aim to catch any immediate causes for memory or CPU errors.
For manual overclocks, based on the information gathered from previous testing, starts off at a nominal voltage and CPU multiplier, and the multiplier is increased until the stability tests are failed. The CPU voltage is increased gradually until the stability tests are passed, and the process repeated until the motherboard reduces the multiplier automatically (due to safety protocol) or the CPU temperature reaches a stupidly high level (100ºC+). Our test bed is not in a case, which should push overclocks higher with fresher (cooler) air.
Overclock Results
System Performance
Power Consumption
Power consumption was tested on the system while in a single MSI GTX 770 Lightning GPU configuration with a wall meter connected to the OCZ 1250W power supply. This power supply is Gold rated, and as I am in the UK on a 230-240 V supply, leads to ~75% efficiency > 50W, and 90%+ efficiency at 250W, suitable for both idle and multi-GPU loading. This method of power reading allows us to compare the power management of the UEFI and the board to supply components with power under load, and includes typical PSU losses due to efficiency. These are the real world values that consumers may expect from a typical system (minus the monitor) using this motherboard.
While this method for power measurement may not be ideal, and you feel these numbers are not representative due to the high wattage power supply being used (we use the same PSU to remain consistent over a series of reviews, and the fact that some boards on our test bed get tested with three or four high powered GPUs), the important point to take away is the relationship between the numbers. These boards are all under the same conditions, and thus the differences between them should be easy to spot.
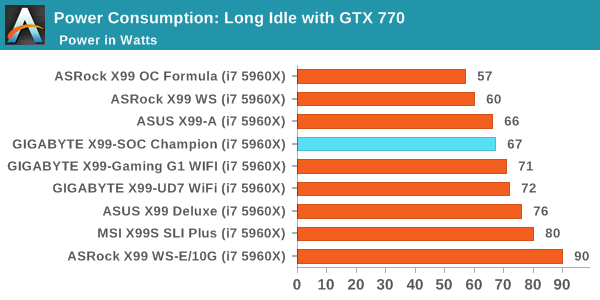
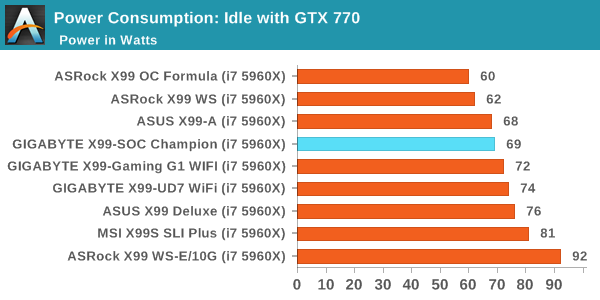
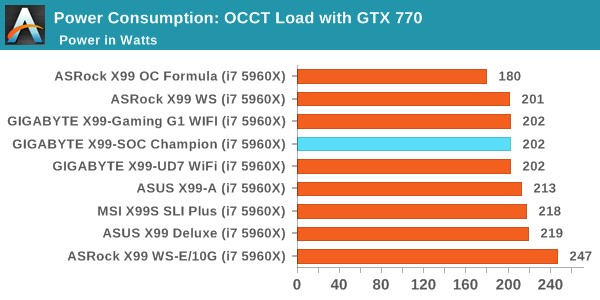
The X99-SOC Champion system polls under 70W during idle modes and just above 200W in our CPU load test, giving a 135W delta between idle and load.
Windows 7 POST Time
Different motherboards have different POST sequences before an operating system is initialized. A lot of this is dependent on the board itself, and POST boot time is determined by the controllers on board (and the sequence of how those extras are organized). As part of our testing, we look at the POST Boot Time using a stopwatch. This is the time from pressing the ON button on the computer to when Windows 7 starts loading. (We discount Windows loading as it is highly variable given Windows specific features.)
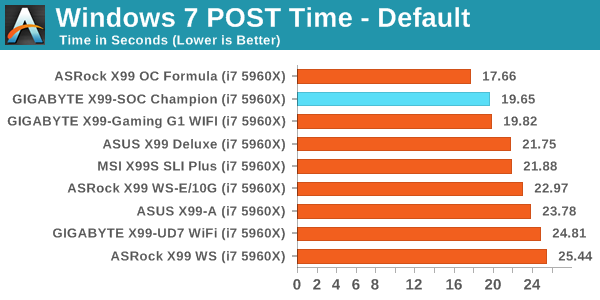
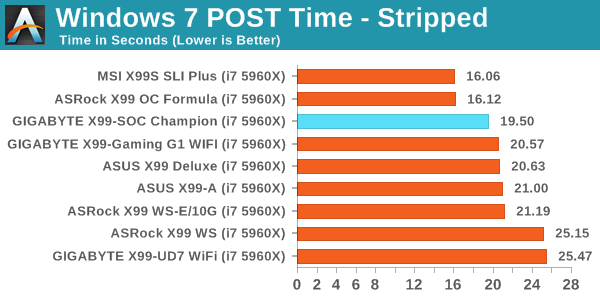
The SOC Champion is one of our fasted time to POST motherboards, sharing the set at 20 seconds with the X99-Gaming G1 WiFi, perhaps indicating a trend with GIGABYTE X99 motherboards.
Rightmark Audio Analyzer 6.2.5
Rightmark:AA indicates how well the sound system is built and isolated from electrical interference (either internally or externally). For this test we connect the Line Out to the Line In using a short six inch 3.5mm to 3.5mm high-quality jack, turn the OS speaker volume to 100%, and run the Rightmark default test suite at 192 kHz, 24-bit. The OS is tuned to 192 kHz/24-bit input and output, and the Line-In volume is adjusted until we have the best RMAA value in the mini-pretest. We look specifically at the Dynamic Range of the audio codec used on board, as well as the Total Harmonic Distortion + Noise.
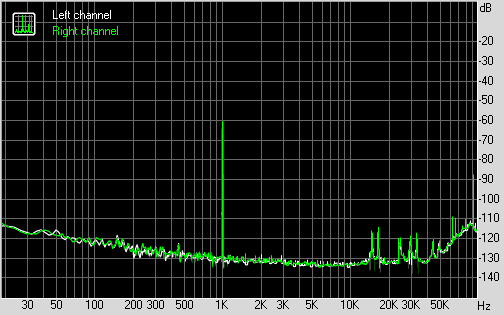
Dynamic Range of the X99-SOC Champion
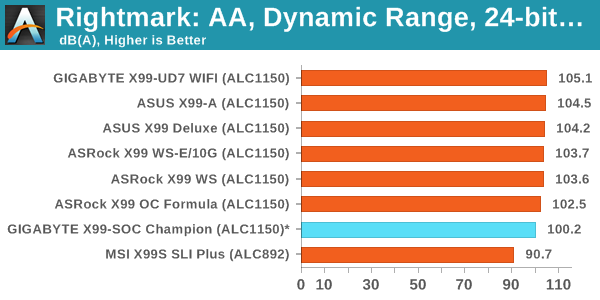
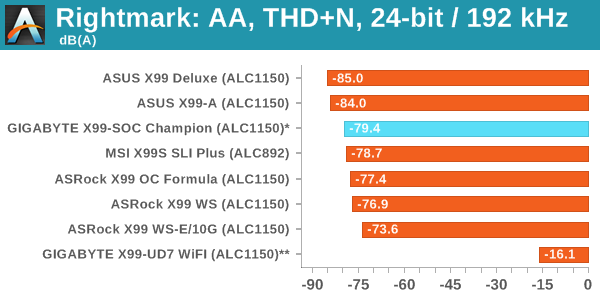
So far with X99 we have issues testing GIGABYTE motherboard audio. It comes down to the fact that we test at 100% speaker volume in order to get the peak power output as part of our testing. Unfortunately GIGABYTE motherboards give our software severe distortion and harmonic peaks when at 100%, and we had to back the volume down to 57% in order to get a reading. At 57% it won’t ever expose the potential the audio codec can deliver, but we get a reasonable result for the test for comparison.
USB Backup
For this benchmark, we transfer a set size of files from the SSD to the USB drive using DiskBench, which monitors the time taken to transfer. The files transferred are a 1.52 GB set of 2867 files across 320 folders – 95% of these files are small typical website files, and the rest (90% of the size) are small 30 second HD videos. In an update to pre-Z87 testing, we also run MaxCPU to load up one of the threads during the test which improves general performance up to 15% by causing all the internal pathways to run at full speed.
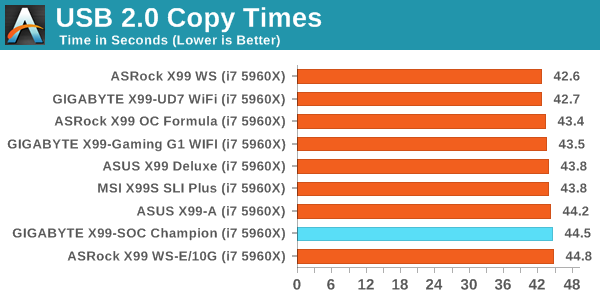
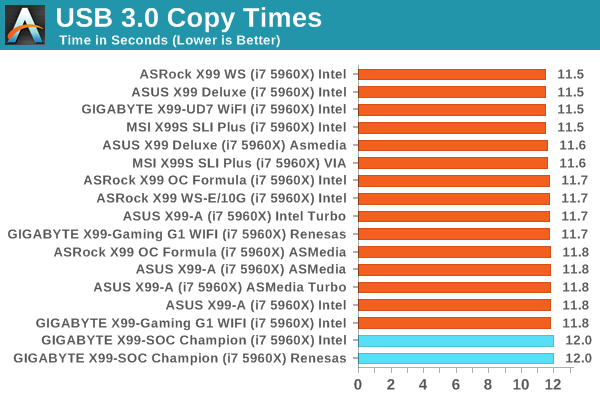
Both USB 2.0 and USB 3.0 results in our tests were some of the slowest of X99.
DPC Latency
Deferred Procedure Call latency is a way in which Windows handles interrupt servicing. In order to wait for a processor to acknowledge the request, the system will queue all interrupt requests by priority. Critical interrupts will be handled as soon as possible, whereas lesser priority requests such as audio will be further down the line. If the audio device requires data, it will have to wait until the request is processed before the buffer is filled.
If the device drivers of higher priority components in a system are poorly implemented, this can cause delays in request scheduling and process time. This can lead to an empty audio buffer and characteristic audible pauses, pops and clicks. The DPC latency checker measures how much time is taken processing DPCs from driver invocation. The lower the value will result in better audio transfer at smaller buffer sizes. Results are measured in microseconds.
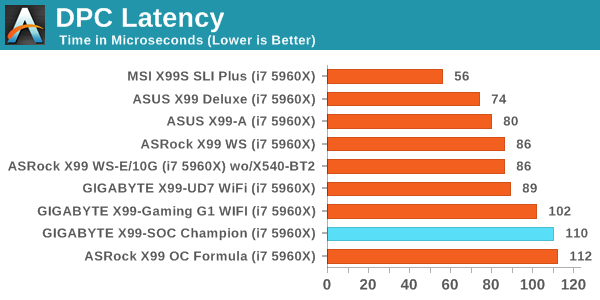
110 microseconds is at the lower end of our X99 spectrum for DPC Latency, however anything below 200 is usually very good to begin with.
CPU Performance
Readers of our motherboard review section will have noted the trend in modern motherboards to implement a form of MultiCore Enhancement / Acceleration / Turbo (read our report here) on their motherboards. This does several things, including better benchmark results at stock settings (not entirely needed if overclocking is an end-user goal) at the expense of heat and temperature. It also gives in essence an automatic overclock which may be against what the user wants. Our testing methodology is ‘out-of-the-box’, with the latest public BIOS installed and XMP enabled, and thus subject to the whims of this feature. It is ultimately up to the motherboard manufacturer to take this risk – and manufacturers taking risks in the setup is something they do on every product (think C-state settings, USB priority, DPC Latency / monitoring priority, memory subtimings at JEDEC). Processor speed change is part of that risk, and ultimately if no overclocking is planned, some motherboards will affect how fast that shiny new processor goes and can be an important factor in the system build.
For reference, the GIGABYTE X99-SOC Champion on BIOS F1b did not have any form of MultiCore Turbo.
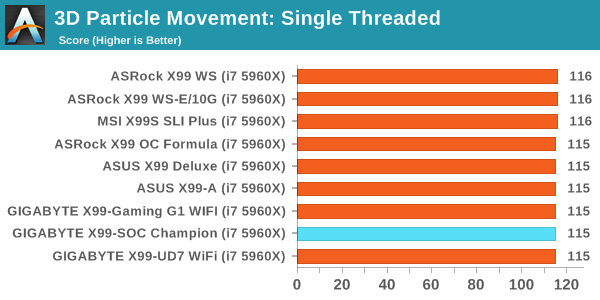
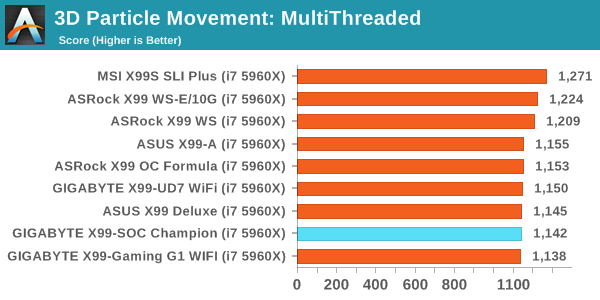
Point Calculations – 3D Movement Algorithm Test: link
3DPM is a self-penned benchmark, taking basic 3D movement algorithms used in Brownian Motion simulations and testing them for speed. High floating point performance, MHz and IPC wins in the single thread version, whereas the multithread version has to handle the threads and loves more cores. For a brief explanation of the platform agnostic coding behind this benchmark, see my forum post here.
Compression – WinRAR 5.0.1: link
Our WinRAR test from 2013 is updated to the latest version of WinRAR at the start of 2014. We compress a set of 2867 files across 320 folders totaling 1.52 GB in size – 95% of these files are small typical website files, and the rest (90% of the size) are small 30 second 720p videos.
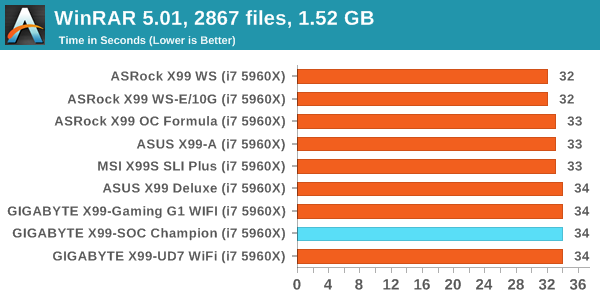
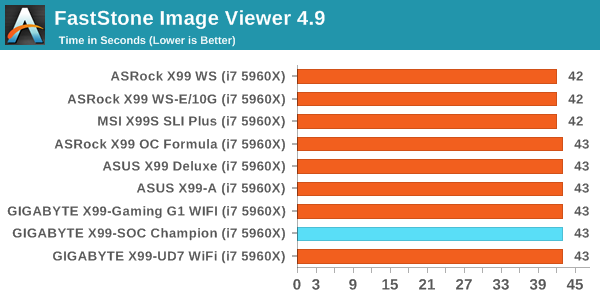
Image Manipulation – FastStone Image Viewer 4.9: link
Similarly to WinRAR, the FastStone test us updated for 2014 to the latest version. FastStone is the program I use to perform quick or bulk actions on images, such as resizing, adjusting for color and cropping. In our test we take a series of 170 images in various sizes and formats and convert them all into 640x480 .gif files, maintaining the aspect ratio. FastStone does not use multithreading for this test, and thus single threaded performance is often the winner.
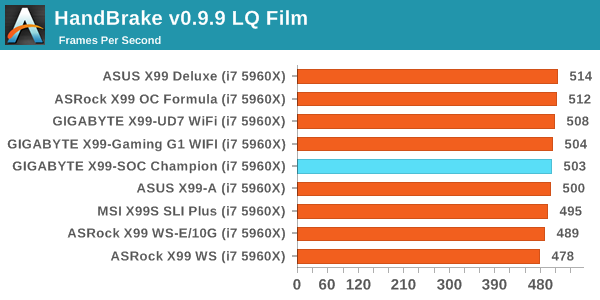
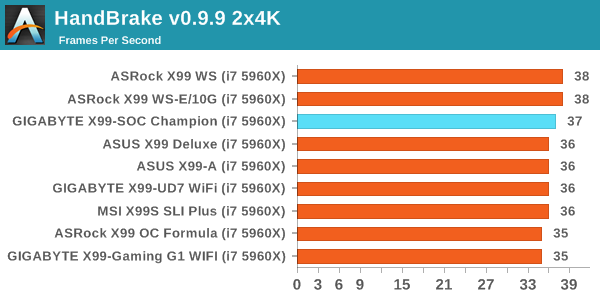
Video Conversion – Handbrake v0.9.9: link
Handbrake is a media conversion tool that was initially designed to help DVD ISOs and Video CDs into more common video formats. The principle today is still the same, primarily as an output for H.264 + AAC/MP3 audio within an MKV container. In our test we use the same videos as in the Xilisoft test, and results are given in frames per second.
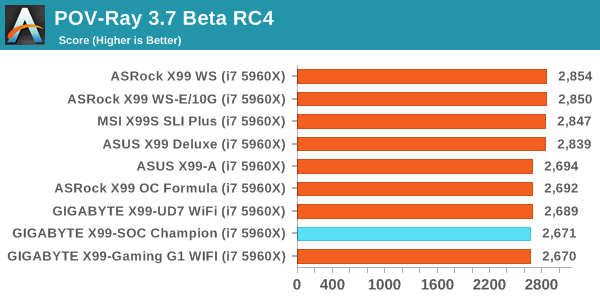
Rendering – PovRay 3.7: link
The Persistence of Vision RayTracer, or PovRay, is a freeware package for as the name suggests, ray tracing. It is a pure renderer, rather than modeling software, but the latest beta version contains a handy benchmark for stressing all processing threads on a platform. We have been using this test in motherboard reviews to test memory stability at various CPU speeds to good effect – if it passes the test, the IMC in the CPU is stable for a given CPU speed. As a CPU test, it runs for approximately 2-3 minutes on high end platforms.
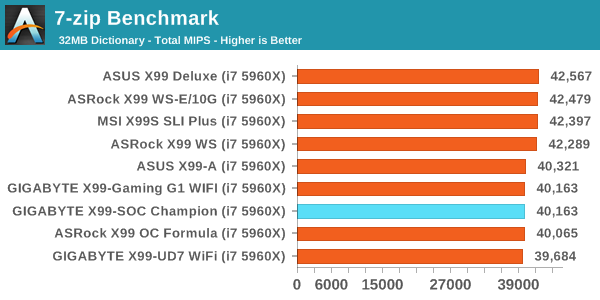
Synthetic – 7-Zip 9.2: link
As an open source compression tool, 7-Zip is a popular tool for making sets of files easier to handle and transfer. The software offers up its own benchmark, to which we report the result.
Gaming Performance
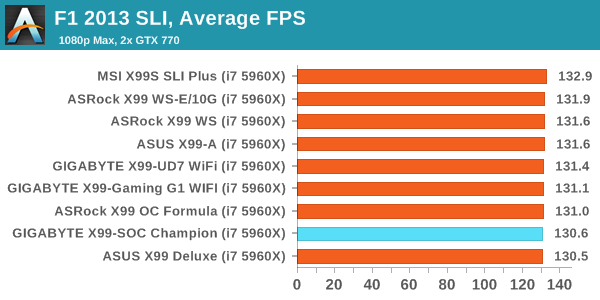
F1 2013
First up is F1 2013 by Codemasters. I am a big Formula 1 fan in my spare time, and nothing makes me happier than carving up the field in a Caterham, waving to the Red Bulls as I drive by (because I play on easy and take shortcuts). F1 2013 uses the EGO Engine, and like other Codemasters games ends up being very playable on old hardware quite easily. In order to beef up the benchmark a bit, we devised the following scenario for the benchmark mode: one lap of Spa-Francorchamps in the heavy wet, the benchmark follows Jenson Button in the McLaren who starts on the grid in 22nd place, with the field made up of 11 Williams cars, 5 Marussia and 5 Caterham in that order. This puts emphasis on the CPU to handle the AI in the wet, and allows for a good amount of overtaking during the automated benchmark. We test at 1920x1080 on Ultra graphical settings.
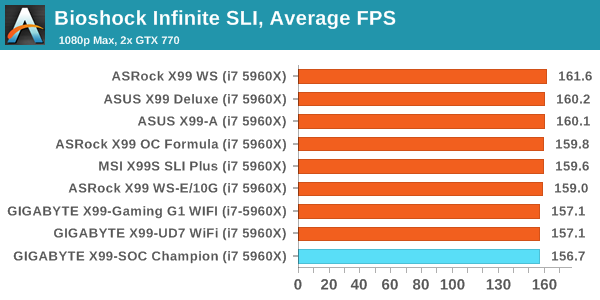
Bioshock Infinite
Bioshock Infinite was Zero Punctuation’s Game of the Year for 2013, uses the Unreal Engine 3, and is designed to scale with both cores and graphical prowess. We test the benchmark using the Adrenaline benchmark tool and the Xtreme (1920x1080, Maximum) performance setting, noting down the average frame rates and the minimum frame rates.
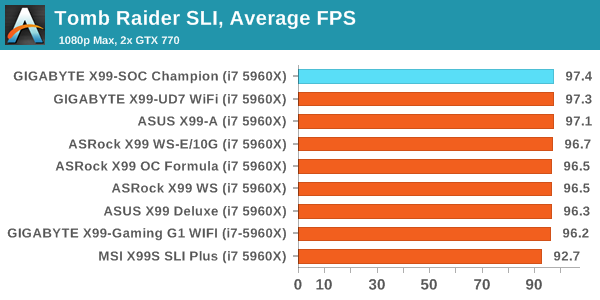
Tomb Raider
The next benchmark in our test is Tomb Raider. Tomb Raider is an AMD optimized game, lauded for its use of TressFX creating dynamic hair to increase the immersion in game. Tomb Raider uses a modified version of the Crystal Engine, and enjoys raw horsepower. We test the benchmark using the Adrenaline benchmark tool and the Xtreme (1920x1080, Maximum) performance setting, noting down the average frame rates and the minimum frame rates.
Sleeping Dogs
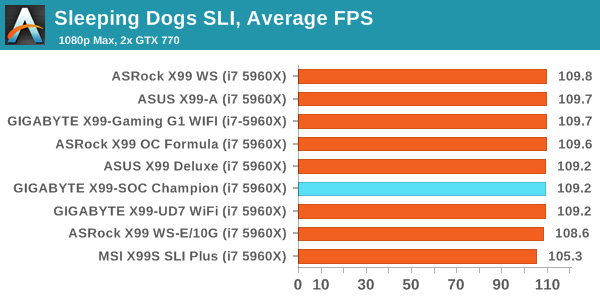
Sleeping Dogs is a benchmarking wet dream – a highly complex benchmark that can bring the toughest setup and high resolutions down into single figures. Having an extreme SSAO setting can do that, but at the right settings Sleeping Dogs is highly playable and enjoyable. We run the basic benchmark program laid out in the Adrenaline benchmark tool, and the Xtreme (1920x1080, Maximum) performance setting, noting down the average frame rates and the minimum frame rates.
Battlefield 4
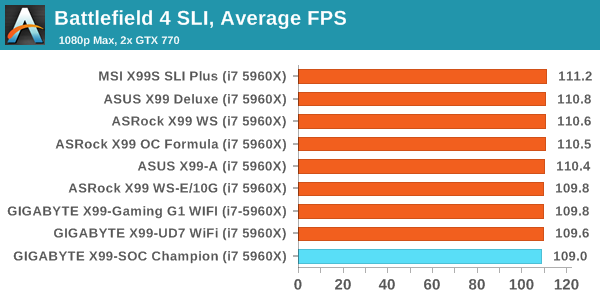
The EA/DICE series that has taken countless hours of my life away is back for another iteration, using the Frostbite 3 engine. AMD is also piling its resources into BF4 with the new Mantle API for developers, designed to cut the time required for the CPU to dispatch commands to the graphical sub-system. For our test we use the in-game benchmarking tools and record the frame time for the first ~70 seconds of the Tashgar single player mission, which is an on-rails generation of and rendering of objects and textures. We test at 1920x1080 at Ultra settings.
GIGABYTE X99-SOC Champion Conclusion
As a competitive overclocker, I appreciate the overclocking motherboard market. When I started overclocking it was to get better day-to-day performance and get a boost in game frame rates. Back then it was fairly nice to say you had a 40-50% overclock on a dual core system, especially when plowing through a dozen rounds of Counter-Strike. It was about that time when overclocking became more of competition and users decided to see how far they could push their hardware, both for 24/7 running and pushing benchmark stability. When I joined the competitive overclocking crowd, getting a higher number than the other person was always the goal.
Skip forward to 2014, and competitive overclocking has a reasonable sized following with at least half-a-dozen global competitions with four or five figure prize money as well as plenty of smaller competitions for lower end hardware. The holy grails for these live competitions or for the overclockers in general are the world records. This means getting the best score ever in a particular benchmark (3DMark Fire Strike, for example) no matter what the hardware. Because these records are highly sought after, and offer various marketing and bragging rights, companies such as GIGABYTE either sponsor or seed overclockers with premium hardware or hire them directly and turn them professional in order to build the products that break these records. GIGABYTE employs former world #1 HiCookie and top overclocker Sofos at their headquarters as well as leveraging the skills of Dino, one of their regional marketing managers well known in the overclocking community, for this purpose. For the modern gaming benchmarks, the best hardware typically revolves around an X99 based system with three or four big GPUs, all overclocked. So while not everyone can buy $4000 of overclocking equipment, perhaps those with $2000 might invest in a high end single or dual GPU overclocked system. This is where the GIGABYTE X99-SOC Champion comes in.
The X99-SOC Champion is a cut down version of the X99-SOC Force and aims at the more 'budget' oriented X99 overclocker, if such a market exists. I am a fan of good, cheap overclocking motherboards in this segment, and the X99-SOC Champion's birth started with 9 world records and 17 other hardware firsts due to an invite-only overclocking camp held at GIGABYTE HQ in Taiwan.
One of the major features for the board is the socket which runs in a default LGA2011 mode but can be switched into LGA2083 mode with an onboard switch. These extra pins are activated to give more access to the voltages inside the CPU, particularly those for uncore and stability, which can be especially useful if the system is on the edge. Their use for regular overclockers in that regard is somewhat limited as either the CPU or the temperatures are the limiting factor in 24/7 overclocking. It is also worth noting that the concept of an LGA2083 overclocking socket is currently being patented by one of GIGABYTE's competitors, so we are unsure as to the legal status of the product or the issues therein.
The socket and slots also come with 30 micron gold contacts which is 6x more than standard and 2x more than most of the competition, to improve longevity against constant replacement as well as corrosion. The socket area also has access to an overclocking set of buttons, giving control of the DualBIOS system as well as LN2 modes. There is an additional header onboard for GIGABYTE's custom overclocking handheld device, although this comes separately.
In terms of regular functionality we get a full-bandwidth quad GPU arrangement offering x16/x16/x8 and x8/x8/x16/x8, 10 SATA ports, SATA Express, an M.2 2.0 x4, an Intel I218-V network controller and an enhanced Realtek ALC1150 audio solution with PCB separation, an EM shield and additional filter caps.
On the benchmark front the GIGABYTE performs well in our power consumption tests and very well in POST time. Our audio test had issues at 100% volume but 57% results were reasonable, but the USB speeds were slower than expected. The overclocking the presets worked first time and we had a good 24/7 overclock for our mediocre processor.
In the end, alongside expectations of performance, the price of the product determines the success. For Z97, the $200 market for overclocking is a hot battleground with some success, however the fear is that X99 brings that up to $300 due to the increased cost of the chipset and IO functionality. Extra gold in the sockets and timing circuitry for full-bandwidth four-way GPU is not cheap. If the SOC Champion comes out at $250, it's a great bargain. At $275 it has some more competition but is still worth a good look. At $300 it starts migrating into the more serious overclocking and gaming setups. At the time of writing this we do not know the MSRP and are awaiting information for the final piece of the puzzle. Latest pricing on Newegg, when it arrives in stock, can be found at this link.
Edit: At CES it would seem that the MSRP will be in the $300 mark, but will be actively pursued for potential discounts depending on the retailer.

