Original Link: https://www.anandtech.com/show/8595/the-battle-of-bay-trail-d-gigabyte-j1900n-d3v-asus-j1900i-c-review
The Battle of Bay Trail-D: GIGABYTE J1900N-D3V and ASUS J1900I-C Reviewed
by Ian Cutress on October 17, 2014 10:00 AM EST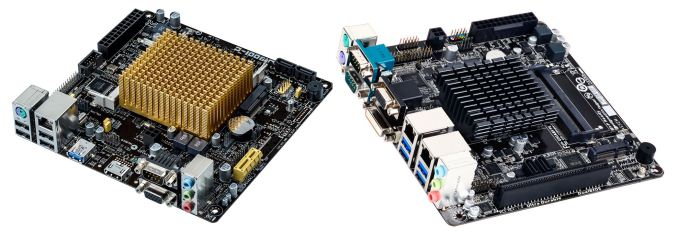
All the recent talk of Haswell-E and high-end refreshes has obscured the more casual computing market. The Bay Trail platform uses Intel’s Atom based Silvermont cores and competes directly against AMD’s Kabini for integrated computing, digital signage and cheap computing models. Today we compare two mini-ITX Celeron J1900 based motherboards: the GIGABYTE J1900N-D3V at $85 and the ASUS J1900I-C at $92, as well as the SoC itself.
Bay Trail-D Overview
Intel’s Atom Silvermont based architecture covers four SoC areas:
- Smartphones, in the form of Merrifield and Moorefield
- Tablets, Notebooks and Embedded in the form of Bay Trail
- Microservers and Storage in the form of Avoton
- Network and Communications in the form of Rangeley
We tested the C2750 eight-core Avoton SoC in the ASRock C2750D4I, a system oriented around maximum DRAM and storage in a mini-ITX form factor, and reported on GIGABYTE’s 46x C2750 Avoton server back at Computex 2014. The microserver market is apparently ripe for Avoton, but Bay Trail makes the desktop and tablet spaces a little more confusing.
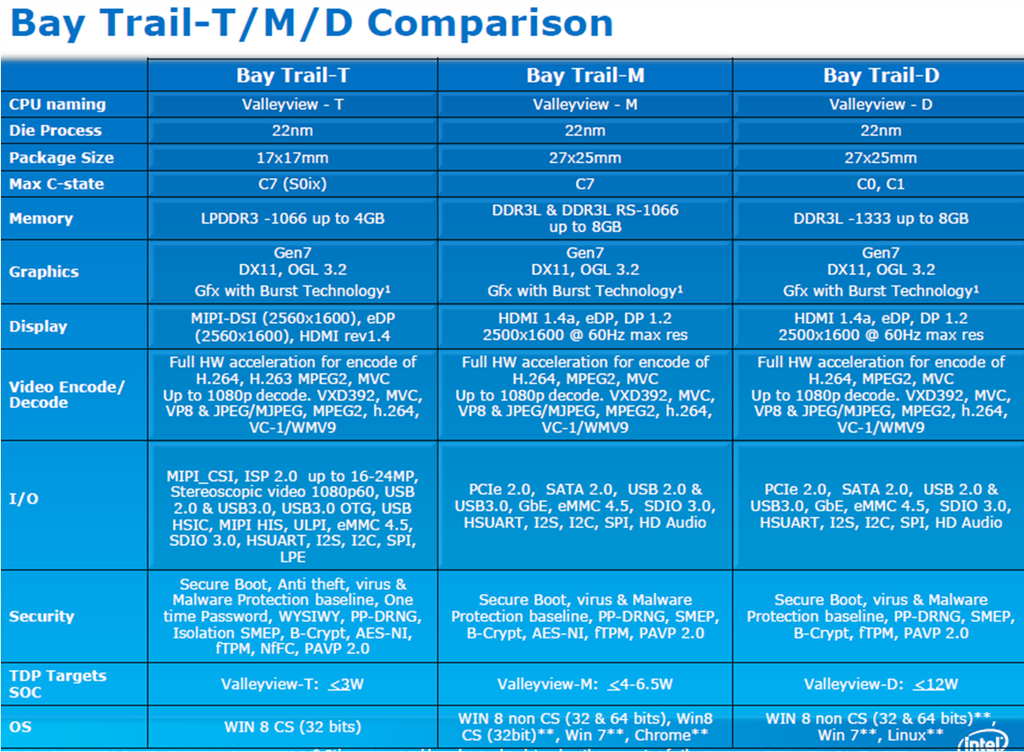
Bay Trail comes in four forms:
- Bay Trail-D, for Desktop Systems at 6W to 20W
- Bay Trail-I, for Embedded and Automotive at 5W to 10W
- Bay Trail-M, for Mobile and Netbooks at 4W to 7.5W
- Bay Trail-T, for Tablets and Hybrids at 2W
We have covered Bay Trail in Mobile and Tablets, such as the ASUS Transformer Book T100 that has the Atom Z3740 Bay Trail-T, but the casual desktop space is still an interesting market. ECS’ LIVA is a perfect example of this: Ganesh’s review of the LIVA with the 4.5W Celeron N2806 Bay Trail-M shows that with enough innovation, some interesting designs can be produced.
Today’s review focuses on the Celeron J1900, a quad core 10W Bay Trail-D with Intel Ivy Bridge HD Graphics (6 EUs). The CPU has a base frequency of 2.0 GHz with a 2.42 GHz Turbo mode, 2 MB of L2 cache and support for dual channel DDR3L-1333. The J1900 was one of the targets of AMD’s AM1 Kabini launch earlier in the year, where the two traded blows on functionality:
| AMD Athlon 5350 vs. Intel Celeron J1900 | ||||
| Athlon 5350 | Celeron J1900 | |||
| CPU Architecture | Jaguar | Silvermont | ||
| CPU Cores | 4 | 4 | ||
| CPU Frequency | 2.05 GHz | 2.0 GHz / 2.4 GHz Turbo | ||
| GPU Cores | 128 SPs | 6 EUs | ||
| GPU Frequency | 600 MHz | 688 MHz | ||
| Memory Channels | Single | Dual | ||
| Memory Frequency | 1600 MHz | 1333 MHz | ||
| L2 Cache | 2 MB | 2 MB | ||
| TDP | 25 W | 10 W | ||
| Price | $59 | $82 | ||
AMD’s main power point for Kabini was the upgradable platform, due to Intel’s Bay Trail involving soldered on CPUs. Memory compatibility is traded, with Intel supporting dual channel but at a lower frequency. Price is also a battleground, along with GPU cores, although Intel uses significantly less power (on paper).
Because Bay Trail-D is a BGA processor, this means that the processor and motherboard must be purchased in tandem. There are a number of Bay Trail-D combinations available for purchase:
$200 – Jetway JNF9M-2930 (Celeron N2930, Bay Trail-M)
$150 – Habey MITX-6771 (Celeron J1900, Bay Trail-D)
$118 – ASRock Q1900TM-ITX (J1900)
$99 – ASRock Q1900DC-ITX (J1900)
$85 – GIGABYTE J1900N-D3V (J1900)
$80 – ASUS J1800I-A (Celeron J1800, Bay Trail-D)
$79 – ASUS J1800I-C (J1800)
$76 – ASRock Q1900-ITX (J1900)
$75 – Foxconn D190S (J1900)
$70 – ASRock Q1900M (J1900)
$70 – ASRock Q1900B-ITX (J1900)
$63 – Biostar J1800NP (J1800)
$60 – ASRock D1800M (J1800)
$60 – ASRock D1800B-ITX (J1800)
$60 – ASUS J1800I-C (J1800)
Thus for this review, we chose two of what might be the most popular Bay Trail-D motherboards for home builds: two mini-ITX systems, the GIGABYTE J1900N-D3V and the ASUS J1900I-C. Both of these use the Celeron J1900 processor, whereby the J1900 sits in the middle of Intel’s Bay Trail-D offerings but is the top SKU with the Celeron nomenclature:
| Bay Trail-D Comparison | |||||||
| Cores | CPU Frequency |
TDP | L2 Cache | IGP | IGP Frequency |
Price | |
| Celeron J1750 | 2 | 2410 | 10W | 1 MB | HD (Ivy) | 688 / 750 | |
| Celeron J1800 | 2 | 2410 / 2580 | 10W | 1 MB | HD (Ivy) | 688 / 792 | $72 |
| Celeron J1850 | 4 | 2000 | 10W | 2 MB | HD (Ivy) | 688 / 792 | |
| Celeron J1900 | 4 | 2000 / 2420 | 10W | 2 MB | HD (Ivy) | 688 / 854 | $82 |
| Pentium J2850 | 4 | 2410 | 10W | 2 MB | HD (Ivy) | 688 / 792 | |
| Pentium J2900 | 4 | 2410 / 2670 | 10W | 2 MB | HD (Ivy) | 688 / 896 | $94 |
| C2550 (Avoton) | 4 | 2400 / 2600 | 14W | 2 MB | None | N/A | $86 |
| C2750 (Avoton) | 8 | 2400 / 2600 | 20W | 4 MB | None | N/A | $171 |
Four Silvermont cores at 2 GHz for 10W sounds impressive, especially when I think back a decade to what I had back at university, or the 35W Core 2 Mobile CPU I had in my last laptop. As we found with the C2750, single thread speed should be reasonable and while multithreaded applications can take advantage, it doesn’t replace an i3, but ultimately that is not the intended market. Both the GIGABYTE J1900N-D3V and ASUS J1900I-C are going for that base desktop market, where ‘some memory’ and ‘some storage’ are needed, such as digital signage, a basic HTPC or run-of-the-mill all-access government machines.
It is worth noting that for Bay-Trail D, there are two steppings of the processors:

The new C0 stepping allows Intel Quick Sync to be used, but aside from the change in stepping (B3 to C0) there is no other outward indication which version is going to be used unless you are a customer that deals with Intel directly. Even though our samples in this review were new, both contained the B3 stepping version of the SoC.
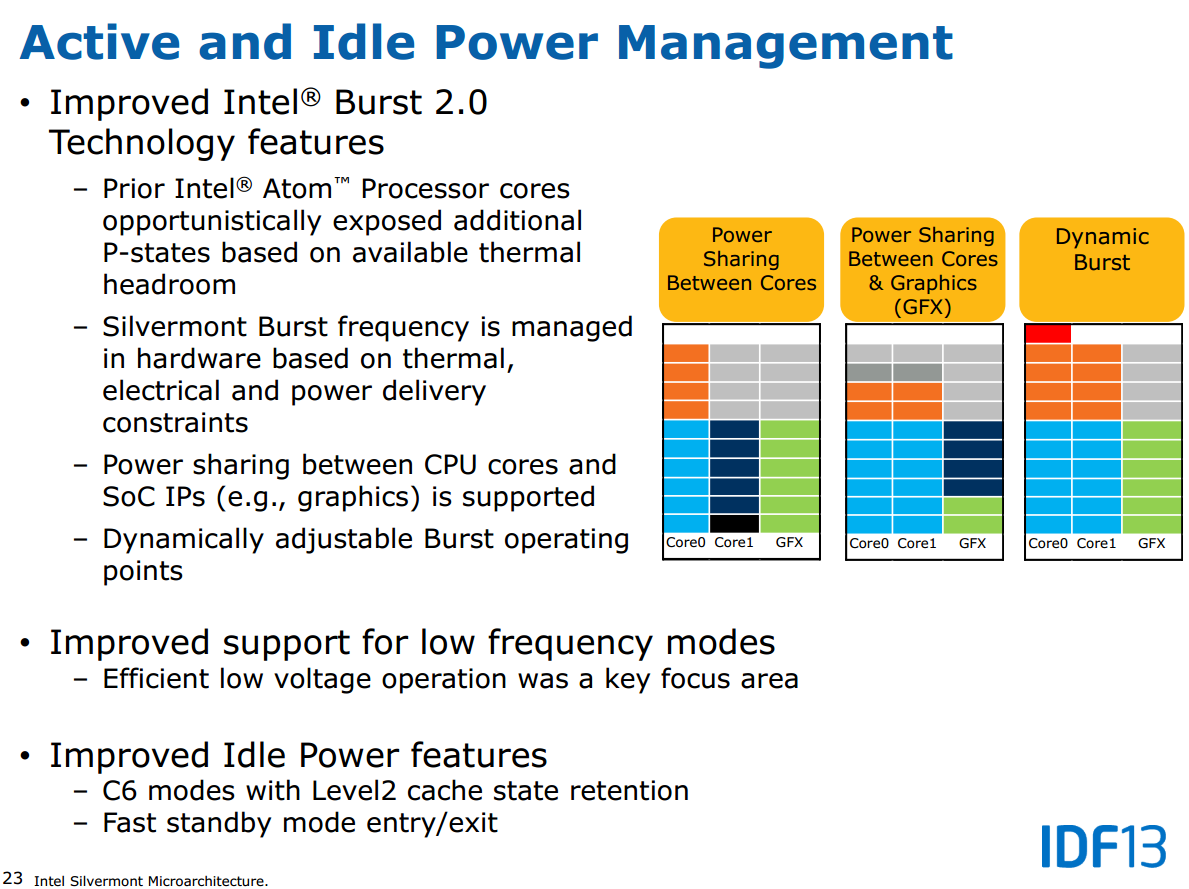
Nevertheless, some of the Bay Trail-D SKUs to come with a form of Intel Burst, allowing parts of the SoC to turbo depending on how power is needed:
The Bay Trail Chipset
Similar with AM1, the integration of the IO into the SoC means there is no formal south bridge to distribute the ports and all routing is via the SoC:
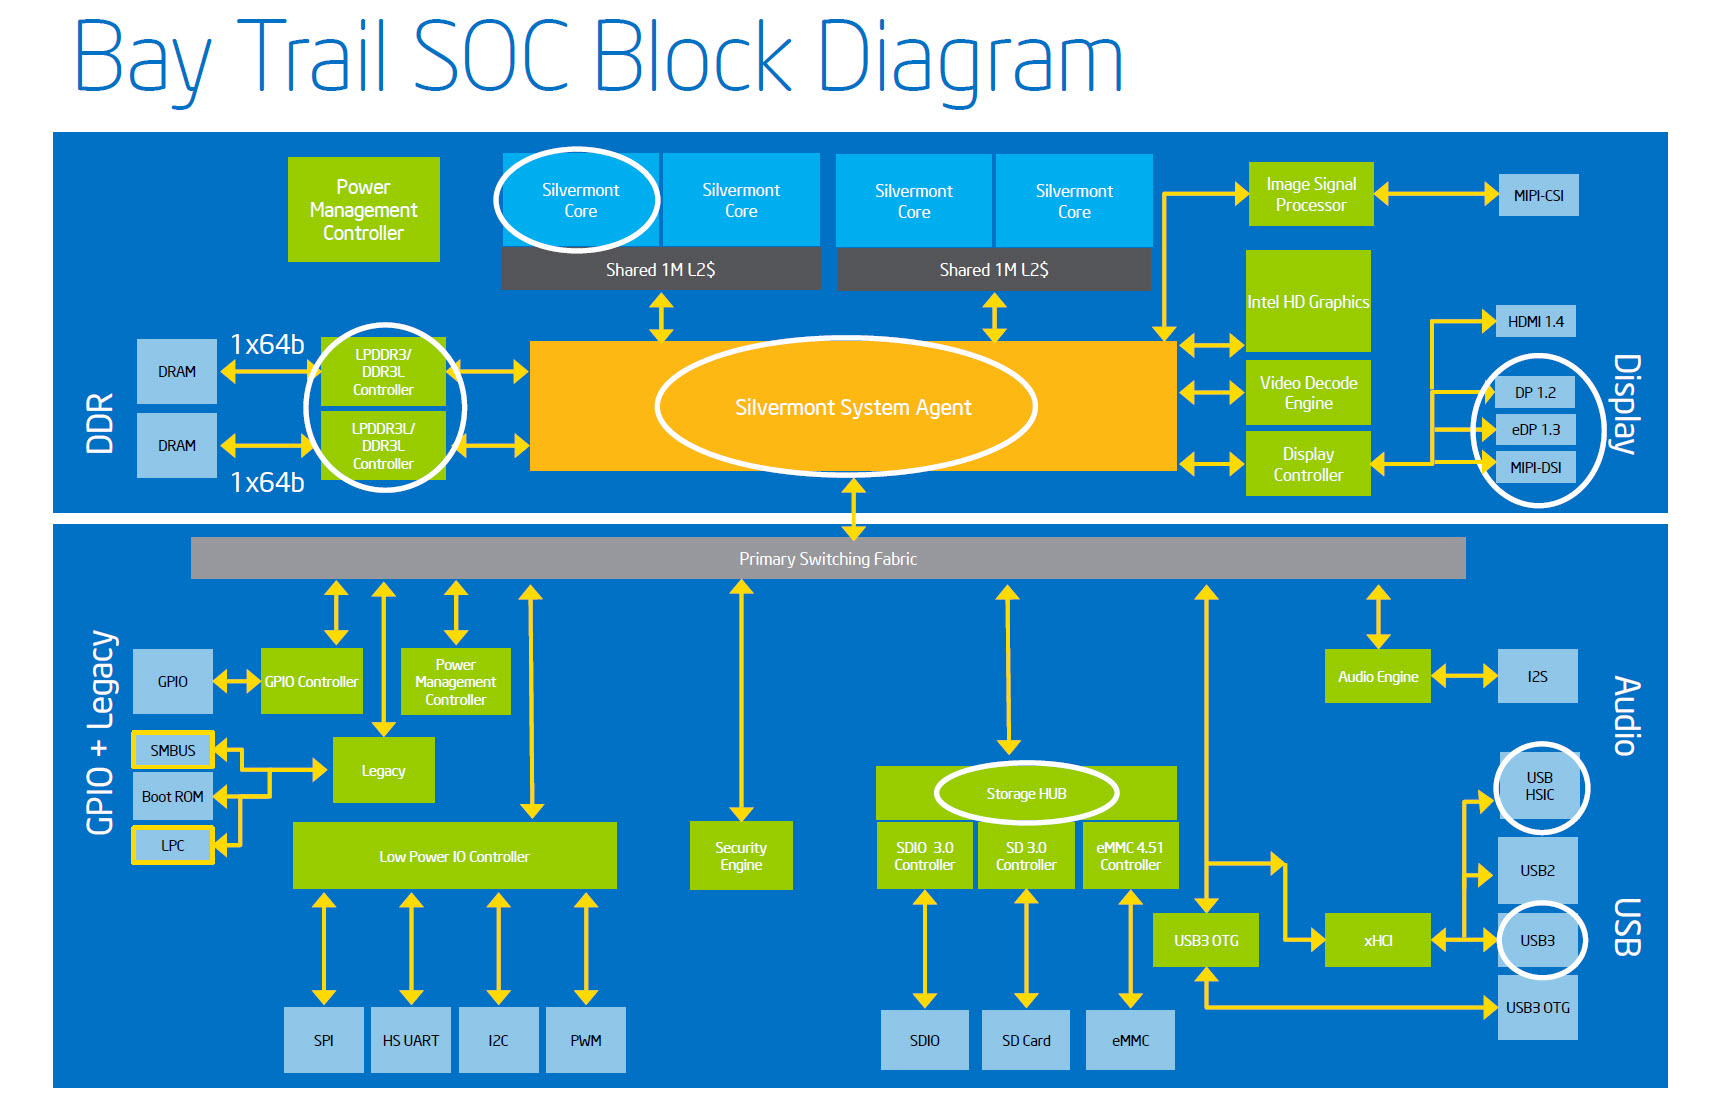
Here the System Agent negotiates data between the dual channel DDR3L memory controllers, the Silvermont dual core ‘modules’ and the graphics, supplied as 6 EUs based on the Ivy Bridge video architecture. Because the Bay Trail SoC supports far fewer I/O connections compared to our usual foray into consumer based motherboard/CPU combinations, a mini-ITX is enough to almost fit them all.
The full block diagram for the J1900N-D3V is:
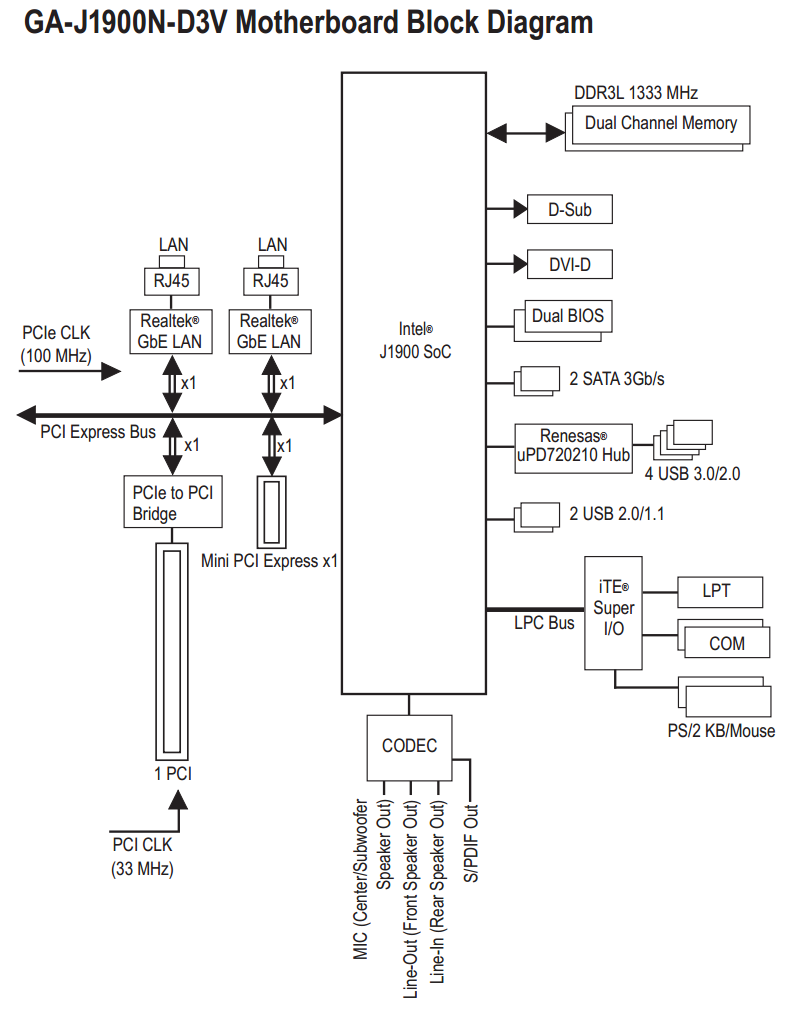
The SoC allows four PCIe 2.0 lanes from the chipset, which the manufacturer can use network connections or other IO controllers for. Here GIGABYTE has used two for Realtek NICs, one for a PCIe to PCI bridge and a mini-PCIe for a WiFi card or similar. The SoC supports two SATA 3 Gbps and a single USB 3.0 port, with this GIGABYTE motherbaord using a Renesas hub on that USB 3.0 to expand the offering to four.
Here is where Bay Trail comes across an issue. The system is designed to be cheap and competing with Kabini, meaning that motherboard manufacturers cannot fill the product up with controllers that cost a lot. It would be interesting if the PCIe lanes were used for additional SATA controllers, allowing for a large storage system, but that ends up being exactly what the C2750D4I is. Also, the decision here on the GIGABYTE to use a PCI slot will be for legacy use, as the latest graphics card available that uses PCI would be a HD 5450 or GT610/430.
Legacy connectors are always a touchy subject. Some motherboard reviews on products with a PS/2 or PCI slot might end up with a comment wondering why they still exist. The answer lies in industry, because upgrading that $1,000 PC is cheaper than upgrading the $5,000,000 bit of 15-year old equipment it is connected to. Bay Trail-D, even though is offered to the public, has a use in these motherboards for industry, so GIGABYTE and ASUS have to cover the bases. There are a few key points to consider in this respect:
- Does it have the right connectors?
- Does it cost a lot?
- Is it easy to set up?
- Is it responsive enough?
- Will it compute as much as is needed in a reasonable time?
The last two points end up being the usual reason for upgrading. For example, back in the lab I worked in several years ago our vintage equipment (an older version of this) ran on Pentium 4 machines but required a legacy slot for the proprietary communication and control card it ran on. In order to upgrade, it had to meet the above criteria. This is why legacy still exists.
Back to the review: we are putting both the GIGABYTE J1900N-D3V and the ASUS J1900I-C through their paces for usability as well as the J1900 SoC for responsiveness. These boards are in the $85-$95 mark, providing a competitive price point against AMD’s Kabini. Motherboards at the cheaper end of the spectrum tend to be worked on by less people, purely because the profit margins are low. Both the motherboards in this review are dealing with the fact that they have to include the SoC on the motherboard at the point of sale. Intel lists the price of the J1900 as $82, meaning that these SoCs are actually sold at a discount or in a discounted-revenue strategy, or the motherboard manufacturers are getting them severely discounted in order to make cents per sale.
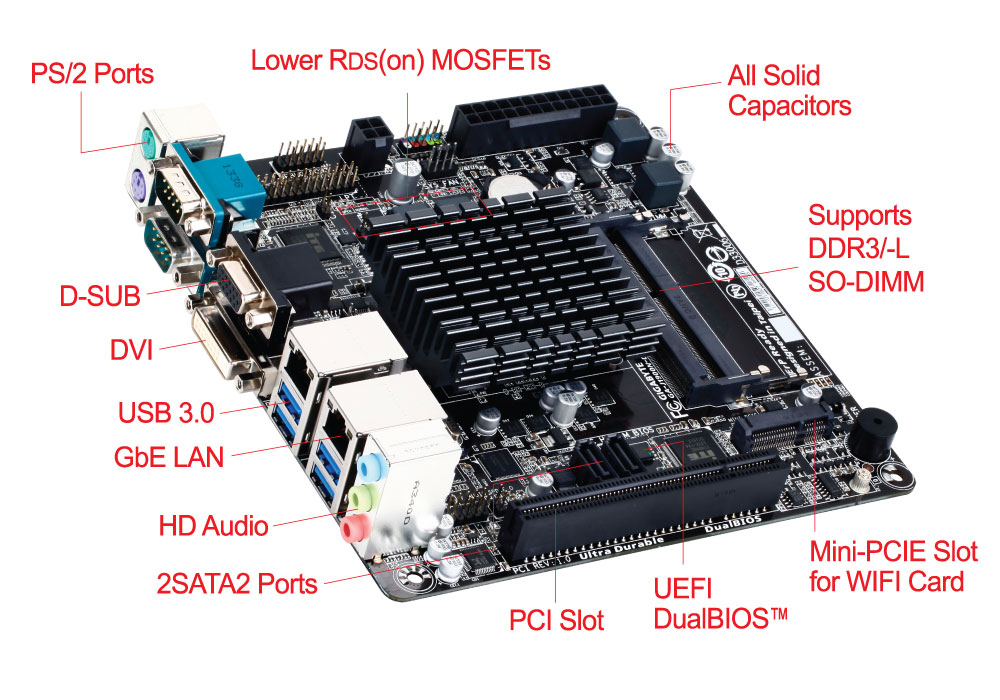
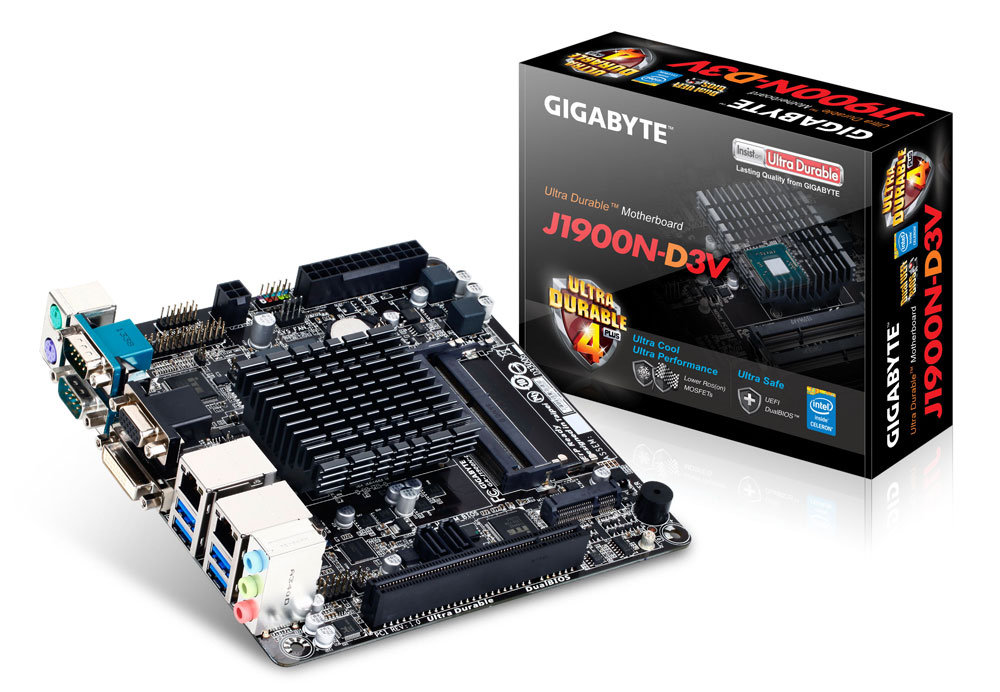
GIGABYTE J1900N-D3V Visual Inspection
The J1900N-D3V due to the 10W SoC under the hood uses a passive cooler with plenty of surface area to direct heat away. It is interesting that if we compare this cooler to some of the power delivery heatsinks on mainstream boards, this looks more like a cooler than they do, even though those power delivery heatsinks might actually cost more. Because these motherboards fall under the $100 bracket, little attention is paid to the presentation, although GIGABYTE has at least synchronized the heat sink and the slots to match the PCB. Also for cost reasons, the PCB looks very busy – if an engineer can replace a component with two components and still save money, this becomes the mentality for this sort of design. Every component on board is also surrounded by a white box so the automated machines can be guided onto where each IC or resistor should be.

GIGABYTE has placed the 24-pin ATX and 4-pin CPU power connectors at the edge of the motherboard making it easier to use this board in a case, something their mainstream Z77 and Z87 mini-ITX motherboards had trouble doing. At the top of the board with these connectors are the front panel header, an LPT header and a 4-pin SYS fan header. The motherboard has only two fan headers on board – one just above the SoC and a 3-pin to the left of the SoC, with this one labeled ‘CPU’. This is next to a USB 2.0 header in white.

On the right hand side we have a stacked SO-DIMM arrangement, with each module being placed the opposite way round to each other. As with upgradable laptop SO-DIMM slots, the slots have latches to fasten the modules in place. Below this is a mini-PCIe slot, suitable for a half-length WiFi module which is not included. We also get a built in speaker on the bottom right, something we tend not to see in $100+ products.
At the bottom of the board we have the PCI slot which comes from a PCIe to PCI bridge, with two SATA ports above it. This is a frustrating place to put the SATA ports, as it means a user with two devices will have to reach over the motherboard in order to connect them. The connectors also face the same direction, and if the user decides to have locking cables, the cable on the left needs to be removed before the one on the right can be taken out. To the left of these SATA ports is the front panel audio header.
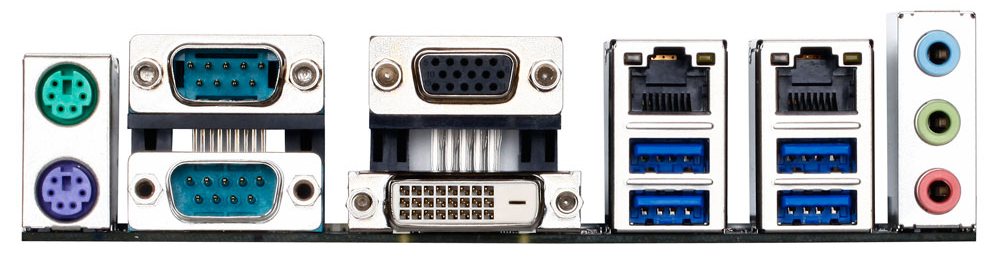
The rear panel has separate PS/2 connectors for a mouse and keyboard, along with two COM ports, a VGA port and a DVI-D port. GIGABYTE has implemented four USB 3.0 ports by using a Renesas hub, and the two Realtek NICs provide an upgrade over the standard configuration. The 2.1 audio solution is provided by a Realtek ALC887 codec.
Board Features
| GIGABYTE J1900N-D3V | |
| Price | Link |
| Size | Mini-ITX |
| CPU Interface | Soldered |
| Chipset | Bay Trail-D Quad Core |
| Memory Slots | Two DDR3/L SO-DIMM slots supporting up to 8GB Up to Dual Channel, 1333 MHz |
| Video Outputs | VGA (2560x1600) DVI-D (1920x1080) |
| Onboard LAN | 2 x Realtek |
| Onboard Audio | Realtek ALC887 |
| Expansion Slots | 1 x PCI 1 x Mini-PCIe |
| Onboard SATA/RAID | 2 x SATA 3 Gbps |
| USB 3.0 | 4 x USB 3.0 (Hub via SoC) [rear panel] |
| Onboard | 2 x SATA 2 x Fan Header 1 x LPT Header 1 x USB 2.0 Header 1 x mini-PCIe Front Panel Header Front Audio Header |
| Power Connectors | 1 x 24-pin ATX 1 x 4-pin CPU |
| Fan Headers | 1 x CPU (4-pin) 1 x SYS (4-pin) |
| IO Panel | 1 x PS/2 Mouse Port 1 x PS/2 Keyboard Port 2 x COM Ports VGA DVI-D 4 x USB 3.0 2 x Realtek Network Ports Audio Jacks |
| Product Page | Link |
The GIGABYTE J1900N-D3V splits the four PCIe lanes from the chipset into a mini-PCIe slot, a PCIe to PCI bridge and two Realtek NICs. This is perhaps a good scenario for a machine that needs to be networked, although storage users miss out. Other configurations might have revolved around a SATA controller, a PCIe 2.0 x1 slot or a true USB 3.0 controller. But at the price point, users have to bring along their own WiFi and antenna bracket.
GIGABYTE J1900N-D3V BIOS
The J1900N-D3V BIOS we tested with reverts back to the ‘old-school’ blue text on grey background scenario. This means that GIGABYTE has not decided to integrate this board with a graphical UEFI and is instead using a textual one, although from the ASUS BIOS later in the review we can confirm that a graphical BIOS is at least possible. Having tested a few pre-production motherboards recently, it is clear that this is the type of basic graphical BIOS that the manufacturer receives from AMI before the manufacturer integrates their own interface on the top of it. It would seem that GIGABYTE does not have that simple ‘everything works’ interface that can be easily applied.
The first screen on entry is the Main tab, offering important information such as the motherboard model, the BIOS version and the DRAM installed. Naturally we would prefer other information, such as the CPU, CPU temperature, CPU frequency, a per-slot report of the DRAM as well as voltages and timings.
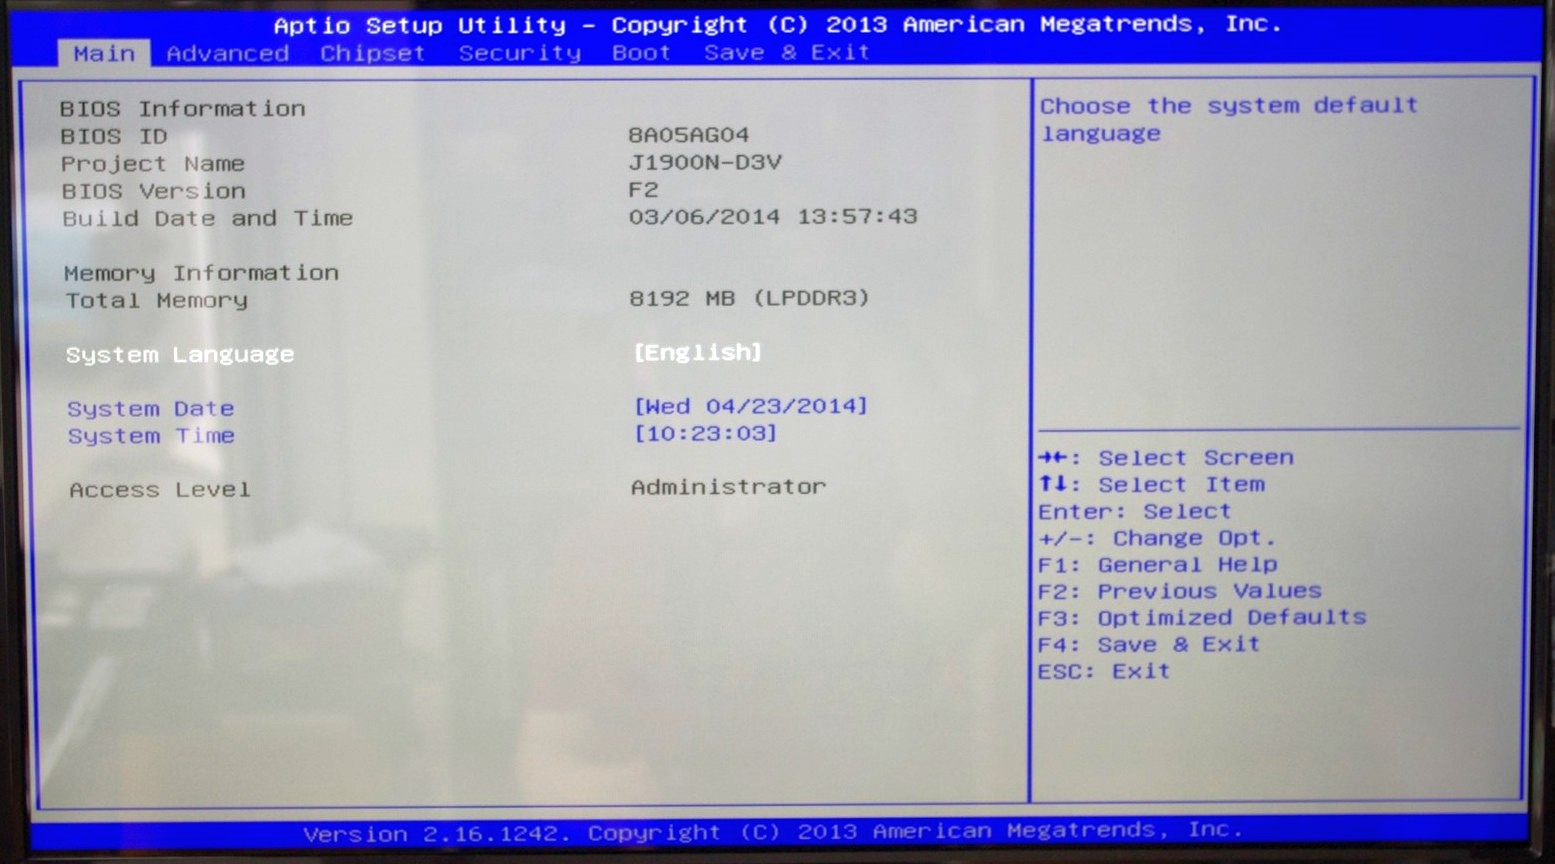
Apologies for the image quality – we were unable to ascertain if a ‘print screen’ situation exists for this BIOS, although in a later review we know Aptio V does integrate this functionality in higher-end chipsets.
The BIOS is split into several main tabs and the Advanced tab features most of the more technical options.
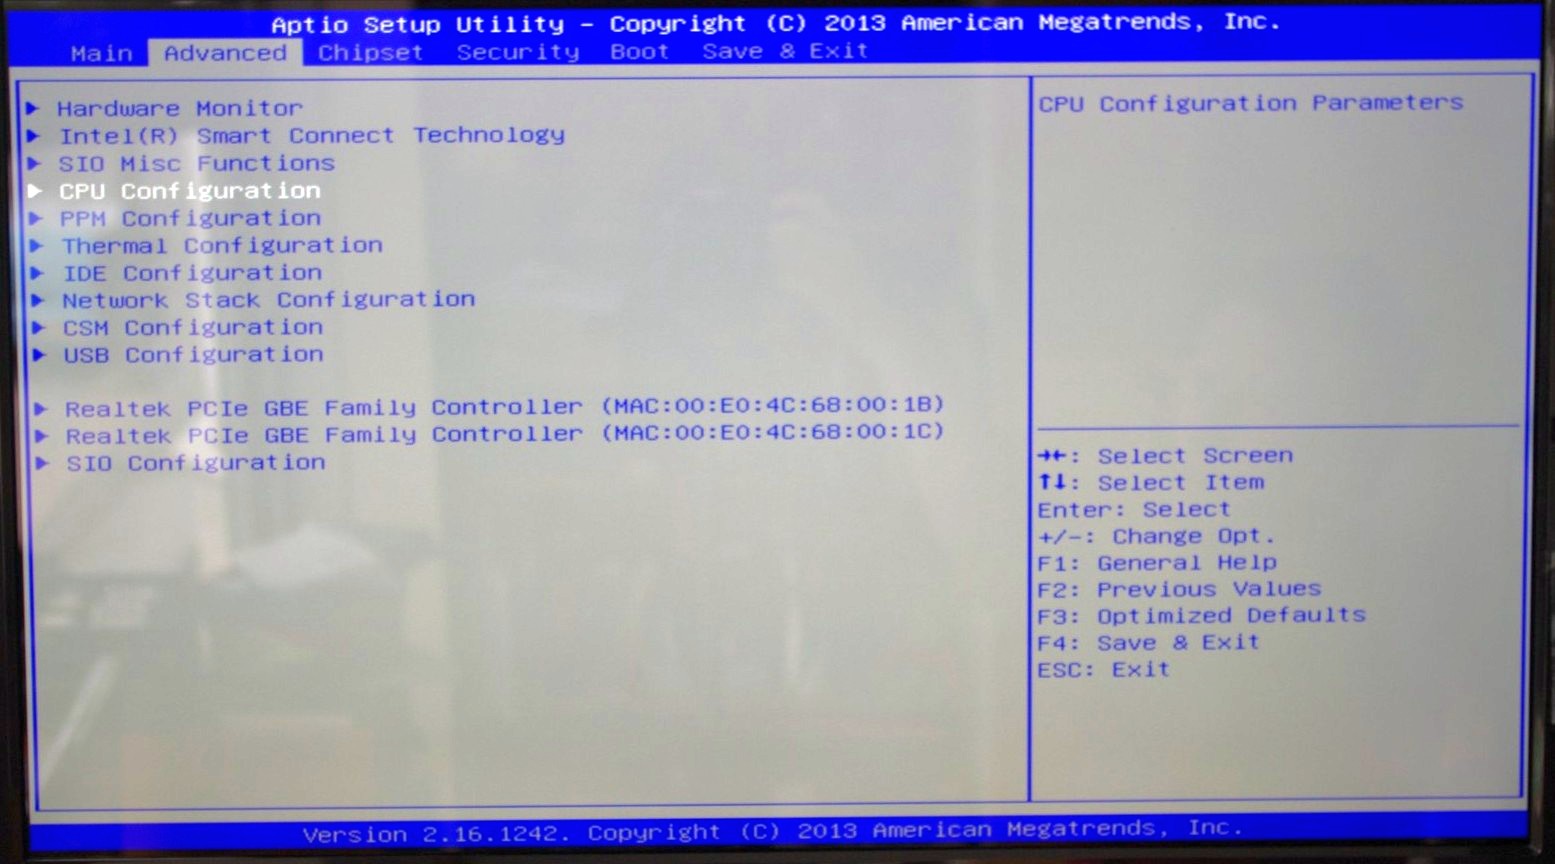
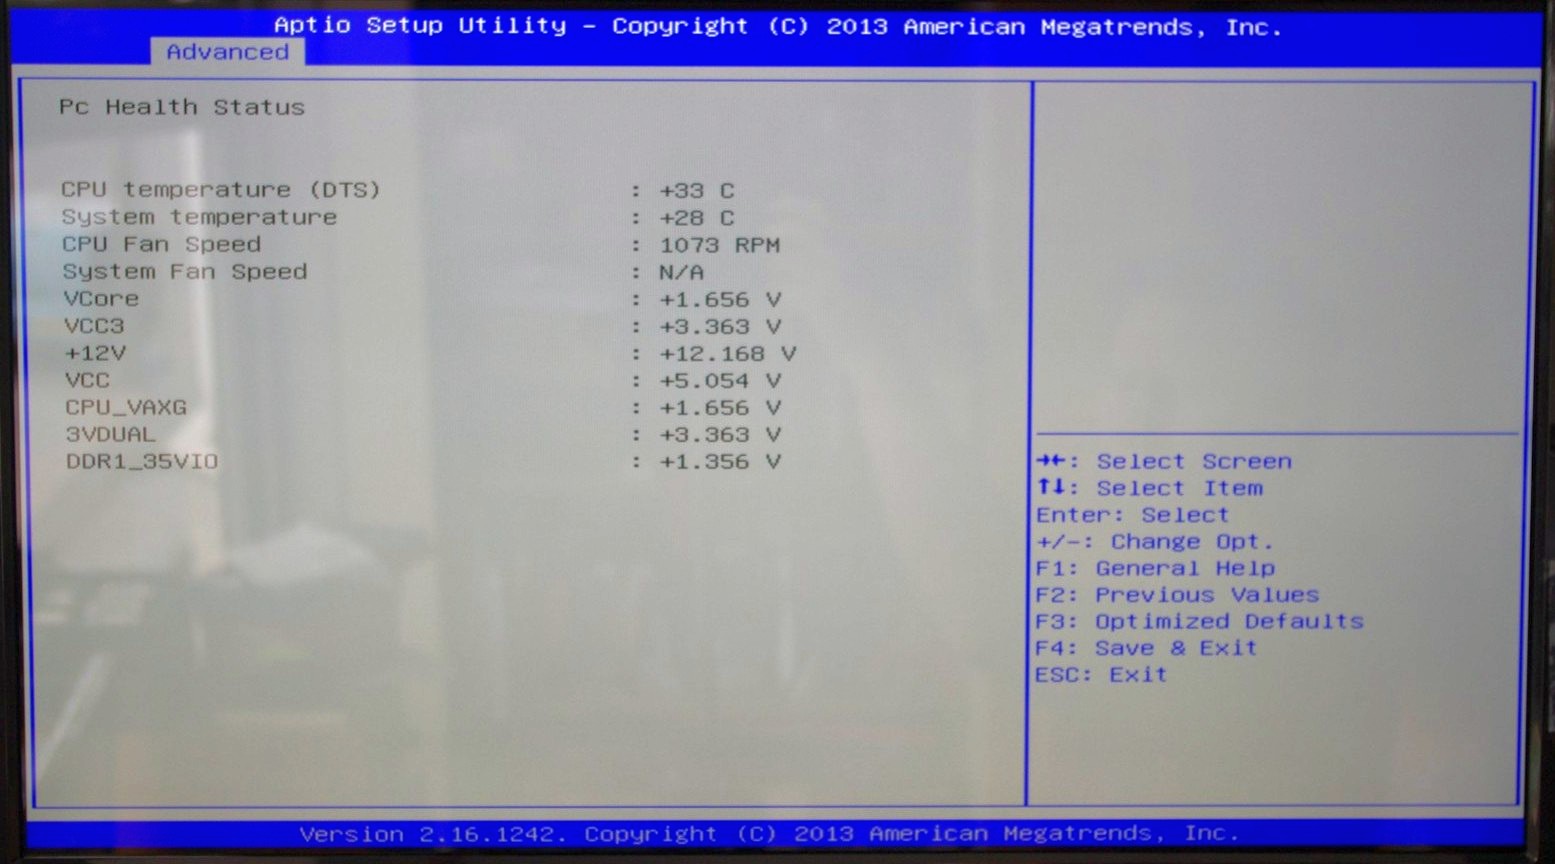
The Hardware Monitor option gives a rundown of the temperatures, fan speeds and voltages available to the system for monitoring:
Smart Connect Technology is disabled by default in the BIOS, and the CPU is set up for Energy Efficient usage by default:

Information about the CPU is found in this menu via the ‘Socket 0 CPU Information’ option.
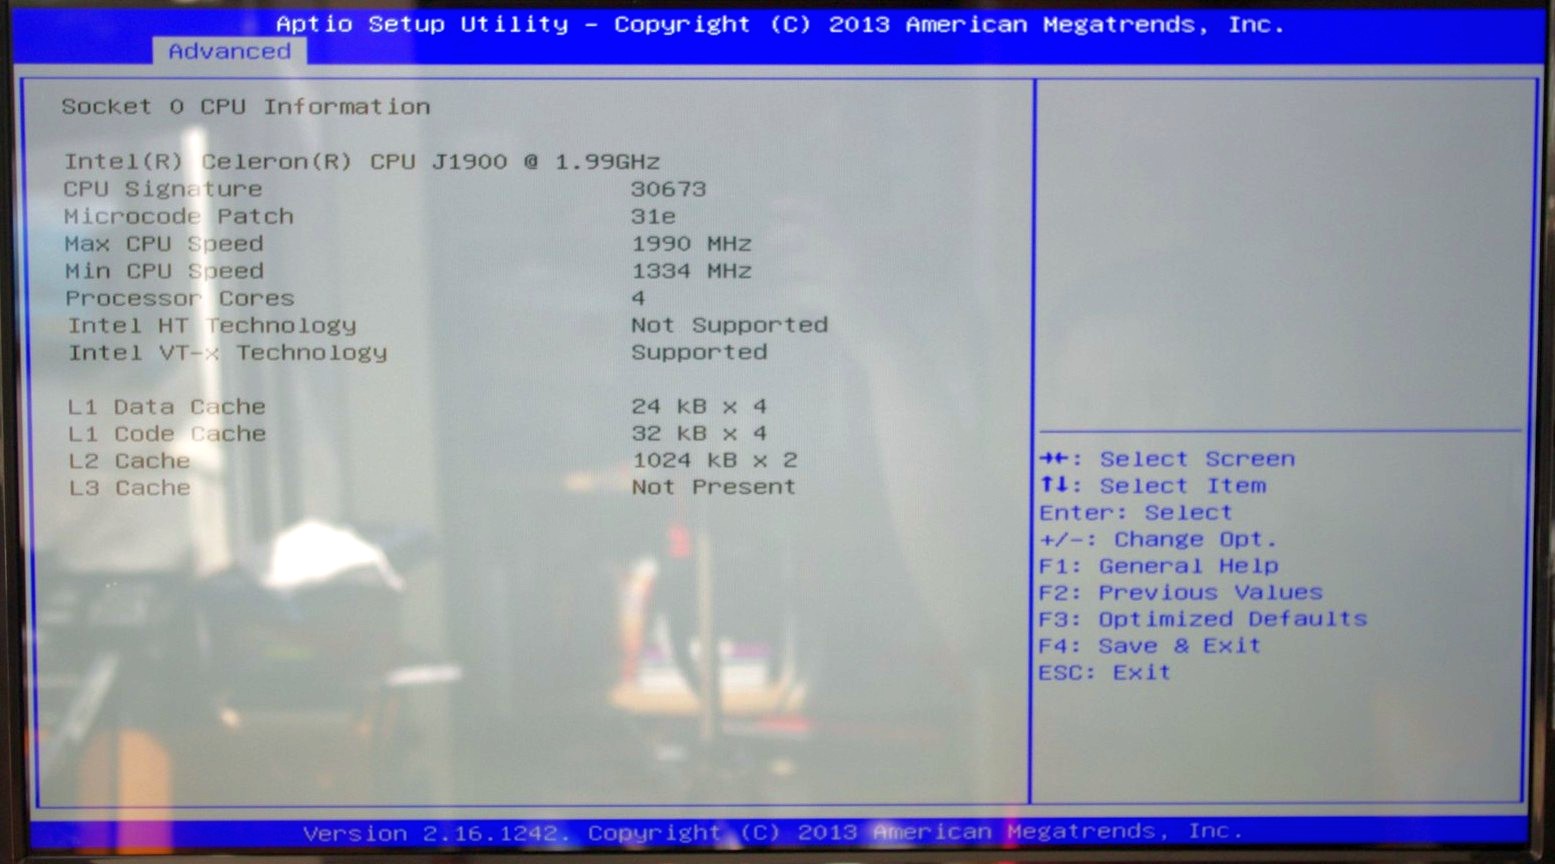
This shows that we are dealing with a Celeron J1900 at 2.0 GHz with four cores and an idle frequency of 1333 MHz. While HyperThreading is not present, VT-x is.
The PPM Configuration menu hides the C-State options which we would normally find in a power options type menu:

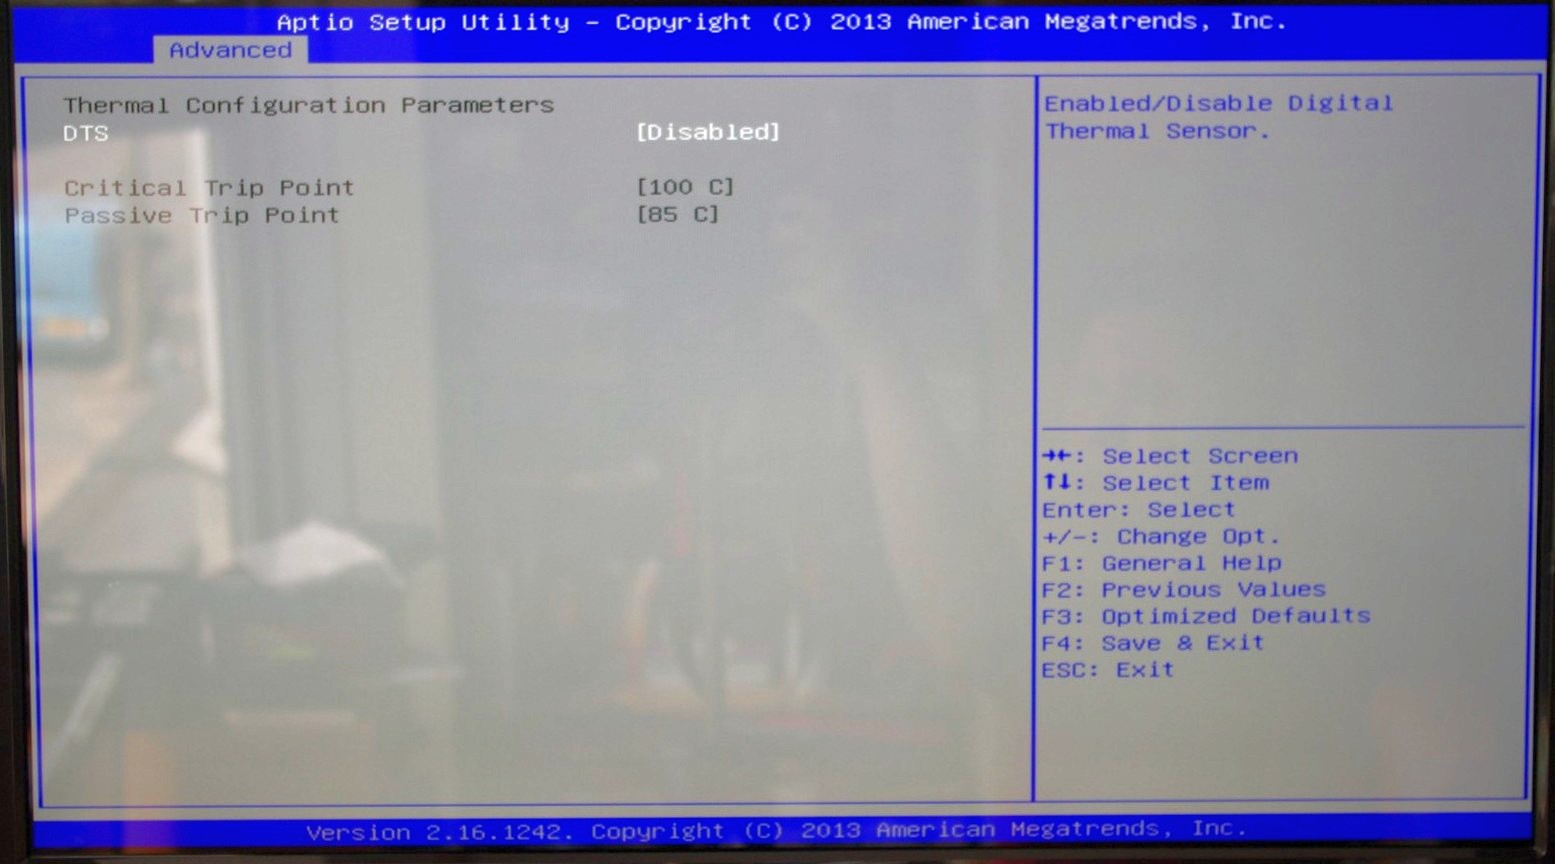
Users can determine the thermal configuration for the system, giving strict guidelines for temperature limits before shutdown. This will be relevant to users wanting this platform in a 24/7 embedded scenario:
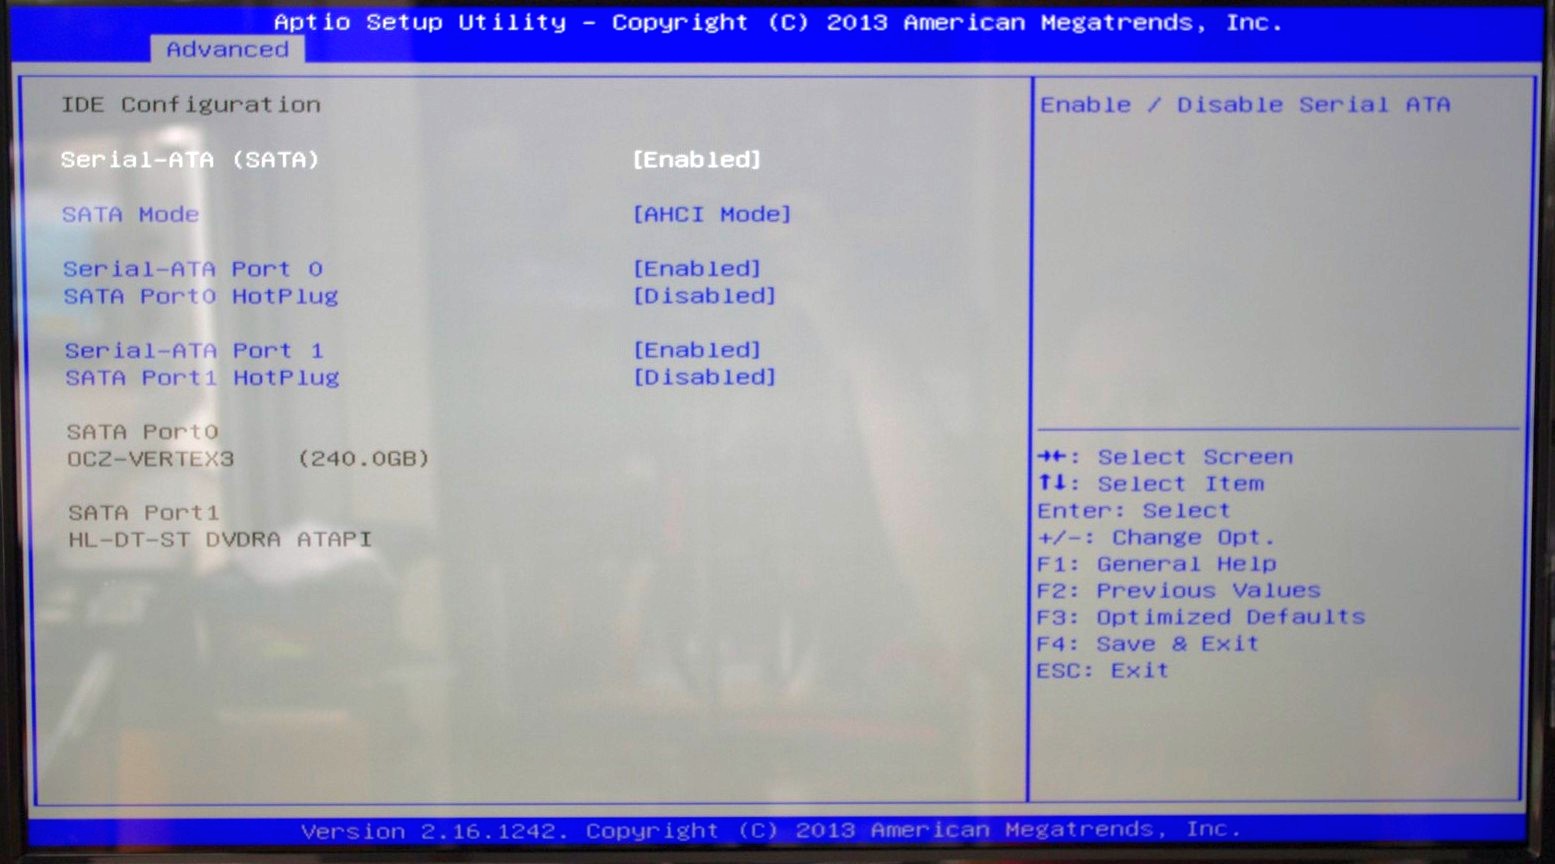
The two SATA ports are set for AHCI mode by default, although Hot Plug needs to be enabled.
Because this BIOS is an EFI based platform, fast boot options for Windows 8 and other supported OSes are present:

The Chipset Tab gives options for what is listed as the North and South Bridge although these are technically integrated into the SoC. The North Bridge menu controls the memory and integrated graphics, although both are limited in options:
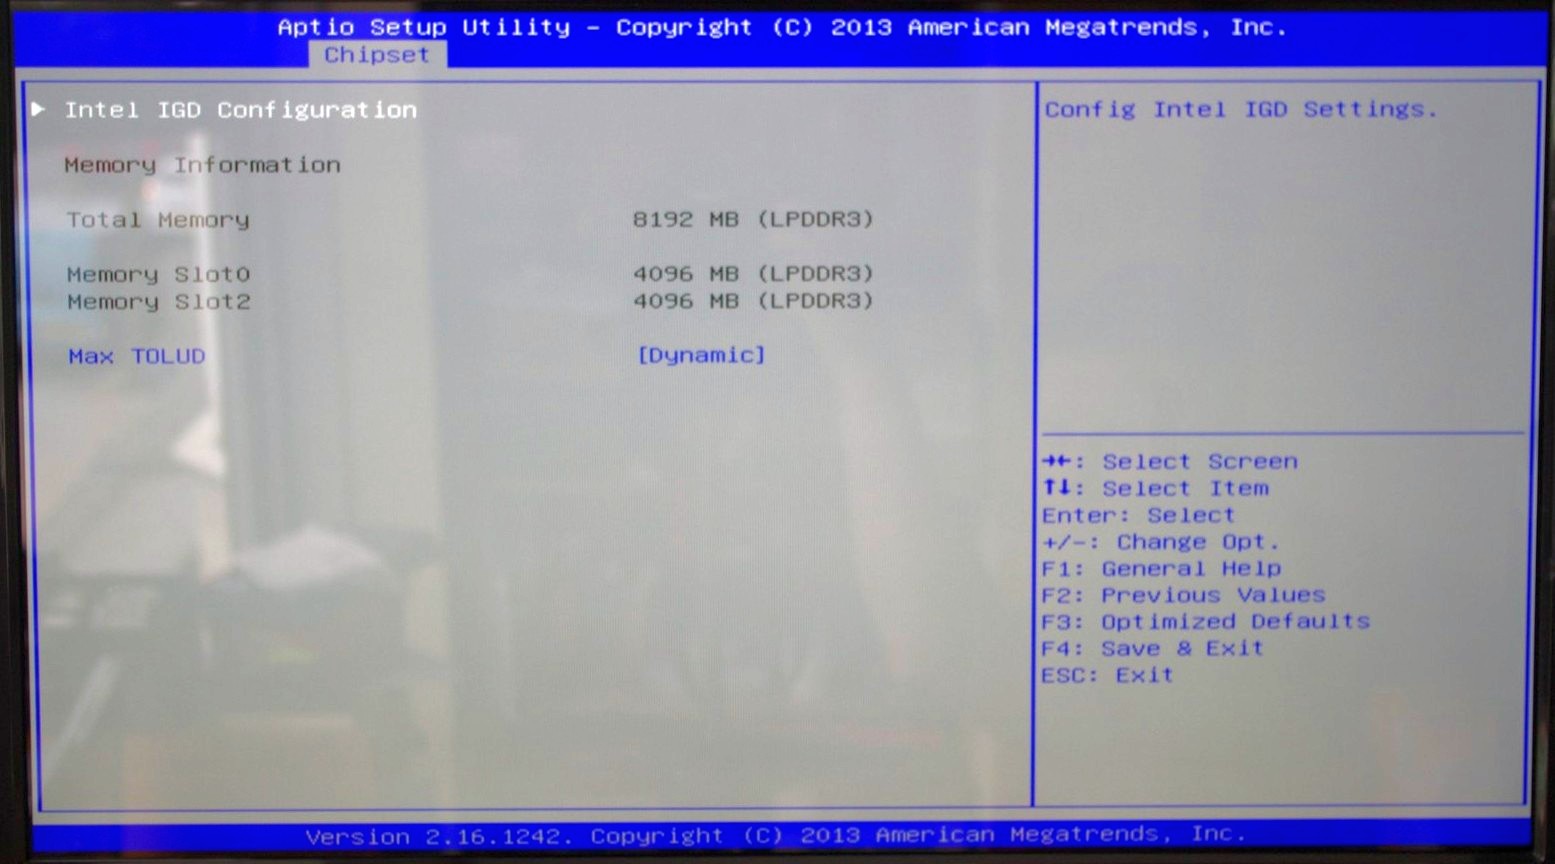
There is no room to adjust the DRAM frequency or sub-timings here.
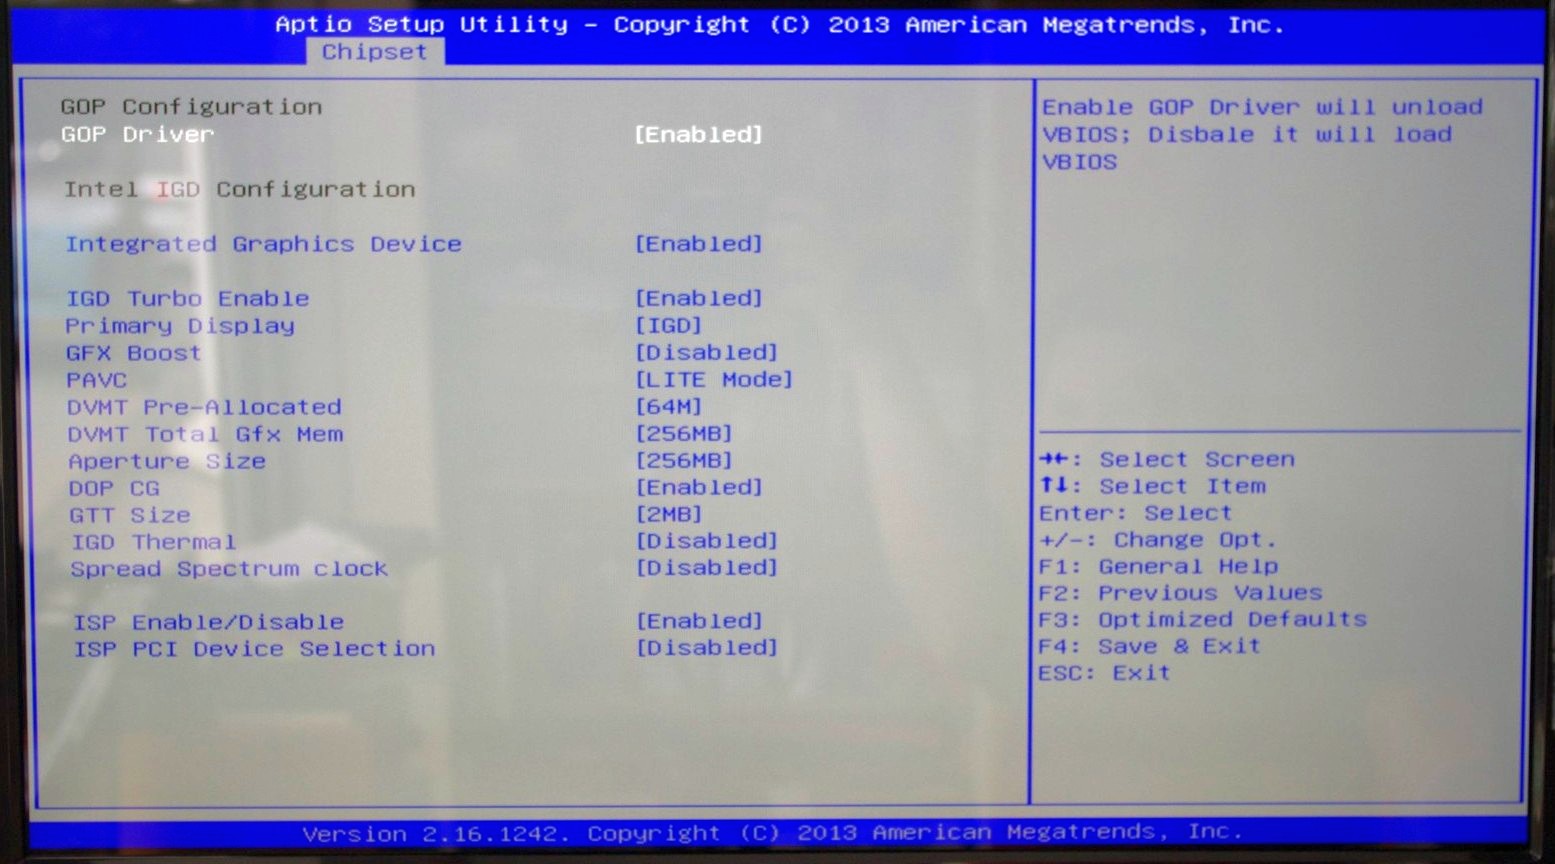
The integrated graphics options are a little more varied, allowing users to adjust the size of the memory or apply a ‘GFX Boost’, although some of these options make little sense outside the engineering lab.
The South Bridge menu option offers options for the functionality that comes from the ‘chipset’ part of the SoC:
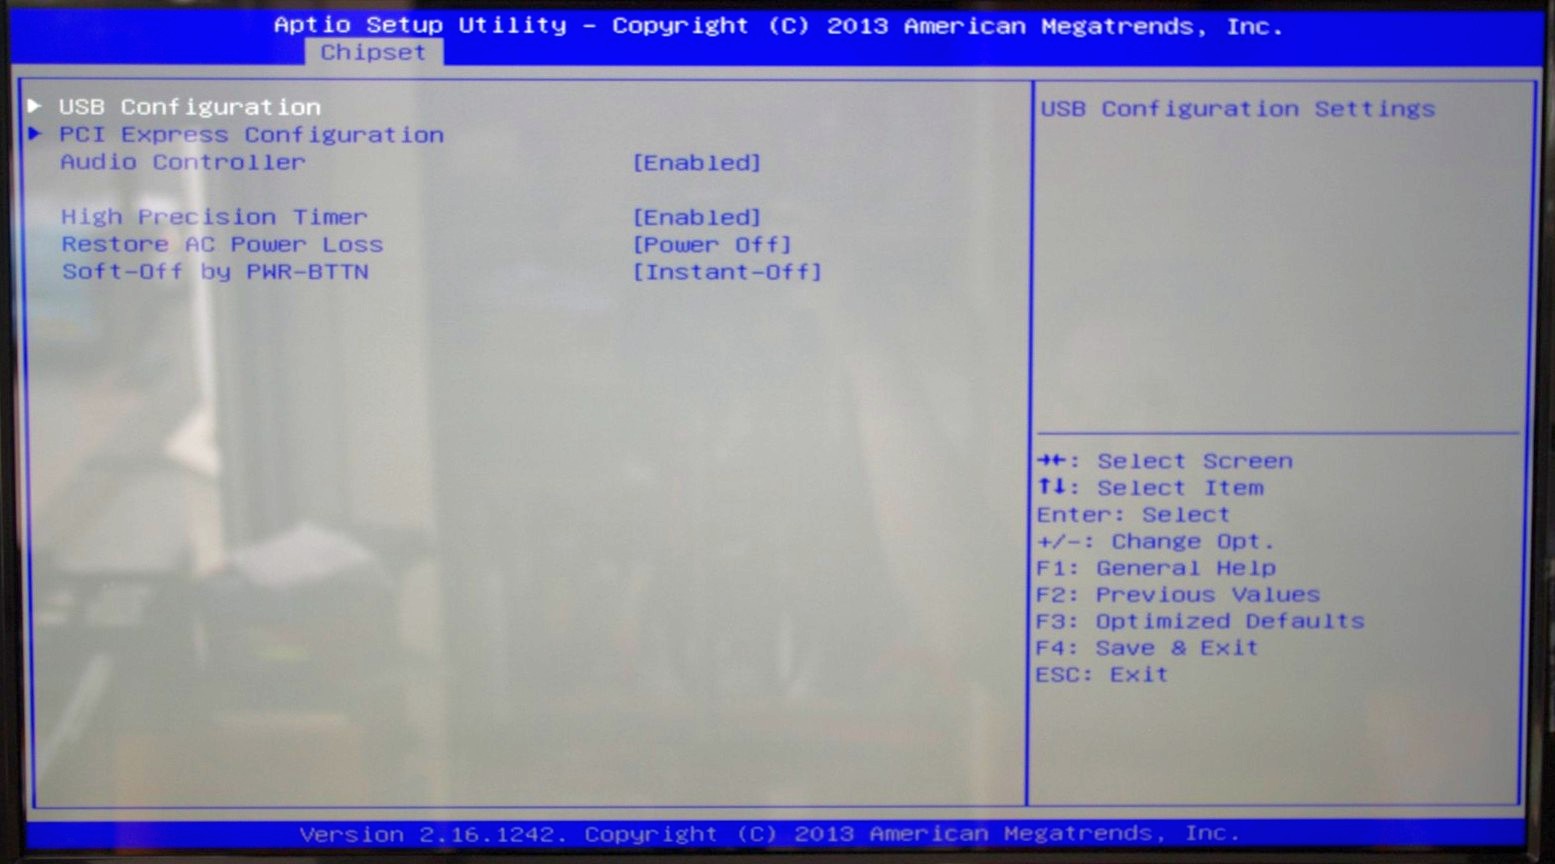
Here is the audio controller, with the USB and PCIe configuration options.
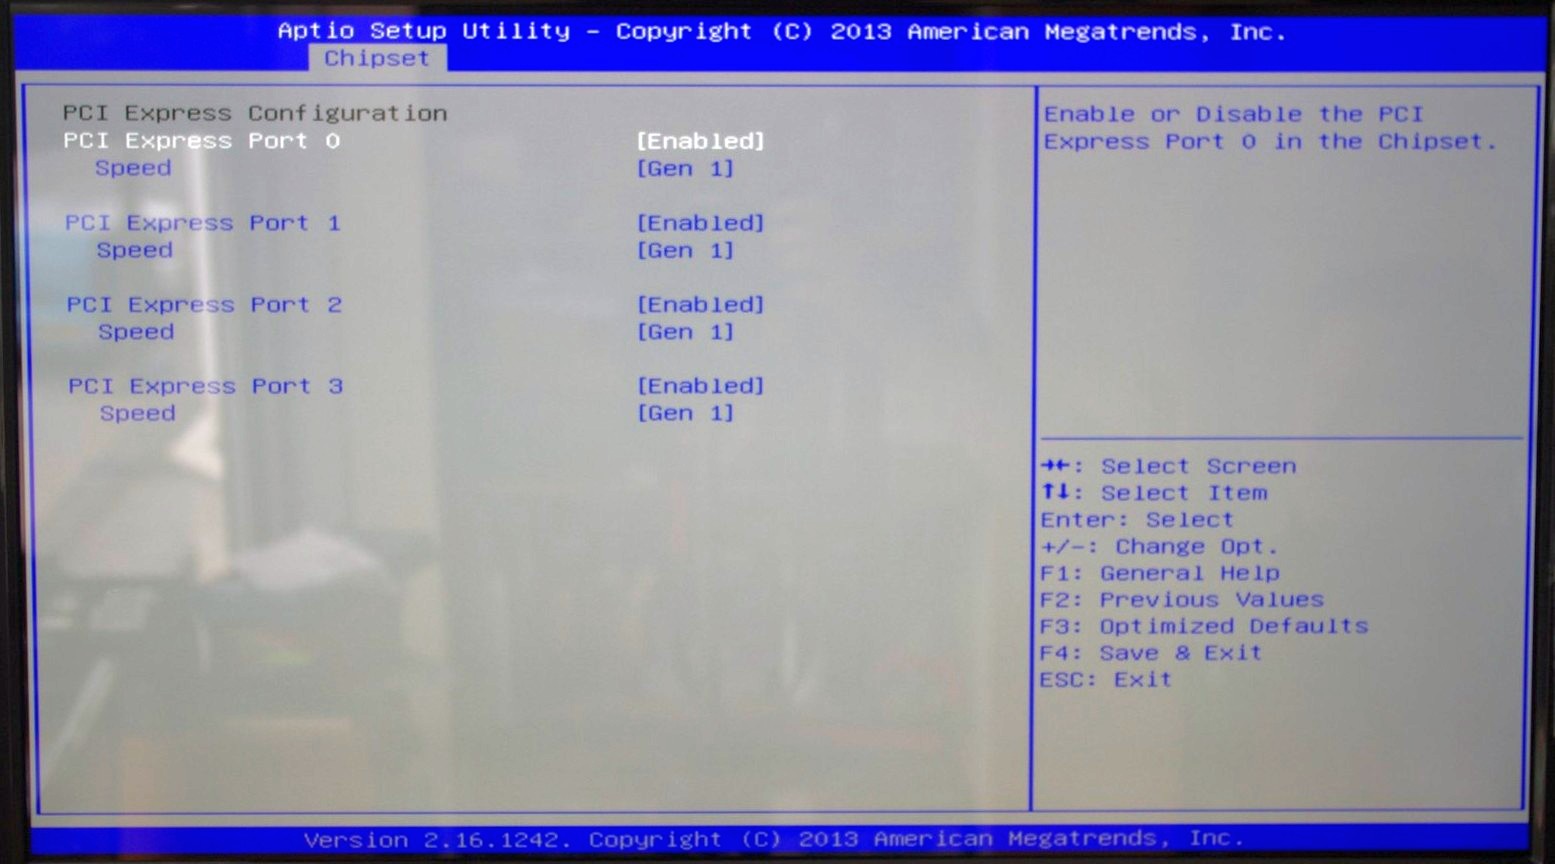
It is interesting to show the four PCIe lanes offered, although it would have been handy if each of these showed what was connected – either the NICs, the PCIe to PCI bridge or the mini-PCIe slot.
The rest of the BIOS offers basic boot section options and security. There is a Boot Override function as well, but what is missing is an ‘Update BIOS’ option from within the BIOS. This has to be done via an OS or command-line bootable USB instead.


Software
While GIGABYTE did not update the BIOS to a newer version, we do get the latest version of GIGABYTE’s APP Center to play with. Unfortunately, most of what APP Center is designed for does not aim at the Bay Trail-D platform, and as such we are limited in what it offers.
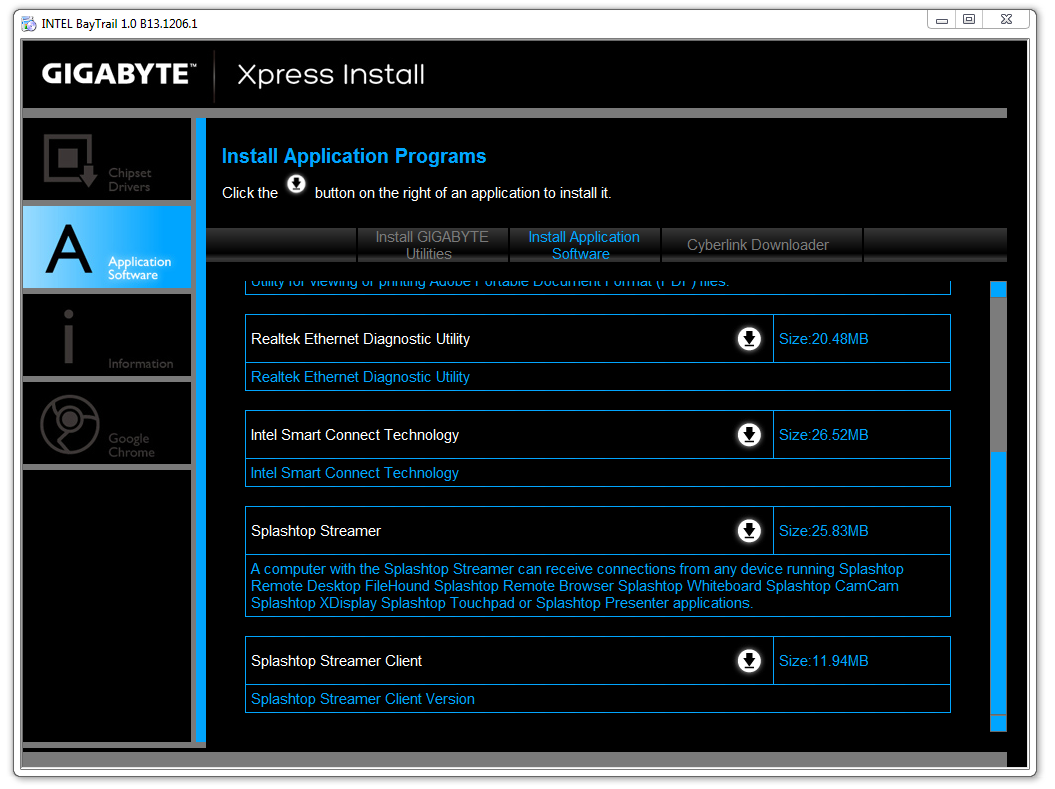
Firstly the driver disk gives the regular set of options for chipset drivers and application software:
This installs APP Center, which offers only @BIOS and Live Update.

At the time of testing, Live Update offered no new updates to the system and the software is programmed to only display a message box when that is the case.
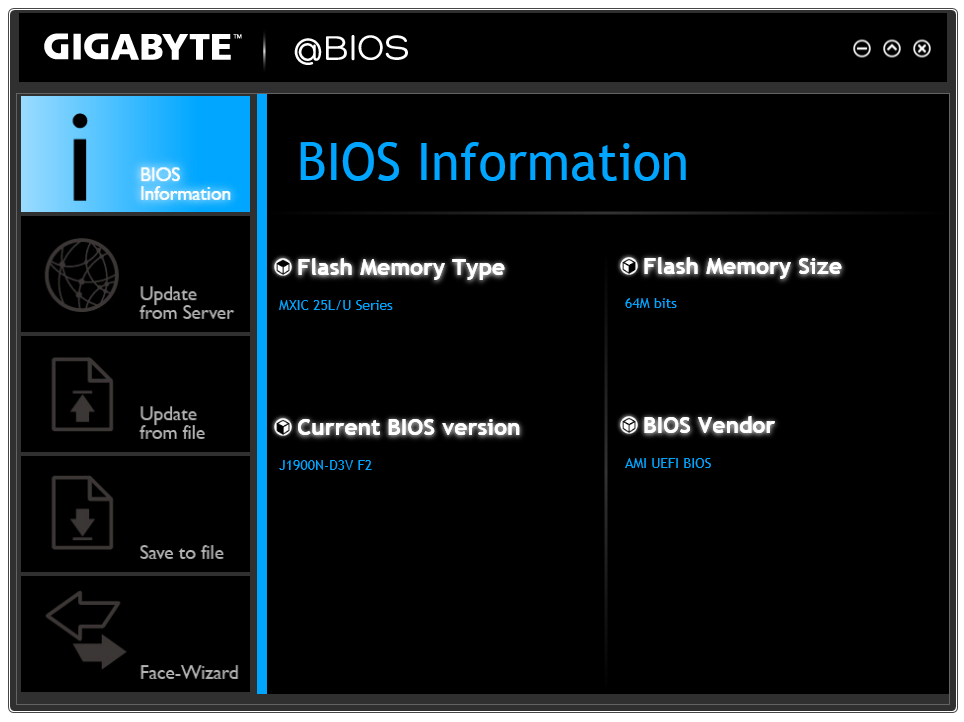
@BIOS gets the full works, offering information about the BIOS as well as options to update from the Server:

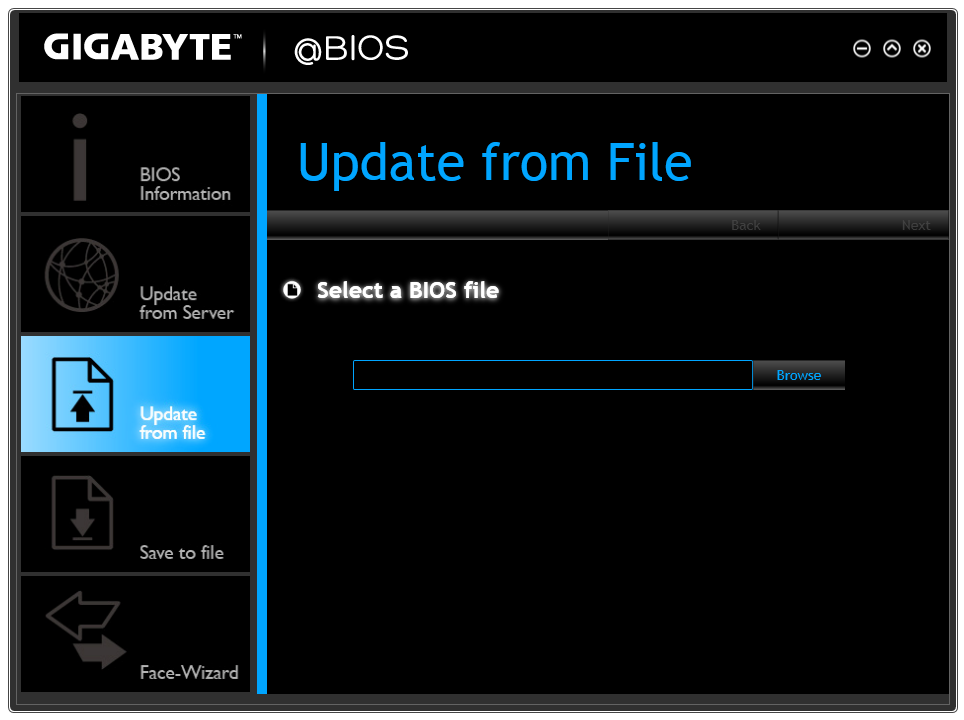
Or from a file:
Face Wizard also allows the user to adjust the image during POST.
It is interesting that despite the fan headers on the motherboard, neither the BIOS nor the Software offers any form of fan control. This would have been great as part of the software, along with some of the other options from GIGABYTE: Fast Boot, System Information Viewer, TimeLock and so on.


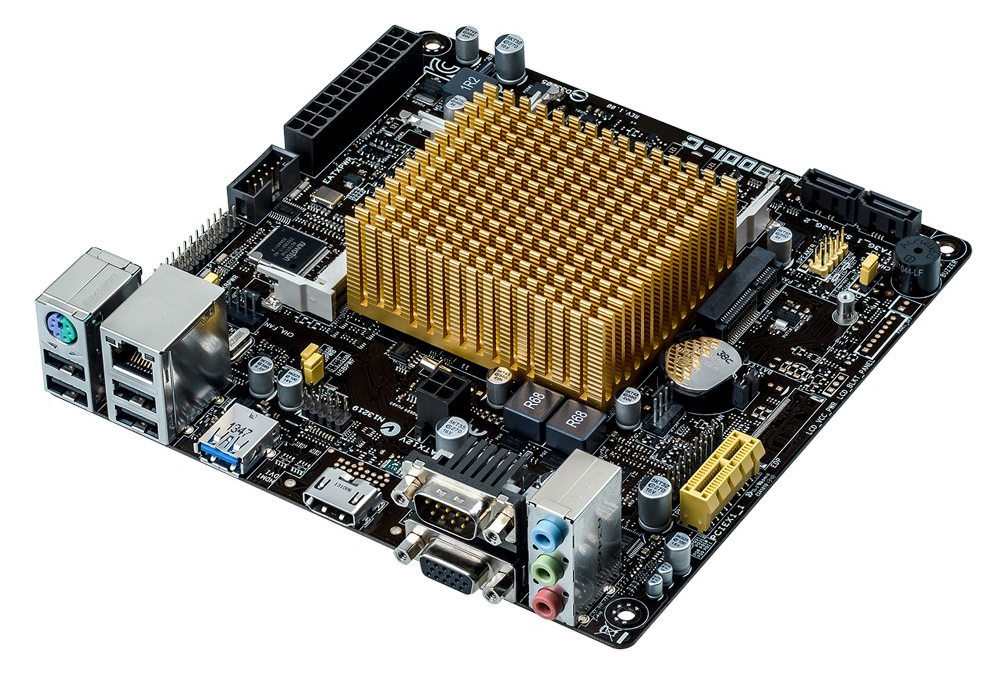
ASUS J1900I-C Visual Inspection
The implementation of J1900 from ASUS differs a fair amount from GIGABYTE. Taking the board out of the box and the first thing to notice is the DRAM placement – instead of stacking one above the other, the modules are arranged such that one is above the SoC and one is to the right. There is still enough space for standard sized modules in both of these slots, and ASUS has even placed a fair amount of electronics underneath as well – the top DRAM slot has the Nuvoton SuperIO IC in that area, for example.
Similar to GIGABYTE, the motherboard has only two fan headers. The CPU header is below the socket beside the CR2032 battery, with the CHA header just to the left of the DRAM slot at the top. Both of these headers are 4-pin as well.
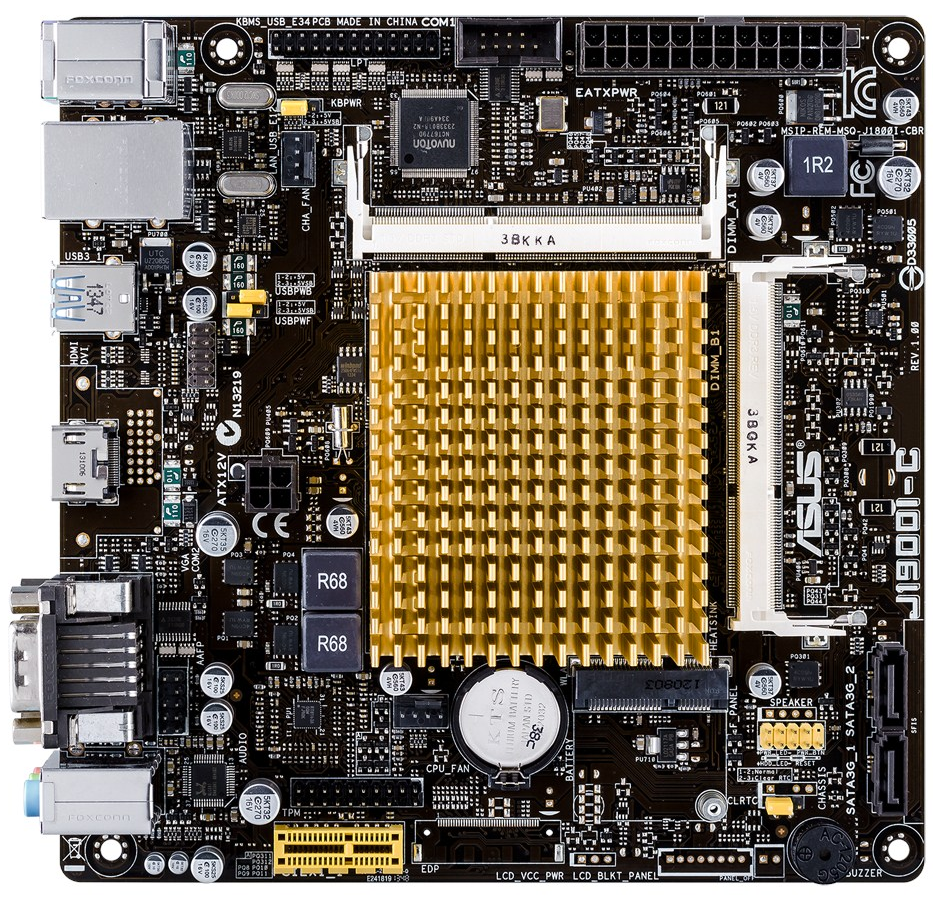
ASUS has prioritized different connectors around the edge, with the LPT header and COM header having priority at the top over the 4-pin CPU power connector which has a spot just to the left of middle nearer the SoC. This is an abysmal place for a 4-pin CPU power connector as it means any cable has to stretch over most of the board in order to reach. While making a neat layout might not be the ultimate goal for anyone using a Bay Trail motherboard, having this connector here might still disrupt airflow over the passive heatsink.
On the right hand side of the motherboard are our two SATA ports with the front panel header in yellow beside them and the internal buzzer nearby. The mini-PCIe port also rests in this bottom right corner beside the battery. Another difference to the GIGABYTE board will be the extra slot at the bottom – where GIGABYTE used a PCIe to PCI bridge, ASUS has implemented a PCIe 2.0 x1 slot instead. Perhaps unfortunately this is a closed ended PCIe 2.0 x1 slot, meaning that larger cards cannot be used. Above this is a TPM header.
Also on the board is the front audio header, powered from a Realtek ALC887-VC audio codec, and a USB 2.0 header behind the USB 3.0 on the rear panel.
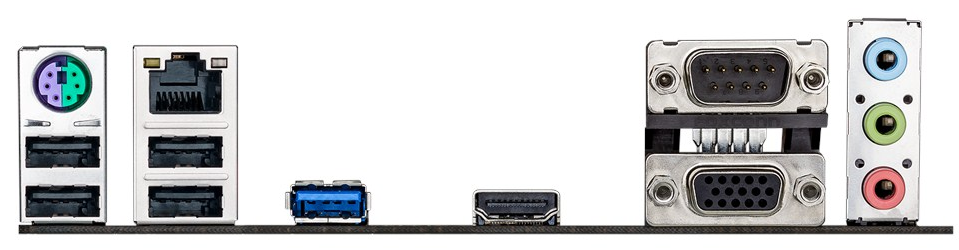
The rear panel looks a bit bleak compared to the GIGABYTE, but this is because ASUS has decided to only use one COM header here and we get HDMI rather than a DVI-D. There is also only one network port, and the PS/2 connector is a joint connector. Where GIGABYTE uses a USB 3.0 hub to have four USB 3.0 ports, the J1900I-C only has one and four USB 2.0 ports instead.
Board Features
| ASUS J1900I-C | |
| Price | Link |
| Size | Mini-ITX |
| CPU Interface | Soldered |
| Chipset | Bay Trail-D Quad Core |
| Memory Slots | Two DDR3L SO-DIMM slots supporting up to 8GB Up to Dual Channel, 1333 MHz |
| Video Outputs | VGA (2560x1600 at 60Hz) HDMI (1920x1080 at 60 Hz) |
| Onboard LAN | Realtek 8111G |
| Onboard Audio | Realtek ALC887 |
| Expansion Slots | 1 x PCIe 2.0 x1 1 x Mini-PCIe |
| Onboard SATA/RAID | 2 x SATA 3 Gbps |
| USB 3.0 | 1 x USB 3.0 (SoC) [rear panel] |
| Onboard | 2 x SATA 1 x USB 2.0 Header 1 x LPT Header 1 x COM Header 1 x TPM Header 1 x mini-PCIe 2 x Fan Headers Front Panel Header Front Audio Header |
| Power Connectors | 1 x 24-pin ATX 1 x 4-pin CPU |
| Fan Headers | 1 x CPU (4-pin) 1 x CHA (4-pin) |
| IO Panel | 1 x PS/2 Combination Port 4 x USB 2.0 Ports 1 x USB 3.0 Ports 1 x Realtek Network Port HDMI VGA 1 x COM Port Audio Jacks |
| Product Page | Link |
One might ask why the J1900N-D3V costs less than the J1900I-C and yet has two NICs and four USB 3.0 ports. The J1900I-C combats this with a HDMI port (which will arguably be preferred), have a total of six USB 2.0 ports and a PCIe 2.0 x1 port, which should also be more versatile.
ASUS J1900I-C BIOS
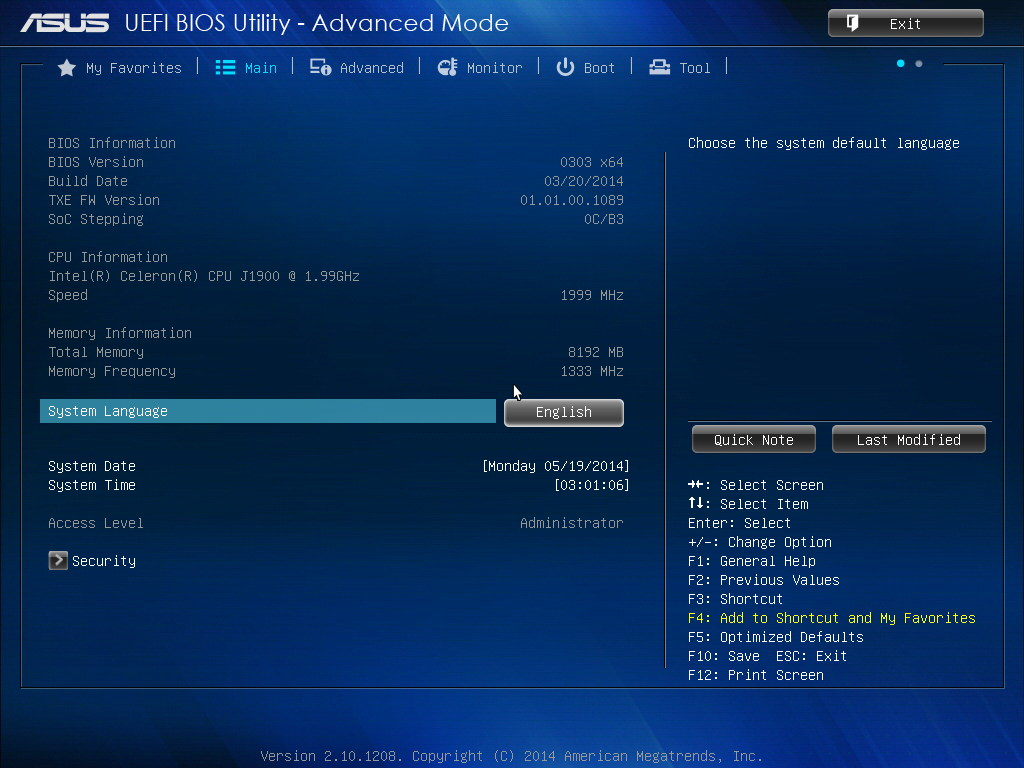
In contrast to the other motherboard, the J1900I-C gets a full graphical UEFI to command in the style of ASUS’ range of 8-series motherboards. The main color scheme is a white on blue interface with a constant width font making it easy to see and navigate. The first screen on entry is the EZ Mode, which contains a lot of useful data: the motherboard in use, the BIOS version, the CPU installed, the speed of that CPU, the total amount of DRAM installed, the speed the DRAM is running, the temperature of the CPU, the voltage of the CPU, the per-module DRAM information, the fan speeds and the boot priority. For a motherboard like this, very little is missing at all.
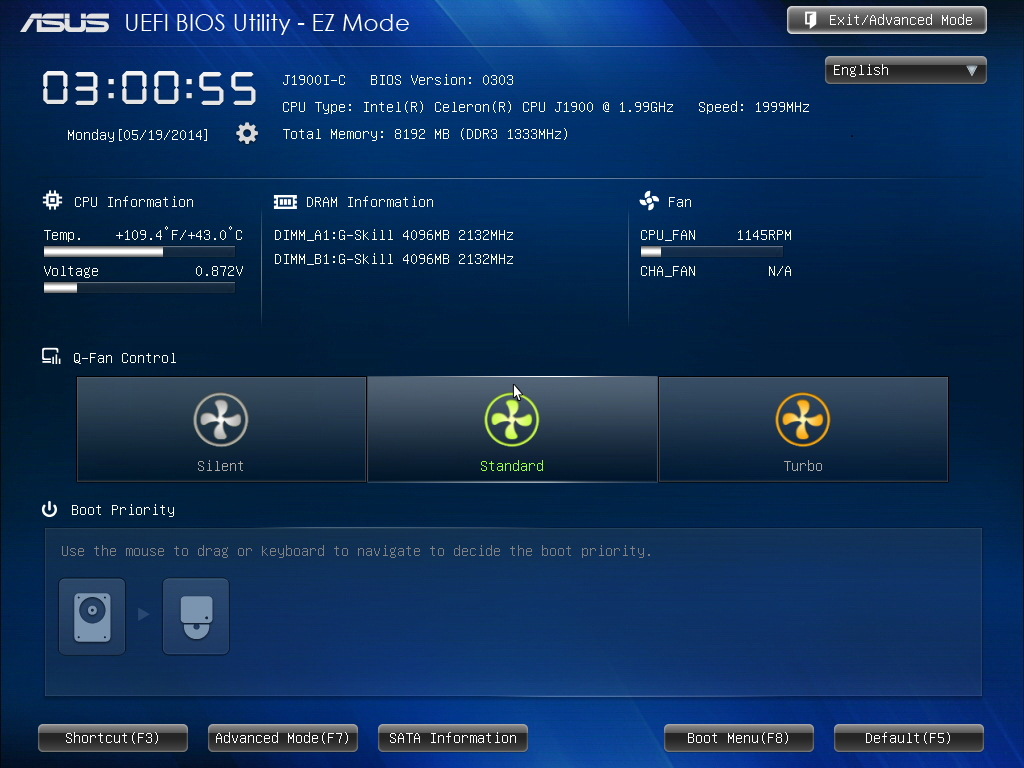
The middle options for Q-Fan control initiate either a calm, standard or full-power fan modes to help cool the system. By pressing F7, we move into the advanced mode.
Here we get some more information, including confirmation that our SoC is the B3 stepping and thus does not support Quick Sync.
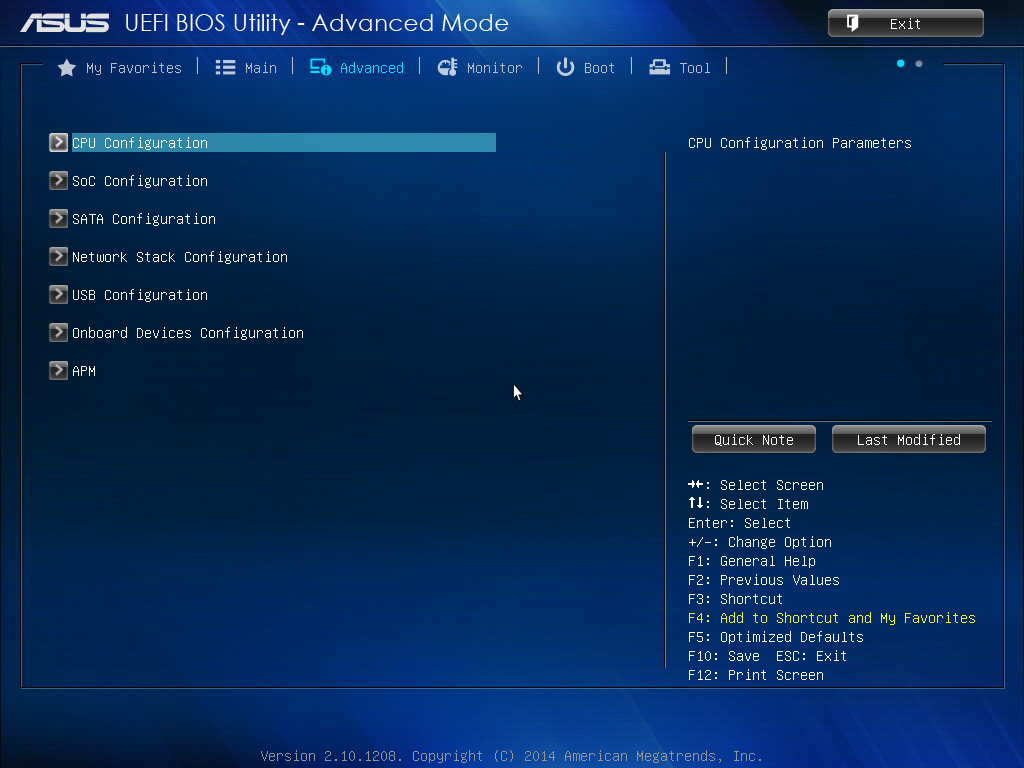
The Advanced tab gives a breakdown of most of the configuration options in the BIOS. It is worth noting that as the SoC frequencies are locked down, there are no options for underclocking or overclocking. There are no options to adjust the voltage to bring power consumption down.
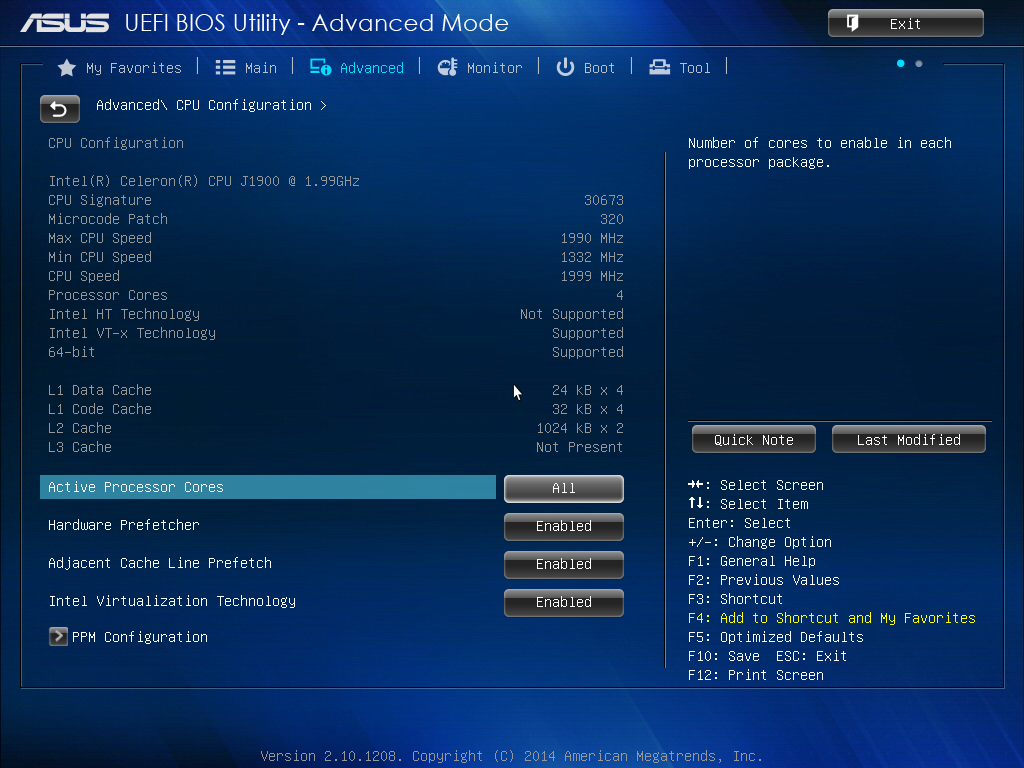
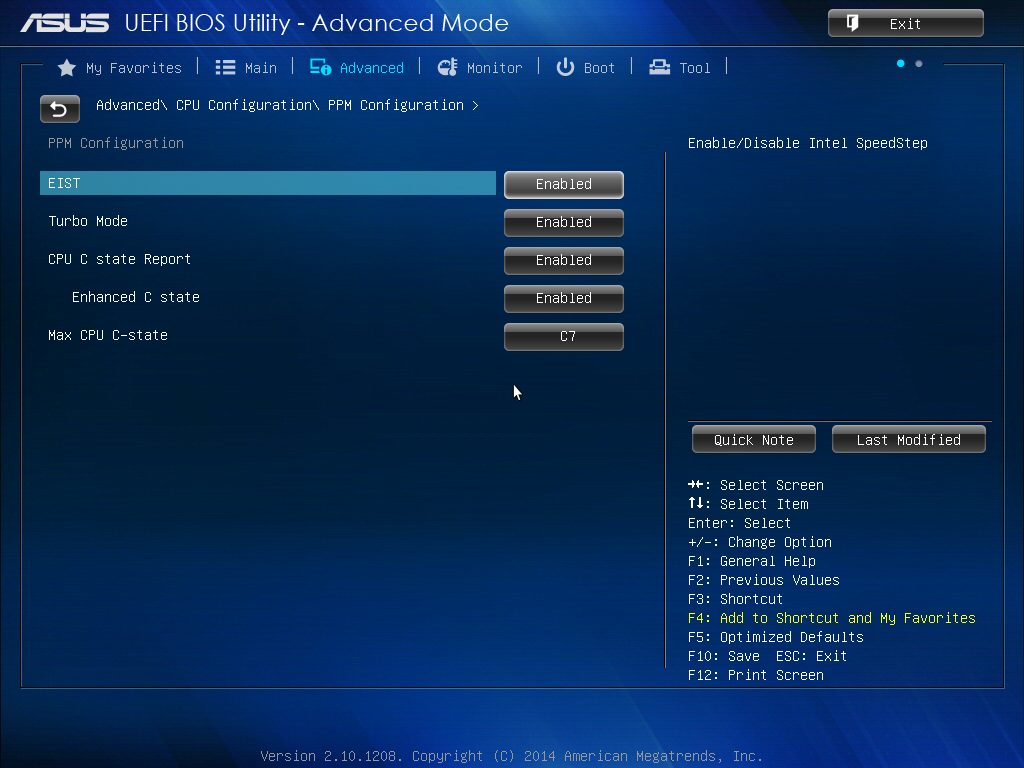
The CPU Configuration menu tells the user more information about the SoC, including confirmation that HT is not supported but VT-x is. The user can disable cores to reduce power consumption here, or adjust C-states in the PPM Configuration menu.
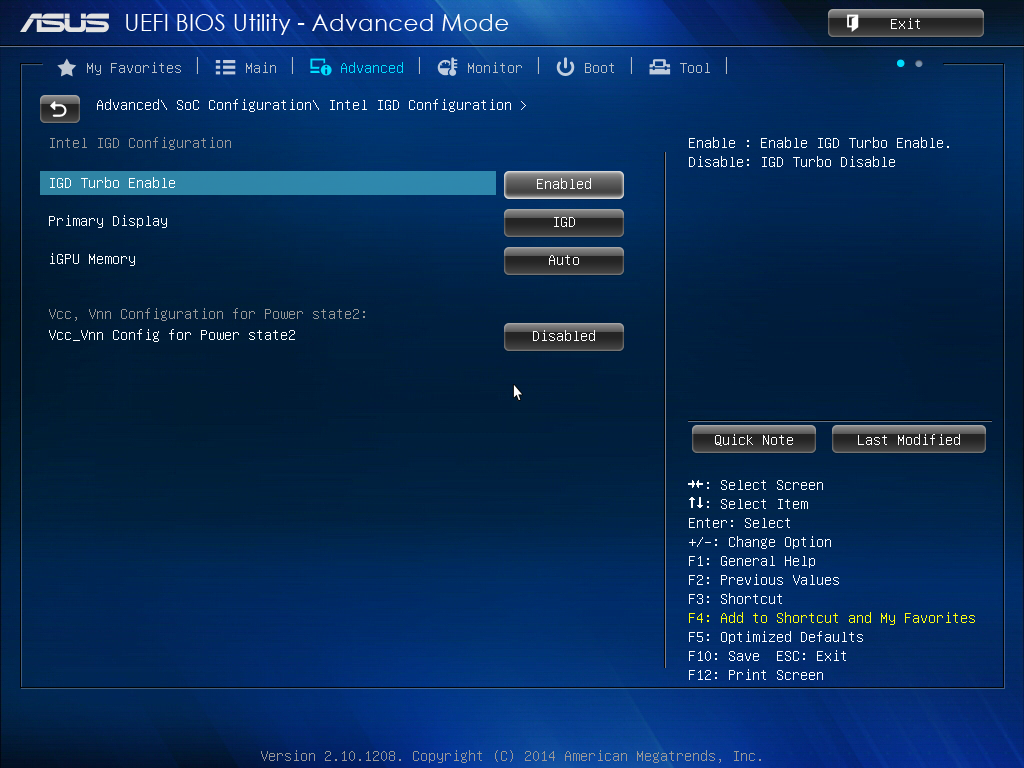
The SoC Configuration menu from the Advanced tab offers integrated graphics options and memory configuration.
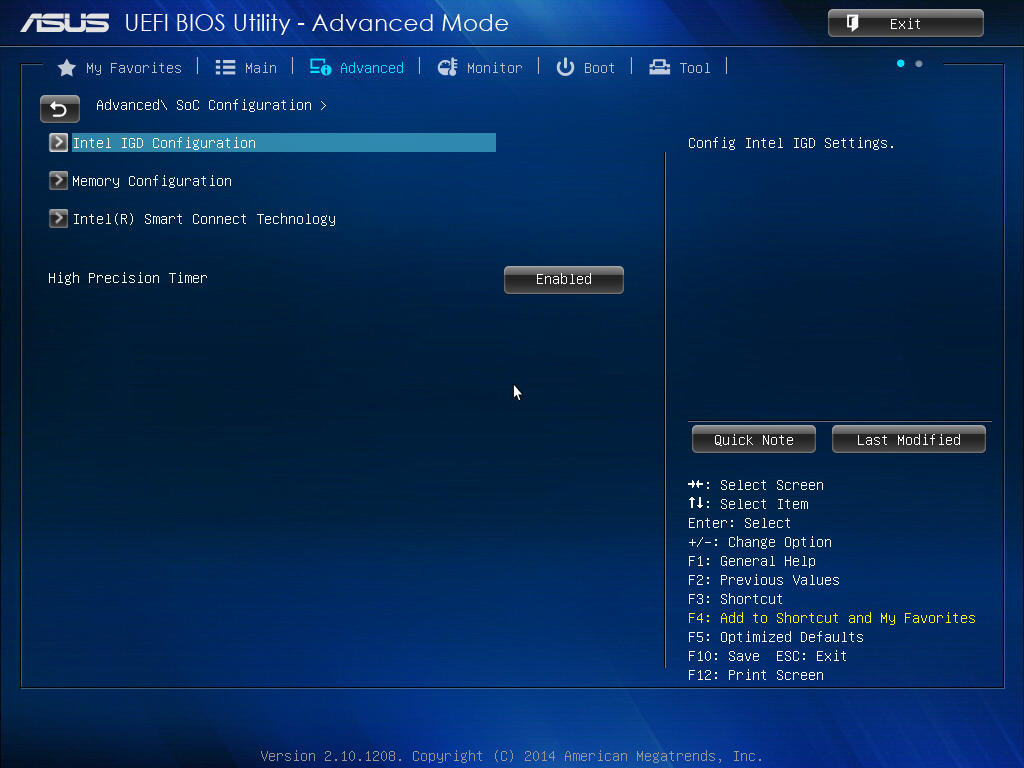
Like the J1900N-D3V, the integrated graphics menu gives a ‘Turbo Enable’ option, as well as an opportunity to adjust the side of the DRAM set aside for the IGP.
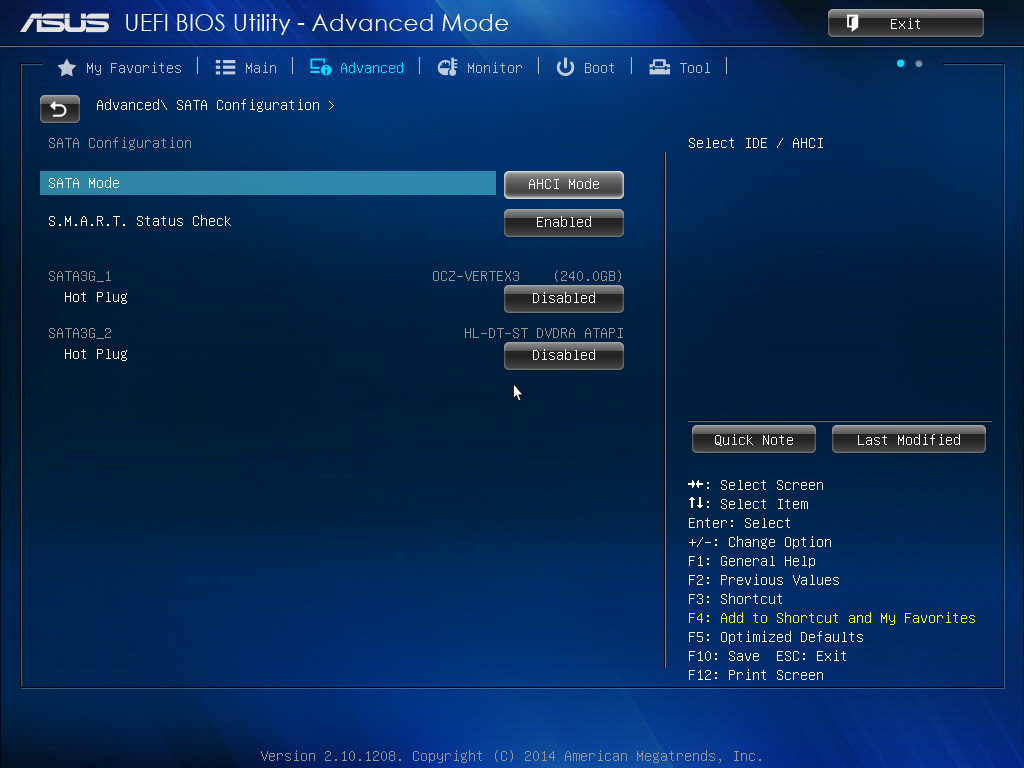
The SATA Configuration menu option indicates that this motherboard defaults to AHCI mode, and while Hot Plug is supported it is set to disabled by default:
The Onboard Devices Configuration menu option is where we head to speed up post times. Here are the options for the onboard audio, Realtek network ports, COM ports and LPT port:

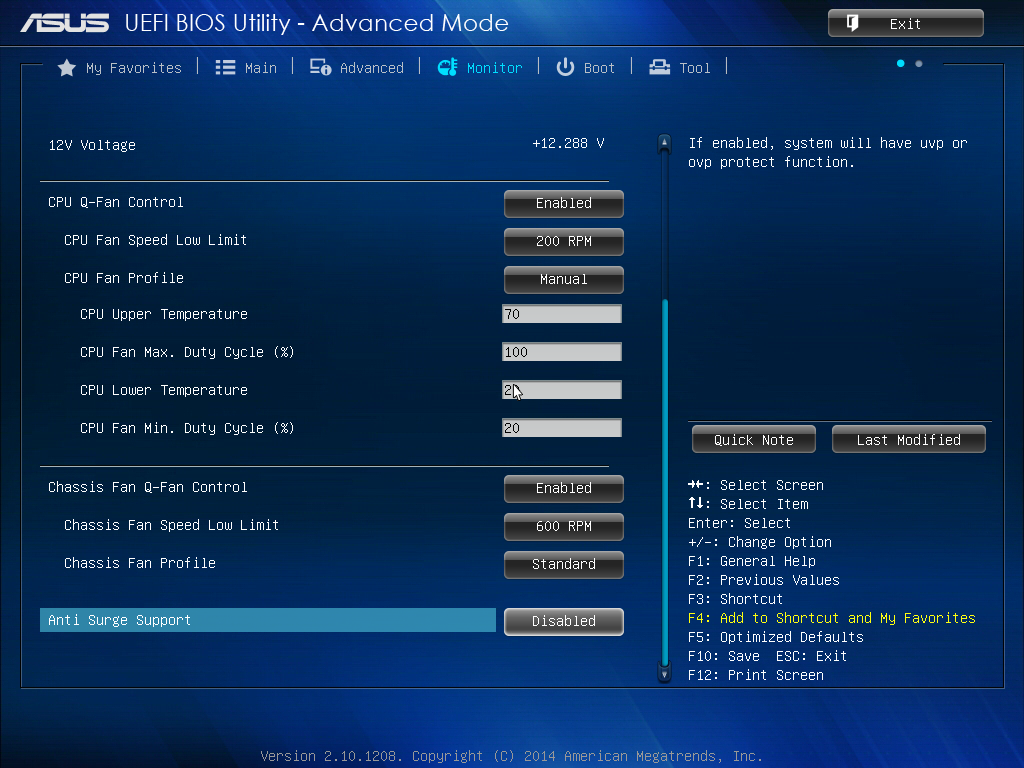
In the Monitor tab we get a full breakdown of the temperature, fan and voltage sensors along with fan control settings:
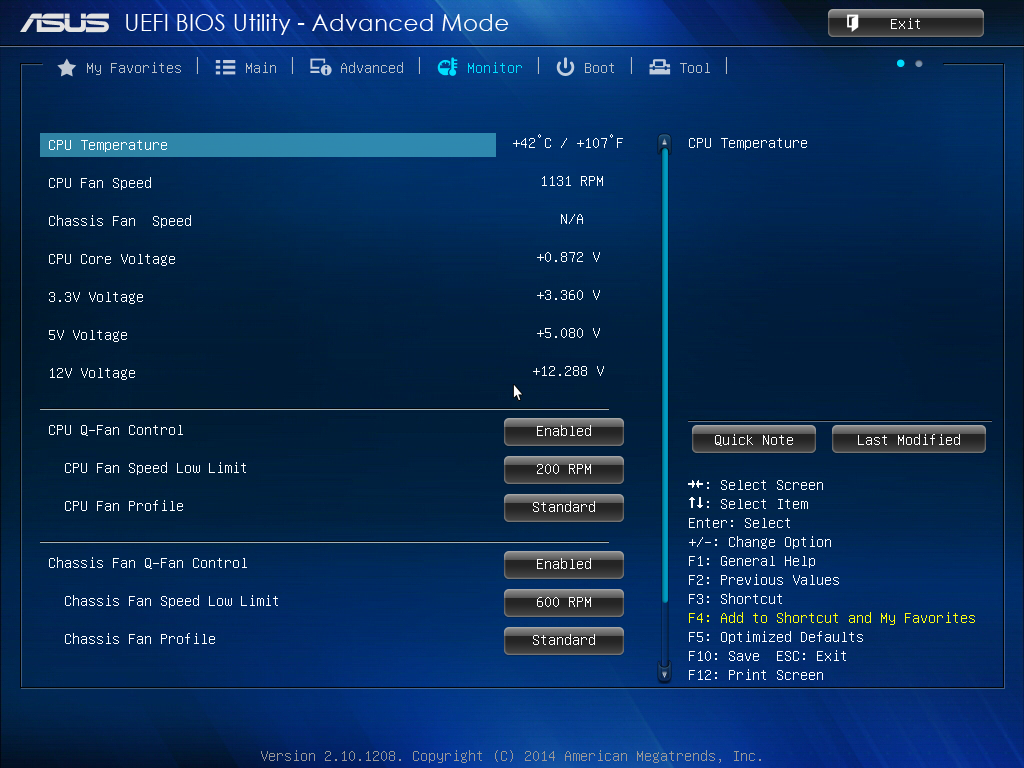
The fan controls offer a preset profiles or the user can adjust a two point gradient manually:
The Boot tab offers fast boot options as well as boot override capabilities.

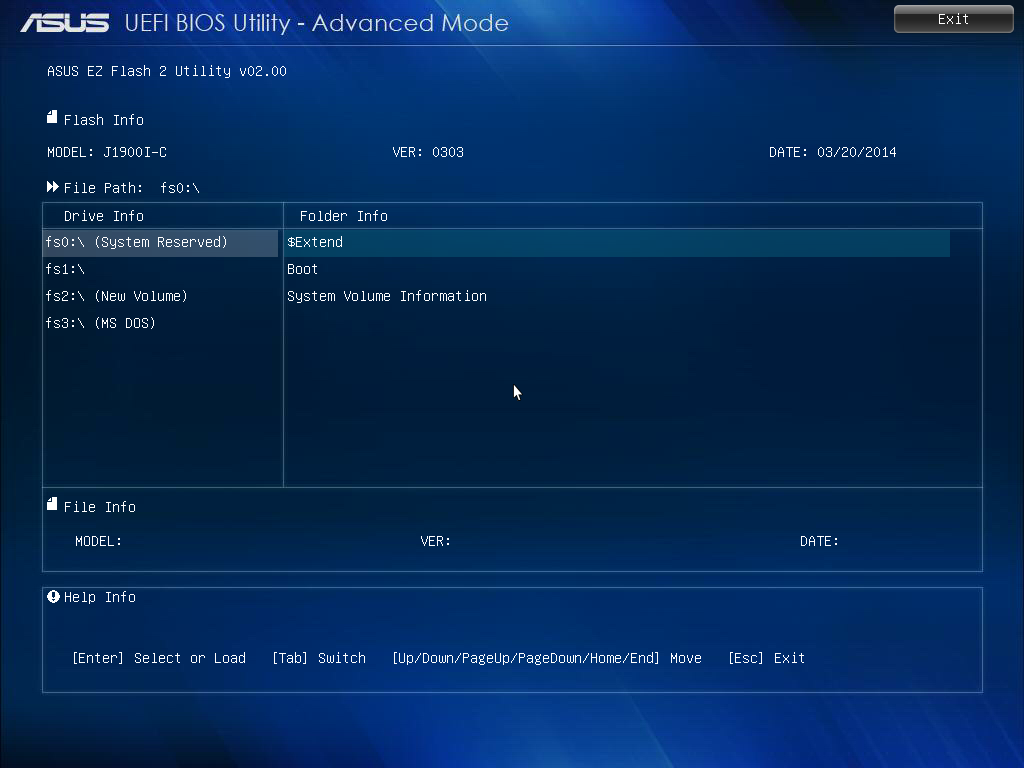
The BIOS also includes a tool tab, which comically includes the ‘OC Profile’ menu alongside SPD information and EZ Flash 2 for updating the BIOS.
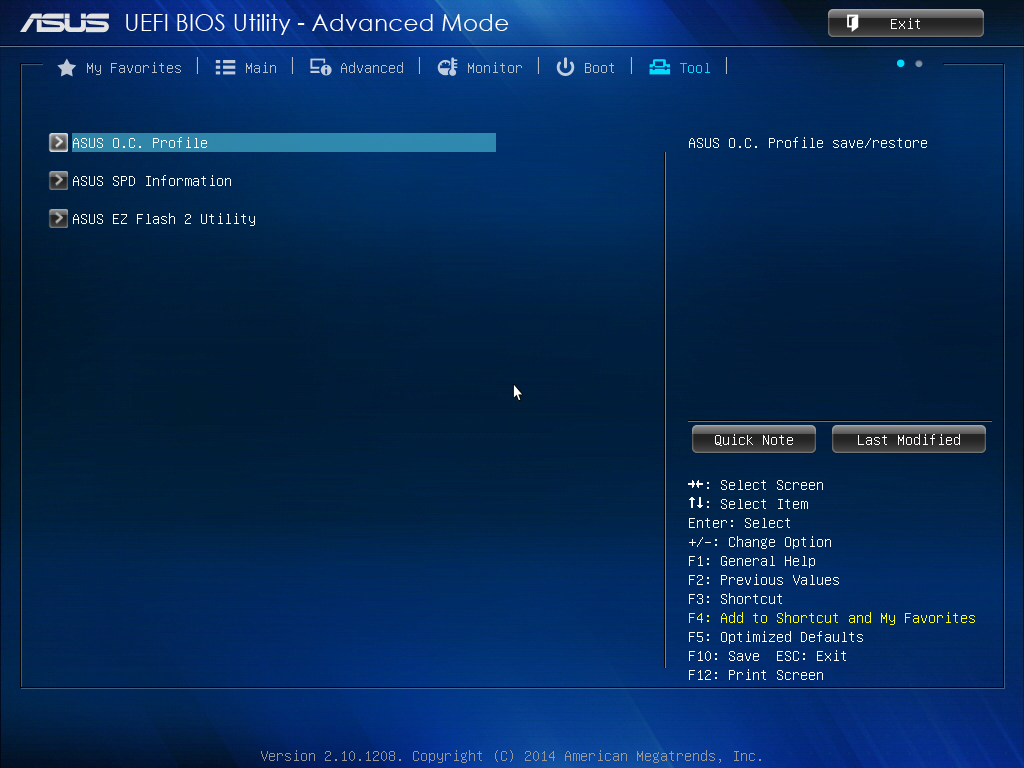
While we cannot overclock, the OC Profile acts as a save function for a set of BIOS settings, in case a user needs to use more than one set.
The BIOS also lets the user know what is adjusted when they exit the BIOS in ‘BIOS Setting Change’:


Software
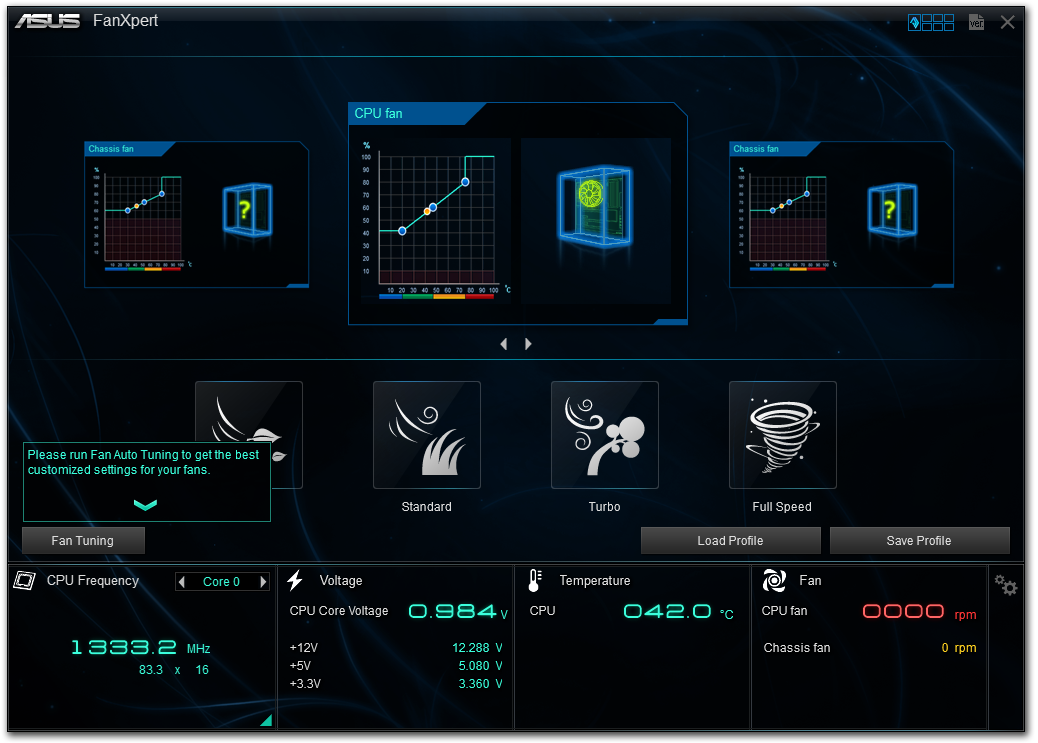
One of the question marks over low cost hardware like Bay Trail-D is the software support. ASUS brings out AI Suite 3, although a cut-down version compared to the mainstream motherboard line. As there is no overclocking, the big application in AI Suite is FanXpert.
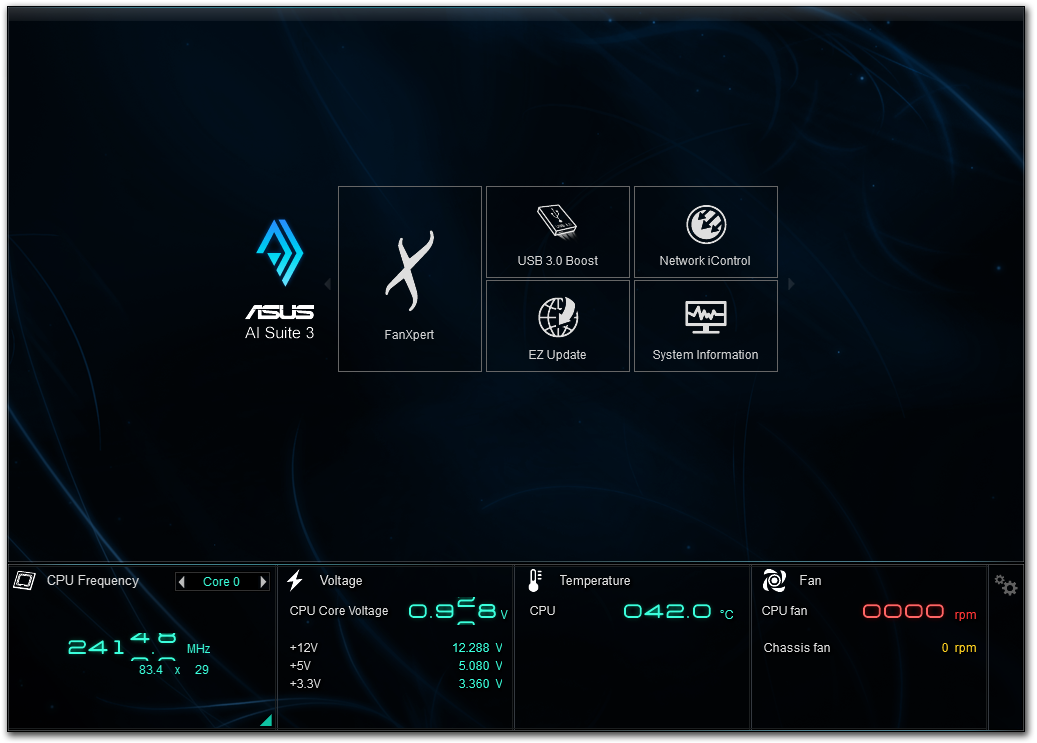
Similar to the BIOS, FanXpert offers a series of fan presets as well as the option to adjust the fan gradient manually.
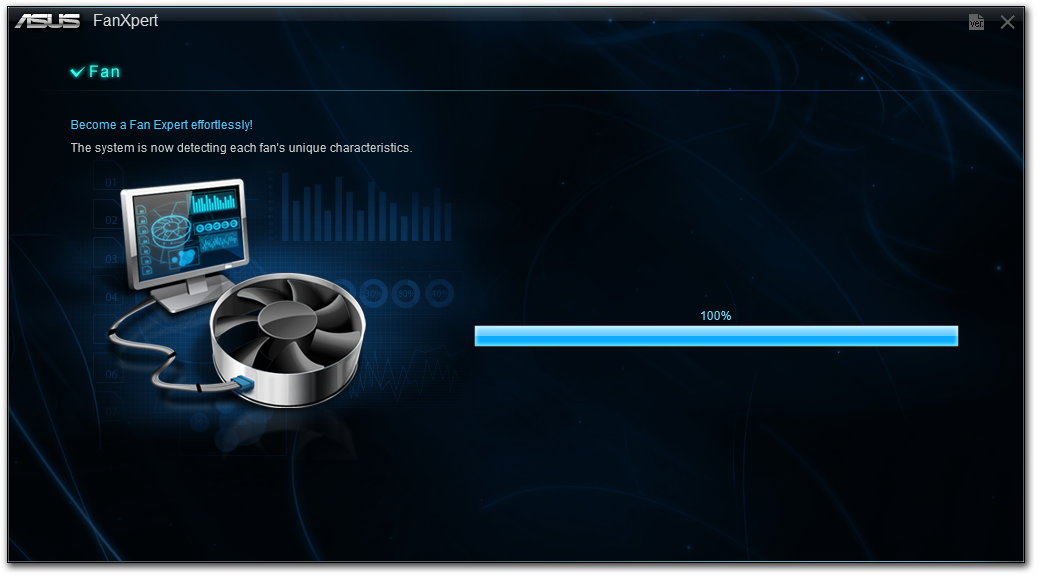
As this software seems transferable between chipsets, ASUS is able to include the Fan Tuning element to Fan Xpert so we can see how the fan responds to power:
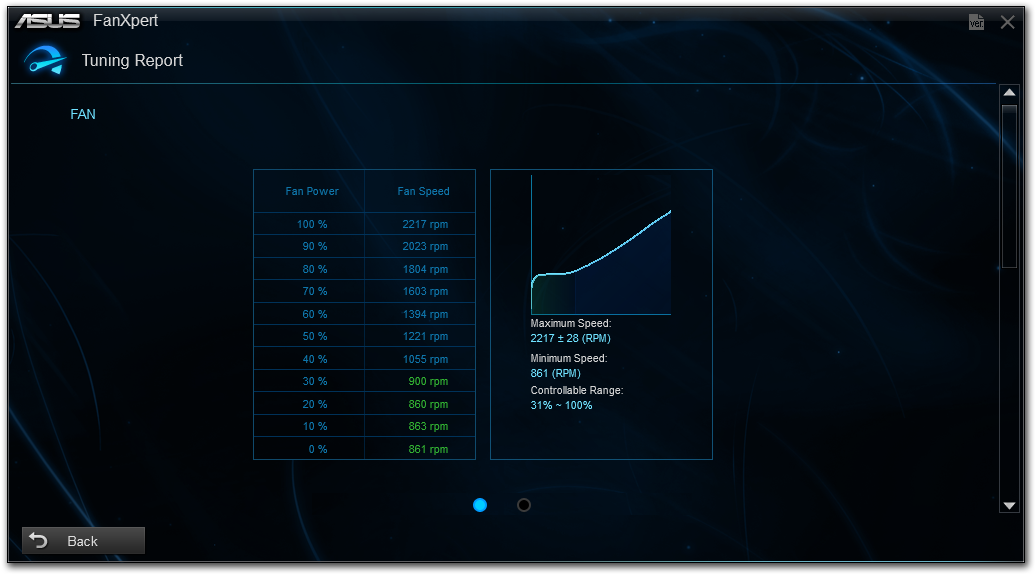
This graph shows best what I constantly rant about – fans do not have a linear relationship with fan power across the whole range. Here my fan stays around 860 RPM up to 30 % power, then kicks in a near-linear response. This makes any fan controls built around ‘fan power’ a bit misleading, especially at the low end.
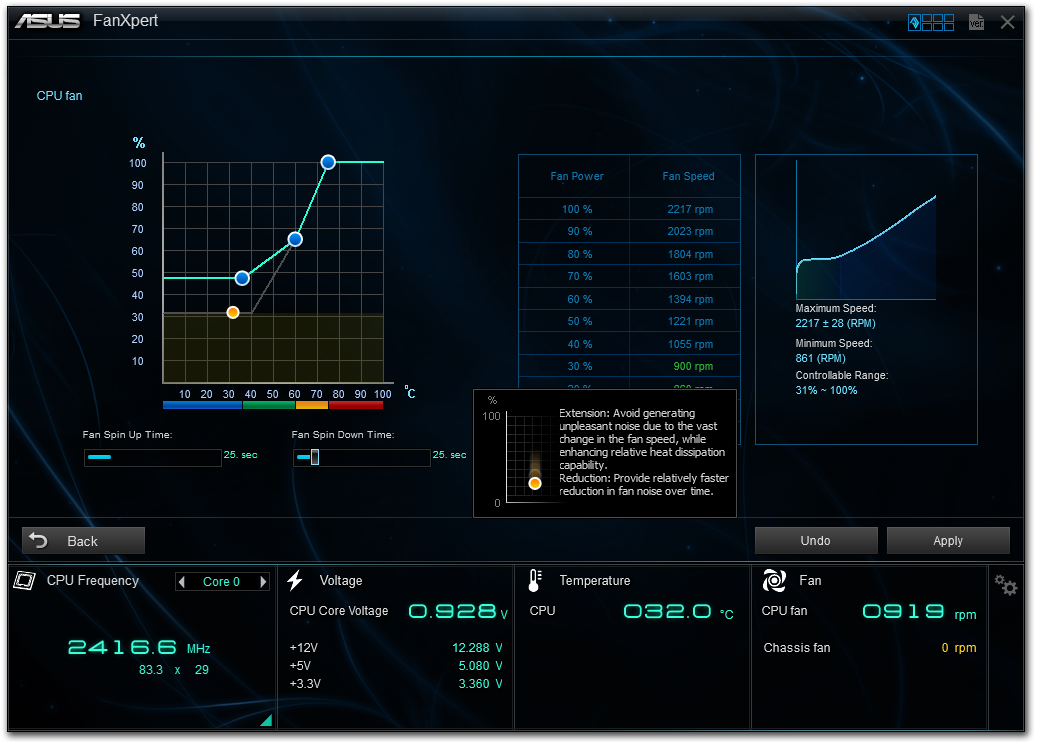
Users can adjust each of the three fan gradient points, with the orange section showing the constant RPM zone. ASUS also offers a Fan Spin-Up and Spin-Down time, with the latter being a form of hysteresis.
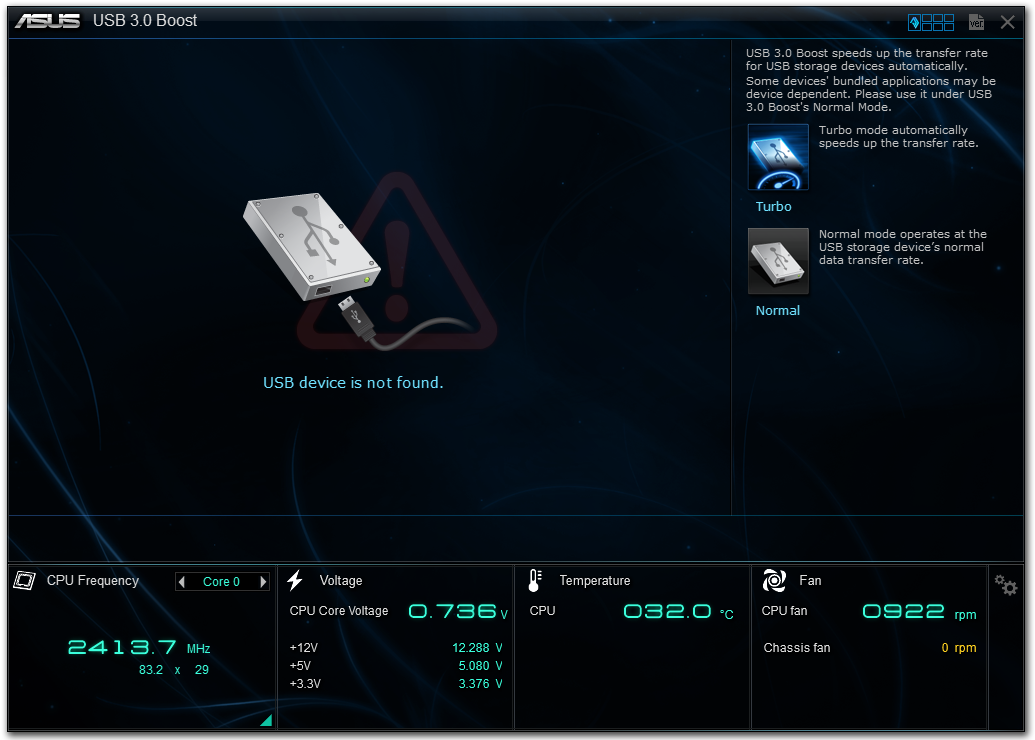
USB 3.0 Boost gives compatible USB 3.0 devices a faster throughput at the expense of latency by injecting a different USB 3.0 driver when selected.
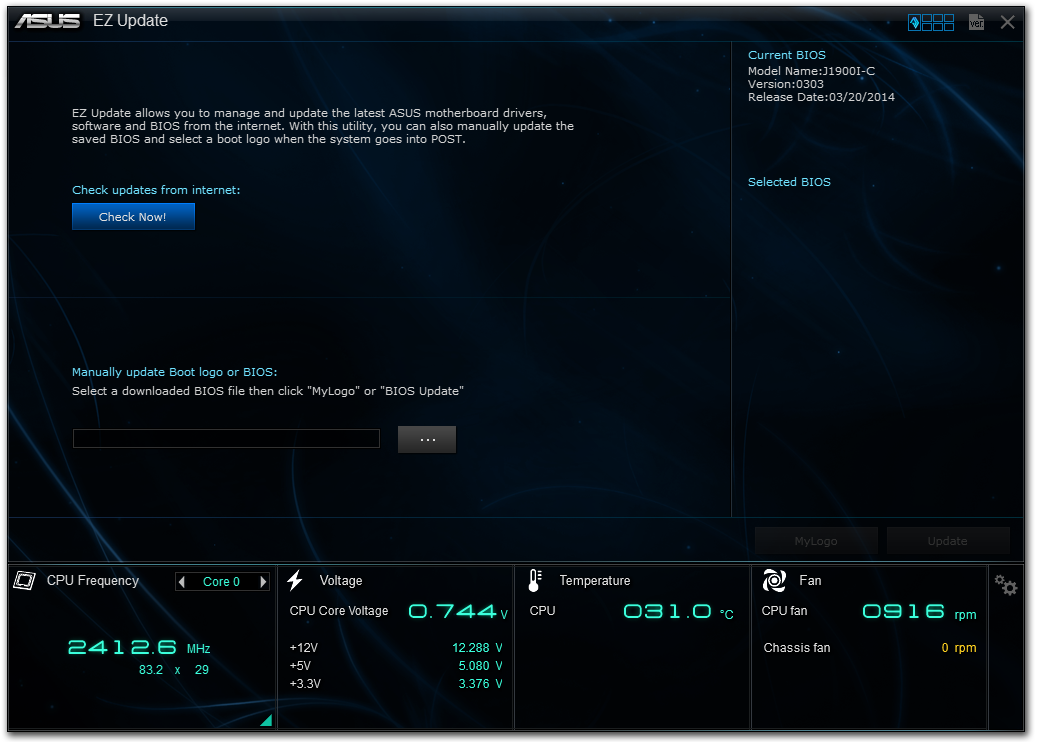
ASUS includes an update tool with the software, though similarly to our previous attempts with ASUS’ EZ Update, it does not seem to pick up any new downloads.
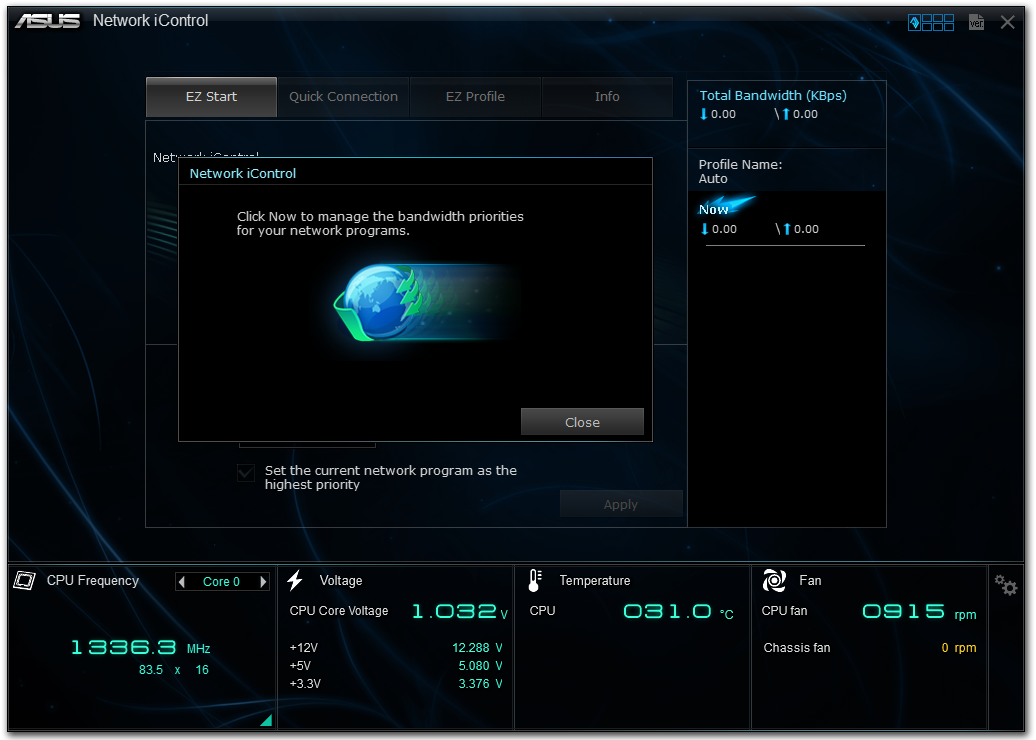
Interestingly ASUS includes network control software with the J1900I-C, allowing users to give priority to the network traffic of selected executables. This is in essence a software middle-layer stack integration, organizing packets of data before they are sent to the Windows stack.


When the SoC plus a motherboard retails for around $90, and Intel lists the SoC as $82, you can imagine that the box contents are going to be extremely light. These motherboards only have two SATA ports, but both do have mini-PCIe and functionality headers (COM/USB) which might throw up a surprise or two. It would have been interesting if one of them offered a motherboard with WiFi for example.
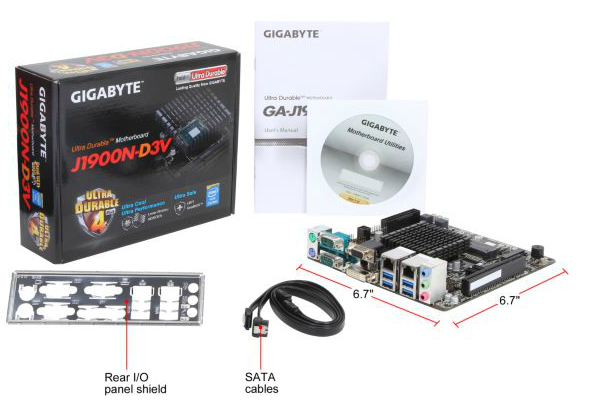
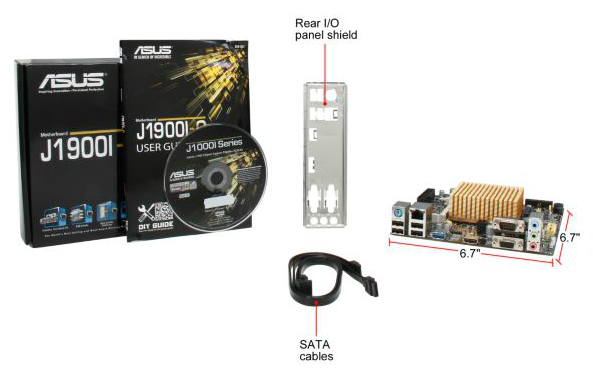
In The Box: GIGABYTE J1900N-D3V
Manual
Driver Disk
Rear IO Shield
Two SATA Cables
In The Box: ASUS J1900I-C
Manual
Driver Disk
Rear IO Shield
Two SATA Cables
Many thanks to...
We must thank the following companies for kindly providing hardware for our test beds:
Thank you to OCZ for providing us with PSUs and SSDs.
Thank you to G.Skill for providing us with memory.
Thank you to Corsair for providing us with an AX1200i PSU and a Corsair H80i CLC.
Thank you to MSI for providing us with the NVIDIA GTX 770 Lightning GPUs.
Thank you to Rosewill for providing us with PSUs and RK-9100 keyboards.
Thank you to ASRock for providing us with some IO testing kit.
Thank you to Cooler Master for providing us with Nepton 140XL CLCs.
Test Setup
| Test Setup | |
| Processor | Intel Celeron J1900 (Bay Trail-D) Quad Core, 2.0 GHz (2.4 GHz Turbo) |
| Motherboards | GIGABYTE J1900N-D3V ASUS J1900I-C |
| Cooling | Integrated Passive Coolers |
| Memory | G.Skill SO-DIMM DDR3L-1600 9-9-9 |
| Memory Settings | Stock |
| Video Drivers | Intel |
| Hard Drive | OCZ Vertex 3 240 GB |
| Case | Open Test Bed |
| Operating System | Windows 7 64-bit SP1 |
| USB 2/3 Testing | OCZ Vertex 3 240 GB |
System Benchmarks
Windows 7 POST Time
Different motherboards have different POST sequences before an operating system is initialized. A lot of this is dependent on the board itself, and POST boot time is determined by the controllers on board (and the sequence of how those extras are organized). As part of our testing, we look at the POST Boot Time using a stopwatch. This is the time from pressing the ON button on the computer to when Windows 7 starts loading. (We discount Windows loading as it is highly variable given Windows specific features.)
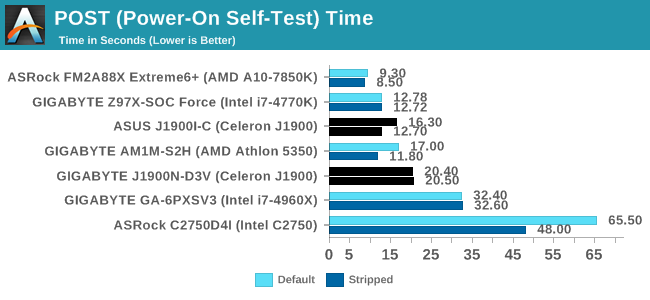
The ASUS gets the jump on POST time, even shaving almost 4 seconds off from disabling controllers. The GIGABYTE result stands around 20 seconds by comparison.
Rightmark Audio Analyzer 6.2.5
Rightmark:AA indicates how well the sound system is built and isolated from electrical interference (either internally or externally). For this test we connect the Line Out to the Line In using a short six inch 3.5mm to 3.5mm high-quality jack, turn the OS speaker volume to 100%, and run the Rightmark default test suite at 192 kHz, 24-bit. The OS is tuned to 192 kHz/24-bit input and output, and the Line-In volume is adjusted until we have the best RMAA value in the mini-pretest. We look specifically at the Dynamic Range of the audio codec used on board, as well as the Total Harmonic Distortion + Noise.

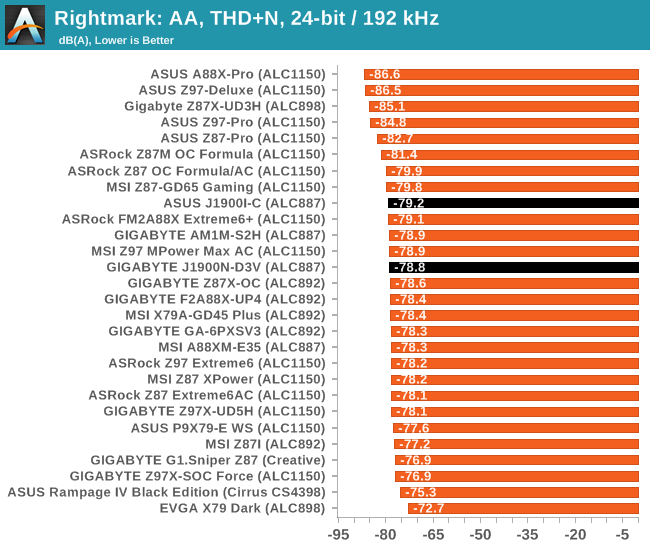
ALC887 is one of the top end 2.1 codec solutions, although here we balance SNR against cost compared to something like the ALC898.
USB Backup
For this benchmark, we transfer a set size of files from the SSD to the USB drive using DiskBench, which monitors the time taken to transfer. The files transferred are a 1.52 GB set of 2867 files across 320 folders – 95% of these files are small typical website files, and the rest (90% of the size) are small 30 second HD videos. In an update to pre-Z87 testing, we also run MaxCPU to load up one of the threads during the test which improves general performance up to 15% by causing all the internal pathways to run at full speed.
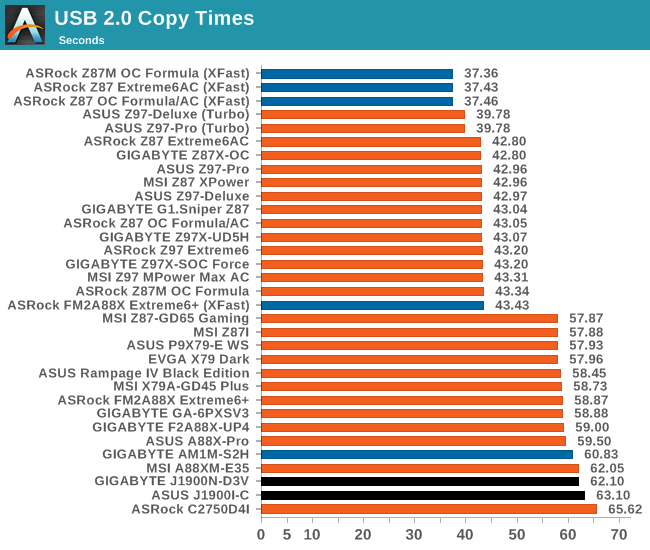
We actually had an odd issue with both of our motherboards in this review. Neither of them wanted to play ball properly with the USB 3.0 mode, which we think comes down to drivers. The latest drivers will need to be downloaded and installed for anyone purchasing these motherboards.
DPC Latency
Deferred Procedure Call latency is a way in which Windows handles interrupt servicing. In order to wait for a processor to acknowledge the request, the system will queue all interrupt requests by priority. Critical interrupts will be handled as soon as possible, whereas lesser priority requests such as audio will be further down the line. If the audio device requires data, it will have to wait until the request is processed before the buffer is filled.
If the device drivers of higher priority components in a system are poorly implemented, this can cause delays in request scheduling and process time. This can lead to an empty audio buffer and characteristic audible pauses, pops and clicks. The DPC latency checker measures how much time is taken processing DPCs from driver invocation. The lower the value will result in better audio transfer at smaller buffer sizes. Results are measured in microseconds.
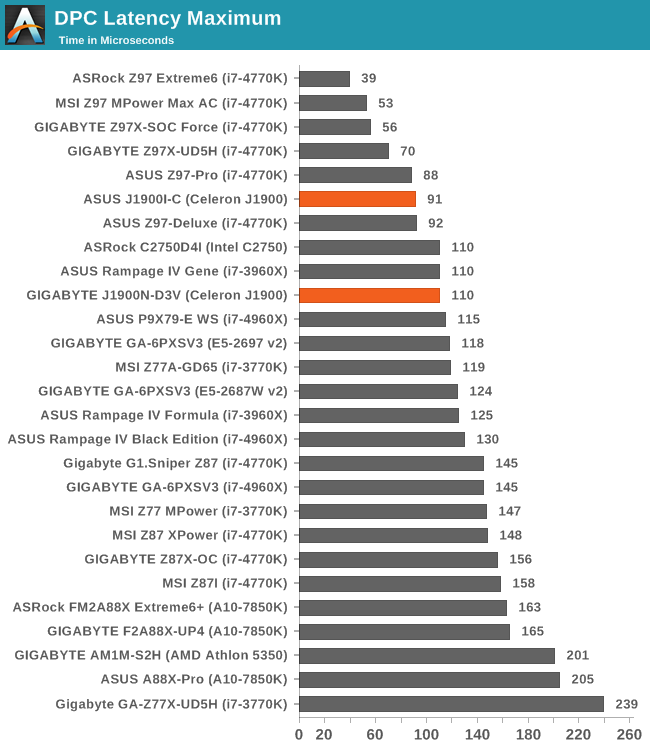
I was actually rather impressed with DPC Latency, with both motherboards hovering around the 100 microsecond mark. In the past, slower systems often tend to spike outside of the normal range, but both of these do rather well.
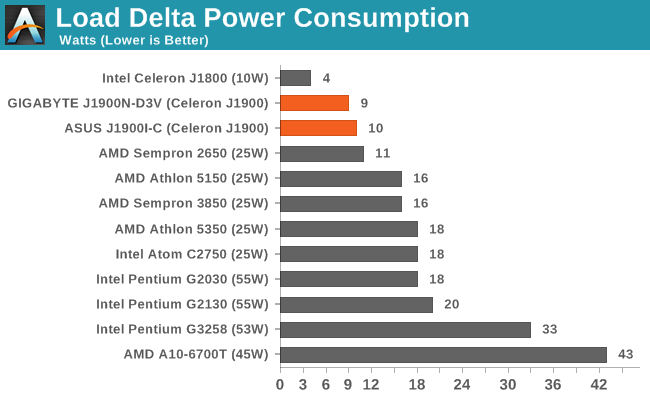
Load Delta Power Consumption
CPU Benchmarks
Readers of our motherboard review section will have noted the trend in modern motherboards to implement a form of MultiCore Enhancement / Acceleration / Turbo (read our report here) on their motherboards. This does several things, including better benchmark results at stock settings (not entirely needed if overclocking is an end-user goal) at the expense of heat and temperature. It also gives in essence an automatic overclock which may be against what the user wants. Our testing methodology is ‘out-of-the-box’, with the latest public BIOS installed and XMP enabled, and thus subject to the whims of this feature. It is ultimately up to the motherboard manufacturer to take this risk – and manufacturers taking risks in the setup is something they do on every product (think C-state settings, USB priority, DPC Latency / monitoring priority, memory subtimings at JEDEC). Processor speed change is part of that risk, and ultimately if no overclocking is planned, some motherboards will affect how fast that shiny new processor goes and can be an important factor in the system build.
Neither the GIGABYTE J1900N-D3V nor ASUS J1900I-C had any form of MultiCore Turbo.
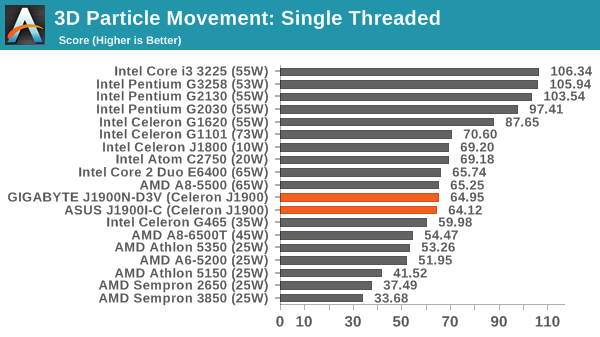
Point Calculations – 3D Movement Algorithm Test: link
3DPM is a self-penned benchmark, taking basic 3D movement algorithms used in Brownian Motion simulations and testing them for speed. High floating point performance, MHz and IPC wins in the single thread version, whereas the multithread version has to handle the threads and loves more cores.

Compression – WinRAR 5.0.1: link
Our WinRAR test from 2013 is updated to the latest version of WinRAR at the start of 2014. We compress a set of 2867 files across 320 folders totaling 1.52 GB in size – 95% of these files are small typical website files, and the rest (90% of the size) are small 30 second 720p videos.
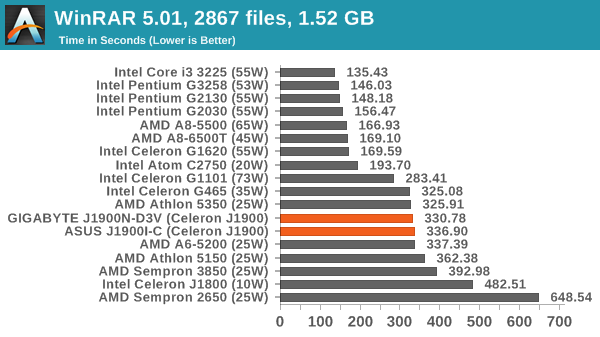
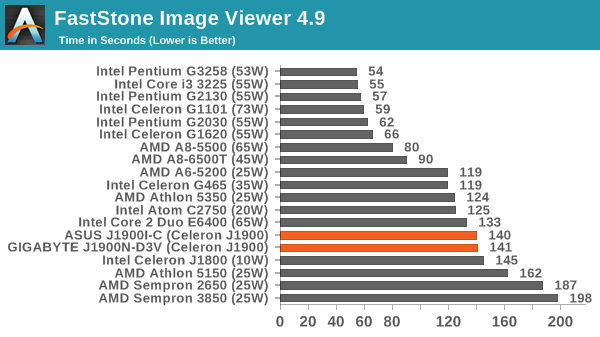
Image Manipulation – FastStone Image Viewer 4.9: link
Similarly to WinRAR, the FastStone test us updated for 2014 to the latest version. FastStone is the program I use to perform quick or bulk actions on images, such as resizing, adjusting for color and cropping. In our test we take a series of 170 images in various sizes and formats and convert them all into 640x480 .gif files, maintaining the aspect ratio. FastStone does not use multithreading for this test, and thus single threaded performance is often the winner.
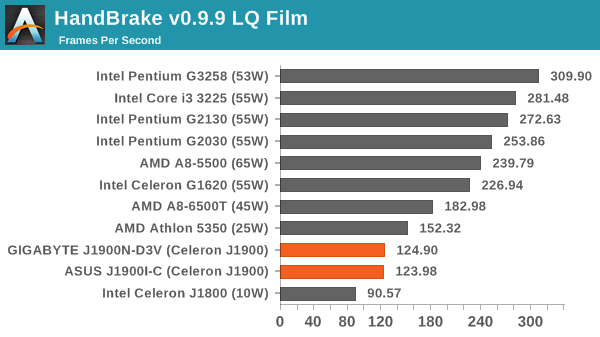
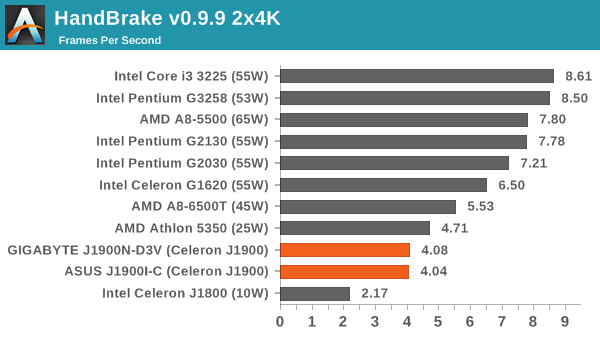
Video Conversion – Handbrake v0.9.9: link
Handbrake is a media conversion tool that was initially designed to help DVD ISOs and Video CDs into more common video formats. The principle today is still the same, primarily as an output for H.264 + AAC/MP3 audio within an MKV container. In our test we use the same videos as in the Xilisoft test, and results are given in frames per second.
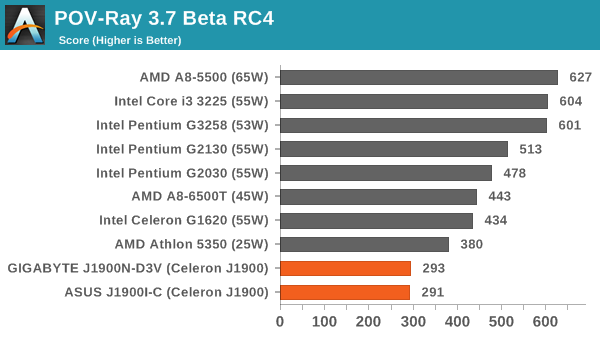
Rendering – PovRay 3.7: link
The Persistence of Vision RayTracer, or PovRay, is a freeware package for as the name suggests, ray tracing. It is a pure renderer, rather than modeling software, but the latest beta version contains a handy benchmark for stressing all processing threads on a platform. We have been using this test in motherboard reviews to test memory stability at various CPU speeds to good effect – if it passes the test, the IMC in the CPU is stable for a given CPU speed. As a CPU test, it runs for approximately 2-3 minutes on high end platforms.
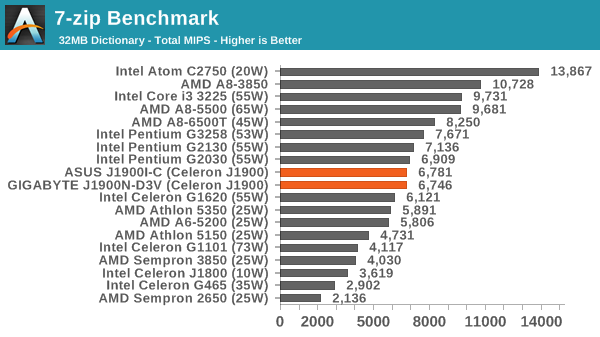
Synthetic – 7-Zip 9.2: link
As an open source compression tool, 7-Zip is a popular tool for making sets of files easier to handle and transfer. The software offers up its own benchmark, to which we report the result.
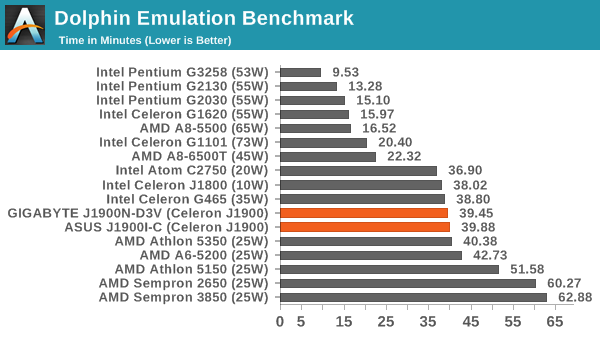
Emulation - Dolphin Benchmark: link
Many emulators are often bound by single thread CPU performance, and general reports tended to suggest that Haswell provided a significant boost to emulator performance. This benchmark runs a Wii program that raytraces a complex 3D scene inside the Dolphin Wii emulator. Performance on this benchmark is a good proxy of the speed of Dolphin CPU emulation, which is an intensive single core task using most aspects of a CPU. Results are given in minutes, where the Wii itself scores 17.53 minutes.
Web Benchmarks on the Celeron J1900
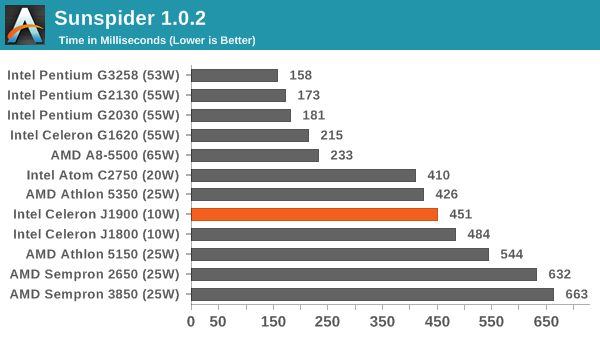
On the lower end processors, general usability is a big factor of experience, especially as we move into the HTML5 era of web browsing. For our web benchmarks, we take four well known tests with Chrome 35 as a consistent browser.
Sunspider 1.0.2
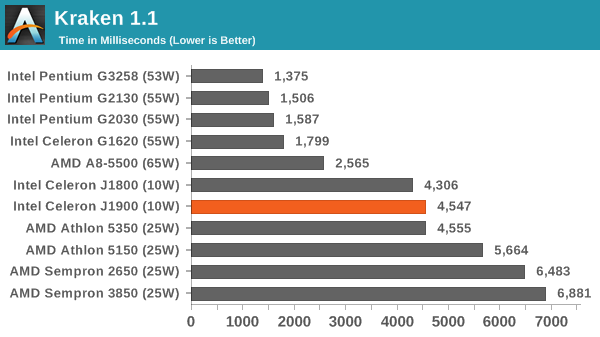
Mozilla Kraken 1.1
WebXPRT
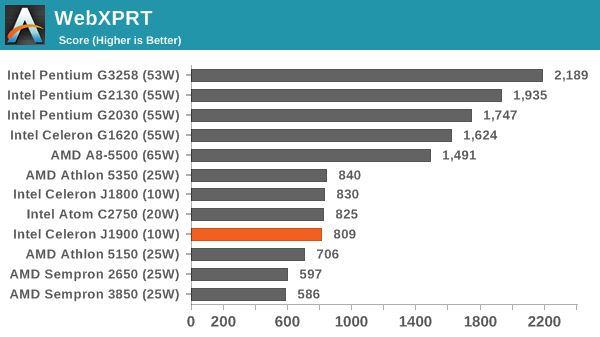
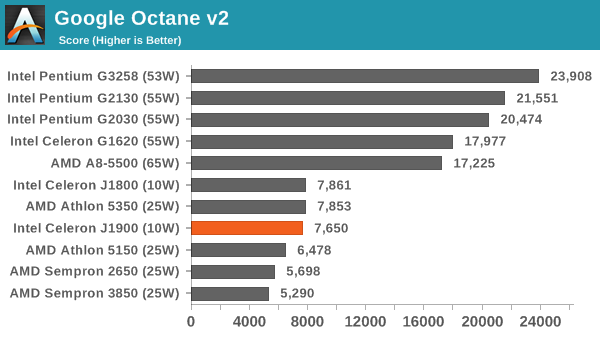
Google Octane v2
Integrated Graphics Gaming on J1900
For our gaming analysis, we took the gaming results from the GIGABYTE J1900N-D3V to compare against other integrated graphics solutions.
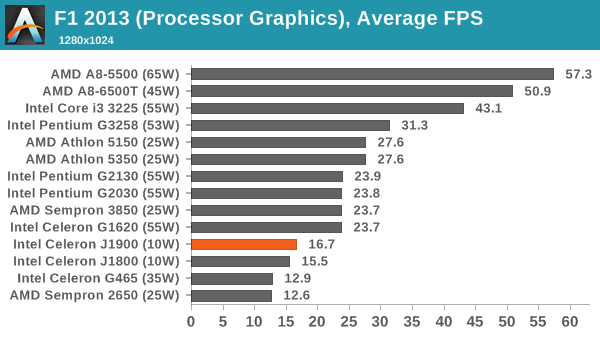
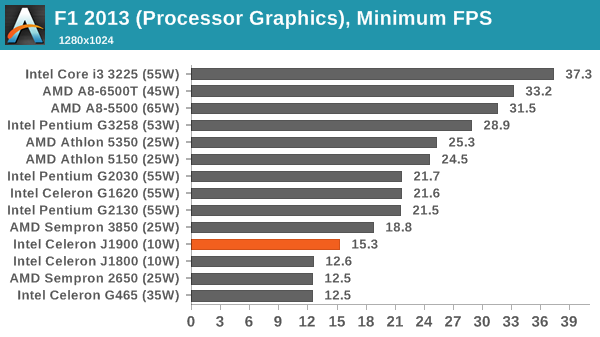
F1 2013
First up is F1 2013 by Codemasters. I am a big Formula 1 fan in my spare time, and nothing makes me happier than carving up the field in a Caterham, waving to the Red Bulls as I drive by (because I play on easy and take shortcuts). F1 2013 uses the EGO Engine, and like other Codemasters games ends up being very playable on old hardware quite easily. In order to beef up the benchmark a bit, we devised the following scenario for the benchmark mode: one lap of Spa-Francorchamps in the heavy wet, the benchmark follows Jenson Button in the McLaren who starts on the grid in 22nd place, with the field made up of 11 Williams cars, 5 Marussia and 5 Caterham in that order. This puts emphasis on the CPU to handle the AI in the wet, and allows for a good amount of overtaking during the automated benchmark. We test at 1280x1024 on Low graphical settings.

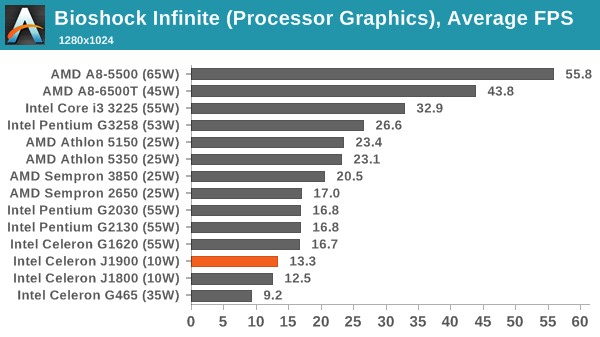
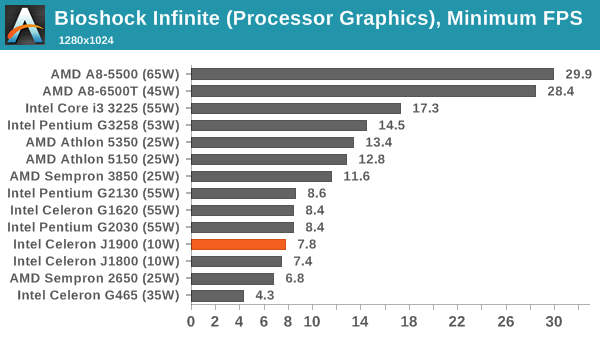
Bioshock Infinite
Bioshock Infinite was Zero Punctuation’s Game of the Year for 2013, uses the Unreal Engine 3, and is designed to scale with both cores and graphical prowess. We test the benchmark using the Adrenaline benchmark tool and the Performance (1280x1024, Low) setting, noting down the average frame rates and the minimum frame rates.

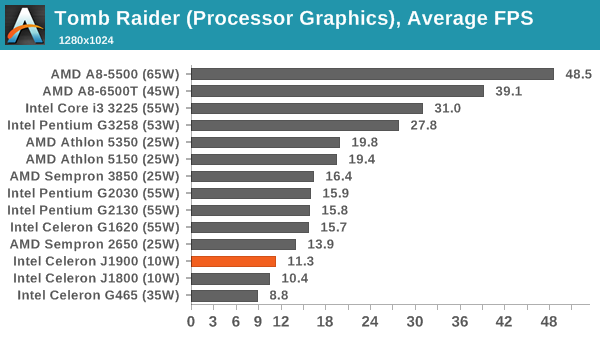
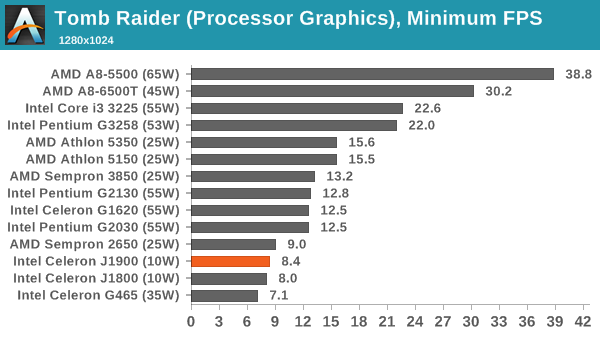
Tomb Raider
The next benchmark in our test is Tomb Raider. Tomb Raider is an AMD optimized game, lauded for its use of TressFX creating dynamic hair to increase the immersion in game. Tomb Raider uses a modified version of the Crystal Engine, and enjoys raw horsepower. We test the benchmark using the Adrenaline benchmark tool and the Performance (1280x1024, Low) setting, noting down the average frame rates and the minimum frame rates.

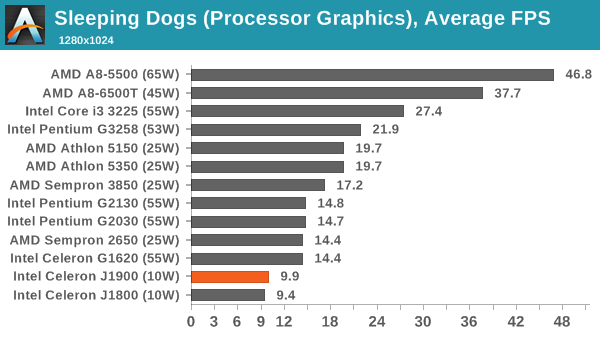
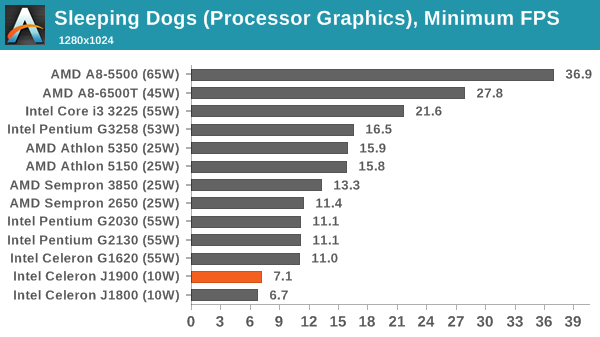
Sleeping Dogs
Sleeping Dogs is a benchmarking wet dream – a highly complex benchmark that can bring the toughest setup and high resolutions down into single figures. Having an extreme SSAO setting can do that, but at the right settings Sleeping Dogs is highly playable and enjoyable. We run the basic benchmark program laid out in the Adrenaline benchmark tool, and the Performance (1280x1024, Low) setting, noting down the average frame rates and the minimum frame rates.

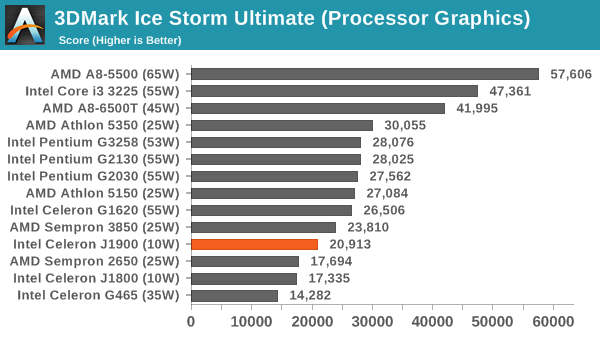
3DMark Ice Storm Ultimate
Conclusion: The Motherboards
With only a few dollars separating our two candidates, one might imagine that they would act very similar to each other and you end up buying more for the brand over the capabilities. To a certain extent that is true, but these boards actually differ quite a lot in terms of their functionality. It all comes down to what extras each manufacturer decided on. The GIGABYTE J1900N-D3V goes with two network ports, a PCI slot, a DVI-D port and a USB 3.0 hub, whereas the ASUS J1900I-C has a single network port, a PCIe 2.0x 1 slot, a HDMI port and fan controls. The best way to compare ends up as a rundown of the feature set:
| GIGABYTE vs. ASUS, J1900 mini-ITX | ||
| GIGABTYE J1900N-D3V | ASUS J1900I-C | |
| Network Ports | 2 | 1 |
| USB 2.0 Ports | 2 | 6 |
| USB 3.0 Porrts | 4 | 1 |
| PCIe 2.0 x1 | 0 | 1 |
| PCI | 1 | 0 |
| Mini-PCIe | 1 | 1 |
| Digital Display | DVI-D | HDMI |
| BIOS Visuals | Text | Designed |
| Fan Controls | No | BIOS + OS |
| Update BIOS in BIOS | No | Yes |
| Control Network Priority | No | Yes |
On the performance side of the equation, almost nothing splits these two boards. CPU results are all very similar, they draw almost the same power from idle to load, but it can be said that the ASUS has the upper hand for POST times and DPC Latency. Both motherboards seem to match each other on audio quality and USB speed.
One area where the J1900I-C surpasses the J1900N-D3V is in the BIOS and software packages. ASUS has this squared down with an easy to understand menu, extensive fan controls and a tool to update the BIOS from within the BIOS. The fan controls in the OS software fully test the fans, and we even get a form of Network management control. In contrast to the GIGABYE board, the BIOS is flat with plenty of confusing options. The GIGABYTE’s software is a little better, but still nothing to direct the fans.
On the counter argument, the GIGABYTE J1900N-D3V is more equipped for network connectivity and USB 3.0. While the four USB 3.0 ports are coming from a hub, the idea here is not for simultaneous access – it allows four high speed devices to be connected at once and when one is needed on its own, it gets the full bandwidth. The only downside here is that for the ASUS and the GIGABYTE boards the on-disk drivers had trouble initializing USB 3.0 on Windows 7, so the latest drivers are needed. ASUS would also argue, in terms of functionality, that a HDMI and PCIe 2.0 x1 would be more welcome for more people than a DVI-D and PCI slot.
The conclusion about which board to buy comes down to common sense. As a day-to-day product for home use, the ASUS would be my choice as the better experience especially if the user had to deal with fan controls or USB 3.0 boost. That being said, the four USB 3.0 ports on the GIGABYTE is a difficult one to concede as it could be very useful for connected devices that require bandwidth. If the BIOS and Software packages were updated to include fan controls, and the BIOS went into GIGABYTE's 'Classic' EFI style, it would probably swing me towards the GIGABYTE. However, for embedded applications that requires increased network connectivity or PCI, the GIGABYTE targets that market well, with the ASUS focusing on HDMI/PCIe.


