Original Link: https://www.anandtech.com/show/8030/backup-guide
Averting Disaster - A Guide To Computer Backups (2014)
by Brett Howse on May 21, 2014 9:00 AM EST- Posted in
- IT Computing
- Mac
- Apple
- Windows
- Cloud Computing
- macOS
Introduction
We all store more and more of our lives in digital form; spreadsheets, résumés, wedding speeches, novels, tax information, schedules, and of course digital photographs and video. All of this data is easy to store, transmit, copy, and share, but how easy is it to get back?
All of this data can be a harsh reminder that computers are not without fault. For years, storage costs have been dropping while at the same time the amount of storage in any one computer has been increasing almost exponentially. We are at a point where a single hard drive can contain multiple terabytes of information, and with a single mishap, lose it all forever. Everyone knows someone who has had the misfortune of having a computer stop working and wanting their information back.
It’s always been possible to safeguard your data, but now it’s not only necessary thanks to the explosion of personal data, it’s also more affordable than ever. When you think of the costs of backing up your data, just remember what it would cost you if you were to ever lose it all. This guide will walk you through saving your data in multiple ways, with the end goal being to have a backup system that is simple, effective, and affordable. In this day and age, you really can have it all.
It’s prudent at this point to define what a backup is, because there are a lot of misconceptions out there which can cause much consternation when the unthinkable happens, and people who thought they were protected find out they were not.
Backups are simply duplicates of data which are archived, and which can be restored to a previous point in time. The key is the data must be duplicated, and you have to be able to go back to an earlier time. Anything that doesn’t meet both of those requirements is not a backup.
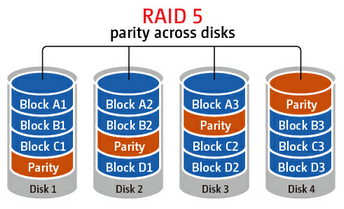
As an example, many people trust their data to network storage devices with RAID (Redundant Array of Independent Disks). Without going into the intricacies of various forms of RAID, none of these Network Attached Storage (NAS) devices are any sort of a backup on their own. RAID is designed to protect a system from a hard disk failure and nothing more. Depending on the RAID level, it either duplicates disks, or uses a calculation to create a parity of the data which can be used to calculate the original value of the data if any part of the data is missing from a failed disk. While RAID is an excellent mechanism to keep a system operational in the event of a disk failure, it is not a backup because if a file is changed or deleted, it is instantly updated or removed on all disks, and therefore there is no way to roll back that change. RAID is excellent for use as a file share, and can even be effectively utilized as the target for backups, but it still requires a file backup system if important data is kept on the array.
Another similar example is cloud storage. Properly configured, cloud storage can be a backup target, and different services can even properly perform backups, but the average person with the average Google Drive or OneDrive account can’t copy their files there and hope they are protected. As with RAID, it is a more robust file storage than any single hard drive, but if you delete a file, or copy over another, it can be difficult or impossible to go back to a previous version.
Both RAID and cloud storage suffer from the same problem – you can’t go back to an earlier time, and therefore are not a true backup. True backups will allow you to recover from practically any scenario – fire, flood, theft, equipment failure, or the inevitable user error. This guide will walk you through several methods of performing backups starting at simple and moving up to elaborate systems that will truly protect your data. These methods work for home and business alike, just the type of equipment will likely differ.
There is some common terminology used in backups that should be defined before we start discussing the intricacies of backups:
- Archive Flag: A bit setting on all files which states whether or not the file has been modified since the last time the flag was cleared.
- Full Backup: A backup of all files which resets the archive flag.
- Differential Backup: A backup of all files with the archive flag set, but it does not clear the archive flag.
- Incremental Backup: A backup of all files with the archive flag set which resets the archive flag.
- Image or System Based Backup: A complete disk level backup which would allow you to image a machine back to a previous state.
- Deduplication: A software algorithm which removes all duplicate file parts to reduce the amount of storage required.
- Source Deduplication: removing duplicate file information from files on the client end. This requires more CPU and memory usage on the client, but allows for a much smaller file size to be transferred to the backup target.
- Target Deduplication: removing duplicate file information from files on the target end. This saves client CPU and memory usage, and is used to reduce the amount of storage space required on the backup target.
- Block Level: A backup or system process which accesses a sequence of bytes of data directly on the disk.
- File Level: A backup or system process which accesses files by querying the Operating System for the entire file.
- Versioning: A list of previous versions of a file or folder.
- Recovery Point Objective (RPO): The amount of time since the last backup deemed safe to lose in a disaster scenario. For example, if you perform backups nightly, your RPO would be the previous night’s backups. Anything created in between backups is assumed to be recoverable through other methods, or an acceptable loss.
- Recovery Time Objective (RTO): The amount of time deemed acceptable between the loss of data and the recovery of data. For home use, there’s really no RTO but many commercial companies will have this defined either with in-house IT or with a Service Level Agreement (SLA) to a support company.
Plan Your Backups
No matter what kind of a backup system you end up using, you need to start with a plan. To be successful, there are a couple of things that need to be ironed out first:
- Where is your data now? Do you keep your data organized in your Documents, Photos, Music, and Videos folders? Is it on a NAS device? External hard drive? While not essential to performing backups, knowing where you keep your data is going to make the process easier. The more it is spread out, the more difficult it is to back it up – not impossible – but more difficult. Some of the built-in backup tools assume your files are in fact in your user folder, or at least your libraries, so take the time now to figure out where your important data is. Other backup programs will scour the entire computer for files, so if you have files everywhere, there are solutions for this as well.
- How important is your data? Is it all about equally important, or is there some data where you don’t want to lose it, and other data where it’s crucial you don’t lose it? It’s possible to do full backups to a local backup target, but also back up your most important data offsite.
- How much risk do you want to mitigate? The easiest backups will be to an internally or externally attached hard drive, which will protect against equipment failure, or user error. Moving up, you can back up to a NAS on your LAN, which will add a possibility of mitigating theft (but certainly not a guarantee) as well as giving you the option of backing up multiple machines. For ultimate protection, some sort of offsite backup is required. This is the only way to mitigate the risks of fire, flood, theft, and natural disaster. If the data is extremely important, you may even want to ensure the data is backed up to multiple geographic areas to ensure recovery from a natural disaster.
- How much space are you going to require for backups? If you are doing Image Level backups as well, factor in that you will need a backup target larger than the total amount of data you want to back up. The more space you have, the more versions of files and the farther back in time you can go to perform a restore. It would be prudent to start with a backup target that is at least twice as large as your total data to be backed up.
- What is your RPO? Are nightly backups good for you, or do you need to perform backups more often? Do you need continuous backups? It is essential to define an RPO that works for you.
- What is your RTO? Cloud based backups are wonderful because they are offsite, but the amount of bandwidth required to recovery multiple terabytes of information will be quite significant. If you aren’t worried about time, then it may be fine for you, but if time is a factor you may want to ensure you have some sort of local backup as well as offsite. RTO also factors in to the backup equipment decision. Optical media can be used as an offsite backup method, but recovering the data will be labor intensive and slow.
- What is your budget? For a single PC, you can configure a backup using just optical media, or an external hard drive, either of which will not be overly expensive. For multiple PCs, you may want to invest in a NAS or server to back up to. You can also expand the backups to the cloud for monthly or annual fees depending on the backup system you decide to go with. Just remember though that the cost of your backups may potentially save you from a much higher cost if disaster ever strikes.
- How much time are you willing to spend performing backups? Actually, this is a trick question. While it is possible to do a backup plan based on burning files to a DVD, and then storing these discs for later use, the fact is that unless a backup system is completely seamless, odds are that it’s not going to be used. In this day and age, there are many ways to perform backups without having to do anything but the initial set up, and for this reason there isn’t much point in doing anything manually.
Built-in Backup Tools - Windows 7
The first method of performing backups is to use the built-in backup tools in Windows 7, 8.1, or OS X. These offer both image based backups, as well as file based backups. This is your first line of defense. If your budget is low, the bare minimum that you want to do is at least back up your files and system image to an internal or external drive, or a network share.
Windows 7
Windows 7 includes a built-in utility called Backup and Restore (formerly Backup and Restore Center in Windows Vista) which allows you to perform backups to internal or external disks on your local PC. If you have Windows 7 Professional, Enterprise, or Ultimate, Backup and Restore will also allow you to perform backups to a network share. Backup and Restore allows both file level, and image level backups. Windows 7 also has a built-in feature called Previous Versions, which will leverage both Windows Backups as well as restore points in order to allow you to restore files to a different point in time.
Backup and Restore, when configured to perform both file and system level backups, will actually perform both a file level, and a system level backup. Unlike more sophisticated backup software, it doesn’t leverage the system level backups for file level restores, meaning it is going to take up more space than a backup solution which does just system level. It does allow incremental backups and versioning though. The biggest issue with Windows 7’s built-in Backup and Restore is its inability to backup files and images to a network share for Starter and Home Premium – the two versions most people have. It also can’t backup files that are on a network share. That being said, it’s a great place to start for anyone who wants to back up to an internal or external drive for file and system protection. Let’s run through how to configure it:
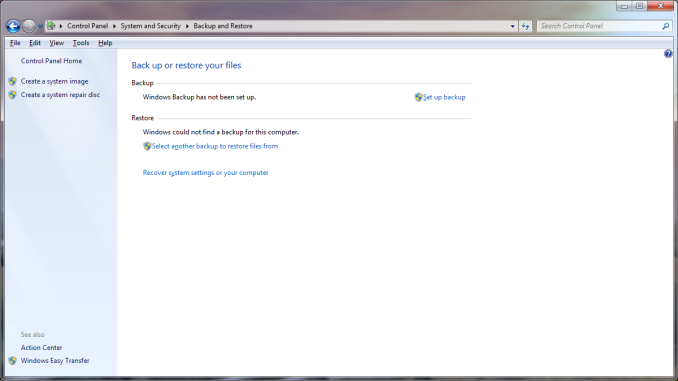
- Go to the Control Panel, then choose System and Security, and select Backup and Restore.
- On the Control Panel applet screen, choose Set up backup.
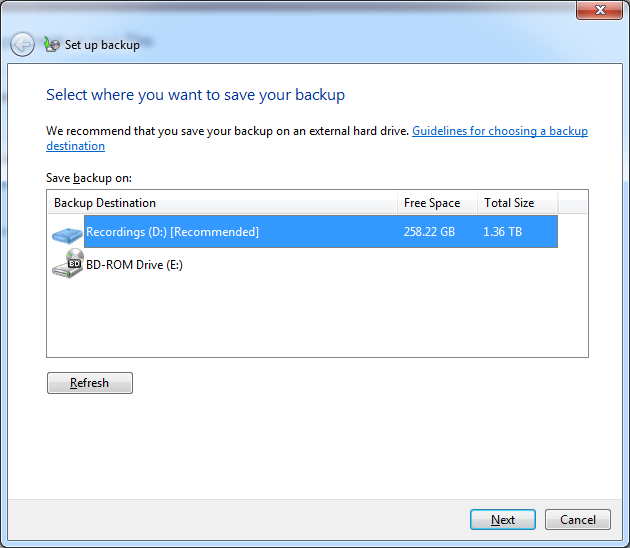
- First you will be prompted as to where to save your backups. Your options are any local disk, USB disk, or CD/DVD. If you have Windows 7 Professional, Enterprise, or Ultimate, there will be an additional selection here to choose a network share and enter the necessary credentials to access it. Choose your backup disk and click Next.
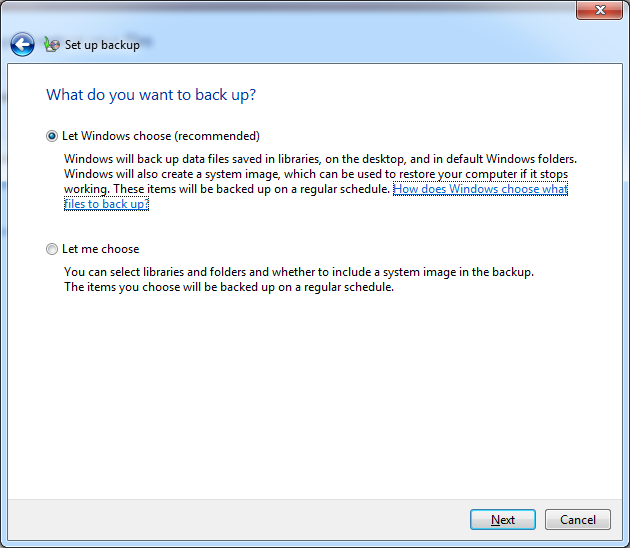
- Next, you will be asked what to back up. The default selection is to back up all user data saved in libraries and default user folders, as well as a system image. If you keep all of your data in your libraries, this should be fine for you so click Next. If you keep data in other folders, or only want to backup certain locations, select Let me choose and click Next.
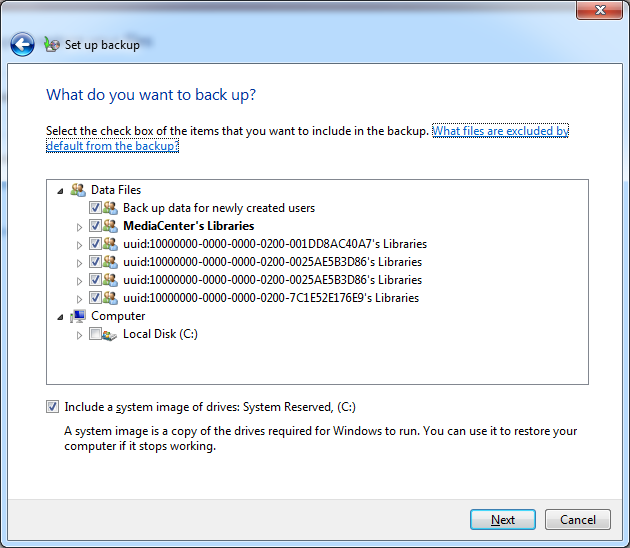
- If you’ve chosen Let me choose, you will be prompted to select what data files to backup. By default, all user Data files are selected, but you can also expand under Computer and choose what to backup, or just backup everything. Also there will be a selection to include a system image for restoring your entire drive. If you have space on your backup drive, it’s a great idea to include this. Click Next when you’ve selected everything you need to backup.
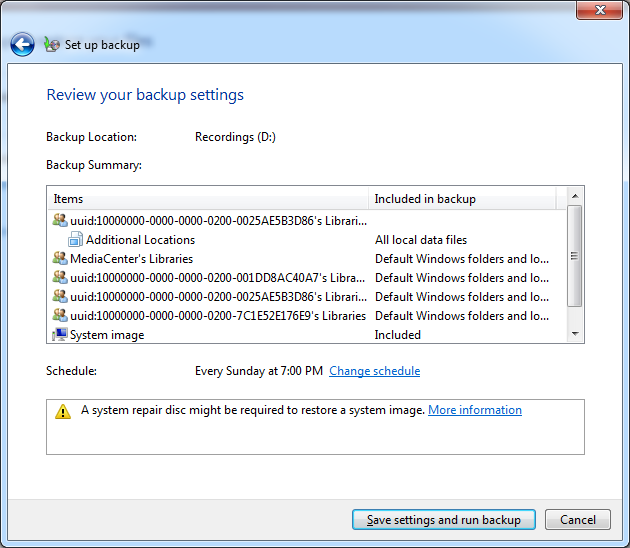
- Next, you will be provided a summary of the backup job which you can review. The summary page will display the default schedule (Sunday at 7pm) and you can change the schedule to perform backups more often. Weekly backups would be the minimum that I would perform. Since the backups are incremental, it’s probably a good idea to bump this up to daily. Choose a time where you are not likely to be using the computer. Once you are happy, click Save settings and run backup, and the system will perform the initial full backup.
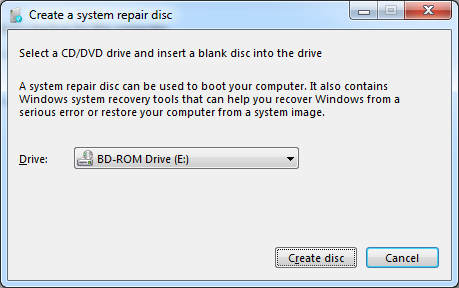
That’s it. Your computer is now backing up automatically at whatever schedule you chose. The next thing you should do, assuming you selected to create a System backup, is to create a bootable disk to recover your system. It’s easier to do this now, than when you need it. To do this, simply go to the Backup and Restore applet in the control panel, and choose Create a system repair disc. You will be prompted to place a CD or DVD in your drive and then just select Create disc. A small bootable disc will be burned which will allow you to restore a complete system image from a local disk, or a network share. If you do ever need this, bear in mind that a system restore will completely erase all files on the restore target.
If you want to restore individual files, you have a couple of options. You can use the Backup and Restore applet to browse for files and folders of your backups and choose which ones to restore. If you do a restore this way, and select restore to original location, it will do a standard file copy of the restored files to their original locations. If the original files are still in that location, the standard dialog will appear letting you select whether to replace the originals, copy with a new file name, or do nothing. Be careful if you do this as you will have a good chance of overwriting files you meant to keep.
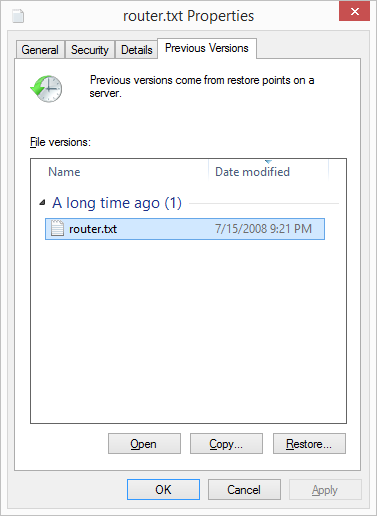
The other method for restoring files is to use the Previous Versions interface to select which file and folder, and from which date to restore. This is likely the preferred method since it will display graphically all previous versions of the file or folder. To invoke this method, simply browse to the file or folder you wish to restore, right click, and choose Restore previous versions. This will display all versions that are in the backups, and allow you to open the file to view it, copy the file, or restore the file.
Overall, the Windows 7 backup utility is fairly good. With both file level and image level backups available, you can recover from practically any scenario. Its glaring omission is the lack of network support on the home versions of Windows 7, which is really unfortunate. Many people would rather back up their files to a NAS, especially in any house with more than one computer. But if you are running Windows 7 and you just have a single computer, it is worthwhile using this for the price of a single hard drive to back up to. Unfortunately, almost no one used this backup system so it was replaced when Windows 8 was launched.
Built-in Backup Tools Windows 8.1
While Windows 7 and Vista had the Backup and Restore applet, Windows 8 introduced File History as the default backup option. File History is a replacement for Previous Versions from Windows Vista and Windows 7. Unlike Windows 7, File History does allow backup to network shares for all versions of Windows 8 which is a good thing and makes the software far more useful. The downside is that scheduled System Backups have been removed from Windows 8 and 8.1. You can still manually create a system backup, and you can perform a system backup to a network share, but you can’t schedule this to be run. Also, File History only performs a backup of files in your libraries (Documents, Music, Pictures, Videos, and Desktop folders), as well as any files saved locally from OneDrive. Still, the most important information on your computer is your files, so let’s look at how to enable this feature to protect them:
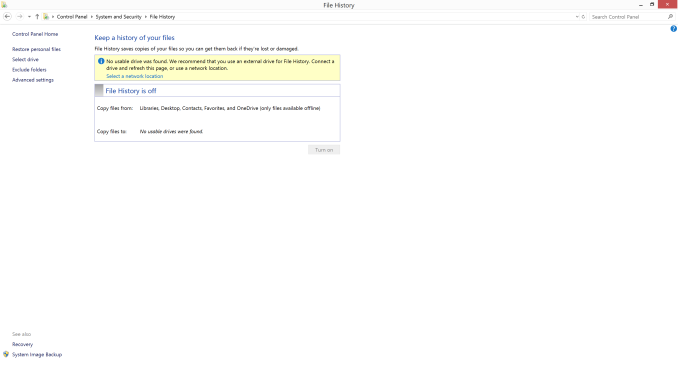
- Windows 8.1 adds the ability to enable File History from PC Settings, however the options are just to enable File History and to select a backup target, so these instructions will focus on the Control Panel applet which offers more advanced options. To launch File History, right click the Start button and choose Control Panel. Next expand System and Security and select Save backup copies of your files with File History.
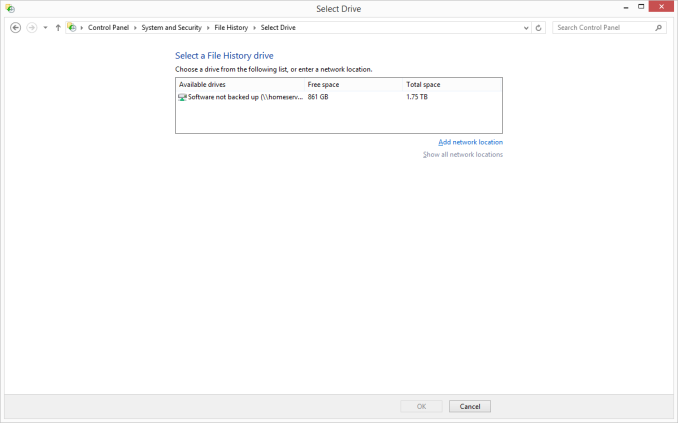
- If File History has never been configured before, the system will scan for available disks that it can back up to. You can choose the disk, or use the link Select a network location to configure the disk.
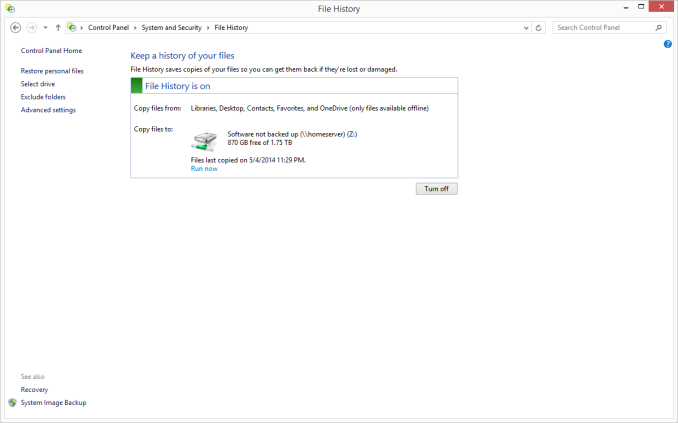
- Once configured, simply click Turn On, and File History is enabled.
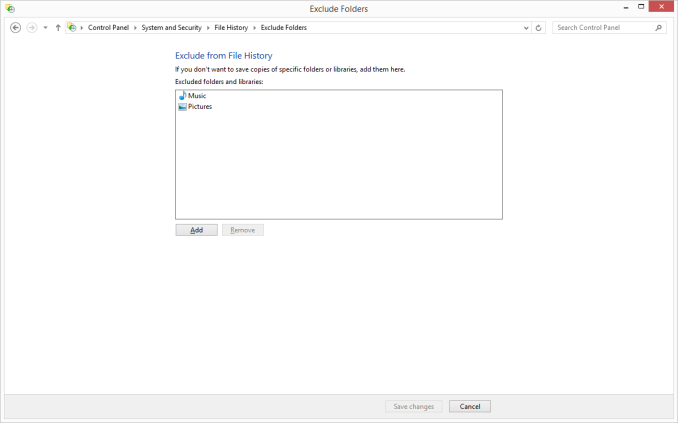
- If you’d like to modify your File History settings, that can be done in the File History applet. To exclude folders, choose Exclude Folders where you can select folders you wish to exclude from the backup. Unfortunately, you can’t add user defined folders here which you do want backed up. To add folders to be backed up, you either have to add that folder to an existing library, or create a new library.
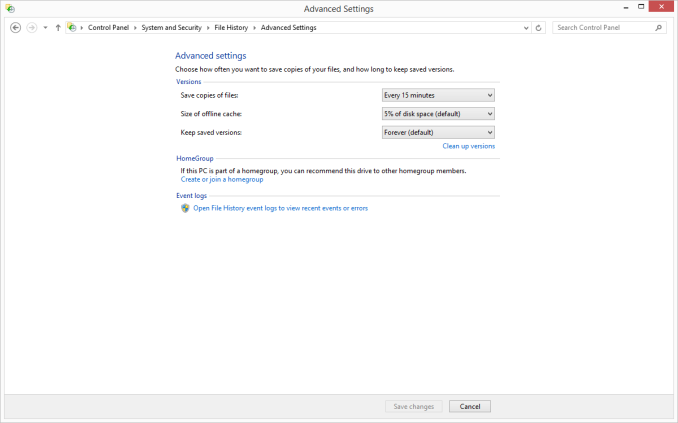
- Advanced settings are also available in the File History applet, and these allow you to specify how often to run the File History backup (from ten minutes to daily) as well as specify how much of the PC’s disk to use as an offline cache (2% to 20%) in the event you are travelling and not able to access your backups, as well as to specify how many versions of files to keep.
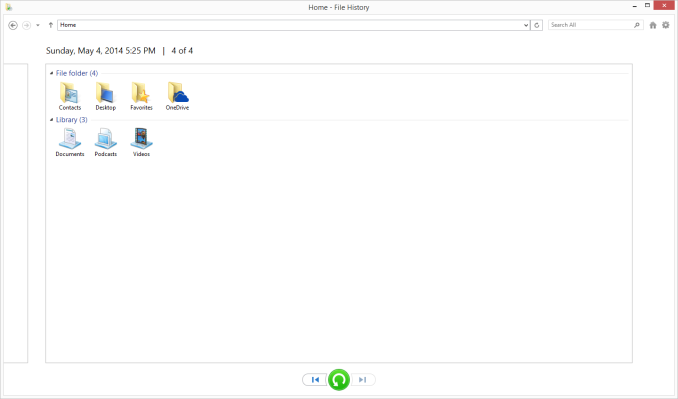
Unlike Windows 7, File History’s interface is all in the control panel. It’s not as elegant as Previous Versions was, where you could right click any file or folder and see a list of all versions, but the interface is fairly straightforward and does show you a list of all of the backups:
- Launch File History by right clicking the Start button and opening the Control Panel. Next expand System and Security and select Restore your files with File History.
- The interface that opens up will be a listing of the locations you are backing up. The most recent backup will be displayed by default. To restore a file, navigate to the folder it was in, select the file by clicking it, and then press the green Restore button to restore it to the original location.
- If you’d like to restore it to a different location, right click the file and choose Restore To and then browse to your path.
- To navigate through your backups, you can use the skip buttons at the bottom of the page. The easiest way to sort though is to navigate to the folder where your file is (or was), and it will display only the backups that have changes in them. If a folder hasn’t been modified since you enabled File History, there will only be one backup for it. This is an easier method than trying to figure out which day you deleted a file.
Overall, File History is a decent built-in utility, but as is often the case, attempts to make the process easier to use often result in a system that is less powerful, and that’s certainly the case with this. Windows 7 lacked network backup for some versions, but overall the Windows 7 backup utility offered more features, especially with the automatic system backup. Previous Versions is also an easier way to find changes made to a file. File History also lacks a method of backing up files outside of your libraries and OneDrive folders which is not ideal by any means. Windows 8.1 forces you to make a system backup manually, and that can be done as so:
- Right click the Start button and open Control Panel. Expand System and Security, and then select Save backup copies of your files with File History which won’t actually be used, but is the shortcut to the System image backup.
- On the File History applet, click on System Image Backup in the bottom left corner.
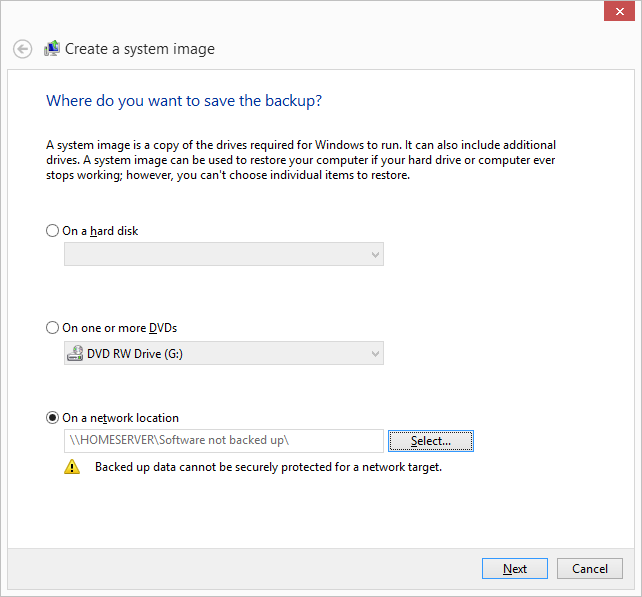
- Choose a location for your backup. If it’s on a network share, you can optionally enter login credentials if required. Click Next.
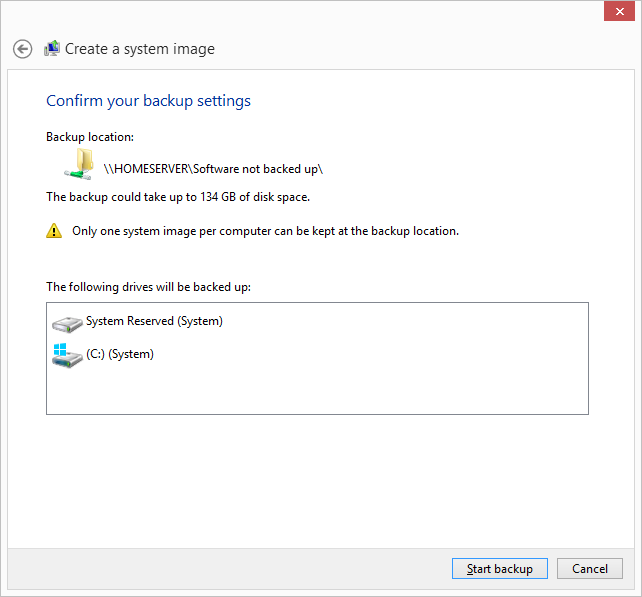
- Now you will be prompted to confirm, and if you are happy click Finish. The confirmation dialog will estimate how much disk space will be required, and warn you that only a single backup file will be kept. In other words, there is no versioning.
If you are using File History as your backup method of choice, you should definitely create at least one system backup to allow you to restore to a new hard drive or machine if necessary. If you ever need to restore this, you can create a recovery drive by choosing the Recovery option in the File History applet. If you don’t have another computer to create this on if needed, it’s a good idea to create one ahead of time.
It is possible to create full scheduled backups, but only from the command line using wbadmin but this is not something I would recommend for the average user.
Built-in Backup Tools - OS X
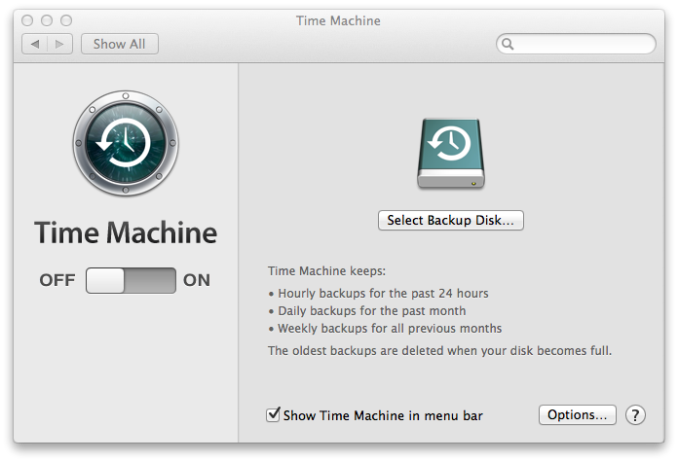
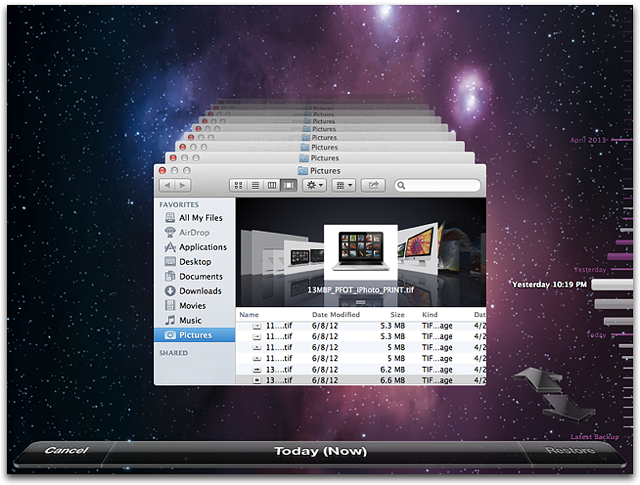
Apple introduced Time Machine back with the Leopard release in 2007. Time Machine is an all-in-one built-in backup utility, allowing both file and image level backups with versioning. Time Machine will back up to internal or external disks, as well as the AirPort Time Capsule which is Apple’s own NAS specifically for backups. You can also back up to another Mac running at least Leopard, and with Mountain Lion Apple added the ability to backup to multiple destinations, with the backups alternating among the backup targets to provide additional levels of redundancy. Officially, Time Machine is not supported on other NAS devices. It does not work natively with Server Message Block (SMB) or Network File System (NFS) shares but instead requires the Apple Filing Protocol (AFP). If you are not going to use an AirPort device, ensure the NAS you select specifically supports Time Machine. Time Machine is simple to use, and yet powerful enough to be an almost complete backup solution for the Mac. Let’s look at how to set it up:
- First you need to configure a backup disk. Ensure you have your backup disk connected, or your AirPort Time Capsule configured, and then open the Time Machine menu from the menu bar by clicking the Time Machine icon and choosing Open Time Machine Preferences…
- On the Time Machine menu, click Select Backup Disk…
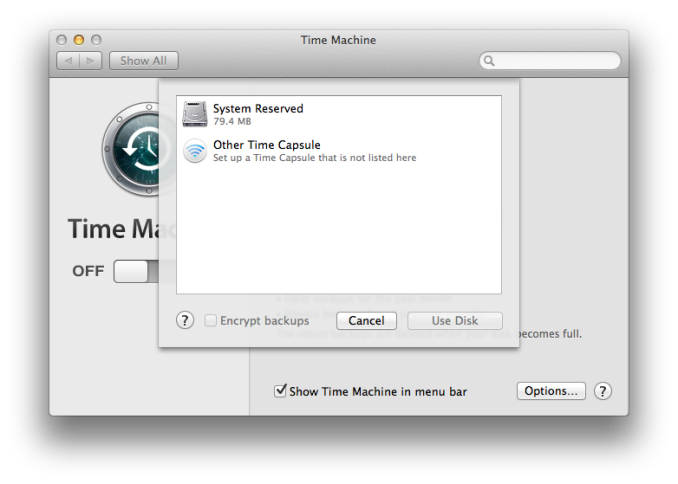
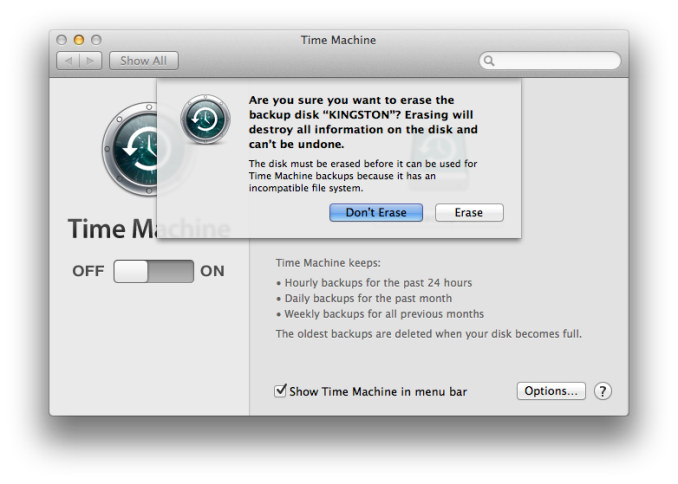
- Here it will display the available backup targets. Choose the backup target you’d like to use, whether it is an attached hard disk or the AirPort Time Capsule and click Use Disk. If the hard disk is not formatted with HFS+, you will be prompted to erase the disk and reformat which will of course delete any data currently on the backup target.
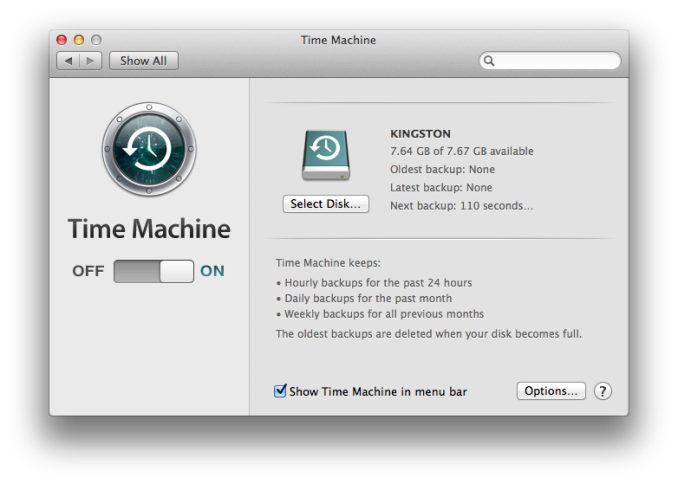
- Now that you’ve selected a disk, Time Machine will automatically start backing up.
Time Machine does a full backup of your system, and then it starts to back up every hour. If the backup target is unavailable it will delay the backup until it is available again. Because only changes are backed up, each successive backup is relatively quick. If you would like to exclude some files from being backed up, click the Options button in the Time Machine menu to add exclusions.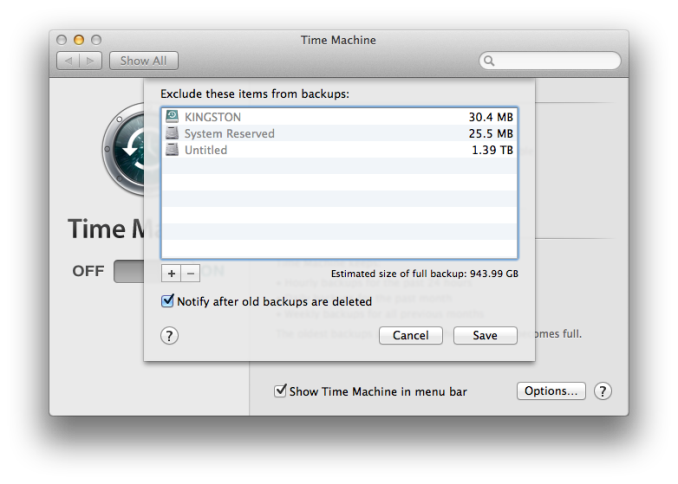
Other advanced options are not available, so there is no way to increase or decrease the frequency of backups or specify how many versions of a file to keep. The program will just back up indefinitely until it fills the available backup target, at which point it begins to delete the oldest files first.
Restoring files is relatively easy as well:
- Navigate to the folder where the file you want to recover should be (example – Documents).
- Click on the Time Machine icon in the menu bar and choose Enter Time Machine.
- This will open the restore interface, which shows a list of all of the previous backups sequentially. Using the arrows allows you to move from one backup to the next, or you can utilize the date bar on the right side which will allow you to move back to a known date. Selecting a backup date will then display the folder exactly as it was during the backup.
- Once you’ve located the file you wish to restore, select the file, and then click Restore. If the file was deleted, it will just be restored, but if the file still exists in its original location, you will be prompted to overwrite the file.
Time Machine can also be used within certain programs such as contacts, and restores operate in the same manner as files.
To restore the entire system to a previous state, hold down the Command and R keys at startup to enter the Recovery mode. In Recovery mode, one of the options is to restore from a Time Machine backup.
Built-in Tools Faults
All of the built-in backup tools are a great method to locally backup your computer. They are all fairly easy to set up and use, but they all have their faults.
The Windows tools are chock full of artificial limitations. Windows 7’s lack of network backups for home versions of the software is a major limitation with the low cost of network storage. Windows 8 fixes that issue, but creates new ones by no longer allowing automated image backups and not allowing backups of any files outside of the libraries and OneDrive folders.
Apple’s Time Machine is likely the best built-in utility of the bunch, but even it has some limitations. There are no advanced options at all, other than to exclude files or folders, so you can’t tailor the backups to work the way you want, and Time Machine, like the built-in utilities from Microsoft, doesn’t offer the more sophisticated abilities of dedicated backup systems. Also, none of the built-in solutions offer the ability to backup a network share, so if you have network storage to allow multiple devices to access your data, you’ll need a 3rd party backup solution.
And most importantly, none of the built-in solutions will perform automatic offsite backups.
Advanced Backup Approaches
If you are just backing up a single PC and your main backup goal is redundancy to recover from a system failure or file deletion, all of the built-in backup tools will do the job. Their main goal is to allow you to get your files back if the machine quits, or a file is overwritten by accident. External hard drives are excellent for this task as well as inexpensive so don’t feel like you are not doing a good enough job if you stop there. Any backup is far better than no backup, and for the majority of instances, local backups to an external hard drive or NAS are all you will need.
There are going to be scenarios though where the built-in backup tools are not enough though. Any local backup is susceptible to a few situations that none of us want to think about, but unfortunately do happen. Theft is probably the most common way to lose your local backups. If your home is broken into, and a shady character steals your PC or laptop, they will also likely take your external hard drive as well. If you are backed up to a NAS, you are probably a bit more safe assuming it’s not in an obvious locations such as running on your computer desk, but there’s no guarantee even with a hidden NAS that it won’t be taken as well. And moving up the list in possible calamities, fire, flood, earthquake, or even a simple power surge can be a way to render your local backups useless.
The solution to losing local backups is also performing off-site backups, and the solution to off-site backups for most users is cloud storage. It’s certainly possible to perform off-site backups without utilizing the cloud, but for most users I would recommend a Hybrid approach with the cloud as the off-site archive.
Hybrid backups combine both local backups, for fast backups and restores, with off-site storage for disaster recovery. There are likely an infinite number of ways to achieve this, so I will go over a couple of different methods. Hybrid backups will be more expensive than choosing one solution or the other, so first we’ll look at just backing up online.
Option 1 - Cloud backup
Cloud backups are solutions which back up your data to a server, or servers on the internet. There are many vendors of online backup solutions now, and all of them offer different price points, redundancy levels, available storage, and other features. Some of them backup to their own services, and others are a portal to allow you to choose your own online storage from services like Amazon S3, Rackspace, Microsoft Azure, and others. Some services offer unlimited backups of one PC, while others tier the pricing to the amount of available backup storage. Several offer the ability to also backup one or more network shares. Some offer the ability to seed your initial backup by sending you an external hard drive which is very handy for scenarios where your upload speed is not very fast, or if you have a large amount of data you’d like to keep safe. Here is a list of several vendors offering their own take on cloud backups:
Of course this list is certainly not exhaustive, with many companies now offering online backup solutions. A quick search in your favorite search engine will provide dozens of options. Be sure to choose the one that works best for you.
Keep in mind that your data may or may not be encrypted at rest with online backup solutions depending on the provider. If you are backing up business data to the cloud, be sure to verify the terms and SLA of the service for legal reasons. For personal data, it is unlikely there will be any legal ramifications to storing family photos in the cloud, but for privacy reasons, be sure to read over the terms carefully.
Pros of Cloud Backup:
- Increased protection from loss of personal property due to theft or natural disaster.
- Ability to get to your backups from any internet connected PC.
Cons of Cloud Backup:
- Can be slow to create the initial backup.
- Backing up many large files may require a faster internet connection.
- Unable to backup and restore system images quickly.
- File restores for major file loss much slower than local backups.
- Recurring costs of online storage.
- May be limits on file sizes that can be backed up, or have total backup size limitations.
Let's take a look at one of the more popular cloud backup solutions to see what it offers: Crashplan
Crashplan is a cloud solution with a lot of good qualities. The free version allows you to use it as your local backup to a locally attached drive (no supported backups to NAS), as well as backup to other computers running Crashplan – even if they are somewhere else on the internet. Crashplan also has clients for Windows, OS X, and Linux which is excellent.
The free version allows one backup per day, but you can choose the files you want to backup from anything local on the PC including external drives.
The paid version increases the backup frequency from daily to every minute if you choose, to give you more protection and versioning as you are working on your files. Also, you gain access to the Crashplan cloud storage with unlimited space, and they also have a family tier to allow backups of 2-10 computers. You can also seed the data to the cloud with the paid version.
Crashplan doesn’t do any sort of image based backups though, so it doesn’t outright replace the built-in backup utilities. Having a known good system image is always useful. It can’t backup to a NAS, nor can it backup shared folders on a NAS. You also can’t choose your cloud storage provider with Crashplan like some of the others, so if you’d rather buy your storage from Amazon S3 or Azure, this isn’t the product for you.
Option 2 - Built-in+
I’ll call this method Built-in+ because it leverages the built-in backup utilities we’ve already discussed to perform the local backup. The default backup clients have some advantages especially with the cost to implement, so it’s a good starting point.
Simply add a cloud backup service in addition to the built-in backup tools, and you’ve now got a hybrid approach. This will likely be the most cost effective way of achieving a hybrid backup.
This method of backing up your files should cover you for pretty much any scenario.
Pros of Built-in+
- Local backups for fast recovery.
- Off-site backups for Disaster Recovery.
- Inexpensive.
- Ease of use of built-in backups combined with off-site storage.
- Ability to backup and restore system images quickly.
Cons of Built-in+
- Two backup systems are not integrated.
- Built-in backup utilities are not full featured.
- Recurring costs of online storage.
- Windows 8 does not do automated system image backups.
Option 3 - NAS Backup
We’ve discussed backing up one or more of your PCs using the built in software to a NAS. It’s a great option because network storage is relatively inexpensive now, with two bay devices for home use less than $200 including drives.
But what if you are using your NAS as more than a backup target? Network shares are extremely useful in any scenario, with the ability to access your data from multiple devices on your network, as well as offering large amounts of storage that many modern computers lack due to the surge in SSD equipped devices. Many NAS vendors offer additional services and plugins for their devices to allow them to perform many tasks. The data on your NAS is likely just as important as the data on your PC or Mac, so you need to treat it the same way and back it up.
One way that a NAS can protect itself from data loss is with RAID. We’ve already discussed how RAID is not a form of backup at all though, and is just a form of redundancy. You can’t use RAID as a backup. That doesn’t mean it’s not useful, it just has a different purpose which is to keep the unit operating if you lose a hard disk. It doesn’t protect against file deletion, file overwriting, or data corruption from a system issue or even a virus.
If I was using any two bay NAS for important data, I would certainly use it in RAID 1 rather than RAID 0 or JBOD (Just a bunch of disks which appear as a single pool), but never trust it as a backup.
I think I’ve stressed that enough, so it’s time to look at solutions to backing up a NAS.
Luckily, the concepts are exactly the same as backing up a PC or Mac, but unfortunately every NAS vendor will have their own version of backup with unique features and limitations. I can’t go into specifics for each model out there, but this is a general overview.
Some NAS devices will allow local backups to an external hard drive or even another NAS. Depending on the model, they may have a backup GUI, or they may rely on a file copy job using rsync or similar file copy tools. This is your local backup option.
You can even have a multi-bay NAS backup to itself by not implementing RAID and creating separate shares on each disk, with one as a backup for the other.
Offsite storage in addition to local backups is an even better solution, just like with your PC or Mac. Most NAS vendors now offer support for some type of cloud based storage. Your choices will be much more limited than with a full computer, but there should be a choice. Here are some links to popular NAS brands and their backup offerings:
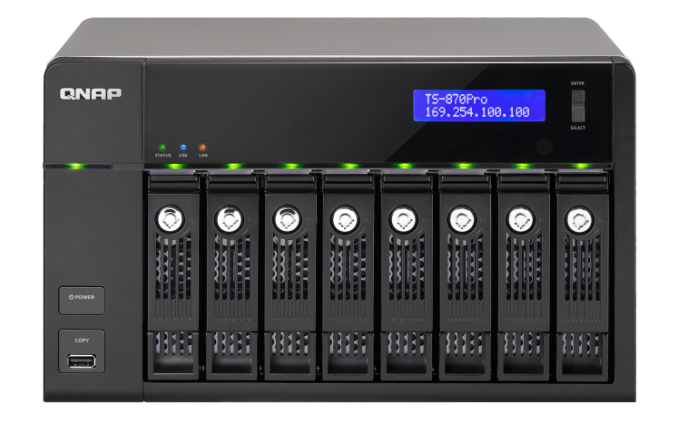
QNAP: http://www.qnap.com/en/index.php?lang=en&sn=1844
Synology: http://www.synology.com/en-global/dsm/app_packages/Backup
Netgear: http://www.readynas.com/?page_id=942/
Asustor: http://www.asustor.com/admv2?lan=en&type=2&subject=4&sub=13&lan=en#content
Thecus: http://www.thecus.com/media_news_page.php?NEWS_ID=4447
Buffalo: http://www.buffalotech.com/resource-center/nas-system (note - no cloud backup listed)
Western Digital: http://www.wdc.com/en/products/products.aspx?id=1200
As always, depending on your personal needs and budget your backup can be either local, cloud, or a hybrid approach utilizing both local and cloud backups. With a NAS in RAID 1, you may feel more comfortable not having the local backup and just going with a cloud backup because the risk of losing the entire system due to a drive failure is lower, or you may opt to just go with local backups due to the need for fast recovery or if you have a very large amount of data to protect which may get cost prohibitive if backing up to the cloud. The best option is always the hybrid option, but it may not be attainable for all people.
Complete Backup Solutions
To this point, we have gone over performing backups with an emphasis on the built-in backup tools available, with a smattering of third party solutions to get us to the cloud. Any of the previous solutions are a great way to back up your data, but maybe you want a more comprehensive solution. Luckily there are many great products available which will do:
- Image based backups with incremental images.
- File level backups, or file restores from images.
- Backup to local and cloud/offsite.
- Deduplication of data to reduce the amount of backup storage required.
- More management of the backups, what is backed up, what is saved offsite.
- Some offer plugins for backup of apps like SQL, and virtual machine backups.
- Some offer continuous backups rather than scheduled backups, for a better RPO.
- Some offer centralized backups if you have multiple PCs.
- Some offer PC migration to new hardware.
Here are some examples of complete backup solutions. This list is not exhaustive, and if you’d like to see more your favorite search engine should be able to help you out.
Acronis True Image: http://www.acronis.com/en-us/personal/
Symantec System Recovery: http://buy.symantec.com/estore/clp/productdetails/pk/system-recovery-desktop-edition
NovaBACKUP: http://www.novastor.com/en/software/windows-backup
Paragon: http://www.paragon-software.com/home/br-free/features.html
Windows Server Essentials 2012 R2: http://www.microsoft.com/en-us/server-cloud/products/windows-server-2012-r2-essentials/default.aspx#fbid=Q3KT90t4jky
All of these solutions offer advanced functionality over the built-in backup tools, at an additional cost of course. We’ll go over a couple of them below. Unfortunately I was unable to find any Mac backup products that I would consider a complete solution. Most either supplemented Time Machine with online backup, or did advanced backups but locally only. I didn’t find any Mac backups that would do system backups, file backups, and cloud backups all in one product. If you are running a Mac and want protection I would recommend Time Machine plus one of the online backups such as CrashPlan to cover the offsite cloud storage.
Acronis True Image
Acronis True Image will be our example program for a complete backup solution. Once installed, it will provide complete image based backups which are saved to a tib file. The image based backup calculates a checksum value for data blocks on the disk itself rather than looking at the file level. The checksum will be used for both deduplication – any duplicate checksum values can be saved just once - as well as verification of the backup integrity.
True Image leverages a system function that has been a part of Windows since XP/2003 called Volume Shadow Copy Service which allows snapshots of the disk volume. Snapshots can be used to backup all files – even files that are currently open – which makes this the best way to perform a backup since all files will be presented to the backup software. It’s actually the same process that the Windows 7 Backup and Restore utility uses.
Once the initial image based backup is completed, Acronis True Image is able to perform incremental or differential backups going forward, depending on what the user chooses. It can also leverage these block level backups to perform single file restores, lowering backup storage requirements over any of the built-in backup utilities.
The software can backup to all of the usual backup targets – USB drive and network shares, but also offers the ability to backup to a FTP server, so with some configuration you could do a sort of private cloud backup to get your data offsite assuming you have somewhere offsite to run a FTP server that you trust. I wouldn’t really recommend this since the FTP service has a lot of limitations, with one very large limitation of not allowing secure file transfers, so your data would not be encrypted during transit. This leaves you with only trusting it for a LAN connection, and in that case you are much better off using a shared folder.
Finally Acronis also includes an online backup storage location. Like some of the other cloud backups, it’s a proprietary backup location with Acronis so you can’t choose other online storage, but the online backup does allow you to backup entire disk images if you would like. Since that is overkill for most of us, it also allows file backups only to keep the storage costs down.
So Acronis does everything in one package – image level backups, file level backups, and online backups, plus offers extra features such as deduplication, the ability to image your backup to an entirely different PC (with the Premium version of the software), and a backup schedule as low as five minutes between backups.
This is great for a single PC, but what if you have several PCs in your home, or if you run a small business? Don’t worry – there are solutions for that too.
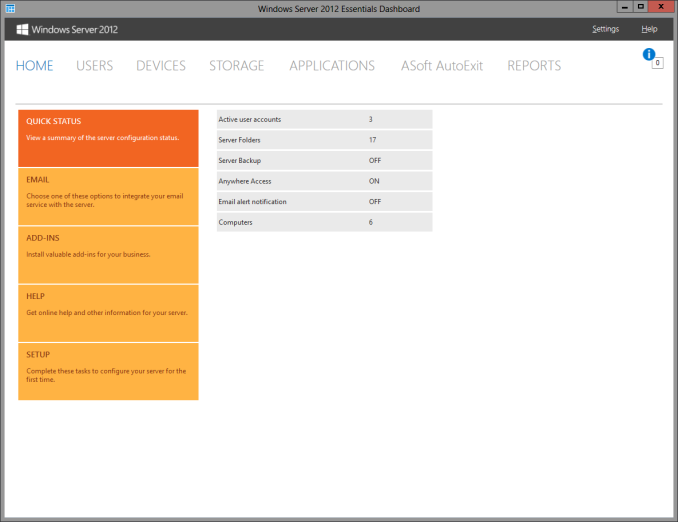
Windows Server Essentials 2012 R2
This may seems like a stretch. Every other backup solution so far has been fairly inexpensive, and geared towards being simple to use for the average PC user, which is of course the idea. There are people though with requirements to backup many machines at home, or in a small business environment. Windows Server Essentials offers a lot in the way of data protection, so I’d be remiss to not mention it in a discussion of backups.
Moving up to a low end server running Windows Server Essentials offers:
- Storage Spaces: low-cost, flexible, resilient, and dynamically expandable data volumes.
- Server Folders: SMB shares for file storage with access lists for file rights.
- User and Groups management: ability to easily add users and manage group membership.
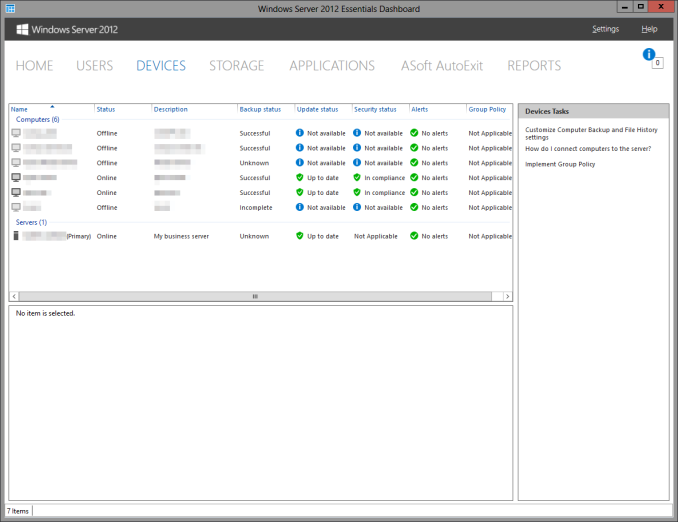
- Client Computer backups: Connect computers to the server to allow backups of entire client machines.
- Windows Server Backup: Utilities to backup the entire server locally to another Storage Space, NAS, or external drives. This also enables the Previous Versions file recovery mechanism for network shares for Windows 7 and 8 clients.
- File History backups: automatically backup using File History on Windows 8+ machines.
- Azure backup: offsite backup to the cloud.
All of these features are excellent, but it’s the Client Computer Backups that we are going to focus in on. The computer backups provided by Windows Server Essentials are top notch. Once the connector software is installed, the client will perform image based backups at the scheduled times. After the initial backup, subsequent backups for the machine are incremental, and quick. The backup allows you to restore to bare metal using a bootable USB drive to launch WinPE (Windows Preinstallation Environment) which is a small version of Windows which is leveraged to connect to the server, and pull down the image. Image restores can be to any previous backup, since all backups are of the entire machine.
File level restores are accomplished by the server mounting the image, and displaying the file system at the point in time selected allowing you to restore the file.
It’s easy, it’s fast, and it’s centrally managed, which is a blessing when managing more than a couple of computers. And since it’s running a full OS, you can use any software you’d like to perform the offsite backups. The Azure backup is available from Microsoft, but if you’d rather backup to another cloud storage such as Amazon S3, you can use another service such as JungleDisk or Cloudberry.
Although this product is more expensive than all of the rest listed, it’s still not hugely expensive and would be a solid investment for any small business with 25 employees or less.
Consumer Cloud
You’ve made it this far and you’re thinking “but what about Google Drive/OneDrive/Dropbox/etc?”
Consumer Cloud as I’ll call it is changing the way we store data. Everyone now has access to cloud storage, and often quite a bit of storage for free. Is this not a backup?
The answer is – maybe.
Consumer Cloud is less about backup, and more about synchronization. The goal is to keep all of your files available on all of your devices. It’s not really a true backup. For instance, if I delete a file from OneDrive on the web, the next time my PC syncs up with OneDrive it also deletes the local copy. If you were using your cloud storage as backup, you may be in trouble. Luckily in the case of OneDrive, it has a recycle bin feature which allows the restore of any deleted files, but only for a maximum of thirty days.
Google Drive includes versioning, and again keeps a history for 30 days. But if a file is deleted and no longer in the Trash folder, it’s gone.
Dropbox also has versioning, so you can go back to the previous version or restore any file for thirty days as well, and optionally with the Packrat feature added on allows unlimited versioning and deletion recovery. Packrat is only available with Dropbox Pro, and is an additional $3.99/month or $39 per year on top of the Pro pricing.
| Consumer Cloud Offerings | ||||||
| OneDrive | Google Drive | iCloud | DropBox | Box | Amazon Cloud Drive | |
| Free Storage | 7 GB | 15 GB | 5 GB | 2 GB | 10 GB | 5 GB |
| Paid Storage (USD/year) |
50 GB - $25 100 GB / $50 200 GB / $100 |
100 GB - $24 1 TB / $120 10 TB / $1200 20 TB / $2400 30 TB / $3600 |
10 GB / $20 20 GB / $40 50 GB / $100 |
100 GB / $99 200 GB / $199 500 GB / $499 |
100 GB / $120 |
20 GB / $10 50 GB / $25 100 GB / $50 200 GB / $100 500 GB / $250 1 TB / $500 |
| Versioning | Office files (30 days) | Yes (30 days) | No |
Yes (30 days) Unlimited with PackRat addon |
No (Personal Tier) | No |
| File Restore | Yes (30 days) | Yes (30 days) | No |
Yes (30 days) Unlimited with PackRat addon |
Yes (30 days) | Yes |
| Operating System Support |
Windows OS X Android iOS Xbox Windows Phone |
Windows OS X Chrome OS Android iOS |
Windows OS X iOS |
Windows OS X Linux Android iOS BlackBerry Kindle Fire |
Windows OS X Android iOS Windows Phone BlackBerry |
Windows OS X Android iOS Kindle Fire |
So other than Dropbox with the PackRat addlon, which frankly is too expensive, Consumer Cloud is not as good as a dedicated backup system, though it is miles better than no backup at all. With Consumer Cloud, you lose control over the retention period for your files, and thirty days is not a huge window. If paired with a local backup using the built-in utilities, it could work very well. Just be sure that you sync your entire cloud folder to your PC that is performing the backups to gain a local backup of your cloud drive. Also, you have to make sure that you actually store all of your files in these cloud drives in order to get the offsite storage.
What I Do
Hopefully by now, you’ve given backup a good amount of thought. Maybe you already do some local backups, or subscribe to a cloud backup service; but what about how I backup my devices? In the interests of not looking like a hypocrite, it's likely best to detail what I currently use:
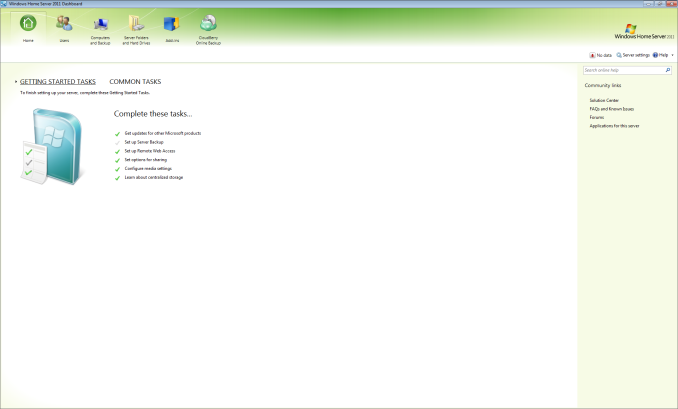
Right now in our household, we have a desktop, two laptops, and a HTPC. To backup and manage all of these devices, I have invested in a home server which is running the now defunct Windows Home Server 2011 operating system.
WHS 2011 offers many of the same features as Windows Server Essentials 2012, but at a much lower price point. Though missing some of the new functionality such as Storage Spaces, it still has Server Backup, Server folders, and Client Computer backup.
My home server is a HP MediaSmart EX485 – a lowly single core Celeron with 2 GB of RAM. Though it has four drive bays, I’m currently only using two of them. Two WD Black 2 TB drives provide the storage, which is plenty for me. One drive has the OS partition (60 GB), and the share partition (1800 GB) and the second drive is for Server Backup.
We utilize the server shares for our data – documents, pictures, music, videos, and general file storage.
The Server Backup feature does a complete backup of everything on the server to the backup drive. If the main drive were ever to fail, the secondary drive has a copy of everything.
The WHS connector program is installed on all client computers which allows them to be backed up with the Client Computer Backup which is the same incremental image based backup system as Windows Server Essentials 2012.
For offsite storage of important data, I use the Cloudberry plugin for WHS 2011 which then backs up folders I have selected to Amazon S3 Reduced Redundancy Storage. My S3 storage is right now sitting at around 120 GB.
The initial setup cost was higher than a run of the mill NAS, but at the time it wasn’t significantly higher than a four bay NAS. Ongoing costs are very low, with my S3 account being billed around $2.50 per month with the recent S3 price cuts.
It’s a great solution, and the Client Computer Backups have saved me several times already with the loss of a drive in my HTPC and our Alienware laptop being wiped by Dell when it was sent in for a screen replacement.
Oh yeah – it’s also a fantastic file server. I regularly hit 900+ Mbps transfer speeds over my wired LAN.
Final Words
Backups are important. If you were ever to have a catastrophic system failure, or your laptop bag was stolen from your car, any amount of time and money you spend setting up some form of backup will pay for itself hundreds of times over. We all store an amazing amount of our lives in digital form now, and you don’t want to be “that person” who loses everything they have saved over the years.
Take the time now to set up a backup. Here is a summary of the recommended backups for different scenarios:
Single PC or Mac:
Good: Backup to USB hard drive using built-in utilities.
Better: Backup to cloud.
Best: Backup to USB hard drive and cloud for Hybrid Backup.
Multiple PCs or Macs:
Good: Backup to NAS using built-in utilities.
Better: Backup to NAS, then use NAS utilities to backup NAS to cloud.
Best: Centralized backup tool such as Windows Server 2012 Essentials.
NAS Storage:
Good: Backup NAS to internal or external drive.
Better: Backup NAS to cloud storage.
Best: Backup NAS to internal or external drive, and cloud storage.
Consumer Cloud:
Good: Use cloud storage as the default save location for all important files.
Best: Ensure entire cloud drive is synced with PC, then perform PC backups on the cloud data.
Hopefully you are already backing up your data, but if not, then the next best thing would be to have this discussion urge you towards adding a backup system to protect your files.
If you have a backup system that works great for you, sound off in the comments to let others know!

