Original Link: https://www.anandtech.com/show/7426/evga-x79-dark-review
EVGA X79 Dark Review
by Ian Cutress on October 23, 2013 10:00 AM EST- Posted in
- Intel
- Motherboards
- EVGA
- X79
Investing into the high performance Intel arena can be expensive. Alongside that $330/$580/$1050 CPU (or more for Xeons) there has to be a motherboard up to the task. X79 motherboards run from ~$200 to ~$400, with a couple of models above that, potentially doubling the price of the setup before a case/memory/storage or GPUs are considered. Today we are looking at the EVGA X79 Dark which sits near the top of this price range at $400.
EVGA X79 Dark Overview
In the world of the motherboard review, aside from the hardware present on the board itself, the main differentiator is the BIOS. The BIOS dictates everything, from performance to idle states and how much the CPU decides to Turbo. A nice BIOS can be a pleasure to work with – the user experience of the BIOS can make it easy to overclock or show simple features (like fan speeds or Load Line Calibration) to enhance functionality. A bad BIOS can be a nightmare, when features are not programmed properly or disabling one component causes another to malfunction. A BIOS is always just ones and zeroes, and it is up to the company who manufacturer the motherboard to get the BIOS to work first time, even on the simple stuff.
As most motherboard manufacturers are prone to BIOS updates, motherboard reviews are often easier to consider as a ‘snapshot’ in time as to where the product performs. If a week after review a BIOS is released that improves performance, then that arguably could discount that review’s benchmarks. However the ecosystem is such that most motherboard BIOSes (from the big four) are mature enough by the time reviewers get their hands on them – most updates are to push weaker spots into more regular territory.
So here is where EVGA come in. Being one of the few manufacturers still on the old black/blue/white BIOS systems, the X79 Dark ushers in their new graphical BIOS. The size of EVGA means that they have fewer BIOS engineers than other manufacturers, hence the limited number of motherboards and delays in bringing a graphical UEFI to market. The BIOS is a lot more thought-out that previous EVGA iterations, but my everlasting memory of the X79 Dark will be BIOS issues.

Over the course of this review, we tested five (maybe even six) different BIOSes. The initial problem with the motherboard was that it was not implementing Intel’s turbo mode. The i7-4960X processor we were using for review was ‘stuck’ at its lowest turbo bin: 3.7 GHz. The BIOS does offer an option to set in the per-core turbo multipliers, but this did not work either. EVGA sent us BIOS version 2.04, 2.04 beta and 2.05 over the course of a couple of weeks, all of which did not fix the issue. In fact BIOS 2.05 was a slight regression – XMP no longer seemed to function as it decided to push the normal 10-12-12 timings to 9-11-11. Manually adjusting them allowed the system to boot, but was unstable. The latest BIOS delivered to us, 2.05beta, did implement Intel’s turbo properly (after requiring a BIOS reset and going into the BIOS to implement the defaults by the selecting the option rather than the one-button F5/F7 which I commonly use). But XMP was still broken, and to cap it all off, the system refused to implement any sort of overclock on the CPU. Overclocking on 2.03/2.04 was working fine, but 2.05beta was a dud.
Arguably BIOS 2.04 was fine for anyone wanting to overclock. Our out-of-the box testing (and allowances to EVGA to fix the issue) is a pledge to get the basic standards of QA and QC up for those who buy a motherboard but do not touch the BIOS. But on this 2.04 BIOS, in our snapshot of a review, the stock performance is down on other X79 motherboards. Using 2.05beta for the proper turbo is a little devious as XMP was unstable for any sustained load such as gaming. Then there is MultiCore Turbo, which other motherboards are using to put the top turbo bin at any load through the CPU. For the sake of this review, we have three sets of numbers for our CPU tests:
- BIOS 2.03, where the BIOS has the CPU at 3.7 GHz and XMP enabled
- BIOS 2.03 @ 4.0 GHz, to show where an MCT motherboard would lie
- BIOS 2.05 @ Intel defined turbo modes, XMP enabled but unstable for 3D
The GPU tests are shown as a result of BIOS 2.03 at 3.7 GHz.
Aside from the BIOS issues encountered, EVGA have gone in at the high end for the X79 Dark. In true EVGA style, all the extras in the box are individually wrapped, and the board itself has a PCIe layout conducive to two, three and four way GPU layouts (also five single slot cards, if you want compute). Alongside the 8 DIMM slots there are two Intel NICs (82579 + 82574), six USB 3.0 ports (ASMedia ASM1042) and four additional SATA 6 Gbps ports (Marvell 9230) giving ten SATA ports in total. EVGA offer a tri-BIOS solution, mainly for overclockers who have preferred BIOSes, and one of these BIOSes is removable from the motherboard. In another nod to overclocking, we have PCIe disable switches and EVGA peripheral connectors. On the software side of the equation, EVGA have two to speak of – the wallpapers and ELEET which offers an attempt at overclocking combined with a CPU recognition software.
The issue for the EVGA X79 Dark is the ASUS Rampage IV Extreme. Priced in the same bracket ($400-430), we awarded the RIVE our second highest award and offers a lot of bang-for-buck, despite being over $400, with a long stream of software and BIOS utilities that work out of the box. While the X79 Dark, when overclocked, seems a more than capable product, there are other motherboards out there in this price range that have a lot more reach and without the BIOS issues just getting the CPU to run at stock followed by XMP being broken. Other websites have praised the X79 Dark, but I find a lack of quality control in BIOS updates being a potentially fatal flaw. Frustratingly enough, it is not the first time we have had this issue with an EVGA motherboard.
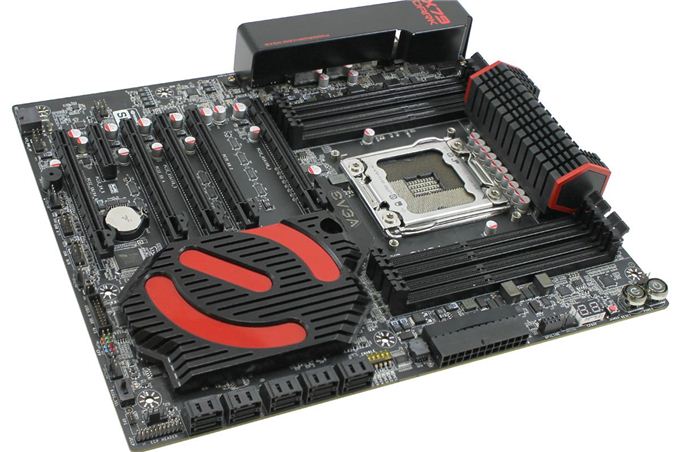
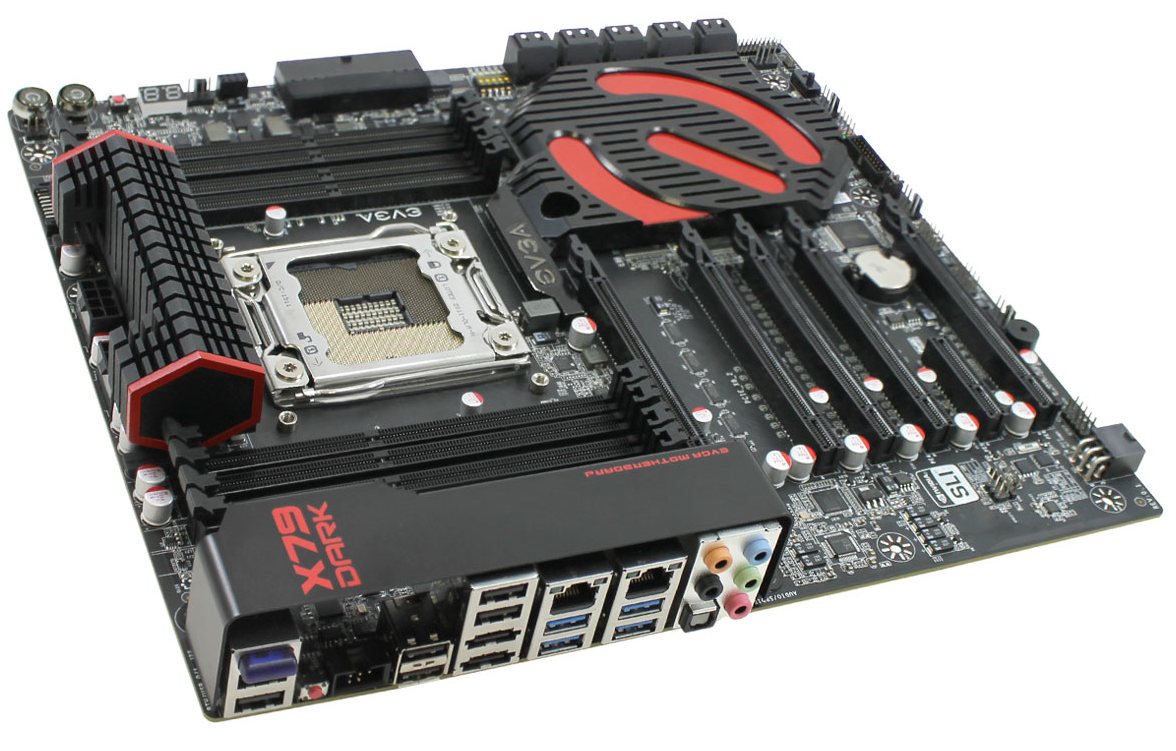
Visual Inspection
The EVGA X79 Dark comes in at the E-ATX standard, meaning an extra inch in width overall. As EVGA tends to use a right-angled 24-pin ATX power connector on the motherboard, this means that the X79 Dark is more suited to users with big cases. To go along with the Dark name, EVGA have gone into an all-black mode on the livery, with red accents and a big red E from EVGA on the chipset heatsink.
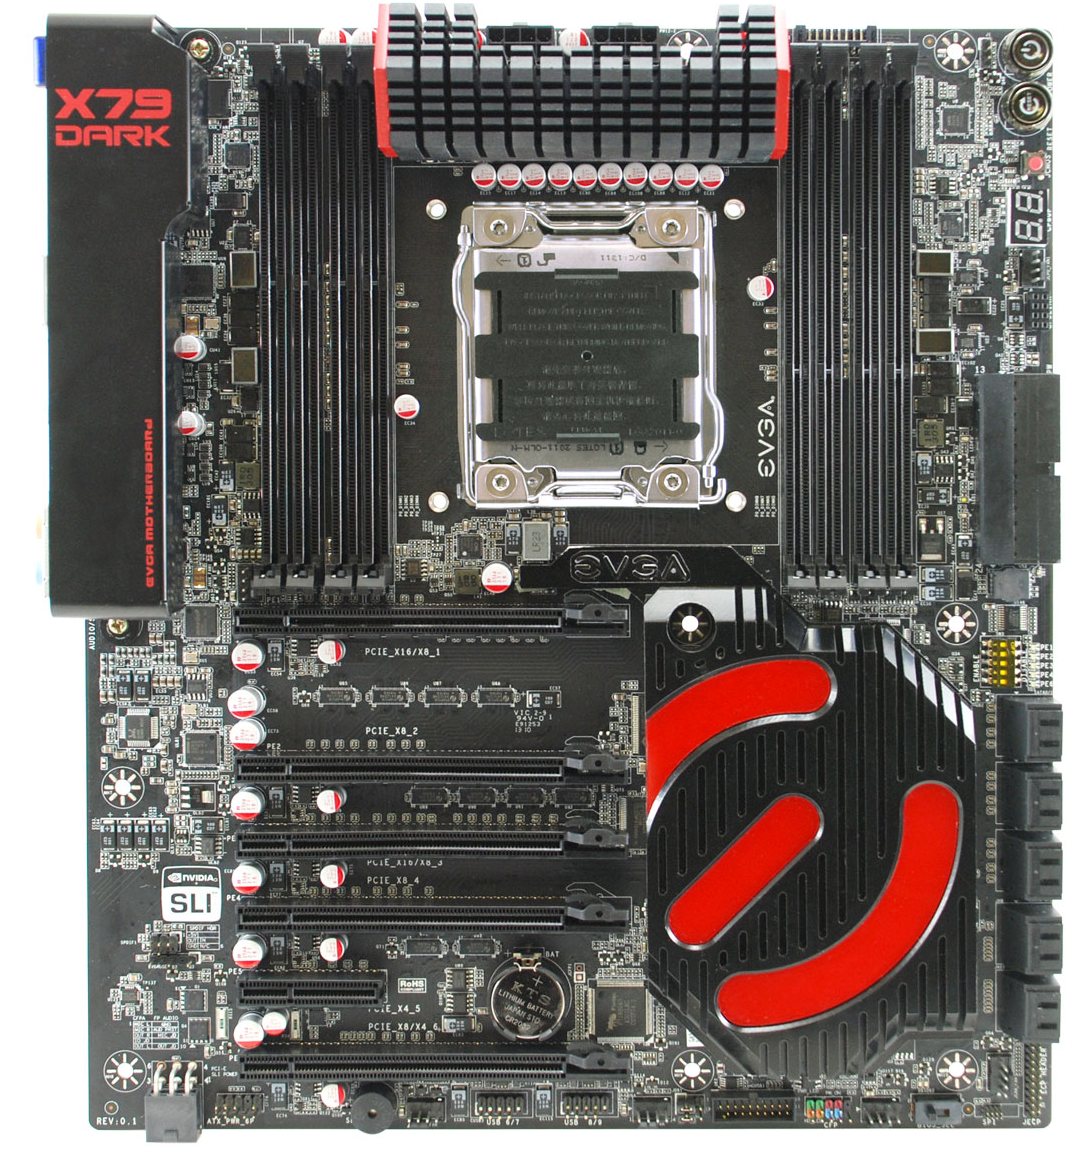
The power delivery is limited to above the socket where we get two 8-pin CPU power connectors hidden in the back. The eight DRAM slots surrounding the CPU socket use the single latch system, a common feature on high end boards that have the first PCIe slot at the top of the arrangement. It is worth noting that the CPU socket area is relatively clean of extra components – one of the purposes of the X79 Dark is for extreme overclockers that insulate the socket area from moisture. To that effect, the X79 Dark has a couple of high ranking benchmark scores [1, 2].
The motherboard has six fan headers, but only two of which are within reach of the socket. The CPU 4-pin fan header is in an odd place on the right hand side of the board (below the two-digit debug) and another header is to the left of the socket near the first PCIe slot. The other four headers are along the bottom of the board, and are all four-pin.
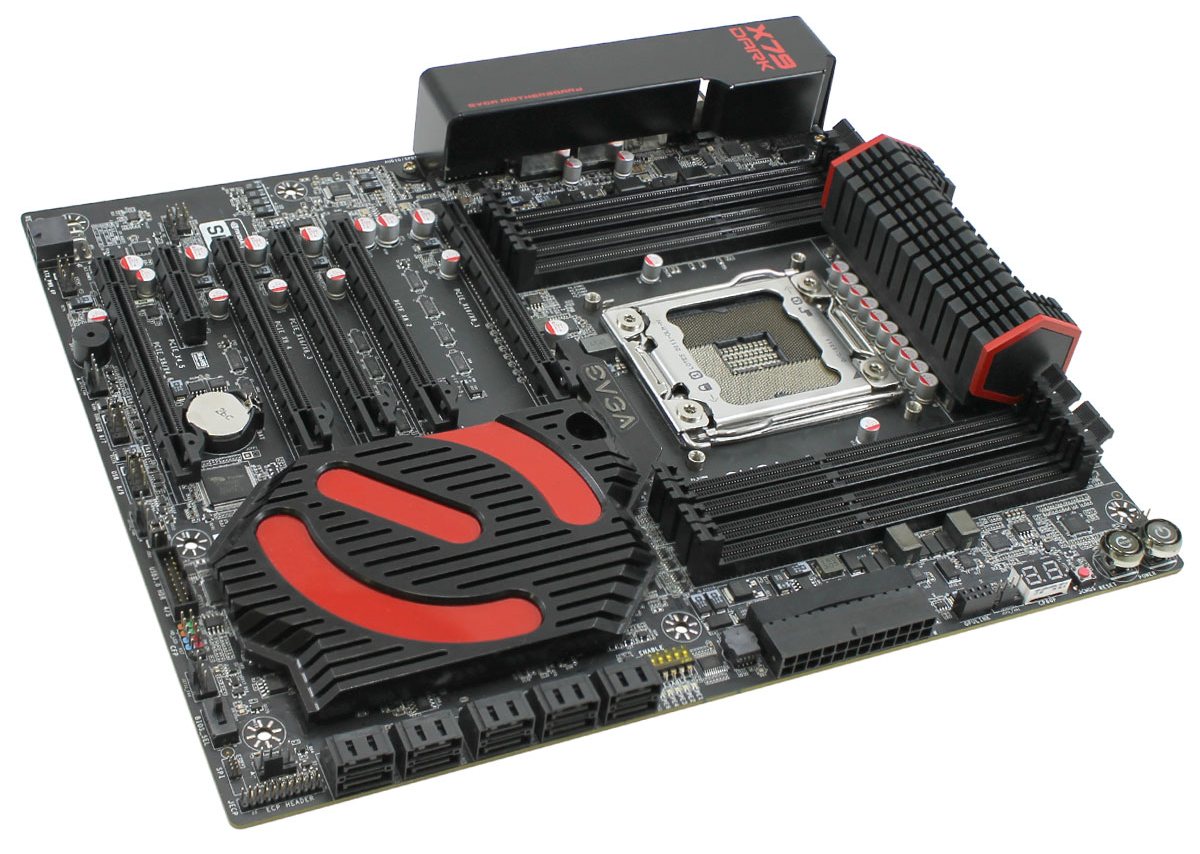
Along the right hand side of the motherboard we get the power/reset switches along with a smaller ClearCMOS switch (I always prefer the latter to be different so they are not pressed accidentally) and the two-digit debug LED. Following the 4-pin CPU fan header and a GPULINK header, the 24-pin ATX connector is found at right angles to the board. EVGA do this such that cables are not in the way of the large EVGA GPUs that come to market – it does mean however that users typically have to invest in a slightly longer case to accommodate. Given that this motherboard is already E-ATX, this further compounds the requirement. Beneath this is a removable BIOS chip and the PCIe disable switches.
While the X79 chipset comes with two SATA 6 Gbps and four SATA 3 Gbps, technically there are a further six SATA/SAS ports with the chipset that Intel request are not used due to compatibility issues at launch (despite at least one board using them). Fast forward onto the refresh and there are no silicon updates, meaning those six ports are still ‘disabled at request by Intel’, and motherboard manufacturers have to use SATA controllers instead. On the EVGA X79 we get a Marvell 9230 controller giving four SATA 6 Gbps ports. Due to the ‘X79 Dark’ naming all the SATA ports are colored black, whereas I typically prefer color indicators as to which ports are which. Next to the SATA ports is the large chipset heatsink, covering the chipset as well as a couple of controllers. The heatsink uses a red ‘E’ motif from EVGA, but this does not light up (which would look pretty cool).
On the bottom of the board are the USB 2.0 and USB 3.0 headers, the latter coming from an ASMedia ASM1042 controller. EVGA equips their boards with a built in speaker (makes noises on POST), and we also get four fan headers, a triple BIOS selector switch and our front panel headers. Thankfully EVGA use a 6-pin power connector for additional VGA power, although this connector at right angles does require a longer case than 7 slots to operate.
The PCIe layout is a little odd compared to most X79 boards. Typically we see PCIe slots share lanes with the slot underneath, but EVGA have turned it a bit upside down in order to accommodate tri-slot cards or three-way setups. Thus:
| PCIe 1 | PCIe 2 | PCIe 3 | PCIe 4 | PCIe 5 | PCIe 6 | |
| 1 GPU | X16 | |||||
| 2 GPU | X16 | X16 | ||||
| 3 GPU | X16 | X16 | X8 | |||
| 4 GPU | X8 | X8 | X8 | X8 | ||
| 5 Cards | X8 | X8 | X8 | X8 | X8 | |
| 6 Cards | X8 | X8 | X8 | X8 | X4 | X4 |
Actually this makes the EVGA board one of a only a handful that supports three-way triple slot GPUs. Unfortunately I did not have a full set to test, however we do get three-way dual slot for the gaming tests later in the review.
The rear IO panel has the optional protector guard as seen in the image above, and is there to remove the shiny silver from the rear IO in a case. The rear IO itself has an amount of wasted space, due to EVGA deciding to place the ClearCMOS button, EV-bot header and two USB 2.0 ports with nothing above them. We also get another four USB 2.0 ports, a BT 4.0 module, two eSATA, four USB 3.0, two Intel NICs and audio jacks from the ALC898.
Board Features
| EVGA X79 Dark | |
| Price | Link |
| Size | E-ATX |
| CPU Interface | LGA-2011 |
| Chipset | Intel X79 |
| Memory Slots |
Eight DDR3 DIMM slots supporting up to 64 GB Up to Dual Channel, 1333-2400+ MHz |
| Video Outputs | None |
| Onboard LAN |
Intel 82579 Intel 82574 |
| Onboard Audio | Realtek ALC898 |
| Expansion Slots |
5 x PCIe 3.0 x16 - x16, - x16/x16, - x16/x16/x8, - x8/x8/x8/x8 - x8/x8/x8/x8/x8 1 x PCIe 2.0 x4 (from PCH) |
| Onboard SATA/RAID |
4 x SATA 3 Gbps (PCH), RAID 0, 1, 5, 10 2 x SATA 6 Gbps (PCH), RAID 0, 1, 5, 10 4 x SATA 6 Gbps (Marvell 9230), RAID 0, 1 2 x eSATA 3 Gbps (Marvell 9172), RAID 0, 1 |
| USB 3.0 |
6 x USB 3.0 (ASMedia ASM1042) [1 header, 4 back panel] 10 x USB 2.0 (PCH) [6 back panel, 2 header] |
| Onboard |
6 x SATA 6 Gbps 4 x SATA 3 Gbps 1 x USB 3.0 Header 2 x USB 2.0 Headers Three-way BIOS Switch Power/Reset/Clear CMOS buttons 6 x Fan Headers PCIe Disable Switches Front Audio Header SPDIF Header EV-Gauge Header Front Panel Header |
| Power Connectors |
1 x 24-pin ATX Power Connector (at 90º) 2 x 8-pin CPU Power Connectors 1 x 6-pin PCIe Power Connector |
| Fan Headers |
1 x CPU (4-pin) 4 x SYS (4-pin) 1 x CHA (4-pin) |
| IO Panel |
6 x USB 2.0 4 x USB 3.0 (ASMedia ASM1042) 2 x eSATA 3 Gbps Clear CMOS Button EVBot Header Intel 82579 Intel 82574 Audio Jacks |
| Warranty Period | 3 Years direct with EVGA |
| Product Page | Link |
Users shelling out $400 on an X79 gaming motherboard might expect a bit more than a Realtek ALC898 onboard, perhaps something from Creative or the run of ALC1150 codecs in the Z87 space might have been interesting.
Personally I would prefer more fan headers around the CPU socket rather than at the bottom of the motherboard, but EVGA have filled out the USB and SATA ports to sufficient numbers for this price bracket. All arrows point towards the comparison with the ASUS Rampage IV Extreme, which offers more overclocking tools out of the box.
EVGA X79 Dark BIOS
With the X79 refresh, EVGA are keen to promote their new graphical UEFI BIOS. While being one of the last to jump onto the technology, EVGA have undoubtedly had time to work on and perfect the presentation. As the main audiences for EVGA boards are gamers and enthusiasts, the BIOS should reflect one that both would use. With the current trend of graphical UEFI BIOSes and requests from users, EVGA starts off with a main screen of information:
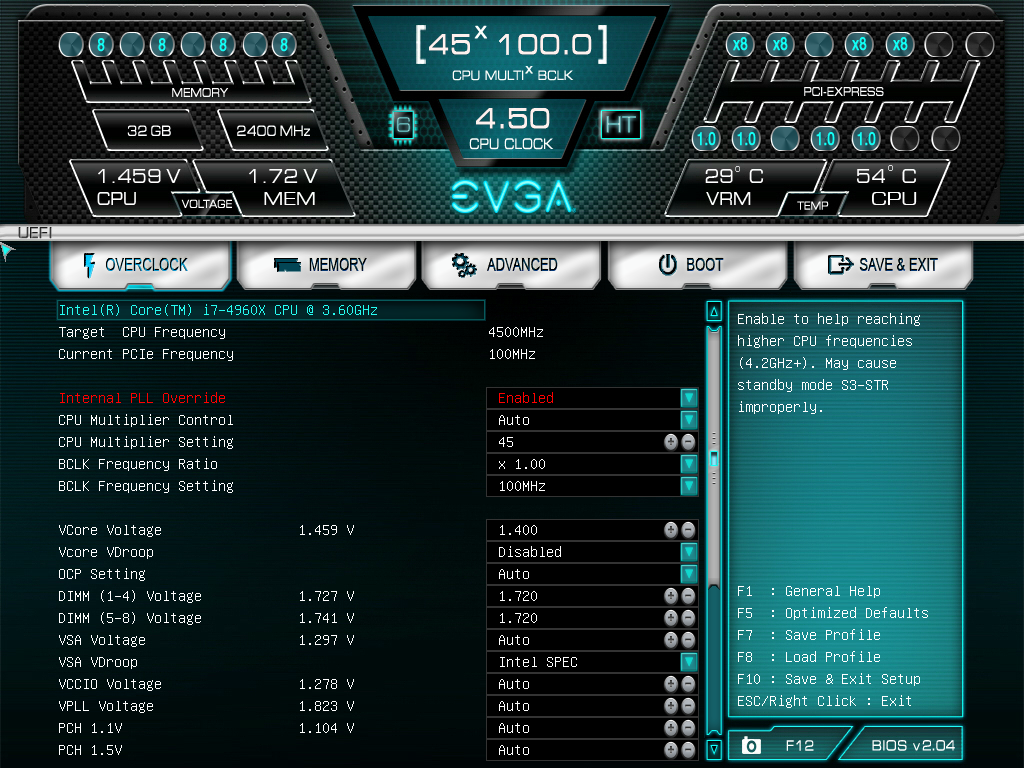
Along the top is the current CPU speed, number of cores (6) and that HyperThreading is enabled (HT). The installed memory, along with size, speed and voltage is also present as well as CPU multiplier, BCLK, voltage and temperature. The PCIe devices installed, along with lane counts, are here also. On the bottom right is the BIOS version, and the first thing we see in the list of options is the CPU installed. The only thing missing in all of this is perhaps the motherboard model name, which is in the F1 general help menu. One downside of all this information is actually the size at which it populates the top of the screen, leaving less space for options or explanations, but visually the color scheme and the layout is of benefit to most users.
In terms of options in the BIOS, EVGA have all the main avenues covered, especially with all the overclocking options less than a few clicks away on the main screen. The ‘OC Mode’ on EVGA boards is a favorite – it disables all additional controllers, which can be useful for stability in extreme overclock conditions. Extreme tweakers might want more control over clock skews and the like, but the only thing really missing from basic OC is perhaps a few quick OC options for the user to select – we have ‘quick BCLK settings’ on the bottom of the motherboard, but something like ‘4.2 GHz, 4.3 GHz, 4.4 GHz’ would be more appropriate.
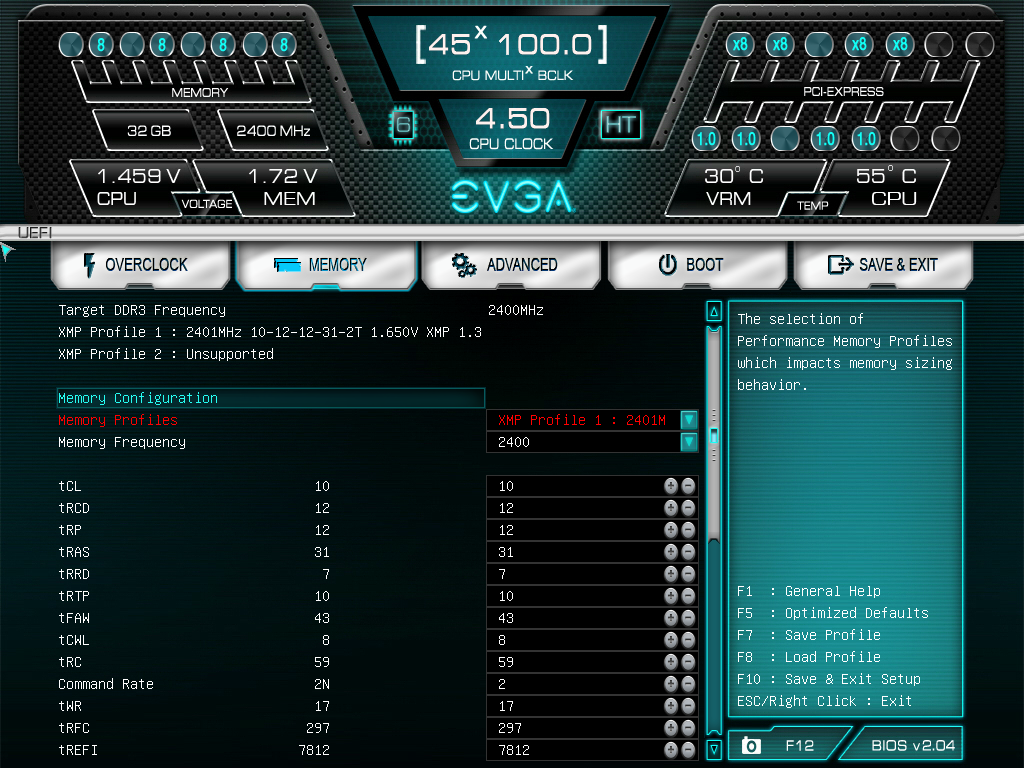
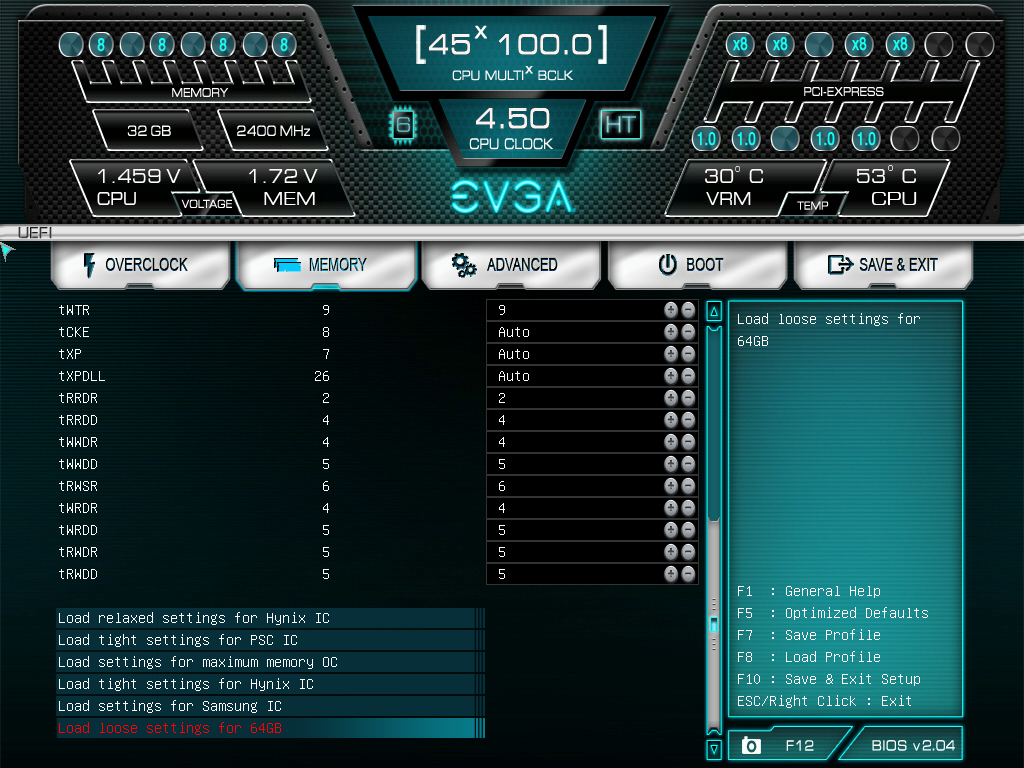
For memory, the BIOS lists available XMP profiles and the main primary/secondary timings, but no tertiaries. There are a few sets of predefined profiles for certain types of extreme memory kits at the bottom of this screen.
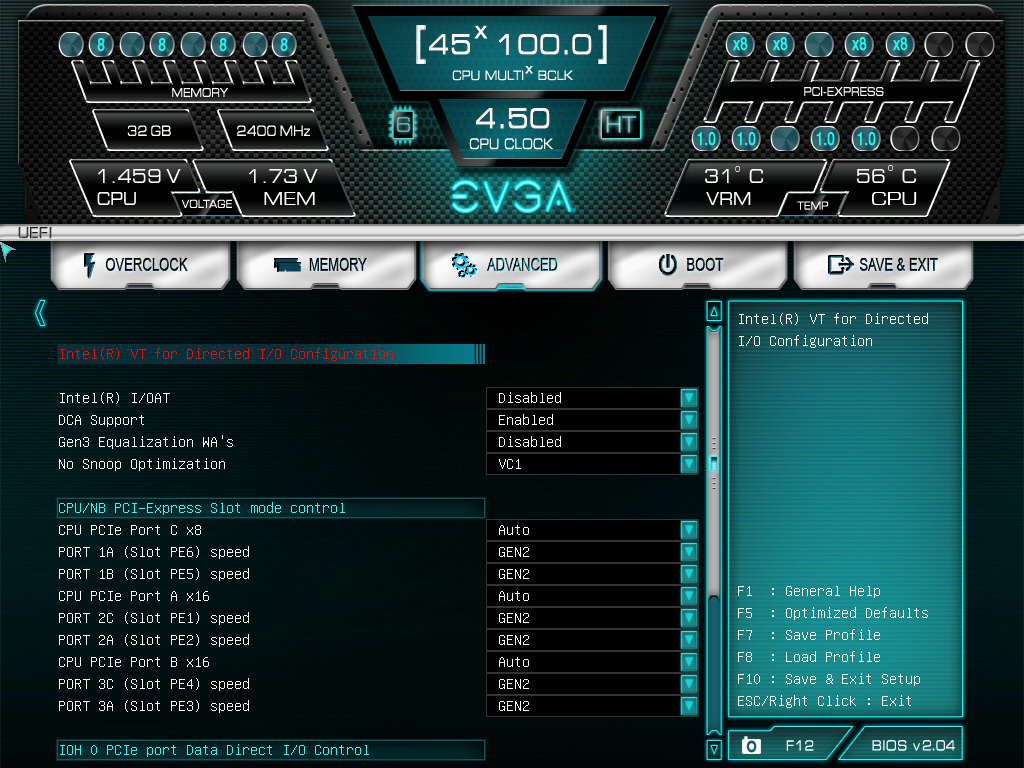
The rest of the BIOS is standard as they come – USB/SATA configurations, boot configurations, boot override and quick boot options. One thing I would like to point out is that by default PCIe 2.0 is selected, not PCIe 3.0. Users will have to navigate to the Advanced -> IOH Configuration and manually adjust the options:
Despite the number of 4-pin fan headers on board, only four are configurable for fan speeds via the BIOS in the Hardware monitoring option under Advanced.

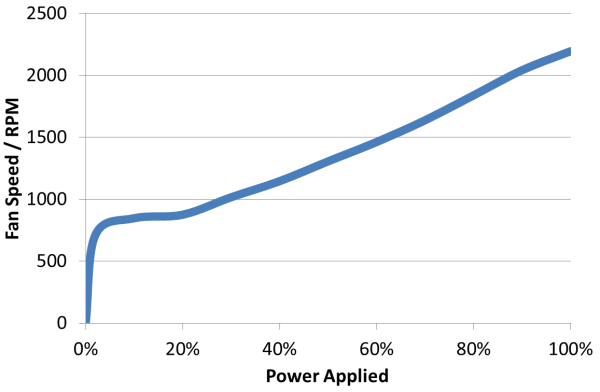
Aside from a few fundamental issues in the BIOS (listed below), there are two areas that EVGA need to work on with this BIOS. Firstly, I need a system in the BIOS that lets me update from within the BIOS – at present, as has been the case with EVGA boards for several generations, we need to install a Windows OS to update the BIOS. This needs to become a feature yesterday. The other area is fan controls – perhaps take a leaf from MSI’s latest fan profile implementation which we rather liked and generate something similar. The progression of fan controls after this is to get a fan speed vs. temperature profile (rather than fan power vs temperature, as power is not proportional to fan speed).


The BIOS Issues
The EVGA motherboard has been on my testbed as least double the normal length of time than other motherboards for one main reason – my insistence of proper ‘out-of-the-box’ operation. As mentioned in the previous page:
- Upon initial testing of the latest BIOS (2.03), the system would only run at 3.7 GHz at any load, rather than the Intel specification 40x/39x/39x/38x/37x/37x for the CPU we used. We ran our tests at this speed to find the base line, but it performs worse than other X79 motherboards due to its non-compliance out of the box.
- The BIOS offers per-core ratio settings, thus in an attempt to replicate standard operation, these were set under the assumption that it would be fixed in a later BIOS update (and we would publish both sets of results). Unfortunately, these options did not work on our motherboard.
- EVGA sends us BIOS 2.04 public, which does not change the situation.
- EVGA sends us BIOS 2.04beta, which does not change the situation.
- EVGA sends us BIOS 2.05 public, with no change in CPU operation. XMP no longer works on our memory kit: the system is misreading XMP values and putting them lower than before.
- EVGA sends us BIOS 2.05beta, and after selecting a series of options, Intel specifications are now working. However, per-core ratios are still not working, and XMP is broken, resulting in instability on certain types of load. No GPU results are possible at XMP manually configured values.
- For BIOS 2.05beta, overclocking is broken. Manually putting the CPU at any multiplier other than Auto causes the system to reboot continuously. In order to do the overclocking tests, we rolled back to 2.04, which worked flawlessly.
There are two clear sides to the argument – EVGA’s target audience are enthusiasts who will more than likely overclock, and thus stock speeds bear little relevance and we should not hold anything against them. However, I have not seen any concrete numbers (I fear they would be difficult to track) of how many users actually overclock vs. out-of-the-box at stock. For every user on a forum that talks about overclocking, I have a suspicion that there are at least 10-25 who will not touch the BIOS, and insist it is just plug-and-play. There is also system builders/integrators that might use the motherboard in non-overclocked systems up for sale. For those latter group, the BIOS is finally there to get performance on par with other X79 motherboards, albeit at the detriment to XMP settings and stability. No doubt a fix will come in due course, but it strikes at the heart of what exactly quality control is doing if the board does not come with a BIOS that at least gives Intel recommended speeds at pure default settings. Either someone did not check, the board was released too early, or the ‘fix’ was far down the list of things to do.
EVGA X79 Dark Software
The only tool in EVGA’s software arsenal, aside from the EVGA wallpapers, is the ELEET tuning tool. This is a skinned CPU-Z version with additional features related to overclocking on an EVGA motherboard, although we had to download the latest version of the tool (which requires registration on EVGA’s website) in order to see any recognition of the system being used. Overclocking via the tool had no issues.
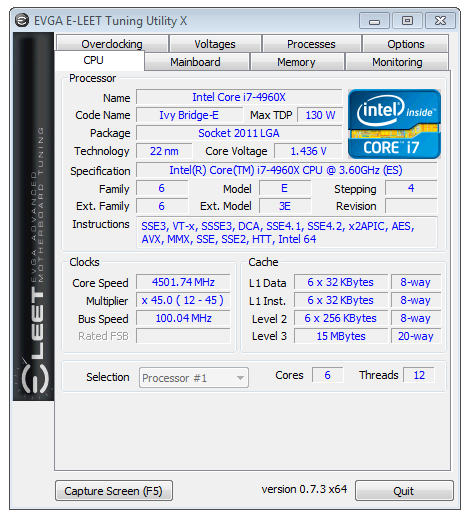
Compared to other motherboards in this price bracket, to say the software contribution from EVGA is light is a relative understatement. There are no fan controls, no additional gaming tools, no network management software, no automatic overclock options and no audio software.


EVGA X79 Dark In The Box
When counting out 400 simoleans for a motherboard, not only do we expect the motherboard to deliver, but the package should provide the goods as well. Normally in this price bracket we see specialist gaming/overclocking models that could come with specific components directed to that market segment. EVGA often take the tack of individually wrapped components with a lot of their motherboards having copious amounts of SLI bridges, molex-to-SATA or PCIe connectors as well as USB 2/3 rear brackets. This goes on top of the typical ‘EVGA deals with warranties, not the reseller’ sticker on each end of the box.
In the EVGA X79 Dark, we get the following:
Driver CD and pull out installation sheet
Rear IO Shield
Four SATA cables
One 2-way Long SLI bridge
One 3-way rigid SLI bridge
One 4-way rigid SLI bridge
Two molex-to-SATA (3) power cables
Smaller rear socket bracket
USB 3.0 rear panel connector
USB 2.0 dual rear panel connector
Front panel extension cables
|
|
|
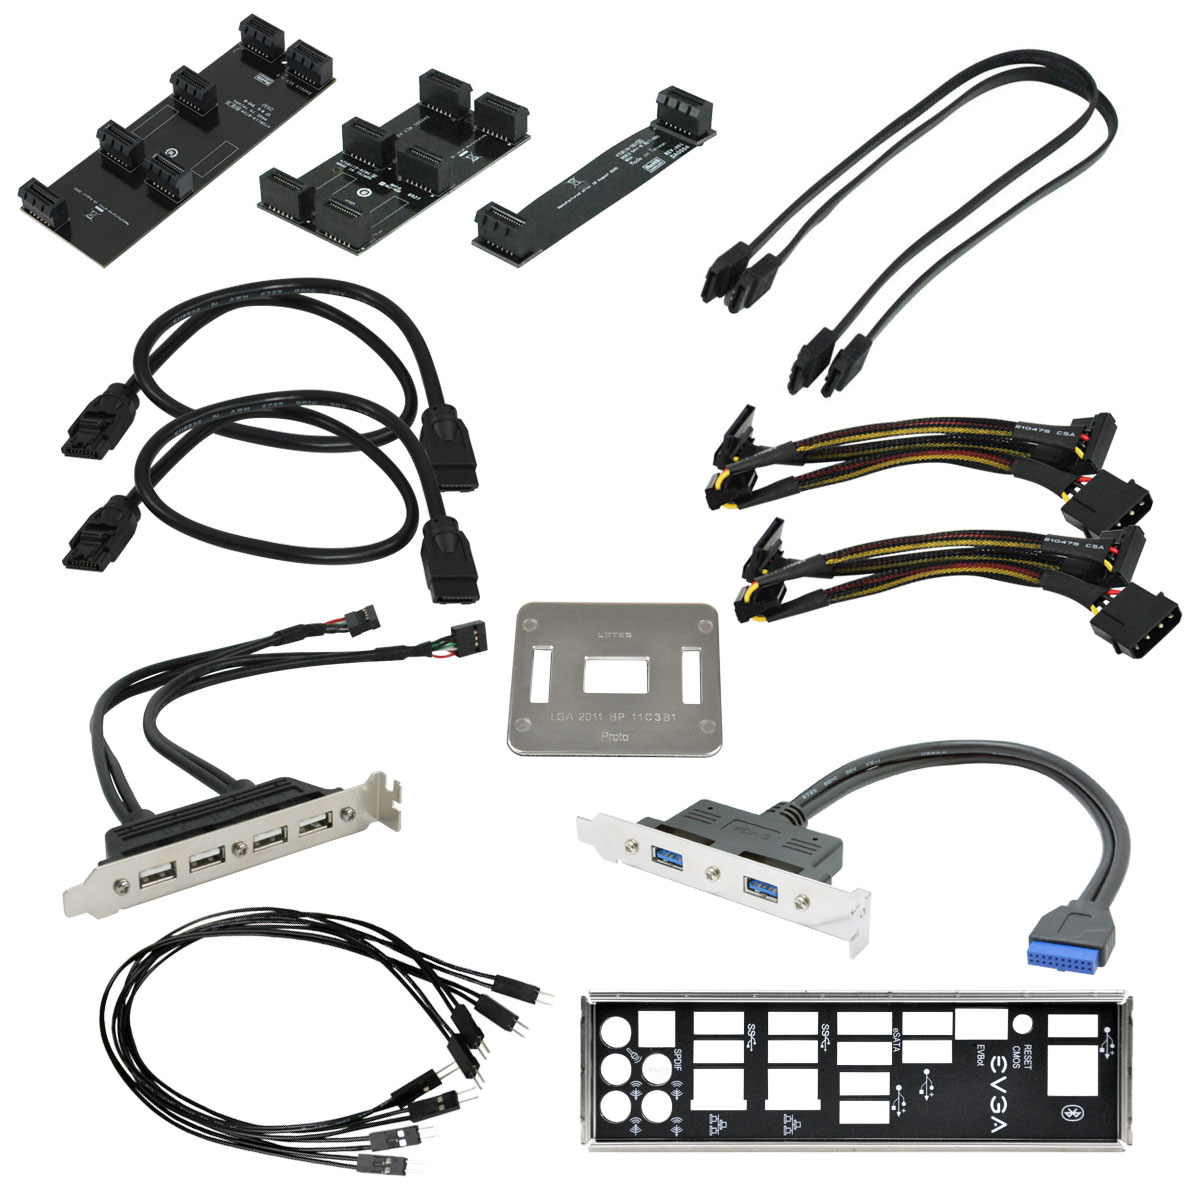
As mentioned, all of these are individually wrapped in EVGA branded packaging, which immediately gets thrown in the bin after use. While I appreciate it might come as a marque of quality, most of these additional connectors are relatively cheap or un-necessary: is there really a need for molex to SATA connectors, often part of a PSU package, to be in the EVGA package? For a real marque, perhaps combine the USB 2 and USB 3 connectors into one front panel 5.25” box, along with a WiFi card?
EVGA X79 Dark Overclocking
Experience with EVGA X79 Dark
As mentioned in the previous page, by the time we got a BIOS that implemented turbo properly, overclocking seemed to fall on its head no matter what the settings, and thus for our overclock tests we rolled back to BIOS 2.04.
Despite the lack of auto overclocking features on the EVGA X79 Dark, it did overclock our CPU with relative ease in line with what we expected from our sample and what we experienced with other motherboards in this price range.
Methodology:
Our standard overclocking methodology is as follows. We select the automatic overclock options and test for stability with PovRay and OCCT to simulate high-end workloads. These stability tests aim to catch any immediate causes for memory or CPU errors.
For manual overclocks, based on the information gathered from previous testing, starts off at a nominal voltage and CPU multiplier, and the multiplier is increased until the stability tests are failed. The CPU voltage is increased gradually until the stability tests are passed, and the process repeated until the motherboard reduces the multiplier automatically (due to safety protocol) or the CPU temperature reaches a stupidly high level (100ºC+). Our test bed is not in a case, which should push overclocks higher with fresher (cooler) air.
Manual Overclock:
Using the Corsair H80i, we started at 4.0 GHz (40x100) for all cores at a CPU Vcore of 1.200 volts under ‘Intel Spec’ LLC. The following results were achieved.
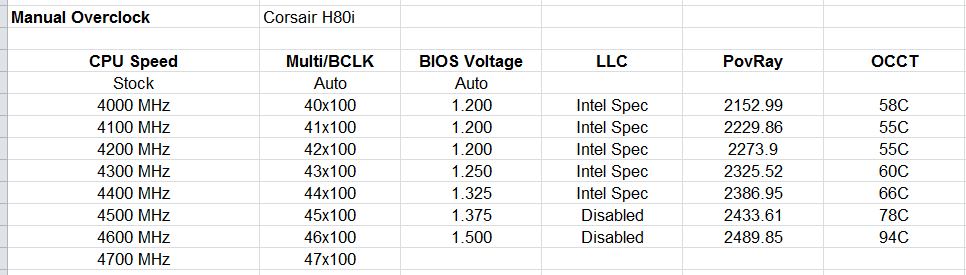
Pushing the mid 90ºC for 4.6 GHz was a bit of a stretch in terms of regular stability, thus a nice medium of 4.5 GHz at 1.45 volts keeps the temperatures reasonable in conjunction with added stability.
This is the setting I have used for some overclock testing on the X79 Dark – 45x100 @ 1.450 volts, Intel Spec LLC. DRAM is at XMP but the voltage is increased to 1.72 volts, again just for a bit of headroom. This setup scores ~45000 CPU points on 3DMark Vantage.
Many thanks to...
We must thank the following companies for kindly providing hardware for our test bed:
Thank you to OCZ for providing us with 1250W Gold Power Supplies.
Thank you to G.Skill for providing us with memory kits.
Thank you to Corsair for providing us with an AX1200i PSU, Corsair H80i CLC and 16GB 2400C10 memory.
Thank you to ASUS for providing us with the AMD GPUs and some IO Testing kit.
Thank you to ECS for providing us with the NVIDIA GPUs.
Thank you to Rosewill for providing us with the 500W Platinum Power Supply for mITX testing, BlackHawk Ultra, and 1600W Hercules PSU for extreme dual CPU + quad GPU testing, and RK-9100 keyboards.
Thank you to ASRock for providing us with the 802.11ac wireless router for testing.
Test Setup
| Processor |
Intel Core i7-4960X ES 6 Cores, 12 Threads, 3.6 GHz (4.0 GHz Turbo) |
| Motherboards | EVGA X79 Dark |
| Cooling |
Corsair H80i Thermalright TRUE Copper |
| Power Supply |
OCZ 1250W Gold ZX Series Corsair AX1200i Platinum PSU |
| Memory | Corsair Vengeance Pro 2x8 GB DDR3 2400 10-12-12 Kit |
| Memory Settings | XMP (2400 10-12-12) |
| Video Cards |
ASUS HD7970 3GB ECS GTX 580 1536MB |
| Video Drivers |
Catalyst 13.1 NVIDIA Drivers 310.90 WHQL |
| Hard Drive | OCZ Vertex 3 256GB |
| Optical Drive | LG GH22NS50 |
| Case | Open Test Bed |
| Operating System | Windows 7 64-bit |
| USB 2/3 Testing | OCZ Vertex 3 240GB with SATA->USB Adaptor |
| WiFi Testing | D-Link DIR-865L 802.11ac Dual Band Router |
Power Consumption
Power consumption was tested on the system as a whole with a wall meter connected to the OCZ 1250W power supply, while in a dual 7970 GPU configuration. This power supply is Gold rated, and as I am in the UK on a 230-240 V supply, leads to ~75% efficiency > 50W, and 90%+ efficiency at 250W, which is suitable for both idle and multi-GPU loading. This method of power reading allows us to compare the power management of the UEFI and the board to supply components with power under load, and includes typical PSU losses due to efficiency. These are the real world values that consumers may expect from a typical system (minus the monitor) using this motherboard.
While this method for power measurement may not be ideal, and you feel these numbers are not representative due to the high wattage power supply being used (we use the same PSU to remain consistent over a series of reviews, and the fact that some boards on our test bed get tested with three or four high powered GPUs), the important point to take away is the relationship between the numbers. These boards are all under the same conditions, and thus the differences between them should be easy to spot.
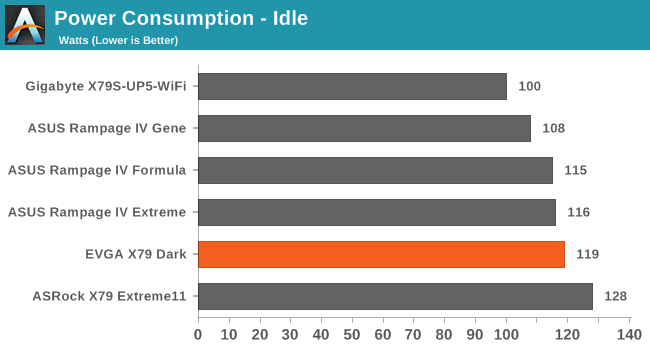
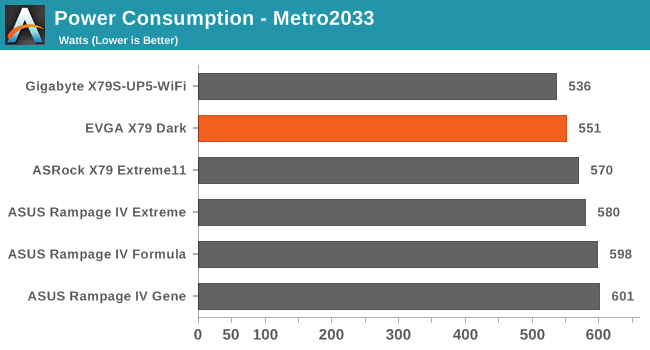
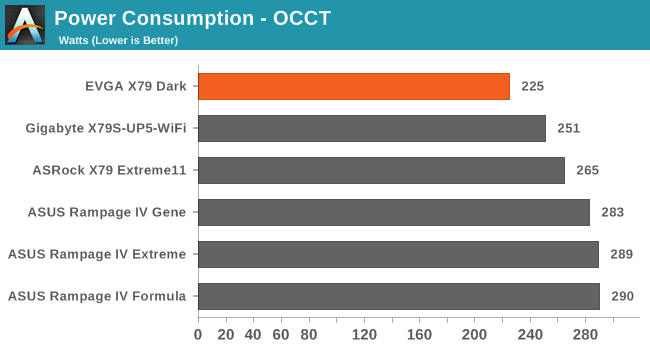
The EVGA X79 Dark seems very efficient in CPU loads, requiring only 225W total system power compared to 250W+ of other motherboards. This might be down to the 3.7 GHz issue of the BIOSes, however.
Windows 7 POST Time
Different motherboards have different POST sequences before an operating system is initialized. A lot of this is dependent on the board itself, and POST boot time is determined by the controllers on board (and the sequence of how those extras are organized). As part of our testing, we are now going to look at the POST Boot Time - this is the time from pressing the ON button on the computer to when Windows 7 starts loading. (We discount Windows loading as it is highly variable given Windows specific features.) These results are subject to human error, so please allow +/- 1 second in these results.
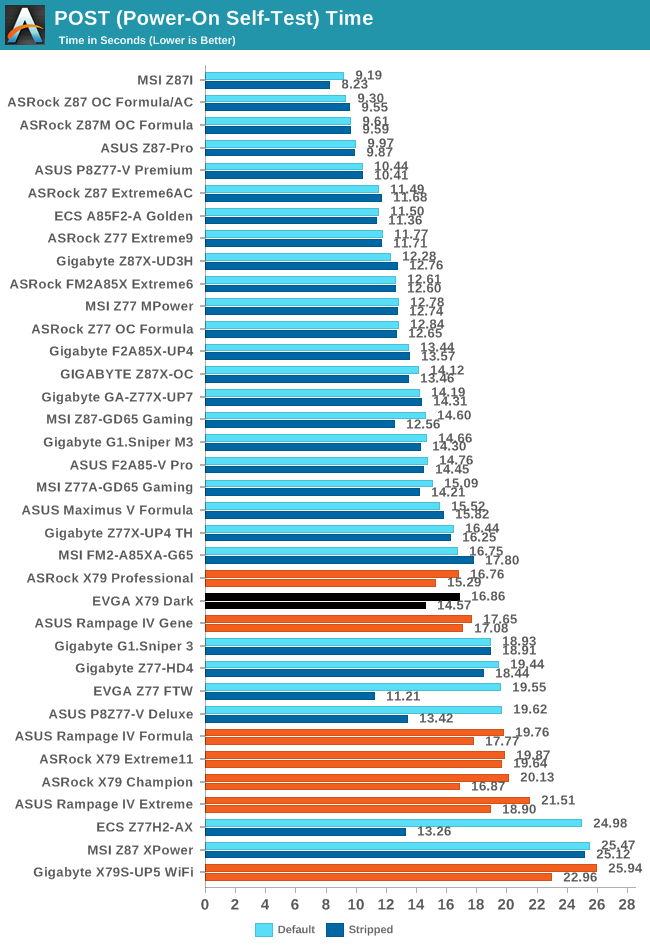
Due to the Marvell controllers, the standard boot time of the EVGA feels longer than it should – our 16.86 seconds result felt longer than it is, and cutting the controllers out speeds up the process by a couple of seconds. Ideally we would like a sub-12 second result for this test.
Rightmark Audio Analyzer 6.2.5
In part due to reader requests, we are pleased to include Rightmark Audio Analyzer results in our benchmark suite. The premise behind Rightmark:AA is to test the input and output of the audio system to determine noise levels, range, harmonic distortion, stereo crosstalk and so forth. Rightmark:AA should indicate how well the sound system is built and isolated from electrical interference (either internally or externally). For this test we connect the Line Out to the Line In using a short six inch 3.5mm to 3.5mm high-quality jack, turn the OS speaker volume to 100%, and run the Rightmark default test suite at 192 kHz, 24-bit. The OS is tuned to 192 kHz/24-bit input and output, and the Line-In volume is adjusted until we have the best RMAA value in the mini-pretest. We look specifically at the Dynamic Range of the audio codec used on board, as well as the Total Harmonic Distortion + Noise.
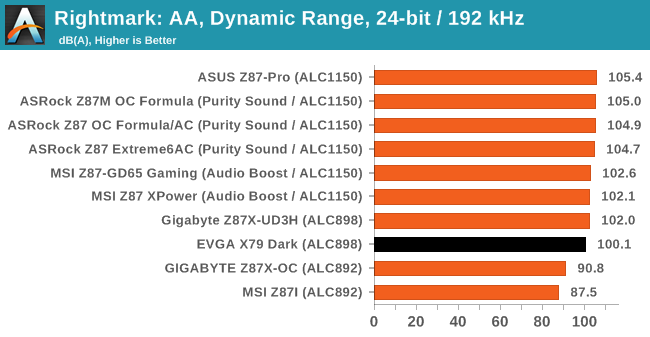
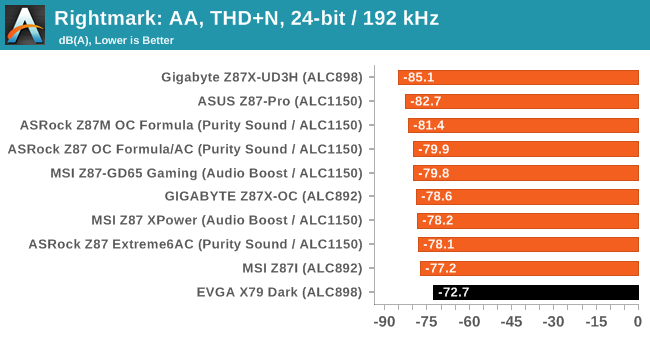
Using the Realtek ALC898 we see a dynamic range of over 100 dBA, although GIGABYTE squeezed more out of the codec than EVGA in terms of harmonic distortion levels.
USB Backup
For this benchmark, we run CrystalDiskMark to determine the ideal sequential read and write speeds for the USB port using our 240 GB OCZ Vertex3 SSD with a SATA 6 Gbps to USB 3.0 converter. Then we transfer a set size of files from the SSD to the USB drive using DiskBench, which monitors the time taken to transfer. The files transferred are a 1.52 GB set of 2867 files across 320 folders – 95% of these files are small typical website files, and the rest (90% of the size) are the videos used in the WinRAR test. In an update to pre-Z87 testing, we also run MaxCPU to load up one of the threads during the test which improves general performance up to 15% by causing all the internal pathways to run at full speed.
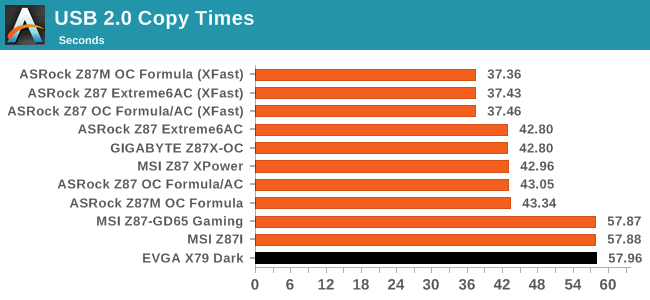
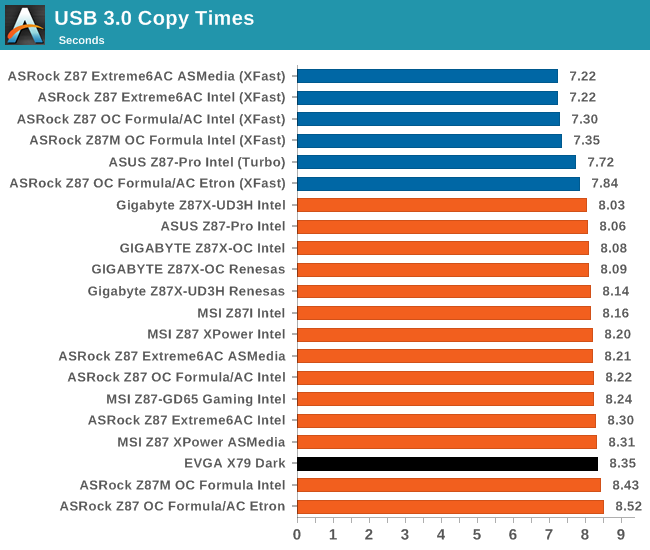
The EVGA X79 Dark, being on the older chipset, cannot keep up pace with the newer chipsets and optimizations.
DPC Latency
Deferred Procedure Call latency is a way in which Windows handles interrupt servicing. In order to wait for a processor to acknowledge the request, the system will queue all interrupt requests by priority. Critical interrupts will be handled as soon as possible, whereas lesser priority requests, such as audio, will be further down the line. So if the audio device requires data, it will have to wait until the request is processed before the buffer is filled. If the device drivers of higher priority components in a system are poorly implemented, this can cause delays in request scheduling and process time, resulting in an empty audio buffer – this leads to characteristic audible pauses, pops and clicks. Having a bigger buffer and correctly implemented system drivers obviously helps in this regard. The DPC latency checker measures how much time is processing DPCs from driver invocation – the lower the value will result in better audio transfer at smaller buffer sizes. Results are measured in microseconds and taken as the peak latency while cycling through a series of short HD videos - under 500 microseconds usually gets the green light, but the lower the better.

With Z87’s reluctance to have a peak DPC Latency less than 150 microseconds, it falls on Ivy Bridge to be the backup. The EVGA falls just under that 150 target.
Readers of our motherboard review section will have noted the trend in modern motherboards to implement a form of MultiCore Enhancement / Acceleration / Turbo (read our report here) on their motherboards. This does several things – better benchmark results at stock settings (not entirely needed if overclocking is an end-user goal), at the expense of heat and temperature, but also gives in essence an automatic overclock which may be against what the user wants. Our testing methodology is ‘out-of-the-box’, with the latest public BIOS installed and XMP enabled, and thus subject to the whims of this feature. It is ultimately up to the motherboard manufacturer to take this risk – and manufacturers taking risks in the setup is something they do on every product (think C-state settings, USB priority, DPC Latency / monitoring priority, memory subtimings at JEDEC). Processor speed change is part of that risk which is clearly visible, and ultimately if no overclocking is planned, some motherboards will affect how fast that shiny new processor goes and can be an important factor in the purchase.
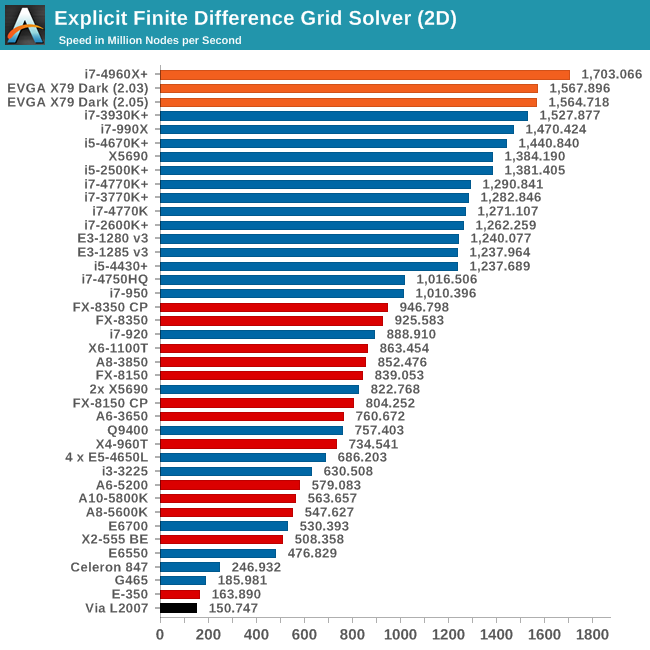
For clarification, EVGA does not use MultiCore Turbo. On BIOSes prior to 2.05, the system actually runs our 4960X at 3.7 GHz at any load, almost performing the antithesis of MultiCore Turbo and reducing single core speed. For clarity in our testing, we have included results in this mode, as well as the latest beta BIOS which implements turbo correctly, and what an MCT enabled EVGA X79 Dark would perform (under 4960X+ results).
Point Calculations - 3D Movement Algorithm Test
The algorithms in 3DPM employ both uniform random number generation or normal distribution random number generation, and vary in various amounts of trigonometric operations, conditional statements, generation and rejection, fused operations, etc. The benchmark runs through six algorithms for a specified number of particles and steps, and calculates the speed of each algorithm, then sums them all for a final score. This is an example of a real world situation that a computational scientist may find themselves in, rather than a pure synthetic benchmark. The benchmark is also parallel between particles simulated, and we test the single thread performance as well as the multi-threaded performance.
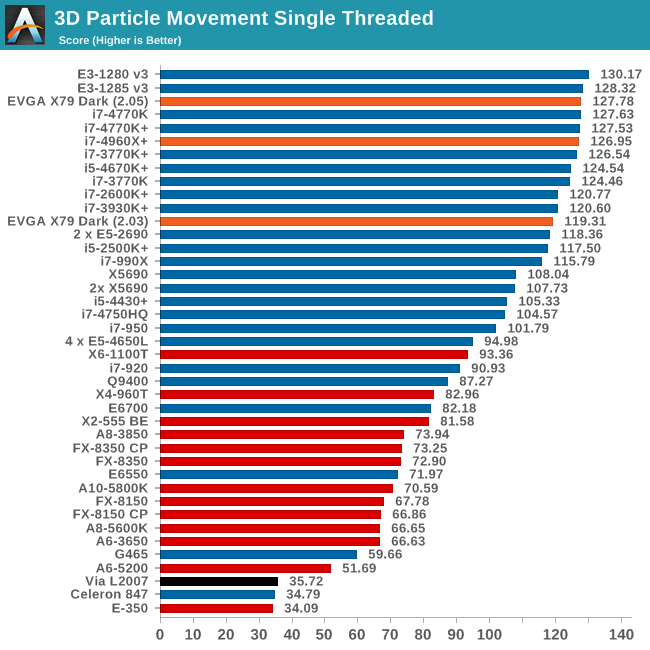
The effect of BIOS 2.03 on the EVGA means ~ 7% worse performance in single threaded apps than standard Intel specifications.
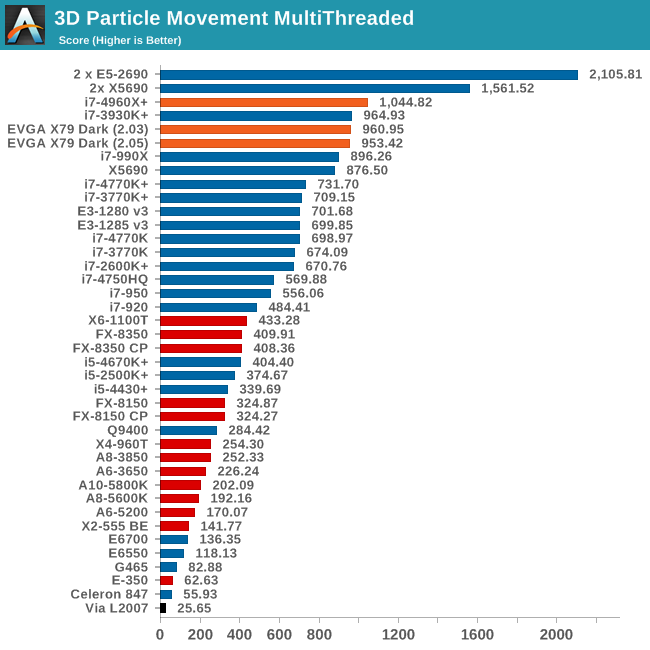
In multithreaded mode, the system loses out to MCT enabled X79 motherboards by almost 9%.
Compression - WinRAR 4.2
With 64-bit WinRAR, we compress the set of files used in the USB speed tests. WinRAR x64 3.93 attempts to use multithreading when possible, and provides as a good test for when a system has variable threaded load. WinRAR 4.2 does this a lot better! If a system has multiple speeds to invoke at different loading, the switching between those speeds will determine how well the system will do.
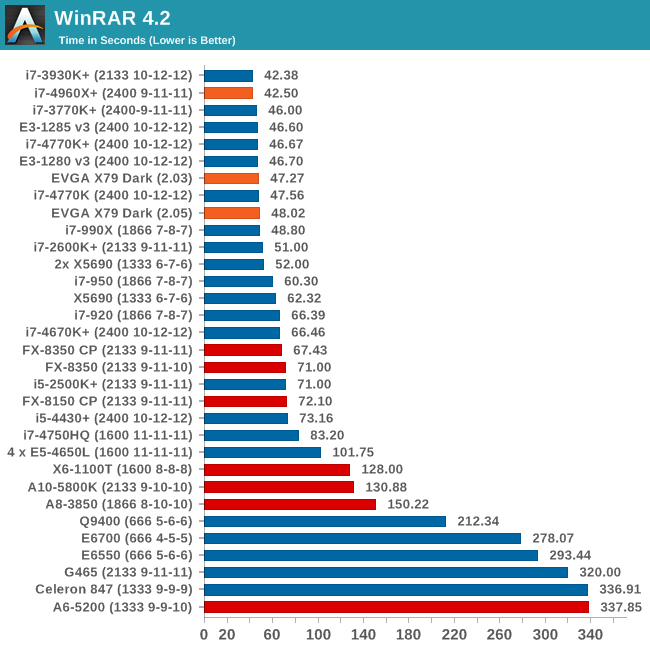
The variable threaded nature of WinRAR shows a distinct advantage in using an MCT enabled motherboard out of the box.
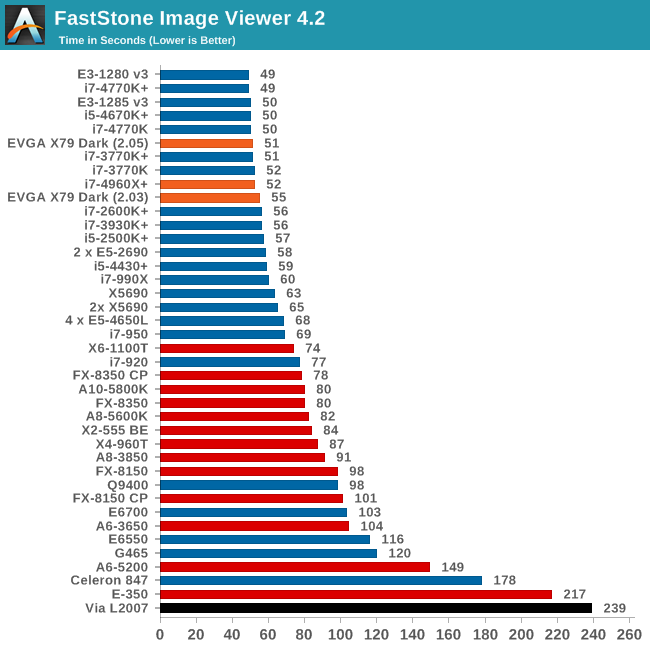
Image Manipulation - FastStone Image Viewer 4.2
FastStone Image Viewer is a free piece of software I have been using for quite a few years now. It allows quick viewing of flat images, as well as resizing, changing color depth, adding simple text or simple filters. It also has a bulk image conversion tool, which we use here. The software currently operates only in single-thread mode, which should change in later versions of the software. For this test, we convert a series of 170 files, of various resolutions, dimensions and types (of a total size of 163MB), all to the .gif format of 640x480 dimensions.
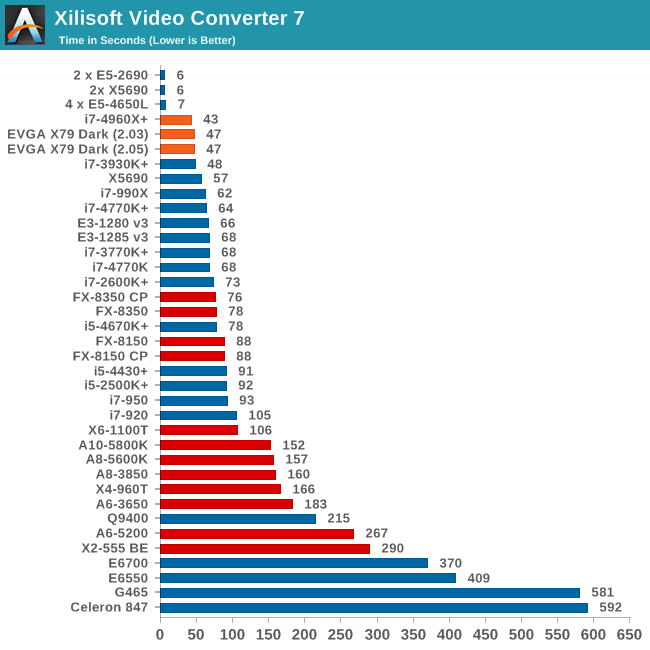
Video Conversion - Xilisoft Video Converter 7
With XVC, users can convert any type of normal video to any compatible format for smartphones, tablets and other devices. By default, it uses all available threads on the system, and in the presence of appropriate graphics cards, can utilize CUDA for NVIDIA GPUs as well as AMD WinAPP for AMD GPUs. For this test, we use a set of 33 HD videos, each lasting 30 seconds, and convert them from 1080p to an iPod H.264 video format using just the CPU. The time taken to convert these videos gives us our result.
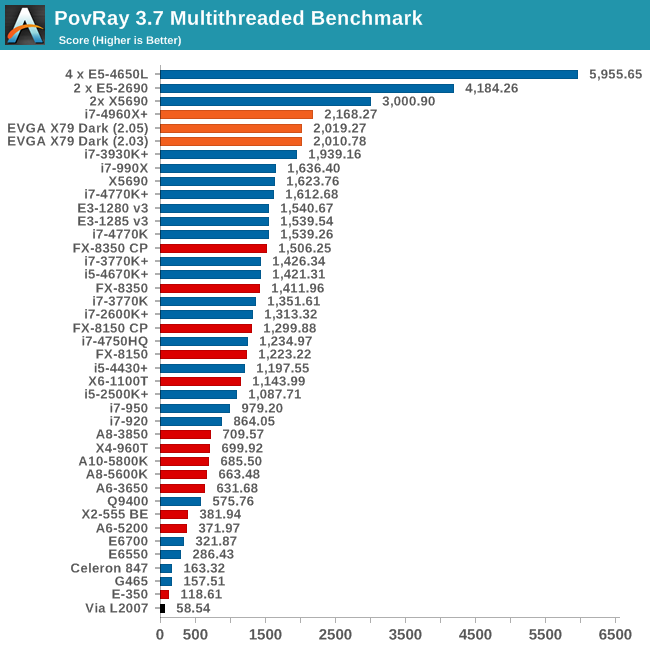
Rendering – PovRay 3.7
The Persistence of Vision RayTracer, or PovRay, is a freeware package for as the name suggests, ray tracing. It is a pure renderer, rather than modeling software, but the latest beta version contains a handy benchmark for stressing all processing threads on a platform. We have been using this test in motherboard reviews to test memory stability at various CPU speeds to good effect – if it passes the test, the IMC in the CPU is stable for a given CPU speed. As a CPU test, it runs for approximately 2-3 minutes on high end platforms.
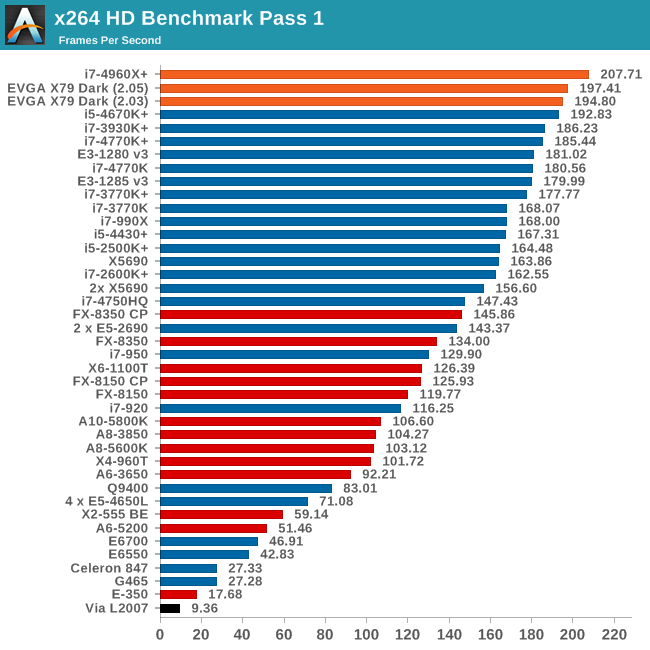
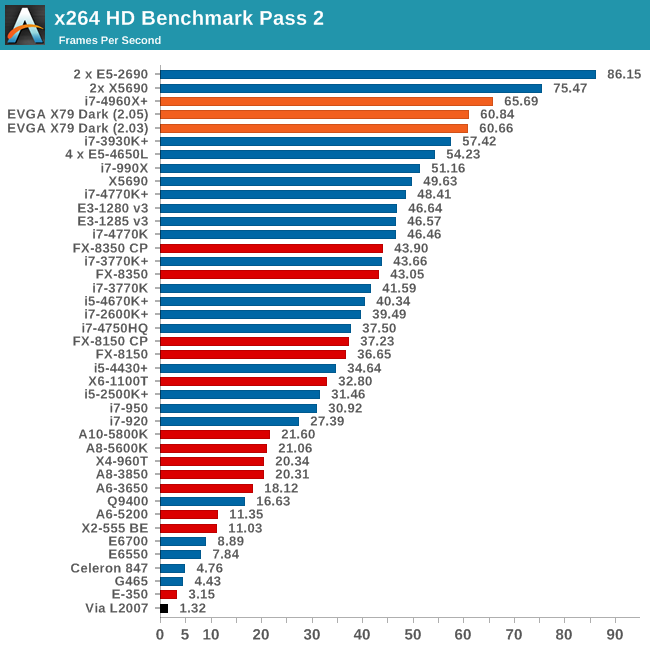
Video Conversion - x264 HD Benchmark
The x264 HD Benchmark uses a common HD encoding tool to process an HD MPEG2 source at 1280x720 at 3963 Kbps. This test represents a standardized result which can be compared across other reviews, and is dependent on both CPU power and memory speed. The benchmark performs a 2-pass encode, and the results shown are the average of each pass performed four times.
Grid Solvers - Explicit Finite Difference
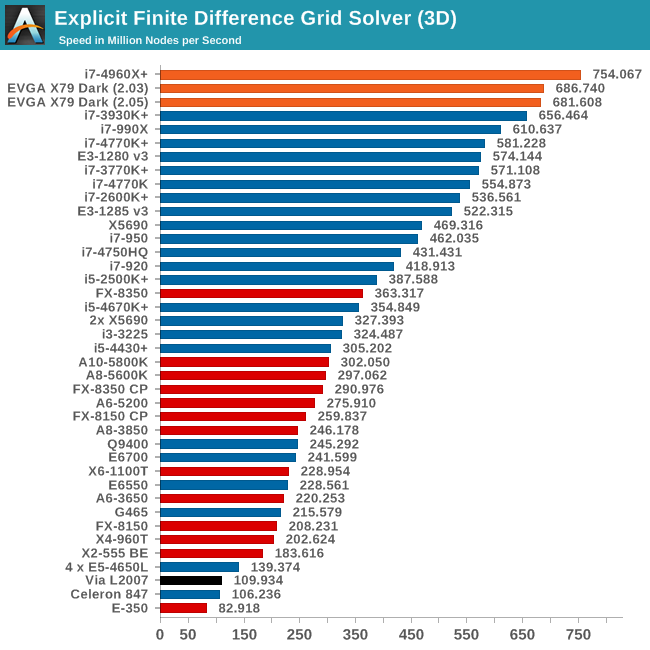
For any grid of regular nodes, the simplest way to calculate the next time step is to use the values of those around it. This makes for easy mathematics and parallel simulation, as each node calculated is only dependent on the previous time step, not the nodes around it on the current calculated time step. By choosing a regular grid, we reduce the levels of memory access required for irregular grids. We test both 2D and 3D explicit finite difference simulations with 2n nodes in each dimension, using OpenMP as the threading operator in single precision. The grid is isotropic and the boundary conditions are sinks. Values are floating point, with memory cache sizes and speeds playing a part in the overall score.
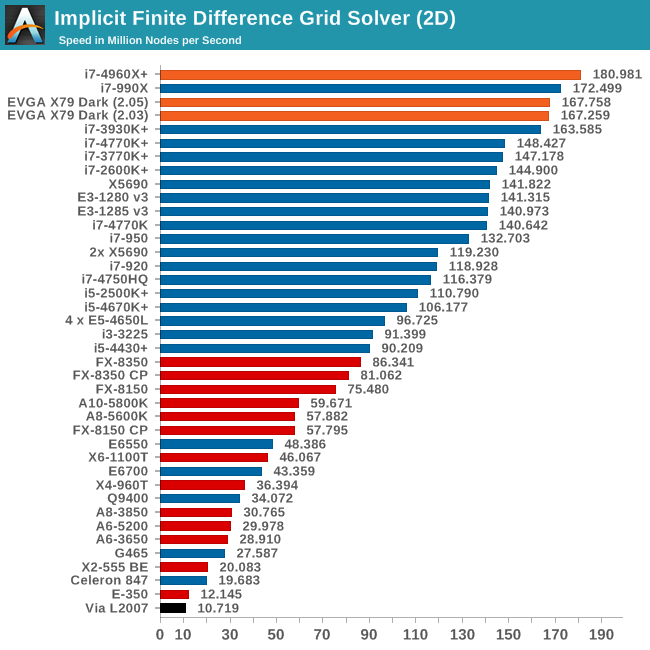
Grid Solvers - Implicit Finite Difference + Alternating Direction Implicit Method
The implicit method takes a different approach to the explicit method – instead of considering one unknown in the new time step to be calculated from known elements in the previous time step, we consider that an old point can influence several new points by way of simultaneous equations. This adds to the complexity of the simulation – the grid of nodes is solved as a series of rows and columns rather than points, reducing the parallel nature of the simulation by a dimension and drastically increasing the memory requirements of each thread. The upside, as noted above, is the less stringent stability rules related to time steps and grid spacing. For this we simulate a 2D grid of 2n nodes in each dimension, using OpenMP in single precision. Again our grid is isotropic with the boundaries acting as sinks. Values are floating point, with memory cache sizes and speeds playing a part in the overall score.
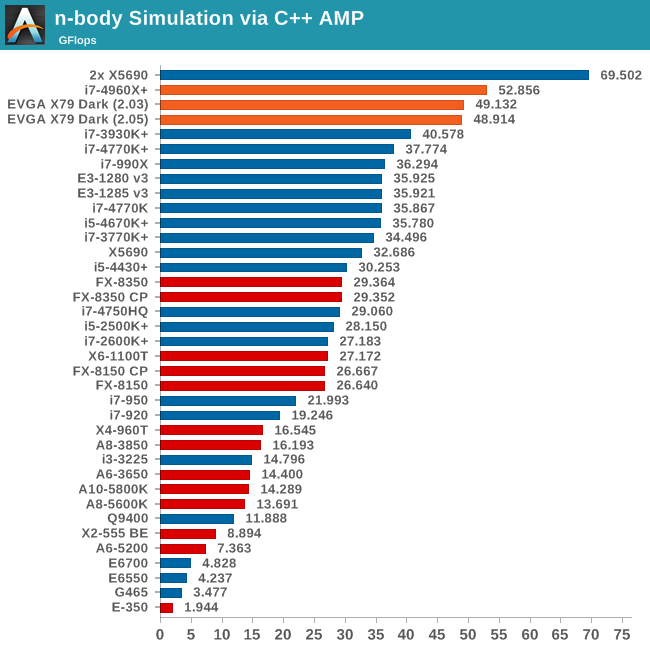
Point Calculations - n-Body Simulation
When a series of heavy mass elements are in space, they interact with each other through the force of gravity. Thus when a star cluster forms, the interaction of every large mass with every other large mass defines the speed at which these elements approach each other. When dealing with millions and billions of stars on such a large scale, the movement of each of these stars can be simulated through the physical theorems that describe the interactions. The benchmark detects whether the processor is SSE2 or SSE4 capable, and implements the relative code. We run a simulation of 10240 particles of equal mass - the output for this code is in terms of GFLOPs, and the result recorded was the peak GFLOPs value.
In light of the previous results, due to memory issues with the BIOS that follows Intel specifications on multiplier turbos, the EVGA X79 Dark gaming results are taken with BIOS 2.03. Unfortunately, as mentioned in the BIOS section, the per-core turbo options in the BIOS were non-functional, thus not allowing us to predict the results should the issue be fixed with working XMP.
It is also worth noting that by default the EVGA X79 Dark is only in PCIe 2.0 mode, and not PCIe 3.0 for Ivy Bridge-E processors.
Metro2033
Our first analysis is with the perennial reviewers’ favorite, Metro2033. It occurs in a lot of reviews for a couple of reasons – it has a very easy to use benchmark GUI that anyone can use, and it is often very GPU limited, at least in single GPU mode. Metro2033 is a strenuous DX11 benchmark that can challenge most systems that try to run it at any high-end settings. Developed by 4A Games and released in March 2010, we use the inbuilt DirectX 11 Frontline benchmark to test the hardware at 1440p with full graphical settings. Results are given as the average frame rate from a second batch of 4 runs, as Metro has a tendency to inflate the scores for the first batch by up to 5%.
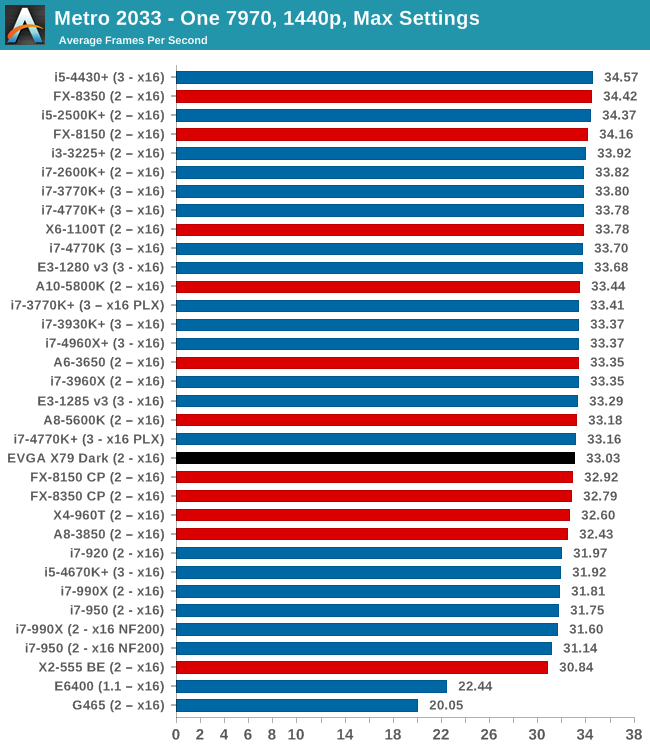
| Metro 2033 | 1 GPU | 2 GPU | 3 GPU |
| AMD | |||
| NVIDIA |
Dirt 3
Dirt 3 is a rallying video game and the third in the Dirt series of the Colin McRae Rally series, developed and published by Codemasters. Dirt 3 also falls under the list of ‘games with a handy benchmark mode’. In previous testing, Dirt 3 has always seemed to love cores, memory, GPUs, PCIe lane bandwidth, everything. The small issue with Dirt 3 is that depending on the benchmark mode tested, the benchmark launcher is not indicative of game play per se, citing numbers higher than actually observed. Despite this, the benchmark mode also includes an element of uncertainty, by actually driving a race, rather than a predetermined sequence of events such as Metro 2033. This in essence should make the benchmark more variable, but we take repeated in order to smooth this out. Using the benchmark mode, Dirt 3 is run at 1440p with Ultra graphical settings. Results are reported as the average frame rate across four runs.
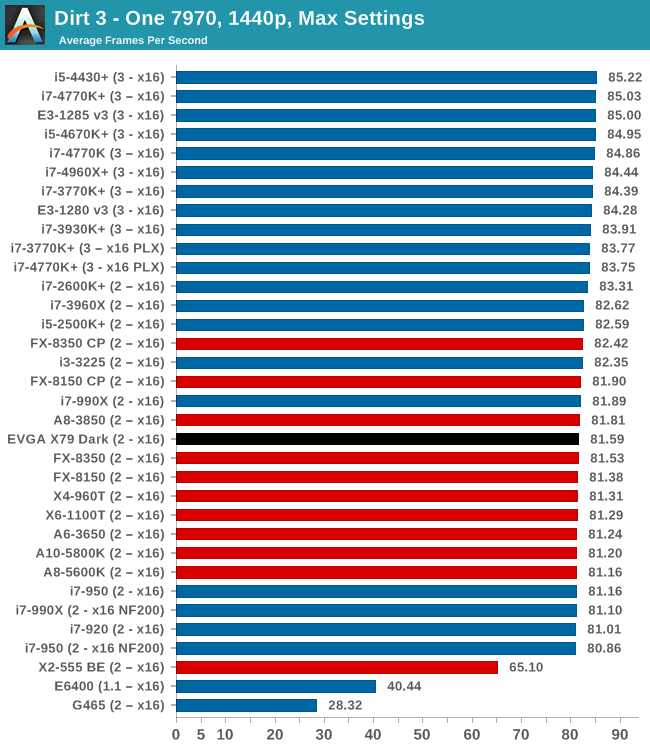
| Dirt 3 | 1 GPU | 2 GPU | 3 GPU |
| AMD | |||
| NVIDIA |
Civilization V
A game that has plagued my testing over the past twelve months is Civilization V. Being on the older 12.3 Catalyst drivers were somewhat of a nightmare, giving no scaling, and as a result I dropped it from my test suite after only a couple of reviews. With the later drivers used for this review, the situation has improved but only slightly, as you will see below. Civilization V seems to run into a scaling bottleneck very early on, and any additional GPU allocation only causes worse performance.
Our Civilization V testing uses Ryan’s GPU benchmark test all wrapped up in a neat batch file. We test at 1080p, and report the average frame rate of a 5 minute test.
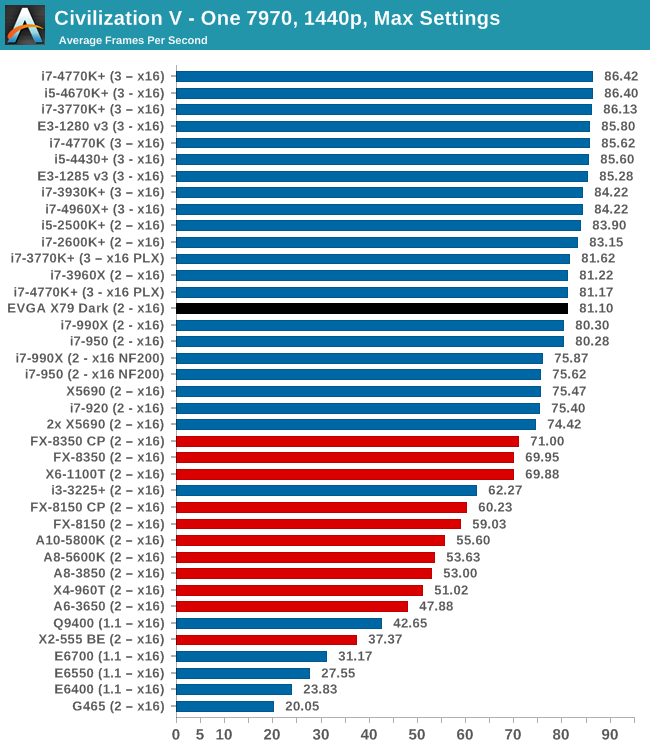
| Civilization V | 1 GPU | 2 GPU | 3 GPU |
| AMD | |||
| NVIDIA |
Sleeping Dogs
While not necessarily a game on everybody’s lips, Sleeping Dogs is a strenuous game with a pretty hardcore benchmark that scales well with additional GPU power due to its SSAA implementation. The team over at Adrenaline.com.br is supreme for making an easy to use benchmark GUI, allowing a numpty like me to charge ahead with a set of four 1440p runs with maximum graphical settings.
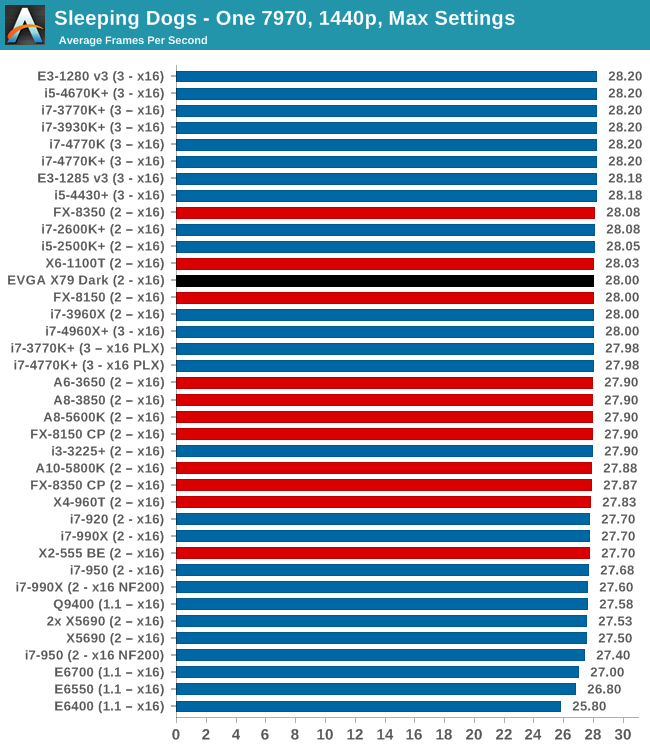
| Sleeping Dogs | 1 GPU | 2 GPU | 3 GPU |
| AMD | |||
| NVIDIA |
EVGA X79 Dark Conclusion
For those that have jumped to the conclusion, I will say this: I am a stickler for out-of-the-box results. Despite target audiences of gamers or enthusiasts, (I feel) the majority of users are most likely to run a motherboard out of the box without any changes, or system integrators will sell motherboards at their stock settings. As a result, the impetus is to have stock settings done correctly, and then optimized. Having stock settings work out of the box should be a simple task – it is in Intel’s own documents supplied to the manufacturer. If you have trouble implementing the small stuff, then what impression is that for the bigger picture?
So the EVGA X79 Dark, in this ‘snapshot in time’ review using currently available (and supplied) BIOSes, has some serious out-of-the-box issues. It all comes down to a small number of factors:
- BIOS 2.03 and 2.04 do not implement turbo mode correctly, however XMP and Overclocking are OK.
- BIOS 2.05 implements turbo mode correctly, but XMP and Overclocking are broken.
If you overclock, then strap on BIOS 2.04 and away you go. BIOS 2.04 will run at the overclock speeds, and although per-core ratios are still not working through the BIOS, our overclock testing gave a solid 4.6 GHz across all cores, despite some high (94ºC) temperatures.
Performance is doubly hard to gauge with multipliers all over the place, as well as competing motherboards in the same price segment use MultiCore Turbo, meaning a 400 MHz boost across the range regardless of loading. The result of this lower CPU speed did have a positive effect on our power consumption readings, at the expense of reduced performance.
I mentioned at the beginning of the review that the EVGA X79 Dark has been reviewed with positive comments elsewhere on the web, and those that discovered the stock turbo issue were more than happy to overlook the issue when examining overclocked performance. The hardware on the board itself allows for three tri-slot GPUs with ease, as well as 4-way. There are four additional SATA ports to bring the total to ten, two Intel NICs, and the black/red color scheme can be matched to a system build with great effect. The bundle in the box puts all the components sealed individually, which could be viewed as a marque of quality or an expression in overindulgence depending on your point of view.
The main competition for the EVGA X79 Dark, at $400, is the ASUS Rampage IV Extreme at $430, to which we gave our 2nd highest award back in 2012. While viewed in isolation, BIOS notwithstanding, the EVGA comes out as a reasonable product, but the ASUS RIVE provides an all-guns blazing approach to BIOS, software, the extras in the box, the hardware on board, and the overclocking utilities in the extreme enthusiast segment. While the EVGA X79 Dark would have to come in at a lower price to tempt my palate (along with a corrected BIOS) in an overclocked scenario, it does not make sense for users running a CPU at stock right now.
Addendum: Since writing this review, on posting (10/23) the latest BIOS is 2.07. Here's the link to the thread on EVGA forums.


