
Original Link: https://www.anandtech.com/show/7363/the-neophytes-custom-liquid-cooling-guide-how-to-why-to-what-to-expect
The Neophyte's Custom Liquid Cooling Guide: How To, Why To, What To Expect
by Dustin Sklavos on September 30, 2013 12:01 AM EST_678x452.jpg)
For a lot of enthusiasts, a full custom watercooling (or liquid cooling, if you prefer) can be essentially the final frontier. Closed loop coolers have been taking off in a big way, bringing watercooling to the masses, but sacrifices are made in the process. The overwhelming majority of closed loop coolers employ aluminum radiators instead of the copper and brass that are used in custom loops, and the pumps tend to be on the weaker side, presumably to both keep noise down and because there's really only one component to cool. I'm still enthusiastic about these products because they can offer excellent cooling performance without placing the undue strain on the motherboard that a heavy tower air cooler can, and they're typically a win for system integrators who don't want to risk shipping damage. Whether you like it or not, this is the direction the market is heading, although pure air cooling most definitely still has its place.
So why look at watercooling? First, establish how important noise is to you. Watercooling systems (and this includes CLCs) occupy an interesting middle ground. For pure thermal-to-noise efficiency, they're basically unbeatable, but if you want absolute or near absolute silence, you actually have to go back to conventional air cooling. The reason is that watercooling necessitates using a water pump, and while they can be tuned down for efficiency, they're never going to be dead silent. An air cooler will always be a fan plus heatsink; watercooling adds a pump.
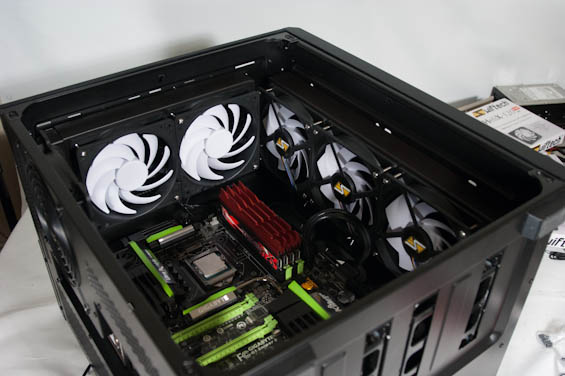
Watercooling is so efficient because it effectively allows you to spread your system's heat load across a tremendously greater surface area. Water transfers heat exceptionally well, and radiators in turn will be massive, densely packed arrays of copper fins. By being able to spread that heat across one or multiple radiators, you also allow yourself to use multiple fans at low speeds. Alternatively, you substantially increase your system's heat capacity, so if you're looking to overclock a little more aggressively, watercooling may be the way to go.
In my opinion, one of the biggest reasons to go for it is actually the potential for watercooling graphics cards, especially in a multi-GPU setup. While the stock blower cooler for the NVIDIA GeForce GTX 780 is actually a work of art and does a stellar job of keeping that card cool, it simply can't hold a candle to a full-card waterblock that can absorb the heat from every heat-generating component on the card, especially the power circuitry. Suddenly you're not risking tripping the 780's boost clock thermal limits anymore, and the blower coolers aren't generating any more of a racket for your trouble.
Of course, building a custom loop is insanely daunting. This is the first time I've ever built one and while guides exist all over the internet, they all feel a bit incomplete in one aspect or another. There's also the fear of spraying coolant all over the inside of your case, or accidentally frying graphics cards when you install the waterblock, etc. It's also a decent amount of work, and it's not cheap. Truthfully, if I hadn't been able to put this together for AnandTech, I don't know that I'd have ever made the attempt. But the opportunity did present itself and now I can at least share the results with you.
Component selection for this build was tricky, but not overly so. If you're going to engage in an undertaking like this, you really do want to pick the most ideal hardware you can. Thankfully we had a few vendors willing to step up and donate some very high quality kit to this build.
Intel Core i7-4770K Processor
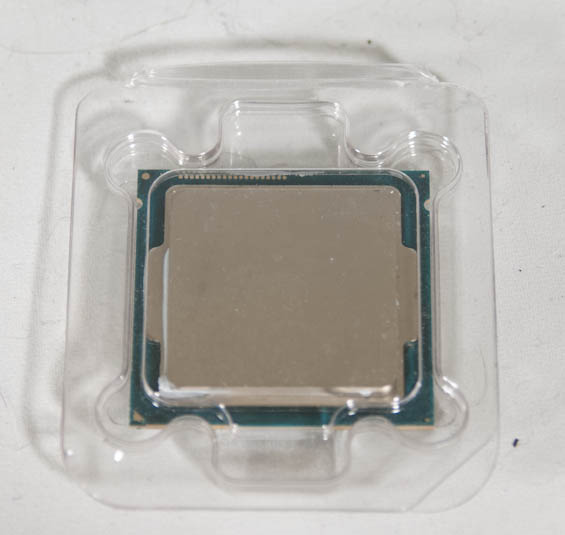
For our CPU we went with Intel's shiny new Haswell architecture in the form of the Core i7-4770K. This quad-core, hyper-threaded chip runs at a nominal 3.5GHz clock with a maximum turbo boost of 3.9GHz on a single core, and is one of Intel's first chips to feature an integrated VRM. Intel's 22nm chips seem to have been largely thermally limited, making the newest member of the family a compelling choice to be the center of a watercooling build. You do always run the risk of getting a dud CPU that simply doesn't want to run at a high clock speed without an unrealistic amount of voltage, though. Note that ours is a retail chip and not an Engineering Sample, so it's subject to the same potential limitations as any CPU you might pick up off the shelf.
Our thanks to CyberPowerPC for graciously donating this processor.
G.Skill Trident X 32GB (4x8GB) DDR3-2133 RAM
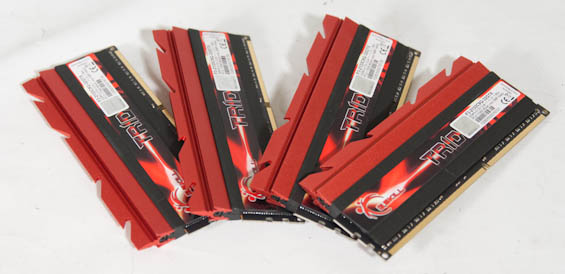
Our resident motherboard reviewer and overclocking expert, the good Dr. Ian Cutress, recommended we go with G.Skill for this build, and G.Skill was happy to oblige with a respectable kit of fast DDR3. This kit runs at a nominal 1600MHz, but features an XMP profile that sets it to run at 2133MHz with a CAS Latency of 9 at 1.6V. I'm not an aggressive memory overclocker, which makes the ready-out-of-the-box 2133MHz settings an easy way to score a little extra performance.
Our thanks to G.Skill for providing this memory.
Gigabyte G1.Sniper 5 Z87 Motherboard
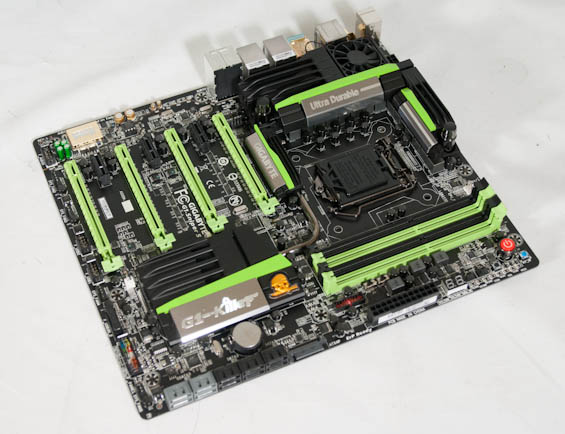
I remain of the opinion that the Z87 chipset is arguably the most compelling part of Haswell, and Gigabyte's high end gaming offering hammers that home. The G1.Sniper 5 features a PLX switch enabling full PCIe 3.0 x16 lanes for each of two video cards, or PCIe 3.0 x8 for up to four. Alongside that are an additional four SATA 6Gbps ports to go along with the six that come with the Z87 chipset, dual gigabit ethernet NICs with one provided by Intel and the other courtesy of Killer Networks, and Creative Sound Core3D with a user upgradeable OP-AMP. There's even an 802.11n dual-band PCIe x1 wireless network adapter bundled with the motherboard.
But what sells this board for our purposes is that it includes not only active cooling on the motherboard's 16-phase power circuitry, but a liquid cooling path built in. There are barbs on both ends of the heatsink that allow you to include the power circuitry in your watercooling loop.
Our thanks to Gigabyte for providing this motherboard.
Dual NVIDIA GeForce GTX 780 Graphics Cards
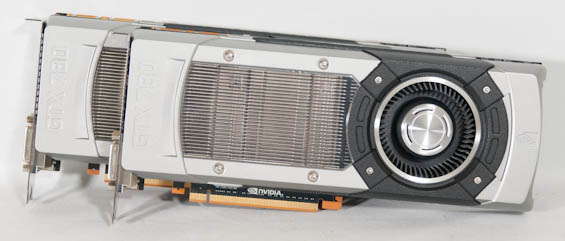
With AMD currently still having issues with multi-GPU surround performance, we were left going to NVIDIA for a pair of high end graphics cards. Two GeForce GTX 770s would've been stellar on their own, but the 780 is getting a healthy reputation as being a decent overclocker in addition to just being a tremendously powerful card on its own. 7.1 billion transistors and 2,304 CUDA cores are nothing to sneeze at, and the 384-bit memory bus connected to 3GB of GDDR5 running at 6GHz stock ensures that beefy engine stays fed.
The biggest shame about using these reference 780s is actually having to remove their stock coolers. NVIDIA did a fantastic job engineering these shrouds, which are both very beautiful and very efficient.
Our thanks to NVIDIA for providing this pair of graphics cards.
Plextor M5P Xtreme 256GB SSD

For this build we needed a fast SSD with enough capacity to hold our entire benchmarking suite, and Plextor was able to accommodate us. The M5P Xtreme we were sent is a 256GB SATA 6Gbps solid state drive with a 7mm height (as is becoming the norm), rated for sequential speeds of up to 540MB/sec reads and 460MB/sec writes, and a random read/write rating of 100,000/86,000 IOPS. It employs an enterprise class Monet 88SS9187 controller, and definitely met our needs during testing.
Our thanks to Plextor for this solid state drive.
Corsair AX1200i Power Supply
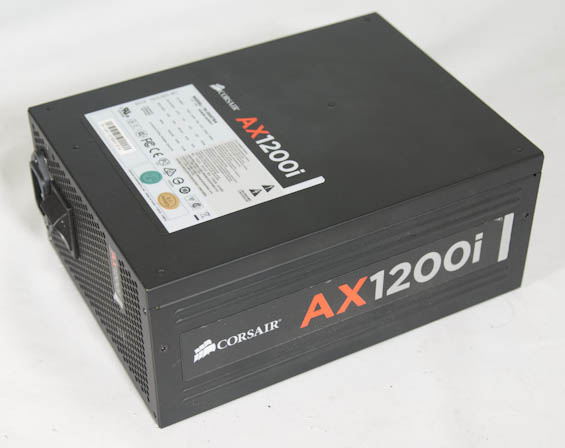
Truth be told, Corsair had provided me this power supply some time ago for testing with their Corsair Link software, and it's proven to be absolutely worthy for this build. The AX1200i is a fully modular, 200mm power supply rated for up to 1200 watts and 80 Plus Platinum certified, and it boasts one single, beefy 12V rail. When this unit is running at 30% or less load, the fan actually stops completely, but even under duress I found its fan noise to be negligible at worst. What makes it ideal, of course, is that it can easily supply the required current for two GTX 780s and an i7-4770K with plenty of overclocking headroom. The Corsair Link support is an added perk.
Our thanks to Corsair for this power supply.
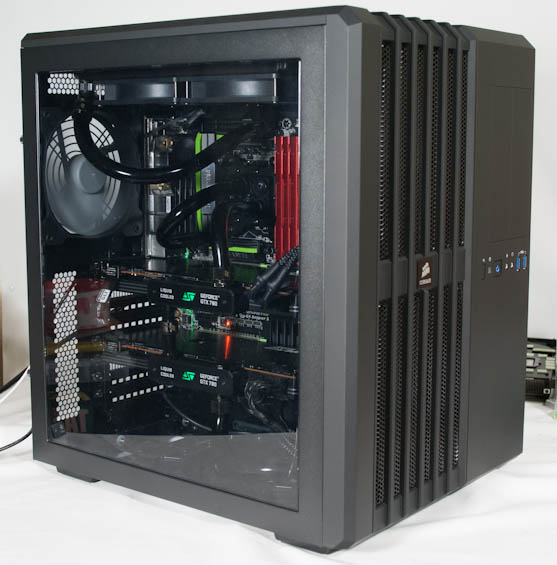
Corsair Carbide Air 540 Enclosure
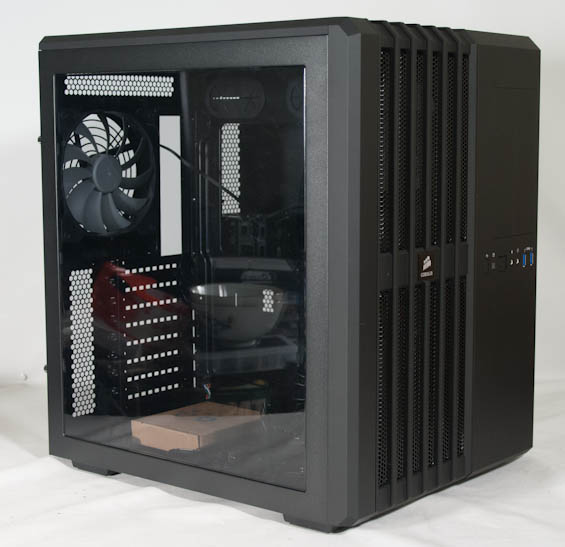
When it came to choosing a case, I really had my pick of the litter. You can plead favoritism, but honestly I've found Corsair's mid-to-high end offerings to be the most desirable for watercooling. Initially I'd planned on using the Micro-ATX Obsidian 350D, but then the Carbide Air 540 launched and I elected to go full ATX. In addition to just being a very interesting looking case, the Carbide Air 540 is perfect because it lets me test an air cooled system for comparison without having to use a case with middling air cooling performance. The case also supports a 360mm radiator in the front and a 240mm radiator in the top, giving a very healthy amount of cooling capacity when the switch to watercooling is made.
That, and like I said, it's just really neat.
Our thanks to Corsair for this enclosure.
Noctua NH-U14S Air Cooler
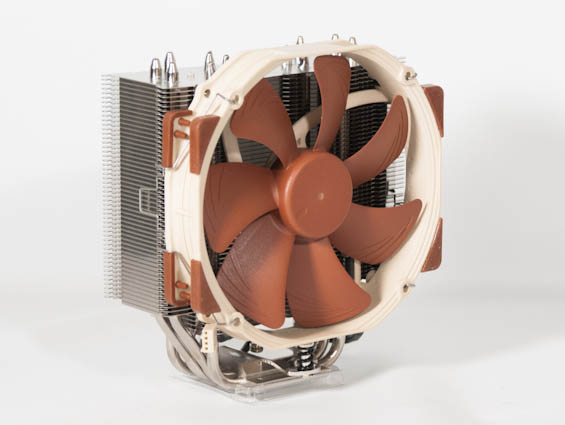
In order to prove the hypothesis we're entering into this review with, we need a control. Noctua's NH-U14S air cooler serves as that control; this cooler is incredibly quiet but also very efficient. This and its smaller sibling, the NH-U12S, are two of my favorite air coolers. Though they don't come cheap, they're awfully close to as good as you'll get on air if noise matters to you. The NH-U14S did not disappoint.
Our thanks to Noctua for this cooler.
If our whole hypothesis is that watercooling is (in most cases) superior to air cooling, then we need some measure of data to prove it. That means building our system and cooling it under air first, and seeing just how much overclocking performance we can get out of it before heat becomes too serious an issue. This is difficult to fully quantify; luck of the draw means we could wind up with stellar, efficient overclockers on both the CPU and GPU sides, or absolutely lousy ones. Haswell, in particular, seems to be afflicted with unusually high variation between individual chips.
To get some idea of how assembly goes in the Corsair Carbide Air 540, you can refer to my review. Suffice to say the system came together pretty easily. The modular nature of the SSD cages allowed me to remove all but one, and the 3.5" drive sleds went unpopulated but connected for the future. My biggest concern was the lack of clearance between the Noctua NH-U14S and the top GeForce GTX 780.
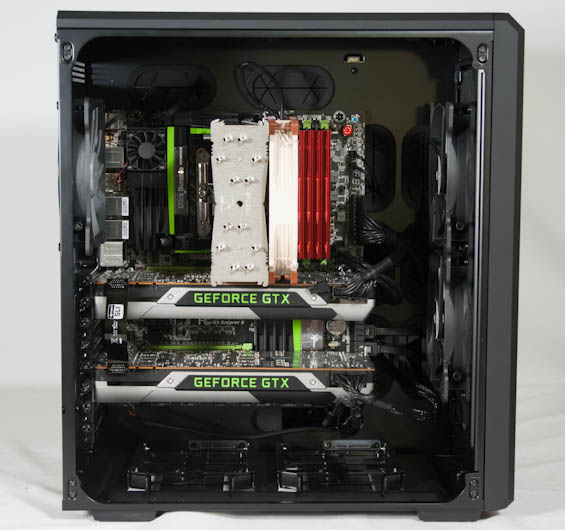
It looks like they're touching, but fear not, they're just playing the scariest game of "I'm not touching you" I've ever seen. This board is designed for quad-GPU graphics systems, which puts the primary PCIe x16 slot at the top. The upshot of that is the excellent spacing between the two cards: they're two slots apart, allowing for plenty of airflow between them.
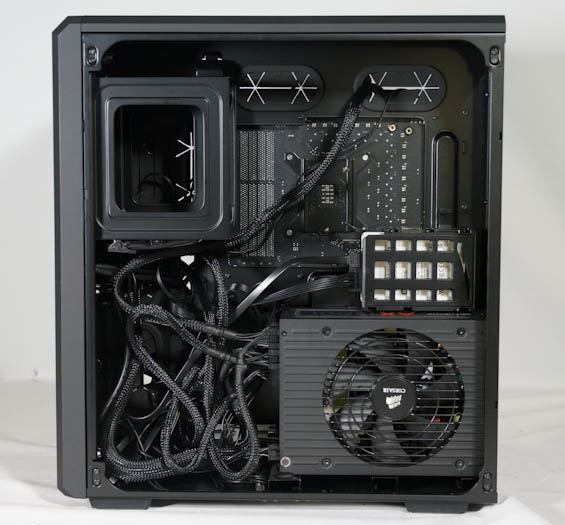
Ignoring for a moment the fact that I've always been lousy at cabling, we're presented with something of an issue. The Carbide Air 540 doesn't really necessitate neat cabling since that cubby in the bottom left of the photo is typically where the mass of cables always goes. However, the AX1200i is a very deep power supply, and that cubby is where I intend to put the pump and reservoir. This is, in my opinion, a failing of the Carbide Air 540's design: there's a tremendous amount of open space at the top right, and no real way to occupy it.
Overclocking on air wasn't actually tremendously difficult, but it's where I ran into some real issues with the i7-4770K. This is...not a spectacular sample. VRIN starts at 1.812V, and the VCore's default voltage is already at 1.2V. With load line calibration set to Turbo, I was able to get the chip stable at 4.3GHz, but VCore was reading ~1.3V in Windows. Thermals were reaching the low 90s under OCCT. 4.4GHz and 4.5GHz were both bootable, but thermally too dangerous. For stability testing, I did a five minute run of OCCT followed by a run of POVray 3.7 RC, per Ian's suggestion.
The two GeForce GTX 780s fared a bit better. I maxed out the power and temperature targets, and while the fans got pretty loud, I was able to get a +125 offset on the core and stunning +550 offset on the GDDR5, leading to a peak boost clock of ~1150MHz and a GDDR5 clock of 7.1GHz. Any higher than that on the GDDR5 would work, but produce artifacts. Peak boost was pretty tough to maintain, though, with the cards regularly dipping back at least a couple of boost bins under EVGA OC Scanner X. Stability testing was initially done with OC Scanner X, but I found it to be remarkably unreliable. Per Ryan Smith's suggestion, I switched to using a Crysis Warhead benchmark and then running Fire Strike Extreme in 3DMark. Crysis Warhead was pretty good at ferreting out unstable overclocks, but 3DMark was fantastic at it.
All in all, the overclocks were decent, although the i7-4770K apparently lived to underwhelm. I'm also a little disappointed the 780s couldn't hit 1.2GHz under boost on the core, but the excellent GDDR5 overclock takes some of the sting off of that.
With solid air cooling performance tested, it's time to make the jump to liquid cooling. It's very easy to be intimidated by the hardware involved, but let's break down what Swiftech graciously provided (and they provided quite a bit) and understand what these individual parts represent.
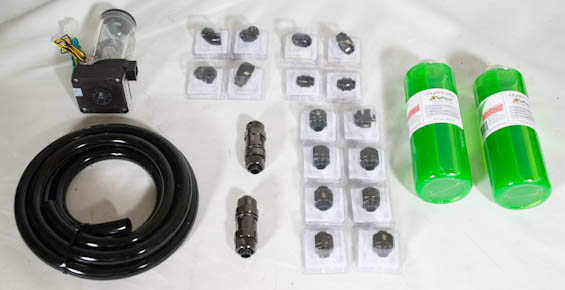
The top left of the photo above is Swiftech's combination MCP35X pump and reservoir, pre-assembled. The MCP35X pump is powered by a 4-pin molex connector, but can run at a variable speed controlled through an additional PWM header. Below it is six feet of very thick black TruFlex PVC tubing. The two large chrome parts to the right of it are no-spill, quick-release couplings designed to be in the middle of the tubing to allow you to disconnect parts of the loop as needed; these use what are called compression fittings. Speaking of which, the bulk of the parts in the surrounding plastic cubes are compression fittings, with 45-degree and 90-degree adapters floating around, along with multi-GPU connectors. Finally, the two bottles are Swiftech's HydrX PM (pre-mixed) coolant.
We're talking about watercooling, so what's in the coolant? Water is actually absolutely excellent at absorbing and carrying heat and has a tremendous heat capacity (think about how long it takes a pot of water to boil); the HydrX PM is actually 90% distilled water (which contains no impurities) and a mixture of chemicals to prevent algae and corrosion. This is very similar to how coolant/anti-freeze works in your car; water carries heat very well, but is also corrosive, so chemicals are introduced into the mixture to counteract that effect.
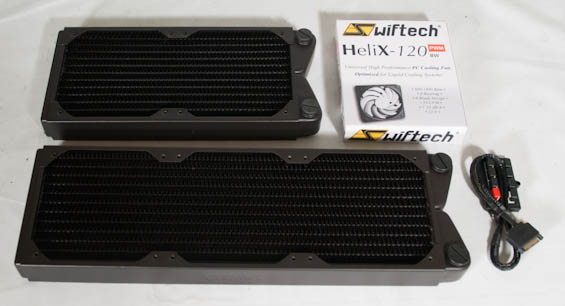
Next are the radiators. The radiators are made out of copper with brass tubing, and Swiftech carries two different types: one with a normal fin density designed for low speed fans (these), and one with a higher fin density designed for high speed fans. Higher fin density means improved surface area which in turn means superior heat dissipation, but more powerful fans are required to really push air through a denser radiator. For this build, there's one 360mm radiator and one 240mm radiator. Next to them is one of the five Helix-120 PWM-controlled fans intended to be used with the radiators, and the odd-looking dongle is actually a SATA-powered PWM-splitter.
So we've seen all the stuff that connects together, but fat lot of good it'll do us if we don't actually have waterblocks.
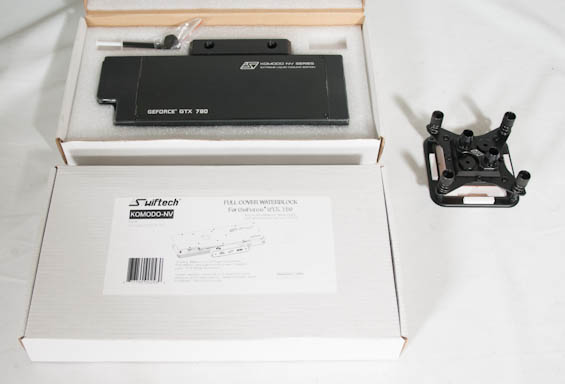
To handle our toastiest components, Swiftech sent along their Apogee HD waterblock for the Core i7-4770K and two of their KOMODO-NV waterblocks for the GeForce GTX 780s. Astute observers may find the waterblocks for the GeForces familiar. That's because Swiftech actually manufactures the waterblocks EVGA employs on their Hydro Copper cards. The Hydro Coppers are basically reference cards with faster BIOSes and Swiftech's KOMODO-NV waterblock pre-affixed. In effect, I'll be building my own pair of Hydro Coppers.
The Apogee HD comes with two barbs pre-installed, but is actually capable of supporting up to four. This allows you to run multiple components in parallel instead of a conventional serial cooling loop; since I'm intimidated enough by just trying to get the whole thing working, I stuck to just using the two. The KOMODO-NV can also be used to run multiple lines in parallel, but again I opted to run a single serial line.
Tools You'll Need
Here's information I wish I had when I started, prior to multiple runs to Orchard Supply and Home Depot, but now you'll have it. In addition to a firm grip and stellar upper body strength for affixing the compression fittings, you're going to need the following tools, bare minimum:
- Phillips head screwdrivers (one standard, one precision)
- Flathead screwdriver
- 8" adjustable wrench
- Multiple SAE wrench kit (not essential, but very helpful)
- Precision torx screwdriver kit (needed for any current generation GeForce)
The screwdriver kits I thankfully all had since almost everything we normally do when we build systems involves a screwdriver, but the wrenches I needed to get separately. These are specifically for attaching fittings and caps to ports that don't already have barbs on them (barbs being the conical ports for liquid to pass through).
Before you start assembling your loop, you'll really want a clear idea of how everything is going to route together. It will help to physically draw a diagram, even a hastily scribbled one, so you have some idea of how everything will connect. For the Corsair Carbide Air 540, I knew the cubby next to the power supply was where I wanted to put the reservoir and pump assembly. That meant that two lines were going to be routing back behind the motherboard: the line that flowed into the reservoir, and the line exiting the pump.
Below is the sequence I used for my loop, and it shouldn't be too hard to use it as a basic blueprint. This is undoubtedly going to create contention; I spent hours and hours reading posts on different watercooling forums before concluding that the simplest layout would be the best and easiest.
- Reservoir and pump assembly.
- Top radiator (240mm).
- Motherboard voltage circuitry.
- CPU waterblock (Apogee HD).
- First GeForce GTX 780 (KOMODO-NV).
- Second GeForce GTX 780 (KOMODO-NV).
- Front radiator (360mm).
- ...and back to the reservoir and pump assembly.
I spent a lot of time playing Tetris with the radiators, attaching and detaching the fans, trying to figure out exactly how everything would fit into the case and how everything would get connected. While the entire assembly probably could've taken only a couple of hours, my work on it went on over the course of three nights. Clearance issues reared their ugly heads a couple of times, necessitating the use of 45 degree and 90 degree adapters, sometimes even in sequence.
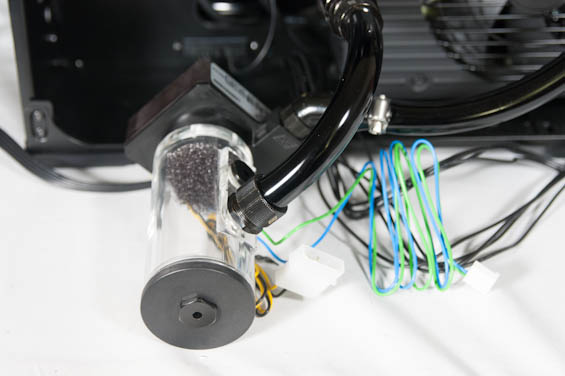
Compression in the foreground, worm clamp in the background.
At this point I'm also going to admit the one thing I was most worried and ignorant about when I started this project specifically for those of you out there who are wondering about it, because I couldn't find any instructions in any of the tutorials I read for how to assemble a loop: how to actually connect the tubing to the individual blocks, radiators, reservoir, and pump.
The reservoir, waterblocks, radiators, and pump all have ports which fittings screw into (and screwing in those fittings is what you need the wrenches for). There are essentially two types of fittings I had to worry about: barbs and compressions. Barbs are the conical ports I mentioned earlier; the end of the tubing fits around the barb (typically pretty snugly and requiring a healthy amount of force), and then you use either a nylon clamp or a worm clamp. The nylon clamp snaps around the tubing and should be tightened with a pair of pliers, and is...adequate. The worm clamp needs to be loose and around the tubing before you affix it to the barb, and it's a royal pain to completely tighten because they all use flathead screws, but once it's on secure it's not going anywhere.
Compression fittings start with a barb you have to fit the tubing around, but before that there's a circular piece that goes around the tubing similar to the way you start with a worm clamp. The difference is that there's a set of threads below the barb, and the circular piece screws on to those. The lip in the circular piece squeezes the tubing, compressing it into place and sealing it. These can be extremely difficult to apply if you don't have a good grip and decent forearm strength, but they're tight, much easier to remove than worm clamps, and comparatively easy to connect.
Now that you understand what the fittings are, the rest of it is just a matter of going by the plan and adapting as unforeseen issues materialize. There isn't any order you have to connect the individual parts in, just as long as they make a complete loop and you're careful to tighten (but not overtighten) all of the seals. My suggestion is to just connect whatever's easiest and take your time. That said, the easy part and one of the most fun parts is installing the waterblocks.
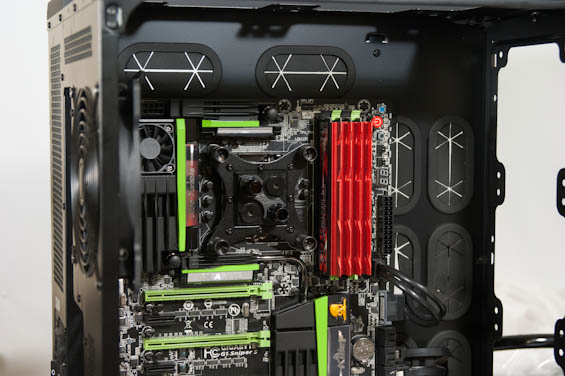
The CPU waterblock goes on pretty much like any conventional CPU cooler, but without a massive heatsink array getting in the way or even the tubing from a CLC. Because the Apogee HD's two barbs both stick straight up and the area surrounding the CPU socket is typically pretty clear, this is actually fairly easy to install early and connect late.
Installing the GPU waterblock is more involved, but not actually that bad. Disassembling a GeForce GTX 780 (or 680/770/Titan) is simple; the hardest part really is saying farewell to that beautiful stock cooler. The back of the card is going to be nothing but screws; four larger Philips head, one smaller one, and then ~15 small torx screws. You'll have to remove all of them. The stock cooler has two different connectors plugged into the PCB that you'll also need to disconnect.
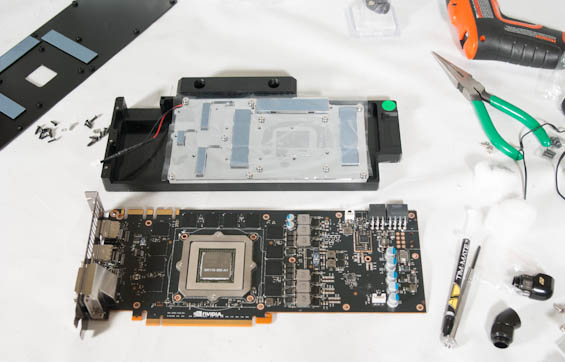
Once the cooler is removed, use a cotton ball and some rubbing alcohol (90% pure or better) and gently remove the thermal grease from the surface of the GPU die. From there, the included instructions for the waterblock will be very clear and straightforward. The benefit of using a specially designed waterblock like the KOMODO-NV is that the assembly is extremely easy. It's contingent upon your card being a reference board, but the block is designed specifically to fit that board and cool all of the surface components. From the photo above you can even see the thermal padding for the power circuitry and GDDR5 chips.
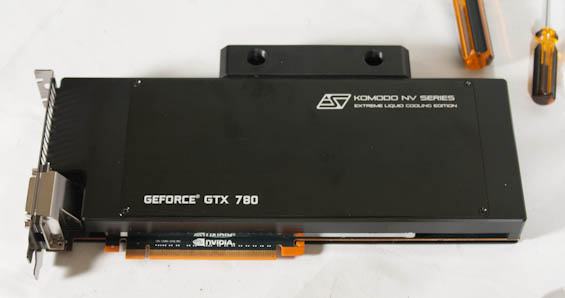
In my opinion, the video card waterblocks are the biggest upshot of a custom liquid cooling loop. Everything gets cooled properly, the blocks look nice, and you'll see load thermals that are maybe half what the card ran at under air.
For my build, I ran into a series of small but notable issues that made me question whether I'd made the right decision in opting to use the Corsair Carbide Air 540, specifically in terms of clearance. I opted to use the two in-line quick-release connects on the radiators; I'd connect an arbitrary amount of tubing to one of the ports on the radiator and then put half of one of the connects on the other end of the tube before routing that tube back behind the motherboard tray. This made assembly much easier as I didn't have to install the pump and reservoir early on or measure out the length of tubing I'd need; I'd just affix the appropriate amount of tubing along with the other half of the quick-release to the reservoir and pump.
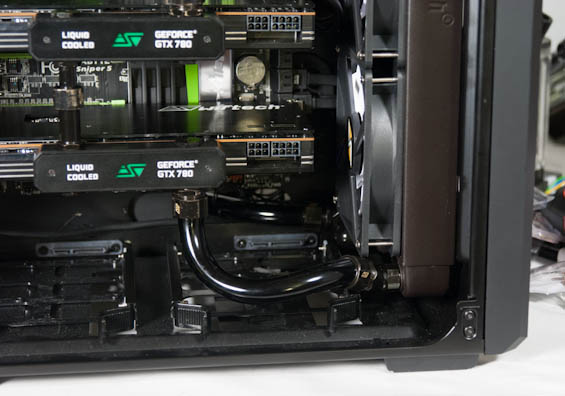
My first major problem child was the 360mm radiator in the front. Originally I'd wanted the fans on the outside in a push configuration instead of pull, but you can see clearance around one of the two 3.5" drive trays wound up being extremely cramped. There's stress being put on that joint (as well as a bit on the connector that's routed back behind the motherboard tray), and I was concerned it would be likely to leak when I primed the system.
The other issue was routing the lines from the pump and reservoir. Because the power supply is so deep, and because power cabling naturally wanted to be in the same cubby area, real estate was at quite a premium. Before installing the pump I had to disconnect all of the modular power cables from the power supply just to get some breathing room.
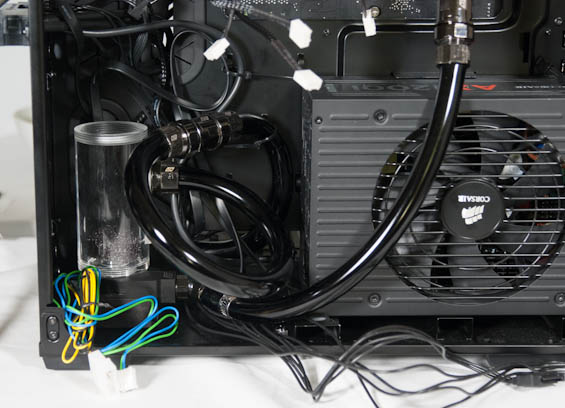
You can see I also wound up using especially long lines from the pump in order to prevent any serious kinking, and this is all before the power cables wound up getting threaded back in.
Thankfully, good practice also happened to be the easiest thing to do. Before powering on the system, you need to fill the pump and reservoir with coolant and get the coolant circulating while checking for leaks. I actually happened to have a separate 4-pin molex power supply handy from a USB hard drive kit, so I was able to power the pump without needing to even touch the AX1200i. You really don't want to run the pump without coolant in it any longer than you have to, but you'll want a decent amount of coolant in the reservoir to start (have a towel handy in case you accidentally overfill like I did) and then slowly add coolant until it's clear you don't need any more. For me, I had a pretty good idea I didn't need any more when the whole thing overflowed again. But at least I didn't have any leaks.
Leave the pump running for a few minutes, and rock the case back and forth to work air bubbles out of the system. Take a flashlight and look at each of your interconnects and make sure none of them are leaking. For the record, I wound up going through about one and two-thirds bottles of the HydrX.
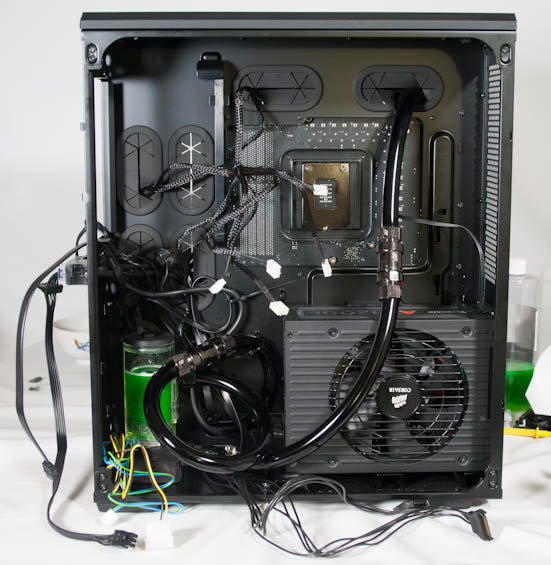
After getting coolant circulating through the system and all of the air out (you'll know the air has been released when the coolant level in the reservoir has a sudden drop and there are no leaks), I went back to threading all of the power cables and very carefully cramming everything into that hopelessly small space.
The last problem I ran into had to do with Swiftech's PWM splitter. While it's supposed to take the PWM signal from the motherboard and split it among all of the fans connected to it, the fans all wound up just running at full speed. It's tough to figure out exactly where the blame lies or if it's just an incompatibility. Honestly, I think a rig like this is pretty much the ideal situation for a Corsair Link kit, where extremely tight and flexible software control of multiple PWM channels is vital. Gigabyte has made a fantastic motherboard here in the G1.Sniper 5, but their fan control is still woefully lackluster.
Apart from my fan control woes, though, I found that I was ready to close the shiny new system up and get to testing.
It stands to reason that the heat barriers I was running into under air would become less of an issue when I moved to water. That's...partially true. In a weird way, I feel like this review would ultimately have been a lot less useful if things had gone smoothly instead of turning out the way that they had. Early on I mentioned that overclocking is and will always be a bit of a lottery. The halcyon days of Sandy Bridge are behind us and for many of us even Ivy Bridge is going to be a dream of better days.
I used my overclock under air as a fairly appropriate starting point. Since 4.4GHz and 4.5GHz were outside the realm of possibility under air due to thermals, I made the jump to 4.4GHz, and it was here where I ran into two complications: one specific to Haswell and one broad enough that I should've seen it coming even as more of a hobbyist overclocker.
First, when overclocking the CPU, it's wise to set the RAM to the spec of the CPU to take it out of the equation; in the case of the Core i7-4770K, that's 1333MHz/1600MHz. After finding an overclock, though, I neglected to test it under the G.Skill Trident X RAM's rated speed, and that complicates things with Haswell. An overclock stable at 4.4GHz at DDR3-1333 wound up needing even more voltage for DDR3-2133. Haswell's IMC can be particular about memory speed when the cores are heavily overclocked.
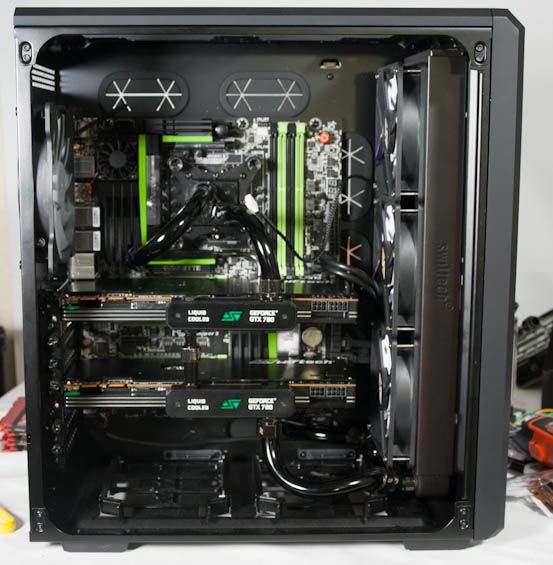
The other more broad complication was that I hadn't accounted for the minor voltage bump that 4.3GHz required, or the major one that 4.5GHz did under air. Chips tend to have an inflection point; you can get up to a certain speed at stock voltage or with a slight bump, but once you get there, any increases in speed require substantially boosted voltage. As it turned out, 4.5GHz wasn't happening, and 4.4GHz required a fairly healthy one in and of itself.
4.4GHz at DDR3-2133 and 1.35V ran benchmarks fine, but stress testing for power consumption and thermals with the GTX 780s being pushed at the same time caused its core temperatures to shoot over 90C. I had to run all the fans on the radiators at maximum to cool that 4.4GHz as well. Ultimately a really good overclock just wasn't in the cards for this i7-4770K.
Meanwhile, the two 780s had also apparently hit their wall on air. Watercooling stabilized boost clocks, but even after overvolting in Precision X, I was only able to get them to run at a consistent ~1160MHz on the cores and 7.1GHz on the GDDR5. Temperatures remained incredibly low; a modified BIOS would probably help but is out of the scope of this article. For now, I have to rely on the improved boost stability and 100MHz jump on the CPU to improve performance.
Part of the purpose of this article is to help quantify just how much of a performance boost an individual can obtain by overclocking their system. Watercooling or not, modern hardware typically has a healthy amount of headroom that can be exploited for additional performance.
At stock, our system ran its Intel Core i7-4770K at 3.7GHz on all four cores (3.9GHz on a single core) and the pair of GTX 780s at reference clocks.
The air overclock ran its i7-4770K at 4.3GHz on all four cores and the pair of GTX 780s with a +125 offset on the GPUs and 7.1GHz on the GDDR5.
The liquid overclock ran its i7-4770K at 4.4GHz on all four cores and the pair of GTX 780s with a +135 offset, with a stable boost at 1160MHz, and 7.1GHz on the GDDR5.
We'll start with the PCMark tests.
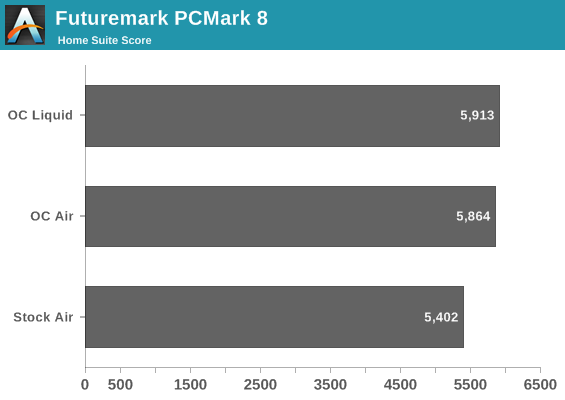
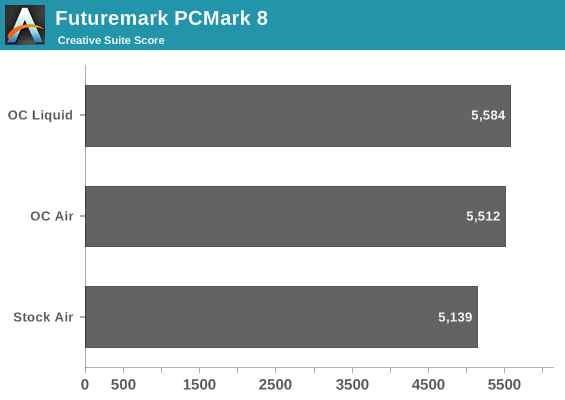
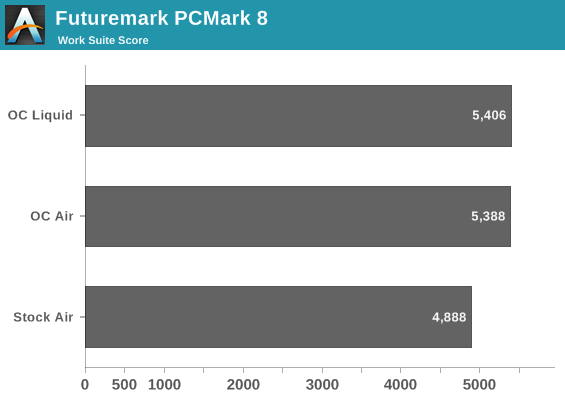
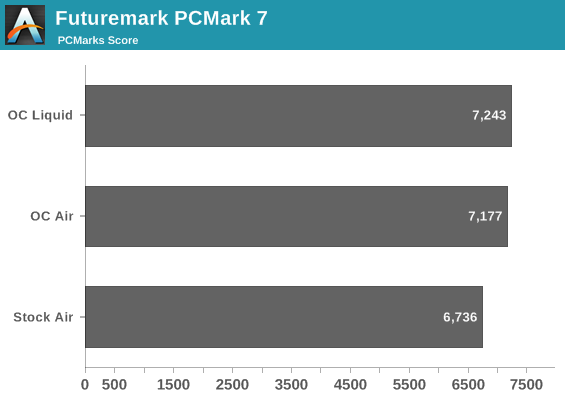
Our biggest jump came, naturally, from going from an effective 3.7GHz to 4.3GHz. The extra 100MHz on water improves scores across the board, but only marginally.
Next, we'll isolate CPU performance completely with Cinebench and the x264 benchmark.
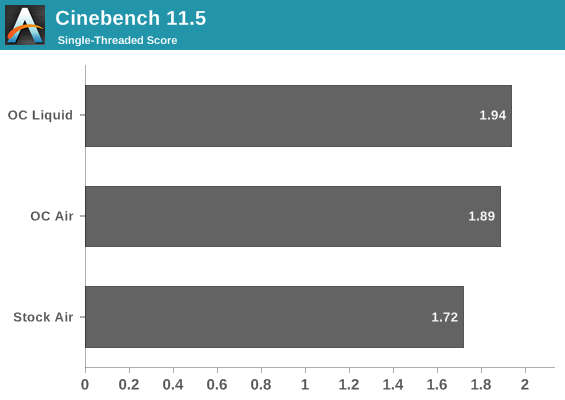
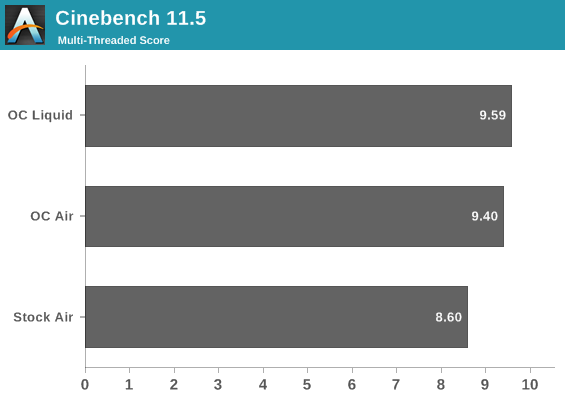
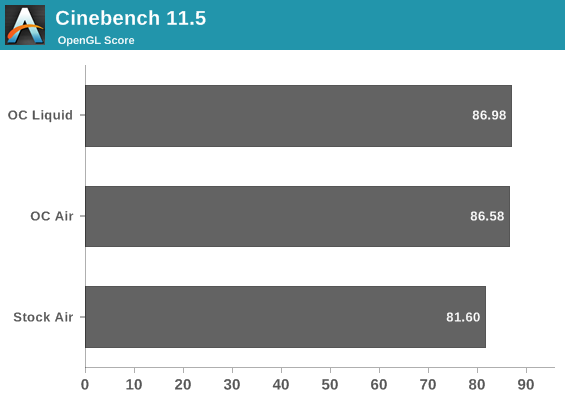
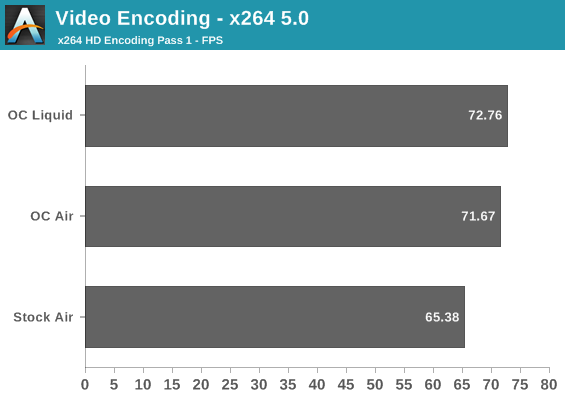
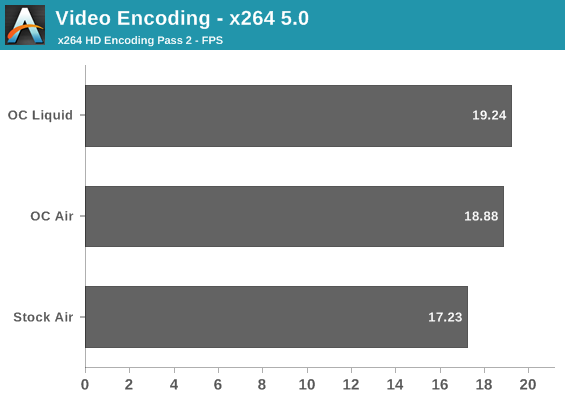
Again there's a healthy boost across the board, but the effort to get 4.4GHz just doesn't seem worth it for CPU centric tasks. 4.3GHz and DDR3-2133 wasn't too difficult for this chip and is probably the way to go; 4.4GHz brings a lot of heartache for not much gain.
Of course the big reason to go through this trouble was to hopefully get an improved gaming experience out of the bargain. Slightly more stable boost clocks on the pair of GeForce GTX 780s in SLI should give them at least a leg up, and now that we're getting past the era of the shoddy console port, CPU performance is starting to become more relevant. Mutli-GPU configurations only increase CPU overhead.
Again, per the previous page:
At stock, our system ran its Intel Core i7-4770K at 3.7GHz on all four cores (3.9GHz on a single core) and the pair of GTX 780s at reference clocks.
The air overclock ran its i7-4770K at 4.3GHz on all four cores and the pair of GTX 780s with a +125 offset on the GPUs and 7.1GHz on the GDDR5.
The liquid overclock ran its i7-4770K at 4.4GHz on all four cores and the pair of GTX 780s with a +135 offset, with a stable boost at 1160MHz, and 7.1GHz on the GDDR5.
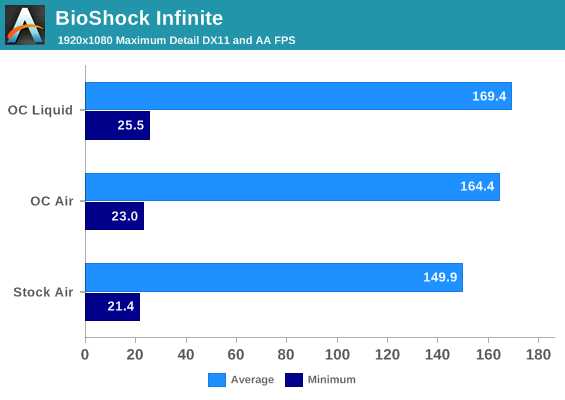
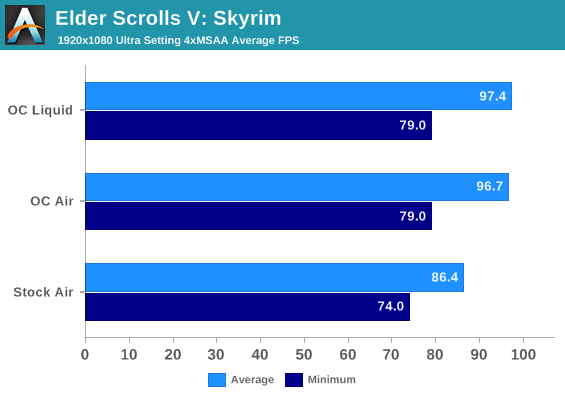
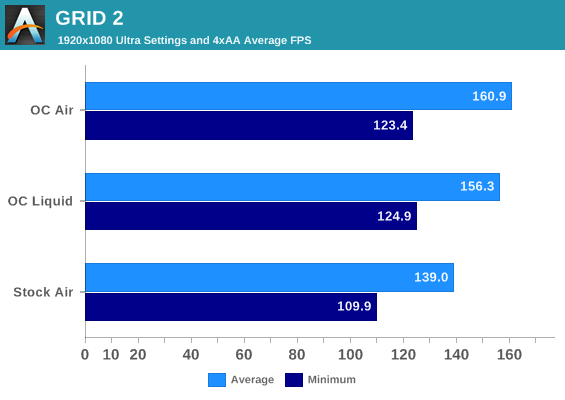
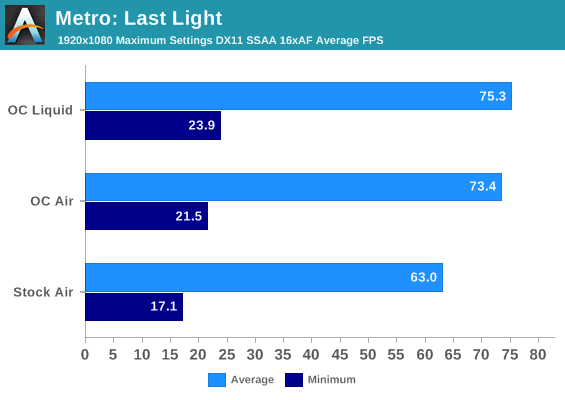
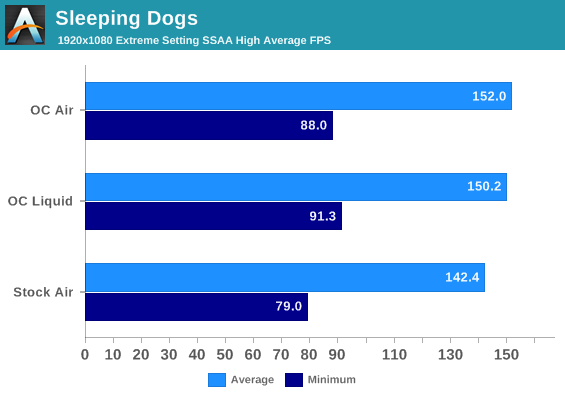
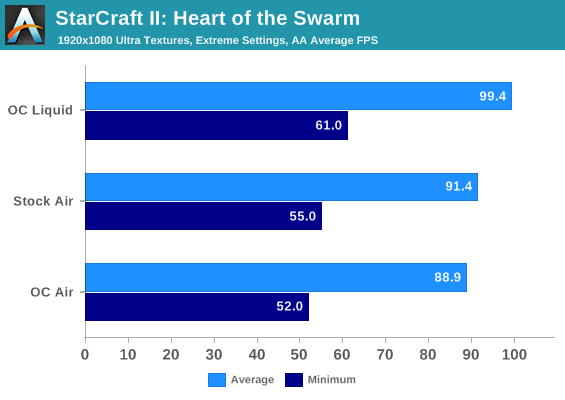
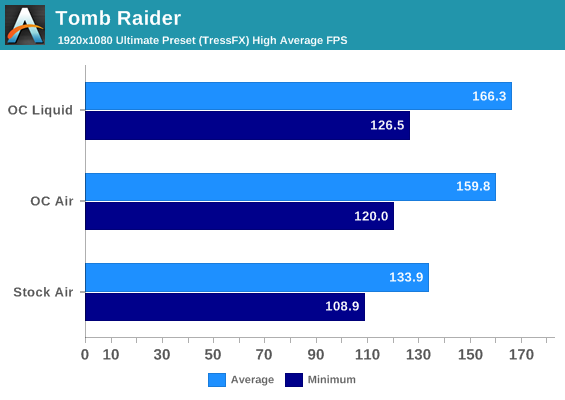
1080p tends to be more CPU limited, but let's see if there are some conclusions we can draw. I've included minimum frame rates as these are the ones we really want to boost. The initial overclock generally gives us a healthy performance jump across the board, but StarCraft II actually does worse for some reason. The modest increase in clocks going to liquid just doesn't seem to do a whole lot, but remember that the cards are spending more time at their boost clocks than they did under air. We could just be CPU limited, and the 100MHz increase on the i7-4770K may be too modest to let the cards stretch their legs.
Obviously, we need to jump to the surround resolution of 5760x1080.
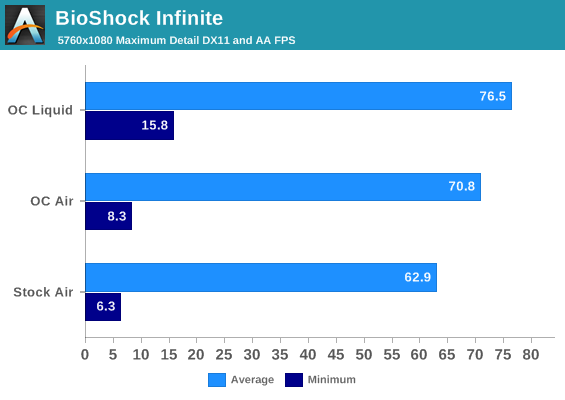
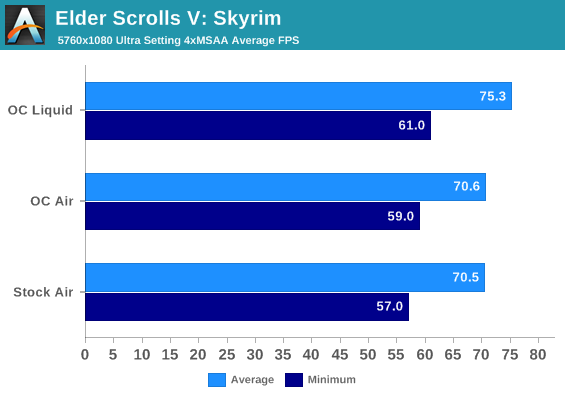
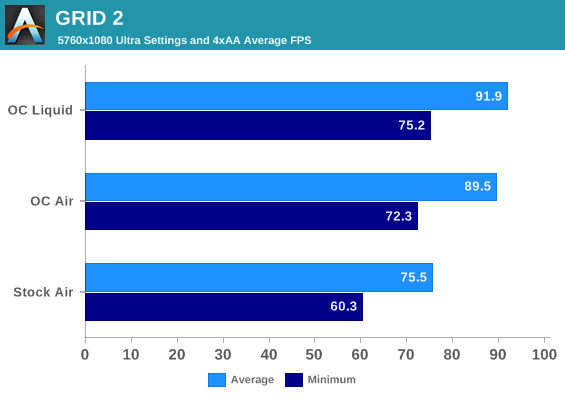
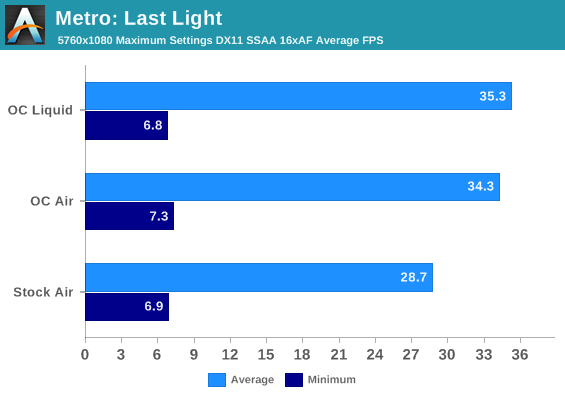
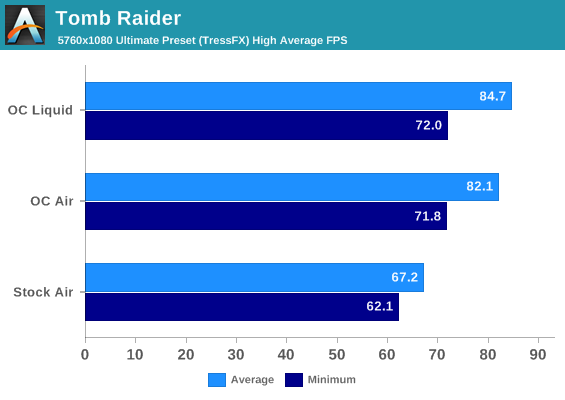
Most games continue to see only a mild increase in performance, but BioShock Infinite and Skyrim both start stretching their legs a bit more. The performance difference isn't tremendous, but it's measurable. BioShock Infinite in particular gets a really nice bump to its bottom line.
The last part of our objective testing is in measuring noise levels, thermals, and power consumption. All of these theoretically go up due to increased voltages on the CPU and graphics cards as well as just the overhead in running the liquid cooling system. Remember that we've added a water pump and essentially increased the number of case fans from three to six.
As I mentioned in my initial review of the Corsair Carbide Air 540, noise levels for the case itself aren't particularly stellar but they're not horrible either. Where we do benefit from the Gigabyte G1.Sniper 5 motherboard is its spacing between the two graphics cards; the board is designed to support four cards, so there's plenty of room for both cards to breathe.
First, we'll take a look at thermals.
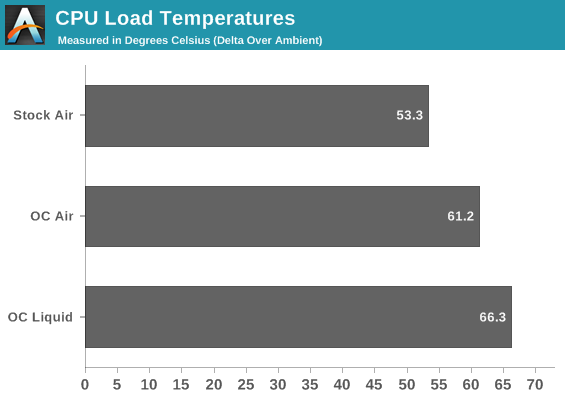
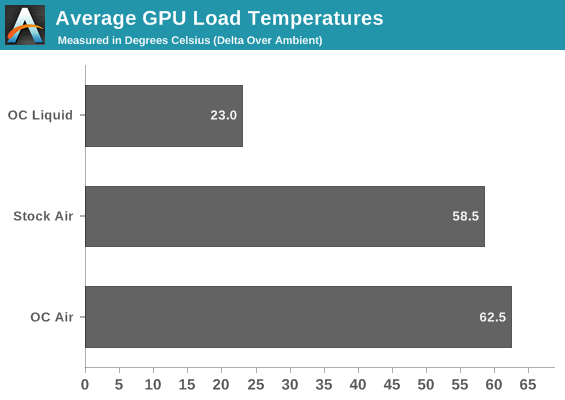
What should be striking is the increase in temperatures on the CPU going from air to water, but remember that we also were able to add a substantial amount of voltage in the process to hit 4.4GHz. Doubly striking is the way the load temperatures on the 780s are more than halved.
Despite the GPUs drawing substantially more power (and thus generating more heat) than the CPU, they also have much higher surface area and less overall heat density. We also benefit from direct contact between the heatsink and the GPU die, while Intel uses poor quality glue and thermal paste to bond the 4770K's die to the heatspreader. Ultimately it becomes too difficult to transfer heat off of the 4770K fast enough.
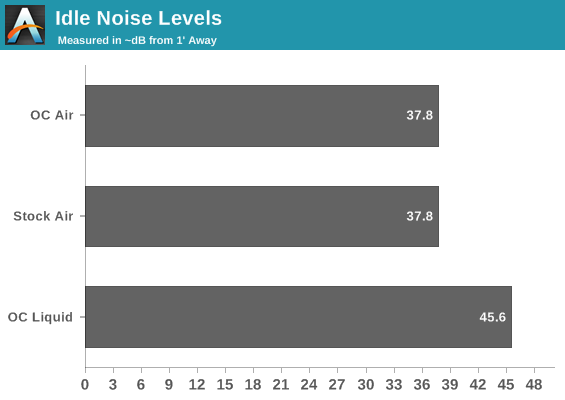
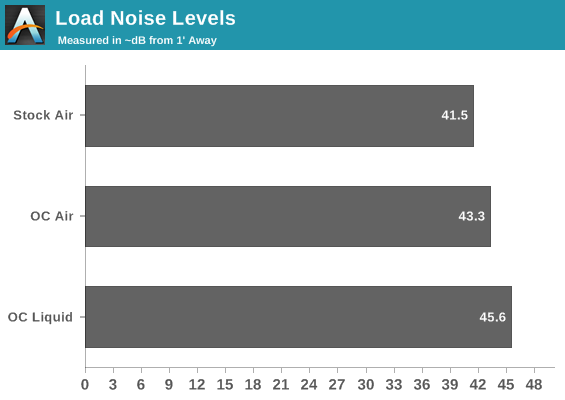
The reality is that none of these noise results are particularly uplifting, but there is a silver lining. If you shift down to 4.3GHz and lose all that voltage that was needed to hit 4.4GHz, you can also reduce the speeds on all of the fans and at least get your noise levels down substantially. Idle noise drops to about 31dB, with load noise closer to 35db or 36db. It's a lot more tolerable.
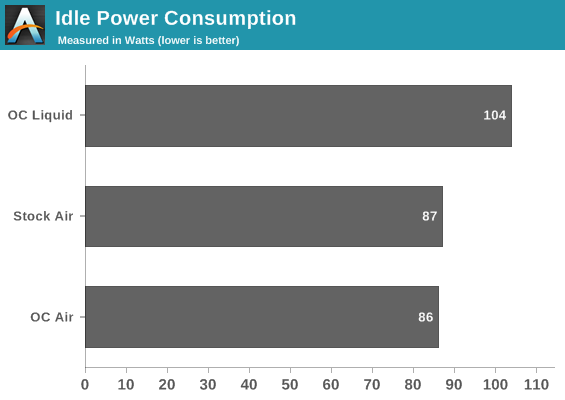
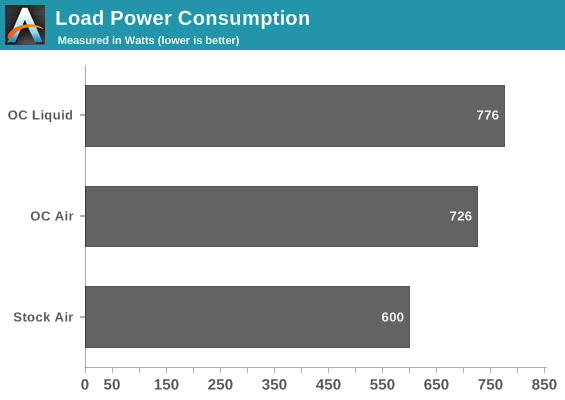
Given the way idle voltages are handled by Haswell and Kepler, it's reasonable to suggest the liquid cooling system adds about 15-20W of overhead as opposed to air cooling. Subtract 20W for the loop, and you're looking at our modest overclock tacking another 30W of power consumption on over the air cooling system. I'm at least a little nervous about what will happen when I flash the BIOSes of the GTX 780s to unlock a small voltage boost down the road.
Obviously there's a tremendous amount of information to sift through. This is without a doubt the longest article I've ever personally written; normally I leave the comprehensive works to my more gifted colleagues. I couldn't resist the challenge or the opportunities that presented themselves, though. Even as I write this, I'm testing an engineering sample i7-4770K donated by iBuyPower and finding it to be an infinitely more capable performer than the original retail chip I used. That's not a black mark on CyberPowerPC; it's not like they deliberately sent me a bad chip. It's more a reflection of the chip lottery that is a fact of life for enthusiasts.
Whether or not a custom liquid cooling loop is worth the time, effort, and expense is really going to be a matter of opinion for each individual. As someone who likes working with his hands in general, there was a lot of appeal in just building something, and a tremendous amount of satisfaction when, performance metrics be damned, the thing worked. When that pump fires up and you hear that coolant start circulating, and then after you've filled up the system just seeing the coolant cycle...that's rewarding. This is something that a lot of people have accomplished, sure, but it's much more work than just assembling a computer and sticking a CLC on the processor.
Performance wise, if you're trying to get a better overclock on the CPU, I think we're at the point where a good closed loop cooler is probably going to be enough. Dumping boatloads of voltage into it just to get incrementally higher performance past the chip's inflection point doesn't really do you any favors long term, so any increased thermal headroom a loop can offer you is somewhat negated.
Where I think watercooling really shines is when you apply it to graphics cards. High end graphics cards are ripe for it, with air coolers that are already being pushed fairly hard. Watercooling tanks the temperatures on those, and if you're feeling adventurous, can theoretically allow you some room to play with voltage and get a healthier bump in performance. I think it's worth it just for the low thermals and substantially reduced noise, personally, but if you're looking to sandwich two or more cards together, it's also nice not to have to worry about suffocating air coolers.
Finally, it's important to accept the limitations on the hardware you have. Chip lottery means that watercooling may just not give up the performance you were hoping for. It's often said that there are no guarantees when it comes to overclocking, but in the backs of all of our minds, with each generation of hardware, what we really want to know is "what's the typical overclock." What we really think is that we can count on the "typical overclock," but that's not true, and hopefully my experience here demonstrates that. Ian has an i7-4770K in his lab that won't go any higher than 4.2GHz for love or money. Overclocking is always going to be a gamble.
There are no clear recommendations that I can offer at the end of this experience; the best I can do is present you with the information and my experience and let you decide for yourself. I will say that Swiftech in particular has been tremendously helpful, overnighting me parts when I made mistakes and being exceptionally patient in answering any questions I had so that I could pass that information along to you. With a system like this on hand, it's difficult not to want to experiment and play in this new space, so expect at least an update or two with what I've done and tried and with more information in the future.

_thumb.jpg)
_thumb.jpg)
_thumb.jpg)
_thumb.jpg)
_thumb.jpg)
_thumb.jpg)
_thumb.jpg)
_thumb.jpg)
_thumb.jpg)
_thumb.jpg)
_thumb.jpg)
_thumb.jpg)
_thumb.jpg)
_thumb.jpg)
_thumb.jpg)
_thumb.jpg)
_thumb.jpg)
_thumb.jpg)


