Original Link: https://www.anandtech.com/show/6697/asrock-fatal1ty-x79-champion-and-x79-professional-review-from-a-gamer-to-gamers
ASRock Fatal1ty X79 Champion and X79 Professional Review: From a Gamer to Gamers
by Ian Cutress on February 9, 2013 10:30 AM EST- Posted in
- ASRock
- Motherboards
- Fatal1ty
- X79
We have a long wait until Ivy Bridge-E hits the shelves, and until that point the dichotomy between the features and price of both Sandy Bridge-E and Ivy Bridge will continue to weigh on the minds of performance enthusiasts. But does it weigh on the minds of gamers so much? Continuing debates rage on regarding how many cores are needed for game X, the low uptake of multi-GPU configurations, and the percentage of users with multi-monitor setups – are most gamers equipped with single screen and a single GPU? There will always be niche categories for the über enthusiast, and the ASRock Fatal1ty X79 range is aiming in that direction. Today’s review focuses on the Champion and Professional boards, both of which have had presence in the market for several months, but will continue to be ASRock’s high-end gaming offering until Ivy Bridge-E is released.
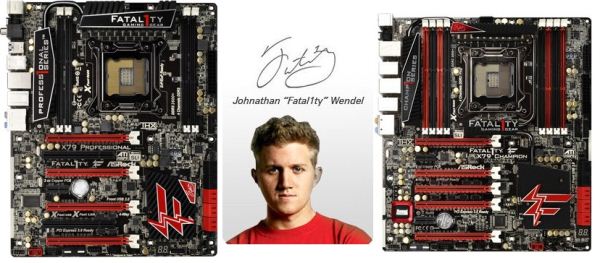
Johnathan ‘Fatal1ty’ Wendel – Who is he?
For anyone who has been involved in competitive gaming, Fatal1ty is a known name. For everyone else, cast your minds back to the late 90s. Gaming as a competitive competition was growing with the popularity of Doom and Quake, and eventually leagues were formed (such as the Cyberathlete Professional League) for the best players in the world to compete for cash prizes. Over recent years these contests (with the latest games) are regularly broadcast live across the internet, with thousands of fans avidly watching with anticipation.
Fatal1ty was a perennial winner of these competitions in the early 2000s, with a total of $500,000+ in cash and prizes and twelve major championship titles over five different games: Doom 3, Alien vs. Predator 2, Unreal Tournament 2003, Quake III and Painkiller. His life story has been presented by mainstream media in both print and television, such as in Time Magazine, The New York Times and MTV, as he has achieved a gamers ‘dream’ – international recognition with continued success. He is often quoted regarding his training regimen, featuring over eight hours a day of training, including both physical and mental preparation, alongside other normal sports which also pique his interest like hockey and American football.
Wendel has put aside actively competing, with his most recent accolades dating back to 2006. What Wendel has been able to do is cash in on the marketability of his success, much like top sports personalities that endorse day-to-day products. Fatal1ty Inc. is a brand licensing institution, with his name attributed to motherboards, power supplies, headsets, soundcards and even high energy ‘gamer food’, with a predicted income greater than that from his gaming exploits.
Come forward to 2013, and Wendel now manages his company, keeping abreast of his social media but also trying to develop competitive video gaming, and is often cited as the primary ambassador for e-Sports. He still games regularly, with updates on what/where he is playing online through the social media which is often streamed to the public. With the branding element of his business, we often see him promoting his various products at all the major technology and gaming events, such as CES, Computex and others.
From a hardware and technical standpoint, there are two ways to approach the Fatal1ty branding. The first is just a name addition – company X will pay $$ to put the name on the product, no other changes made. The other is that Wendel is comparable to a racing driver. He knows how the equipment should feel, and he can relay the experiences back to the design teams – there may even be an element of technical knowledge involved. But it is up to the engineers back at base to actually put pen to paper and design the equipment to respond as expected.
The analogy breaks down on the basis that the drivers in a series like Formula 1 are still competing, and want the best all the time – if the drivers do not perform, the company is not advertised and there is emphasis to improve more. Wendel is definitely not a test driver; he is a Schumacher – (semi)retired with respect to the greatest of the latest, but still a consultant. While the knowledge is still there, and he could take-on any regular off the street and win easily, he is not still at the top of the game, using the latest hardware in the most recent of stressful situations. Formula 1 is not sold by consultant branding.
The Dichotomy of the Brand
While Wendel has had success, the equipment that has his branding has two different responses depending on which side of the camp you are in. On one side, most gamers are vastly competitive – they do not want to aid to Fatal1ty’s stardom, they want to beat it. This means carving their own route, avoiding anything that has his name to strengthen his position. The flip side of the coin is fandom – in order to be the best you have to be equipped like the best (in order to be Messi or a Tom Brady, you want the boots, the kit etc.). If it has been endorsed by such an ambassador for competitive video gaming, it must be good, even if they have never used the latest versions to win in international competition?
When I approached ASRock at Computex 2011 regarding their decision to license the Fatal1ty logo and Wendel’s services at events, the response came back that the branding has immense success in pan-Asia. Without concrete numbers one could postulate that the ‘fan worship’ is more of an element in those areas, whereas the western gamer wants their own path.
To put this into my personal perspective as an ex-clan gamer, no-one I knew had Fatal1ty branded products. I currently own a Fatal1ty mouse pad, although that was a prize in a random draw. My brother by comparison is a casual PC gamer, enjoying FPS gaming but nothing competitive; he has owned three pairs of Fatal1ty headphones, based on a particular feature of those headphones. He has fallen afoul multiple times of accidentally pulling the cable out of his PC while still wearing them, something I have done from time to time (or running over the cable on an office-type chair).
Relationship with ASRock
“The heart of any gaming system is the gaming motherboard, and that is why I teamed up with ASRock, one of the best gaming motherboard companies in the world. They had the engineering expertise to make my concepts for gaming motherboards a reality. Fatal1ty Gaming Motherboards are engineered to be the best performing and value in mobos available on the market.” -Fatal1ty.
Generic marketing quotes aside, Fatal1ty initially pared up with Abit, a now defunct (but often praised in memoriam) motherboard manufacturer. The Fatal1ty branded boards were ‘designed by Abit, but game-tested and approved by Fatal1ty’ up until socket 775 and FM2. The first ASRock boards to bear the name come from the P67 and 990FX range, and subsequent Intel chipsets have enjoyed the naming.
The partnership offers ASRock a gaming range to market to consumers, with each product styled with the signature and colors of Fatal1ty Inc. Given Wendel’s repeated showcasing at ASRock events around the world, I would not be surprised that they wheel him in in front of the ASRock R&D team from time to time to ask for suggested updates.
Gamers prioritize responsiveness, performance, audio and connectivity, and thus over the generations of ASRock Fatal1ty boards we have seen IDE ports and Floppy ports ‘because some gamers want them’, but also high polling rate USB ports. As I would expect, PS/2 ports and multi-GPU configurations are part of the standard on these boards, and we also get software to enhance the polling rate of the USB ports for decreased latency between movement and action. One would also expect some form of network interface to reduce CPU consumption / prioritize gaming traffic, but rather than going the Atheros Killer route, ASRock use Broadcom NICs and software. Audio solutions also differ, with the cheaper boards getting the best Realtek solution, and some of the more expensive models going for Creative Sound Core3D.
“Gaming Motherboards are engineered to be the best performing and value”
‘Best performing and value’ is an odd phrase with a motherboard aimed at gaming – a gaming motherboard needs low latency and a good feature set beyond the standard off-the-shelf, both of which cost money to design, engineer and implement. This takes it away from the ‘value’ aspect, and the proof will be in the benchmarks as to whether they can take the heat.
In today’s review we are testing the X79 Champion and the X79 Professional, Fatal1ty boards aimed at the Sandy Bridge-E chipset. To a large degree, value does not apply with Sandy Bridge-E – the entry point for the processors is currently $300 for the base quad core or $570 for the hex-core (prices as of 1/25). The debate is still out as to whether having 6 Intel cores is better than 4 (and perhaps Z77) for gaming, but ASRock are aiming these boards at the gaming market where money is almost no object.
Both of these boards have been sitting in the office for a few months, gathering dust, but in that time we hope ASRock have been able to fix any initial release issues that have developed. It also means that the price should be lower than at release – current prices for the X79 Champion and X79 Professional are $360 and $265 respectively, putting them in the path of the Rampage IV Formula ($370) and Rampage IV Gene ($280), both boards aimed at gamers.
Ready? FIGHT!
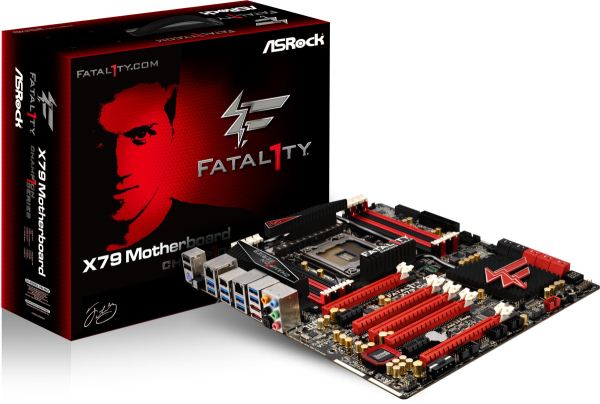
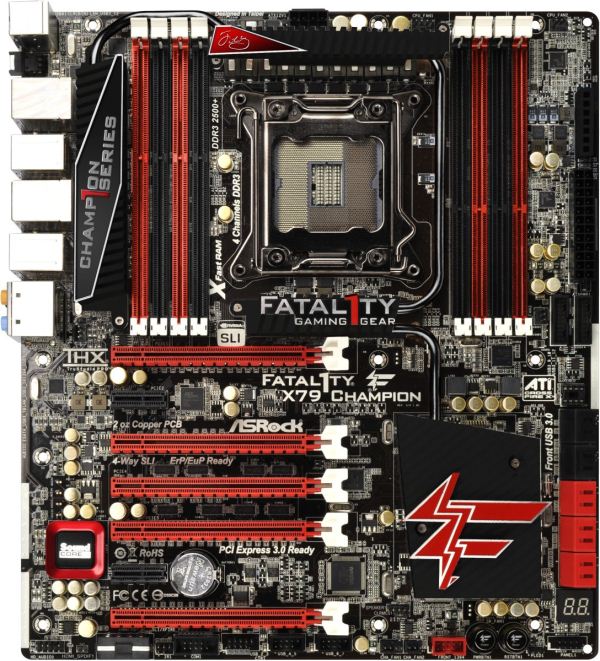
ASRock X79 Champion Visual Inspection
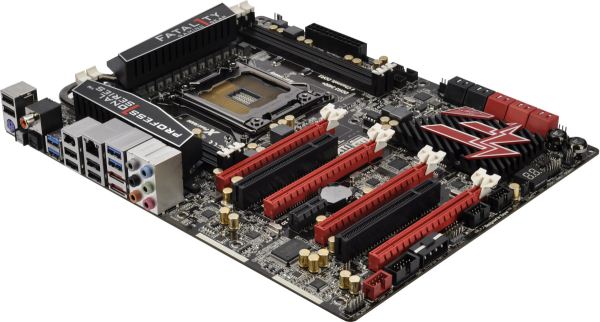
The best way to describe the Champion at first glance is ‘red’. The red and black color scheme does stand out a fair bit, although on close inspection we can see how busy the motherboard looks with all the additional components. The main reason for this is that each component is surrounded by a white box to help the automated machines that place components, so they can line everything up correctly. This is process and manufacturer dependent, as some of the manufacturers do not need this – in return, there is extra space on board for additional components.
As a result of the Champion naming, we get an E-ATX sized motherboard, giving an extra inch of space from side to side (easiest way to check is look for the ATX case mounting holes). The extra space allows ASRock to exploit a full array of memory slots for X79, totaling 8 for two per memory channel. The power delivery heatsink is an extended array around the CPU power delivery, the memory sockets and also down to the chipset, all connected via heatpipe in order to maximize the surface area of any additional power draw through overclocking.
The socket area itself is at the limits of the Intel specifications, but the heatsinks are sufficiently low such that all the major air coolers should fit without issue – only by filling up all the memory slots may there be trouble with extended heatpipe arrangements. The CPU socket area has access to four fan headers within easy reach – one CPU 4-pin above the socket, a CPU 3-pin to the top right on the other side of the memory slots, a 3-pin to the bottom left of the socket between the heatsink and the rear IO, and a 3-pin on the bottom right between the USB 3.0 headers and the memory. The board has two other fan headers, one 4-pin and another 3-pin, on the bottom of the board.
Along the right hand side we get a series of voltage check points, which is an odd inclusion on a gaming motherboard. This feature is useful for extreme overclockers using sub-zero temperatures, but this board is not designed for that crowd; I cannot imagine gamers using them. Below the voltage check points is the 24-pin ATX power connector and a pair of USB 3.0 headers (using a TI controller), one of which should be used with the included USB 3.0 front panel in the box. In terms of SATA connectivity we get four SATA 3.0 Gbps and two SATA 6.0 Gbps from the chipset (all supporting RAID 0, 1, 5, 10) as well as four SATA 6.0 Gbps from a Marvell SE9230 controller (RAID 0, 1, 10).
Despite the voltage check points being in the remit of overclockers only, the two-digit debug, power and reset buttons found on the bottom right of the board are more amenable to a larger percentage of the target audience of the motherboard – they allow for quick debugging or checking that the board actually powers up and on. Along the bottom of the board we get the front panel header, the front panel audio header, a ‘front 1394’ header (FireWire), two fan headers, three USB 2.0 headers, a COM port and a 4-pin molex connector for additional VGA power.
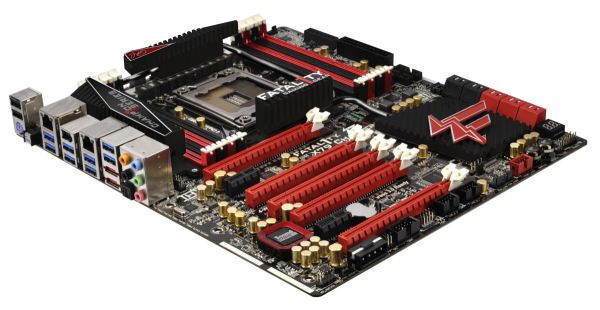
The PCIe layout is designed to accommodate up to four dual slot GPUs, but also three triple-slot GPUs, such that the following layouts are possible (using the full sized PCIe slots from top to bottom):
| ASRock X79 Champion PCIe Layout | |||||
| PCIe 1 | PCIe 3 | PCIe 4 | PCIe 5 | PCIe 7 | |
| Single GPU | x16 | - | - | - | - |
| Dual GPU | x16 | - | - | x16 | - |
| Tri-GPU | x16 | x8 | - | x16 | - |
| x16 | - | x8 | - | x8 | |
| Quad-GPU | x16 | x8 | - | x8 | x8 |
We test both cases in our GPU benchmarks, but it should be noted that in our sample, the bottom slot did not go into PCIe 3.0 when tested, even with the additional power connector at the bottom of the board. It remained in PCIe 2.0 mode despite the settings in the BIOS.
To the left of the PCIe slots is our audio codec, and ASRock have smartly selected a non-Realtek option in the form of the Creative Sound Core3D, a quad core sound and voice processor that supports EAX1.0 to EAX5.0. The Core3D also has a Premium Headset Amplifier chip which (as stated in the marketing blurb) provides wider bandwidth, a higher slew rate with lower noise and distortion, and supports up to 250 Ohm headsets, albeit only through the front panel audio header.

ASRock are laying USB 3.0 on fairly thick with the rear IO, bringing the total number of ports on the board to twelve with eight on the rear panel (all powered by TI controllers). Aside from these we get a pair of USB 2.0 ports (one of which is Fatal1ty Speed Port enabled), a PS/2 keyboard port, a ClearCMOS button, two Broadcom BCM57781 NICs, a FireWire/IEEE1394 port, two eSATA 6 Gbps ports (Marvell 9172 controller), an optical SPDIF output and audio jacks (Core3D).
Board Features
| ASRock X79 Fatal1ty Champion | |
| Price | Link |
| Size | E-ATX |
| CPU Interface | LGA-2011 |
| Chipset | Intel X79 |
| Memory Slots |
Eight DDR3 DIMM slots supporting up to 64GB ECC+non-ECC Up to Quad Channel, 1066-2500 MHz |
| Onboard LAN | Broadcom BCM57781 |
| Onboard Audio | Creative Sound Core3D |
| Expansion Slots |
5 x PCIe 3.0 x16 slots - 1/5: x16/16 - 1/3/5: x16/8/16 - 1/4/7: x16/8/8 - 1/3/5/7: x16/8/8/8 2 x PCIe 2.0 x1 |
| Onboard SATA/RAID |
2 x SATA 6 Gbps (Chipset), RAID 0, 1, 5, 10 4 x SATA 6 Gbps (Marvell SE9230), RAID 0, 1, 10 4 x SATA 3 Gbps (Chipset), RAID 0, 1, 5, 10 |
| USB |
12 x USB 3.0 (Controller) [4 onboard, 8 rear panel] 7 x USB 2.0 (Chipset) [6 onboard, 2 rear panel) 1 x USB 2.0 Fatal1ty Mouse Port (rear panel) |
| Onboard |
6 x SATA 6 Gbps 4 x SATA 3 Gbps 2 x USB 3.0 Headers 3 x USB 2.0 Headers 1 x COM Port Header 1 x HDMI_SPDIF Header 1 x IEEE1394 Header 7 x V-Probe Connectors 6 x Fan Headers Power/Reset Buttons Two-Digit Debug LED Post Status Checker LEDs |
| Power Connectors |
1 x 24-pin ATX Power Connector 1 x 8-pin CPU Power Connector 1 x 4-pin Molex Power Connector |
| Fan Headers |
2 x CPU (4-pin, 3-pin) 3 x CHA (4-pin, 2x3-pin) 1 x PWR (3-pin) |
| IO Panel |
2 x USB 2.0 Ports 1 x Keyboard PS/2 Port 1 x ClearCMOS Button 2 x Broadcom BCM57781 GbE NICs 1 x IEEE1394 Port 8 x USB 3.0 Ports (TI Controllers) 2 x eSATA 6 Gbps (Marvell 9172) Optical SPDIF Output Audio Jacks |
| Warranty Period | 3 Years |
| Product Page | Link |
As a gaming board, the use of a Creative audio codec on the Champion is a big plus, and the option for dual NICs will be welcomed by some users. The inclusion of voltage check points is a little odd, as this is not a board aimed at overclockers. Compared to the ASUS Rampage IV Formula, the ASRock offers more memory slots, SATA ports, more USB 3.0 ports, FireWire/IEEE1394, and dual the NICs, but fewer fan headers, a less obvious PCIe layout, a non-Intel network interface or nothing similar to ASUS Premium Service. Note that the Formula is also aimed at extreme overclockers and gamers alike, hence it has things like a Slow Mode, LN2 Switch and ROG Connect that the Champion does not.
ASRock X79 Professional Visual Inspection
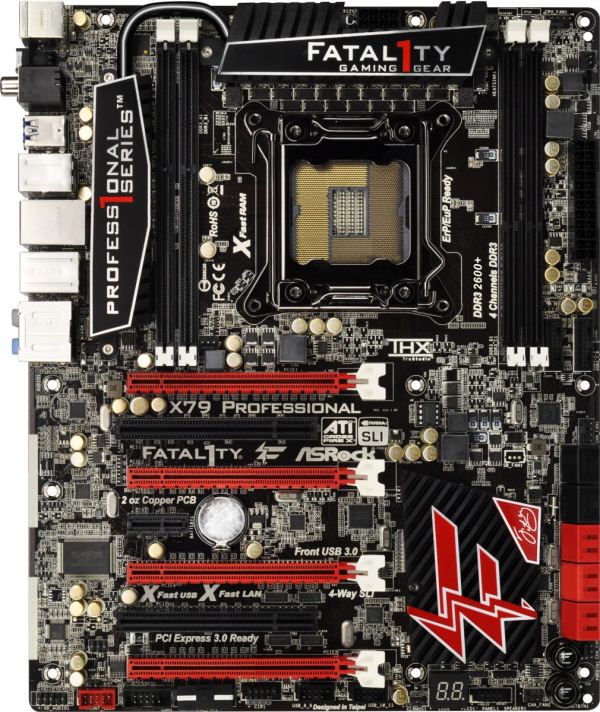
Naming aside, the Professional instantly comes across as a version of the Champion that has been stripped down, aiming for its $265 price point. The most obvious detail in this is the reduction down to four memory slots, giving one per channel of the CPU. The motherboard is also normal ATX sized, rather than the E-ATX of the Champion, meaning that the memory slot reduction helps fit everything on the motherboard. Similarly to the Champion, the PCB looks very busy indeed, and the black PCB is hidden under the components, unlike the MSI Z77 MPower we recently reviewed that was fairly clean by comparison.
Due to the fewer memory slots, the power delivery heatsink is larger than that of the Champion, both above the power delivery itself and the heat sink extra mass to the side of the memory slots (connected via heatpipe). Rather than have an extended affair across the whole motherboard with heatsinks, the chipset heatsink on the Professional is a separate unit that attempts to maximize surface area.
The socket itself is given ample room beyond Intel specifications in both the x and y dimensions, suggesting that all manner of CPU coolers are applicable here. However the distance between the inside memory slots is approximately 127 mm (5”), which means that the Noctua DH-14 would have issues if both fans were fitted and all the memory slots occupied. For fan headers, the socket area has four within easy reach – two CPU fan headers to the top right (4-pin + 3-pin), a PWR fan header to the bottom left beside the memory slots (4-pin), and at a stretch a CHA fan header above the SATA ports (also 4-pin). The final two fan headers are 3-pin at the bottom right of the board.
Along the right hand side of the board are two of the aforementioned fan headers, followed by the 24-pin ATX power connector and two USB 3.0 headers. Similarly to the Champion, ASRock are laying on the USB 3.0 with the Fatal1ty series, using TI controllers unlike others (ASMedia and Etron are more common). Below the USB 3.0 is another 4-pin fan header, then the SATA ports, and other fan header. The SATA ports give the typical chipset output (four SATA 3 Gbps, two SATA 6 Gbps), but we also have four more SATA 6 Gbps ports from Marvell controllers. The chipset ports are capable of RAID 0, 1, 5, 10, whereas the Marvell ports are only rated for RAID 0 and 1.
Much like the Champion, we get the power/reset buttons to play with, as well as a two digit debug display. As mentioned many times before, even though these have limited uses when the motherboard is set up inside a case, for debugging or testing they are a great asset to have.
The bottom of the board is the usual array of headers, including front panel audio, the front panel header, three USB 2.0 headers, a COM port header, an IEEE1394/FireWire header, the power/reset buttons, the two-digit Debug LED display, and a 4-pin Molex connector for VGA power. As mentioned with the Champion, even through the PCIe slots may need extra power when going 3-way or 4-way on the GPUs, I’d rather have a SATA power connector or 6-pin PCIe connector to use, ideally near the 24-pin ATX power connector if possible. At least we have moved away having the 4-pin molex between the socket and PCIe slots.
The PCIe layout is thankfully very simple, with the red slots indicating PCIe 3.0 x16 lanes available in an x16/x8/x16/- or x16/x8/x8/x8 configuration. In between these is a pair of PCI slots and a PCIe x1 such that the PCIe x1 is still available when two triple width GPUs are plugged in.

Personally I find the rear IO of the Professional a little more sensible than that of the Champion, as we have a more balanced number of USB 2.0 and USB 3.0 ports. I often use three USB 2.0 ports when installing an OS (mouse, keyboard, USB stick with OS image), and it can be frustrating when none of the USB 3.0 are initialized by the OS installer – it depends on the source of the USB 3.0 (Chipset or Controller) and the image whether it is initialized on install. Hopefully if/when the test suite is moved from Windows 7 to Windows 8, this will be less of an issue, or I may have to use onboard headers for USB 2.0 ports in the future.
Ranting aside, from left to right we get a PS/2 Keyboard port, a total of six USB 2.0 ports, a ClearCMOS button, a coaxial and optical SPDIF output, four USB 3.0 ports (TI controllers), an IEEE1394/FireWire port, a Broadcom BCM57781 gigabit Ethernet port, two eSATA 6 Gbps ports (Marvell) and a set of audio jacks.
Board Features
| ASRock X79 Fatal1ty Professional | |
| Price | Link |
| Size | ATX |
| CPU Interface | LGA-2011 |
| Chipset | Intel X79 |
| Memory Slots |
Four DDR3 DIMM slots supporting up to 32 GB, ECC+non-ECC with Xeons Up to Quad Channel, 1066-2600 MHz |
| Onboard LAN | Broadcom BCM57781 |
| Onboard Audio | Realtek ALC898 |
| Expansion Slots |
4 x PCIe 3.0 x16 (x16/x8/x16/- or x16/x8/x8/x8) 1 x PCIe 2.0 x1 2 x PCI |
| Onboard SATA/RAID |
2 x SATA 6 Gbps (Chipset), RAID 0, 1, 5, 10 4 x SATA 6 Gbps (Marvell SE9172), RAID 0, 1 4 x SATA 3 Gbps (Chipset), RAID 0, 1, 5, 10 |
| USB |
8 x USB 3.0 (Controller) [4 onboard, 4 rear panel] 11 x USB 2.0 (Chipset) [6 onboard, 5 rear panel] 1 x Fatal1ty USB 2.0 Mouse Port (rear panel) |
| Onboard |
6 x SATA 6 Gbps 4 x SATA 3 Gbps 2 x USB 3.0 Headers 2 x USB 2.0 Headers 6 x Fan Headers 1 x COM Port Header 1 x IEEE1394 Header 1 x Front Panel Audio Header 1 x Front Panel Header Power/Reset Buttons Two-Digit Debug LED |
| Power Connectors |
1 x 24-pin ATX Power Connector 1 x 8-pin CPU Power Connector 1 x 4-pin Molex VGA Power Connector |
| Fan Headers |
2 x CPU (4-pin, 3-pin) 3 x CHA (4-pin, 2 x 3-pin) 1 x PWR (4-pin) |
| IO Panel |
4 x USB 3.0 (TI) 6 x USB 2.0 1 x Keyboard PS/2 Port 1 x ClearCMOS Button 1 x Optical SPDIF Output 1 x Coaxial SPDIF Output 1 x FireWire/IEEE1394 Port 1 x Broadcom BCM57781 GbE NIC 2 x eSATA 6 Gbps (Marvell) Audio Jacks |
| Warranty Period | 3 Years |
| Product Page | Link |
Comparing the Professional to the Champion highlights the ‘stripped down’ feel of the Professional – half the number of memory slots, half the number of Ethernet ports, a move away from the Creative Core3D to a Realtek ALC898, a different PCIe layout, fewer USB 3.0 ports and a reduced heatsink array. A lot still stays the same, such as SATA port count, eSATA, fan headers, power/reset buttons, IEEE1394 functionality and a Fatal1ty mouse port.
As mentioned in the introduction, the Professional squares up against the Rampage IV Gene, a motherboard we awarded a Bronze award to back in our ROG review. The Professional comes in at $15 less, but it almost seems a mismatch given that the Gene is a micro-ATX sized board. The Gene is geared to both gaming and overclocking, and uses the fact that most gamers are unlikely to use beyond two GPUs. While the Professional has 4-way capability, more SATA ports, more USB 3.0 ports, more fan headers and Firewire/COM support, the Gene uses an Intel network interface, upgraded audio (SupremeFX III is a bulked up and optimized ALC898 under the hood), overclockers measurement points (due to board aims), full fan header control, ROG connect and the warranty is part of the ASUS Premium Service program. Aside from BIOS/Software differences which we will get into, the Professional is aiming at ‘more of everything’, whereas the Gene is ‘quality over quantity’, and both offer different ways of investing in an X79 system.
ASRock X79 Fatal1ty BIOS
With a specific line of motherboards, it would be great to assume that each manufacturer would tailor the BIOS and software to the branding in question. This means a change in color themes, styles, logos and philosophy (plus more wishy-washy sounding applications). It is very easy to stick in the ‘usual’ system, and the benefits therein would lie in consistency across the range. But when a product is endorsed/uses a branding under license, there has to be some extra element to the package.
Across the motherboard manufacturers, the top tiers are getting on the bandwagon and recognizing this. It goes beyond making sure all the slots on the board are the right color. The ASUS ROG team is actually a separate division within ASUS, making the transition easier. With ASRock, Gigabyte and MSI, the high end teams are still part of the channel divisions, meaning that adding the extra element involves diverting team members away from their normal tasks. MSI use Big Bang marketing on the software, but the BIOS is the same; Gigabyte lacks any segregation between their channel gaming and OC certified brands in this respect, and ASUS have filtered skins and styles. ASRock has already shown with the Z77 OC Formula that they can run different brands side by side, but Fatal1ty is perhaps a different kettle of fish.
Last year we examined the Z77 Fatal1ty Professional, which used a red themed BIOS adorned with the Fatal1ty logo – a definite step up from P67 BIOSes that insisted you see Fatal1ty’s mug all the time. The software was themed as well, turning the ASRock eXtreme Tuning Utility into F-Stream, and implementing the Fatal1ty mouse port. The X79 Fatal1ty series motherboards, under the latest BIOS, follow this livery.
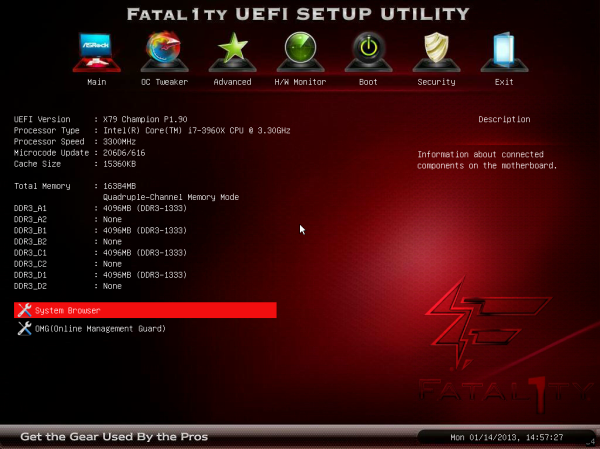
The Champion and Professional are much the same in their option range, and for the purposes of this review we are going to use screenshots from the Champion motherboard. Like all ASRock motherboards tested to date, there is no easy mode for the BIOS and we go straight into the meat of an advanced mode. The first screen on show is the Main screen, giving us the name of the motherboard, the BIOS version, the CPU installed, the current speed of that CPU, the memory installed, a DIMM slot breakdown of sizes and speeds, and a couple of options to various features. As always, on the first screen of a BIOS I want information, and ASRock covers most of the bases, although ideally I would like some temperature values in there and some voltages/fan speeds, just to make sure that I have not forgotten to put the liquid cooler pump onto a fan header (again).
One of my main gripes with current BIOS implementations is the lack of user experience. We get an opportunity to present the BIOS like it was software, and rather than an all-singing and all-dancing implementation using graphical representations and limitless possibilities, we get a wall of text and are told to enjoy it. The Fatal1ty range falls under the latter, which may or may not still be the case for the 8-series motherboards later this year. ASRock’s latest Z77 OC Formula makes a small step in the positive direction (better layout, higher definition graphics), but it is still a long way to being a true representation of the original UEFI vision.
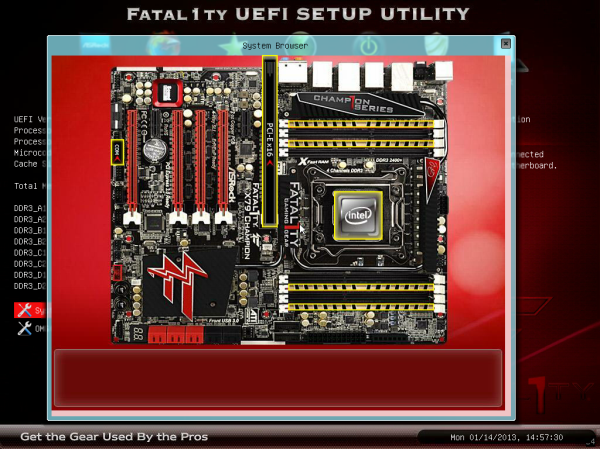
The nearest we really get to that vision in this BIOS is through the System Browser option on the Main screen, which displays a 2D image of the motherboard being used and highlights all the slots that are populated. Here the user can check whether everything is being seen at the BIOS level properly, such as PCIe devices, memory, SATA drives and so on. On the whole this is a good option from a debugging perspective, especially when family member X calls up and complains that they have only got 12 GB of memory.
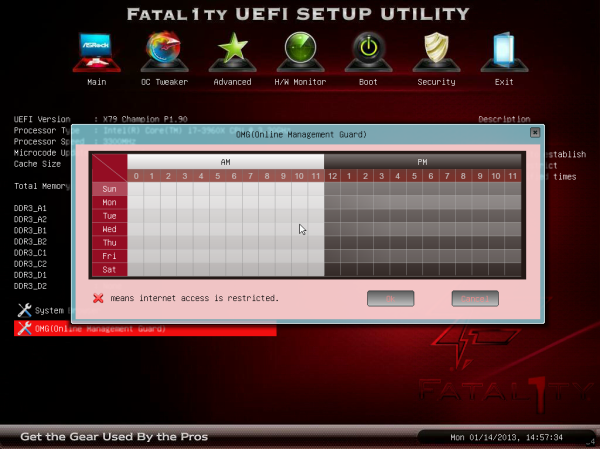
Beneath the System Browser option is the oddly named Online Management Guard (OMG for short). With OMG the user can select various hours at which the network controllers are disabled, such that if a user wants to limit the amount of time other users (such as children) are limited to the internet in the evenings. There are a few small issues, such as the granularity is only in hours, it disables everyone (even the owner) from the network, and it can easily be bypassed with a trip into the BIOS itself.
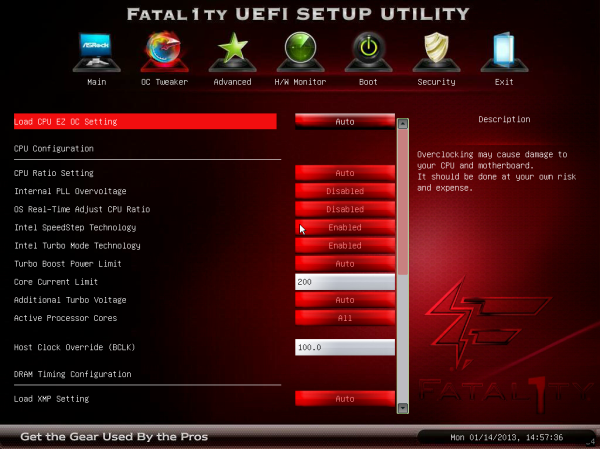
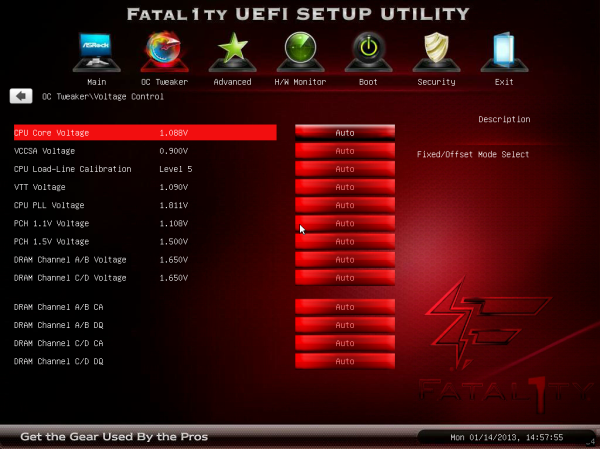
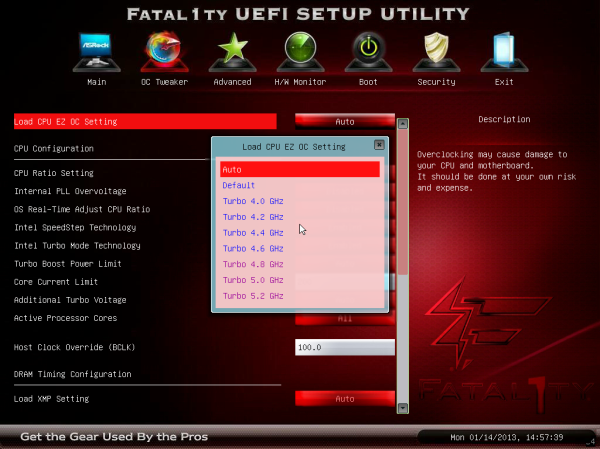
Users looking to overclock the CPU or enable XMP should navigate to the OC Tweaker menu. ASRock does a good job in laying out the various overclocking options in terms of CPU, power, memory then voltages, and we also get a ‘description’ bar on the right hand side as an explanation to what each option does. This description bar is something severely lacking in many other motherboards on the market, so I am glad we have one here.
The OC Tweaker menu provides a selectable list of ‘CPU EZ OC Settings’ which range from 4.0 GHz to 5.2 GHz in 200 MHz increments and use a pre-programmed look up table for overclock settings. Testing these (and observing which settings change) is often a good way to start an overclocking adventure, as well as finding the limits of the setup.
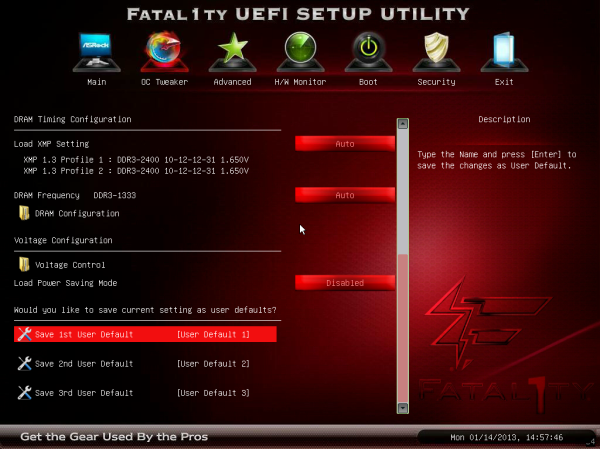
The memory sub-timing menu is suitably verbose such that seasoned overclockers can get to grips with the most obscure of settings, but also contains a list of Auto presets for anyone dealing with the primary sub-timings. The voltage control menu offers the main voltage change options (CPU Core, VCCSA, VTT, PLL, PCH and DRAM) as well as Load Line Calibration settings with a handy graph describing what each LLC setting does. The overclock options are sufficient for most users, although for extreme overclocking some users would also like access to slew and skew rates, which are standard BIOS options on the gaming/overclocking-oriented ASUS ROG boards.
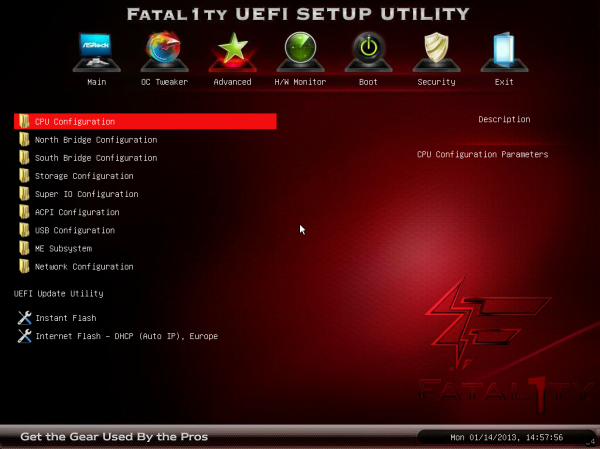
The Advanced tab contains the majority of standard BIOS options such as USB and storage configurations, CPU Power Management, storage configurations, South Bridge control and PCIe lane allocations. It should be noted that both the Champion and the Professional have issues on the PCIe front in the latest BIOSes:
- Champion: On default settings all the PCIe slots are set to Gen3, but the bottom PCIe slot drops down from PCIe 3.0 to PCIe 2.0 while in the operating system.
- Professional: On default settings all the PCIe slots are set to Gen2.
This is an unfortunate set of circumstances, as I am sure that shifting the Professional to Gen3 by default would offer various niche scenarios with more performance.
Also in the Advanced tab is our BIOS/UEFI update options. ASRock offer a direct download and flash option from the BIOS itself if you have an applicable wired home setup (no WiFi or ICS), or update via USB for everyone else.
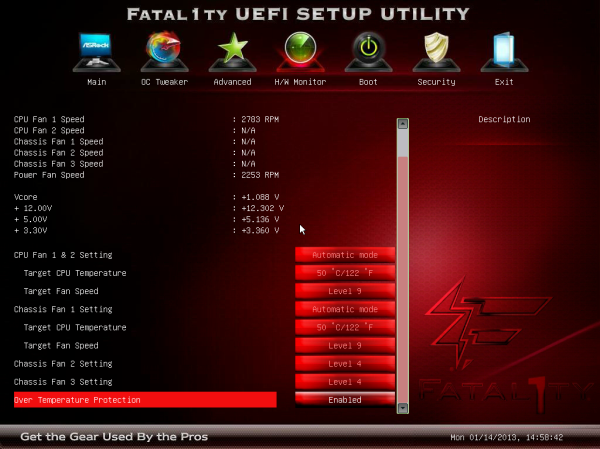
The H/W Monitor tab shows the temperature sensors and fan speeds of all the headers on board. For fan controls, the CPU fan headers are controlled as one and the Chassis fan headers get treated individually. Any PWR headers have no options, but the default setting for all fans is 100% fan speed all the time. This is a little game ASRock play which allows reviewers to get higher overclocks on stock settings in exchange for a higher fan noise which reviewers tend not to test. With regard to the fan options, the CPU fans are given a target CPU temperature and a target fan speed – if the CPU temperature goes over the target temperature, the fan will ramp up until it is brought back down. Below the target temperature, the fan will spin according to the target fan speed.
Elsewhere in the BIOS we have boot options and security configurations. Unfortunately we are missing boot override functionality that allows for a one-time boot from an attached device without adjusting the boot order. This is a feature we see on some other manufacturer’s products that helps when dealing with external bootable devices.
ASRock X79 Fatal1ty Software
The big feature ASRock always wants to promote is its XFast platform – XFast USB, XFast LAN and XFast RAM. This trio of features have been a constant addition to any ASRock motherboard over the past twelve months, and promise up to 5x performance in each of the areas (although benchmarks are cherry picked to get that 5x speedup). When XFast meets Fatal1ty, part of me secretly hoped for “XFatal1ty” software to integrate all the features. No such luck, though the regular software platform does get a new red and black skin along with an extra Fatal1ty specific feature.
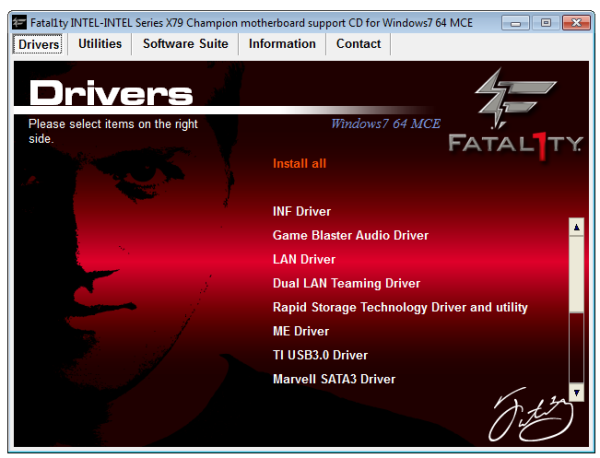
The Driver CD gets the Fatal1ty treatment – when selecting which drivers and software to install, Wendel’s face greets you on every screen. Thankfully choosing which drivers and software to install is a quick affair and the process completes automatically, leaving the user to go off make a hot drink rather than make eye contact.
The main hub of the software platform comes from the ASRock eXtreme Tuning Utility, which for the purposes of the Fatal1ty motherboards is called F-Stream Tuning, but it is essentially the same program with a red and black skin.
F-Stream Tuning
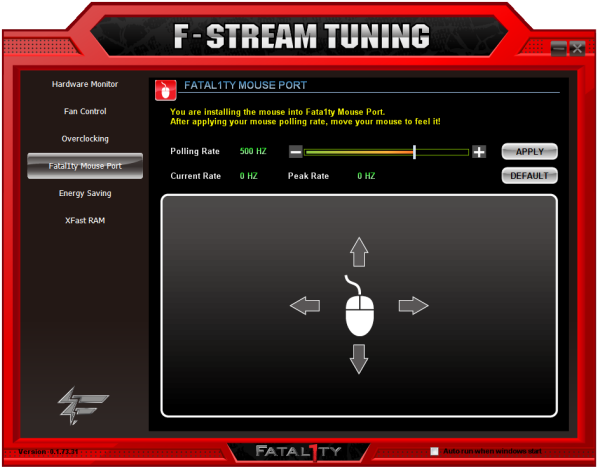
Much like its parent AXTU, F-ST features several menus including a hardware monitor, fan control, an overclocking menu, an energy saving menu and the XFast RAM selections. The Fatal1ty exclusive component is in the Fatal1ty Mouse Port option:
If a user has a USB mouse capable of being polled at more than 125 Hz, then this software enables that setting through a specific motherboard port designed to be polled at the higher frequencies. The benefits of having a mouse that can be polled 1000 Hz is debatable at best, depending on the frame rate and responsiveness of the game in question (e.g. at V-Sync, the mouse input is processed as if it were at 60 Hz), but it is there if needed.
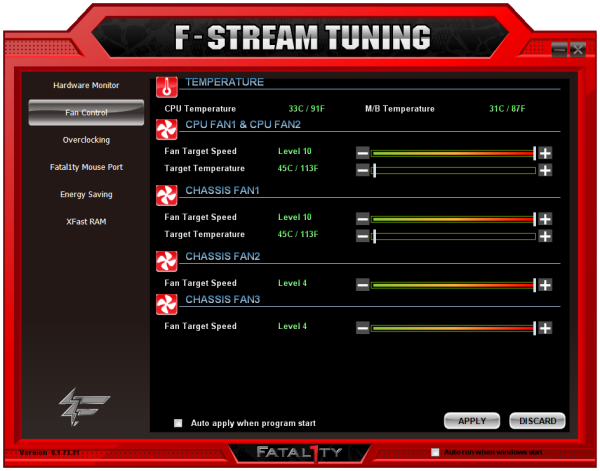
On the fan control side of the software, our basic ASRock controls are still at play – the CPU fans and first chassis fan are offered target temperatures and fan target speeds, with all other fan headers having fan target speeds. It is a little uncertain what the ‘target speed’ actually does due to the lack of explanation – does it define the fan speed after the target temperature, or will the fan be at 100% above the target temperature such that the target speed defines the fan profile below the target temperature? Or is it just a single fan speed above/below the target temperature? Fan controls this basic are practically pointless, especially when the motherboard has access to the fan RPM, temperature sensors and power output to all the fan headers. With some clever software manipulation, it would be easy to create an all-singing, all-dancing fan software application. No such luck with the ASRock X79 Fatal1ty boards.
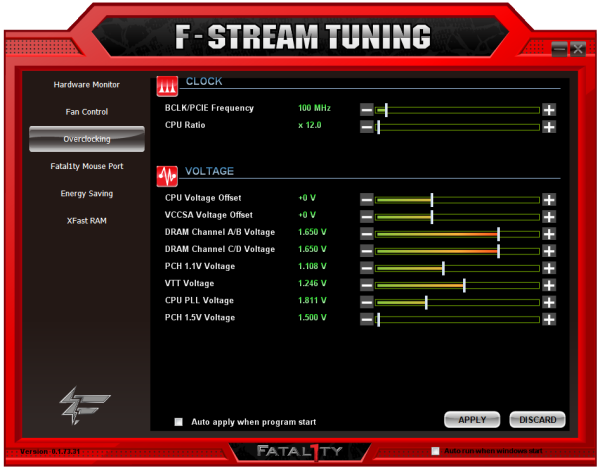
Overclock settings via F-Stream are also a little odd like the fan controls. The software behind the overclock settings was developed before turbo boost became a regular CPU feature and idle CPU states came into play. This means that this part of the software will always take the current CPU speed and voltage settings as the common settings, even if the system is idling. As shown in the picture below, it thinks we are at 1200 MHz all the time. CPU voltages are only changeable in terms of offset, and there is no indication as to what the current voltages, speeds or temperatures are. Time for an upgrade, ASRock!
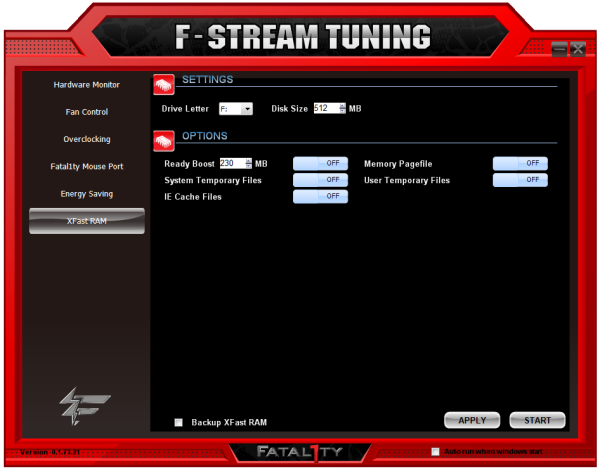
XFast RAM is actually a smart feature I like on these ASRock boards. It allows users with a lot of memory to partition some of it away as a fast (5+ GBps read/write) storage device and quick cache, meaning all those temporary files created by various actions are put somewhere quick to be accessed again. ASRock offers the ability to enable Ready Boost through this feature, as well as change settings to adjust system and IE temporary files. For any system with 16GB+ of memory, it might be worth partitioning 4 GB into something like this.
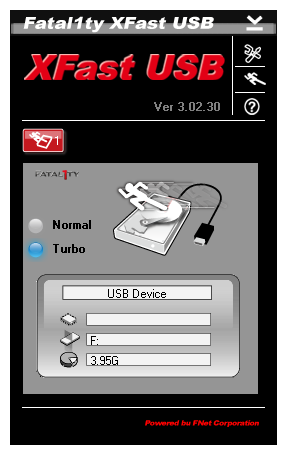
XFast USB
We have played with XFast USB for many months now, and the premise is simple – the basic Windows 7 USB drivers were written many years ago, and now we have the option to speed up those protocols. XFast USB, when enabled and a USB storage device is inserted, implements its driver to take advantage of Bulk Only Transfer (BOT) commands. This technically speeds up mass transfer across the USB interface (USB 2.0 and USB 3.0) at the expense of individual file latency. In our testing it makes a significant improvement on USB 2.0 and USB 3.0 in Windows 7, although it is worth mentioning that some other manufacturers also have their own implementations of something similar to XFast USB.
XFast LAN
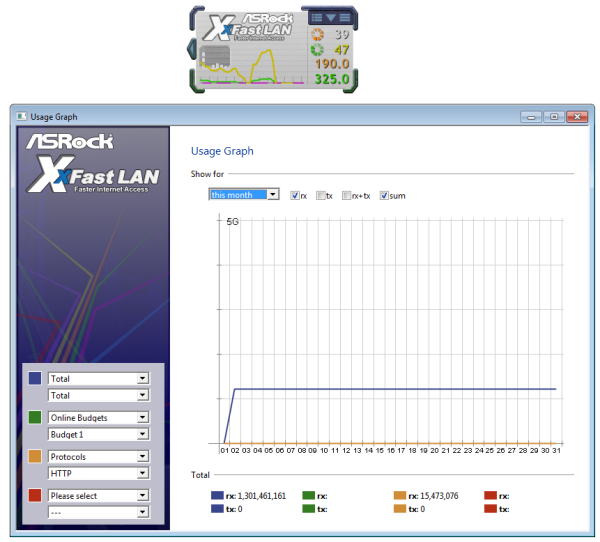
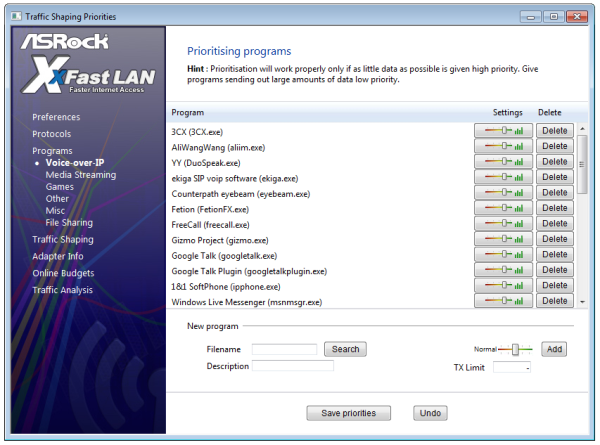
XFast LAN (aka cFosSpeed) is an advanced network port manipulation tool, designed for monitoring, prioritizing and adjusting network traffic all via software. For anyone other than ASRock, this is a 9.90 Euro purchase, but ASRock has a bulk licensing deal for every one of their motherboards, and helps users to adjust certain programs for priority data travel over any network interface on the motherboard.
Marvell Storage
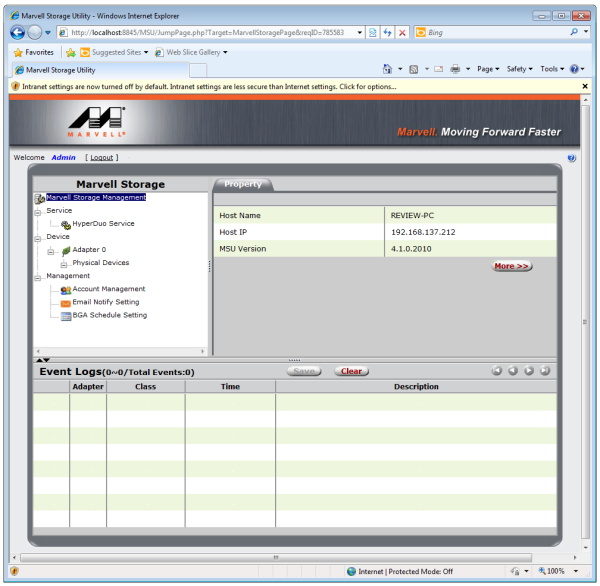
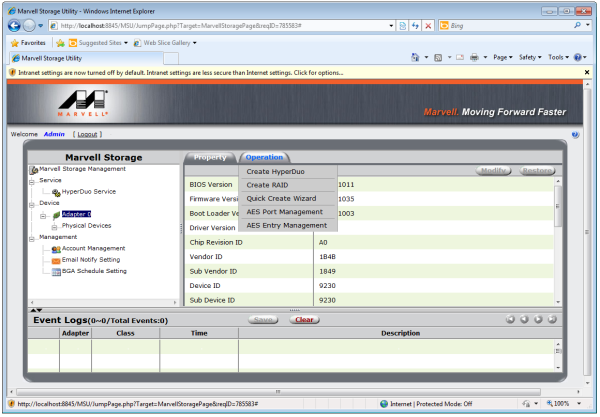
As the ASRock X79 Fatal1ty motherboards both use Marvell controllers to increase the SATA 6 Gbps port count, included in the package is the Marvell Storage Management panel. Accessed via the web interface, the software allows the user to manage the RAID setup across the ports, AES and HyperDuo (the Marvell version of SSD Caching).
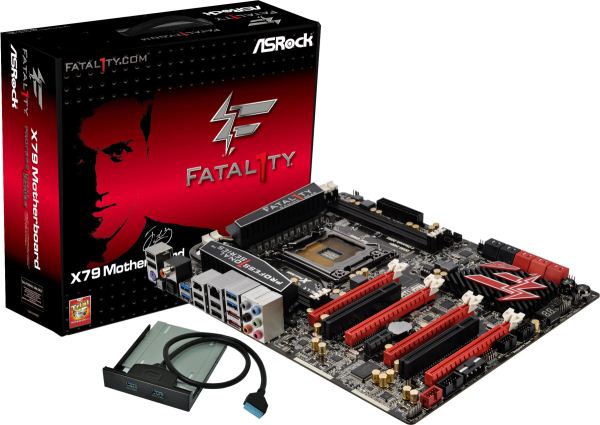
ASRock X79 Champion In The Box
With these high-priced system configurations, it is sometimes hard to predict what extras come with the package. Every motherboard manufacturer should be trying to give something special with their motherboard – either in terms of something we would actually use (WiFi/USB 3.0 combination box), a little gimmick that becomes part of a daily routine (a keychain or belt buckle), or some memorabilia (cloth bag with logo for carrying accessories, poster or a ‘do not disturb’ door sign). This is not always the case – if a product is stripped down to be as cheap as possible but still have high end features, we may not take away more than a couple of SATA cables. A $1.50 keychain in every box might mean an extra $5 on the box cost, resulting in pricing the motherboard out of the market. The only SKU that gets free reign are the ultimate high end models (Z77X-UP7, Rampage IV Extreme, X79 Extreme11), but seeing as the Champion is the high end X79 gaming model from ASRock, should we be expecting anything special, such as a Fatal1ty branded lanyard or stickers?
In the X79 Champion, we get the following:
Driver CD
User Manual
Rear IO Shield
Six SATA Cables
Two Molex to SATA Power Cables
Two 2-slot Rigid SLI Bridges
One 3-slot Rigid SLI Bridge
One 2-slot Rigid 3-way SLI Bridge
One 3-slot Rigid 3-way SLI Bridge
USB 3.0 Front Panel with Rear Bracket included
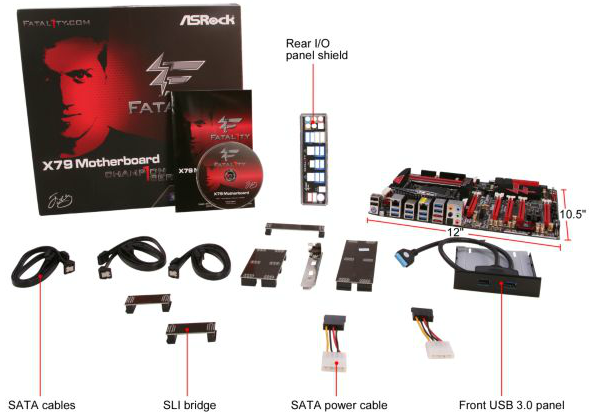
There is nothing Fatal1ty branded (not even the SLI bridges or USB 3.0 front panel), but a wide selection of everything in a standard motherboard package. Six out of ten SATA cables is a reasonable number, but I wonder how many users will be needing molex to SATA power cables when they are spending $300+ on a motherboard and possibly $550+ on a CPU? Actually what I am more concerned about is the number of SLI bridges included. A total of five across four sizes for any NVIDIA combination scenario is a bit silly, and probably adds $10+ to the overall cost of the motherboard. AMD got it right with a standard connector and insisting all of its partners include one in the box of every card (not that all of them do), rather than putting the emphasis on the motherboard manufacturers. In retrospect, by doing it this way, NVIDIA sells more SLI bridges. This motherboard package only needs two – a 4-way SLI bridge for PCIe 1/2/4/5, and a 3-way SLI bridge for 1/3/5.
ASRock X79 Champion Overclocking
Experience with ASRock X79 Champion
Recent overclocking attempts with ASRock boards have been overtly successful when isolated purely by the BIOS. The amount of automatic overclocking options has been plentiful, and the layout of the BIOS makes it amenable to adjusting voltages, VDroop and clock speeds. The downside is often the overclock options in the operating system, which are varied in their usefulness such that there are no automatic options, and manual options are enabled only after booting into the OS and when a program is running.
Unfortunately we also have another issue – the 3960X we have used in our overclocking tests since November 2011 is not running at its best. After using it for several small extreme overclocking sessions (5.2+ GHz), it now requires more voltage to get to similar clocks at the beginning of its life (e.g. 1.45V for 4.6 GHz now rather than 1.40 V). In the grand scheme of things this is not too bad – if this 3960X was a poor sample to begin with, it would have showed these traits. This just means that the OC results for this review should not be directly compared to other X79 reviews, as we hit the ambient temperature cooling limitations quicker such that the system automatically reduces clock speeds.
Overall the overclocking experience through the BIOS was easy. Keeping track of what the automatic OC options did helped shape how the manual overclocking went, especially in terms of load line calibration and power limits. At the high voltages and speeds, the temperatures caused the system to automatically reduce the multiplier rather than overheat, suggesting that a fine tune is needed for the optimum speed.
Methodology:
Our standard overclocking methodology is as follows. We select the automatic overclock options and test for stability with PovRay and OCCT to simulate high-end workloads. These stability tests aim to catch any immediate causes for memory or CPU errors.
For manual overclocks, based on the information gathered from previous testing, starts off at a nominal voltage and CPU multiplier, and the multiplier is increased until the stability tests are failed. The CPU voltage is increased gradually until the stability tests are passed, and the process repeated until the motherboard reduces the multiplier automatically (due to safety protocol) or the CPU temperature reaches a stupidly high level (100ºC+).
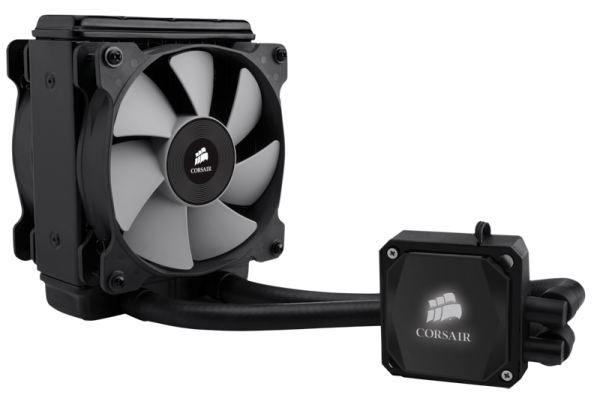
Our test bed is not in a case, which should push overclocks higher with fresher (cooler) air. We also are using Corsair’s H80i with a push-pull fan arrangement. This is a 120mm double-width radiator liquid cooler, designed to mimic a medium-to-high end air cooler.
Automatic Overclock:
The X79 Champion offers seven automatic overclocking options in the BIOS under the CPU EZ OC Menu:
Each of these options was stress tested under our normal setup conditions, with the following results:
As we moved through the options, the system increased the power and current limits on the board, along with applying a first a CPU voltage offset, then a fixed voltage value. The LLC was also adjusted from Level 5 (low) up to Level 1 (constant). Unfortunately the results were not that great, with the CPU and system maxing out at 4.4 GHz under these settings.
Manual Overclock:
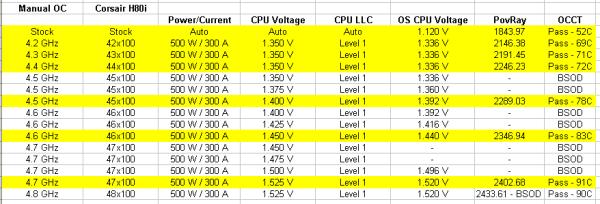
From the automatic overclocking, the system was set to a power limit of 500W, a current limit of 300A, PLL Overvoltage turned on, and the LLC set to Level 1. In line with previous X79 reviews, we set the CPU to the 42x multiplier for 4.2 GHz, and the BIOS voltage at 1.350 volts. When the system passed the stress test, the multiplier was increased – if it failed, the voltage was increased. Repeat until cooked.
Our system managed to pass the stress tests at 4.7 GHz with an alarmingly high 1.525 volts set in the BIOS. At 4.8 GHz the system passed both tests, although when closing PovRay the system BSODed. At that temperature, the system was already starting to throttle the CPU multiplier, as shown by the irregular increase in the PovRay score. With these results, 4.5 GHz seems a happy spot to be in.
ASRock X79 Professional In The Box
As we move down a range of motherboards from a single vendor in terms of price, the only change worth expecting in terms of box contents is usually a decrease in number, or elimination of high-end specific/low-end novelties. At $265, the Professional is still a large investment for any build, meaning we still expect some depth and range in the package itself. Given that the Champion and Professional support 4-way GPU configurations, I would safely assume given what the Champion provided that the Professional will also supply sufficient SLI Bridges.
From the Professional we get:
Driver CD
User Manual
Rear IO Shield
Six SATA Cables
Two Molex to SATA Power Cables
Two 2-slot Rigid SLI Bridges
One 3-slot Rigid SLI Bridge
One 2-slot Rigid 3-way SLI Bridge
USB 3.0 Front Panel with Rear Bracket included
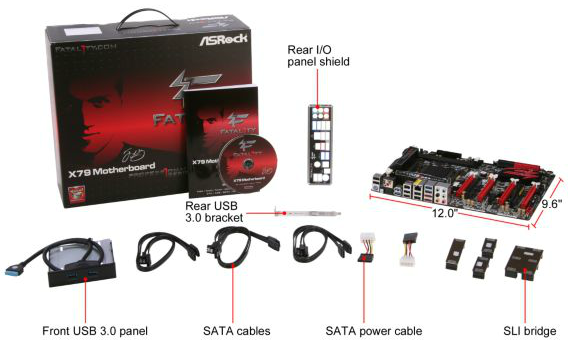
The only difference between the Professional and the Champion is the Professional lacks the 3-slot rigid 3-way SLI bridge because the PCIe layout does not allow such a configuration. Despite this, the motherboard still has four SLI bridges when a single rigid 4-way would have been sufficient for all NVIDIA configurations.
ASRock X79 Professional Overclocking
Experience with Professional X79 Professional
In comparison to overclocking with the Champion, the Professional achieved a higher overclock at a lower voltage and a lower temperature. It feels very weird to say that for two boards that are near identical, the cheaper one offers a better overclocking experience. A possibility for this could relate to the reduction of functionality from the Champion to the Professional, or that the Professional has had more input on the BIOS side (latest versions at testing time was P2.30 for the Professional and P1.90 for the Champion).
Nevertheless, the ASRock boards still fall down on the OS overclock implementation – no list of automatic overclocks from software, and the OC implementations in software are lacking at best, especially when put side by side with the competition, such as ASUS. The BIOS overclocking options are however well laid out, easy to use, and provide a large number of automatic options to help any user on their overclocking journey.
Methodology:
Our standard overclocking methodology is as follows. We select the automatic overclock options and test for stability with PovRay and OCCT to simulate high-end workloads. These stability tests aim to catch any immediate causes for memory or CPU errors.
For manual overclocks, based on the information gathered from previous testing, starts off at a nominal voltage and CPU multiplier, and the multiplier is increased until the stability tests are failed. The CPU voltage is increased gradually until the stability tests are passed, and the process repeated until the motherboard reduces the multiplier automatically (due to safety protocol) or the CPU temperature reaches a stupidly high level (100ºC+). Our test bed is not in a case, which should push overclocks higher with fresher (cooler) air.
Automatic Overclock:
Due to the lack of automatic overclock settings in the OS and software, we delve straight into the BIOS. We are offered overclocks from 4.0 GHz to 5.2 GHz, in 200 MHz intervals – these options recall a pre-programmed table of settings and apply them in the BIOS.
The results are as follows:
The options and settings for the Professional mirror those of the Champion as one would expect, however as noted, the automatic settings on the Professional are stable one notch higher than those of the Champion.
Manual Overclock:
Using the automatic overclock settings as a guide, the following options were selected for the manual overclocks:
Power Limits: 500 W
Current Limit: 300 W
Load Line Calibration: Level 1
PLL Overvoltage: Enabled
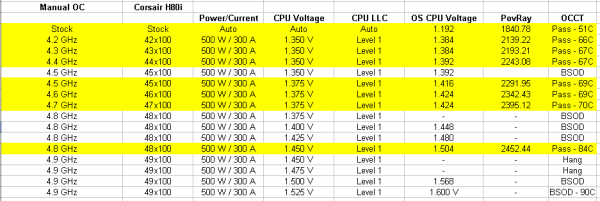
Starting at 4.2 GHz and 1.350 volts as set in the BIOS, the system was tested for stability, moving up in multiplier when successful and moving up in voltage when unsuccessful. Our results are as follows:
There are a couple of results worth noting.
On the Professional, the load OS voltage (when using a Load Line Calibration of Level 1) is clearly miles above what is actually set in the BIOS. For example, at our 4.8 GHz stable setting, at load in the operating system showed 1.504 volts, compared to only 1.450 volts in the BIOS. That is a crazy difference, and I have no understanding of why ASRock would program it this way, especially when the Champion by comparison does a near 1:1 application of setting and load.
As a result of our overclocking, the system was successfully stable at a lower range of voltages as set in the BIOS. The Professional was stable at 4.7 GHz with only 1.375 volts in the BIOS (1.424 volts at OS load) compared to the Champion which required 1.525 volts (1.520 volts at OS load). This is a large difference, indicated by a load temperature of 70C on the Professional to 91C on the Champion.
Many thanks to...
We must thank the following companies for kindly providing hardware for our test bed:
Thank you to OCZ for providing us with the 1250W Gold Power Supply and USB testing SSD.
Thank you to Micron for providing us with the SATA testing SSD.
Thank you to G.Skill for providing us with the memory kits.
Thank you to ASUS for providing us with the AMD GPUs and some IO Testing kit.
Thank you to ECS for providing us with the NVIDIA GPUs.
Additionally, many thanks to Corsair for providing us with the Corsair H80i CLC, as this is the first time we are using this unit in motherboard testing. The H80i is the Corsair Link enabled and updated version of the H80, the closed-loop liquid cooling system with a 120mm double width radiator. Dustin reviewed the unit at the beginning of the year, and is currently available for $95.
Test Setup
| Test Setup | |
| Processor |
Intel Core i7-3960X 6 Cores, 12 Threads, 3.3 GHz (3.9 GHz Turbo) |
| Motherboards |
ASRock X79 Professional ASRock X79 Champion |
| Cooling | Corsair H80i CLC |
| Power Supply | OCZ 1250W Gold ZX Series |
| Memory | GSkill RipjawsZ 4x4 GB DDR3-2400 10-12-12 |
| Memory Settings | 2133 10-12-12 |
| Video Cards |
ASUS HD7970 3GB ECS GTX 580 1536MB |
| Video Drivers |
Catalyst 12.3 NVIDIA Drivers 296.10 WHQL |
| Hard Drive | Micron RealSSD C300 256GB |
| Optical Drive | LG GH22NS50 |
| Case | Open Test Bed - CoolerMaster Lab V1.0 |
| Operating System | Windows 7 64-bit |
| SATA Testing | Micron RealSSD C300 256GB |
| USB 2/3 Testing | OCZ Vertex 3 240GB with SATA->USB Adaptor |
Power Consumption
Power consumption was tested on the system as a whole with a wall meter connected to the OCZ 1250W power supply, while in a dual 7970 GPU configuration. This power supply is Gold rated, and as I am in the UK on a 230-240 V supply, leads to ~75% efficiency > 50W, and 90%+ efficiency at 250W, which is suitable for both idle and multi-GPU loading. This method of power reading allows us to compare the power management of the UEFI and the board to supply components with power under load, and includes typical PSU losses due to efficiency. These are the real world values that consumers may expect from a typical system (minus the monitor) using this motherboard.
While this method for power measurement may not be ideal, and you feel these numbers are not representative due to the high wattage power supply being used (we use the same PSU to remain consistent over a series of reviews, and the fact that some boards on our test bed get tested with three or four high powered GPUs), the important point to take away is the relationship between the numbers. These boards are all under the same conditions, and thus the differences between them should be easy to spot.
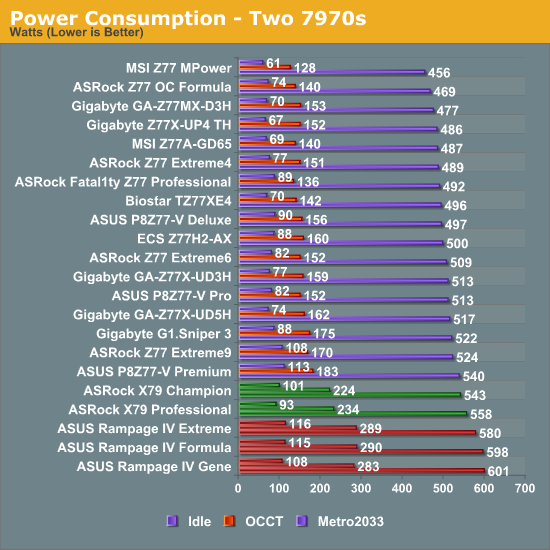
Power consumption on the ASRock boards is much lower than that of the ASUS Rampage boards, especially during OCCT loading.
Windows 7 POST Time
Different motherboards have different POST sequences before an operating system is initialized. A lot of this is dependent on the board itself, and POST boot time is determined by the controllers on board (and the sequence of how those extras are organized). As part of our testing, we look at the POST Boot Time - this is the time from pressing the ON button on the computer to when Windows starts loading. (We discount Windows loading as it is highly variable given Windows specific features.) Despite the advent of Windows 8 introducing features for quick booting within several seconds, a significant number of users are still on Windows 7, where POST times usually fall in the 7-25 second range. For a good result, we are looking for around 12 seconds when the board has two GPUs fitted (one for mITX), as per our testing. We test both the stock boot time (with BIOS at default), and a stripped BIOS where all extra onboard controllers (LAN, USB 3.0, SATA, etc.) are disabled.
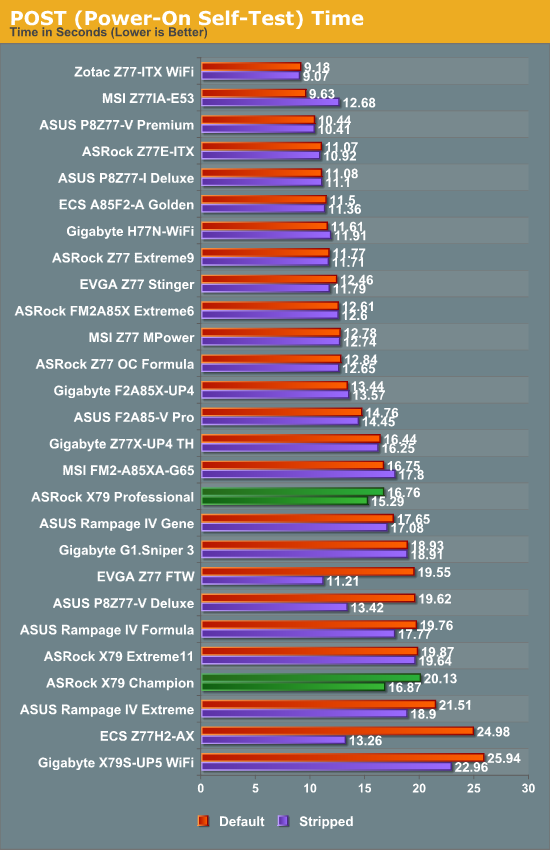
Unfortunately the Champion falls down on boot times, hitting over 20 seconds at default but saving a little grace with 16.87 seconds when stripped. The Professional has a better time, beating the stripped Champion while at stock, and going a little further when stripped. Neither however have great boot times.
Rightmark Audio Analyzer 6.2.5
In part due to reader requests, we are pleased to include Rightmark Audio Analyzer results in our benchmark suite. The premise behind Rightmark:AA is to test the input and output of the audio system to determine noise levels, range, harmonic distortion, stereo crosstalk and so forth. Rightmark:AA should indicate how well the sound system is built and isolated from electrical interference (either internally or externally). For this test we connect the Line Out to the Line In using a short six inch 3.5mm to 3.5mm high-quality jack, turn the OS volume to 100%, and run the Rightmark default test suite at 48 kHz, 96 kHz and 192 kHz. We look specifically at the Dynamic Range of the audio codec used on board, as well as the Total Harmonic Distortion + Noise.
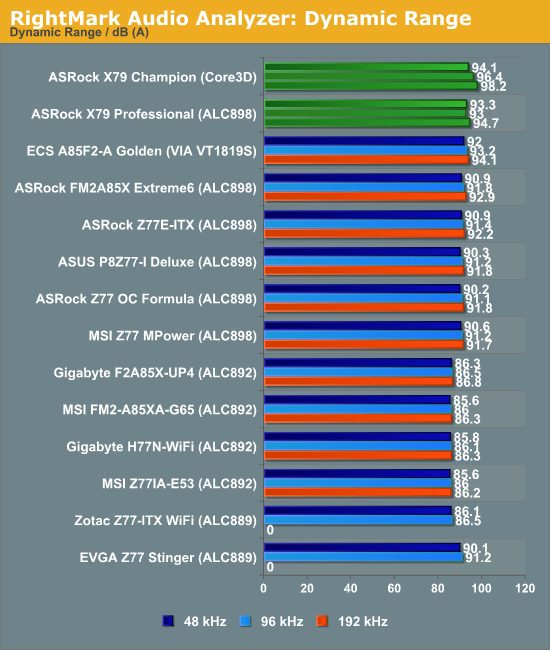
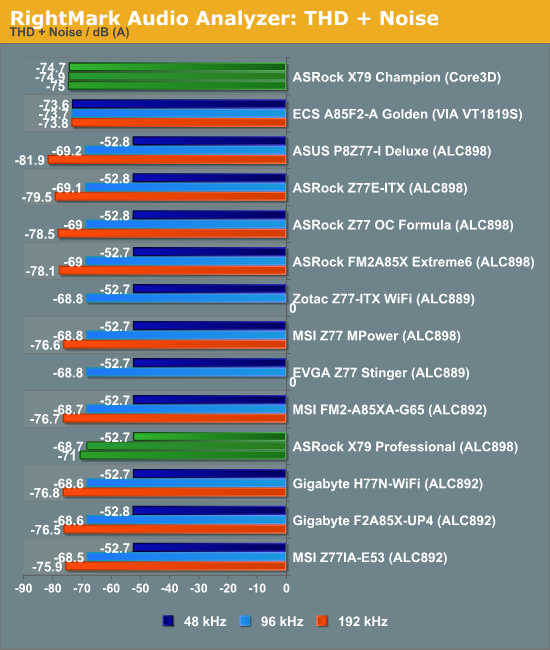
The Creative Sound Core3D chip in the Champion does a great job in our THD+N test across all frequency ranges, -75 dB(A) relating to a distortion of less than 0.02%. The ALC898 in the Professional performs much like the other ALC898s in other motherboards.
It should be noted that we had to disable THX Studio Pro on the Champion to perform the tests, due to extreme cross channel leakage of the audio signals.
USB 3.0 Backup
For this benchmark, we run CrystalDiskMark to determine the ideal sequential read and write speeds for the USB port using our 240 GB OCZ Vertex3 SSD with a SATA 6 Gbps to USB 3.0 converter. Then we transfer a set size of files from the SSD to the USB drive using DiskBench, which monitors the time taken to transfer. The files transferred are a 1.52 GB set of 2867 files across 320 folders – 95% of these files are small typical website files, and the rest (90% of the size) are the videos used in the WinRAR test.
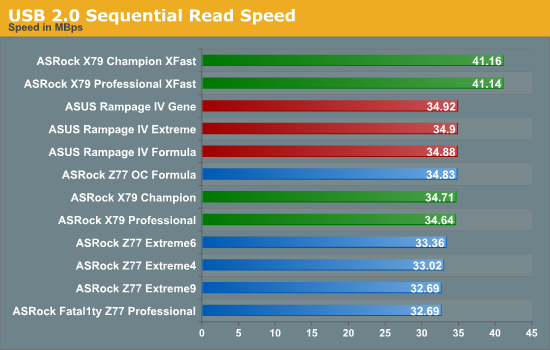
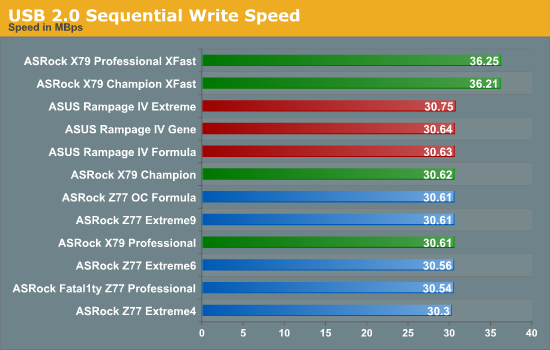
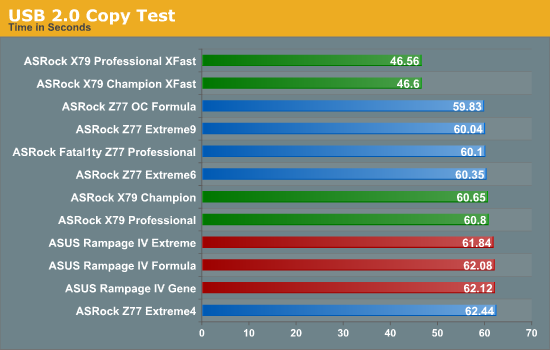
ASRock’s XFast software always gives them the best USB 2.0 scores in comparison to the rest of the spectrum. Even without XFast though, the ASRock copy times are still very competitive.
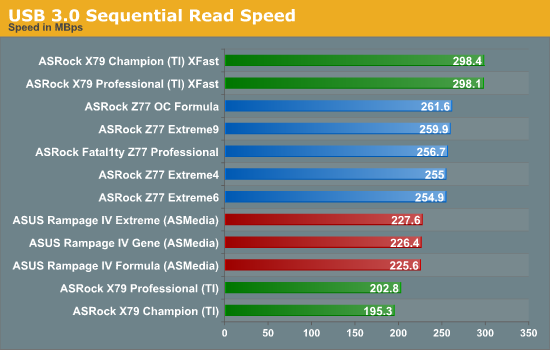
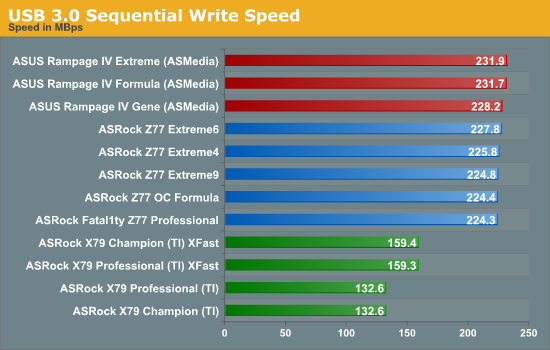
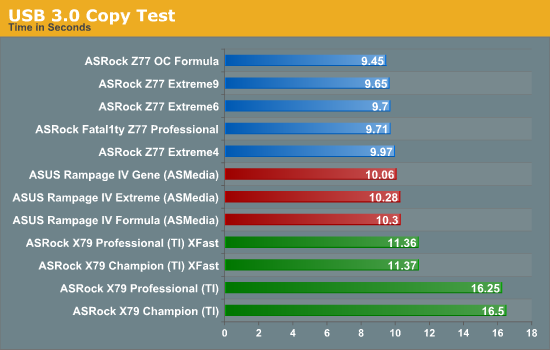
For both the Champion and the Professional, ASRock are using Texas Instruments USB 3.0 controllers (no native USB 3.0 on the X79 platform). We normally do not come across these, but rather Etron or ASMedia. It is clear to see why – the TI controllers are not the best performing, and are 60% slower than native USB 3.0 implementations in our copy test. XFast is a saving grace, getting our copy tests back in the ball park.
DPC Latency
Deferred Procedure Call latency is a way in which Windows handles interrupt servicing. In order to wait for a processor to acknowledge the request, the system will queue all interrupt requests by priority. Critical interrupts will be handled as soon as possible, whereas lesser priority requests, such as audio, will be further down the line. So if the audio device requires data, it will have to wait until the request is processed before the buffer is filled. If the device drivers of higher priority components in a system are poorly implemented, this can cause delays in request scheduling and process time, resulting in an empty audio buffer – this leads to characteristic audible pauses, pops and clicks. Having a bigger buffer and correctly implemented system drivers obviously helps in this regard. The DPC latency checker measures how much time is processing DPCs from driver invocation – the lower the value will result in better audio transfer at smaller buffer sizes. Results are measured in microseconds and taken as the peak latency while cycling through a series of short HD videos - under 500 microseconds usually gets the green light, but the lower the better.
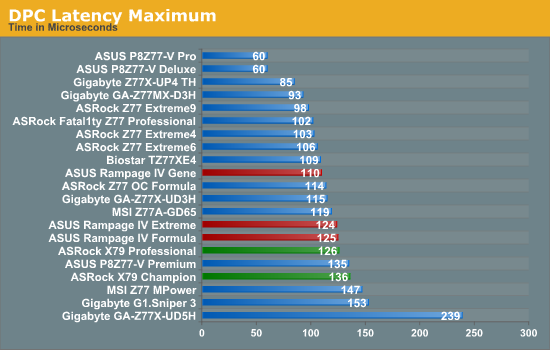
ASRock typically do rather well in our DPC Latency testing, and the X79 combo tested today are no different, coming in under 200 microseconds with ease.
Readers of our motherboard review section will have noted the trend in modern motherboards to implement a form of MultiCore Enhancement / Acceleration / Turbo (read our report here, we refer to it now as MCT) on their motherboards. This does several things – better benchmark results at stock settings (not entirely needed if overclocking is an end-user goal), at the expense of heat and temperature, but also gives in essence an automatic overclock which may be against what the user wants. Our testing methodology is ‘out-of-the-box’, with the latest public BIOS installed and XMP enabled, and thus subject to the whims of this feature. It is ultimately up to the motherboard manufacturer to take this risk – and manufacturers taking risks in the setup is something they do on every product (think C-state settings, USB priority, DPC Latency / monitoring priority, memory subtimings at JEDEC). Processor speed change is part of that risk which is clearly visible, and ultimately if no overclocking is planned, some motherboards will affect how fast that shiny new processor goes and can be an important factor in the purchase.
For this review, neither the Champion nor the Professional implement any form of MCT, meaning the Turbo ratios that Intel intended based on load are applied on the motherboard.
3D Movement Algorithm Test
The algorithms in 3DPM employ both uniform random number generation or normal distribution random number generation, and vary in various amounts of trigonometric operations, conditional statements, generation and rejection, fused operations, etc. The benchmark runs through six algorithms for a specified number of particles and steps, and calculates the speed of each algorithm, then sums them all for a final score. This is an example of a real world situation that a computational scientist may find themselves in, rather than a pure synthetic benchmark. The benchmark is also parallel between particles simulated, and we test the single thread performance as well as the multi-threaded performance.
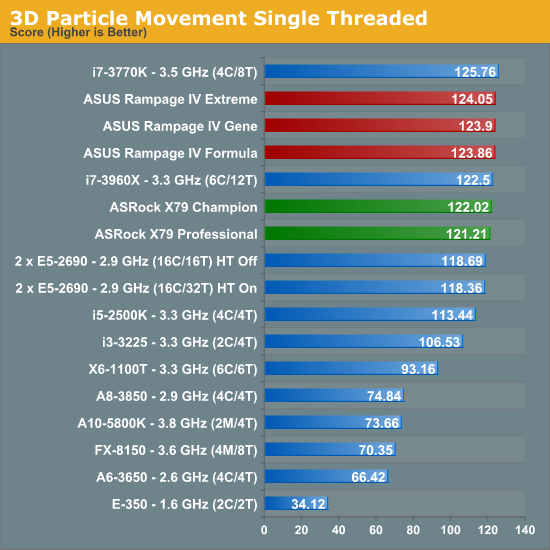
Even though MCT is not a factor in single thread benchmarks, the X79 Fatal1ty boards are both behind their ROG counterparts by the smallest of margins.
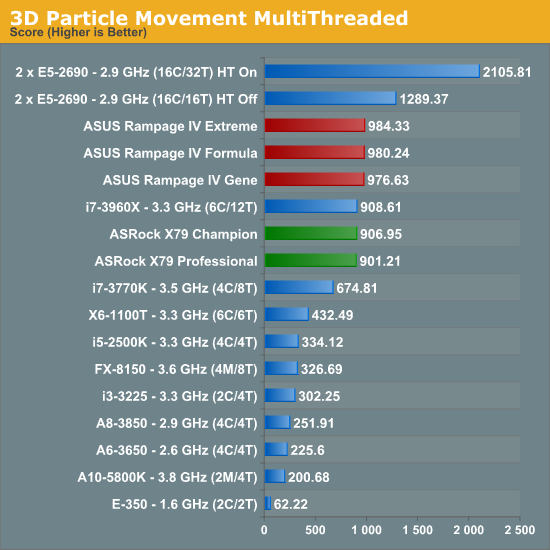
When dealing with 12 threads, the effect of not having MCT is obvious to see, with the Professional almost 10% behind the Rampage IV Extreme.
WinRAR x64 3.93 - link
With 64-bit WinRAR, we compress the set of files used in the USB speed tests. WinRAR x64 3.93 attempts to use multithreading when possible, and provides as a good test for when a system has variable threaded load. If a system has multiple speeds to invoke at different loading, the switching between those speeds will determine how well the system will do.
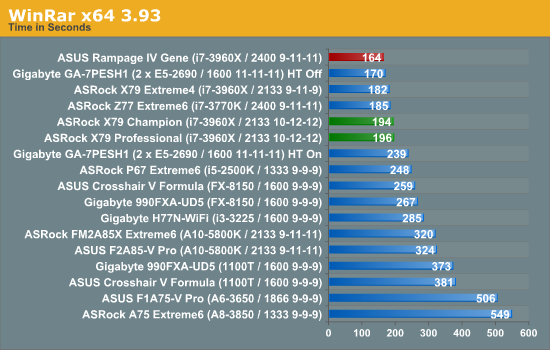
As WinRAR is a variable thread workload, any board with MCT is going to benefit by not having to deal with changes in core speeds. The ROG boards were also able to implement our normal memory testing speeds (2400 9-11-11) which the ASRock Fatal1ty boards were not (2133 10-12-12) which is also likely to have had an effect.
FastStone Image Viewer 4.2 - link
FastStone Image Viewer is a free piece of software I have been using for quite a few years now. It allows quick viewing of flat images, as well as resizing, changing color depth, adding simple text or simple filters. It also has a bulk image conversion tool, which we use here. The software currently operates only in single-thread mode, which should change in later versions of the software. For this test, we convert a series of 170 files, of various resolutions, dimensions and types (of a total size of 163MB), all to the .gif format of 640x480 dimensions.
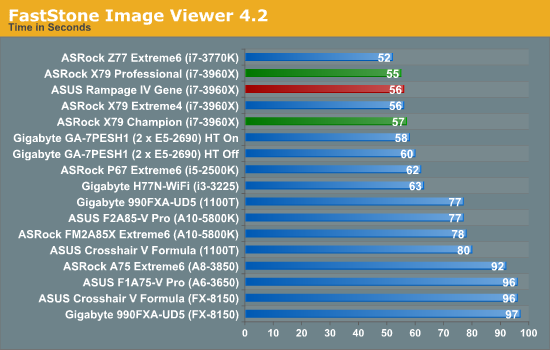
The single threaded nature of FastStone does not tend to show up any discrepancies, and here we see both ASRock boards performing similarly to the ROG boards.
Xilisoft Video Converter
With XVC, users can convert any type of normal video to any compatible format for smartphones, tablets and other devices. By default, it uses all available threads on the system, and in the presence of appropriate graphics cards, can utilize CUDA for NVIDIA GPUs as well as AMD APP for AMD GPUs. For this test, we use a set of 32 HD videos, each lasting 30 seconds, and convert them from 1080p to an iPod H.264 video format using just the CPU. The time taken to convert these videos gives us our result.
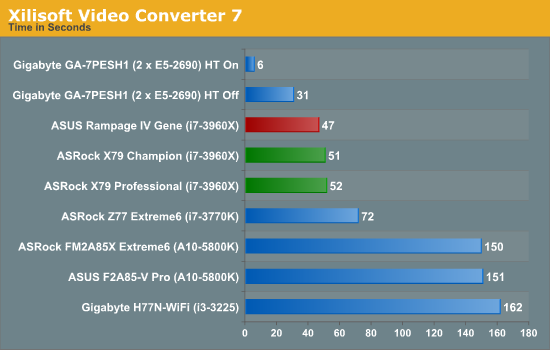
As XVC is a full on multithreaded benchmark, the X79 Fatal1ty boards are both behind any ASUS ROG offering by ~10%.
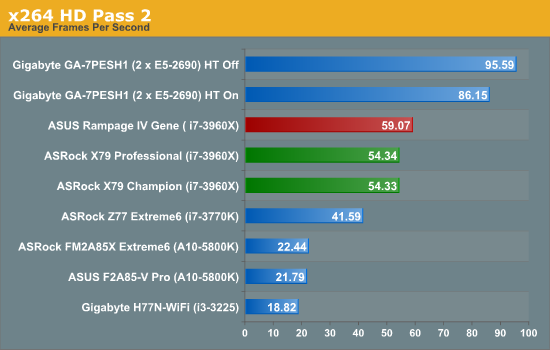
x264 HD Benchmark
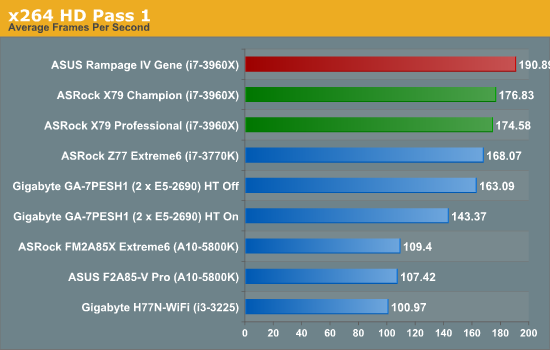
The x264 HD Benchmark uses a common HD encoding tool to process an HD MPEG2 source at 1280x720 at 3963 Kbps. This test represents a standardized result which can be compared across other reviews, and is dependant on both CPU power and memory speed. The benchmark performs a 2-pass encode, and the results shown are the average of each pass performed four times.
The X79 Fatal1ty boards had some small issues related to gaming worth noting in this section. Starting with the Champion, it should be noted that the fourth PCIe slot would never engage in PCIe 3.0 – even when set in the BIOS, it would drop down to PCIe 2.0 x8 in the operating system. On the Professional, PCIe 2.0 was enabled by default, meaning all the results here were performed at PCIe 2.0. To make matters worse, every now and again the Professional would reduce one of the GPUs to PCIe 1.1, requiring a restart to bring it back up to speed. This is an unfortunate set of events for any gaming motherboard.
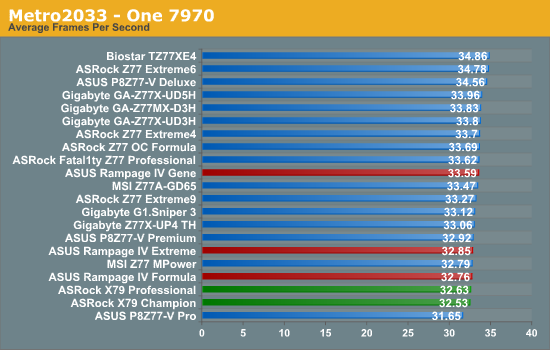
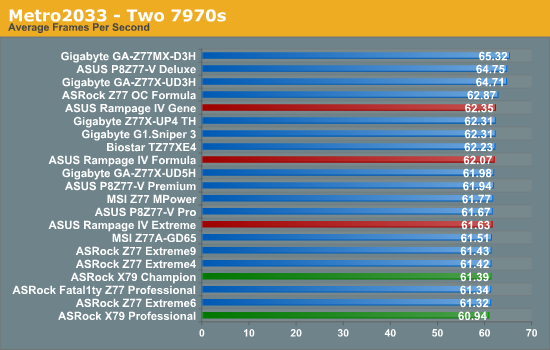
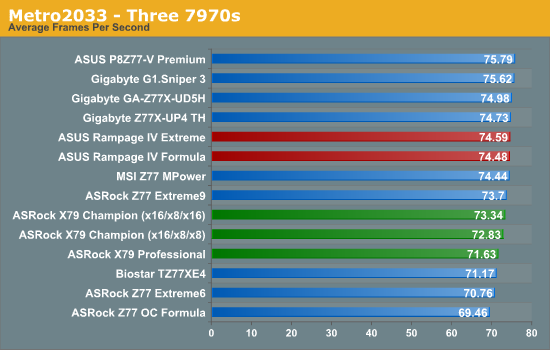
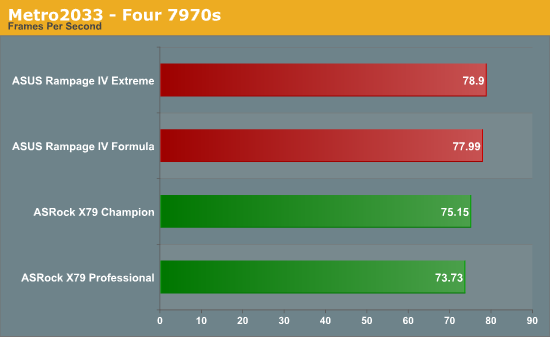
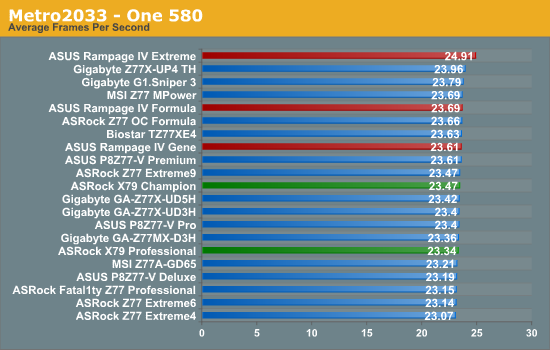
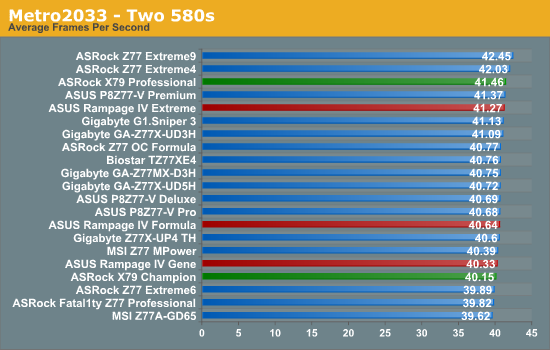
Metro2033
Metro2033 is a DX11 benchmark that challenges every system that tries to run it at any high-end settings. Developed by 4A Games and released in March 2010, we use the inbuilt DirectX 11 Frontline benchmark to test the hardware at 2560x1440 with full graphical settings. Results are given as the average frame rate from 4 runs.
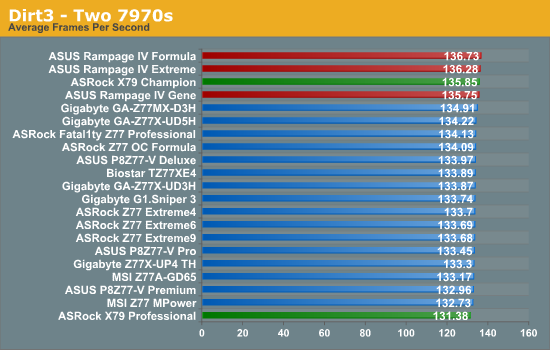
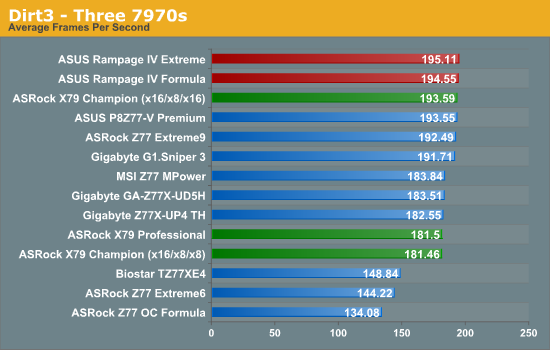
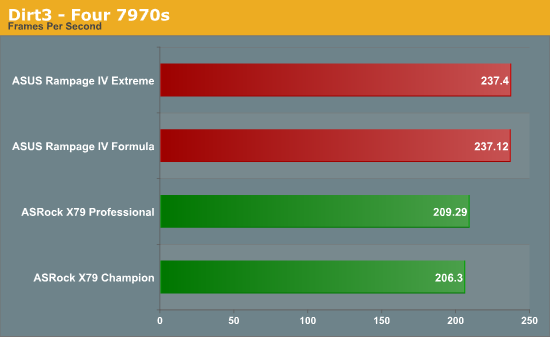
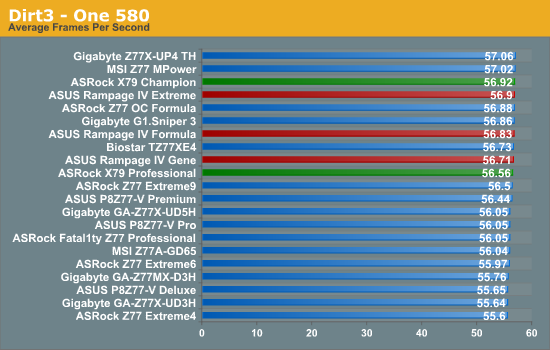
Dirt 3
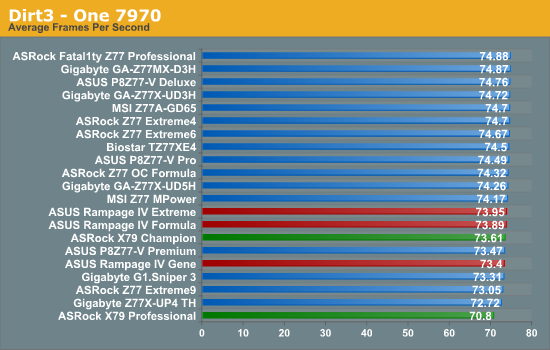
Dirt 3 is a rallying video game and the third in the Dirt series of the Colin McRae Rally series, developed and published by Codemasters. Using the in game benchmark, Dirt 3 is run at 2560x1440 with Ultra graphical settings. Results are reported as the average frame rate across four runs.
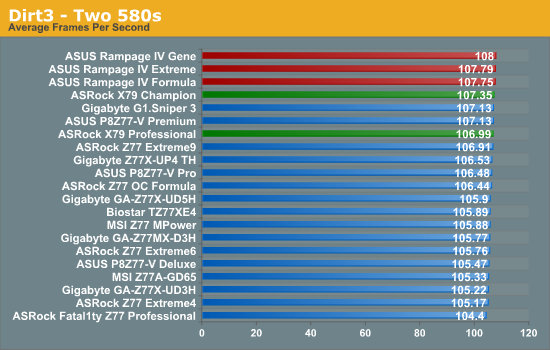
ASRock X79 Fatal1ty Champion Conclusion
The Champion is a hard product to fathom out. Sitting at $360 at the time of review, it is within striking distance of the ASUS Rampage IV Formula ($370), a motherboard that crosses the boundary between gaming and overclocking. The Champion is designed (and endorsed) by users specifically for gaming, and so we would expect the Champion to deal a better hand on that front.
Going by PCIe configuration, the Champion wins – the odd combination of five full length PCIe slots allows users of triple-slot GPUs to use up to three onboard without PCIe risers, whereby the Formula will have to resort with two. The Champion also wins on memory configuration, having access to all eight memory slots, whereas the Formula has only four (although anecdotal evidence would suggest that those gamers that use more than four tend to go big and high end anyway).
Looking through the specifications, the Champion gets the nod over the Formula in onboard SATA 6 Gbps ports (6 vs. 4), USB 3.0 ports (12 vs. 6), network ports (2 vs. 1), and IEEE1394 connectivity. The Formula takes the upper hand on NIC branding (Intel vs. Broadcom), and fan headers (8 vs. 6). While the Champion gets a Creative Core3D audio chip, the Formula also gets improved audio via the SupremeFX III (an actively enhanced ALC898). In terms of Software and BIOS, we would have to give that to the Formula, on the basis of the automatic overclock settings, depth of fan control, memory compatibility and ease of use which the Champion does not have.
In terms of our performance testing, the Champion is 10% down on the Formula in multithreaded benchmarks at stock, due to no implementation of MultiCore Turbo, although this point is moot given that both systems are likely to see an overclock. For overclocking, our Champion sample had a rough time with our processor, as it required 1.525 volts in the BIOS (1.520 volts at load) just to hit 4.7 GHz, which gave 90C at load.
| ASRock X79 Fatal1ty Champion | ASUS Rampage IV Formula | |
| Price | Link | Link to Newegg |
| Size | ATX | ATX |
| CPU Interface | LGA-2011 | LGA2011 |
| Chipset | Intel X79 | Intel X79 |
| Memory Slots |
Eight DDR3 DIMM slots Supporting up to 64GB ECC+non-ECC Up to Quad Channel, 1066-2500 MHz |
Four DDR3 DIMM slots Supporting up to 32 GB Up to Quad Channel DDR3, 1066-2400 MHz |
| Onboard LAN | 2 x Broadcom BCM57781 | Intel |
| Onboard Audio | Creative Sound Core3D | SupremeFX III |
| Expansion Slots |
5 x PCIe 3.0 x16 slots - 1/5: x16/16 - 1/3/5: x16/8/16 - 1/4/7: x16/8/8 - 1/3/5/7: x16/8/8/8 2 x PCIe 2.0 x1 |
2 x PCIe 3.0 x16/x8 2 x PCIe 3.0 x8 2 x PCIe 2.0 x1 |
| Onboard SATA |
2 x SATA 6 Gbps (Chipset) 4 x SATA 6 Gbps (Marvell SE9230) 4 x SATA 3 Gbps (Chipset) |
2 x SATA 6 Gbps (Chipset) 2 x SATA 6 Gbps (ASMedia) 4 x SATA 3 Gbps (Chipset) |
| USB |
12 x USB 3.0 (Controller) 7 x USB 2.0 (Chipset) 1 x USB 2.0 Fatal1ty Mouse Port |
6 x USB 3.0 (ASMedia) 12 x USB 2.0 (Chipset) |
| Onboard |
6 x SATA 6 Gbps 4 x SATA 3 Gbps 2 x USB 3.0 Headers 3 x USB 2.0 Headers 1 x COM Port Header 1 x HDMI_SPDIF Header 1 x IEEE1394 Header 7 x V-Probe Connectors 6 x Fan Headers Power/Reset Buttons Two-Digit Debug LED Post Status Checker LEDs |
4 x SATA 6 Gbps 4 x SATA 3 Gbps 1 x USB 3.0 Header 3 x USB 2.0 Headers 8 x Fan Headers 1 x SPDIF Output Header 1 x SlowMode switch 8 x Measurement Points Power/Reset Buttons LN2 Mode Switch Go Button |
| Power Connectors |
1 x 24-pin ATX Power Connector 1 x 8-pin CPU Power Connector 1 x 4-pin Molex Power Connector |
1 x 24-Pin ATX Power Connector 1 x 8-Pin CPU 12V Power Connector 1 x 4-Pin Molex PCIe Power Connector |
| Fan Headers |
2 x CPU (4-pin, 3-pin) 3 x CHA (4-pin, 2x3-pin) 1 x PWR (3-pin) |
2 x CPU (4-pin) 3 x Chassis (4-pin) 3 x Optional (4-pin) |
| IO Panel |
8 x USB 3.0 Ports (TI Controllers) 2 x USB 2.0 Ports 2 x Broadcom BCM57781 GbE NICs 2 x eSATA 6 Gbps (Marvell 9172) 1 x Keyboard PS/2 Port 1 x ClearCMOS Button 1 x IEEE1394 Port Optical SPDIF Output Audio Jacks |
4 x USB 3.0 (ASMedia) 6 x USB 2.0 1 x Gigabit Ethernet (Intel) 2 x eSATA 6 Gbps (ASMedia) 1 x PS/2 Combination Port 1 x Clear CMOS Button 1 x ROG Connect Button Optical SPDIF Output Audio Jacks |
| Warranty Period | 3 Years | 3 Years with ASUS Premium Service |
| Product Page | Link | Link |
The battle between the Champion and the Formula is more of a direct face off than the Professional and the Gene, primarily by virtue of board size. It is a tough decision – almost all that the Formula has, the Champion has more, but the execution is better on the Formula. XFast is a core feature of any ASRock product, but this has competition with the fan controls, features like USB BIOS Flashback and automatic overclock settings on the Formula. Not to mention the ROG board also offers ASUS Premium Service as part of the warranty package.
The Champion technically gets more ‘stuff’ for your money, whereas the Formula will give you a better user experience. How much that is worth is up to what you really want from an X79 product if your budget is near $360.
ASRock X79 Fatal1ty Professional Conclusion
The Professional sits between a rock and a hard place in the grand scheme of X79 shootouts. It is cheaper than the Rampage IV Gene, which I would put as its main competition, and has a higher number of all the basic features – SATA ports, USB 3.0 connectivity, four way GPU setup and the like. However, much like the Champion, it lacks finesse – that extra spark that the Gene has.
Sitting at $265 ($280 for the Gene, $360 for the Champion), the Professional outscores the Champion by virtue of the price difference related to the additional features. While the Champion gets Core3D rather than the ALC898, a PCIe layout more beneficial to tri-slot GPU setups, the full array of memory slots and less USB 3.0 on the rear IO, the Professional gets PCI and a better overclock. Is the difference in features really worth almost $100?
In terms of Software and BIOS, the Champion and Professional are essentially identical, except for the mishap of the Professional having PCIe 2.0 rather than PCIe 3.0 set as default. The difference in overclock between the two is astounding, with the Professional only needing an OS load voltage of 1.424 volts to reach 4.7 GHz and getting load temperatures 20C below that of the Champion. However the BIOS of the Professional does implement Load Line Calibration awkwardly, giving higher voltage in the OS than set in the BIOS.
If you sit the Professional next to the Gene, what stands out most is the size (ATX vs. mATX), followed by the number of SATA ports available. ASRock goes for the full on 4-way option, in comparison to the ASUS’ feature set and warranty program. We gave the Gene a Bronze Award when it was reviewed and rightly so. If I was set on the Gene, the X79 Fatal1ty Professional would only tempt me away if I needed more PCIe slots and more storage capacity. The 10% performance difference at stock speeds in favor of the Gene is also something to consider if overclocking is not on the task list, and the inclusion of that many SLI bridges in the Professional package rather than a single 4-way SLI bridge ultimately leads to wondering if the package could have been $5-10 cheaper.
| ASRock X79 Fatal1ty Professional | ASUS Rampage IV Gene | |
| Price | Link | Link |
| Size | ATX | MicroATX |
| CPU Interface | LGA-2011 | LGA2011 |
| Chipset | Intel X79 | Intel X79 |
| Memory Slots |
Four DDR3 DIMM slots Supporting up to 32 GB ECC non-ECC with Xeons Up to Quad Channel 1066-2600 MHz |
Four DDR3 DIMM slots Supporting up to 32 GB Up to Quad Channel DDR3 1066-2400 MHz |
| Onboard LAN | Broadcom BCM57781 | Intel |
| Onboard Audio | Realtek ALC898 | SupremeFX III |
| Expansion Slots |
4 x PCIe 3.0 x16 - x16/x8/x16/- - x16/x8/x8/x8 1 x PCIe 2.0 x1 2 x PCI |
2 x PCIe Gen 3 x16 1 x PCIe Gen 3 x8 1 x PCIe x1 |
| Onboard SATA |
2 x SATA 6 Gbps (Chipset) 4 x SATA 6 Gbps (Marvell SE9172) 4 x SATA 3 Gbps (Chipset) |
2 x SATA 6 Gbps (Chipset) 2 x SATA 6 Gbps (ASMedia) 3 x SATA 3 Gbps (Chipset) |
| USB |
8 x USB 3.0 (Controller) 11 x USB 2.0 (Chipset) 1 x Fatal1ty USB 2.0 Mouse Port |
4 x USB 3.0 (ASMedia) 12 x USB 2.0 (Chipset) |
| Onboard |
6 x SATA 6 Gbps 4 x SATA 3 Gbps 2 x USB 3.0 Headers 2 x USB 2.0 Headers 6 x Fan Headers 1 x COM Port Header 1 x IEEE1394 Header 1 x Front Panel Audio Header 1 x Front Panel Header Power/Reset Buttons Two-Digit Debug LED |
4 x SATA 6 Gbps 3 x SATA 3 Gbps 1 x USB 3.0 Header 2 x USB 2.0 Headers 5 x Fan Headers 1 x SPDIF Out Header 11 x Measurement Points Power/Reset Buttons Clear CMOS Button Go Button |
| Power Connectors |
1 x 24-pin ATX Power Connector 1 x 8-pin CPU Power Connector 1 x 4-pin Molex VGA Power Connector |
24-Pin ATX Power Connector 8-Pin 12V CPU Power Connector |
| Fan Headers |
2 x CPU (4-pin, 3-pin) 3 x CHA (4-pin, 2 x 3-pin) 1 x PWR (4-pin) |
2 x CPU (4-pin) 3 x CHA (4-pin) |
| IO Panel |
4 x USB 3.0 (TI) 6 x USB 2.0 1 x Keyboard PS/2 Port 1 x ClearCMOS Button 1 x Optical SPDIF Output 1 x Coaxial SPDIF Output 1 x FireWire/IEEE1394 Port 1 x Broadcom BCM57781 GbE NIC 2 x eSATA 6 Gbps (Marvell) Audio Jacks |
1 x PS/2 Combination Port 1 x eSATA 3 Gbps 1 x Gigabit Ethernet 2 x USB 3.0 8 x USB 2.0 1 x Optical S/PDIF Output 6 x Audio Jacks 1 x Clear CMOS Button 1 x ROG Connect |
| Warranty Period | 3 Years | 3 Years with ASUS Premium Service |
| Product Page | Link | Link |
The Fatal1ty Range of ASRock Motherboards
ASRock need to decide whether Fatal1ty is here for the long run. The branding has carried over several generations and chipsets now, but as a brand of motherboard it lags behind the user friendly atmosphere of its competitors. It needs to do something different and something focused beyond the normal plethora of motherboard products – there is no point just sticking a lot of everything onto a PCB then applying a red and black color scheme. It is time to question more than one power user about what a gaming product needs, and develop through successful iterations of focused hardware. ASUS had bundled versions of ROG boards with Battlefield 3 – perhaps the next game Fatal1ty is in love with becomes part of the box as well. There are plenty of possibilities in the world of motherboards, and it all has to be coupled with that optimized user experience.

