Original Link: https://www.anandtech.com/show/6127/buffalo-ministation-thunderbolt-review-an-external-with-usb-30-and-thunderbolt
Buffalo MiniStation Thunderbolt Review - An External with USB 3.0 and Thunderbolt
by Brian Klug on August 1, 2012 4:04 PM EST- Posted in
- Storage
- SSDs
- USB 3.0
- Thunderbolt
- Buffalo
Back when Thunderbolt (then Intel Lightpeak) was optical, I was actively involved in covering the interface, partly out of professional curiosity due to my optical background, partly because I sincerely believe optical interfaces are an inevitable part of the future. When Lightpeak became Thunderbolt and lost the optical layer, it fell under Anand’s beat and the Mac umbrella. I acquired a MacBook Pro with Thunderbolt somewhere around the same time, but never acquired any Thunderbolt peripherals or drives. Since then, Thunderbolt has slowly but surely gained traction with more and more peripherals and host devices. Initial adoption was glacial in part because most of the earliest Thunderbolt peripherals were really aimed at the very high end market with big RAID or JBOD stations, and partly due to what boiled down to Thunderbolt being Apple-only until just recently.
There’s an interesting story as to exactly why most of the initial Thunderbolt peripherals were aimed at such a high-end market, and some of it was purely because of both the TDP, size, and engineering constraints involved with the first generation Thunderbolt controllers. The other half of the equation is that selling external storage isn’t always the most valuable prospect, as shoppers expect commodity pricing and generally know the cost of the drive inside. Thankfully, second generation Thunderbolt controllers with smaller size, TDP, and lower cost are now the norm, and at the same time Apple has unleashed more Macs with the interface of note, meaning that there’s a bigger captive market of potentially interested shoppers.
So when Buffalo dropped us a line about an upcoming 2.5" form factor portable hard drive with both USB 3.0 and Thunderbolt interfaces, I couldn’t resist the temptation and jumped at the opportunity to review it. When it comes to single drive external Thunderbolt storage, the only real options at this point are either the Seagate GoFlex, or the new Buffalo MiniStation Thunderbolt.
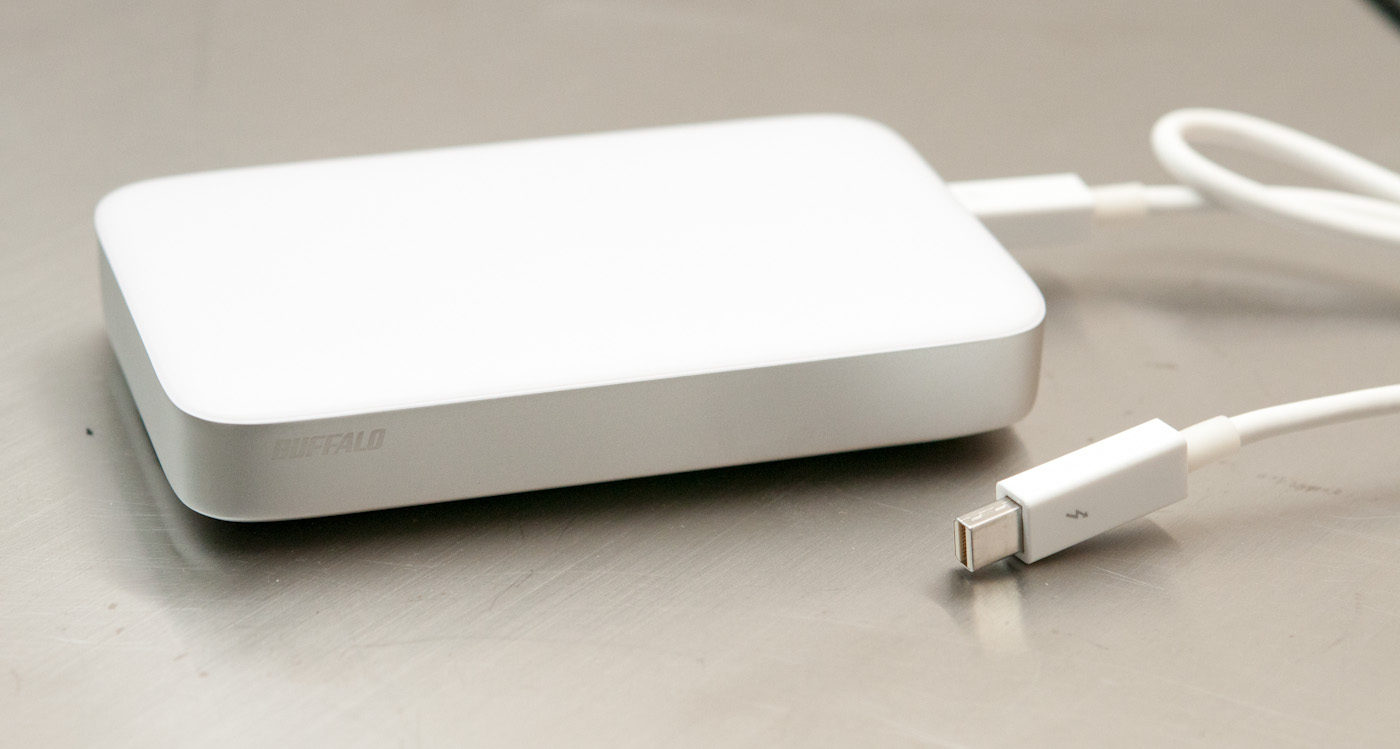
The Buffalo MiniStation comes in two flavors, differentiated only in storage size. There’s a 1 TB version which runs $229.99 named the HD-PA1.0TU3, and a 500 GB version named the HD-PA500TU3 and priced at $199.99. The only difference is what drive you get inside; both include Thunderbolt and USB 3.0. Buffalo has also opted to include both the USB 3.0 and Thunderbolt cables with both MiniStations. Prior drives required the separate purchase of a Thunderbolt cable, which costs around $50. Since there are now multiple cable suppliers (whether this means the active controller in the cable, or companies cabling the system remains unknown to me), pricing has started creeping down and Buffalo was able to include both a 19.7 inch Thunderbolt cable and USB 3.0 cable.
| Buffalo MiniStation Thunderbolt | |||||
| HD-PA500TU3 | HD-PA1.0TU3 | ||||
| Storage | 500 GB HDD | 1 TB HDD | |||
| Interface | miniUSB 3.0 (2.0 legacy), Thunderbolt (no pass through), Cables Included | ||||
| Formatting | Mac (HFS+) | ||||
| Size, Mass | 3.17 x 5.12 x 0.91 (inches), 9.28 oz | ||||
| Pricing | $199.99 (newegg) | $229.99 (newegg) | |||
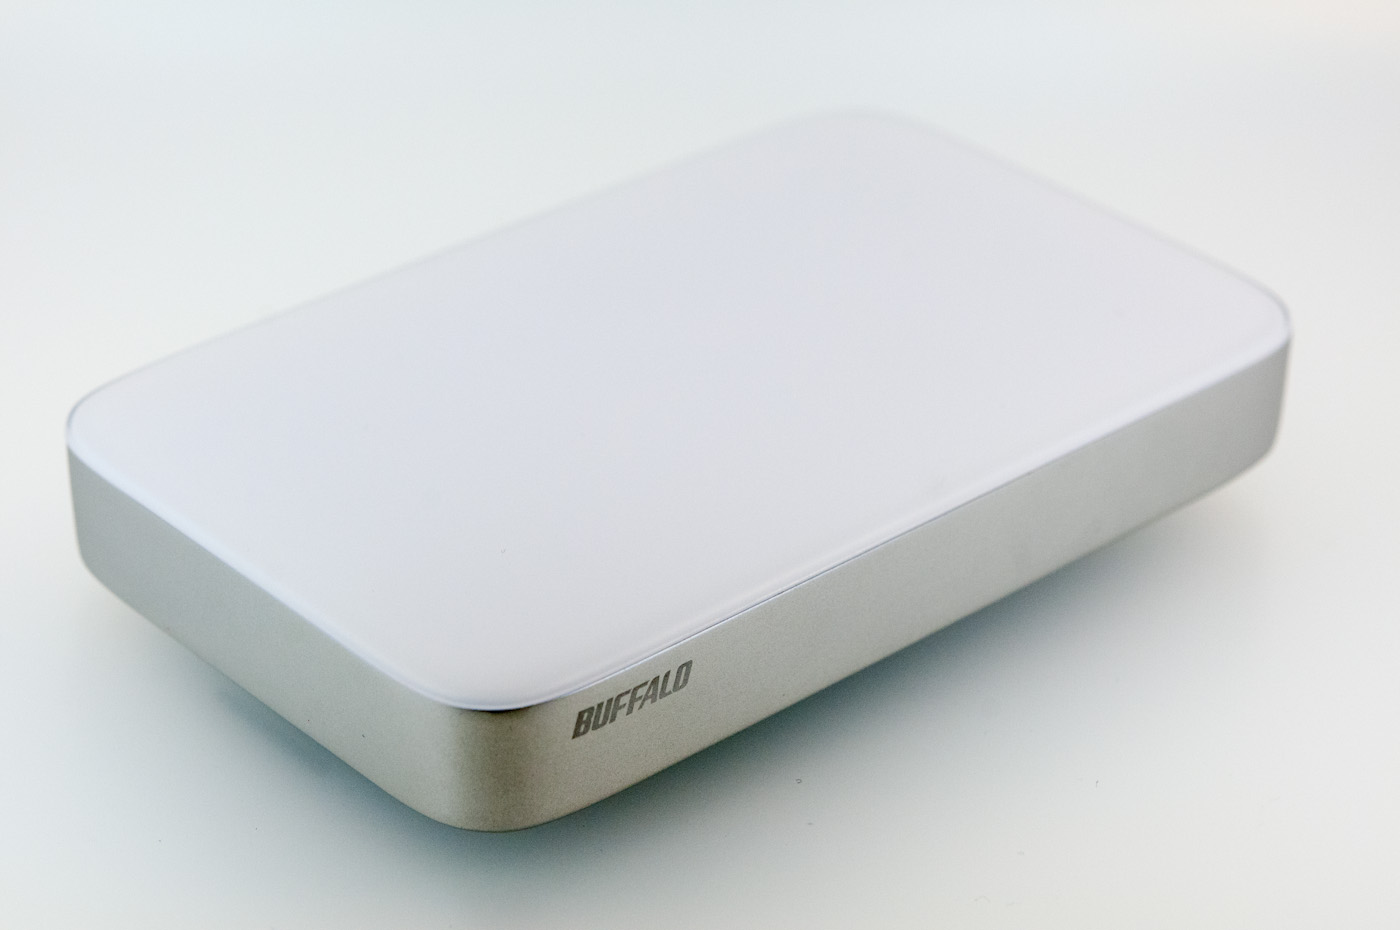
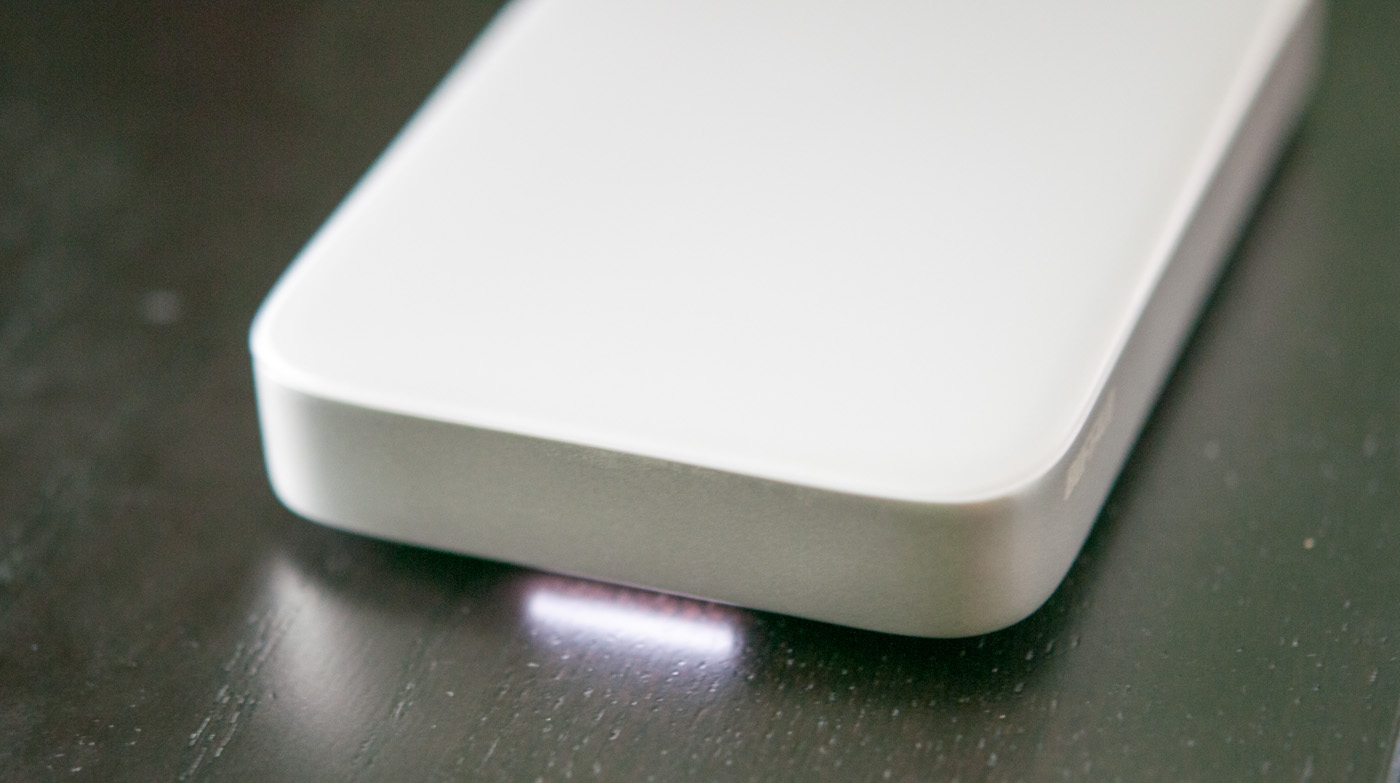
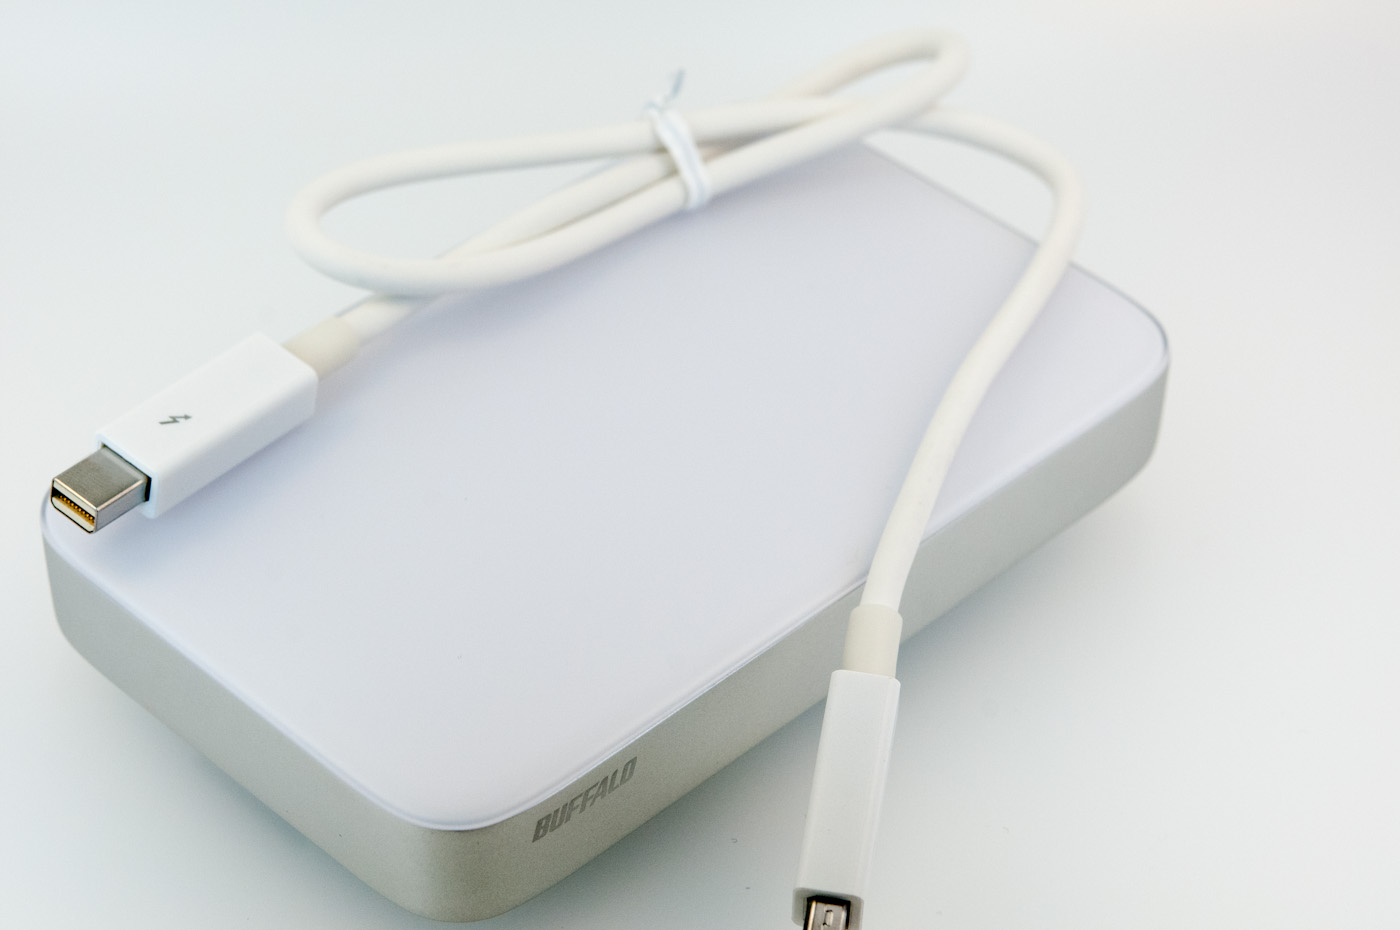
Since Thunderbolt is still predominantly an Apple interface (7-series boards and IVB Ultrabooks notwithstanding), the industrial design of the Buffalo MiniStation is decidedly Apple inspired. The drive is made of two main parts, a single piece aluminum can in which the drive sits, and a plastic top which snaps inside this assembly.
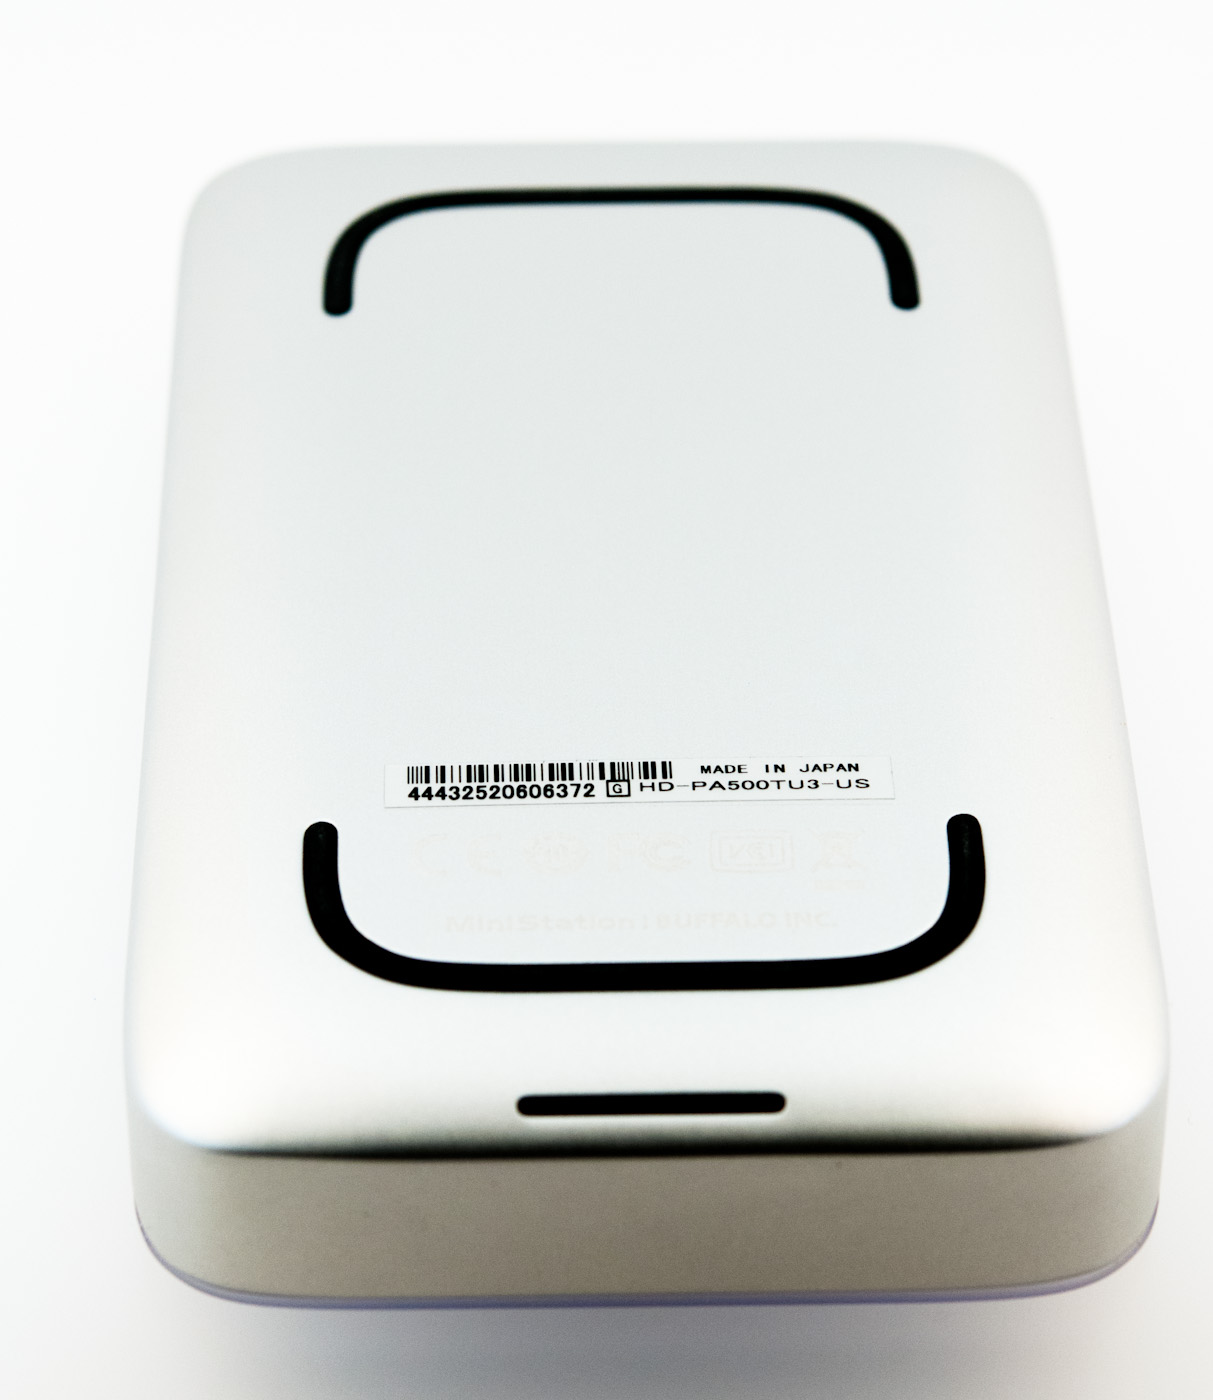
There’s a series of white status LEDs which shine through a diffuse rectangular chicklet cutout on the bottom front lip, which reflects up off of a surface. The indicator light breathes like an Apple power indicator when there’s activity, and stays solid when plugged in. It’s a nice take on an external hard disk status LED that I haven’t seen done before.
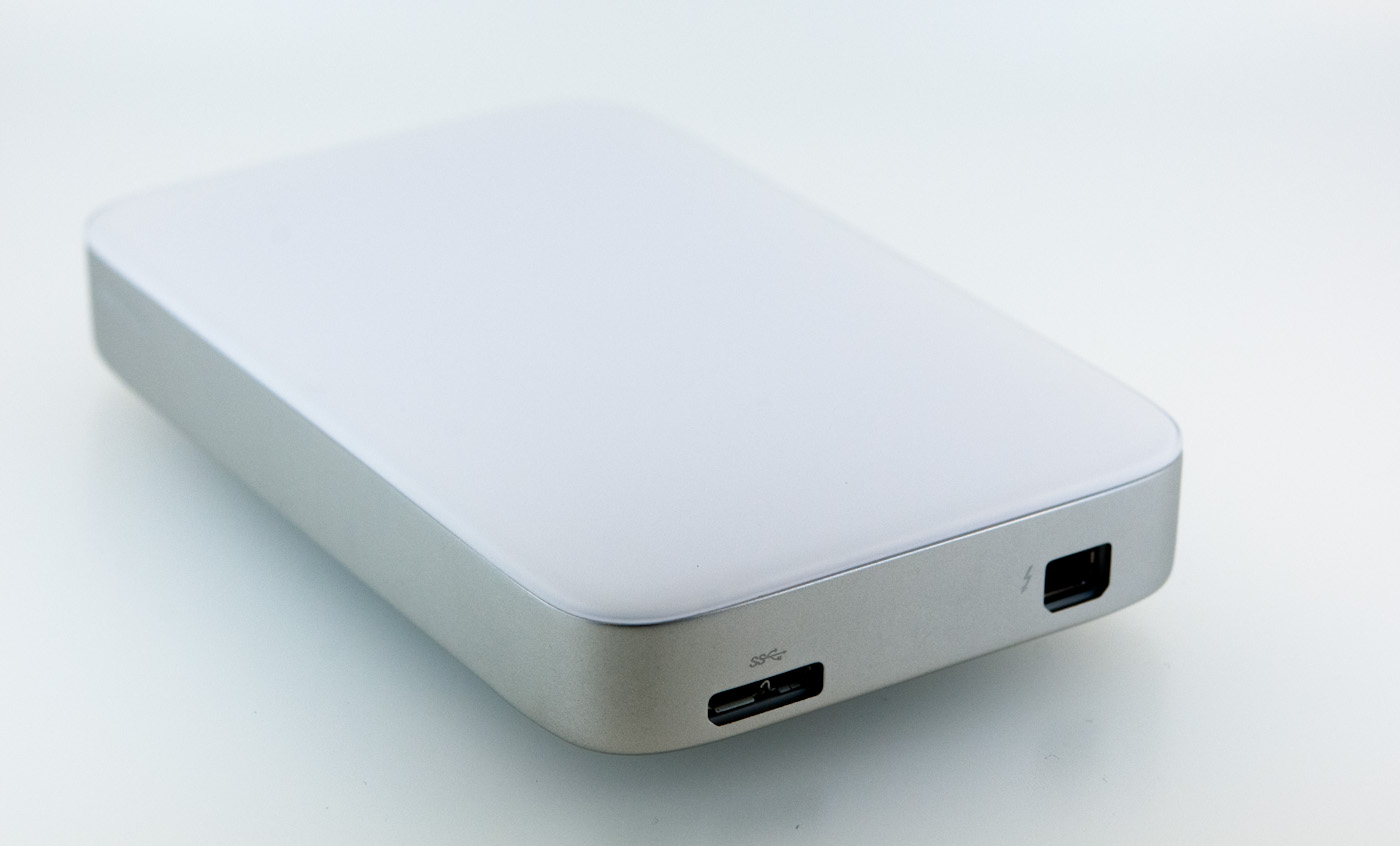
On the underside are two small rubber feet which actually aren’t part of the aluminum base but make contact with the drive caddy inside. Regulatory markings are laser etched near the front rubber foot. At the back of course are the Thunderbolt and USB 3.0 ports, on opposite sides of the drive.


Construction of the MiniStation is subjectively great. There’s not much flex if you squeeze the aluminum side against the plastic lip, and it feels like a solid brick of aluminum in the hand. I’ve regularly transferred videos shot on my DSLR onto the MiniStation, then tossed the drive into the main pocket of my backpack. It isn’t a super rugged design, but definitely will get the job done.
Part of what makes the Buffalo MiniStation Thunderbolt unique is the inclusion of USB 3.0 alongside, well, Thunderbolt. Going with a Thunderbolt only drive is admittedly a difficult prospect to swallow - what happens if your only Thunderbolt-packing computer dies, for example, and you need files on the drive? Having legacy interfaces is just something everyone has grown accustomed to, and what that usually ends up meaning is that USB needs to be onboard.
Buffalo told me that they worked with Intel and Apple to develop a switching system for deciding which controller to switch SATA from the drive to, and that this system is unique to the MiniStation Thunderbolt for now. To find out more, I had to open up the drive. To be honest, well, I was always going to open the enclosure…
I wager a lot of other potential customers are interested in putting an SSD inside the MiniStation Thunderbolt and taking advantage of the interface’s basically native transfer speeds. Unfortunately, getting the MiniStation apart is somewhat challenging. Disassembly starts by prying the top plastic cover off, which is connected via plastic clips to the drive tray, which is in turn adhered to the aluminum base with some sticky double sided foam tape.
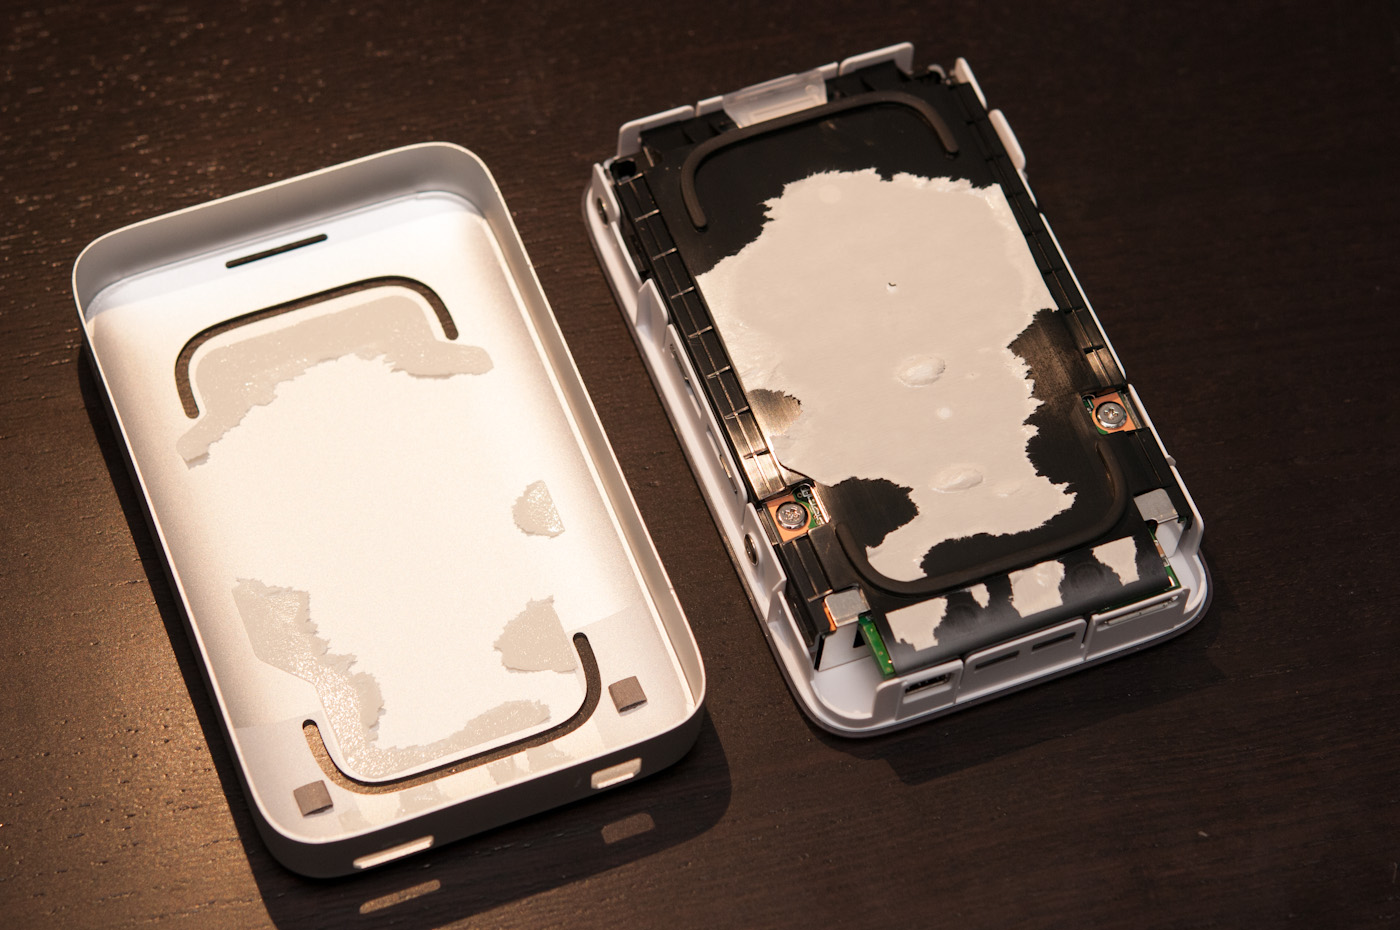
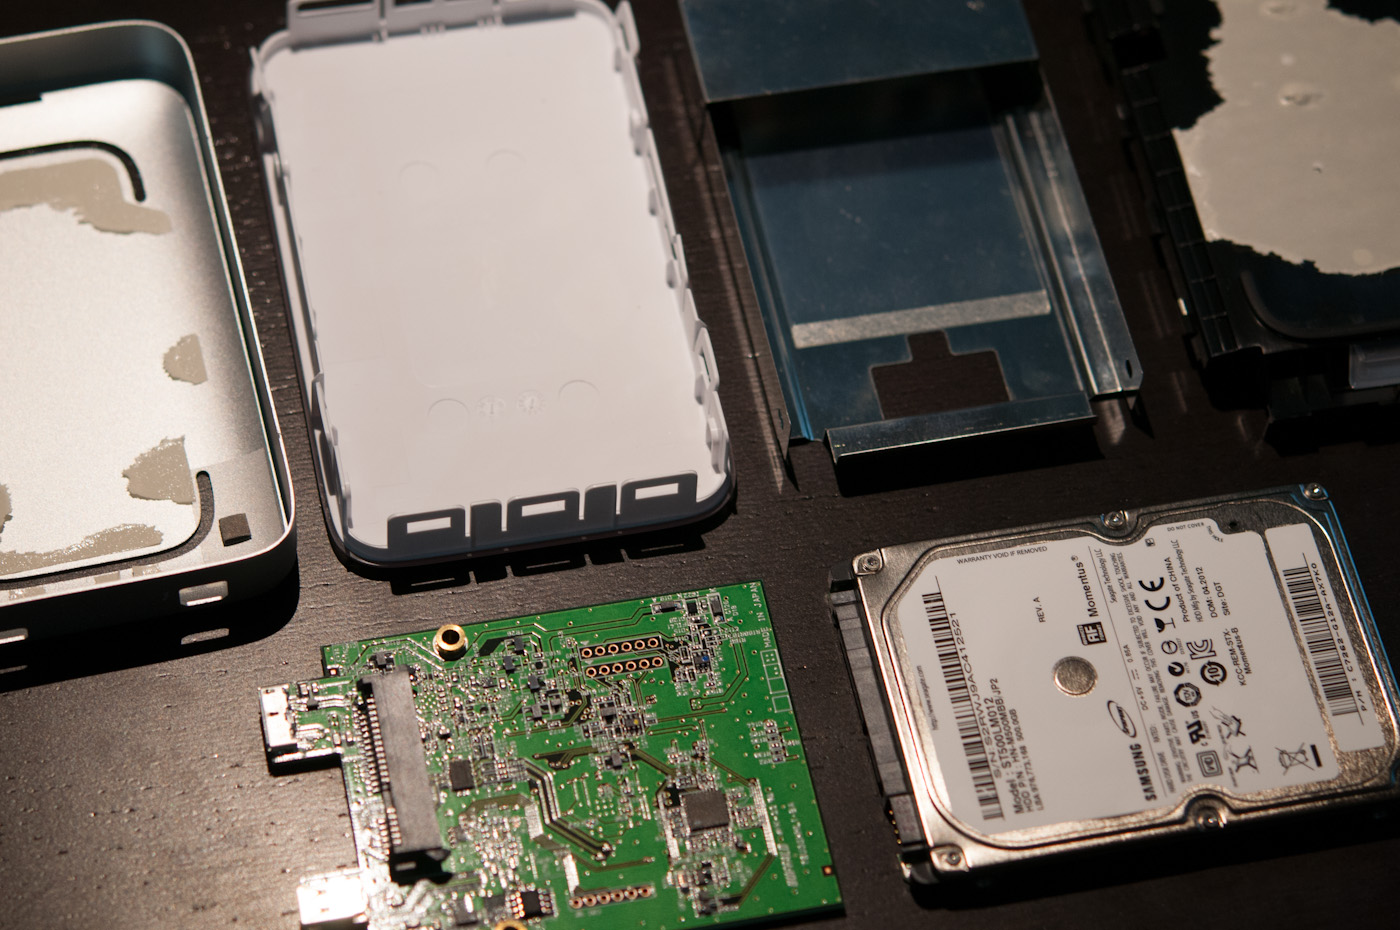
I ended up having to apply a lot of force to separate things, and for me the adhesive was what gave first while prying on the top part of the drive. Armed with this knowledge, people trying to take apart the drive assembly should probably heat the underside with a heat gun before prying the top off with a plastic opening tool. After this comes up, there are plastic clips and a few screws in your way securing the drive to a plastic cage. It’s clear the black part sits in the aluminum tray, and the top white plastic part snaps over this.
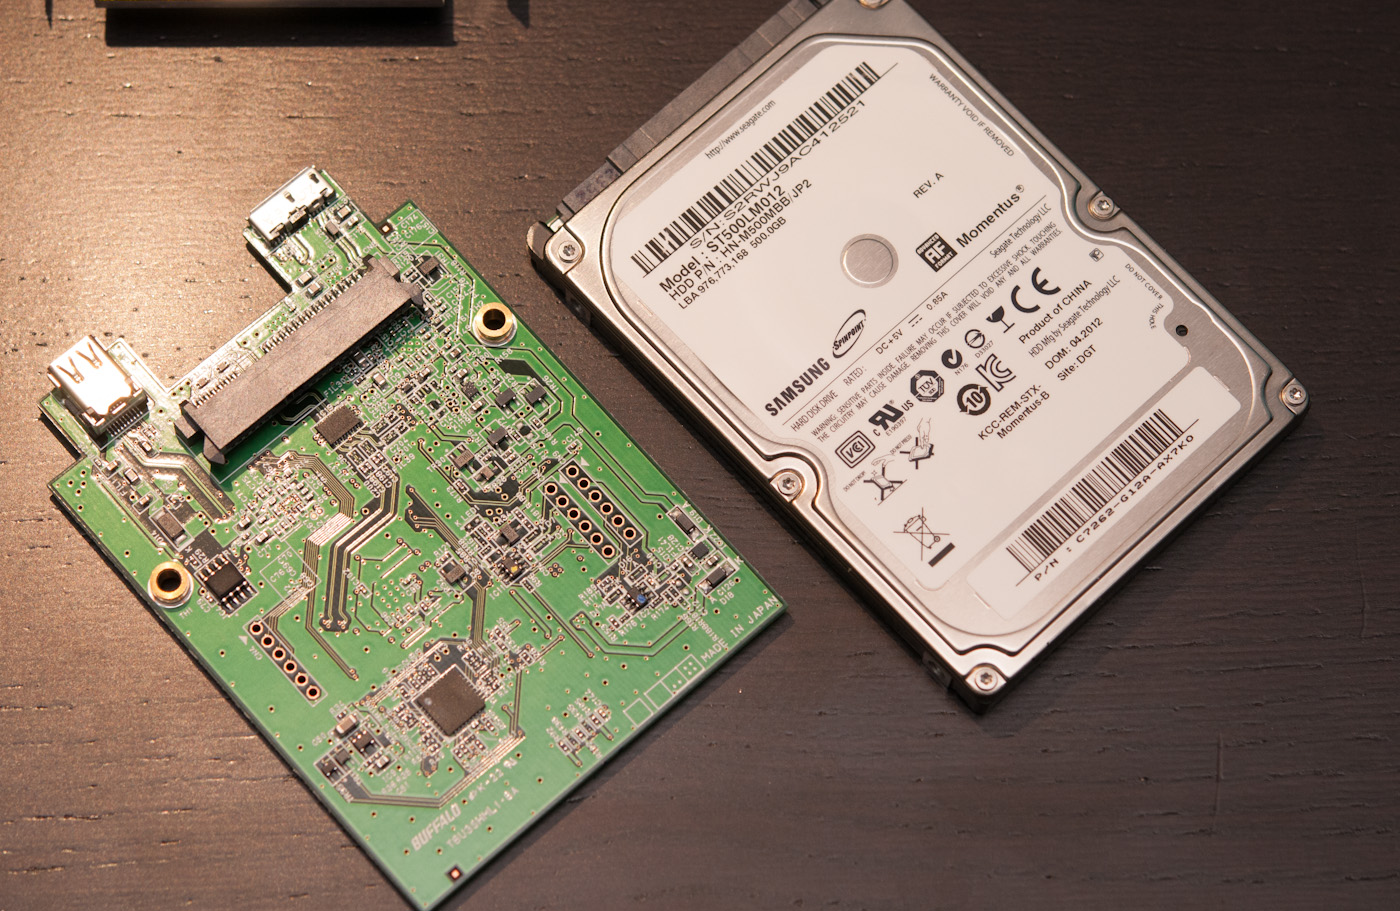
With this apart, you can separate the PCB which runs under the 2.5" HDD inside the drive. In the case of my 500 GB model, the drive is a SATA 3.0, 5400 RPM, 8 MB cache, Samsung ST500LM012. I’m not sure what the 1 TB model uses since I wasn’t sampled one, but likely the same family.
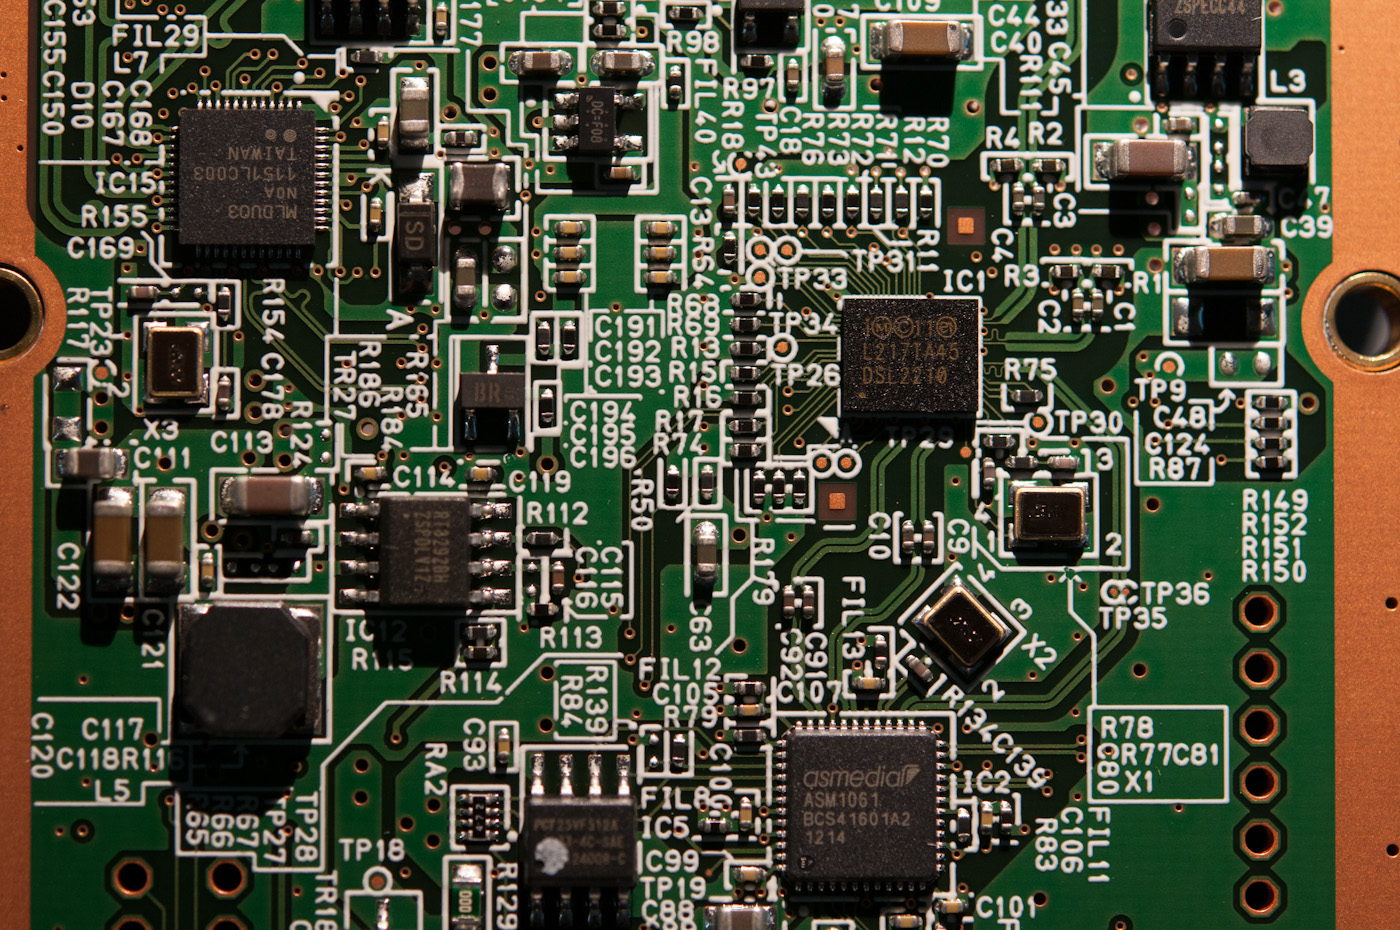
The board runs almost the full length of the HDD underside, and there’s a fair number of packages onboard. On the topside we can find the Intel DSL2210 (codename: Port Ridge) endpoint Thunderbolt controller, which is a single Thunderbolt channel, 2 PCIe device with 0.7W TDP. Port Ridge is popping up in a lot of places, for good reason - it’s inexpensive, second generation, small, and has a low TDP. What it sacrifices is pass through functionality or additional Thunderbolt channels.
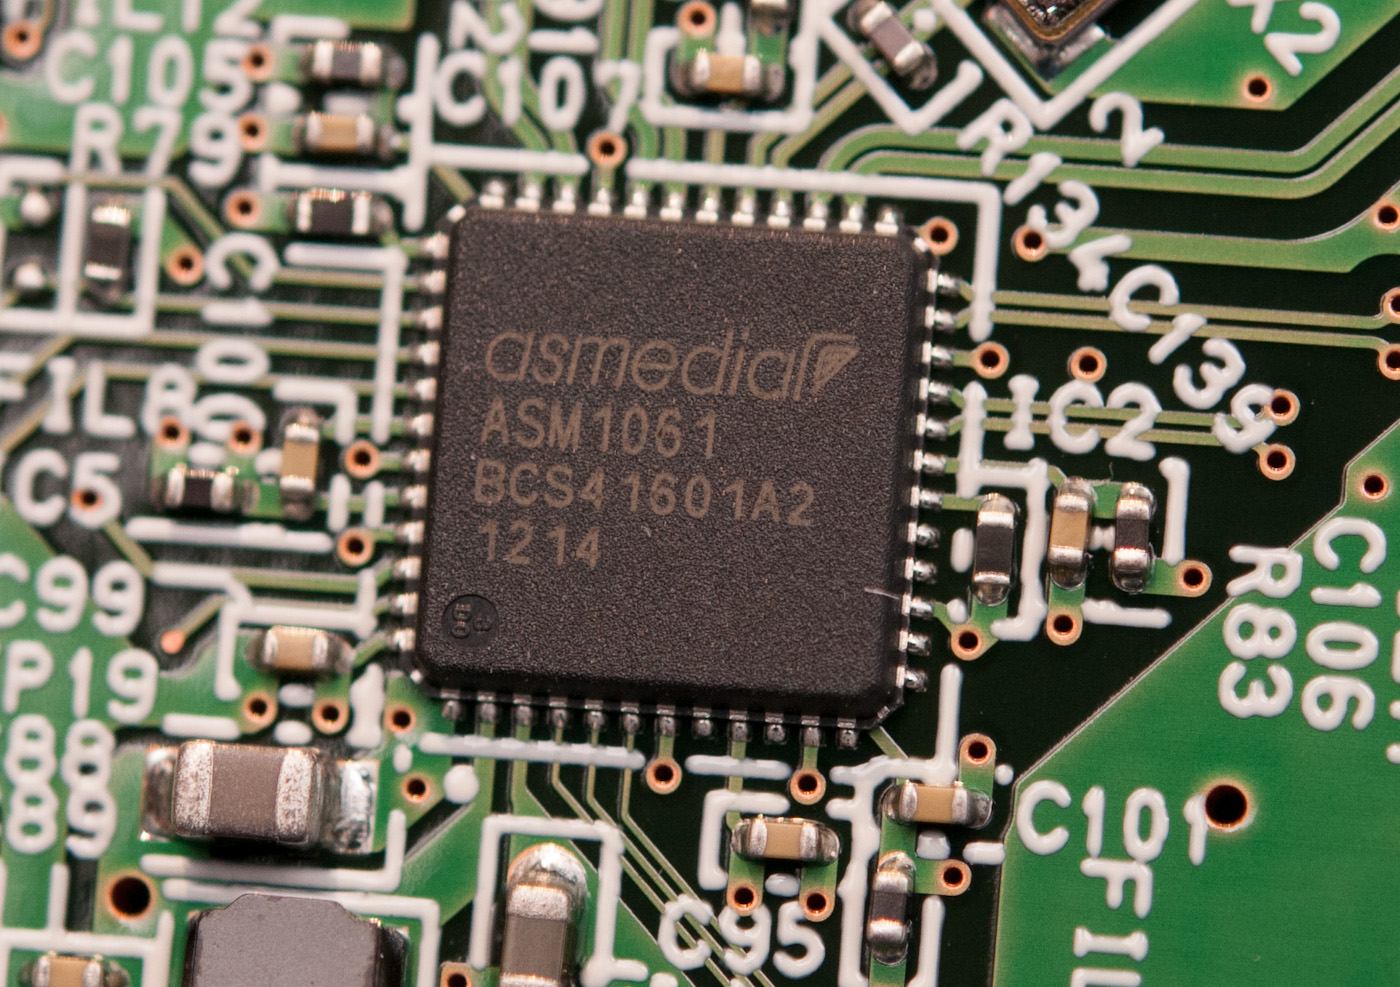
At center, below the DSL2210 is an ASmedia AS1061 PCIe-1x to SATA 3.0 controller. This is clearly the controller used when the MiniStation is connected over Thunderbolt. Again, Thunderbolt basically tunnels either PCIe or DisplayPort, you need a fully fledged PCIe controller on the other side for whatever you’re connecting to.
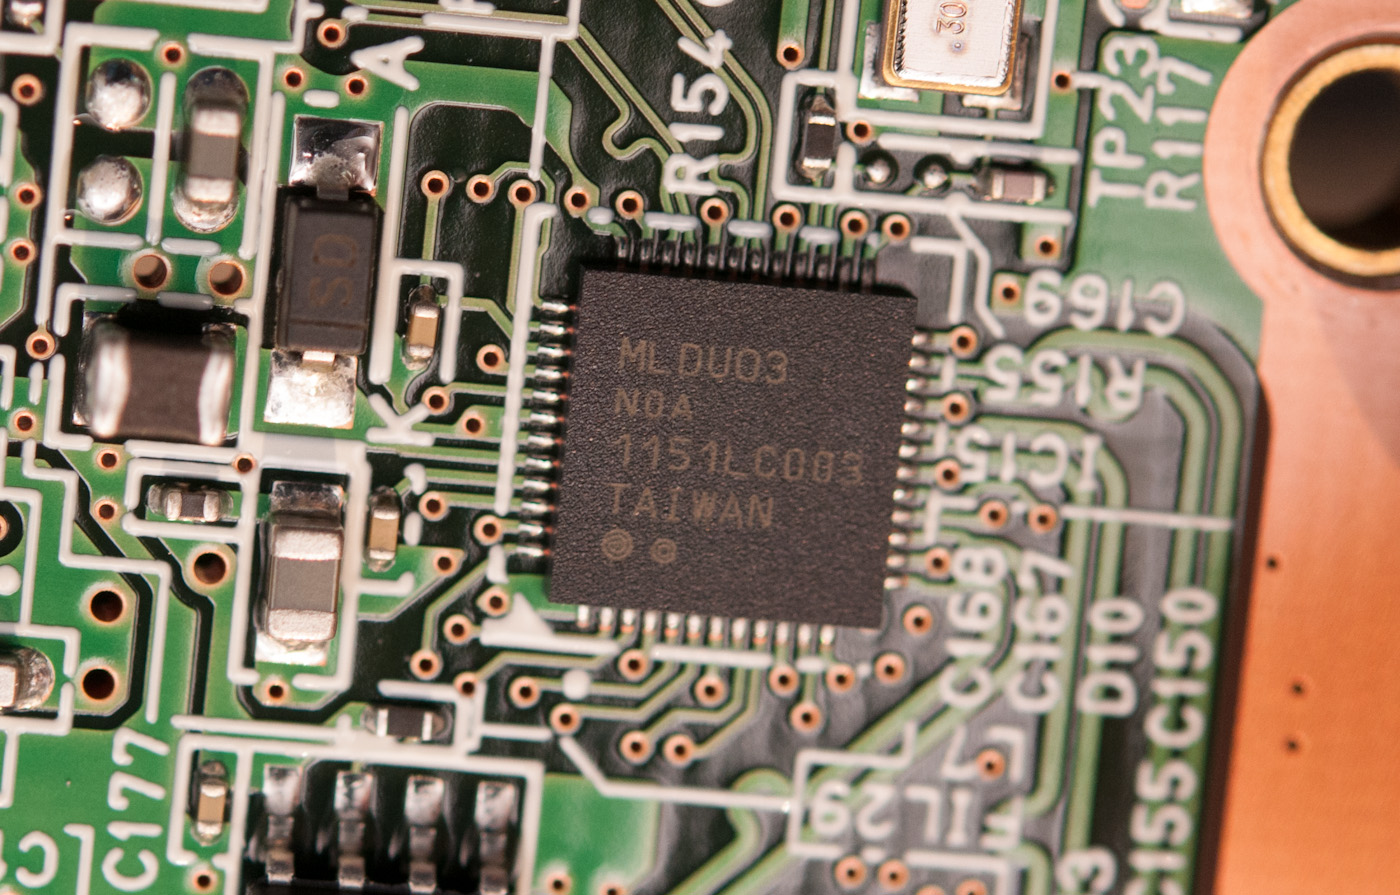
At top left under the USB 3.0 controller is a MediaLogic MDLU03 USB 3.0 to SATA 3.0 controller, which obviously gets used when the drive is connected over USB. On this side of the board there are a few other things, like a step-down converter for Thunderbolt power, a tiny 512 Kbit flash, and three white LEDs (with pads for two more) at the bottom.
So you’re probably wondering, well, how does the device switch between the MediaLogic USB 3.0 controller and the ASmedia controller? The answer is on the other side of the PCB.

Here on the back side of the PCB there’s both an ASmedia ASM1456 SATA 3.0, 2 to 1 multiplexer/switch, and an NXP LPC1114F (PDF) microcontroller with an up to 50 MHz ARM Cortex M0 at its core. This controller undoubtably contains the management and logic which tells the switch which SATA controller to choose between. There’s also something a little bit ironic about Intel having to recommend use of an ARM Cortex M0 controller for its platform for Apple and Buffalo - it seems like making a next generation Thunderbolt controller with a tiny controller or AP of its own onboard would make a lot of sense.


There’s a ton of integration here to do what seems like a simple task, but the end result is a drive which will connect and switch between USB 3.0 and Thunderbolt and handle the edge case where someone decides to connect both at the same time. The only real next level is for future Thunerbolt controllers to offer some onboard AP purely for devices like this with multiple I/O. Maybe we’ll get a third generation Thunderbolt SKU with SATA built in, that would seem logical.
After I ran performance numbers and testing on the MiniStation with HDD inside, I disassembled the MiniStation and tossed in an OCZ Vertex 3 MAX IOPS, which works perfectly. Getting the MiniStation back together is a bit of a challenge, but not impossible - I just don’t want to do it again, and with those plastic clips and adhesive would only recommend disassembly and reassembly once. That’s the tradeoff which gets made for having a drive with no external screws.
To test the MiniStation Thunderbolt I turned to a combination of Intech’s QuickBench and the BlackMagic Disk Speed Test application from the Mac App store. I tested on my 2011 MacBook Pro, which has a first generation Light Ridge Thunderbolt controller inside. For testing on OS X, I used native HFS+ formatting for the MiniStation.
| BlackMagic Disk Speed Test - 2011 MBP | |||||||
| 500 GB HDD | 240 GB OCZ Vertex 3 | ||||||
| Read (MB/s) | Write (MB/s) | Read (MB/s) | Write (MB/s) | ||||
| USB 2.0 | - | - | 28.4 | 34.7 | |||
| Thunderbolt | 112.5 | 110.9 | 269.8 | 370.5 | |||
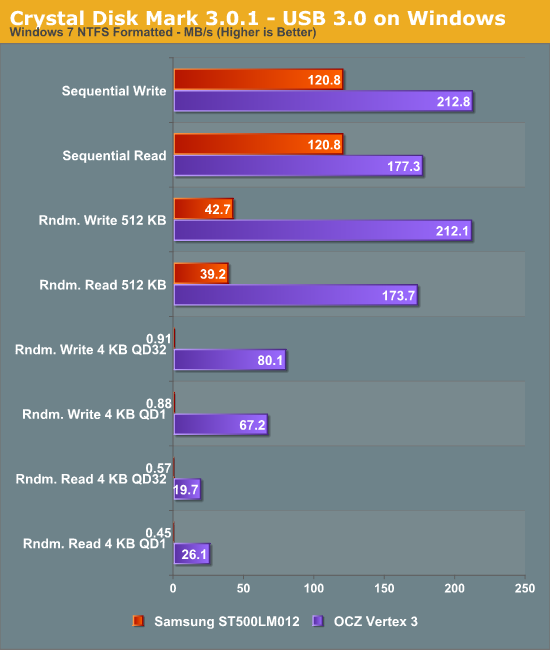
There’s no USB 3.0 on my 2011 MacBook Pro, so for USB 3.0 I turned to my desktop which has a Renesas based USB 3.0 controller, and reformatted the drive to NTFS. I used CrystalDisk Mark to test.
With the HDD inside, you basically get the kind of speeds you’d expect were the drive connected natively over SATA. Keep in mind, with the 1 TB HDD, speeds will actually be slightly higher thanks to the higher storage density.
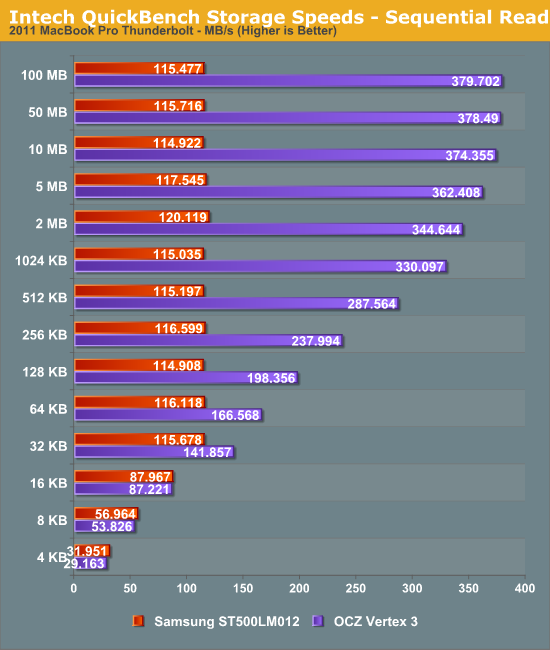
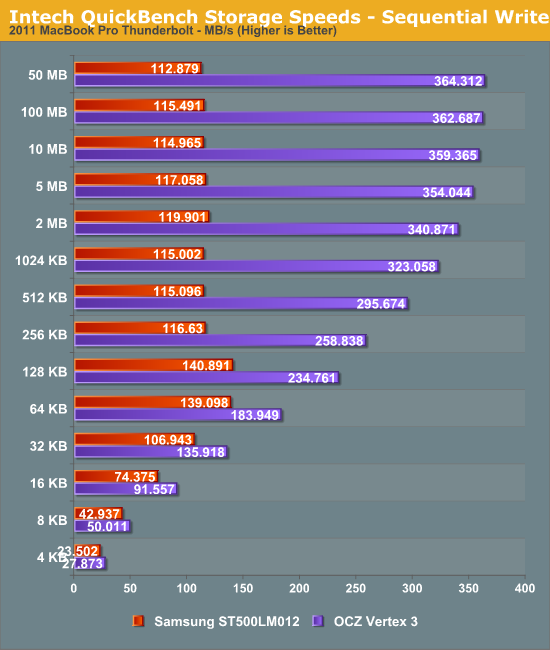
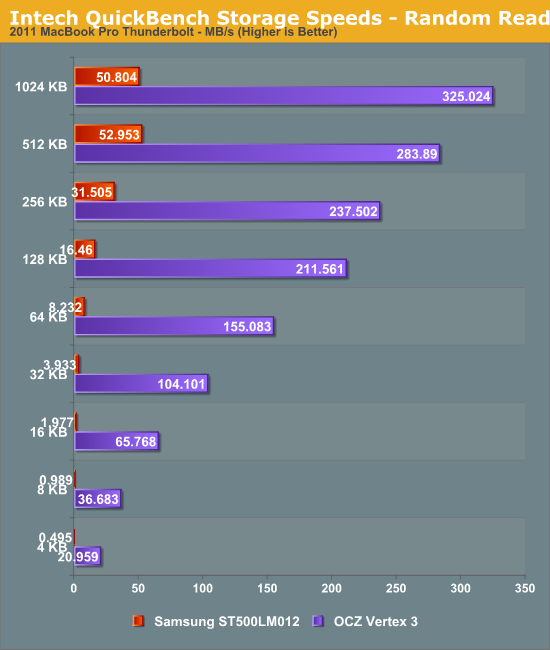
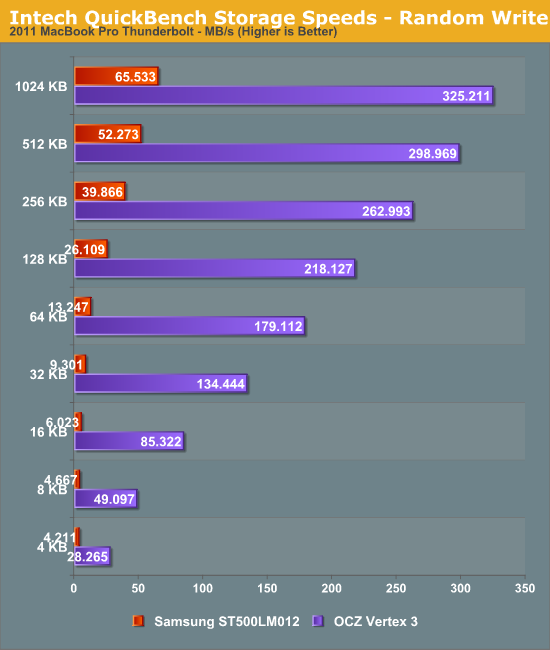
Looking at the QuickBench scores, the Vertex 3 performs just as well inside the MiniStation as it does connected to a 6Gbps SATA controller in our Bench test bed.
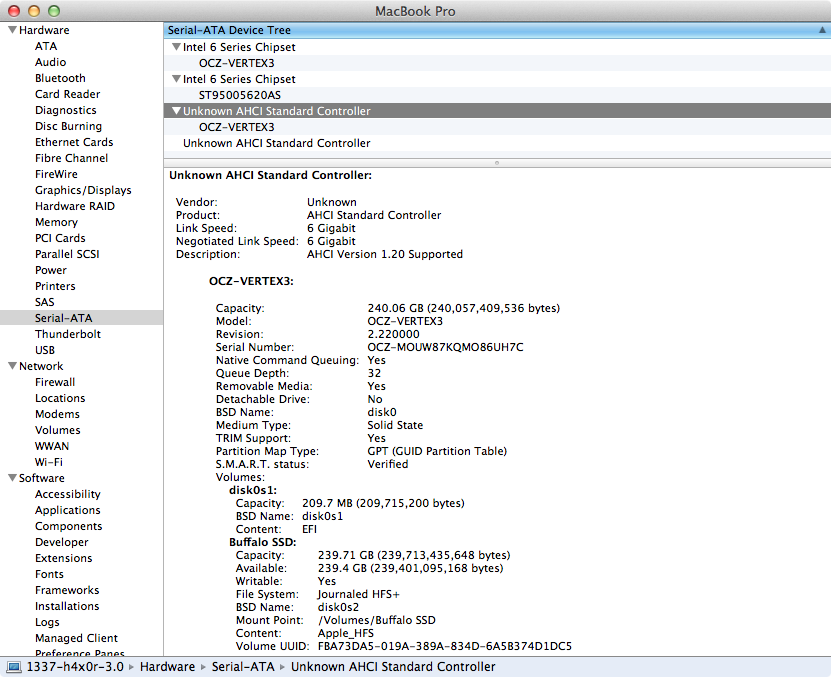
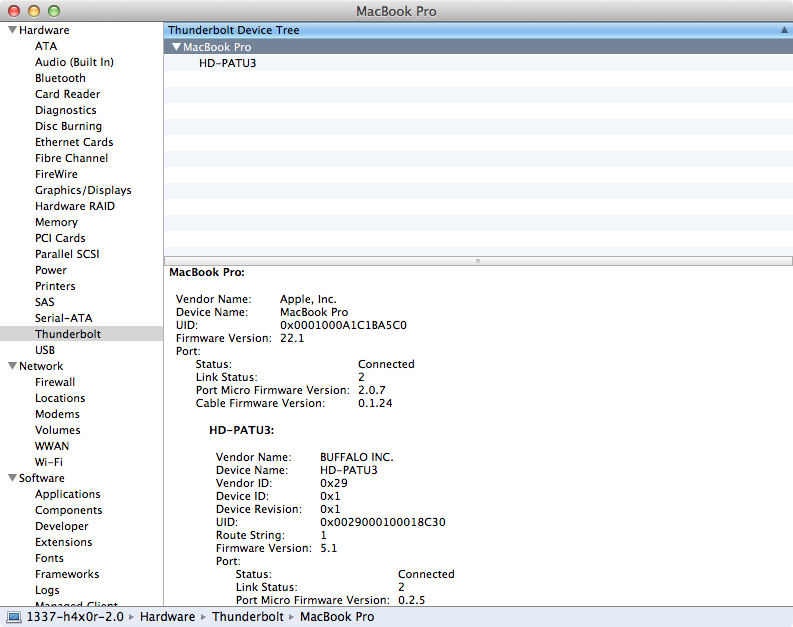
When connected over Thunderbolt on OS X, in System Profiler you can see the drive attached over an AHCI controller just like any internal drive, and with TRIM enabler patched kexts on OSX you can even TRIM the SSD. Buffalo has no plans to sell a bare external enclosure for people to stick their own SSD in, but at the current price point upgrading it yourself is a pretty viable option.
In addition to stressing the drive with the BlackMagic Disk Speed Test app set to 50 GB, I filled the stock HDD with random data by running good ol’ dd with data from /dev/urandom, a favorite test of mine for all storage that comes my way. Just run “dd if=/dev/urandom of=test.bin” in the root of the drive, and let it fill up. The drive’s aluminum underside does a great job conducting heat away, and gets somewhat warm (after all, it is doubling as a heatsink, and aluminum has great thermal conductivity) during use. Even with hours of constant Thunderbolt and HDD access, the drive didn’t overheat or disconnect at all with the HDD inside. I’ve also stressed the drive with the SSD inside (an unsupported configuration) and didn’t encounter any issues.
Anand noted in his original Thunderbolt piece that the cable connectors at the endpoints get warm, and measured 27.6C at the end of a cable. I ended up measuring a notably warmer temperature of over 35C during my stress testing of the drive, but my ambient temperature in AZ is also hotter than Anand’s in NC. When you consider that there’s an active component at the end of both sides of the cable (a Gennum GN2033), this isn’t altogether surprising, but it is disconcerting to feel the cables get noticeably warm during use.
The first Thunderbolt peripherals were primarily aimed at the very high end, as they were usually either RAID or JBOD solutions, with either a number of HDDs or SSDs and first generation Thunderbolt controllers. For the vast majority of customers, single drive solutions with much more modest price points were what everyone has been waiting for, and I strongly feel that the Buffalo MiniStation Thunderbolt is one such drive.
The combination of Apple-reminiscent industrial design, an affordable price point, and the option for either USB 3.0/2.0 and Thunderbolt as an interface makes it a no brainer for shoppers with both feet squarely in the Apple ecosystem. Even outside the Apple ecosystem, users with Z77 boards that include Thunderbolt will shortly be looking for drives and enclosures that allow them to use the new interface. In addition, a number of previous drives haven’t been nearly as portable as the MiniStation Thunderbolt is in practice, which is a one-piece solution that’s powered entirely over either USB2.0/3.0 or Thunderbolt.

As Apple moves to a platform that increasingly is flash-only, albeit with less overall storage, external mass storage will start becoming important once again. Buffalo feels that it’s here they can win with the MiniStation Thunderbolt for iTunes and Video collections that users will stick on external storage. Whether that comes true or the cloud-centric, thin client as a cache model wins out is still something that remains to be seen. As a drive, however, the MiniStation Thunderbolt is an excellent use of what boils down to the current fastest external interface, even if it isn’t over fiber, yet.


