Original Link: https://www.anandtech.com/show/5850/gigabyte-gaz77mxd3h-review-z77-and-microatx
Gigabyte GA-Z77MX-D3H Review – Z77 and MicroATX
by Ian Cutress on May 24, 2012 3:00 PM EST- Posted in
- Gigabyte
- Motherboards
- Z77
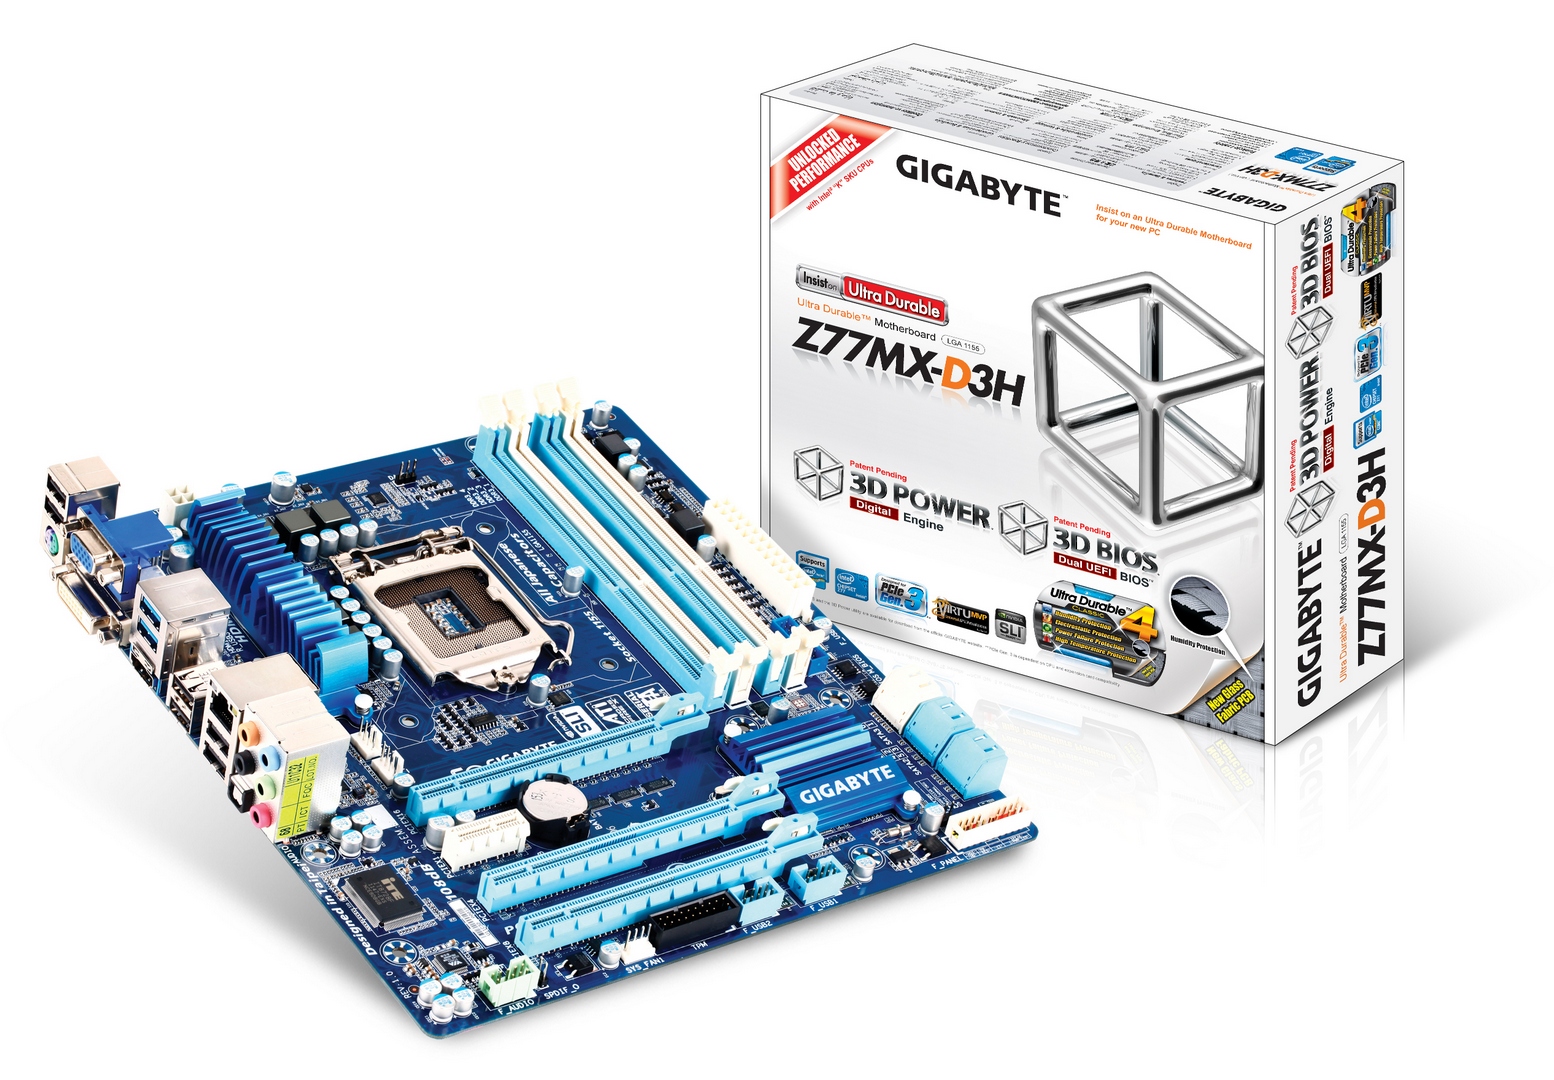
In the first of our non-full-size Z77 motherboard reviews, we are today getting to grips with the Gigabyte GA-Z77MX-D3H. Currently retailing at $135, the Z77MX-D3H offers more performance in the microATX factor than some motherboards do in full-fat ATX mode. This motherboard took high-powered memory in its stride, and on the latest F10 BIOS (at time of testing) Gigabyte claim full compatibility with Xeon E3-12xx processors. The Z77MX-D3H represents a great crack at a smaller form factor combined with a dual GPU gaming machine.
Gigabyte GA-Z77MX-D3H Overview
If I had to condense the testing of the Z77MX-D3H, it would be in a word 'niiice'. For the most part, the board performed brilliantly and worked like a charm. It never missed a beat during testing and had almost no trouble dealing with what I had to throw at it.
From our previous reviews, the Gigabyte's main competition is the ASRock Z77 Extreme4, a full sized ATX board that currently retails at $140 compared to $135 for the Gigabyte. With the push for more compact form factors, while you may not get the unique styling of the ASRock for your money, Gigabyte offers better performance and the smaller size as a bonus.
Performance wise, due to the default overclock offered by Gigabyte motherboards which boosts the CPU turbo frequency under multilthreaded mode, the Gigabyte perfromes very well under multithreaded tasking on par with other Gigabyte (and ASUS) motherboards. The Gigabyte Z77MX-D3H also does well in terms of power usage under moderate work loads.
The only issues I found were that a user cannot rely on the voltage readings in the OS for overclocks, nor are the fan controls that brilliant compared to the offerings of Gigabyte's competitors. In terms of the voltage readings, Gigabyte has put in a layer between the sensors and the OS such that they can control what the sensors display while in the operating system. This means that you will constantly see the same 1.056 volts shown in the OS no matter what you choose in the BIOS, or similarly manipulated values should the BIOS change.
For your money Gigabyte offers three different processor video outputs (D-Sub, DVI-D, HDMI), support for three GPU gaming via SLI/Crossfire (if you have single slot cards, dual GPU gaming only if they are bigger), and that TPM header which features prominently across the Gigabyte range.
Visual Inspection
While still a Z77 product, capable of dual GPU setups, we have a motherboard aimed at the cheaper end of the spectrum. The Z77MX-D3H comes with generic Gigabyte styling, and the power delivery sports relatively small sized heatsinks. We are limited in terms of fan headers (three), and rear panel USB 3.0 ports (only two) compared to the Z77X-UD3H bigger brother.
The socket itself is clean with little obstructions – fan headers are found below the VRM heatsink, where we have two of the 4-pin variety. The other fan header on board can be found at the bottom next to the TPM.
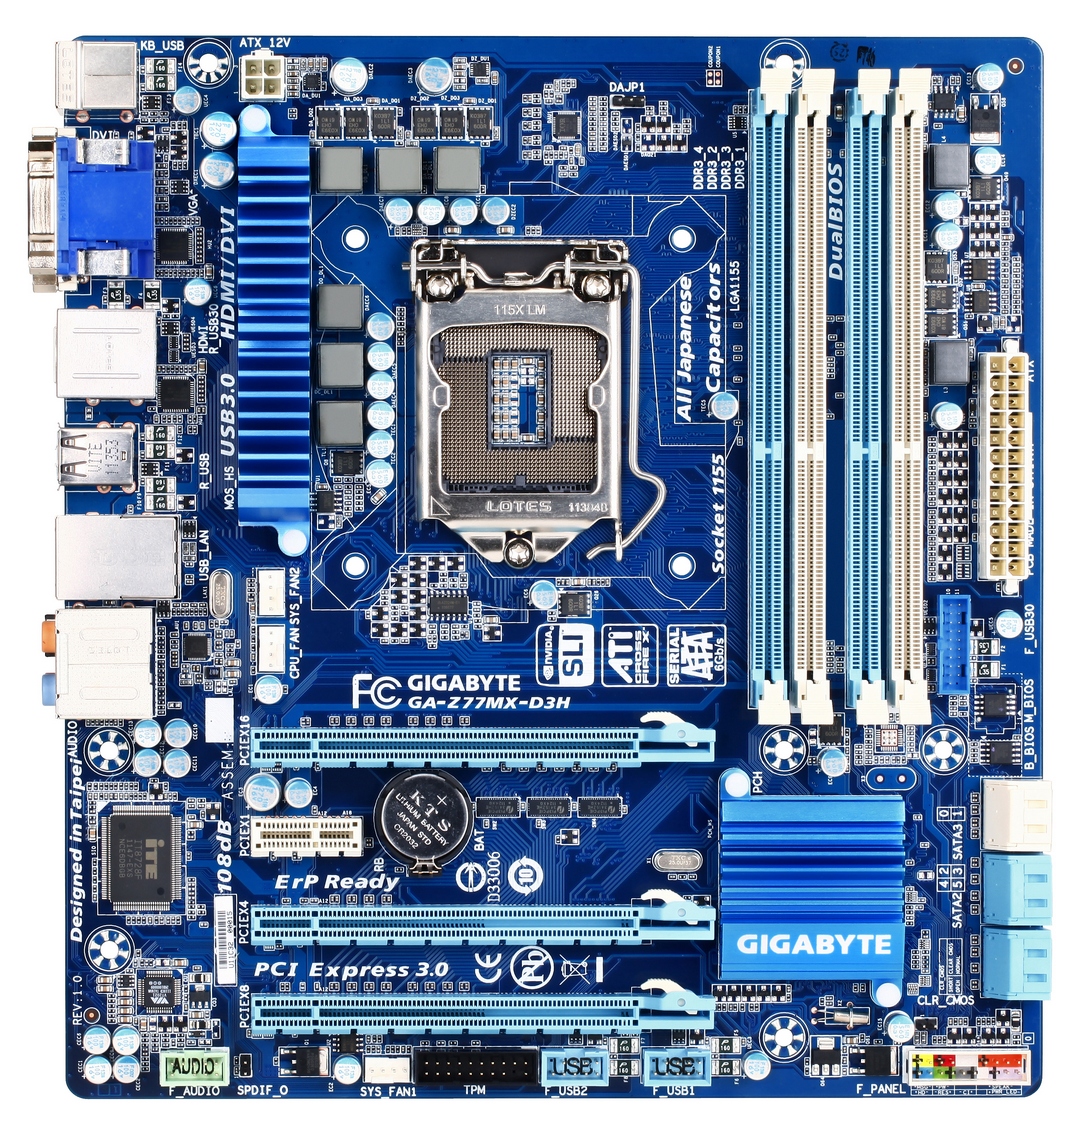
Despite being a cheaper small motherboard, we still have typical Gigabyte features, such as dual BIOSes next to the USB 3.0 header underneath the 24-pin ATX power connector. Due to the size of the board, we only the SATA ports from the chipset specification - this means two SATA 6 Gbps (white) and three SATA 3 Gbps (blue). The chipset heatsink is also small but has enough surface area to keep Gigabyte confident of its functionality.
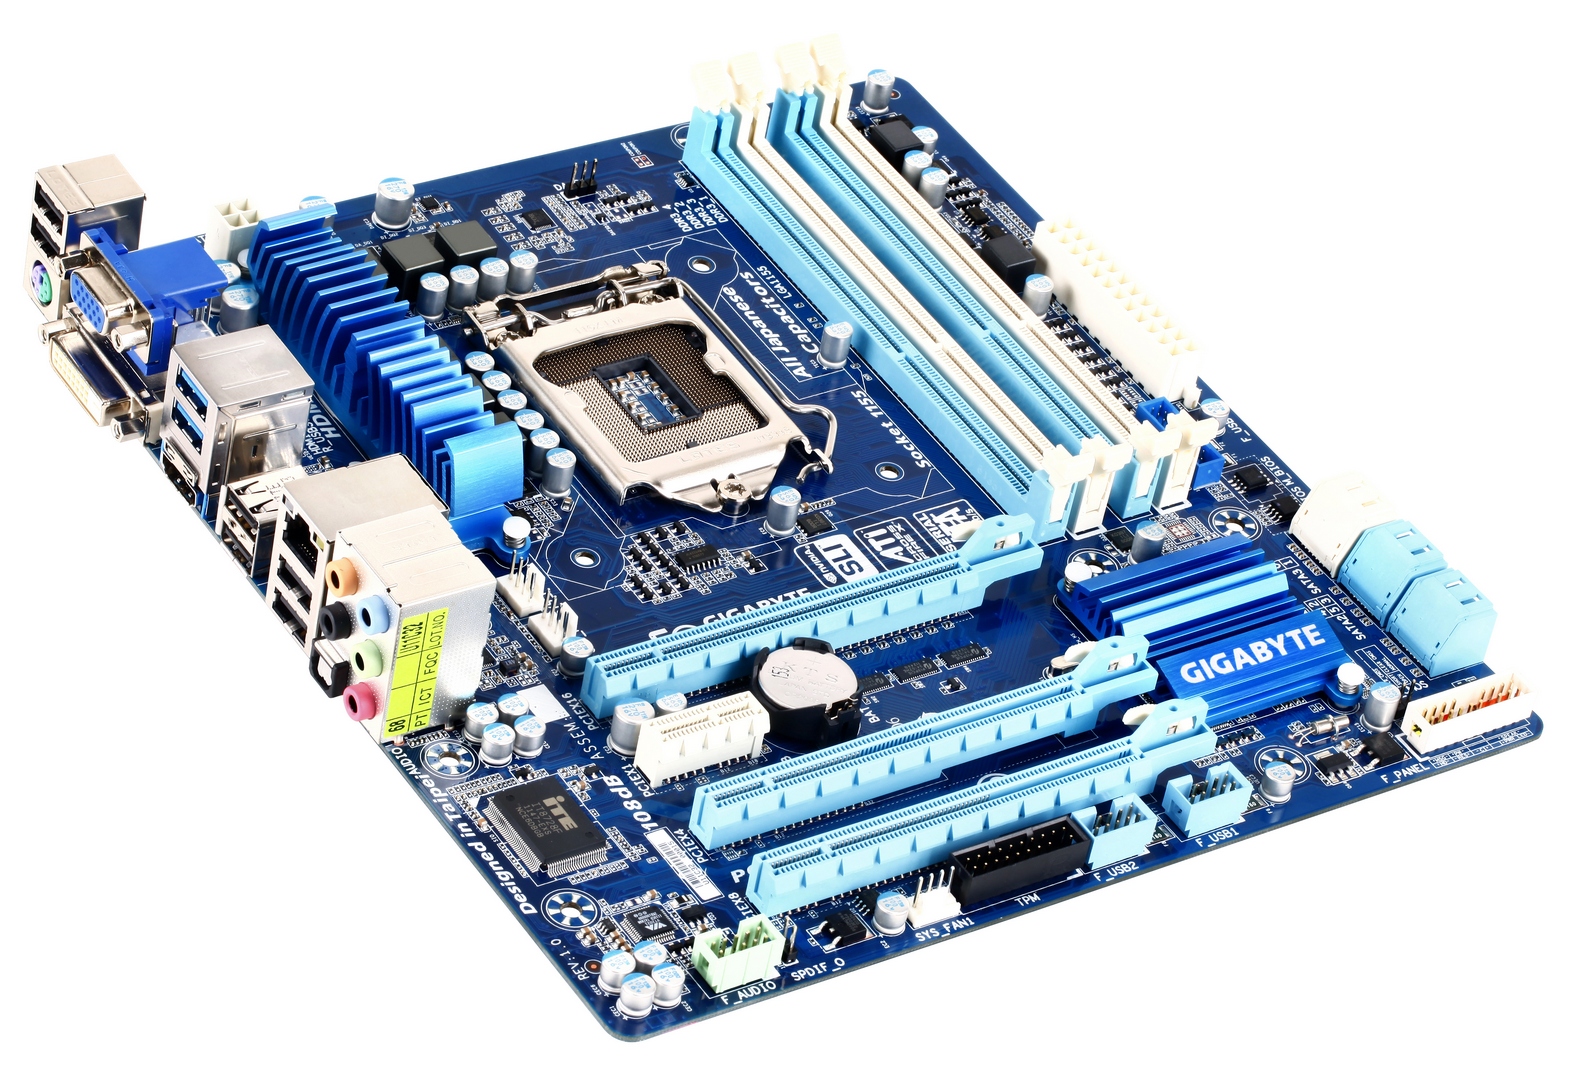
The south side of the board is relatively naked, with a front panel audio, fan header, TPM and two USB 2.0 headers. Given the look of the board and that it does not display many potential features (presumably to fit into a price bracket), I was not expecting anything elaborate such as power/reset buttons.
Gigabyte has aimed the PCIe at users wanting dual GPUs or users needing an extra PCIe device alongside their GPU. The PCIe layout becomes x16 (x8 on dual GPU), x1, x4, x8, with this the x4 having only PCIe 2.0 connectivity.
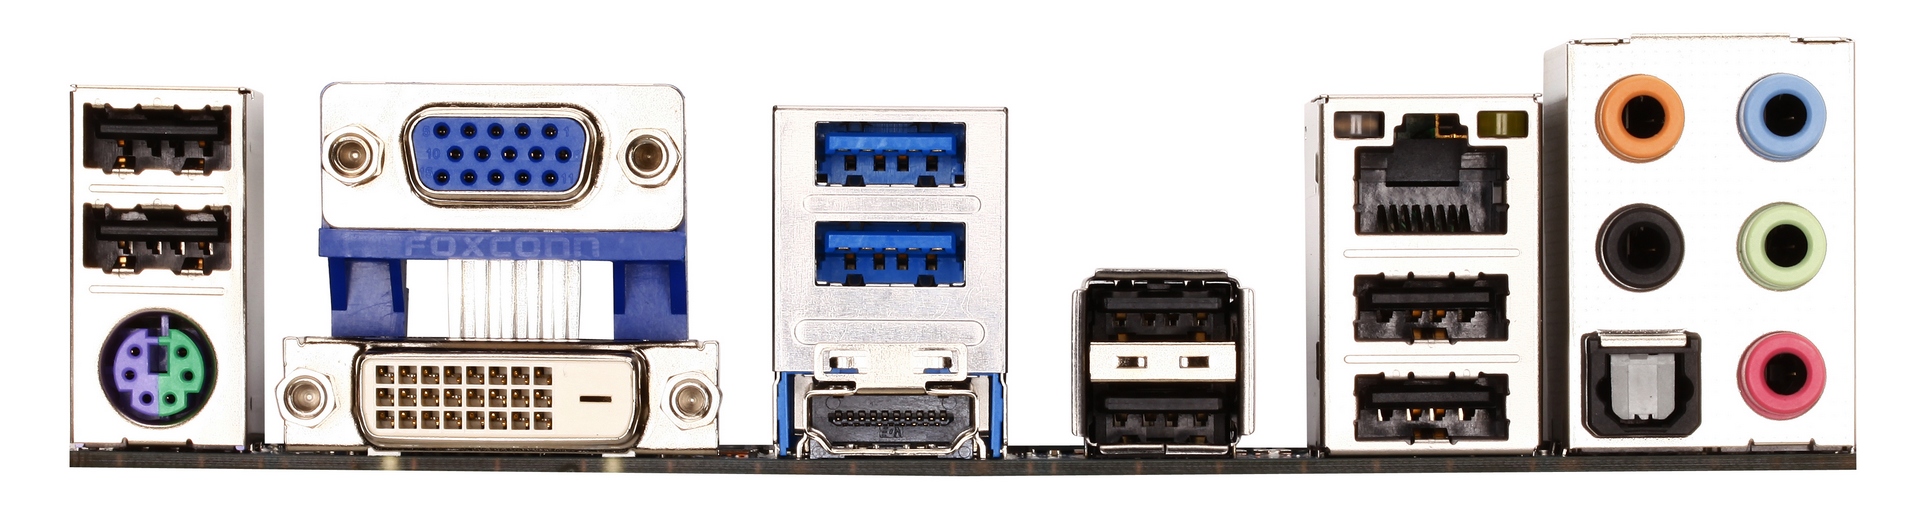
The rear IO panel is more substantial than I assumed, which can only be a good thing. From left to right we have a pair of USB 2.0 (black), a combination PS/2 port, D-Sub, DVI, two USB 3.0 (blue), HDMI, four more USB 2.0 (black), gigabit Ethernet, and standard audio jacks with a combination optical SPDIF output.
Board Features
| Gigabyte GA-Z77MX-D3H | |
| Price | Link |
| Size | mATX |
| CPU Interface | LGA-1155 |
| Chipset | Intel Z77 |
| Memory Slots |
Four DDR3 DIMM slots supporting up to 32 GB Up to Dual Channel, 1066-1600 MHz |
| Video Outputs | HDMI, DVI-D, D-Sub |
| Onboard LAN | Atheros |
| Onboard Audio | Via VT2021 |
| Expansion Slots |
2 x PCIe x16 Gen3 (x16, x8/8) 1 x PCIe x16 Gen2 (x4) 1 x PCIe x1 Gen2 |
| Onboard SATA/RAID |
2 x SATA 6 Gbps (PCH), Support for RAID 0, 1, 5, 10 4 x SATA 3 Gbps (PCH), Support for RAID 0, 1, 5, 10 |
| USB |
4 USB 3.0 ports (2 back panel, 2 from headers) 10 USB 2.0 ports (6 back panel, 4 from headers) |
| Onboard |
4 x SATA 3 Gbps 2 x SATA 6 Gbps 3 x Fan Headers 1 x Front Panel Header 1 x Front Audio Header 1 x SPDIF Output Header 1 x USB 3.0 Header 2 x USB 2.0 Headers 1 x TPM |
| Power Connectors |
1 x 24-pin ATX connector 1 x 8-pin 12V connector |
| Fan Headers |
1 x CPU Fan Header (4-pin) 2 x SYS Fan Headers (4-pin) |
| IO Panel |
1 x PS/2 Combo Port 1 x D-Sub 1 x DVI-D 1 x HDMI 2 x USB 3.0 6 x USB 2.0 1 x Gigabit Ethernet 1 x Optical SPDIF Audio Jacks |
| Warranty Period | 3 Years |
| Product Page | Link |
Gigabyte is continuing with a trend of using audio and NIC different to almost every other manufacturer - with the Z77MX-D3H this means a Via VT2021 audio solution and an Atheros NIC. The PCIe layout is also odd - the 2nd main PCIe slot for GPUs is actually the one at the bottom. This has implications for dual width GPUs which will encroach on the front panel header, as shown in my test bed:
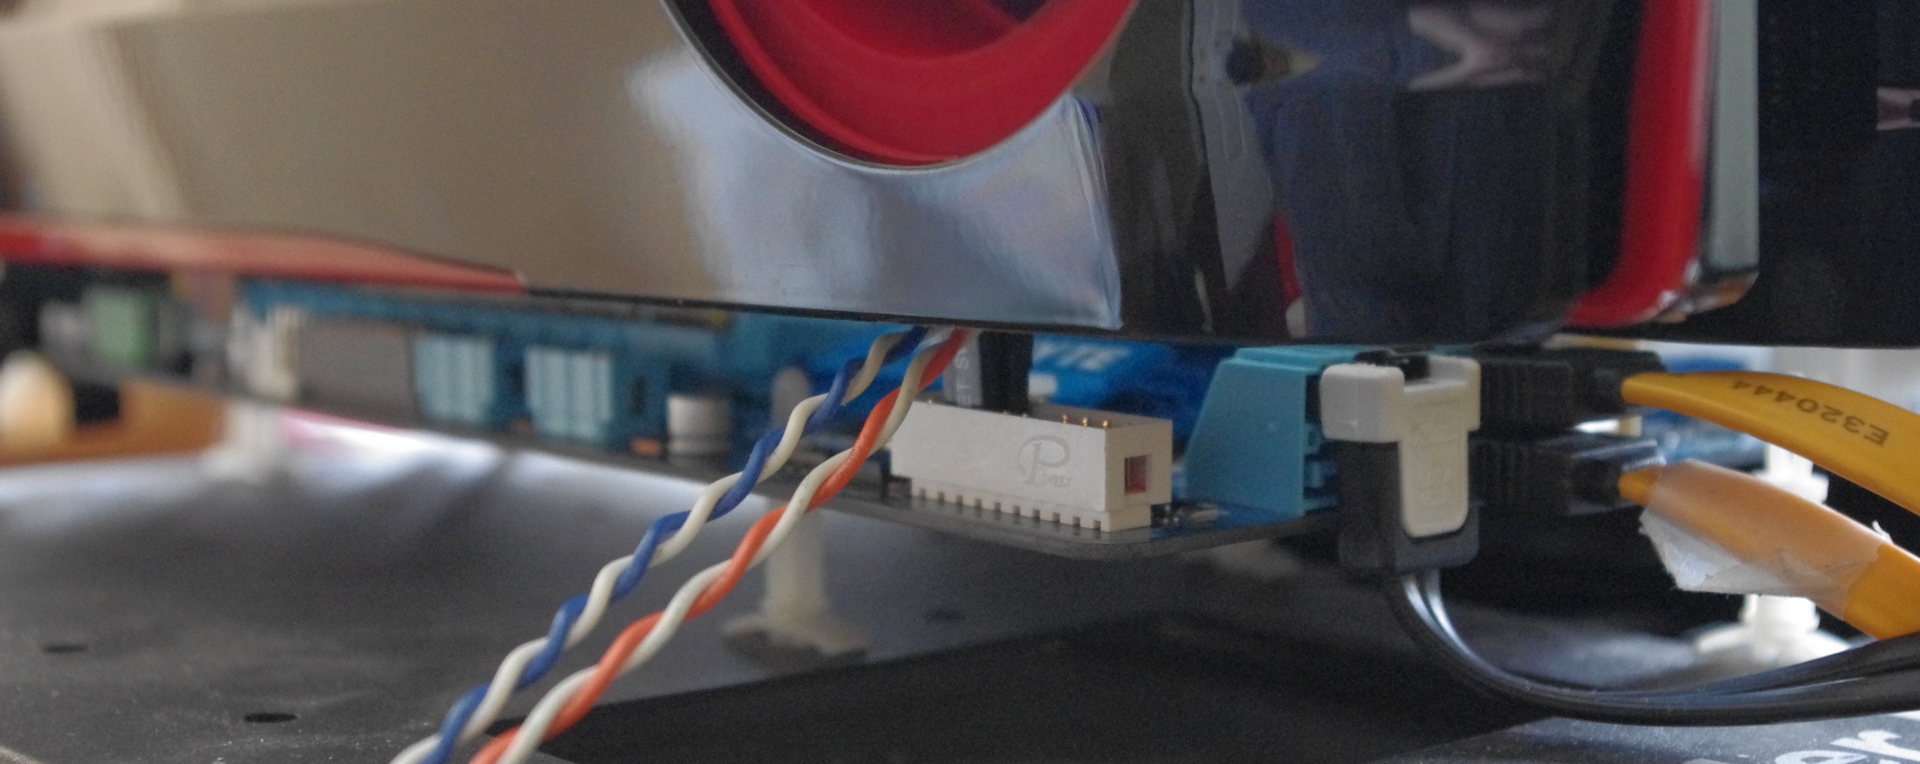
There are some upsides to this - there is now a space between the PCIe slots for GPUs to breathe, it also means the Z77MX-D3H will be one of a few micro ATX boards that will support dual GPU setups where the GPUs are triple width. In my testing, I accidentally assumed the middle x4 PCIe 2.0 slot was the second GPU slot, however the board still applied a CrossFireX profile to it. This would tend to suggest that the motherboard would accept 3-way GPU setups if all the cards would fit in, or two GPUs in SLI with a single width card for PhysX.
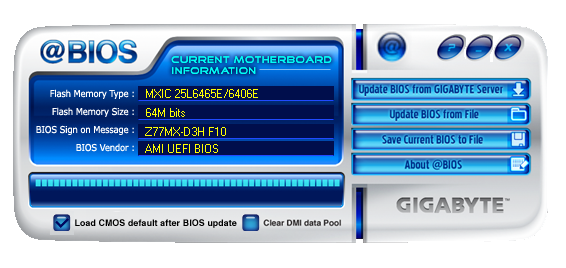
Gigabyte GA-Z77MX-D3H BIOS
When a reviewer gets a board in, especially before release, it often comes with a preview BIOS that is not linked to a full retail BIOS. So when it comes time to test the board, the reviewer has several options - test the BIOS the board came with, test the release BIOS, test the latest BIOS, or ask the manufacturer for their internal beta BIOS. With each different version comes inherent stability changes, CPU microcode changes, or fixes to the system. In the grand scheme of things, there are also two classes of user - OEM/pre-built users who may never touch or update a BIOS at all, or enthusiasts who don't mind getting their hands dirty. Therefore it becomes quite a task for a motherboard reviewer to satisfy everyone in this regard.
With the Gigabyte GA-Z77MX-D3H, I was shipped with BIOS F5, however the earliest one available online was BIOS F9. Using the Gigabyte @BIOS software to update the BIOS, it pulled F9 from the servers. However, navigating to the website gave me access to BIOS F10, which is what I used for this review. The F10 BIOS supposedly updates the board to accept Xeon E5-12xx processors, if that is your flavor. Initially BIOS F5 went straight into advanced mode, but BIOS F10 jumps us into 3D BIOS mode on boot:
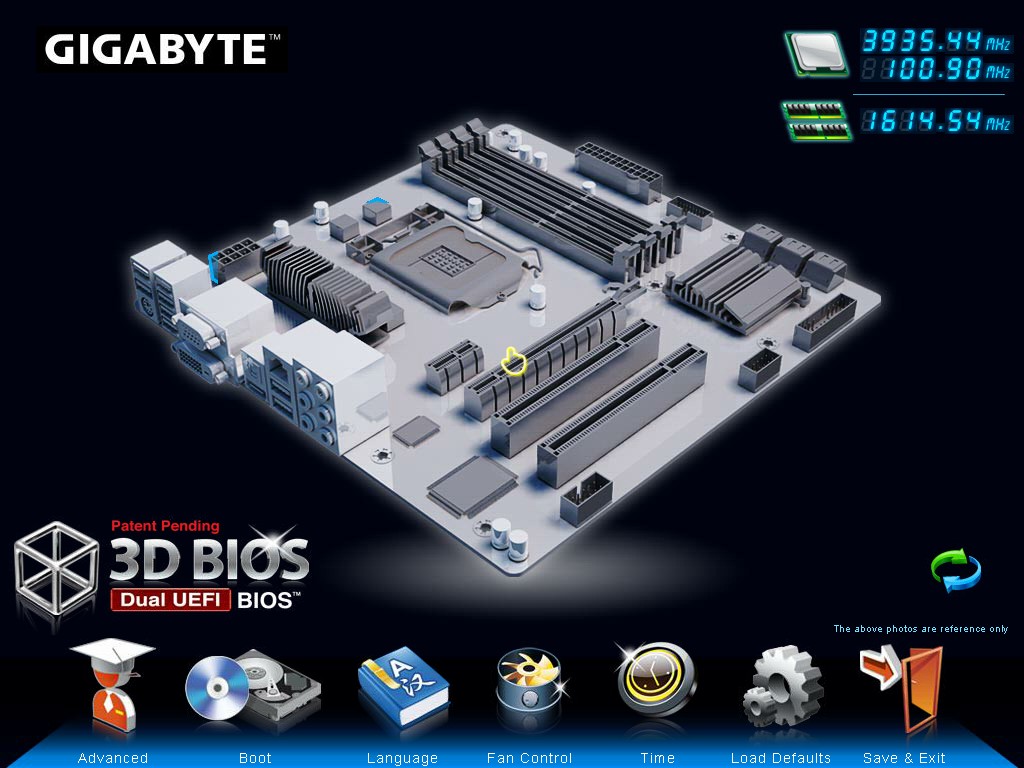
Gigabyte uses a semi-generic picture depending on the model you have, meaning that it may not display the correct or exact number of PCIe slots, but this is just a visual layer over all the settings that are specific to the board. As a front screen, it does will in giving the CPU and memory speed, but I would have liked actual words stating the board model, the CPU model, and perhaps some temperatures, voltages and fan speeds. Upon clicking any of the highlighted areas in the 3D BIOS screen, other menus pop up with options respective of that section (CPU brings up CPU speed offerings), as well as a side menu on the right:
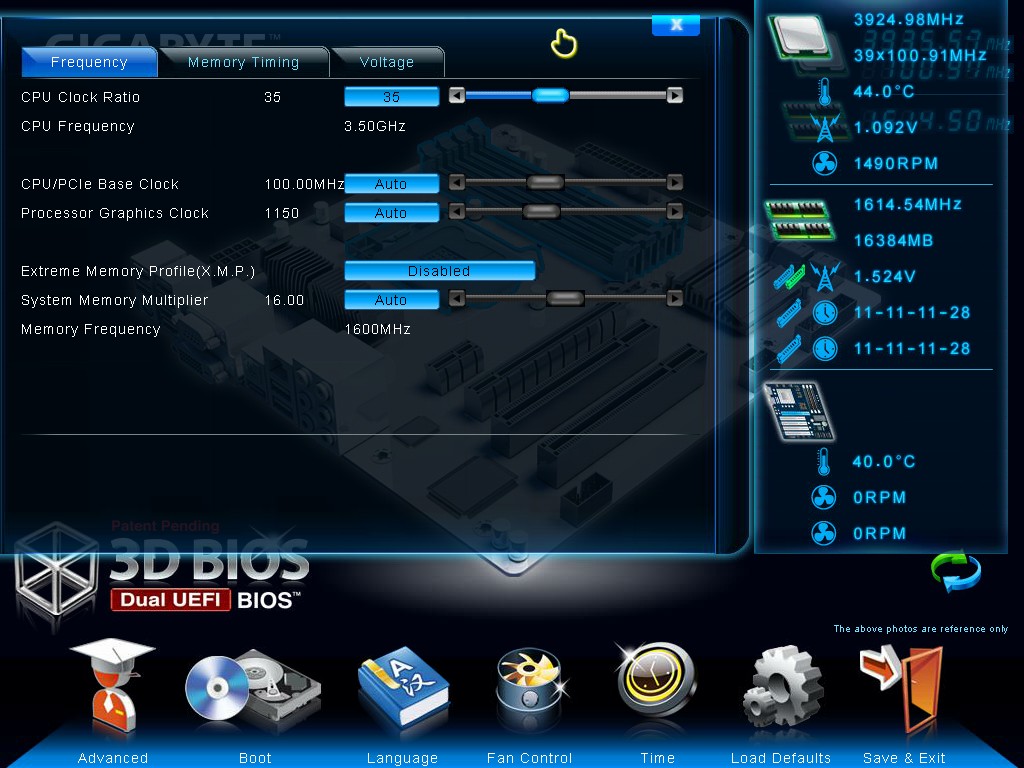
The side menu contains more of what we want to know, and I think this would be better served on the main screen with the board affixed on the right hand side. It shows temperatures, voltages, memory subtimings and fan speeds.
From the 3D BIOS screen, all the main areas are clickable for users who want to visualize what part of the board they are changing. There are also options to modify the boot order, change the language and adjust the fan speed settings (more later).
By clicking Advanced, we move more into a menu system to which users of other BIOSes will feel more comfortable. The first screen in Advanced is designated M.I.T (Motherboard Intelligent Tweaker[?]), and shows the BIOS version as well as important speeds of the CPU and memory.
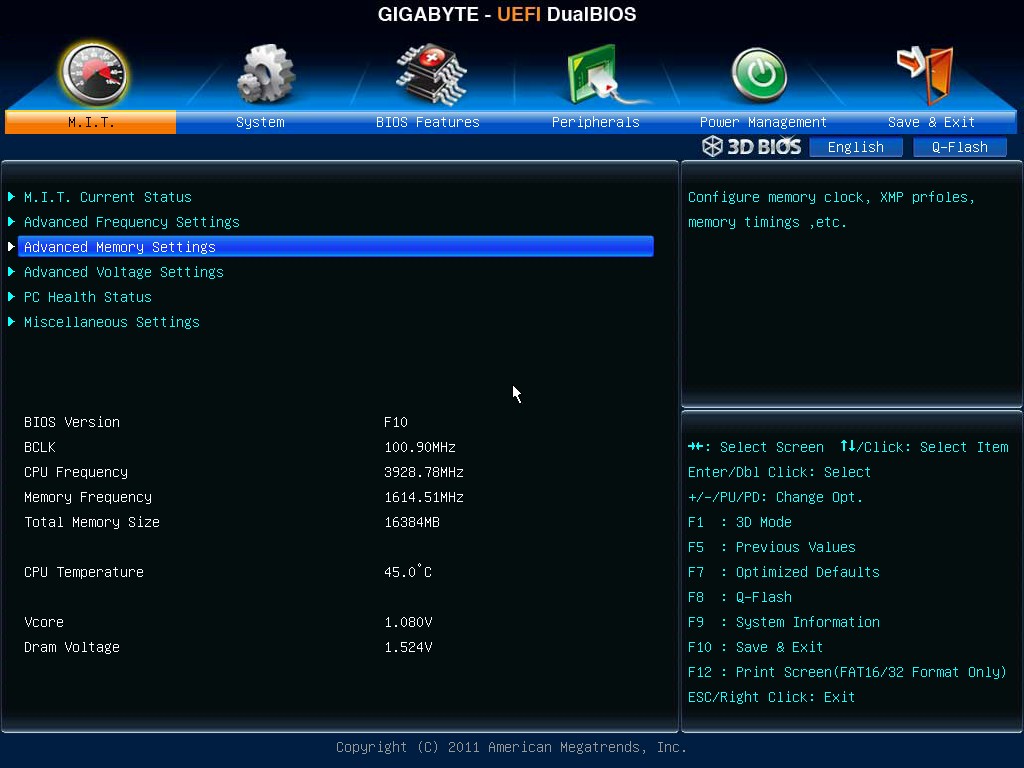
Overclocking options in a Gigabyte BIOS are slightly haphazard. Adjusting speeds of the CPU and memory are relatively straightforward in the Advanced Frequency Settings menu, however the voltages and LLC (Load Line Calibration) settings are a little trickier.
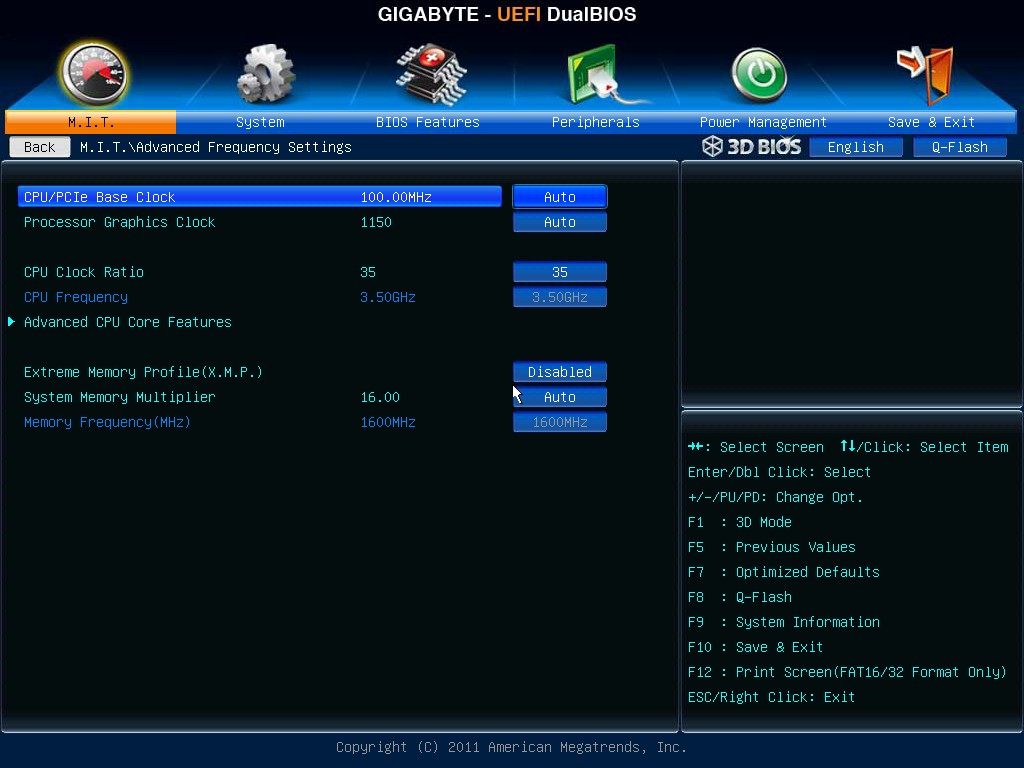
CPU voltage is kept in the MIT -> Advanced Voltage -> CPU Core Voltage Control menu, LLC settings are in the MIT -> Advanced Voltage -> 3D Power Control menu and DRAM voltages are kept in the MIT -> Advanced Voltage -> DRAM Voltage Control menu. It seems a lot of hassle to adjust these in individual screens then go back and adjust the CPU/memory speeds or having to navigate back in case of a missed setting. It would be more helpful to have many of the relevant options on one screen, nicely arranged into CPU / Memory / Power. It should not be that hard to do.
Another feature worth mentioning about the BIOS is the fan controls, located in the MIT -> PC Health Status menu.
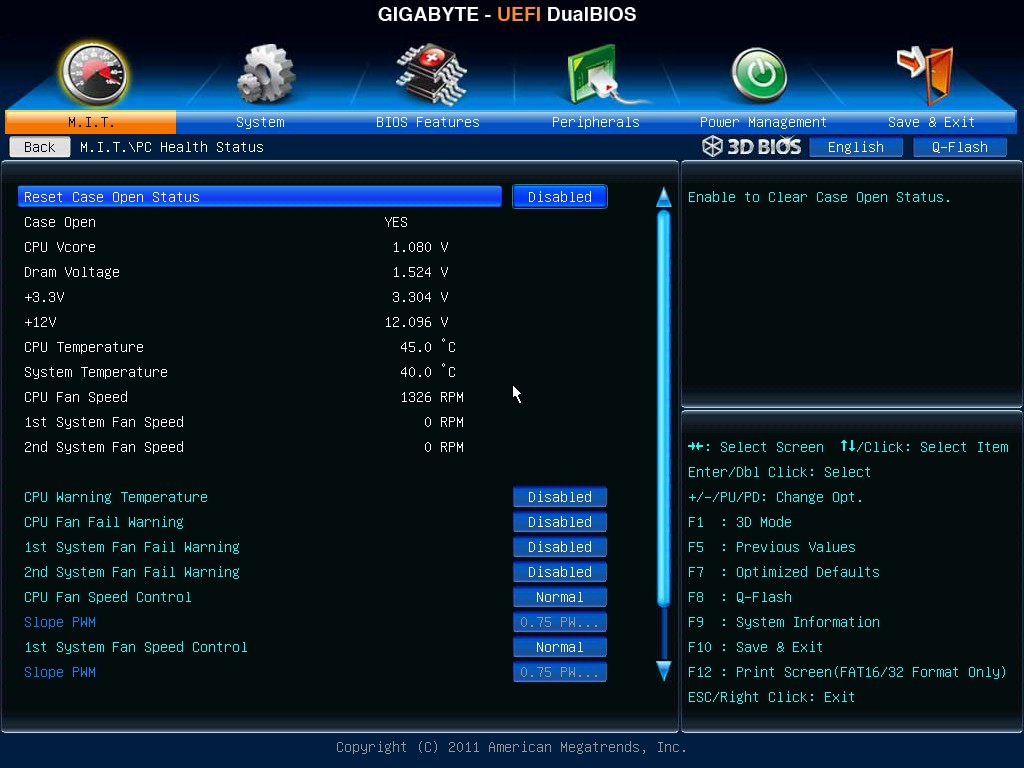
For a long time I have been a big critic of Gigabyte fan controls. Over successive chipset generations, the implementation from Gigabyte does not even come close to that of its primary rival, especially when they implement it in a manner such as what they do on Z77. The fan headers to which the user has control over can be used either in terms of a preset option (Silent, Turbo) or in a manual mode. The manual mode offers settings in terms of 'PWM value / ºC', which for most users will have no meaning apart from 'more means more power to the fans'. There is no opportunity in the BIOS to set a temperature slope, a minimum temperature barrier for fans to kick in or a maximum temperature to put fans on full. In order to get higher praise from reviewers and users, it might be worth Gigabyte looking into different fan solutions for their products.


Software
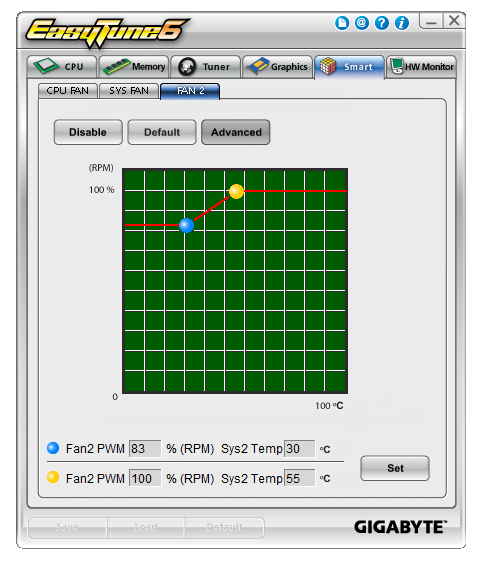
Compared to other vendors, Gigabyte has not always been the best on the software front. For the past few generations the main software has come in the form of EasyTune6, a pseudo all-in-one package for software needs in a system. This includes overclocking, fan controls, voltage/temperature monitoring and relevant CPU and memory information.
I should point out that the ET6 software on the Install CD did not recognize one of the board or CPU, meaning that it did not offer a range of overclocks. Using the automatic update system (the blue @ symbol at the top), an updated version of the software downloaded, but refused to update ET6. In the end, I had to uninstall ET6, and then update with a fresh download from the Gigabyte website.
Apart from the overclock section, the auto tuning option is also available similar to the Z77X-UD3H. In terms of fan controls, we again have the very limited array of options that Gigabyte offers. Controllable fan headers are given a simple two value ramp selection, with a minimum temperature/fan speed and maximum temperature/fan speed.
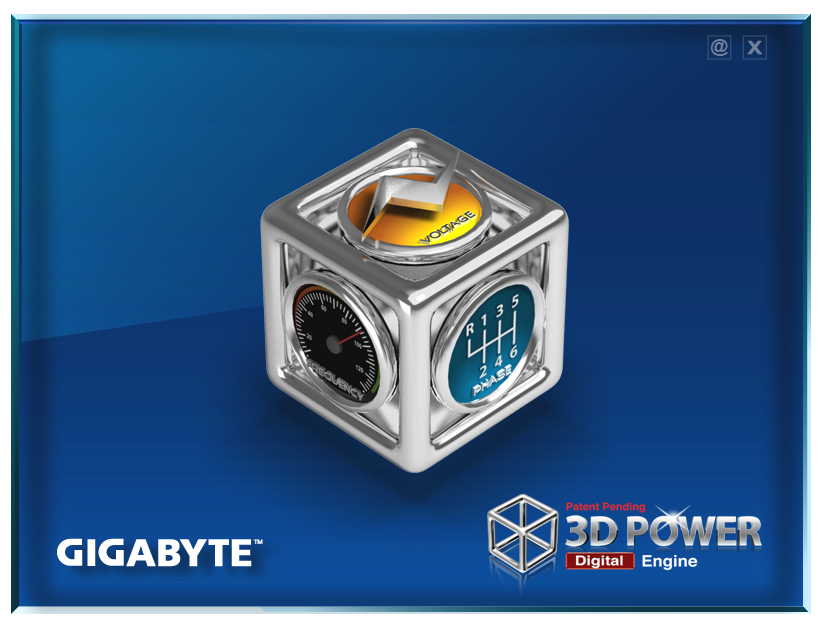
Another element of the Gigabyte software is the 3D Power utility. This is essentially a showcase bit of software, demonstrating that someone at Gigabyte can use a fancy set of 3D tools to make an interface that controls the power delivery settings. Unfortunately, this software fails a little on two fronts. Firstly, 99% of people will not use it, and secondly it is a little unstable to be used for overclockers. Ideally, these settings should have been meshed in with EasyTune6 under another tab. As 3D Power stands, it feels slow, laggy, and the animations are not exactly the smoothest.
@BIOS is the other mainstay of the Gigabyte suite, offering users and easy interface to probe online servers for BIOS updates.


Gigabyte GA-Z77MX-D3H In The Box
Gigabyte rarely produces a shock when it comes to accessories in the box. More often than not they leave it up to the user to source their own additional components, thereby not limiting them (or charging them) for a series of additional controllers they do not want. On the plus side, this helps Gigabyte reach perhaps a lower price point than other manufacturers. On the downside, some users would like an all-in-one motherboard that caters for eventualities. Inside the Z77MX-D3H, we have:
IO Shield
User Manual
Driver CD
Four SATA cables
SLI Bridge
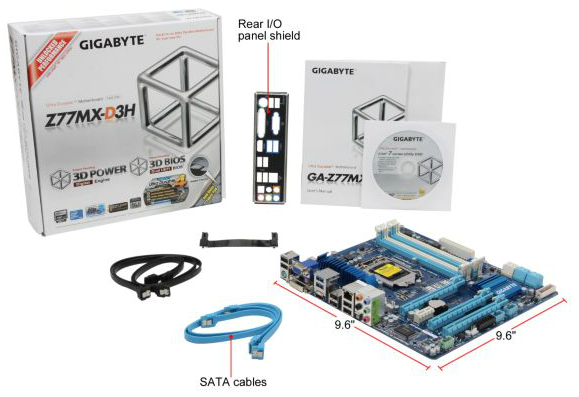
As expected, for $135 all-in the Gigabyte package does not exactly pack a punch for additions. Perhaps we may expect more in our future reviews of the Sniper motherboards?
Voltage Readings
After my first publication of OCCT voltage readings, a few readers responded with a more in-depth reasoning behind some of the results we were seeing. With this in mind, I would like to re-describe what we are doing with this test, and how it comes about.
Much of what an enthusiast overclocker does is monitor CPU temperature and voltage. Whatever settings a user places in the BIOS or OS is at the mercy of the motherboard - in terms of actually setting the values and reporting the values back. As an enthusiast, we have to rely on what readings we get back, and hope that motherboard manufacturers are being honest with their readings.
Take CPU voltage. What we as a user see in CPU-Z or OCCT is a time-averaged value that hides voltage ripple (if any) for power delivery. It is very easy for a motherboard manufacturer to hide this value, or to disregard slight deviations and report a constant value to the user. The CPU voltage reading can be taken at a variety of places on the power plane, which can vary between motherboards and manufacturers, meaning that each reading is essentially not comparable with the other. Nevertheless, as an enthusiast, we will constantly compare value A with value B.
Whether or not I can achieve 4.7 GHz with 1.175 volts on a particular board is inconsequential - your motherboard may perhaps produce the same result with a reading at 1.200 volts. The only way to test the actual value is with consistent methodology is via an oscilloscope connected to similar points on each board. This may sound like taking an OCCT reading is therefore redundant.
However, motherboards have settings relating to load line calibration. As load is applied to the CPU, the voltage across the processor decreases (VDroop). Load Line calibration essentially attempts to control this level of droop, by increasing voltage when voltage drops are detected away from a fixed value. Manufacturers have different ideas on how to modify LLC with respect to load, or whether the level of modification should be controlled by the user. Some manufacturers offer the option at a variety of levels, such that overclockers can be sure of the applied setting (even if it increases peak voltage, as explained by AnandTech in 2007).
By doing a full load OCCT test, we are essentially determining both how aggressive the motherboard is reporting the CPU voltage under load and how aggressive load line calibration is performing (from the point of view of the user without an oscilloscope or DVM). If someone has one of the motherboards we have tested and you have a different one, variations in load voltage should describe the offset you may require for overclock comparisons.
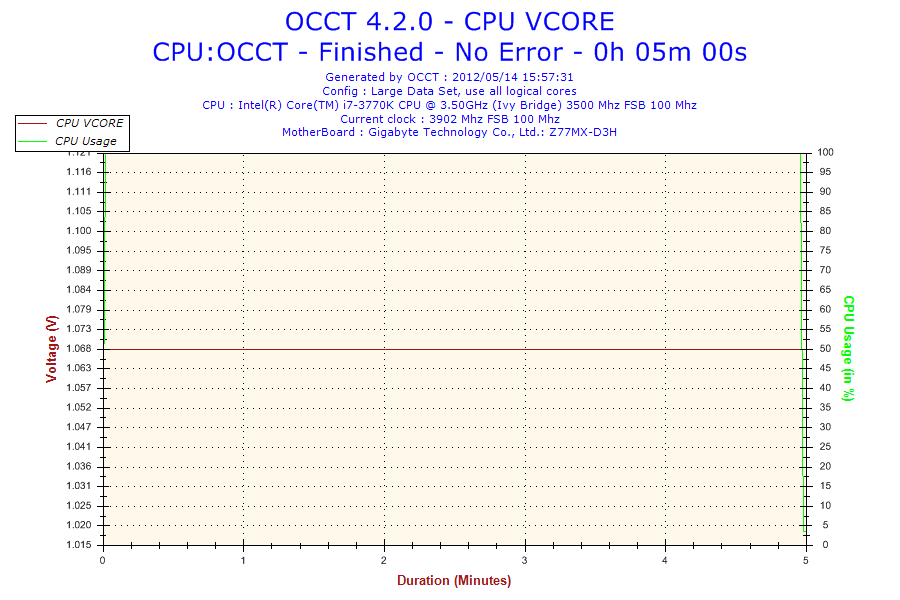
Last time we reviewed a Gigabyte Z77 board, the Z77X-UD3H, we were given a straight line for the voltage in our OCCT test as well. Given the correlation between this test and previous results, it looked 'normal'. That was until I performed some overclocking and used the auto-overclock features. On every change of the CPU voltage, the operating system software would constantly read the same 1.068 volts value. Even if the CPU was set at 1.200 volts, I would still get the 1.068 volts reading (even at load). This means that Gigabyte are artificially putting in a layer between the CPU and the OS and manipulating the results as it passes through to the OS. While this is nothing new (often used for monitoring), the fact that Gigabyte have kept it a fixed value confuses me. As an overclocker, I perhaps cannot see what the real voltage being applied to the CPU is unless I break out a DVM. It is also slightly devious to users who use the voltage value as a marker in reducing power usage. I hope that this will be changed in a future BIOS, but whether this change was malicious or not, it does raise questions as to what else Gigabyte may be changing from real values on the board to reported values.
Overclocking
Note: Ivy Bridge does not overclock like Sandy Bridge. For a detailed report on the effect of voltage on Ivy Bridge (and thus temperatures and power draw), please read Undervolting and Overclocking on Ivy Bridge.
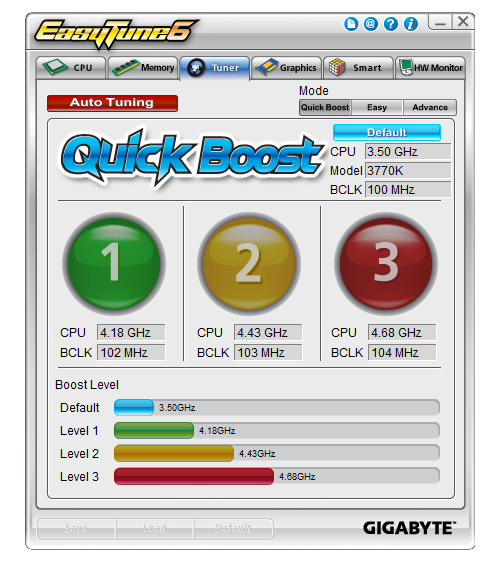
Auto overclock options come purely as part of EasyTune6 software in the operating system. Gigabyte offers three levels of overclock, which essentially apply an array of preset values to the BIOS and reboot the system. Also in ET6 is an 'Auto Tuning' option, which actively applies a stress test on the system and then boosts the CPU speed based on thermal readings and stability. Manual overclocks can be performed in ET6, though for best results a user should head to the BIOS in advanced mode, and navigate through various menus to set speeds and voltages.
Automatic Overclock: In ET6, each of the auto overclock options were tested:
Level 1 sets the CPU at 102 MHz and 41x multiplier, giving 4.18 GHz total. At this setting, the memory was also adjusted to DDR3-2266 9-11-11-29 (compared to DDR3-2400 9-11-11-31 for XMP). At this level, with 100% load, PovRay reached a peak temperature of 83ºC and so did OCCT. The voltage reading from the CPU still showed stock 1.056-1.068 volts, however the temperatures suggest that something closer to 1.175 volts was being applied.
Level 2 sets the CPU at 103 MHz and 43x multiplier, giving 4.44 GHz total. Memory was also adjusted similar to Level 1. At this level, with 100% load, PovRay reached a peak temperature of 87ºC and OCCT gave a peak temperature of 86ºC. This also reiterates a suggested voltage reading of around 1.175V.
Level 3 sets the CPU at 104 MHz and 45x multiplier, giving 4.68 GHz total. At this level, the CPU reached 97ºC peak temperature for PovRay and 100ºC for OCCT. The board would automatically reduce the CPU multiplier to 35x when the CPU was above 97ºC.
The auto tuning setting rebooted the system and then gave a full screen image indicating that overclock testing was taking place. The system initially booted into Auto overclock Level 2, and raised the multiplier slowly while performing stability tests. The program crashed when it reached 48x (at 103 MHz, giving 4944 MHz), and then the system rebooted back to Level 2 setting with no other modification.
Manual Overclock: As with our other Z77 manual overclock testing, here we raise the multiplier slowly and find the minimum voltage at which the CPU successfully passes a run of PovRay and OCCT. While this may not be the most thorough of stability tests, it provides a suitable benchmark to aim for while balancing time taken to test the motherboard. For the Gigabyte Z77MX-UD3H, we implemented an LLC setting of Extreme to ensure stability.
We start at 45x multiplier at 1.100 volts, which gives 69ºC peak temperature during PovRay and 72ºC during OCCT.
At the 46x multiplier, this was stable at a minimum of 1.125 volts, giving 75ºC peak temperature during PovRay and 77ºC during OCCT.
At the 47x multiplier, this was stable at a minimum of 1.200 volts, giving 80ºC peak temperature during PovRay and 84ºC during OCCT.
At the 48x multiplier, the system was not stable even at 1.300 volts, giving 95ºC+ during our testing.
One other point to note is with the F10 BIOS. This BIOS was particularly unstable if the voltage was too low for the CPU clock. This required that after each bad setting that I applied I had to short the ClearCMOS header and then input all the settings again. The BIOS was only partially stable even if the settings were stable in the OS. This is indicative of the way Gigabyte handles overclock settings - the Gigabyte board will apply all BIOS settings immediately at the start of POST, while some other manufacturers only apply overclock settings at the end of the POST to ensure stability in the BIOS. It would perhaps be beneficial for Gigabyte to go down this route, unless the issue is inherently with the BIOS itself.
Test Setup
| Processor |
Intel Core i7-3770K ES (Stepping 9, Retail) 4 Cores, 8 Threads, 3.5 GHz (3.9 GHz Turbo) |
| Motherboards |
ASRock Z77 Extreme4 ASUS P8Z77-V Pro Gigabyte GA-Z77X-UD3H MSI Z77A-GD65 ASUS P8Z77-V Deluxe ASRock Fatal1ty Z77 Professional Gigabyte GA-Z77MX-UD3H |
| Cooling | Intel All-in-One Liquid Cooler |
| Power Supply | OCZ 1250W Gold ZX Series |
| Memory |
GSkill RipjawsZ 4x4 GB DDR3-2400 9-11-11 Kit GSkill TridentX 2x4 GB DDR3-2666 11-13-13 Kit |
| Memory Settings | XMP (2400 9-11-11) |
| Video Cards |
ASUS HD7970 3GB ECS GTX 580 1536MB |
| Video Drivers |
Catalyst 12.3 NVIDIA Drivers 296.10 WHQL |
| Hard Drive | Micron RealSSD C300 256GB |
| Optical Drive | LG GH22NS50 |
| Case | Open Test Bed - CoolerMaster Lab V1.0 |
| Operating System | Windows 7 64-bit |
| SATA Testing | Micron RealSSD C300 256GB |
| USB 2/3 Testing | OCZ Vertex 3 240GB with SATA->USB Adaptor |
Power Consumption
Power consumption was tested on the system as a whole with a wall meter connected to the OCZ 1250W power supply, while in a dual 7970 GPU configuration. This power supply is Gold rated, and as I am in the UK on a 230-240 V supply, leads to ~75% efficiency > 50W, and 90%+ efficiency at 250W, which is suitable for both idle and multi-GPU loading. This method of power reading allows us to compare the power management of the UEFI and the board to supply components with power under load, and includes typical PSU losses due to efficiency. These are the real world values that consumers may expect from a typical system (minus the monitor) using this motherboard.

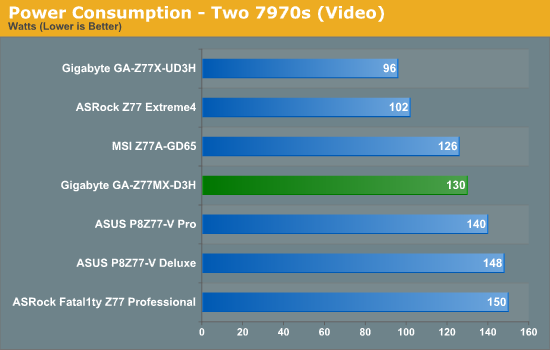
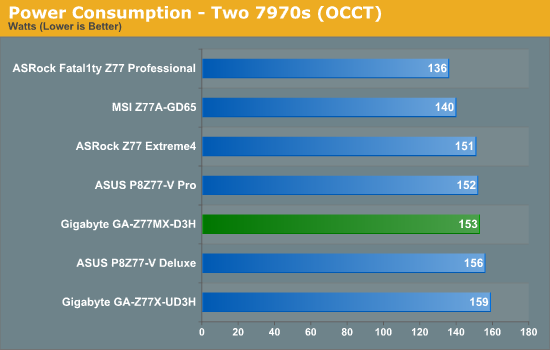
Due to the size of the board and the lack of phase loading in any serious manner, the Gigabyte Z77MX-D3H does rather well in power usage especially at idle. During video, the board is somewhat thwarted with it's bigger brother needing less power.
POST Time
Different motherboards have different POST sequences before an operating system is initialized. A lot of this is dependent on the board itself, and POST boot time is determined by the controllers on board (and the sequence of how those extras are organized). As part of our testing, we are now going to look at the POST Boot Time - this is the time from pressing the ON button on the computer to when Windows starts loading. (We discount Windows loading as it is highly variable given Windows specific features.) These results are subject to human error, so please allow +/- 1 second in these results.
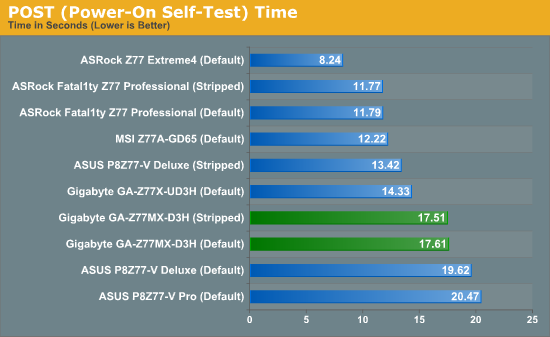
The controllers on board the Z77MX-D3H do not add much for POST times, and overall the Gigabyte is rather slow compared to its competitors. The ASRock Z77 Extreme4 for example is in a similar price bracket but takes around half the time to POST.
Overclocks
Here at AnandTech we want to provide quick and easy ways to determine if a board is good for you (with in-depth analysis of course). So here is a quick round up of our overclocking results. Overclocks are tested for stability with PovRay and OCCT - while these may not be the most strenuous of stability tests, it does offer a quick check for memory errors under high load (and also balances testing time with getting the next board on for review!).
|
CPU Speed (MHz) |
Voltage (Volts) |
PovRay Peak Temp (ºC) |
OCCT Peak Temp (ºC) |
Notes | |
|
ASRock Fatal1ty Z77 Professional |
4700 | 1.200 | 89 | 89 | PLL Overvoltage enabled |
|
ASRock Z77 Extreme4 |
4700 | 1.175 | 86 | 86 | LLC Level 1 |
|
ASUS P8Z77-V Deluxe |
4700 | 1.225 | 89 | 84 | PLL Overvoltage enabled |
|
ASUS P8Z77-V Pro |
4700 | 1.200 | 83 | 86 | PLL Overvoltage enabled |
|
Gigabyte Z77X-UD3H |
4700 | 1.200 | 82 | 86 | LLC Extreme |
|
Gigabyte Z77MX-D3H |
4700 | 1.200 | 80 | 84 | LLC Extreme |
|
MSI Z77A-GD65 |
4700 | 1.250 | 90 | - | PLL Overvoltage enabled |
USB Speed
For this benchmark, we run CrystalDiskMark to determine the ideal sequential read and write speeds for the USB port using our 240 GB OCZ Vertex3 SSD with a SATA 6 Gbps to USB 3.0 converter. Then we transfer a set size of files from the SSD to the USB drive using DiskBench, which monitors the time taken to transfer. The files transferred are a 1.52 GB set of 2867 files across 320 folders – 95% of these files are small typical website files, and the rest (90% of the size) are the videos used in the Sorenson Squeeze test.
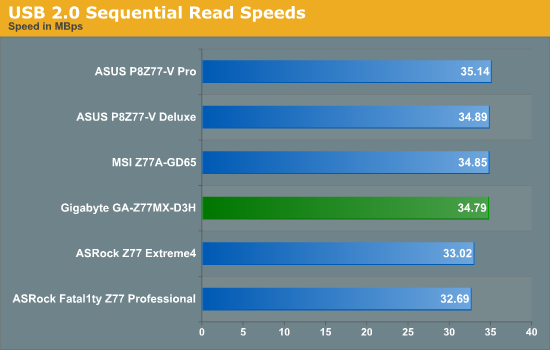
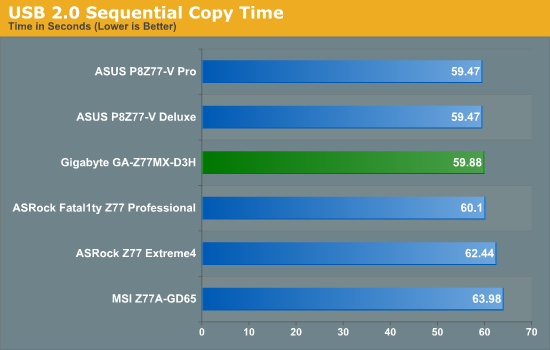
USB 2.0 performance is reasonable; the ASUS models in our copy test edge out the Z77MX-D3H.

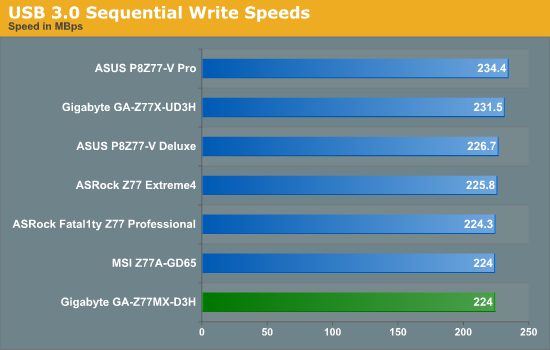
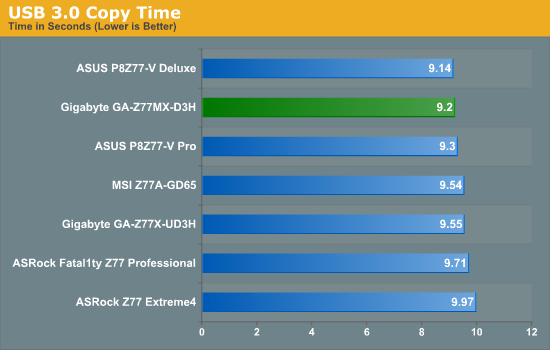
The Gigabyte Z77MX-D3H does reasonably well in USB 3.0, beating out many other boards in our copy test.
SATA Testing
We also use CrystalDiskMark for SATA port testing on a C300 drive. The sequential test (incompressible data) is run at the 5 x 1000 MB level. This test probes the efficiency of the data delivery system between the chipset and the drive, or in the case of additional SATA ports provided by a third party controller, the efficiency between the controller, the chipset and the drive.
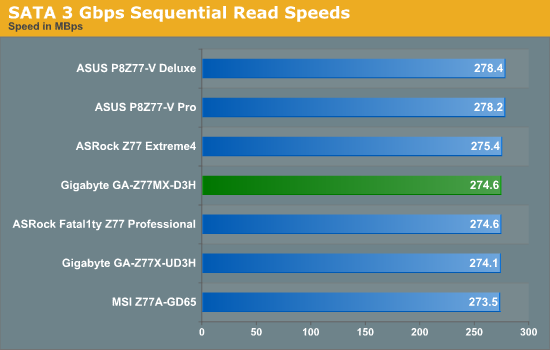
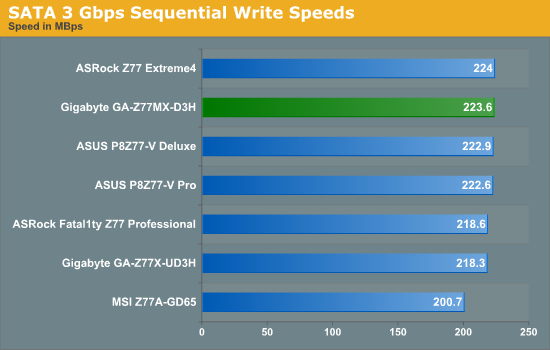
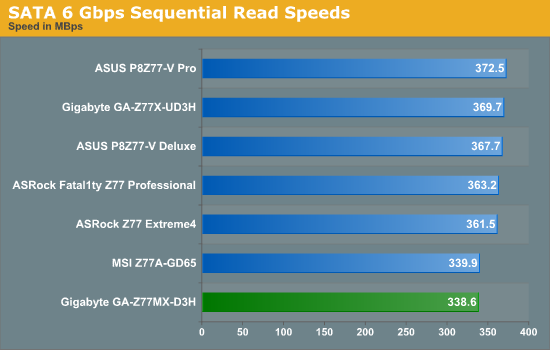
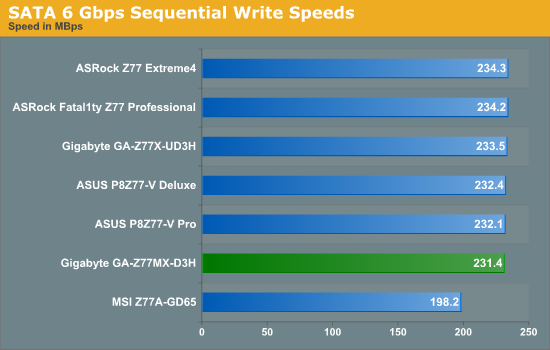
SATA 6 Gbps read performance on the Z77MX-D3H matches that of the MSI board, which is almost 10% slower than our other products tested. This isn't seen in the write tests, where the MSI still takes home the wooden spoon.
DPC Latency
Deferred Procedure Call latency is a way in which Windows handles interrupt servicing. In order to wait for a processor to acknowledge the request, the system will queue all interrupt requests by priority. Critical interrupts will be handled as soon as possible, whereas lesser priority requests, such as audio, will be further down the line. So if the audio device requires data, it will have to wait until the request is processed before the buffer is filled. If the device drivers of higher priority components in a system are poorly implemented, this can cause delays in request scheduling and process time, resulting in an empty audio buffer – this leads to characteristic audible pauses, pops and clicks. Having a bigger buffer and correctly implemented system drivers obviously helps in this regard. The DPC latency checker measures how much time is processing DPCs from driver invocation – the lower the value will result in better audio transfer at smaller buffer sizes. Results are measured in microseconds and taken as the peak latency while cycling through a series of short HD videos - under 500 microseconds usually gets the green light, but the lower the better.
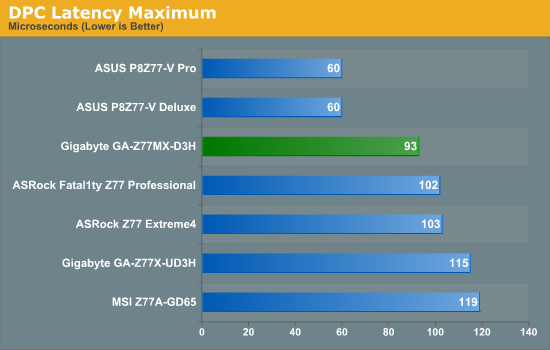
The Z77MX-D3H does very well to achieve a time less than 100 microseconds in our DPC latency test.
3D Movement Algorithm Test
The algorithms in 3DPM employ either uniform random number generation or normal distribution random number generation, and vary in various amounts of trigonometric operations, conditional statements, generation and rejection, fused operations, etc. The benchmark runs through six algorithms for a specified number of particles and steps, and calculates the speed of each algorithm, then sums them all for a final score. This is an example of a real world situation that a computational scientist may find themselves in, rather than a pure synthetic benchmark. The benchmark is also parallel between particles simulated, and we test the single thread performance as well as the multi-threaded performance.
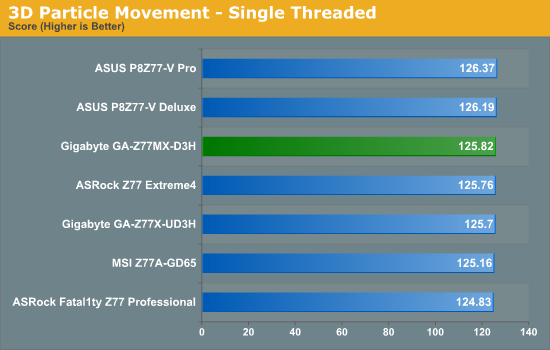
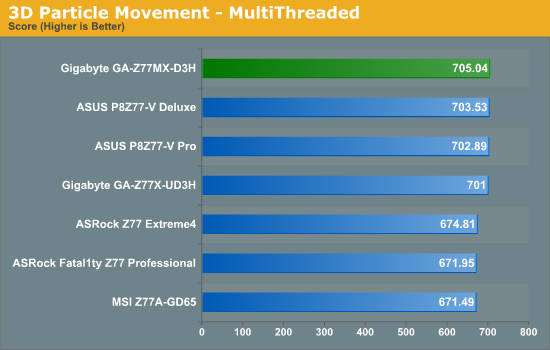
Due to Gigabyte's policy of providing their boards with an automatic overclock (single thread performance in multithread mode) using the Turbo modes of Intel processors, we see the Z77MX-D3H is in the top grouping in multithreaded speed at stock.
WinRAR x64 3.93 - link
With 64-bit WinRAR, we compress the set of files used in the USB speed tests. WinRAR x64 3.93 attempts to use multithreading when possible, and is a good indicator of how well the motherboard switches between turbo modes on processors.
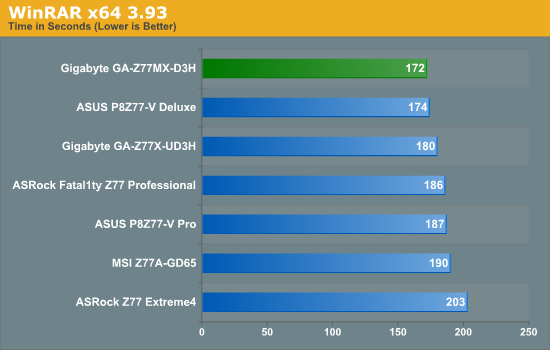
The Z77MX-D3H surprises me in taking the lead in our WinRar test, edging out the performance of the P8Z77-V Deluxe.
FastStone Image Viewer 4.2 - link
FastStone Image Viewer is a free piece of software I have been using for quite a few years now. It allows quick viewing of flat images, as well as resizing, changing color depth, adding simple text or simple filters. It also has a bulk image conversion tool, which we use here. The software currently operates only in single-thread mode, which should change in later versions of the software. For this test, we convert a series of 170 files, of various resolutions, dimensions and types (of a total size of 163MB), all to the .gif format of 640x480 dimensions.
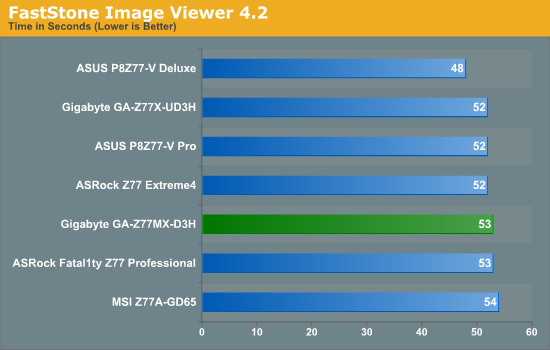
In our single threaded FastStone test, the Z77MX-D3H performs on par with other Z77 motherboards.
Xilisoft Video Converter
With XVC, users can convert any type of normal video to any compatible format for smartphones, tablets and other devices. By default, it uses all available threads on the system, and in the presence of appropriate graphics cards, can utilize CUDA for NVIDIA GPUs as well as AMD APP for AMD GPUs. For this test, we use a set of 32 HD videos, each lasting 30 seconds, and convert them from 1080p to an iPod H.264 video format using just the CPU. The time taken to convert these videos gives us our result.
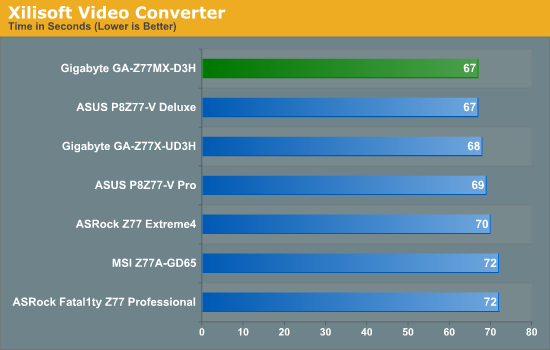
Due to the highly optimized multithreaded nature of Xilisoft, the Z77MX-D3H continues lighting up the multithreaded benchmarks, achieving a joint top score.
x264 HD Benchmark
The x264 HD Benchmark uses a common HD encoding tool to process an HD MPEG2 source at 1280x720 at 3963 Kbps. This test represents a standardized result which can be compared across other reviews, and is dependant on both CPU power and memory speed. The benchmark performs a 2-pass encode, and the results shown are the average of each pass performed four times.
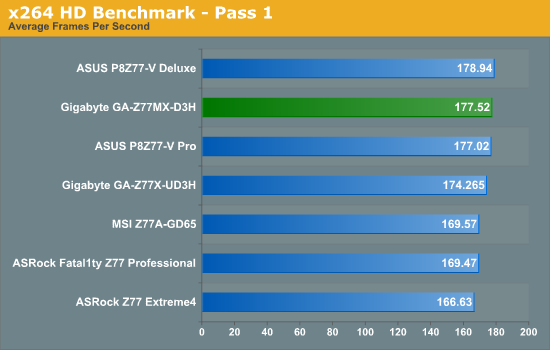
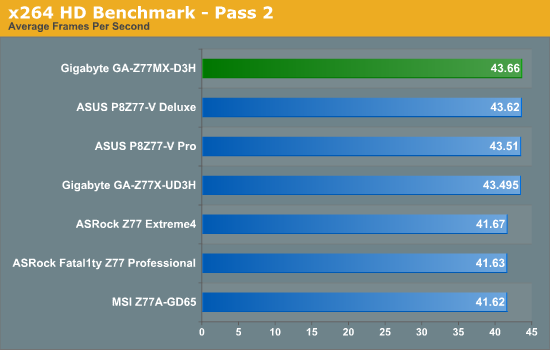
Again, in a fully multithreaded test the Z77MX-D3H stretches its legs/pins and performs very well in our x264 HD benchmark, reaching the upper echelons seemingly with ease.
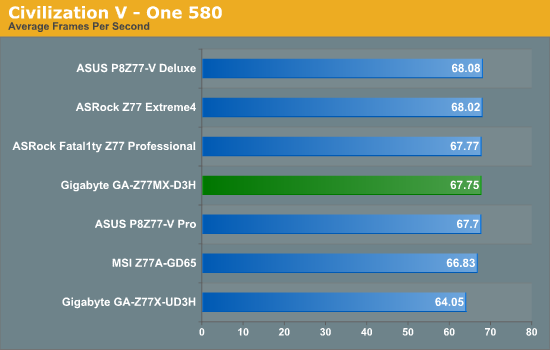
Civilization V
Civilization V is a strategy video game that utilizes a significant number of the latest GPU features and software advances. Using the in-game benchmark, we run Civilization V at 2560x1440 with full graphical settings, similar to Ryan in his GPU testing functionality. Results reported by the benchmark are the total number of frames in sixty seconds, which we normalize to frames per second.
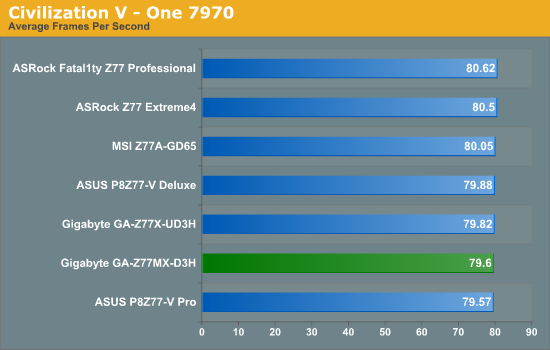
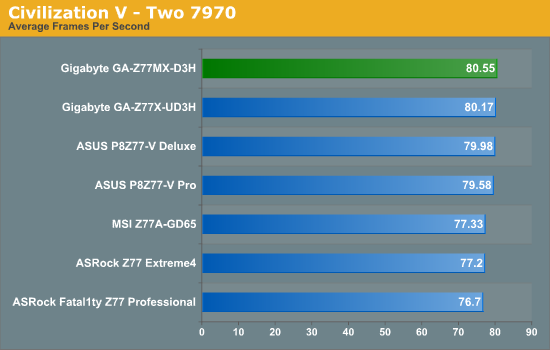
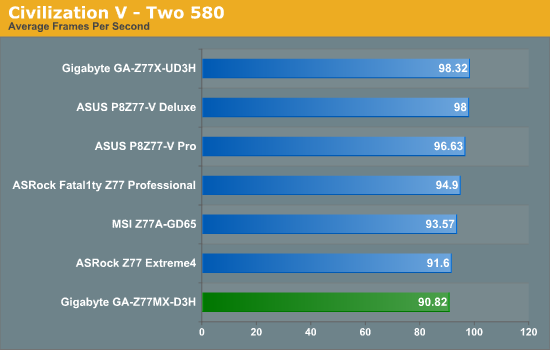
Performance in Civilization V is varied, however in dual GTX 580 mode the Gigabyte oddly enough comes in last place, 7.5 FPS (8%) slower than the UD3H.
Dirt 3
Dirt 3 is a rallying video game and the third in the Dirt series of the Colin McRae Rally series, developed and published by Codemasters. Using the in game benchmark, Dirt 3 is run at 2560x1440 with full graphical settings. Results are reported as the average frame rate across four runs.
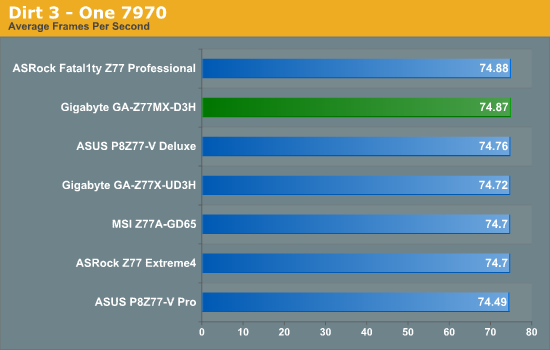
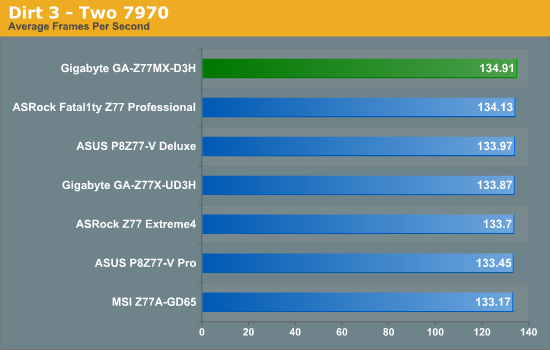
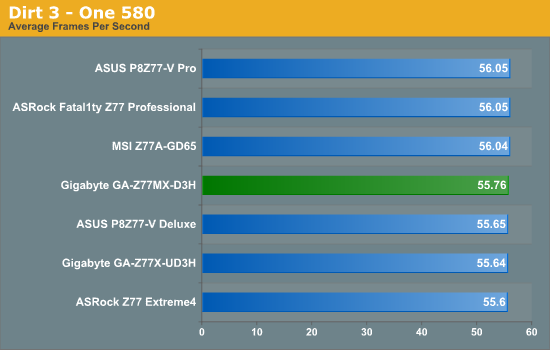
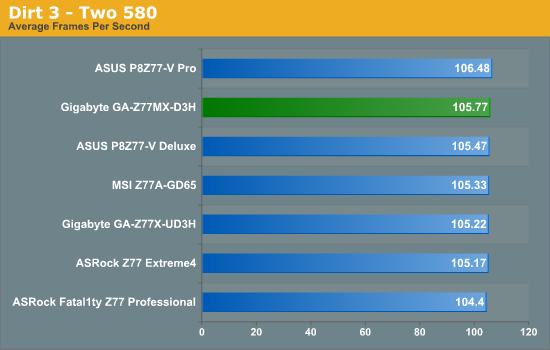
The Z77MX-D3H performs well in Dirt3, though given the close proximity of all the results, it seems like there are other limitations than the motherboard in the results.
Metro2033
Metro2033 is a DX11 benchmark that challenges every system that tries to run it at any high-end settings. Developed by 4A Games and released in March 2010, we use the inbuilt DirectX 11 Frontline benchmark to test the hardware at 2560x1440 with full graphical settings. Results are given as the average frame rate from 10 runs.
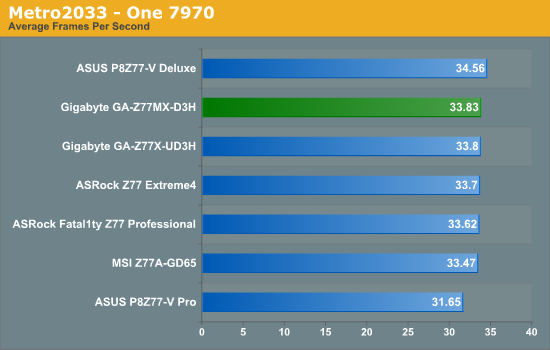
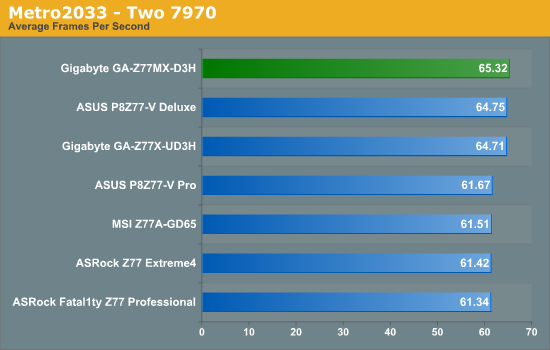
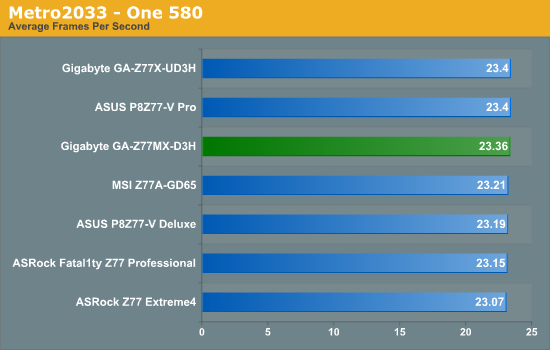
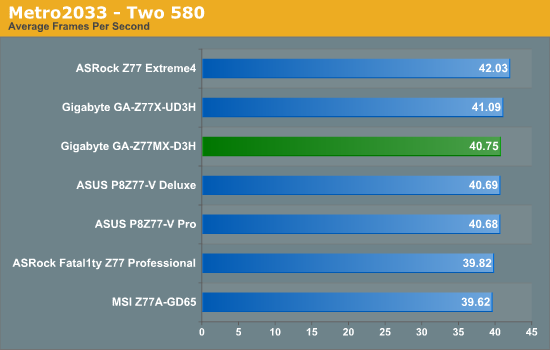
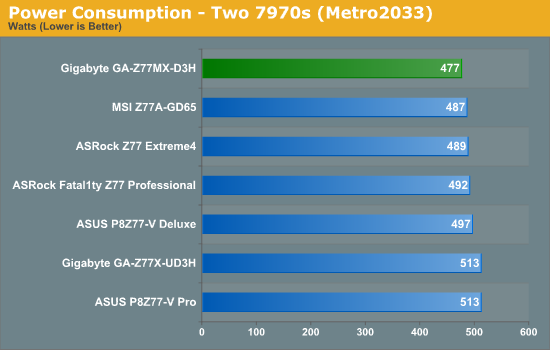
The Z77MX-D3H has a good showing in Metro2033, coming near top in all our testing.
Z77 motherboards are currently spanning a wide range of prices - as low as $80 after rebate and up above $300 if you want a board with everything. Today we have looked at the Gigabyte Z77MX-UD3H, a microATX board hoping to make waves at the $135 price point.
Gigabyte is continuing their trend of supplying a factory overclock to the processors used in this board. Should your processor utilize turbo modes to boost the single threaded throughput, the Z77MX-D3H will tell the processor to utilize its top turbo mode even in multithreaded scenarios. This invariably leads to greater performance at stock in these scenarios, at the expense of power draw. I also had no issues with running my DDR3-2400 9-11-11 G.Skill RipjawsX in this board, which can sometimes present problems in other boards.
Therefore, for our $135, we get a top performing board in all things dealing with processor throughput. In terms of features, as we are dealing with a smaller microATX board at the low end of the price bracket, we would assume a distinct lack of add-ons. However, Gigabyte has decided to still keep dual GPU SLI/Crossfire compatibility on board, with the possibility of three-way GPU if a user decides to add in a third single slot graphics cards together (and the third card being PCIe 2.0 x4 speed). This opens up possibilities of using this board in a dual-card SLI+PhysX layout.
Elsewhere on the board, we have a strange selection of NIC/Audio compared to almost every other non-Gigabyte motherboard on the market, as the Z77MX-D3H uses an Atheros NIC and Via VT2021 audio. The NIC selection might be understandable - as the high end Gigabyte boards use Killer NICs made by Atheros, Gigabyte probably have a deal for Atheros to also supply network controllers for the rest of the Gigabyte range.
Negative points are seemingly few - the aesthetics of the board are not much to look at, the software could use a large amount of redecorating and upgrading, the BIOS isn't exactly the most stable if you are overclocking and I'm rather suspicious with the integrated software layer fixing the voltage output value in the operating system. The fan controls are relatively basic as well, with other manufacturers investing heavily in fan control. We do not get a lot in the box, but this board is built to meet as low a price point as possible whilst still giving reasonable profit margins. I would have still liked to see perhaps a mini-PCIe slot on board with a WiFi card, or another couple of SATA ports to push this board to the next level.
The Z77MX-D3H does represent a good board for its size and price point. Nothing would stop this board being a small powerhouse underpinning an Ivy Bridge build. There are a few fundamental issues that need updating (software, fan controls) before I could give this motherboard an award, but I would gladly recommend it to friends and family as part of a good mATX Ivy system.


