Original Link: https://www.anandtech.com/show/4910/motorola-droid-bionic-review-dual-core-with-4g-lte
Motorola Droid Bionic Review - Dual Core with 4G LTE
by Brian Klug on October 11, 2011 1:55 AM EST- Posted in
- LTE
- Smartphones
- Motorola
- OMAP 4
- Mobile
- motorola droid bionic
It is something of an understatement to start out by mentioning that the Motorola Droid Bionic was easily this summer’s most anticipated smartphone. The story of the Bionic started at CES, where it immediately attracted attention thanks to its combination of 4G LTE connectivity and a Tegra 2 SoC. I remember seeing the Bionic on a table on the last bleary-eyed day of CES, among its other 4G LTE brethren as shown below.
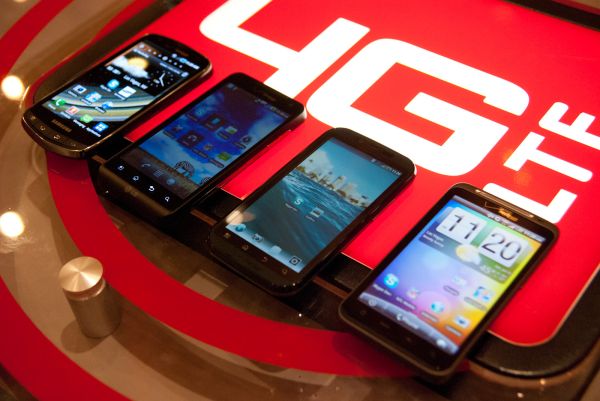
Left to Right: Droid Charge, LG Revolution, Motorola Droid Bionic (old), HTC Thunderbolt
I don’t remember much about that Bionic, other than that it was the only one among the four that I didn’t get a chance to grab photos of loading the AnandTech homepage or Dailytech, and that reps were guarded about letting me touch it. Rumor had it that the Thunderbolt would come first, and then down the row of devices. Eerily, other than the Bionic, the devices launched in that order.
That Bionic doesn’t exist anymore, instead the phone that launched in its stead is codename Targa, which was further down the roadmap and no doubt accelerated to take the original Bionic’s place. Until now, 4G LTE and dual core SoCs have been mutually exclusive, and the result is performance now gated by the SoC instead of the last mile of air between you and a base station.
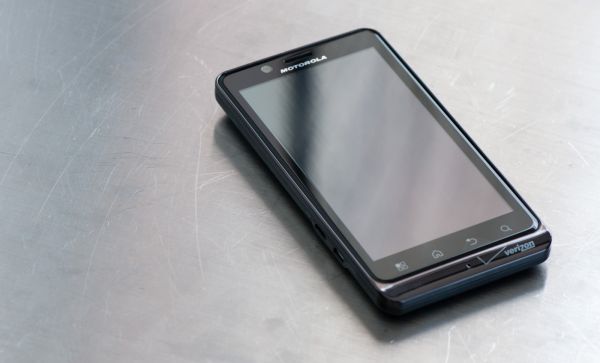
The new Motorola Droid Bionic (codename Targa)
Finally with the Bionic things change, and we have a smartphone that combines a dual core SoC with the fastest air interface around, 4G LTE. It’s been a long and arduous wait for the Bionic, but it’s finally here. The only lingering question is whether the wait has been worth it.
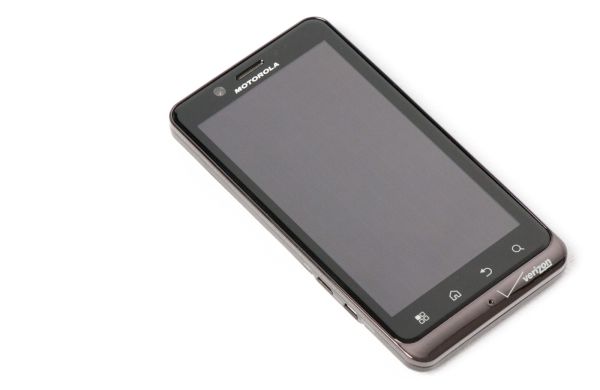
It’s always easiest to start with aesthetics, and here the Bionic shows an interesting combination of design language borrowed from the Droid X/X2 and the latest QWERTY keyboard packing Droid 3. I think that actually does a good job summing up what the Bionic really is - it’s a combination of the X/X2 form factor and display, and the SoC plus nu-Motorola design language of the Droid 3. If you take a step back and squint at it, I think these are totally reasonable conclusions to make.
The Bionic’s front side is a single piece of gorilla glass with tapered edges, ringed in relatively typical Motorola chrome. The lip where display meets the edge chrome is something that has drawn a lot of attention for being a dust magnet, but thus far I haven’t seen inordinate dust or lint collection in that crack. It’s nothing that a microfiber cloth can’t take care of, and honestly isn’t as big of an issue as dust collection in virtually every smartphone earpiece.
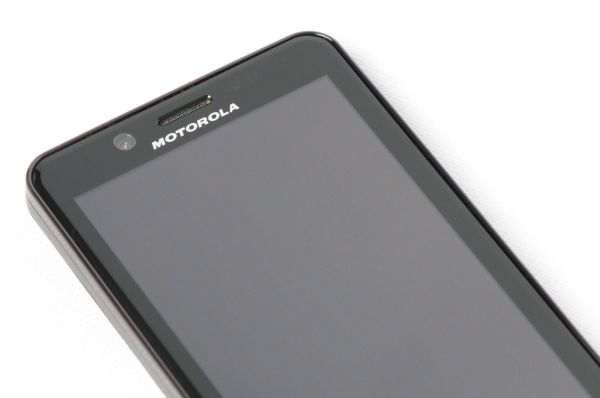
Up at the very top is the VGA front facing camera, earpiece, proximity and ambient light sensor, and finally notification LED. I know the notification LED is a must have for some smartphone shoppers, so rest assured it’s here and does work. It appears to have two colors - green and red, which blink for alerts and charging status, respectively.
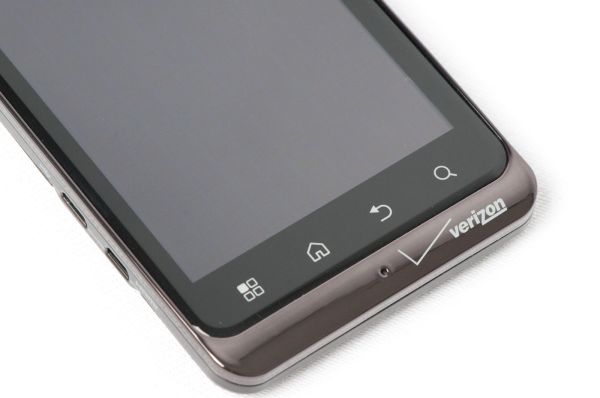
At the bottom are the same style capacitive buttons as we’ve seen on other Motorola phones. I guess it’s worth mentioning that this isn’t something that changes much anymore - each OEM seems to have settled on at least some common pattern and is keeping it that way. The buttons are nicely backlit, but the white point seems a tad warmer than most. Right in the center of the bottom chrome is the primary microphone.
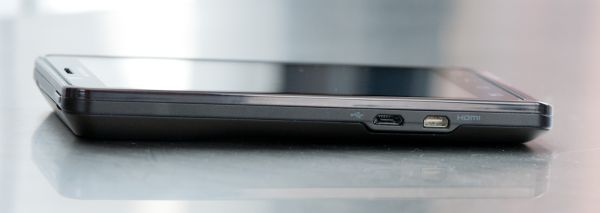
Left side is home to the microUSB and microHDMI ports, which are in the bottom quarter just like so many other Motorola devices. They jut out normal to the side and don’t follow the curve of the phone along its side, no doubt so it can mate up with the laptop dock, which unfortunately we don’t have.
If you squint and look at the phone from this angle, it’s readily apparent just how much inspiration the Bionic draws from the Droid X/X2 line of devices. They both have a thicker top region that tapers to a thin point at the bottom, and this iconic port placement.
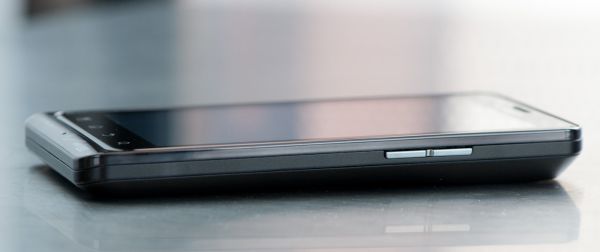
On the other side is the volume rocker, which is one piece of plastic and adequately clicky.
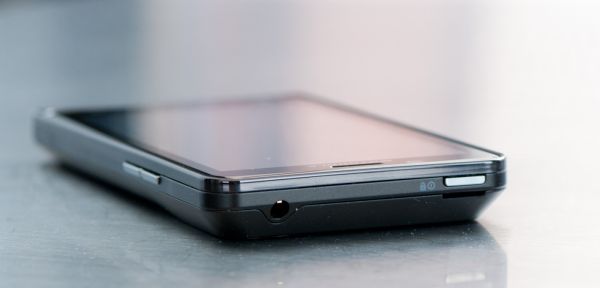
Topside is the headset jack, and opposite to it, the Bionic’s lock/off button. It took me a while to get used to this button placement, and the button itself isn’t very good either - it rocks back and forth, and feels loose, but gets the job done.
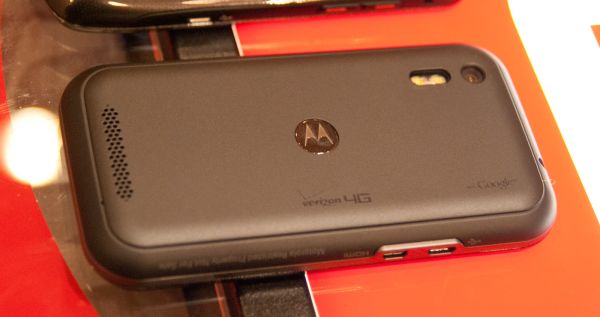
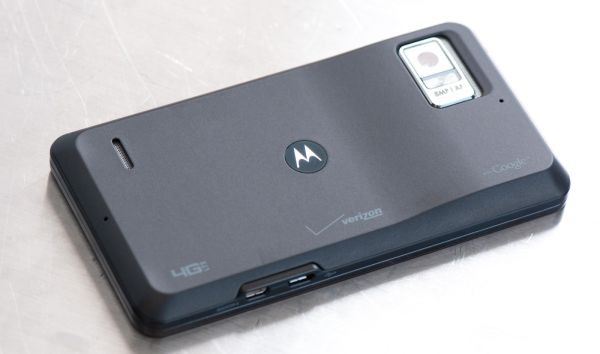
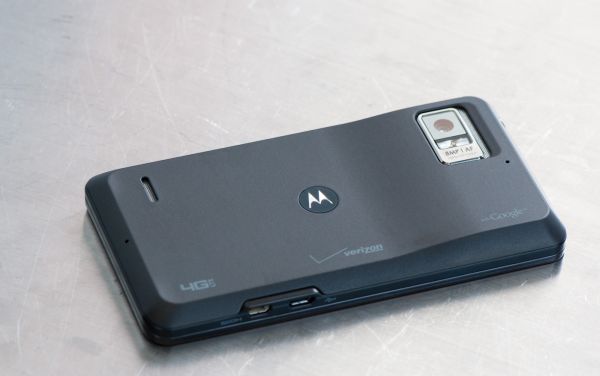
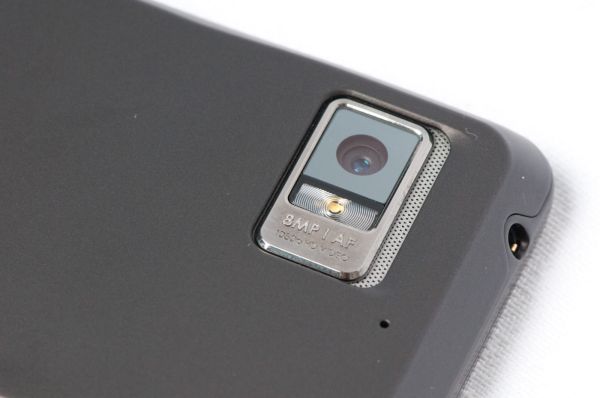
Directing our attention to the back side, we can see the Bionic’s 8 MP rear facing camera and LED flash, which is ringed in a large chrome package. There’s a grille to the side of this which serves no real purpose that I can tell other than decoration. Just below this is a microphone for ambient noise cancelation, and on the extreme other side of the Bionic is another microphone for stereo audio recording. That’s a grand total of three microphones on the Bionic, which is pretty par for Motorola.
The edge of the phone is given a bevel which proceeds around the entire lip. This gives it a uniquely positive in-hand feel. The battery cover is topped with a brown-grey soft touch material.
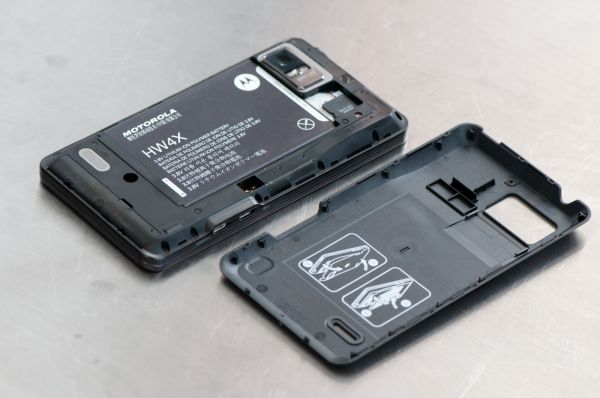
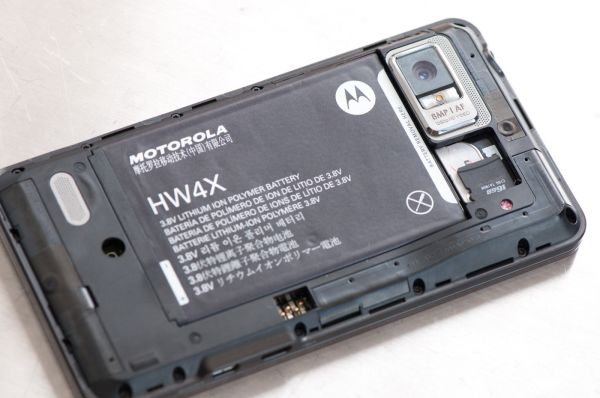
Peel that battery cover up, and you can see Bionic’s standard thin and wide battery. At the top is the unique microSD card slot, which just pushes in and is held in place by friction and the battery cover. The Bionic’s SIM slides out sideways underneath it.
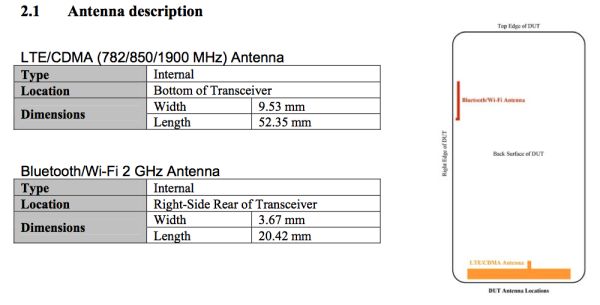
You can also see some characteristic antenna traces on the backside. There’s one at the bottom for CDMA and LTE, WLAN on the right side, and another at the very top likely for diversity. More on that later though.
I find the Bionic’s industrial design to be a relatively safe design for Motorola, especially given some of the more radical things we’ve seen come out lately. It keeps the chrome chin at the bottom and absolutely does match the Droid 3, but at the same time I feel like things could be much more overstated than they are here for such a high profile device.
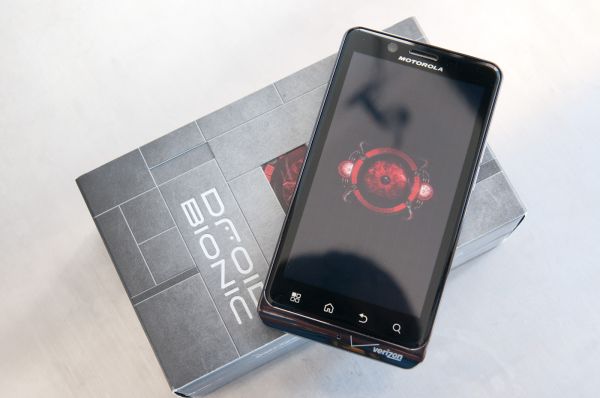
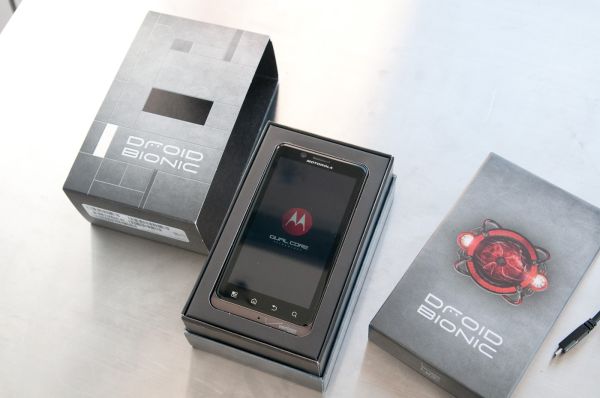
Packaging for the Bionic matches what I’ve seen for the other high end LTE devices, with a die-cut card stock wrapper giving a glimpse of the droid eye underneath. There’s nothing out of the ordinary here, but it bears mentioning. Inside that box is the phone, standard battery, microUSB cable, charger, and some documentation. The 16 GB class 4 microSD card is, like always, preinstalled in the phone.
| Physical Comparison | ||||||
| HTC Thunderbolt | Motorola Droid X2 | Motorola Droid 3 | Motorola Droid Bionic | |||
| Height | 122 mm (4.8") | 126.5 mm (4.98") | 123.3 mm (4.85") | 127.5 mm (5.02") | ||
| Width | 67 mm (2.63") | 65.5 mm (2.58") | 64.1 mm (2.52") | 66.9 mm (2.63") | ||
| Depth | 13.2 mm (0.52") | 9.9 - 14.4 mm (0.39"-0.57") | 12.9 mm (0.51") | 10.99 mm (0.43") | ||
| Weight | 183.3 g (6.46 oz) | 148.8 g (5.25 oz) | 184 g (6.49 oz) | 158 g (5.57 oz) | ||
| CPU | 1 GHz MSM8655 45nm Snapdragon | 1 GHz Dual Core Cortex-A9 Tegra 2 AP20H | 1 GHz Dual Core Cortex-A9 OMAP 4430 | 1 GHz Dual Core Cortex-A9 OMAP 4430 | ||
| GPU | Adreno 205 | ULP GeForce | PowerVR SGX 540 | PowerVR SGX 540 | ||
| RAM | 768 MB LPDDR2 | 512 MB LPDDR2 | 512 MB LPDDR2 | 1 GB LPDDR2 | ||
| NAND | 4 GB NAND with 32 GB microSD Class 4 preinstalled | 8 GB NAND, 8 GB microSD class 4 preinstalled | 16 GB NAND, up to 32 GB microSD | 16 GB NAND, 16 GB microSD class 4 preinstalled | ||
| Camera | 8 MP with autofocus and dual LED flash, 720p30 video recording, 1.3 MP front facing | 8 MP with AF/LED Flash, 720p30 video recording | 8 MP with AF/LED Flash, 1080p30 video recording, VGA (0.3MP) front facing | 8 MP with AF/LED Flash, 1080p30 video recording, VGA front facing | ||
| Screen | 4.3” 800 x 480 LCD-TFT | 4.3" 960 x 540 RGBW LCD | 4.0" 960 x 540 RGBW LCD | 4.3" 960 x 540 RGBW LCD | ||
| Battery | Removable 5.18 Whr | Removable 5.65 Whr | Removable 5.65 Whr | Removable 6.6 Whr | ||
I'm not quite at the point where I can do videos like Anand, complete with studio, but I've done the usual thing and put together a video review and tour of the Motorola Droid Bionic.
Batteries and More Batteries
I’m going to deviate from the normal review path here a bit and immediately talk about what’s important, and that’s battery life and some discussion about the Bionic’s battery.
The stock battery that comes with the Bionic is relatively beefy, with a marked capacity of 6.6 watt-hours, or 1735 mAh if you prefer. That capacity is, on its own, nothing really out of the ordinary, and actually for Motorola phones on the smaller side, as the Atrix shipped with a relatively gargantuan 7.1 Whr battery.
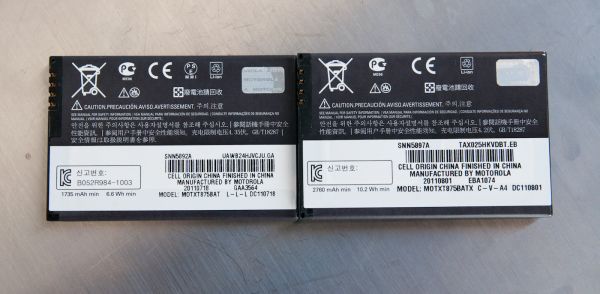
Left: Standard Battery (6.6 Whr), Right: Extended Battery (10.2 Whr)
But that’s not all there is to say about this standard battery. You see, normally, the nominal voltage for lithium-ion polymer battery is 3.7 V, with a fully charged voltage of 4.2 V. However, the Bionic’s standard battery is marked 3.8 V, and sure enough, with a fully charged voltage of 4.3 V. I went ahead and measured with a DMM just to make sure, though you can simply just look at the battery information page in *#*#4636#*#* and see the same voltage at fully charged. It seems that, for once, our habit of citing battery capacity in watt-hours has paid off.
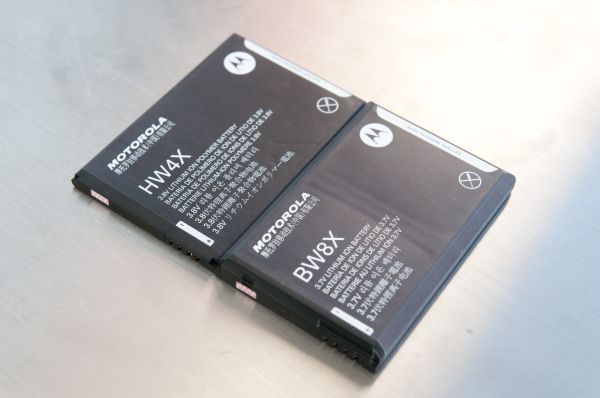
Left: 3.8 V marked standard battery, Right: 3.7 V marked extended battery
Most of the time, users quote battery capacity in just mAh because you can be assured that the nominal per-cell voltage of consumer grade lithium-ion batteries is going to remain the same, at 3.7 V nominal, and 4.2 V fully charged for a Lithium-manganese oxide (LiMn2O4) battery. That isn’t something that was just decided on; the voltage falls literally out of the electrochemistry of the reaction. Lithium is the ideal anode for an electrochemical cell because it has the lowest redox potential, at –3.05 V, and it’s very light, at 6.94 g/mol. Combine that with a cathode of your choice, and you get a battery. Relatively standard cathode choices are things like Mn2O4 or CoO2 or NiO2, with the first and second being popular choices. In reality, a graphite anode is used alongside a LiMn2O4 cathode to make things safer, and ions migrate between the cathode and anode during charge and discharge. I’ll spare you the hand waving, but the anode reaction gives you –3.0 V, the cathode reaction 1.15 V, combine them, and you get a ΔE of 4.15 V. You can see where the 4.2 V comes from purely from this, with a little bit of fudge factor. Each battery is different, but it’s again just a material choice.
So where does 4.3 V fully charged, and 3.8 V nominal come from? Well, you can push the battery a bit further at the expense of battery longevity, which is likely what’s being done here, unless there’s some non-standard battery chemistry involved. We all know that Lithium ion batteries wear out, and the mechanism is simple - over time, interstitial sites get filled with either impurities or some oxide, and there are fewer sites for for the lithium ions to migrate back and forth between. Increasing the voltage increases the rate of that wear.
Update: A source reached out to us and let us know that the Motorola Bionic's 3.8 V battery is in fact using a new alternative high voltage chemistry, and is not simply an overcharged Lithium Ion battery. This same battery will be used in the just-announced Motorola Atrix 2 as well. Note that the battery name includes an H (eg HW4X) to denote the use of these high voltage battery chemistries. This new chemistry also has similar cycle life as existing 3.7 V nominal batteries, and has been in the works for several years.
It’s just interesting that this particular battery is 3.8 V nominal (4.3 V fully charged), as this 0.1V boost design choice gives the battery a bit more capacity. It isn’t a huge difference, 3.7 V would make the 1735 mAh battery 6.4 Whr, the 3.8 V of this current design makes it 6.6 Whr.
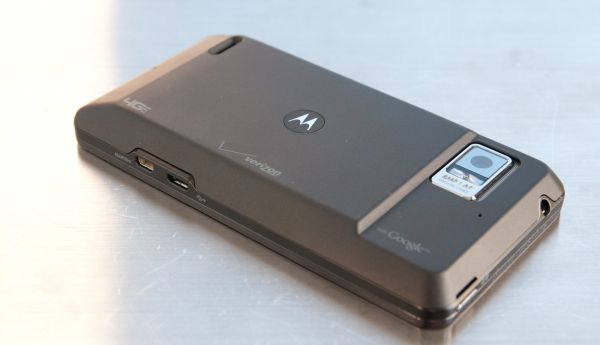 Bionic with extended battery and cover
I decided to do something we haven’t done before and try out the Bionic’s extended battery, upon seeing it on sale for $24 the weekend after its initial release. I was also curious to see whether this particular battery would also be marked with a 3.8 V nominal voltage. Instead, it’s marked 3.7 V, and has a capacity of 10.2 watt-hours, or 2760 mAh. I’m used to seeing extended batteries roughly double the capacity of the standard, here the extended battery is 1.54 times the original capacity.
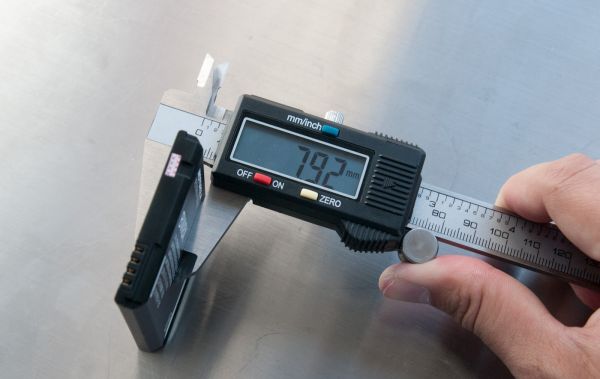
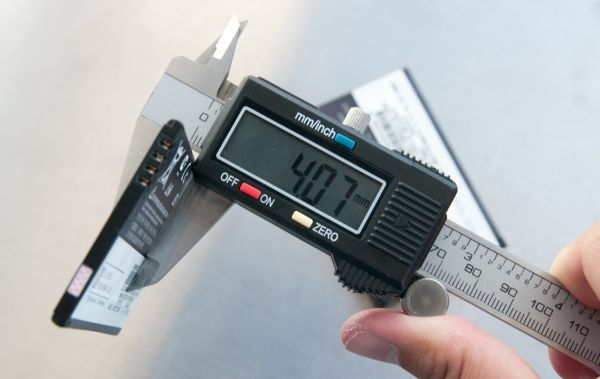
As with virtually all extended batteries, you get a modified battery cover that accommodates the battery’s increased profile. In this case thickness roughly doubles, from 4.07 mm for the standard battery, to 7.92 mm on the extended version. It definitely increases the size of the device, and as a result goes from feeling like a Droid X/X2 to something much bulkier, but it’s worth it for the extra longevity.
For comparison, the other three 4G LTE Verizon smartphones have smaller stock batteries. I’ve put together a table below showing their respective capacities for comparison. We don’t normalize to battery sizes quite yet, but you can do that with this data if you so please.
| LTE Smartphone Battery Size Comparison | |||||
| HTC Thunderbolt | LG Revolution | Samsung Droid Charge | Motorola Droid Bionic (STD) | Motorola Droid Bionic (EXT) | |
| Nominal Voltage | 3.7 V | 3.7 V | 3.7 V | 3.8 V | 3.7 V |
| Capacity in watt-hours | 5.18 Whr | 5.6 Whr | 5.92 Whr | 6.6 Whr | 10.2 Whr |
So now we get to the part where we talk about actual battery life, which we’ve measured for the Bionic just like we have other devices. I ran these tests twice and put the device through a few charge discharge cycles before doing them as well. The first is probably the most relevant, our smartphone web browsing battery life test. This consists of a few dozen pages loaded endlessly over cellular data with the display set to 200nits brightness until the phone dies. I wager most people are interested in seeing how 4G LTE battery life fares, and measured with the standard and extended batteries.
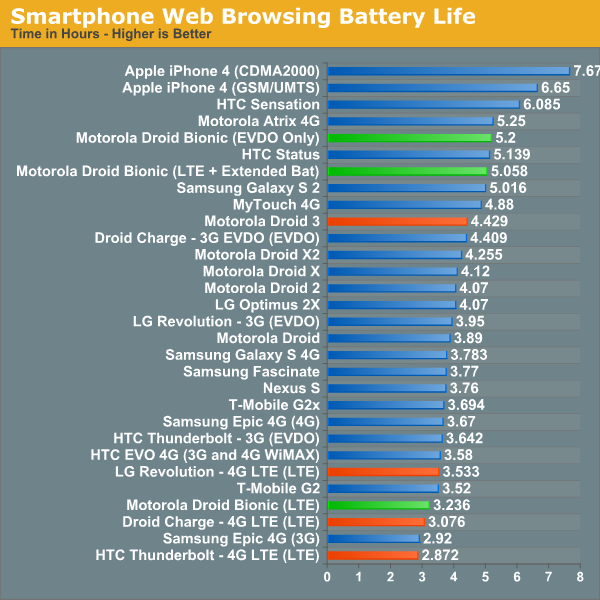
The Bionic with standard battery manages to best the Thunderbolt and Droid Charge, though not by a considerable margin. Interestingly enough the LG Revolution still leads the pack here. The extended battery provides considerable gains, as it should, with just over 5 hours of total life. This increase represents an almost perfect linear scaling, considering 1.54 * 3.236 = 4.98 hours of predicted life, so all is well in the universe in that regard at least.
WiFi web browsing life represents essentially the same test, except instead of loading pages over cellular data, pages are loaded over WiFi.
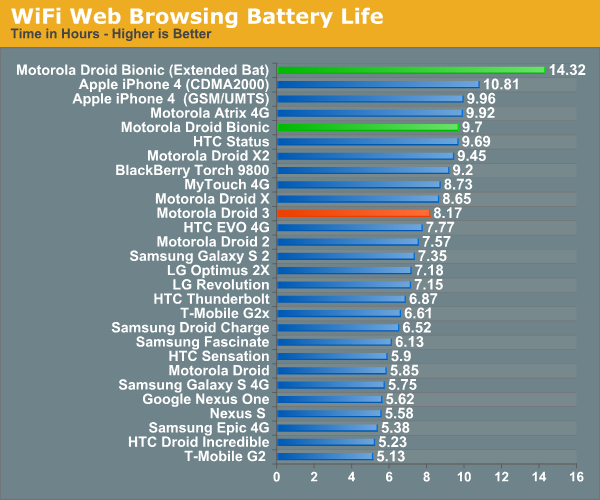
Again here we see an almost perfect linear scaling from 9.7 to nearly the 15 hours expected given the extended battery’s 1.54x capacity. Even without the extended battery, the Bionic does last a nice long time on WiFi.
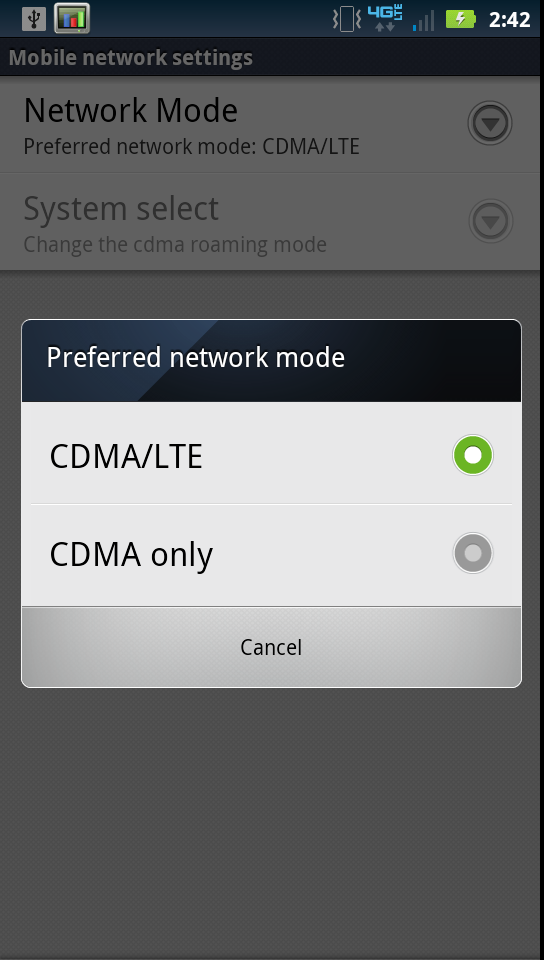
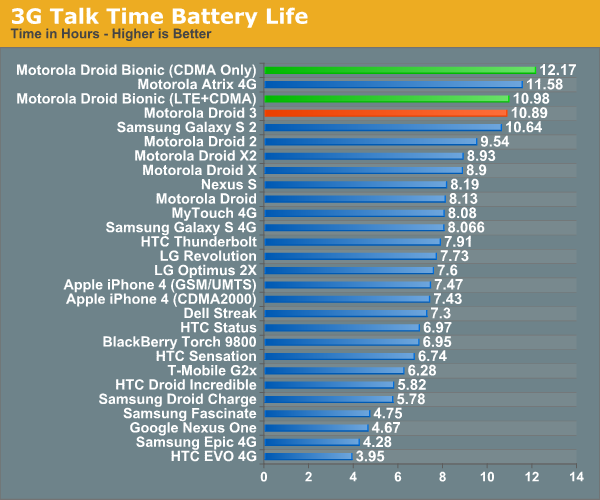
For talk time, I only tested using the standard battery, as this test would be extremely long with the extended battery. You can already pretty much assume the scaling applies here too if you’re interested. I did test with the mobile network settings configured for CDMA/LTE and CDMA Only. In CDMA/LTE mode, the 4G LTE baseband is on and working while the call is in progress, since the Bionic can do 4G LTE data and voice at the same time (SVLTE).
Last but not least is the WiFi hotspot battery life test, where we enable the device’s built in portable hotspot functionality and connect one wireless client. That wireless client loads four tabs of our page loading test, and a 128 kbps audio stream.
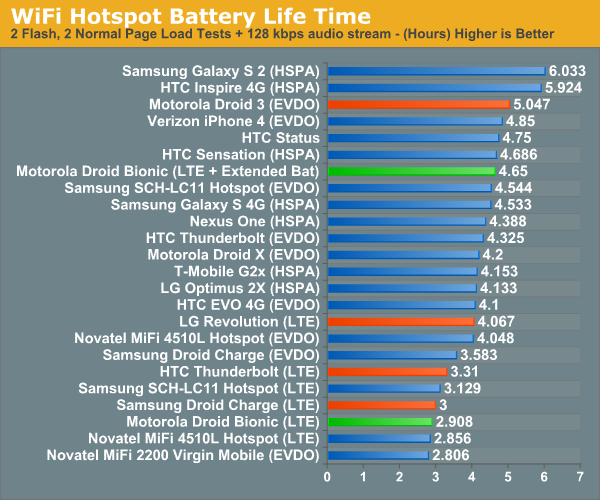
Battery life here isn’t quite as shining for the Bionic, as it comes in last place among the LTE devices despite carrying the largest standard sized battery of the bunch. Toss in the extended battery and you get that nice linear scaling of course. During the 4G LTE smartphone web browsing test and hotspot test, the Bionic got pretty hot. After the hotspot test ended, I measured a surface temperature of around 110 F (43 C) using a contactless IR thermometer. I should note that the Bionic does get very hot if you do things like remote desktop for a long while - I used RDP for 45 minutes and saw the battery temperature report at 120F, and the surface was also alarmingly warm.
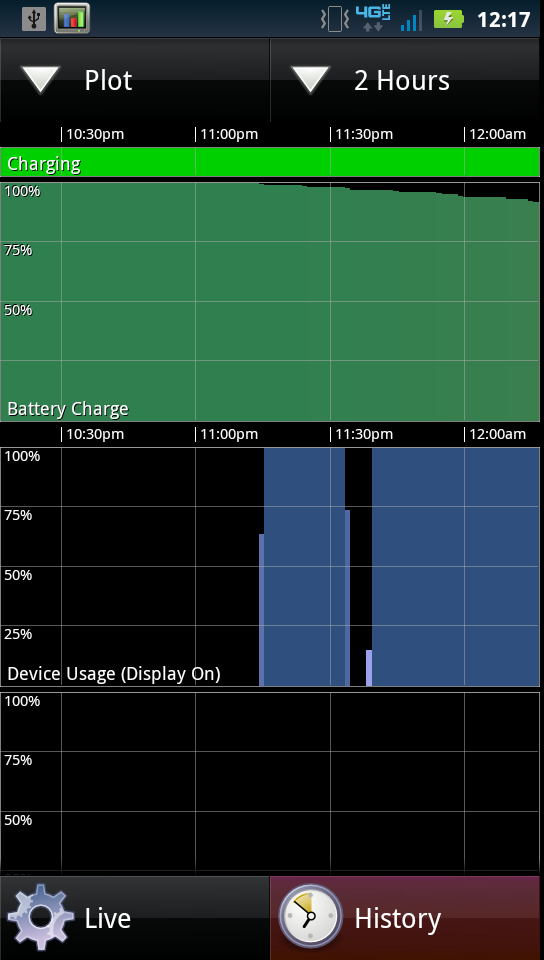
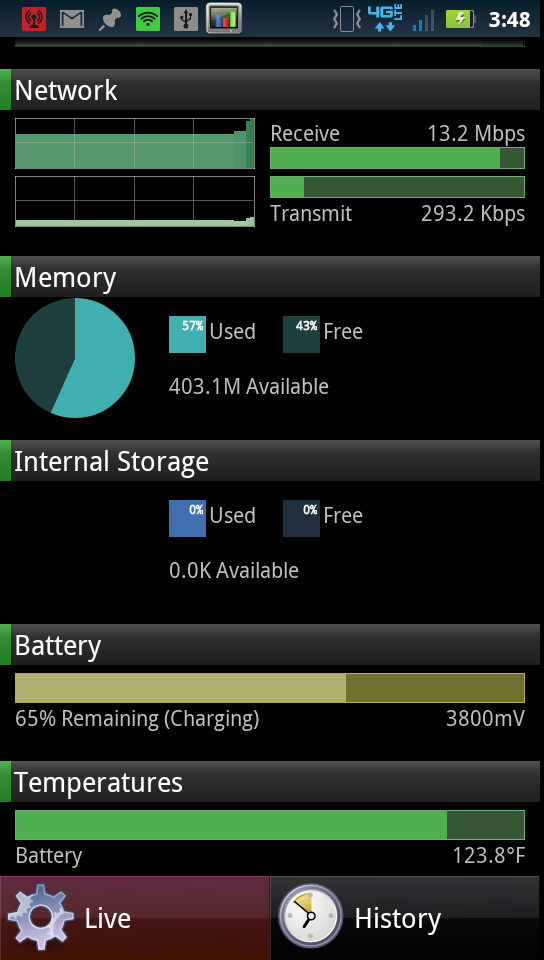
While we’re on the subject of power, there’s also more to talk about regarding USB charging - any USB charger that implements the USB charging specification will work. The bundled Motorola USB charger supplies 850 mA (at the usual 5 VDC) which isn’t really a huge amount. I charged the Bionic numerous times off of 1A and 2A USB charging spec compliant chargers with no problem. It bears saying again that the age of proprietary Motorola chargers is long, long over.
The other unfortunate thing is that the Bionic’s ST-E 3.1 CPAC (combo PMIC and audio codec) doesn’t seem to pull the 1 or 2 A of current from those beefier chargers. The result is that you can actually discharge the Bionic while it’s plugged in if you’re doing the wrong thing. Thus far I’ve seen this discharing-while-plugged-in behavior in a number of different use cases. Using WiFi tethering and 4G LTE will do it, tethering 4G LTE over USB (500mA) will do it, and finally even doing things like RDP for a long period of time on 4G LTE will do it. The Bionic clearly can’t draw enough power from microUSB either when connected to a USB charging spec wall wart to power the phone and transact data on LTE, and as a result draws the current delta from the battery.
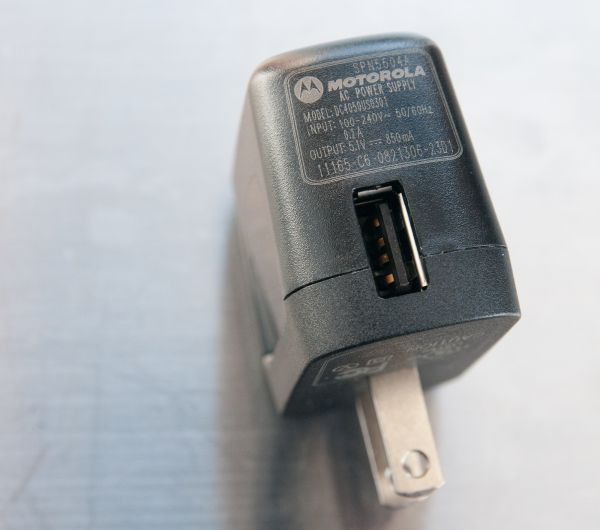
The Bionic's charger - 850 mA out
Subjectively, it seems like each time a 4G LTE smartphone launches, I read some breathless words about it being the longest-lasting device yet. The Bionic went through that same cycle, and while Motorola continues to dominate the call time battery life test (which to this day still amazes me), the Bionic performs pretty middling in 4G LTE scenarios with the standard battery, in spite of having the largest stock capacity. The flipside is that the Bionic is the only device (until the Nexus’) with a dual core SoC, though as we’ve shown before this is something that actually results in lower power consumption for multithreaded workloads. You just can’t beat voltage scaling.
That’s not all there is to talk about with the Bionic and 4G LTE, however.
Cellular Connectivity - Motorola’s 4G LTE
Like most of Motorola’s lineup, the Bionic uses Qualcomm’s MDM6600 for CDMA2000 1x and EVDO (3G) connectivity. There’s nothing out of the ordinary about that at all, and again MDM6600 is a combination HSPA+ (HSDPA 14.4, HSUPA 5.76) and CDMA2000/EVDO Rev.A baseband and transceiver. In the Bionic, only CDMA2000 1x/EVDO is used, on both 850 MHz and 1900 MHz, but more on that in a moment. I started out by looking at the FCC internal photos which are of marginal quality, and then the iFixit disassembly photos which are much better.
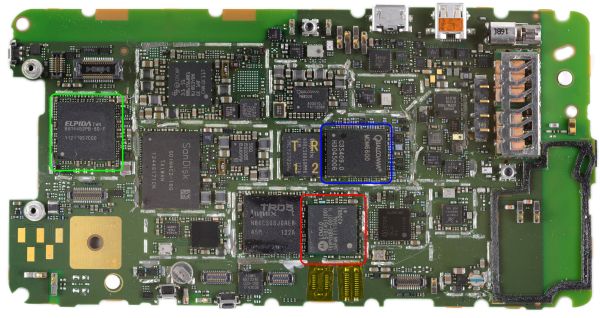
Green square: Elpida LPDDR2 PoP w/OMAP 4430, Blue: Qualcomm MDM6600, Red: Motorola Codename Wrigley LTE baseband
What’s unique about the Bionic is that it uses a Motorola LTE baseband for LTE, instead of MDM9600 which would also be a logical choice. To date, we’ve seen QCT’s MDM9600, LG’s L2000, and Samsung’s CMC220 providing LTE in respective smartphones.
So what about this Motorola LTE modem can we glean? Unfortunately, there’s not a lot out there. The chip is silkscreened with the Motorola logo, and LCM2.0, and it appears like “T6VP0XBG” is another part of the name. Search any of this and you’ll find nothing more than speculation and recursive levels of confusion. Motorola also declined to comment about this particular part.
Adjacent to the Motorola LTE baseband is a Hynix combo 2 Gbit NAND and 1.8V 1 Gbit LPDDR1 DRAM, marked H8KCS0SJ0AER. This is undoubtably for the LTE baseband, as it’s standard fare for each of these to have their own MCP DRAM and NAND. Look above and you’ll see a smaller one (also H8) Hynix adjacent to MDM6600 which we’ve seen over and over.
To the right of the LTE baseband is an undocumented Intel/Infineon transceiver, and then further to the right, a part with Skyworks markings which is almost without a doubt the 700 MHz power amp. Then to the far right you can see two gold pins which mate up with the antenna board that attaches there. You can see where the Tx antennas are for WLAN and CDMA/LTE from the FCC docs. WLAN is off to the side, CDMA/LTE seem to be integrated into one module at the bottom, which is pretty standard.
Above the LTE modem is its CDMA2000 counterpart, again consisting of a Hynix H8 series combo DRAM and NAND, MDM6600, and then to the right an Avago power amplifier marked ACPM–7968. This power amp is actually quad band 850/900/1800/1900 MHz. In its shipping form, the Bionic is limited to just 850/1900 for CDMA2000 in the USA, however, I have very little doubt this device could also be used with WCDMA on all four bands with some tweaking. FCC documents also talk about WCDMA functionality being disabled:
The WCDMA/GSM network functions have been disabled by the firmware and are SIM locked by all US operators on this product.
In addition, inside build.prop are numerous lines and commented out configuration files for both android RILs and other things which are preceded with:
#####Override in cdma_targa.mk until LTE + Global support.#####
I would not be surprised to see a Droid Bionic Global with LTE, EVDO, and WCDMA/UMTS support some time in the future.
I’m unsatisfied with just reporting that some part exists, so I poked around. Delving deeper by poking around inside the Bionic’s /system folder, I uncovered that this baseband actually has a name - it’s Motorola’s codename Wrigley LTE modem, which works like an ethernet over USB (communications device class) device. Interestingly enough, the Droid 3, Bionic, and Motorola Xoom kernels all include the Motorola Wrigley Modem Controller driver. Inside the Bionic are also a few bash scripts that dump wrigley-specific debugging data including some statistics.
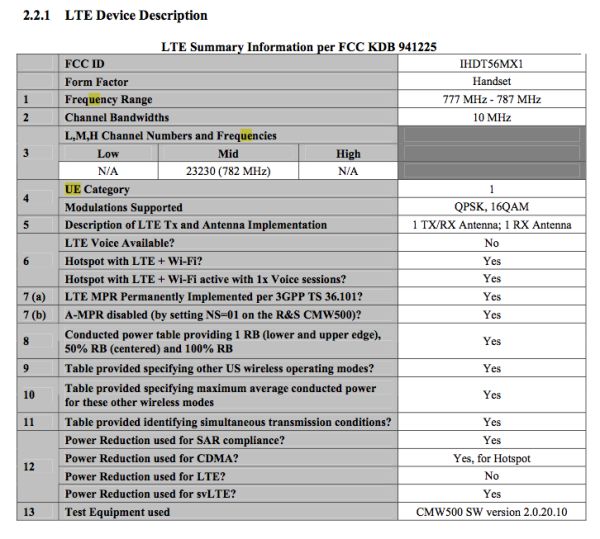
The next logical question is what LTE UE category codename Wrigley is. We talked about this in our Verizon 4G LTE piece, but UE category essentially is analogous to the UE category from HSPA - it defines the theoretical maximum throughput in Mbps. The FCC documents are usually a good place to start, however in this case they list UE Category 1, which is completely wrong. You can however tell that it has 2 Rx chains, and 1 Tx chain, just like every other LTE smartphone.
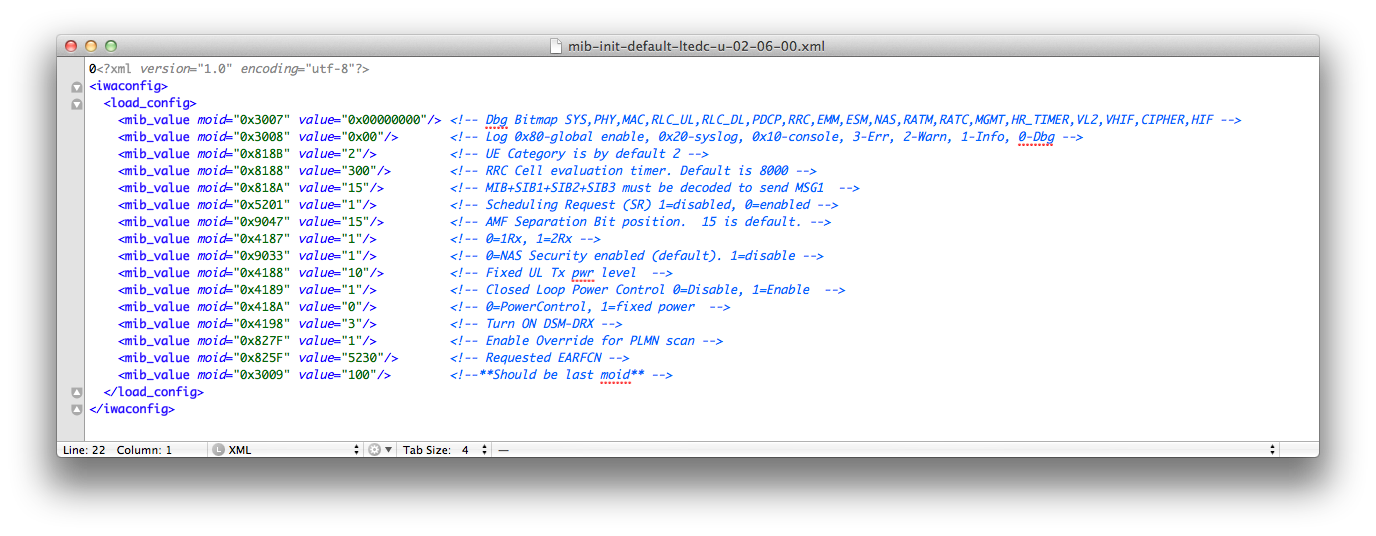
After poking around with the debug scripts on the Bionic, I was able to find what I believe are SNMP MIBs which relate to Wrigley’s configuration. You can see references to object identifiers (OIDs) just like you’d expect for an SNMP configuration, and further, given that Wrigley is apparently an ethernet over USB device, this configuration route makes sense. There are 14 configuration files, some of which include some logging and debug, and only one that mentions LTE.
The two lines I find particularly interesting (outside the whole thing, which is very interesting) are
<mib_value moid="0x818B" value="2"/> <!-- UE Category is by default 2 -->
which is almost self explanatory, and this next one:
<mib_value moid="0x825F" value="5230"/> <!-- Requested EARFCN -->
So there we have it, Wrigley is very likely UE Category 2 for LTE. The fact that it is configured to work on EARFCN 5230 is telling, as this corresponds to LTE Band 13 precisely, which is exactly what Verizon uses for LTE. As a reminder, all the LTE devices we’ve seen so far are UE category 3, which corresponds to a maximum theoretical throughput of around 73 Mbps on the downlink.
Before we leave Wrigley entirely, I should conclude my mention of the Motorola Xoom. For those interested, I did some poking around and found that the Xoom’s LTE module is based on this same exact baseband. It’s immediately visible on the FCC’s internal photos, and as I already mentioned has drivers and references in the Xoom’s kernel.
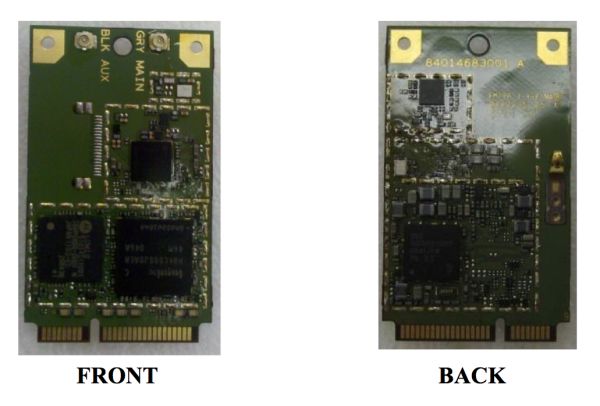
The same Motorola baseband in the Xoom - FCC Internal Photos
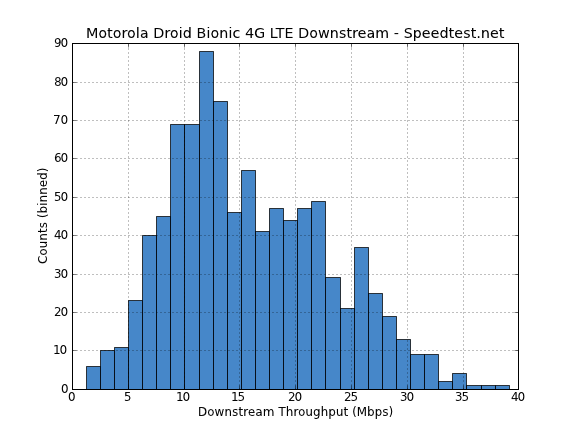
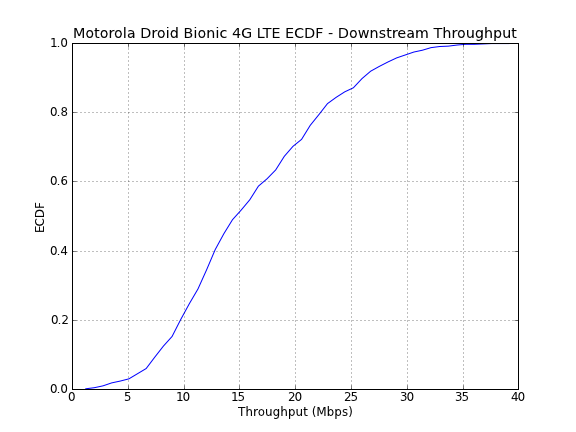
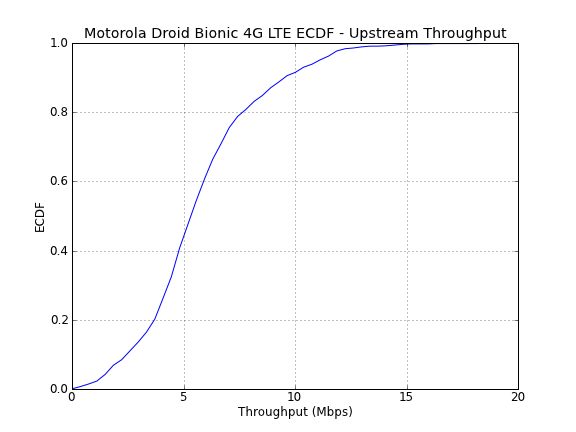
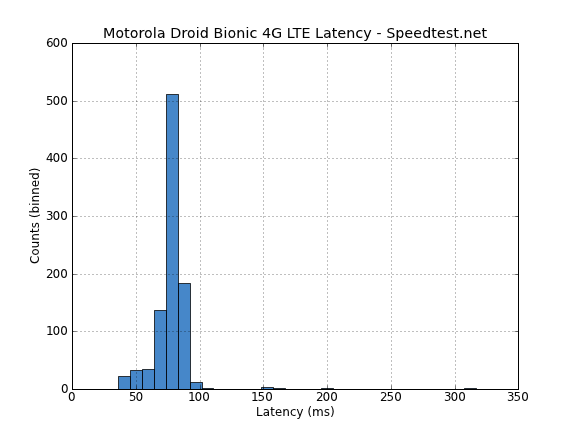
That brings me to throughput, which we’ve measured on the Bionic just like every other smartphone since I’ve started doing this. I run a ton of speedtests, gather some data, and create histograms showing the distribution for throughput (downstream and upstream) as well as latency. I did this just on 4G LTE on the Bionic since EVDO is well understood and not really worth exploring much anymore. For the Bionic, I ran a total of 938 tests in my own market in Tucson, AZ, in Phoenix, AZ, and some in Anaheim, CA, and generated those plots. A few people have also asked me to make empirical cumulative distribution functions (ECDF) plots of the data as well, so I went ahead and made those in addition to the normal histograms.
First up is downstream, where the average is 15.9 Mbps, with a maximum of 39.1 Mbps. I’ve tried hard to get close to 50 Mbps but couldn’t hit it.
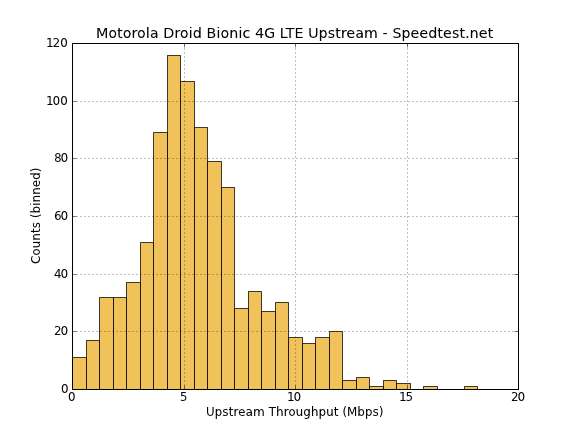
Next is upstream, where I saw an average of 5.7 Mbps up, and a maximum of 18.1 Mbps.
Latency is pretty low on the Bionic, minus a few strange outliers, with an average of 77ms, and a minimum of 36ms.
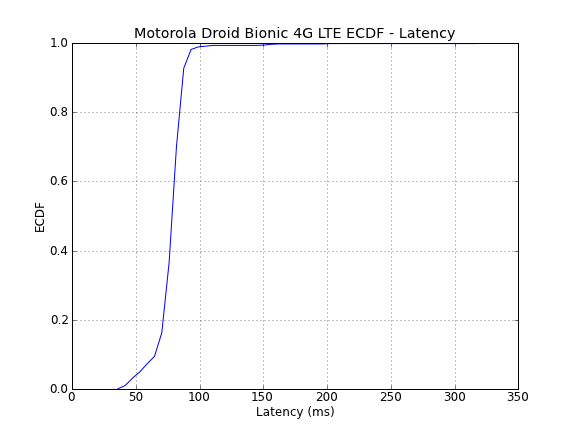
For supposedly being UE Category 2, the Bionic posts speedy results that seem completely in line with what I’ve seen on other UE Category 3 4G LTE devices. I’m not sure whether I just haven’t been able to test the Bionic in a situation where it could go faster but was otherwise limited, but I wager most people won’t be able to tell the difference.
I’d like to reiterate that LTE simply needs to be experienced to be fully appreciated. Were I blindfolded (and in a good signal area) I would have a very tough time differentiating between LTE and a decent wired connection. I played a few rounds of the BF3 beta (for science, of course) over the Bionic while tethered over USB, and found latency almost indistinguishable from my cable connection. It’s a dramatic difference from EVDO in both latency and throughput, one that’s shocking if you get pushed back to EVDO.
The Bionic also is the first device (to the best of my knowledge) that reports 4G LTE signal bars based on channel quality in addition to just received signal strength. Devices like the Droid Charge and others can be somewhat misleading and just report the bar visualization based on signal strength. It took me a while to figure out how to actually get to the Bionic’s 4G LTE signal metrics, as it isn’t the number shown in “About” - that’s actually just what’s reported from MDM6600 for EVDO or 1x.
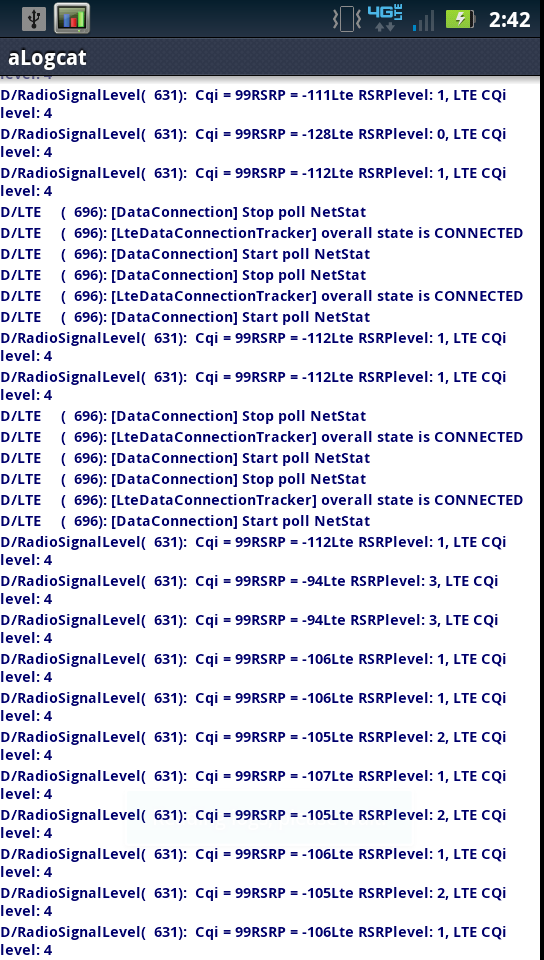
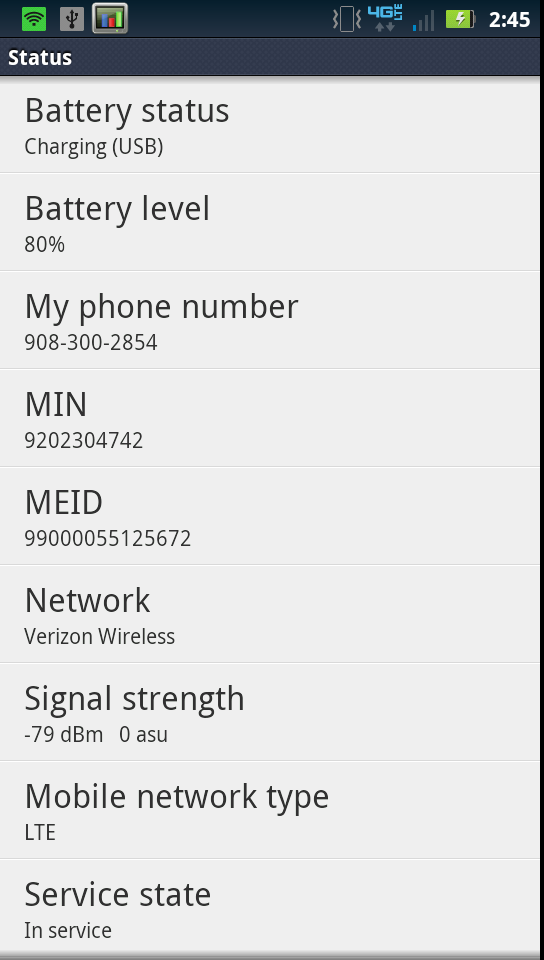
Left: Real LTE signal information shown in logs, Right: MDM6600 signal shown in "About" (same place)
If you run logcat, you can see actual signal information being reported which in turn is used to paint the appropriate number of bars up at the top using RadioSignalLevel(). In the case of the Bionic, the two figures of merit used are the RSRP Reference Signal Receive Power, and CQI Channel Quality Indicator. The phone reports a number from 0–4 for both in addition to just the raw number, and the minimum of these two is the number of “bars” shown, eg min(RSRP,CQI). The result is that this is a much more realistic and practical visualization than most others I’ve seen, and you can also just run alogcat from the Android market, filter by LTE, and see this information in real time.
Finally, I didn’t experience very many stalled data sessions on LTE or other connectivity problems. This of course varies on a market to market basis depending on your coverage characteristics, but in contiguous coverage settings I saw no problems with the Bionic stalling outside the normal one or two seconds to handover between cells. In addition, the Bionic seems to cling onto LTE even down to –115 dBm before falling back to EVDO, which minimizes the number of slow or frustrating handovers. Again, for LTE the real figure of merit is SINR (Signal to Interference + Noise Ratio) which is reported in a bit of an ambiguous manner on the Bionic using CQI.
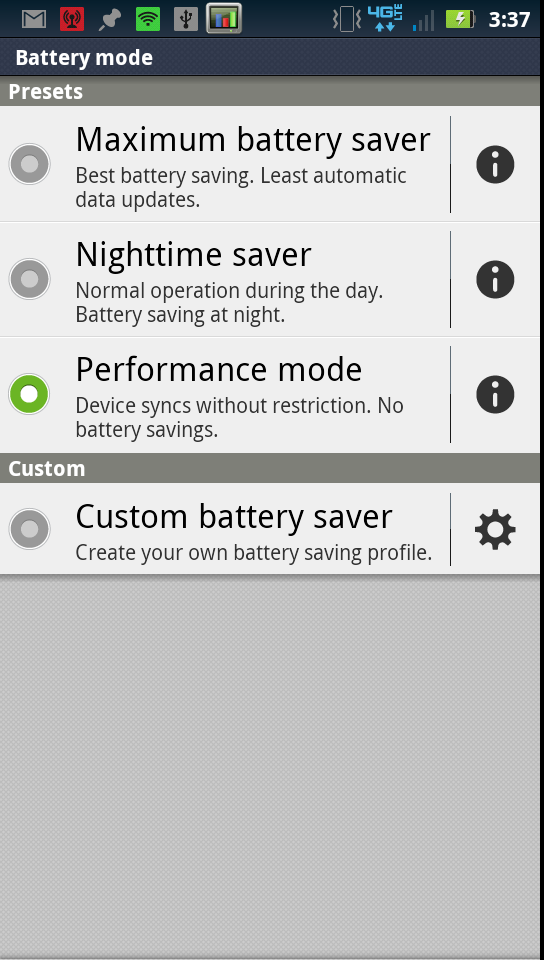
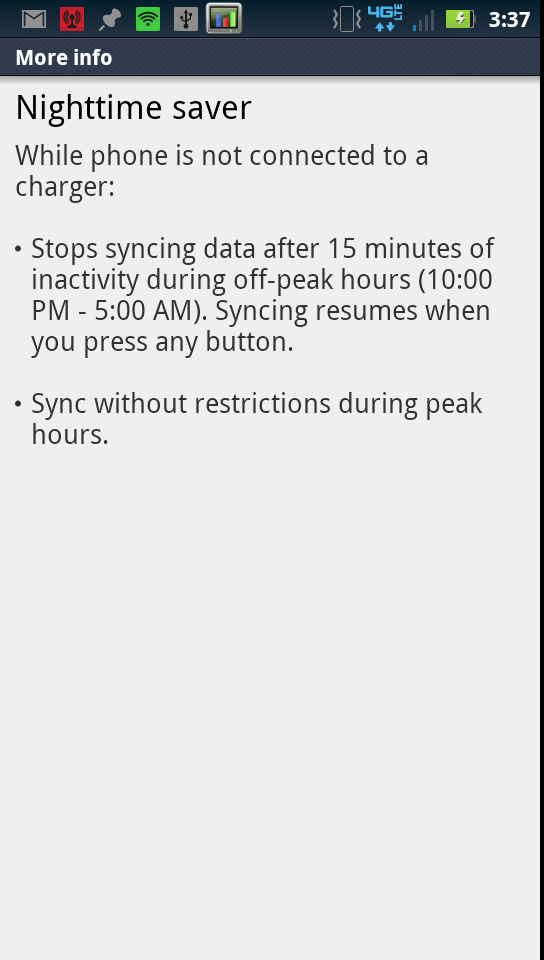
I’ve also read some confusing reports about LTE data pausing for long periods and suspect this is just confusion which arises from the default battery mode setting - nighttime saver - which stops account synchronization between 10 PM and 5 AM. Motorola sets this by default on all its devices, and I don’t think most people realize it. I always end up setting this to maximum performance and use a charger next to my nightstand.
WiFi, GPS, Audio
The Motorola Droid Bionic, like the Droid 3, uses a TI WL1285 wireless combo for WLAN, Bluetooth, and an FM radio, were the Bionic to have an application for it. WiFi range on the Bionic is totally adequate, I can find nothing to fault with this, and we’ve pointed out where the WLAN antenna is on the device. Things are pretty standard here, the Bionic does a good job hopping on and off of my 2.4 GHz 802.11n network, and with my 20 MHz channels I see a link speed of 65 Mbps, which indicates long guard intervals.
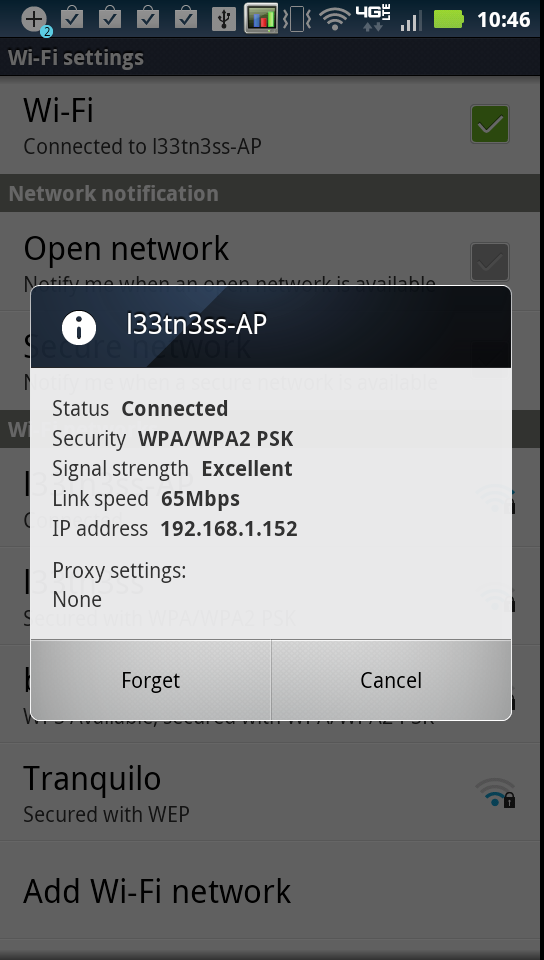
I did the usual thing and ran our local WLAN test which consists of downloading a locally-stored 100+ MB PDF and measuring throughput.
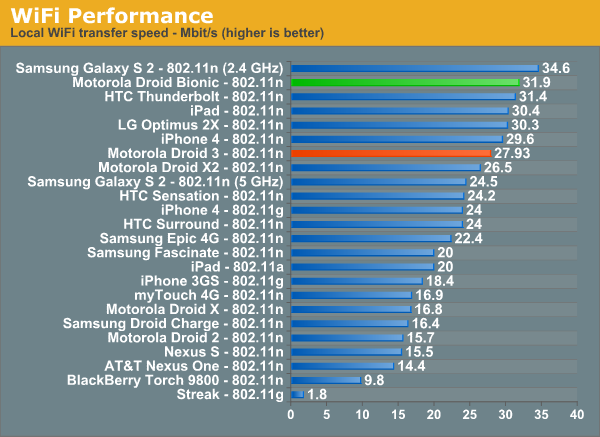
Performance here is on par with and slightly better than the Droid 3.
WiFi Hotspot
The Bionic also includes the requisite WiFi hotspot functionality you’d expect from a top tier smartphone. There are a maximum of five allowed wireless clients that can attach at a time. The software configuration thankfully also allows users to choose what wireless channel the hotspot sits on, and the DHCP server pool’s starting address. You can use WPA2 PSK or no encryption at all.
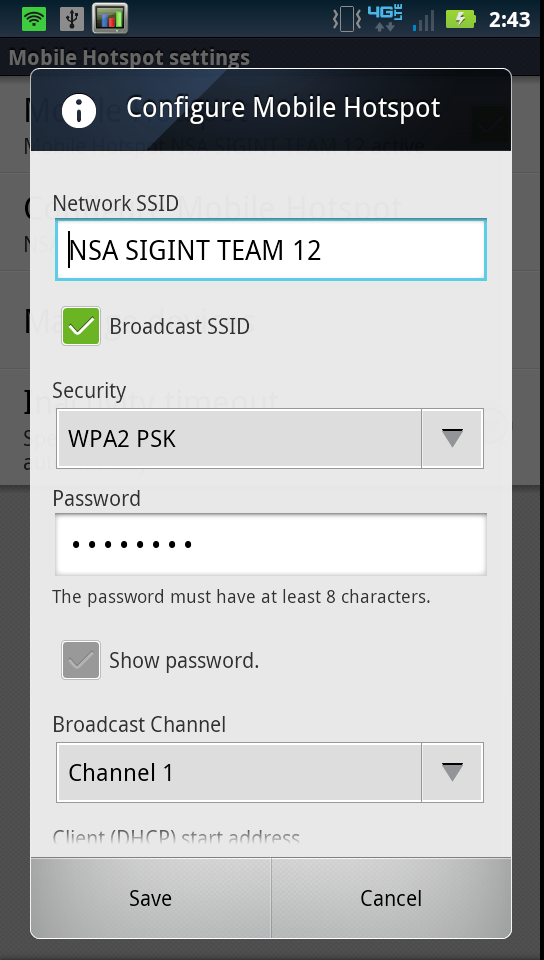
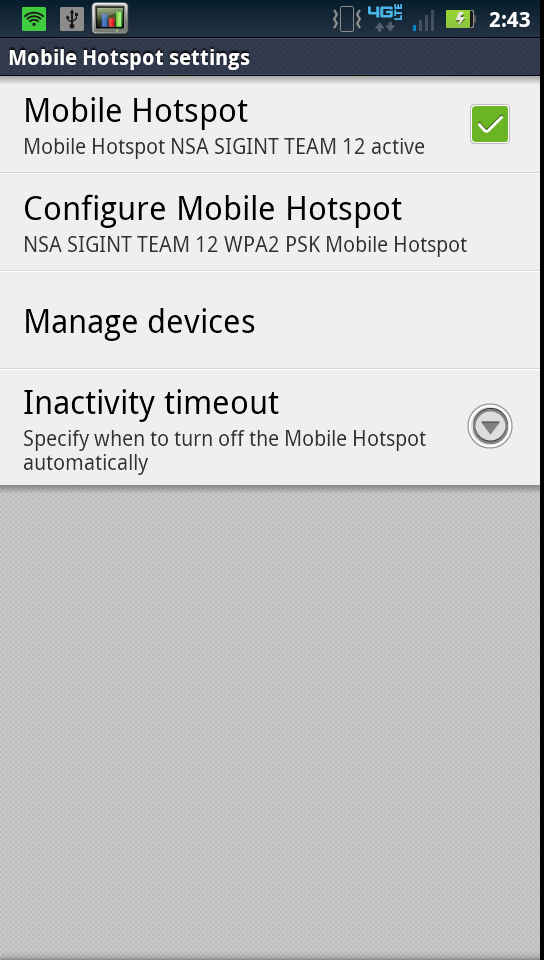
Clients attach and negotiate an 802.11g 54 Mbps link rate at maximum. I did have some initial stability problems with the Bionic when running our WiFi hotspot test, which I eventually tracked again to data saver during those night hours. Other than that, the hotspot works decently well. Just keep in mind that even connected to the charger, heavy WiFi hotspot use can discharge the phone slowly.
GPS
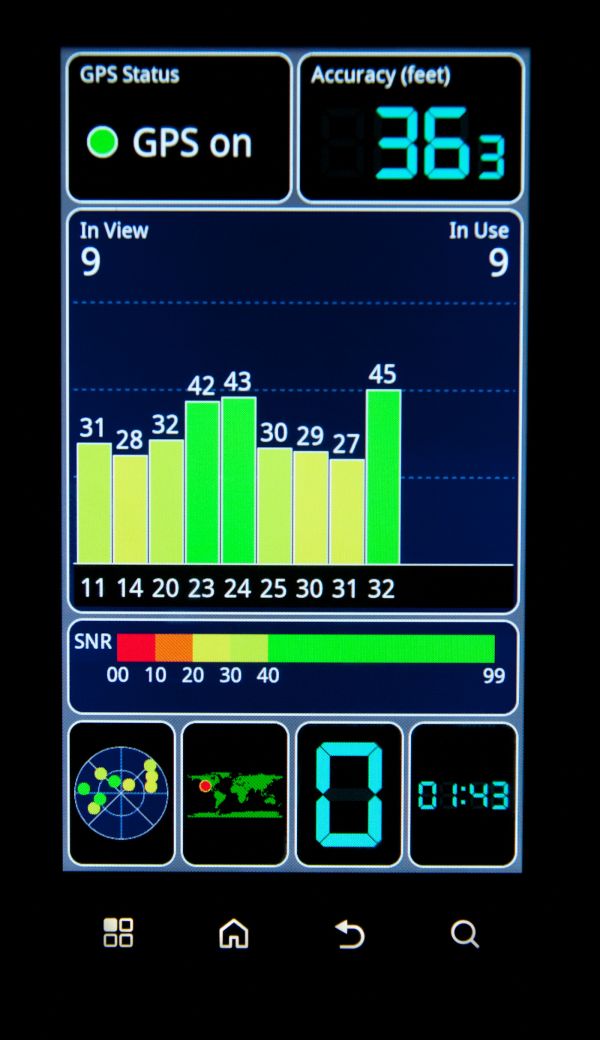
The Bionic uses Qualcomm’s GPSOne onboard MDM6600 and locks very fast and accurately, even indoors. Since Qualcomm’s GPS seems to be somewhat further abstracted away than most, I have a feeling every fix is warm rather than cold which helps speed things along considerably.
I’m impressed with the speed and robustness of the GPS on the Bionic it’s largely the same that I saw on the Droid 3.
Noise Cancelation and Audio
The Bionic, just like the Droid 3, has a total of three microphones. Two on the back of the device, one at the top, one at the bottom, and on the front, the primary microphone at the bottom. The Bionic, like the Droid 3, does some common mode noise rejection to reduce ambient noise when on calls, the result is that the other party in theory hears less background noise even if you’re in a noisy environment.
The Bionic performs about as well as the Droid 3, doing a good job filtering out background music when in close proximity to a speaker. I’ve recorded a sample showing this behavior the same way we’ve done before - I increase the volume, then decrease it, while talking, and record on another phone connected to line-in. I subjectively remember the Droid 3 doing a bit of a better job, but I have little doubt the Bionic uses the same solution, though I’m not sure whose IP this is.
Actual in-call audio is the same as well, I found the Bionic handset pleasing and decently loud. The Bionic does a good job making EVRC voice (which is what Verizon uses by default) sound actually pretty decent, and the earpiece doesn’t saturate or crackle at maximum volume. I’ve also recorded another sample with the Bionic calling the local ASOS.
The Bionic’s weak point is audio quality for listening to music. I’m still working with Francois to build out our audio testing suite. Unfortunately the Bionic’s main problem is blatant enough to be audible without doing objective testing. Just like the Galaxy S 2, the Bionic exhibits background hiss and whine that seems to be reflective of CPU frequency and current power draw. I’ve recorded a sample of this background whine that happens whenever the audio codec is on. You can hear the frequency of that background hiss change as I run a speedtest and keep the LTE radio active. It’s unfortunate because this is one of those - once you notice it, you can’t un-notice it - annoyances that really makes listening with sensitive in-ear monitors annoying.
The Bionic, just like the Droid 3, uses ST-E’s 3.1 CPCAP which is a combination PMIC, audio codec, and really an integrated solution for system management. I don’t have much hope for this being remedied with an external headset amplifier, as just like SGS2 you end up amplifying noise that exists even at 1/10 or 2/10 volume settings.
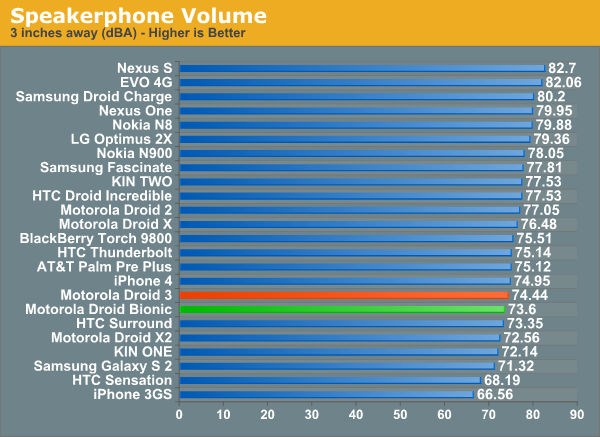
Speakerphone on the Bionic is supplied courtesy of what’s under that grille on the back in the lower left. The Bionic doesn’t saturate at maximum volume, but doesn’t go particularly loud either. Volume is very close to the Droid 3.
Display - qHD 4.3"
I went over this in our preview piece, but the Bionic literally uses the same display as the Droid X2. It’s a 4.3" qHD (960 x 540) panel with an RGBW PenTile subpixel matrix. The goal of PenTile in RGBW is to affect more light throughput at a given backlight brightness than a traditional RGB stripe. It seems simple enough in theory - R, G, and B filters in an LCD all incur losses, and having a white subpixel is an easy way to increase total throughput with a lower backlight level. Luminance gets mapped to the white subpixel, chrominance gets mapped to RGB, and in theory you get the same image with fewer incurred losses, and can drive the panel with less backlight power.

RGBW PenTile on the Motorola Droid Bionic
The side effect is that, like RGBG PenTile which we saw in Samsung’s AMOLED and SAMOLED, the grid is offset and thus renders vertical elements in a unique fuzzy manner. From far away enough, those offset elements look relatively homogenous or straight, but up close is where you can notice things aren’t a nice, straight grid. In other terms, instead of 3 subpixels per pixel in a normal RGB stripe, RBGW PenTile uses 2 subpixels per pixel. Nouvoyance also explains all of this on their own RGBW page.
I have to admit that I found RGBG PenTile distracting, but RGBW PenTile not nearly as much on these newer devices. Maybe I’ve just gotten used to it from seeing it crop up so many times now. It’s more noticeable on the Droid X2 and Bionic purely because the logical pixels are larger - same resolution, larger display (4.3“ as opposed to 4.0”), however.
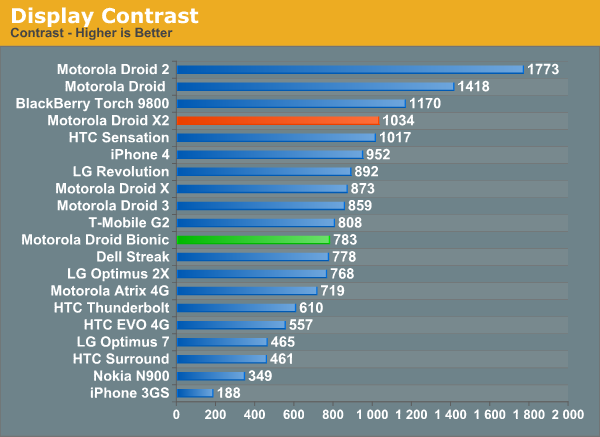
Motorola earned something of a reputation for including good IPS displays in the original Droid all the way through the Droid 2. PenTile or not, the display does post good brightness and contrast numbers in our measurements with an i1D2 as always.
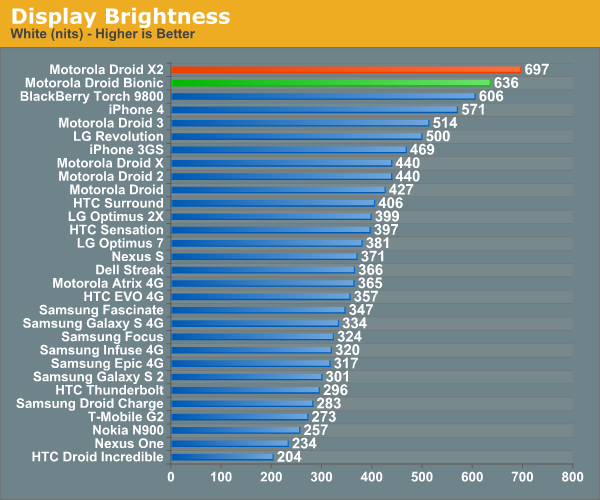
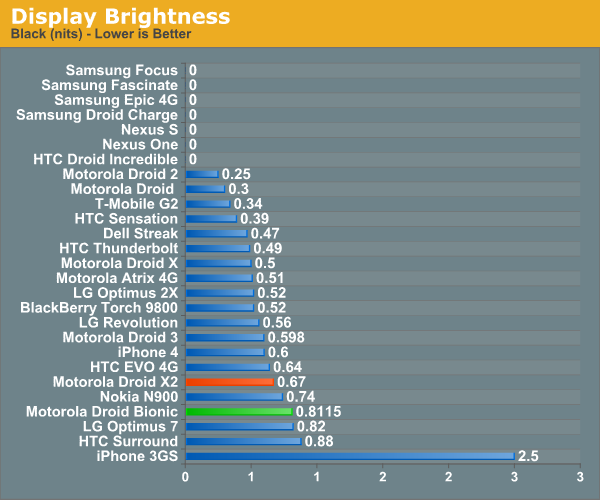
I also measured display brightness and white point as a function of brightness selected from the settings menu. This is something we’ve been doing for a while now, and it’s actually pretty cool to see the Bionic’s lines pretty much lie right atop the X2’s - for once, everything does make sense. Viewing angles and outdoor viewing quality is basically identical to what I saw on the X2, which is to say pretty darn good.
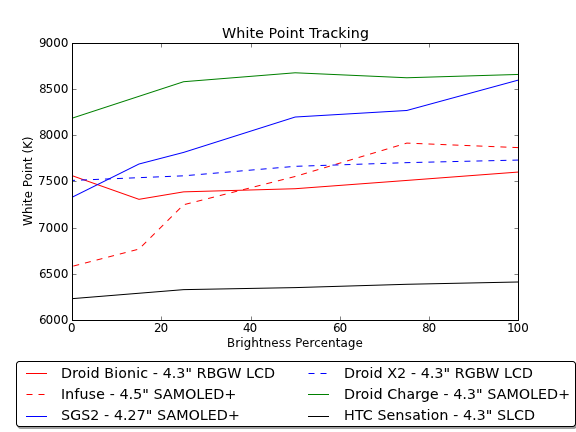
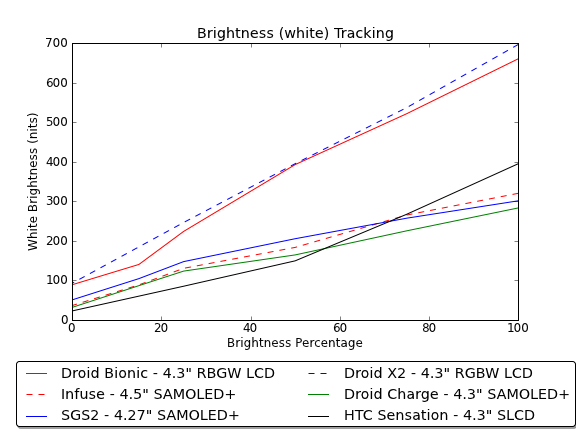
I like the Bionic’s display if nothing else because it’s qHD, even if this display is effective qHD resolution through RGBW PenTile rather than an RGB stripe. Higher dot pitch through any means necessary is something I’m ok with, and there are just so many places that qHD gives more breathing room than WVGA in Android.
Camera - Stills and Video
I sound like a broken record here with how many similarities there are between the Bionic and the Droid 3, but camera is another of them. The Bionic has a rear facing 8 MP camera with single LED flash and autofocus, and captures stills at a maximum resolution of 3264 x 2448.
The rear sensor is based on an Omnivision OV8820 CMOS sensor which is backside illuminated, 1/3.2" in size, and has 1.4µm square pixels. This is a very modern sensor behind an optical system with F/2.8 optics and a 4.6mm focal length. If that sounds familiar, it’s because this is exactly what’s inside the Motorola Droid 3 as well.
The front facing camera is home to a rather less interesting VGA (0.3 MP) fixed focus CMOS sensor. In this case, it’s an Omnivision OV7739 with 3.0µm square pixels which is 1/7.5" in size. I’ve found all of these drivers and configuration files again lurking deep inside /system on the Bionic.
The Bionic also has the same exact camera application, though subjectively it seems a lot more finicky on the Droid Bionic. In still image shooting mode, one can toggle between widescreen 16:9 aspect ratio 6 MP or the sensor’s native aspect ratio 8 MP, there aren’t any other options for lower resolutions. The other options are for toggling storage location, shutter noise, and video capture resolution. There are the usual assortment of other toggles on a ribbon down at the bottom - effects, scenes, modes, brightness, and flash settings.
The Droid Bionic shoots pretty decent photos, the problem that I have with this is the software. It takes a while to get into the camera application, and there’s a lot of shot to shot variance in speed. The other problem is that the Bionic seems to miss focus a lot more than I remember the Droid 3 doing - occasionally it’ll just blow off the long press on capture button and take the picture before AF finishes. This is maddening at times and downright frustrating at others since you’ll need to capture two or three to get one where AF has settled down, you can see this behavior below for yourself.
We’ve taken photos with the Bionic at the usual test location, and in the lightbox, with the lights on and off. Just like the Droid 3, the Bionic doesn’t illuminate the scene when running AF in the dark, so often it’ll expose perfectly but capture a blurry image. I’ll let you be the judge of image quality, it’s just like I saw on the Droid 3.
In video mode, you get the same layout, however instead the new options are audio scenes, video shooting duration, and an on/off toggle for LED lighting. Options for video shooting are pretty simple - 1080p30 at 15 Mbps, 720p30 at 10 Mbps, and a few others. For both of these, high profile features are used like we talked about in the Droid 3 review. You can actually see all of these configured from build.prop on the Bionic:
ro.media.camcorder.1080p=mp4,h264,30,15000000,aac,128000,44100,2 ro.media.camcorder.720p=mp4,h264,30,10000000,aac,128000,44100,2 ro.media.camcorder.d1NTSC=mp4,h264,30,6000000,aac,128000,44100,2 ro.media.camcorder.vga=mp4,h264,30,4000000,aac,128000,44100,2 ro.media.camcorder.cif=mp4,h264,30,1500000,aac,128000,44100,2 ro.media.camcorder.qvga=mp4,h264,15,500000,aac,64000,44100,2 ro.media.camcorder.mms=3gp,h264,15,128000,amrnb,12200,8000,1
Resolution, extension, video compression standard, framerate, video bitrate, audio codec, sampling rate, and number of channels. It’s all right there in that order presented nicely in build.prop just like so many other Android devices.
I’ve also captured sample video at the usual place from the front and rear facing cameras. Video quality is very good, though the Bionic does run that AF routine a lot on the rear facing camera while shooting 1080p video. Again OMAP4’s encoder implements some nice high profile feature, but still only uses 1 reference frame where 2–4 would ensure better encoder efficiency. I’ve also uploaded native samples from the Bionic to our server for you to watch without YouTube’s transcoding.
Software and Performance
The Bionic comes with Motorola’s new Motoblur, just like I saw on the Droid 3. You can go pull the specific version from build.prop:
Blur_Version.5.5.886.XT875.Verizon.en.US
It includes a custom lock screen which gets some different styling and a slide left-right unlock scheme. The theme also includes an CRT off animation, which seems to be an approximation of the off animation from Android 2.3. The Bionic as we reviewed it was running Android 2.3.4, which is new but not absolute bleeding edge.
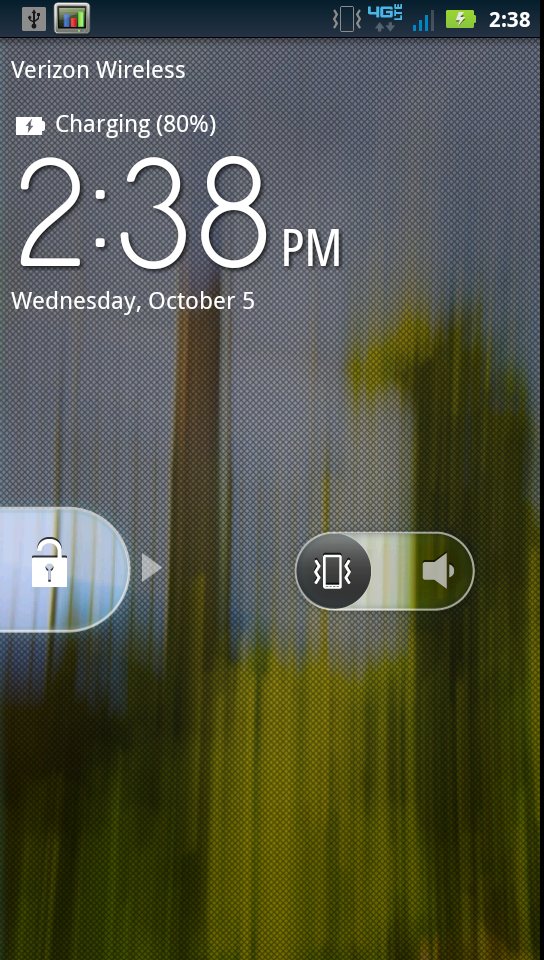

All the usual Motoblur accoutrements are here, including a black on grey theme for settings and menus, and blue elsewhere for the shade and highlighting colors.
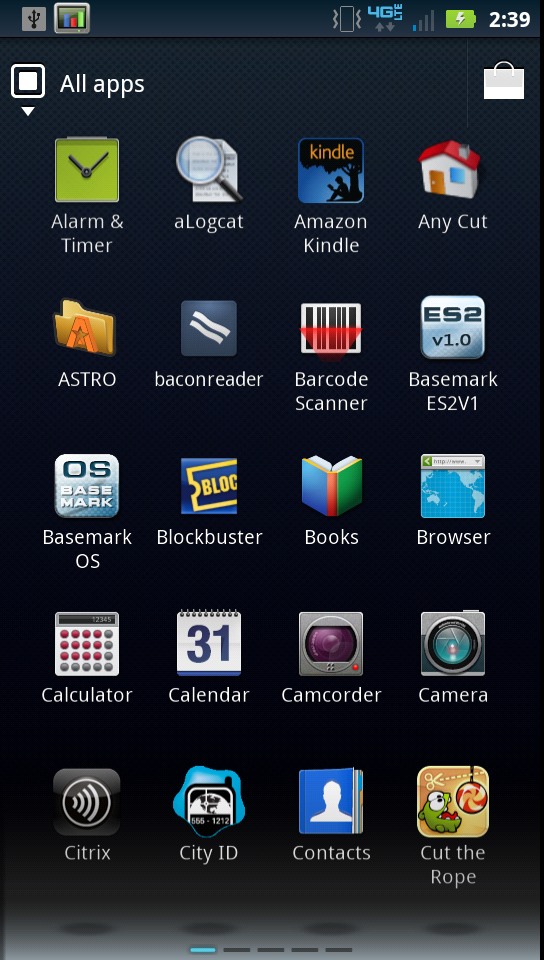
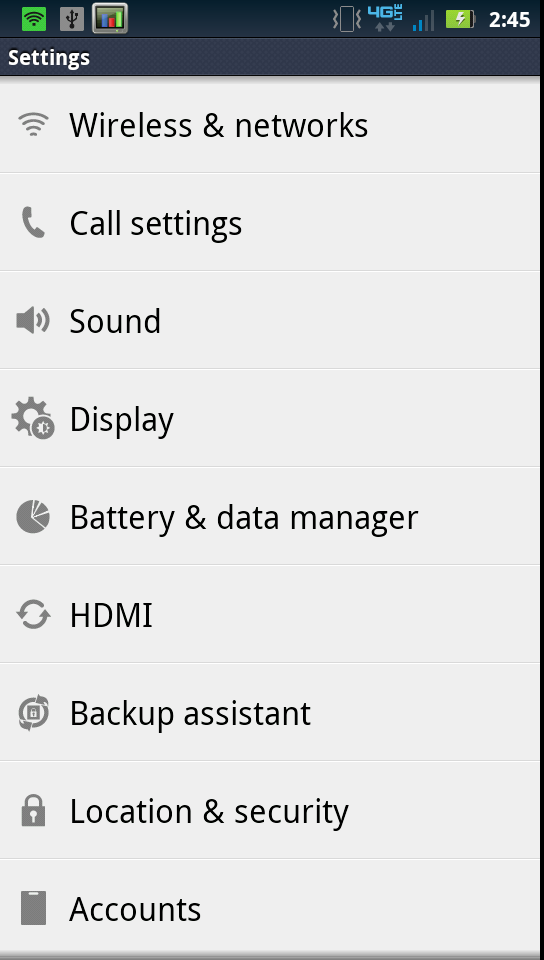
The home screens get the same kind of 3D composition I saw on the Droid 3, and feel pretty smooth panning back and forth. The only thing I’ve noticed this time is that it looks like the color depth here on the background seems to be 16 bit (RGB 565). I bet this is due to some GPU composition going on which makes things nice and speedy.
Pretty much the same applies to the launcher, where you get a paginated 4x5 grid of icons that can be sorted alphabetically or grouped. The Bionic does come with an assortment of preloaded stuff that’s entirely par for Verizon. Some things can be removed without root, other things can’t. I feel like we’re getting closer to the point where users are given the ability to uninstall stuff without root, but it still isn’t here yet.
Going over the storage situation on the Droid 3 is also important. By default, you get 16 GB of internal NAND, and a 16 GB class 4 microSD card. Things look like this using df:
Filesystem Size Used Free Blksize/dev 465M 388K 465M 4096/mnt/asec 465M 0K 465M 4096/mnt/obb 465M 0K 465M 4096/system 477M 332M 144M 1024/data 3G 501M 3G 4096/cache 708M 18M 689M 4096/osh 1G 650M 661M 2048/pds 3M 1M 2M 1024/preinstall 302M 187M 115M 1024/mnt/sdcard-ext 14G 11M 14G 32768/mnt/sdcard-ext 14G 11M 14G 32768/mnt/sdcard 8G 227M 7G 8192/mnt/sdcard 8G 227M 7G 8192
I’m not going to go over all of the OMAP 4430 details again since we’ve already gone in depth with the Motorola Droid 3, so I’d encourage curious minds to check that out for more detail. The short of it is that the Droid Bionic has a 1.0 GHz OMAP4430 SoC which consists of two ARM Cortex A9s with the MPE (ARM’s NEON SIMD unit), alongside PowerVR SGX 540 graphics at 304 MHz and a dual channel LPDDR2 memory interface. The Bionic has 1 GB of LPDDR2 over the Droid 3’s 512 MB of LPDDR2, but this is primarily to accommodate the increased demands from the laptop dock.
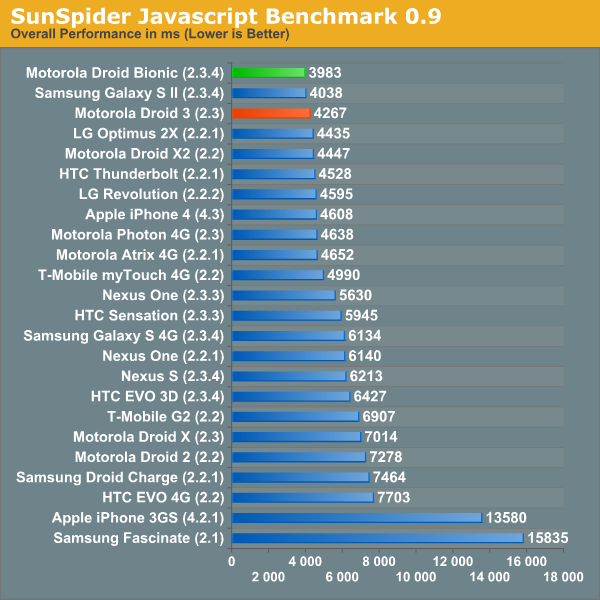
First up are the web based tests. Interestingly enough the Bionic posts an impressive result for SunSpider 0.9, I ran this test a few times as always and this wasn’t an errata. I also updated the SGS2 results with a run from the newest firmware I see on Kies, XXKI1, which is 2.3.4.
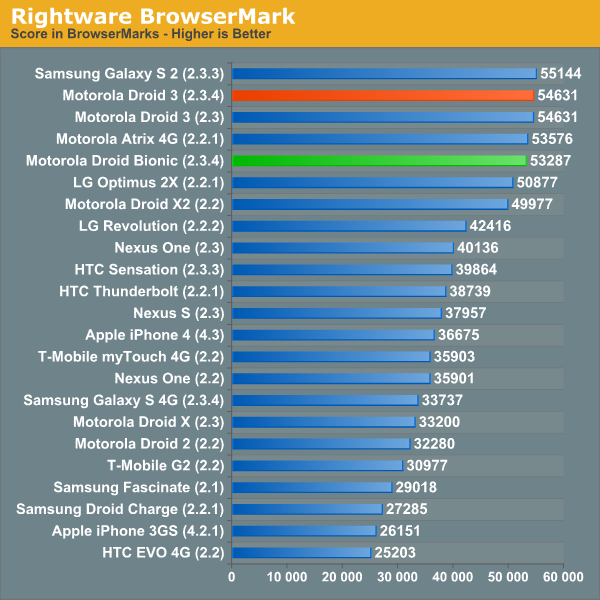
Browsermark curiously is a bit lower compared to the Droid 3 however, which is surprising since the two should be close considering the same SoC and version of Android. The results are reasonably close, however.
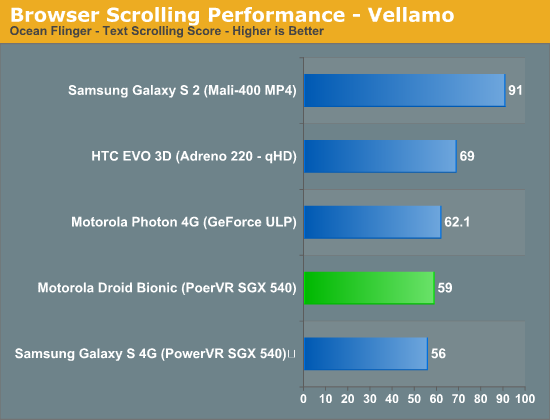
I didn’t record the Vellamo ocean flinger result from the Droid 3, however the Bionic comes in just above the Galaxy S 4G. Motorola isn’t using a backing store, rather something of a re-skinned stock Android browser, and thus scrolling performance isn’t as fluid as other devices.
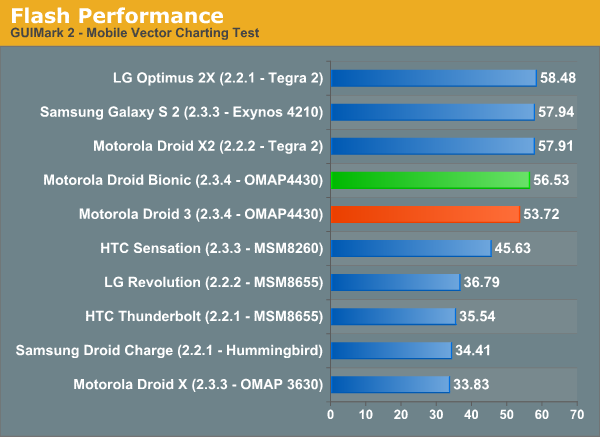
Flash is a bit interesting - there was an update for Flash 10.3 on Android pushed out a while back that enabled NEON codepaths for OMAP4 based phones. I didn’t have the Droid 3 at the time, but the Bionic now shows an improvement and is much closer to the cap for most of the test.
The rest of the tests are essentially the same as what we posted in the Droid Bionic preview piece, and reflect what we’ve seen before from OMAP4430.
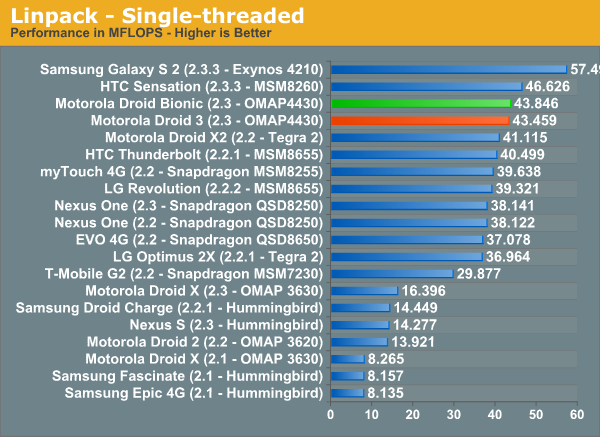
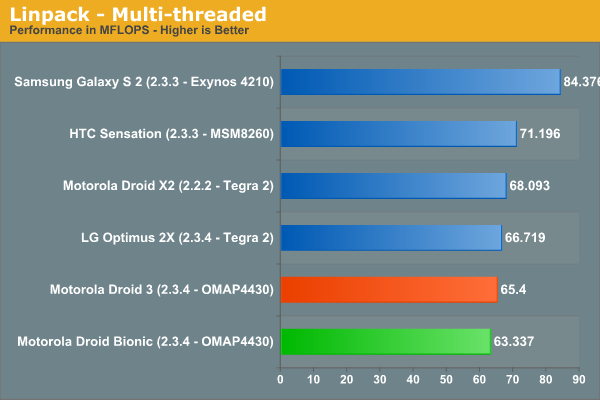
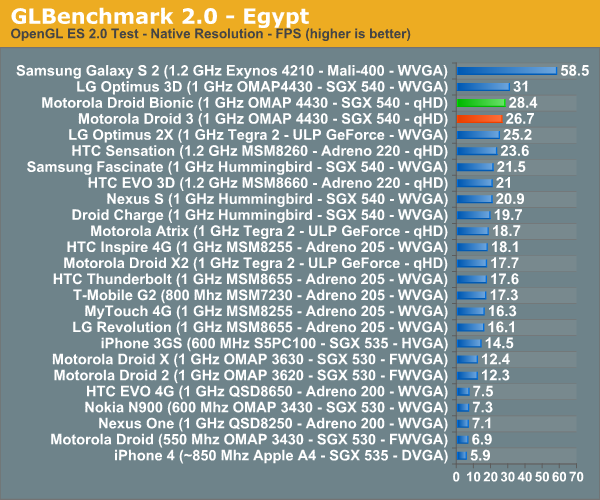
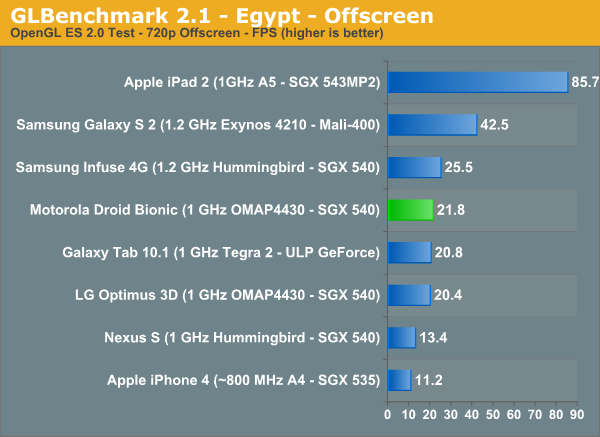
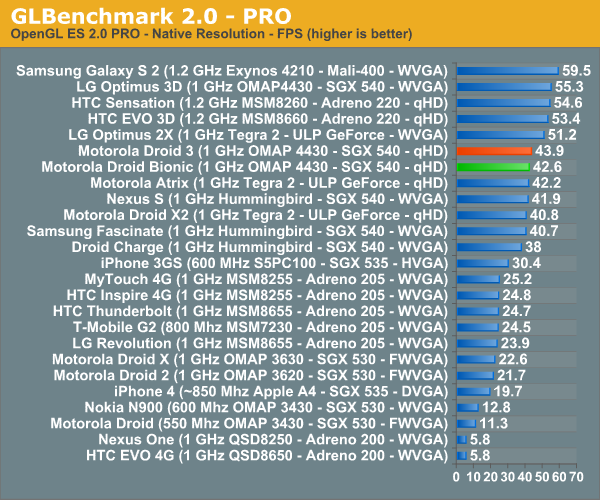
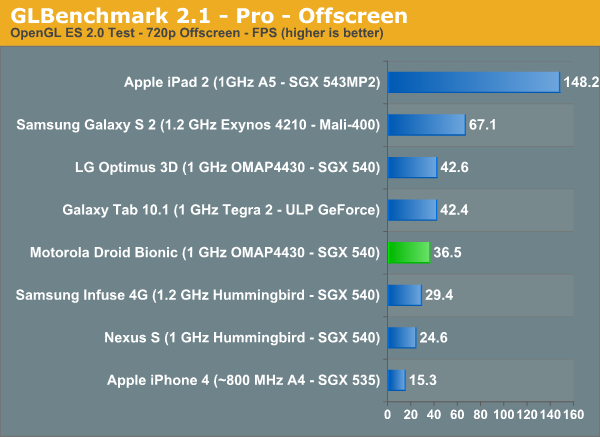
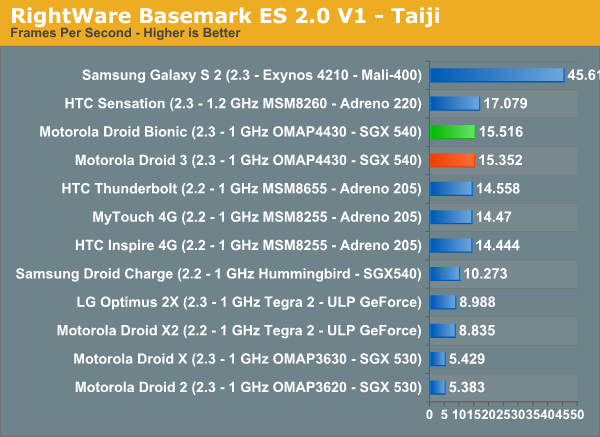
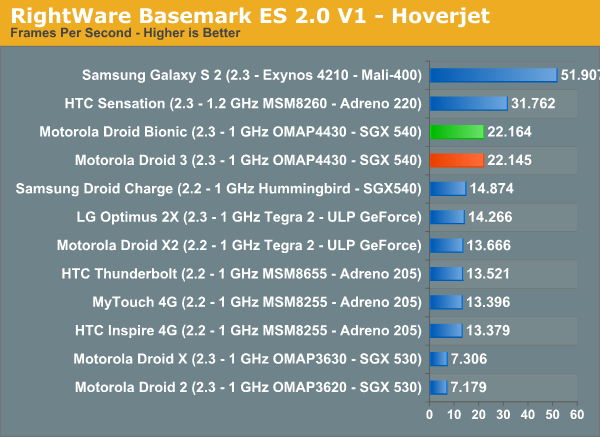
The results are unsurprising and completely in line with where they should be. The Bionic isn’t the absolute fastest of the dual core smartphones we’ve seen before, but it’s the first with LTE alongside it. The other question is how fast pages load on LTE compared to EVDO, I shot some video in our video review which really communicates things nicely.
Conclusion & Final Thoughts
The Bionic is the first smartphone we’ve seen to date that combines 4G LTE connectivity with a dual core SoC, ending a surprisingly long period where those two were mutually exclusive. The result is what’s currently the best cross section of features on paper, and a shockingly speedy experience.
The Bionic’s stock battery life isn’t far behind the other LTE smartphones, but it’s also not any better than them. That kind of performance is very indicative of where we should expect things to sit until 28nm LTE basebands and SoCs start arriving on the scene in 2012. If you don’t have access to a microUSB charger for at least a few hours during the day, the standard battery might be too much of a stretch. If you’re in that situation, the extended battery is an absolute necessity.
Though this Bionic isn’t the phone we were shown at CES, the result of being kicked back to the drawing board is overall pretty positive. The problem is that the incurred delay puts the Bionic right up against another phone with a dual core OMAP 4460, LTE, and a new build of Android. It would be a disservice to readers to not at least make mention of the Nexus Prime somewhere in this review, but my thoughts are still to wait and see what that device has to offer. I wouldn’t expect battery life to differ all that much however, given the same combination of features.
I sound like a broken record, but the Bionic really is a combination of the Droid 3’s software load and SoC, the Droid X2’s display and form factor, and a Motorola 4G LTE baseband. It’s a combination that finally breaks the mutual exclusivity that dual core and 4G LTE have had since Verizon’s 4G LTE launch. The Bionic that we saw and played with at CES never really saw the light of day, and yet I feel like this “Targa” turned Bionic does the promise of being the first dual core smartphone with 4G LTE justice. Even though the Nexus Prime is looming eerily on the horizon as of this writing, if there’s anything I’ve learned in the smartphone space, it’s that it is usually better to be first, than better, and you have to hand it to the Bionic for being first to dual core with LTE.





_575px.jpg)
_575px.jpg)


