Original Link: https://www.anandtech.com/show/4832/the-apple-thunderbolt-display-review
The Apple Thunderbolt Display Review
by Anand Lal Shimpi on September 23, 2011 2:56 AM EST- Posted in
- Displays
- Mac
- Apple
- Thunderbolt
- Thunderbolt Display
Ever since I moved to a notebook as my main work computer I've become increasingly annoyed with the process of actually moving my notebook-as-a-desktop around. At my desk I've got DisplayPort, Ethernet, two USB, FireWire 800, speakers and power all plugged into a 15-inch MacBook Pro. What makes it frustrating isn't the first-world-problem of having to unplug seven cables, rather that it doesn't need to be seven cables - Apple could make the whole thing happen with just two.
Every Mac released in 2011 has at least one Thunderbolt port (the iMac has two), and Thunderbolt can deliver exactly what I'm looking for. Thunderbolt can carry two things: PCI Express and DisplayPort, the former for data and the latter obviously for video. Why would you want to carry PCIe and DP over a single cable? To address problems like the one above.
Pretty much all device expansion on modern day PCs happens via PCI Express. Several years ago it was hard to find PCIe sound cards or Ethernet controllers, but these days vanilla PCI slots are nearing extinction and PCIe is the de facto standard. Ethernet, USB and FireWire controllers all exist as single-lane PCIe devices. Put a bunch of them at the other end of a Thunderbolt cable and you no longer need to plug in a bunch of individual cables into your notebook when at your desk. Send DisplayPort over the same cable and you can actually move all of those ports onto your monitor, thereby using a single cable to carry everything but power to your display. And this is exactly what Apple has done with its new Thunderbolt Display. By mating its 27-inch LED Cinema Display with a bunch of integrated IO controllers, Apple is hoping to deliver a display that's more of a mobile docking station than just a passive way to display video.
Apple has tried this in the past. The old Cinema Displays used to feature an Apple Display Connector (ADC) that actually carried DVI, USB and power from a desktop Mac to the monitor. You only needed to plug in a single cable to your display, significantly reducing desktop clutter. Although Thunderbolt does carry power, it's limited to 10W - not enough to power any reasonably sized display. Where Thunderbolt does win out over ADC however is in its universal appeal. Intel created the standard. Although it's used almost exclusively on Apple systems today, come 2012 Intel is expecting PC OEMs to embrace the interface with its Cactus Ridge line of Thunderbolt controllers.
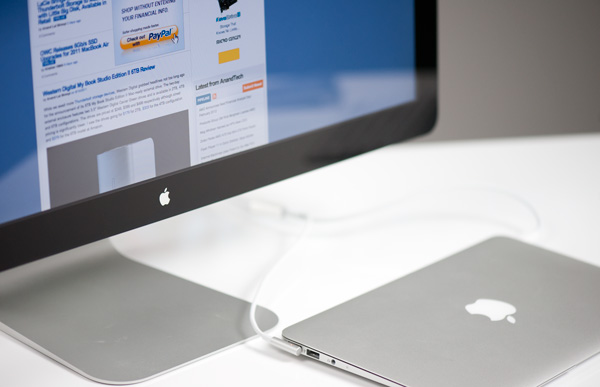
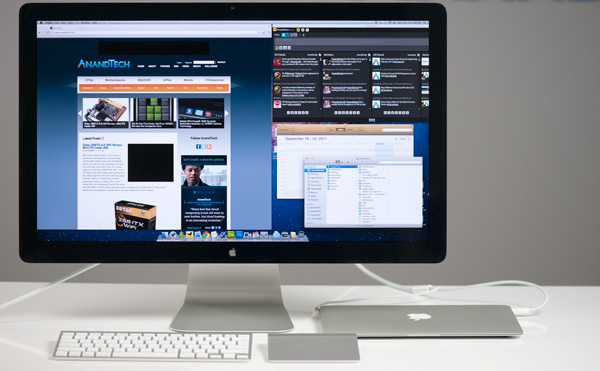
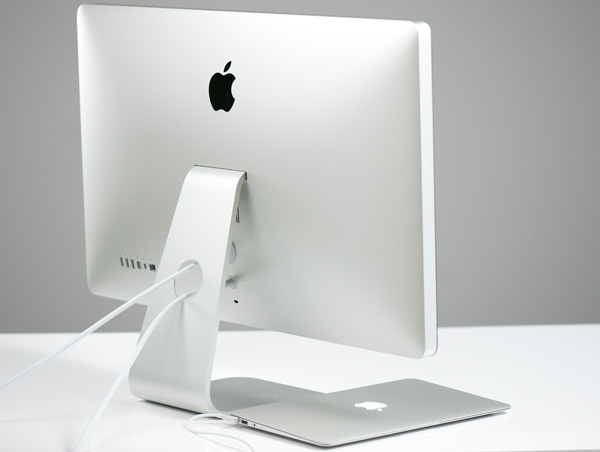
Apple's Thunderbolt Display
The Thunderbolt Display uses a near, if not perfectly, identical panel to what was in last year's 27-inch LED Cinema Display. You get a 27-inch, 16:9, 2560 x 1440 LED backlit display capable of at least 350 nits at full brightness. Apple seems to conservatively spec its desktop displays as we were able to measure 425 nits at max brightness. The uber brightness comes in handy because the display does have a glossy finish. Indoors it's not really a problem unless you're watching a dark movie scene with the display lit by a sun-facing window. Even then, cranking up the brightness all the way is usually enough to overcome any significant glare. As with all glossy displays, if you have light control (e.g. curtains or blinds) you'll be just fine.
The similarities don't end with the internal panel, the chassis is very similar to its older sibling and the Thunderbolt Display retails for the same $999 price.
 |
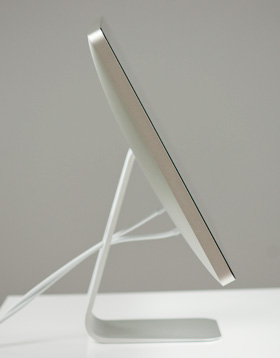 |
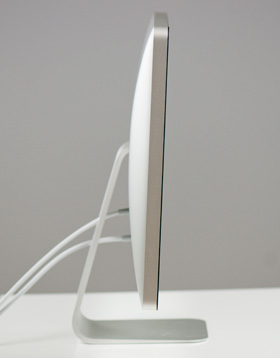
The display sits on an aluminum swivel base that allows for -5 degrees to 25 degrees of tilt along the horizontal axis. There's no height adjustment for the display either, only tilt. Personally, I use a height adjustable desk as I find it helps me avoid any carpal tunnel pain. Combined with a height adjustable chair, the lack of height adjustment on the display doesn't bother me. If you have a fixed height desk however, this may be a problem.
Aesthetically the Thunderbolt Display continues Apple's aluminum meets glass design language. The front of the display is all glass, while the edges and back are all aluminum. Along the top surface of the display is a mic for the integrated FaceTime HD camera. The outgoing 27-inch LED Cinema Display (still available for purchase online) sported a 640 x 480 camera, while the Thunderbolt Display ups capture resolution to 1280 x 720.
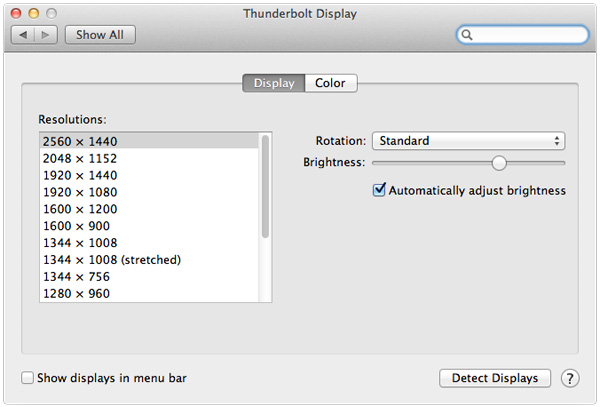
There's an ambient light sensor hidden in the top bezel of the display, but as always you can disable its functionality from within OS X.
There are two integrated speakers in the display, again unchanged from the previous LED Cinema Display.
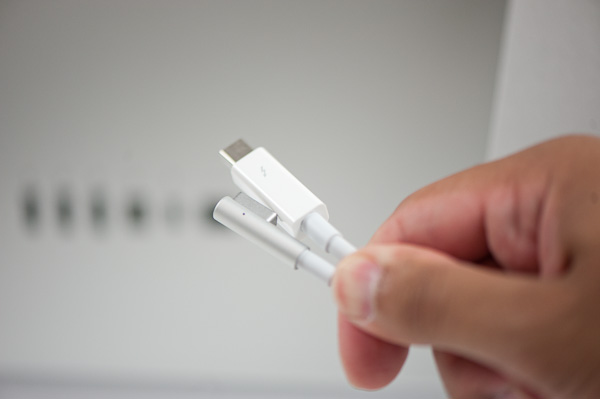
Two cables attach directly to the display: a removable power cable and an integrated IO cable. Cable management is done through a round cutout in the aluminum stand. The IO cable is where things really change with the Thunderbolt Display. Instead of a breakout of three cables as was the case with the Cinema Display, there are now only two: MagSafe and Thunderbolt.
The MagSafe connector remains unchanged. If you've got any Mac that can be charged by an 85W MagSafe adapter, the Thunderbolt Display will charge said Mac. This feature alone is particularly awesome for notebook-as-a-desktop users since it allows you to just keep your actual AC adapter tucked away in your travel bag. For me I keep my MagSafe adapter in my bag and never take it out so I never have to worry about forgetting to pack it. Given how expensive MagSafe adapters are ($79 for an 85W), this is a nice feature for MacBook Air/Pro owners.
The Thunderbolt cable is obviously what gives this new display its name. Inside the Thunderbolt Display is an Intel Light Ridge Thunderbolt controller. The type of controller is important as it bestows upon the display some clear limitations. The biggest of course is the lack of support for all non-Thunderbolt systems. That's right, the only way to get video to the Thunderbolt Display is by using a Thunderbolt enabled Mac (or theoretically a Thunderbolt enabled PC). For Mac users that means only 2011 MacBook Pro, Air, iMac or Mac mini models will work with the Thunderbolt Display. Everyone else has to either buy a new Mac or stick with older displays.
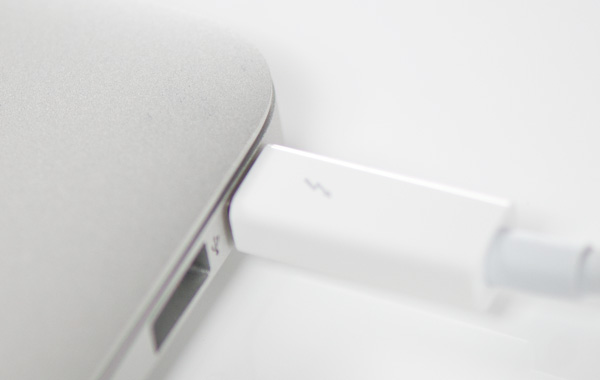
I believe the limitation here is actually on the cable side. A Thunderbolt cable can only transmit a Thunderbolt signal. Although DisplayPort is muxed in, if the display on the other end is expecting Thunderbolt and it receives DisplayPort it won't know what to do with it. It's possible Apple could have built in logic to autosense and switch between Thunderbolt and DisplayPort as inputs, but Apple traditionally employs clean breaks rather than long technology transitions. If Apple wants to ensure Thunderbolt gets adopted (at least by its users), this is the way to do it. As we learned from other legacy interfaces (e.g. PS/2, IDE), if you enable backwards compatibility you'll ensure the survival of systems that implement those interfaces. It's not so great for existing customers unfortunately.
The Changing Role of Displays
Thunderbolt carries PCIe and DisplayPort, which enabled Apple to change the role of its display. The Thunderbolt Display is no longer a passive monitor, but it's a full fledged docking station.
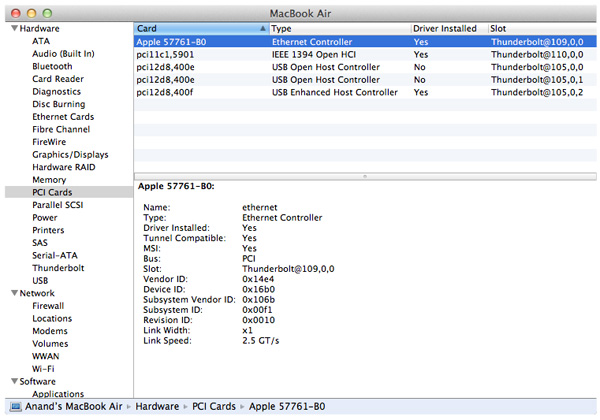
Thunderbolt can carry PCIe x4, that's four lanes, which gives Apple the ability to put four PCIe x1 devices in the display itself. Apple chose wisely and included a Broadcom Gigabit Ethernet controller (BCM57761), a FireWire 800 controller and a USB controller. The FaceTime HD and integrated audio codec both use the internal USB controller. Just to be clear, these controllers are present independent of what you connect to the Thunderbolt Display. If you have a Mac with an integrated Gigabit Ethernet controller, hooking it up to the Thunderbolt Display now gives you two GigE ports - and you can use them both in tandem if you'd like. The same goes for FireWire 800 and USB.
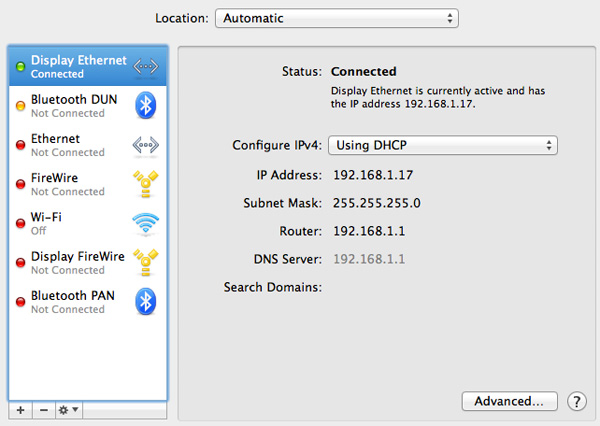
Apple doesn't see the Thunderbolt Display as a way to offer more expansion ports, but rather a way to shift those ports to a different location. Chances are you won't need GigE while mobile, but you would like it while at your desk. The same goes for FireWire 800.
What's particularly awesome about the Thunderbolt Display's integrated controller farm is what it does to MacBook Airs. The 2011 MBAs ship with two USB ports and a Thunderbolt port, that's all you get in terms of high-speed IO. With their internal SSDs capable of moving data at up to 200MB/s, you're quickly bottlenecked by the MBA's 802.11n WiFi stack. Had Apple included a Gigabit Ethernet port on the MBA it would ruin the thin form factor. The Thunderbolt Display takes care of all of this. Connect a MacBook Air to a Thunderbolt Display and not only do you get more pixels, but you get more connectivity. Gigabit Ethernet and FireWire 800 are now retrofitted to the MacBook Air. For those notebook-as-a-desktop users who migrated from old MacBook Pros to the 13-inch MacBook Air, the Thunderbolt Display is a must-have. The biggest feature for me is Gigabit Ethernet. For large file transfers 802.11n just doesn't cut it.
While connected you can use the Thunderbolt Display with your MacBook Pro/Air closed or open as a secondary display just like you could with last year's 27-inch LED Cinema Display.
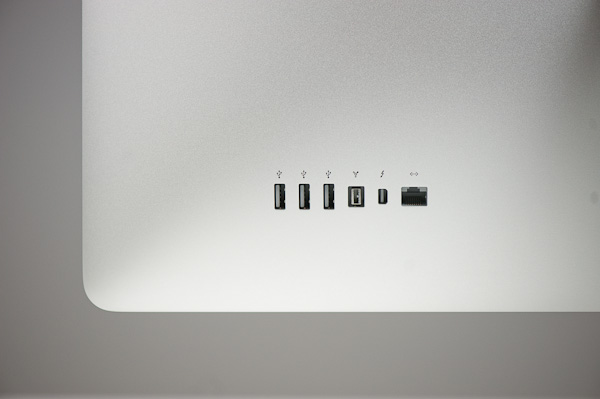
These aren't just ports, they are backed by controllers physically located within the display
The Thunderbolt Display not only adds functionality but it also simplifies cable management as a result. Users who are constantly docking and undocking their notebooks now only have to deal with two cables: power and Thunderbolt. Whereas today I have no less than seven cables plugged into my notebook.
The Limitations
What's missing from the Thunderbolt Display's port repertoire? For starters, there's no analog audio out. While the display does feature a pair of integrated speakers, they don't produce the best sound in the world. Thanks to their diminutive size and unusual enclosure, the speakers don't cover a lot of dynamic range and you can forget about any ultra low frequencies. If you like bass, you still need a sub. Unfortunately there's no way to use the display's integrated audio codec to drive external speakers. You either have to plug a 1/8" stereo cable into your Mac or buy a USB sound card and connect your external speakers to it. In my opinion this is a pretty significant oversight. It either defeats the purpose of the simplified cable setup by requiring you plug in yet another cable into your Mac to use external speakers, or it defeats the purpose of having an integrated audio controller since you need another USB audio controller to get audio out. This is something Apple could've easily solved by just including a 1/8" jack on the back of the display.
Apple has done a great job of including SD card readers on most of its Macs (although I'd love one on the 11-inch MBA, ahem #waystomakeanandhappy). The Thunderbolt Display oddly enough doesn't include an SD card reader. If it weren't for this and the missing 1/8" jack you'd have almost no reason to reach over to your Mac once at your desk.
There's also no USB 3.0 support. While Thunderbolt does enable some very high speed IO, there are still far more USB 3.0 devices than Thunderbolt devices. Not to mention that you likely won't see Thunderbolt enabled flash memory sticks but we already have quite a few portable USB 3.0 drives. USB 2.0 is just ungodly slow today and I'd much rather have Apple introduce USB 3.0 support with its first Thunderbolt Display instead of introducing it with an updated version down the road. The controllers are available on the market today, although it won't be until next year with Ivy Bridge before Apple considers enabling USB 3.0 on Macs.
The final complaint shouldn't come as a surprise, but the Thunderbolt Display just doesn't have enough USB ports in my opinion. The MacBook Pro & Air come with two, while all desktop Macs have at least four. The Thunderbolt Display only gives you three. USB hubs are easy to come by, but I would've preferred to see at least 4 or 5 on the display.
Testing the Pieces
Before we get to the display and Thunderbolt specific testing I wanted to confirm that the individual controllers in the Thunderbolt Display were just as capable as those in the Mac it was connected to. For the most part, they are.
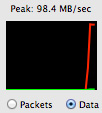
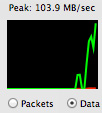
Following in Brian Klug's footsteps, I created two RAM disks - one on a MacBook Air and one on a MacBook Pro. I connected both systems to my local GigE network and copied giant files between them. I measured over 780Mbps going from the MacBook Air to the MacBook Pro, and 832Mbps in the other direction (images below). That's about as good as it's going to get.
 |
 |
Next I tested performance over FireWire 800 and USB 2.0. For FireWire 800 I used a Western Digital My Book Studio Edition II configured in RAID-1 and measured peak read speed from the device. For USB testing I turned to a Corsair Flash Voyager 3.0 (USB stick) and a SF-2281 SSD connected to a SATA-to-USB bridge. In both of the USB tests I measured write speed to the USB 2.0 devices. Apple appears to have chosen its FireWire controller well as performance was only off by 2MB/s compared to the FW800 port on the 15-inch MacBook Pro. USB 2.0 performance wasn't nearly as good however, I maxed out at 16.4MB/s and saw typical rates closer to 15MB/s:
| Transfer Rate Comparison | |||||
| FireWire 800 | USB 2.0 (stick) | USB 2.0 (SSD) | |||
| Apple Thunderbolt Display | 70.0 MB/s | 14.1 MB/s | 16.4 MB/s | ||
| Apple 15-inch MacBook Pro (2011) | 72.0 MB/s | 21.2 MB/s | 32.2 MB/s | ||
Both the audio controller and FaceTime HD cameras interface via the Thunderbolt Display's internal USB controller. It's likely that one of those devices is forcing the controller to negotiate at a lower speed and thus ultimately limit peak USB 2.0 performance through the display. Note the gap in performance is much smaller if you're looking at transfers to a USB stick vs. an SSD. I happen to have a lot of SSDs around so I tend to use them as glorified USB sticks, I suspect the majority of users won't notice much of a difference due to the lower overall performance of standard USB sticks.
FaceTime HD Camera
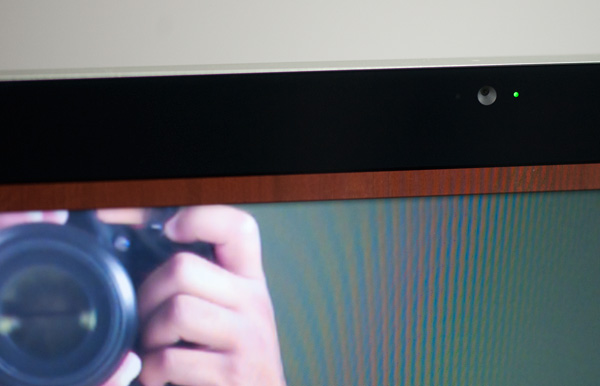
Although Photo Booth in Lion captures at 1080 x 720, using iSightcapture I was able to confirm that the sensor in the Thunderbolt Display appears to be able to capture 1280 x 720 natively. Quality is what we'd come to expect from the current generation of FaceTime HD cameras.
I tested the camera both in Photo Booth and in a FaceTime chat with our own Brian Klug. The experience worked fine in both cases.
FaceTime seems to have issues when one party is in a noisy environment but that doesn't appear to have anything to do with the Thunderbolt Display hardware as I duplicated the issue on a MacBook Air as well. If you're curious, the problem I'm talking about occurs when the party in a quiet environment is trying to talk to the person with a lot of background noise. The quiet party will hear audio just fine but the noisy party will get a lot of broken up audio from the other side. It seems like FaceTime is trying to do some active noise cancelation that ends up doing more harm than good. I confirmed it's a FaceTime software problem by calling Brian via Skype without any issues.
Thunderbolt Performance
The Eagle Ridge Thunderbolt controller is home to two Thunderbolt channels, each one is good for up to 10Gbps in either direction (up or downstream). That works out to be 20Gbps of bandwidth per channel or 40Gbps aggregate between the two. You can only send two channels worth of data down a single Thunderbolt cable, so there's no point to having more than two from a performance standpoint unless you have more than one port on your system.

If DisplayPort and PCIe traffic are indeed carried on separate channels, then the Thunderbolt Display by itself is eating up around 70% of the bandwidth of a single channel on its own (2560 x 1440 x 32bpp x 60Hz with 8b/10b encoding > 6.75Gbps). That leaves 10Gbps in each direction for PCIe traffic. If we look at our benchmarks from the previous section we see that we can hit just under 2Gbps with all of the auxiliary interfaces (GigE, FW800, USB2) running. Given our previous investigation with the Promise Pegasus we know that 8Gbps is feasible there as well. It's possible, that with everything running at once, we could actually run into bottlenecks with Thunderbolt.
To find out I ran a few tests. First I needed a baseline so I threw four SF-2281 SSDs into the Pegasus R6 chassis and configured them in a RAID-0 array. I ran a 2MB sequential read test (QD=16) and measured 909MB/s from the array. This value was obtained without the Thunderbolt Display connected, only the Pegasus R6.
Next I connected the Thunderbolt Display directly to my test MacBook Pro, and then connected the Pegasus to it. I repeated the test, this time getting 900MB/s. Thankfully the presence of the Thunderbolt Display doesn't seem to impact the max data rate I can get from the Pegasus.
For my third test I added a Gigabit Ethernet transfer from a file server to a local SSD using the GigE port on the display. During this test I was also playing back music using the Thunderbolt Display's internal audio codec and speakers. I re-ran the Pegasus test and got 855MB/s.
For my final test I re-ran the third test but added a FireWire 800 to USB 2.0 SSD transfer, both connected to the Thunderbolt Display. I also fired up the FaceTime HD camera on the display using Photo Booth and left it on during the test. The final performance score from the Pegasus was 817MB/s.
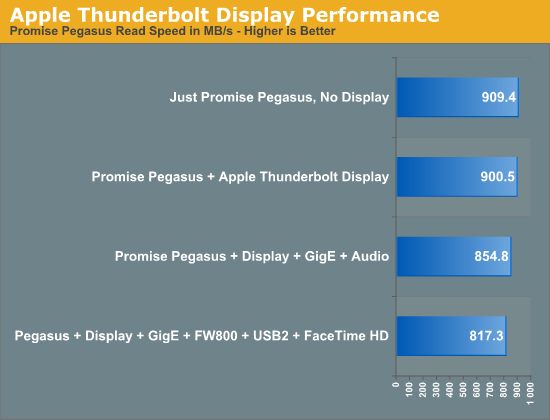
With everything running Thunderbolt performance took a 10% hit. Note that the standard Pegasus configuration isn't able to hit these data rates to begin with, so unless you've pulled out the 12TB of storage and stuck in your own SSDs you won't see any performance drop.
What this does tell me however is the ultra high end users that are looking to daisy chain multiple Thunderbolt storage boxes together may not want to do so. I only have a single Pegasus R6 on hand, but I'm guessing there will be significant performance drop off after the first box. Not that I'm complaining about being able to push nearly 1GB/s over a $49 cable from a notebook, I'm just trying to give a heads up to those who may have aspirations of even higher performance.
Display Testing
With all of the extra connectivity there is to test with the Thunderbolt Display we can't forget the actual panel testing. Thankfully this part is pretty simple, the display characteristics are near identical to the 27-inch LED Cinema Display we reviewed last year.
Color Quality
We report two main quality metrics in our display reviews: color accuracy (Delta-E) and color gamut. Color gamut refers to the range of colors the display is able to represent with respect to some color space. In this case, our reference is the AdobeRGB 1998 color space, which is larger than the sRGB color space. So our percentages are reported with respect to this number, and larger is generally better.
Color accuracy (Delta E) refers to the display’s ability to display the correct color requested by the GPU and OS. The difference between the color represented by the display, and the color requested by the GPU is our Delta-E, and lower is better here. In practice, a Delta E under 1.0 is perfect - the chromatic sensitivity of the human eye is not great enough to distinguish a difference. Moving up, a Delta E of 2.0 or less is generally considered fit for use in a professional imaging environment - it isn’t perfect, but it’s hard to gauge the difference. Finally, Delta E of 4.0 and above is considered visible with the human eye. Of course, the big consideration here is frame of reference; unless you have another monitor or some print samples (color checker card) to compare your display with, you probably won’t notice. That is, until you print or view media on another monitor. Then the difference will no doubt be apparent.
As I mentioned in our earlier reviews, we’ve updated our display test bench. We’ve deprecated the Monaco Optix XR Pro colorimeter in favor of an Xrite i1D2 since there are no longer up-to-date drivers for modern platforms.
For these tests, we calibrate the display and try to obtain the best Delta-E we can get at 200 nits of brightness for normal use. We target 6500K and a gamma of 2.2, but sometimes the best performance lies at native temperature and another gamma, so we try to find what the absolute best performance could be. We also take an uncalibrated measurement to show performance out of the box using either the manufacturer supplied color profile, or a generic one with no LUT data. For all of these, dynamic contrast is disabled.
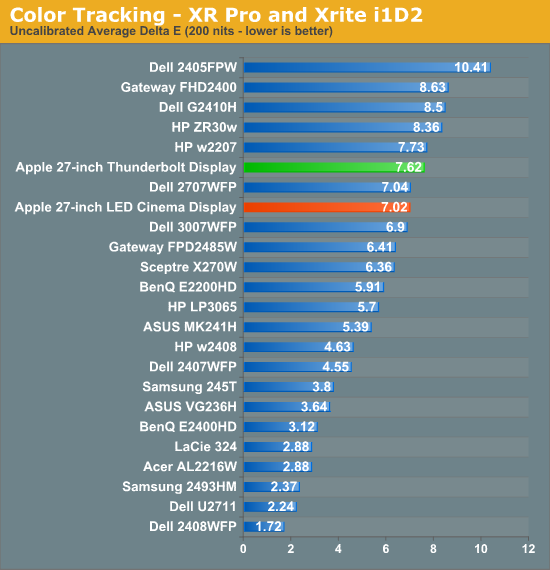
Uncalibrated performance remains fairly similar to last year's LED Cinema Display, however once calibrated the Thunderbolt Display is spot on with its predecessor:
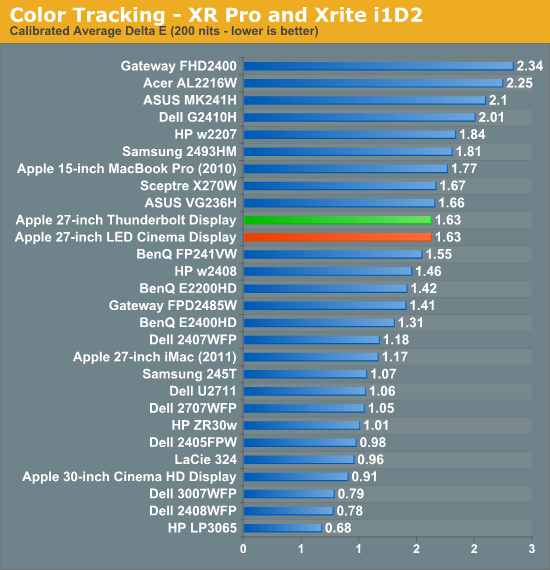
As we mentioned earlier, a sub 2.0 delta E is good enough for professional use. Although not perfect the Thunderbolt Display falls within that range for sure.
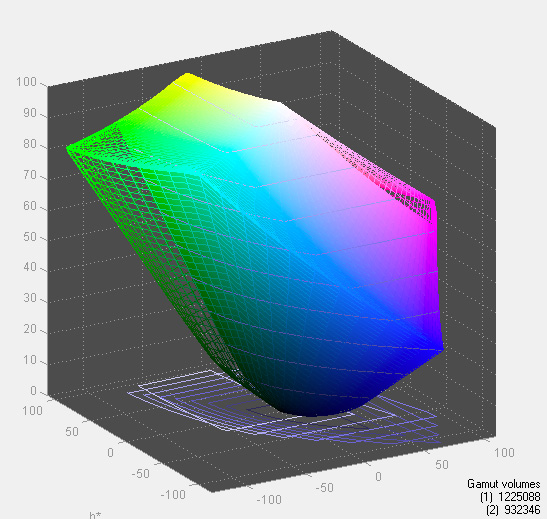
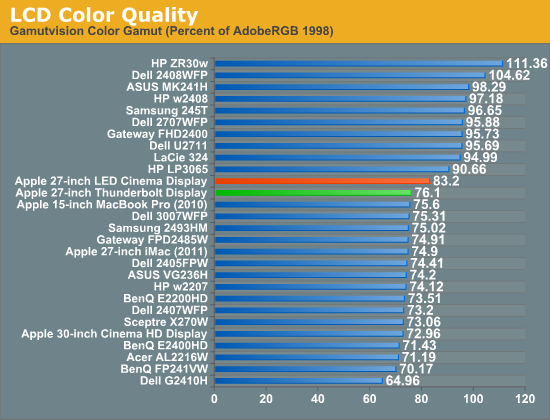
We measured slightly lower color gamut on the Thunderbolt Display than the original LED Cinema Display, however the result was much closer to the 2011 27-inch iMac. I couldn't visibly tell any differences and Apple indicates that color gamut shouldn't have changed, so it's quite possible that the differences here are due to our colorimeter and not the panel.
Color Uniformity
Now for color consistency, we take our best calibration profile from the very center at 200 nits and test color accuracy at 9 different places around the LCD display in an evenly distributed grid. We’ve shown before that calibration is localized across the display, partly due to the brightness not being uniform, partly due to the discrete nature of the display itself.
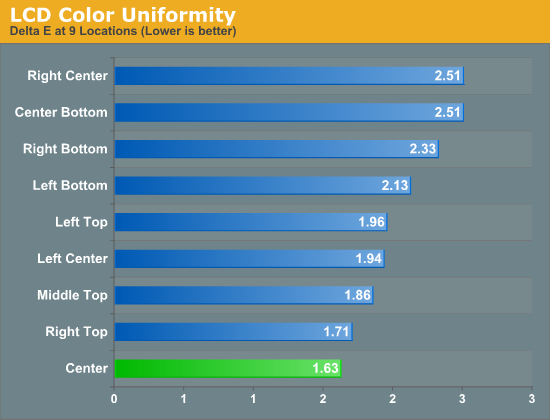
The Thunderbolt Display was fairly uniform across its surface, something we noticed in reviewing the 27-inch LED Cinema Display last year. Uniformity is actually better on this panel than the one we reviewed last year, although in both cases I couldn't really tell any differences.
Peak brightness appears down slightly, but so are the black levels which result in a slightly better contrast ratio. Apple is also calibrating these things at the factory now so white points are now set at around 6300K vs. 7100K on the original 27-inch LED Cinema Display.
Brightness and Contrast
For brightness, black level, and contrast points, we use the same colorimeter setup described earlier. Specifically, we use an Xrite i1D2 with ColorEyes Display Pro, and take measurements at maximum and minimum brightness of white and black targets. Dynamic contrast is turned off. We also let the panels settle in for a half hour at the respective settings before taking any measurements.
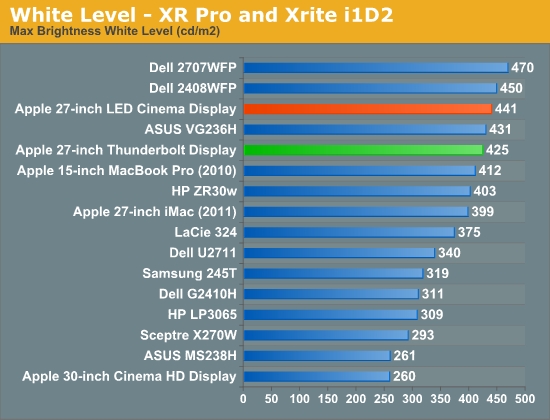
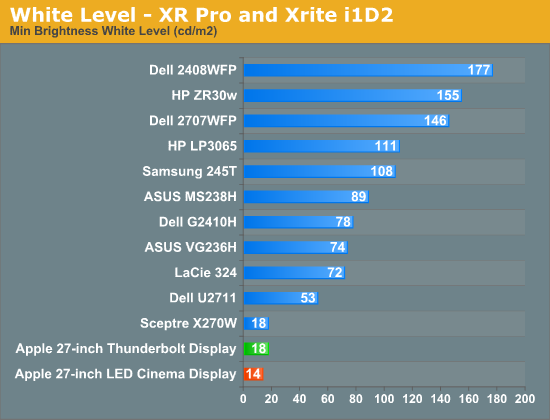
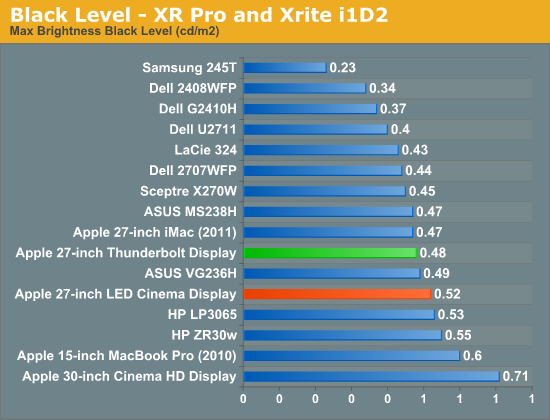
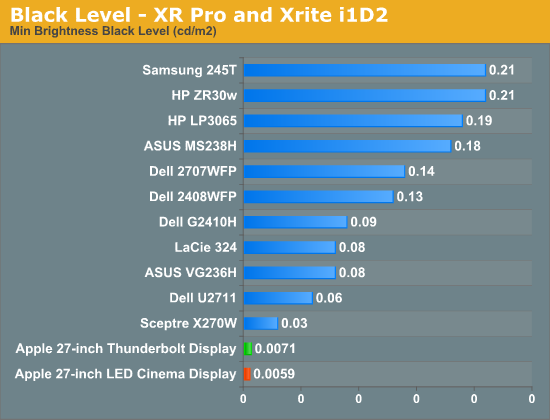
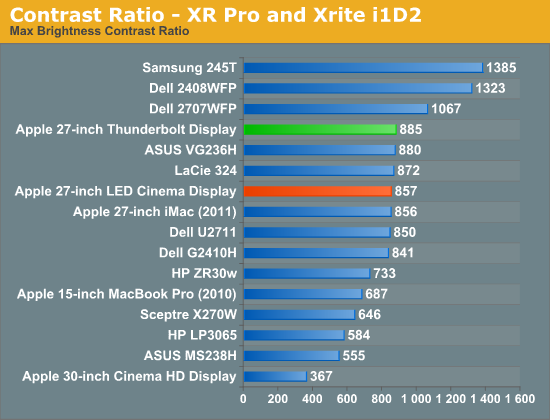
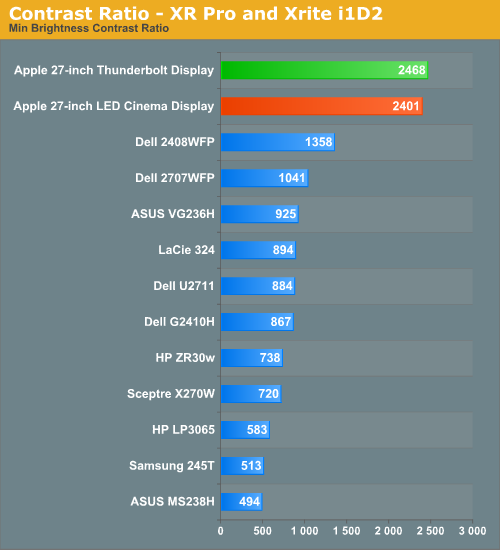
If you were expecting an change in panel quality you won't find it here. The Thunderbolt Display is almost exactly the same as last year's panel but with a bunch of new features.
Brightness Uniformity
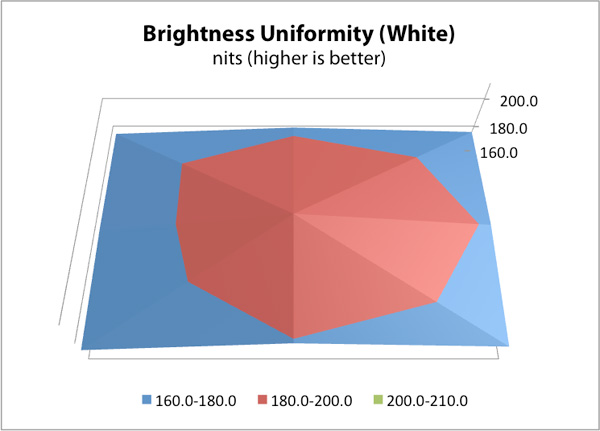
In addition to the performance at center, we’ve also added 9-point testing for brightness, both white and black. This is done the same way we measure color uniformity, except we only care about measured intensity. We set the monitor to near 200 nits, and then measure those 9 points.
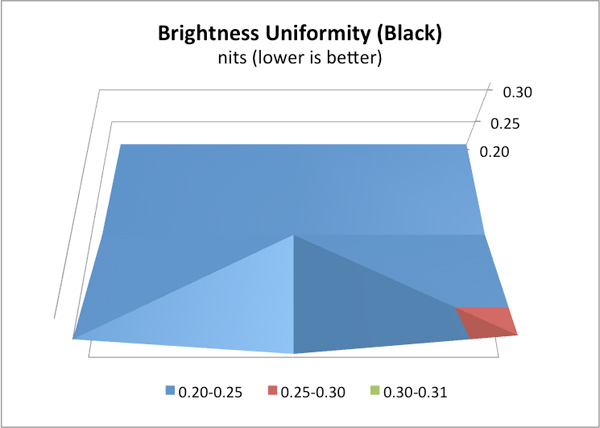
The Thunderbolt Display performed very well in these tests. The display was very consistent everywhere. Although the center of the panel measured about 8% brighter than the surroundings, it wasn't noticeable in actual use. Brightness uniformity was remarkably consistent through the majority of our measurements, even better than the original 27 we reviewed last year.
White Level Uniformity

Black Level Uniformity

Viewing Angles
The Thunderbolt Display uses an IPS panel which guarantees good horizontal and vertical viewing angles. It doesn't matter how you tilt the display or from what angle you're looking at it (within reason), you'll get a fairly consistent image.
Power Consumption
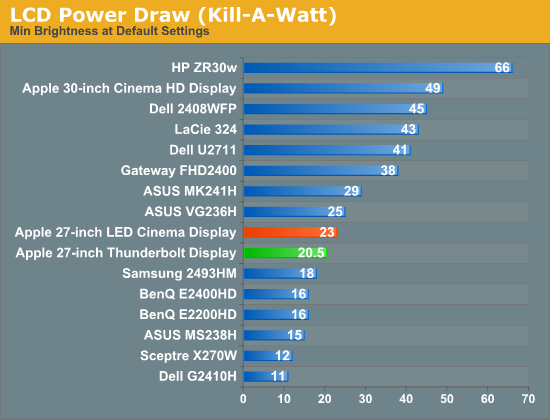
Unsurprisingly, power consumption hasn't changed much in the past year. The Thunderbolt Display draws a bit less at its dimmest setting (likely just panel efficiency variance) and draws a bit more at max brightness:
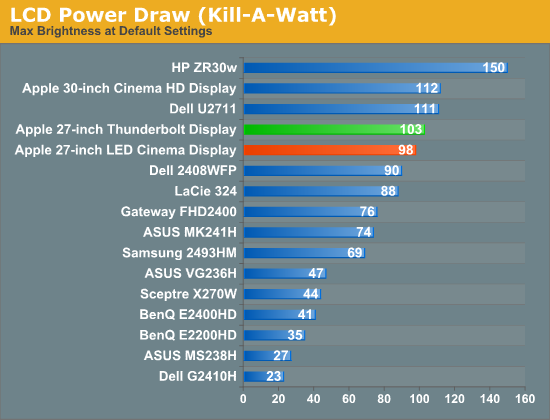
While powering a 15-inch MacBook Pro and reading data from an attached Pegasus R6 (copying to a local SSD at around 200MB/s) I measured total power consumption for the display (max brightness) at 179.6W. That number could go up if the battery in the MBP was near empty and thus being charged at a higher rate.
Multi-monitor with the Thunderbolt Display
The Thunderbolt Display has a single Thunderbolt port for daisy chaining additional devices. Each Thunderbolt port can support 7 additional devices, which means 6 devices once you connect the Thunderbolt Display. These devices can be anything Thunderbolt, however you cannot connect a DisplayPort monitor to the Thunderbolt Display directly. If you want to connect another monitor directly to the Thunderbolt Display it must be another Thunderbolt Display. To understand why, we need to look at the architecture of a Thunderbolt controller.
This is the first Thunderbolt controller Intel introduced, codenamed Light Ridge:

You see it has four Thunderbolt channels and two DisplayPort inputs. It also has a single DisplayPort output as well as a DisplayPort passthrough option. What's the difference? If there are only two devices in the chain, the computer and a DisplayPort monitor, you can use the DisplayPort passthrough option bypassing the majority of the logic entirely. This is how the 2011 MacBook Pro can connect directly to a DisplayPort display. Put a Thunderbolt device in between those two devices and you can no longer use the passthrough mode. You have to send a Thunderbolt signal to the Thunderbolt device, and it can then extract the DisplayPort signal and output it. Simply passing DisplayPort through won't work.
I originally believed Apple used the smaller Eagle Ridge controller in its Thunderbolt Display, but now believe that to be incorrect. Upon closer examination of our dissection photos it appears that the 27-inch panel is driven by an embedded DisplayPort (eDP) connection. If I'm right, that would mean the DisplayPort output from the Light Ridge controller is routed to the eDP connector in the display. With its sole DP output occupied by the internal panel, the Thunderbolt Display cannot generate any more DP signals for anything connected directly to its Thunderbolt Port.
If you connect a Mac to the Thunderbolt Display what is sent is a Thunderbolt signal. DisplayPort is broken off and sent to the display but there's no way to propagate an additional DisplayPort signal to any other non-TB displays in the chain. The output on the Thunderbolt Display is literally a Thunderbolt output, it can't double as DisplayPort.
However, if you connect another Thunderbolt device that uses Light Ridge you can split any additional DisplayPort signals out of the chain. In other words, if you connect the Thunderbolt Display to a Promise Pegasus you can then chain on another DP panel. If you own a 27-inch Cinema Display and were hoping to add the Thunderbolt Display to it on the same Thunderbolt chain, you will need another TB device in between.
There are also the obvious GPU limitations. The 13-inch MacBook Pro only supports two displays (Ivy Bridge will up this to three). If you manage to connect two to the 13 however, Apple will just blank the display on the notebook and drive the two external panels. The MacBook Air is a different story. Not only does it only support two displays, but the Eagle Ridge controller only has a single DisplayPort input so you're not driving more than one external display via a MBA no matter what you do.

I tested multimonitor functionality with a 27-inch LED Cinema Display as well as a second Thunderbolt Display. In the case of the Cinema Display, as expected, I couldn't get video out of the port on the Thunderbolt Display. Connecting the Thunderbolt Display to a Promise Pegasus and then connecting a Cinema Display to it worked however. I also woke up the MacBook Pro's internal display and confirmed that I could get all three functioning simultaneously. There's a definite slowdown in UI frame rate with two 27-inch panels being driven by the MacBook Pro's integrated Radeon HD 6750M. It's not unbearably slow but kiss any dreams of 30 fps goodbye.
I also confirmed that two Thunderbolt Displays worked on the MacBook Pro regardless of the connection configuration.
Windows/Boot Camp Experience
Thunderbolt is designed to be transparent to the OS. The Thunderbolt controller IC on each end of the chain muxes/demuxes PCIe and DisplayPort automatically, presenting the OS with just PCIe and/or DisplayPort signals depending on the hardware configuration. Intel had a slide from IDF that may explain it a bit more clearly:
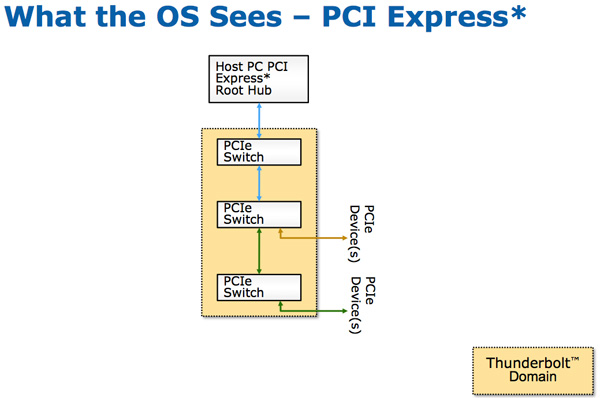
Although everything in yellow is between Thunderbolt controllers, the OS just sees a bunch of PCIe switches and devices and uses native drivers for all of them. As a result, Boot Camp works just fine with the Thunderbolt Display. If you have Apple's Boot Camp drivers installed all of the new hardware inside the Thunderbolt Display should be automatically detected (it was in my case). The major exception is the Promise Pegasus which still lacks Windows driver support, something we pointed out in our original review.
Trouble in Promise-land
What's the first thing you do when you've got a display that has tons of interfaces and bandwidth at its disposal? Try them all at once to see if anything breaks of course. Over the course of the past few days that's exactly what I did. Unfortunately I did find a situation where things broke.
For whatever reason, if you're doing a lot of writes to the Promise Pegasus while playing music (or any other constant audio) through the Thunderbolt Display's internal speakers the audio will eventually corrupt. You can hear exactly what I'm talking about below:
TB Pegasus Audio Issue by AnandTech
This is a recording taken of me listening to music on the Thunderbolt Display (via its internal speakers) while writing a couple hundred gigabytes to the Pegasus R6. Note the introduction of what can only be described as really bad noise at the 6 second marker.
If you stop music playback and quickly resume, the problem will still be there. You have to restart the application that's using the audio codec to recover from this point. From a hardware standpoint, the codec just needs to go through an off/on (sleep/wake?) cycle to return back to normal. If you do this however and haven't stopped the transfer, the problem will creep up again. Stopping the transfer while playing back music won't fix the issue either. You have to stop the transfer and restart the music playback application for it to go away.
The issue goes deeper than that. I went out and bought a Creative Labs X-Fi Go Pro USB sound card to see if the problem stopped at the internal audio codec or extended to all USB sound devices. Unfortunately, it does even happen if you're using an external USB sound card connected to the Thunderbolt Display. Connect the same sound card directly to your Mac or use your Mac's 1/8" stereo jack and the problem goes away.
I was worried that what may appear as noise through speakers could result in data corruption over USB transfers. I ran the Pegasus write test while copying a bunch of files to an SSD attached via USB to the Thunderbolt Display and never saw any corruption on the SSD. This appears to be limited entirely to audio playback.
What's truly bizarre is I can only get the issue to appear when writing to the Pegasus, hundreds of GBs of sequential reads don't seem to produce it. Short bursts of writes don't seem to cause it either. Sending tons of data across the monitor's Gigabit Ethernet, FireWire 800 and USB ports doesn't seem to trigger it either. It appears to be an issue with the Pegasus and the Thunderbolt Display. But which device is ultimately at fault? Is it a problem with the Thunderbolt Display or the Pegasus? Ideally I'd use another Thunderbolt storage device to see if the issue remained, but I couldn't get my hands on a LaCie Little Big Disk.
I thought of something else.
First I needed to test and see if perhaps the issue was related to ultra high speed transfers. As we've already shown, the Pegasus can push as much as 1GB/s over Thunderbolt whereas none of the other bandwidth eaters come even remotely close to that. To determine if the issue was data rate invariant I wrote to the Pegasus at different speeds ranging from 480Mbps all the way up to 7.2Gbps. I tried putting SSDs in the Pegasus as well as standard mechanical hard drives. The problem remained. I got audio corruption regardless of what drives were in the Pegasus or what speed I wrote to the drives. The problem wasn't related to transfer rates.
I also took apart the Thunderbolt Display to confirm there weren't any obvious issues on the controller board (E.g. putting the Thunderbolt IC far too close to the audio controller). Nothing obvious there either.
While I was doing all of this, Apple put forth a Thunderbolt firmware update the other day, however it didn't seem to address the issue either. So I went back to my testing.
Since the problem appeared regardless of how fast (or slow) I was transferring and all I needed was another Thunderbolt storage device to vindicate either the Pegasus or the Thunderbolt Display I turned to the trusty MacBook Air.
As I mentioned in our original Pegasus review, if you have two Thunderbolt equipped Macs and a Thunderbolt cable you can actually put one of the machines in target disk mode and access its drives via Thunderbolt on the remaining Mac. You don't get super high performance but you can get around 500Mbps. Since I had reproduced the audio corruption issue at an even slower data rate I decided to give this a try.
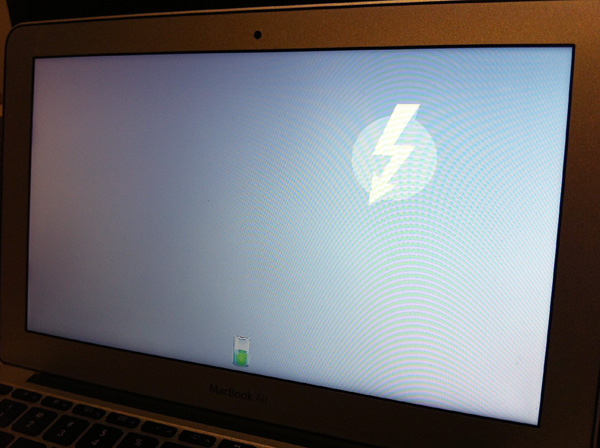
I booted the MacBook Air in target disk mode by holding down the 't' key after turning on the machine. My MacBook Pro was connected to the Apple Thunderbolt Display and a Thunderbolt cable connected the display to the MacBook Air. This was the same setup as the Pegasus, but with the MBA in place of the Pegasus.
I wrote to the MBA just like I did the Pegasus (from a file server connected over the Thunderbolt Display's GigE, transfer rates were capped at around 500Mbps from the file server). After a couple hundred gigabytes were transferred without any audio corruption I swapped out the MBA and connected the Pegasus. I copied the same files at the same rate from the same source. After no more than 7GBs were written to the Pegasus the audio stream started to corrupt.
Based on my testing I can only conclude that the Pegasus seems to be at fault here, not the Thunderbolt Display. Given that the Pegasus was introduced prior to Apple's Thunderbolt Display it's not all that surprising that this issue made it through to production. It's unclear what the root cause is but it's hopefully something Promise can address either through firmware or a driver revision.
Update: I'm still verifying that this is indeed a "fix" but it looks like if you use a USB sound card plugged into a USB hub which is then plugged into the Thunderbolt Display then the sound corruption doesn't happen. This seems to point at noisy power as being the cause with the USB hub acting as a crude filter. It's still not ideal but this may be a workaround for Pegasus users until Promise supplies a fix.
Dissection
If you haven't gathered by now, the Thunderbolt Display isn't a regular monitor - it has a lot of components inside that you'd typically only find in a full fledged computer. Being the curious cat I am, I wanted to see inside. Apple isn't too fond of us poking around inside their review samples, but luckily the Crabtree Valley Mall Apple Store just got Thunderbolt Displays in so I hopped in the practical-wagon and grabbed one in the name of science.
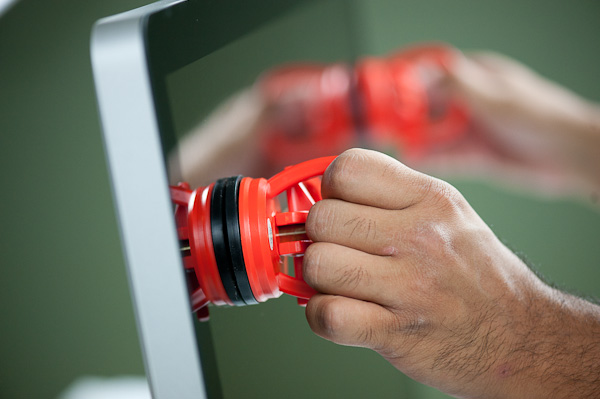
Apple has an incredible fascination with using magnets in its designs. What it enables are some pretty neat enclosures, particularly on its displays. The glass front of the Thunderbolt Display is actually identical to what's used on the 27-inch LED Cinema Display and iMac. The glass is held to the chassis via several very strong magnets. To remove the glass you'll need to use suction cups:
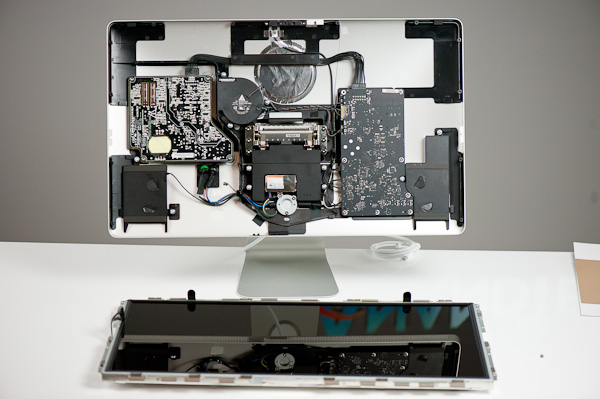
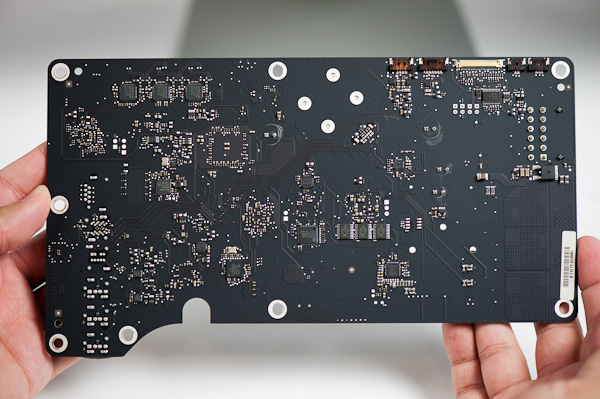
Behind the glass front is the actual LCD panel itself. The LCD and backlight are enclosed in a single unit. What we're interested in is behind the LCD however. Unplug a few cables and remove a grounding screw and the LCD unit is easily cast aside. Behind it are two discrete PCBs:
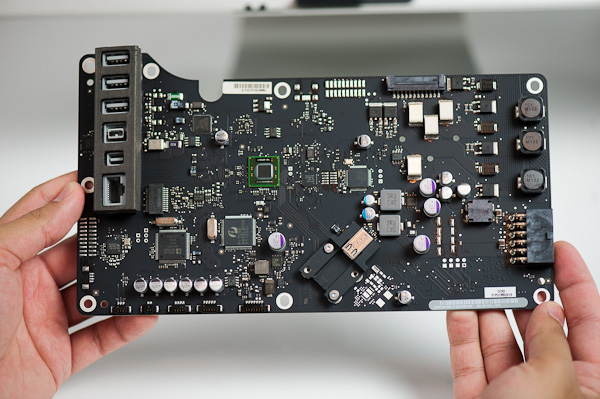
The PCB on the left is the monitor's power supply. Looking at another half-wave rectifier isn't on my to-do list this time, so we turn our attention to the right PCB. This is the board that handles all of the IO on the Thunderbolt Display. All of the screws we've removed thus far just need a T9/T10 torx bit.
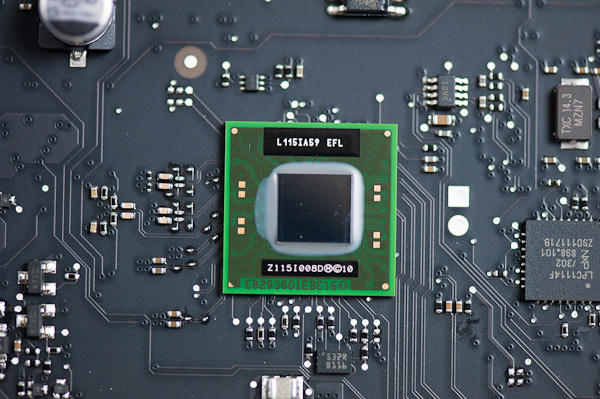
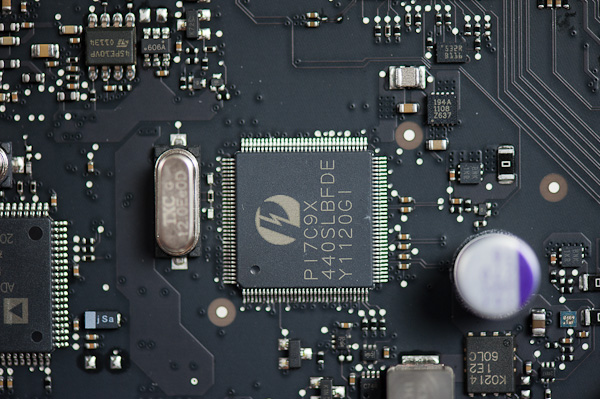
The Thunderbolt Display's motherboard is full of controllers driving all of the rear facing IO ports. Contrary to what we originally posted, I now believe this is the same Light Ridge controller we've seen on other Macs (not the MacBook Air):
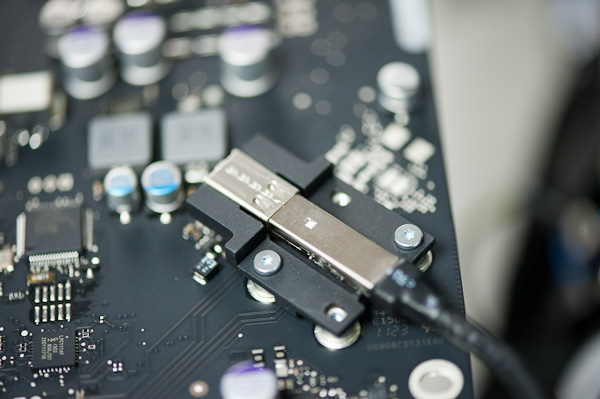
The external Thunderbolt cable actually continues inside the display and ends up at an internal Thunderbolt port. The cable terminates at the port and then is routed via traces on the PCB to the Eagle Ridge chip:
The other controllers are sprinkled around the PCB, although there's enough space between all of them to make routing nice and easy. The beauty of designing PCBs for monitors like this is you have tons of room to work with.
Pericom provides a PCIe x1 to 4-USB-port adapter on the board:
The internal speakers are driven by a combination of an ST-NXP 0161ET USB audio controller and an Analog Devices ADAV4601 audio processor. The ST-NXP controller sits on an internal USB interface, while the ADAV4601 dangles off of it.
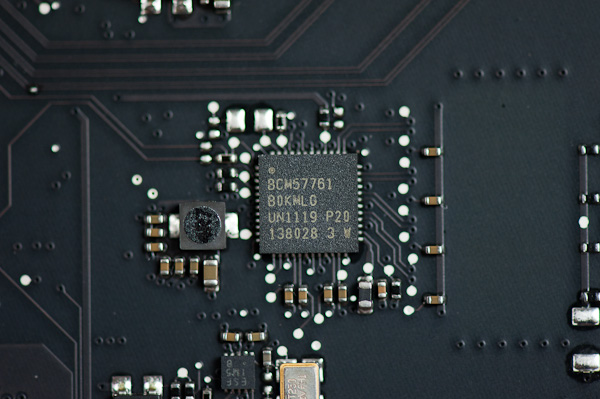
That wraps it up for the front of the PCB. Around back there's a collection of stereo amps as well as the GigE (Broadcom BCM57761) and FW800 (LSI L-FW643E-2) controllers.
There's nothing immediately apparent in the PCB design that would point to the cause of the issue we saw with the Promise Pegasus interfering with the Thunderbolt Display's USB audio controller. The root cause must be exclusive to the Pegasus.
Final Words
As a display, the Thunderbolt Display is no different than the 27-inch LED Cinema Display. You lose some of the resolution of the older 30-inch panels but you get a much more compact form factor that feels far less overwhelming on a desk. Having the 27-inch display exclusively for the past year I can honestly say that I don't miss the 30. I've mentioned before that I'm more productive on a single high resolution display vs. two lower resolution panels, the 27 continues to suit my needs very well in that regard.
Quality hasn't changed at all since the previous generation. Color temperatures are finally more reasonable out of the box thanks to Apple's pre-calibration on all panels. Brightness and contrast are both good and calibrated color quality is professional grade. Color gamut is about the only blemish, a side effect of Apple's LED backlight. If you're coming from a notebook panel however, you won't notice the difference.
The real improvements here are obviously those enabled by Thunderbolt. Apple is turning its line of displays into docks for its mobile computers rather than just external displays. It started with integrating MagSafe and has culminated in GigE and FireWire controllers now a part of the display. For MacBook Air owners who don't have options for these high speed interfaces to begin with, the Thunderbolt Display is a must-have. If your MBA is a secondary or tertiary computer that only gets taken on trips perhaps the Thunderbolt Display isn't so life changing. For those users who have moved from older MacBook Pros to the 13-inch MBA however, the Thunderbolt Display is a wonderful companion.
For MacBook Pro owners the Thunderbolt Display is more of a convenience than anything else. If you ferry your notebook between locations frequently, having to hook up only two cables vs. several is nice. I don't know how else to word this without sounding incredibly lazy (I promise I'm not), but I'm more likely to move my notebook around if I don't have to unplug/reconnect 7 cables everytime I get back to my desk.
For me the Thunderbolt Display is good but not perfect. I wish it had a 1/8" stereo output, an SD card reader and USB 3.0 support. Give me those things and I'd be ecstatic. There's always next year's model.
Promise Pegasus owners beware. If you're writing to the Pegasus while listing to music via the Thunderbolt Display you'll eventually encounter dropped/corrupted audio frames. The problem seems confined to the Pegasus, so we'll have to wait on Promise for a fix. The Thunderbolt Display itself doesn't seem to be the cause of any issues.
Even with its limitations, the Thunderbolt Display is one of a kind. I do hope it's the start of a much larger trend. Short of a CPU and memory there's a bonafide motherboard inside the Thunderbolt Display, featuring many of the components we're used to seeing inside systems but now encased in a display. Thanks to SSDs, Turbo Boost and Thunderbolt the only thing holding notebooks back from being true desktop replacements is GPU performance. Sony has already toyed with the idea of sticking a GPU in an external box connected to their notebooks, perhaps that's something we may see more of in the future.
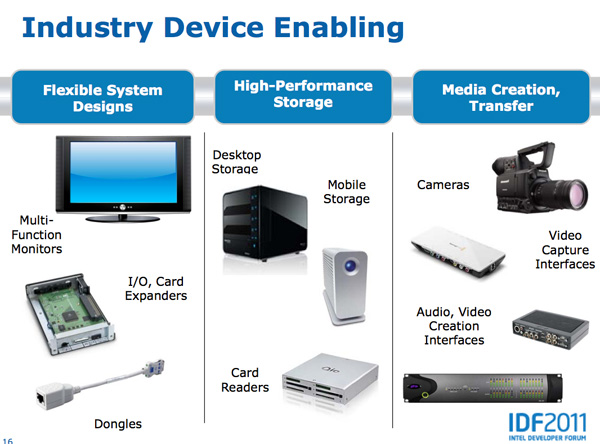
There are still significant concerns over the adoption of Thunderbolt in the future. While it may be free of royalties, there's only one company that makes Thunderbolt controllers: Intel. Not to mention the licensing fees for using the Thunderbolt logo. What made USB and PCIe successful was the ability for many companies to produce and integrate the necessary controllers. I believe we'll need to see the same from Thunderbolt for it to truly become ubiquitous.

