Original Link: https://www.anandtech.com/show/4525/thermaltake-level-10-gt-monument-to-excess
Thermaltake Level 10 GT: Monument to Excess
by Dustin Sklavos on July 26, 2011 11:50 AM EST- Posted in
- Cases/Cooling/PSUs
- Thermaltake
- Full-Tower
Introducing the Thermaltake Level 10 GT
This promised to be a good month for big stonking enthusiast-class cases, and we're delivering on the second half of our one-two punch with Thermaltake's monstrous Level 10 GT. This is the biggest, most expensive enclosure we've reviewed to date. It was one of the major centerpieces of Thermaltake's line-up back at CES, and later it showed up housing one of the most powerful gaming systems we've ever reviewed, the CyberPowerPC Gamer Xtreme FTW. Today we get to take a look at the Level 10 GT on its own and pit it against the best and brightest we've been sent so far.
When I reviewed the CyberPowerPC unit back in May, I found myself with some reservations regarding the Level 10 GT. A great many of those were ameliorated when I went to actually test that tower and found it to be a remarkably capable enclosure, able to dissipate the heat generated by a pair of GeForce GTX 590s and a massively overclocked Intel Core i7-990X without creating too much of a racket. At the very least on that front it seemed like it would be a winner, and spoiler alert: it is.
Within that review I stated that I'd come back and review the Level 10 GT on its own merits, and that's on the docket today.
| Thermaltake Level 10 GT Specifications | ||
| Motherboard Form Factor | Extended ATX, ATX, Micro ATX | |
| Drive Bays | External | 4x 5.25", 1x 3.5" |
| Internal | 5x 2.5"/3.5" (see above) | |
| Cooling | Front | 1x 200mm fan |
| Rear | 1x 140mm fan | |
| Top | 1x 200mm fan | |
| Side | 1x 200mm fan | |
| Bottom | 1x 120mm fan mount | |
| Expansion Slots | 8 | |
| Front I/O Port | 4x USB 2.0, headphone and mic jacks | |
| Top I/O Port | 2x USB 3.0, eSATA, fan controller, fan lighting toggle | |
| Power Supply Size | ATX | |
| Clearance | 13.5" (Expansion Cards), 190mm (CPU HSF), 290mm (PSU) | |
| Weight | 28 lbs. | |
| Dimensions | 23" x 11.1" x 23.2" | |
| Price | $269 | |
From the stats it's pretty easy to tell: the Level 10 GT is big. Off the cuff it looks like it retains a lot of the design and compartmentalizing cues from the original (and comically expensive) Level 10, but as we get into the review you'll see the Level 10 GT is really a very different beast.
In and Around the Thermaltake Level 10 GT
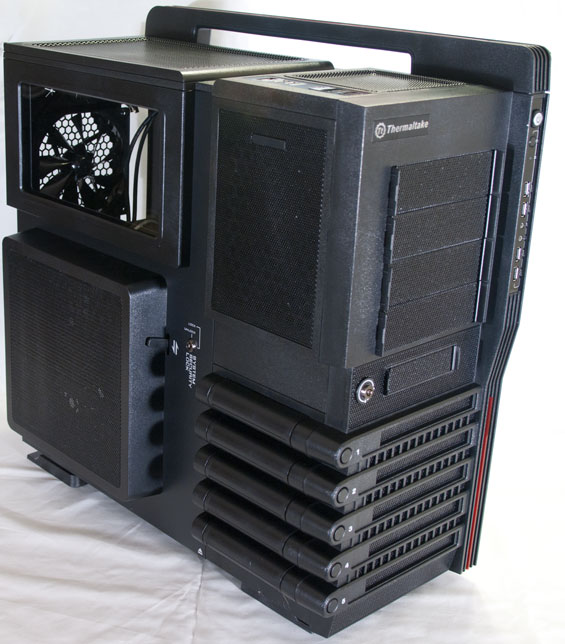
Starting this review I find myself experiencing the same issue I had when I started working on the Thermaltake Level 10 GT to begin with: where the hell do you start? But appearances can be deceiving, and once we break it down into what it really is, the whole enclosure becomes a lot easier to grok. What you're going to find is that the Level 10 GT isn't a radically redesigned ATX enclosure so much as just an ATX enclosure with tessellation turned on.
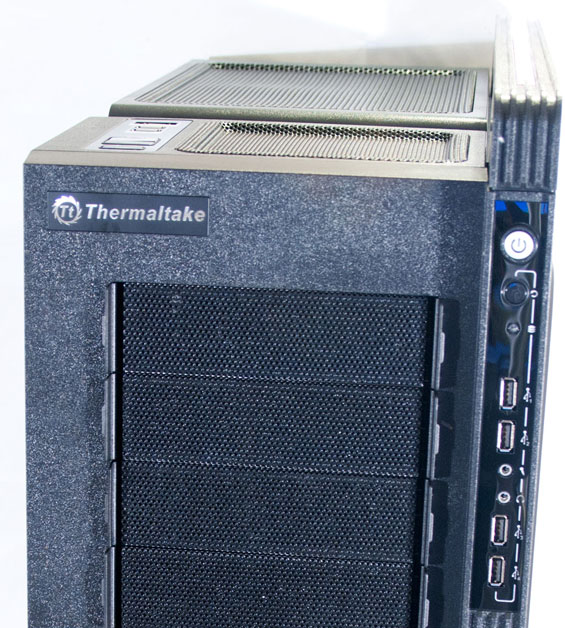
The front of the case sports four 5.25" external bays along with a single 3.5" external bay for either your archaic floppy disk drive or more likely your card reader. Given the way controls are beginning to migrate to the top of cases (a trend I'm actually a fan of), one day I'd like to see a 3.5" bay mounted vertically so the card slots would be at the top next to everything else. The Level 10 GT divides buttons and controls across the front stripe and the top of the enclosure in a way that seems like a strange compromise: the fan control, USB 3.0 ports, and eSATA port are all at the top of the case, while the audio jacks, four USB 2.0 ports, and power and reset buttons are all along the bar on the front. It's a strange orientation decision, only made stranger when you consider that the "show off" side of the Level 10 GT is on the left while these ports are on the right. Depending on where you put your desk and computer, something's going to be awkward.


On any given case, the left side is where the magic happens, and that's doubly true on the Level 10 GT. Its best and brightest user-friendly features are here, with a button that opens the hinged (and removable) side panel, a lever for directing airflow from the side intake, the window, and the five hot-swappable drive bays. The drive bays and side panel are all locked into place on shipment, and you'll need to use one of the keys (which ship attached to the back) to unlock them. There's also a rubber stopper next to the 5.25" bays that can be removed to add a removable headphone rack to the Level 10 GT, a nice convenience feature.
When you get to the back of the Level 10 GT it's business as usual, with a bottom-mounted power supply bay, eight expansion slots, and three rubber-lined grommets for water-cooling tubing.
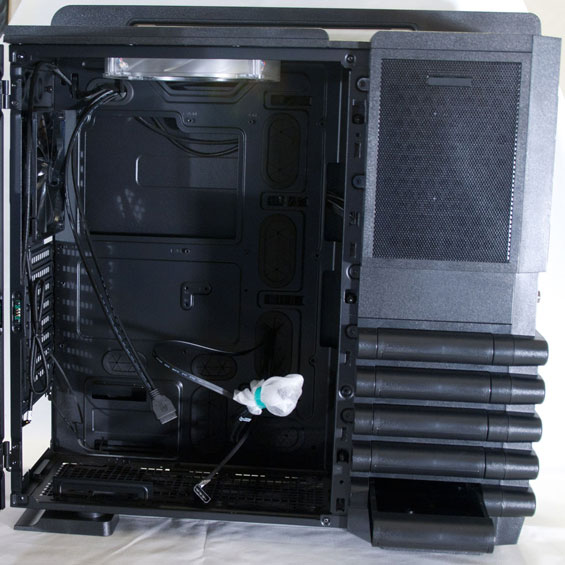
Opening up the Level 10 GT reveals what I honestly consider the major flaw of the design: it's not actually that easy to work with and it's out of the norm in ways that may not be necessary. The 5.25" drive bays aren't truly cordoned off internally like the exterior of the enclosure would have you believe, but they're basically inaccessible from the left side. Likewise, you're not going to be replacing the front 200mm intake fan any time soon, or really any of the fans except maybe the rear fan. The cabling is wrapped up within the case, and the front fan is borderline inaccessible.
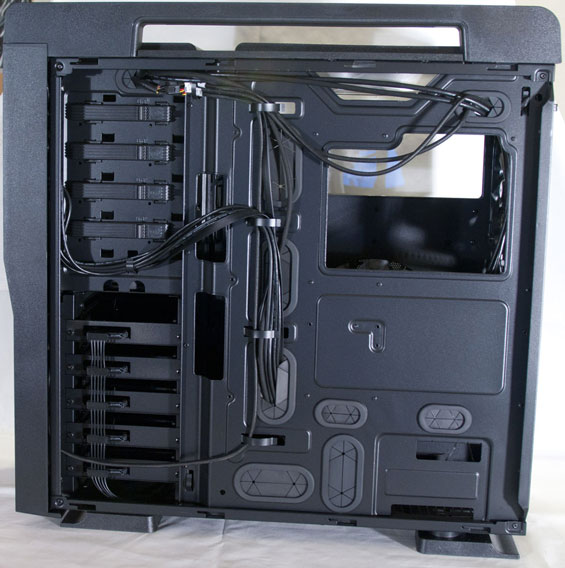
When you get around to behind the motherboard tray, you'll see a cutout for heatsink fan mounts, and all the hotswap drive bays are pre-cabled...sort of. This part is really confusing and was one of my major gripes when I reviewed the CyberPowerPC unit. Thermaltake has a power cable connected to all the bays, but leaves it to the end user to connect the SATA ports, and as a result of the SATA data cable spec's fatal flaw (loose connections), one of the drives didn't register on boot. When In-Win's $100 BUC integrates both the power and data leads and Thermaltake's case costing more than twice as much doesn't, I take issue. And given that it will take some force to replace the back panel (as it does with most cases), I worry that these cables will get knocked loose if they're not properly routed and affixed.
This is also the only side you can secure the 5.25" and 3.5" external bays on, which means they get to float free on the other side. There's a toolless clamp for the 5.25" drives and you can add an additional screw to secure them, but that doesn't make up for the lack of an easy way to secure the drives on both sides. As a result, our test optical drive felt pretty loose.
Assembling the Thermaltake Level 10 GT
When you get north of the $140/$150 price point you do start to see a lot of unusual case designs begin to surface. Making a bog standard ATX case is reasonably easy, but tweaking and changing designs in an effort to improve both aesthetics and performance does take some effort. Likewise, the end user should be prepared for a little more thought and work to go into his or her build.


The Thermaltake Level 10 GT's assembly is actually less daunting than it looks, but it can be rife with minor nuisances. The absolute first thing you're going to want to do is take the hinged side panel off, and that's done by just opening it and then lifting it off the hinge. It's nice for quick and dirty changes internally, but for anything remotely more involved like installing a motherboard or expansion card, it needs to come off.

Someone over at Thermaltake heard my prayers when it came to motherboard installation, because I didn't have to install a single standoff into the motherboard tray. The exact standoffs for a bog standard ATX board were already in place and ready to go; all I had to do was pop in the I/O shield (a slightly tighter fit than usual) and then screw in the motherboard. It was incredibly painless.
Installing a 5.25" drive is also reasonably easy, with the bay shields designed to pop out of the front by squeezing the sides. It's a little unsightly but not a deal breaker, and the 5.25" drive is then clamped into place using a toolless clamp on the other side of the case. As I mentioned on the previous page, I do take issue with this, because I found it to be fairly difficult to get our optical drive to feel fully secure in the bay. Installing an external 3.5" drive is also a little fraught, as you'll have to carefully maneuver two screws into the enclosure to secure it in the bay.
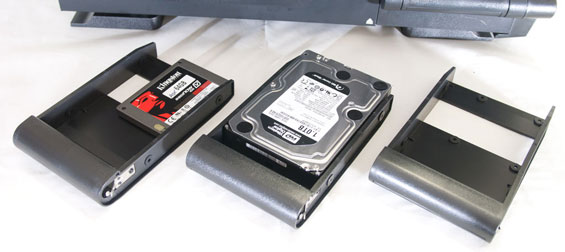
The hot-swappable 3.5" drive bays are easy enough to install into. Each tray includes rubber grommet-lined mounting holes for both 2.5" and 3.5" drives, and that's much appreciated. It highlights a reason why using drive trays in modern enclosures is such a smart idea: it makes integrating 2.5" drive support much easier.

Unfortunately, having that smooth, flat rear (heads out of the gutter, kids) around the I/O shield and expansion ports creates an issue other enclosures don't have: there needs to be a way to secure expansion card brackets while giving space to work them into place. The result is that the Level 10 GT adds an extra step: you have to remove a small plate affixed with two thumbscrews and then remove the slot covers for the expansion slots before popping in the card.
Finally, installing the power supply is fairly easy and routing cables wasn't too problematic. There's a healthy amount of space behind the motherboard tray that it can be done without too much trouble, but you're probably still going to have to squish the side panel back down and on. The only power leads the enclosure requires are a single SATA power lead for the drive bays and a molex lead for the fans; the rear fan uses its own 3-pin lead allowing it to be controlled by the motherboard. That's a detail I actually really liked: Thermaltake seemed to know exactly which fan you'd want your hardware to control.
The takeaway with assembling the Level 10 GT is simple: remove the side panels completely, and then try to approach it like a regular enclosure. It will still take a bit of time and thought, but if you're buying a $270 case that shouldn't be a problem.
Testing Methodology
For testing ATX (and larger) cases, we use the following standardized testbed in stock and overclocked configurations to get a feel for how well the case handles heat and noise.
| Full ATX Test Configuration | |
| CPU |
Intel Core i7-875K (95W TDP, tested at stock speed and overclocked to 3.8GHz @ 1.38V) |
| Motherboard | ASUS P7P55D-E Pro |
| Graphics Card | Zotac NVIDIA GeForce GTX 580 (244W TDP) |
| Memory | 2x2GB Crucial Ballistix Smart Tracer DDR3-1600 |
| Drives |
Kingston SSDNow V+ 100 64GB SSD Western Digital Caviar Black 1TB SATA 6Gbps Samsung 5.25" BD-ROM/DVDRW Drive |
| CPU Cooler | Zalman CNPS9900 MAX with Cooler Master ThermalFusion 400 |
| Power Supply | SilverStone Strider Gold 750W 80 Plus Gold |
A refresher on how we test:
Acoustic testing is standardized on a foot from the front of the case, using the Extech SL10 with an ambient noise floor of ~32dB. For reference, that's what my silent apartment measures with nothing running, testing acoustics in the dead of night (usually between 1am and 3am). A lot of us sit about a foot away from our computers, so this should be a fairly accurate representation of the kind of noise the case generates, and it's close enough to get noise levels that should register above ambient.
Thermal testing is run with the computer having idled at the desktop for fifteen minutes, and again with the computer running both Furmark (where applicable) and Prime95 (less one thread when a GPU is being used) for fifteen minutes. I've found that leaving one thread open in Prime95 allows the processor to heat up enough while making sure Furmark isn't CPU-limited. We're using the thermal diodes included with the hardware to keep everything standardized, and ambient testing temperature is always between 71F and 74F. Processor temperatures reported are the average of the CPU cores.
For more details on how we arrived at this testbed, you can check out our introductory passage in the review for the IN-WIN BUC.
Last but not least, we'd also like to thank the vendors who made our testbed possible:
Thank You!
We have some thanks in order before we press on:
- Thank you to Crucial for providing us with the Ballistix Smart Tracer memory we used to add memory thermals to our testing.
- Thank you to Zalman for providing us with the CNPS9900 MAX heatsink and fan unit we used.
- Thank you to Kingston for providing us with the SSDNow V+ 100 SSD.
- Thank you to CyberPower for providing us with the Western Digital Caviar Black hard drive, Intel Core i7-875K processor, ASUS P7P55D-E Pro motherboard, and Samsung BD-ROM/DVD+/-RW drive.
- And thank you to SilverStone for providing us with the power supply.
Noise and Thermal Testing, Stock
Given the price tag of the Thermaltake Level 10 GT compared to the much less expensive enclosures we've tested so far (it's easily at least $100 more than each), it's not unreasonable to expect it to provide performance commensurate with the increase in price. It's true there's a bling factor involved with the Level 10 GT, too, but we don't want something that's just for show.
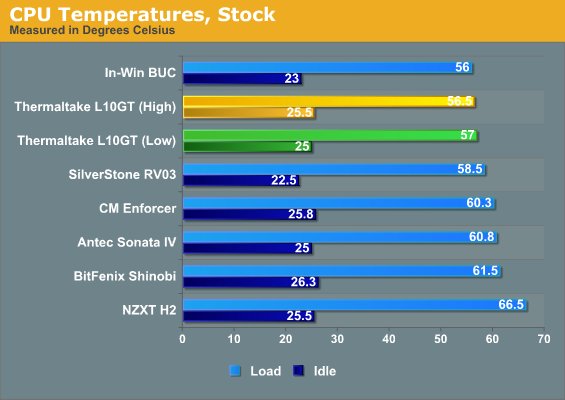


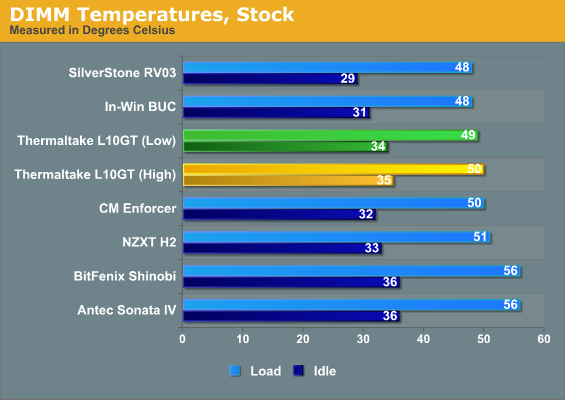
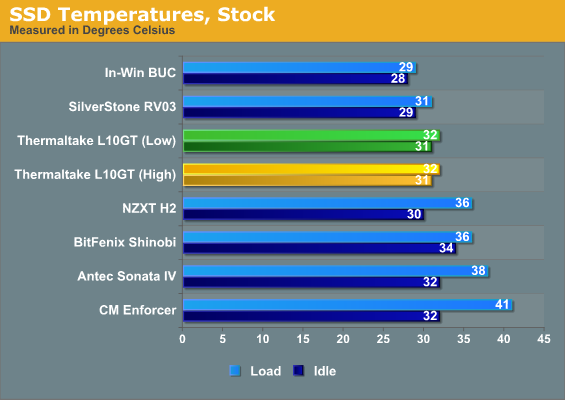
As far as temperatures go, the Level 10 GT isn't the biggest winner but it's close enough to the top that you could probably count it within the margin of error. Note that the difference in thermal performance between running the fans at low or high is minor bordering on academic. There's a second side to the thermal story of course....
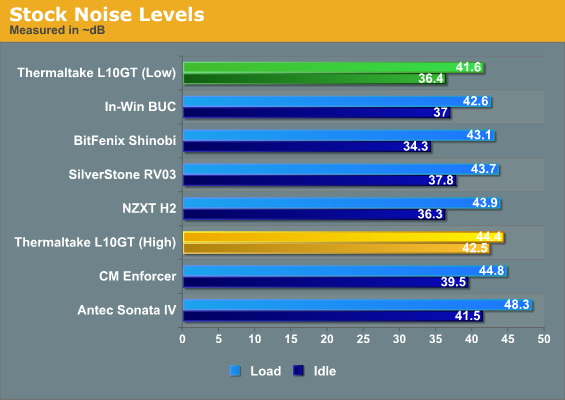
The biggest difference between the two fan settings winds up being the noise. Idle noise levels are slightly higher than the BitFenix and NZXT cases, but load noise came in at the top of the charts with the fans on low. Unfortunately, the charts don't tell the whole story, as when the Level 10 GT is loud, it's an ever so slightly high-pitched sort of loud that isn't particularly pleasant to listen to. Thankfully the Level 10 GT doesn't actually need to run at high, in which case it's one of the quietest cases we've tested, although the character of the fan noise isn't quite as low as the SilverStone Raven RV03's.
Noise and Thermal Testing, Overclocked
Nobody's going to buy a case like this just to run everything at stock. The Thermaltake Level 10 GT is made for high performance and thankfully our test bed is able to deliver. I'd like to add here, as well, that the Level 10 GT proved to be capable of handling an even greater load than this when we tested the CyberPowerPC Gamer Xtreme FTW. This is a large case with plenty of fans, designed to handle the highest-end components around.
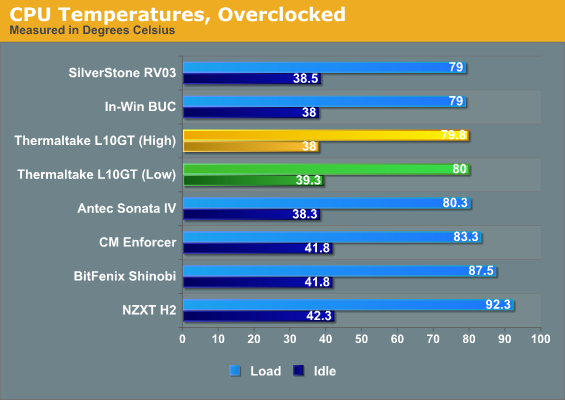
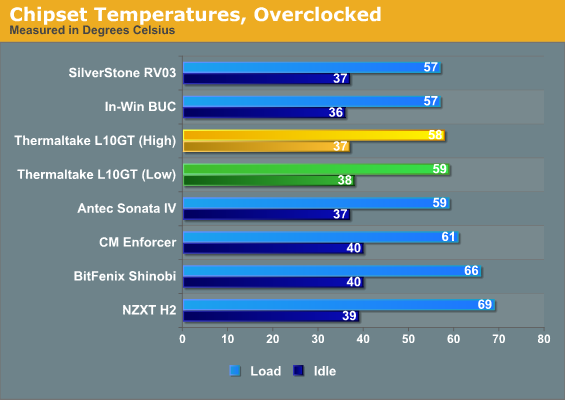
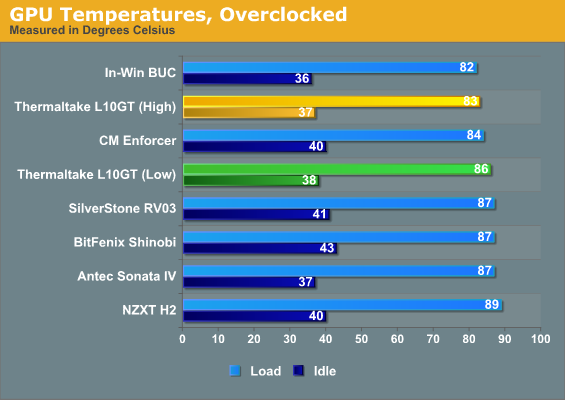
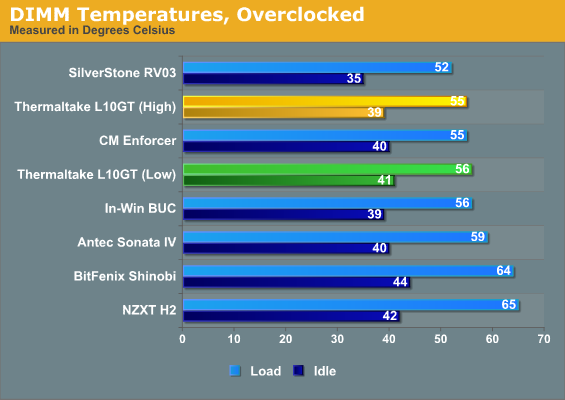
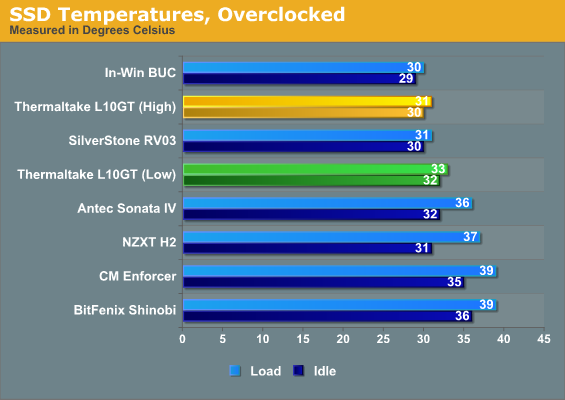
Again, the Thermaltake Level 10 GT's thermal performance isn't perfect but it's awfully close. The clumping in the CPU temperatures suggest the processor thermals are probably limited by the CPU cooler we use for our testbed. Overall the Level 10 GT's temperatures aren't the best but they're excellent across the board, but we also need to check noise levels.
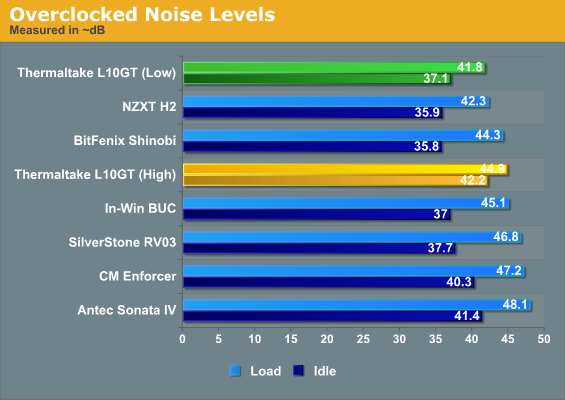
The Level 10 GT also benefits by being among the quietest cases we've tested despite handling a substantial thermal load with aplomb. You're definitely paying for the privilege, but at least we know it's not dragging its heels. Once again, though, the benefit of running the fans at high speed is minimal at best while the increase in noise is substantial. At low, the GT delivers the quietest load noise of our test group, just edging out the NZXT X2.
Conclusion: Works Great, But With Caveats
If you're looking strictly at performance, it's fair to say the Thermaltake Level 10 GT comes out a winner. Thermaltake's design marries strong heat management with some of the quietest acoustics we've tested, and that's something most of us can get behind. It proves that the enthusiast can have a case that performs well and does so without drawing attention to itself--or at least, drawing attention to itself by way of noise.
Thermaltake's aesthetic is undoubtedly going to strike some of you as being pretty ostentatious and I'm not sure I disagree. If you were interested in the way the original Level 10 looked but were unwilling to shell out the mad duckets to actually purchase one, the Level 10 GT is at least a more affordable (but still expensive) alternative. Yet the resulting case still seems to speak to a "gamer aesthetic" I'm not even sure actually exists in the marketplace, at least if our readership is anything to go on. There's a switch on the top of the case that lets you toggle the LED lighting in the fans between blue, red, green, or off, which is at least a concession to both personalization and to the users that want their enclosure to be neither seen nor heard. And while the external connectivity is fantastic, the arrangement is at least a little perplexing.
There's also the assembly. While a lot of it is painless and appreciated, like the standoffs for an ATX board being built into the motherboard tray and a decent amount of space for routing the dreaded AUX 12V line, securing external drives is more fraught than it should be, and I can't fathom why the hot swap drive bays don't have both data and power leads coming off the back of each. In-Win pulled it off in their $100 BUC and the Level 10 GT is almost three times as expensive. And then having an extra piece when you want to mount an expansion card is just a bit more irritation thrown into the mix.
Finally, there's the price tag. At $279 the Thermaltake Level 10 GT is basically a luxury item. Does it perform effiicently and quietly? Yes, it does. Does it perform to the level of $279 of efficiency and quiet? That's up for debate, and it's really going to depend on your needs as an end user as well as your personal tastes and aesthetics. Personally I find it to be a bit too heavy, ostentatious, and unwieldy, but I'm also tiny and frail, and your mileage may vary.
We have the SilverStone Fortress FT02 coming in soon, and that monster is five pounds heavier than this beast. I think that will wind up being the real test for the Level 10 GT: the FT02 is an older case, but it's also established. We'll have to wait and see, but for now we can at least give the Level 10 GT a nod of acceptance, if not outright approval.


