Original Link: https://www.anandtech.com/show/4489/promise-pegasus-r6-mac-thunderbolt-review
Promise Pegasus R6 & Mac Thunderbolt Review
by Anand Lal Shimpi on July 8, 2011 2:01 AM ESTOne by one the barriers to mobile computing have been falling. In the early days you could move to a notebook but you'd give up a lot of CPU, GPU and I/O performance. SSDs really fixed the storage performance issue (2.5" hard drives are horrendously slow compared to their 3.5" counterparts), power gating and turbo boost helped address the CPU problem and I wouldn't be too surprised to see companies have another go at external GPU solutions for those who need the added graphics horsepower.
The idea of external GPUs brings up the current limitation we face in this mobile transition. Although being more mobile is great, we still want the best of both worlds: great performance when we're at a desk, and great battery life when mobile. Enabling the former is going to require new technologies as well as new high speed interfaces.
Intel has been at the forefront of many of the successful high bandwidth interfaces in the evolution of the PC industry. Will Thunderbolt be another feather in its cap? In February we got the first Thunderbolt enabled MacBook Pros and just last week Promise shipped the first Thunderbolt enabled storage device. It's time to put the two together.
Thunderbolt Recap
At the beginning of this year Intel, alongside Apple, finally introduced a productized version of the interface we'd previously only known as Light Peak. Given that the first instantiation of this interface used traditional copper wires and not an optical interface, Apple and Intel branded it Thunderbolt.
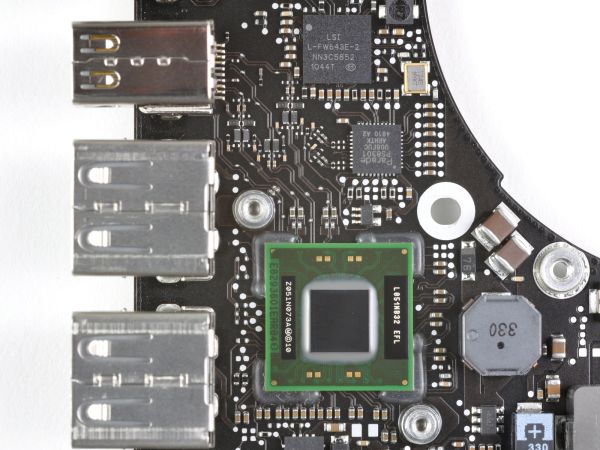
Thunderbolt Controller IC on 15" 2011 MacBook Pro - Courtesy iFixit
The interface is royalty free, although Intel is the only company that makes Thunderbolt controller needed to support the interface. There's no word on the cost of the Thunderbolt controller. Thunderbolt isn't an Apple exclusive, however we won't see PCs ship with the high bandwidth copper interface until 2012 at the earliest.
Thunderbolt is a high speed, dual-channel serial interface. Each channel is good for up to 10Gbps of bi-directional bandwidth (20Gbps total) and with two channels a single Thunderbolt link is enough for 40Gbps of aggregate bandwidth.
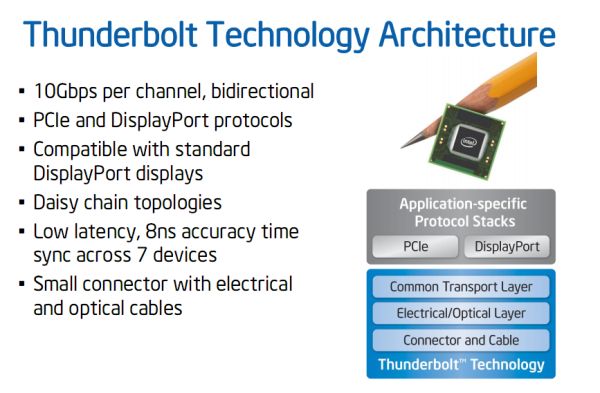
Thunderbolt can carry both PCIe and DisplayPort signaling. Apple claims that one of the channels is used for DisplayPort while the other is used for PCIe. DisplayPort interface support extends to the connector, which is physically compatible with a standard mini-DisplayPort connector. DisplayPort support is key as it allows video to be carried in addition to data, potentially allowing for some interesting use as a single cable docking solution for notebooks.
In addition to carrying up to 40Gbps of total bandwidth, a single Thunderbolt cable can also deliver up to 10W of power to connected devices.
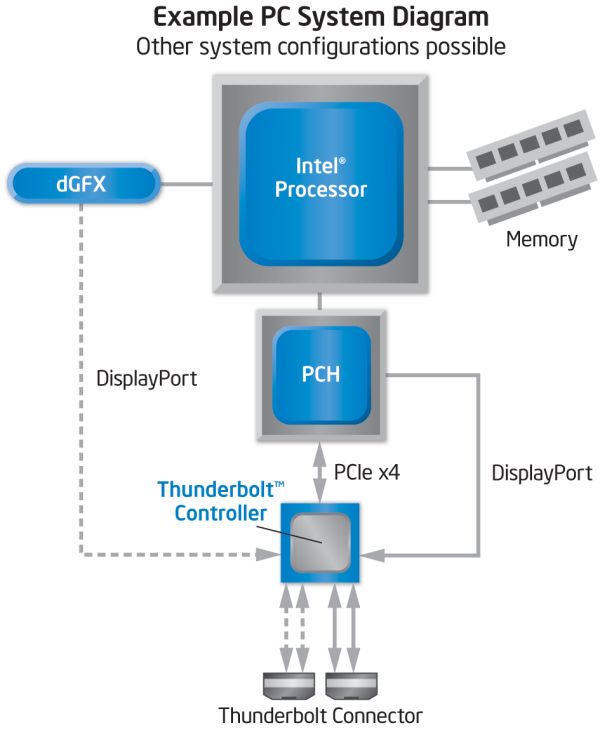
Each Thunderbolt port can drive up to 7 daisy chained devices, although all devices must share the 40Gbps (up/down) bandwidth to the host.
There's an obvious comparison to USB 3.0 which currently tops out at 5Gbps, however even it offers only 1/4 of the total available bandwidth of the Thunderbolt PCIe channel (not to mention its inability to carry DisplayPort).
The Pegasus: Hardware
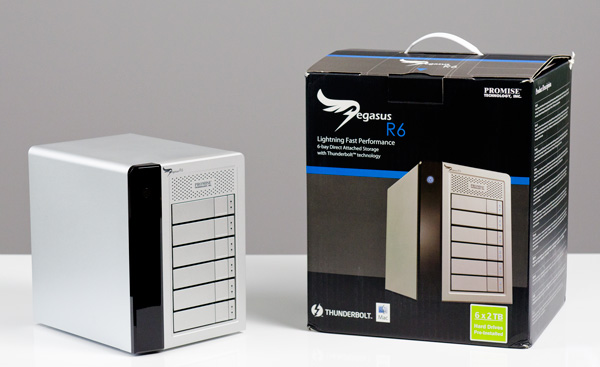
Promise offers two versions of the Pegasus: the R4 and R6. The names are easy enough to understand, they simply refer to the number of drive bays. Through Apple you can buy any of four configurations:
| Promise Pegasus Lineup | ||||||
| # of Bays | Drive Configuration | Default Capacity | Price | |||
| Promise Pegasus R4 4TB | 4 | 4 x 1TB RAID-5 | 2.7TB | $999 | ||
| Promise Pegasus R4 8TB | 4 | 4 x 2TB RAID-5 | 5.7TB | $1499 | ||
| Promise Pegasus R6 6TB | 6 | 6 x 1TB RAID-5 | 4.7TB | $1499 | ||
| Promise Pegasus R6 12TB | 6 | 6 x 2TB RAID-5 | 9.7TB | $1999 | ||
All of the configs ship with 3.5" 7200RPM hard drives and are configured as a single RAID-5 array by default, although Pegasus supports most of the common RAID formats (RAID 0/1/5/50/6/10).
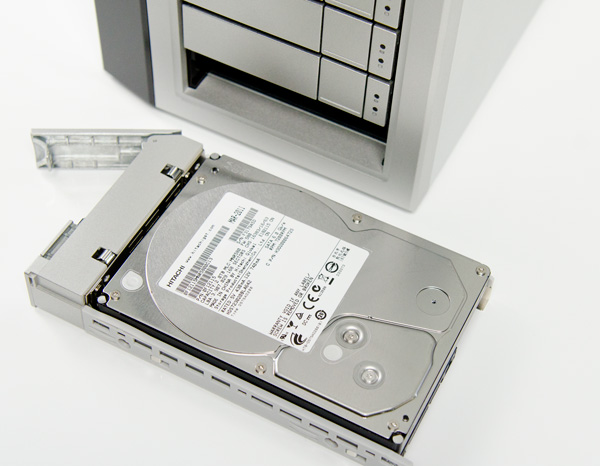
The 12TB Pegasus R6 we received for review came with 6 x 2TB Hitachi Deskstar 7K3000 drives. These are four platter drives with 64MB buffers. I did try installing Seagate 3TB drives and SandForce SF-2281 SSDs in the system, both of which worked. I did run into some reliability issues with the Pegasus R6 configured with 4 x SF-2281 SSDs, however it's unclear whether they were caused by the drives themselves, the Pegasus or a combination of the two.
Internally Promise uses a PMC Sierra PM8011 8-port SAS-2 RAID controller. This is an 8-lane PCIe Gen 2 controller with eight SAS/SATA 6Gbps ports. On the R6 obviously only six of those ports are functional. The PM8011 has an embedded 600MHz MIPS processor and is paired with 512MB of DDR2-533.
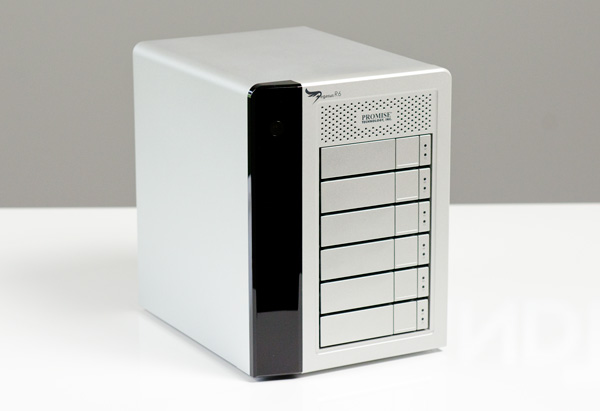
The Pegasus chassis is made out of aluminum, similar to the unibody MacBook Pro and iMac but not quite identical. The color is a bit lighter with a more coarse grain. The metal construction combined with the six 3.5" drives gives the Pegasus R6 its 20.4 lbs weight (the R4 weighs in at around 15 lbs).
The front of the chassis is pretty clean. The glossy black strip on the left of the unit is home to the power button and the two Thunderbolt indicators. There are two Thunderbolt ports on the Pegasus, one connects to your Mac while the other connects to any other DisplayPort/Thunderbolt devices in the chain. Occupy a single port and one indicator lights up, occupy both and you get two:
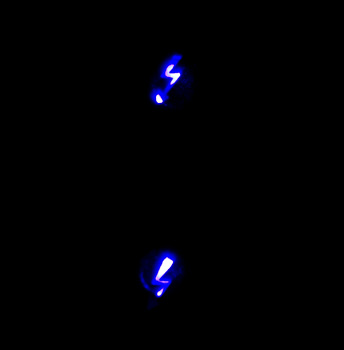
The power button burns blue when everything is functional, orange during startup and red if there's a problem with the array. Powering down the Pegasus requires that you hold the power button for ~10 seconds until the button glows red then release in order to avoid any accidental shutdowns.
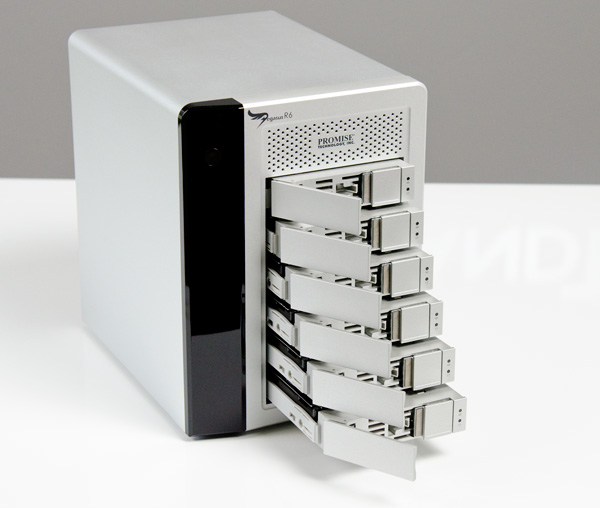
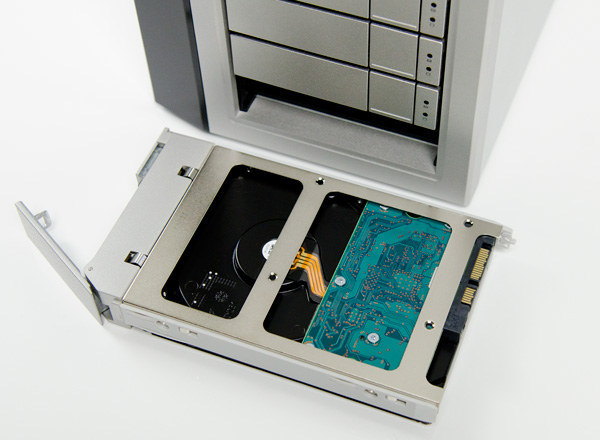
The R6 has six removable 3.5" drive bays that accept 2.5" drives as well. The screws Promise provides with the Pegasus are too large for SSDs so you'll have to supply your own if you want to replace the HDDs with SSDs down the road.
Ejecting and inserting the Pegasus' drives is incredibly smooth. There's a large square eject button on the front of each drive carrier - depress it and the handle pops out. Pull on the handle and the drives slide out perfectly. There's surprisingly little resistance to inserting the drives completely, the entire motion is just very fluid.
Each carrier has two LEDs - status and activity. Blue indicates proper operation while red indicates a problem.
The Pegasus' on-board RAID controller doesn't care about the order in which you install drives for a single array (e.g. you can swap carriers 2 & 5 and your array will still function, provided you do so while the Pegasus is powered down). Note that if you do remove more than one drives from an live RAID-5 array you'll lose all of your data, even if the array was idle when you pulled the drives. You can remove a single drive and be fine, although you'll have to resyncrhonize the array when you insert the missing drive. A full RAID-5 rebuild takes about 7 hours on the Pegasus R6. The array is still usable during its synchronization process.
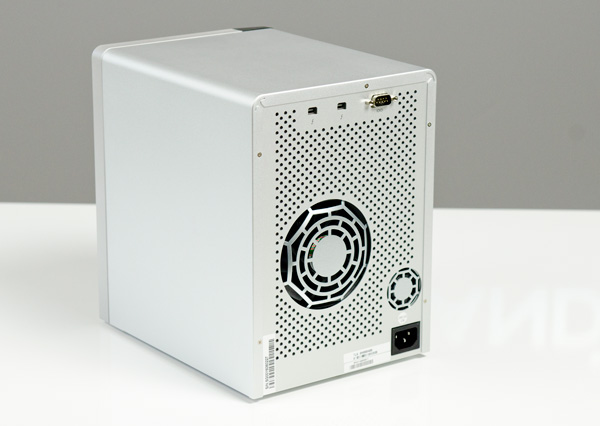
Around back there are two Thunderbolt ports and a serial port, the latter presumably for firmware updates/direct access to the on-board controller (the port is currently undocumented).
There are two fans in the Pegasus R6: a large ~100mm fan to cool all of the drive bays and a small ~40mm fan to cool the integrated PSU. The Pegasus ships with a 250W 80Plus Bronze certified power supply. The PSU isn't intended to be user serviceable and can't be removed without disassembling the Pegasus.
The Pegasus is powered by a standard 3-pin AC power connector. Promise supplies a cable although any standard PC power cable will work.
The Thunderbolt Cable
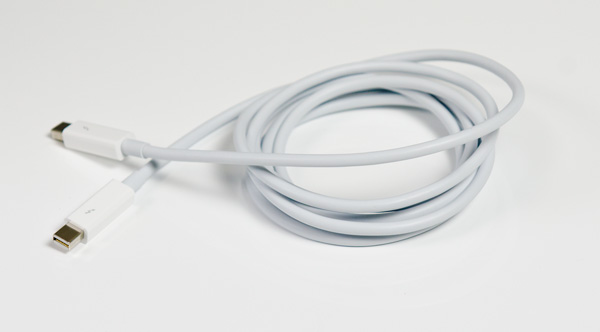
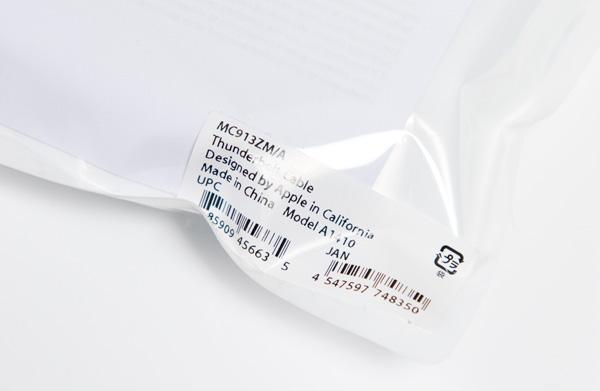
Despite the $999 - $1999 price tag of the Promise Pegasus, it does not ship with a Thunderbolt cable. Apple currently offers a 2 meter long Thunderbolt cable for $49. As iFixit discovered this is an active cable with a Genum GN2033 transceiver in each connector:
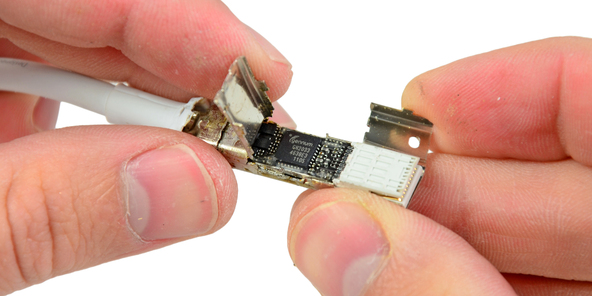
Gennum GN2033 Transceiver in Apple's Thunderbolt cable - Image Courtesy iFixit
Thanks to all of the added components in the cable each connector is approximately 50.8mm long, much longer than the end of a standard DisplayPort cable.
The Genum transceiver and auxiliary components do generate heat under load. Using an IR thermometer I measured a connector surface temperature of 27.6C at the end plugged into my test MacBook Pro. The end plugged into the Pegasus R6 was warmer (presumably because of its close proximity to the drive cage) at 32.9C. Neither is too hot to handle but both are warmer than you typically expect from a cable plugged into the side (or back) of your computer.
The Pegasus: Software
The Pegasus ships fully functional from the factory, but you'll need to do a couple of things to your Mac before the first Thunderbolt device on the market will just work. First, the Pegasus (or any TB device) will only work on a 2011 MacBook Pro or 2011 iMac as those are the only two systems on the market today with an integrated Thunderbolt controller. Apple is widely expected to introduce a new Mac Pro and maybe even a new MacBook Air with Thunderbolt support, but for now you need a 2011 MBP or iMac.
![]()
If you have one of those two systems you'll need two software updates. The first is the Mac Thunderbolt Firmware Update and the second is Mac OS X 10.6.8 (or later, Lion is supported). With both software updates installed, simply plug in a Thunderbolt cable and you'll be greeted with a Promise RAID icon on your desktop.
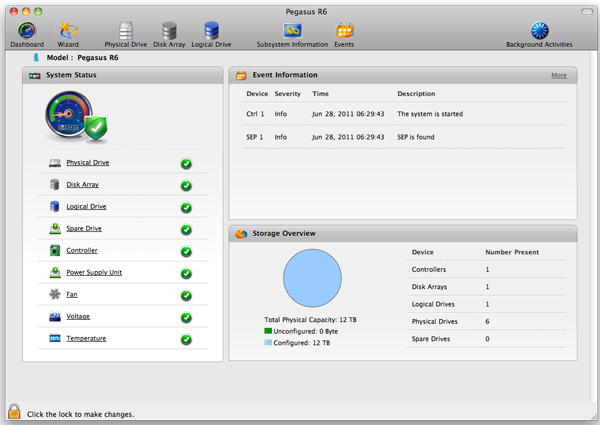
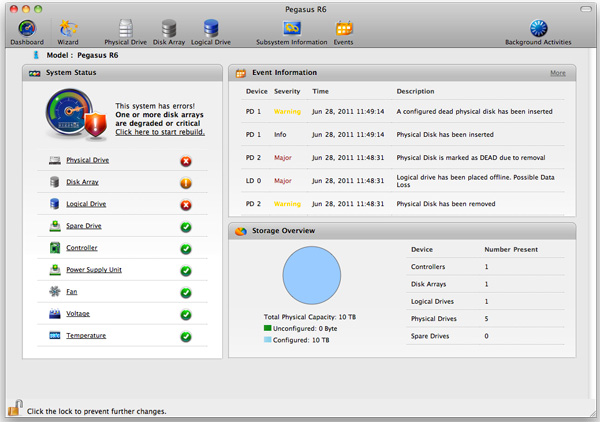
The bundled Promise Utility gives you full control over the Pegasus including reporting on drive/array health:
The major functions of the Promise Utility are pretty self explanatory. The Dashboard is the home screen of the application, it gives you a quick look at the current status of your drives/arrays (e.g. green for good, yellow for caution, red for major issue):
By default the Pegasus ships in a RAID-5 configuration with either 4 or 6 drives depending on whether you bought an R4 or R6 model. The RAID-5 array is configured with a 128KB stripe size and 512-byte sector size. This generally offers the best balance of redundancy and performance for most users, however if you'd like to delete it and start anew you can.
The wizard gives you one click array creation if you don't want to deal with adjusting things like stripe and sector sizes. There are varying levels of advanced array creation, or you can always go full manual.
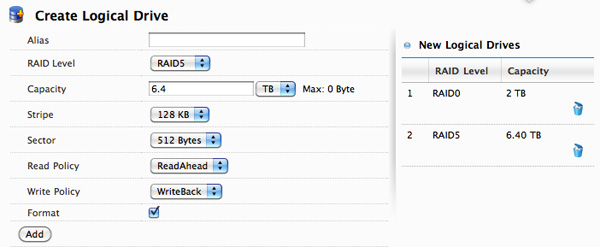
You can choose any combination of drives in the Pegasus to be included in a disk array. From there you can partition the aforementioned disk array into any valid RAID array(s) you'd like. For example, you can choose to include all 6 drives in an array and from there create a 2TB RAID-0 and use the remaining space as a 6.4TB RAID-5. Alternatively, you can use five drives in an array and use one as a hot spare. Finally you can choose to only use some of the drives in an array and leave the remaining drives in pass-through mode, accessible outside of any RAID arrays.
Any drives you don't include in the drive array can be set as spares.
The table below shows you the options you have when creating a custom drive array on the Pegasus (I've highlighted the defaults):
| Promise Pegasus Array Creation Options | ||||
| Item | Options | |||
| RAID Level | RAID0, RAID1E, RAID5, RAID6, RAID10, RAID50 | |||
| Stripe | 64KB, 128KB, 256KB, 512KB, 1MB | |||
| Sector | 512 Bytes, 1KB, 2KB, 4KB | |||
| Read Policy | ReadCache, ReadAhead, No Cache | |||
| Write Policy | WriteThru, WriteBack | |||
All major configuration changes require that you type the word "confirm" before proceeding, a nice way to ensure you don't accidentally delete something.

The Promise Utility reports on both array and drive level events. It'll tell you basic things like whether or not your current array is healthy or down a drive. At the drive level you do get basic SMART reporting including temperature and health status. You also have the option of dumping an advanced SMART log to a text file which includes the drive vendor specific SMART attributes and their current, worst and threshold values:

In the utility's physical drive list you can locate any drive in the Pegasus array. Hitting the locate button will cause the corresponding identify LED to blink on the Pegasus.
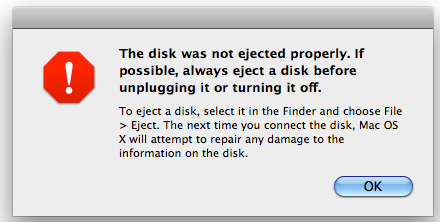
Like any other array under OS X, you do have to manually eject any volumes before unplugging the Thunderbolt cable or powering down the Pegasus. Failing to do so will give you this all-too-familiar error:
The Pegasus: Quirks
I did encounter occasional glitches with the Promise Utility. No show stoppers, but annoying nonetheless. Sometimes when deleting a logical drive I'd get an error telling me that the delete operation failed (even though it didn't):

Refreshing the logical drive page revealed that the drive had been deleted, despite the warning.
Sometimes various fields will be populated with not a number (NaN) instead of the actual data itself. Just as before, refreshing the page in question usually cleared the problem:

The Pegasus itself was most problematic when operating at or near its capacity. In one case I tried filled a 10TB RAID-5 array with 10TB of data. Rather than copy a bunch of large files over and over again, I used Iometer to generate a single 10TB file on the drive. Somewhere around the 9TB marker Iometer stopped writing to the drive. Mac OS X reported a single 10TB file on disk but the actual file was under 9TB in size leaving over 1TB of free space on the drive. I force quit Iometer and tried writing to the drive manually. At this point the drive became incredibly slow to respond. I tried canceling the copy but Finder crashed under OS X. The Pegasus itself actually hung and refused to power down, I had to pull the plug on the device in order for it to power cycle. When I plugged it back in the R6 wouldn't appear under OS X. I had to pull two drives to break the RAID-5 array then delete/recreate the array to get it working again. Of course I lost all of the data I wrote to the drive, thankfully it was just a bunch of repeating bytes created by Iometer. I attempted the same thing again (twice) and couldn't duplicate the issue. I'm going to assume this was an Iometer related issue (or a problem with creating a single ~9TB file on the array), but it's worth disclosing regardless.
The only other time I had an array go bad was when I swapped in four SandForce SSDs and created a giant RAID-0 array. One of the drives simply dropped out of the array, forcing me to delete and recreate the array. As I mentioned earlier, I can't be entirely sure if this is a Promise issue, SandForce issue or a little of both. I never had a drive mysteriously disappear when using the Hitachi drives that came with the Pegasus however.
Other than the issues I've mentioned here, I didn't encounter any problems during my testing of the Pegasus R6.
The Pegasus: Performance
A single 2TB Hitachi Deskstar 7K3000 is good for sequential transfer rates of up to ~150MB/s. With six in a RAID-5 configuration, we should be able to easily hit several Gbps in bandwidth to the Pegasus R6. The problem is, there's no single drive source that can come close to delivering that sort of bandwidth.
Apple sent over a 15-inch MacBook Pro with a 256GB Apple SSD. This was the first MacBook Pro I've ever tested with Apple's own SSD, so I was excited to give it a try. The model number implies a Toshiba controller and I'll get to its performance characteristics in a separate article. But as a relatively modern 3Gbps SSD, this drive should be good for roughly 200MB/s. Copying a large video file from the SSD to the Pegasus R6 over Thunderbolt proved this to be true:
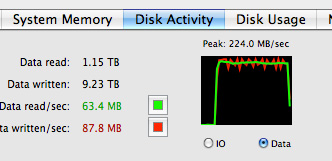
Apple's SSD maxed out at 224MB/s to the Thunderbolt array, likely the peak sequential read speed from the SSD itself. Average performance was around 209MB/s.
That's a peak of nearly 1.8Gbps and we've still got 8.2Gbps left upstream on the PCIe channel. I needed another option.
Without a second Thunderbolt source to copy to the array at closer to the interface's max speed, we had to generate data. I turned to Iometer to perform a 2MB sequential access across the first 1TB of the Pegasus R6's RAID-5 array. I ran the test for 5 minutes, the results are below:
| Promise Pegasus R6 12TB (10TB RAID-5) Performance | ||||||
| Sequential Read | Sequential Write | 4KB Random Read (QD16) | 4KB Random Write (QD16) | |||
| Promise Pegasus R6 (RAID-5) | 673.7 MB/s | 683.9 MB/s | 1.24 MB/s | 0.98 MB/s | ||
The best performance I saw was 683.9MB/s from our sequential write test, or 5471Mbps. Note that I played with higher queue depths but couldn't get beyond these numbers on the stock configuration. Obviously these are hard drives so random performance is pretty disappointing.
That's best case sequential performance, what about worst case? To find out I wrote a single 10TB file across the entire RAID-5 array then had Iometer measure read/write performance to that file in the last 1TB of the array's capacity:
| Promise Pegasus R6 12TB (10TB RAID-5) Performance | ||||||
| Sequential Read (Beginning) | Sequential Write (Beginning) | Sequential Read (End) | Sequential Write (End) | |||
| Promise Pegasus R6 (RAID-5) | 673.7 MB/s | 683.9 MB/s | 422.7 MB/s | 463.0 MB/s | ||
Minimum sequential read performance dropped to 422MB/s or 3.3Gbps. This is of course the downside to any platter based storage array. Performance on outer tracks is much better than on the inner tracks, so the more you have written to the drive the slower subsequent writes will be.
At over 5Gbps we're getting decent performance but I still wanted to see how far I could push the interface. I deleted the RAID-5 array and created a 12TB RAID-0 array. I ran the same tests as above:
| Promise Pegasus R6 12TB (10TB RAID-5) Performance | ||||||
| Sequential Read | Sequential Write | 4KB Random Read (QD16) | 4KB Random Write (QD16) | |||
| Promise Pegasus R6 (RAID-5) | 673.7 MB/s | 683.9 MB/s | 1.24 MB/s | 0.98 MB/s | ||
| Promise Pegasus R6 (RAID-0) | 782.2 MB/s | 757.8 MB/s | 1.27 MB/s | 5.86 MB/s | ||
Sequential read performance jumped up to 782MB/s or 6257Mbps. We're now operating at just over 60% of the peak theoretical performance of a single upstream Thunderbolt channel. For a HDD based drive array, this is likely the best we'll get.
To see how far we could push things I pulled out all six drives and swapped in four SF-2281 based SSDs. To really test the limits of the interface I created a 4-drive RAID-0 array sized at only 25GB. This would keep drive performance as high as possible and reduce the time required to fill and test the drives.
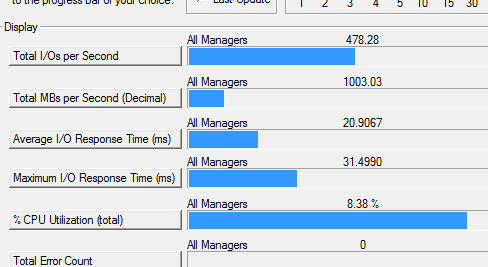
Unlike the hard drive based arrays, I had to take the queue depth up to 16 in order to get peak performance out of these SSDs. The chart below shows all of my performance attempts:
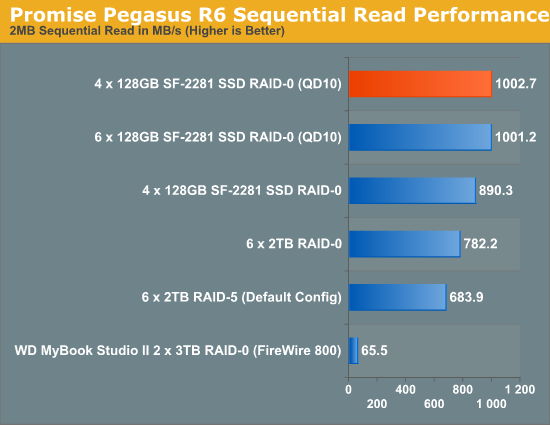
With highly compressible data, I managed to get just over 1000MB/s (8021Mbps to be exact) to the 4-drive SF-2281 Pegasus R6. Note that this isn't a shipping configuration, but it does show us the limits of the platform. I'm not entirely convinced that we're limited by Thunderbolt here either - it could very well be the Pegasus' internal controller that's limiting performance. Until we get some other Thunderbolt RAID devices in house it's impossible to tell but at around 8Gbps, this is clearly an interface that has legs.
It's Bootable

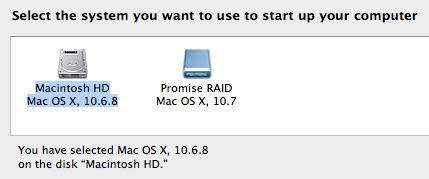
With the Thunderbolt firmware update installed on your MacBook Pro or iMac, the Promise Pegasus is a bootable device. You can install OS X to it and select it as a boot device either at startup (hold down option) or through OS X's Startup Disk preference pane:
I would still recommend using a single SSD to boot from. Even in a 6-drive RAID-0 configuration you get much better small file random read/write performance from a single SSD. As a result you get better boot and application launch times. Although sequential performance is far better on the Promise array.
Power, Thermals & Noise
With six 3.5" 7200RPM drives inside, the Pegasus R6 consumes a decent amount of power. At idle a fully configured R6 draws around 64W of power at the wall. Under maximum load I saw just under 70W on our power meter.
| Power Consumption Comparison | |||||
| Idle | Sequential Write | Random Write | |||
| Promise Pegasus R6 (6 x 2TB RAID-5) | 64.3W | 69.1W | 68.1W | ||
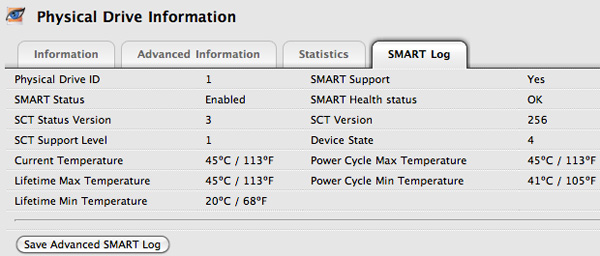
The single 100mm fan tasked with cooling all six drives does a good job. Even after writing 10TB of data to the RAID-5 array for nearly 8 hours the highest temperature of any drive in the Pegasus was 45C. Under load the drives tend to stay in the 41 - 45C range and the fan likes to spin at 1200 RPM.
The fans are the loudest part of the Pegasus R6. While you can hear the 7K3000s spin up, random and sequential accesses are typically quiet. The noise level at my desk is around 43dB, with the Pegasus R6 running it peaks at 48dB with all of the drives crunching and idles at 47dB. The Pegasus is by no means silent - it definitely adds low fan noise to your environment.
Target Display Mode with an iMac
In our 2011 iMac review I mentioned that you could use the new iMac as an external display if, and only if, you had a Thunderbolt cable connecting it to a 2011 MacBook Pro. When I reviewed the iMac, you couldn't buy a Thunderbolt cable. Now you can.
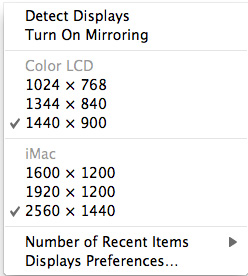
The process is pretty simple. Just connect any 2011 MacBook Pro to any 2011 iMac via a Thunderbolt cable. Hit Cmd + F2 on the iMac's keyboard and boom, your brand new iMac is now a secondary display for your MacBook Pro. Note that you need a modern Apple keyboard for this to work. Older Apple keyboards and some non-Apple keyboards won't send the right key code and will refuse to activate target display mode on the iMac.
 |
 |
The iMac has to be fully powered on when this happens. You do lose all keyboard/mouse support on the iMac, however the machine doesn't go to sleep when in this mode - it'll remain on, although likely in a low power state. Any applications you have open on the iMac will remain open. Any music playing on the iMac will continue to play and you don't get use of the iMac's speakers from your MacBook Pro.
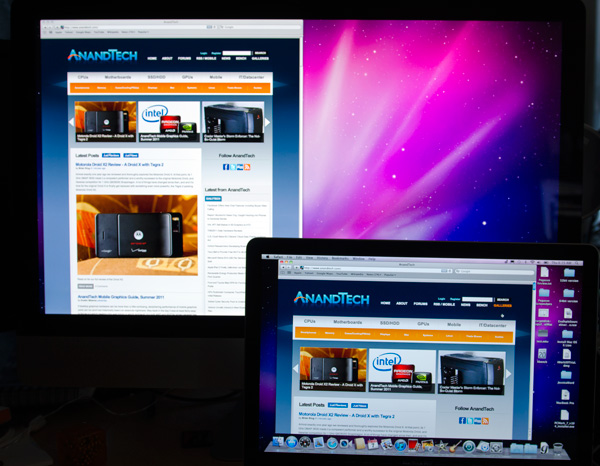
15-inch MacBook Pro (2011) + 27-inch iMac (2011) running in Target Display Mode
For 2011, this is admittedly an odd usage model. I'm not sure how many people want to connect their brand new MacBook Pro to a brand new iMac and use the latter as just a display. Down the road I can see this being a good feature as it lets you upgrade to faster MacBook Pros and still use your iMac as a larger display if you'd like.
I would prefer it if the iMac allowed itself to boot into a minimal environment where only the display and necessary ICs were powered, leaving the CPU, GPU, hard drive and the rest of the system mostly powered down. I suspect Thunderbolt complicates this as the controller needs a number of components powered up before it'll function. Perhaps future versions of the iMac can find a way around this limitation however.
Target Disk Mode
Another use of Thunderbolt is Target Disk Mode. Connect any two 2011 iMacs, 2011 MacBook Pros or any combination of the two with a Thunderbolt cable, reboot one of them while holding down the T key and you'll boot into target disk mode.
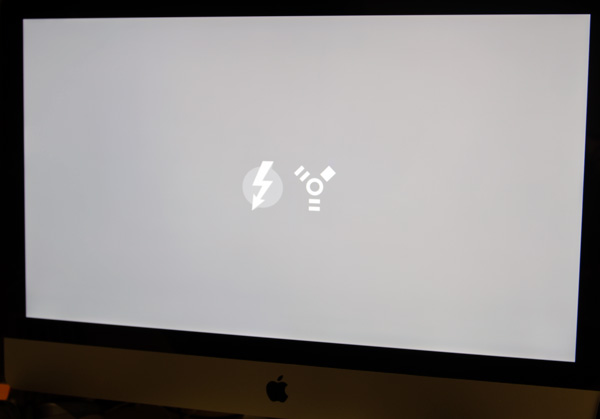
Hold down T and you'll get both Thunderbolt and FireWire logos at boot
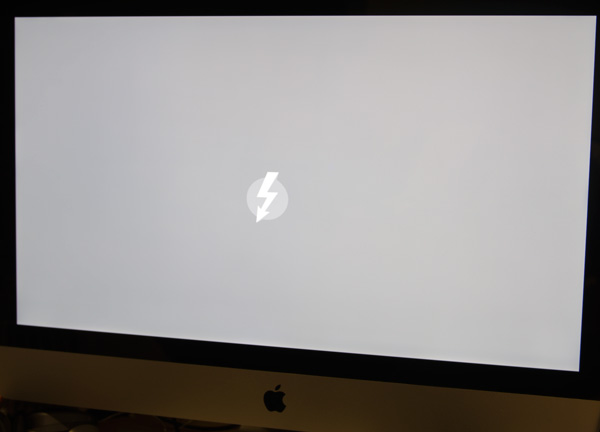
With only Thunderbolt connected, the FireWire logo disappears - you're now in Target Disk Mode over TB
In this mode the target Mac boots into a special EFI state that allows all of its drives (HDDs, SSDs, optical, anything connected to the computer) to be mounted by the host Mac. The drives appear like normal removable disks on the host Mac:
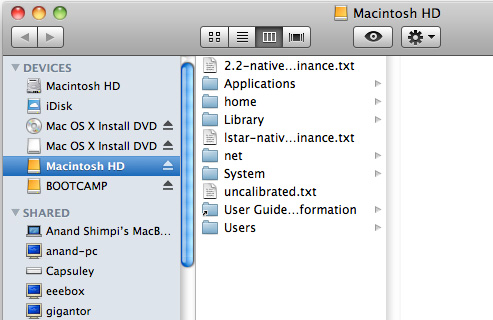
MacBook Pro accessing the iMac's sole HDD over Thunderbolt in Target Disk Mode
You even have to eject them all manually before turning off the target Mac.
Don't get too excited though, since the target Mac isn't running full blown OS X it only implements basic storage drivers and optimizations. As a result, peak performance is no where near what Thunderbolt is capable of. Regardless of whether I put the 15-inch MacBook Pro or 27-inch iMac in target disk mode, I never saw more than 61MB/s from the target.
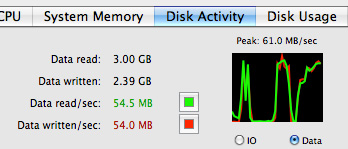
Performance was erratic as well. Sometimes I'd see transfer rates drop all the way down to 9MB/s before jumping up to 30MB/s and then 60MB/s. On average I'd say I saw transfers around 40MB/s.
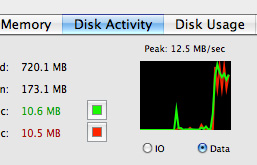
The functionality is great, however I believe target disk mode would be a killer feature of Thunderbolt if it could operate at peak performance. In its current implementation, it's faster than a WiFi transfer but a bit slower than a good Gigabit Ethernet network transfer. If we could get line speed transfers, being able to move data between two modern Macs at multiple Gbps would be great.
DisplayPort Passthrough
The Pegasus has two Thunderbolt ports. You can use the second port to daisy chain up to six Pegasus devices together, for up to 36 drives. With a single Pegasus in its default configuration able to hit over 5Gbps, you'd definitely run into bandwidth limitations with six of these things. But you could get by with two and not be limited by Thunderbolt.
There's another role that second Thunderbolt port can play: as a DisplayPort output. Remember both PCIe and DisplayPort are carried on a single Thunderbolt cable, the latter occupying half of the 40Gbps of total bandwidth available.
At the end of a Thunderbolt chain you can insert a miniDP display, currently the only option is the 27-inch LED Cinema Display but in theory other panels that accept a miniDP input could work as well.
I connected a 27-inch Cinema Display through the Pegasus without any problems. The Pegasus does have to be on for you to get video however, so if you ever have to shut down the Pegasus you do lose video to the Cinema Display.
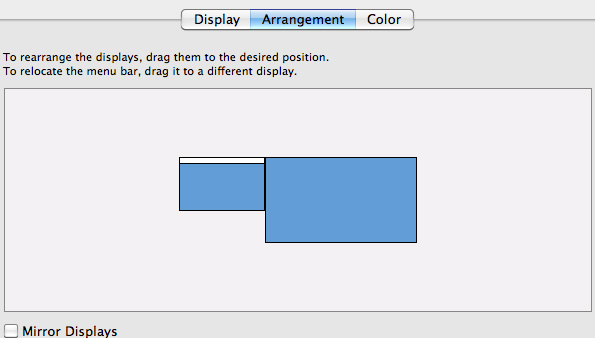
Audio still works, so you'll see the Cinema Display as an audio device on your Mac:

The experience is pretty seamless overall.
I ran a quick test to see if I lost any bandwidth to the Pegasus with the 27-inch Cinema Display in the chain. I measured a slight performance drop (< 3%) in the best case scenario of four SF-2281 SSDs in a RAID-0 array on the Pegasus, but nothing substantial at all. Note that simply displaying an image at 60Hz on the 27-inch Cinema Display requires over 6.75Gbps of bandwidth (because of 8b/10b encoding), so a full Thunderbolt channel is necessary for DisplayPort (although admittedly it only needs to be unidirectional bandwidth).
| Thunderbolt PCIe + DP Bandwidth Test | ||||
| 2MB Sequential Write, QD16 | No DisplayPort Passthrough | 27-inch Cinema Display Connected | ||
| Promise Pegasus R6 (4 x SF-2281 SSDs, RAID-0) | 1002.7 MB/s | 988.2 MB/s | ||
Windows Support
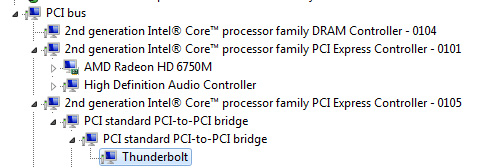
I've got good news and bad news for Windows 7/Boot Camp users. If you're using the Pegasus as a pass through for a 27-inch Cinema Display, your monitor will still work under Windows 7. Unlike what we saw when Apple first introduced the MacBook Pro, there's now a Thunderbolt device listed in Device Manager. As we mentioned in our review of the MacBook Pro, the Thunderbolt device branches off 4 PCIe lanes from the Sandy Bridge CPU itself:
The bad news is that neither Promise nor PMC Sierra have published Windows drivers for the PM8011 SAS/SATA RAID controller - the Pegasus is currently unavailable under Windows.
There's some more bad news. With the Pegasus attached, you lose the ability to put your machine to sleep under Windows. Sleep works totally fine under OS X, just not under Windows with a Thunderbolt device attached. Target display mode isn't supported under Windows either.
There are a couple more quirks that exist under Windows. Apparently you can't use the ExpressCard slot while a Thunderbolt device is connected to your MacBook Pro under Windows. And finally if you have a Thunderbolt device connected and choose to eject it using the taskbar tool, you can't reactivate the device without restarting Windows. This last quirk doesn't really apply yet since there is no Windows driver support for the Pegasus, but these issues do seem a little worrisome for Thunderbolt adoption under Windows. It remains to be seen whether these are Boot Camp issues or broader problems that will impact all Windows implementations of Thunderbolt.
Final Words
There are really two things that need concluding in this article. We'll start with the Promise Pegasus R6. Without a doubt this is the highest performing external enclosure you can get for your 2011 MacBook Pro or iMac. Even using lowly mechanical hard drives you can get absolutely amazing sequential performance out of the R6. In its beefiest configuration you get 10TB of storage that you can readily access at over 600MB/s. For a MacBook Pro or iMac user that does a lot of HD video work, this amount of high speed storage is just unheard of. The big tower guys have always been able to piece together beefy RAID arrays, but now you're able to get that sort of an experience in a more compact computing device.
I'd love to see Promise offer a version of the Pegasus with SSDs instead of mechanical drives. If Promise didn't want to retool the Pegasus' design it could come in the same chassis, but it'd be really nice to see an even smaller form factor chassis designed exclusively around the 2.5" form factor. I've already shown what four high speed SSDs can do in the R6's chassis. You obviously don't get the capacity but I suspect there's a class of users out there that needs more than what a MacBook Pro can offer with its internal drive bays, but doesn't quite need 10TB of storage.
The Promise Utility that comes with the Pegasus is nice but I found it slightly temperamental at times. I almost feel like we're another couple of software/firmware revisions away from a more polished solution, although admittedly I didn't encounter any issues when I was just using the device as configured.
The biggest drawback to the Pegasus is its price. At $1999 fully loaded, or $999 for an entry level 4TB R4 it's just a very difficult device to justify. I suspect if your work depends on it then you'll have no problems spending the money, but it is a very niche product as a result. I would like to see Promise or someone else offer a barebones Thunderbolt chassis for those users who need this sort of performance but at a better price point. I can understand the price premium for Thunderbolt, but at these prices the technology is simply out of the reach of too many who could honestly use it.
Which brings me to the next topic of discussion: Thunderbolt. The interface is fast, there's no doubt about that. With the right drive configuration I had no problems pushing 8Gbps over the PCIe channel while sending another ~7Gbps over the DisplayPort channel to a 27-inch monitor. It's clear that Thunderbolt has what it takes to really enable more users to migrate from big desktops to high powered quad-core notebooks. The interface effectively solves the high speed local storage issue.
I'd love to see Apple get really aggressive here and offer a Cinema Display with two Thunderbolt ports, more USB ports, Ethernet and audio out. Then MacBook Pro users would only have to run a single Thunderbolt cable + power to their notebooks when they're docked at a desk. I'd also like to see full-speed performance when used in Target Disk Mode. Thunderbolt could become the new defacto way to quickly migrate data between Macs.
I am concerned that we may run into bandwidth limitations in the not too distant future. If we can already push 5 - 8Gbps of data on a single channel, what happens when you run Gigabit Ethernet and USB over Thunderbolt as well. For high end users, I see a definite need for faster signaling or multiple Thunderbolt ports.
I also have concerns about cable costs and widespread adoption. For Thunderbolt to really take off we need to see tons of products that support it. Intel's Thunderbolt controller IC can't be cheap, so I am curious to find out if more companies will give Thunderbolt a try. I believe cable costs can be prohibitive, but today device costs are the bigger concern.
Intel already announced that we'd see Thunderbolt support in Ivy Bridge designs next year so it may be at least one more year before we see just how much market potential Thunderbolt has. While I'm happy that Apple is championing the standard, Thunderbolt really needs widespread industry support to make an impact.

