
Original Link: https://www.anandtech.com/show/4460/bitfenix-shinobi-the-budget-ninja
BitFenix Shinobi: The Budget Ninja
by Dustin Sklavos on June 22, 2011 12:45 AM EST- Posted in
- Cases/Cooling/PSUs
- mid-tower
- bitfenix
- shinobi
Introducing the BitFenix Shinobi (Window)
Compared to some of the vendors we've reviewed cases from thus far, BitFenix seems like a young pup. Antec and In-Win have been around for a long time, and Silverstone has established itself as a go-to for quality enclosures. But BitFenix has been making a lot of waves in a short period of time, producing attractive cases designed to appeal to consumers who are less about bling, be they a gamer or not. Today we're taking a look at BitFenix's Shinobi ATX enclosure (windowed version). With an MSRP of just $69.99, is it the budget ninja we've been looking for?
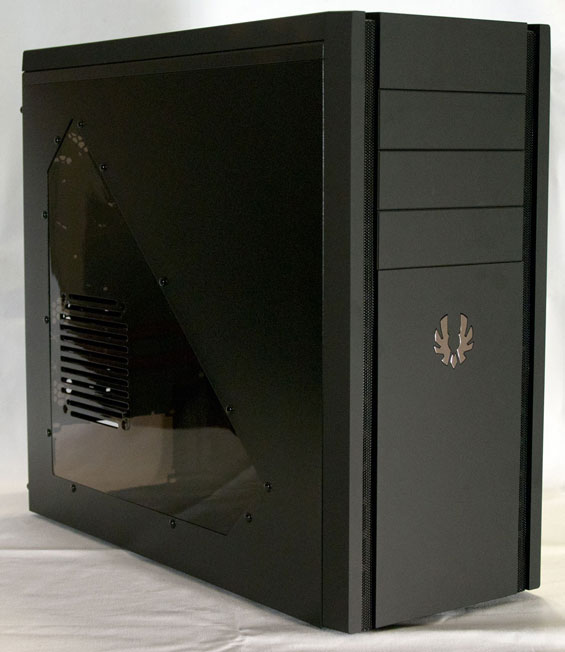
First impressions when I opened the box for the BitFenix Shinobi were extremely positive. When an enclosure comes out with the price that BitFenix is shipping the Shinobi at, it tends to wear that low price tag on its sleeve. The competition is often gaudy, making heavy use of cheap looking plastic, and such cases frequently aren't particularly user-friendly. The Shinobi on the other hand is actually quite mild by comparison, maybe even austere. It's worth noting that BitFenix offers two different models of Shinobi, one with a window (dubbed the "Shinobi Window") and one without. The windowed version costs an extra $10 and includes tool-less installation for the hard drives. That's what we're looking at today.
| BitFenix Shinobi Window Specifications | ||
| Motherboard Form Factor | ATX, Micro ATX, Mini ITX | |
| Drive Bays | External | 3x 5.25" (includes 5.25"-to-3.5" external or 2.5" internal bay adapter) |
| Internal | 8x 3.5" | |
| Cooling | Front | 1x 120mm intake fan (3-pin header), one open 120mm fan mount |
| Rear | 1x 120mm exhaust fan (3-pin header) | |
| Top | 2x 120mm/140mm fan mounts | |
| Side | 1x 120mm fan mount | |
| Bottom | 1x 120mm fan mount | |
| Expansion Slots | 7 | |
| Front I/O Port | - | |
| Top I/O Port | 4x USB 2.0, headphone and mic jacks | |
| Power Supply Size | ATX | |
| Clearance | 13" without hard drive/10" with hard drive (Expansion Cards), 170mm (CPU HSF), 300mm without bottom fan/180mm with bottom fan (PSU) | |
| Weight | 15.5 lbs. | |
| Dimensions | 18.1" x 8.1" x 19.3" | |
| Price | $69 MSRP | |
The Shinobi doesn't include a native 3.5" external bay or 2.5" drive mount for SSDs, but BitFenix does happily include an adapter that can be used for either of these which I'll show you during the assembly. My only complaints regarding the adapter are that there isn't more than one, and that it does take up one of the 5.25" bays. Other than those points, it's a fairly elegant solution.
One other issue you may run into is clearance: while our Zalman CNPS9900 was able to fit with some headroom, you may have a little trouble with larger tower coolers. Likewise, you're not going to be able to fit a 240mm radiator inside the case, since the radiator and fans are liable to butt up against the motherboard. That's not a huge complaint since if you're going to use a 240mm radiator and liquid cooling system, you're probably going to spend more than $69 on your case. Finally, our GeForce GTX 580 did have some clearance issues with hard drives installed behind it, so be forewarned: when using a longer card you'll wind up losing one or two of the copious eight 3.5" bays.
In and Around the BitFenix Shinobi
Like I said, my first impressions of the Shinobi were excellent. While the enclosure is comprised almost entirely of black plastic and black SECC steel, BitFenix was able to produce a very sleek and attractive design that doesn't draw negative attention to itself or its price tag.
The removable front and top panels are both plastic with ventilated grills lining the sides, but BitFenix textures the plastic. Instead of the traditional (and cheap-feeling) matte plastic, the Shinobi's panels use a sort of rubberized soft texture that makes the whole thing look and feel a lot better. Those ventilated strips work both as a means of improving airflow and as an appealing accent that gives the case some character. Finally, the silver BitFenix logo on the front is subdued and subtle enough to add the last bit of identity and polish without looking gaudy.
Everything else is SECC steel, painted black inside and out. Our review unit is the windowed version, and I'm actually impressed by the window on the side of the case. The triangle shape of it keeps in theme with the sharp angles of the rest of the design, but BitFenix opts to use a tinted plastic window. It's an interesting compromise that lets you bling out your build a little bit without overdoing it. Included in the window is a ventilated 120mm fan mount for cooling expansion cards.
The back of the Shinobi is business as usual, again all black, with two rubber-lined grommets for running water-cooling tubing out of the enclosure. A power supply can be installed with the fan oriented down or up; there are screw holes that allow you to flip it if you wish, but there's also a grille with a dust filter on the bottom of the enclosure in case you install the PSU in the traditional orientation.
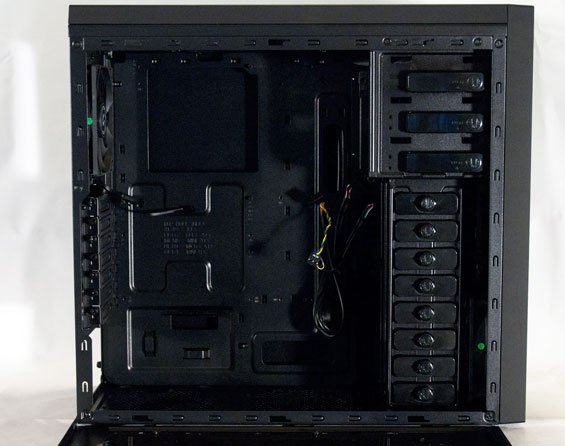
Opening the Shinobi reveals a case with all the modern accoutrement, neatly assembled and arranged to make building a machine inside as easy as possible. The motherboard tray has a spacious cut-out for installing processor cooling, and there are additional holes around the motherboard for routing cables behind the tray. Expansion cards are mounted with thumbscrews, and BitFenix includes individual slot covers as opposed to asking you to remove cut-outs from the back panel. Those slot covers seem like a small deal, but they're an appreciated touch that add value to the case. Finally, the drive bays all use tool-less mounting mechanisms.
Without getting into the assembly, the Shinobi is remarkably welcoming. Some of the enclosures I've had to assemble have been exercises in frustration, but despite being comparatively diminutive the Shinobi features a very spacious interior and the enclosure itself is remarkably light. All the modern features you could ask for internally are accounted for, although an eSATA port or USB 3.0 port in the top port cluster would be appreciated. Still, given everything else BitFenix crams into the Shinobi for $69, it's hard to really complain.
Assembling the BitFenix Shinobi
Actually building our testbed into the BitFenix Shinobi proved to be remarkably painless. Everything about the building experience from start to finish screamed polish, although there were hiccups here and there (nothing is ever trouble free). One thing I appreciated tremendously was the instruction manual included: it's not perfect, but for the most part instructions are clear, simple, detailed, and written in perfect English.
The side panels are affixed with thumbscrews and are easy enough to remove. You'll want to remove both, too, as there's a healthy amount of space behind the motherboard tray for routing cables and the tool-less hard disk mounting mechanisms need to be attached to both sides of the drive.
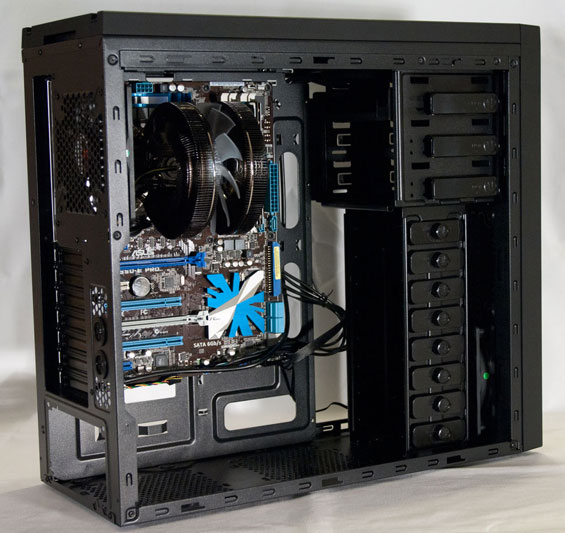
Installing the motherboard is the standard process, involving manually screwing standoffs into the tray. BitFenix only ships the Shinobi with two standoffs pre-installed, and I have to be honest here: this is one aspect of assembly where everything has largely standardized at this point. It's a small nuisance but a nuisance nonetheless. Nonetheless, once the standoffs are installed, putting the I/O shield and the motherboard in is painless and easy. You'll see that word "painless" come up again and again and that's because with the Shinobi it's true: this is an exceptionally easy case to work with.
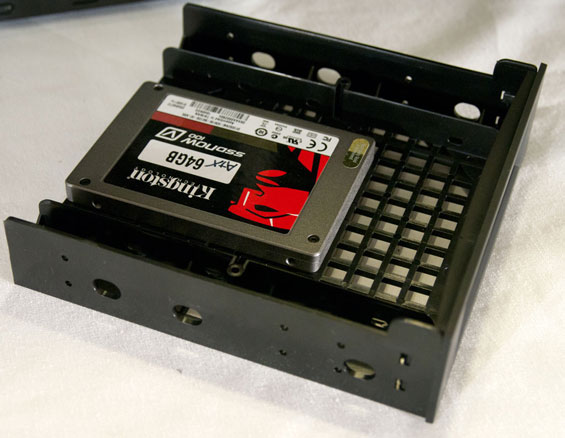
Things get a little bit confusing initially with the drive installation, but once you know what you're looking at, everything's right as rain again. The 5.25"-to-3.5"-to-2.5" adapter tray comes pre-installed behind the top 5.25" bay shield; to remove it you have to actually take the front of the case off. That's not too difficult and requires only a reasonable application of force. From there it just slides out. The adapter tray comes with two sets of screw notches: one for using it internally, and the second for using it externally. It's a slick solution; you can easily hide it behind a drive bay shield if you're just using it to mount an SSD. Plastic clasps are used on one side to secure 5.25" drives in place; I found the adapter to be a little too loose for my liking in its bay, but the optical drive we use didn't budge once the clasp was snapped in, and it lined up perfectly.
Installing 3.5" drives is incredibly simple. Twist the knob on the clamp and it pops off of the cage. Do the same to the clamp on the other side. Then slide your drive in, line it up with the screw holes, pop the clamp back in and twist it back to the "lock" position (helpfully marked on the clamp itself). Like the 5.25" adapter bay it's not 100% secure, but it's close enough not to worry about it or drive vibration creating noise or reducing the lifespan of the drive.
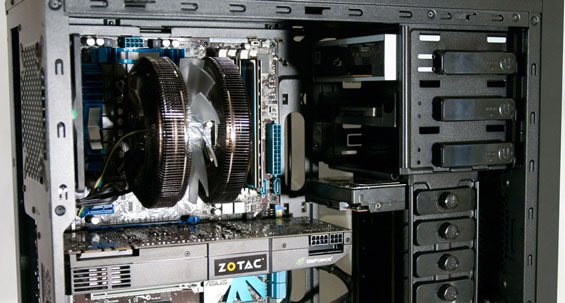
It's here that you'll discover the first potentially serious clearance problem of the BitFenix Shinobi, though. A high-end video card is liable to butt up against the back of a hard drive and prevent you from connecting the cables to it, so this means you'll lose at least one or two drive bays in the process. I also discovered that the way I'd installed the hard drive and the video card effectively created a barrier between the front intake fan and the rest of the components inside the case. This is the configuration I used for testing, and it might have been a little unfair since it's clearly not the ideal arrangement, but it's not an unusual one either: doing this allowed me to use just one power lead for connecting all of the drives, thus reducing cable clutter.
Speaking of which, is this case ever excellent for minimizing cable clutter. Installing the power supply and wiring everything was about as easy as I could expect, with the mounting holes in the motherboard tray working perfectly and a healthy amount of breathing room between the back of the tray and the side panel. I didn't actually even need to use the included zip-ties to keep everything in place.
Of course, there were still some hassles in the assembly. The AUX 12V line proved once again to be extremely difficult to connect; this is a situation where adding a half inch or so of height to the Shinobi would've given the top of the motherboard enough clearance for you to route that cable all the way up to the top, and also create enough clearance to use a 240mm radiator and water-cooling solution, something you can't do with the Shinobi as is.
Also, understanding the window on the case is to help you display your internals, coloring all of the case header leads black is nearly as ridiculous an idea here as it was in the NZXT H2. It's not worth it. I was able to get them connected and working properly on the first try, but I'd just as soon not play guessing games trying to figure out which side is the positive and which side is the ground.
Testing Methodology
For testing ATX cases, we use the following standardized testbed in stock and overclocked configurations to get a feel for how well the case handles heat and noise.
| Full ATX Test Configuration | |
| CPU |
Intel Core i7-875K (95W TDP, tested at stock speed and overclocked to 3.8GHz @ 1.38V) |
| Motherboard | ASUS P7P55D-E Pro |
| Graphics Card | Zotac NVIDIA GeForce GTX 580 (244W TDP) |
| Memory | 2x2GB Crucial Ballistix Smart Tracer DDR3-1600 |
| Drives |
Kingston SSDNow V+ 100 64GB SSD Western Digital Caviar Black 1TB SATA 6Gbps Samsung 5.25" BD-ROM/DVDRW Drive |
| CPU Cooler | Zalman CNPS9900 MAX with Cooler Master ThermalFusion 400 |
| Power Supply | SilverStone Strider Gold 750W 80 Plus Gold |
A refresher on how we test:
Acoustic testing is standardized on a foot from the front of the case, using the Extech SL10 with an ambient noise floor of ~32dB. For reference, that's what my silent apartment measures with nothing running, testing acoustics in the dead of night (usually between 1am and 3am). A lot of us sit about a foot away from our computers, so this should be a fairly accurate representation of the kind of noise the case generates, and it's close enough to get noise levels that should register above ambient.
Thermal testing is run with the computer having idled at the desktop for fifteen minutes, and again with the computer running both Furmark (where applicable) and Prime95 (less one thread when a GPU is being used) for fifteen minutes. I've found that leaving one thread open in Prime95 allows the processor to heat up enough while making sure Furmark isn't CPU-limited. We're using the thermal diodes included with the hardware to keep everything standardized, and ambient testing temperature is always between 71F and 74F. Processor temperatures reported are the average of the CPU cores.
For more details on how we arrived at this testbed, you can check out our introductory passage in the review for the IN-WIN BUC.
Last but not least, we'd also like to thank the vendors who made our testbed possible:
Thank You!
We have some thanks in order before we press on:
- Thank you to Crucial for providing us with the Ballistix Smart Tracer memory we used to add memory thermals to our testing.
- Thank you to Zalman for providing us with the CNPS9900 MAX heatsink and fan unit we used.
- Thank you to Kingston for providing us with the SSDNow V+ 100 SSD.
- Thank you to CyberPower for providing us with the Western Digital Caviar Black hard drive, Intel Core i7-875K processor, ASUS P7P55D-E Pro motherboard, and Samsung BD-ROM/DVD+/-RW drive.
- And thank you to SilverStone for providing us with the power supply.
Noise and Thermal Testing, Stock
The stock settings for our platform are fairly representative of a mid-to-high-end configuration, the upper perimeter of the kind of build we'd expect users to install in a case like the BitFenix Shinobi. Going into this testing I wasn't sure what to expect; there are certainly concerns about the hard drive and video card blocking air from getting to the processor heatsink. Note that both the NZXT H2 and Antec Sonata IV have selectable fan speeds with their built-in fan controllers, while the In-Win BUC and BitFenix Shinobi both use the motherboard fan controls. The H2 and Sonata IV results included here are from their "medium" fan settings which produced a good balance between thermal performance and noise.
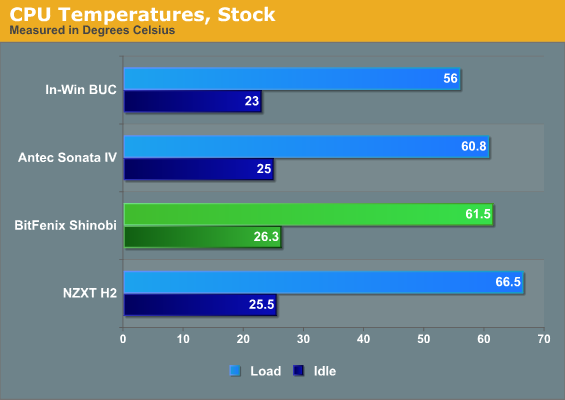
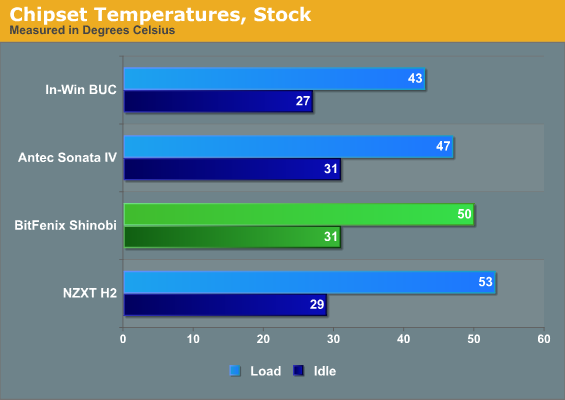
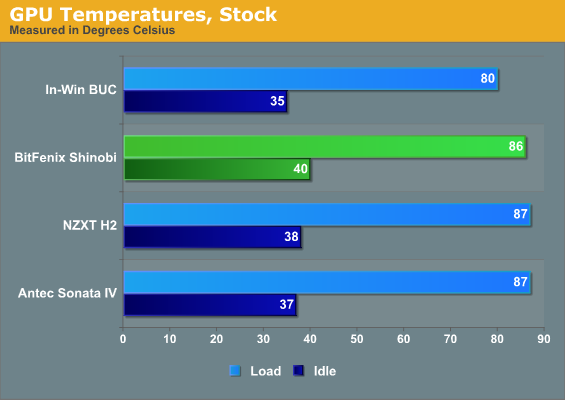
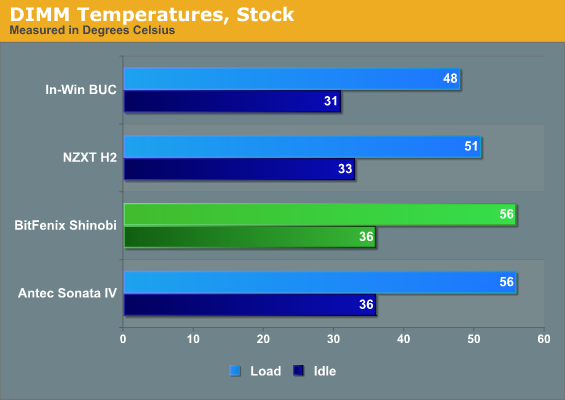
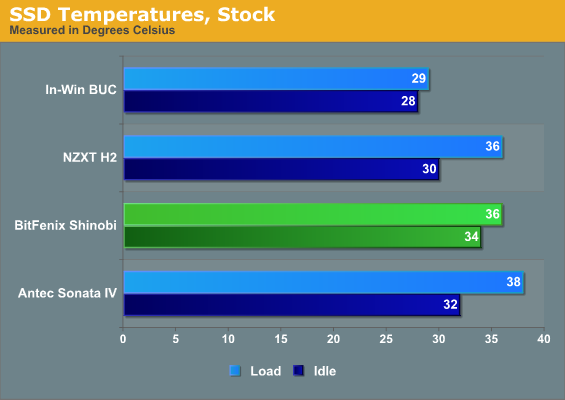
Unfortunately the thermals are less than ideal. Once again In-Win's BUC pulls a victory, a testament to its slick design (and probably the extra fan it includes). The Shinobi features some of the highest idle temperatures, but load temperatures are at least on par with if not better than the Antec Sonata IV and the air-starved NZXT H2.
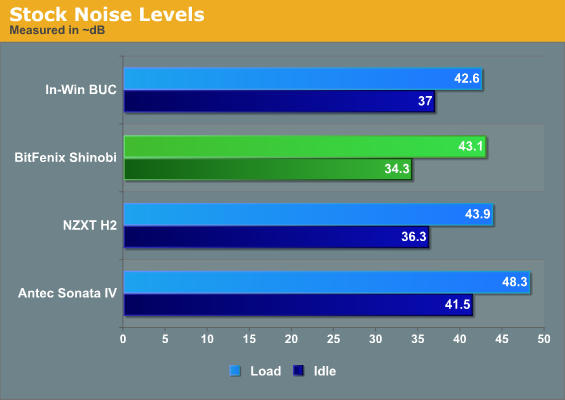
On the flip side, the Shinobi winds up being the quietest of the cases we've tested at idle, so while the temperatures are a bit higher, they're nowhere near dangerous and the Shinobi is able to keep things running silently. Under load it's still in good shape, hanging out in the same neighborhood as the well-ventilated BUC and the soundproofed H2.
Noise and Thermal Testing, Overclocked
When we apply the overclocked settings to our testbed, though, we start to separate the men from the boys. The juicy overclock applied to the processor and RAM produces a substantially greater amount of heat and draws far more power, forcing the enclosures to work that much harder and in some cases revealing thermal limitations for the cases.
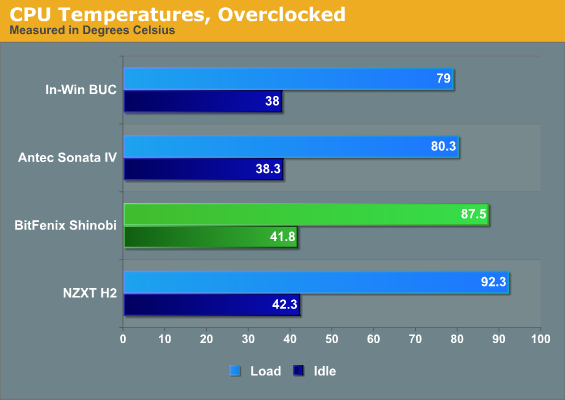
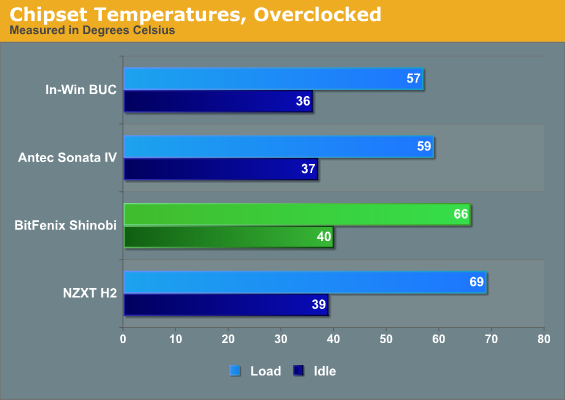
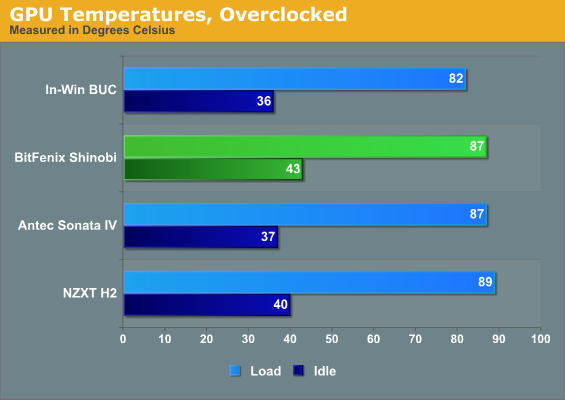
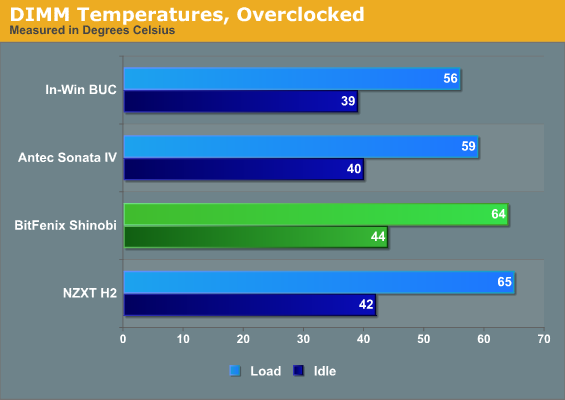
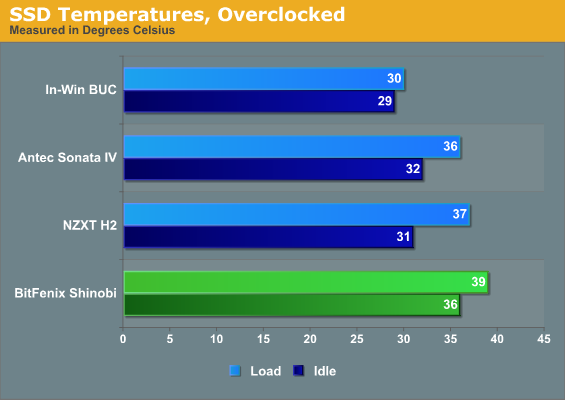
Uh oh. In its stock configuration the Shinobi's cooling system starts running into problems. While the In-Win BUC's ventilation and the Antec Sonata IV's smart thermal design are able to keep the CPU running at a fairly reasonable temperature given the overclock, the CPU starts to creep close to the unhealthy 90C threshold in the Shinobi, with only the H2 delivering worse performance. Everything runs pretty toasty in the Shinobi, even the SSD. That SSD temperature is still well within spec, but the drive does suffer for having to be mounted in a 5.25" bay with no real ventilation as opposed to the other enclosures.
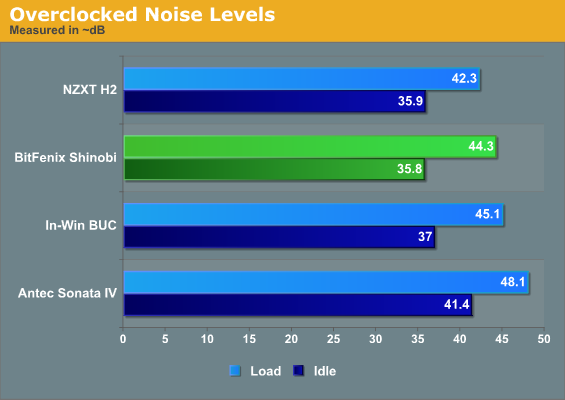
There's a bright side to this story, though: the Shinobi is a touch quieter than the In-Win BUC and only slightly louder than the H2. So while the fans inside the Sonata IV have to work double-time (and you can really hear it), the Shinobi's two included fans are able to at least keep things running quietly. The thermal results aren't anywhere close to ideal, but at least the Shinobi isn't particularly loud. There's a trade-off being made.
Conclusion: Solid Choice for the Budget Builder
The BitFenix Shinobi leaves me of two minds at the end of this review. As far as assembly goes, I can't really argue with what BitFenix has done here: the Shinobi is just plain incredibly easy to build, among one of the easiest I've ever worked with. Nothing about it feels particularly cheap although the case itself is light enough that I worry it's not the sturdiest thing in the world. That shouldn't be a big deal: if you're putting your case in situations where it's liable to get consistently banged up, you may want to reconsider some of your computing habits.
Aesthetically, I personally love the Shinobi's look, and the tinted window on the side is a nice touch that allows you to give your build a little flair without overdoing it. The hard angles, smooth textures, and generally subdued appearance are all very appealing and some would even say preferable compared to other, louder-looking cases (like the In-Win BUC). At the price BitFenix is asking for the Shinobi line ($59 for the windowless version, $69 for the windowed one), you'd really expect something gaudier or chintzier, but the Shinobi looks like it could reasonably sell for at least $100. It's the difference between cheap and inexpensive.
The problem is that to get the most out of the Shinobi's design, you're probably going to have to move the fans around if not buy more fans, and that does add to the price. The In-Win BUC remains our gold standard for budget cases with flexible designs and excellent performance, and the Shinobi unfortunately doesn't unseat it. I can see the Shinobi performing much better with the addition of a couple more quiet fans; as the Sonata IV proved against the BUC, three fans that don't have to work very hard are going to be quieter and more efficient than a single fan that has to do all the heavy lifting. If you're willing to pop the front off and move things around and experiment, the Shinobi will probably serve you well.
Unfortunately, those questionable thermals keep me from giving the Shinobi an editor's choice award. It would be a great enclosure if it ran better out of the box, but it doesn't. It's still among the quieter cases we've tested, the thermals aren't horrible, and I really do love how easy it is to work with. But we need something quiet and cool.
I'm forced to give it a bit of an odd recommendation. The Shinobi is the least expensive case we've tested, but in terms of build quality and aesthetics it easily competes with the In-Win BUC. With a little bit of thermal re-engineering and maybe an extra front fan, this could be a stellar case. It's certainly a good choice for someone building a machine they want to tinker with, and I'd personally love to see it employed by boutique builders looking for a classy case with a low price tag. So I recommend it with reservations: if you're willing to invest the time to work with the fans and airflow, or if you plan on a midrange build with a moderate GPU and no overclocking, it should serve you very well. But out of the box, I'd rather pay the extra $30 for the In-Win BUC.
Addendum: Some of you have expressed concerns as to how the Shinobi was tested compared to other enclosures, and those concerns are in line with those of the manufacturer. I installed the hard drive where I did for the same reason I've done similarly on previous enclosures: to illustrate any potential clearance issues. In the process, though, this likely skewed the testing results against the Shinobi. This is coupled with the manufacturer's concern that the Shinobi is being pit against enclosures at least $30 more expensive. I'm not sure how unfair the comparison is, but it's worth mentioning nonetheless. BitFenix intended the case to be an affordable option capable of a fair amount of tweaking for the end user, and it is successful in that.


