
Original Link: https://www.anandtech.com/show/3877/asrock-890fx-deluxe-full-review-and-an-investigation-of-thuban-performance-scaling
ASRock 890FX Deluxe: Comprehensive Motherboard Review & Investigation of Thuban Performance Scaling
by Rajinder Gill on August 31, 2010 7:00 AM EST- Posted in
- AMD
- ASRock
- Motherboards
- 890FX
By now ASRock is a familiar household name for many enthusiasts, noted by generally decent product quality, budget-friendliness, and tendency to equip with innovative, if not interesting, features. Of course this did not happen overnight, and in the past ASRock's offerings were rather known for experimental features that were rarely seen on other vendors’ products. Boards like 4CoreDual-SATA2/VSTA are prime examples of such endeavors, and these products enjoyed enormous popularity among forum enthusiasts. Over time, ASRock’s efforts have expanded to cover wider market segments and lately much of the focus has shifted toward high-end offerings on various fronts. Products like the X58 SuperComputer and X58 Extreme series are a testament of ASRock’s determination to reach the high echelon motherboard market.
With this short background today we’re taking a look at ASRock’s latest and ongoing attempt to tackle the high-end motherboard market: ASRock 890FX Deluxe 4. In the past ASRock’s portfolio on the AMD platform pretty much remained in budget and mid-range sectors, largely based on IGP-based products. ASRock attempts to rectify the situation with the 890FX Deluxe 4, a product squarely aimed at AMD enthusiasts and power users. They even try to one-up the big players by giving more features, while maintaining a reputation of wallet-friendliness. Whether (or to what extent) ASRock succeed, is what we’re going to find out today. We are also going to take this opportunity for a short brush up of AMD’s Leo platform and a quick inquiry into Thuban’s performance relative IMC scaling.
rt.png)
Board Summary and User Experience
Though It’s not apparent by looking at the the board’s PCB, from the board packaging we see ASRock is taking a page from ASUS and Gigabyte’s marketing manual and proudly boasting “True 3-3-3” design. We are being hit heavy by this 3-3-3 slogan these days but it doesn’t mean we can always guess correctly what those 3s are, because they tend to differ per vendor. In ASRocks dictionary, they apparently refer to USB 3.0, SATA 3, and eSATA 3. The board itself looks quite similar to X58 Extreme 3, with nearly identical layout and color scheme. There is no glaring fault in its layout other than the oddly-positioned auxiliary SATA ports at the bottom left corner (more on this later), and the nicely aligned all-solid caps leave the impression the board design was well-planned.
The board’s cooling is provided by two massive heatsinks covering mosfets and the north bridge. The two heatsinks are connected via a heatpipe and additional cooling is provided in the form of an optional 50mm x 10mm fan, which can be swapped with the aluminum plate that covers the mosfet heatsink. It is a rare sight to see a fan on a motherboard these days, but our experience with the fan was surprisingly pleasant. It keeps the heatsinks cool without making obnoxious noise typical of a fan of this caliber. The expansion slots are logically placed and overall we think ASRock did a fine job at designing the layout, both in form and in function. (Again, except for the auxiliary SATA ports)
The Deluxe 4’s performance was in line with ASUS M4A89GTD Pro/USB3 board we have recently reviewed, which was expected to a degree. With memory controller residing in CPU die, there just aren’t many areas where individual board makers can distinguish themselves on performance front. Nevertheless, we found the Deluxe 4 somewhat lacking compared to ASUS M4A89GTD Pro/USB3 in HTT overclocking and memory overclocking when mated with a Thuban CPU. While those may not matter much for majority of users, extreme overclockers and those who want to tweak the system to the heart’s content might not look too kindly upon these limits.
The maximum attainable HTT using a 1090T CPU and 8GB of memory was 316 HTT with memory set to DDR3-1684/7-8-7-2T via the 3:8 divider, but the board refused to go into S3 sleep at this configuration. Another caveat we noticed was the board’s strange “HTT Hole” right around 300 HTT, which is a rare phenomenon on the AMD platform. The board would boot to up to 292 HTT normally, but it took multiple attempts to boot beyond that, eventually failing to boot at 300 HTT despite our best attempts. The Deluxe 4 would then slowly regain confidence around 305 HTT, finally reaching its maximum 316 HTT. The maximum HTT up to which S3 resume functioned normally was 290 HTT. Memory overclocking was decent but not the best we have seen, the board preferring a 3:10 divider ratio over the 1:4 (3:12) divider. This made it difficult, if not impossible to achieve the maximum memory overclock we had achieved on ASUS M4A89GTD Pro/USB3. On the other hand, recovery from failed overclocking on the Deluxe 4 was one of the best we have seen, and we did not once need to clear CMOS during the course of overclocking . As a matter of fact, we don’t even remember ever having to recycle the power – all it took was a couple of resets for the board to recover.
What concerns us more is the board’s tendency to overvolt the CPU-NB and memory. This is a concern for a long-term reliability, especially for the DIMM sticks specified to run at 1.65V or below. When left auto or set manually 1.65V, the board will juice up the memory sticks with 1.70V. This is an absolutely unnecessary move by ASRock, not just because it puts those DIMM sticks in risk without users’ knowledge but because many mainstream DDR3 sticks today are not very responsive to excessive voltages, overclocking-wise. We will discuss this in detailed BIOS evaluation part of this review.
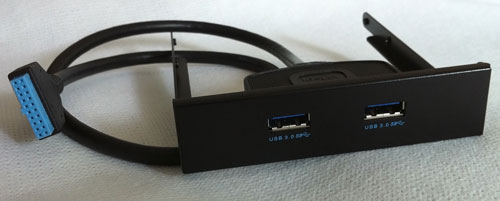
Where the Deluxe 4 shines is its feature front, and doing so it takes advantage of everything the 890FX chipset has to offer. At its forefront is its excellent USB 3.0 performance and compatibility. Unlike most boards on the market that offer two USB 3.0 ports, ASRock offers total four USB 3.0 ports, and from our experience the performance and compatibility is top-notch. Out of the four ports, two of them are accessible at the front of enclosure via a bundled 3.5” front-panel bay unit. We had no trouble installing it in popular tower cases like Antec Nine Hundred and Cooler Master HAF 932. Coupled with whopping eight SATA 6.0 Gbps ports, the Deluxe 4 seems as feature-rich as any you can find in a today’s motherboard.
Another area the Deluxe 4 impressed us is its fan control ability. The board has total 6 fan headers, and 5 of them are controllable in one way or another via BIOS or the excellent OC Tuner utility in Windows. The OC Tuner Utility is the Deluxe 4’s command center for system monitoring and in-OS overclocking, and despite its appearance it does what it is supposed to do with no fuss. However, we wish ASRock was a bit more attentive to the individual headers’ locations. All six headers are somewhat crowded around the CPU socket, making it difficult to reach if you want to use them for your case’s front or side fans.
Overall, ASRock’s entry (the short-lived Deluxe 3 notwithstanding) into this high-end AMD market is solid, but with a couple of nagging issues such as over- voltage and tight memory parameters that hinder high frequency overclocking. We are aware that this is our first evaluation of the 890FX-based board and do not want to be unfair to the Deluxe 4 without comparing it to similar products, but at this segment of market users tend to expect perfection.
Putting that aside, the Deluxe 4 offers everything but the kitchen sink, and everything except the kitchen sink just worked without a hitch. The board showed an exceptional compatibility with a wide range of add-in cards, and its USB 3.0 ports worked out of the box with the included drivers unlike ASUS M4A89GTD Pro/USB3 whose USB 3.0 ports seem finicky to date. The way ASRock configured SATA ports for AHCI and hot-swap function in the BIOS is brilliant, and will bring smiles to users who have ever struggled to get hot-swap working in Windows. We feel the Deluxe 4’s MSRP of $180 is fair enough for the majority of users who are looking to build a Phenom II X4/X6 based system with reasonable 24/7 overclocking in mind and with room to grow. (N.B.: undervolt your memory!) Extreme overclockers and memory aficionados may well be better served by looking elsewhere.
Timed with Phenom II X6 CPU launch, AMD introduced a new platform to go along and dubbed it “Leo”. Essentially, the Leo platform is comprised of the the following: Phenom II CPU, 890GX/890FX motherboard, and Radeon HD 5800 series video card. Instead of the obvious marketing, we are focusing on what has changed on the 890FX from the 790FX. The improvements are rather sparse, but there still are meaningful improvements on Leo platform over previous generation platforms and we covered some of those in the past.
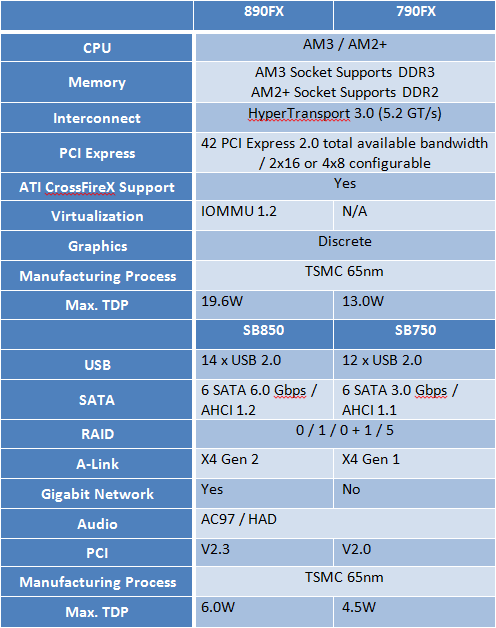
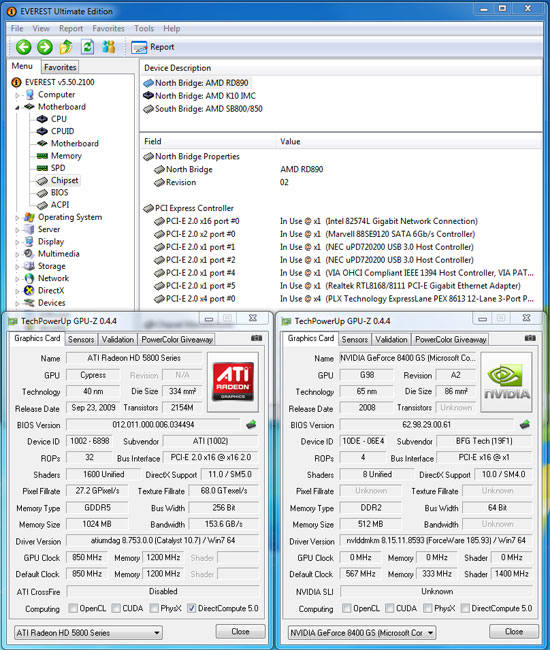
While the changes are subtle, they are just about enough to make the 890FX the most advanced desktop chipset today. The most significant contributions lie in the amount of PCI Express 2.0 at its disposal as well as the official support of SATA 6.0 Gbps standard. Not only does it provide the most PCIe bandwidth, but from what we’ve seen most board makers opt to utilize the PCIe 2.0 lanes stemming from the north bridge for the boards’ PCIe slots and peripheral controllers unlike Intel’s PCH-based solutions that rely on PCIe 1.0 bandwidth then have to go through slow DMI bus. On ASRock’s 890FX Deluxe 4 we had no problem fully saturating the total available 42 lanes.
However one thing we find somewhat dubious is AMD’s claim of 5.2 GT/s of HyperTransport bandwidth. The HyperTransport bandwidth is closely related to the CPU-NB (CPU’s Integrated memory controller) frequency as we will see later, and in order for HyperTransport bus to supply 5.2 GT/s of bandwidth the CPU-NB should be running at 2.6 GHz or faster. We do not know of a shipping AMD CPU with its CPU-NB at 2.6 GHz, so that kind of makes the 5.2 GT/s claim meaningless. To be fair, the claim is on the chipset not on the CPUs, and we did not have trouble running ASRock 890FX Deluxe 4 @2.6 GHz HT Link frequency along with our retail 1090T’s CPU-NB @2.6 GHz.
The interconnect between north bridge and south bridge, A-Link, has been upgraded to PCIe 2.0 standard from PCIe 1.1 on 790FX/SB750 combo. The new south bridge, SB850, is indeed what steals the spotlight, providing six native SATA 6.0 Gbps ports and whooping 14 USB ports. It also retains its RAID capability from its predecessor, but we advise against complex RAID setups like RAID5 or RAID10 on chipset-based controllers. AHCI standard received an upgrade as well, from V1.1 to V1.2.
IOMMU is an acronym of Input-Output Memory Management Unit, and it is supposed to make virtualizing I/O such as the storage subsystem or video cards possible. Even though virtualization is gaining traction on desktops thanks in part to Windows 7’s XP Mode, desktop virtualization is still limited on CPU virtualization. We are still some time away from I/O virtualization on desktops, and in any case we’re not aware of any client Windows OS that support I/O virtualization. So this remains a check-box feature for now.
We are unsure as to why TDPs have increased for both 890FX and SB850, but without AMD disclosing datasheets for those we are left, well, unsure. We assume they did go up considering that AMD heavily touted 10W TDP for 790FX at its launch. This time AMD is rather silent on the TDP front. Lastly, we see AMD’s first gigabit controller native to SB850, but we haven’t seen any board that uses it.
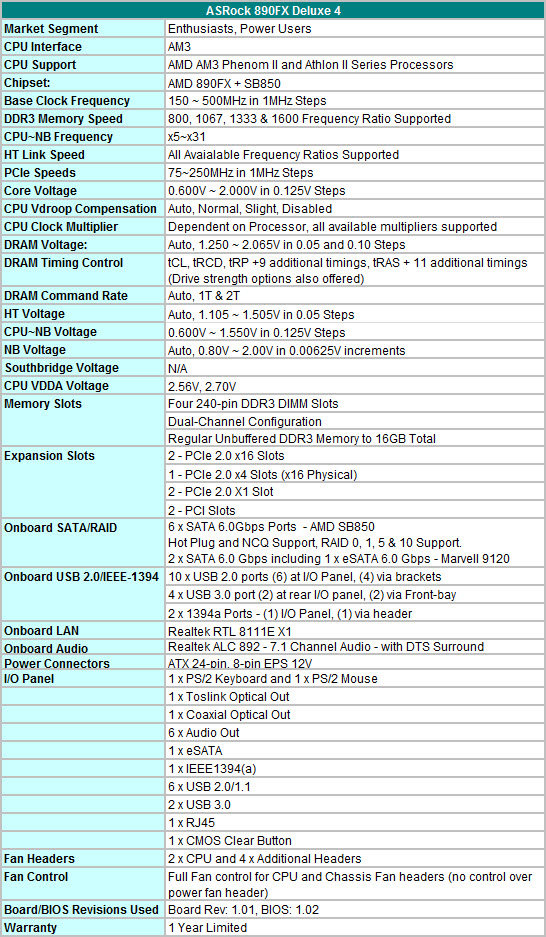
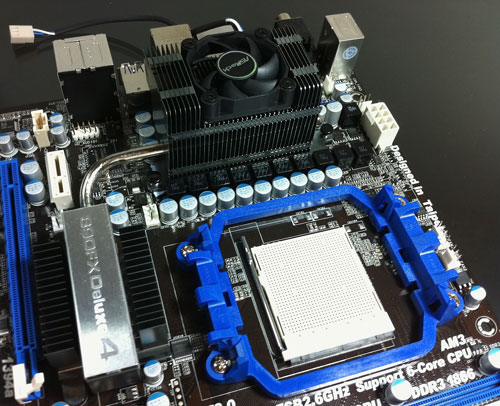
Back to the 890FX Deluxe 4, we start with the CPU socket area and immediately notice the tall mosfet heatsink. The heatsink is 2” tall, and the plate with number “4” etched on it can be taken out for optional fan (50x10mm) installation. We are usually not fans of fans of this size (get that?), because of their tendency to generate noise and to die young. However, the ASRock supplied fan wasn’t noticeably loud, even at its maximum 5,000RPM. Moreover, we found it to be doing an excellent job at keeping the heatsinks cool. Add to that the board has many available fan headers that can be individually controlled; we don’t see this optional fan as a minus. To the contrary, it may even be a necessity should you overclock your CPU and your CPU cooler is one of those tall tower-style heatsinks, because those heatsinks often do a poor job at cooling the CPU socket area.
Even though we didn’t have problem installing popular cooling solutions like Scythe Mugen 2 and Cooler Master Hyper 212+, as well as Corsair H50 watercooling kit, push-pull configuration using two fans was not possible due to the height of MOSFET heatsink. Also, many of tower-style CPU coolers will interfere with tall, fancy memory sticks. This isn’t an issue limited to the Deluxe 4, but rather a common one on AM2+/AM3 sockets due to their close proximity to DIMM sockets. We suggest you plan ahead so that you do not run into an unexpected surprise.
Around the CPU socket we see total six on-board fan headers: Two for 4-pin PWM fans, four for 3-pin fans. Out of the four 3-pin headers, three of them can be controlled in BIOS and/or in Windows. The one header that can’t be controlled is for the power supply fan that nobody uses these days, but it still provides RPM monitoring for any fan plugged in Windows via OC Tuner utility. For the other 3-pin headers, you can set from “level 1” to “level 10” strength, level 1 being about 60~70% of maximum RPM depending on the fans and level 10 being 100%.
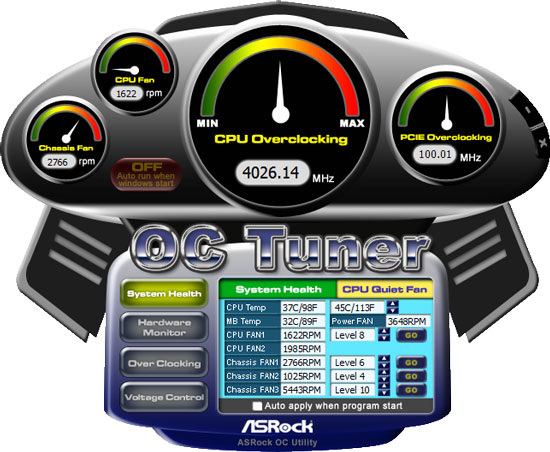
It goes without saying that we are glad to see this amount of fan control provided by the Deluxe 4. One might nitpick on the fact that not all fan headers are aware of ambient temperatures and acting on their own, and that would be a serious miscalculation oblivious to the reality, in which majority of motherboards on the market today give users nearly non-existent fan control except for the CPU.
However, it’s for this excellent fan control ASRock bestows on the Deluxe 4 we are all the more puzzled why ASRock didn’t locate some of the headers on other areas of the board. They’re far away from a case’s front and side fans, and once a CPU HSF and a video card are installed it becomes nearly impossible to reach them without needle-nose pliers. Also a word of caution: Upon installation of the OC Tuner utility, it will set up an extra power plan in the Windows’ Control Panel. We advise you delete this plan immediately because it doesn’t do anything special but disable S3 sleep and PCI-Express power management. Stick to Window’s built-in Power Plans or make your own to suit your needs.
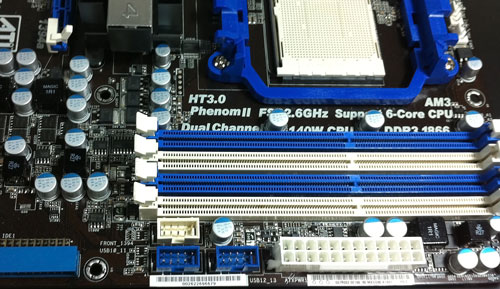
Moving on, we see the DIMM sockets are correctly color-coded for dual-channel operation. There is plenty of clearance between the DIMM sockets and the first PEG slot, making it easy to swap video cards or memory sticks should the need arise. Next to the right of the DIMM sockets located two USB 2.0 headers and a Firewire header. Though this is not the most common spot for these, it should not pose trouble for a typical mid/full-tower case. In charge of Firewire is the VIA VT6330, which doubles its duty as the board’s PATA controller. The PATA connector is located right below the Firewire header, facing outward.
Down below, we see six SATA 6.0 Gbps connectors courtesy of SB850. The connectors are angled by 90 degree so that large video cards do not block their entrance. These connectors, we’re happy to report, are correctly numbered on the board’s PCB, manual, and in the BIOS. This may sound trivial but it is one of those things that board makers can’t seem to get right for whatever reason. If you have ever had to go through the process of trial and error to determine which port is port No. 1 and which is No. 6 (or anything in between) to setup a RAID array or a hot-swap bay, you’ll know what we’re talking about. On the Deluxe 4, port No. 1 is port No. 1 in the BIOS, in the manual, and on the board’s PCB whether the storage subsystem is configured as plain IDE, AHCI, or RAID mode.
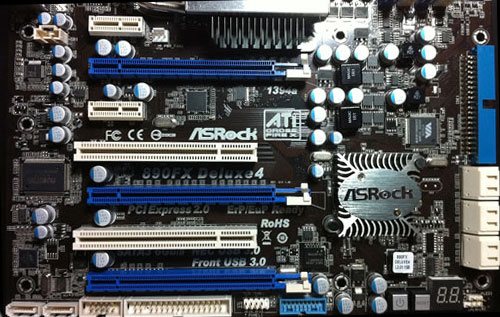
We now turn to the board’s expansion slots. There are total five PCIe slots and two PCI slots. All PCIe slots are rooted in 890FX north bridge and are at fixed bandwidth. The first PCIe x1 slot at the top is half-way open until it is blocked by the north bridge heatsink, so it can only accept half-length add-in cards, e.g. a wireless adapter card. From there down, the board has an additional PCIe x 1 slot in white and three full-length PEG slots in blue. The top two PEG slots are both physically and electrically x16, and the bottom PEG (also blue) is physically x16 and electrically x4. The white PCI slots are sandwiching the last PEG, but there is an access to at least one of these even when multiple double-width graphics cards are installed. Installing a double-width video card in the last PEG, however, will block the access to the board’s auxiliary SATA ports, the front-panel USB 3.0 connector, (gasp) the floppy connector and the COM port.
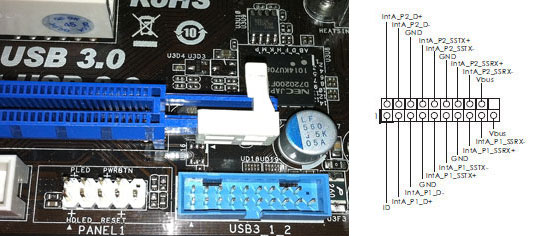
The board’s USB 3.0 ports are provided by ubiquitous NEC 720200F chipsets, two of them, each serving up two ports for total of four. The board’s installation CD came with the latest drivers (v.10190), and we experienced no compatibility issue with HDD docks from Vantec and ICY DOCK we purchased off the shelf.
The two auxiliary SATA ports on the bottom-left corner are controlled by Marvell 9120 which support AHCI (but no RAID), and frankly it’s incomprehensible to us why they have to be there. Suffice to say the ASRock provided SATA cables were not long enough to reach any of the hard drives in our HAF 932 case. Smaller cases might fare better, but your choices will be limited by the physical distance. It would have been nice if ASRock positioned those ports more sensibly on the board or bundled longer SATA cables.
The usual suspects (hint: you might have one in your board, too) show up to fill up the rest of the on-board duties: Realtek 8111E for gigabit network and Realtek ALC892 for 7.1 HD audio. The board is also equipped with an on-board debug LED, on-board power switch and on-board reset switch that come in handy when overclocking.

The rear I/O panel selection is good, and we only caution that the eSATA port shares the Marvell controller with the two on-board auxiliary SATA ports. If you attempt to use the eSATA while both of Marvell ports are internally used, you will be greeted with a BSOD.
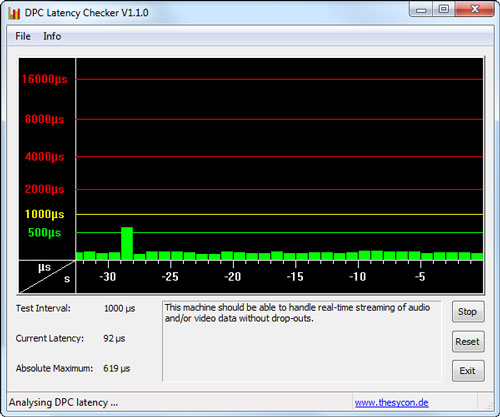
DPC latency was excellent on the Deluxe 4. The shot below was taken while Prime95 was running in the background and a virtual machine streaming 1080p video to a PlayStation 3. The small spike occurred when we launched OC Tuner utility and it is a common occurrence we see on motherboards when a low-level hardware monitoring application is launched.
The Deluxe 4’s AMI-based BIOS is pretty straight-forward. Almost all overclocking related changes are made under “OC Tweaker” tab, and enthusiasts will feel right at home with familiar labels. We suggest you take a look at the Gallery for the individual pages of the Deluxe 4’s BIOS.
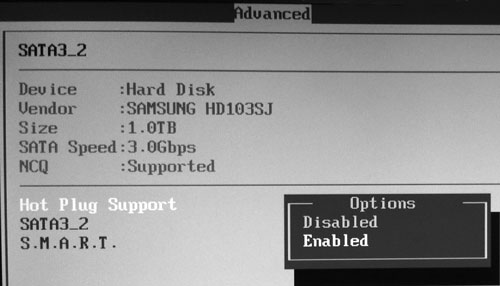
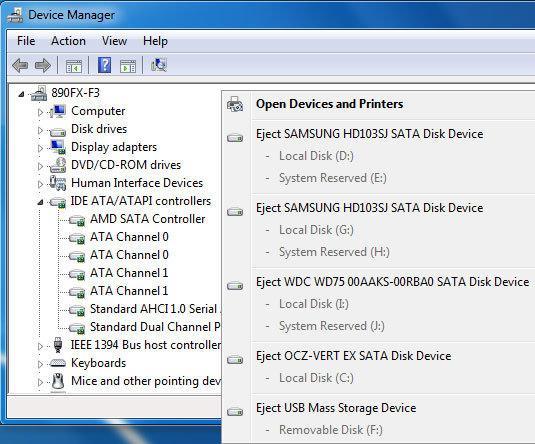
A notable item in the BIOS is the way ASRock manages SB850’s six SATA 6.0 Gbps ports as well as two of the Marvell’s. We’ve already commended how the Deluxe 4 matches the port numbers in the BIOS and on the PCB. Furthermore, ASRock somehow found a seamless way to make hot-plug/hot-swap to work from the BIOS, both for Windows native AHCI drivers and for AMD’s AHCI drivers. Windows and AHCI have had a rather tricky history, and although Windows 7 is miles ahead of previous iterations of Windows, we still run into trouble getting hot-plug function properly on occasions. Those who have attempted to take advantage of AHCI’s hot-plug/hot-swap might remember “Safely Remove Hardware” notification disappearing, or not showing up at all when it should. This often occurs upon installation of chipset drivers from AMD and Intel but Windows native AHCI drivers don’t seem to be immune to it, either.
The Deluxe 4 lets users handle this in the BIOS’s Storage Configuration section. Once AHCI is enabled, users can select individual drives to enable hot-swap/hot-plug. This worked for us with Microsoft’s AHCI drivers, AMD’s AHCI drivers, and with the “F8” method by loading the AHCI drivers at the time of OS installation. We are not sure how ASRock is doing this but it worked throughout our testing with both SSDs and mechanical drives, so we have no complaints.
Our retail 1090T CPU reached its maximum overclock of 4.10 GHz on the Deluxe 4 at 1.42V actual vCore using conventional air-cooling. Having a Black-Edition CPU makes overclocking easy on most boards if you simply want to take advantage of the unlocked multiplier. On the 890FX Deluxe 4 or any other board, our retail 1090T’s overclocking has been limited by heat for the most part. For maximum HTT overclocking, we lowered multiplier as low as x10 and reached 316 HTT, which coincidently got us to the same maximum CPU overclock of 4.10 GHz using x13 multiplier. For S3 Sleep/resume to work correctly the HTT had to stay at or below 290 HTT. Not bad, but not great. That should give enough room for the 1055T CPU (x14 multi) to reach its maximum potential, but it might not be enough for CPUs with lower multipliers. (There are rumors of more X6 CPUs from AMD later this year).
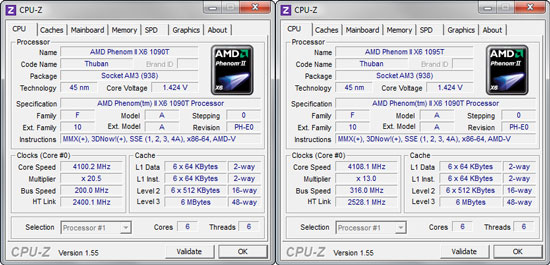
In general, the board tends to overvolt vCore under load by 0.04V with ensuing 0.02V or so vDroop. For example, when we set the vCore to 1.40V, the CPU received about 1.44V when the load is light (e.g. a single Super Pi instance), but when all 6 cores were loaded fully we measured about 1.42V. Once the CPU was idle and C1E kicked in, the board lowered the vCore below 1.20V accordingly.
Unfortunately, we found neither the BIOS reading nor Windows-based software including ASRock’s own OC Tuner utility correctly informs us of the actual amount of current the CPU receives. To make matters worse, the BIOS labels referring to vDroop control are highly misleading. The BIOS offers four options under “Load-line Calibration” section: Auto, Normal, Slight, Disable. We advise you to stick to “Normal” if you overclock, and to “Auto” for stock operation with TurboCore enabled, since the other two options will take your CPU to a voltage rollercoaster. “Normal” was also the most predictive of all as we exampled above, so without reliable software readings it is the only option we would take when overclocking an X6 CPU.
Memory overclocking on the Deluxe 4 was disappointing compared to our experience on ASUS M4A89GTD Pro/USB3. First and foremost, we warn you again the board overvolts memory by 0.05~0.06V so you should always subtract what you set in the BIOS by that amount. We set out to find out maximum stable frequency using 4 x 2GB and reasonable timings, and settled at DDR3-1666/7-8-7-1T at vDIMM set to 1.62V actual (1.57V in the BIOS). It was possible to run DDR3-1666/7-7-7-1T but it required us to set 1.62V in the BIOS, resulting in actual 1.67~1.68 vDIMM. The maximum frequency we reached with complete stability on 8GB configuration was DDR3-1800/8-9-8-2T. 4GB configuration with two DIMMs did fare slightly better, reaching stable DDR3-1800/7-8-7-1T. We were able to finish some tests @DDR3-2000/8-9-8-1T (1.67V actual), but it was nowhere near fully stable to finish our entire stressing test suit.
Overall, we feel the Deluxe 4’s memory overclocking is rather limited; the BIOS provides no control options for certain sub-timings that require adjustment as memory frequency is increased. This is obviously a matter of BIOS finesse, since we were easily able to achieve DDR3-2066/8-9-8-1T on the ASUS M4A89GTD USB3/PRO, using the same 4x2GB PSC kits. We hope ASRock will improve in this regard in the future BIOS releases, so that users will have more freedom exploring the limits of their hardware.
|
Testbed Setup Overclocking / Benchmark Testbed |
|
| Processors | Phenom II X6 1090T 3.2GHz 6MB L3 Cache |
| CPU Voltage | Various |
| Cooling | Scythe Mugen II |
| Power Supply | Corsair HX620W |
| Memory | CorsairXMS3 CM4GX3M2A1600C7 2x2GB Kit |
| Memory Settings | Various |
| Video Cards | Radeon HD5870 |
| Video Drivers | Catalyst 10.7 |
| Hard Drive | OCZ Vertex 120GB SSD |
| Optical Drives | Plextor PX-B900A, Toshiba SD-H802A |
| Case | Open Test Bed |
| Operating System | Windows 7 64 bit |
| . | |
We are splitting today’s test into two parts. In part one; we take a look at the impact of Thuban’s CPU-NB (or IMC, integrated Memory Controller) on performance, courtesy of our retail 1090T and the ASRock 890FX Deluxe 4. In part two we’re pitting the ASRock 890FX Deluxe 4 against ASUS’ M4A89GTD Pro/USB3 through our usual but slightly revised and condensed benchmark suit.
For the latter, we would like to ask readers ahead for an understanding that this is our first evaluation of the 890FX-based board and we are in the middle of devising a proper testing suit for this platform. Once we have more experience with products based on this chipset, we will have a thorough comparison of power consumption and onboard controllers, including multi-GPU performance.
To make up for this deficit, we decided to spend some time on investigating the new CPU-NB of Thuban. It is a well-known secret that Phenom architecture benefits from faster CPU-NB. The bottlenecks are manifold, but we hypothesize a few.
- The CPU-NB’s frequency is directly responsible for the transaction of data between CPU and memory. Lower CPU-NB frequency thus tends to waste memory bandwidth.
- The CPU-NB’s frequency is also the CPU’s L3 cache frequency. Even when memory access doesn’t come into equation, slow L3 impacts the overall CPU performance.
- The CPU-NB is what controls the memory (it’s another name is “IMC” after all). A higher quality IMC tends to be more flexible when it comes to DIMM frequency and timings. Whether overclocked or not, previous generation Phenoms didn’t like high speed memory, even though the same modules were perfectly able on Intel platforms.
Assuming the above, it is easy to imagine the performance impact CPU-NB plays on this architecture. Any of the above can present a performance bottleneck. Prior to E0 revision silicon (Thuban is E0 stepping), Phenom II’s CPU-NB’s quality was frankly abysmal, and outside extreme conditions (i.e. sub-zero) there just wasn’t enough room to improve performance by manipulating CPU-NB.
However, we now see a dramatically different characteristic of the CPU-NB in E0 silicon Thuban CPUs. Previously unthinkable frequencies under air-cooling are now a possibility, and it handles high frequency DIMMs much better as well. So we think it is a perfect time to start examining the impact of the CPU-NB in AMD’s “Star” architecture.
To find out how the CPU-NB affects the performance, we picked three data points each for our 1090T’s stock frequency (3.2 GHz) and for overclocked frequency (4.0 GHz). Ideally we wanted to control memory ratio, frequencies and timings, but the data size became quickly too large for this review. In the end we decided on some of the key data points so that users can easily understand the impact of the CPU-NB and memory configuration on this platform. For these tests, we disabled Window’s power saving features and 1090T’s Turbo Core. Keep in mind that these tests were not performed as a comparison between different products, so the data here cannot be directly compared to numbers you may see elsewhere. Games were run at 1680x1050 in full-screen mode with maximum in-game settings. AA and AF were disabled.
Stock Configuration (1090T, 3.2 GHz)
3200-2000: CPU 3.2 GHz, 16x200 | CPU-NB 2.0 GHz, 10x200 | 2x2GB DDR3-1066/CL5
3200-2400: CPU 3.2 GHz, 16x200 | CPU-NB 2.4 GHz, 12x200 | 2x2GB DDR3-1333/CL6
3200-2800: CPU 3.2 GHz, 16x200 | CPU-NB 2.8 GHz, 14x200 | 2x2GB DDR3-1600/CL7Overclocked Configuration (1090T, 4.0 GHz)
4000-2000: CPU 4.0 GHz, 16x250 | CPU-NB 2.0 GHz, 8x250 | 2x2GB DDR3-1333/CL6
4000-2500: CPU 4.0 GHz, 16x250 | CPU-NB 2.5 GHz, 10x250 | 2x2GB DDR3-1666/CL7
4000-3000: CPU 4.0 GHz, 16x250 | CPU-NB 3.0 GHz, 12x250 | 2x2GB DDR3-2000/CL8
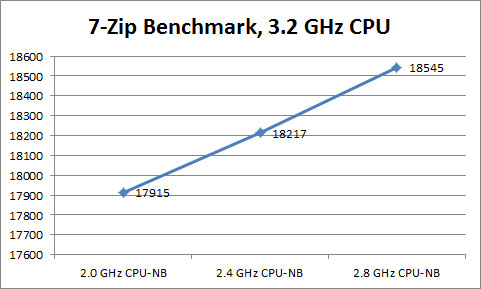
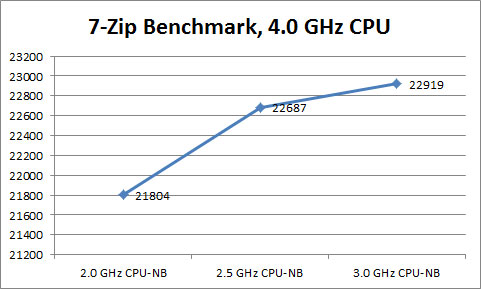
The 7-Zip benchmark does set the trend of what’s to come. Note we had to stretch the charts in order to keep the numbers legible. It looks like the performance gain is almost linear at 3.2 GHz while it tapers off somewhat as we raise the CPU-NB from 2.5 GHz to 3.0 GHz at the core frequency 4.0 GHz. The improvements from the default CPU-NB frequency 2.0 GHz ring at 3.5% and 5%, respectively.
X264 HD 3.0 Benchmark
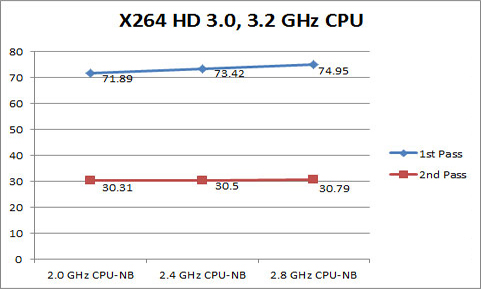
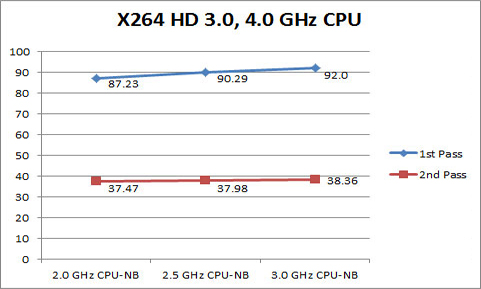
We ran the latest version of X264 HD 3.0 benchmark five times, and averaged the middle three scores. X264 HD 3.0 benchmark results are interesting. We see slightly better scaling than 7-Zip for the 1st pass (FPS increases by 4.2% and 5.4%, respectively) , but the improvement in 2nd pass was almost non-existent. We are starting to wonder whether it is worth raising the CPU-NB frequency because the gain pales in comparison to the gain made by increasing the core frequency. Simply overclocking the CPU core by 25% without touching the CPU-NB got us 20% performance improvement in the 2nd pass.
H.A.W.X.
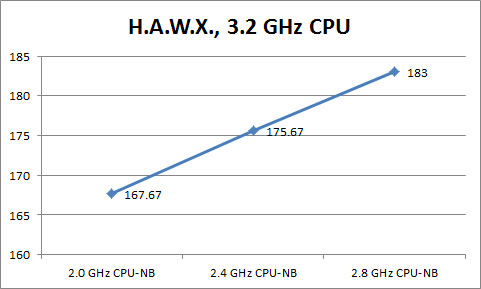
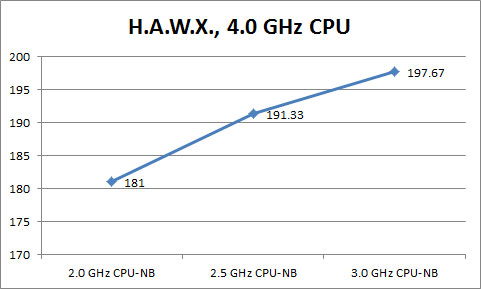
Finally we are seeing some impressive gains. We are using the game’s built-in benchmark at 1680x1050 with in-game graphics options set to maximum in DX9 mode. This game is not known for particularly being CPU-bound, so we are seeing ridiculously high frame rates here. At the same time, the gains made by overclocking the CPU-NB seemed too good to be true, 3.2 GHz CPU / 2.8 GHz CPU-NB combo surpassing 4.0 GHz CPU / 2.0 GHz CPU-NB combo. We ran the benchmark over 10 times on both ASRock’s 890FX Deluxe 4 and the ASUS M4A89GTD Pro/USB3 and the trend was the same, CPU-NB overclocking benefiting the game as much as, if not more than, the CPU core overclocking. Overclocking CPU by 800 MHz nets an 8% improvement in FPS, yet overclocking CPU-NB by 800 MHz got us 9% FPS increase.
This was a completely unexpected result after the 7-Zip and X264 benchmarks, so we had to turn to a game that’s known to be more stressful to CPU. Enter StarCraft 2.
StarCraft 2
This game needs no introduction. We are using a 38 minute replay file and let it play throughout from a player’s point of view to ensure the game data stays in the memory. We then go back and measure the 5 minutes of the battle near the game’s end using FRAPS utility. We set the resolution at 1680x1050 and in-game quality options at maximum.
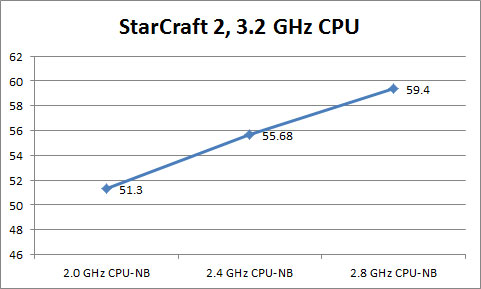
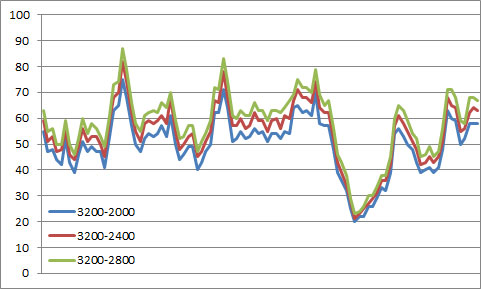
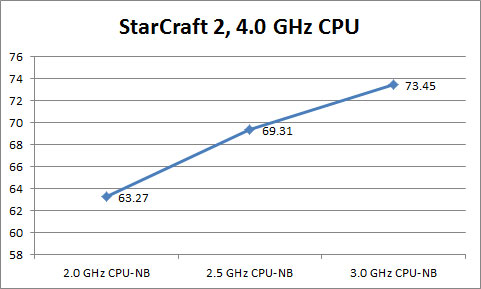
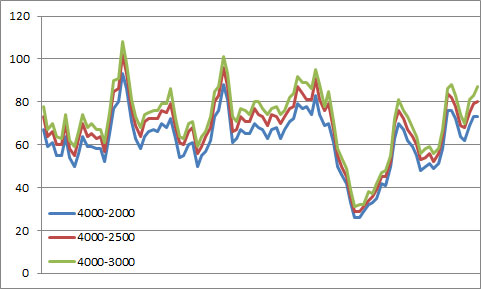
It was quite disorienting to watch the player’s frantic mouse clicks and keyboard tapping while the camera followed the commands (and 130+ Zerglings). Nevertheless, we had to take many disorienting trips in order to ensure the reliability of our results. We ended up running many more replays countless times and played the game ourselves, and conclude the results are valid.
Both at 3.2 GHz and 4.0 GHz, the CPU-NB overclocking yielded 16% more performance in this game without moving an inch of the CPU frequency. Of course in both the cases the CPU-NB overclocks were massive - 40% at 3.2 GHz and 50% at 4.0 GHz. Whatever conclusion you draw from these tests, one thing is for sure: If your X6 CPU feels sluggish in StarCraft II, overclock its CPU-NB and memory.
We now follow up with our usual system evaluation suit to test ASRock 890FX Deluxe 4 and pit it against ASUS M4A89GTD Pro/USB3 . For this part of the test, we enabled all the power-saving features of our 1090T and Turbo Core, and Windows power plan was set to “Balanced”. We matched the 4x2GB of Corsair XMS3 sticks to DDR3-1600/7-8-7-1T on both boards using 3:12 (1:4) divider. All games were tested at their maximum graphics quality settings available in-game. Anti-aliasing was set to 4xAA when applicable, and anisotropic filtering was set to 16xAF in Catalyst Control Panel.
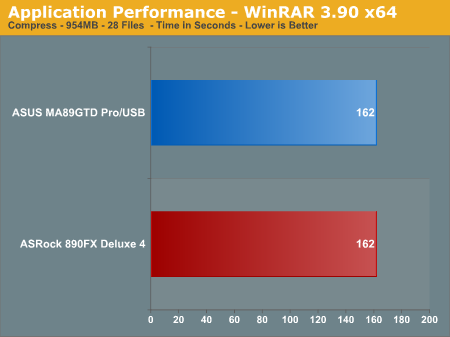
Application Performance - WinRAR 3.90 64-bit
This benchmark compresses our AT workload consisting of a main folder that contains 954MB of files in 15 subfolders. The result is a file approximately 829MB in size.
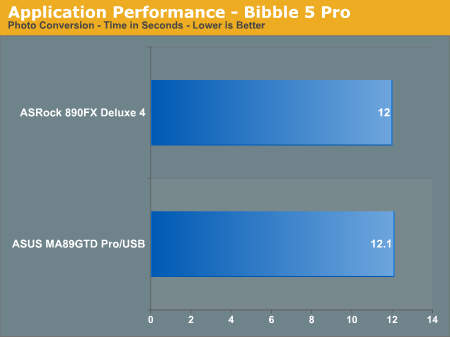
Application Performance - Bibble 5.0
We utilize Bibble Labs’ Bibble 5 v2 to convert 50 RAW image files into full size JPEG images with the program’s default settings. This program is fully multithreaded and multi-core aware.
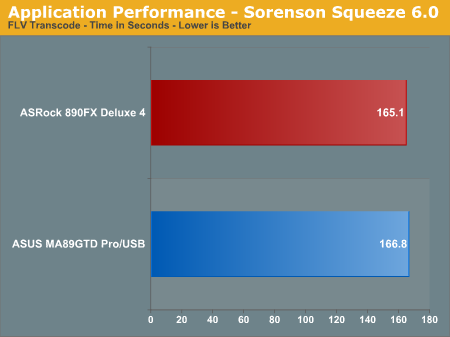
Application Performance - Sorenson Squeeze 6.0
We are using Sorenson Squeeze to convert eight AVCHD videos into HD Flash videos for use on websites. This application heavily favors physical core count and processor clock speed.
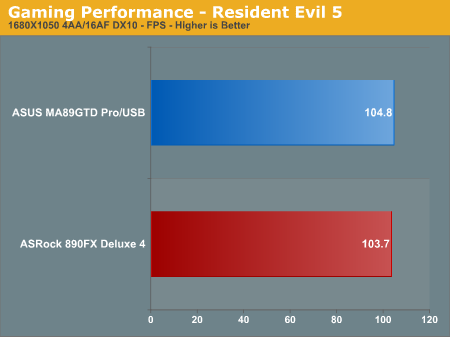
Gaming Performance - Resident Evil 5
We are using the built-in benchmark utility of Capcom's highly addictive horror game.
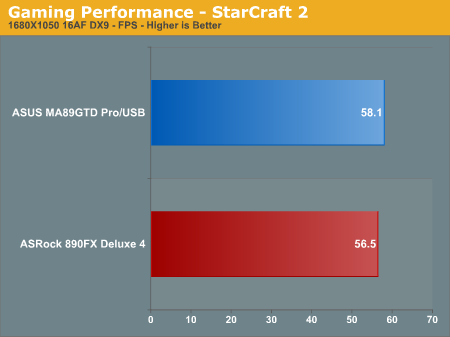
Gaming Performance - StarCraft 2
We use the same replay file we used in part 1, but the numbers are slightly different because here our setups are devised more closely to match actual user experience. Keep in mind that Turbo Core is enabled and memory configuration is different for this part of the test. 16AF is forced from Catalyst Control Center.
USB 3.0 Performance
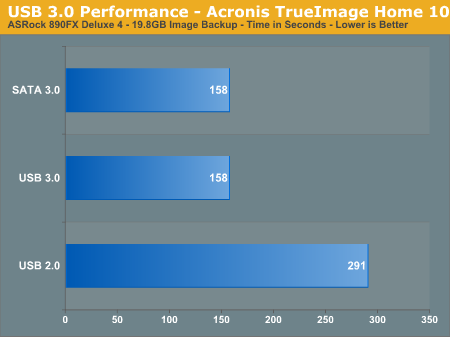
We use Acronis TrueImage Home (v. 10) to make a backup of our installation drive to an external SATA 3.0 Gbps drive via USB 3.0 and compare it with USB 2.0 and SATA 3.0 Gbps transfers. The total data backed up is approximately 20 GB. We could not complete the backup on the M4A89GTD Pro/USB3 in a consistent manner.
After two weeks of being abused, ASRock’s 890FX Deluxe 4 proved to be a worthy contender in the market where users are looking for a home of their brand new Thuban CPU. It wasn’t without its share of issues, though, and we want to disclose at this point that we lost our first deluxe 4 during testing. According to ASRock the board was a pre-retail board and we saw a few physical differences between the first and second board, so we do believe it.
When we compared ASRock 890FX Deluxe 4 and ASUS M4A89GTD Pro/USB3 through our benchmark suit, there was an interesting pattern. In applications that can take advantage of all 6 cores, the 890FX Deluxe 4 equaled, if not exceled by a thin hair, the M4A89GTD Pro/USB3. When not all CPU cores were busy, however, the M4A89GTD Pro/USB3 consistently pulled out better scores. The difference is small, but it is there nonetheless. We suspect that ASUS’ expertise in BIOS tuning is at work here, either for faster memory access or better Turbo Core implementation.
What we did not expect was that a similar pattern would emerge from our CPU-NB testing. Our experiment with Thuban’s CPU-NB was truly strange. In applications that can take advantage of as many cores as 6, the gains achieved by CPU-NB overclocking was rather small. It’s there, but not to the point of writing home about. On the other hand, overclocking CPU-NB greatly benefited less-threaded applications, namely games. This can also be observed from the X264 HD 3.0 test, where the less intense first pass yields much better scaling with CPU-NB overclocking than the second pass.
We have no conclusive theory to explain this phenomenon at this time. Originally our suspicion was limited to CPU-NB’s frequencies and memory frequencies/timings, but now we wonder whether the size of L3, which is meager 1MB per core for the X6’s, comes into play as well. We are looking to further examine this subject in the future.
At the end of the journey, we do not have a show-stopper complaint on ASRock 890FX Deluxe 4. It does what it sets out to do and it does it very well. Is it worth $180 when ASUS M4A89GTD Pro/USB3 is $30 less? We think the difference largely comes down to the board’s selection of components. The Deluxe 4 is based on the 890FX chipset, more expensive than the 890GX. It has two NEC USB 3.0 controllers, instead of one, of which the performance is flawless. The bundled USB 3.0 front-panel bay unit is the first of the kind we have seen, and we suppose that costs something as well. Add them up, and you can imagine where the price difference lies. The M4A89GTD Pro/USB3 feels like a sprinter. The 890FX Deluxe 4 an all-round workhorse. And the choice is yours.


