Original Link: https://www.anandtech.com/show/3842/asus-vg236h-review-our-first-look-at-120hz
ASUS VG236H 23-inch 3D Display Review: 120Hz is the Future
by Brian Klug on August 7, 2010 2:48 AM ESTIntroduction
120Hz panels are definitely still market newcomers - in fact, look no further than Newegg, where there still isn’t a 120Hz category, much less a refresh rate field for drilling down products. The necessity for 120Hz panels arose entirely out of the ongoing 3D obsession across the entire consumer electronics segment, something that remains a difficult sell for many gamers. On a technical level, the necessity for 120Hz arises from the need to drive two discrete 60Hz images - one 60Hz image for each eye. In its current incarnation, consumer 3D technology relies primarily on active shutter glasses - parallax barrier 3D displays are still too expensive, and I’ve yet to see passive polarization methods used outside the movie theatre. But you probably already know most of the 3D story.
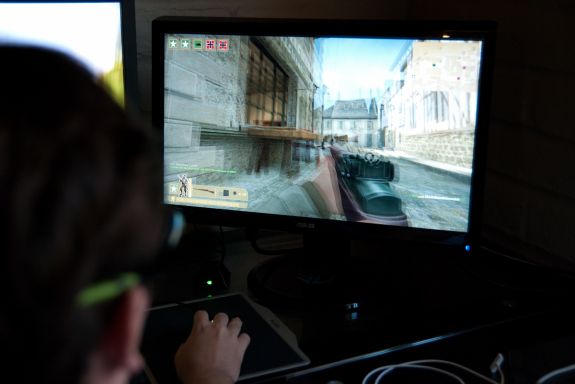
Though the 120Hz refresh frequency does make games playable in 3D, there’s another important benefit of using a faster refresh rate - everything looks smoother, and you can now drive up to 120 FPS without tearing. The ASUS VG236H was my first exposure to 120Hz refresh displays that aren’t CRTs, and the difference is about as subtle as a dump truck driving through your living room. I spent the first half hour seriously just dragging windows back and forth across the desktop - from a 120Hz display to a 60Hz, stunned at how smooth and different 120Hz was. Yeah, it’s that different.
If you’re the kind of person that cares about squeezing every last FPS out of your box - regardless of how you feel about 3D - don’t even bother reading the rest of this review, just run, don’t walk, to the store and get this 120Hz display. I’m serious.
ASUS’ VG236H isn’t perfect, like any product there are a few caveats. That aside, honestly, the completely unparalleled level of smoothness on a 120 Hz display has made me hyper attuned to just how flickery 60Hz looks on all the other LCDs I’ve got.
Oh and my initial skepticism about 3D? I’m still shocked about it, but I've completely changed my mind.
Let’s dive into this review.
Overview and Specifications
First off, let’s get the name down for this 23 inch, 120Hz display, because ASUS is selling the VG236 in two different packages and model numbers. One is the VG236H, which comes with a NVIDIA 3D Vision Kit and retails for $499. The other is the VG246HE, which is the exact same display, but comes without a bundled NVIDIA 3D Vision Kit and retails for $349. Both of those packages contain the exact same display, but just differ in whether they include the shutter glasses you’ll need to do stereoscopic 3D.
ASUS is basically selling you the 3D Vision Kit for $150, which is a pretty sweet deal. As of this writing, the same NVIDIA 3D Vision Kit is retailing on Newegg for $174.
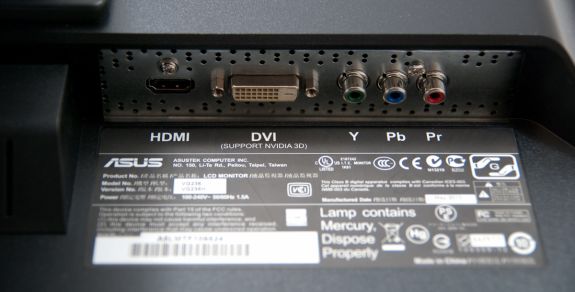
The VG236H packs HDMI, DVI-D, and component video inputs, though the only one that will work with 120Hz refresh rates, and thus 3D, is DVI-D.
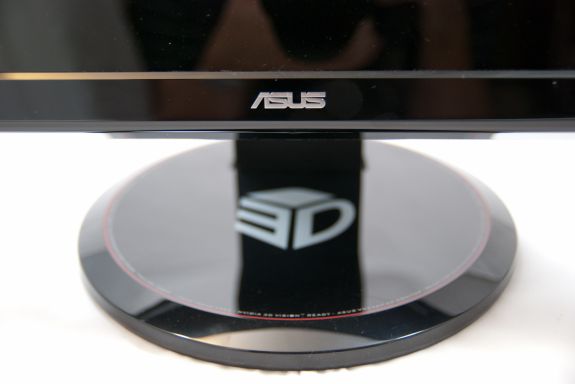
The VG236H display is glossy, as is nearly all of the bezel. ASUS claims to have added an antireflection coating to the display, as they well should. It no doubt mitigates the reflection a bit, but there’s still going to be unavoidable glare, especially if you have lights behind you. That might be killer for some, but it isn't a huge issue - I still wish it was matte though. The VG236H is also a TN panel, partly out of necessity to drive that super fast refresh rate, however color quality is actually pretty good as we’ll show in a minute. ASUS is using a technology called Dual Side driving to get to 120Hz.
Hate it or love it, the VG236H is also 16:9, and thus native 1920x1080. Finding 16:10 1920x1200 monitors which used to be the norm, not the exception, is increasingly difficult. Honestly, I’d rather have my extra 120 pixels of image height when hunting down people in games than deal with two black bars when playing back anamorphic video content. Oh well, 1080P is more marketable I guess.
Let’s go into the rest of the specifications:
| ASUS VG236H - Specifications | |||
| Property | Quoted Specification | ||
| Video Inputs | DVI-D (120 Hz 3D), HDMI, Component YPbPr | ||
| Panel Type | TN (with Dual Side driving), CCFL backlight | ||
| Pixel Pitch | 0.265 mm | ||
| Colors | 16.7 Million (24 bit) | ||
| Brightness | 400 nits maximum | ||
| Contrast Ratio | 1,000:1 (standard), or 100,000:1 (dynamic) | ||
| Response Time | 2ms (g2g) with Overdive/"Trace Free" control | ||
| Viewable Size | 23" (54.8 cm) diagonal | ||
| Resolution | 1920x1080 at 120Hz (1080P) | ||
| Viewing Angle | 170 degrees horizontal, 160 degrees vertical | ||
| Power Consumption (operation) | <60 watts typical | ||
| Power Consumption (standby) | <2 watts typical | ||
| Screen Treatment | Glossy (with antireflection coating) | ||
| Height-Adjustable | Yes: ~4" (100 mm) of travel | ||
| Tilt | Yes: -5 degrees to 15 degrees | ||
| Pivot | No | ||
| Swivel | Yes: +/- 150 degrees | ||
| VESA Wall Mounting | Yes - 100x100mm | ||
| Dimensions w/ Base (WxHxD) | 21.7" (550 mm) x 16.5" (420 mm) x 9.8" (250 mm) | ||
| Weight w/o Stand | 15.4 lbs (7.0 kg) | ||
| Additional Features | NVIDIA 3D Vision Kit, 120 Hz operation | ||
| Limited Warranty | 3 years - repair or replacement | ||
| Accessories | DVI-D cable, power cable, quick start guide, manual, warranty card, support CD, NVIDIA 3D Demo DVD, NVIDIA 3D vision kit | ||
| Price |
VG236H (includes 3D vision kit): $499 VG236HE (w/o 3D kit): $349 |
||
ASUS definitely understands its gamer segment, as including component and HDMI video inputs is definitely an added plus for people who want to hook up a game console or two. Of course, the caveat with HDMI on a display like this is that there’s no audio out for connecting headsets, something which would definitely put this over the top for most gamers. We could get upset about DisplayPort being absent, but honestly it isn’t that big of a deal, yet.
Impressions and Subjective Analysis
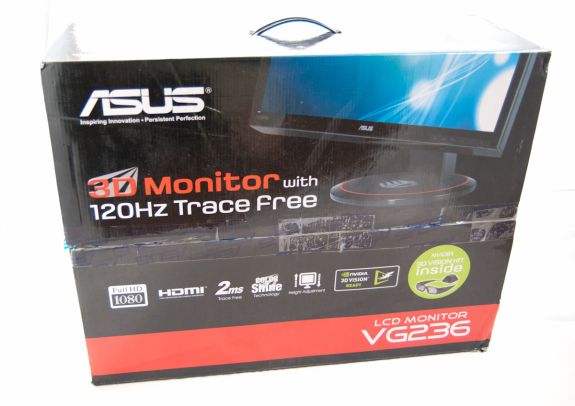
Packaging for the VG246H is definitely a step above the drab cardboard boxes all my other monitors have come in, but honestly it’s probably not going to be something you keep around. Still nicely done though.
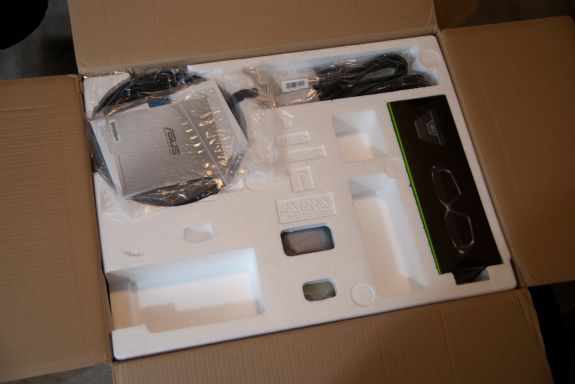
Inside is lots of styrofoam - the 3D Vision Kit comes cleverly nested in a small recessed area off to the right and gets protected the same way as the display. Carefully placed inside is the display itself, the monitor base, a few accessories bags for cables, a manual and getting started guide, and the warranty.
Assembling the display is easy, but not quite as polished of an undertaking as the other stands I’ve used. You lay the display flat on a desk or table (which is a bit scary, since you could scuff or scratch the important bits you're going to be staring at), and then screw the base into the display arm using a supplied nut which folds down, letting the assembly rotate.
The part that’s scary is releasing the height adjustment lock, which is literally a pin jammed in the mechanism, preventing the spring loaded height-adjustment arm from extending. There’s an awesome diagram in the manual which pretty much says it all.

There’s also a yellow warning sticker right above where the pin is too. Thank goodness. Seriously, pull that pin out carefully, and only when you’re ready, or the monitor base will literally smash into your chest, or... other sensitive bits like that diagram above. Not fun.
Other display arms also usually have a height lock with a button of some kind, locking the display in its lowest height position. That makes it easy to transport the whole display assembly without having the base extended all the way and hitting your knees the whole time. Unfortunately, the VG236H lacks one of those - pick the display up, and the base will be sticking all the way out in its maximum extended position. Honestly, this is is the only truly major oversight on the entire display that I have some issue with.
The nice part about the display base however is that it swivels 150 degrees in each direction, which is awesome. The stand also tilts, and you get about 4 inches of height travel.
|
Tilt: -5 degrees to15 degrees
|
||
 |
 |
|
To be honest, the display arm feels a bit flimsy, but gets the job done just fine. The assembly is nicely balanced as well, not requiring much force to rotate, tilt, or adjust height. There’s no locking mechanisms for any of those three axes of adjustment, however.
|
Height Travel
|
||
 |
 |
|
Again, most of the monitor’s plastic bits that face you are glossy plastic, and do show fingerprints. Curiously enough, the back of the display is standard textured matte plastic. I’m left wondering why the whole thing couldn’t be this way. The base of the display is also glossy, as is a bit of the height adjustment arm.
There’s a cable guide on the back, if you use those.
Additionally, the display is VESA mount compatible (the arm it ships with is screwed in there), so you can roll your own stand if you choose like I usually do.
OSD Controls
The front of the display is glossy, but tasteful. There’s the ASUS logo front and center, a subtle HDMI logo silkscreened in the bottom left, and on the bottom right are the OSD control buttons. To the right of the rightmost button is a blue power LED.
I guess these buttons are my second and last major complaint about the VG236H. There are 6 buttons, and while they work just fine and the control schema itself is straightforward, the problem is just how hard to see they are. The symbols are screened onto the plastic, and are just too hard to see.
The other problem is that there aren’t any raised edges or bits on them, so it’s hard to know when you’re actually pressing the center of a button. Most of the time, I just counted gaps to tell which button I was on. The power button has a small red line which differentiates it, but the rest are all the same and are just a bit difficult to use. There’s also a bit of flex in the whole display arm when pressing these buttons.
There’s a dedicated source button, menu button, and ‘splendid’ display mode button which cycles through five presets. The up and down buttons change brightness and contrast when the menu isn’t up. Tap down, and you can change contrast. Tap up, and you can change brightness. After tapping and entering respective modes, you can adjust in both directions.
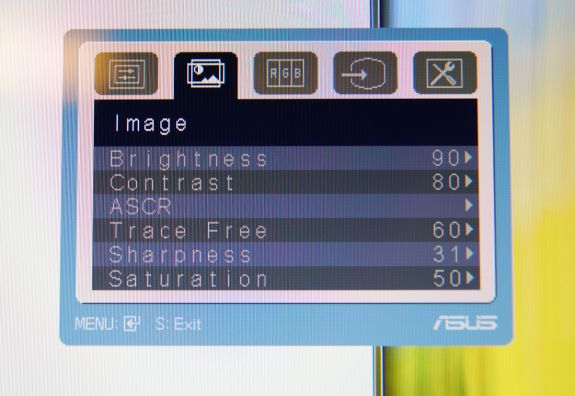
I figure we should talk about the OSD controls here, which are actually very good. ASUS exposes different settings in the image tab depending on which spelendid mode you’re using. Under Standard, you’ll only be given brightness, contrast, and trace free - which lets you directly control LCD Overdrive. You can change ‘Trace Free’ in increments of 20, from 0 to 100.
Change modes to ‘Game’, and you can change brightness, contrast, ASCR (dynamic contrast), trace free, sharpness, and saturation. In fact, all of the modes except Standard seem to expose all the settings, which is interesting.
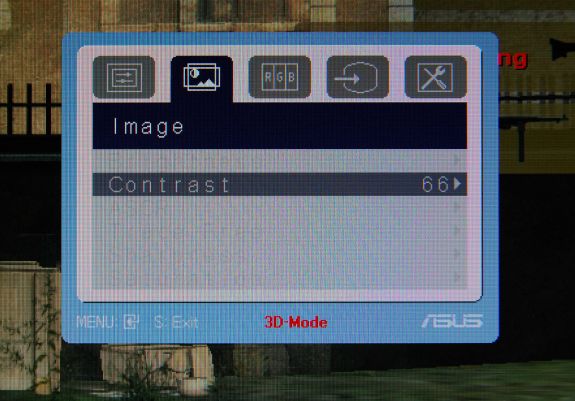
When you’re in 3D mode, the OSD also locks down into predefined settings for optimal 3D quality. In fact, all you’re left able to control is contrast. I can understand this - when doing things in 3D, you’re going to want all the brightness the panel can deliver, and probably the most ‘Trace Free’ the display can offer.
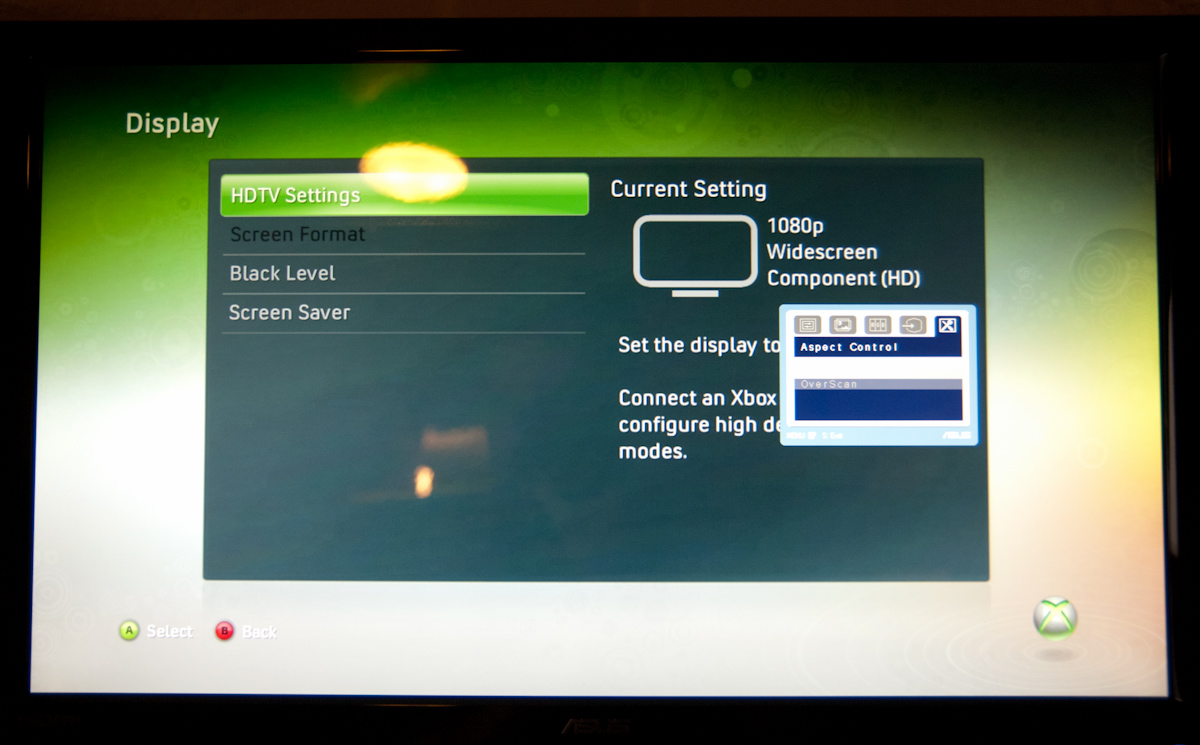
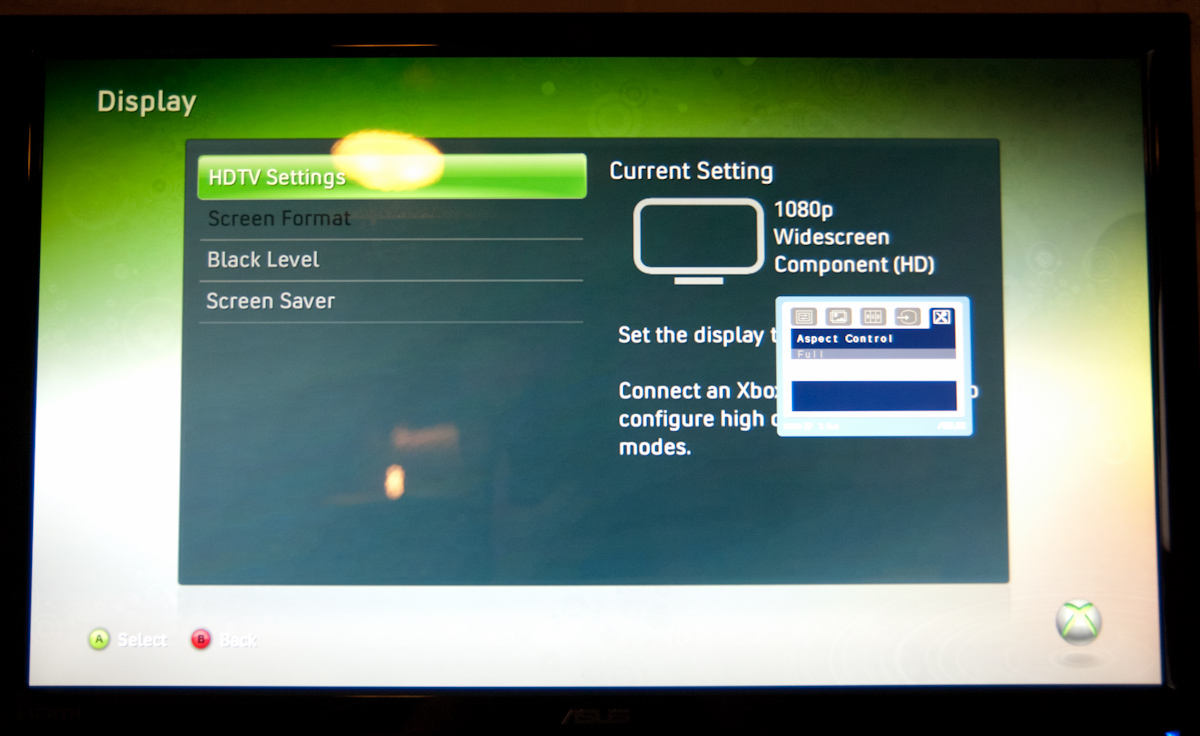
ASUS also thankfully provides a variety of OSD aspect ratio controls. You can select from full, 4:3, and overscan. There’s no 1:1 option, but what content seriously isn’t 1080P these days anyways? Full and 4:3 are self explanatory - Full is basically stretch, while 4:3 leaves you with black bars.
Overscan is a bit different, and I’m surprised ASUS included it, but props for doing so. I’d say that overscan is still a misunderstood beast for a lot of the population, but it’s simple - it’s extra image around the viewable image which gets cropped out. Back in the days of CRT TVs (seriously, can you still find a CRT TV at a store anymore?), image placement wasn’t perfect. To ensure uniformity, there was a safe area for content and important information, and a border that would get cut off. If you’ve ever done layout for publishing, think about the bleed area used for trimming, and you’ll get the picture exactly.
You can see the difference between the xbox dashboard with overscan on and off here. Basically, putting the monitor in overscan mode is what you’ll want to do, as you get close to 1:1 reproduction with no cropping. It’s awesome that ASUS included this, even a number of high end TVs have ambiguous or no overscan control, which is annoying.
There’s also our complete OSD tour in the gallery below:
Viewing Angles
Viewing angles on the VG236H are what you’d expect from a TN panel. There isn’t very much contrast or color distortion viewing the display at even extreme horizontal angles, it’s vertical angles that are sensitive to viewing angle. Check out our viewing angle gallery below:
ASUS advertises 170 degrees of viewing angle in the horizontal plane, and 160 degrees in the vertical with a 10:1 contrast ratio. I’d say the vertical angle you get isn’t quite as advertised, but honestly if you’re viewing the monitor from so far down below that this is noticeable, you’re probably doing something wrong and will complain more about damage to your spine than how colors look funny.
I’d say viewing angles overall are pretty standard on the VG236H.
3D Vision on the VG236H
So let’s talk about 3D for a bit before going into the deep bits of the display’s performance. We’ve already covered NVIDIA’s 3D Vision here, but this review would just be incomplete without discussing how much I’ve changed my mind about 3D after playing with the VG236H.
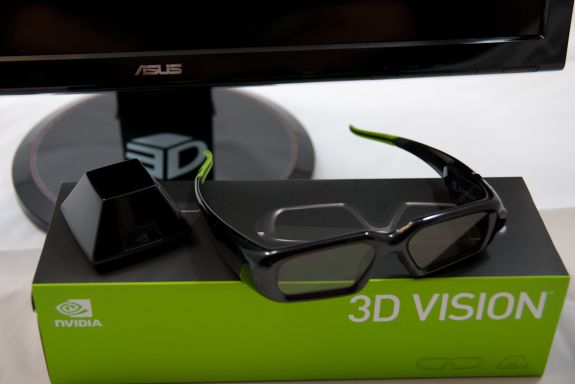
First off, the NVIDIA 3D Vision kit itself is unchanged, though the packaging is a bit more compact. Inside is a soft cloth bag for the classes, two different nasal guides for comfort, two different length USB cables, the IR base station pyramid, shutter glasses, and demo and driver CDs. It feels like a high end product, with the base station pyramid and glasses sitting in foam cutouts, and the requisite accessories in a compartment above.
Additionally, you’ll need a 3D Vision compatible GPU, and can only drive 120Hz refresh rates over DVI-D, not HDMI. Because you’re rendering twice the frames (one for each eye), you’ll take a framerate hit for enabling 3D, so that GPU best be powerful. Zotac graciously supplied their ZOTAC GeForce GTX 470 for testing, which worked perfectly in my testbench.
I noted before that I’ve been skeptical about mainstream 3D gaming for some time now. I’ve seen my fair share of 3D content - though not as much as most of the other AnandTech writers that experienced it at CES on myriad displays - but have an above average grasp for the tech thanks to my optical sciences background.
That out of the way, most of the shutter or polarization based methods I’ve seen up until now suffered from being flickery. Refresh rate just wasn’t high enough, and the result was that I could detect individual frames when moving my head or really looking for it. In theaters, I tried the circularly polarized passive RealD system, and another IMAX 3D system using linear polarization. I had also tried a number of active LCD shutter systems on LCD TVs. While impressive, all of them had noticeable flicker.
The VG236H is the first 3D implementation I’ve played with that doesn’t have noticeable flicker. It just doesn’t. I was immediately impressed with the NVIDIA 3D Vision setup.
NVIDIA thankfully has a pretty comprehensive list of 3D Vision games and how good they perform with the whole system. At the top of the scale is 3D Vision Ready, meaning the game has basically been developed from the start to be viewed in 3D or 2D. Down the list is excellent, good, fair, poor, and not recommended. I first tried a number of ‘good’ titles, and found that while the 3D experience indeed worked, but often small things got in the way.
Legacy Titles, 'Good' Games: Work with 3D, but hardly Flawless
The most common problem in older titles was that crosshairs rendered at screen depth. Two titles where this really stuck out were Battlefield Bad Company 2, and to a lesser extent games running Valve’s Source engine.
To be fair, NVIDIA offers the ability to enable a 3D Laser Sight for certain games, which replaces the distracting normal cursor in some games.
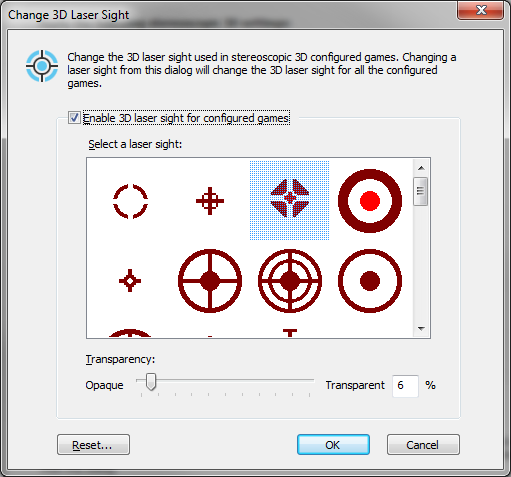
In general, it’s distracting when things are being rendered at screen depth. A good example is how in games like TF2 or DOD:S, kill notifications in the top right, chat text, weapon selection, and players names all render in 2D at screen depth. You can get used to it, but it looks out of place. There’s also the occasional bit of content that just isn’t 3D as well.
When you fire up a title, NVIDIA gives you an overlay in the bottom right with information about the game’s compatibility, as well as what settings should be enabled or disabled for optimal 3D quality. The interesting bit about 3D is that you can really get a feel for when game engines are doing hackety things like rendering HDR at screen depth instead of in 3D - all these little flaws show in 3D mode on older titles.
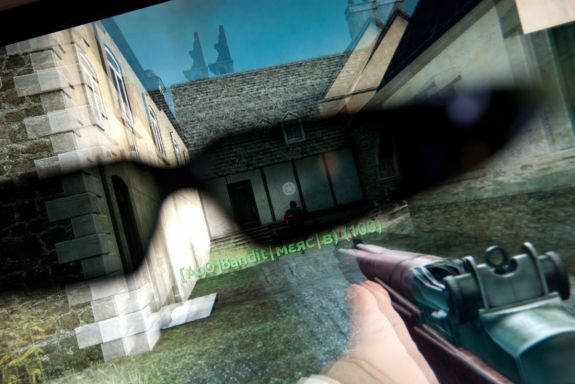
The other problem is simple - hold a weapon up to a wall, and you’ll get the perception that your gun is going into the wall, which is actually closer to you. This is that age old clipping problem rearing its ugly head, now in 3D. It’s impossibly difficult to describe, but weapons will appear to dive into materials that they can’t. In the past, with 2D, this wasn’t a problem, but the result just looks off in 3D.
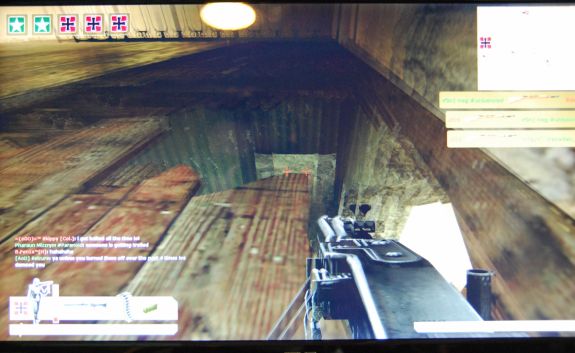
See how the MG42 goes into the wood? It's even weirder when it appears to have depth.
The reality is that Excellent and Good rated titles work very well, but just haven’t been designed for 3D. The result is that while the game content is 3D and looks beautiful, things like menus, crosshairs, and information all on the edges makes the experience a bit jarring.
NVIDIA 3D Vision Ready: Play These in 3D
But what about NVIDIA’s 3D Vision Ready titles? New games designed for 3D? I decided to try a little experiment. I decided I would play Metro 2033 through, beginning to end, entirely in 3D. I would then repeat the same thing in 2D and see what I thought.
I want a 120Hz 3D monitor and kit of my own now.
The difference in the 3D experience here compared to ‘good’ or even ‘excellent’ titles is mind-blowing. What makes Metro 2033 a particularly good example is how everything is 3D. The initial menu screen is 3D, everything is 3D. There isn’t a jarring difference between content that obviously was never intended to be viewed in 3D and the rest of the game - in Metro 2033 it just works.
Things like dust are entirely volumetric, not just 2D speckles. There’s depth and detail on weapons, objects, and textures. The game is just completely immersive in a different way. It’s difficult to explain just how much more engaging this game feels in 3D compared to 2D. Suffice it to say things like the very final level where you’re running on floating platforms or in a maze away from the dark ones, or up in Ostankino tower, are amazingly different and trippy. Honestly, Metro 2033 in 3D is close to if not entirely NVIDIA 3D Vision’s killer app. 3D vision does exact a considerable price on framerate though. With Metro 2033 I settled on 1680x1050 on High with the DX10 codepath to get playable framerates. Pushing the GTX 470 much further reduced FPS too much.
The only caveat which remains is the same as found in other 3D systems - you do lose some brightness, and you’ve got to wear glasses, which is annoying if you already wear glasses to correct your vision.
As I’ll show in a second, the VG236 is indeed a very bright display, but you really need every last nit to keep things lit up when in 3D mode. Just by nature of using shutter glasses, everything gets dimmer. I wouldn’t say it was a problem when playing 3D games, but I did increase gamma in Metro 2033 just a bit because it’s such a dark game most of the time.
For me, the bottom line is this. Virtually every game is going to benefit from a 120Hz panel because you won’t get visible tearing until your framerate is over 120 fps. In older games where even on maximum everything you’re well over 100, it’s nice to actually see some of those frames. To that extent, games do appear smoother to me visually. For 3D content, 3D Vision Ready titles are a whole different level of immersion compared to older titles that - while they do work - have distracting 2D elements. With time, hopefully more games will be developed with 3D in mind and lose the distracting bits that otherwise diminish the experience.
Color Quality
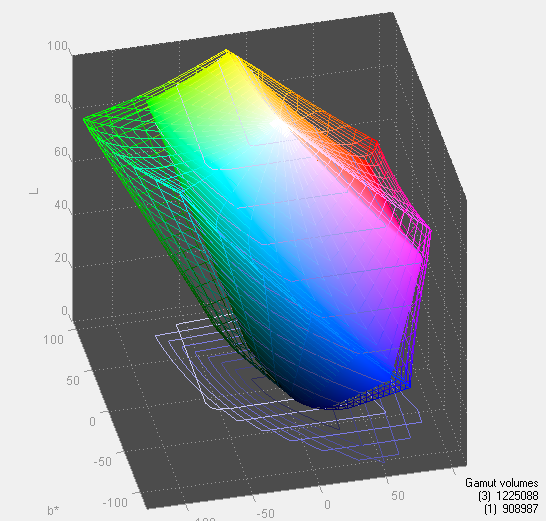
Now let’s get to the meat of the display characteristics. As usual, we report two main quality metrics: color accuracy (Delta-E) and color gamut. Color gamut refers to the range of colors the display is able to represent with respect to some color space. In this case, our reference is the AdobeRGB 1998 color space, which is larger than the sRGB color space. So our percentages are reported with respect to this number, and larger is generally better.
Color accuracy (Delta E) refers to the display’s ability to display the correct color requested by the GPU and OS. The difference between the color represented by the display, and the color requested by the GPU is our Delta-E, and lower is better here. In practice, a Delta E under 1.0 is perfect - the chromatic sensitivity of the human eye is not great enough to distinguish a difference. Moving up, a Delta E of 2.0 or less is generally considered fit for use in a professional imaging environment - it isn’t perfect, but it’s hard to gauge the difference. Finally, Delta E of 4.0 and above is considered visible with the human eye. Of course, the big consideration here is frame of reference; unless you have another monitor or some print samples (color checker card) to compare your display with, you probably won’t notice. That is, until you print or view media on another monitor. Then the difference will no doubt be apparent.
As I mentioned in our earlier reviews, we’ve updated our display test bench. We’ve deprecated the Monaco Optix XR Pro colorimeter in favor of an Xrite i1D2 since there are no longer up-to-date drivers for modern platforms.
For these tests, we calibrate the display and try to obtain the best Delta-E we can get at both 200 nits of brightness for normal use, and 100 nits for print brightness. We target 6500K and a gamma of 2.2, but sometimes the best performance lies at native temperature and another gamma, so we try to find what the absolute best performance could be. We also take an uncalibrated measurement to show performance out of the box using either the manufacturer supplied color profile, or a generic one with no LUT data. For all of these, dynamic contrast is disabled.
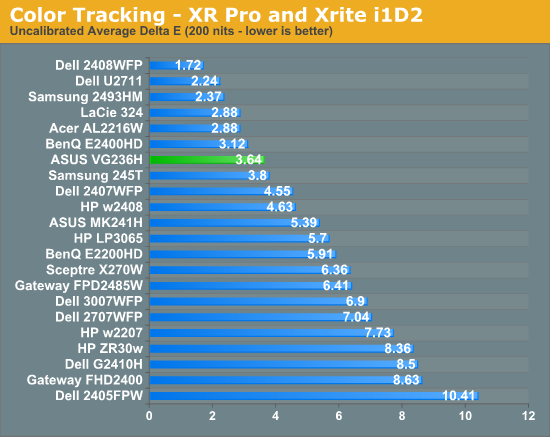
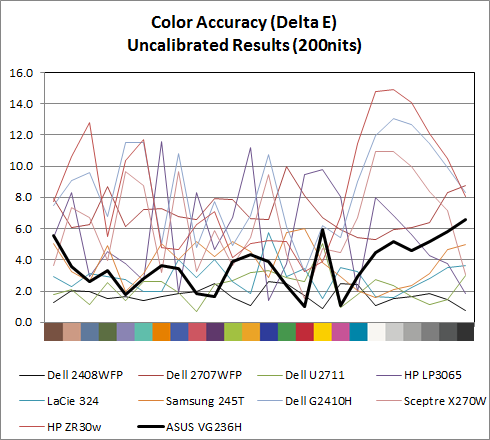
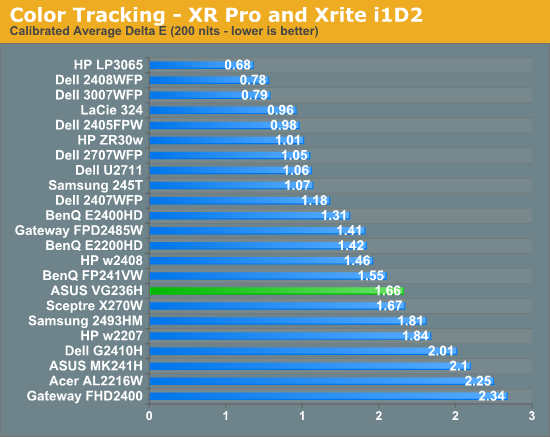
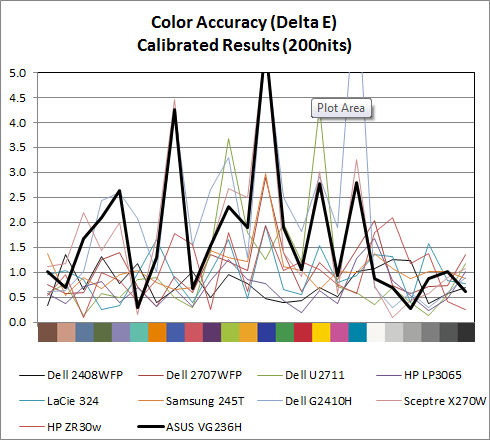
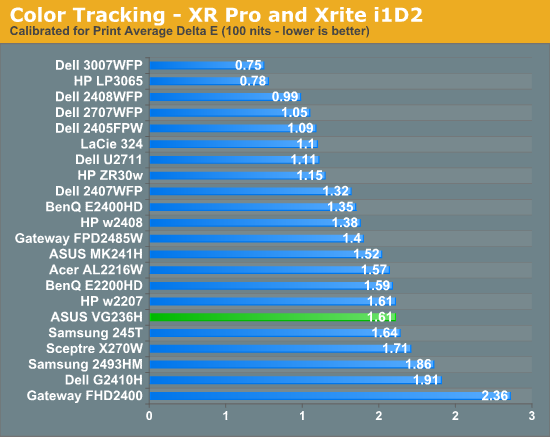
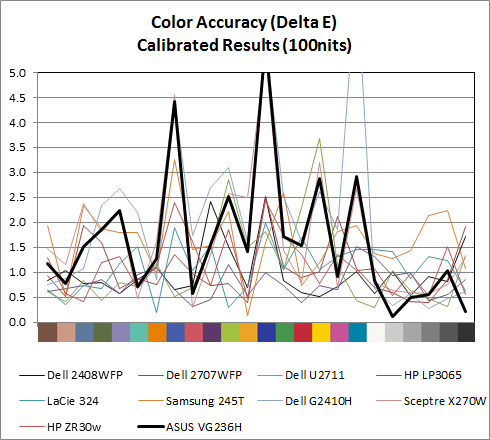
Performance uncalibrated, entirely out of the box is actually very good, at a respectable 3.64. When I first started working on the VG236H I didn’t notice any color tints or weird hues, and upon measuring the display, found the white temperature to be almost exactly 6600K, very close to our 6500K target for calibration. This is nice to see out of the box. For gamers interested in ballpark color reproduction but not professonal level absolute colormetric reproduction, this is adequate.
Moving on, at 200 nits the VG236H gets a bit more accurate, down to 1.66, but still isn’t quite as good as an IPS panel. Still, not bad for a TN. Going down to 100 nits, we get a bit better, moving down to 1.61, but still not that elusive sub 1.0 the highest quality displays can deliver. What about gamut?
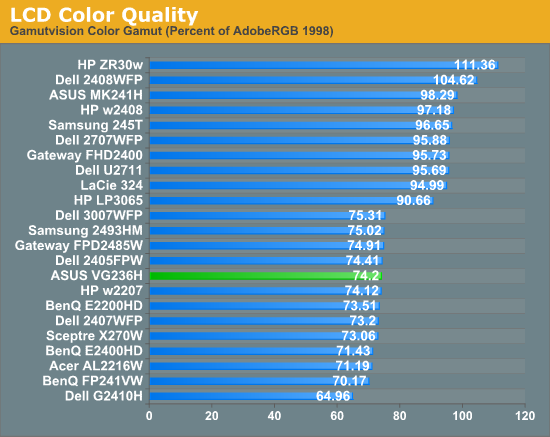
As expected, gamut is right around where we’d expect it to be for the TN, sRGB display. Interestingly enough, the OSD controls do have an sRGB mode, though I don’t think it’s as necessary as it would be on say a wide gamut display. But it’s there for certain.
Color Uniformity
Now for color consistency, we take our best calibration profile from the very center at 200 nits and test color accuracy at 9 different places around the LCD display in an evenly distributed grid. We’ve shown before that calibration is localized across the display, partly due to the brightness not being uniform, partly due to the discrete nature of the display itself.

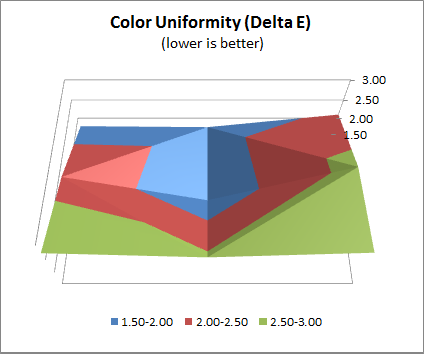
The bottom of the display appears to be where color tracking is most mismatched with the exact center. This isn’t surprising given the brightness uniformity I’m getting to in a second. Right center isn’t stellar either. On the whole though the difference between the best and worst case is 1.14 of Delta E, which is on par with other displays we’ve tested.
Brightness and Contrast
For brightness we display white and black levels at maximum and minimum brightness as allowed by the OSD, and divide the two to get contrast. We use the same colorimeter described earlier. In this case, an Xrite i1D2 with ColorEyes Display Pro.
The VG236H uses a CCFL backlight, but thankfully warm up times are very quick. There’s still settle, so we wait 30 minutes between adjusting from 100 to 200 nits before calibrating (that’s the last section), but brightness does change and slowly stop like any CCFL and even WLED display.
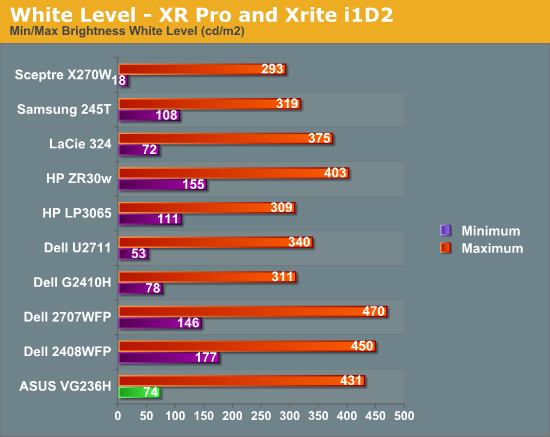


The VG236H is thankfully a very bright display, exceeding the 400 nit advertised maximum and getting up to 431 nits. Brightness is really important for these 3D displays as using the active shutter glasses perceptibly reduces brightness. Thankfully, the VG236H is bright enough that it doesn’t make games impossibly dark.
Similarly, contrast and black levels are important. Black levels are pretty good, but not stellar at maximum brightness. They’re good enough to net the display a contrast ratio of 925 at maximum brightness, which is pretty impressive.
On the whole I’m pretty pleased with the display characteristics on paper, the VG236H is an admirable TN performer, arguably one of the best.
Brightness Uniformity
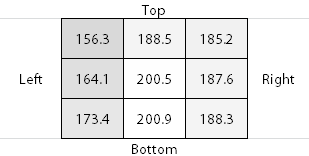
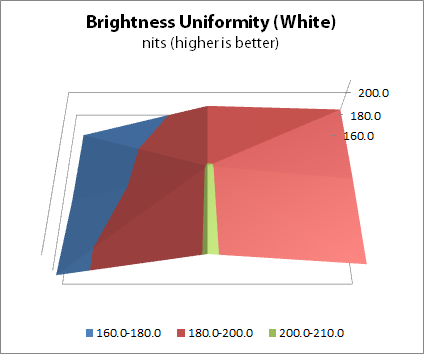
For brightness uniformity, we test at the same 9 points we measure Delta-E on, but this time measure white and black levels when the center point is as close to 200 nits as we can get. We use the same colorimeter as before, again an Xrite i1D2 with ColorEyes Display Pro.
Brightness Uniformity - White
Brightness Uniformity - Black
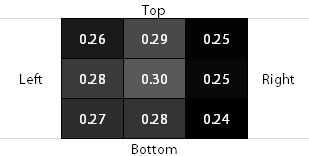
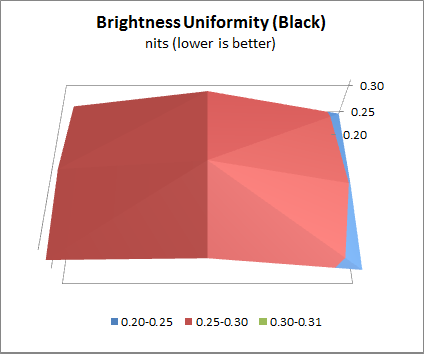
Qualitatively, I never noticed a big change in brightness from right to left like these measurements imply. I was a bit surprised and measured three times, getting similar results. There’s a good 15-20 nits of difference at 200 nits from the right to left. It’s not killer, and honestly for a gaming centric monitor hardly an issue.
There was a bit of light leakage at the bottom and top of the display, however.
It’s noticeable when displaying a uniform black field, and most apparent at the very bottom right, as shown here. In normal use however I couldn’t tell it was there. Even playing Metro 2033 in the dark.
Processing and Input Latency
Processing and display lag is a very important thing for gamers, and it’s most often nebulously reported if at all. We’ve discussed this in previous display reviews, but what matters most is how the display acts in real world testing. I’ve been doing previous tests by comparing LCDs with first a 17” Princeton CRT, then a Sony G520 20” CRT.
So far the results have been a bit interesting, with the CRT barely edging out over the LCD. I did the same thing with the VG236H.
Jarred and Anand both warned me right after my first attempt with this method that we were probably going to see a difference purely because we’re comparing an analog VGA signal for the CRT to the DVI signal for the LCD in test. The problem being that because of the way we test, it’s likely the VGA and DVI paths get different frames from the framebuffer entirely. In addition, because I had the Zotac GTX 470 instead of the ATI Radeon HD5870 like previous tests, there’s another element of change here.
I ran through the tests as usual and measured the difference between the CRT at 75Hz (its maximum, seriously), and the VG236H at 120Hz running the 3Dmark Wings of Fury benchmark on constant loop. The ASUS comes in about 12ms behind the CRT after collecting 14 different samples.
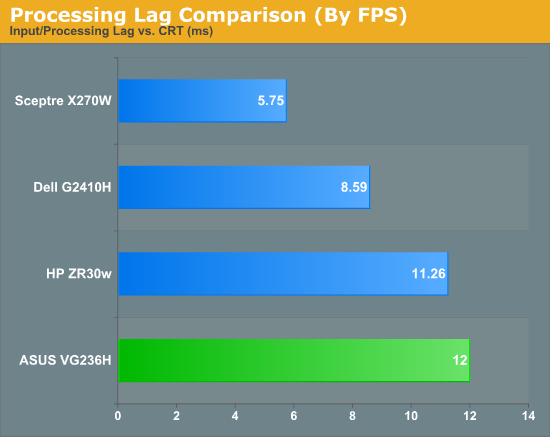
I used the VG236H to play a number of FPS games during my time with it, and never noticed perceptible input lag. I’m convinced there’s something else at play here.
Remember how I mentioned the display has overdrive, er... “trace free” controls? By default, outside of 3D mode, trace free is set to 60. I decided to test at 100 and 0, effectively with overdrive on maximum, and off entirely. Turning overdrive off adds a repeatable 2.2ms of display latency after 20 data points.
More importantly, it effectively reduces the number of ghost images captured from two (one trailing, one preceding), to one (just trailing). Now you can understand why ASUS probably sets overdrive to maximum in 3D mode and keeps you from touching it, to virtually guarantee no ghosting or weird artifacts.
While we’re on that subject, I’ll note that I only noticed ghosting once while playing Metro 2033 start to finish in 3D with the VG236H, and even then I first thought it was something reflecting weird in the glasses. I’ve read about other displays having very obvious ghosting - you’d be hard pressed to find that with the VG236H.
I wasn’t entirely convinced that the VG236H had more input lag than any display I had tested previously, so I decided to test against a display I’m pretty fond of - my BenQ FP241W. Now, what about how the VG236 compares to it?
The VG236H consistently lags 1 frame from the FP241W, regardless of FPS, across about 40 photos I captured of the two displays. It’s always exactly one frame behind.
So what does that mean? Well, we’re likely seeing the difference between the 60Hz refresh rate of the FP241W and the 120Hz refresh rate of the VG236H. The higher refresh rate lets the ASUS show more frames than the FP241W, giving us more granularity. It just so happens that it’s pulling one frame behind, which on average worked out to a lag of 1.9 ms.
Further, Jarred tested the FP241VW which is essentially the exact same monitor as the FP241W but in a different enclosure, and measured input processing lag to be 2 ms compared to the famous HP LP3065 (which has no scaler and no input lag). Thus, a more accurate number for input lag on the ASUS VG236H is the sum of the two, at a much more respectable 3.9ms.
Power Consumption
The ASUS VG236H specifications stipulate power use of under 60 watts in typical circumstances. At maximum draw, we measured 47 watts.
We test display power consumption using a Kill-A-Watt EZ in line with the display power cable, and measure at maximum and minimum brightness while displaying solid white.
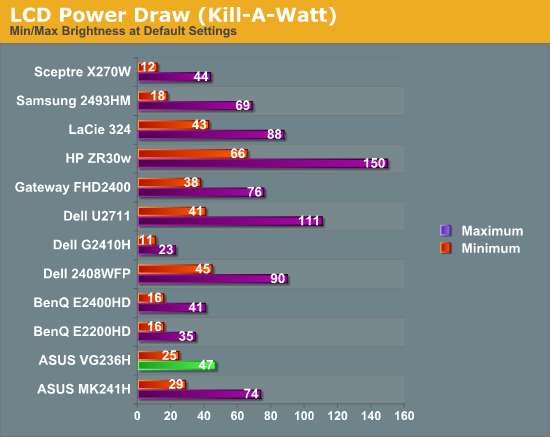
The VG236H finished within this 60 watt upper limit, drawing a maximum of 47 watts at maximum brightness, and 25 with the display at its lowest brightness. Granted, it’s only 23”, but still efficient results.
Conclusions
This was the first 120Hz desktop LCD I’ve gotten time with, and even before I opened the box I had heard from all around that it’s held in very high regard. Regardless of how you feel about 3D, the VG236H is an awesome choice even from the perspective of its 120Hz refresh rate. Side by side with a traditional 60Hz LCD, the difference is striking. Further, instead of getting tearing above 60 FPS like you would with vsync off on a traditional 60Hz LCD, you get smoother gameplay that just looks more fluid. I definitely can tell the difference, and now I don’t want to go back.
With the 120Hz display, you’re really getting every frame at or below 120 FPS drawn to the screen. At that high of a response time, you definitively can’t see flicker. The result is a similar kind of ‘once you’ve experienced it, you can’t go back’ to a solid state drive.
But if you’re going to get the VG236, it’s worth it to go for the H model which bundles the 3D vision kit over the HE which excludes it, if nothing else so you can see 3D for yourself and decide if it’s worth it. It’s a shame that NVIDIA doesn’t bundle or subsidize copies of Metro 2033 or other 3D Vision Ready titles that really offer a level of gameplay and 3D polish that even ‘excellent’ and ‘good’ titles clearly lack.
Right now, the VG236H’s primary competition is the Acer GD235Hz, which, bundled with the 3D Vision kit, runs $545 on newegg. At $499 with the bundled 3D Vision kit, the VG236H looks like an undeniably better deal with the same specs on paper. The other primary contender is the Alienware OptX. Hopefully we’ll get our hands on these and compare.
As for the future, the real draw will be to larger screens and higher resolutions. In the immediate future, we’ll see a move to LED backlighting on these 120Hz panels. Once you try a 120Hz display, it’s hard to go back.

