Original Link: https://www.anandtech.com/show/3820/asus-evga-gigabyte-msi-four-flagship-motherboards-reviewed
ASUS, EVGA, Gigabyte & MSI: Four Flagship X58 Motherboards Reviewed
by Rajinder Gill on July 15, 2010 10:00 PM ESTRound one of the high-priced enthusiast end of X58 went to EVGA last year, who set the pace with their Classified line of motherboards. While not perfect in every regard, the E759 and E760 broke and set more overclocking records than any other product, elevating the Classified series to must have status in the eyes of overclocking and gaming enthusiasts.
In light of this success, it was clear that ASUS, Gigabyte and MSI would have to go back to the drawing board and come up with new designs to captivate the audience. The launch of Intel’s i7-980X Gulftown together with the availability of SATA 6G and USB 3 controllers from Marvell and NEC provided the excuse for a revamp and here we are a couple of months down the road with everyone vying to capitalize on sales thanks to the longevity of the X58 platform. That’s where we pick up today, we’ve got the very best ASUS, Gigabyte, EVGA and MSI have to offer and have lined up a compare taking a look at basic functionality, overclocking and overall stability.
Meet the contenders:
Now grab a fresh pair of pants before you take a look at the asking prices:
| Motherboard | Chipsets | SATA 6G | USB 3 | Price |
| ASUS Rampage III Extreme | X58 | Yes | Yes | $379 |
| EVGA X58 4 way Classified | X58, 2 x NF200 | No | No | $429 |
| Gigabyte X58A-UD9 | X58, 2 x NF200 | Yes | Yes | $699 |
| MSI Big Bang-XPower | X58 | Yes | Yes | $299 |
Eek! $700 for a single socket motherboard? That’s waaay over the top. While we acknowledge there is a market for high-end products, we can’t think of a good reason for why a motherboard designed around a heavily integrated architecture should be priced this high. There nothing radical on or about the UD9 that justifies such expenditure ; like most of the other boards on test here today, the base design is very much de-facto for the platform and identical to lower priced motherboards( apart from the addition of two nVidia NF200 chips to provide four way SLI capabilities).
In general, all these boards do over their $200~$250 counterparts is offer a more robust VRM for heavy overclocking, in some cases a better layout and lastly a more overclocking centric BIOS. As such, these motherboards are worth looking at by those of us that have very specific overclocking needs beyond conventional cooling, or by those that have a mind-set that pays scant regard to cost versus performance ratios. So yes, this is a minority audience article, but we’ll be getting back to our roots straight after – don’t despair!
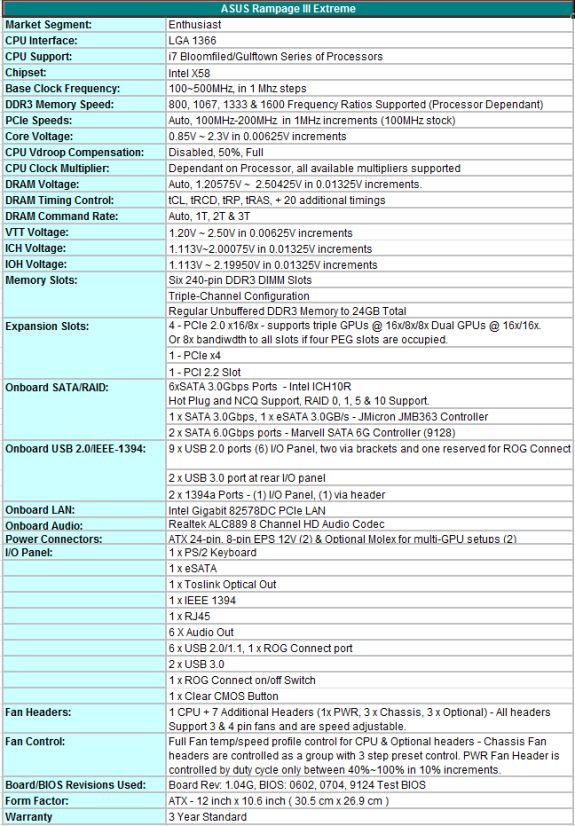
The Rampage III’s component layout is nigh-on identical to the P55 based Maximus III (Marvell SATA 6G and NEC USB 3), the only real change coming in the form of the Realtek’s ALC889 audio codec instead of a VIA solution. Unlike previous ROG boards, ASUS are not providing the Realtek’s codec as a plug-in soundcard, instead it’s back to on-board placement. This would have been okay with us provided ASUS bundled some form of Creative gaming software or Dolby package, but there’s nothing of the sort on offer here, which will leave most users looking at plug-in alternatives.
A single Intel 82578DC NIC is utilized for LAN duties, which many users fancy as a better alternative to controllers from Realtek, Broadcom and Marvell. You’ll want to avoid the latest Intel drivers (ASUS are using an older version which works OK), as they seem to have a bug with wake from S3 so stick with what you get on the driver disk or ASUS download site until newer drivers are qualified.
What’s in the box?
The following items are shipped with the Rampage III Extreme:
1 x ROG Connect Cable
1 x ProbeIt Cable Set
1 x 3-Way SLI Bridge
1 x SLI Cable
1 x CrossFire cable
6 x SATA Cables
2 x SATA 6G Cables
1 x two Port USB 2.0 and eSATA bracket
1 x I/O Shield
1 x Thermal Sensor Pack (for fan header thermal monitoring/speed control)
1 x Cable ties pack
1 x ROG sticker and 1 x Cable label pack
1 x Optional Heatsink and fan (for IOH cooling)
1 x RC Bluetooth module
1 x Support DVD
1 x User Manual
A fairly comprehensive bundle from ASUS as you’d expect at the price. The thermal sensors are a nice touch and tie in very nicely with ASUS’s fan control options – easily the most comprehensive range of control on offer from any vendor, putting more expensive boards from EVGA and Gigabyte to shame.
Board Layout
We quite like the layout of the R3E, everything is accessible in most situations:
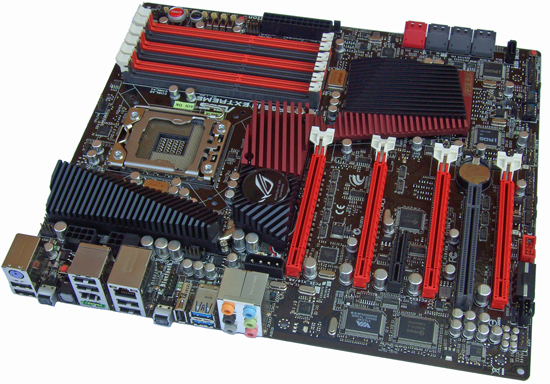
On-board cooling isn’t that great in our opinion – IOH idle temps with ASUS’s heatsink and fan combo are up in the 60s at stock voltages (high for a board without NF200s). Overclock higher and you will hit 70 Celsius plus quite easily in a case. Ordinarily we are not overly concerned about temps although in this instance high temperatures on the IOH can be a hindrance because the QPI bus starts to throttle when temps go too high. This also limits the board’s stability at high BCLK unless you provide copious amounts of additional airflow across the heatsink assembly. The whole situation is not helped by ASUS’s choice of thermal interface material; it’s thick yellow bubble gum type stuff. A simple change out of TIM on the IOH to Artic Silver Ceramique lowered the IOH idle/load temps by seven Celsius and encouraged the board to POST past 215 BCLK. We’ve passed our findings on to ASUS and hope they update future boards from the factory.
One thing we should mention before we move on; ASUS provide socket 775 mounting holes for older CPU coolers, which some users may appreciate.
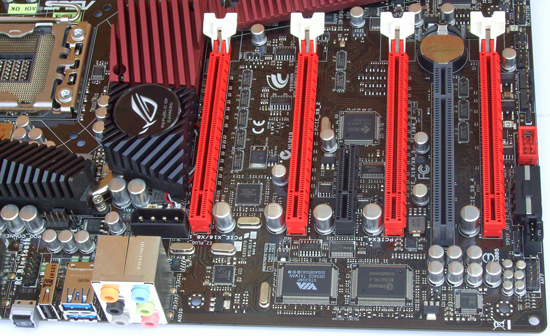
Slot layout is geared for multi-GPU setups, allowing the use of three dual slot graphics cards in tandem with a PCIe sound card or four dual slot GPUs (CrossFireX). Lane allocation is 16x/16x, 16x,8x,8x or 8x/8x/8x/8x.
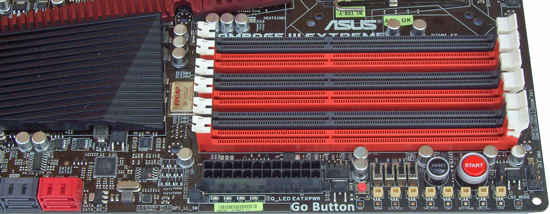
On-board power and reset buttons are available near the DIMM slots, together with voltage read points and also on/off switches for the PEG slots which can be useful when using multi-card setups during benchmarking.
Software
The software side of ASUS’s bundle is the same as what we covered on the Maximus III Extreme here. You’ll be pleased to know we didn’t find bugs, the overclocking software works fine.
BIOS & User Experience
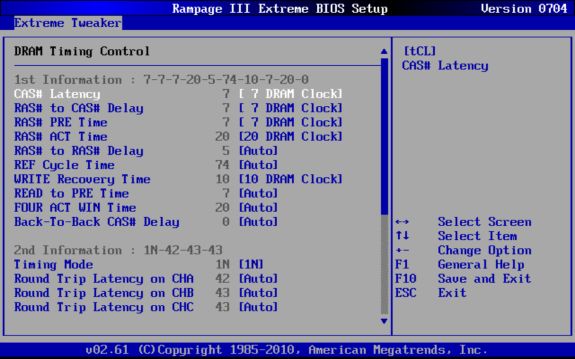
Aside from aesthetic appeal, BIOS is probably the best reason to choose the R3E over the other boards we’ve got on test today. It’s easy to navigate and contains options for every type of user.
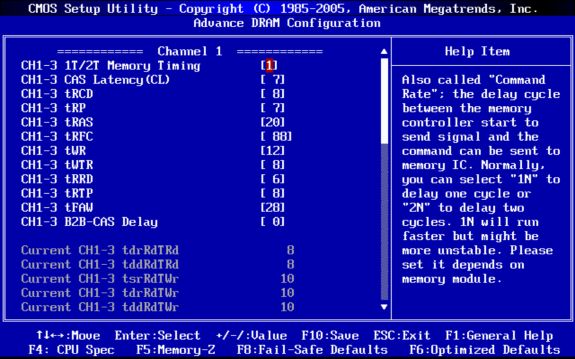
Memory overclocking is made easy thanks to automated scaling routines that apply offsets as memory frequency is increased. Individual timings can be changed one at a time, away from the BIOS presets, while the BIOS displays the actual setting in a list for cross reference.
Out of all the boards we’ve got on test today the R3E provided us with the best overall user experience. The only “bugs” we found in the 0602 BIOS related to a couple of sub-timings failing to respond to manual changes. This has since been fixed, and right now there’s nothing we can think of to complain about.
The 9124 beta BIOS is earmarked as ASUS’s benchmarking centric BIOS, it adds all the fixes to date together with what ASUS call “2D Performance Booster” for Gulftown processors. ASUS love giving simple things proprietary names, all this setting really does is disable Gulftown specific microcode which gives a boost to some 2D benchmarks (circa 4~6 seconds in Super Pi 32M). This feature is not unique to ASUS; EVGA have a Turbo option in their BIOS that does the same thing, while Gigabyte have a beta BIOS in circulation that does something similar (without the option to swtich the microcode on and off). Overall, it’s a nice feature for those chasing 2D records, but is of no use to anyone running these boards in a 24/7 system.
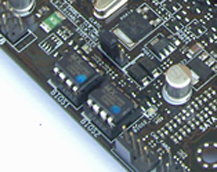
The dual BIOS system we first saw employed on the M3E gets an outing on the R3E, too. Two separate BIOS chips are used by ASUS each can be flashed to a different BIOS version for cross compare and backup. Switching between BIOSes can be done via BIOS, ROG Connect or by using an onboard switch when the board is in standby mode.
BIOS flashing can also be taken care of a variety of ways; flashing is possible via OS software, via a built in routine accessed through BIOS or ROG connect while the board is in standby state - covering just about every usage scenario.
There are no hardware incompatibility issues we have to report, everything in our test repertoire was recognized and available for use with minimal setup fuss. S3 resume worked well, we managed to wake the board at 210BCLK from USB after several hours, which we consider excellent, though not class leading. Recovery from failed overclocks works farily well in most instances, at most we needed to cycle power to encourage a safe mode POST. Not the very best rendition of automated recovery we’ve seen, however it is something we can live with.
General board stability under stress and benchmarking conditions is also good, the R3E consistently scored at or near the top in our tests and managed some of the highest stable frequencies we’ve seen on our Gulftown processors. The only exception being the need to switch over to QPI slow mode on our test sample boards once past 219 BCLK – something we don’t have to do on the EVGA and Gigabyte test samples (although those boards cost more). Where this may become an issue for some users is when pushing locked core multiplier processors at high BCLK for benchmarking purposes; you need a board with a good IOH to do it. That’s the only black mark we have against our R3E samples thus far; we were expecting the second generation of X58 boards to be more consistent in the BCLK department. That being said, out of the four boards we’re testing today, the R3E is the best all round performer and the easiest to use.
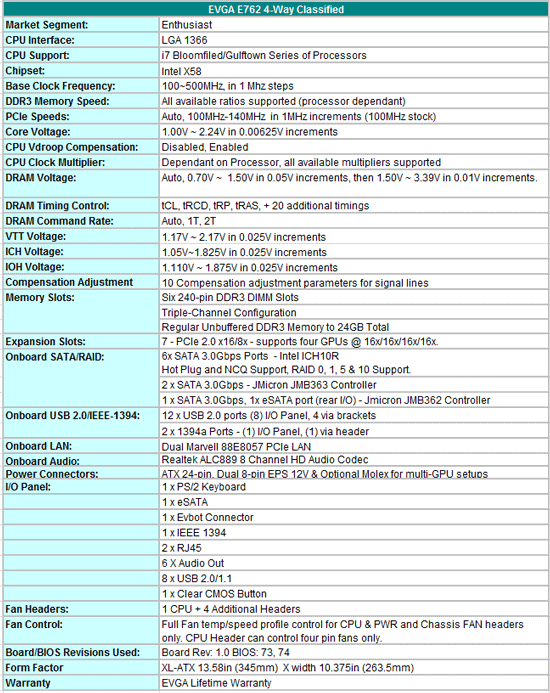
The E762 was released earlier this year, just before Marvell and NEC obtained a footing in the market with SATA 6G and USB 3. That means the E762 misses out on two features that vendors have used as a spearhead for the second generation of X58 motherboards. That’s going to be a big hurdle to jump at the asking price (~$420)
On-board audio capabilities are supplied by Realtek’s ALC889 and work fine for the most part barring the omission of optical or coax S/PDIF on the rear I/O panel. We see this as a crippling blow, leaving the only option to stick with analog out or purchase a dedicated soundcard. Considering MSI are able to bundle a plug in soundcard and Creative driver package with their board at around $300, we don’t think it’s too much to ask to have something of similar ilk on the E762.
EVGA are selling a plug in USB 3 card as an optional extra, our advice would be for EVGA to include it in the package rather than ask users to fork out extra for something other boards are providing as standard.
Nothing special on the LAN side either, dual Marvell controllers are used to govern the two rear RJ45 ports. A few extra SATA ports are on tap, wired through JMicron’s JMB362/363, very much standard stuff that we find on boards costing half the price.
What’s In the Box?
1 x I/O Shield
3 x Molex to SATA power cables
1 x 2 port USB and 1 port 1394 bracket
6 x SATA cables
1 x IDE ATA 133 HDD cable
1 x 2-way SLI bridge
1 x 3-way SLI bridge
1 x 3-way SLI with Physx bridge
1 x Driver CD
1 x User manual
1 x Visual guide
1 x ECP (overclocking module)
Just about every type of cable needed is supplied by EVGA, apart from a bracket to make use of the internal S/PDIF header. The manuals are reasonable, but don’t actually cover the E762 model specifically (E759/E760 layout), although the layout side of the E762 is taken care of by the supplied visual guide.
Software
The only software that EVGA bundles with their boards is E-LEET. Be sure to download the latest version from EVGA if your driver disc comes with anything older than 1.08 - older versions won't allow you to apply Vcore over 1.60V.
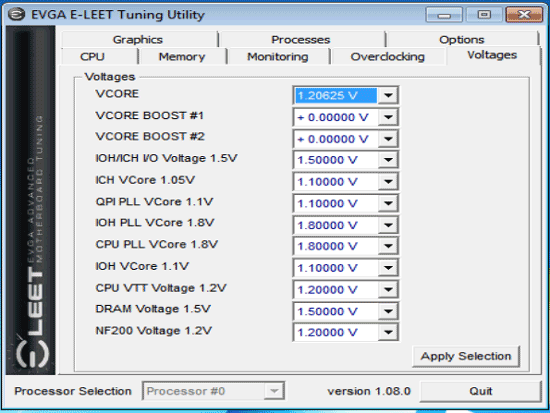
Still our favourite overclocking utility. This is one thing that EVGA do better than anyone else in the business. The standard control of BCLK and rail voltages is provided together with quick save profiles and the ability to run the software in the background of the bench without polling the SMbus. The only thing EVGA does not provide via this interface is OS level fan control (BIOS is the only way). No negatives to report elsewhere, the latest version of the utility works pretty well.
Board Layout
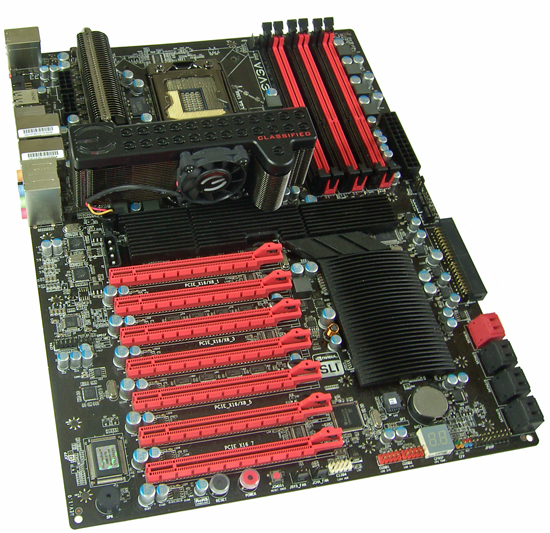
The first thing you’ll need to be aware of is this boards’ from factor it what EVGA refer to as XL-ATX length 13.58in (345mm) X width 10.375in (263.5mm). This obviously limits case options, for a list of compatible cases check here.
Looking past the form factor, the sheer number of PCIe slots should accommodate just about every type of multi-GPU setup. Provided you’re not holding on to PCI cards, we can’t see anything to complain about. The power and reset button placement can become obscure when the last PEG slot is occupied, but the supplied overclocking panel gets around this without a problem.
The IOH/ICH/NF200 heatsink is substantial in size. A small fan is fitted as standard, although idle temperatures (like the ASUS board) run rather hot; the IOH sensor reports idle temperatures of 72 Celsius in a 20 degree ambient. This is an obvious side-effect of having two NF200 chips dumping their heat into the assembly. Needless to say, extra cooling is definitely needed even at stock operating frequencies, especially if running a multi-GPU setup. If the IOH gets too hot it will throttle, causing a loss in performance and an impact on stability if the system is overclocked.
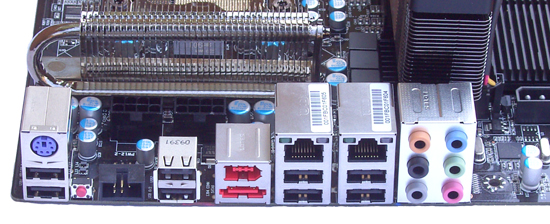
The rear I/O panel is home to all standard connections apart from a digital audio ouput. It seems the space that EVGA reserved for the S/PDIF connector has been donated to a header for EVGA’s EVBot remote overclocking device. As we said earlier, be prepared to shell out for a discrete soundcard if you want to build a decent gaming rig with this board, the Realtek is okay, but won’t send tingles up your spine with startling dynamics.
All of the things EVGA have now become famous for are present on the E762, low CPU inductance socket, voltage manipulation(current sourcing and sinking) control for critical receiver bias on all key signal lines, voltage measurement points, cold boot jumper (for sub-zero benchmarking conditions), PCIe disable jumpers, the list goes on. With the exception of the voltage control for receiver bias, everything else has now been adopted by ASUS in some form or another - so much of this is no longer a unique selling point. EVGA were ahead of the curve last year with this stuff, but things seldom stand still.
BIOS & User Experience
Not a great start for us on the E762; our board was shipped with an old BIOS that does not allow Gulftown processors to POST. Over the past 4 months, EVGA have released several BIOS updates for this board that support Gulftown and it seems that these updates are not filtering down to various branch offices. We’ve seen reports of users purchasing a brand new E762 only to find themselves in the same situation as we did. The only fix is to use a Bloomfield processor or to replace the BIOS chip. Things like this don’t inspire confidence.
With that little gem out of the way, there’s also a problem with revision one boards not POSTing with Westmere Xeon processors. There is a fix for this; a hardware mod and not something most users will want to attempt (even though it’s relatively simple if you know how to use a soldering iron). If wanting to use a Westmere Xeon processor in this board our advice is to be sure that you to get a revision 2 motherboard. We only mention this because our sample was shipped recently from the EU EVGA office and it’s a rev 1. That means there are probably a few of these floating around in retail – just a heads up.
As for the BIOS itself, it’s a little more raw than what you get on an ASUS or Gigabyte board in terms of layout, and in some areas of functionality. We encountered an issue with Gulftown processors during our testing where BIOS would automatically increase the Uncore multiplier ratio to 16x from our setting of 15x upon reboot. This has been fixed now thankfully, making the board a lot more predictable to use. Be sure to flash over to the latest BIOS as soon as your board lands (assuming you can).
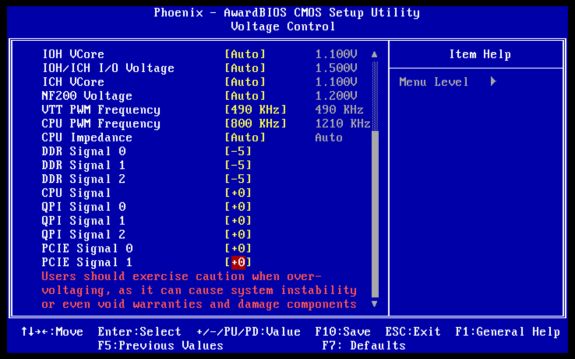
Almost everything the EVGA BIOS offers is relatively straight forwards to understand, the only settings users will struggle to comprehend are some of the compensation adjustments:
Most of these can actually be left on default in most scenarios unless chasing high BCLK or QPI frequencies. At such point, sinking additional receiver bias current can help extend margins a little on some processors. The idea is to hold receiver stages in an off state while the associated data lines are not transmitting data (tri-state receivers – logic high, logic low and off), this ensures that inactive lines do not register logic (data) falsely during a bus transmit. The settings you’ll want to change are QPI signal 1, and CPU signal 1. Try values between -5 and -31 at most for these – sinking too much of the receiver bias can be as bad as not sinking enough (we suspect this has something to do with slew rates). There are also sometimes small gains to be had by adjusting DRAM compensation values in a similar manner. Effects will vary from processor to processor according to substrate variance, environmental factors (noise such as RFI and EMI) and the rail voltage applied to either side of the bus.
Moving on, the rest of the BIOS is adequate although it could do with some work to make it a little more user friendly; you can’t type voltage values in directly to select the value we want, instead having to scroll through the scale – direct input is a feature that ASUS, Gigabyte and MSI have in their BIOSes.
EVGA haven’t gone to the trouble of adding a built-in BIOS flashing utility on their boards either. A bootable pen drive or DVD (both with DOS) is the only way to flash the BIOS. The E762 was also released before EVGA decided to start using multiple BIOS chips on their enthusiast P55 motherboards. Therefore the E762 does not have the luxury of multiple onboard BIOS chips, which is one cross in the book against ASUS and to a certain extent Gigabyte.
We did not encounter any major issues during basic functionality testing, the only thing we had to dig around with is our ASUS Xonar D2X PCIe soundcard. The E762 fails to recognize the card unless “bridge device” mapping is enabled in the PCI configuration page of BIOS. EVGA disable this by default at nVidia’s behest. We’re told this has something to do with nVidia’s surround vision. If that’s the case, this is a potential issue for people that decide to opt for such a configuration with a plug-in soundcard like the Xonar in tow.
S3 resume works fine up to 210 BCLK, which is on par with the ASUS R3E, but not quite as good as the Gigabyte UD9 which resumed after several hours at 220 BCLK with the same processor and memory. We hasten to add that 210 BCLK covers the range of interest to most overclockers, so not a huge deal breaker but something worth bearing in mind.
Fan control is on offer for three headers only, not as good as the ASUS R3E, but better than what Gigabyte are offering on the UD9. Unfortunately the CPU header is not capable of controlling three pin fans, which is a problem for certain aftermarket coolers. Even though this isn’t the worst level of fan control options on the boards we’re testing today, high-end boards should offer a lot more control than what we’re seeing here - it seems only ASUS are getting this right at present.
The “tweakability” of the E762 may appeal to some users, although many of the extra hardware options are of little use when using conventional forms of cooling. In situations where these settings can help, the rewards on Gulftown processors are not quite as prevalent as what we found on Bloomfield last year, so not an absolute necessity. We are happy that EVGA go the extra mile on their boards though, and at least try to extend clocking margins. With what consumers are being asked to pay for high-end products, it is very disappointing to find that most vendors don’t spend any extra time in R&D at all but still find a way of attaching a high price tag to their boards regardless. The end result of the extra work may be small, but that’s why users buy these boards in the first place - a little credit to EVGA for trying.
However, this uniqueness is not enough to get a glowing recommendation from us this year, there are key areas that EVGA need to improve the Classified series to bring it in line with what other vendors are offering. Specifically, a little BIOS refinement, fan control, BIOS flashing options, better support in the EU and certainly better validation practices on BIOS updates - boards shipping to consumers with old BIOSes that don’t support new processors is unacceptable, especially when we’re not the first ones to have pointed this out.
If you haven’t found any of what we’ve said here off-putting, chances are you’re a die-hard overclocking fanatic. The lowdown is that we can’t see a need for the E762 unless running three or more video cards. If that’s what you intend to do for a big bad gaming rig, or if you’re interested in benchmarking only; other than the cost disparity (which is a huge deal actually), the UD9 is possibly a little more efficient than the E762 in certain 2D benchmarks clock for clock. However, as you’ll see later in the overclocking compares, the E762 makes up for this by managing higher stable frequencies thus gaining an overall advantage in 2D benchmarks. We’re not sure if this will manifest for everyone in a similar fashion, because we did not have sufficient cooling on tap to really max out our processors, although what we’ve experienced is enough for us to favor the E762 over the Gigabyte UD9.
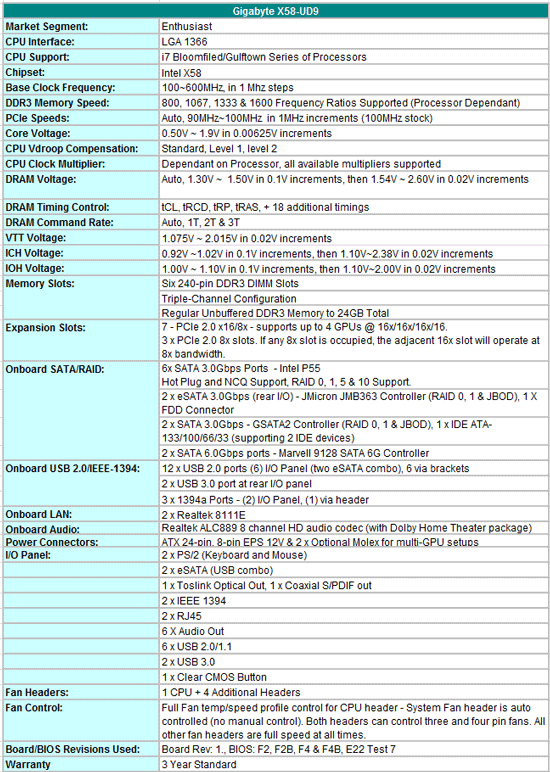
Where to start? Yes, there is an abundance of SATA ports and such on the UD9, but, there’s nothing on the component front that sticks out as special at the asking price. Much of what we see here is utilized by Gigabyte on their lower end models which are substantially cheaper (same NICs, audio and JMicron style SATA controllers , SATA 6G, USB 3 and associated features like on/off charge). We can’t help but feel that there is some serious price gouging going on here. The only thing setting the UD9 apart from the UD7 model is the addition of the NF200 bridge chips, and a revamped VRM – it’s impossible to see how this adds $300 worth of value. Until Gigabyte or Newegg drop the asking price (whoever the guilty party is), we’re not in any kind of position to offer a recommendation.
Here’s what you get bundled with the UD9:
1 x Driver disk
1 x User manual
1 x Quick installation guide
1 x IDE cable
4 x SATA cables
1 x two port eSATA bracket
1 x I/O shield
1 x “Silent-Pipe” heatsink (optional)
1 x 2-Way SLI connector
1 x 3-Way SLI connector
1 x 4-Way SLI connector
2 x 2-Way CrossFireX connectors
No major extras in the bundle or special goodies like a pre-paid trip to Vegas. With all those extra SATA ports one would expect Gigabyte to have provided more than four SATA cables. Unlike ASUS, EVGA and MSI, Gigabyte don’t have any kind of external overclocking hardware in the bundle, it’s all very basic Gigabyte stuff with the UD9, which leaves us even more bemused by the price.
Software
For a software rundown check here as there aren’t any major changes for the UD9. There’s a slight revamp to Dynamic Energy Saver in that the software has been updated to manipulate Gigabyte’s dual VRM topology on the UD9. Basically, what the DES software allows you to do is utilize half the phases during light~moderate loads to save some power.
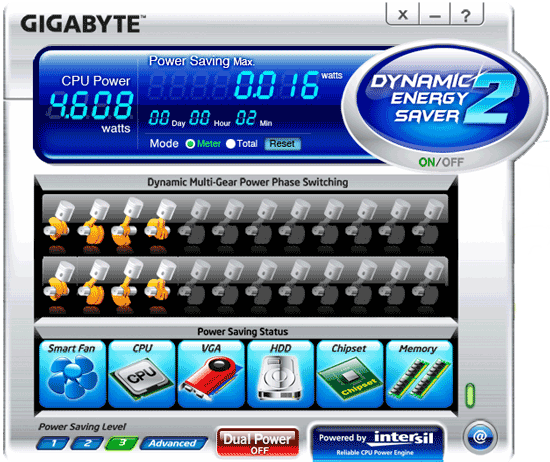
The primary functions of DES work fine, the custom aspects like underclocking don't. Any time we tried to apply our custom power saving preferences the OS prompted us to reboot and then froze before completing the process. Upon reboot we were told that DES had been disabled, and when we re-enabled the software none of our preferences seemed to take effect. Stick with the primary functions of the software if you must use it until Gigabyte fixes the problem. The saving grace is that we can’t see many users opting for a board like this with energy efficiency at the top of their buying shortlist. We’d expect most users will want to use Gigabyte’s Easy Tune software for overclocking though. Updates to the software have added extra functionality such as quick load profiles for benchmarkers and such. Overall, the software is quite heavily laden with options which can make it a little slow to navigate and to load. We didn’t find this to be too much of a hindrance during benchmarking though - everything one needs to adjust is readily available.
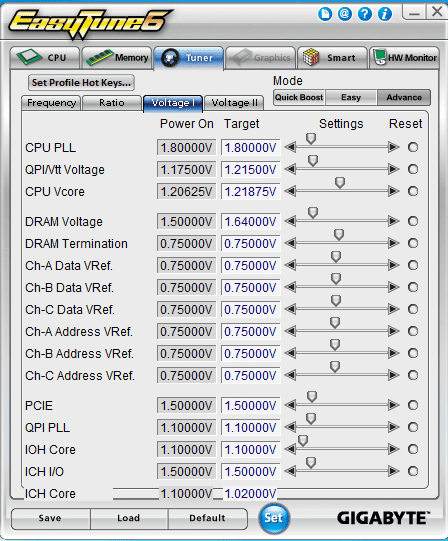
The only thing Gigabyte do need to fix with Easy Tune and in their BIOS is the misreporting of DRAM Vref values. The BIOS and Easy Tune show these at 0.75V regardless of where we set VDIMM. All DRAM side voltage references track 50% of VDIMM by default (the norm for differential signal stages). We’ve pointed this out to Gigabyte before but things are still the same. It doesn’t affect operation of the board in any way, which is probably why we have been ignored, regardless; these values should be reported correctly in our opinion.
Board Layout
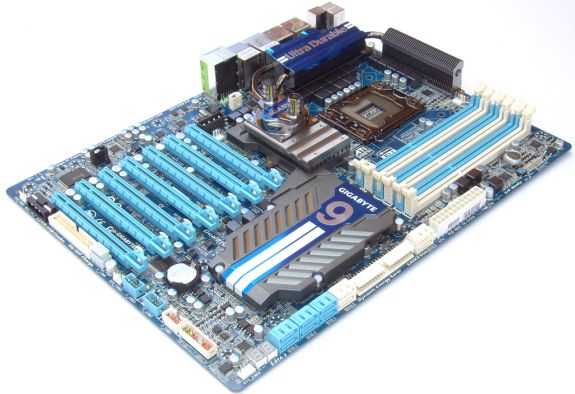
Like the EVGA E762, the UD9 is an oversized ATX board (34.5cm x 26.2cm), rendering most PC cases as unsuitable for a home. We refer you to Gigabyte’s supported chassis list here for a list of candidates.
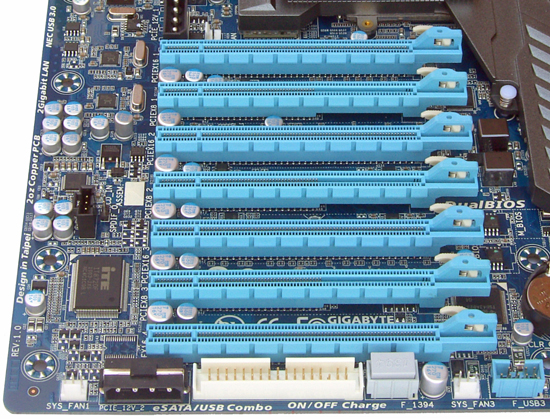
Like other Gigabyte boards, the UD9 is strewn with a plethora of peripheral ports right down to legacy stuff like FDD (no PCI though). PCIe layout is identical to EVGA, and geared for multi GPU setups.
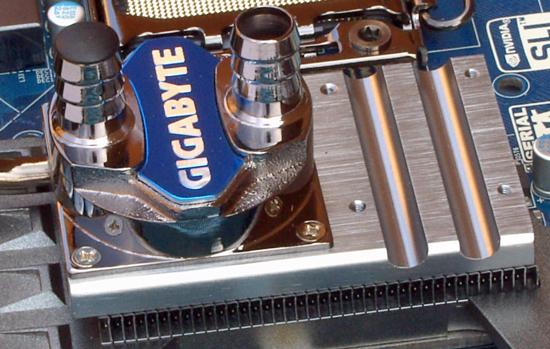
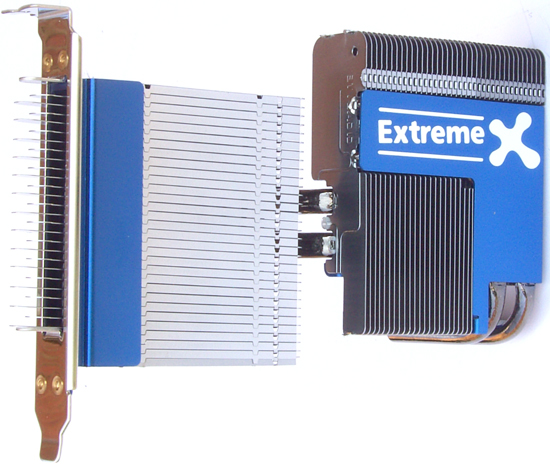
While the base setup works fine with a bit of airflow, the addition of a built-in water block and the plug in heat sink look like they were an afterthought. There is heat transfer to the water block, but placed in this location, water-cooling the assembly is more hassle than it’s worth - the same thing applies to Gigabyte’s optional heatsink (we noted a two Celsius change in temperatures using this solution). it makes more sense pointing a fan at the base assembly to keep temperatures in check. Our final verdict about the add-on parts is that for a $700 outlay we'd prefer a custom full-coverage water-block from the likes of EK bundled in the package.
We don’t have any layout gripes per se, everything is accessible. Something we did expect to find on a board like this is the inclusion of voltage measurement pads for multi-meters. Software reporting is seldom accurate, so many users like to use a multi-meter and measure voltage as close to the load as possible (provided vendors tap traces at the right point). Gigabyte are the only vendor on test today that don’t provide provision for this and that is a shame for anyone who is going to push the UD9 hard. Monitoring voltages under full load conditions during heavy overclocking experiments can save a lot of time, and at least paint a more accurate picture of what the processor is seeing at the power pads.
As we mentioned earlier Gigabyte’s VRM has undergone a revamp – still using Intersil’s six phase controller (MUXed out to 24 phase), with the major change over previous iterations being a switch out to integrated driver/FET stages. Overall current handling capabilities are purported to be a crazy 1.5KW, more than any single processor can draw. We’ve seen peaks in excess of 320 watts from a Gulftown running the CPU tests of Vantage at 5.1GHz, while users have reported up to 500W from Gulftown processors running Vantage around 6GHz. So, there’s far more than anyone will physically and theoretically be able to use on tap. Gigabyte has gone this far to aid long-term reliability. Whatever the reason may be, it’s not a big enough lynch-pin to justify an elevated price tag in our opinion.
BIOS & User experience
Our test journey began with the F2 public release BIOS, which was updated in a matter of days to the F4 series of releases. A common problem on all of these releases (and one we keep finding on Gigabyte boards), is an issue using AHCI mode with optical DVD drives. Gigabyte’s BIOS base code does not include a sufficient hold time during POST for our optical drives to initialize and boot from inserted disks. Usually the workaround is to hit the Pause button before BIOS goes into drive detection routines, although we found this did not work for us on the UD9, forcing us to install Windows 7 in IDE mode and then using a workaround to enable AHCI drivers in the OS registry. Someone back at Gigabyte needs to take note of this reoccurring issue and force through a permanent fix.
Getting past that, one thing we’ve seen vendors do in the past is apply small overclocks to boards at board defaults in order to improve their position in “stock” benchmark compares during reviews. The UD9 applies a 2MHz BCLK overclock as standard to ALL processors. While this is within the bounds of stability without needing over-voltage, it is something anyone testing these boards needs to be made aware of – like ASRock, Gigabyte aren’t going out on a limb to tell review sites they are doing this, you either see it or you don’t. Fortunately, we’re always on the lookout for stuff like this and make sure we line up all boards as fairly as possible in our base compare tests. Right now, the only two vendors we’ve seen employ such methods to keep their nose ahead of the pack are ASRock and Gigabyte. ASRock ar probably the bigger guilty party here (forcing other vendors to follow suit) and will apply as much as 5 BCLK on AUTO defaults (138BCLK effective). Vendors like ASUS are a little less obvious, and apply a small positive offset of .7 MHz which gives a tiny overclock (133.7Mhz) – EVGA are a little more honest and apply the same .7 offset but keep you one BCLK below what you’ve set (133BCLK is 132.7MHz) We’d like to see the positive offset practice stop – stock defaults should be absolute specification defaults and as close to 133 BCLK as possible. Little things like this may not sound like a lot, but they are enough to skew benchmark results. (Sigh, end of rant).
Back to the UD9 proper, we quite like Gigabyte’s BIOS layout, it’s well laid out and comprehensive enough for all types of users. Gigabyte is the only vendor really pushing ASUS on general BIOS quality. There are a couple of areas where we feel ASUS have the edge; slightly better implementation of automated parameters for overclocking and more obviously fan control options. Only the CPU header can be fully controlled on the UD9. The System fan header can control both three and four pin fans but this is tied to automatically ramp up and down with system temperature – direct user changes are not possible. The other three headers remain full-on at all times. Again, this is not what we expected to find on a high-end motherboard.
On a positive note, recovery from failed overclock does work pretty well and is on-par with the ASUS R3E – the only improvement we had to suggest to Gigabyte for this was to add an F1 halt alert, as we found pre F4B BIOSes to sometimes POST in safe-mode after a failed overclock without alerting the us that BIOS settings had been changed to safe.
Plug-in peripheral compatibility is good, we did not encounter any problems (other than what we mentioned above), with our test equipment. Overclocking stability is also good for the most part, the only exception to that will be of interest to the extreme benchmarking crowd; we found this board to be a little less stable than the ASUS and EVGA offerings when pushed hard during sub-zero benchmarking runs. Heavy CPU load test like Vantage were not a problem; it’s Super Pi 32M where we ended up 2~3 BCLK adrift and hence achieved a lower overall score. Clock for clock efficiency using Gigabyte’s benchmarking BIOS is pretty good, and on the face of it appears to have an edge of the EVGA E762, unfortunately, the frequency disparity we experienced between the UD9, E762 and R3E while using the same processor and parts nullifies the gain in 2D, although the 3D side edges the other boards in scores.
Recovery from S3 resume works very well on the all BIOS releases, allowing us to recover our system from sleep all the way up to 221 BCLK (higher than any other board in this test).
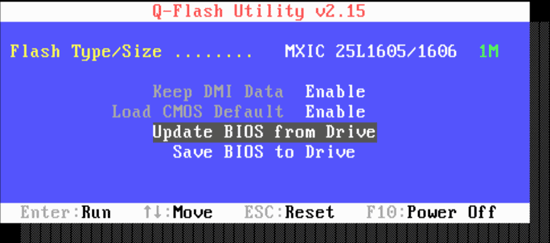
Q-Flash is Gigabyte’s rendition of a built in BIOS flashing routine, and we’re happy to report this works well. If we recall correctly, Gigabyte were the first vendor to market with dual-BIOS, providing a failsafe in the event of BIOS corruption. This feature is also utilized on the UD9, and as on previous motherboards does not allow users to load two separate BIOSes for compare. As we see so often in this industry, nothing is sacred for long; if it means improving sales, someone will copy a good idea and occasionally improve it, and that’s what’s happened here with ASUS. We’d like to see Gigabyte offer something similar to what ASUS are providing on the R3E (flashing two separate BIOSes and easy changing between both). There is a slight reprieve for Gigabyte in that neither EVGA or MSI have dual BIOS options on their X58 boards, mind you, that’s balanced against you know what – the dollar.
Now this is more like it on the pricing front for a flagship motherboard, at $299 shipped the XPower looks a lot more attractive than the other three boards we’re testing today. SATA 6G and USB 3 are present, together with a plug-in soundcard that includes Creative X-Fi drivers as part of the package.
Let’s take a look at package contents:
1 x Driver/utility DVD
7 x SATA cables
1 x Two port eSATA bracket
1 x Two port USB bracket
1 x Molex to 2 x SATA power connector cable
2 x Molex to SATA power connector cable
3 x SLI bridges
1 x CrossFireX bridge
4 x V-Check cables
1 x QuantumWave audio card
1 x User guide
1 x Quick start visual guide
1 x I/O shield
1 x OC Dashboard (remote overclocking panel)
A fairly comprehensive package from MSI, including needed brackets, a plug-in soundcard plus a nifty little remote overclocking device known as OC Dashboard. For a description of the soundcard and OC panel we re-direct you here as there are no changes to either device, either electrically or in terms of operation – both work well. A decent bundle of goodies from MSI, especially if you take a gander at what Gigabyte are providing with the UD9 at over double the price.
Software
The software saga is the same as what has gone before on MSI. The main tool being Control Center:
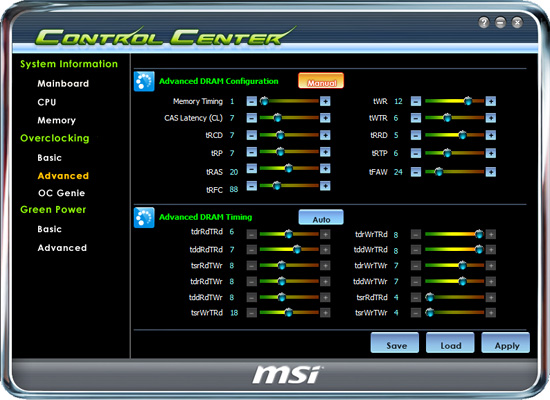
We’re not sure what version MSI are currently shipping with retail boards, whatever it is, we’d advise you to head over to the MSI download section and grab the latest version just to be sure. Early versions of the software work in most regards, but do have a tendency to misreport voltages on occasion. This has been fixed so you should be good to go on the latest release.
Control Center hasn’t really seen any improvements over the past six months; every iteration offers the same level of options. While the memory tweaking section is a nice touch, changing any parameters requires a reboot - we may as well change things from BIOS instead. Third party tools like CPU Tweaker do a better job than Control Center in this regard so it’s probably wise for MSI to either follow suit or put resources behind other areas of operation.
Where Control Center falls behind other vendor tools is a lack of multiplier changing options, which can be a pain for users who benchmark Gulftown processors. Other than that, options to control fans, voltages, bus speeds are all present – although we find OC Dashboard more convenient to use.
Board Layout
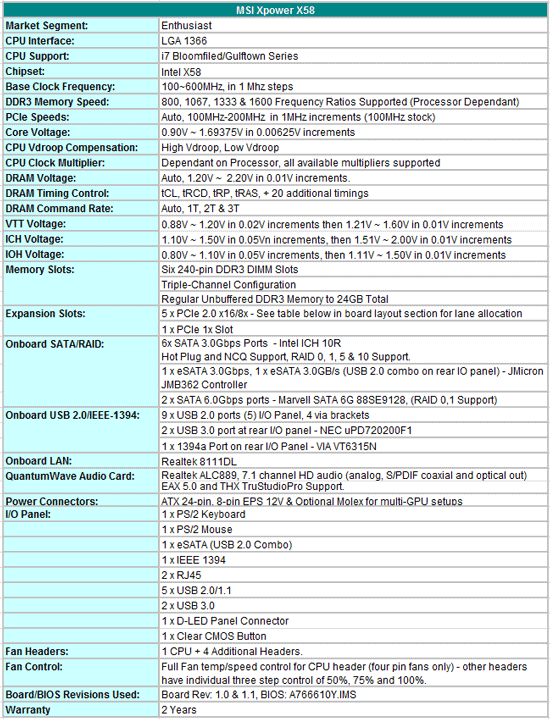
When we first laid eyes on the XPower, we were certain MSI had included an NF200 chip due to the number of PCIe slots on offer. However, that’s not the case, it’s straight X58 routing. Here’s a table copied from MSI’s user manual:
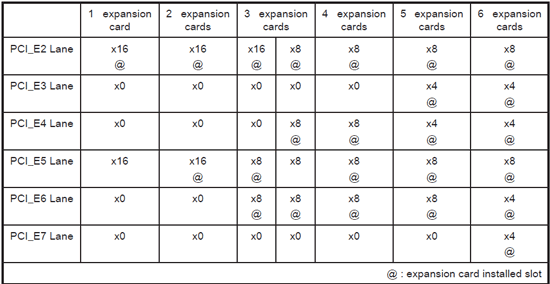
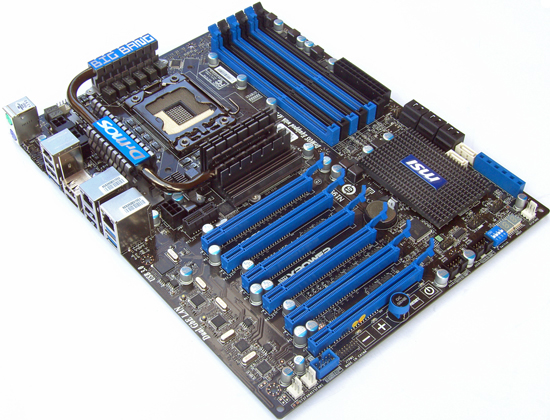
Board dimensions are standard ATX (24.4cm X 30.5cm). The XPower can run up to four cards in 8x lane width mode like the ASUS R3E, while dual and triple card configurations are confined to 16x/8x or 16x/8x/8x allocation respectively. There may be a very slight penalty as a result of this for outright benchmarking scores, nothing worth worrying about for everyday use, though.
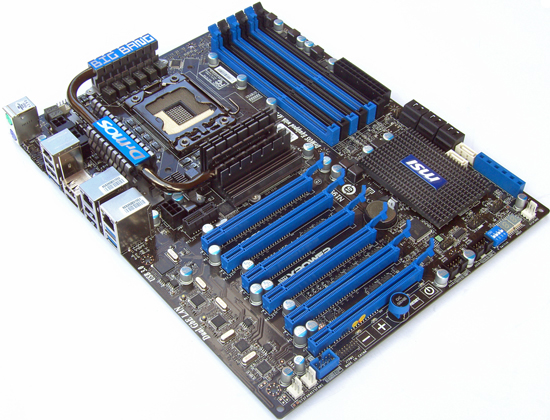
Layout is reasonable barring placement of the SATA 6G ports which become obscure if running a long dual-slot GPU in PEG slot four. On-board features include, an OC Genie switch (one-touch pre-set overclocking), and also touch sensitive power, reset and BCLK adjustment pads. Voltage measurement points are also available, and MSI supply four plug in cables that allow hands free voltage monitoring from a digital multi-meter. Based upon features alone, the XPower appears to offer more “value” than ASUS’s R3E, and certainly better value than the two NF200 based boards included in this article.
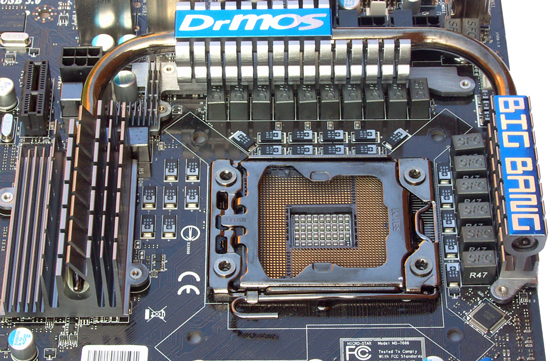
Like other vendors, MSI have redesigned the power delivery stage for CPU Vcore for their new board, upping current delivery capabilities to around 360 amps (without need for modification -so we’re told). Everything else is standard fare for the Big bang series, DrMOS FETs used in key locations, and a slew of tantalum capacitors used for decoupling major rails.
BIOS & User Experience
Familiar start here; be sure to flash the XPower to the latest BIOS as soon as it lands if you want a stress free ride during operation. Early BIOS releases won’t resume from S3 much past stock, and memory sub-timings have a habit of either being misreported or unresponsive to changes. The latest BIOS fixes S3 resume, which should work up to 210 BCLK provided the board is setup properly (stable).
In total, the MSI BIOS is probably the least refined out of today’s test samples. Basic functionality is in place, and adequate for stock use. Heavier overclocking requires a fair amount of patience and/or knowledge of memory sub-timings to get the best from this board. Actually, the subject of memory overclocking is a bit of a sore point for us with the XPower board in comparison to everything else we’ve tried our memory modules and processors in. Speeds up to DDR3-1900 are okay, anything higher than that starts to suffer problems no matter what we do. There is more data on this later in the article, so we’ll sum up here by saying that we don’t think the XPower is an ideal choice for high speed memory clocking. Not only that, but this becomes quite an hindrance in certain benchmarking scenarios, too.
The positive side to the BIOS is that you can key in voltage values directly and that there is a built in BIOS flashing utility unlike EVGA. Peripheral setup options are also available in abundance, and work fine. Where things start to go awry, on the functionality side is that the built-in flashing routine does not seem to work with certain thumb drives (our PNY 2GB stick is incompatible). The BIOS does recognize and read the drive, root and subfolders, but does not manage to find the BIOS file for flashing. Plug in a different USB stick and everything works fine. We have reported this back to MSI several times now and they have not managed to fix it. Out of interest, the PNY stick is what we use with every other board for BIOS flashing and we’ve never seen this problem before.
Automated memory timing adjustment of individual parameters has never been one of MSI’s strong points, and that trait is prevalent on the XPower, too. Once again, you can either leave things completely in the hands of AUTO, tackle half of the timings manually, or if you’re feeling really brave, take on the whole brigade yourself. For new users, it’s better to set the DRAM frequency multiplier ratio manually and leave the DRAM section of the BIOS on AUTO at first, reboot the board then select the manual option. Doing so will at least give you a set of loose base timings to work away from when manual adjustment mode is selected.
This pretty much sums up our experience with the XPower; MSI have put together a good package of peripherals for wow factor and are more than competitive on pricing in present company, but the overall execution of BIOS lacks refinement, and we feel there may be some hardware issues that hinder overclocking based upon how our sample boards behave when pushed hard.
|
Testbed Setup Overclocking / Benchmark Testbed |
|
| Processor |
Intel i7-980X ES - 3.33GHz, 6 cores, 12 threads. 12MB L3 Cache Intel i7-980X Retail - 3.33GHz, 6 cores, 12 threads. 12MB L3 Cache |
| CPU Voltage | Various |
| Cooling | Intel air cooler, Heatkiller 3.0 waterblock, 2 x PA120.2 radiators and 2 x DDC ultra pumps (with Petra top) in series, 1/2 ID tubing for watercooling. |
| Power Supply | Corsair HX950, PCP Turbo Cool 1200W |
| Memory |
Corsair Dominator GT 8-8-8-24 2200MHz 4GB kit G.Skill Perfect Storm 8-8-8-24 2200MHz 4GB kit. |
| Memory Settings | Various |
| Video Cards | MSI N275 Lightning |
| Video Drivers | nVidia 197.45 WHQL |
| Hard Drive |
Western Digital 7200RPM 1TB SATA 3/Gbps 32MB Buffer OCZ Vertex 120GB SSD |
| Optical Drives | Plextor PX-B900A, Toshiba SD-H802A |
| Case |
Open Test Bed - Dimastech Benching Station Lian-Li V2110 |
| Operating System | Windows 7 64 bit |
| . | |
We utilized memory kits from Corsair and G.Skill to verify memory compatibility on our test boards. Our OS and primary applications are loaded on the OCZ Vertex 120GB SSD drive and our games operate off the WD Caviar Black 1TB drive. We did a clean install of the OS and applications for each motherboard. For graphics duty, MSI’s GTX N275 GPUs are used to provide performance comparisons between boards during gaming benchmarks.
For our test results we set up each board as closely as possible in regards to memory timings, Uncore, QPI frequency and also match up C-state parameters. The X58 boards utilized 6GB of memory throughout the course of benchmarking compares. Memory timings are set to 7-7-7-20 1T @ DDR3-1333 for the stock benchmarks and 8-8-8-24 1T DDR3-1600 for the 4GHz processor overclock compares.
We’ve recently updated our graphics drivers to nVidia’s WHQL 197.45 so are a little thin on platform compare results. However, there are a few reviews where gaming performance of X58, P55 and AMD platform compares have been made here and here.
Power Consumption
Our power consumption testing utilizes the same batch of components under similar circumstances in a bid to monitor variances between idle and CPU load conditions. We install the vendor supplied power saving utilities on each board and enable power saving modes that don't involve any kind of underclocking or CPU core frequency modulation in order to run an apples to apples comparison.
ATX PSU switching losses are absent from our figures because we monitor power consumption directly at the DC rails of the PSU. These figures measure only the CPU, motherboard, memory and GPU PCIe power draw via the motherboard and exclude any other peripherals, such as cooling fans and hard drives etc. Actual AC power consumption for the motherboard will be anywhere from 15~40% higher than these figures depending upon the efficiency of your power supply and choice of GPU.
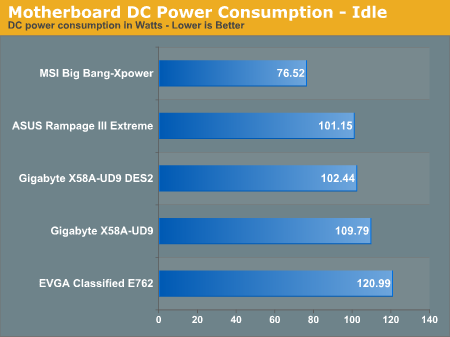
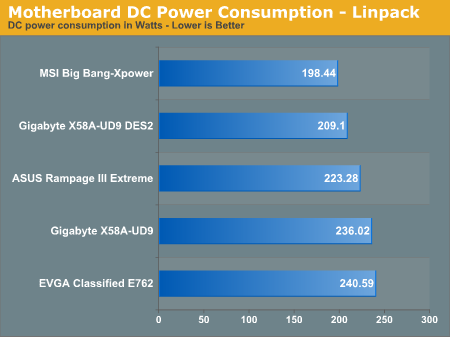
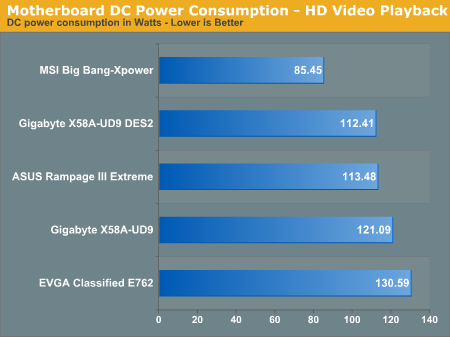
Unsurprising that the MSI board comes out on top in these tests. Gigabyte’s UD9 fares well in comparison to the ASUS Rampage III Extreme with DES power saving modes engaged (considering it has two NF200 chips in tow). EVGA trails in all tests behind the UD9 for raw efficiency because the Volterra VRM used for CPU Vcore duty operates at a base switching frequency of 800KHz.
For basic overclocking we decided to choose a medium of 4.4GHz as an achievable overclock for our Gulftown processor at reasonable voltage levels. Obviously high-end boards like these are designed to be pushed further, so we deal with that aspect in the sub-zero cooling section below.
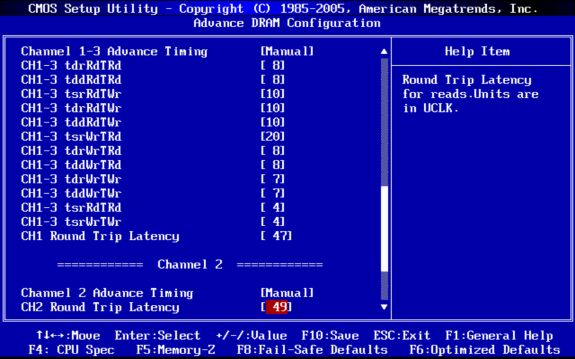
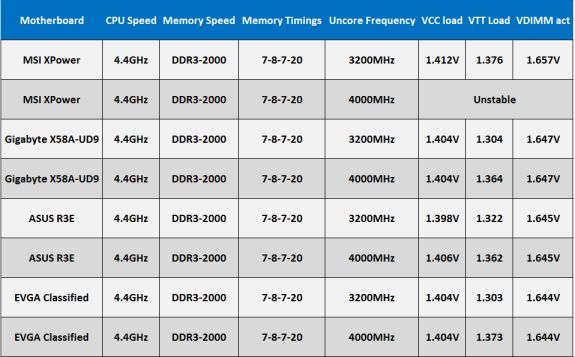
For the 4.4GHz compares, we decided to monitor minimum CPU socket side voltage levels required for stability ( minimum 2 hour pass of Linpack and 12 threads of 32M Super Pi). We soldered wires directly to under-socket decoupling capacitors to get a more accurate picture of the voltage at the CPU socket – apart from on the MSI board which does not have under-socket decoupling capacitors for VCC or VTT. We managed to find an under-socket test point to solder a wire to measure VCC but could not locate one for VTT. MSI’s on-board measurement point for VTT does run to a location under the socket though, so the measurements shown are valid. Memory timings are matched up as closely as possible right down to Round Trip Latency. The results as expected are fairly close, barring some drift for the MSI XPower:
While MSI's XPower is adequate for normal use, team it up with a high speed memory kit, like Corsair’s Dominator GT 7-8-7-20 modules, and it starts to struggle to keep up with the other boards in this test. At an Uncore frequency of 3200MHz, the XPower requires more VTT than the other boards do at 4000MHz. An eleventh hour BIOS update does allow the XPower to use the 1.5X Uncore ratio which should help keep VTT in check somewhat, however, we’d still expect a slight delta between boards.
Although we acknowledge that running higher Uncore frequencies has a tiny impact on day to day performance, benchmarking and overclocking fanatics will want to take note of this disparity. If running a high frequency low latency memory kit, and interested in the highest bus frequencies at the lowest bus voltages, the XPower is not going to be the very best choice based upon our results here.
We’re not sure why this delta exists on the XPower, MSI have told us that memory parameters are being set properly, which leads us to believe that this may be a hardware level issue. We’ve seen results in the wild that don’t correlate we’ve what we found here in terms of maximum achievable frequency, meaning some boards don’t seem to have the same problem. We’ve also conversed with several consumers who have similar problems to ours, thus our advice is to hold off purchasing the XPower until the root cause of this problem is found (if you have heavy overclocking in mind).
Maximum stable BCLK
Just a quick compare here of maximum bootable and stable BCLK running Linpack on our Gulftown processor for those who are interested in such things:
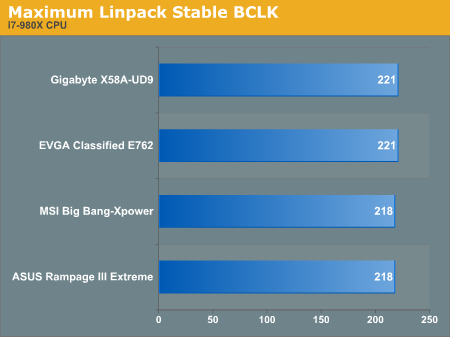
Now, the NF200 boards will run Linpack all the way to 221 BCLK, but the EVGA E762 won’t resume from S3 up that high. We have to peg back to around 210 BCLK for the E762. The Gigabyte UD9, not only POSTs at 221 BCLK consistently, but can also resume from S3 sleep after several hours. Both the E762 and UD9 will POST all the way to 228 BCLK without the need to revert QPI frequency to slow mode, provided we offset the PCIe frequency by a few MHz. The side-effect is that USB 3 and LAN ports stop functioning if we do this.
The ASUS R3E and MSI XPower won’t POST for us consistently past 217 BCLK with QPI frequency set to normal mode.
For those who are looking for extended QPI frequency margins over first generation X58 boards (especially if you are running a Bloomfield processor), our advice is NOT to upgrade to these boards expecting better overclocking margins. Everything about these products which relates to signaling (with the exception of a few subtle changes to the EVGA E762 over the lower priced Classified models) is exactly the same as the previous generation.
It’s clear that no extra work or special sauce has gone into board design here. Bottom line is that you’re not getting anything new on these boards other than a revamped VRM and some funky software enhancements. In fact, you run the risk of ending up with a poorer overall QPI frequency given that the IOH plays just as big a role in QPI frequency as the CPU.
Taking QPI frequency out of the picture, the only place you may see a difference in overclocking is where some of the first generation X58 boards are weak in supplying current to Vcore hence limiting overall CPU frequency.
Sub-Zero Cooling results
For this section of testing we utilized our dual rotary cascade cooler in order to find out if which board handles a given CPU and memory kit better in two key benchmarks – Super Pi 32m and 3D Mark Vantage. For our base compares in the test suite, the general practice while running benchmarks is to make five runs of and take the middle score. Here, as we’re clocking for the best scores, we’re taking the highest or fastest out of multiple attempts at each operating frequency whilst using the latest or recommended benchmarking BIOS for each board.
Overall, we get close results in terms of raw frequency; although certain traits do manifest that benchmarking fanatics may want to take into account:
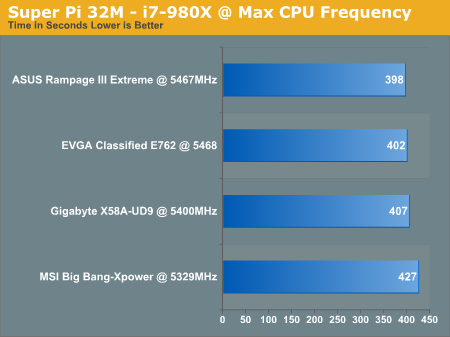
Both the EVGA E762 and ASUS R3E reached the highest frequency in this test. The ASUS R3E is more efficient overall and manages to beat EVGA by four seconds at equivalent settings. The Gigabyte UD9 seems to falter somewhat in memory stability when faced with sub-zero temperatures and high DRAM frequency; our sample could not hold CPU speeds higher than 5.4GHz stable for 32M with reasonable sub-timings. We did manage to squeeze another 20MHz out of the processor during this bench on the UD9 (5.422GHz effective), but had to use very lose memory timings and the score tanked worse than it does as 5.4GHz.
In a similar vein, it’s obvious that the disparity we found on air and water cooling is causing issues for MSI’s XPower during sub-zero tests, which is a shame.
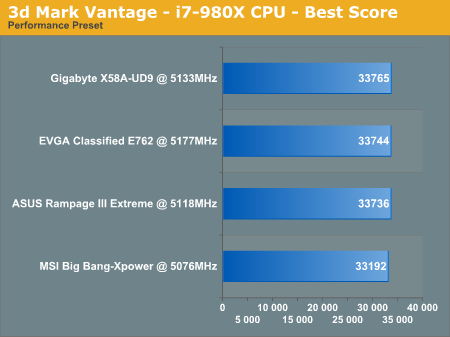
These results were unexpected, the NF200 boards marginally ahead ASUS’s R3E to the post in three-way SLI using nVidia GTX 275s. Do bear in mind if you take a look at the gallery screenshots, that the ASUS board was running at 5118MHz on CPU, and not the 5078Mhz shown (we increased BCLK in Windows and for some reason CPU Tweaker does not always pick this up as shown in one of the other screenshots). The ASUS and EVGA boards actually managed to run Vantage all the way to 5178MHz but we ended up with lower scores as we increased QPI frequency on both of them - the best scores for both boards came in around 5120Mhz. The UD9 managed to pass at a maximum of 5133MHz and deliver a good score in the process. We did try pushing the UD9 higher but could not get the CPU test of Vantage to pass.
In the grander scheme of things the frequencies we are running here are not earth shattering. In truth, we were not expecting the kind of heat load Gulftown generates with six cores active as voltage/frequency is increased. Most dual rotary cascades are tuned for heat loads circa 250Watts. Clocked to 5.1GHz, the CPU test of Vantage draws around 320W to VCC & VTT – right on the cusp of what our cascade can handle for a short period - we were fully tapped out for frequency.
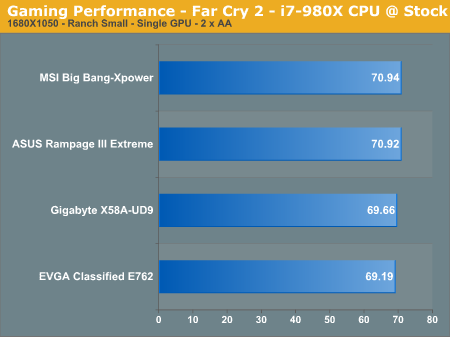
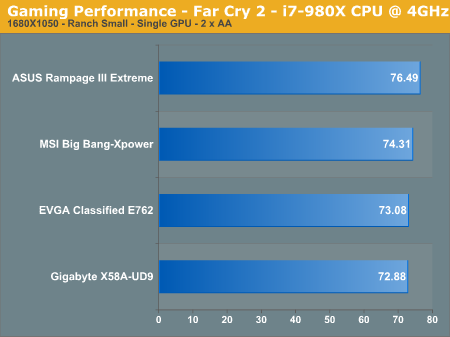
Far Cry 2
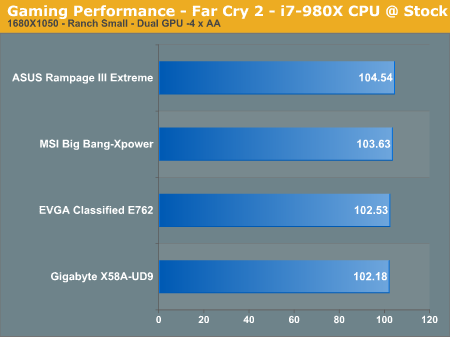
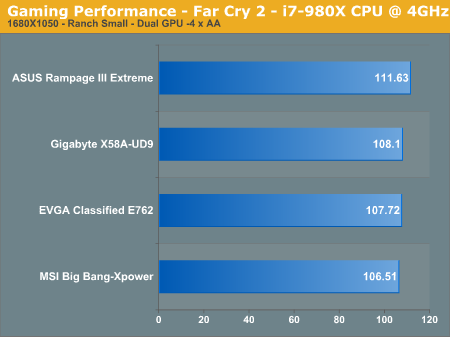
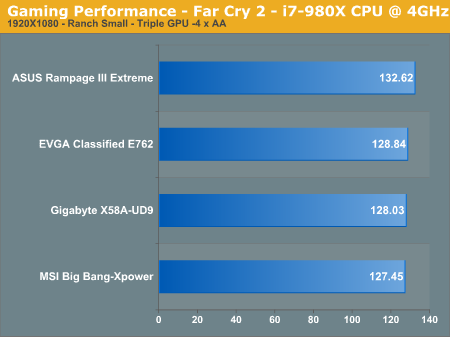
Featuring fantastic visuals courtesy of the Dunia Engine, this game also features one of the most impressive benchmark tools we have seen in a PC game. For single GPU results we set the performance feature set to Very High, graphics to High, and enable DX10 with 2xAA. Multi card results are generated using Ultra High settings with 4XAA.
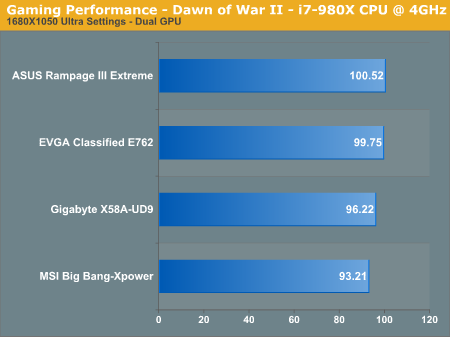
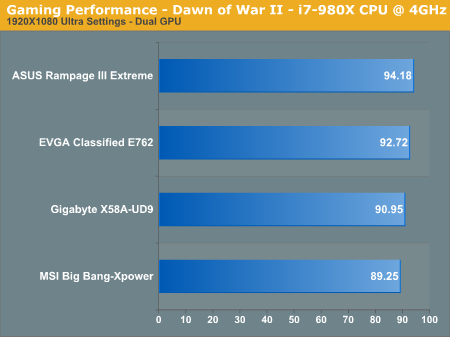
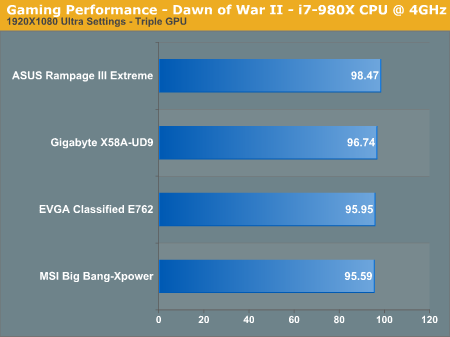
Warhammer 40K: Dawn of War II
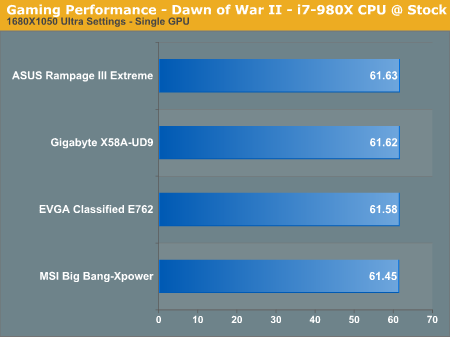
We are big fans of the Warhammer franchise, especially Dawn of War II. One of the latest RTS games in our library is also one of the more demanding titles on both the CPU and GPU. We crank all options to Ultra, enable AA, and then run the built-in performance benchmark for our result.
Futuremark 3D Mark Vantage
We utilize the performance preset of Futuremark's 3D Mark Vanatge to compare 3-way SLI performance .
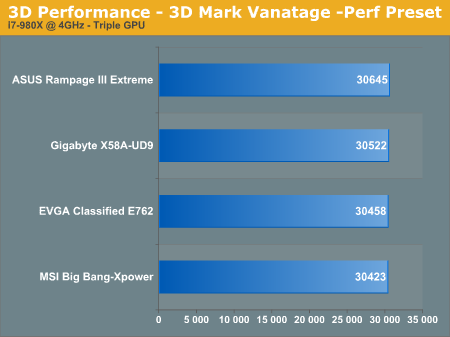
ASUS's R3E scores high consistently in all benchmarking tests thus far. The MSI turns in decent scores but comes in below the NF200 supporting boards when loaded with three GPUs. We're not sure on the exact cause though will conject that it's possibly down to PCIe bandwidth. Either way, the loss is not significant enough to warrant alarm at this point. The Gigabyte and EVGA boards are hampered slightly by the latency penalty of the NF200, and give up 3~5% of performance to the ASUS R3E under normal operating conditions.
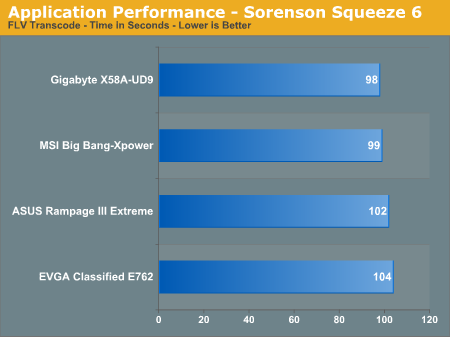
Sorenson Squeeze 6
We are using Sorenson Squeeze to convert eight AVCHD videos into HD Flash videos for use on websites. This application heavily favors physical core count and processor clock speed.
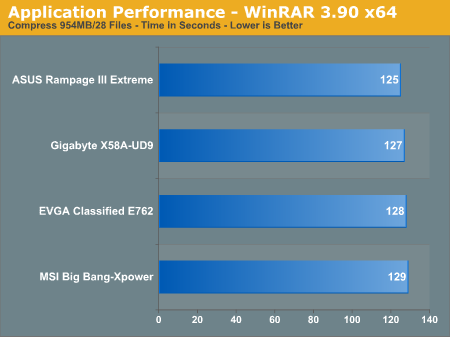
WinRAR 3.9 x64
This benchmark compresses our AT workload consisting of a main folder that contains 954MB of files in 15 subfolders. The result is a file approximately 829MB in size.
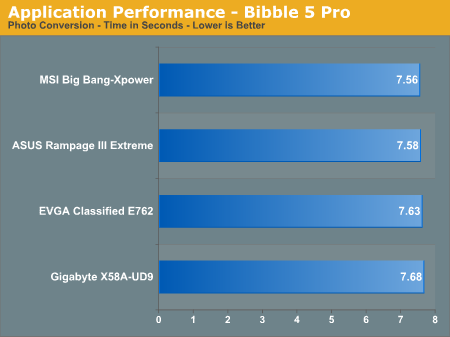
Bibble 5.0
We utilize Bibble Labs' Bibble 5 v2 to convert 50 RAW image files into full size JPEG images with the program's default settings. This program is fully multithreaded and multi-core aware.
File Transfer to USB
In this test we use La Cie’s Rugged USB 3.0 500GB external hard drive and transfer a 1GB file from a 1TB HDD connected to the Intel ICH monitoring the time taken.
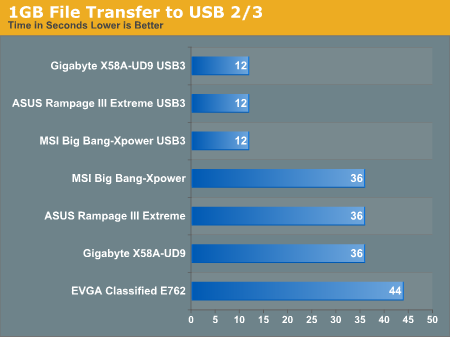
Not much to remark on here other than the EVGA Classified's slow USB 2 performance. The USB 3 supporting boards are tied transfering files of this size. USB 3 is not a killer feature just yet, however, there's certainly scope to make large backups and system images in the fraction of the time it would take to complete the process over USB 2.
Based upon everything we’ve seen in our testing to date, our advice to users that already have enthusiast level first generation X58 motherboards is to think very carefully before laying down dollar on anything new – there are very few reasons to upgrade. In fact, even if buying a completely new system based around Bloomfield or Gulftown, there’s no need to fork out extra for any of these updated motherboard models unless there is something specific about board layout or multi-GPU abilities that appeals to you.
As we have to give a verdict, out of the four motherboards tested, we’d probably stretch ourselves to opt for the Rampage III Extreme in almost every scenario. While ASUS did not clean the floor in all departments, the R3E is easy to use, has a good BIOS, decent feature set and overclocks reasonably well. This doesn't mean to say that we feel the board is priced fairly though for what it offers. We'd like to see ASUS sell the R3E around the $300 mark considering there are no NF200 bridge chips cutting into base part costs.
We’d love to give the MSI XPower a global recommendation, but unfortunately can’t until the overclocking disparity we experienced against other boards both in voltage and frequency improves. While the XPower is cheaper than the other three boards on test and fares a lot better in power consumption tests, there are a plethora of boards under the $300 mark that can overclock better on air and water cooling (models from ASUS, Gigabyte & EVGA). Okay, you give up some of MSI’s bundle, but the extra peripherals don’t add up to much when high frequency low voltage operation is preferred by most users who purchase high-end memory kits.
If by some bizarre twist of fate we happened to be running four-way SLI and chasing big 3D Mark Vantage numbers (which is never going to happen), then our choice goes to EVGA. Yes, there is work to be done, but, we can’t find good enough reason to opt for Gigabyte’s UD9 instead. Simply because we feel Gigabyte have priced themselves out of the market and aren’t offering anything that we deem worth the price hike.
Looking past SATA 6G and USB3, all this second wave of flagship motherboard releases boils down to for ASUS, Gigabyte and MSI is the re-designed PWM; earlier models lacked sufficiently engineered VRMs to handle Gulftown and keep up with the EVGA Classified boards when pushed hard by the benchmarking crowd when using LN2 cooling. And that’s why there’s no need to upgrade or jump on the bandwagon unless you fall into the category of a niche group of users.


