Original Link: https://www.anandtech.com/show/308
Gigabyte GA-6BX7 i440BX ATX Socket-370
by Mike Andrawes on June 1, 1999 1:49 AM EST- Posted in
- Motherboards
Gigabyte is one of those motherboard manufacturers that is extremely well known in some circles, but completely unheard of in others. Quite an odd situation, but one that happens quite often when a motherboard manufacturer makes quality products, but remains relatively low key in the industry. In this situation, the manufacturer often becomes sort of a well kept secret among those who stumble upon them.
Gigabyte is one of those well kept secrets, and has actually been around longer than many more popular manufacturers. Those that have been using their boards for years know that they generally put out high quality products that are mostly trouble free. These users have helped spread the word about Gigabyte, and as that word has spread, more and more vendors have picked up their products. With vendor support and an improved web/newsgroup presence, Gigabyte is poised to take on the big boys like Asus, Abit, AOpen, and Tyan - a much tougher challenge. The first of their boards that we looked at, the BX2000, offerred a dual BIOS setup as its claim to fame. Let's see how they fare with the second of their boards to come through the AnandTech test labs - the GA-6BX7.
New Anand Tech Report Card Rating
88/B
Do not compare newer ratings to older ones, the newer ratings are much more aggressive
| CPU Interface | Socket-370 |
| Chipset | Intel i440BX |
| L2 Cache | N/A (on-chip) |
| Form Factor | ATX |
| Bus Speeds |
66 / 75 / 83 |
| Clock Multipliers | 3x - 9x |
| Voltages Supported | Auto Detect |
| Memory Slots | 3 168pin DIMM Slots |
| Expansion Slots | 1
AGP Slot 5 PCI Slots (5 Full Length) 2 ISA Slot (1 Shared / 2 Full Length) |
| BIOS | Award 4.51PG |
The Good

The GA-6BX7 is a much more traditional motherboard where Gigabyte decided to focus primarily on the board itself rather than gimmicks. Just looking at the GA-6BX7, it's clear that they set out to follow all current specifications and standards set forth for motherboard design. The one that catches the eye first is the color coded ATX ports on the back of the board for PC99 compliance. Almost every new motherboard will start including this nifty little "feature." While it does little for the tweaker, it certainly does make it easier for grandma to setup her computer using color coded plugs. It's no longer just for Packard Bell's ;).
The ATX specification is also closely followed with all major components strategically placed to minimize cable clutter and provide the most room to work around the board. All HDD/FDD connectors are located where they should be, right at the front of the board, so that no cables are forced to run over the CPU and/or memory. The second IDE connector is conveniently colored white (as opposed to the black of the first IDE channel) to make identification at a glance possible. The ATX power connector is right behind the DIMM slots, but still far enough forward to allow adequate air flow over the CPU from the power supply. The board uses a standard ATX format, but is fairly short - just a bit longer than an ISA slot - and should fit just fine in any ATX case.
Gigabyte was also wise enough to offer a 5/2/1 (PCI/ISA/AGP) configuration that is virtually standard on newer Slot-1 i440BX, but lacking on the majority of Socket-370 models. The three available DIMM slots are pretty much standard fare for an i440BX board. Three fan connectors are available - two next to the CPU socket, and one at the front of the board. Ten 1200uF capacitors are located immediately around the CPU socket with several 330uF capacitors placed all over the board. A variety of generic connectors are used for I/O and expansion slots, but a high quality AMP connector is used on the CPU socket. DIMM slots are also no-name, but seem to be quite strong and as good as any others available today.
The stability of the GA-6BX7 was top notch in both non-overclocked and overclocked situations. While not quite reaching the level of the Intel SE440BX, it was about the same as the AOpen AX6BC, which is to say excellent. Performance was similarly exemplary, outperforming the average i440BX board by more than the normal 5% variation among such boards in both Winstone 99 and Quake 2 demo1.dm2.
Complete hardware monitoring is included on the GA-6BX7 through the Winbond 83782 chip and monitors 3 fan speeds, 9 voltages, and up to 3 temperatures. The 83782 improves upon the older Winbond 83781 by including a provision to read CPU temperature straight from the on-die thermal diode for the most accurate CPU readings possible. The 9 voltages measured include VGTL, +5VSB, and battery voltage, in addition to the standard +/- 5V, +/- 12V, +3.3V, and Vcore.
The reason for "up to 3 temperatures" is that the Winbond hardware monitor can only monitor two temperatures on its own - the temperature of the Winbond chip itself and the CPU's thermal diode (where available, which in the case of Socket-370 CPU's is always). In order to monitor the other temperature, the Winbond chip requires an external thermistor. There is no place to connect a thermistor, so with this board, you're stuck with just two temperatures - the CPU and system temperatures.
Gigabyte takes things one step further by allowing the system to be shut down if the CPU temperature exceeds a user defined value in the BIOS. This can of course be disabled as well if erroneous readings ever crop up and cause problems. Alarms for overheating and fan failure are also available via the BIOS. To top the hardware monitoring off, the core voltage and CPU ID are proudly announced upon bootup just before the memory check - a nice touch by Gigabyte.
Speaking of that BIOS, Gigabyte has also taken the standard Award BIOS and improved upon it just a bit, starting off with a feature well known on AOpen boards - a set of BIOS options that can be loaded and are already tweaked for performance. These options pretty much are optimal for the majority of users, but if you're a real hardcore tweaker, you'll want to go through and double check that everything set the way you like it. SDRAM CAS latency can be configured to 2 or 3 manually, or just left to be ready off the SDRAM SPD.
Overclockers will find the common FSB speeds 66/75/83/100/112/133 available via a dip switch setup. Clock multipliers are also controlled via a dip switch block. All FSB and multiplier settings are silk screened on the board, so there's no need to get the manual out when installing a new CPU. Any bus speed can be selected regardless of the CPU used. Clock multipliers are, of course, locked by Intel on the CPU.
Power management consists of pretty much the standard stuff these days. Wake on LAN and wake on modem ring headers are available to allow the system to power on in the persence of network activity or incoming call. The BIOS can be set to turn on the system at a specific time. The CPU fan can be shut off when the system suspends to quiet things down a bit. ACPI support is built into the BIOS for added power management under an ACPI compliant OS like Windows 98 or Windows 2000. The system can be configured to power on via hot key or mouse click as well.
A nice touch is the ability to configure what the system will do when AC power is restored after a power outage - either remain off, turn on, or resume last power state. This is a feature often overlooked since ATX and soft power became available, but is critical for anyone using their system where it must be on 24/7 or as close as possible. It also allows for users to shut the system on and off from a surge protector.
Although lacking details on installing a motherboard, the manual is otherwise pretty good for the experienced user and includes detailed information on all connector pin outs as well as the various BIOS settings. On the other hand, the CD is much better than the manual and includes Intel LANdesk Client Manager (LDCM) for hardware monitoring, Trend PC-Cillin 98 (OEM) anti-virus software, a suspend to disk utility, and even DirectX 6.1. Of course, there's also the traditional chipset patches and drivers. The CD is not board specific and does not include an online version of the manual.
The Bad
The front panel connectors are somewhat cryptically labeled on the motherboard, with just a one or two letter label. That means you'll have to break out the manual to hook them up - not exactly the worst thing that could happen, but something worth noting.
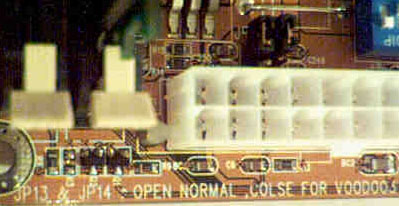 Something else worth noting
is a set of jumpers that the silk screening on the board says need to be closed
when a Voodoo3 video card is used and open otherwise. No other manufacturer
has found it necessary to do anything different for a Voodoo3 board, but it
is something AnandTech will look further into on this board.
Something else worth noting
is a set of jumpers that the silk screening on the board says need to be closed
when a Voodoo3 video card is used and open otherwise. No other manufacturer
has found it necessary to do anything different for a Voodoo3 board, but it
is something AnandTech will look further into on this board.
As usual, there's still no sign of voltage tweaking options from most manufacturers, including Gigabyte. Another oversight by many manufacturers is also found here - the ability to assign a specific IRQ to a particular PCI slot. This has been a boon for many users trying to sort out fully loaded situations, but something Gigabyte users will have to do without for now (although there is always the possibility of a BIOS upgrade to add it).
As mentioned earlier, the manual is a bit weak in the installation section. Anyone that has never installed a motherboard before will not feel comfortable with the complete lack of information given in the Gigabyte manual on this topic.
USB Compatibility
-
Number of Front Universal Serial Bus Root Ports: 0
-
Number of Rear Universal Serial Bus Root Ports: 2
-
USB IRQ Enable/Disable in BIOS: Yes
-
USB Keyboard Support in BIOS: Yes
Recommended SDRAM
Recommended SDRAM: Mushkin SEC -GH
PC100 SDRAM; Memory Man SEC -GH PC100 SDRAM
SDRAM Tested: 1 x 64MB PC100 SDRAM
Manufacturer: The Memory Man
Purchase Web-Site: http://www.memory-man.com
Manufacturer: Mushkin
Purchase Website: http://www.mushkin.com
The Test
In recent times, choosing a motherboard cannot be completely determined by a Winstone score. Now, many boards come within one Winstone point of each other and therefore the need to benchmark boards against each other falls. Therefore you shouldn't base your decision entirely on the benchmarks you see here, but also on the technical features and advantages of this particular board, seeing as that will probably make the greatest difference in your overall experience.
AnandTech Motherboard Testing Methodology
|
Test Configuration |
|
| Processor(s): | Intel Celeron 366 OEM |
| RAM: | 1 - 64MB Memory Man SEC PC100 SDRAM DIMM |
| Hard Drive(s): | Western Digital Caviar AC28400 - UltraATA |
| Video Card(s): | Matrox Millennium G200 (8MB SGRAM - AGP) |
| Bus Master Drivers: | Microsoft Win98 DMA Drivers |
| Video Drivers: | Matrox Millennium G200 Release 1677-411 |
| Operation System(s): | Windows 98 |
| Motherboard Revision: | Gigabyte GA-6BX7 Revision 1.4 |
|
Windows 98 Performance |
||||
| Winstone | Quake 2 | |||
| Business 99 | demo1.dm2 | |||
| Intel Celeron 366 (5.5 x 66MHz) | 19.1 | 16.1 | ||
| Intel Celeron 458 (5.5 x 83MHz) | 20.5 | 18.0 | ||
The Final Decision
On the surface, there's nothing that makes this Gigabyte entry stand out from the crowd - no onboard sound or video, no exotic tweaking options or bus speeds. However, performance and stability that were both well above average are what really differentiate the GA-6BX7 from the seemingly endless supply of plain-jane Socket-370 boards. For those of you that rely on your computer every day for real work, the Gigabyte GA-6BX7 is hard to pass up in the Socket-370 market. If Gigabyte keeps this up, they might not be such a secret any more ;)
|
AnandTech Motherboard Rating |
|
| Business | |
| Performance | 90% |
| Price | 85% |
| Ease of Use | 85% |
| Overclocked Stability | 92% |
| General Stability | 92% |
| Quality | 87% |
| Documentation | 85% |
| Reliability | 85% |
| Overall Rating | 88% |
Click Here to learn about AnandTech's Motherboard Testing Methodology


