Original Link: https://www.anandtech.com/show/2681
Intel X58 Motherboard Roundup - What does $300 Get You?
by Gary Key on December 5, 2008 3:00 PM EST- Posted in
- Motherboards
As of November 17th you can officially buy an Intel Core i7 processor - the new heavyweight champion of the world. When it comes to media encoding and 3D animation/rendering tasks, the Core i7 is not only without peer but also provides us the sort of generational performance gap that we've come to expect from Intel every two years. By now you've already decided whether or not you want to buy one, and if you're in a rush to spend money, the next question is what motherboard do you pick?
Current Core i7 CPUs work in Intel's new LGA-1366 socket, currently only found on motherboards based on the X58 chipset. While Intel did a great job of making sure the Core i7 was available at a wide range of price points ($284, $562, and $999), the X58 boards themselves are pretty pricey. We've got a consistent group of $300+ motherboards on the market, and honestly we're not expecting ~$100 Nehalem boards until the introduction of the mainstream Lynnfield/Havendale CPUs in 2H 2009. Boards using the P55 chipset should arrive early next year and at least bring in true sub-$200 options, but for now it's an X58 world.
These boards are very high end - with the exception of Intel's own X58, these motherboards all feature six DDR3 DIMM slots, easily enabling 12GB of memory on a desktop platform. Certification for 24GB and 48GB is coming, but that's absolutely ridiculous on a desktop motherboard. Combine that with the fact that all three Core i7 parts are capable of working on 8 threads at a time and you've got the makings of an extremely powerful system. A desktop Core i7 system has the potential to embarrass quite a few upper end workstations already on the market.
What we've put together today is a roundup of the "midrange" X58 motherboards currently on the market, a sort of first look at the state of the X58 realm for early adopters who are lucky enough to be buying today. We've got motherboards ranging from $220 to $390 in the labs that we will go through over the next couple of weeks; if you're building a Core i7 system before the end of this year, we'll help you pick a motherboard in each category.
BIOS Ridiculousness: Everyone Say, "Thank You Gary"
Hey guys, Anand here. I'm writing this sub-section, not at Gary's request, but because I felt it was necessary. Over the past year I've watched the number of motherboards Gary gets to review go down, and the amount of time spent per motherboard go up tremendously. This year was especially bad as Gary spent more time helping manufacturers fix their BIOSes and compatibility problems than actually writing motherboard reviews.
I wanted to help bring some of what Gary does to light in this section, just so you know the sad state in which many of these motherboards are being brought to market and the work that goes into getting them ready so that we can actually write about it, much less recommend one.
With that said, let's take a look at a particular sequence of events we encountered with the motherboards in today's review. We are not going to name names today as all of the manufacturers are guilty, some worse than others. The point being is that we feel the lack of quality assurance before a product hits the market has now reached an all time high.
Testing Ridiculousness:
It is true, too true unfortunately, about the amount of time it takes to thoroughly test a motherboard, report problems, and then regression test a possible fix. I am anal retentive when it comes to this process as others are also. While the benefits of doing it eventually payoff for manufacturers and users alike, it is a disservice to our readership to delay reviews of new products based on this seemingly never ending cycle of test, report, test, report.
So we are refocusing our efforts in generating quick and to the point reviews in the motherboard section. The manufacturers are going to receive two rounds of the test and report process before we publish our reviews. After this, we will provide short updates about the product over its lifespan in the market. We are also instituting a new process where we will purchase select products at retail and review them as is. This means no conversations with the manufacturers or access to the designers and engineers that we currently enjoy. We will utilize the latest drivers, BIOS, and utilities on the website in the same way you do when purchasing a product.
Our plan is to cycle through each manufacturer so we are not singling out any one supplier but we are going to be brutally honest in our assessments in these particular focus reviews. Our hope is that it will spur the manufacturers to improve their internal QA processes and focus on product usability at launch instead of setting a world record in SuperPI.
That said, let's take a quick look at the number of problems we encountered up until this week with our four boards in today's review.
1. Of the course of the past 30 days we communicated problems, suggestions, and resolution status on our test products via email 896 times and over a 100 phone conversations.
2. We have received 31+ different BIOS releases in the last thirty days to address problems and/or improve performance.
3. Our change log of problems and fixes reads like a bad novel. While we will not ding the manufacturers for performance improvements that we or others suggest, the simple fact that auxiliary storage controllers, power management features, memory and voltage settings, and other basic features on these boards failed to even work or resulted in a non-POST situation just floored us.
We are talking about $300 plus motherboards designed and released to be the crown jewel in the manufacturers product lineup. Of course, there is no excuse for this regardless of price, but one would truly think that the QA process would have noticed simple items like S3 not working, drives attached to certain storage ports not recognized, 12GB memory configurations causing non-POST situations, various BIOS settings not working or auto settings generating out of bounds voltages at stock speeds, power management features that when enabled actually increased power consumption, various overclock bugs, and USB and network controllers operating at half speed. The list just goes on and on. To us, these were simple items that we found just booting the board and trying to use it in a manner that 99% of buyers would, not randomly generated bugs due to weird settings, bad drivers, or a collection of old peripherals.
Even more depressing was the fact that several of our technical contacts did not have the necessary components to recreate our problems in a timely manner. The biggest item was memory, specifically 12GB of memory. All of the boards had some type of problem with a 12GB installation, ranging from overclock performance to non-POST situations. Granted, 98% of the 12GB problems have been addressed now, but it took close to a month, dozens of phone calls, hundreds of messages, and constant pressure for this to happen.
We spoke with several personnel at various companies and they asked why we were so adamant about 12GB compatibility and performance (6GB operation was not much better at first) as one example. The typical response was not that many people will actually use 12GB and we tuned our board for high overclocks with 3GB, this is what the enthusiast wants. Our simple answer was and continues to be, "If you advertise the feature, we expect it to work correctly." This particular problem highlighted one area that seems to drive the current high-end market.
Catering or focusing exclusively to the extreme overclocking community has resulted in initial product launches that are focused on getting the highest possible results from a product at the expense of usability, compatibility, and stability. The quest to release quickly and have the top motherboard in the forums, or HWBot/FutureMark rankings has blinded some of the product teams to the more important issue of ensuring their product actually works as advertised. We enjoy seeing these records as much as anyone else and I am guilty of scouring the Internet everyday to see what record has been broken and more importantly, how it was done.
Overclocking is interesting to most of us and its importance in improving the quality of electrical components and design aspects on the motherboards cannot be overstated. However, we need balance in this area again. Simply, we need to get the basic features and options working right at product launch and then the BIOS engineers can have free reign in tuning the boards to reach their limits.
One of the technical marketing personnel at a particular board supplier kept pressing me on how well does the board overclock. They also wanted to know about 3GB memory performance at DDR3-2000+ and my SuperPI scores. I kept responding with a laundry list of items that needed to be fixed before I would even worry about overclocking. His responses continued to be, those problems are minor and we will get to them, what we need to know is if our board overclocks and performs better than the competition.
I thought the fact that 12GB would not POST correctly at DDR3-1333 or higher, storage controllers were on the fritz, and power management was not even working was more than minor, but it just accentuated the thought processes that we encounter on a daily basis now. The current situation is not acceptable in our book but we would like to hear your opinions on this subject. After receiving three new BIOS releases this morning to address performance improvements and not usability concerns, I just have to repeat Serenity Now, Serenity Now....
That said, let's take a look at the EVGA X58 SLI, Gigabyte GA-EX58-UD5, MSI Eclipse, and ASUS P6T-Deluxe motherboards today.
EVGA X58 SLI
Features
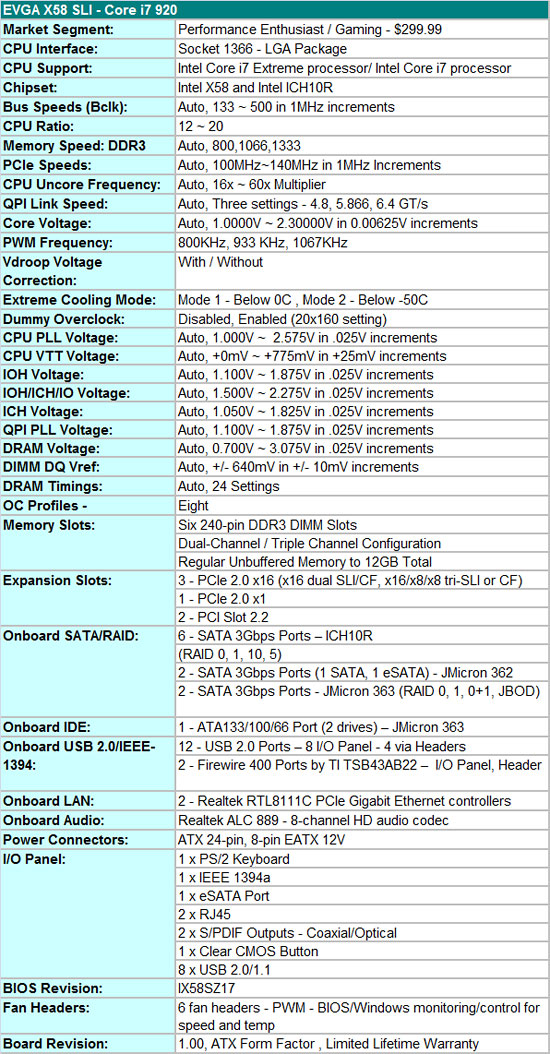
There aren't too many bells and whistles on the EVGA X58 SLI from a hardware feature viewpoint, and considering the market for this board we think that's a good design choice. The almost universal Realtek RTL-8111C PCIe Gigabit Ethernet controllers are utilized in tandem; the Realtek ALC-889 is on board for HD audio; and JMicron’s JMB362/363 chipsets get the nod for eSATA, IDE, and additional SATA port duties. TI is selected for IEEE 1394a support and the Intel ICH10R is utilized for primary storage purposes. We have never been real big fans of either Realtek audio or JMicron IDE, but considering the dearth of competition in the onboard peripheral market, you make do with the provided choices.
The BIOS is designed to get the most out of the board when overclocking. At first glance, some of the available options like the number of memory timings seem sparse compared to the ASUS and Gigabyte offerings. However, EVGA does a very good job of setting sub-timings to optimal points so far in our testing. We still prefer the ability to set additional memory timings and skew levels ourselves, but we can certainly live with the decisions made by the BIOS, although those at the bleeding edge of benchmarking would probably prefer the additional control level in either the ASUS or Gigabyte products. We just received BIOS IX58SZ17 that features additional memory settings and fine tuning options. We will update our comments and results once we have finished testing.
In a nod to the users who like to cool their systems via cascade or LN2, EVGA provides two different modes to properly set the board at POST for sub-zero temperatures. Those who love or need voltages to improve clock speeds will not have any problems with the choices provided by EVGA. DRAM voltages sky rocket up to 3.075V and VCore goes to a nice silicon melting 2.3000V. VDroop control can be enabled or disabled. In fact, the board has a tendency to slightly overvolt with VDroop control disabled.
Also, you can fine tune the frequency level on the digital PWMs. We normally left it at 800KHz to help reduce temperatures in the CPU area but switched to 1067KHz when overclocking our i920 past 4GHz. We were able to get an additional 80MHz out of our CPU on air by switching from 800 to 1067 once we passed 4GHz. EVGA also provides a setting called a dummy overclock; quite simply, enable this setting and the board will set itself to run a 20x160 overclock on the i920. We found the settings to be perfectly stable during benchmark testing, though obviously that's a far cry from what manual overclockering can achieve.
EVGA also supports a stock 1333MHz memory speed on the i920/i940 processors along with opening up QPI link speeds from a standard 4.800 GT/s up to 6.400 GT/s, which is standard on the i965 Extreme processor. We were disappointed with the lack of OC profiles in the initial BIOS, but the latest BIOS allows a total of eight profiles to be saved.
Finally, the board fully supports 12GB of DDR3 memory. We have not had any real problems running 12GB of our Patriot or G.Skill DDR3-1600 kits at 1600 with 8-8-8-24 1T timings, although we needed about 1.70V for absolute stability. Dropping the command rate to 2T allows 1.65V operation with the current BIOS.
One last item of note is that the three PCI Express 2.0 x16 slots will operate in x16/x16 mode for 2x SLI/CF if the third x16 slot is empty. If you decide to place a PCIe RAID, network, audio, or TV tuner card in the third x16 slot, then a 2x SLI/CF configuration will operate in x16/x8 mode. We did not notice any performance differences between the two modes with our HD 4870 or GTX 260 cards. 3x SLI/CF configurations will run in x16/x8/x8 mode. You can also use the first and third x16 slots for graphics if you need to open up a PCI slot but the board will run in x16/x8 mode. Although the owner’s manual states the three x16 slots are for graphics cards only, we had no problems running our ASUS Xonar D2X or Highpoint Rocket RAID cards in x16 slots two or three.
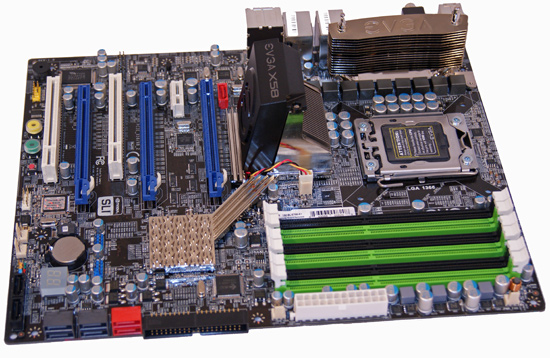
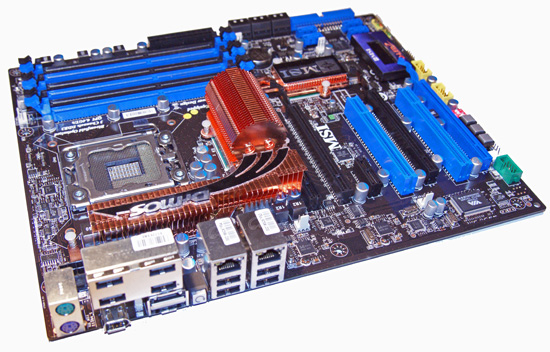
The Board
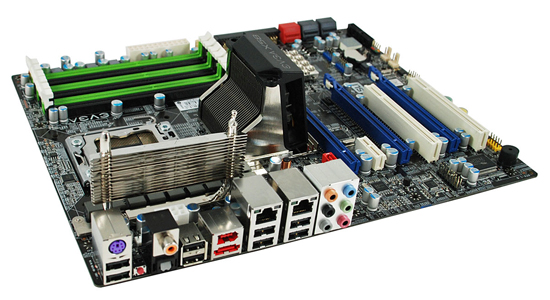


The primary design goal from EVGA was to allow 3x SLI/CF operation without needing a special case design to make room for the bottom video card. Put simply, this board will allow tri-card installations in most ATX cases but at the expense of rendering the additional PCIe and PCI slots physically unusable.
Keep that in mind when trying to figure out why EVGA located the lone x1 PCIe slot next to the first x16 slot. EVGA might as well have left it off the board (the same holds true for the other boards) and saved some money. We assume just about any owner willing to pay $299.99 for the board, at least $300 for a CPU, and $250 or so for 6GB of DDR3 will not be running a single slot GPU. In fact, unless you are going all out to set up up a folding machine or something similar, any GPU choice under an HD 4870 or GTX 260 is just a waste on this setup. Fortunately, the other PCIe x16 slots double for peripheral duty so those are available if needed.
The northbridge heatsink is fairly large and actively cooled. We could not hear the fan over our HD 4870 card, so noise should not be a problem. We were able to comfortably fit our large air coolers on the board without too much trouble once the PWM heatsink was moved slightly. The PWM heatsink looks nice, has an impressive EVGA logo stamped on the top fin, and is generally a pain in the you-know-what to work with when installing the 8-pin ATX power connector, large CPU heatsinks, or during case installation. It does a nice job of keeping the digital PWMs cool, but we just think something in a low rise design would have been better suited.
Some will wonder about the positioning of the 8-pin EPS12V power connector since it is a tight fit for most cables and the CPU fan header is right next to it just to make matters more interesting during installation. The position was chosen to provide the quickest and most stable power path to the CPU. We understand the reasoning and support EVGA’s decision, but a different PWM cooling solution would have made life easier.
Other than the above, the layout is very good and works well for us in a variety of cases. The board does come with power, reset, and clear CMOS buttons. In fact, two clear CMOS buttons are provided, one on the bottom edge of the board and the other on the IO panel. A handy LED debug display is available and six of the nine SATA ports are provided in a right angle setup.
The Application
![]()
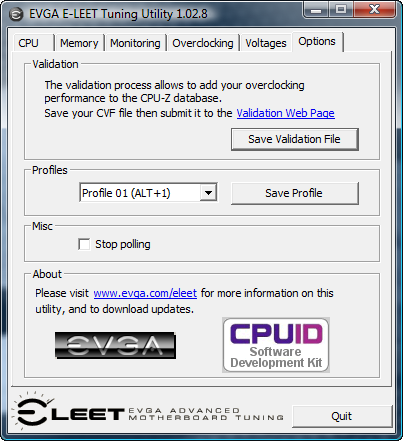


The ability of a board manufacturer to provide unique hardware or software features helps to differentiate products based on the same hardware. EVGA is hard at work in fully developing their Windows based on-the-fly overclocking utility. The application is known as the EVGA E-LEET Tuning Utility. We tested with version 1.02.08 that features profiles that can be saved and then applied quickly with a simple hot-key combination.
The E-LEET tuning utility was created with the CPUID software development kit, so users of CPU-Z will feel right at home. In fact, the utility will create a CVF file that can be submitted for validation to the CPU-Z database. There are six tabs with CPU, Memory, Monitoring, and Option being informational in nature. The Overclocking and Voltages tabs are where the action is with this program. The Voltages tab allows all of the major voltages to be changed on-the-fly and the Overclocking tab lets you adjust Bclk (QPI) , PCIe bus speed, and Turbo mode. Turbo mode selections cannot go higher than what the processor allows.
We found the utility to be handy in squeezing out that last Bclk step and to help ensure voltages are properly set at each overclocking step. The changes are not saved to the BIOS or a BIOS profile (hint, hint) and at this time the user will need to power down their system when exiting Windows to properly clear/reset the clock generator. We would like to see the ability to change the CPU multiplier and memory settings in future updates. Otherwise, the utility is very helpful but not a knockout, need-to-buy-the-board type of tool yet.
Gigabyte GA-EX58-UD5
Features
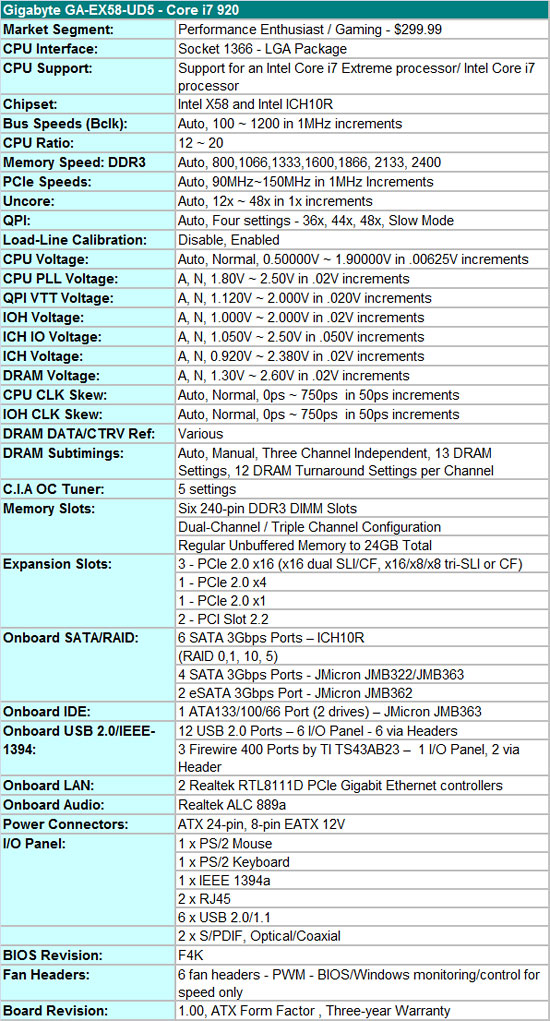
We have to hand it to Gigabyte; if there was an empty spot on the board during the design phase, they figured out a way to add a feature in that space. This board is loaded with everything but the kitchen sink and yet it appears mostly uncluttered; only when using the board do you sometimes notice that it is crowded. Gigabyte throws in twin Realtek RTL-8111D PCIe Gigabit Ethernet controllers that can be teamed; the Realtek ALC-889a is on board for HD audio and features real-time Dolby Digital Live encoding; JMicron’s JMB322/363 chipsets are tabbed for IDE and additional SATA port duties; TI is selected for IEEE 1394a; and the Intel ICH10R is onboard for primary storage purposes.
The BIOS is designed for those who like to tweak for a living. For some, the number of available options will be overwhelming while others will take joy in squeezing out every last little bit the board has to offer. The number of memory timing options is immense and includes the ability to setting timings for each individual channel. However, as we also found with the ASUS board, the auto settings are not always spot on.
Also, the latest beta BIOS we utilized (F4H) has a habit of overriding manual memory settings. This can be a good and bad decision on behalf of the BIOS. The good is that it will do its best to keep the user out of trouble; the bad is that when we manually tweak a board we would like to know when we are in trouble. In the end, the settings determined by the BIOS were always stable and performance was generally not detrimental. We will look at this as a glass half full situation. (update - BIOS F4K received today corrects this problem)
The only nitpick we truly have with the BIOS centers on Load-Line calibration. The purpose of this setting is to reduce VDroop and it works perfectly on the other boards. On our particular board sample we still noticed VDroop when a VCore setting of 1.425V resulted in 1.392V real. Gigabyte is aware of this and is working on it now. Otherwise, we commend Gigabyte for a well laid out BIOS and for offering the enthusiast just about every option one could use on a board.
Gigabyte supports a stock 800MHz ~ 2400MHz memory speed on the i920/i940 processors along with opening up QPI link speeds from a standard 4.800 GT/s up to 6.400 GT/s. They also include a slow mode QPI link speed for high Bclk testing. The board supports up to 24GB of DDR3 memory. We have not had any problems running 12GB of our Patriot or G.Skill DDR3-1600 kits with the latest F4H BIOS. Our final settings are at 1600 with 9-9-9-24 1T timings at 1.66V. Although the timings are looser than the other boards, performance is basically equal; only a user looking for that last bit of advantage in a benchmark would notice a difference.
The three PCI Express 2.0 x16 slots will operate in x16/x16 mode for 2x SLI/CF if the third x16 slot is empty. If you decide to place a PCIe RAID, network, audio, or TV tuner card in the third x16 slot, then the 2x SLI/CF configuration will operate in x16/x8 mode. 3x SLI/CF configurations will run in x16/x8/x8 mode. We had no problems running our ASUS Xonar D2X or Highpoint Rocket RAID cards in x16 slots two or three.
The Board
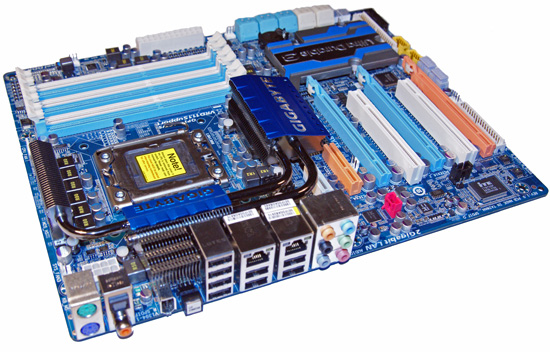
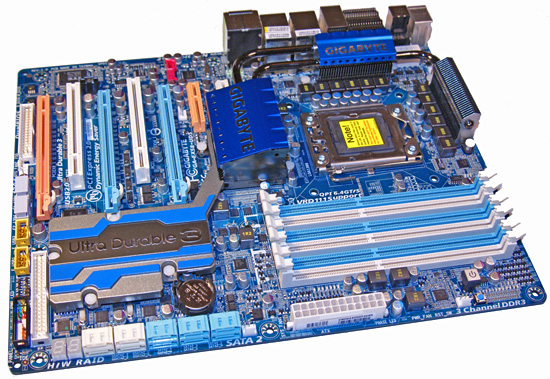


The $299 GA-EX58-UD5 is Gigabyte's mid-range X58 board, with the Extreme version being at the top end with a $330 price tag and the DS4 board placed at the low end with a $245 street price. We think Gigabyte's product separation is right on considering the feature set on each board, although we had hoped the DS4 would also have SLI capability considering the additional cost when compared to the MSI Platinum board.
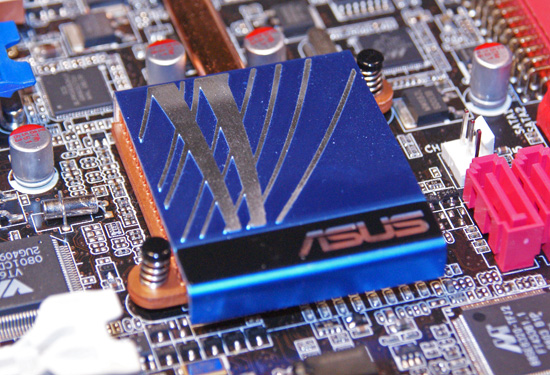
Gigabyte introduced a new color palette on this board and we like it for the most part. We still notice a few of the crayola colors in use but overall this board would not look bad in a case with a large window. The one item that stands out on the board is the rather large heatsink for the ICH10R/JMicron controllers proudly displaying the Ultra Durable 3 technology incorporated on the board. Ultra Durable 3 refers to Gigabyte's use of solid-state Japanese capacitors, ferrite core chokes, and low RDS(on) MOSFETs along with an extra dose of copper in the board layers.
All of this is meant to improve overclocking potential and extend the life of the board. Until we get to our sub-zero overclocking article, it has been difficult to notice any overclocking differences between this board and the others in our roundup. However, we do appreciate the high quality components that Gigabyte included at this price point.
Gigabyte provides a hefty combination of heatsinks for the northbridge and vrm areas that link together with a heatpipe system. In fact, part of the first VRM heatsink extends into the IO panel to provide an exhaust outlet for the cooling system. Of course this system relies on radial type cooling for proper heat dispersion. We highly recommend direct air-cooling in this area if you are utilizing a tower heatsink/fan for the CPU or water-cooling when overclocking.
The CPU area is fairly open and our larger air coolers installed perfectly without interference from the heatsinks. However, a large air cooler like the Monsoon Vigor III that we utilized will render the first DIMM socket unusable, essentially limiting you to only populating three of the DIMM slots. This board features a two-phase power delivery system for the northbridge and a two-phase delivery for the memory subsystem. A twelve-phase power delivery design is utilized for the processor, which could be construed as overkill, but it does serve its purpose when overclocking. Like the other boards, the capacitors in the CPU area are fairly close to the 1366 socket, something that is important to note when utilizing other cooling methods like large water blocks, cascade, or LN2 setups.
The general layout is very good considering the vast number of ports, slots, and hardware included on the board. Gigabyte's design keeps interference to a minimum with installed peripherals for the most part. The board includes three PCI Express 2.0 x16 slots (x16/x8/x8), one PCIe x1 slot, a single x4 slot, and two PCI slots. This arrangement allows 3X Crossfire or SLI and still leaves the PCIe x1 and x4 slots open. However, using double slot cards for CF or SLI will render the PCI slots physically unusable. It is at this point that we realized a couple of potential problems with this layout.
The first PCIe x1 slot can only be utilized with a half length card, which excludes most audio and tuner cards. The bigger problem is that when utilizing two double slot cards for CF or SLI, the cards sit right next to each other, which inhibits airflow. The same holds true when utilizing the third x16 slot. When installing a dual-slot card in the third slot, it will hangover the board, which could create an installation problem in most cases. We do not care for 3X CF/SLI for general gaming, so we would have preferred a proper dual x16 design or an additional slot between the first two x16 slots to improve cooling or allow water-cooling on the GPUs.
At the rear of the board are the ten SATA ports, a Debug LED display unit, and the IDE connector. The gigantic heatsink covers the ICH10R and the JMB 363/322 controller chipsets. The JMB322s are responsible for the two white SATA ports and offer driver-free RAID 0 and 1 support. The hardware stack in the JMB322 makes arrays appear as standard hard drives and hence the lack of required software drivers when setting them up. Gigabyte took a different approach and hooked the JMB322s directly into JMB363 SATA ports instead of riding on the PCI Express bus as they do on the MSI board. This results in slightly lower performance as our PCMark Vantage HDD test suite will indicate later on. All ten SATA ports have a right angle cable connection scheme that allows them to be utilized even with the longer double-slot video cards. About the only drawback is placing this board in a smaller case where the drive bays would butt up against the board. Even so, we feel this arrangement is the right way to go.
In a change from other board designs, Gigabyte locates the power on and reset buttons behind the DIMM slots, an unusual location but one that we grew accustomed to quickly. At the front of the board Gigabyte places their dual BIOS chips, which can come in handy in case a flash attempt goes south. Also, they figured out a way to include a floppy connector, although we no longer care to see them on boards in this market sector. Gigabyte also throws in some onboard LEDs to light up your life. Actually, they do serve a purpose besides looking cool in a windowed case at night: the LEDs will let you know how many phases are being utilized by the board during operation.
The IO panel features eight USB 2.0 ports, two Ethernet jacks with LED indicators, an IEEE 1394a port, standard PS/2 keyboard/mouse ports, coaxial and optical S/PDIF output ports, and a handy clear CMOS button. The audio panel offers connections to the Realtek ALC 889a HD audio codec. The one thing missing on this board is a fixed eSATA port. However, Gigabyte includes an expansion slot backplate that allows an additional two external SATA ports via any of the board's internal SATA connections.
The Applications


Gigabyte provides their EasyTune 6 application that provides monitoring, system information, and overclocking capabilities. This is one of the best applications provided by the various motherboard suppliers for tuning the system within Windows. We would still like to see the ability to save the settings to the BIOS or at least a BIOS profile; otherwise, this application is useful for extracting a fair amount of performance improvement out of the system within Windows.

Gigabyte recently updated their DES (Dynamic Energy Saver) software so it is compatible with the X58 chipset, along with providing BIOS improvements. Our original F2 BIOS would not work properly with the latest DES beta but the F4 series has made great strides in this department. We noticed a 5W improvement in idle rates and a 1W improvement in our load tests with DES. Gigabyte expects some additional savings once the software and BIOS are finalized. The DES system offered fast switching times once a full load was placed on the system and we did not experience any crashes during our benchmark tests.
MSI Eclipse X58
Features
The MSI Eclipse X58 is a feature laden board from a hardware and software viewpoint. It should be considering the $350 price tag, although there is a $30 mail-in-rebate at present. The almost universal Realtek RTL-8111C PCIe Gigabit Ethernet controllers are utilized in tandem; a riser card featuring the Creative Lab's CA0110-IBG chipset provides HD audio and EAX 5.0 capabilities; JMicron’s JMB 363/362/322 chipsets are tabbed for eSATA, IDE, and additional SATA port duties; VIA's VT6308P provides IEEE 1394a support; and the Intel ICH10R is utilized for primary storage purposes.
The BIOS is designed for overclocking duties, although it's not as comprehensive as those from ASUS or Gigabyte. However, it is fair to say that several of the options that ASUS and Gigabyte provide will never be touched by about 95% of us when overclocking. Our main knock against the BIOS is that it is not as user friendly as the others in this roundup. We do not care for the +/- voltage settings as it becomes confusing for the user to understand exactly what effect their changes had on the particular option, especially without knowing what the base voltage is set at.
MSI supports stock memory speeds up to 2133MHz on the i920/i940 processors along with opening up QPI link speeds from a standard 4.800 GT/s up to 6.400 GT/s, which is standard on the i965 Extreme processor. The board fully supports 24GB of DDR3 memory. We have a 24GB kit arriving shortly for testing so we cannot confirm compatibility yet, but we trust MSI in this regard.
In the meantime, we have not had any problems running 12GB with our Patriot or G.Skill DDR3-1600 kits up to 1600 at 9-8-8-24 1T timings, although we needed about 1.68V for absolute stability with the i920 at stock speeds. Dropping the command rate to 2T allows 1.64V operation with the current BIOS. Overall, memory performance is very competitive with the other boards and improving in each BIOS release. However, this is the only six slot board that we have been unable to clock a 12GB configuration up to a 191x21 setting. The board stops around a 175 Bclk with an 8x memory multiplier that results in a DDR3-1528 speed. The board will clock up to a 191 Bclk with the memory multiplier at 6x, which results in a DDR3-1146 setting. MSI is working on improving this area.
The Eclipse board contains three PCI Express 2.0 x16 slots that operate in x16/x16 mode for 2x SLI/CF. The third x16 slot operates in x4 mode regardless of the second slot population. 3x SLI/CF configurations run in x16/x8/x8 mode on the EVGA and Gigabyte boards. We did not notice any performance differences between the x16/x16 or x16/x8 operation in 2x CF with our HD 4870 cards. However, we just received a new BIOS from MSI that allows 3X SLI/CF to operate properly. We will update the article in a few days with a comparison between the boards utilizing all three x16 slots. We had no problems running our ASUS Xonar D2X or Highpoint Rocket RAID cards in slots two or three.
The Board
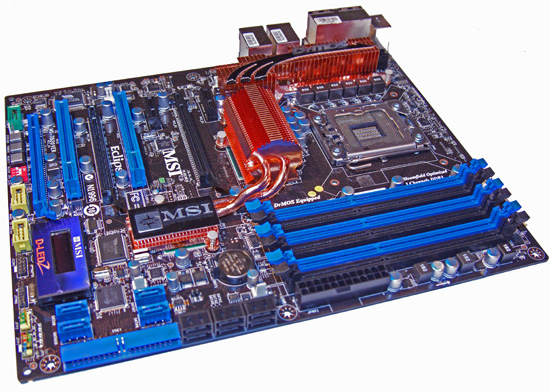


The Eclipse X58 is MSI's current flagship board with the recently introduced Platinum X58 filling a void in the low end X58 market with a $220 price tag. While $220 is an awful lot for a motherboard, it's practically a bargain in this particular market sector. Of course, you give up a few items like SLI compatibility, an additional x16 slot, and the JMicron SATA ports, but for a lot of users those features are not that important.
MSI went a different direction with this board compared to earlier designs; gone is the roller coaster or circular heatpipe design, as is the traditional fire engine red color scheme that is now a subdued black and blue color palette. While colors do not determine the performance of a board, they do tend to make a difference in first impressions. We like the new color scheme and sincerely appreciate a more traditional heat pipe setup. In fact, MSI skipped on an elaborate heatpipe setup found on other boards and concentrated on cooling the voltage circuitry separately, although the northbridge and southbridge are still linked together.
The CPU area is fairly open and our larger air coolers did not pose a problem. The Eclipse board features a two-phase power delivery system for the northbridge and for the memory subsystem. A six-phase power delivery design is utilized for the processor, half that of the Gigabyte and ASUS boards. However, this did not adversely affect the overclocking capabilities of the board. MSI utilizes high quality solid-state capacitors and ferrite core chokes on the board.
The general layout is very good as MSI has managed to situate the vast number of ports, slots, and hardware in a manner that keeps them from interfering with installed peripherals. MSI managed to squeeze three PCI Express 2.0 x16 slots (x16/x16/x4), two PCIe x1 slots, and two PCI slots. This arrangement allows 3X Crossfire or SLI and still leaves a single PCIe x1 slot open. However, using a double slot card in the third slot will make it extremely difficult to utilize the power, reset, IEEE 1394a, and USB ports. Our opinion about 3X CF/SLI is not that high unless you are benchmarking for 3DMark records, so we appreciate the fact that a 2X CF/SLI arrangement will leave a PCIe x1, PCI, and PCIe x16 (x4 electrical) slot open.
On the bottom of the board you will find onboard buttons for power, reset, and the D-LED 2 display module. The D-LED 2 is handy for a quick glance during the POST process or you can have it display VCore or northbridge voltages along with pinpointing a particular temperature on the board with the included 20" probe. The D-LED does not display hex codes, instead relying on short hand messages like "DDR Ini" during post processes.
While we appreciate the D-LED, it is really only good for windowed cases or open platform testing. We think MSI should have included an attachment cable that allowed placement outside of the case. Also, the unit does not live up to its potential by providing additional hardware monitoring capabilities such as temperatures, fan speeds, or other voltage readings. Of course, MSI has monitoring software that accomplishes these tasks, but we think a hardware solution would be better, especially considering the cost of the board.
The IO panel features eight USB 2.0 ports, two Ethernet jacks, an IEEE 1394a port, and two eSATA ports courtesy of the JMB 362 chipset. MSI also includes an expansion slot backplate that allows an additional two eSATA ports via any of the board's internal SATA connections. An audio output panel is missing since MSI utilizes a riser card that features Creative Lab's CA0110-IBG audio chipset.
Our first reaction was very positive until we looked at the chipset specifications and realized that hardware audio processing capabilities - including the EAX 5.0 implementation - are done through software and the CPU. Also, most of the software features from a standalone X-FI card are not available in the software package that MSI provides. They did include access to Creative's 24-bit Crystalizer and speaker virtualization features along with other hardware settings.
Of course the big question is the audio quality provided by this solution. RightMark Audio Analyzer indicated poor THD and inter-channel leakage, but in actual usage we could not tell any real differences between the Creative and Realtek solutions in music playback quality. The ADI solution on the ASUS board sounded a bit clearer and dynamic in music playback. In gaming, we thought the Creative solution was slightly better than the ADI chipset and noticeably better than the Realtek solutions on the Gigabyte and EVGA boards. If gaming or music playback is a priority, we still suggest an add-in card for best performance.
The Application
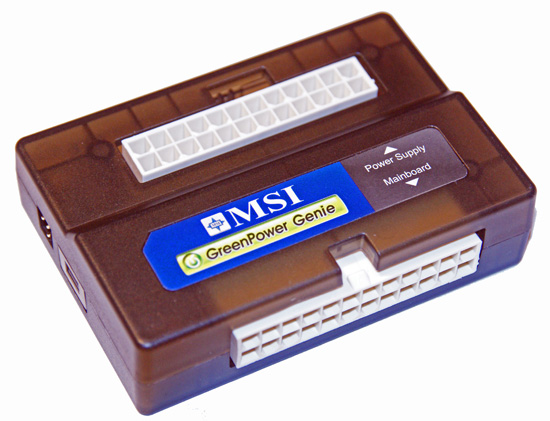
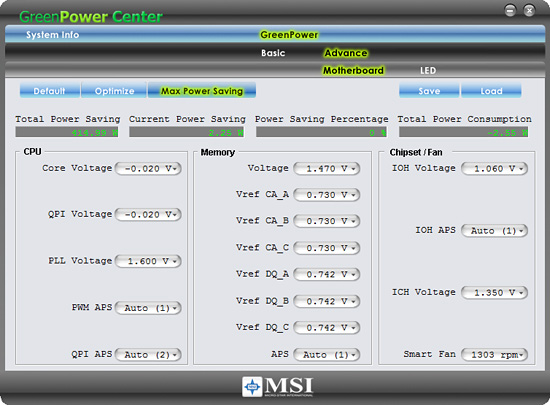
MSI features a unique power saving system on the Eclipse. They include a GreenPower Genie pass-through connector that attaches to the 24-pin ATX power supply cable and a cable that attaches to the 24-pin ATX connector on the motherboard. There is also a two-pin cable that attaches to the Genie and the motherboard that works in conjunction with the the GreenPower software to monitor and dynamically reduce power usage.
This system will automatically scale the number of active power phases for the processor, memory, and northbridge. We noticed savings of 9W at idle, so it actually works. In fact, it provides better results than the ASUS EPU-6 or Gigabyte DES power saving systems. During testing, it was able to switch fast enough so we did not have to worry about program crashes when utilizing GreenPower. The one drawback is that the pass-through connector and cable is a bit cumbersome to use in smaller cases.
ASUS P6T Deluxe
Features
ASUS offers the P6T Deluxe in two different versions, one with the OC Palm external display module for $338 and one without for $299. The OC Palm was originally introduced as the ScreenDuo last year and features a 2.5" QVGA display, four-way directional pad, and four input buttons. It attaches to the motherboard via a USB cable and features a clean, uncluttered, and simplistic interface that allows the user to interface with various ASUS software programs. The user can monitor various hardware functions or do on-the-fly overclocking. The unit allows real-time changes to the processor's Bclk along with voltages for QPI, memory bus, and the CPU. We would like to see additional overclocking variables along with the ability to save profiles to the BIOS or real-time changes to the BIOS. Overall, it is a unique feature and fun to play with for about 30 minutes, but for most users we would suggest saving the money and buying the base board - A board that we might add is one of our favorites in the lab since it first arrived.
Not to take anything away from our other boards as they are all very good with one bordering on being great, but the ASUS P6T-Deluxe impressed us with its ability to just work as expected out of the box. While we provided several suggestions to ASUS for improvements, they mainly centered on tuning aspects, not getting basic functions to work properly before we could even consider testing. That may seem trivial, but unfortunately it is not if you are an early adopter of high-end motherboards.
The BIOS is designed for a wide variety of users who want to get the most out of a board when overclocking. Some of the voltage ranges are not as wide as Gigabyte's, nor do you have the ability to control each individual memory channel, but the options available will more than suffice for most users. We also think the ASUS BIOS is more user friendly due to the information provided for each option. However, ASUS continues to use the terminology QPI/DRAM instead of VTT as the other boards do.
ASUS features memory speeds from 800MHz to 2133MHz memory for the i920/i940 processors along with opening up QPI link speeds from a standard 4.800 GT/s up to 6.400 GT/s. We are disappointed with the number of OC profiles in the BIOS. ASUS has three OC profiles compared to up to eight on the other boards.
The board officially supports 12GB of DDR3 memory, although we expect full support for 24GB in a future BIOS release. Running 12GB of memory on this board is extremely easy and it usually requires less voltage while providing tighter timings than the other boards. Our 12GB Patriot and G.Skill DDR3-1600 kits were 24/7 stable at 1600 with 8-8-8-24 1T timings, although we needed about 1.66V for absolute stability. The Gigabyte board offered slightly better latency results with 9-8-8-24 1T timings, but the ASUS board was just slightly faster in most of the benchmarks except for WinRAR. Of course, your mileage will vary with different memory kits and sub-timings, and outside of memory benchmarks the net difference is generally less than 1%.
One last item of note, at least in this first look, is that the three PCI Express 2.0 x16 slots will operate in x16/x16 mode for 2x SLI/CF if the third x16 slot is empty. If you decide to place a PCIe RAID, network, audio, or TV tuner card in the third x16 slot, then the 2x SLI/CF configuration will operate in x16/x8 mode. We did not notice any performance differences between the two modes with our HD 4870 or GTX 260 cards. 3x SLI/CF configurations will run in x16/x8/x8 mode. You can also use the first and third x16 slots for graphics if you need to open up a PCI slot but the board will run in x16/x8 mode. Although the owner’s manual states the three x16 slots are for graphics cards only, we had no problems running our ASUS Xonar D2X or Highpoint Rocket RAID cards in x16 slot two or three.
The Board
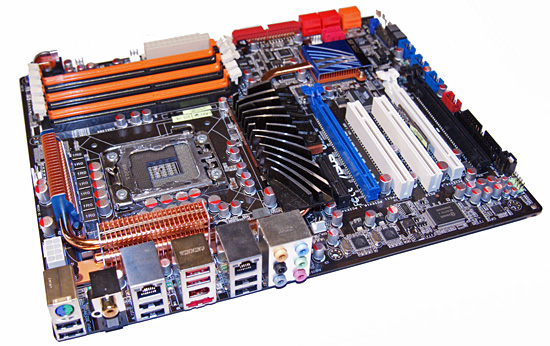


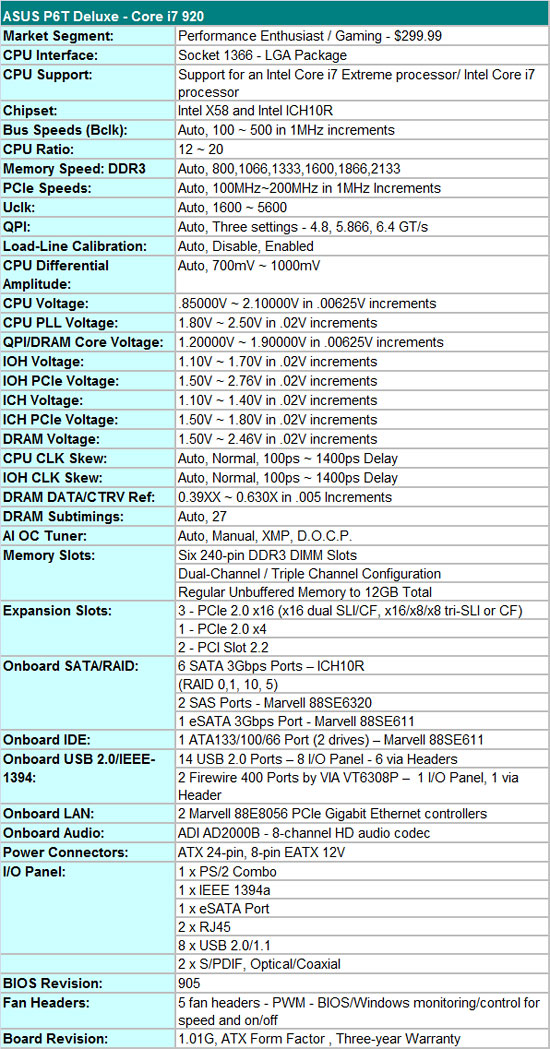
The P6T Deluxe carries over the orange and black decor from previous ASUS DDR3 boards along with a blue and white slot motif. While not exactly as colorful as previous Gigabyte boards or as subdued as the MSI board, it does work well enough; we prefer the flagship ROG color palettes. ASUS has constantly improved their layouts over time and the P6T Deluxe reflects this with a design that is virtually free of clearance problems. While not as loaded as the Gigabyte board, ASUS still has a substantial amount of items to squeeze onto the motherboard.
The first item we notice on the P6T Deluxe is the heatsink and thermal pipe setup encircling the CPU socket area. The CPU socket is centered to the DIMM slots as we noticed on the Gigabyte board. The engineers tell us this is to optimize the memory trace paths resulting in higher overclocks and improved stability. The various heatsinks are low-profile designs featuring a completely passive setup in order to keep noise to a minimum. ASUS utilizes a swept fan design for the northbridge, a small but effective fin array for the ICH10R, and a couple of relatively low-profile fin arrays for the PWM area.
All of this equates to a CPU area that is basically void of clearance issues with large air coolers, although the capacitors are little close to the 1366 socket for the more extreme cooling options. The P6T Deluxe features 23 power phases, which certainly sounds impressive, but we are still not sure if quantity is better than quality in this regard. ASUS dedicates 16 for the processor core and another three memory, two each for the memory/QPI controller and chipset. The Gigabyte and MSI boards feature two individual two-phase designs for the memory and QPI systems.
On the other end of the board we have a bevy of SATA ports and the IDE connector. The six red ports are tied to the ICH10R while the two orange ones attach to a Marvell 88SE6320 Serial Attached SCSI controller. Backwards compatibility built into the SAS standard allows current SATA drives to work. When utilizing a standard SATA drive, performance is close to the ICH10R and definitely a step ahead of the JMicron controllers on the other boards. As a plus, it will do RAID 0 and 1 arrays, and ASUS includes SAS cables in the box. We appreciate the right angle connectors as they ensure there will not be any clearance issues with longer cards. However, ports 5 and 6 use a standard design that results in a very tight fit with a couple of GTX280s installed.
ASUS includes onboard power and reset buttons, but curiously forgot to include a clear CMOS button. After weeks of testing, it is a feature we miss, even though ASUS' BIOS recovery system rarely let us down. Moving forward, we have three physical x16 slots available for graphics in a x16/x8/x8 configuration with a 3X setup. In order to run a 3X setup, the second GPU will have to be a single slot solution... which sort of defeats the purpose of 3-way support, since the current NVIDIA 3-way SLI cards are all dual slot solutions. Still, you can add in a card for PhysX processing if you'd like. In a 2x CF/SLI setup, the user ends up with a x16/x16/x1 configuration. An additional x4 slot is at the top of the board that can accommodate full length cards. To top it off, two PCI slots are available, but the first one will be blocked by double-slot graphics card.
ExpressGate is included on this board and the riser card is located between the second PCIe x16 and PCI slots. In addition to the riser card, the board features onboard headers for an additional IEEE 1394a port and six USB ports. The user ends up with a total of 14 usable USB ports, two more than the ICH10R supports. That means some sharing is going on between the ports, but we never noticed a problem with the board loaded out.
Finally we get to the IO panel that features a single combo PS/2 port, eight USB ports, two Gigabit LAN ports, a single IEEE 1394a and eSATA port, and optical and coaxial S/PDIF out ports. The audio panel features connection jacks to the Analog Devices AD2000B codec, probably the last time we will see this codec since ADI has exited the PC audio business.
The Application
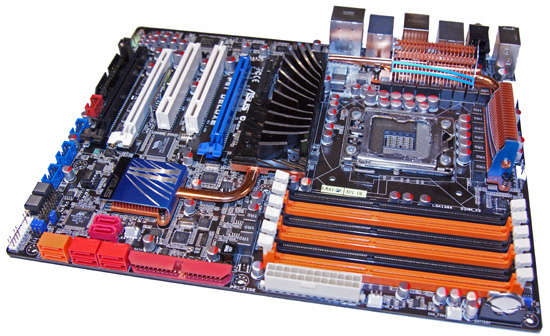
TurboV is ASUS' latest Windows based overclocking utility that features the ability to change most major BIOS settings to improve overclocking rates. It features profiles and works quite well, provided the memory timings and CPU multiplier have been set up properly prior to entering Windows. We are still hopeful that one of the major suppliers will offer the same capabilities as AMD's AOD utility.
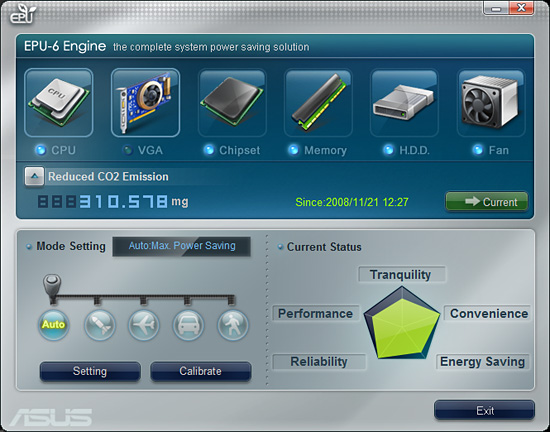
The P6T Deluxe features the EPU-6 power savings technology that can be accessed through the EPU software. The program offers five different modes or levels of energy savings. After hours of testing each setting, we found that leaving the application on Auto with a proper calibration worked best. Utilizing EPU-6 resulted in a power savings of 5W at both idle and load settings.
Test Setup
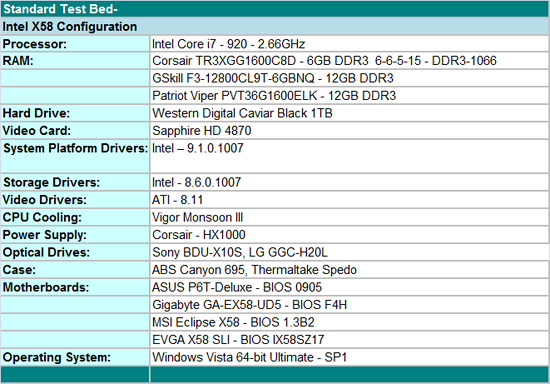
We are utilizing the Intel i7 920 processor in our testing today. We believe this processor will be the top selling i7 processor for the near term due to its reasonable cost and excellent performance capabilities. We test with Hyper-Threading enabled, all power saving options enabled, and memory set to DDR3-1066 at 6-6-5-15 1T timings unless noted. Memory sub-timings are set to auto along with all voltages set to auto. All peripheral options on the board are enabled along with the Vista HD audio drivers for each audio solution.
Our 6GB memory kit is provided by Corsair and this particular kit will reach DDR3-1800 on 1.75V, thus providing reasonable overclocking headroom for our i7 920. We also tested with several different kits from Kingston, OCZ, Patriot, G.Skill, and Mushkin that have all provided excellent results from 1066 up to 2000 speeds depending on the kit. The retail i7 processors do not have a memory multiplier or QPI lock as we noticed in our engineering samples. We will take a look at all of the available DDR3 tri-channel kits running at various clock speeds in a separate article.
Our video card choice is the Sapphire HD 4870 512MB edition. We originally had decided to test with the Sapphire 4870X2 card but constant driver problems prevented us from effectively utilizing the card in our first benchmark results. The latest 8.11 drivers are a welcome relief, but problems still exist in a few games with AA disabled. We will show CF results with the HD 4870 today and GTX 260 results in our overclocking guide shortly. At this point, at least in motherboard testing, we prefer the NVIDIA GTX260/280 series on the X58 due to better driver support.
We stored everything in an ABS Canyon 695 chassis for these particular tests. This is case you have to see and touch in person to really appreciate it. We are also testing our GTX 260 setups with the Thermaltake Spedo. We might add that the Spedo is an excellent case for the money. For those of you who have spent most of your money on upgrading to the X58 platform but still need a case on a budget, the Antec Nine Hundred Series worked very well for us during thermal testing. If you already have a case like the Cooler Master 830 Stacker or Cosmos 1000, then you are set.
Cooling is provided via the Vigor Monsoon III and allows us to reach 4.0GHz~4.1GHz on air-cooling. Our other coolers from Thermaltake, Thermalright, and Cooler Master offer similar performance. CoolIT Systems has provided their updated Freezone Elite to handle overclocking duties when we push our CPUs and GPUs to the limit in part two. Storage duties come via the superb WD Black Edition 1TB drive. Power delivery is provided by the Corsair 1000HX PSU.
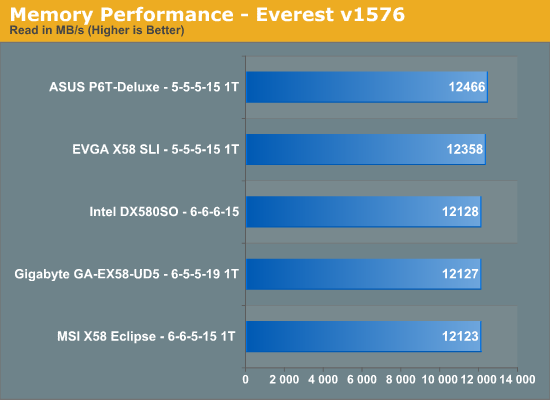
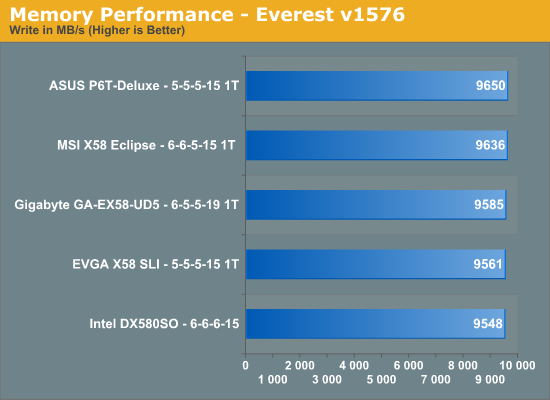
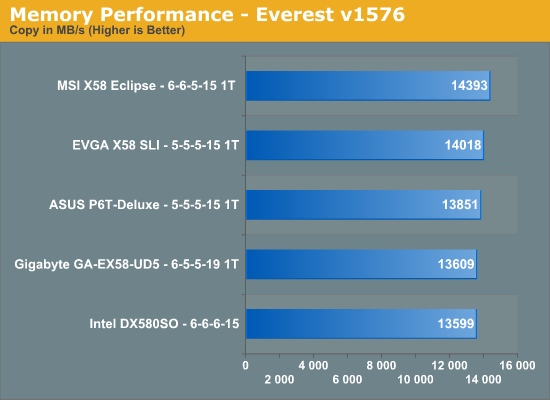
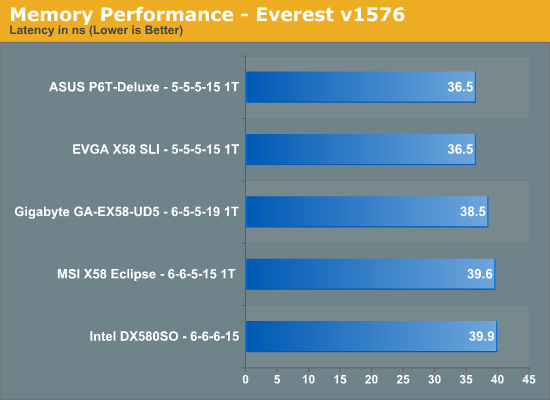
Memory Performance - Everest
Our base memory tests were completed with a 6GB memory configuration and best possible timings at DDR3-1066. We will be providing additional memory results in a separate article shortly at various speeds and timings. We just received BIOS F4K from Gigabyte that resolves tRAS issues and will update our results after testing is complete. Our tests results for Gigabyte were completed with BIOS F4H.
Memory Performance - Applications

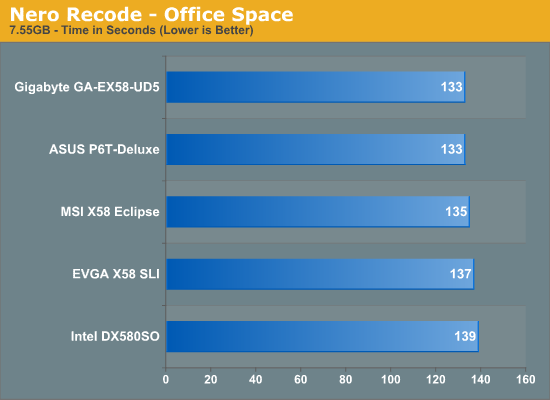

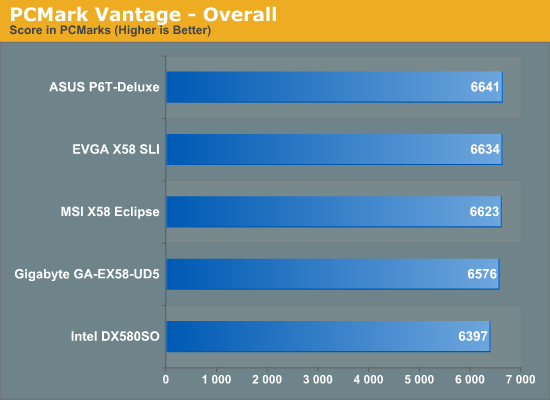
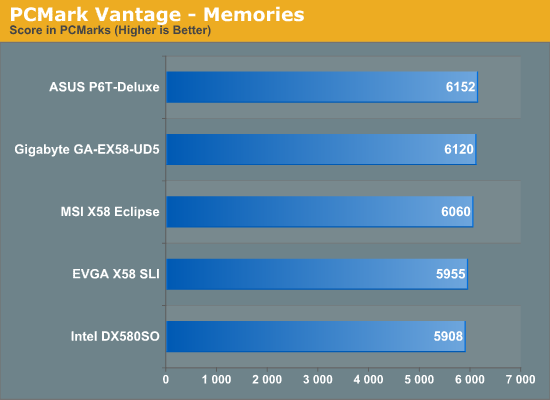
General Performance
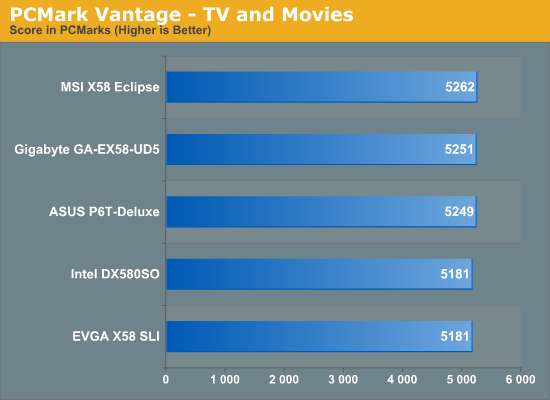
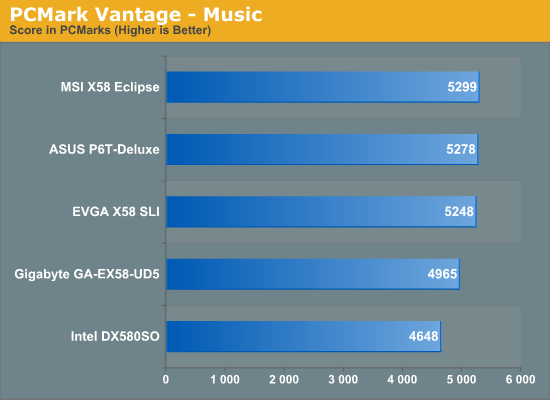
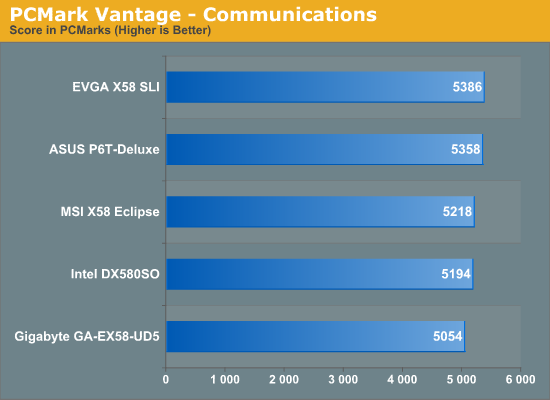
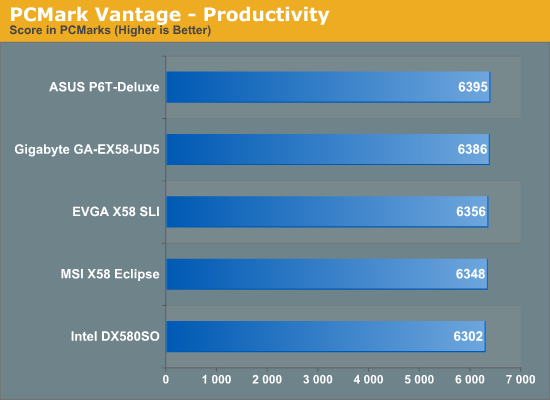
Futuremark's PCMark Vantage x64 is probably the single most diverse set of benchmarks that can be run on a system to mimic real world usage scenarios. The TV and Movies, Gaming, and Music Suites can be frighteningly difficult to pass when a system is not set up correctly. We've had boards in the labs that will pass hours of Prim95 torture testing or OCCT that fail even the basic 30 minute run of PCMark Vantage, let alone the full 1 hour and 30 minute test run.
Although the scores are very close, the ASUS P6T-Deluxe offers a slight advantage in our system benchmark results thanks to slightly better video performance. The Gigabyte GA-EX58-UD5 scores very well in most of the individual tests except for the Music suite that features a heavy reliance on the CPU and HDD. The Gigabyte board scored low in the individual Media Center and Storage tests for an unknown reason that we are still investigating. The MSI Eclipse and EVGA X58 SLI also offer solid performance in these benchmarks. Our reference Intel board trails the other solutions due to video and memory performance. We had to run the Intel board at 6-6-6-24 memory timings compared to 6-5-5-15 1T timings due to stability problems in the TV and Movies test suite. However, a user would be hard pressed to actually tell the difference between any of the boards during actual usage.

Gaming Results
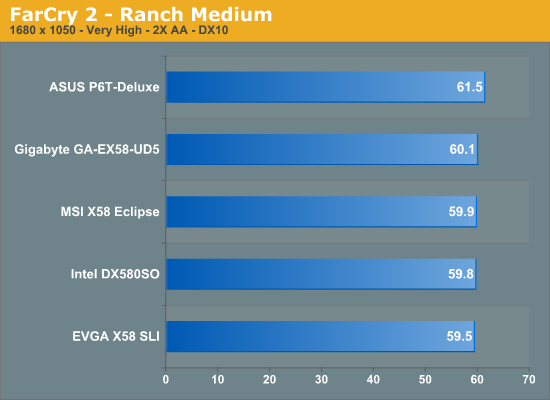
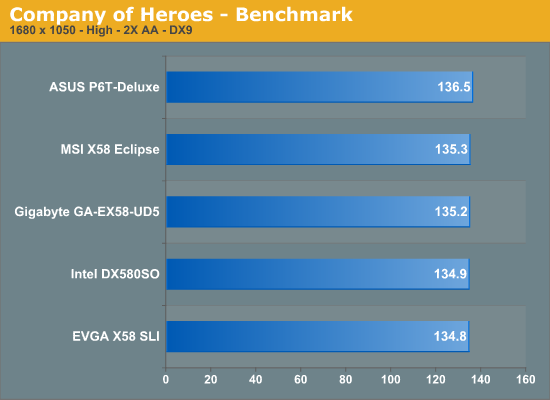
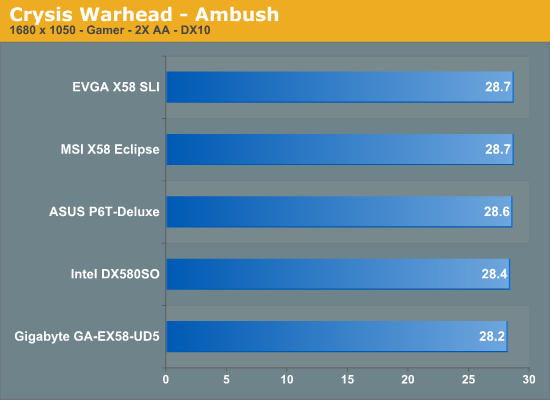
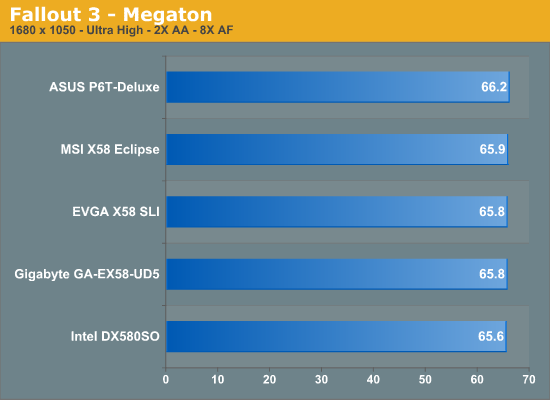
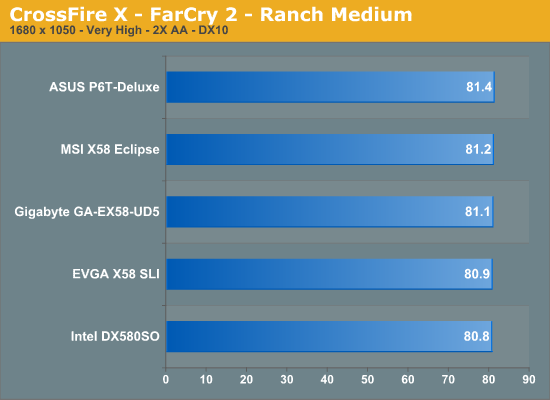
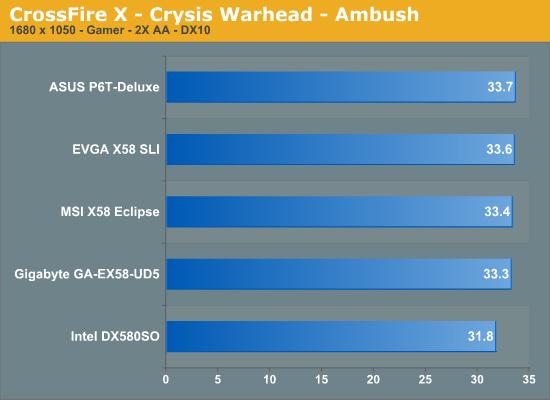
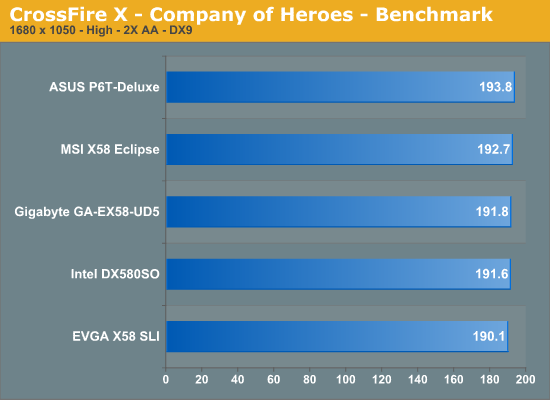
We debated on which direction to go with the gaming test results. Do we show 1024x768 at low quality settings to provide a more detailed look at differences between the boards or go with a popular resolution and settings that most gamers would utilize with our choice of video cards knowing that the GPU would start to become the handicap? We decided on a 1680x1050 resolution with 2xAA enabled and 8xAF where applicable. Our in-game settings were set to high quality settings.
As such, all of the boards offer roughly the same performance, though the ASUS P6T Deluxe is the clear winner in a majority of tests. This same pattern holds true at 1024x768, 1280x1024, 1920x1200, and 2560x1600 with our HD 4870, HD 4870X2, and GTX260 video cards in both single card and CrossFire/SLI configurations. Apparently ASUS has located the secret sauce that gives it that slight advantage in video performance in a wide variety of benchmarks. We will have an expanded set of results with CrossFire and SLI configurations in our final roundup.
\


CrossFire Results
SATA Performance
PCMark Vantage is the latest benchmark available from Futuremark, and it is only for use with Windows Vista. Similar to the venerable PCMark05 in its makeup, Vantage modernizes the criteria and test methodology to reflect what users may encounter when running the new Windows OS and current applications. The total HDD benchmark is roughly 87% reads and 13% writes in nature. We run each test five times per drive, producing a median score that we use for comparison in our charts. We utilize AHCI settings for each board.
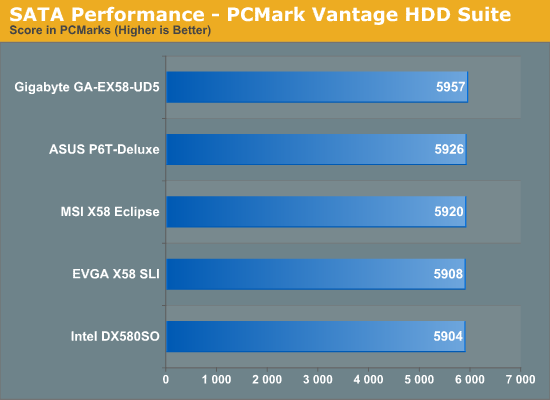
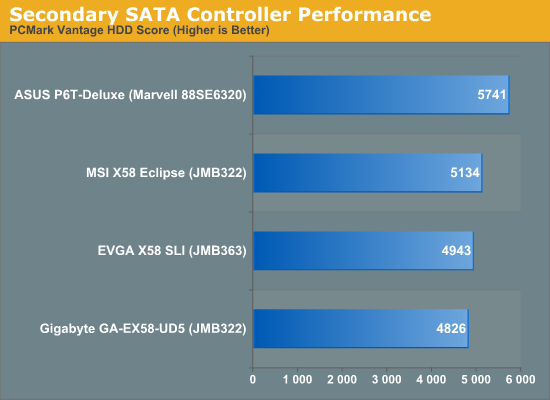
All of the boards utilize the ICH10R for primary storage duties, so there is little difference between the results. In our secondary controller results, we see the SAS solution from Marvell leading the JMicron controllers utilized on the other boards. The MSI and Gigabyte boards both utilize the JMB322 chipset, but we see the MSI board performing better since the JMB322 resides directly on the PCIe bus instead of utilizing the JMB363 as a pass through chip in the same manner that Gigabyte does. EVGA uses the JMB363 chipset and it just barely slides past the Gigabyte setup.
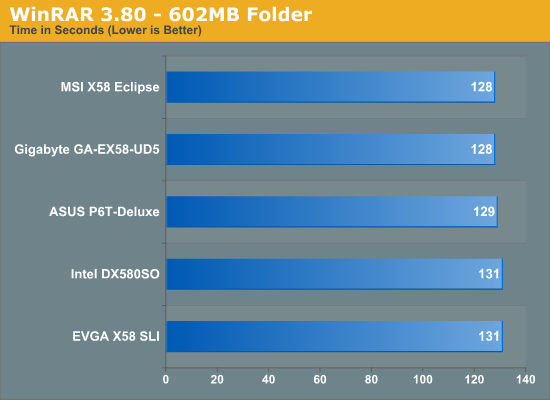
USB / FireWire Performance
Our USB transfer speed tests are conducted with an OCZ Rally 2 Turbo 4GB Flash Drive and USB 2.0/FireWire based Maxtor OneTouch II external hard drive. In the small file test, we transfer a 602MB file folder containing 444 files of various sizes from our hard drive to the USB Flash drive. In the large file test, we transfer a 1.90GB file folder containing 17 different files from our hard drive to the external drive utilizing the USB 2.0 and IEEE 1394a interface.

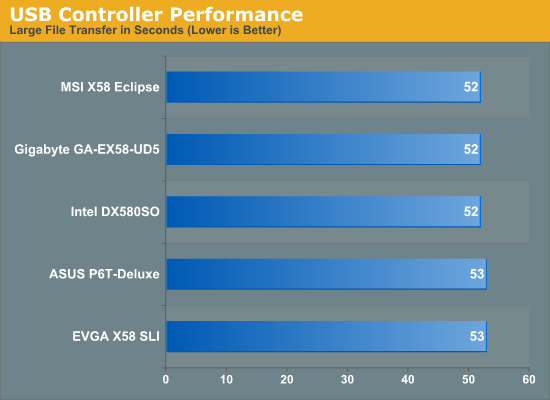
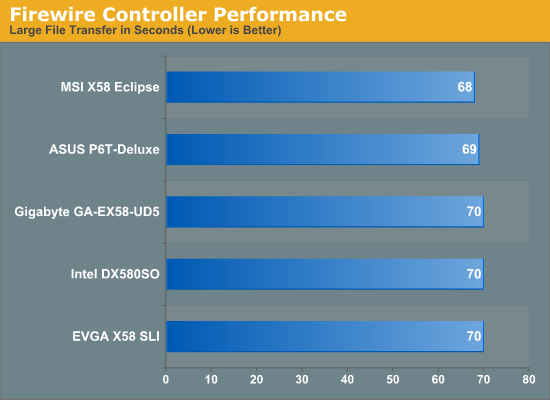
USB performance should be a wash since all the boards use the same ICH10R chipset that provides the USB capabilities. While our synthetic HD Tune tests indicate parity between the boards, the actual transfer of files in the small file test indicates a slight advantage to the ASUS, Gigabyte, and Intel implementations. Our large file USB test is basically a wash as the external hard drive becomes the limiting factor. The VIA FireWire solution on the MSI and ASUS boards hold a small advantage over the Texas Instruments chipset on the other boards.
Networking
The Windows 2000 Driver Development Kit (DDK) includes a useful LAN testing utility called NTttcp. We used the NTttcp tool to test Ethernet throughput and the CPU utilization of the various Ethernet Controllers used on the Intel motherboards. We set up one machine as the server; in this test, an Intel system with an Intel CSA Gigabit LAN connection. Intel CSA has a reputation for providing fast throughput and is a logical choice for our Gigabit LAN server.
On the server side, we used the following Command Line as suggested by the VIA whitepaper on LAN testing:
Ntttcpr -m 4,0,‹server IP› -a 4 -l 256000 -n 30000
On the client side (the motherboard under test), we used the following Command Line:
Ntttcps -m 4,0,‹client IP› -a 4 -l 256000 -n 30000
At the conclusion of the test, we captured the throughput and CPU utilization figures from the client screen.
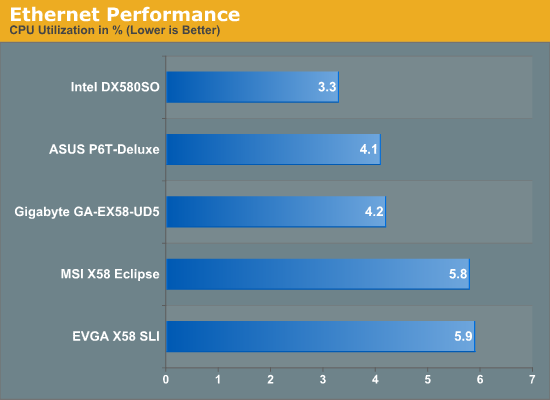

Our network throughput test indicates how well a particular controller design from Realtek, Marvell, or Intel performs instead of being indicative of true chipset performance. This also holds true for the CPU utilization results, though this test can also be influenced to certain degree by the BIOS code and chipset interconnect design.
The CPU utilization numbers favor the integrated GbE controller on the Intel board, followed closely by the Marvell chipset on the ASUS board. The EVGA, MSI, and Gigabyte boards use similar Realtek networking chips, but the Gigabyte board uses the newer RTL8111D over the MSI/EVGA RTL8111Cs. All of the boards feature excellent throughput, with the Marvell solution edging slightly ahead of the Realtek and Intel solutions.
Power Consumption
We measured "system" power consumption at the wall outlet using a Watts Up Pro power meter. We do not include the power numbers for a monitor or external speakers; however, we do install a set of headphones to the audio out jack. We also turn on all peripherals in the BIOS along with enabling all power saving features. Power consumption was measured at idle after a 15 minute period and under a load while measuring the average power consumption of the Ambush level in Crysis Warhead. Windows Vista is set to balanced performance mode and the prefetch folder is cleared for each test. Our two tests consist of the standard BIOS power savings mode and a second test using the energy saving applications provided by each supplier. Today the latter consists of the MSI, ASUS, and Gigabyte boards.
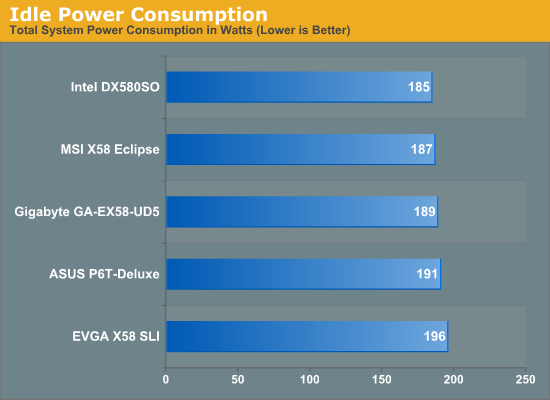
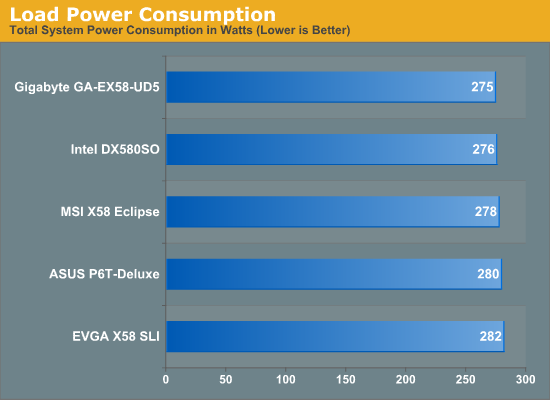
At idle with the BIOS only setup, the Intel DX58SO has the lowest power usage and is followed by the MSI, Gigabyte, ASUS, and EVGA boards. The load numbers favor the Gigabyte board with the EVGA once again utilizing the most power. Our power numbers have fluctuated greatly as the BIOS designs have improved for each board. EVGA just delivered a new BIOS that we are testing now that addresses S3 resume problems and should improve power consumption numbers also. The latest Gigabyte BIOS also provided a significant decrease in idle power consumption as it originally matched the EVGA board.

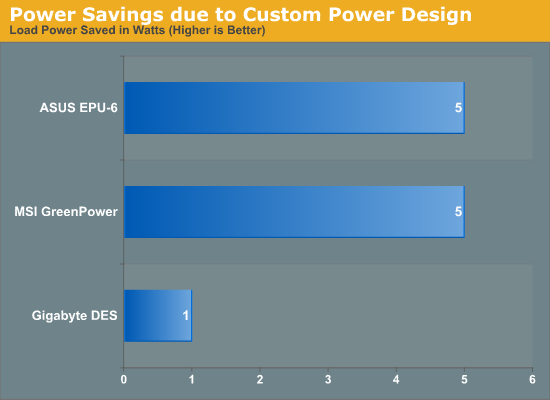
The MSI Greenpower system provides the greatest power savings compared to the ASUS EPU-6 and Gigabyte DES designs at present. The MSI board has an idle power reduction of 9W with the ASUS and Gigabyte boards dropping 5W. We noticed that even under gaming, each design managed to save a few watts during our load testing. We utilized a beta version of Gigabyte's DES software that has preliminary support for the X58. All three suppliers indicated we should see slightly better results in the next round of BIOS and software updates.
Initial Overclocking Results
We are working on a comprehensive overclocking guide for the i7/X58 platform to fully explain each BIOS setting as well as providing an easy to follow set of instructions to get the most out of this new platform. In the meantime, we are showing our initial overclocking results with air-cooling and the i920. To be blunt, overclocking the i920 on air to 4GHz is fairly simple: raise Bclk to 191, enable turbo and HT modes, set VCore to 1.4125V, VTT to 1.30V, VDimm to 1.67V, and set your 6GB kit to 9-9-9-24 as a good base start. After that, it is merely a matter of fine tuning the voltages a little and adjusting memory timings for improved performance and/or stability. Of course, all of this depends on the quality of your memory, cooling, and CPU. In our case, even with very good air-cooling, we found the practical limit for VCore to be around 1.425V without incurring throttling under load temperatures. Based on this setting, we arrived at our 21x191 setting. We will take a further look at overclocking on these boards and others with a CoolIT Systems Freezone Elite shortly.
Our overclocking numbers are reached with HT and Turbo settings enabled on a retail CPU. This adds a significant load on the IMC and memory system resulting in the need to run higher voltages than if we turned off HT or Turbo, especially HT. In fact, a 19x211 (ES CPU) setting without HT or Turbo enabled resulted in us lowering VCore from the 1.4125V range to 1.35V and VDimm from an average of 1.67V to 1.64V while retaining like CPU clock speeds and stability. Performance is basically equal, except in applications that take advantage of four or more cores where a slight lead goes to an HT enabled system. Our retail CPU sample is not the best around so our non HT/Turbo enabled voltages and Bclk numbers could be improved with a better unit. In fact, the retail CPU we utilized refused to go over a 205 Bclk so we had to use an ES sample for the 19x211 testing. We have additional CPUs arriving shortly.
![]()
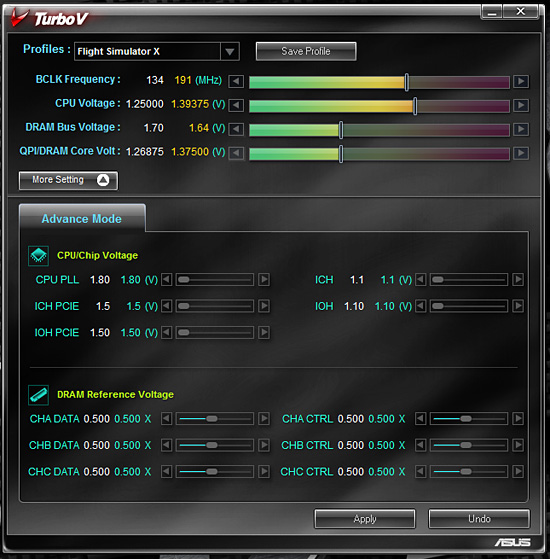
All of our boards easily reached 21x191 for a turbo boosted speed of 4010MHz or so. Each board was able to run our Corsair or Mushkin 1600MHz 6GB kits at CAS7 with ASUS offering the best timings at 7-7-7-20 1T, Gigabyte at 7-8-7-24 1T, MSI at 7-8-7-20 1T, and EVGA at 7-8-7-20 1T. Memory performance was very close for each solution considering the Bclk ratio was not exactly at 191 as set in the BIOS. The EVGA board returned a 190.5 setting, MSI at 191.5, ASUS at 190.9, and Gigabyte at 191. Even accounting for the various Bclk speeds, the boards were extremely close in the write, copy, and latency numbers; the exact numbers we think are extremely important for improving system performance with an IMC design, whether from Intel or AMD.
Overall, we think the Gigabyte numbers are the best and for good reason. On each board, we set the basic timings based on extensive stability testing and let each individual board set the balance of the subtimings based on their auto settings. Gigabyte offers an additional memory setting that improves subtimings automatically; there are three different settings: Standard, Turbo,and Extreme. We utilized the Turbo setting without affecting stability. The Standard setting returned results that were slightly lower than the other boards and the Extreme setting was not stable.
This is not to take away from the performance of the other boards. In fact, each successive MSI BIOS has improved memory performance and stability greatly, to the point now that the Eclipse board is able to run with the wolves. ASUS started out with the fastest memory performance, and in our initial testing beyond 4GHz their ability to run tighter timings pays off as you increase Bclk rates. EVGA just provided a BIOS that opens up 24 different subtimings and we could improve memory performance about 3% after a quick session.
Of course, manually tuning each setting certainly results in better performance in certain benchmarks - you know, the ones like SuperPI 32M, AquaMark, or WinRAR. However, you will never notice the difference in daily usage unless you do it wrong and wonder why Excel or Crysis constantly crashes. So, for the majority of users we highly recommend auto settings for the subtimings - and often for the base memory timings as well.
The one knock we have against the Gigabyte board is that VDroop is present even with load line calibration enabled. We had to set our VCore to 1.4250 to 1.4300V to ensure stability after accounting for VDroop; however, the board proved to be stable at a real 1.392V ~ 1.412V. The EVGA board tended to overvolt slightly under load while the MSI and ASUS boards kept VCore stable.
![]()
Overclocking to 21x191 with our G.Skill or Patriot 1600MHz kits was like an Indiana Jones adventure. Just when we thought the treasure of stability was in our hands, it would slip away quickly and we had to go through some exciting travels to get it back. To be honest, the ASUS board was the easiest to clock high with 12GB installed. The Gigabyte and EVGA products required a few BIOS revisions before we could overclock properly and we are still fighting with the MSI board. All of the manufacturers stated that they fully support 12GB operation up to DDR3-1333, but after that, the IMC is being pushed beyond its official rating from Intel. However, like the official 1.65V VDimm warning, we basically ignored the official rating and set off to see how high we could go on air-cooling.
Let's get the bad news out of the way first. We could not get the MSI board stable past a 21x175 setting utilizing manual tuning methods. We tried every setting, especially setting tRFC to 74 or higher and starting with 10-10-10-24 timings, but nothing worked. If we set the board to auto settings for voltages and memory, manually set Bclk to 200, and turned on Turbo/HT the board would work; however, VCore was set to 1.48V, VTT to 1.48V, and VDimm to 1.90V. Not bad for a stable 4.1GHz, and considering the relationship between VTT and VDimm, we were within a safe range for not destroying our CPU. However, the VCore level was too much for our air-cooling solution on a 24/7 basis and after a few hours load temps would rise past 90C, throttling would occur, and our system would crash. What we found to be strange was that a 21x191 manual setting, but with all other settings the same as the 21x200 setup, would crash the system after the initial POST sequence. MSI is working on it and we expect a solution shortly.
We were able to run the ASUS board at memory timings of 8-8-8-20 2T compared to 9-8-8-24 1T on the Gigabyte and EVGA boards. Memory performance was nearly identical between each board and once again showed that we could make a choice if required between a lower CAS setting with 2T or a higher CAS setting with 1T enabled without really affecting performance in our application benchmarks. We had to set VCore to 1.425V, VTT to 1.325V, IOH to 1.20V, and VDimm to 1.70V for 24/7 stability on each board. Once again, the Gigabyte board operated fine even though VDroop meant real voltage swung between 1.392V and 1.412V. We could have slightly reduced our VCore settings to 1.4125V on the ASUS and EVGA board but we always had Crysis Warhead lock up on us after the 15th pass out of 25.
Overall, we generally found it was easier to overclock with the ASUS P6T-Deluxe and could easily do it on mostly auto settings. We would recommend this board for those who do not want to get their hands too dirty to reach a reasonable overclock level. The ASUS BIOS is very informative and lists out the min/max and standard settings for the major BIOS options, and a new user interested in overclocking will find this comforting. You can still get down and dirty with the P6T when it comes to tweaking the BIOS for best performance. Based on this we find the ASUS board to have a very balanced design for both types of users.
Except for the informative BIOS settings, the same basically holds true for the EVGA X58 SLI board, and in some ways we liked its simplicity of settings when overclocking. The latest BIOS allows you to tweak further but still not to the absolute degree of the ASUS or Gigabyte boards. Since the V15 BIOS, getting high Bclk with 12GB has been relatively easy and pain free. Also, the BIOS is smart about setting the right auto timings to get the best possible performance while retaining stability. This platform has also proved to be rock stable. Depending on your memory supplier, there might be a need to set tRFC to 74 or higher when clocking high with 12GB installed.
The MSI Eclipse X58 is an interesting board; it has all the makings of a great overclocking platform and yet the BIOS is still a tweak or two away from being really good. The board performed equally to the other offerings with a 3GB or 6GB memory load but buckled underneath the pressure when loaded with 12GB. Based on the progress MSI has made in the past couple of weeks, we expect this problem to be solved shortly. The one item of note when overclocking this board is that a few of the voltage settings in the BIOS are rather cryptic as MSI utilizes a +/- setting for changes. The base voltage information is not always listed so the user has to have prior knowledge of base settings before making an informed decision.
The Gigabyte GA-EX58-UD5 is a tweaker's delight, and based on our initial testing with the latest F4K series BIOS we have no doubt now about the potential capabilities it offers. Gigabyte has come a long a way in improving the overclocking capabilities of this board along with improved performance and stability in a short time. If Gigabyte could match usability features of the ASUS BIOS and improve auto settings, we feel like this board could ultimately offer the best overclocking experience in the mid-range X58 market.
Final Words
All of our motherboards performed admirably today, some better than others, but in the end any motherboard sporting an X58 will perform the same when it comes to standard performance attributes. Which board is better really comes down to your needs, budget, and for some, product brand loyalty. We are willing to recommend any of our boards at this point in time.
The BIOS releases we utilized are stable now, offer excellent performance, and have addressed the majority of our usability problems. That said, each manufacturer still has tuning work left to accomplish for improved memory and overclocking performance. We might even see some minor improvements in power consumption shortly although our numbers reflect an almost best case scenario right now.
We still have several boards to review, ranging from the $220 MSI Platinum up to the $400 Foxconn Bloodrage with several in-between. Our next review will focus on the "lower" end X58 boards from Intel, Gigabyte, Biostar, and MSI. Our final review will feature the upper end boards from ASUS, Gigabyte, DFI, and Foxconn. In between, we will provide a comprehensive OC guide along with a detailed look at memory performance with several DDR3 tri-channel kits from Corsair, OCZ, Patriot, GSkill, Kingston, Crucial, and Mushkin. Look for these in the coming weeks after we return from our final IGP roundup.
So, let's just dive straight into our board recap. Additional details about each motherboard can be located in the features section.
Awards
 |
We are proud to present the ASUS P6T-Deluxe with our Gold Editors Award. We highly recommend this board for beginners and advanced users alike. The Deluxe is not perfect, no board is, but it was by far the easiest board to use on a daily basis. Regardless of whether we wanted to setup a stable 24/7 folding machine or push the board to its limits trying to reach a new overclock record in the labs, it was a simple process to do either. We especially liked the ASUS BIOS as it is very informative, lists out the min/max and standard settings for the major BIOS options, and makes it possible for new users to quickly get the most out of the board. Yet, it still retains enough options to satisfy most tweakers and always recovered from settings that made us look for the clear CMOS button on the other boards.
When it comes to performance, the word balanced was the first thought in our minds. The P6T Deluxe offers the best video performance of the boards we tested while providing class leading performance in the majority of our application benchmarks. The board also features an array of options including Serial Attached SCSI controller support, SLI and CrossFire, very good on-board audio capabilities, eSATA and Firewire, and enough USB ports to make one forget about needing a hub. Based on the layout, this is the board we would recommend for 2x SLI or CrossFire users, plus you get the bonus of class leading video performance.
 |
We are excited to present our Silver Editors award to Gigabyte for the GA-EX58-UD5. What else can we say, this board is a tweaker's delight and has tremendous performance potential. Based on the progress that Gigabyte has made with the latest F4K BIOS, we feel like this board could ultimately offer the best overclocking experience in the mid-range X58 market. The performance of this board was consistently near the top and ultimately offered the best overall memory performance. While performance is important, ultimately a board needs to offer the right feature set, stability, support, and pricing in a very competitive market.
The GA-EX58-UD5 offers all of this and more to potential X58 buyers. The UD5 offers an abundance of SATA ports, flexible layout, an excellent cooling solution, very good HD audio featuring Dolby Digital Live encoding, and an extensive accessory package along with excellent documentation.
We almost placed this board ahead of the ASUS P6T-Deluxe. There were just a few items that we felt like Gigabyte could improve upon to reach the next level. We wish Gigabyte could match the usability and informational features of the ASUS BIOS, the x16 slots are spaced too close to each other for our liking when using a 2x CrossFire or SLI setup since heat generation could be a problem in cases without proper ventilation, and losing the first DIMM slot when utilizing large CPU heatsink/fan designs means 12GB users are out in the cold. Regardless, the GA-EX58-UD5 is still an excellent board and one we highly recommend.
The Others
The MSI Eclipse X58 is the most expensive board in the roundup at $322 with rebate and offers an extensive set of features and accessories. We loved the layout, color scheme, and overall quality of the board. We like to think of the MSI Eclipse as a Grand Touring Coupe in the automotive world, it offers an excellent blend of features and performance. The board performed equally to the other offerings with a 3GB or 6GB memory load but buckled underneath the pressure when overclocking with 12GB. Based on the progress MSI has made in the past couple of weeks, we expect this problem to be solved shortly.
We are not crazy about the BIOS layout as several of the voltage settings in the BIOS are rather cryptic since MSI utilizes a +/- setting for changes. The base voltage information is not always listed so the user has to have prior knowledge of base settings before making an informed decision when overclocking. MSI tries to make up for this with auto settings that almost allow the user to overclock exclusively by just setting the Bclk rate and letting the board do the rest. However, while this system worked well, it sometimes drove voltages past the rate we could effectively utilize with air cooling.
In the end, we still recommend the MSI Eclipse X58 for users who want a feature rich, stable, and well supported platform but do not plan on tweaking or heavily overclocking the system. This could all change with another BIOS update and we will be the first to let you know if it does.
The EVGA X58 SLI is an excellent motherboard and one that we have throughly enjoyed working with the past few weeks. EVGA's support has been phenomenal and we expect that to continue to end users. This board has award worthy status written all over it, just one snag, memory multipliers. Unlike the other boards in our roundup and in the labs, the EVGA board tops out at a 10x memory multiplier (DDR3-1333) for the i965. Even though 10x is available, the i920/i940 are regulated to the 6x (800) or 8x (1066) multipliers. While we can live with these multipliers when raising Bclk to the 200+ level, we just find it a hindrance that the other multipliers are not available in a board designed for the more extreme users.
Otherwise, the quality of components, layout, and BIOS design are very good. Performance is also very good and in off-line testing it comes extremely close to the Gigabyte board up high. We have seen continual performance improvements and expect this board to do very well in the overclocking market once the memory multiplier problem is solved. If overclocking is not of primary importance, for a lot of us it is not, then the ease of use, stability, support, and features of this board make it a highly desirable product in the $300 range. At the end of the day, this board simply performs well and never makes a fuss about doing it.


