Original Link: https://www.anandtech.com/show/2147
Micro-ATX Cases - Shoebox Showdown
by Joshua Buss on January 2, 2007 12:40 PM EST- Posted in
- Cases/Cooling/PSUs
Introduction
Even though micro-ATX motherboards have been in rather widespread use for a while now, the small form factor PC is still relatively new to most people. Show an average PC user a no-holds-barred system roughly the size of a bowling ball and they will most likely be impressed... even if they already know about Mac Minis and Shuttle PCs. This is not to say that the market isn't growing, however. Indeed the computer industry as a whole will probably never cease to try to miniaturize even the most powerful of machines, even if there are already computers smaller than a C battery.
Smaller contraptions containing more processing power pose real thermo-dynamic challenges though, and without good enclosures systems built in these compact sizes will be prone to all sorts of problems stemming from the high heat levels. Unfortunately, the only way most manufacturers deal with heat problems is by compensating with more noisy fans, which ironically defeats a primary purpose of the small form factor PC - simply being a less noticeable computer.
Worse yet, even if a case company happens to get the heat and noise issues of a small PC enclosure handled admirably, they might make the case so impossibly difficult to work in that no one would ever want to put up with the headache of installing parts in it. Extrapolating this mentality brings us to an even worse scenario, where a company would choose to use the case to build a mass quantity of miniaturized computers and they could lose all sorts of revenue simply to lost time spent futzing with poor construction.
As usual with our evaluation of computer cases we have decided it is most beneficial to view several models at once to see how different manufacturers choose to handle the design challenges. We'll compare these techniques to give an overview of not only what we think about these particular models, but the ideas and methodology used to design these units and how they might be improved.
From a mile-high perspective, here's how the three cases we are looking at in this article 'stack up'.
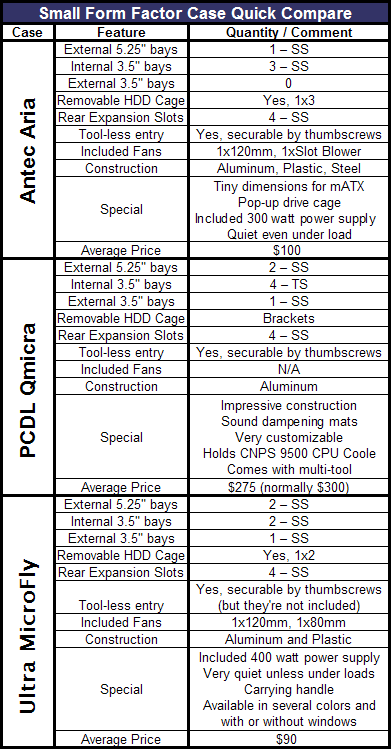
(TL: Tool-less, TS: Thumbscrews, SS: Standard Screws, TR: Tool-less rails, SR: Screwed rails)
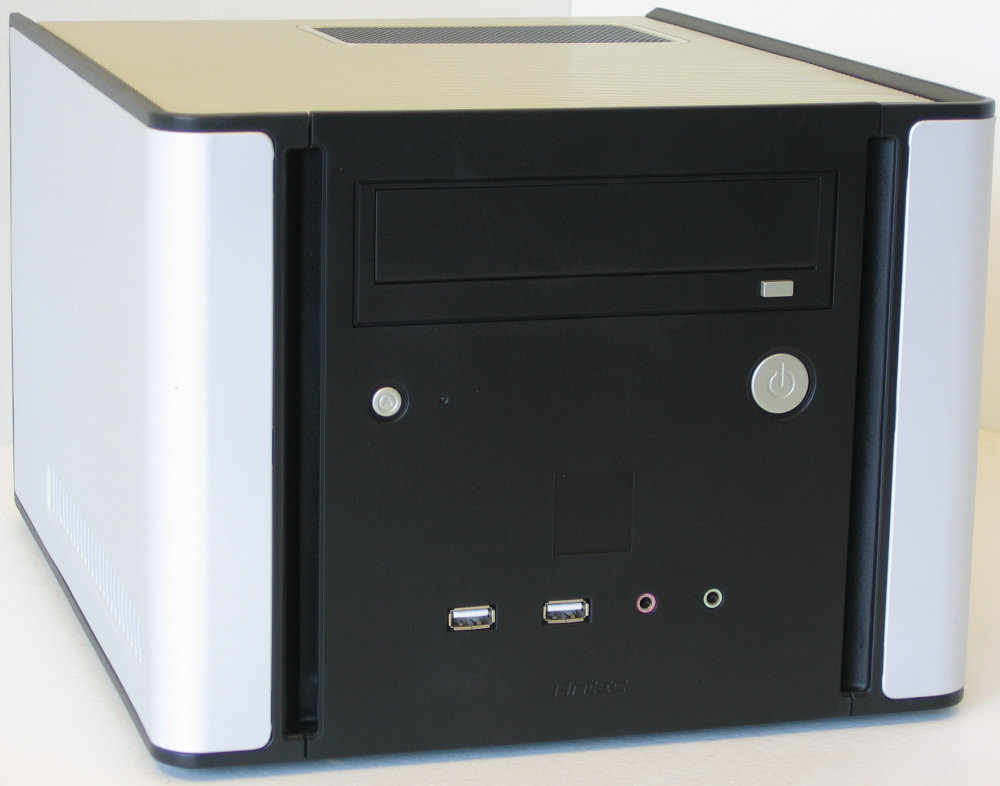
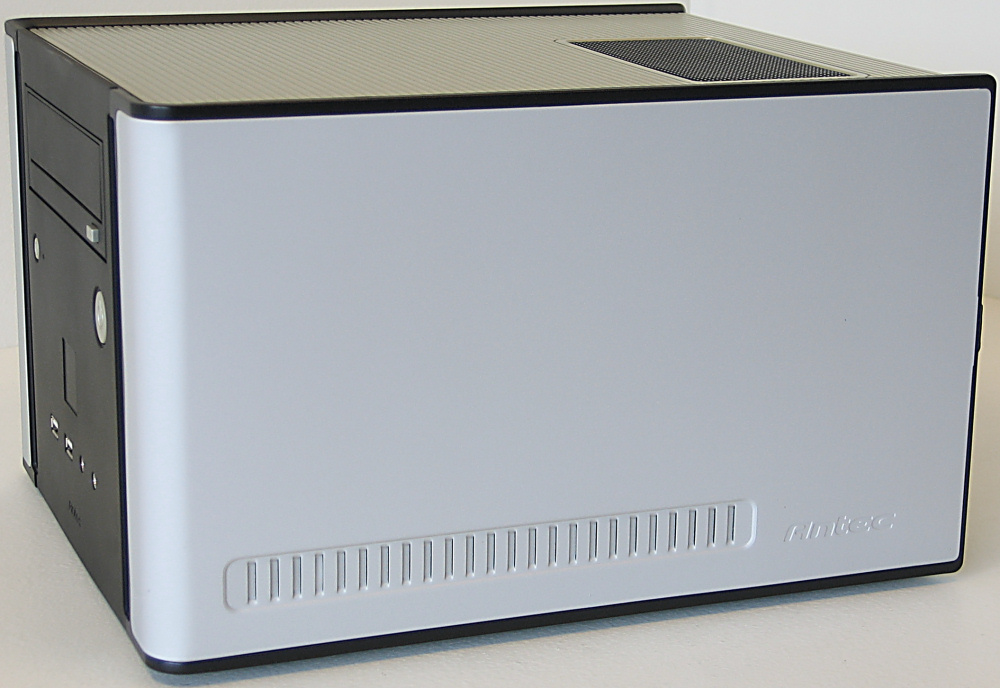
Antec Aria - Exterior
We've had requests to look at the Aria for well over a year now, but only recently were we able to get enough micro-ATX cases to compare against each other for a full-fledged review. Normally our policy on taking pictures of packaging is that we'd expect any manufacturer to protect their product substantially, and we will only make mention of a product's particular packaging job if it's deplorable or substantially better than average. With the small Aria, we were very happy to see Antec using soft foam blocks rather than typically messy Styrofoam or peanuts, and immediately we had a sense that this case was incredibly tough due to its weight for such a small unit.
 |
| Click to enlarge |
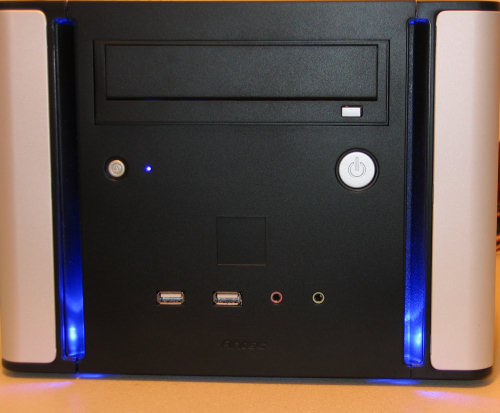
The Aria reminded us of the P180 very much - only obviously much smaller - primarily due to its multi-material construction. The frame of the case is mostly steel, but aluminum and plastic are both used for panels and trim pieces. The simple front gives the first clue that the case is smaller than most mATX PCs and even many proprietary SFFs, as it is designed to hold only a single optical drive. There are a couple other key points about the front. All three buttons are plastic but still have a good feel, and the front ports are all nicely spaced apart for larger devices. HDD activity is shown with a blue LED to the right of the reset button, and as long as the system is powered on blue LEDs shine up from the bottom of the slits on the left and right side.
 |
| Click to enlarge |
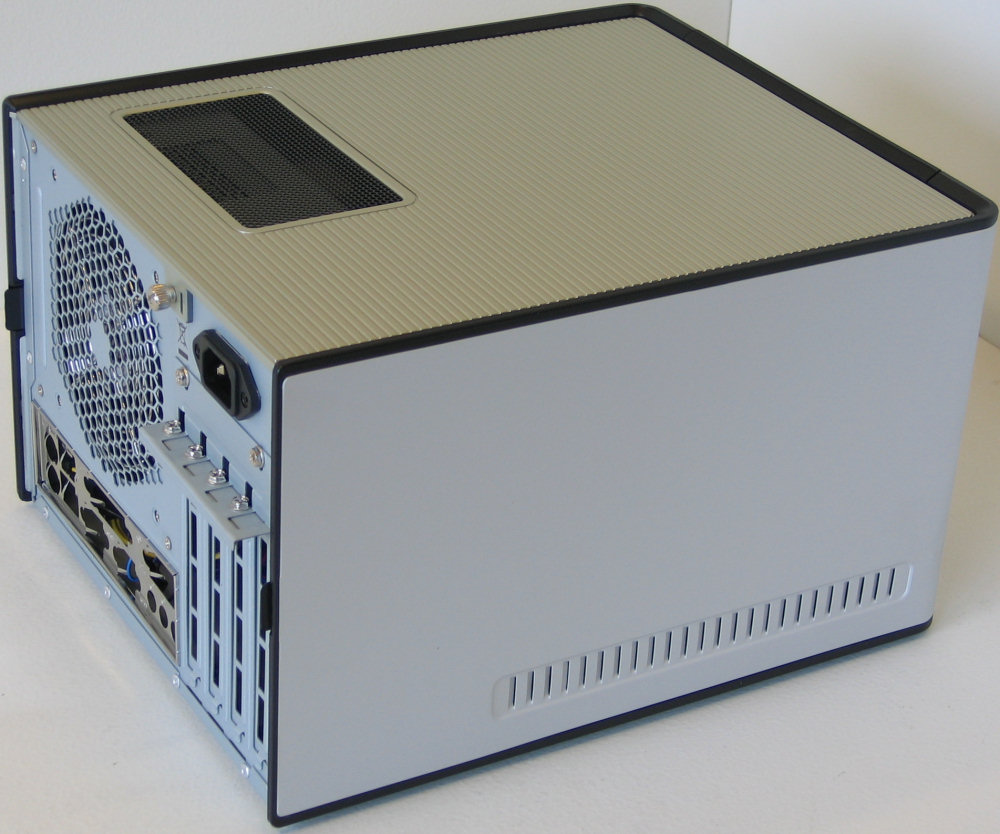
More than just about any other mATX case, the Aria really does resemble a large shoebox in its dimensions. However,,its looks are a little more interesting than dual-tone cardboard. We really like the look the black trim gives the case, and the ribbed top is an interesting touch we've come to appreciate. This top cover is plastic on the top and metal underneath including its grill above the PSU, and the equally hefty side panels are plastic inside and around the edges to dampen vibrations. Thanks to the combination of materials the case is quite resilient to fingerprints for the most part, but the exposed aluminum on the sides is not your typical brushed anodized finish and can pick up smudges or scratches a little easier.
 |
| Click to enlarge |
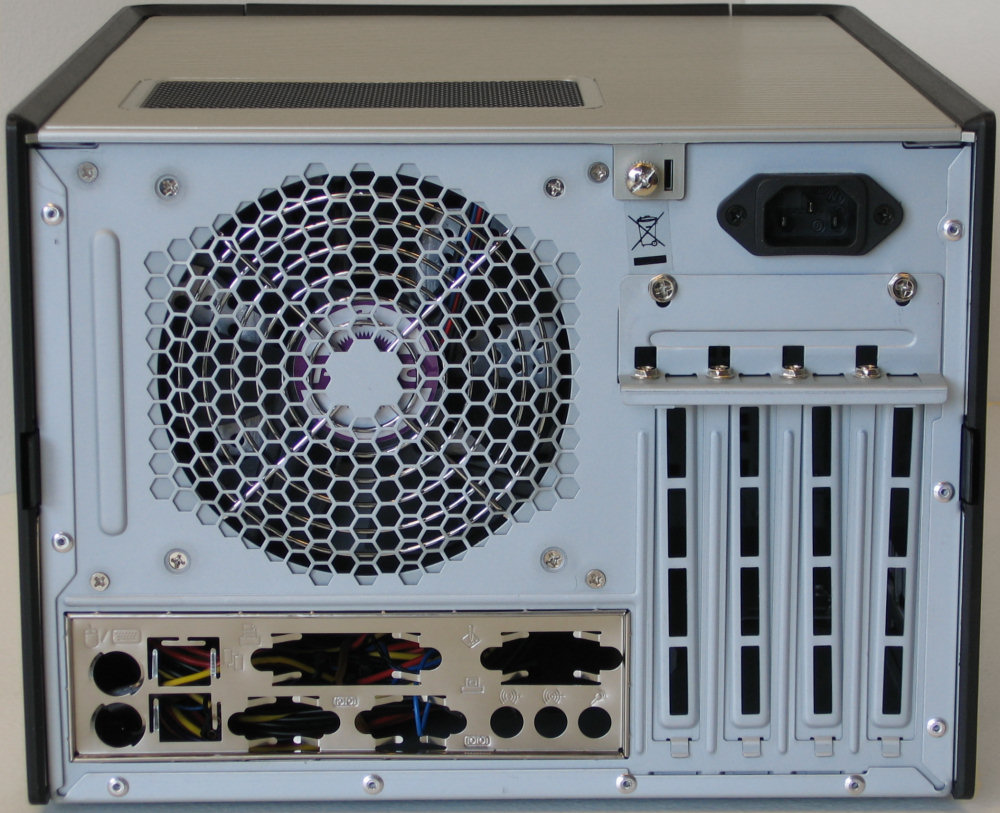
Taking a closer look at the back we can get a sense of the custom-made PSU which allows the Aria to be so compact. Sporting a large fan, the PSU will be able to move plenty of air through the small case without making too much noise. Expansion card retention is done with two standard case screws for a special bracket and one screw for the card itself.
 |
| Click to enlarge |
The right side of the case has an impression of "Antec" in the lower right corner and contains the same ventilation perforations as the other side along the bottom. The case's feet are soft rubber and add to the total sound dampening effect as well as keep it from sliding around like some wheeled cases.
 |
| Click to enlarge |
More information on the Aria is available on Antec's website.
Antec Aria - Interior
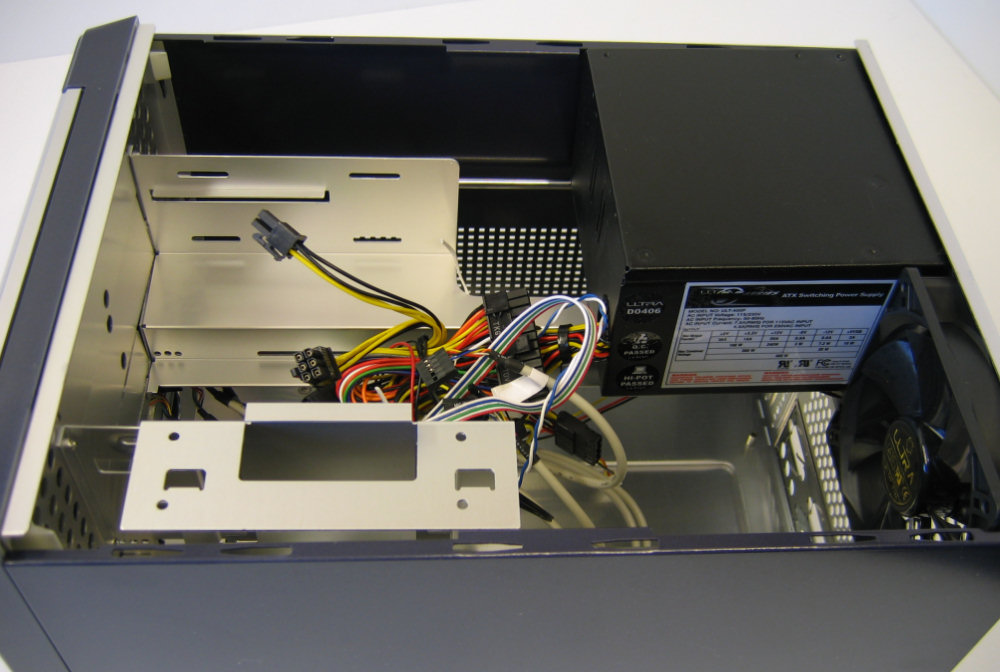
Opening the Aria is a bit like taking apart a puzzle, with multiple interconnected parts and some areas being totally inaccessible until uncovered. That's not to say it's difficult though - the top and side panels all remove individually with only one thumbscrew holding the top in place before the clips which hold the side panels in can be undone.
 |
| Click to enlarge |
After all the covers have been taken off, the drive cage can be slid backwards then lifted up and out. With this view we can now see why the case feels so sturdy - the frame is extremely thick for a unit this size, and it is strongly reinforced at the corners. You can also see just how shallow the custom PSU is, which is the only reason a case this small is capable of holding a standard 5.25" optical drive.
 |
| Click to enlarge |
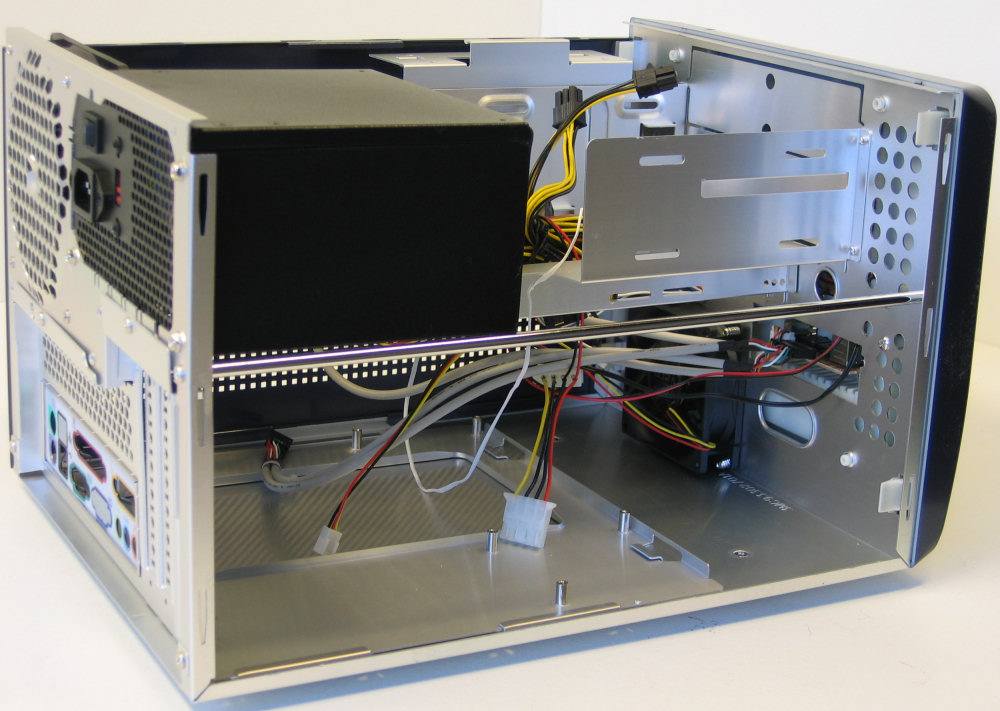
Here's a more holistic view of all the parts of the Aria, with the frame of the case being viewed from its left side and the drive cage from underneath with the front of it resting on the table. Getting the micro-ATX motherboard into the somewhat cramped frame isn't the easiest thing in the world, but if the PSU can be removed for a little extra clearance if necessary.
 |
| Click to enlarge |
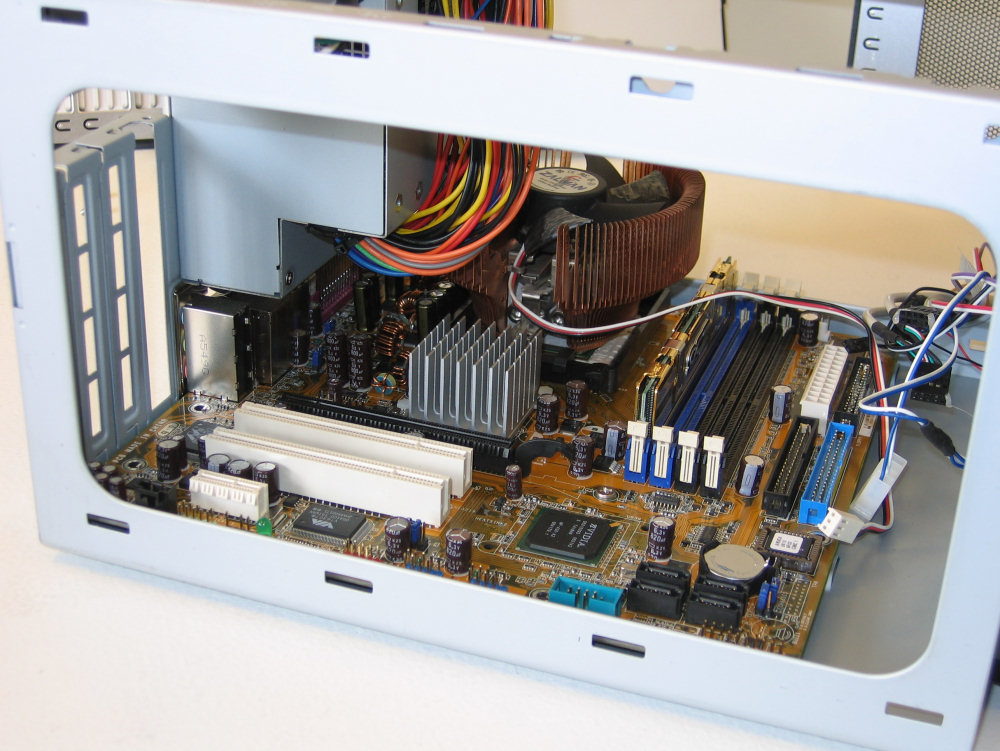
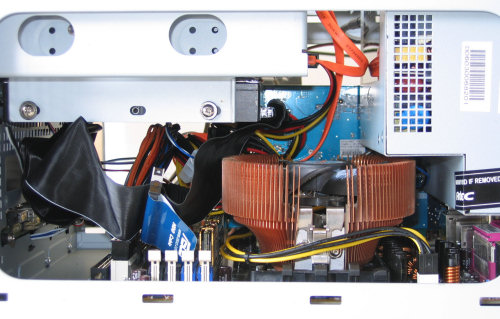
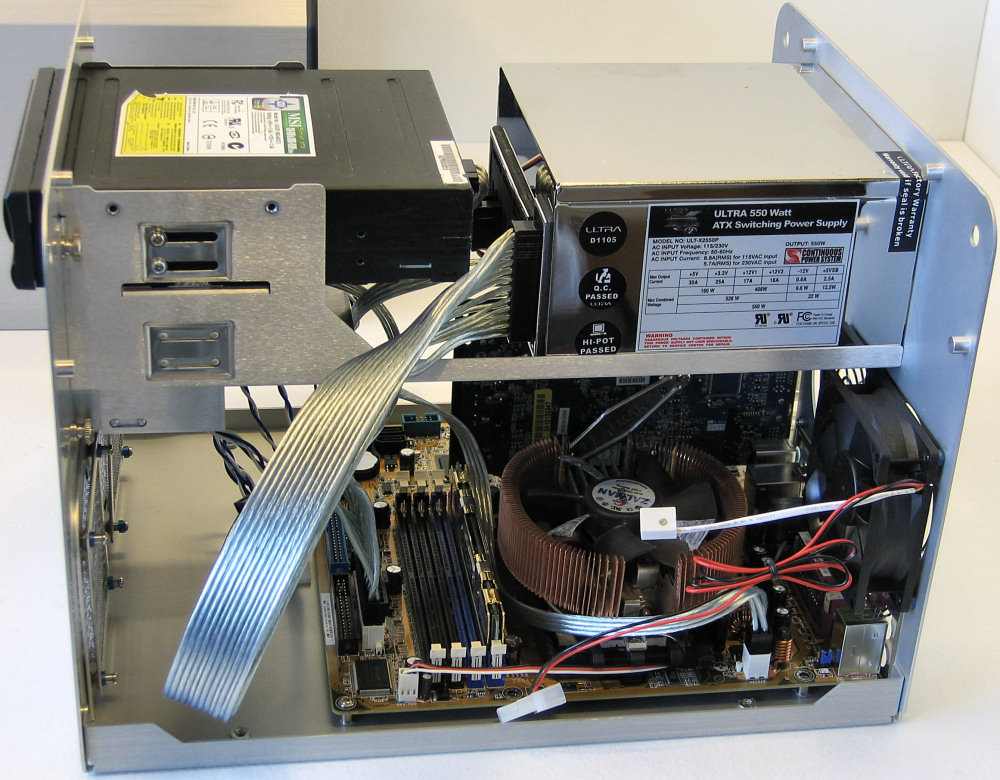
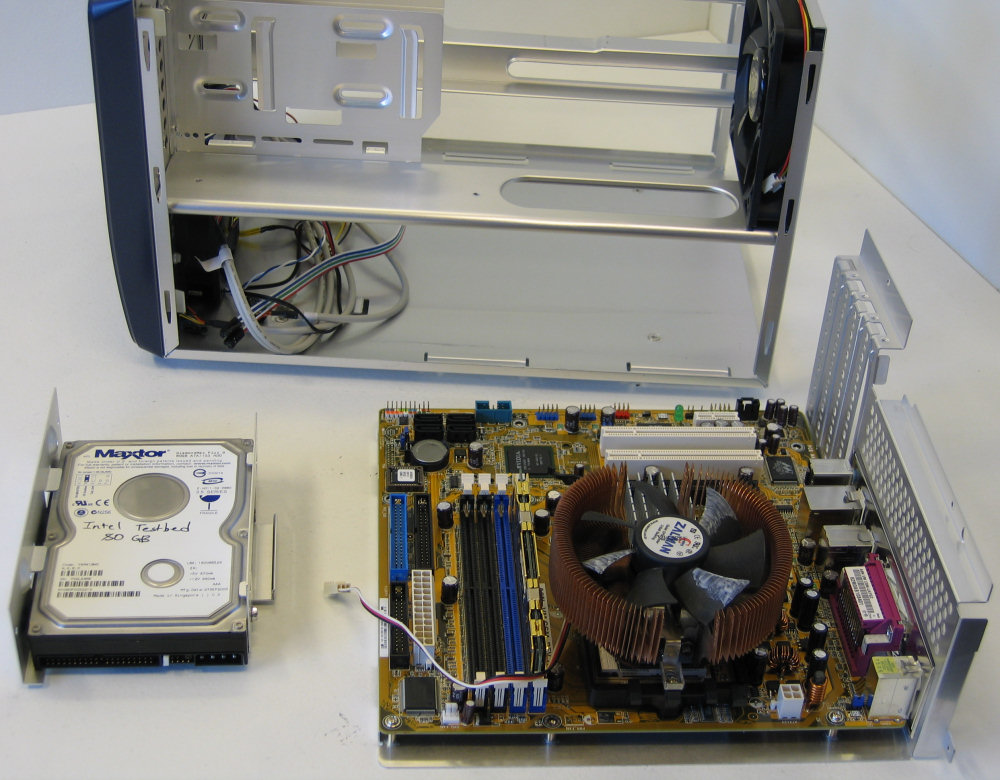
Considering there isn't any other permanently mounted active cooling elements to the case other than the PSUs, we really have to start seeing how parts fit into the Aria to look more closely at the design of the case. Here is the test bed's motherboard with a Zalman CNPS 7000 CU cooler installed to give an idea how tight a fit some parts can be.
 |
| Click to enlarge |
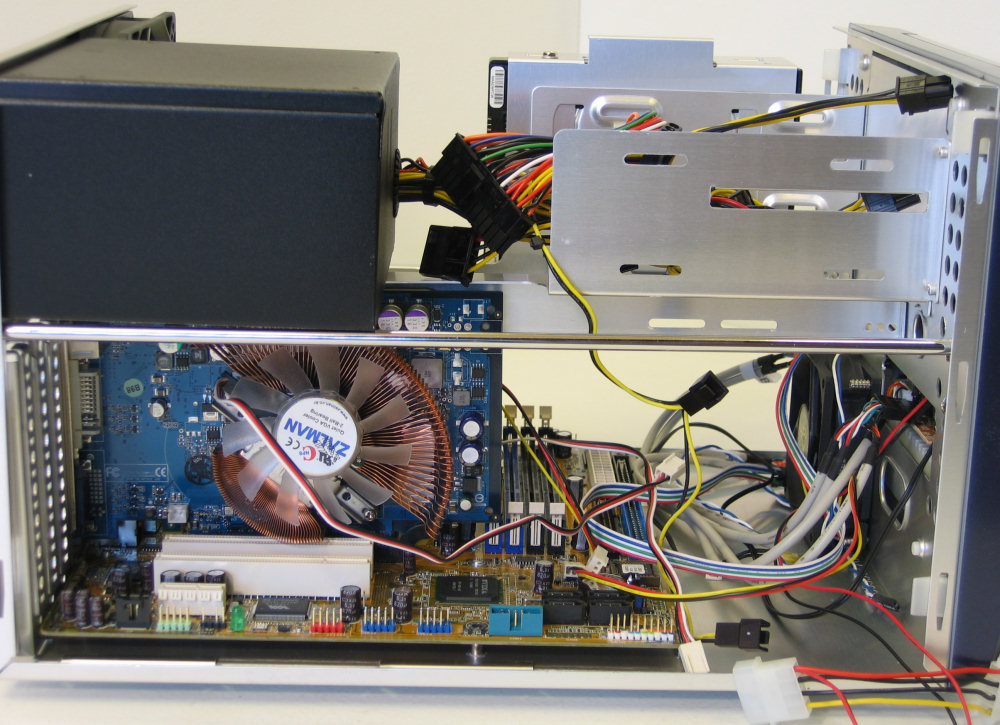
Attaching cables and installing our 6600 GT required a little finagling, but was easy overall. Larger video cards could be a real problem for any case this small, and using all four expansion slots would likely push things too far, in terms of cooling.
 |
| Click to enlarge |
Antec Aria - Interior Cont'd
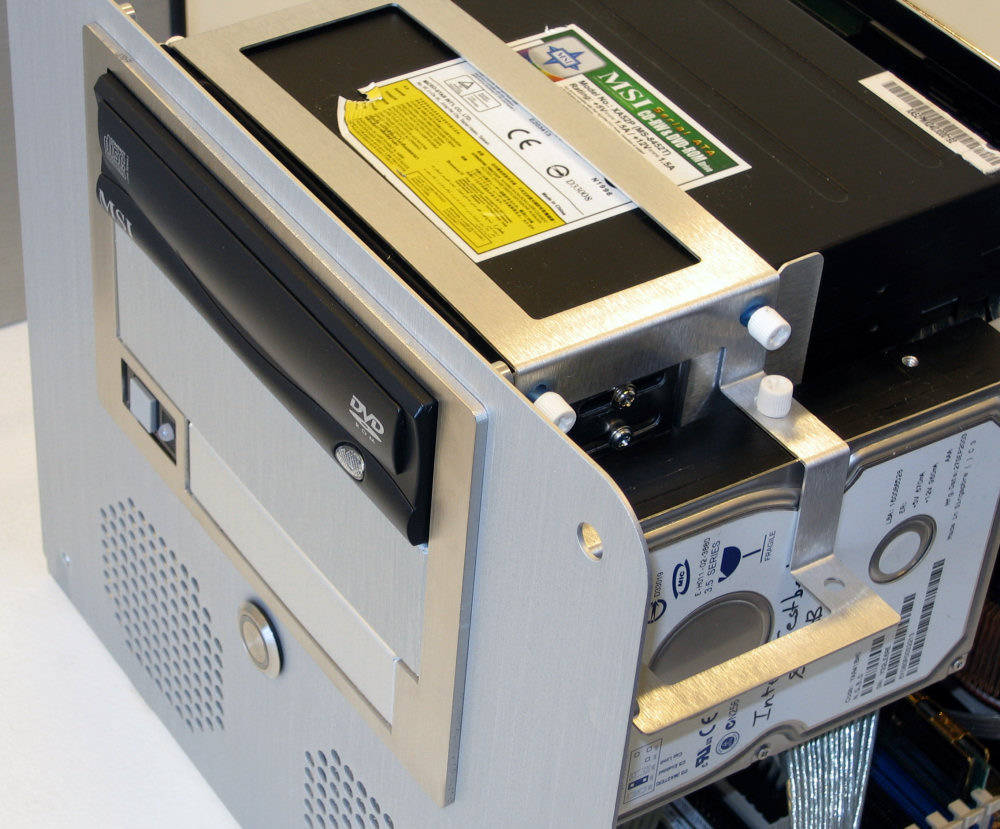
As with many SFF cases, the drive cage has to be prepared before being put back into the rest of the system. One hard drive fits underneath the optical cage, and two others can hang vertically from either side, only mounted with three screws on one side of the drive. Acoustic absorbing material is in between the vertical drives and the metal, and soft grommets are provided for the single horizontal 3.5" bay.
 |
| Click to enlarge |
We had to remove the custom tray cover of our MSI CD burner, but the drive's bezel had to remain so the stealthy cover on the front of the case operated the eject button properly. Getting an SATA (or IDE) cable into the optical drive was a little tricky, but we managed thanks to the ability to hold the whole cage at a half-way open position.
 |
| Click to enlarge |
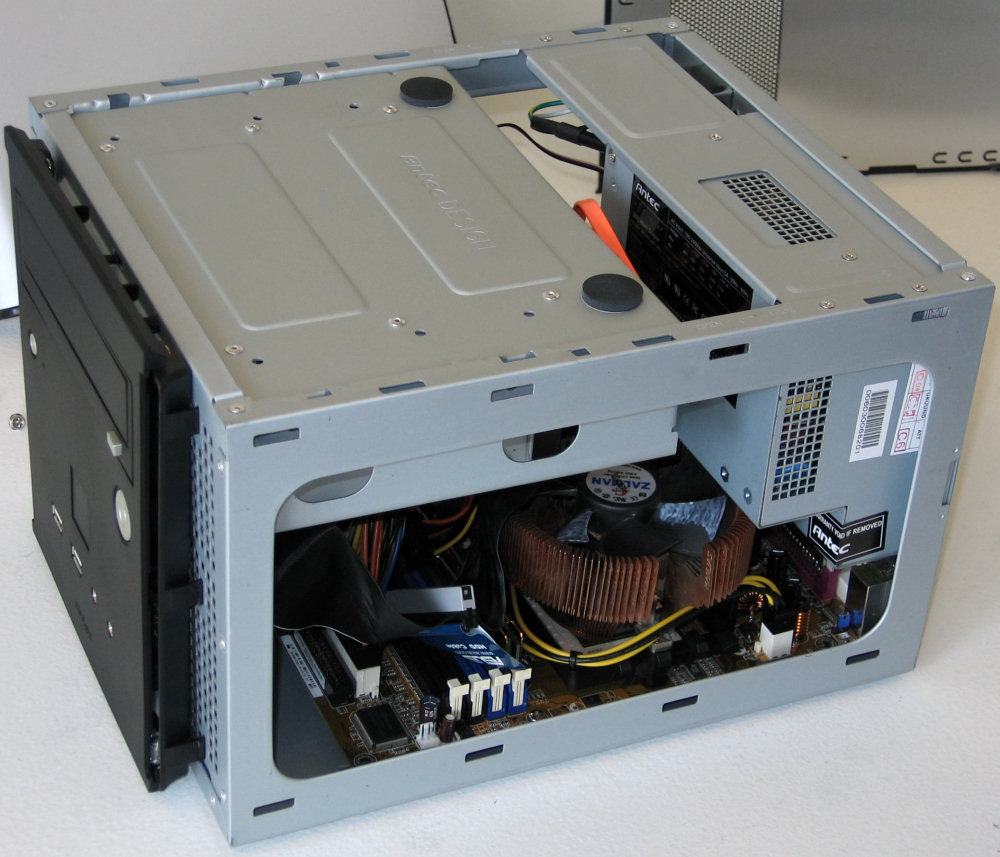
A few more shots of the completed build give a good idea of how cramped things can get in a miniscule case, even if it is well designed.
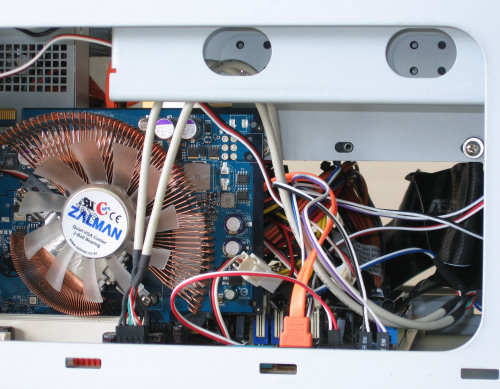
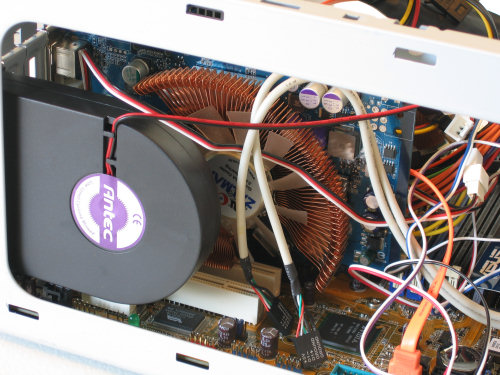
The right side looks quite a bit better, giving a glimmer of hope to people hoping to put more elaborate cooling systems inside the Aria, as long as the vertical hard drives are omitted.
Antec includes a variable speed blower fan which we installed in the last open expansion bay to help the computer keep up with the moderately high cooling demands from our test bed.
Finally, with the test bed up and running, we could capture the effects of the power and HDD activity LEDs with a slower shutter speed, and this is what we got.
In many ways, the Antec Aria reminds us a lot of the typical Shuttle SFF systems, only it's a bit wider in order to accommodate a micro-ATX motherboard. The final price plus motherboard is lower than what you would pay for an SFF case, and you will be able to upgrade the motherboard in the future. While the case does offer more in the way of expansion options than most SFFs, we would be very hesitant to max out this particular design with three hard drives and four expansion cards. In a more moderate configuration, however, the case works well overall.
PC Design Lab Qmicra - Exterior
U.S. based PC Design Lab has only one case to their name so far, and its name is the Qmicra. The case, just like the company, is different from just about everything else out there. When talking to PC Design Lab, one this is for certain - this company is very serious about creating the highest quality product possible, period. Citing poor layout designs and sometimes downright shoddy workmanship as motivations for designing a better small form PC case, designer and company owner Dave LaLopa made it clear that the Qmicra does many things unconventionally in the interest of making a superior final product.
 |
| Click to enlarge |
The Qmicra's construction is considerably different from pretty much anything else because its strength comes from the exoskeleton - not from any internal bracing. When fully assembled, one feels confident that the computer could take a serious amount of abuse without the internals suffering much damage. Entirely manufactured and assembled in the USA, the case is also a fine example of what high-quality craftsmanship entails.
 |
| Click to enlarge |
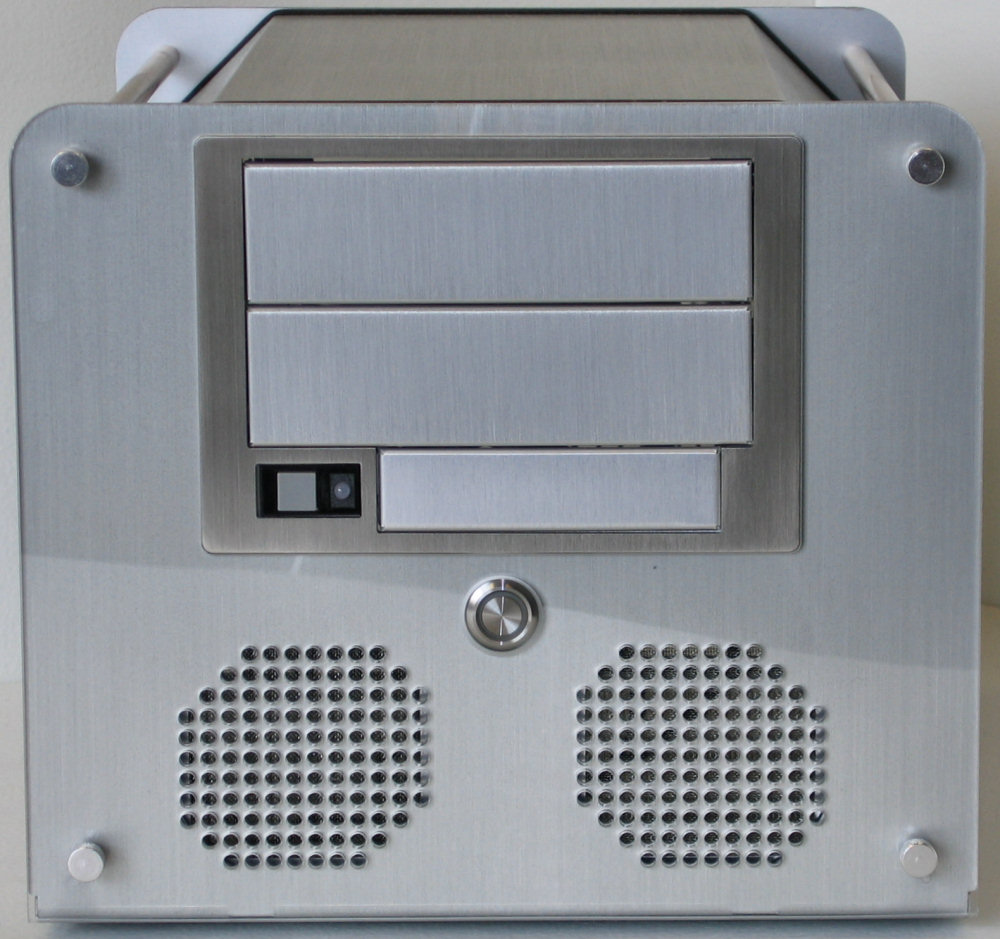
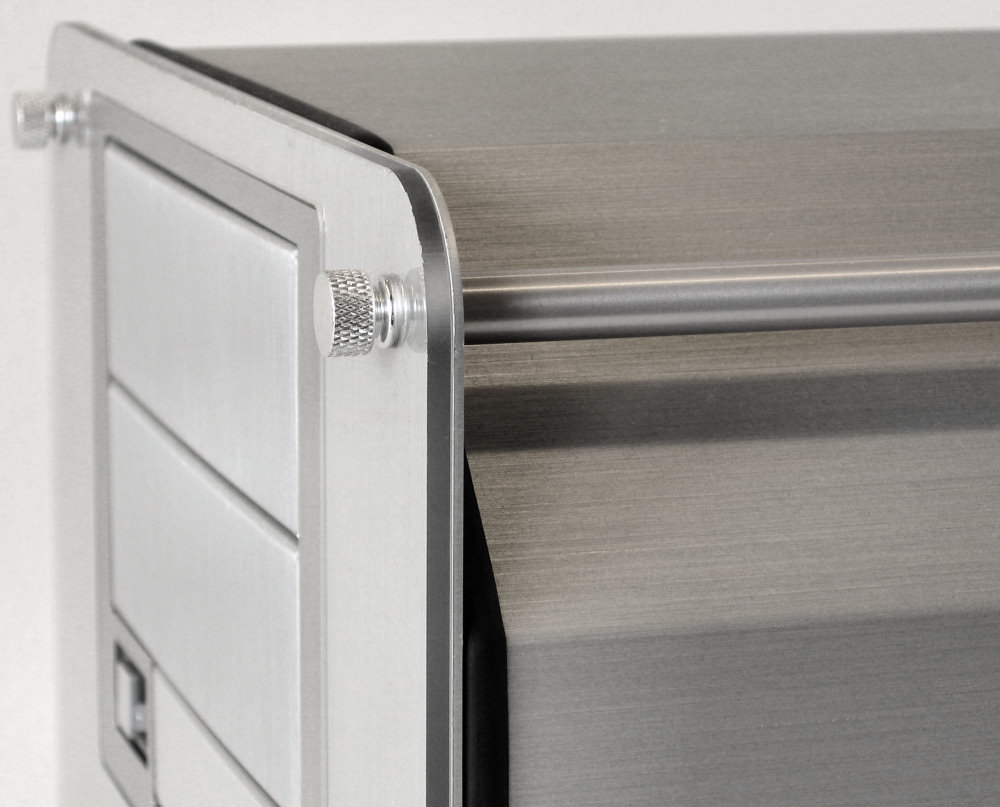
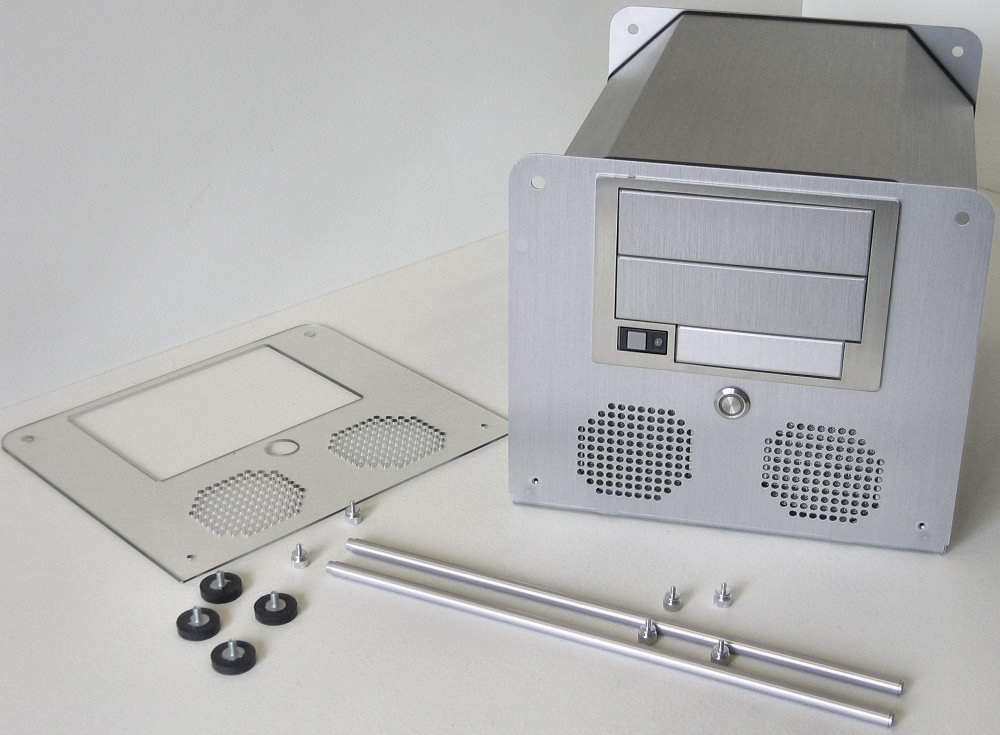
As for the external styling of the case, the Qmicra understandably takes most of its cues from the currently popular minimalist philosophies. The front is just solid brushed aluminum with an eighth-inch thick sheet of Plexiglas in front for the glossy sheen and added protection. Two 5.25" and one 3.5" external bays offer the typical "upper limit" drive flexibility for this size system, and only the essential power and reset buttons are present. Even the almost-always-present front-mounted ports are missing, but the 3.5" bay would be perfect for those that feel they are absolutely critical. We were told that newer versions of the case will have nicer looking reset buttons that better match the theme and current power button (center). At the bottom of the front panel are two perforations for the front 80mm fan intakes.
 |
| Click to enlarge |
Matching the two front intake positions are the two 80mm rear exhaust vents, allowing for a generous amount of airflow for any case in this class, especially taking into account the full-sized power supply as well. Notice how the mounting points for the power supply are perfectly symmetrical too, so there is no concern that flipping a PSU upside down will make it less stable. Instead of a recessed motherboard, the Qmicra positions the board as rearward as possible, with the expansion card mounting tabs actually sticking further beyond the rest of the rear of the case. The perfectly centered power supply mount makes the case not only look nice but also allows for the distinctive rounded top corners.
 |
| Click to enlarge |
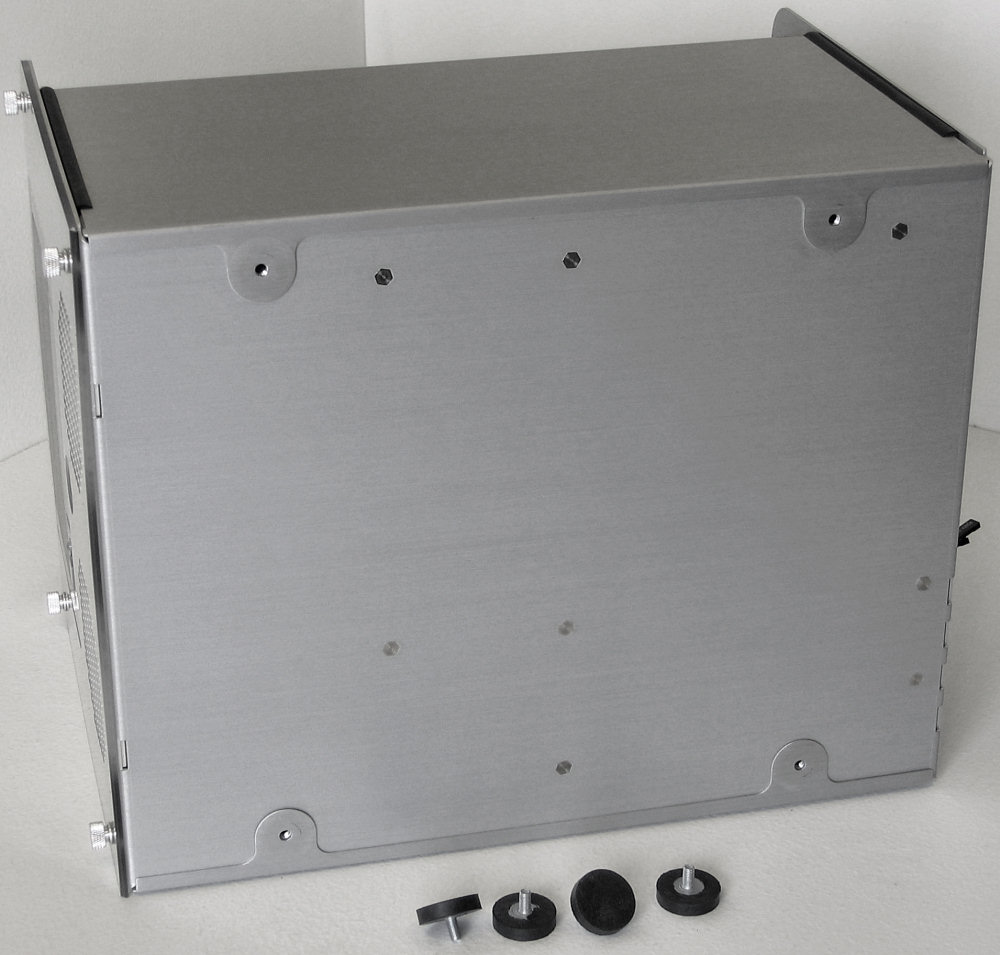
Together, the four thumbscrews pull the front and rear plates to just the right position using the two long aluminum rods. The five-sided, one-piece cover seals against the rest of the case thanks to a soft rubber strip and is held firmly in place by both the pressure from the rods and the four unique screw-in feet.
 |
| Click to enlarge |
The fit and finish of the Qmicra is certainly as high-quality as any other case we've ever dealt with. Every part feels solid and well-made, and the fit of each part couldn't be better. The brushed aluminum finish itself is fantastic - it's not prone to fingerprints, yet it can still be cleaned easily if needed. It's anodized so it won't make things dirty by simply rubbing against them, and it's just thick enough to be strong without adding weight - an empty Qmicra is feather light. More information on the Qmicra is available on PCDL's website.
PC Design Lab Qmicra - Interior
To get inside the Qmicra, the four rubber and steel feet are unscrewed and the four thumbscrews removed from the lengthwise rods. This leaves the plastic guard on the front, but two more thumbscrews can be undone to remove the plastic.
 |
| Click to enlarge |
After taking off all the fasteners, the case's one-piece cover is spread apart on the bottom side until the whole piece can be slid up and around the edges. This leaves the inside of the case incredibly exposed, and reveals how all the strength of the unit comes from the shell, not any sort of internal framework.
 |
| Click to enlarge |
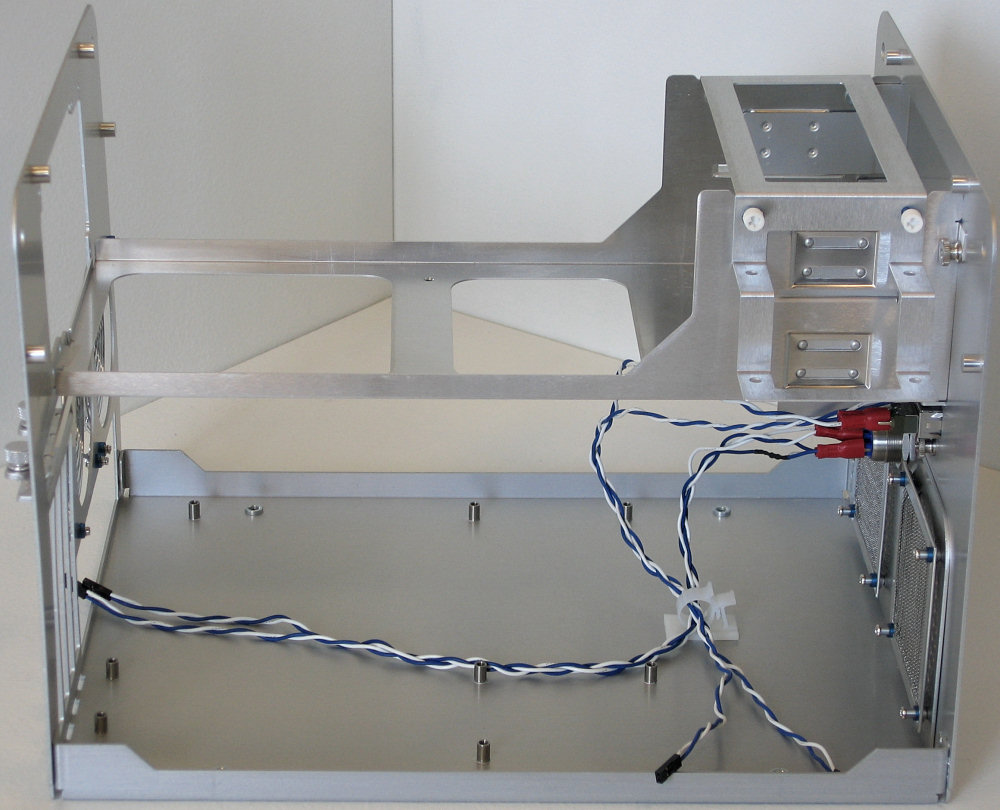
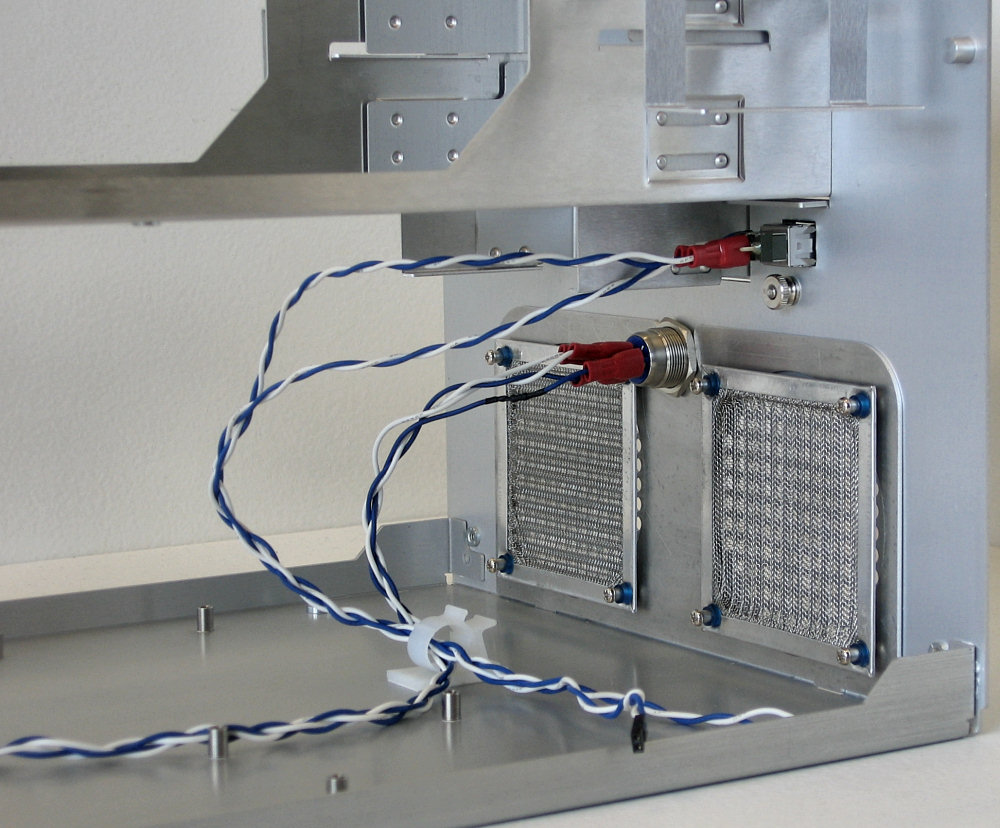
The internal layout of the Qmicra is simple, effective, and smart. The main removable piece holds the power supply, any external drives, and internal drives via an included mounting bracket which allows for a total of four hard drives in addition to all three external drive bays.
 |
| Click to enlarge |
Underneath the front bays are the two 80mm intake fan mounting points, and each comes with a removable filter and screws with grommets designed to hold fans and absorb some of their vibrations. The case doesn't have a standard sized PC speaker, just leads for hard disk activity, power, and power and reset switches.
 |
| Click to enlarge |
On the back plate, the standard cut-outs are all present, along with more fan mounting points. These screws actually thread into the plastic of a fan, as opposed to the ones in front which are designed to fit through the holes then fasten into the case.
 |
| Click to enlarge |
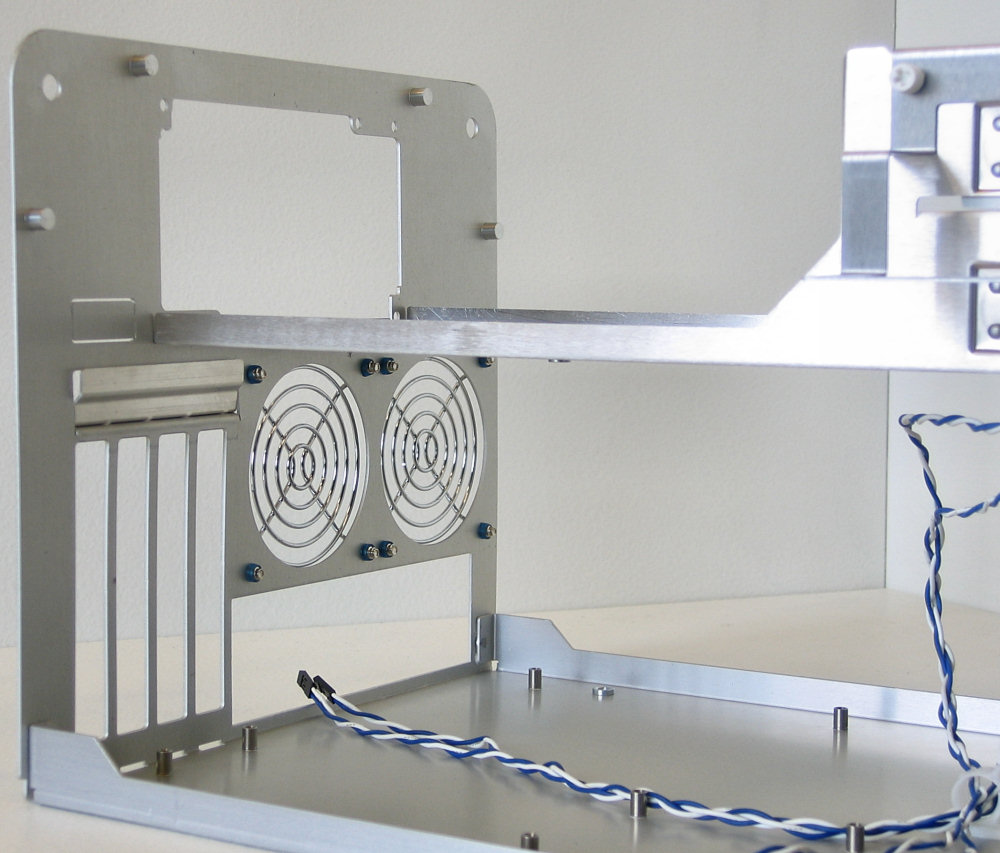
As expected, the entire middle section is easily removed once the bars are no longer pulling the two sides together. This totally opens up the ability to work on the motherboard area, which only includes the standard mATX mount points and doesn't even give the option for removing stand-offs.
 |
| Click to enlarge |
PC Design Lab Qmicra - Interior Cont'd
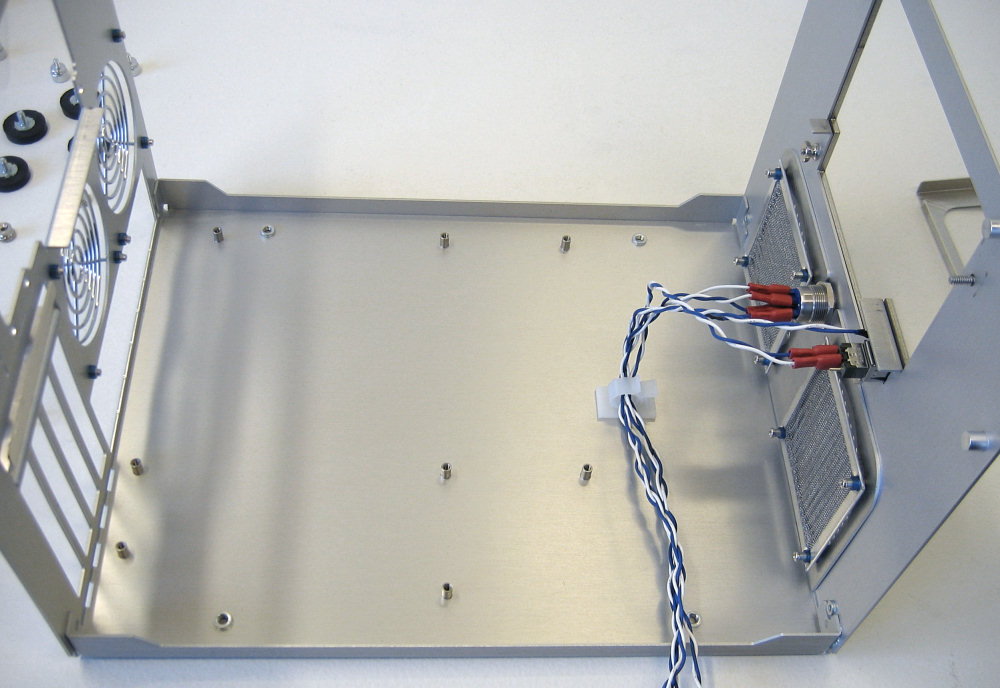
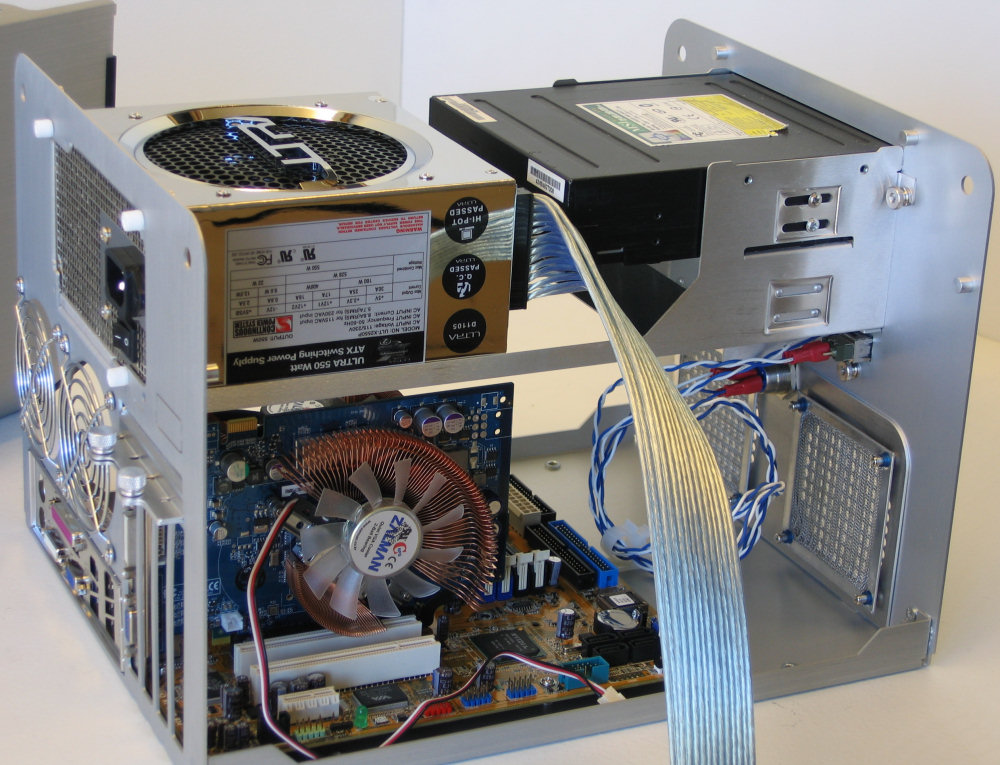
With the ease of access that we had with the Qmicra, the motherboard and video card installation of our new test bed was entirely uneventful. Expansion cards are held in place with a removable clip secured with a pair of oversized thumbscrews, which certainly worked well compared to other tool-less designs we've seen.
 |
| Click to enlarge |
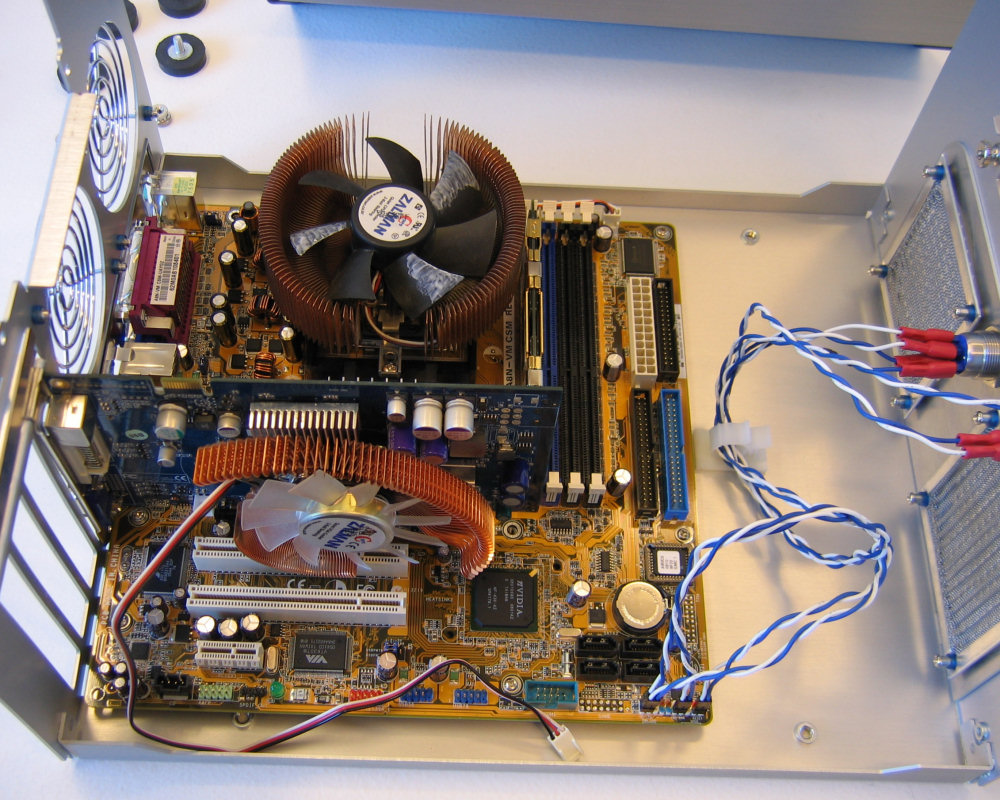
After putting in the motherboard, video card, and our single Antec Tri-cool 80mm fan for extra exhaust, we put the main bracket in and fastened the power supply and optical drive. Note that the testing on the unit was actually done with the Zalman power supply we've used in the past, even though the pictures were taken with our UltraX PSU.
 |
| Click to enlarge |
The fit is tight with a slightly larger than normal power supply (which is actually becoming pretty common with today's 500+ watt units being so popular), but it is still manageable as long as the optical drive isn't much longer than normal. Overall we do feel that making the case just a centimeter or so deeper wouldn't have affected anything negatively and would have made the list of usable PSU / Optical drive combinations much longer.
 |
| Click to enlarge |
Modular supplies can be both a boon and a burden in the Qmicra, since there could be clearance issues with either one in a worst-case scenario. On the other hand, there's the prospect of less cable clutter with a modular supply, since it's pretty much a guarantee that one would never use all the power connectors in a non-modular PSU with a mATX setup.
 |
| Click to enlarge |
Keeping to a mostly tool-less philosophy, the next step of the installation process is accomplished via the use of more plastic and steel thumbscrews, and the specially designed hard drive bracket. The vertical hanging of the hard drives is not the most stable mounting system in the world, but there are two extra angled pieces for anchoring the drives from the bottom as well, and because of this layout the installation of each piece remains very easy.
Once the hard drives are in and the cables are connected, our build in the Qmicra is pretty much done. Over the course of installing and reinstalling various parts in the case we never once had anything major to complain about with the design, layout, or craftsmanship. All the corners are nicely rounded, all the finishes are fingerprint resistant, and the fit and strength of everything is easily at the top of its class. This last picture here shows the actual system as it was right before testing, with the Zalman power supply.
 |
| Click to enlarge |
For a small form factor case, the Qmicra is very spacious to work in and a very large number of customizations and larger aftermarket parts could be accommodated, not to mention places to stuff the extra cables from non-modular PSUs. In particular, a water-cooling setup utilizing a dual 80mm fan radiator could be realized much easier thanks to the generous amount of space in the front, and some of the largest video cards available could be housed without issues (save for maybe having to sacrifice a hard drive or two). In our benchmarking we even tried using our CNPS 9500 CPU HSF as recommended by PC Design Lab, and it did fit (though just barely!).
 |
| Click to enlarge |
The design is very unconventional, but that's not always a bad thing. The Qmicra is easily one of the most flexible micro-ATX designs we've ever encountered, and for anyone seriously considering a small SLI PC, this case should be able to handle it without problems. The excellent design does come with a cost however, as the Qmicra is priced almost three times higher than the other cases in this roundup, and that doesn't include a power supply like the other two units. Anyone looking for top quality of workmanship in a micro-ATX case should still seriously consider the Qmicra.
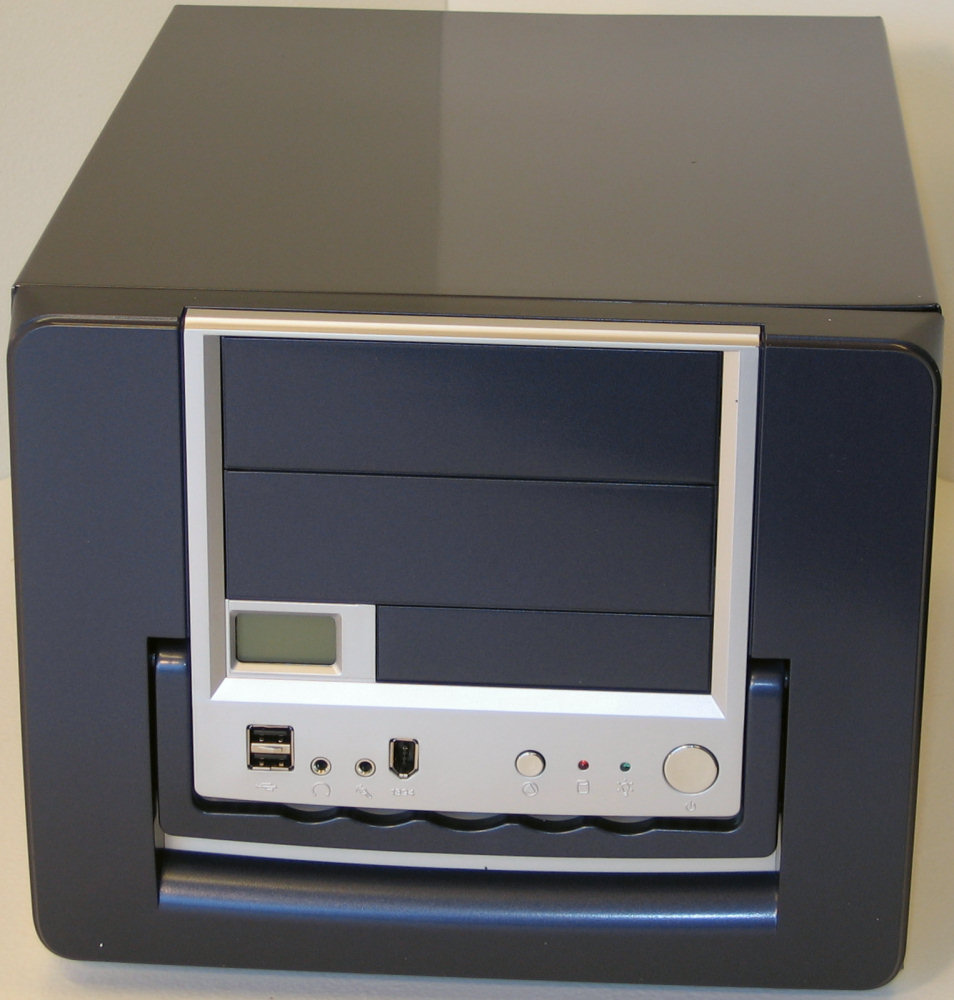
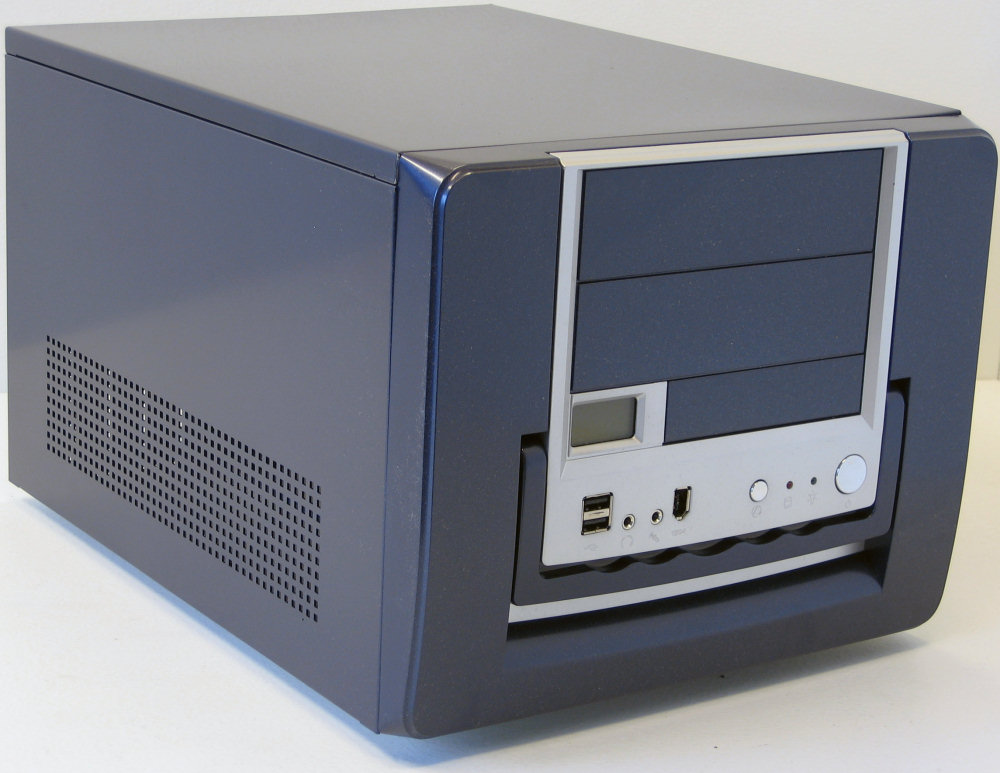
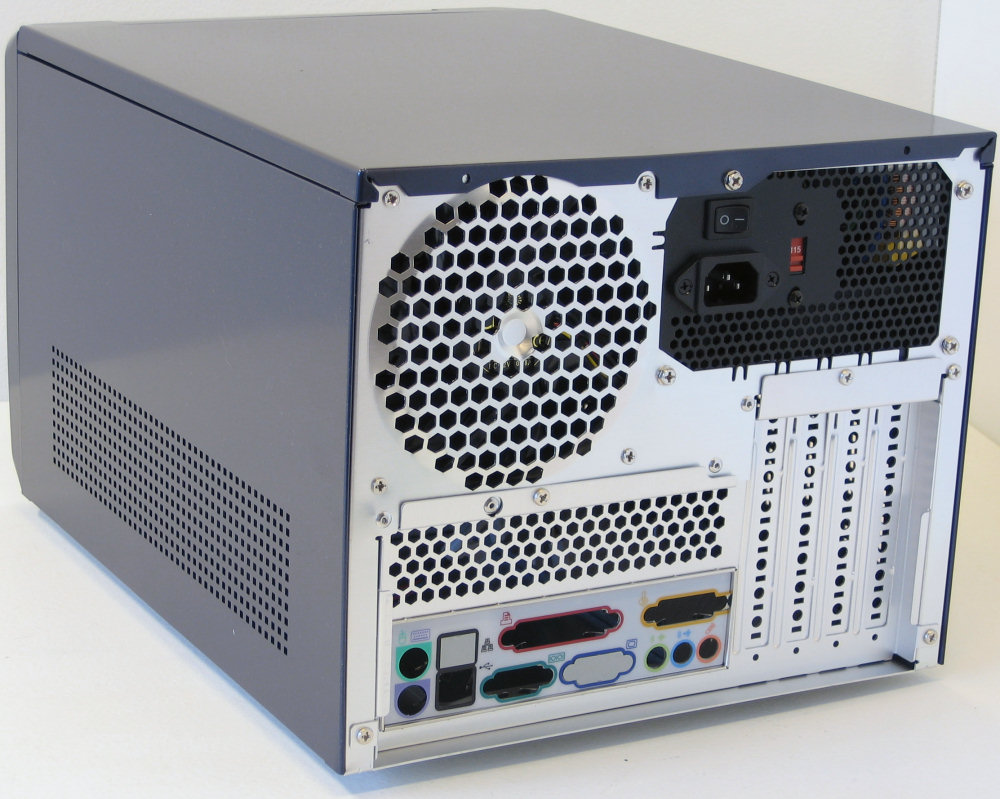
Ultra MicroFly - Exterior
By a good margin the least expensive of the three cases is the Ultra MicroFly. For all practical purposes, this is really just another Chenming 118 clone like the Aspire X-QPack with a few slightly different details. You can read our X-QPack review for more details on an almost identical case.
 |
| Click to enlarge |
The front sports the same easy-to-grasp handle and LCD display, but the front ports and buttons have been moved around just a little bit. The ventilation on the side panels is also different - no longer vertically aligned at the front of the case.
 |
| Click to enlarge |
A close-up of the front shows the chrome finish on the buttons, the scalloped handle, and the relatively tightly-packed port cluster.
 |
| Click to enlarge |
The MicroFly contains a PSU just like the X-QPack, this one rated for 400 watts, as well as the 120mm exhaust fan.
 |
| Click to enlarge |
Four non-slip feet and the rails for the motherboard tray are all that adorn the bottom of the case.

More information on the MicroFly is available on Ultra's website.
Ultra MicroFly - Interior
The biggest difference between the MicroFly and the X-QPack is that the three side panels are separate rather than one large piece. This makes opening up the MicroFly a little easier, but makes the end result feel just a tad less sturdy. Additionally, the case is about an inch deeper than the X-QPack and the original Chenming, making the overall working conditions inside more spacious.
 |
| Click to enlarge |
The same horizontal cylindrical brace holds the front strongly to the back of the MicroFly's left side, and the case suffers from the same slightly unsupported PSU mount. Notice that it does contain an extra 80mm fan for intake in the front.
 |
| Click to enlarge |
Only the top panel is secured with the single rear screw (which should have been replaced by a thumbscrew in our opinion, though end-users can do that on their own); once the top is removed both side panels lift up and out. When totally opened up, it's easy to see the removable motherboard tray.
 |
| Click to enlarge |
The dedicated hard drive cage holds two drives, but a third and even fourth could be put in the external bays if desired. The hard drive cage can be totally taken out too, just like the motherboard tray. We did have a little difficulty with the mobo tray's sliding - it was kind of stiff and the easily bent thin aluminum tracks didn't help, but it worked well enough.
 |
| Click to enlarge |
Ultra MicroFly - Interior Cont'd
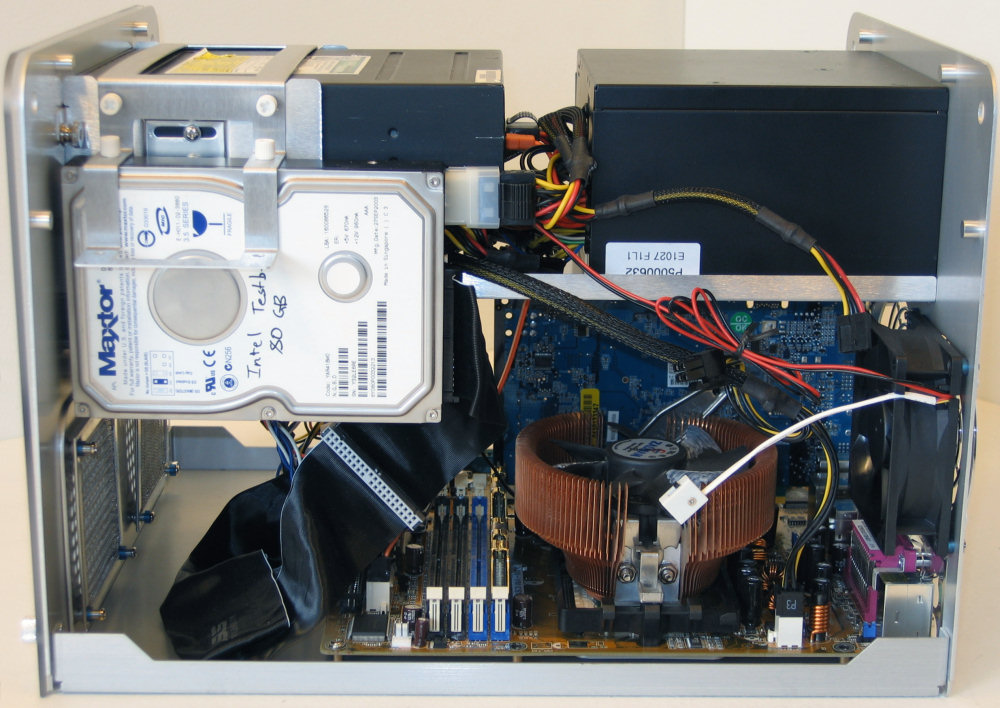
Our first step with the MicroFly's install was putting the hard drive and assembled motherboard into their respective trays.
 |
| Click to enlarge |
Like the other clones of this case, the MicroFly just barely works with our CNPS 7000 Cu cooler.
 |
| Click to enlarge |
After making sure our CPU cooler would fit, we attached the video card with the single standard case screw and slid the completed motherboard tray into the case all the way. The largest video cards could be difficult to squeeze into the MicroFly, but it handles them better than the Aria.
 |
| Click to enlarge |
The included power supply has enough wires for most anything you could fit inside the case, including two 12 volt fan headers
 |
| Click to enlarge |
Our completed build from the right side. Like the other cases, there is still a little room for extra equipment in the front bottom, but unlike them there's actually a little space next to the PSU too, so with a little creativity a specialized water-cooling setup could be realized in this case as well.
 |
| Click to enlarge |
The LCD display on front shows the temperatures detected by the remote sensor which we attached loosely to our Zalman CPU cooler.

There isn't a whole lot to set the Ultra MicroFly apart from other similar micro-ATX cases, but it still represents a well-designed unit. The low cost of entry is definitely one of the most attractive aspects, and as a whole setting up and using the Ultra MicroFly was uneventful. As you'll see in a moment, the overall performance characteristics of the MicroFly are impressive, with the only potential blemish being slightly higher noise levels at full load.
Benchmark Comparisons - Temperature
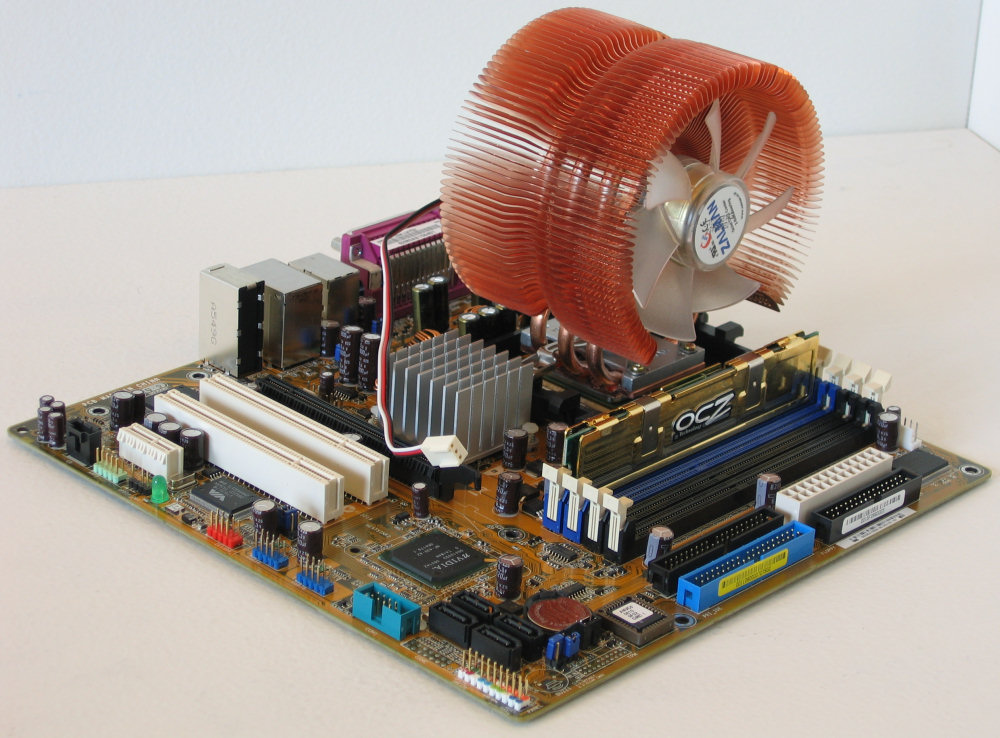
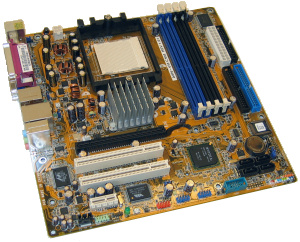
Ever since our socket 754 DFI motherboard has been giving us problems producing reliable temperatures for benchmarking, we've been on the lookout for a new micro-ATX motherboard for testing. We've had great luck with ASUS sensors in the past, and settled with an A8N with the popular socket 939. Using a dual-core CPU will allow us to see bigger differences in CPU heat output, and will let us better evaluate how cases handle the two extremes of cooling loads.
| New mATX Test Bed | |
| ASUS A8N-VM nForce 430 AMD 3800+ X2 Dual Core CPU OCZ 512MB DDR2 x 2 Zalman CNPS 7000cu Heatsink or Zalman CNPS 9500 Heatsink Maxtor 80gb IDE Hard Drive Chaintech GeForce 6600GT Zalman VF-700 Cu GPU Cooler MSI DVD-CD/R/RW Combo drive Zalman ZM460-APS PSU |
 |
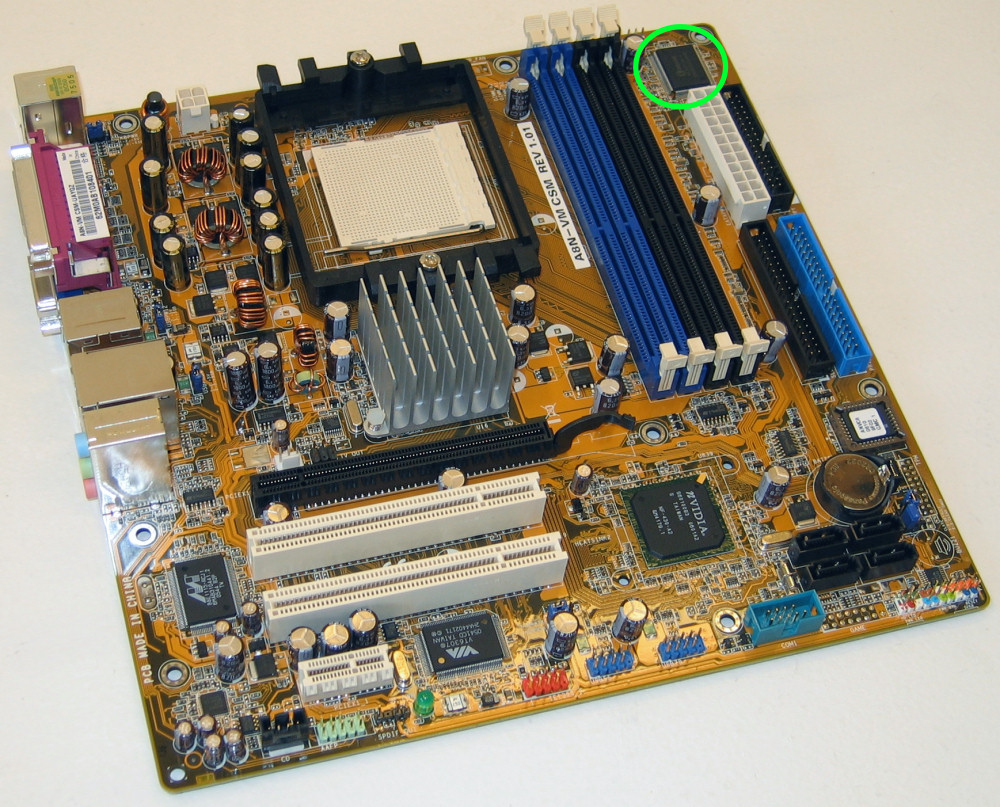
This new motherboard proved to be an excellent choice for our test bed, as it offered a total of eight temperature sensors - nine including the hard drive. We nailed down the location of pretty much every sensor by trial and error and some canned air sprayed upside down to provide localized cooling. Interestingly, we found the board was really showing four different temperatures for roughly the same area, which was right around the CPU. We also found a sensor in a Winbond chip in the top right which works nicely as an ambient motherboard temperature indicator, and will be shown simply as "MB" in our temperature results tables.
 |
| Click to enlarge |
Our 6600 GT continues to provide both a core temperature and an ambient figure read via the NVIDIA driver, and speedfan reflected these numbers too. The only problem is that probably because we were using a separate graphics card, we couldn't find a single sensor tied directly to the north bridge, as unlikely as that may seem. For benchmarking, we took an average result after temperatures had leveled off for over 20 minutes of testing at the idle and full load tests. For loading we used two copies of the Folding@Home project (one for each core) and the popular rthdribl GPU benchmark.
Since the Qmicra is such a customizable case in terms of its thermal performance, we tested it in two completely different configurations; one with just a single Antec Tri-Cool fan on its slowest setting and the CNPS 7000 CPU heatsink, and one with four Arctic Cooling 80mm fans set at each of the designated mounting points and a CNPS 9600 heatsink. The drastic difference in overall airflow affected the temperatures of our components for sure, but we still got very interesting results.
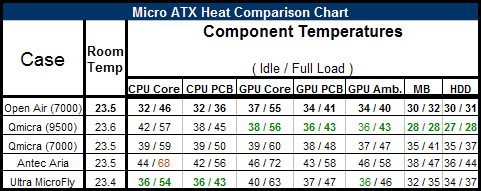
We had to run our temperature tests over, and over, and over to be sure these numbers we were seeing were correct. Needless to say, they are not what we expected. With the Qmicra able to hold the beastly CNPS 9500, we figured for sure that combination would sweep the CPU temperature benchmarks, but instead it was beat pretty handedly by the MicroFly with the smaller CNPS 7000 cooler, both under load and at idle. We even re-mounted our 9500 several times to ensure it wasn't a fluke, but these figures here were always representative of what we saw.
The only explanation we really have is that our particular CNPS 7000 is better at making good contact against our 3800+ X2, and the Ultra's larger 120mm fan located right above the CPU area is keeping only cool air around the processor. As many have pointed out and experienced first hand, the Aria runs a lot hotter than the other offerings, getting the CPU up to a toasty 68C under full load. The good news is that we never encountered any stability problems, so really, these high temperatures don't even need to be taken as that much of a caution - just know that overclocking and the Aria might not be a smart combination.
Other interesting findings that caught our attention included the cooler-than-open-air temperatures of the hard drives and motherboard in the Qmicra once we populated all four fan mounts, suggesting that the all-aluminum design and heavy airflow is doing an excellent job of cooling those areas of the case. The huge decrease in hard drive temperature shows how targeted airflow can be more important than merely having a spacious interior. It would have been really interesting if the 9500 could've fit into the MicroFly, but even as it stands it's clear that the Chenming 118 has a good overall design for performance and the other cases designed in its style work just as nicely. Where the Qmicra really shines here though is in the flexibility. Users can come up with their own selection of fans based on their cooling needs and have custom-tailored performance.
Benchmark Comparisons - Sound
Next up, we took our new test bed and re-worked our sound tests a little to better categorize both the levels and characteristics of the noise produced by each case with the accompanying test hardware installed and operational. No case won or lost overall by a clear margin, but there were still distinct victories in smaller areas.
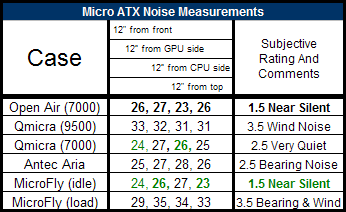
(Sound tests conducted in an ~18dB ambient level environment)
First, for a better frame of reference, we assembled our test bed on the open work bench with our Zalman power supply far enough away that its main fan didn't even turn on. Both of the Zalman coolers - the CNPS-7000 Cu on the CPU and the VF-700 Cu on the GPU - were given 5 volts instead of 12 to keep their levels acceptable for desktop use in a near-silent environment. This open air test bed proved to be nearly silent, registering a record low from the CPU side of the computer of 23 decibels.
An open air computer is hardly practical though, and a good case should actually be able to help bring already quiet levels like these down further with just the right amount of well-designed sound insulation, and much to our surprise, the inexpensive MicroFly did the best job of this! Until we did our loading test, the Ultra case had by far the best characteristics of its sound. Subjectively, it was no different than the open air setup, a very prestigious claim to say the least. When kicked into high-gear unfortunately, the case began to sing a new tune as the included power supply's fan went into its other speed zone, creating a noticeable motor bearing noise along with the whooshing sound of moving air. 3.5 is still a good rating for any desktop PC case (remember that these are 1-10 ratings), but if the environment was quiet enough, a highly-stressed MicroFly might be annoying enough for some people to regret not getting a quieter solution. We did try putting both system fans on 12 volts to see if the power supply would stop going into high-gear, but it still did and then the case was even louder at idle.
The Aria also did a great job of staying nearly as quiet as the open setup, but its power supply fan had just a hint of bearing noise that, thankfully, blended with the air sound from the blower on 5V to get mostly lost in the overall sound signature. For a case as warm as the Aria, it might have helped a lot to allow for a few more active cooling elements, or at least include a power supply that can increase the fan RPMs at the higher temperatures we measured.
PC Design Lab's Qmicra performed admirably with the Zalman supply and single Tri-Cool fan, but when all four fans were installed (and even only running on five volts each) the sound of moving air was certainly noticeable, both to our ears and the dB meter. Strangely enough, the sound-dampening material obviously worked for the dB meter, as the install with the CNPS 7000 cooler registered lower levels than the open-air bench both from in front and the top, but we still noticed the slight hint of extra moving air and motor noise from the single Antec Tri-Cool 80mm fan. We actually speculated that this might be because the good performance of the sound insulation material would make the Tri-Cool (the only active fan immediately next to an open grill) more noticeable without the other fans being heard, and this theory would also explain the almost identical measured levels.
Before wrapping up, it should be reinforced that all of these setups were comfortably quiet - perfectly suitable for use in 90% of computing situations, and a couple even capable of handling the tricky task of working in an audio-sensitive environment, particularly if a high-powered portable machine is desired. Compared to smaller cases we've looked at before and a few famously noisy Shuttle computers, this is a welcome change for the SFF industry.
Final Words
Smaller and smaller cases are sure to come through our labs as customers clamor for ever more stylish and hidden computers to fit into their homes and offices, and it's nice to say that for the most part, we're still seeing improvements from our perspective. All three cases we looked at here were great examples of putting an emphasis on quiet computing, but in their own right each unit brings a unique offering which deserves recognition.
Priced at an affordable $90, the Ultra MicroFly appealed to us just as much as the Aspire X-QPack, for many of the same reasons. The included 400 watt power supply is beefy enough for most SFF builds, and the noise levels and temperature performance are right up there with some of the very best. If you want to use a different full-size ATX PSU, you can get the case only for as little as $50. The case isn't constructed to the same tolerances as the more expensive models, but for the price paid the quality doesn't disappoint. We have a feeling the option of having the benefits of the Chenming and Aspire layouts without the windows on the sides will become a popular choice for many people.
Available for as low as $100 online, the Antec Aria remains popular probably for its most obvious characteristic: its diminutive dimensions. Such a small size comes with a few tradeoffs, including additional heat and cramped working conditions inside, but nothing says portability like a full-fledged computer that can fit in any decent-sized backpack (we tried). It also includes a power supply powerful enough for its application, and stayed quiet even when heavily loaded. For frequent LAN attendees and recording technicians on the go, the attractiveness of the Aria could be hard to beat.
At the other end of the spectrum is the Rolls Royce of small form factor computer cases, the $275 Qmicra from PC Design Lab. Combining best-in-class manufacturing with a smart layout design, the Qmicra is really the case modder's dream-come-true for a micro-ATX build. Save for the smallest of minor complaints, most of which have already been addressed by the proactive, customer-focused company, the case has hardly anything to complain about besides its luxurious price tag. Considering the fact that the Qmicra doesn't come with any power supply or case fans, its pretty obvious that the market for the case won't be huge and will include mostly enthusiasts very well versed in case design and willing to spend the extra time, effort, and money to build their portable dream machine. On PCDL's website images of modded cases can be found of all varieties, from windows and lights to minimalist designs with stealthy drive bezels made from the aluminum of the drive bay covers. Currently the website allows for a custom configuration of the case for options like thumbscrew and fan grill colors, but the only finish available is a black powder coat which would of course look fairly different from the brushed silver finish on our review sample. You can check all of this out at PCDL's website.
It's great to see variety, and even better to see great values in different price segments regardless of the product type - but for the case industry as a whole, and particularly SFF cases, things are definitely on the right track. Much appreciation should go out to all three units' manufacturers.


