Original Link: https://www.anandtech.com/show/167
BeOS Review
| Just weeks away from the heavily delayed release of the next major upgrade to the aging Windows 95 Operating System, there is a new threat for Microsoft to begin paying more attention to. In the past the only competition Microsoft had in the PC market was itself, high end users were confined to the Windows NT platform, while everyone else dealt with the watered down Windows 95 platform. |  |
| Those were the only two real options in the PC world, if you are happy with your current OS and are just looking for something more or if you are down right displeased with Windows and want an avenue of escape, may we interest you in a new letter of the alphabet? Be. | |
Pronounced 'Bee,' the Be Corporation has been in the industry for quite some time now. Founded during the early 90's, Be began development on a next generation Operating System in 1995. Shortly after their original announcements and press releases their BeOS was first seen running on an Apple Macintosh computer, with a Graphical User Interface (GUI) that closely resembled Apple's own MacOS GUI. After announcing the product as a direct competitor to the MacOS, Be also announced that they would be (no pun intended) porting the BeOS to the Intel Pentium II Platform, essentially meaning that the BeOS would collide with the PC world it had evaded for so long.
Considered a match in heaven, the BeOS with its support for up to 8 processors and taking advantage of all of them, and the Intel based PC Platform, with an already incredible user base and an ever expanding processor family. From the looks of the preview, the BeOS appeared to be nothing more than the MacOS that could be run on a PC.
While quite a few PC users tend to shy away from mentioning that forbidden name, the MacOS does have its benefits over Windows - at the same time, Windows does offer a significant amount of enhancements over the MacOS. Consider the BeOS the best of both worlds, multitasking and multi-threaded operation being its strongpoint and with a user friendly nature under its belt.
Move over Microsoft, it's time for someone else to grab the lime light, in Windows 95's hour of reign it is time for a swarm of bees to cash in on their 15 minutes of fame. Strap yourself in as AnandTech takes an in-depth look at the "hot headed teenager" of the Operating System world, stop wondering about where you want to go today, and get ready to Be.
Installing the OS
| Your first experience with any Operating System will be the initial installation procedure. From the days of Microsoft DOS 6.22 to the highly integrated Windows 98 Setup process, times have changed considerably. Over time it has become evident that our setup software is beginning to ask us more and more about our systems before actually proceeding to install the OS itself. |
| Windows 95/98 claim Plug 'n Play compliance, in theory this should mean that you can install just about anything in your system (with reasonable limits) without having to worry about manually configuring the device, having to manually search for the device, or in an ideal PNP case, without having to install any manufacturer provided drivers. Well, what is the first major step in the Windows 95/98 installation process? Autodetecting Hardware, a process that takes a considerable amount of time regardless of what type of system you are running. Now that would be perfectly fine if it detected and configured all of your devices then and there, however life isn't all that simple with OSes of the 90's. You'll probably have to go through at least 2 more scans of your system, and New Hardware Found dialog boxes before your system is up and running at close to 100%. The BeOS changes this. |
The initial setup of the BeOS consists of you placing the supplied boot disk in your system, with the BeOS CD in your CD-ROM drive, and powering up your system. From there you can use the built in Drive Setup Manager to partition your hard drive, either manually or by selecting one of the 4 pre-configured options which include 1, 2, 3, or 4 partitions of equal size (1 - 100%, 2 - 50%, 3 - 33%, or 4 partitions each 25% of your total disk space). It is best to partition your hard drive before hand and simply initialize the partition using the BeOS Filesystem. Once you do initialize the partition, all existing data will be lost and no other operating system will be able to recognize the initialized partition as a useable drive. This is a definite plus since it means that your drive letters will remain unchanged if you plan on Dual-Booting between the BeOS and another operating system, something that is possible.
The BeOS GUI will immediately load after reading from the BeOS CD in your drive, at that point most of your hardware has already been detected and initialized properly. If you happen to have a piece of hardware that isn't supported by the BeOS then reaching this point will not be in your future. Unfortunately the current release of the BeOS (RC3) is greatly limited by its poor support for hardware, this should change in future releases however for now you must double and triple check to make sure that all of your hardware is supported in this release. The tests AnandTech conducted on the BeOS were made using BeOS Release Candidate 3 for Intel Platforms provided courtesy of BeOS Inc. Your first impressions of the BeOS GUI should be ones of familiarity, if you've ever seen a picture of the MacOS then the BeOS will be common territory to you, otherwise, prepare to explore the unexplored.
After selecting a complete clean install on the Ultra ATA Western Digital 4.3GB Caviar (BeOS for Intel Platforms doesn't support any SCSI controllers as of yet) AnandTech used for testing the process was underway. Taking about as much time to install everything as a full install of Windows 95 on the Pentium II - 300 test system did the BeOS soon prompted for all disks to be removed from the drives and for the system to be restarted.
If you're wondering how you Dual-Boot between the BeOS and another OS, you have quite a few options. First of all, you can simply stick in the BeOS Boot Disk that is provided by Be whenever you wish to boot into the BeOS. If you are a more advanced user, you can install Linux Loader (LILO) into the Master Boot Record of your Hard Drive, but be sure you're familiar with LILO before doing this as it may lead to data loss if you don't know what you're doing. Most Windows NT users will opt to add the BeOS to their Windows NT Boot Manager Menu, this can be done by booting into Windows NT and launching the 'addbeos' program found on your BeOS CD-ROM. The final option is to launch the BeOS from Windows or DOS by copying the BeOS Launcher (located on your BeOS CD-ROM) to your Hard Drive and running that program. Regardless of which method you choose, after a few patient minutes of waiting for the software to install the BeOS will be completely ready for use. So without further ado, let's take a look at that GUI.
Entering the GUI
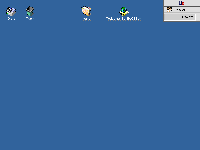
| The first thing you'll see as you enter the BeOS GUI is this screen you can see to your right. Plain and simple, Be was looking to make a lasting yet un-intimidating impression on those who used the BeOS, mainly because, like any business oriented product, they want you coming back for more. |
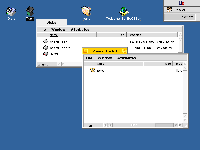
| The upper left hand corner of the screen is home to the Disks Icon. Much like the My Computer Icon under Windows, double clicking on Disks will provide a listing of all recognizable drives and partitions located on your computer. |
|
| One thing you must get used to is that the Disks Window will NOT list devices that aren't present at the time of opening it. For example, if you don't have a CD in the CD-ROM drive your CD-ROM drive will not appear in the BeOS Disks Window. Sticking a CD in the drive however will result in the drive appearing in the box, keep in mind that your CD-ROM drive (provided it has been detected properly and is supported by the OS) is still there it just remains hidden until you place a disk in the drive. The same applies to the Floppy Drive, except for the fact that you must manually mount any disks you stick in your floppy drive keeping in mind that only disks carrying the BeOS File System will be recognized as mountable. | |
Next to the Disks Icon is the oh-so-common Trash can, this is where everything you delete happens to find its way into. Selecting an item and hitting the 'ALT + T' key combination results in the Windows equivalent of hitting the delete key while selecting one or more items. Also like Windows, the BeOS doesn't physically delete the data off of your Hard Disk when you place it in the Trash can. Instead the data is kept in a special folder, able to be recovered by a quick drag and drop of the data out of the Trash and into another folder on your drive. The trash can be emptied by selecting the Empty Trash option from the Trash can's pop-up menu.
| Moving even further to the right hand of the screen, towards the BeOS Deskbar, you'll encounter two general purpose shortcuts, one to the '/home' folder on your BeOS Boot Drive (kind of like the sub-root directory) and the other to a HTML page containing an introduction to the BeOS. The BeOS is highly integrated with the Internet and the Web, most documentation is provided in the form of HTML Documents and Be provides their own Net Positive Web Browser with the OS (sound familiar?). |
Using the Deskbar, you can also force quit applications (the 3-finger salute - CTRL + ALT + DEL completely reboots the system) by holding down the right ALT, CTRL, and SHIFT buttons on your keyboard then left-clicking on the program that you want to close. The Deskbar also allows you to hide/show certain applications not to mention its ability to open up new applications while existing tasks are being performed, which is a bare definition of multitasking - the next visible strongpoint of the BeOS.
Using the OS
| Productivity. That's the key word, what good is an attractive OS if it isn't productive? Luckily, for Be's sake, the BeOS allows for much work to be accomplished while maintaining that user friendly nature which makes the BeOS what it is. |
|
| Within minutes of starting up the BeOS on the Pentium II - 300 test system used, the BeOS was put to work. Out of the CD case, the BeOS comes packed with just about everything you could possibly want in an OS package. Before exploring the goodies stored within the Be Menu, I performed a few common place tasks to get the feel of the BeOS. | |
Copying
Copying from one location to another is a common task made even easier by the BeOS. There is always the conventional drag and drop copy, however you also have the option of right clicking on the item(s) you wish to be copied and up pops a menu which holds two options: Copy/Move to. |
|
| Much like the Windows 95 Send To option, this makes copying/moving files from one location to another very simple. Once you execute a Copy/Move function this Tracker Status window will pop up displaying the current status of your copy procedure, as well as giving you the option to either pause the process or stop it entirely via two stereo like buttons on the right. | |
Emptying Trash
As you can see, Emptying the Trash Can produces the same effect as Copying/Moving Files does. The Tracker Status window pops up this time describing the current process of emptying the trash. |
Multitasking
We discussed before, although introduced quite briefly, that the BeOS was strongly geared towards multitasking. The Tracker Status window from above definitely proves this true. Executing two copy operations while emptying the trash produced the image you see to the right. |
|
| Each individual operation occupies a small portion of the Tracker Status window, each with their own set of Pause/Stop buttons and each with their own progress indicators - represented both in graphics and text. The only thing missing is a time remaining indicator, this could be something we can look forward to in a future release of this infant OS. | |
No More Boring 'Dialog'
| How about interactions between the user and the OS? How well do those work out under the BeOS? For starters, information about just about any application can be found by using the familiar 'About...' menu option. This review referred to the BeOS as the "hot headed teenager" of the OS World earlier, and the BeOS' unique personality is felt in basic dialog interactions between you and the OS. Displaying an About box, for example, may leave you with the option of closing the window by clicking on a button labeled "Big Deal," a fresh new twist on the boring old OS scene. |
|
||
|
|||
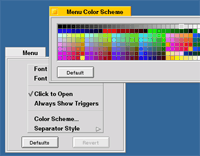
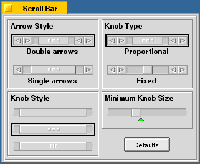
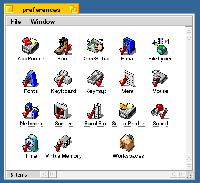
| The highly configurable BeOS allows for just about every single aspect of the OS to be manipulated to more thoroughly fit to suit your needs. Making use of the Preferences Menu under the BeOS Deskbar you are given with a number options including a control panel that can be used to configure the appearance of Menus and Scroll Bars. |
Configuring the OS
With an OS as robust and unique as the BeOS, configurability and control over the OS itself is critical to the success of it among users contemplating adding it to their list of Operating Systems. Luckily, for Be's sake, the BeOS provides you with a number of configuration options and is quite flexible overall.
The default Screen Resolution for the BeOS is 640 x 480 x 8-bit Color, now for most that is a highly intolerable resolution, so what better way to test the control users are given over the OS than a simple resolution change? A quick visit to the Preferences Menu revealed a Screen Control Panel, an extremely easy to use yet powerful utility. All resolution/color-depth changes occur in real time and do not require a reboot of the system. From the Screen Control Panel you can manually configure your video card/monitor from the list of supported resolutions, color depths, and using the refresh rate slider bar. The Screen CP also allows you to select a different desktop background color aside from the boring default sea of blue the BeOS defaults to.
Of course there are the standard control panels, among which include Keyboard/Mouse control panels, not to mention the Keymap control panel which allows you to select from a list of pre-defined language Keymaps. The date and time can easily be configured through the Preferences Menu as well, just as easily as Printers can be selected and just as easily as the Virtual Memory settings can be adjusted.
BeOS Control Panels - Click Thumbnails to Enlarge |
||||
The BeOS wouldn't be complete if it weren't for the highly integrated Web/Email functions of the OS, and you better believe that the Email/Network features can be configured to the fullest extent via the Preferences Menu. While the current Release Candidate of the BeOS (R3) hardly supports any Internal 56K Modems, and has extremely poor support for Network Interface Cards, expect things to change as the OS grows in popularity.
| One Control Panel you may not be familiar with is the Workspaces control panel, closely resembling its roots in Unix, the GUI front-end of the BeOS allows for multiple desktops. Using an ALT + Function Key (F1 - F9) combination, you can switch between 9 virtual desktops under the BeOS, each with their own resolution, color depth, and even desktop color. This becomes quite useful if you tend to quickly clutter your desktop while multitasking, while I do admit that it takes a bit of getting used to, once you give multiple desktops a try you'll wonder how you ever lived without them. | 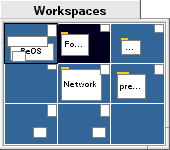 |
Playing with the OS
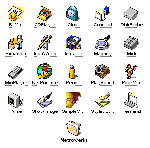
| Now it's time to discuss all the quaint little goodies that come pre-packed with the BeOS. Naturally you have the basics which are found in just about any OS, a notepad style text editor (Styled Edit), a clock, and an audio player (CD Player & Simple Midi). You also have the more "advanced" Internet-Ready features of the BeOS such as an eMail (BeMail) client, a simple Web Browser (Net Positive), and a terminal like dial-up application. In addition to those two categories, Be chose to include a few of their own interesting utilities, the extremely useful Expander Application makes decompressing archives a simple task from the GUI (Expander looks and works just like Stuff-it Expander for the PC/Macintosh). Also included is an icon image editor, an image viewer, a disk probe, a CPU monitor, and an Integrated Development Environment (IDE) for the Be platform by Metrowerks (Codewarrior for the BeOS). |
BeOS Applications - Click Thumbnails to Enlarge |
||||||
All of the above applications are pretty much standard as far as operation and usability goes, nothing too incredibly special there (except for maybe the magnify application that allows you to magnify any portion of your screen by a set factor). In lieu of this, Be included another menu in the BeOS Deskbar rightfully titled, 'Demos.' As you can probably guess, the applications and games listed under this category are meant to demonstrate the features of the OS, and do they ever. Below are some of the demos included with the BeOS:
The BeOS couldn't completely get away from its Unix roots, the Terminal application included with the OS is essentially a Unix prompt. It allows you to switch among drives, directories, perform gzip and other such decompressions, you can change access permissions to files (chmod) and even execute old DOS commands provided you have M-Tools installed which happens to be included on the BeOS CD-ROM. The BeOS Terminal is a very powerful application
BeOS Terminal - Click Thumbnails to Enlarge |
||
|
||
Conclusion
An infant with great potential, or even an adolescent system software, the BeOS can definitely go places, whether it will or not depends on the amount of third party software support it receives. With a competitor like this, we should hope that Microsoft will begin to implement some of the BeOS' key features in their next major OS upgrade after 98. We should also hope that Be will learn from Microsoft (yes, I said it) to improve their OS in a few categories as well. Currently the hardware compatibility list for the Intel version of the BeOS is no where near acceptable, most BX motherboards will work with the BeOS however quite a few still don't. The MVP3 chipset doesn't seem to agree with the OS either. Not to mention the lack of support for virtually any 3D graphics accelerators or sound cards for that matter (the AWE64 is the only sound card supported by the OS). Another huge disappointment would have to be the lack of any SCSI peripheral support in the current release candidate of the OS, which, along with the rest of the flaws mentioned, will have to be changed in future revisions before the final product ships otherwise we'll end up with a knocked up OS rather than a knock-out OS.
We should keep our eyes on Be's little engine, we all know it can, let's see if it will...

