Original Link: https://www.anandtech.com/show/16482/lenovo-thinkstation-p620-review-a-vehicle-for-threadripper-pro
Lenovo ThinkStation P620 Review: A Vehicle for Threadripper Pro
by Dr. Ian Cutress on February 16, 2021 9:30 AM EST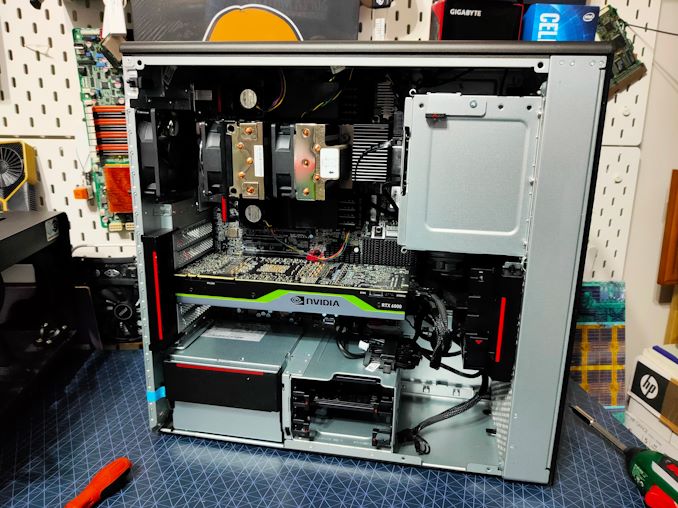
The workstation line of machines from Lenovo have been extremely successful for the company. While ThinkStation might not have as much brand identity as the more recognizable ThinkPad, for the markets that require them Lenovo’s ThinkStation range has been at the front of high-performance under-the-desk offerings since 2008. Lenovo has focused on everything from small form factor entry ThinkStation systems, all the way up to high-end dual socket P-series tower designs. The system we are reviewing today actually marks a major milestone for the ThinkStation business; the ThinkStation P620 is Lenovo’s first AMD workstation system, and it comes in to replace the whole range of Intel-based high-performance ThinkStations previously offered.
ThinkStation Replaces Intel with AMD For Performance
As mentioned, Lenovo started the ThinkStation line in 2008. At the time the first two available options were a mid-range tower system using a Core 2 Quad processor, and a dual-socket tower built on dual Xeon E5000 processors for high-performance. Over the years, ThinkStation has expanded into the low end Xeon E3/Xeon E markets, and introduced small form factor systems around smaller 35 W processors, but still kept up with the premium tower and dual socket designs.
The last update to these higher performance options were in 2017. At the time, single socket designs from the P520 were more mid-range, using Intel’s Xeon W platform on the LGA2066 desktop socket with only four memory channels but with Pro-level features. The P720 and P920 tackled the high-performance using the dual-processor Intel Xeon Scalable platform, giving six memory channels per CPU, with the P920 offering the higher power models with its better cooling design. Since 2017, aside from moving from Skylake to Cascade Lake, and offering newer graphics options, the P520, P720 and P920, have remained static in Lenovo’s offering.
Every single offering in the Lenovo ThinkStation lineup has been Intel. Until now.
| Lenovo ThinkStation Offerings in Q1 2021 | ||||
| Entry | P340 | Small FF | Intel 10th Gen / Xeon | 65 W |
| Tiny | Intel 10th Gen / Xeon | 65 W | ||
| Tower | Intel 10th Gen / Xeon | 125 W | ||
| Mid Range | P520 | Compact Tower | Xeon W, LGA2066 | 140 W |
| Tower | Xeon W, LGA2066 | 140 W | ||
| High-End (Single Socket) |
P620 | Tower | AMD Threadripper Pro | 280 W |
| High-End (Dual Socket) |
P720 | Tower | 2 x Xeon-SP | 2 x 150 W |
| P920 | Tower | 2 x Xeon-SP | 2 x 205 W | |
The ThinkStation P620 is the first AMD system that Lenovo has ever offered with ThinkStation. Built on Threadripper Pro, it forms a new 600-series in the line-up. From the specification sheet it certainly offers performance above and beyond the P500 series, and arguably above the P700 and P900 as well, but it is still single socket, which is why it is ‘600’ rather than anything higher.
Reasons why Lenovo has jumped on the AMD bandwagon for Threadripper Pro are likely numerous, and some of them are obvious – as we’ve showcased before in reviews of the Threadripper 3990X and EPYC 7742, AMD's 64-core offerings at 280 W mean lots of performance, and the Pro side enables over standard Threadripper with 8x memory support, ECC memory, double the PCIe lanes, and Pro-level management capabilities. At a time when Intel’s offering in this space have significantly stagnated (no need to update those product lines since 2007), AMD has something that Lenovo’s customers want.
On top of this, Lenovo secured the exclusive for AMD’s Threadripper Pro. Announced last August, and at retail from late September/early October, Lenovo appears to have secured a 6-month exclusive to be the only OEM to offer the system to customers. Lenovo and AMD have also likely partnered to co-design the products, optimize the platform, and all the other unique benefits on being the launch exclusive partner.
Exclusivity is a big carrot to dangle in front of an OEM, and it seems that Lenovo was a good fit – good enough to leave the Intel systems alone and focus purely on TR Pro as the main offering. So much so infact that on the US Lenovo ThinkStation P-series page, users have to look to the second line of systems to get to the Intel P500/P700/P900 models. The ThinkStation P620 sits front and center for all to see.
The Lenovo ThinkStation Unique Selling Point
It’s been a long time since I reviewed a Lenovo workstation system. The ThinkStation P900 back in 2015 was an absolute beast – dual Intel E5 v3 processors, buckets of memory and storage, and space for a lot of compute add-in cards. What impressed me at the time, rather than the specifications on the sheet, was the meticulous attention to detail that the system chassis had. It went above and beyond almost any other workstation system I had encountered, and it’s enabled by Lenovo’s scale.
As one of the largest OEMs in the market, Lenovo can leverage its custom motherboard team, develop custom connectors for its storage, fans, and even for the power supply, commission unique power supply designs, and then put it all into a chassis custom built for purpose that feels as if the engineers actually knew what they were doing. That dual processor system had independent air baffles for each of the two CPUs, as well as the GPU areas and the power supply. To top it all off, it was very quiet, had a wide array of modern features, and was built to last.
The Lenovo ThinkStation P620 today is built with the same finesse and ethos in mind.
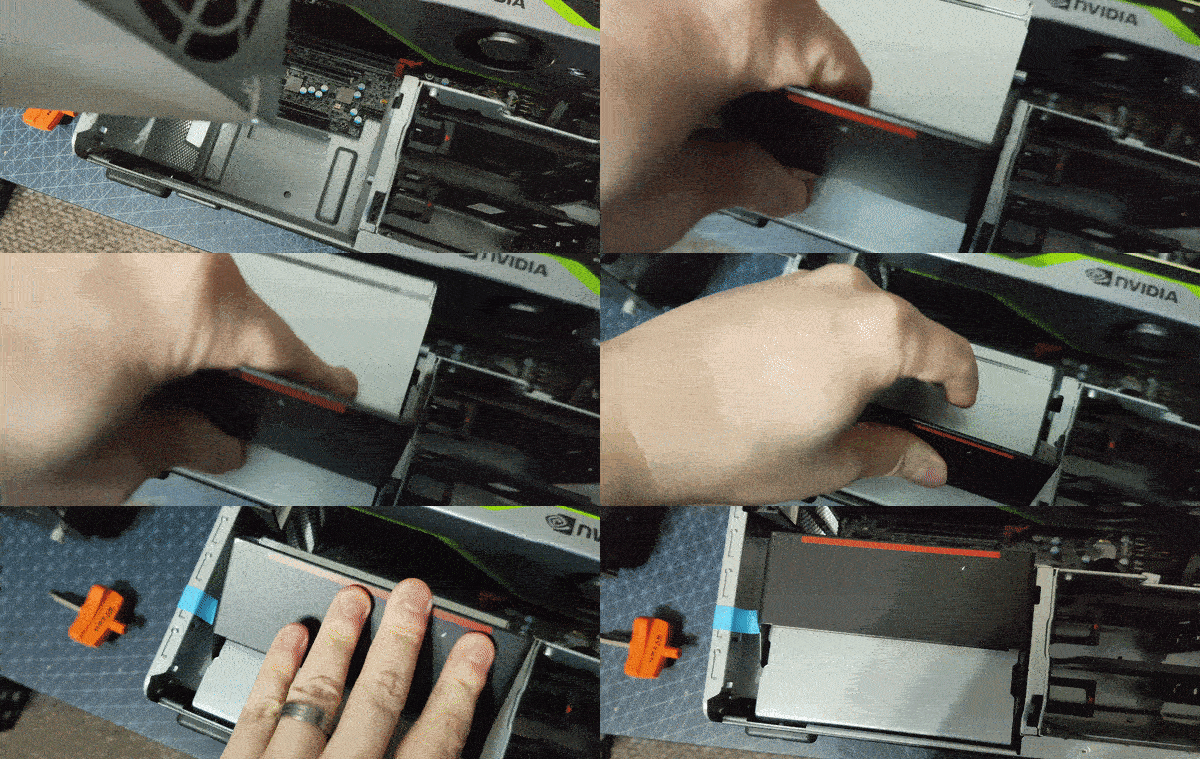
While the single socket design makes it slightly easier to design around, Lenovo has a custom dual heatsink and heatpipe design to cool the 280 W CPU like I’ve never seen before. Each of the DRAM sections has rigid secure coolers for when high-capacity memory is in play. To remove cables, the power supply is a custom design specifically for this motherboard, routing power directly through the motherboard to where it is needed. The design partitions out to backplanes for storage or closer connectors for PCIe. The fans are tool-less and removable with two fingers. The PCIe devices are tool-less and easily removeable. Even the power supply can be removed with two fingers. Lenovo has put the time and effort into this system to not only make it easy to understand, but easy to fix, easy to upgrade, and next to effortless to use. If all PCs were like this, the world would be a brighter place.
I can gush for a long while about the internal design (and I do in the next page as part of the visual inspection), but the critical element about these systems is what they can do.
Specifications
The Lenovo ThinkStation P620 is a custom WRX80 motherboard for AMD’s Threadripper Pro processors. This enables up to 64 of AMD’s Zen 2 cores, with eight channels of memory, and Lenovo puts this at one module per channel. The CPU allows for 128 lanes of PCIe 4.0 connectivity, eight of which go to the chipset, and the P620 offers 80 lanes through PCIe 4.0 slots. There are four x16 slots and two x8 slots, although the nature of the system means that some slots are covered when dual-width cards are in use. Other lanes are enabled for NVMe storage via dual x4 M.2 slots and Aquantia AQC107 10 gigabit ethernet controller, providing a single 10Gbase-T port.
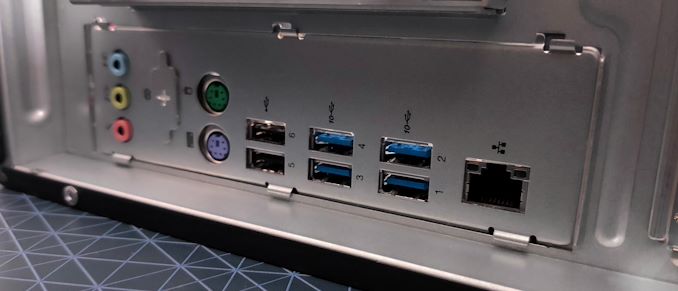
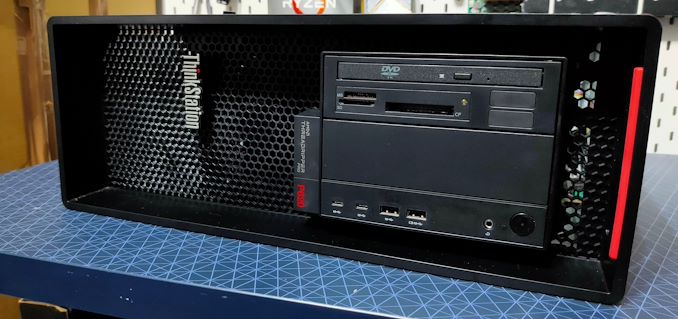
Other connectivity includes a front panel with two USB 3.2 (10 Gbps, one always-on) Type-A and two USB 3.2 (10 Gbps) Type-C, a headphone combo jack, and a 4-digit POST display. The rear ports include two USB 2.0 ports, four USB 3.2 (10 Gbps) Type-C, the 10 gigabit ethernet port, and 2.1 audio output.
| Lenovo ThinkStation P620 | |||
| AnandTech | Base | As Shipped |
Peak |
| CPU | AMD TR Pro 3945WX 12 Cores / 24 Threads 4.0 - 4.3 GHz 64 MB L3 Cache 280 W |
AMD TR Pro 3995WX 64 Cores / 128 Threads 2.7 - 4.2 GHz 256 MB L3 Cache 280 W |
|
| OS | Win 10 Pro | Win 10 Pro | Win 10 Pro |
| DRAM | 1 x 16 GB DDR4-3200 RDIMM ECC |
2 x 16 GB DDR4-3200 RDIMM ECC |
8 x 64 GB DDR4-3200 RDIMM ECC |
| Graphics | NVIDIA Quadro P620 2 GB |
NVIDIA RTX 6000 24 GB |
2 x NVIDIA Quadro GV100 32 GB |
| Storage | 256 GB M.2 PCIe 3.0 x4 |
512 GB M.2 PCIe 3.0 x4 |
2 x 1 TB M.2 PCIe 4.0 x4 |
| HDD | None | None | 4 x 4 TB 7200 RPM |
| Optical | None | DVD-RW | DVD-RW |
| Power | Custom 1000 W 92% Efficient |
Custom 1000 W 92% Efficient |
Custom 1000 W 92% Efficient |
| Ethernet | Onboard 10 GbE Aquantia AQC107 |
Onboard 10 GbE Aquantia AQC107 |
Onboard+Extra 2 x 10 GbE |
| Audio | Onboard 2.1 | Onboard 2.1 | Onboard 2.1 |
| Peripherals | Mouse Keyboard |
Optical Mouse Keyboard |
Optical Mouse Keyboard Key Lock Kit |
| Warranty | 3 Yr On-Site | 3 Yr On-Site | 3 Year On-Site |
| Price (with offer*) |
$3619 ($2099) |
$22099 ($12817) |
$60634 ($35168) |
| *Current Februrary Offer for 42% Discount on Direct Sales | |||
The base specification includes the TR Pro 3945WX, which has 12 cores at 4.0-4.3 GHz, one 16 GB DDR4-3200 RDIMM ECC module, an NVIDIA Quadro P620 2 GB graphics adaptor, a 256 GB M.2 SSD, a 1000W 92% efficient power supply, Win10 Pro, and a keyboard and mouse for a $3619 base price.
Going for peak upgrades, we can choose:
- 64-core TR Pro 3995WX for +$12200,
- 8x64 GB of DDR4-3200 RDIMM ECC (512 GB total) for +$12000,
- dual NVIDIA Quadro GV100 32 GB graphics cards for +$39650,
- two 2TB PCIe 3.0 M.2 drives for +$2400,
- four 4 TB HDDs for +$1520,
- a 15-in-1 card reader for +$40
- an additional 10G NIC for +$155
The TR Pro CPU technically supports up to 2 TB of DDR4-3200 in its full configuration, however Lenovo’s build only has one memory slot per channel (technically two per channel is supported if the motherboard is built that way), and does not have 3DS LRDIMM support, which puts the maximum to 512 GB (we tried 1 TB of LRDIMMs, but the system wouldn’t post).
This full-spec configured version ends up with a price of $60634. Lenovo is doing a discount for February, enabling a 42% discount, so it only comes to $35168. This does not include tax or shipping.
Of course this price is a bit nuts, but that’s because Lenovo sells very few of these systems direct through the website (and the website limits an individual to five systems). Almost all sales are through B2B channels, where a visual effects studio buys a dozen with a support package, and price will obviously depend on how many are being purchased and in what configuration.
The system as shipped to us was relatively decent, except in one key configuration.
Review Configuration
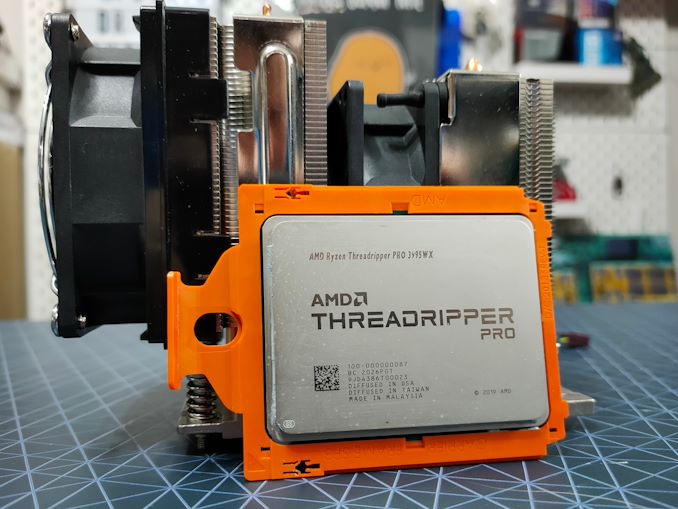
Over the base configuration, our design had the 64-core AMD Ryzen Threadripper Pro 3995WX, an NVIDIA Quadro RTX6000, and a Western Digital SN730 512 GB M.2 PCIe 3.0 x4 boot drive. The one key configuration point that wasn’t so good was the memory. Lenovo shipped the system with only two modules of 16 GB memory, limiting the system to only 32 GB and in dual channel mode.
Lenovo’s reasoning for shipping their review systems with this small amount of memory, as they did with the P900 system back in 2015, is that a good portion of their customers are either (a) not memory bound, or (b) source their own memory. In speaking with other US press who were sampled this system by Lenovo, they similarly had only two modules of memory as default, whereas the EU press had all eight modules. It seems odd that Lenovo US is willing to put a CPU in the system that they charge +$12000 for, a GPU in the system that they charge +$8220 for, only to fundamentally limit the system for the sake of around $1000 of memory.
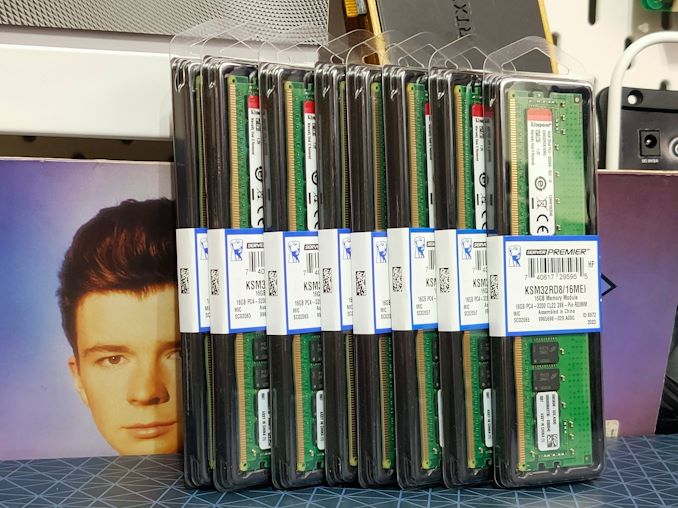
For our testing today, we’re testing it in both the as-shipped configuration with two memory modules and an eight-channel memory configuration. We have to give big thanks here to Kingston for coming in clutch, as they shipped us enough memory for all of our future DDR4 server testing. We’re using Kingston’s 16 GB DDR4-3200 RDIMM ECC modules (KSM32RD8/16MEI), which worked first time in the P620 at the rated speed.
For a good number of benchmarks, having only two memory modules was a severe performance killer. With something like this, AnandTech recommends a full set of memory.
This Review
Users who are looking for analysis of the Threadripper Pro 3995WX processor can look at our in-depth review article from earlier this week,
In this review, we’re examining the Lenovo ThinkStation P620. The review consists of two main parts –the system design, usability, and offering, and then the performance, in both the as-shipped dual-channel configuration, compared to a full set of memory.
Visual Inspection
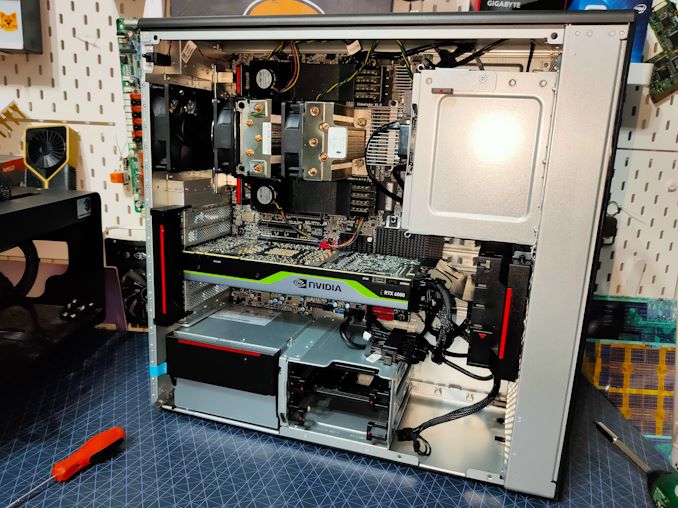
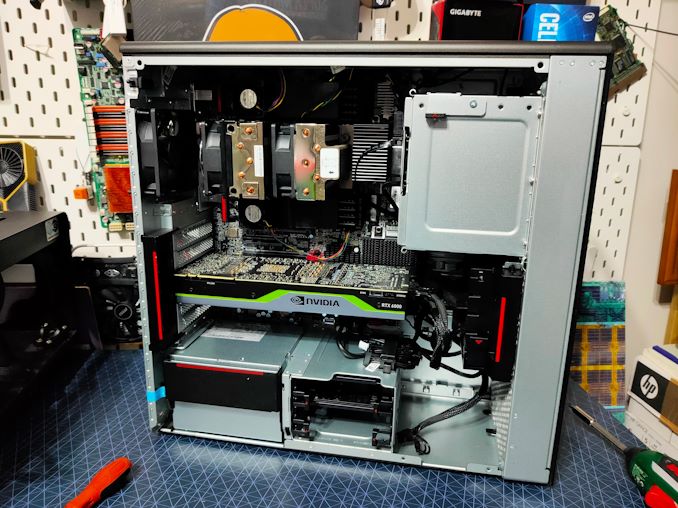
As with most workstations designed for under-the-desk operation, due to the need to power a big CPU and a big GPU (or two), the ThinkStation P620 is a sizeable machine, but smaller than you might think. The comparative dimensions are actually significantly smaller than my own personal Corsair Graphite 760T main gaming system: the P620 is 33.4 liters, while the 760T is 78 liters, more than double. A fully laden system has a max configuration of 24 kg, or 53 lbs.
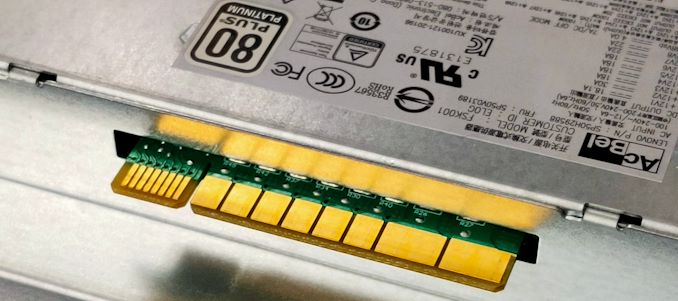
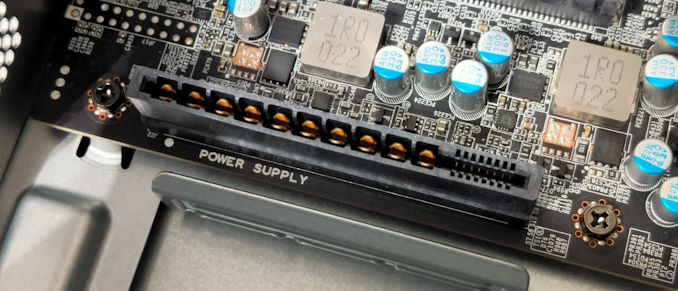
Inside this P620 chassis Lenovo has effectively put in its own custom ATX motherboard. The initial aspect of how custom it is can be seen in the sense that it has a connector for a a special custom 1000W 80 PLUS Platinum power supply. The power supply has no output cables, and this makes the whole design a lot nicer and cleaner to manage – no cables travelling up the rear of the design, making the whole unit thinner.
The power supply connects through a single custom finger that looks like this:
By having a power supply like this, it provides power for the CPU, the motherboard, and the PCIe slots directly. The motherboard has to be engineered to manage all this power, so we’re likely looking at a 14-layer or 16-layer board, compared to the 6-8 layer regular motherboards that we see.
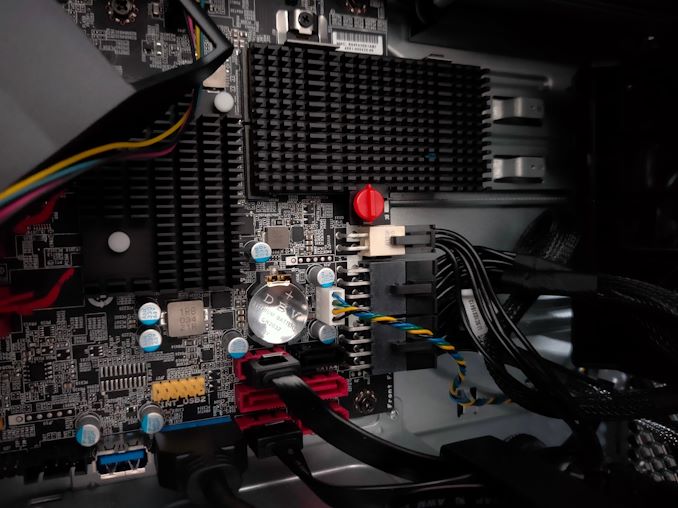
For the items that do need cables, like add-in cards and 2.5-inch/3.5-inch drives, Lenovo uses output ports on the edge of the system, where a traditional motherboard has SATA connectors, and from these the system can power the usual graphics cards ports.
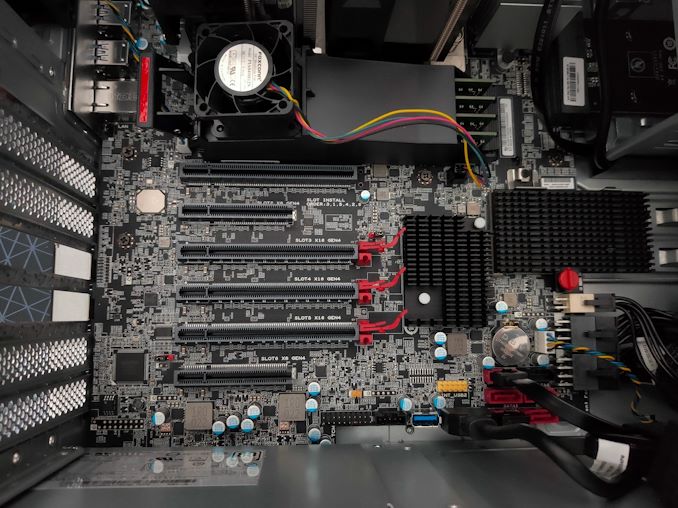
It should be noted that in this SATA port area, even though there is a full PCIe x16 slot, it looks like you can’t fit a full GPU in here. This area isn’t for GPUs, but more for add-in cards.
There are six PCIe 4.0 slots, in a x16/x8/x16/x16/x16/x8 configuration. The preferred slot for the first GPU is the third slot, as shown in the picture above. A second GPU is supposed to go into the first slot at the top, and then any add-in cards (such as M.2 combo cards or additional Ethernet) are meant to go in the bottom two slots.
On the left of the PCIe, Lenovo has not only built a tool-less PCIe latch system, but it’s a one-finger design. Someone is super smart at Lenovo, as this no doubt helps with building the system as well as maintenance and repairs. Again, this is something that every system needs to have.
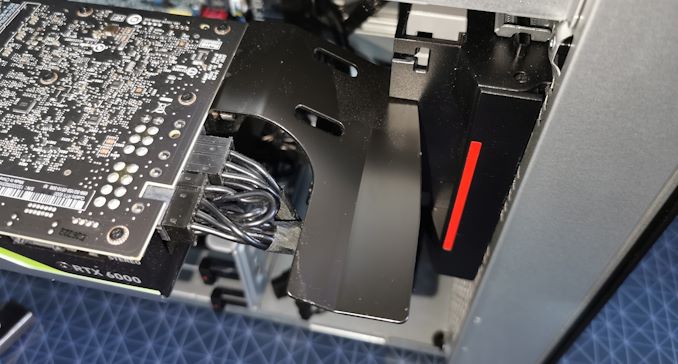
On the right hand side, Lenovo has an entry fan that can be removed very easily. Built into this housing is a rigid connector implementation, to help with holding up heavy graphics cards. Every system needs this.
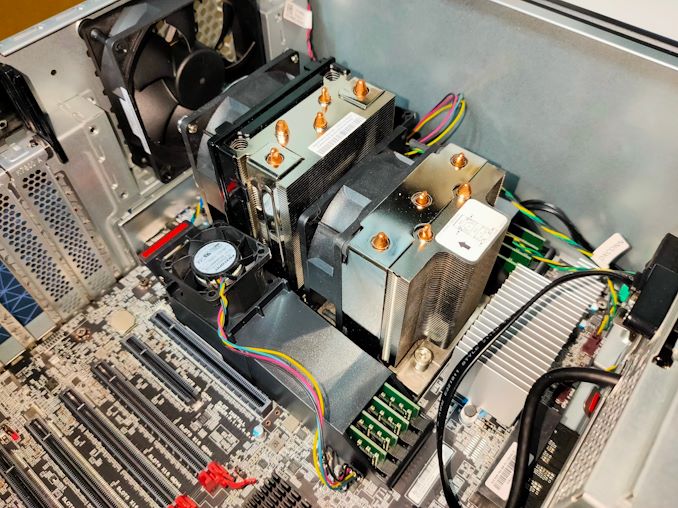
At the top of the system, we have the socket area. The power delivery for the socket would appear to be split to the left and to the right, with two smaller copper heatsinks. This design you imagine might not be sufficient cooling for the power delivery on a 280 W CPU, but Lenovo has designed the unit for baffled airflow, and at this top area of the chassis is cooled mostly by the super interesting CPU cooler.
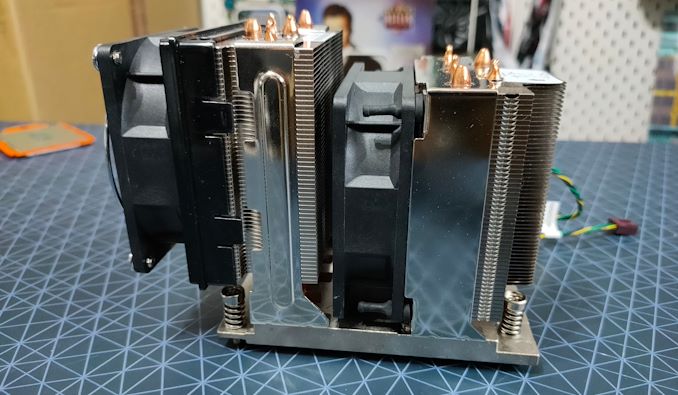
This uses what looks akin to 10 heatpipes (or five long ones) split into two batches of fins, each with its own fan, drawing air from the front of the chassis and pumping it out the rear. You might think this cooler looks a lot like the dual tower stacks available on consumer systems, but these two are at different heights, Perhaps this small design change enables a little more of the Bernoulli airflow affect to take hold, increasing the effective cooling. At any rate, this cooler is sturdy and does the job. I believe it to be a custom Foxconn design for Lenovo, and so alas not available at retail.
On the memory side of things, there are four slots above and below the socket. The processor supports eight channel memory, so we have one slot per channel here. Our system only came with two memory modules from Lenovo, but we filled the system with eight. One of the great things about this unit is the quad-channel memory fan bracket that Lenovo has put on both sets of four. These fan units are sturdily built, with a really nice spring retention mechanism. When systems like this have 64 GB of memory per slot, even at DDR4-3200, they can start using enough power that active cooling is a positive thing to have.
On the back of the system we have the audio outputs on the far left, just a simple 2.1 Realtek ALC462 codec here because nothing more is really needed on a compute system. There is space for a COM port (optional add-on), two PS/2 ports, two USB 2.0 ports, four USB 3.2 10 Gbps ports, and a 10 gigabit Ethernet port powered by an Aquantia AQC107.
The front panel houses the DVD-RW if that option is selected, a 15-in-1 card reader (if selected), the power button, a 3.5mm audio jack, two USB 3.2 10 Gbps Type-A ports, and two USB 3.2 10 Gbps Type-C ports. One of the Type-A ports is an always-on port. There is also a four-digit POST sequencer to help debug any start-up issues.
Overall, what I like about Lenovo workstations like this is that there are a number of unique little add-ons that only a large OEM like Lenovo can provide, and I wish these add-ons were more ubiquitous:
- A one output zero-cable power supply
- Tool-less Fan cages removable with one-two fingers
- Tool-less PCIe retention mechanism built into the chassis
- Tool-less PCIe removal bracket also useable with one-two fingers
- DRAM fan brackets (significantly better than what most/all DRAM vendors offer)
From this, Lenovo’s design gets a gold star from me. This also leads into the system level tests.
BIOS and Software
As this is a custom system from a large OEM, the firmware inside is also very custom compared to consumer grade systems, and even enterprise systems. The big OEMs like Lenovo, Dell, or HP, often develop their own BIOS interfaces for the required option set, some even going as far as to enable a miniature operating system with bells and whistles, however more often than not with limited actual functionality that enthusiasts care about, typically wanting to lock that away so users can’t accidentally break it.
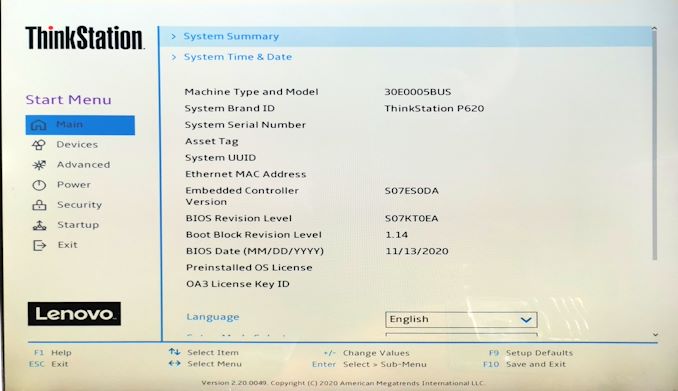
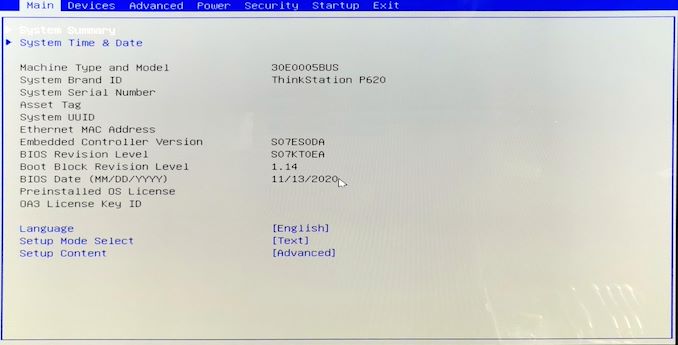
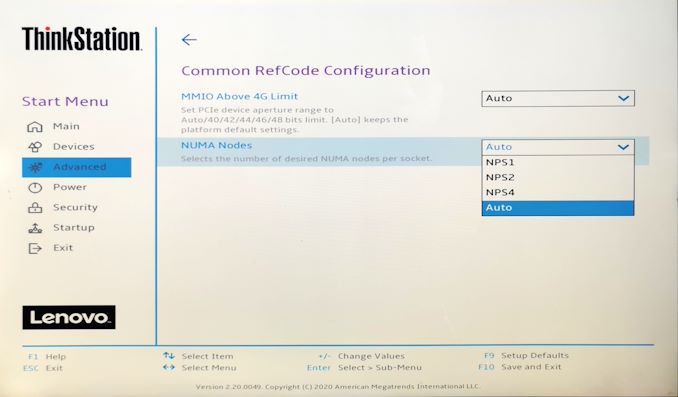
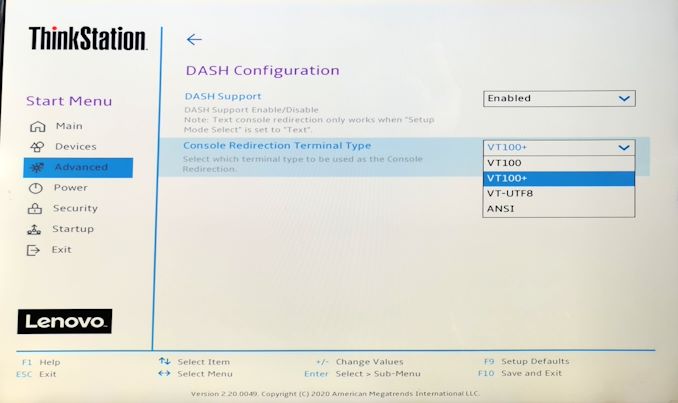
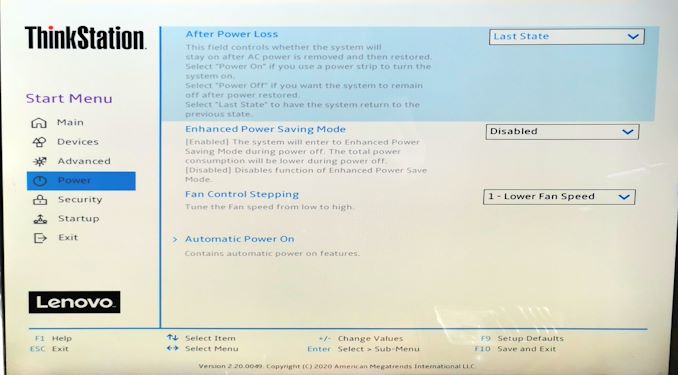
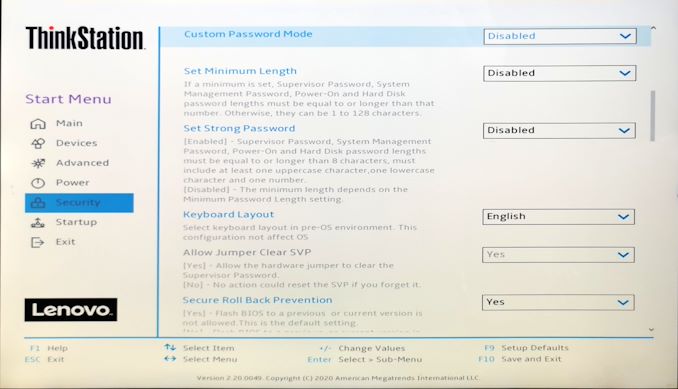
Lenovo to its credit does a much better job with its BIOS on the P620 than I’ve seen on a lot of other systems. Yes there is a custom interface, but it is very much just a modernized version of a simple text interface designed to look nicer with modern fonts. Unfortunately there was no screenshot option, and I've managed to get to 2021 without a capture device. So apologies for the photos of a monitor.
The menu options that are typically on the top of the BIOS screen are now down the side, and all the options we normally get are in the central console with a scroll down. What this design does (and why a lot of enthusiasts aren’t too fond of modern BIOS design) is that there’s a lot of extra white space everywhere, and there’s less information on a single screen. Luckily Lenovo has thought of that, and also offered a retro mode, which has exactly the same menu structure and offering as the initial fancy BIOS.
The BIOS itself gives all the standard chipset options of a regular system – enabling/disabling USB ports or networking or other IO, options to disable CPU performance modes, sleep modes, or SMT, a BIOS boot order, or choosing which PCIe slot has the primary video.
Also present in the BIOS is the professional level options, such as SR-IOV, Above 4G Decoding, RAS configuration for ECC and security, NUMA node selection, and Dash support.
These features were disabled when we first looked at the system, so admins looking to purchase them might request Lenovo do the necessary setup in advance. For business customers, they do things like that.
The fan settings, as we’ll discuss on the next page, are in the Power section.
In the security settings, there are a number of different password options due to the Pro-level nature of the workstation. What also surprised me is that there is an option to set the password encryption algorithm. Your choices are SHA-256 (standard) or SM3 (China), the latter of which is one of the Chinese cryptographic standard hashing algorithms. The other password options enable admins to set password length, password strength, and prevent BIOS rollback.
If there’s one thing I’d like, it would be a section on the screen that states what CPU is installed, how much memory, and perhaps the CPU temperature. The idea would be that this section would be on screen at all times, rather than having to hunt it down (CPU temperature isn’t actually listed in the BIOS anyway).
For users that know their way around a BIOS, Lenovo has made it relatively straight forward and easy.
Software
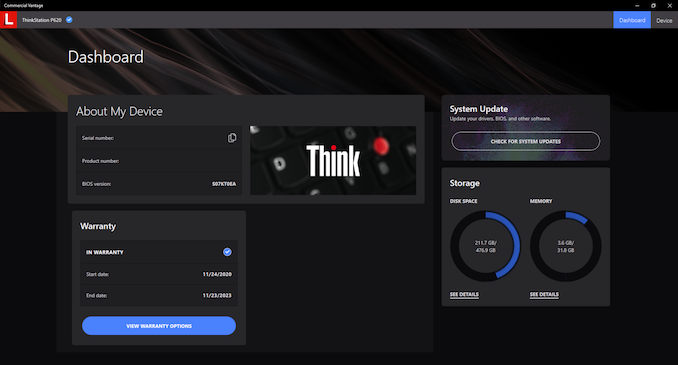
Before most people grown about the concept of OEM-level bundled software, Lenovo has done it right with this one. Aside from the background image when the user starts up, there is next to none. Lenovo’s sole program option is the Commercial Vantage application, allowing the user or admin to see the warranty length, probe Lenovo for system and driver updates, and offer links to online documentation/user guides. It’s unobtrusive and I couldn’t even find it at first, as Lenovo doesn’t even put its own name on it when searching for it.
I wish more vendors offered this little software. But this is perhaps a product of the professional nature of a system, whereas commercial systems for end-users there’s typically a kickback for an OEM to supply various software with it, or they are sold with particular anti-virus software etc.
System Benchmarks
Power
The two main aspects of power for a system like this are the idle and load measurements. For the CPU on its own, we have already tested the Threadripper Pro 3995WX in our 3995WX review, and it only draws the rated TDP, a maximum of 280 W. For the system as a whole however, we have the base power consumption with no load, and then additional loading with the GPU to consider. The official listing of the RTX 6000 24 GB here is 295 W, so a CPU+GPU should be 575 W .
- Measurements taken at-wall
- 75 W: Idle on OS
- 630 W: Initial Peak with 100% CPU+GPU Load
- 640 W: Sustained Peak with 100% CPU+GPU Load
For our metrics, we left the system at idle in the standard power profile but disabled sleep modes and display off modes. After 30 minutes, the at-wall power of the system was measured as 75 W in a long idle state. When firing both the CPU and GPU up with a high-performance cryptography workload, the system jumped up to 630 W at the wall. Over the next 20 minutes, as the fans sped up to deal with the increased thermals, we saw peak power at 640 W. This is easily sufficient for the 1000W power supply, and even with a second GPU, it should be plenty.
Temperature
A workstation wouldn’t be a good under-the-desk unit if the thermals spiraled out of control. Lenovo’s system is straightforward enough, with the unit split into two: the top half with the CPU has a passive intake in the front and blows out the rear, while the PCIe area has an active intake at the front and blows out of the back. We’re under the impression that the full retail units will have a dedicated air baffle between these two zones, but in our testing, the thermals were relatively tame.
We fired up the system in a traditional home/home office environment, with an ambient temperature of around 26ºC, using the default fan setting (which is the lowest). Both the CPU and the GPU were afforded a strong sustained cryptography load with the fans left on automatic. Even when at full loading for over 24 hours, the peak CPU temperature was only 78ºC, and the peak GPU temperature was only 81ºC.
- At Fan Level 1 (lowest) in BIOS, 100% CPU+GPU for 24 hour
- CPU Peak at 78ºC
- GPU Peak at 81ºC
- Ambient of 26ºC
With such a sustained heat soak of the unit, the chassis was warm to the touch for sure, and we did additional measurements with an IR meter. On the side of the chassis, in the middle, 30ºC was recorded. Given that heat rises, the top of the case is where to look, and at the front of the case we saw 33ºC, while at the rear of the case it was 37ºC. Around the CPU exhaust fan, our meter recorded 50ºC for the fan casing, having to deal with the exhaust gases.
Something like this, a big 640W system pumping out hot air, will eventually warm up a room. This is always the danger with high powered workstations that have extended work to perform – gaming is at least somewhat varied for consumer systems that after a few hours the system can have a break.
Noise
Thermal results are not anything without rating the noise of a system, and Lenovo has a setting in the BIOS that allows the owner to select one of 7 fan profiles. The default setting as shipped was the lowest setting for the fans.
At this level, the system was inaudible over the background hum of other electronics, and when the system was pushed to the limit, 36 dBA was measured 30 cm from the rear exhaust, with the GPU hitting a peak of 80ºC. Using the highest fan setting, the system was 36 dBA at idle, rising to 46 dBA when at load (or 50+ if you are even closer than 30cm at the back). In this mode however, the GPU only peaked at 73ºC.
POST Time
With more professional-esque systems, the time from pressing the power button to when the OS is loaded is a lot longer than consumer systems, mostly due to the management control that goes on, as well as the fact that the POST time is not a direct optimization target in the same way. Enterprise systems typically have baseband management controllers (BMC), security aspects, and more memory channels to train, which all adds up to POST time. For example, our launch systems for dual-socket AMD Rome and Intel Cascade Lake take 3-5 minutes after pressing the power button.
Workstations are somewhat in the middle of all this. While they use processors with professional admin controls inside, only some have an added BMC for control. Workstations do have more memory channels than consumer grade hardware, so somewhere between the 20 seconds of consumer systems and 3 minutes of enterprise systems is probably a good balance.
For our test here, we shut down our system but kept the power cable plugged in. We started the timer from the moment we pressed the power button, and stopped it when the operating system was visible and accepted inputs. We also noted the POST time listed in the Startup section of Task Manager. This was repeated 5 times, with obvious outliers removed.
In our test, we had a very consistent 60 seconds to enter the operating system. Due to the manual timing here and waiting for the monitor to refresh into the OS resolution, then a timing resolution to the nearest second is probably most adequate. In each of our tests, the BIOS time as represented in Task Manager was also fairly consistent, showcasing 41.0 to 41.5 seconds.
- Turn on POST Time: 41.0 to 41.5 seconds
- Turn on to OS Time: 60 seconds
While these aren’t the fastest times in the world, this isn’t much of a machine that’s going to be turned off all that often, but when it is, at least it gets back into a useable shape very quickly.
USB Speed
This system has eight USB 3.2 Gen 2 slots, rated at 10 Gbps. Four are located on the rear, all of which are Type-A, and there are four on the front, two are Type-C and two are Type-A. One of those two Type-A ports on the front is also wired for always-on power, enabling it to act as a 5 W charging interface for smartphones and similar even when the machine is powered off but still plugged in.
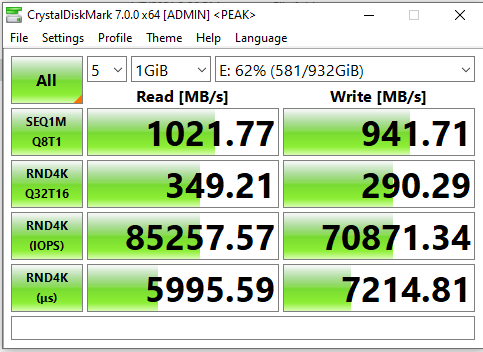
For our test of USB speed, we are taking an NVMe SSD installed into a USB drive case. We have the Western Digital SN750 1TB drive, which is typically a PCIe 3.0 x4 drive, and placed it into an ASUS ROG Arion M.2 SSD Enclosure, built for speeds at USB 3.2 Gen 2 (10 Gbps). This enclosure has a Type-C output, but ASUS supplies both C-to-A and C-to-C cables in order to connect the drive to any number of devices. With this combination of hardware, our theoretical maximum speeds should be at the 10 Gbps range, or 1250 MB/sec.
In our testing, only the front USB ports recognized our drive. The rear USB ports failed to register any device attached – I wonder if this is perhaps due to us receiving a test sample than a full retail system, nonetheless we tested the front ports with our drive using CrystalDiskMark. All four ports on the front performed identically within margin.
As you can see, the theoretical peak speeds are 1022 MB/s read, and 942 MB/s write, indicating some 20% overhead in the protocol for an absolute maximum.
To find a more real-world use case, we transferred files to and from the drive totaling 30 GB. In total there were a dozen compressed files relating to a video game being moved. Our realistic real-world speed was 709 MB/s, and so we’re another 30% off the actual peak of the port.
DPC Latency
Deferred Procedure Call latency is a way in which Windows handles interrupt servicing. In order to wait for a processor to acknowledge the request, the system will queue all interrupt requests by priority. Critical interrupts will be handled as soon as possible, whereas lesser priority requests such as audio will be further down the line. If the audio device requires data, it will have to wait until the request is processed before the buffer is filled.
If the device drivers of higher priority components in a system are poorly implemented, this can cause delays in request scheduling and process time. This can lead to an empty audio buffer and characteristic audible pauses, pops and clicks. The DPC latency checker measures how much time is taken processing DPCs from driver invocation. The lower the value will result in better audio transfer at smaller buffer sizes. Results are measured in microseconds.
- DPC Latency: 180 microseconds
Our result on the Lenovo P620 was 180 microseconds. This is lower than the 300 microseconds usually recommended for good operation, and below the 200 microseconds we usually put as an upper limit for consumer grade systems. Out of all the motherboards we test, 180 μs is actually rather high: our Intel Z490 motherboards were 104-131 μs, and our AMD X470/B550/X570 motherboards varied from 46-156 μs. The only time we typically go higher is with more professional grade systems, and that is because DPC latency, while a target, isn’t always a priority.
System Tests: Dual Channel vs 8-Channel
For testing the processor at full glory, head on over to our review of the AMD Threadripper Pro 3995WX, which shows all the data with respect to other CPUs when it is fully enabled with eight memory modules – we go more in depth in our testing in that review, and the results of those tests and more can be found in our benchmark database, Bench. For this review, we’re doing something slightly different.
Our review sample from Lenovo was shipped with two 16 GB modules of DDR4-3200 ECC, enabling only dual channel memory. The list price difference between a 2x16 GB arrangement and an 8x16 GB arrangement if you buy modules from the open market is $600-$1000 depending on where it is sourced. At the rates that Lenovo buys the memory, this is more likely to be nearer $200-$300. So why did Lenovo skimp on the memory for a system that is sold for nearer $20000? I have no idea. But the performance difference is so much more than the 1% price increase of filling it full of memory. This is something I want to report on, because it matters.
We’ve asked Lenovo in the past why they ship review systems with fewer memory modules than at least one module per channel. The response usually boils down to ‘that is how our customers buy them’ or ‘it doesn’t matter for benchmarks like SPECviewperf’. Of the other media who were sampled this system, we know at least two others were similarly sampled with only two memory modules, both in the US, whereas our European counterparts were shipped with all eight modules, likely down to how each region manages review samples. Luckily Kingston came in to save the day, and supplied sixteen of their 16 GB KSM32RD8/16ME DDR4-3200 RDIMMs for all of our server testing.
But we want to compare the difference between a dual channel system, and proper system performance. Rather than offer a dozen pages showing all our test results, we’ll list the separate the sections we test, and score how many benchmarks are affected by the memory difference for a given percentage, along with notable highlights.
Benchmark Results
| 8-Channel Benefits over 2-Channel | |||||
| AnandTech | # Tests in Segment |
# Tests > 103% of 2-Ch |
# Tests < 97% of 2-Ch |
Average % |
Highlight |
| Rendering | 11 | 2 | 0 | +1% | Corona, +7.5% |
| Office | 3 | 1 | 1 | +2% | Agisoft, +8% |
| Science | 9 | 6 | 1 | +53% | yCruncher MT, +212% |
| Simulation | 5 | 1 | 0 | +10% | DigiCortex, +47% |
| Encoding | 8 | 6 | 0 | +34% | 7z Encode, +135% |
| Legacy | 10 | 0 | 0 | Equal | - |
| Web | 3 | 0 | 0 | Equal | - |
| OpenSSL | 8 | 0 | 0 | Equal | - |
| SPEC2006 ST | 18 | 3 | 0 | +2% | 470.lbm, +10% |
| SPEC2017 ST | 22* | 3 | 1 | +1% | 549.fotonik3d +13% |
| SPECviewperf | 8 | 1 | 0 | +1% | Maya, +5% |
| Total | 105 | 25 | 2 | +15% | - |
| *521.wrf_r doesn't run in our suite due to WSL limitations | |||||
Overall, we’re seeing +15% uplift with the 8-channel configuration. But that’s skewed by several super high results:
- yCruncher MT: +212%
- AES: +62%
- DigiCortex: +47%
- NAMD: +39%
- 7-zip Overall: +31%
- AIBench: +29%
- WinRAR: +23%
If we move to an even tighter 1% margin, then more than 50% of our tests still fall within that +/- of 1% (55/105).
To the point of rendering programs and SPECviewperf, having eight channels of memory doesn't make a difference to performance. As we discussed in our Threadripper Pro 3995WX review, the key market for these processors is the rendering market. For most of our rendering tests, we didn’t see that much difference between 8-channel and 2-channel, with the most notable being the Corona renderer. Similarly if we look at SPECviewperf, overall results are comparable – 8-channel is +1% higher in SPECviewperf overall. This would tend to agree with Lenovo’s line of reasoning, that certain customers are more concerned about memory capacity and performance, than filling up the memory channels.
However, if the workload is encoding (+34% gain) or science (+53%) gain, then that memory upgrade is crucial to the performance of this system.
The full run-down of the side-by-side tests can be found in our benchmark database.
Do It For The Bits
With a review of an OEM system, it can be sometimes hard to separate the conclusion on the hardware from the system itself. Inside a laptop, it’s a lot easier, as the OEM can combine a number of things into a small chassis and optimize for performance – on the desktop and workstation side however, there’s usually not so much to budge on performance, although design, thermals, and acoustics all come into play. The review has to end up focusing a lot on the value, performance per dollar, and build quality, and any extra bells and whistles. Luckily for Lenovo ThinkStation P620, the focus isn’t so much on the price, but all those bells and whistles.
The ThinkStation P620 system that Lenovo sent us was the company’s first ever AMD ThinkStation platform. It was set up with the top end AMD Threadripper Pro 64-core processor, a beefy NVIDIA RTX 6000 GPU, and some solid storage. Taking advantage of the platform, Lenovo put 80 lanes worth of PCIe connectivity in out of the 128 offered by the processor, as well as 512 GB of memory support through eight memory channels. The fact that Lenovo only sent a review unit with two memory sticks is an unfortunate $200-$400 saving on a $20000 review sample and really hurts the performance in some of the tests on the CPU, but to see the full 8-channel results, head on over to our dedicated CPU review. Memory aside, Lenovo has a lot going on in this system worth talking about.
A lot of off-the-shelf systems take standard PC parts and put them together. The size and skill of a company like Lenovo means that they don’t have to do that, and we get designs like the P620. Lenovo has a fully custom motherboard just for this product line, and it uses an ultra-special power supply that has zero power output cables. Lenovo has designed the system such that the PSU plugs into the motherboard like a standard connector, and all 1000 W goes to the rest of the system through the motherboard rather than cables. This means the motherboard has to be designed to take care of all that power, but it reduces the overall size of the system without the need to route cables (the whole design is 33.4 liters, rather than 70+ for a modern high-end PC), and makes the power supply so easy to remove, upgrade, replace, and all that. It is very obvious how deep the design goes here.
On to that, the system also has a PCIe bracket area that is both tool-less and easy to use, and the PCIe card is fixed in with an external stiffener which effortlessly blends in with the rest of the system. The two M.2 slots are built into the motherboard and perhaps more difficult to access, with our system having one of them populated with a 512 GB WD SN530 drive. There are also four 3.5-inch bays for dedicated storage in the bottom of the chassis. Two of the PCIe slots are also aimed at storage add-ins, such as the M.2 riser cards now available.
Lenovo lavishes on the USB 3.2 Gen 2 (10 Gbps) support with eight ports total, four on the front panel, and two of those being Type-C. Networking is through a copper 10 gigabit connection, with options for more advanced connectivity through the PCIe slots. To help out with debugging, there’s a four-digit display on the front panel that turns off after a successful boot.
Another nod on design here – the CPU cooler uses a differential height dual tower design, and the full retail system is designed to have an air baffle between the top and bottom areas, enabling for cooling zones. Cooling on this system is really nice, with the lowest fan setting and a sustained 24-hour CPU+GPU load putting the CPU at 78ºC and GPU at 81ºC. The system was warm to touch on the top, but nothing out of the ordinary. The full system power draw, with the 64-core AMD and RTX 6000, came to 640 W.
For the processor, performance on AMD’s Threadripper Pro 3995WX was a few percent higher than the standard Threadripper 3990X in our testing, with the eight channels of memory offsetting the slightly lower CPU frequencies. Our system observed 4200 MHz on single core turbo, 4000 MHz when up to 20 cores are active, and a sliding scale down to 3100 MHz on all cores when at full tilt. The +3% performance uplift isn’t enough to change the +$1500 list price of the processor, because ultimately that extra cost is going into the features, such as more PCIe 4.0 lanes, higher memory capacity, and professional-grade system administration through a Pro platform, most of which the ThinkStation P620 enables, along with a stellar chassis design.
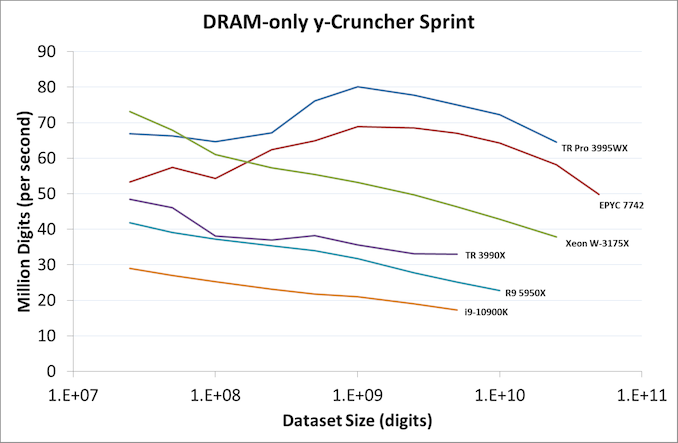
Benchmark from our 3995WX CPU Review, showing 8 Channel Performance
It’s hard to judge a system without a price, but we have to ignore the prices on Lenovo’s website – the company has told me in the past that less than 5% of workstation sales happen like that, and the website only limits a user to five units. Most ThinkStation P620 sales happen through the B2B channels, where a visual effects company orders a few dozen for its artists and designers, perhaps gets a discount, but also enables Lenovo’s pro service and warranty packages. This usually includes replacement machines if one needs to be returned and things like that.
Take this recent Linkedin post from a product manager at Lenovo, showcasing another visual effects design studio that purchased a dozen 64-core variants of the Thinkstation P620 after some initial testing.
At this time Lenovo has the exclusive on Threadripper Pro, and so the P620 is the only option in the market. It’s a really nice option, and for those that need it, it surely fits the bill. There are going to be a number of OEMs coming out later this year with their own TR Pro systems when the exclusivity expires, but they will mostly be using off-the-shelf motherboards. Lenovo’s design is unique, and has hallmarks of design ideas I’d love to see in the industry at large. I don’t see much going wrong for a user that has to use one of these systems. Just make sure it’s got eight memory sticks. Please. Do it for the bits.

_thumb.jpg)
_thumb.jpg)
_thumb.jpg)
_thumb.jpg)
_thumb.jpg)
_thumb.jpg)
