Original Link: https://www.anandtech.com/show/15906/supermicro-superserver-e3029d-review-a-fanless-10g-pfsense-powerhouse
Supermicro SuperServer E302-9D Review: A Fanless 10G pfSense Powerhouse
by Ganesh T S on July 28, 2020 3:00 PM EST- Posted in
- Networking
- Intel
- Supermicro
- 10GBase-T
- Xeon-D
- SFP+
- 10GbE
- ASpeed
- Skylake-D

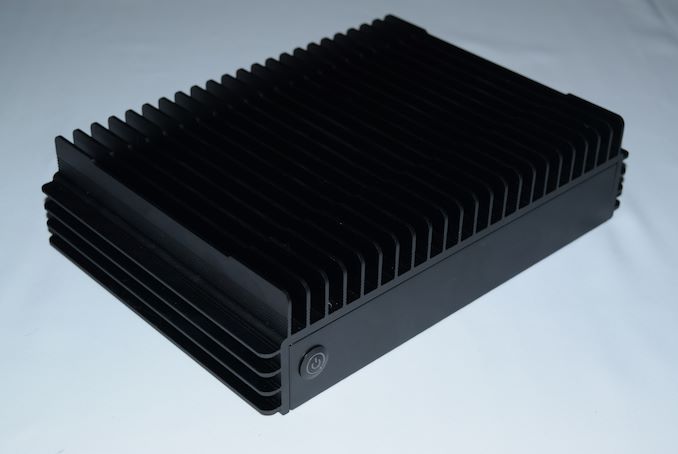
Intel launched the Xeon D-2100 SoCs in early 2018, with a feature set making them a fit for several verticals including edge servers, networking, and storage. One of the key advancements made in the Xeon D-2100 compared to the first-generation Xeon D-1500 series was the inbuilt support for two additional 10G network interfaces. With TDPs starting at 60W, the Xeon D-2100 SoCs lends itself to some interesting and unique server and edge procesing products. One such system is Supermicro's passively-cooled SuperServer E302-9D sporting the Xeon D-2123IT SoC.
As part of the evaluation efforts of different technologies and products, AnandTech editors are regularly tasked with the building or identification of suitable testbed systems. The requirements for these systems often mirror the requirements of software developers and homelab enthusiasts. The increasing adoption of 10G across various networking / network-attached storage product lines meant that we were on the lookout for a low-power system with multiple 10G ports to act as testbeds. We reached out to Supermicro after spotting their X11SDV-4C-TP8F-01 FlexATX board. Supermicro graciously agreed to loan us two SuperServers based on the board to take for a testdrive - the E302-9D in a passively-cooled desktop form factor (that we are taking a detailed look at today), and the 5019D-4C-FN8TP 1U rackmount version.
Introduction
Intel's Xeon D product line targets servers used in power- and size-constrained scenarios (including edge compute). This includes applications across multiple domains such as storage, networking, and communication. The product line integrates server-class CPU cores along with the platform controller hub (PCH) in a single package. The first-generation Xeon D (1500 series) was based on Broadwell-DE cores along with the C220 server PCH. Our launch coverage of the Xeon D-2100 series brought out the details of the updated server core (Skylake-DE) and PCH (Lewisburg C600-series). The relatively power-hungry PCH update and the addition of AVX512 capabilities in the Skylake cores meant that the minimum TDP went up from 20W in the D-1500 family to 60W in the D-2100. However, the updates also brought in welcome connectivity updates.
The Supermicro SuperServer E302-9D / X11SDV-4C-TP8F-01 we are looking at in this review utilizes the Xeon D-2123IT with a 4C/8T configuration. It has the least TDP of all members in the D-2100 family, yet comes with support for up to four 10G ports. The 60W TDP of the SoC allows Supermicro to utilize it in a passively-cooled system. To the best of our knowledge, this is the only off-the-shelf x86 system that provides consumers with four 10G Ethernet ports in a fanless configuration.
The Xeon D-2100 series offers support for up to 20 PCIe 3.0 lanes, 14 SATA 3.0 lanes, and 4 USB 3.0 ports. The D-2123IT can be equipped with up to 256GB of DDR-2400 ECC memory. In creating the X11SDV-4C-TP8F-01 board used in the E302-9D, Supermicro has worked around these features to create a compact board / system that appeals to developers and home-lab enthusiasts working on cutting-edge networking applications.
The SuperServer E302-9D is marketed as an embedded system comprising of the CSE-E302iL chassis and the X11SDV-4C-TP8F-01 board. The power supply is an external 150W adapter. The chassis sports a power button and status LED in the front panel, with all the I/O ports in the rear. The chassis supports a low-profile PCIe card mounted horizontally. The dimensions come in a 205mm x 295.2mm x 73mm. The gallery below takes us around the external design of the system.
The table below presents the specifications of the system along with the details of the reviewed configuration.
| Supermicro E302-9D Specifications | |
| Processor | Intel Xeon D-2123IT Skylake Xeon D, 4C/8T, 2.2 (3.0) GHz 8MB L2+L3, 14nm (optimized), 60W TDP |
| Memory | Up to 4x DDR4-2400 DIMMs (256GB ECC/non-ECC RDIMM) Micron DDR4-2400 ECC DIMMs 17-17-17-39 @ 2400 MHz 2x 16 GB |
| Baseboard Management Controller (BMC) | ASpeed AST2500 |
| Disk Drive(s) | Mushkin Atlas Vital MKNSSDAV250GB-D8 (250 GB; M.2 Type 2280 SATA 3.0; MLC ; Sandforce SF2241) M.2 2280 slot also supports PCIe 3.0 x4 NVMe SSDs Chassis supports 2x 2.5" 7mm SATA drives (HDD or SSD) |
| Networking | 1x Realtek RTL8211 Gigabit Ethernet (IPMI) 4x Intel I350-AM4 Gigabit Ethernet 2x Intel X722 10GbE Controller with X557-AT2 PHY for 10GBASE-T Ethernet 2x Intel X722 10GbE SFP+ |
| Miscellaneous I/O Ports | 2x USB 3.2 Gen 1 (5 Gbps) Type-A (Rear) |
| Operating System | Barebones, configured for triple boot: Windows 2019 Server Standard (x64) Ubuntu 20.04 LTS pfSense 2.4.5-p1 |
| Pricing (As configured) | $1483 ($1203 + $230 + $50) |
| Full Specifications | Supermicro SuperServer SYS-E302-9D Specifications |
In the rest of this review, we first look at the detailed specifications of the board along with a look at the internals of the system. This is followed by some of our setup and usage impressions. In particular, we look at pfSense installation on the system along with some basic benchmarks. Finally, we take a look at the power consumption and temperature profiles before offering some concluding remarks.
Specifications and Teardown Analysis
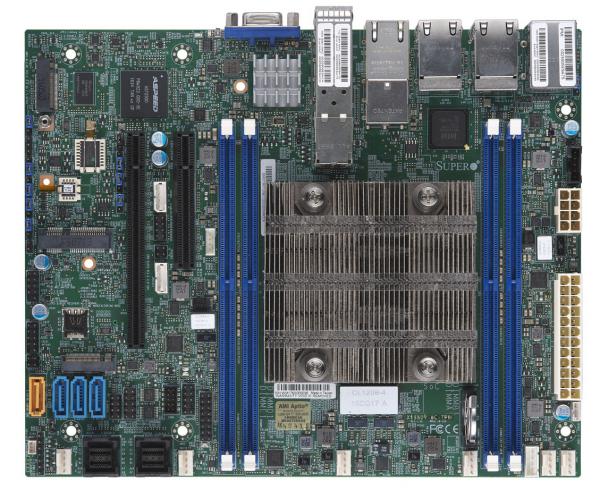
The Supermicro X11SDV-4C-TP8F-01 motherboard used in the SuperServer E302-9D is a Flex ATX board (9" x 7.25"). It integrates the Xeon D-2123IT SoC and supports up to four DIMM slots. Since the SoC is soldered on to the board, the memory slots can only run up to the maximum supported by the Xeon D-2123IT - 2400 MHz.
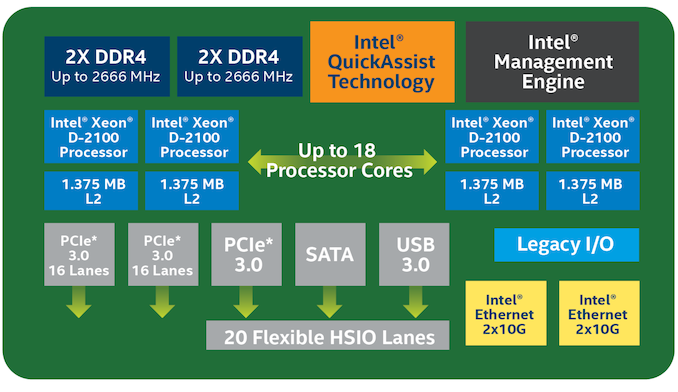
Prior to looking at all the features of the motherboard, some context is provided below in the form of an overview of the capabilities of the Xeon D-2100 series SoCs in general and D-2123IT in particular.
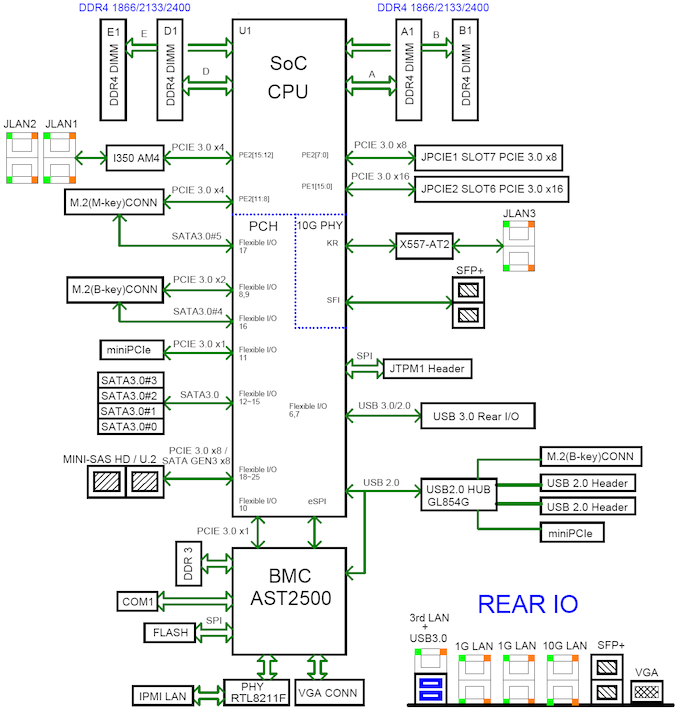
The Xeon D-2123IT, being the entry-level member, comes with four processor cores, and does not have the QuickAssist technology feature integrated. The memory controllers are also limited to 2400 MHz. Server vendors, however, have the ability to make use of the two PCIe 3.0 x16 lanes and twenty HSIO lanes to create a variety of systems targeting different markets. The block diagram below shows Supermicro's approach in the X11SDV-4C-TP8F-01.
The four DIMM slots are arranged on either side of the SoC heat-sink. To one end, we have the PCIe 3.0 x8 and PCIe 3.0 x16 slots. The baseboard management controller (ASPEED AST2500) is seen above the x16 slot. The M.2 SATA / PCIe 3.0 x4 (M-Key) slot is positioned such that the M.2 SSD covers the BMC SoC. Below that, we have a mini-PCIe 3.0 x1 slot and a M.2 B-Key slot (that is also muxed between SATA and PCIe, allowing either type of SSD to be used). Four SATA headers and two mini-SAS / U.2 (SATA / PCIe 3.0 x8) headers round out the other major components seen on the motherboard. The rear I/O on the board has the LAN ports and the USB 3.0 Type-A ports indicated in the block diagram.
The CES-E302iL chassis used in the E302-9D has a removable top cover. Two 2.5" drives (up to 7mm each) can also be installed with a mounting tray inside the system. The power connections to the board are already in-place because of the use of an external power supply. However, users still need to install the DRAM and storage drive(s) on their own.
The gallery above presents a view of the internals and Supermicro's approach to passively cooling a SoC with a TDP of 60W.
Setup and Usage Impressions
Systems such as the SuperServer E302-9D are meant to be operated in a head-less manner (without a display attached). That said, the system does offer a VGA display output using the ASPEED AST2500 BMC SoC on board. The SoC also enables transfer of video-over-IP. Supermicro's user-friendly IPMI (Intelligent Platform Management Interface) implementation allows for users to interact with the E302-9D efficiently. A majority of Supermicro's set of IPMI features and tools cater to datacenter managers. In this section, however, we take a look at the implementation from a home-lab / developer's perspective - from setting up the system to its actual deployment and usage.
IPMI Features
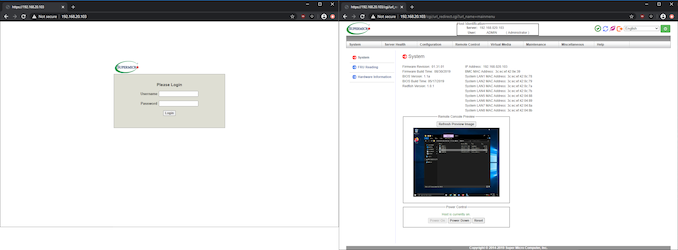
After installing the build components in the system, the unit was connected to the AC mains and its IPMI LAN port was connected to the management network. By default, the IPMI LAN port is capable of obtaining an IP from the DHCP server in the network. A knowledge of the IP allows users to directly navigate to that using any modern web browser. Access to the interface is protected ny a login. Recently, Supermicro started configuring unique BMC passwords for their rackmount systems. For embedded systems like the E302-9D, the ADMIN / ADMIN combination continues to work.
The gallery below presents some of the options available using the HTML interface. With modern browsers, it is possible to utilize the HTML5-based iKVM (Keyboard/Video/Mouse over IP) viewer.
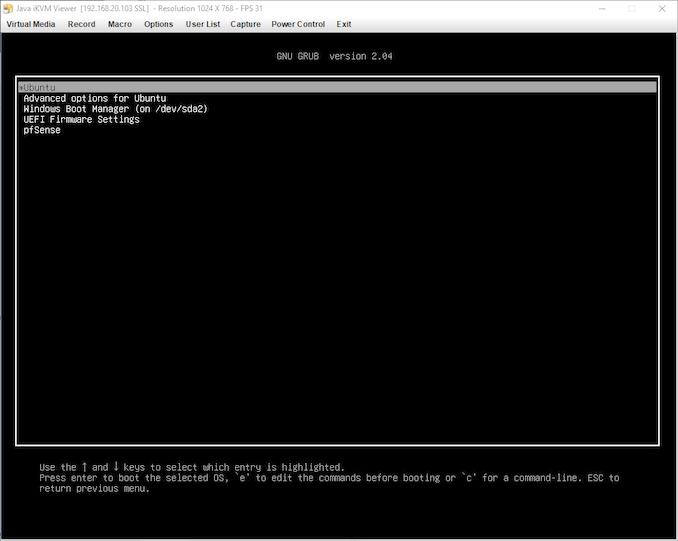
Supermicro also offers a GUI software application in IPMIView (reliant on the OpenJDK runtime) that can be used for, among other things, discovery of Supermicro IPMI clients in the network. An overview of the capabilities offered by IPMIView for the SuperServer E302-9D is provided in the gallery above. The console relies on a Java-based iKVM viewer.
BIOS Features
The BIOS options for the server can be configured via the iKVM interface. The video below presents a walkthrough of the available features.
The BIOS allows both UEFI and legacy boot options. It also allows the configuration of the priority sequence for the boot device within a single drive (at 5:32 in the above video). Boot overrides are also possible from within the BIOS.
Triple-Booting the E302-9D
The presence of 8 network ports (not considering the IPMI LAN port) in the system makes it a suitable candidate for use with a router / firewall distribution such as VyOS or pfSense. Developers and homelab enthusiasts have different platform preferences. In order to test out the behavior of the system across representative scenarios, we decided to set up a triple-boot configuration with Windows Server 2019 Standard x64, Ubuntu 20.04 LTS, and pfSense 2.4.5.
Three different bootable USB drives were created for the installation media for the three operating systems. The drives were physically connected to the system prior to triggering the installation via the iKVM console. It is also possible to mount images as virtual media - in this respect, the Java-based iKVM viewer works in a more user-friendly manner compared to the virtual media settings in the browser interface. Windows Server was installed first, followed by Ubuntu, and finally pfSense.
Setting up the triple-boot was fairly uneventful, with the main challenge related to modifying the grub config to allow visibility of all three OS installations. We were pleased to find that all network ports were up and running right out of the box, without the need for explicit driver installations.
Evaluation Setup and Testing Methodology
The Supermicro SuperServer E302-9D is not a run-of-the-mill server, and its evaluation has to focus on aspects beyond the regular generic testing of the CPU capabilities. The system's focus is on applications requiring a large number of high-speed network interfaces, and our evaluation setup with the server as the device-under-test (DUT) also reflects this.
Testbed and DUT Configuration
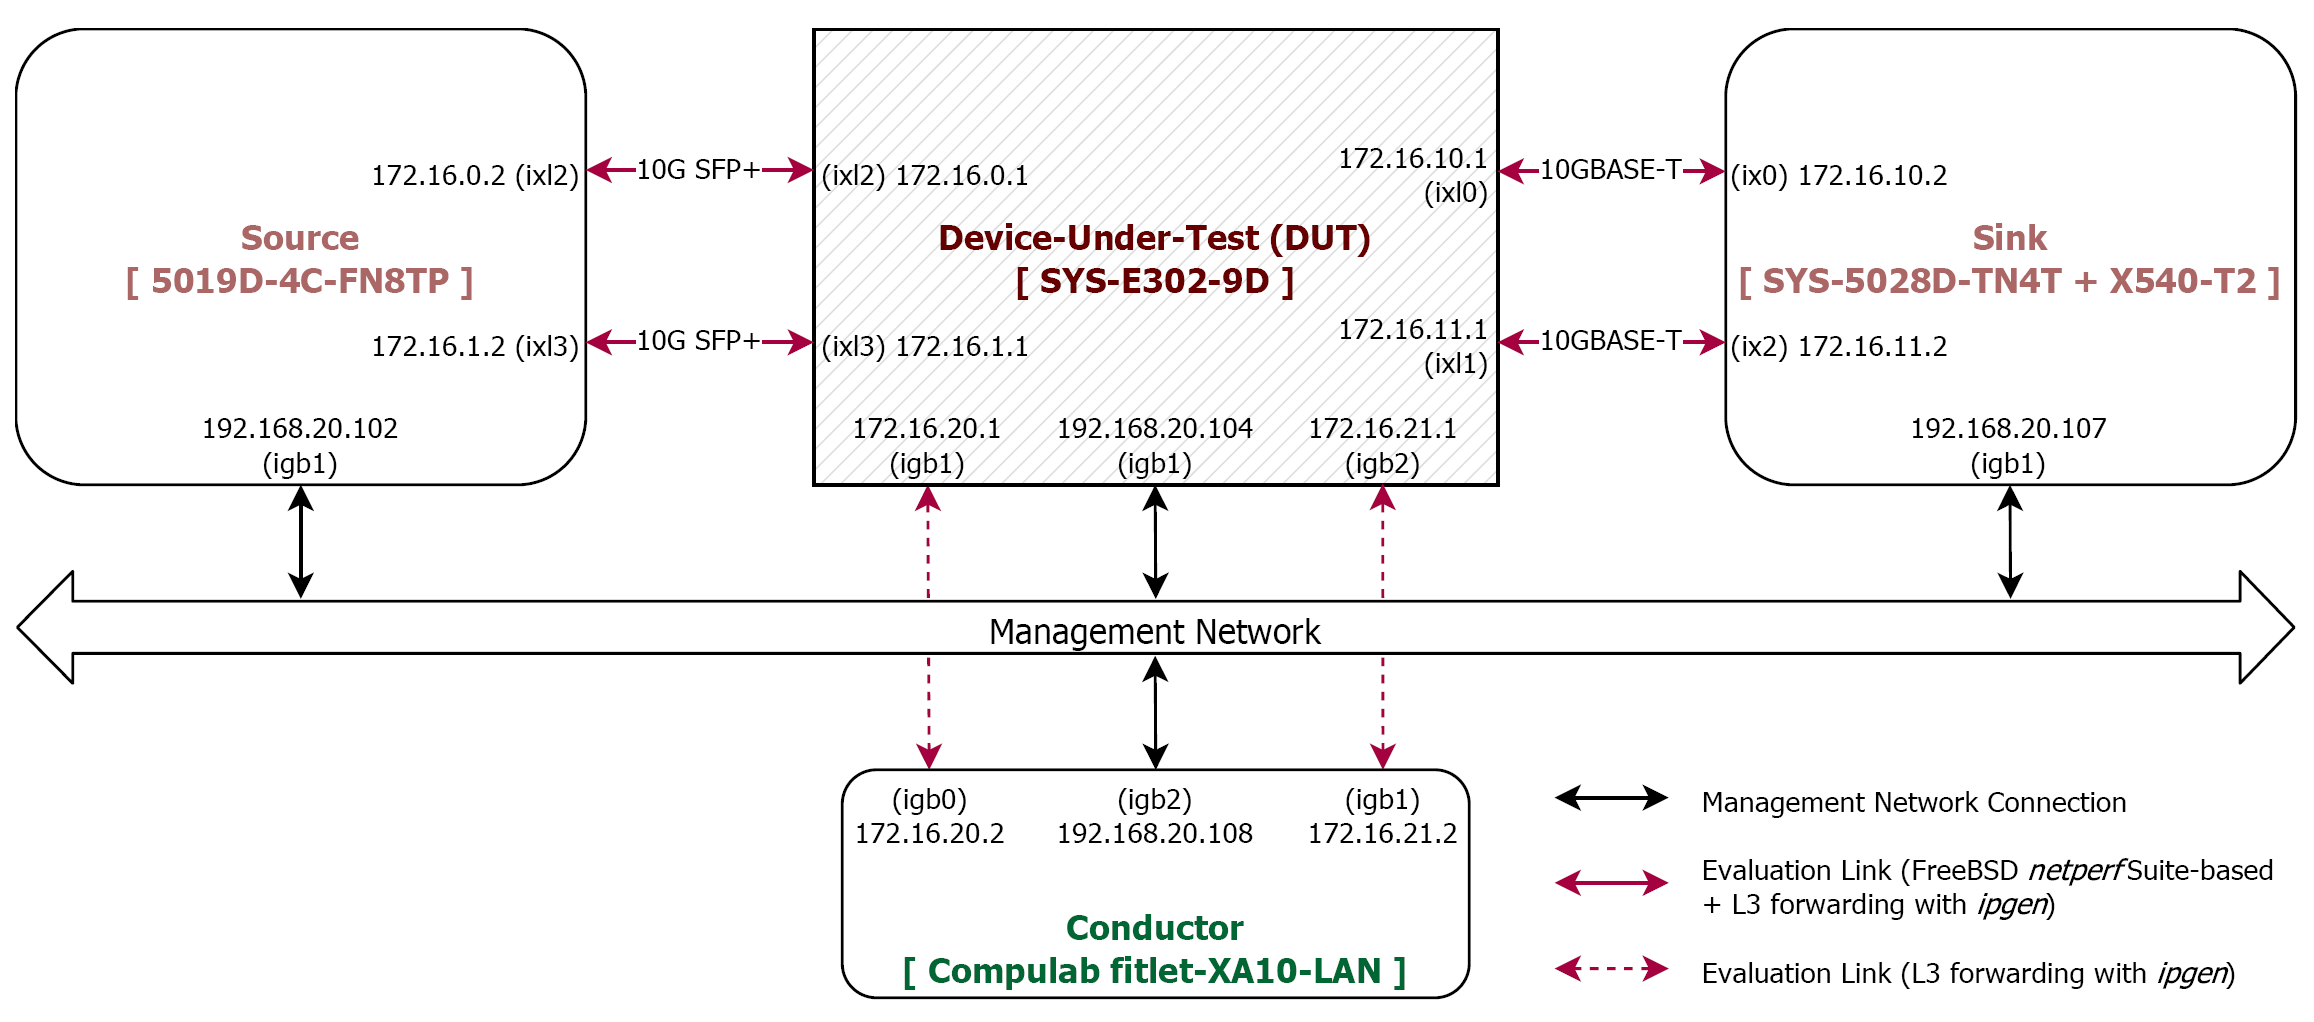
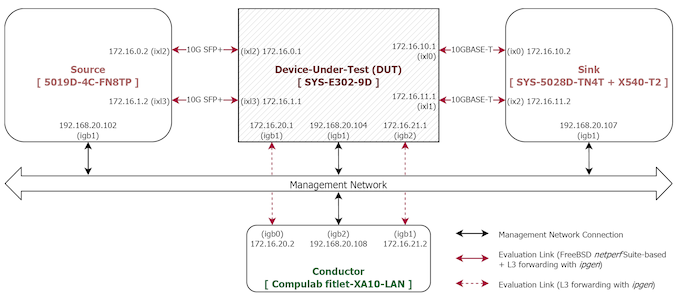
The E302-9D sports eight network interfaces with four gigabit copper ports, and four 10 gigabit ones. Our testing focuses on the 10 gigabit interfaces. These are connected to the stimulus source and sink in our test network topology. Out of the four gigabit ports, one is connected to the management network, while the other three are left idle. The management network is used to send test commands to the source and the sink, while remotely controlling the DUT configuration.
The stimulus source is the Supermicro SuperServer 5019D-4C-FN8TP, which is the actively cooled 1U rackmount version of the DUT. It uses the same Intel Xeon D-2123IT SoC and the same motherboard. Only the cooling solution and chassis are different. The sink is the Supermicro Superserver SYS-5028D-TN4T, which uses the Xeon D-1540 Broadwell-DE SoC. The conductor (a Compulab fitlet-XA10-LAN unit) is the PC that acts as the master for the framework testing these distributed systems, and acts to synchronize various operations of the members and collect results over the management network. The systems in the above configuration all run FreeBSD 12.1-RELEASE, except for the DUT running pfSense 2.4.5 (based on FreeBSD 11.3). In our initial setup, the sink's native 10GBASE-T ports were connected to the DUT. These ports worked fine with Windows Server 2019 Standard running on the sink. However, with FreeBSD 12.1, only one of the 10GBASE-T ports got initialized successfully, with the other suffering a hardware initialization failure. To circumvent this issue, we installed a spare Intel X540-T2 half-height PCIe 2.0 x8 card in the system's PCIe slot. Strangely, FreeBSD again showed a initialization failure for one of the two new ports. Fortunately, we did end up with two working 10G BASE-T ports in the sink, and I did not have to spend any additional time debugging FreeBSD's refusal to activate those specific interfaces in the Xeon D-1540-based system.
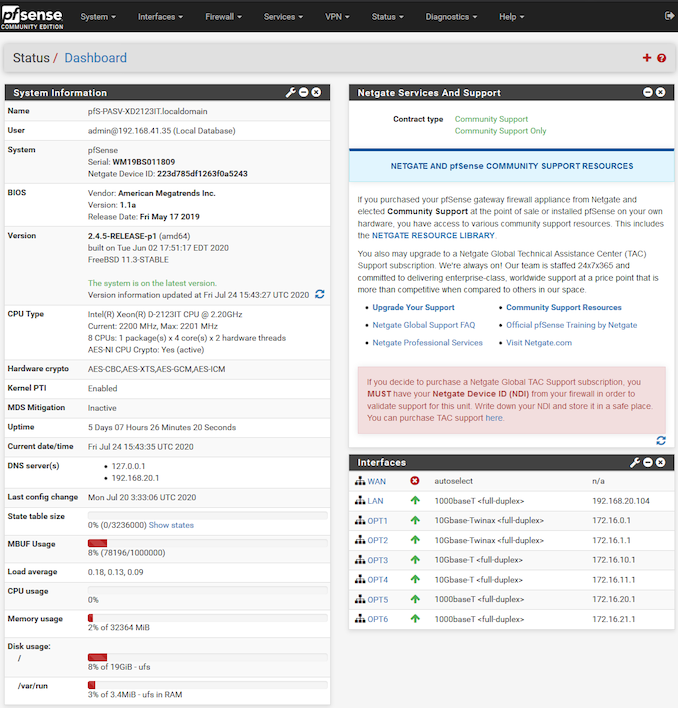
On the DUT side, the interfaces are configured in the pfSense installation as shown in the screenshot below. DHCP servers are activated on all the four 10 gigabit interfaces of the DUT. This configuration is persistent across reboots, and helps in minimizing the setup tasks for each of the performance evaluation runs described further down.
For certain benchmarking scenarios, minor modifications of the interface characteristics are needed. These tweaks are done via shell scripts.
Packet Forwarding Benchmarks
Throughput benchmarks tell only a part of the story. Evaluation of a firewall involves determination of how enabling various options affects the packet processing capabilities. Monitoring the DUT's resource usage and attempting to maximize it with artificial scenarios doesn't deliver much actionable information to end-users. At AsiaBSDCon 2015, a network performance evaluation paper was presented that brought out the challenges involved in creating consistently reproducible benchmarks for firewalls such as pfSense.
The scripts and configuration files for different scenarios in the scheme described above are available under a BSD-2-Clause license in the freebsd-net/netperf github repo. The benchmarks presented in this review are based on this methodology. However, we only take a subset of relevant scenarios for a multitude of reasons - Some of the tests are only relevant to the firewall kernel developers, while some others (such as the comparison between fast-forwarding tunred off and on) are no longer relevant in recent releases of pfSense.
The described methodology makes use of two open-source performance evaluation tools:
- iPerf3
- pkt-gen
While iPerf3 enables quick throughput testing, pkt-gen helps in evaluating how the firewall performs under worst-case conditions (read, processing of packets much smaller than the MTU).
Evaluation is done in the following scenarios:
- Router Mode - The firewall is completely disabled and packet forwarding between all LANs (OPT interfaces in our DUT configuration) is enabled. In this configuration, we essentially benchmark a router
- PF (No Filters) - The packet filter is enabled, but the rule set involves allowing all traffic
- PF (Default Ruleset) - The packet filter is enabled with the default rule-set and a few modifications to allow for the benchmark streams
- PF (NAT Mode) - The packet filter is configured with NAT enabled across two of the interfaces to simulate a multi-WAN scenario
- IPSec - The packet filter is enabled with the default rule-set and a few modifications to allow for the benchmark streams, and a couple of different encryption / hashing algorithm sets are evaluated.
In benchmarking configurations, it is customary to ensure that the stimulus-generating hardware is powerful enough to not be the testing bottleneck. One of the fortunate aspects we are dealing with is that networking performance (particularly at 10G+ speeds) hardly benefits from high core-count or multi-socket systems - the performance penalties associated with moving the packet processing application associated with a particular interface to another core or socket becomes unacceptable. Hardware acceleration on the NICs matter more than CPU performance, though higher per-core/single-threaded performance is definitely welcome. In this context, a look at the suitability of the two testbed machines for packet generation and driving is warranted first.
Packet Generation Options - A Quantitative Comparison
The determination of packet processing speeds of a firewall / router in a test largely absolves the need to take a look at the transport protocol (TCP or UDP). Towards this, packet generators are commonly used tomeasure the performance of routers, switches, and firewalls. Traditional bandwidth measurement at higher levels in the network stack make more sense for client devices running end-user applications. There are many commercial packet generating hardware appliances and applications used in the industry from vendors such as Ixia and Spirent. For software developers and homelab enthusiasts, and even for many hardware developers, PC software such as TRex and Ostinato fit the bill. While these software tools have a bit of a learning curve, there are simple command-line applications that can deliver quick performance measurement results.
FreeBSD supports a framework for fast packet I/O in netmap. It allows applications to access interface devices without the need to go through the host stack (assuming the existence of support from the device driver). Packet generators taking advantage of this framework can generate packets at line rates for even reasonably small packet sizes. The netmap source also includes pkt-gen, a sample packet generator application that utilizes the netmap framework. The open-source community has also created a number of applications utilizing netmap and pkt-gen, allowing for easier interactive testing as well as easy automation for common scenarios. One such application is ipgen. It also includes a built-in option to benchmark packet generation. iPerf is a popular network performance measurement tool. It outputs easy to understand bandwidth numbers particularly relevant to end users of client devices. iPerf3 includes a length parameter that allows control over the UDP datagram size, allowing the simulation of packet generation similar to pkt-gen and ipgen.
In the rest of this section, we benchmark each of these options on various machines in our testbed under different conditions. This includes the dimunitive Compulab fitlet-XA10-LAN with four gigabit LAN ports. It is an attractive x86-64 system for embedded networking applications requiring multiple network ports. While it is not in the same class as the other server systems being tested in this section, it does provide context to folks adopting these types of systems for packet generation / testbed applications.
iPerf3
The iPerf3 benchmarking tool is used to get a quick idea of the networking capabilities of end-user devices. In its most common usage avatar, various options such as the TCP window size / UDP packet length are left at default. The ability to alter the latter does provide an avenue to explore the packet generation capabilities of iPerf. Though iPerf allows the length parameter to be set to very high values for the UDP datagram size (up to the maximum theoretical value of around 64K), going above the MTU results in fragmentation.
`iperf3 -u -c ${ServerIP} -t ${RunDuration} -O 5 -f m -b 10G --length ${pktsize} 2>&1`
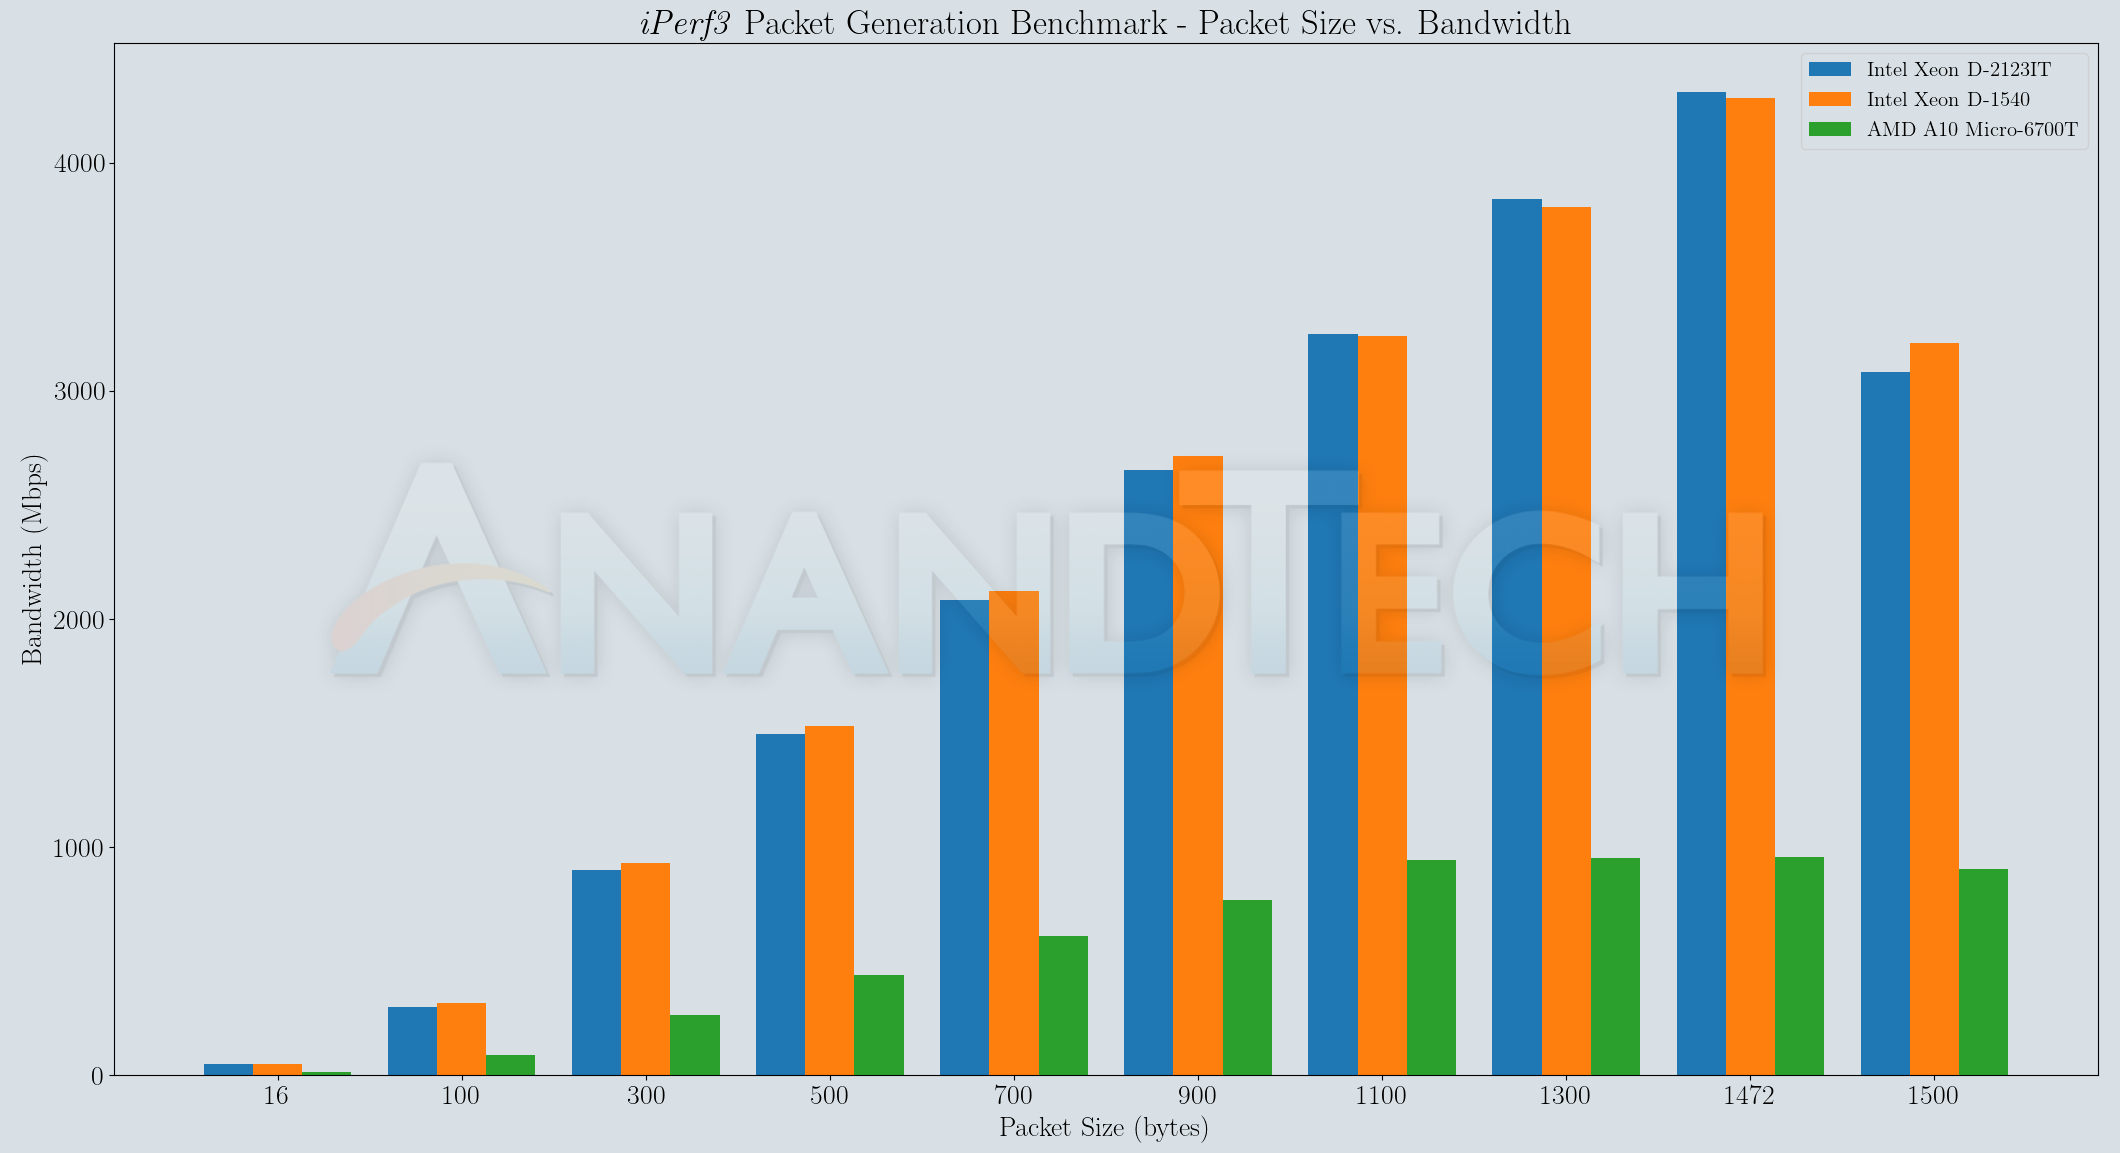
As part of our testing, the source was configured to send UDP datagrams of various lengths ranging from 16 bytes to 1500 bytes across the DUT in router mode, as shown in the testing script extract above.
The bandwidth drop when going from 1472 to 1500 for the datagram length is explained by fragmentation. Protocol overheads tag more bytes on top of the length parameter passed to iPerf3, and that exceeds the minimum configured MTU in the network path. Packet generators are expected to saturate the link bandwidth for all but the smallest packet sizes. The results above suggest that usage of iPerf3 for this purpose is not advisable.
ipgen
The ipgen tool is considered next because it has a built-in benchmark mode. This mode doesn't actually place the generated packets on the network interface - rather it is a pure test of the CPU and the memory subsystem's capability to generate raw packets of different sizes. Multiple instances of the packet generator running simultaneously need to be bound to different cores in order to obtain the best performance.
`timeout 10s cpuset -l $cpuset ipgen -X -s $pktsize 2>&1`
The ipgen benchmark involves generating packets of various sizes for 10 seconds each. The first set involves generating of a single stream, the second involves two simultaneous streams, and so on up to four simultaneous streams. The process is bound to distinct physical cores in case of systems having the physical core count different from the logical core count. The average packet generation rate for across all enabled streams (measured in million packets per second - Mpps) is presented in the graph below.
The generator must be able to output 1.488 Mpps on a 1G interface and 14.88 Mpps on a 10G interface in order to maintain wire speeds when minimum-sized packets are considered. Considering the network interfaces on the machines in the above graphs, the CPUs are suitably equipped for the presented best-case scenario where no attempt is made to dump out the generated packet contents or drive them on to a network interface. Enabling such activities is bound to introduce some performance penalties.
pkt-gen
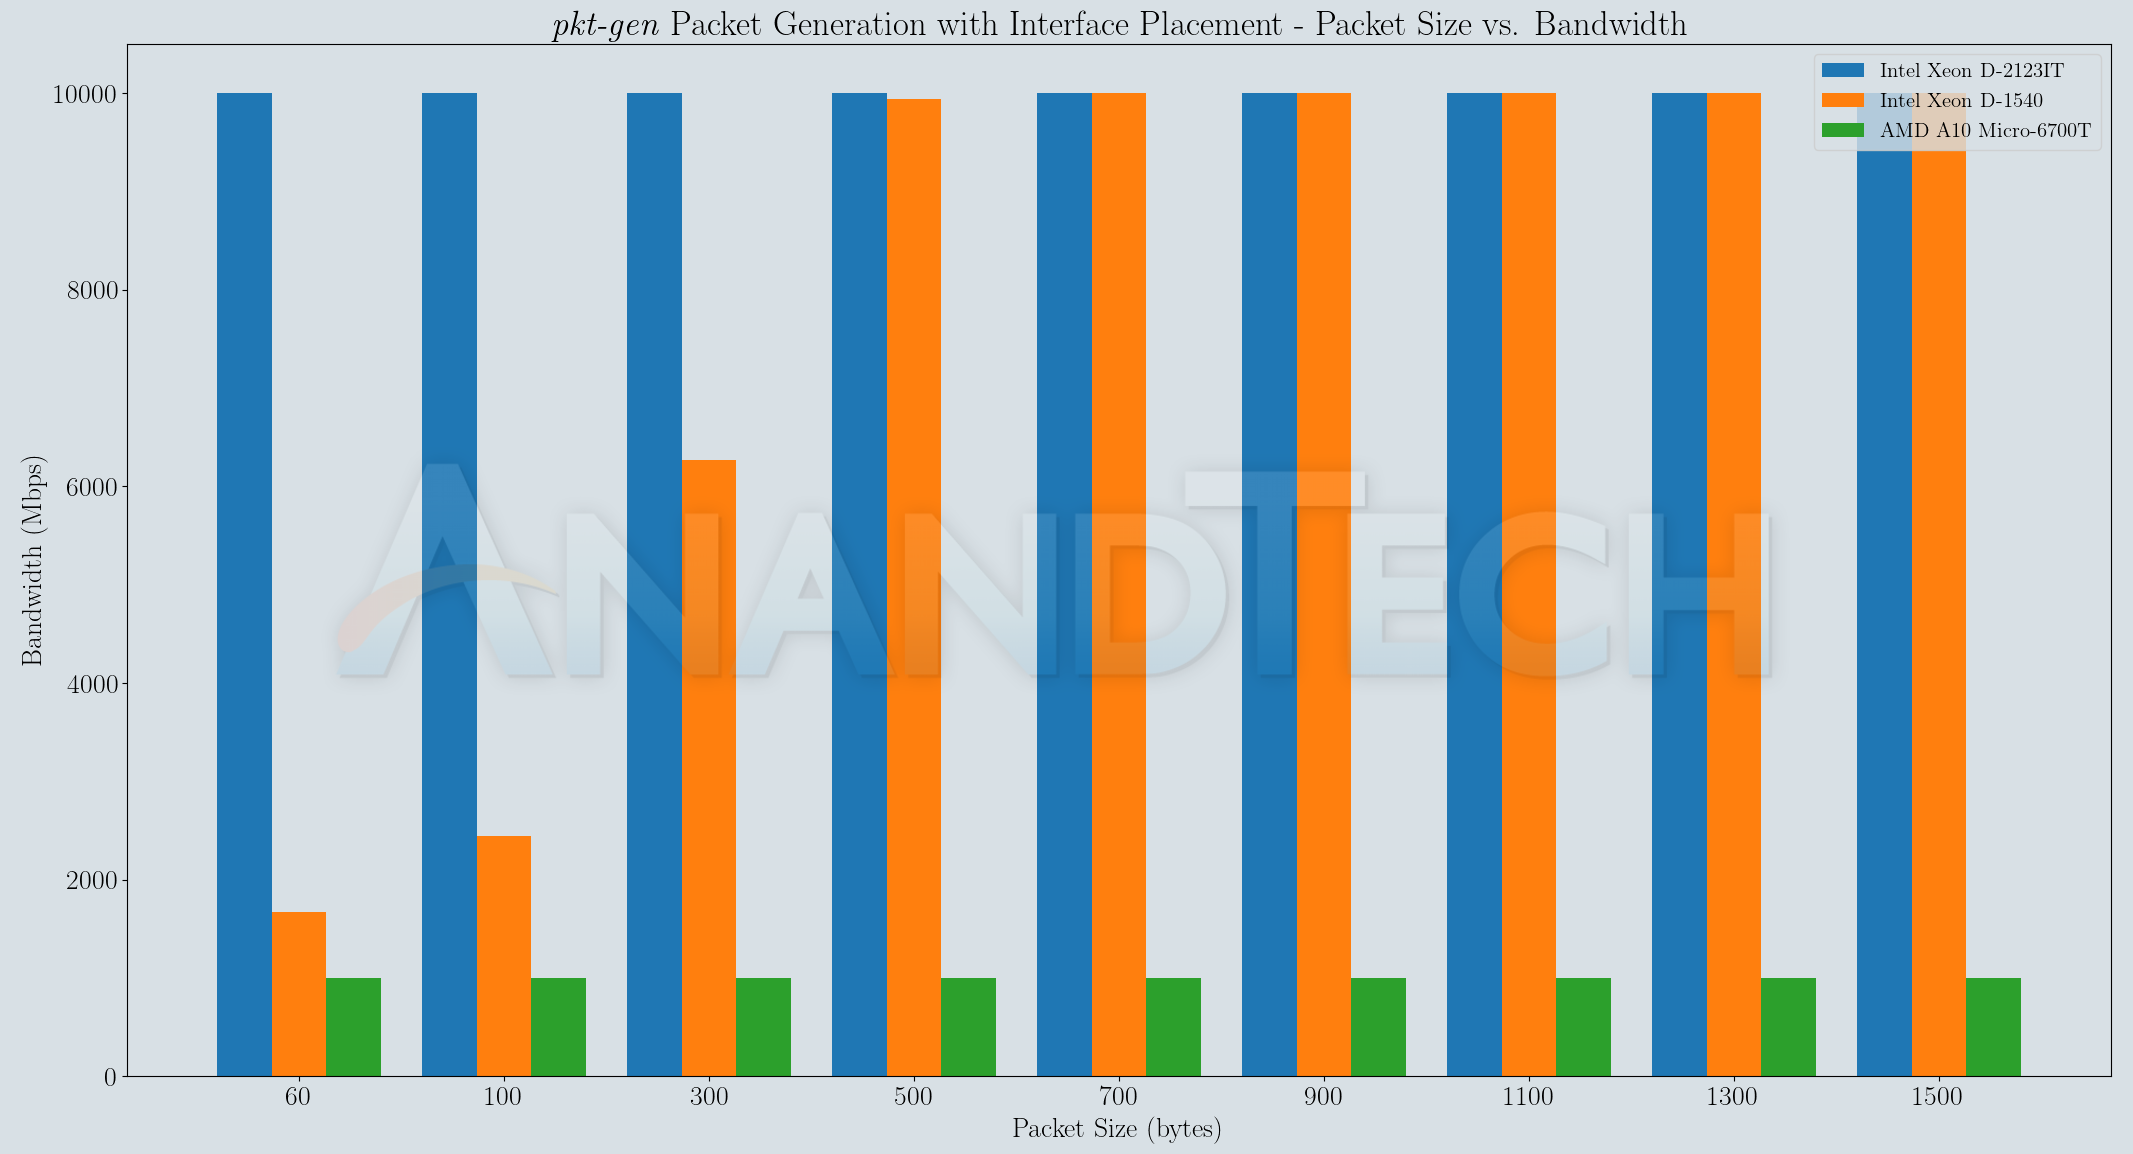
The pkt-gen benchmark described here adds a practical layer to the benchmark mode seen in the previous sub-section. The generated packets are driven on the network interface to the external device (in this case, the E302-9D pfSense firewall) which is configured to drop them. The line-rate often acts as the limiting factor for large frame sizes.
`timeout ${RunDuration}s /usr/obj/usr/src/amd64.amd64/tools/tools/netmap/pkt-gen -i ${IntfName} -l ${pktsize} -s ${SrcIP} -d ${DestIP} -D ${DestMAC} -f tx -N -B 2>&1`
With the network interface as the limiting factor, benchmark numbers are presented only for a single stream. As expected, the CPU speed and cache organization plays a major role in this task, with the 5019D-4C-FN8TP (equipped with an actively cooled 2.2 GHz Intel Xeon D-2123IT) being able to generate packets at the line-rate even for minimum-sized packets.
Based on the above results, it is clear why the pkt-gen tool is adopted widely as a reliable packet generator for performance verification. It may not offer the flexibility and additional features needed for other purposes (fulfilled by offerings such as TRex and Ostinato), but it suffices for a majority of the testing we set out to do. Tools such as ipgen and iPerf3 are still used in a few sections, but, as we shall see further down, pkt-gen is able to stress the DUT the best without being bottlenecked by the stimulus generators.
pfSense Configuration for Benchmarking
A perusal of the FreeBSD firewall performance evaluation guidelines and the accompanying infrastructure helped us narrow down the scope of testing. As elaborated in the section covering the testing methodology, the DUT was configured in various states and the iPerf3 regular TCP benchmark and the pkt-gen sweep for different packet sizes were run for traffic passing through the firewall. A test of the L3 forwarding capabilities of the DUT was also performed using the ipgen benchmark while keeping in mind its stimulus-generating machine limited nature.
| Supermicro E302-9D as pfSense Firewall - Benchmarked Modes | |
| Mode | DUT Commands / Rules |
| Router | sysctl net.inet.ip.forwarding=1 pfctl -d |
| PF (No Filters) | sysctl net.inet.ip.forwarding=1 pfctl -e pfctl -F all |
| PF (Default Ruleset) | sysctl net.inet.ip.forwarding=1 pfctl -e (Additional firewall rules specified at end of sub-section) |
| PF (NAT Mode) | sysctl net.inet.ip.forwarding=1 pfctl -e pfctl -F all -f /home/username/nat.pf |
| PF (IPSec) | sysctl net.inet.ip.forwarding=1 pfctl -e (Additional firewall rules specified at end of sub-section) |
The table above summarizes the different states of evaluation and the shell commands used to place the DUT in that mode.
The additional firewall rules for the PF (Default Ruleset) case (added using easyrule / firewall log view) are as below:
pass in quick on ixl2 inet from 172.16.0.0/24 to 172.16.1.0/24 flags S/SA keep state label "USER_RULE"

pass in quick on ixl2 inet from 172.16.0.0/24 to 172.16.10.0/24 flags S/SA keep state label "USER_RULE"

pass in quick on ixl3 inet from 172.16.1.0/24 to 172.16.0.0/24 flags S/SA keep state label "USER_RULE"

pass in quick on ixl3 inet from 172.16.1.0/24 to 172.16.11.0/24 flags S/SA keep state label "USER_RULE"

pass in quick on ixl0 inet from 172.16.10.0/24 to 172.16.0.0/24 flags S/SA keep state label "USER_RULE"

pass in quick on ixl0 inet from 172.16.10.0/24 to 172.16.11.0/24 flags S/SA keep state label "USER_RULE"

pass in quick on ixl1 inet from 172.16.11.0/24 to 172.16.1.0/24 flags S/SA keep state label "USER_RULE"

pass in quick on ixl1 inet from 172.16.11.0/24 to 172.16.10.0/24 flags S/SA keep state label "USER_RULE"

pass in quick on igb3 inet from 172.16.20.0/24 to 172.16.21.0/24 flags S/SA keep state label "USER_RULE"

pass in quick on igb2 inet from 172.16.21.0/24 to 172.16.20.0/24 flags S/SA keep state label "USER_RULE"
The contents of the /home/username/nat.pf file referenced in the PF (NATMode) row of the table are as below:
set limit states 100000000

nat on ixl0 from 172.16.0.0/16 to any -> ixl0

nat on ixl1 from 172.16.0.0/16 to any -> ixl1

nat on igb2 from 172.16.0.0/16 to any -> igb2

pass in quick all keep state

pass out quick all keep state
The IPsec evaluation doesn't follow the steps outlined for the other modes. Instead of using both the source and the sink, along with iPerf3 and pkt-gen programs running on either side, only the source and the DUT are used. A baseline iPerf3 run between the source and the DUT (with no IPsec communication) is used for comparison. The communication between the two sets of ports is configured for IPsec using the script template below (invoked from the shell as an argument to the setkey -f command). The previous security policies and associations are flushed prior to the invocation.
flush;
spdflush;
# Host to host ESP
# Security Associations
add 172.16.0.2 172.16.0.1 esp 0x10001 -E
add 172.16.0.1 172.16.0.2 esp 0x10002 -E
add 172.16.1.2 172.16.1.1 esp 0x10003 -E
add 172.16.1.1 172.16.1.2 esp 0x10004 -E
# Security Policies
spdadd 172.16.0.2 172.16.0.1 any -P in IPsec esp/tunnel/172.16.0.2-172.16.0.1/require;
spdadd 172.16.0.1 172.16.0.2 any -P out IPsec esp/tunnel/172.16.0.1-172.16.0.2/require;
spdadd 172.16.1.2 172.16.1.1 any -P in IPsec esp/tunnel/172.16.1.2-172.16.1.1/require;
spdadd 172.16.1.1 172.16.1.2 any -P out IPsec esp/tunnel/172.16.1.1-172.16.1.2/require;
The template above is for the DUT side, with the one on the source side being similar (the in and out are reversed in the security policies section).
The next section provides additional benchmark processing details along with the results for both iPerf3 and ipgen tests. That is followed by a discussion of pkt-gen benchmark results.
Benchmarking with iPerf3 and ipgen
The iPerf3 tool serves as a quick check to ensure that the network link is up and running close to expectations. As a simple passthrough device, we expect the Supermicro SuperServer E302-9D to achieve line-rates for 10G traffic across various interfaces. We do expect the rates to go down as more processing is added in the form of firewalling and NAT. Towards this, each tested mode is started off with an iPerf3 test. Following that, we perform the sweep of various packet sizes with the pkt-gen tool. In both cases, each 10G interface set is tested separately, followed by both sets simultaneously. After both sets of experiments, the L3 forwarding test using ipgen is performed from each of the three machines in the test setup. This section discusses only the iPerf3 and ipgen results. The former includes IPsec evaluation also.
iPerf3
Commands are executed on the source, sink, and DUT using the Conductor python package described in the testing methodology section. The setup steps on the DUT for each mode were described in the previous section. Only the source and sink [Run] phases are described here.
On the sink side, two servers are spawned out and terminated after 3 minutes. The spawn and timeout refer to keywords specified by the Conductor package.
spawn0: cpuset -l 1,2 iperf3 -s -B 172.16.10.2 -p 5201

spawn1: cpuset -l 3,4 iperf3 -s -B 172.16.11.2 -p 5201

timeout180: sleep 180

step3: killall iperf3
On the source side, the first link is evaluated for 30s, followed by the second link. In the third iteration, the tests are spawned off for both links simultaneously.
spawn1: cpuset -l 1,2 iperf3 -c 172.16.10.2 -B 172.16.0.2 -P 4 -O 5 -t 35 --logfile /tmp/
timeout45: sleep 45
spawn3: cpuset -l 1,2 iperf3 -c 172.16.11.2 -B 172.16.1.2 -P 4 -O 5 -t 35 --logfile /tmp/
timeout46: sleep 45
spawn5: cpuset -l 1,2 iperf3 -c 172.16.10.2 -B 172.16.0.2 -P 4 -O 5 -t 35 --logfile /tmp/
spawn6: cpuset -l 3,4 iperf3 -c 172.16.11.2 -B 172.16.1.2 -P 4 -O 5 -t 35 --logfile /tmp/
The table below presents the bandwidth numbers obtained in various modes. The interfaces specified in the headers refer to the ones in the DUT.
| Supermicro E302-9D as pfSense Firewall - iPerf3 Benchmark (Gbps) | ||||
| Mode | Single Stream | Dual Stream | ||
| ixl2 - ixl0 | ixl3 - ixl1 | ixl2 - ixl0 | ixl3 - ixl1 | |
| Router | 9.40 | 9.41 | 8.77 | 8.67 |
| PF (No Filters) | 6.99 | 6.96 | 6.50 | 6.98 |
| PF (Default Ruleset) | 5.43 | 5.81 | 4.22 | 5.69 |
| PF (NAT Mode) | 7.89 | 6.99 | 4.49 | 6.06 |
Line-rates are obtained for the plain router mode. Enabling the packet filtering lowers the performance, as expected - with more rules resulting in slightly lower performance. The NAT mode doesn't exhibit much performance loss compared to the plain PF mode, but, multiple streams on different interfaces needing NAT at the same time does bring the performance more compared to the PF (No Filters) mode.
IPsec Testing using iPerf3
IPsec testing also involves a similar set of scripts, except that only the ixl2 and ixl3 interfaces of the DUT are involved. The table below presents the iPerf3 bandwidth numbers for various tested combinations of encryption and authentication algorithms. The running of the iPerf3 server on the DUT itself may result in lower than actual performance - however, the comparison against the baseline case under similar conditions can still be made.
| Supermicro E302-9D as pfSense Firewall - IPsec iPerf3 Benchmark (Mbps) | ||||
| Algorithm | Single Stream | Dual Stream | ||
| (Src)ixl2 - (DUT)ixl2 | (Src)ixl3 - (DUT)ixl3 | (Src)ixl2 - (DUT)ixl2 | (Src)ixl3 - (DUT)ixl3 | |
| Baseline (No IPsec) | 5140 | 7450 | 3020 | 4880 |
| 3des-hmac-md5 | 119 | 118 | 61.3 | 75.2 |
| aes-cbc-sha | 374 | 373 | 236 | 238 |
| aes-hmac-sha2-256 | 377 | 376 | 235 | 212 |
| aes-hmac-sha2-512 | 433 | 430 | 259 | 280 |
The above numbers are low compared to the line-rate, but closely match the results uploaded to the repository specified in the the AsiaBSDCon 2015 network performance evaluation paper for a much more powerful system. Given the 60W TDP nature of the SoC and the passively cooled configuration, coupled with the absence of QuickAssist in the SKU, the numbers are passable. It must also be noted that this is essentially an out-of-the-box benchmark number, and optimizations could extract more performance out of the system (an interesting endeavour for the homelab enthusiast).
L3 Forwarding Test with ipgen
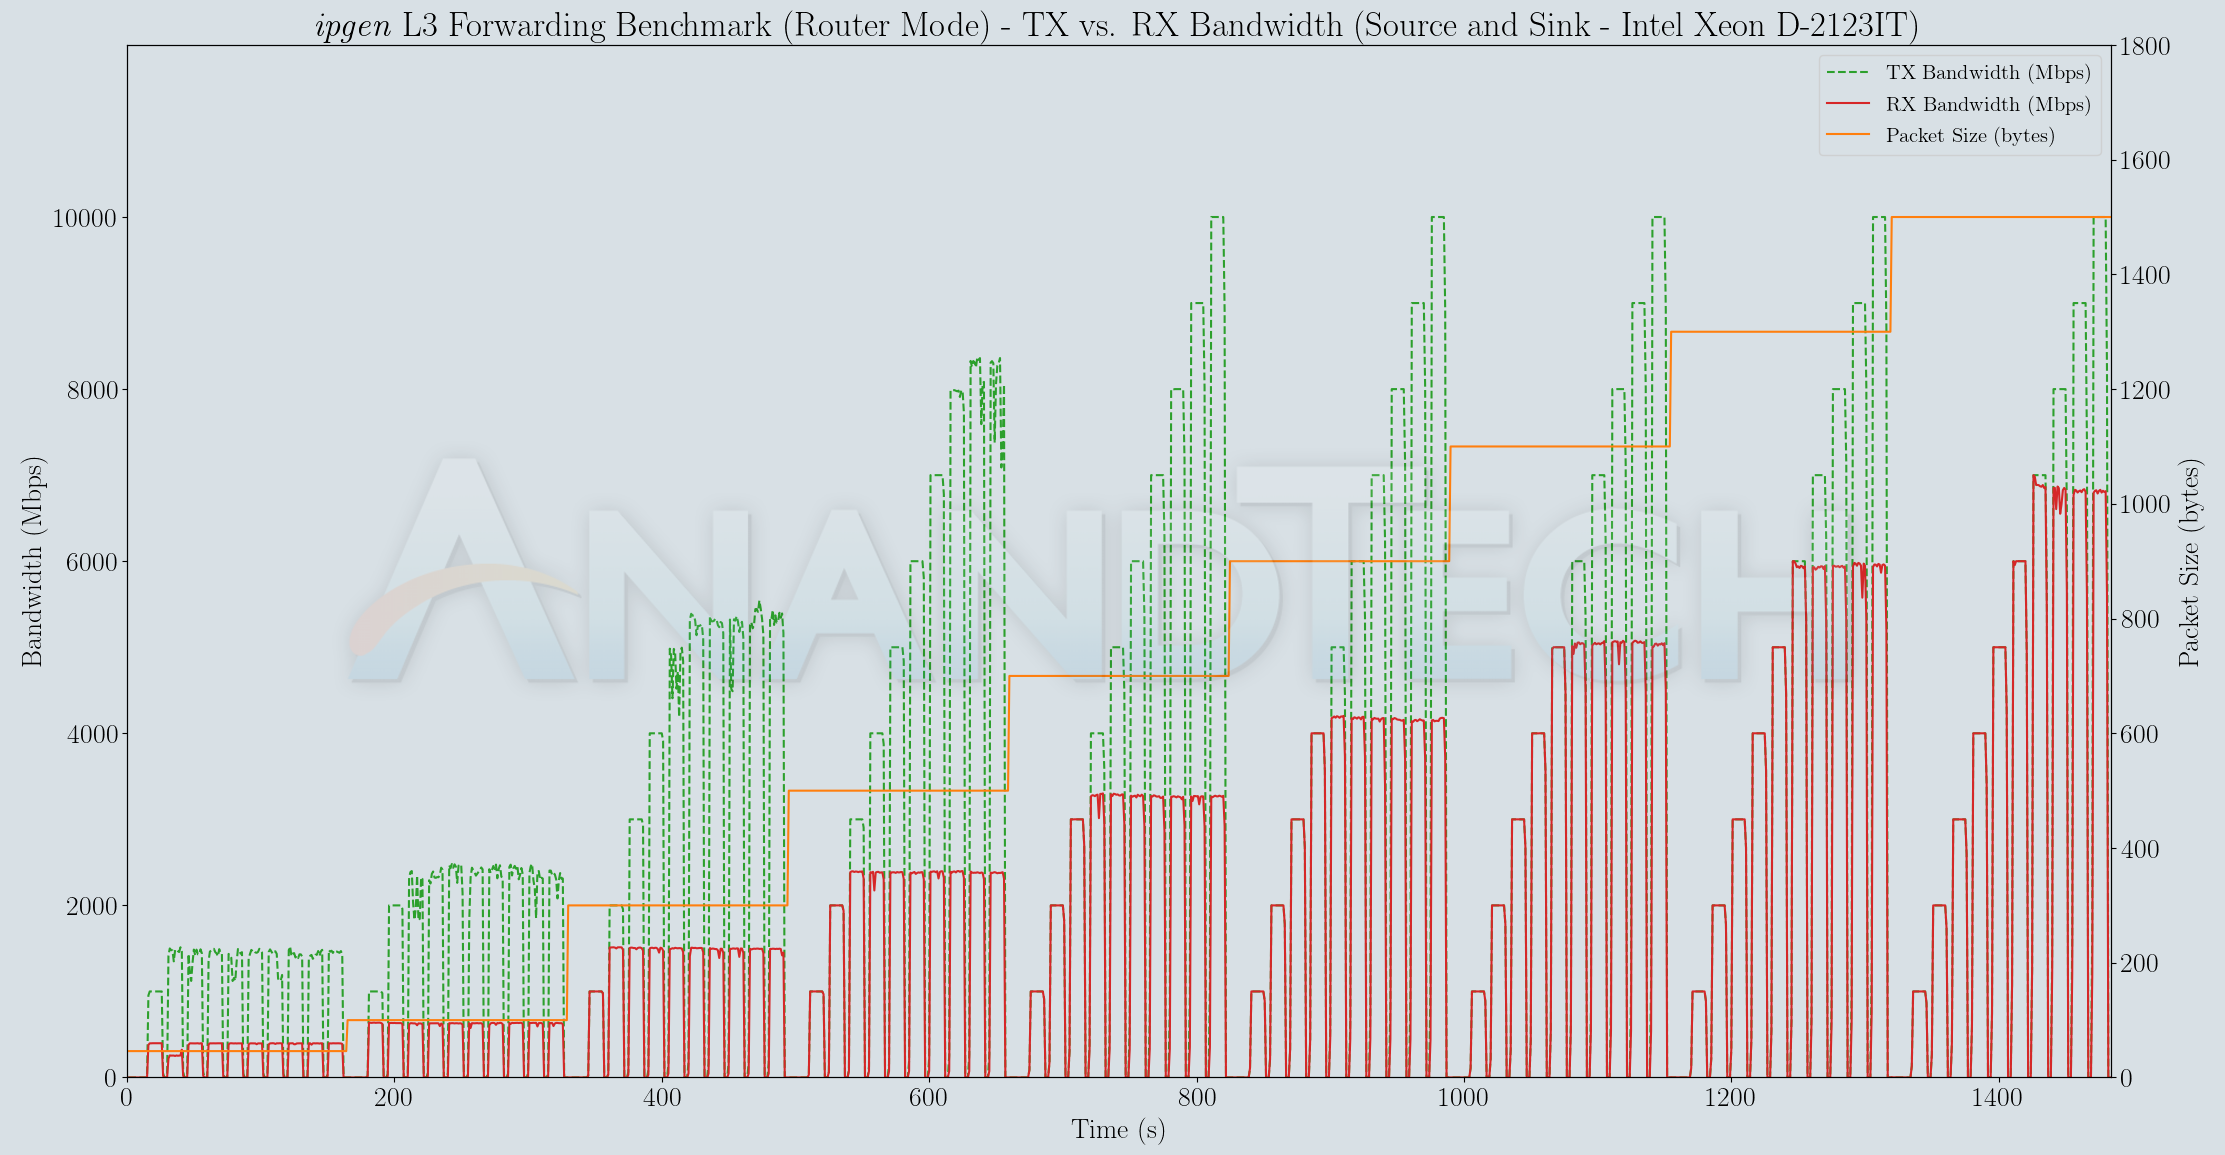
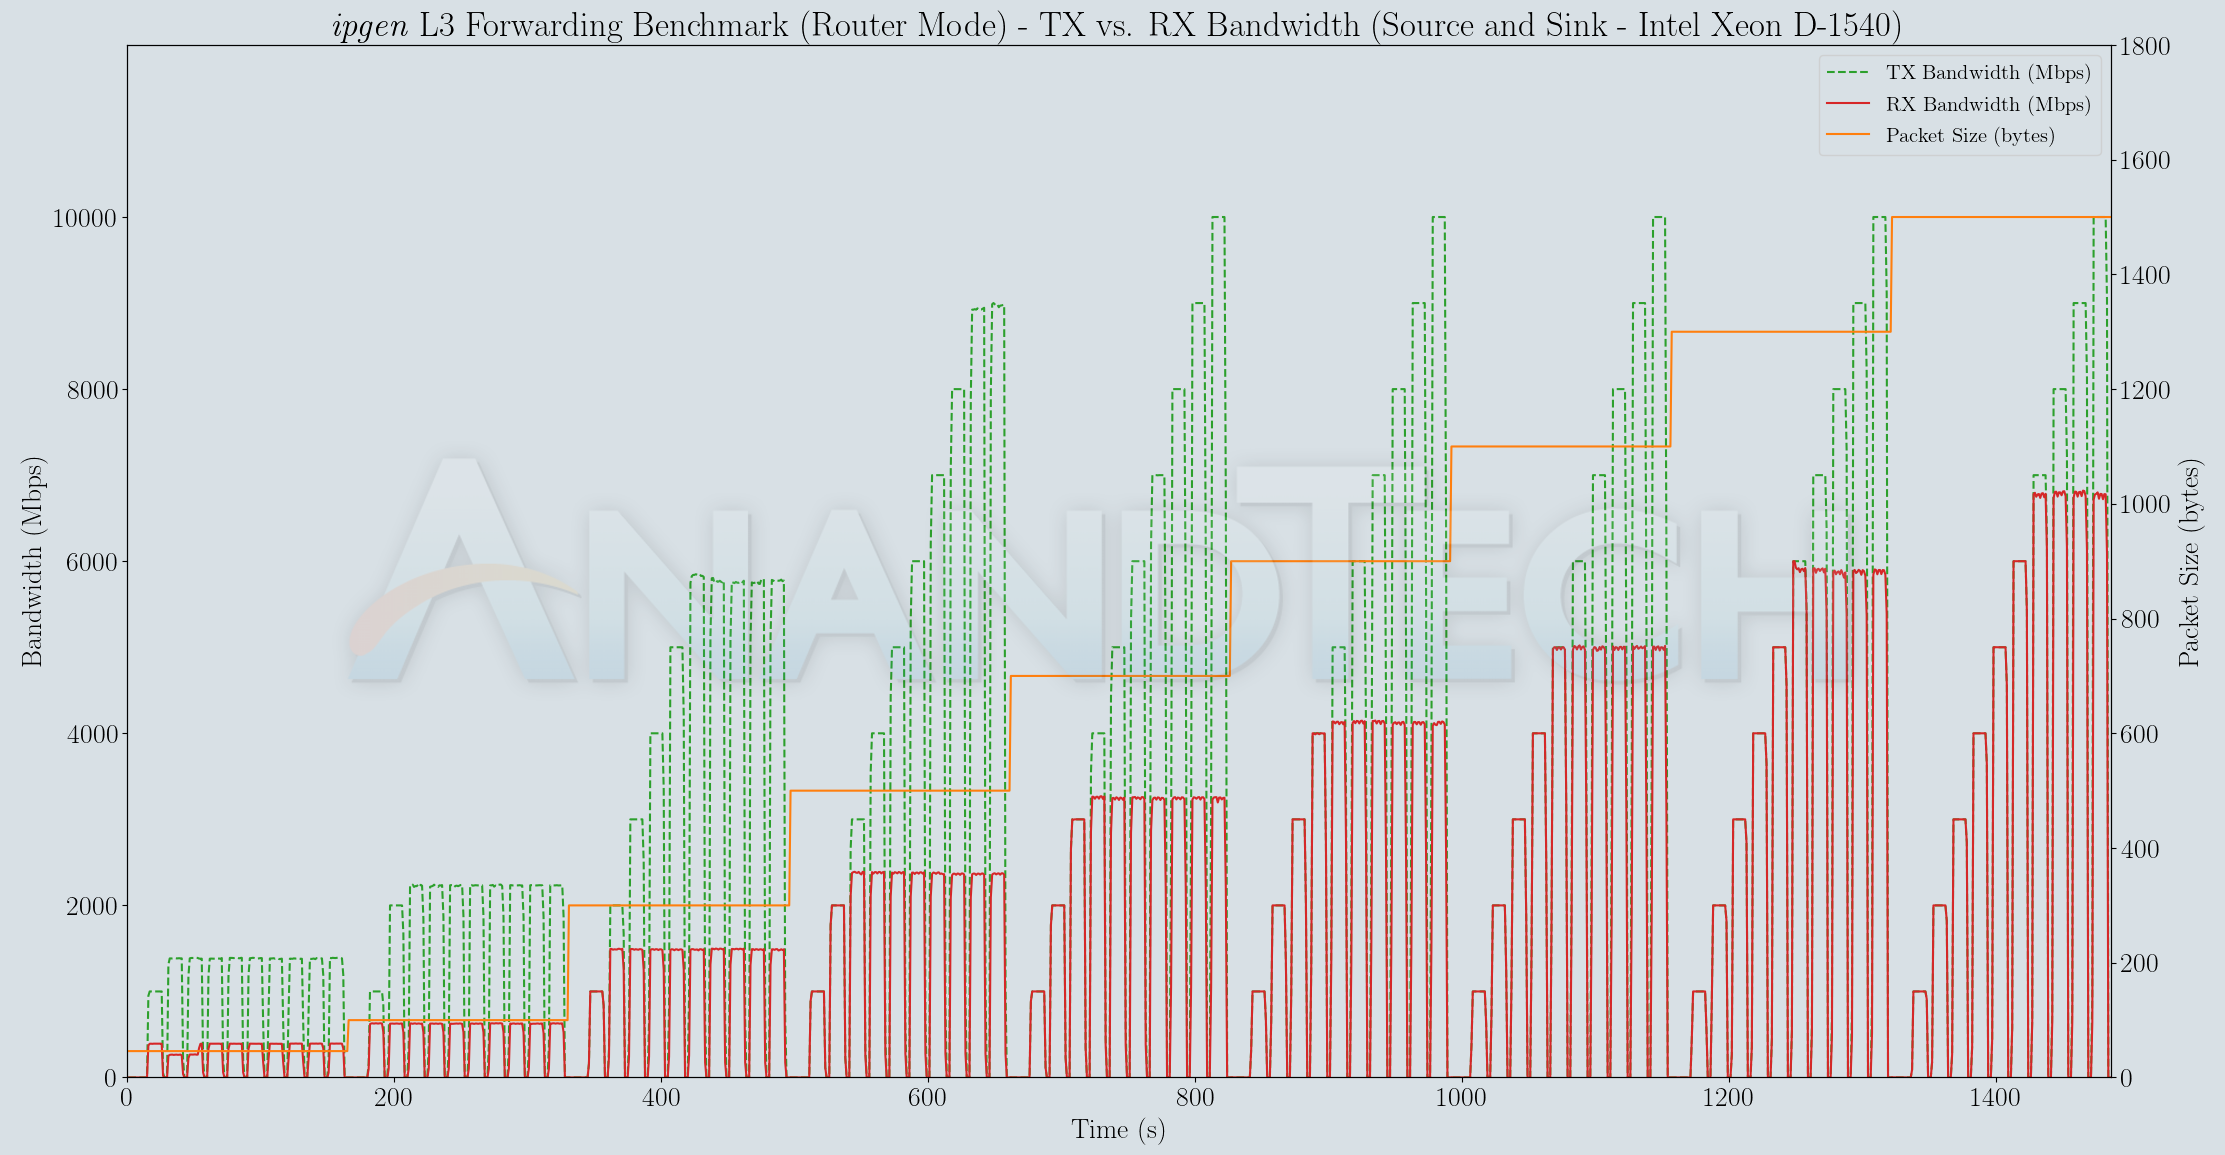
The ipgen L3 forwarding test is executed on a single machine with two of its interfaces connected to the DUT. In the evaluation testbed, this condition is satisfied by the source, sink, and the conductor as well. The ipgen tool supports scripting of a sweep of packet and transmission bandwidth combinations. The script is provided to the tool using a command of the following form:
ipgen -T ${TxIntf},${TxGatewayIP},${TxSubnet} -R ${RxIntf},${RxGatewayIP},${RxSubnet} -S $ScriptToRun -L $LogFN
where the arguments refer to the transmitter interface, the IP of the gateway to which the interface connects, and its subnet specifications, along with a similar set for the receiver interface.
| L3 Forwarding Benchmark (ipgen) with the Xeon D-2123IT (Source) | |||
| L3 Forwarding Benchmark (ipgen) with the Xeon D-1540 (Sink) | |||
| L3 Forwarding Benchmark (ipgen) with the AMD A10 Micro-6700T (Conductor) | |||
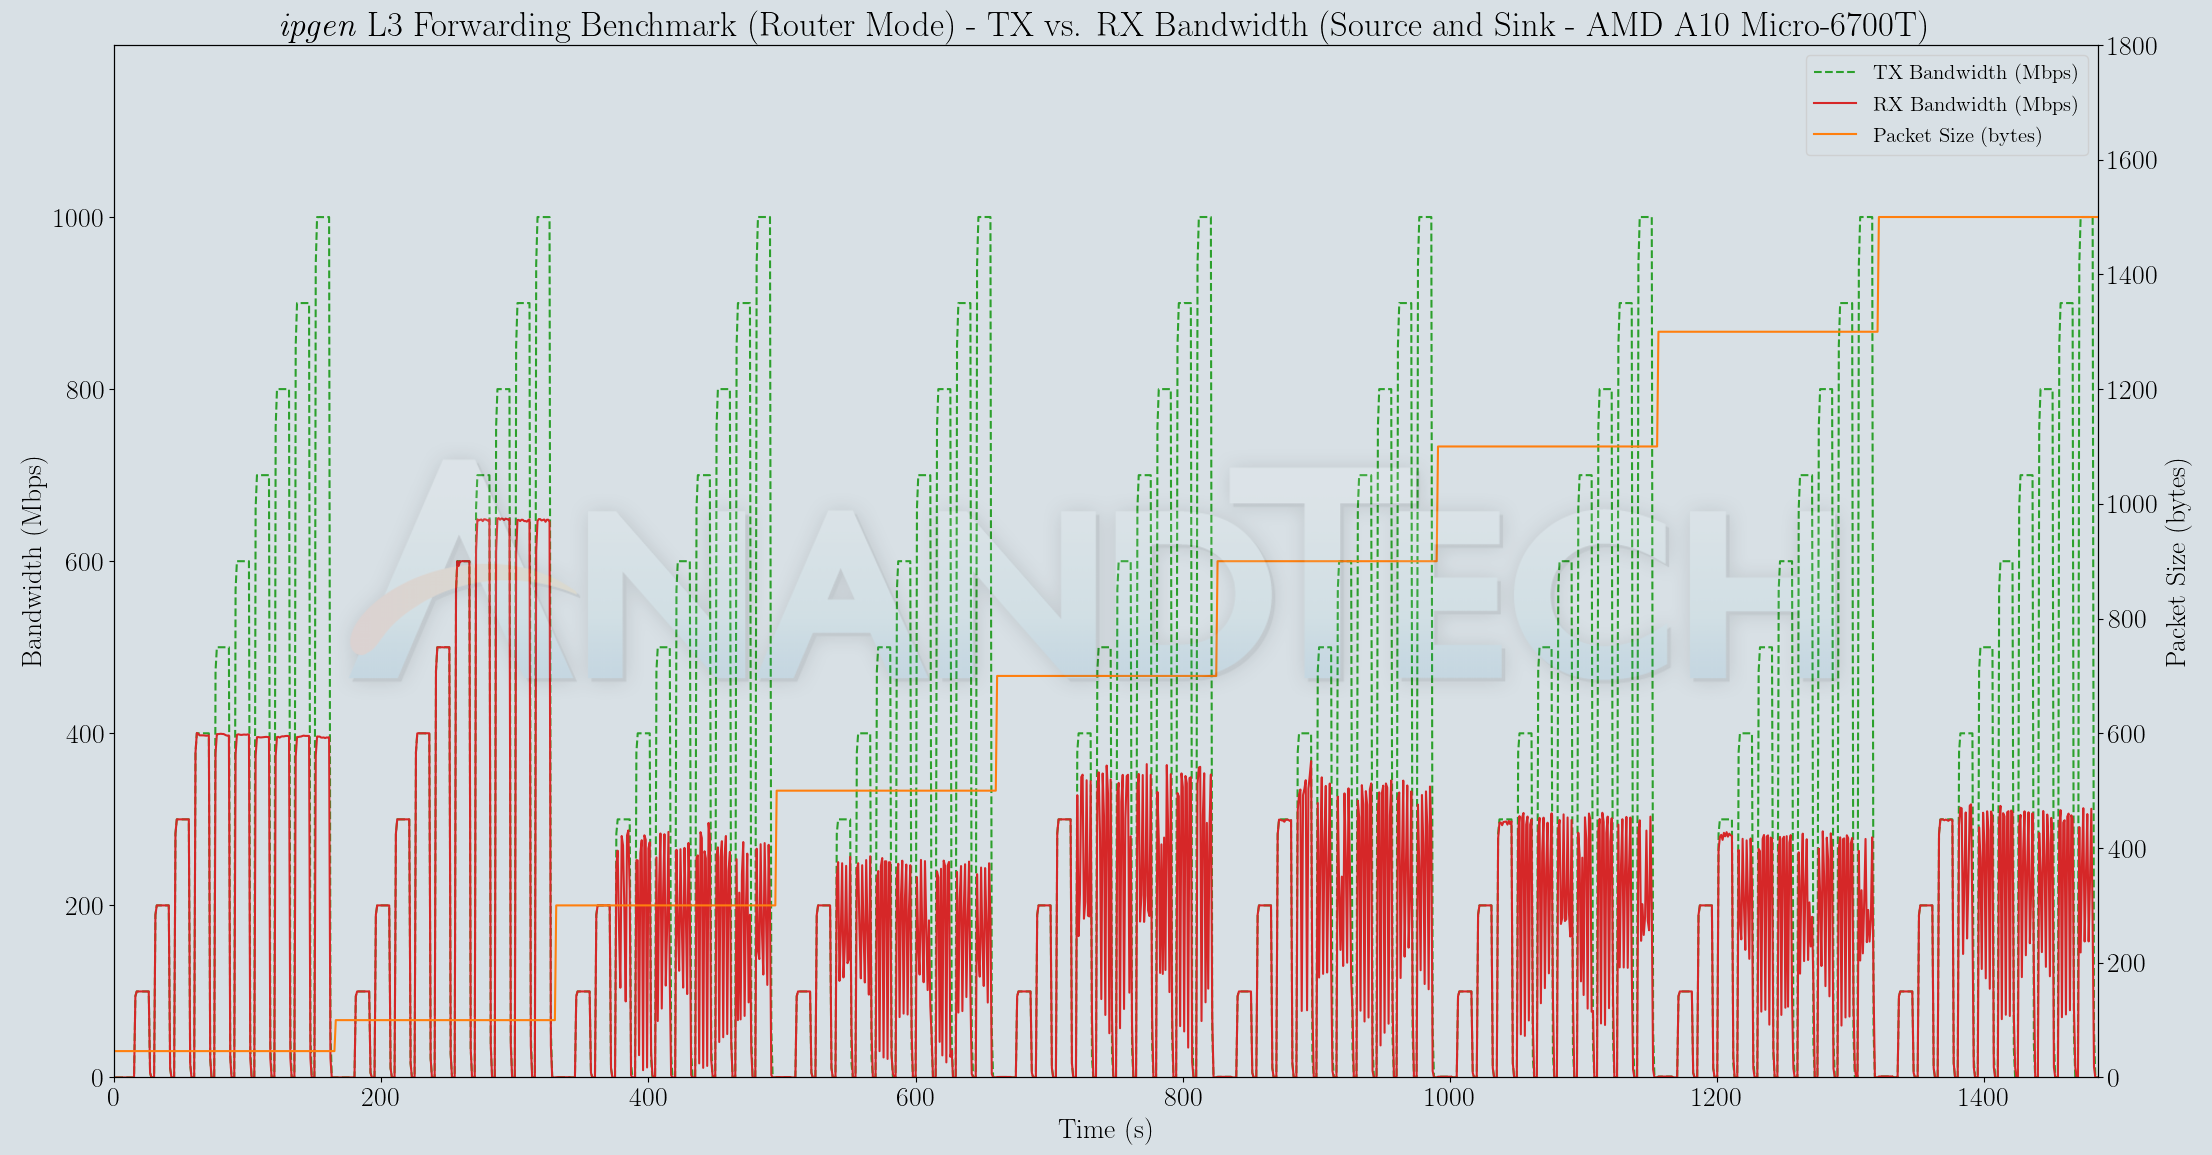
Twelve distinct runs were processed, once in each of the four tested modes for each of the machines connected to the DUT. As mentioned earlier, these numbers are likely limited by the capabilities of the source (like in the case of the Compulab fitlet-XA10-LAN), but the other two machines present some interesting results that corraborate with results observed in the iPerf3 and pkt-gen benchmarks. In general, increasing the number of rules seems to noticeably affect the performance. Enabling NAT, on the other hand, doesn't have such a discernible impact compared to other configurations with similar number of rules to process.
Packet Processing Benchmarks with pkt-gen
The pkt-gen benchmarks were processed using the Conductor python package infrastructure in a similar manner to the iPerf3 benchmarks presented in the previous section. Commands are executed on the source, sink, and DUT using the Conductor python package described in the testing methodology section. The setup steps on the DUT for each mode were described in a previous section. Only the source and sink [Run] phases are described here.
On the sink side, receivers are spawned for the two interfaces serially first. Simultaneous execution is then performed after the required wait time in order to monitor both interfaces. The spawn and timeout refer to keywords specified by the Conductor package.
spawn0:sh pkt.gen.recv.sh 1 ix0 [tested-mode]-pg-rx-1c.0.txt

timeout200:sleep 185

step1:killall pkt-gen

spawn1:sh pkt.gen.recv.sh 3 ix2 [tested-mode]-pg-rx-1c.1.txt

timeout201:sleep 185

step2:killall pkt-gen

timeout30:sleep 30

spawn2:sh pkt.gen.recv.sh 1 ix0 [tested-mode]-pg-rx-2c.0.txt

spawn3:sh pkt.gen.recv.sh 3 ix2 [tested-mode]-pg-rx-2c.1.txt

timeout202:sleep 185

step3:killall pkt-gen
The pkt.gen.recv.sh script handles the reception of the packets sent via the firewall on the appropriate interface and dumps out the statistics to the specified file.
On the source side, the first link is evaluated for 30s with each packet size, followed by the second link. In the third iteration, the tests are spawned off for both links simultaneously.
spawn0:sh pkt.gen.sweep.sh ixl2 172.16.0.2:53 172.16.10.2:53 [ixl2 mac] 1 [tested-mode]-pg-tx-1c.0.txt

timeout200:sleep 185

step1:killall pkt-gen

spawn1:sh pkt.gen.sweep.sh ixl3 172.16.1.2:53 172.16.11.2:53 [ixl3 mac] 3 [tested-mode]-pg-tx-1c.1.txt

timeout201:sleep 185

step2:killall pkt-gen

timeout30:sleep 30

spawn2:sh pkt.gen.sweep.sh ixl2 172.16.0.2:53 172.16.10.2:53 [ixl2 mac] 1 [tested-mode]-pg-tx-2c.0.txt

spawn3:sh pkt.gen.sweep.sh ixl3 172.16.1.2:53 172.16.11.2:53 [ixl3 mac] 3 [tested-mode]-pg-tx-2c.1.txt

timeout202:sleep 185

step3:killall pkt-gen
Here, the pkt.gen.sweep.sh script resident in the source's file system is a wrapper for calling pkt-gen multiple times with varying packet sizes in series. The appropriate CPU core allocation and output file specifications are also passed on to this shell script.
Two sets of metrics - the packet rate and the bandwidth - are gleaned from the log files and graphed below. Note that the bandwidth numbers reported by pkt-gen sometimes exceeds the line-rate - particularly when it misses a couple of samples in the previous timestamps. Despite that obvious discrepancy, we get an idea of the average bandwidth and packet rates for each packet size, as the source tries to saturate the links.
| pkt-gen Benchmark (Packet Rates in Kpps) | |||
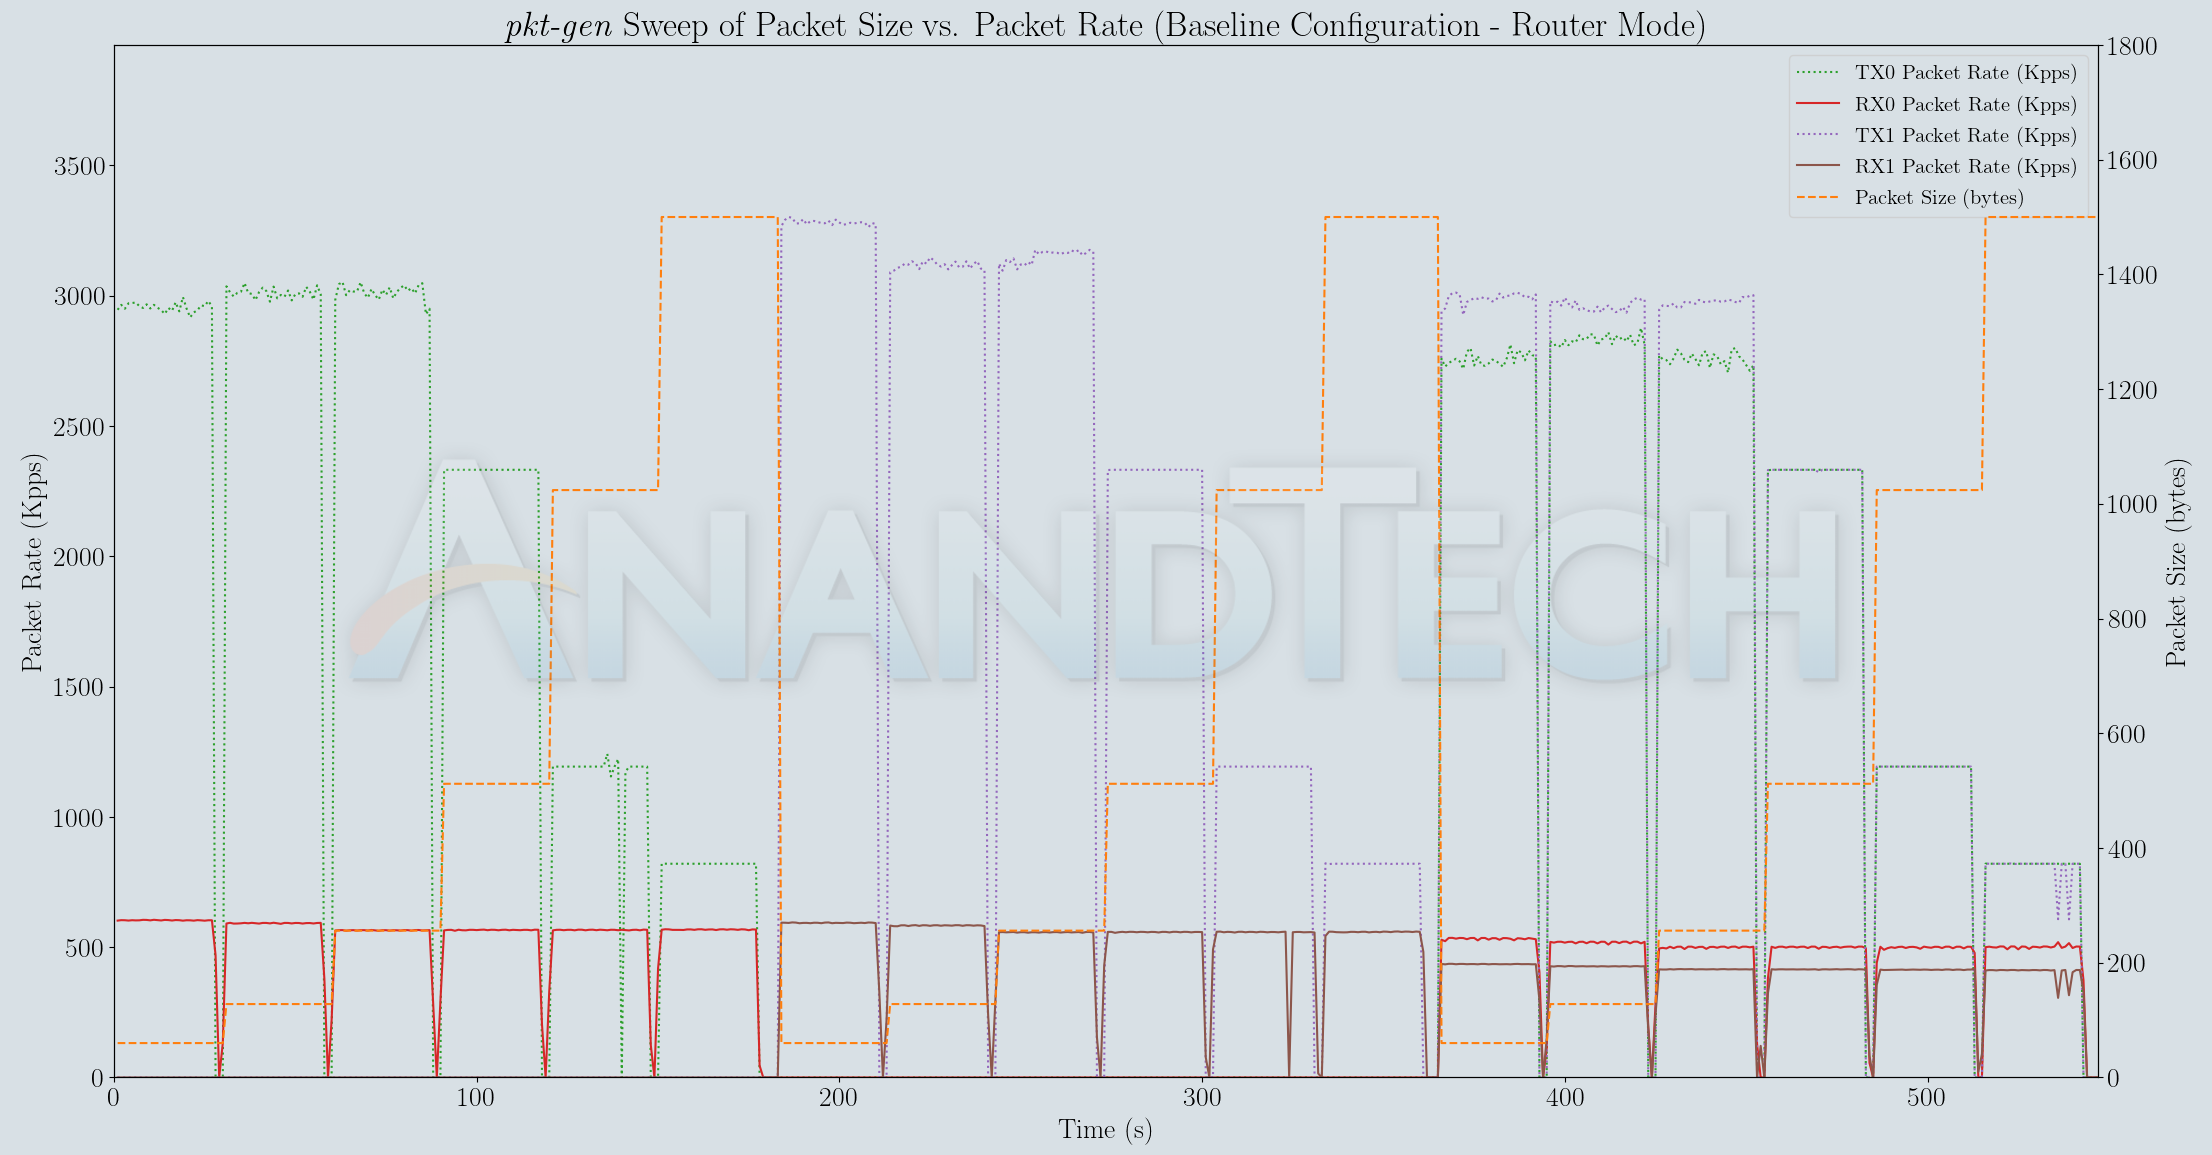
The pfSense installation running on the E302-9D seems to have a best-case packt forwarding rate of 0.6 Mpps per interface, and this goes down to around 0.35 Mpps in the worst case with a large number of rules and NAT being enabled.
| pkt-gen Benchmark (Bandwidth in Mbps) | |||

On the bandwidth front, we see a best-case throughput of around 6.5 Gbps. This goes down as packet processing steps start getting enabled, as shown in the above graphs.
Power Consumption and Thermal Performance
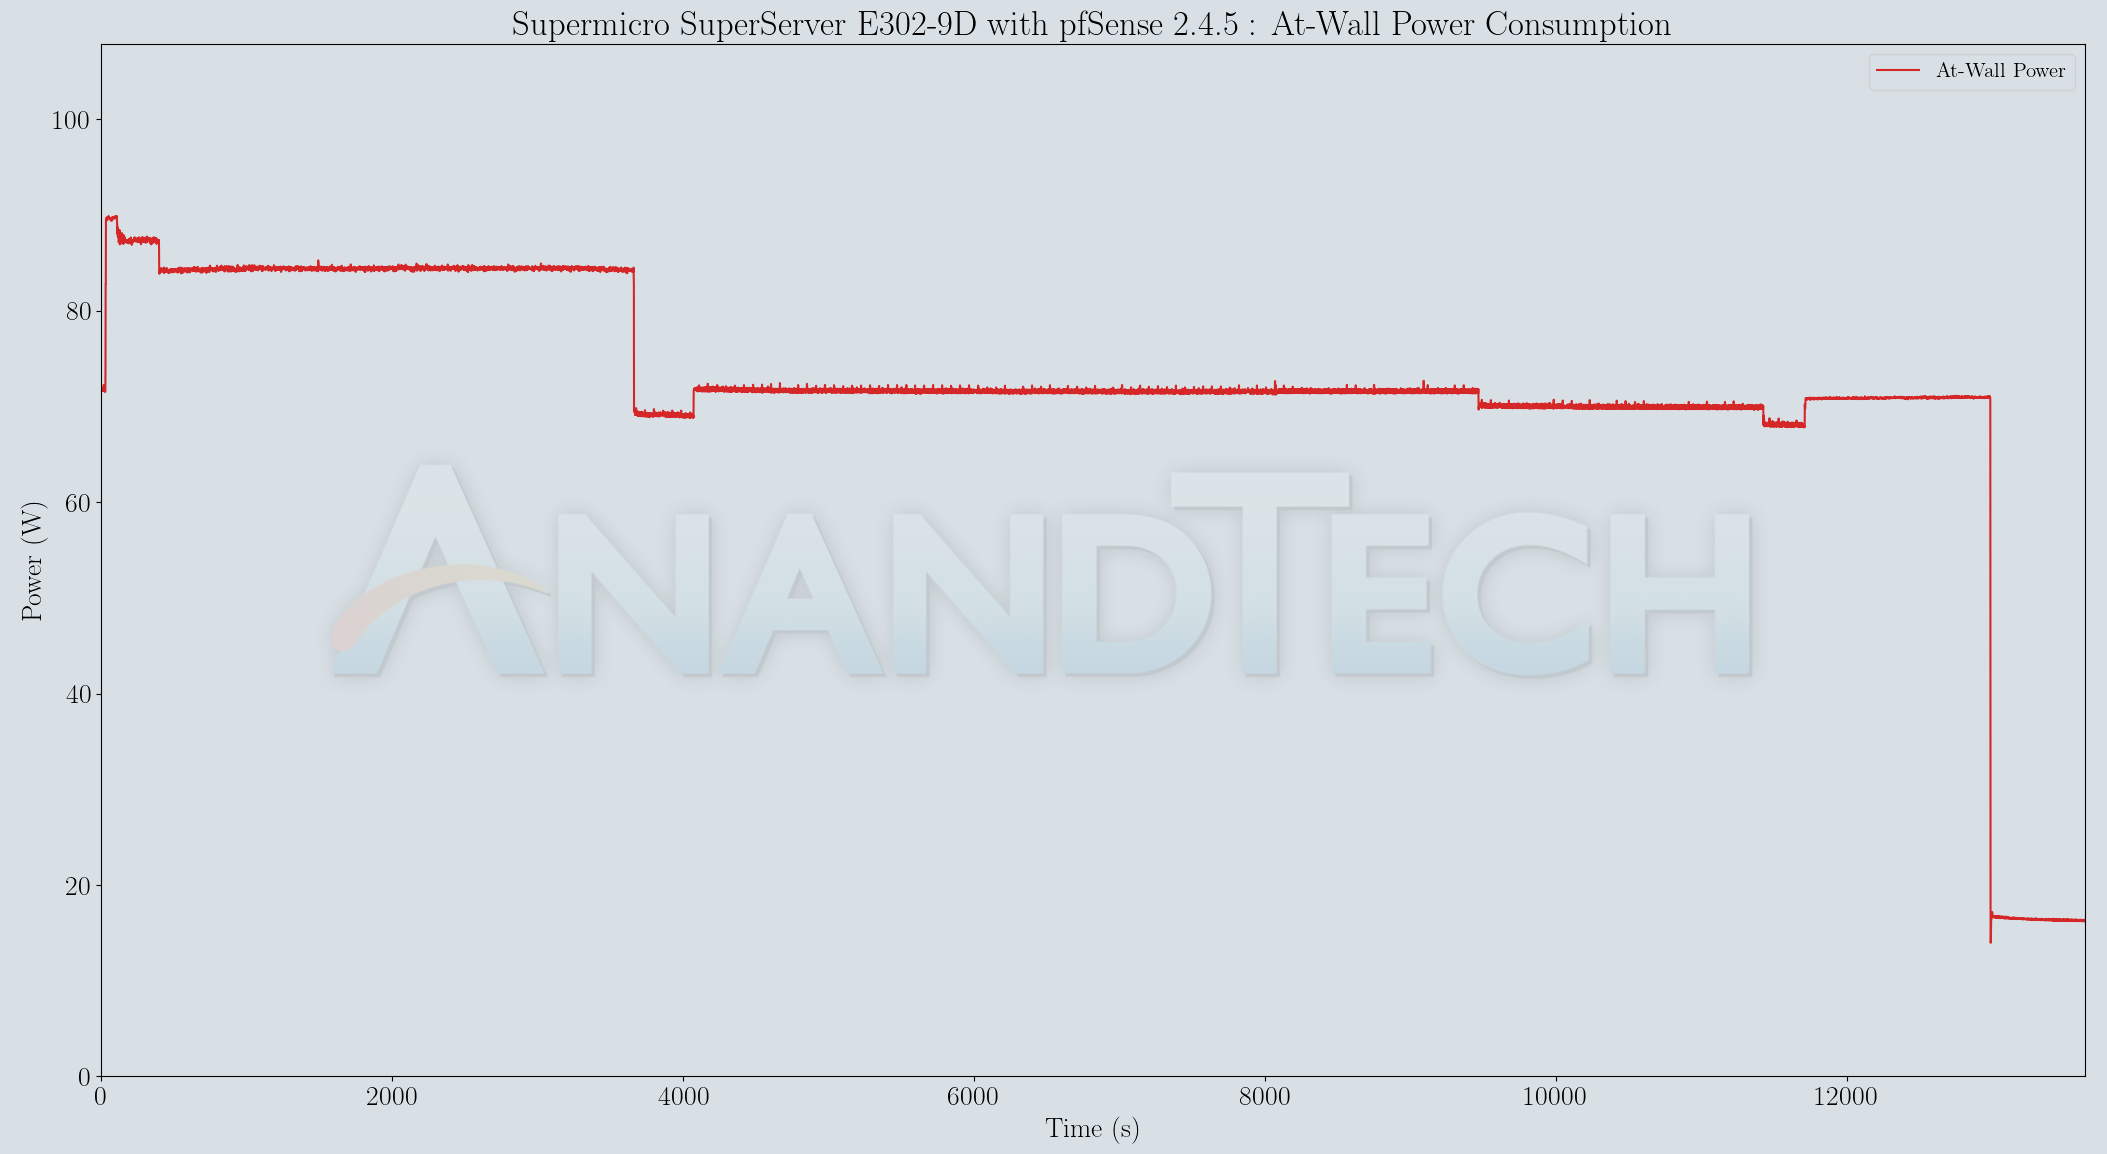
The pfSense installation in the Supermicro SuperServer E302-9D was configured with the default ruleset first, as described in an earlier section. The only free 1000Mbps LAN port was then connected to a spare LAN port in the sink. Two instances of the iPerf3 server were initialized on each of the sink's interfaces connected to the DUT. The firewall rules for the newly connected interface were modified to allow the benchmark traffic. Two iPerf3 clients were started in each connected interface of both the source and the conductor - one in normal, and the other in reverse mode. This benchmark was allowed to run for one hour in an attempt to saturate the duplex link of all of the DUT's interfaces (other than the ones connected to the management network and IPMI). After one hour, the source and sink were turned off, followed after some time by the DUT itself. The power consumption at the wall was recorded during the whole process using an Ubiquiti mFi mPower unit.
The E302-9D pfSense installation idles at around 70W. At full load with all network interfaces active, the power consumption reaches 90W. Keeping just the IPMI active (allowing for the BMC to remotely power up the server) costs slightly more than 15W. Keeping in mind the target market for the system, it would be good on Supermicro's part to see if the 15W number can be reduced further. pfSense / FreeBSD is not a particularly power-efficient OS. Having observed the idle power consumption of both Windows Server 2019 and Ubuntu 20.04 LTS on the same system to be in the high 40s, the inefficiency of pfSense was slightly disappointing. In common firewall applications / deployments in datacenters and server racks, this is not much of a concern (as the system is likely to be never idle), but, embedded applications may not always be in high-traffic mode. Some optimizations from the OS side / Intel drivers may help here.
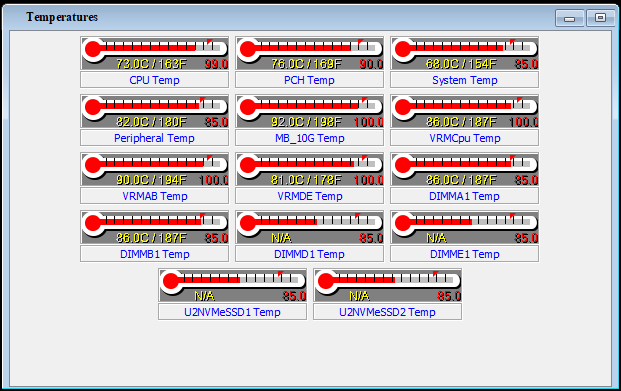
Towards the end of the stress test, we also captured the temperature sensors' outputs as conveyed by Supermicro's IPMIView tool. The CPU temperature of 73C was well within the 90C limit. However, the SSD was a bit too hot at 82C throughout, as was the MB_10G, VRM, and DIMMs between 80 and 92C. The SSD was partly our fault (the power-hungry Mushkin Sandforce-based SATA SSD is definitely not something to be recommended for a tightly enclosed passively cooled system like the E302-9D, particularly when the SSD makes no contact with the metal casing).
The FLIR One Pro thermal camera was used to take thermal photographs of the chassis at the end of the stress test. Temperatures of around 70C were noticed at various points.
Under normal conditions with light traffic (i.e, power consumption remaining around 70W), temperatures were around 60C - 65C. Additional thermal photographs are available in the above gallery. Given the temperature profile, the unit is best placed away from where one's hands might accidentally touch it.
On the thermal solution itself, Supermicro has done an excellent job in cooling down the SoC (as evident from the bright spot directly above the SoC in the thermal photographs and the teardown gallery earlier in the piece). The heat-sink is well thought-out and blends well with the chassis in terms of contact area. It is not clear whether anything can be done about the VRMs and DIMMs, but users should definitely consider a low-power SSD or ensure that the installed SSD has a chance for its heat to be conductively taken away.
Miscellaneous Aspects and Concluding Remarks
The Supermicro SuperServer E302-9D proved to be an interesting system in terms of developing targeted benchmarks. While processing relevant workloads on the machine, we opted to go with an out-of-the-box experience. Despite spending well over three months with the unit, we blelieve there are a lot more aspects that can be looked into - including, but not limited to, additional tuning of the driver settings, adoption of DPDK-capable software, and evaluation of capabilities such as traffic shaping, VLANs, VPN options, etc. offered by pfSense. The Intel Xeon D-2123IT also supports AVX512, and the native 64-byte registers are bound to offer some benefits for networking applications. In terms of performance - there are bound to be systems that deliver similar number of 10G ports while providing greater firewall packet-processing capabilities. However, they are definitely not going to be fanless or be available in a compact form-factor like the E302-9D. Therein lies the unique appeal of the system.
Evaluation Testbed for the Supermicro SuperServer E302-9D
(From L to R - the Compulab fitlet-XA10-LAN, the Supermicro SuperServer 5019D-4C-FN8TP, the Ubiquiti mFi mPower Pro, the Supermicro SuperServer SYS-5028D-TN4T, and the SuperServer E302-9D)
Dual-LAN motherboards are commonly used for putting firewall distributions like pfSense into production. With the advent of 5G and adoption of fixed wireless broadband, high-speed dual-WAN deployments are going to become more common in the future. Networking engineers, software developers, and home-lab enthusiasts can get a head-start on this using systems like the E302-9D.
Migrating server platforms to embedded desktop systems is attractive for many use-cases. We would like to see some innovation from board component vendors as well as Supermicro to lower the power consumption numbers - particularly when only the IPMI is active. Server OSs are rightly optimized for performance and not power consumption. Despite this context, it is surprising to see FreeBSD and associated drivers lag well behind Windows Server in optimizing the aspect based on the workload being processed.
The Supermicro SuperServer E302-9D is an interesting and unique product from the company's stable. Fanless systems for industrial and embedded applications (particularly those with server credentials such as remote management capability) traditionally cost an arm and a leg. In that context, the pricing of the system is relatively sane at $1100 for a barebones configuration.
The size of the system and its passively-cooled nature greatly widens the breadth of deployment scenarios that it can cover. Avoiding an external power brick would have been nice, but it is quite common for systems in this form-factor. Embedded applications require systems that bundle a number of functions to allow for reduction in BOM cost and installation volume when space is at a premium. Systems such as the E302-9D ensure that no separate switches are needed while being deployed for related functionality. The system's design enables it to operate well in harsh conditions commonly found in industrial automation and communication systems. In the latter domain, load and conformance testing applications can also utilize systems such as the E302-9D.
Customers in need of a traditional 1U rackmount offering with the same capabilities can go for the SuperServer 5019D-4C-FN8TP. It is priced much lower at $870, but the target market is quite different given its noise profile and form-factor. The fanless and rugged nature of the SuperServer E302-9D ensures that the $250-odd premium is quite reasonable for most home-lab and industrial automation use-cases.

