Original Link: https://www.anandtech.com/show/15833/the-asus-rog-maximus-xii-hero-wifi-motherboard-review
ASUS ROG Maximus XII Hero Wi-Fi Review: The Tale of Two Motherboards
by Dr. Ian Cutress & Gavin Bonshor on June 11, 2020 11:45 AM EST- Posted in
- Intel
- Motherboards
- Asus
- ROG
- 5GBase-T
- Z490
- 10th Gen Core
- Comet Lake
-What's-Inside-the-Box_678x452.jpg)
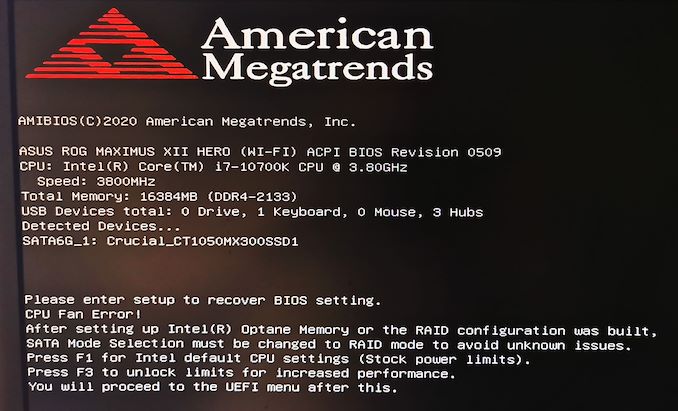
Some of the recent discussions around motherboard design are whether the motherboard manufacturers are actually adhering to the CPU vendor specifications. If a motherboard manufacturer improves the base power delivery and cooling, should they be allowed to go beyond Intel’s suggested turbo power limits, for example? The question is actually rather moot, given that the vendors have been doing this for over a decade in one form or another, so varying degrees of extreme. As this practice has come more into the public light, especially with Intel’s high-end processors going north of 250 watts, companies like ASUS have come under increased scrutiny. That is why, at least with the Maximus XII Hero we are testing today, ASUS offers two options on the first boot: Intel Recommended, and ASUS Optimized.
ROG and Split Personalities
The fact that ASUS are offering users the difference between Intel Recommended and ASUS Optimized at first boot is rather intriguing. For sure it is a clear definitive statement that says that ASUS acknowledges that some users might be concerned about not following Intel guidelines, and the best people to know how do go above Intel’s guidelines are the enthusiasts that build systems on ROG. It’s a great way to provide base line and a boost line of just how far a product has improved upon Intel’s recommended values.
The worry comes when the board is to be used by a non-technical user. If they are unaware of the concept of going beyond Intel specifications, then they may not take advantage of the ASUS optimized values, aside from better thermals at the Intel specifications.
Nonetheless, it does mean that ASUS’ motherboards now have split personalities. Should the Maximus XII Hero now become donned in black, and called the Maximus XII Villain? [Hey ASUS, that’s a fun product idea. I’ll take 10%.]
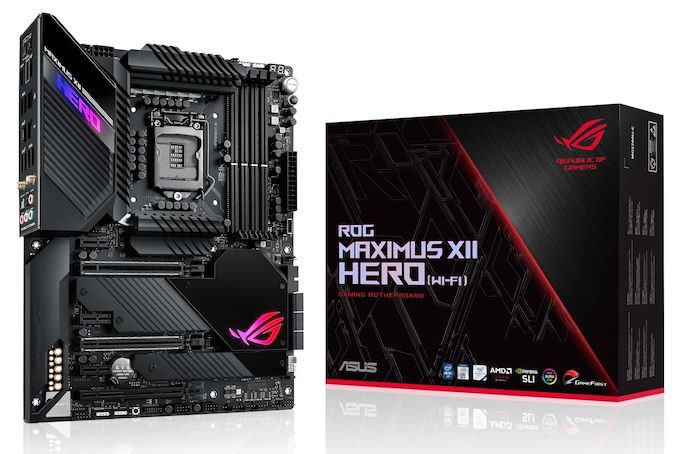
The Hero sits in the middle of ASUS’ ROG Z490 range, despite being $399, but offers a substantial power delivery heatsink arrangement as well as coverings for the rear panel, chipset heatsink, and coverings for the onboard three M.2 slots. Connectivity is substantial, with a 5 GBase-T controller, an Intel I219 gigabit Ethernet, and Wi-Fi 6 as well. There’s even a USB 3.2 Gen2.2 20 Gbps connection on the back, among a myriad of other USB connections.
In our benchmark suite, we probed both the Intel Recommended settings as well as the ASUS Optimized selection. It was clear that that addition of those optimized settings gives the system a good boost in an array of benchmarks, but it is also clear that because other motherboard vendors are implementing their optimized values by default that most motherboards are competitive with each other anyway. For our load testing, we saw a +2% rise in a fully multithreaded benchmark with slightly lower power under the ASUS Optimized conditions.
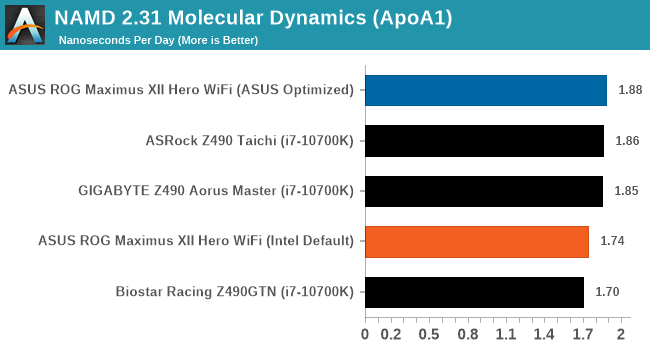
The Hero scored obvious wins in our boot time test, our new NAMD test, and took our Core i7-10700K to 5.1 GHz before experiencing any throttling. The automatic overclocking was actually really good with load voltage compared to some others we have tested.
We pushed on to 5.2 GHz, just to see how the power delivery was holding up. The thermal results from the motherboard were very good on our probes, showcasing that the main limiting factor here for overclocked processors is going to be the CPU instead.
Naturally, motherboards over $300 should be viewed with suspicion. Normally motherboards priced above this are attached to some sort of gimmick, such as 20 SATA ports or a pre-fitted liquid cooling block. For the Maximus XII Hero, there are a number of premium components and features that make this a high-end board, and ultimately the goal here is to provide a good underlying base for any system. The Hero is really built for the overclockable processors though.
Motherboard Tested by Gavin Bonshor
Overview, Visual Inspection, and Conclusion by Ian Cutress.
Other pages written by Gavin Bonshor
Visual Inspection
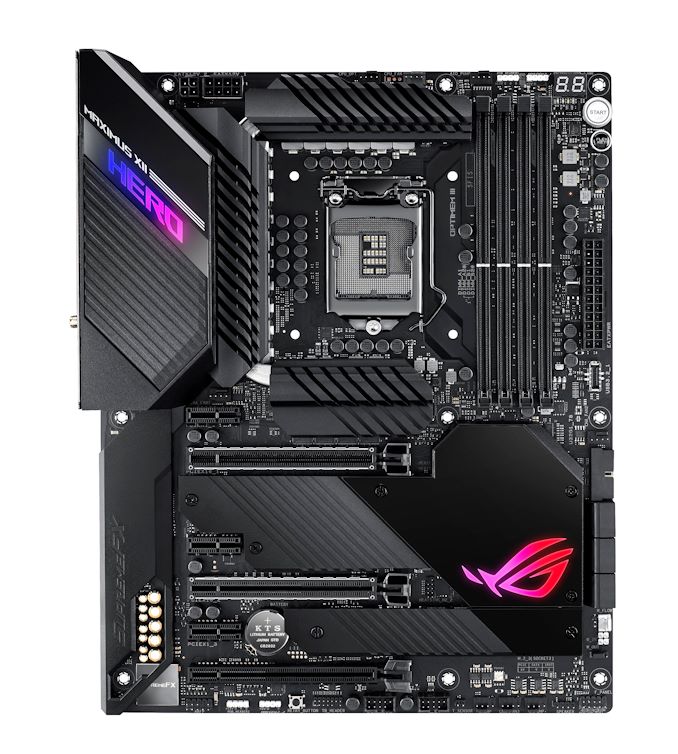
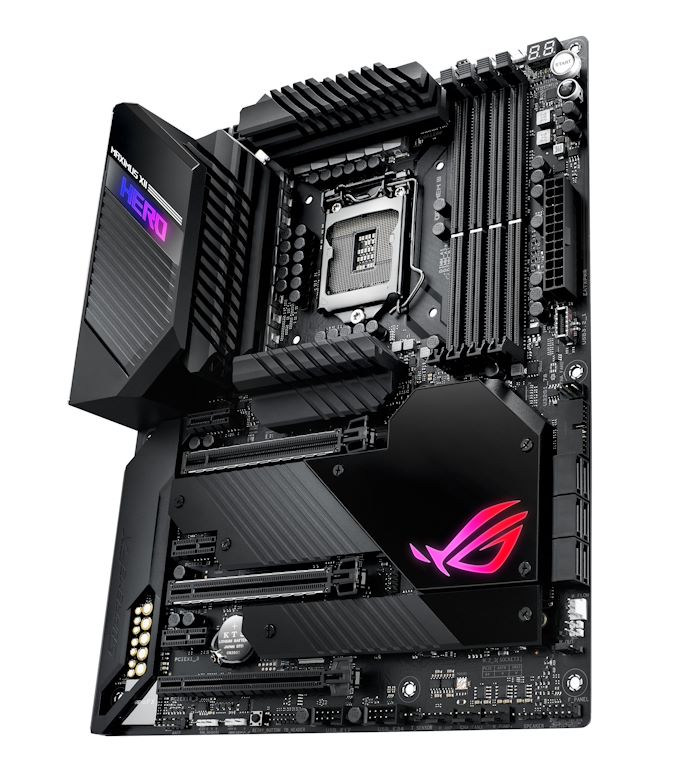
The visual slant of the Maximus XII Hero is a 45-degree downward angle going from left to right, as seen on the rear panel cover, power delivery heatsink, and the chipset heatsink. These sort of angular consistent aesthetic is now becoming consistent on a lot of motherboards, and in the case of the Maximus XII Hero we get a mostly black and neutral design aside from the lit up Hero section on that rear panel, and the ROG logo on the chipset heatsink.
The socket area is relatively clear, with the chipset heatsink covering three sides of the socket and hiding the 14+2 phase power delivery. To the top right of the socket is the 12 V CPU connectors, one 8-pin and one 4-pin, while as we move right across the board there are three 4-pin fan headers, two RGB headers, a two-digit debut, and power/reset buttons.
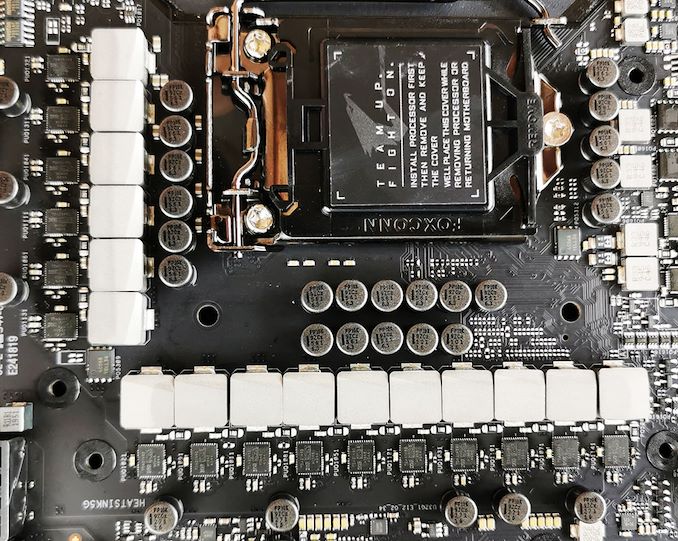
The ASUS ROG Maximus XII Hero WiFi is using a 16-phase design which is controlled by an ASP1405I PWM controller operating in 6+1 mode. This is a custom part designed for ASUS and is similar to the International Rectifier IR35201 controller which can operate a maximum of eight phases. The CPU section is using fourteen Infineon TDA21490 90 A power stages operating in teamed mode, while the SoC section is using two TDA21490 90 A power stages also in teamed phase mode. This type of power delivery is designed to reduce the processing delay for a more consistent and optimized power throughput, as well as reducing the transient response under high-loads.
The power delivery is cooled by three large and weighty heatsinks which are interconnected via a large nickel-plated copper heat pipe. Along the top of each heatsink is a deep channels to direct passive airflow through for more optimal cooling, with aluminium fins and an all-black design.
To the right of the socket we have the four DDR4 memory slots, which ASUS states can support up to DDR4-4800, and benefits from ASUS’ Optimem v3 layout optimization to help memory sub-timings when overclocking. Each of the memory slots has additional security bars to help keep the slots in place during transport, and the slots themselves have a single-sided latch, so users should be wary and make sure both sides are pressed down.
On the right hand side of the motherboard, below the 24-pin ATX power connector, there is a USB 3.1 front panel connector, another 4-pin fan header, a USB 3.0 header, and six SATA ports connected through the chipset. Below this are water flow headers: one 3-pin for a pump, and two 2-pin headers for monitoring.
In the PCIe area, there are two main full-length PCIe slots for add-in cards with additional bracing, supplied with x16/x0 or x8/x8 bandwidth from the processor. The final full-length PCIe slot on the board is an x4 from the chipset, and we also have three more open-ended x1 slots from the chipset.
Between the PCIe slots are three PCIe 3.0 x4 slots, all from the chipset, that allow for M.2 NVMe drives. These are underneath the extended chipset heatsink, in order to help with additional cooling.
Below the PCIe slots on the bottom of the motherboard are the majority of the headers. We get the audio header on the bottom left, another RGB header, a HDD Gen 2 header for those that need 5V access, a retry button, a Thunderbolt header for users that have add-in cards, two USB 2.0 headers, a 2-pin thermal sensor, three more 4-pin fan headers, the speaker header, and the front panel header.
So far we’ve seen three 4-pin fan headers at the top of the board, one 4-pin by the 24-pin ATX connector, one 3-pin water pump header by the SATA ports, and now three more 4-pin at the bottom of the board. If that wasn’t enough, there’s another 4-pin above the top PCIe x1 slot, making eight total.
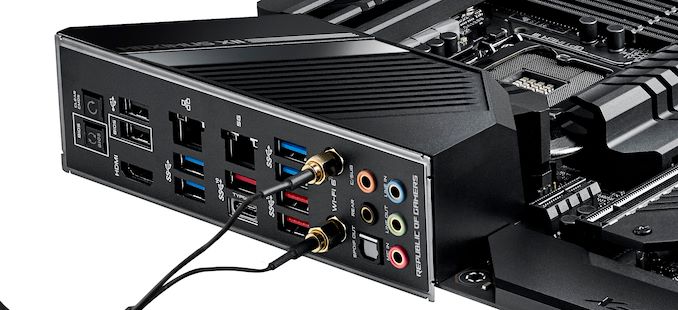
On the rear panel, from left to right, we get a Clear CMOS button, a BIOS Flashback button, two USB 2.0 ports, a HDMI 1.4b video output, the Intel I219 gigabit Ethernet port, two USB 3.2 Gen 1 ports in blue, the Aquantia 5G Ethernet port, three USB 3.2 Gen 2 Type-A ports in red, a USB 3.2 Gen 2.2 Type-C port, two more USB 3.1 Gen1 Type-A ports in blue, two Wi-Fi 6 antenna connectors, and the audio connectors.
What's in The Box
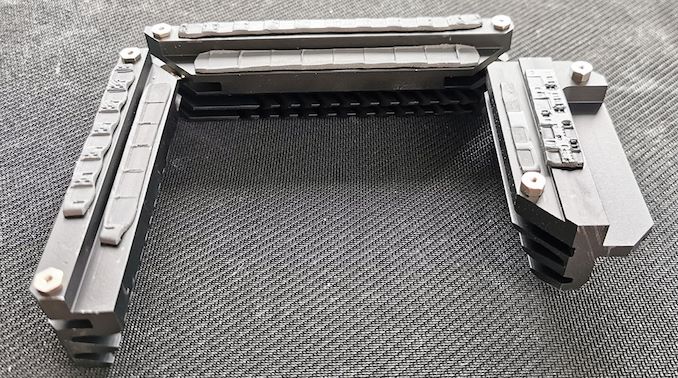
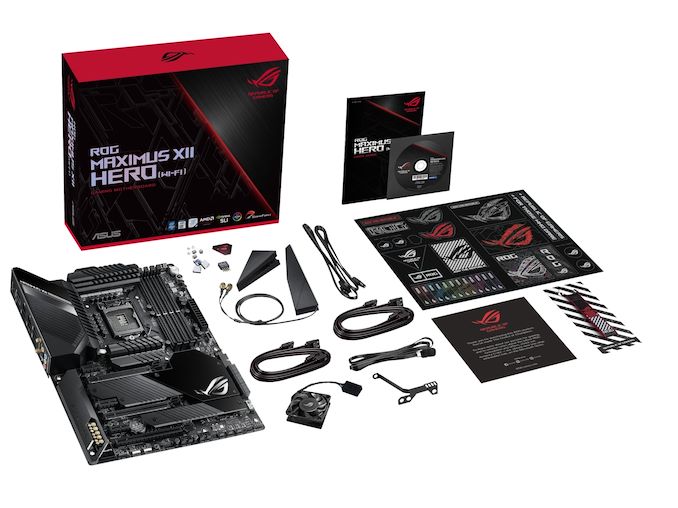
Included in the packaging of the ASUS ROG Maximus XII Hero WiFi is a varied selection of accessories. The most notable includes four SATA cables, two M.2 installation kits, a driver and software installation disc, and the Intel AX201 Wi-Fi 6 wireless antenna. ASUS includes a ROG themed thank you card, a Q-connector and a large ROG sticker sheet. An interesting addition to the bundle is a MOS cooling kit which allows users to turn the passively cooled power delivery into an active one. This includes a fan bracket and a 40 x 40 mm cooling fan.
- MOSFET cooling kit (bracket and 40 mm fan)
- Intel AX201 Wi-Fi 6 antenna
- 4 x SATA cables
- Q-Connector
- 2 x M.2 installation kits
- ROG Big Sticker sheet
- Driver and software installation disc
- ROG logo adhesive plate
- ROG Thank you card
- ROG key chain
- 80 cm RGB extension cable
BIOS
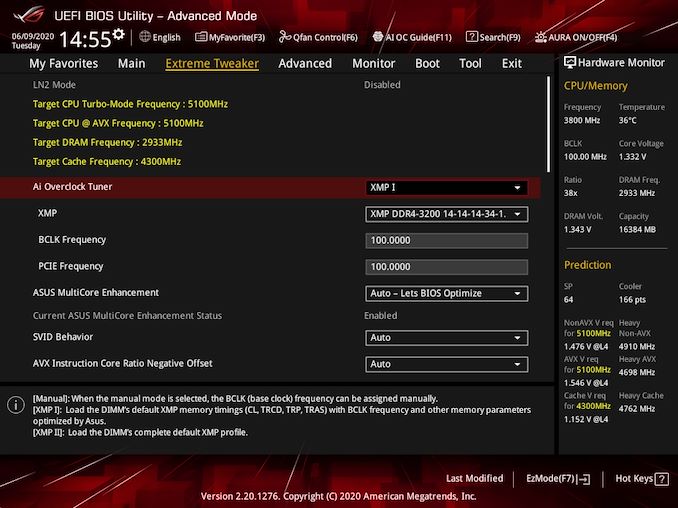
Upon the first boot into Windows, the ROG Maximus XII Hero WiFi allows users to select between two core modes, Intel Default and ASUS Optimized. The latter removes all of the CPU's power limits and lets the board's firmware do its thing. Overall the ASUS ROG UEFI firmware is all-around solid and is one of the most enhanced variants we've seen so far on the Z490 chipset.
The ASUS ROG UEFI firmware includes two different modes depending on the level of the user, EZ and Advanced. The two modes can be switched between by pressing the F7 key, and both provide different levels of function. The EZ mode provides basic functions including enabling X.M.P memory profiles, switching between two CPU overclocking profiles, 'normal' and AI Optimized, as well as enabling Intel RST. The basic mode also displays a basic overview of installed hardware including the CPU and its core voltage, as well as motherboard temperature, DRAM status, the current fan profile, and allows users to access the QFan control utility.
In the advanced section is where ASUS hides away all its customizable settings and options, and these are endless. The Republic of Gamers branding is synonymous with overclocking and generally signifies enthusiast-level features and quality. The most integral part of this is the Extreme Tweaker menu which opens up a host of CPU and memory overclocking options, with some of the most basic settings relevant to the CPU core and Cache frequencies. ASUS also goes all-in with its memory overclocking settings with an extreme memory tweaker which has a host of memory overclocking presets for hardened enthusiasts, as well as a load of memory latency options to select from.
One thing to note with ASUS is that it is very consistent with its firmware across its ranges, with the ROG, Prime, and TUF models all featuring its own GUI in relation to the boards branding. The ASUS ROG firmware is red, black and grey, with white text, and is intuitive and easy to navigate; it can be easy to get lost within the firmware with a plethora of sub-menus within menus for things like power options, VRM options, and Intel VF curve settings.
Software
As we've seen with previous ASUS ROG motherboards, it almost always delivers a stacked software and driver package which is provided through the ASUS Armory Crate. This allows users to avoid connecting to the internet and hosts the files required to install the drivers and software from a stored portion of memory located on the board. This feature can be turned on or off within the BIOS, but it is unique and is something ASUS is doing consistently now.
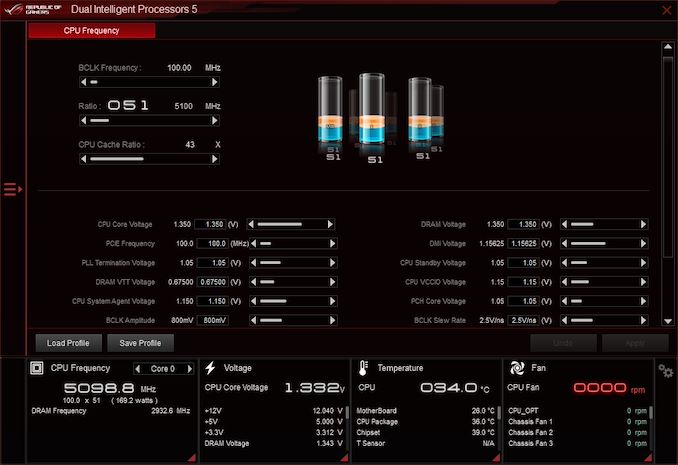
The majority of vendors are now starting to amalgamate its software into a couple of programs, as opposed to offering six or seven separate utilities like a few years ago. The ASUS AI Suite III is one such example and hosts a variety of different options including the AI Overclocking menu, which allows users to let the firmware automatically overclock the system based on set parameters like cooling performance, much the same as the firmware offers. It also includes a section to manually overclock the processor including options to increase the CPU Core frequency and CPU Vcore voltages, as well as CPU cache ratio, the BCLK frequency, and even the BCLK slew rate which is advanced as far as software goes. It also includes options to control the CPU power delivery, options to optimize or set custom fan profiles, as well as the EZ Update section which allows users to install and update to the latest drivers.
Also included in the board's software bundle is a custom ROG skinned variant of the CPU-Z monitoring utility, the GameFirst VI software which allows users to monitor network traffic and perform traffic shaping, as well as optimize the system specifically for gaming. The Ramcache III software allows users to create pools of high-speed storage using spare system memory, which is handy to reap the benefits of memory bandwidth as opposed to slower storage methods when using the 128 GB DDR4 capacity.
One thing we've noted across many motherboard reviews during the Windows 10 era is a lack of audio software supplied with the core drivers, especially with boards that feature Realtek controllers. ASUS includes the ROG Sonic Studio III software along with its SupremeFX S1220 HD audio codec which allows users to enhance the auditory experience, something we wished more vendors would do without having to connect up to the Microsoft store. Overall the ASUS ROG Maximus XII Hero WiFi's software package is plentiful, and has everything needed, and then some for users to sink their teeth into.
Board Features
The ASUS ROG Maximus XII Hero WiFi is an ATX motherboard and is a $400 model into the Maximus XII range of Republic of Gamers motherboards. There is nothing entry-level about it and represents the top end of the mid-range with plenty of features. Included in the feature set are three PCIe 3.0 x4 M.2 slots with two that support SATA drives, while all three can accommodate NVMe drives. For SATA devices, there are six SATA ports with support for RAID 0, 1, 5 and 10 arrays. The ASUS ROG Maximus XII Hero WiFi also has a strong and highly competitive networking array with dual LAN consisting of a Marvell AQC111C 5 G and Intel I219-V Gigabit Ethernet controller, with an Intel AX201 Wi-Fi 6 interface with support for BT 5.1 devices. ASUS uses its Optimem III technology and has four memory slots with support for up to 128 GB of DDR4-4800.
| ASUS ROG Maximus XII Hero WiFi ATX Motherboard | |||
| Warranty Period | 3 Years | ||
| Product Page | Link | ||
| Price | $399 | ||
| Size | ATX | ||
| CPU Interface | LGA1200 | ||
| Chipset | Intel Z490 | ||
| Memory Slots (DDR4) | Four DDR4 Supporting 128 GB Dual-Channel Up to DDR4-4800 |
||
| Video Outputs | 1 x HDMI 1.4b | ||
| Network Connectivity | Marvel AQC111C 5 GbE Intel I219-V GbE Intel AX201 Wi-Fi 6 |
||
| Onboard Audio | SupremeFX S1220 ESS ES9023 DAC |
||
| PCIe Slots for Graphics (from CPU) | 2 x PCIe 3.0 (x16, x8/x8) | ||
| PCIe Slots for Other (from PCH) | 1 x PCIe 3.0 x4 3 x PCIe 3.0 x1 |
||
| Onboard SATA | Six, RAID 0/1/5/10 (Z490) | ||
| Onboard M.2 | 2 x PCIe 3.0 x4/SATA 1 x PCIe 3.0 x4 |
||
| USB 3.2 G2 (20 Gbps) | 1 x Type-C (Rear panel) | ||
| USB 3.2 G2 (10 Gbps) | 1 x Type-C (One header) 3 x Type-A (Rear panel) |
||
| USB 3.2 G1 (5 Gbps) | 4 x USB Type-A (Rear panel) 2 x USB Type-A (One header) |
||
| USB 2.0 | 2 x USB Type-A (Rear panel) 4 x USB Type-A (Two headers) |
||
| Power Connectors | 1 x 24-pin Motherboard 1 x 8-pin CPU 1 x 4-pin CPU |
||
| Fan Headers | 2 x 4-pin CPU 1 x 4-pin Water pump 1 x 4-pin AIO 3 x 4-pin Chassis |
||
| IO Panel | 1 x Clear CMOS button 1 x USB BIOS Flashback button 1 x HDMI 1.4b output 3 x USB 3.2 G2 Type-A 1 x USB 3.2 G2 Type-C 4 x USB 3.2 G1 Type-A 2 x USB 2.0 Type-A 1 x RJ45 (Marvell) 1 x RJ45 (Intel) 2 x Wi-Fi 6 antenna ports (Intel) 5 x 3.5 mm audio jacks (SupremeFX) 1 x SPDIF output (SupremeFX |
||
There is plenty of connectivity on the ASUS ROG Maximus XII Hero WiFi with a single USB 3.2 G2 20 Gbps Type-C, three USB 3.2 G2 Type-A, four USB 3.2 G1 Type-A, and two USB 2.0 ports. Users looking to expand on this can add a single USB 3.2 G2 Type-C, two USB 3.2 G1 Type-A, and four USB 2.0 ports via the use of internal headers. In addition to this, the rear panel also has five 3.5 mm audio jacks and a single S/PDIF optical output powered by a SupremeFX S1220 HD audio codec, with an assisting ESS ESS9023 DAC designed to bolster the boards overall audio quality. A single HDMI 1.4b video output allows users to use Intel's integrated UHD graphics, while a Clear CMOS button and USB BIOS Flashback button are present to make users lives easier.
Test Bed
As per our testing policy, we take a high-end CPU suitable for the motherboard that was released during the socket’s initial launch and equip the system with a suitable amount of memory running at the processor maximum supported frequency. This is also typically run at JEDEC subtimings where possible. It is noted that some users are not keen on this policy, stating that sometimes the maximum supported frequency is quite low, or faster memory is available at a similar price, or that the JEDEC speeds can be prohibitive for performance. While these comments make sense, ultimately very few users apply memory profiles (either XMP or other) as they require interaction with the BIOS, and most users will fall back on JEDEC supported speeds - this includes home users as well as industry who might want to shave off a cent or two from the cost or stay within the margins set by the manufacturer. Where possible, we will extend out testing to include faster memory modules either at the same time as the review or a later date.
| Test Setup | |||
| Processor | Intel Core i7-10700K, 125 W, $374 8 Cores, 16 Threads 3.8 GHz (5.1 GHz Turbo) |
||
| Motherboard | ASUS ROG Maximus XII Hero WiFi (BIOS 0607) | ||
| Cooling | NZXT Kraken Z63 280 mm AIO | ||
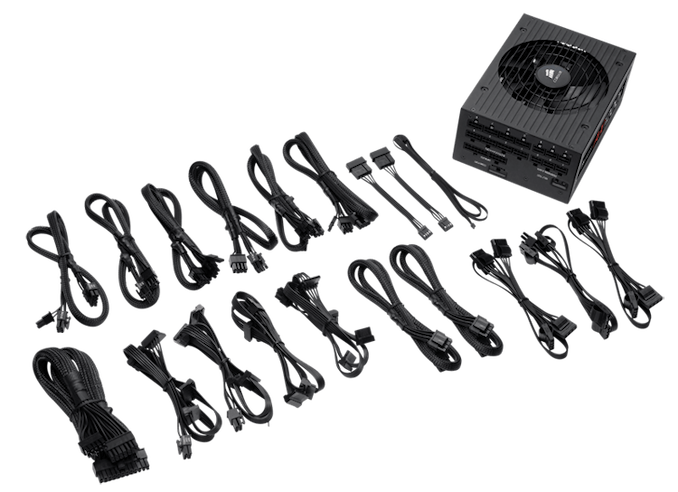
| Power Supply | Corsair HX850 850 W 80 PLUS Platinum | ||
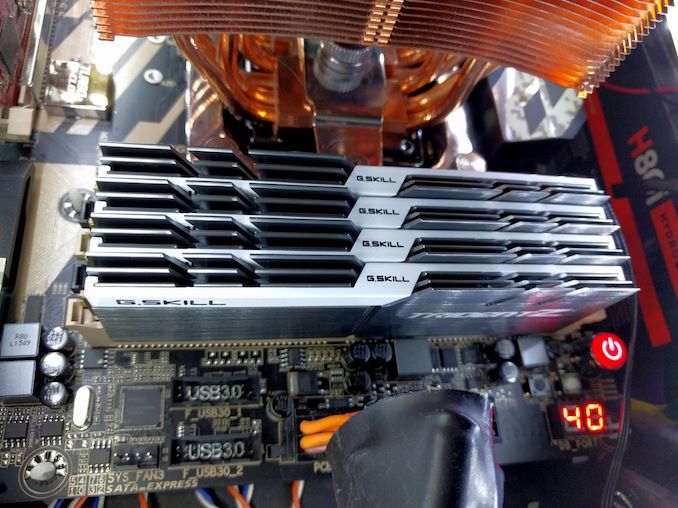
| Memory | G.Skill TridentZ DDR4-2933 CL 14-14-14-34 2T (2 x 8 GB) | ||
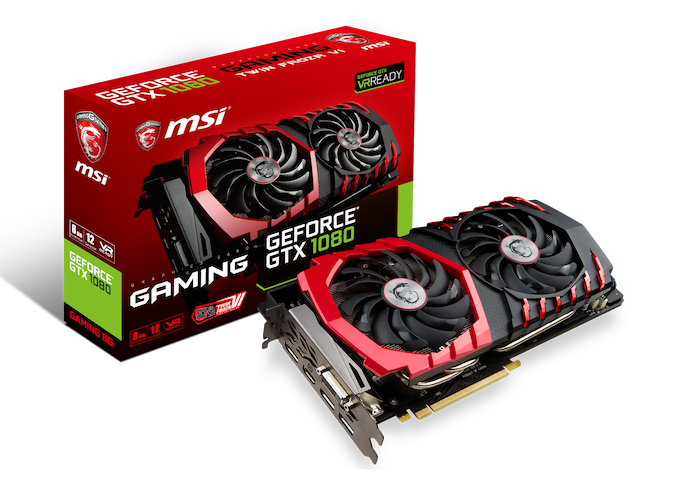
| Video Card | MSI GTX 1080 (1178/1279 Boost) | ||
| Hard Drive | Crucial MX300 1TB | ||
| Case | Corsair Crystal 680X | ||
| Operating System | Windows 10 1909 inc. Spectre/Meltdown Patches | ||
Readers of our motherboard review section will have noted the trend in modern motherboards to implement a form of MultiCore Enhancement / Acceleration / Turbo (read our report here) on their motherboards. This does several things, including better benchmark results at stock settings (not entirely needed if overclocking is an end-user goal) at the expense of heat and temperature. It also gives, in essence, an automatic overclock which may be against what the user wants. Our testing methodology is ‘out-of-the-box’, with the latest public BIOS installed and XMP enabled, and thus subject to the whims of this feature. It is ultimately up to the motherboard manufacturer to take this risk – and manufacturers taking risks in the setup is something they do on every product (think C-state settings, USB priority, DPC Latency / monitoring priority, overriding memory sub-timings at JEDEC). Processor speed change is part of that risk, and ultimately if no overclocking is planned, some motherboards will affect how fast that shiny new processor goes and can be an important factor in the system build.
System Performance
Not all motherboards are created equal. On the face of it, they should all perform the same and differ only in the functionality they provide - however, this is not the case. The obvious pointers are power consumption, POST time and latency. This can come down to the manufacturing process and prowess, so these are tested.
For Z490 we are running using Windows 10 64-bit with the 1909 update.
Power Consumption
We test power consumption on the system while in a single MSI GTX 1080 Gaming configuration with a wall meter connected to the power supply. our 850W power supply has ~75% efficiency > 50W, and 90%+ efficiency at 250W, suitable for both idle and multi-GPU loading. This method of power reading allows us to compare the power management of the UEFI and the board to supply components with power under load, and includes typical PSU losses due to efficiency. These are the real-world values that consumers may expect from a typical system (minus the monitor) using this motherboard.
While this method for power measurement may not be ideal, and you feel these numbers are not representative due to the high wattage power supply being used (we use the same PSU to remain consistent over a series of reviews, and the fact that some boards on our testbed get tested with three or four high powered GPUs), the important point to take away is the relationship between the numbers. These boards are all under the same conditions, and thus the differences between them should be easy to spot.
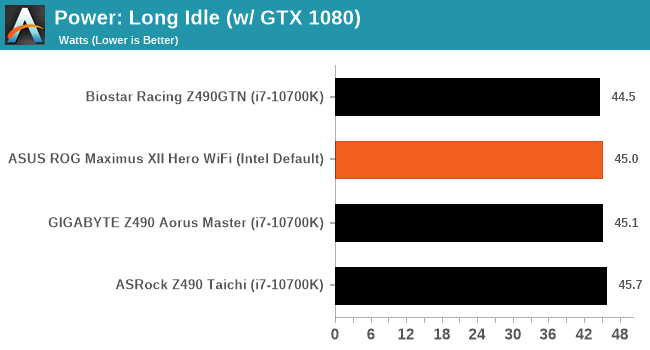
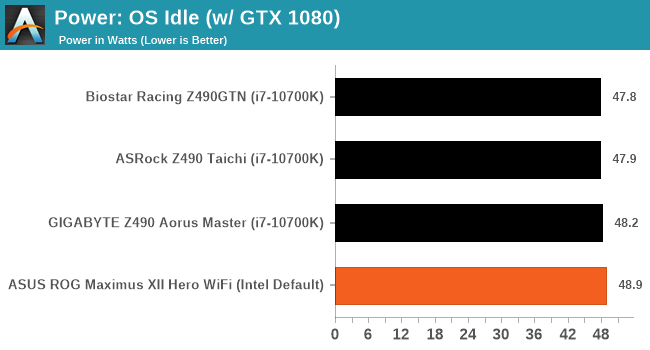
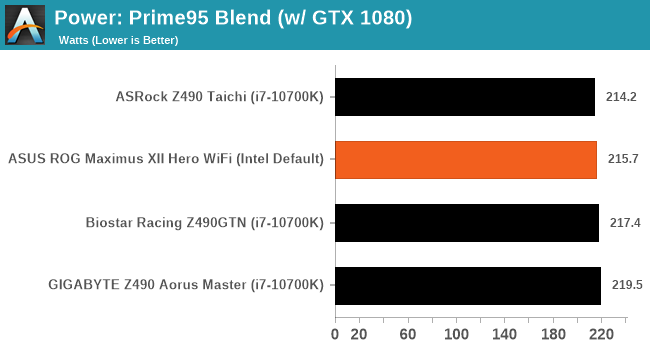
From our initial review of the ASRock, we switched to a more suitable 850 W power supply and we re-tested each of the boards. The ASUS performs consistently in our power testing narrowly losing out to the Biostar in our long idle test. At load, the ASUS shows its efficiency.
Non-UEFI POST Time
Different motherboards have different POST sequences before an operating system is initialized. A lot of this is dependent on the board itself, and POST boot time is determined by the controllers on board (and the sequence of how those extras are organized). As part of our testing, we look at the POST Boot Time using a stopwatch. This is the time from pressing the ON button on the computer to when Windows starts loading. (We discount Windows loading as it is highly variable given Windows specific features.)
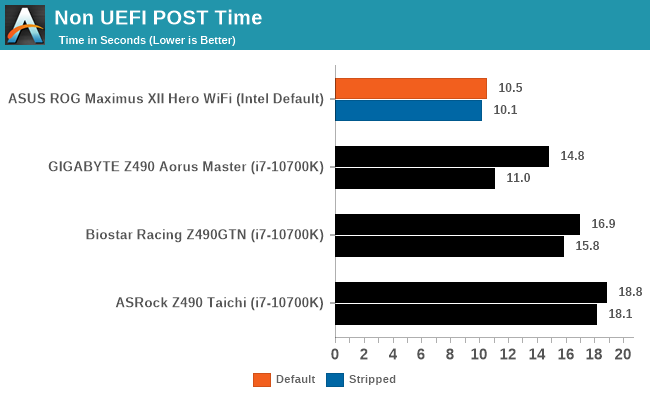
The ASUS board blitzes out the competition in regards to POST times, with a solid four second lead over the next board at default settings. Disabling non-essential components such as networking and audio controllers yielded a slight gain in POST time, with a 0.4-second variance over default.
DPC Latency
Deferred Procedure Call latency is a way in which Windows handles interrupt servicing. In order to wait for a processor to acknowledge the request, the system will queue all interrupt requests by priority. Critical interrupts will be handled as soon as possible, whereas lesser priority requests such as audio will be further down the line. If the audio device requires data, it will have to wait until the request is processed before the buffer is filled.
If the device drivers of higher priority components in a system are poorly implemented, this can cause delays in request scheduling and process time. This can lead to an empty audio buffer and characteristic audible pauses, pops and clicks. The DPC latency checker measures how much time is taken processing DPCs from driver invocation. The lower the value will result in better audio transfer at smaller buffer sizes. Results are measured in microseconds.
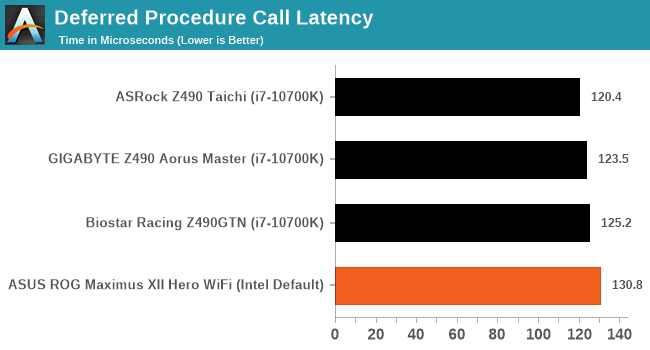
We test DPC latency from out of the box with default settings. From our initial reviews, we saw the ASUS board achieved a high DPC latency, so we decided to re-test. The ASUS performed much better after the re-test which went from 193.6 microseconds down to 130.8 microseconds which is a much more reasonable result.
CPU Performance, Short Form
For our motherboard reviews, we use our short form testing method. These tests usually focus on if a motherboard is using MultiCore Turbo (the feature used to have maximum turbo on at all times, giving a frequency advantage), or if there are slight gains to be had from tweaking the firmware. We put the memory settings at the CPU manufacturers suggested frequency, making it very easy to see which motherboards have MCT enabled by default.
For Z490 we are running using Windows 10 64-bit with the 1909 update.
Update: A Note About Z490 and Turbo
Normally we test our motherboards with out of the box settings. This means that the performance will get boosted based on whatever default algorithm each motherboard vendor implements with regards turbo time and boost power. Intel actively encourages this - the numbers it puts in for turbo time and turbo power are recommendations, rather than specifications, and Intel wants motherboard vendors to engineer their products to the turbo and power that each vendor deems acceptable for their product. As a result, a lot of motherboards will implement an aggressive turbo algorithm.
For this generation, ASUS has done something different. ASUS' enthusiast motherboards offer two different options on first boot: Intel recommendations, or ASUS recommendations. This means that there is a small performance delta between the two, especially for ASUS' high-end motherboards. ASUS has put this into the product based on customer feedback and how motherboard vendors have slowly drifted over the last decade to well beyond what Intel recommends.
For our testing methodology, we try to leave as much as we can on default, because this is part of what makes a motherboard different to any other, and the motherboard vendor has to decide how aggressive it must be. Also, for non-enthusiasts who daren't enter the BIOS, or understand even what turbo or a CPU or what memory channels are, they will just end up with the non-XMP default settings. It is unclear what such a person might select when presented with the ASUS default option.
At this point we have included the results from selecting Intel's recommendations on ASUS' boards. Based on feedback, we are in the process of including both sets of data in our Z490 reviews. We were planning to cover it in depth in our first ASUS Z490 review, but please bare with us while we update our results for this review. We will still cover it in depth in the ASUS review.
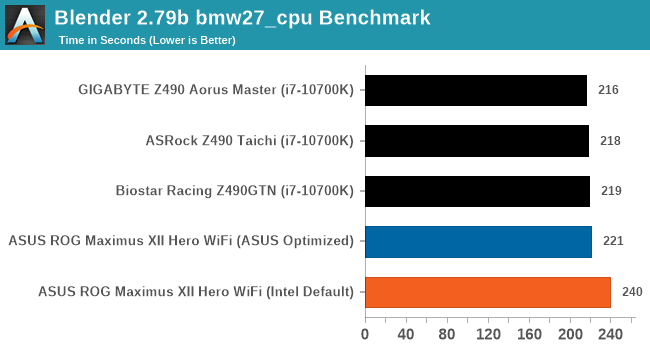
Rendering - Blender 2.7b: 3D Creation Suite
A high profile rendering tool, Blender is open-source allowing for massive amounts of configurability, and is used by a number of high-profile animation studios worldwide. The organization recently released a Blender benchmark package, a couple of weeks after we had narrowed our Blender test for our new suite, however their test can take over an hour. For our results, we run one of the sub-tests in that suite through the command line - a standard ‘bmw27’ scene in CPU only mode, and measure the time to complete the render.
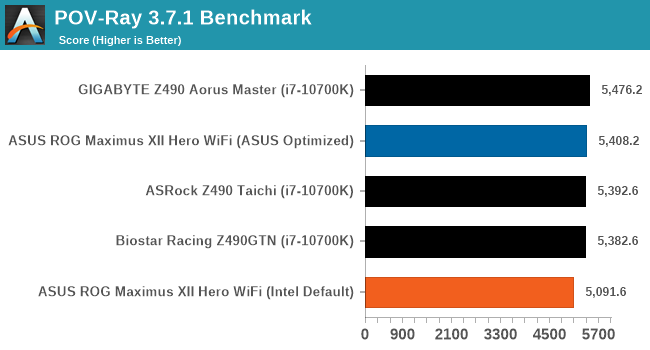
Rendering – POV-Ray 3.7.1: Ray Tracing
The Persistence of Vision Ray Tracer, or POV-Ray, is a freeware package for as the name suggests, ray tracing. It is a pure renderer, rather than modeling software, but the latest beta version contains a handy benchmark for stressing all processing threads on a platform. We have been using this test in motherboard reviews to test memory stability at various CPU speeds to good effect – if it passes the test, the IMC in the CPU is stable for a given CPU speed. As a CPU test, it runs for approximately 1-2 minutes on high-end platforms.
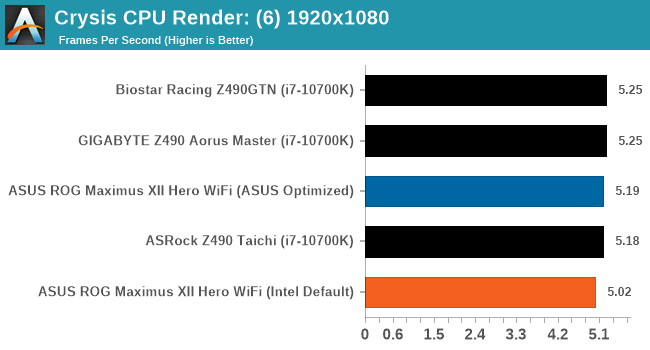
Rendering - Crysis CPU Render
One of the most oft used memes in computer gaming is ‘Can It Run Crysis?’. The original 2007 game, built in the Crytek engine by Crytek, was heralded as a computationally complex title for the hardware at the time and several years after, suggesting that a user needed graphics hardware from the future in order to run it. Fast forward over a decade, and the game runs fairly easily on modern GPUs, but we can also apply the same concept to pure CPU rendering – can the CPU render Crysis? Since 64 core processors entered the market, one can dream. We built a benchmark to see whether the hardware can.
For this test, we’re running Crysis’ own GPU benchmark, but in CPU render mode. This is a 2000 frame test, which we run over a series of resolutions from 800x600 up to 1920x1080. For simplicity, we provide the 1080p test here.
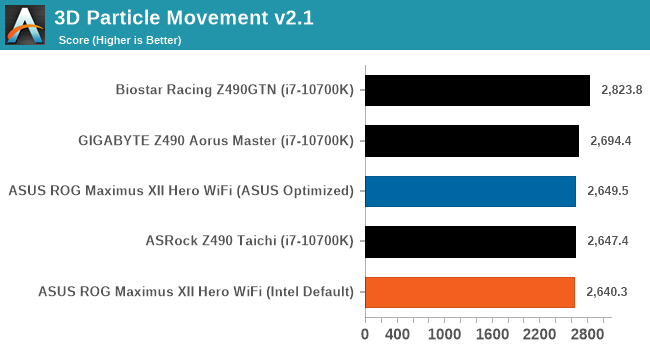
Point Calculations – 3D Movement Algorithm Test: link
3DPM is a self-penned benchmark, taking basic 3D movement algorithms used in Brownian Motion simulations and testing them for speed. High floating point performance, MHz, and IPC win in the single thread version, whereas the multithread version has to handle the threads and loves more cores. For a brief explanation of the platform agnostic coding behind this benchmark, see my forum post here.
NAMD ApoA1
One frequent request over the years has been for some form of molecular dynamics simulation. Molecular dynamics forms the basis of a lot of computational biology and chemistry when modeling specific molecules, enabling researchers to find low energy configurations or potential active binding sites, especially when looking at larger proteins. We’re using the NAMD software here, or Nanoscale Molecular Dynamics, often cited for its parallel efficiency. Unfortunately the version we’re using is limited to 64 threads on Windows, but we can still use it to analyze our processors. We’re simulating the ApoA1 protein for 10 minutes, and reporting back the ‘nanoseconds per day’ that our processor can simulate. Molecular dynamics is so complex that yes, you can spend a day simply calculating a nanosecond of molecular movement.
Application Load: GIMP 2.10.4
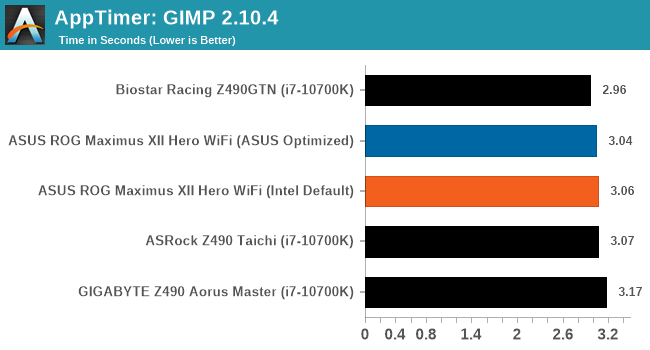
One of the most important aspects about user experience and workflow is how fast does a system respond. A good test of this is to see how long it takes for an application to load. Most applications these days, when on an SSD, load fairly instantly, however some office tools require asset pre-loading before being available. Most operating systems employ caching as well, so when certain software is loaded repeatedly (web browser, office tools), then can be initialized much quicker.
In our last suite, we tested how long it took to load a large PDF in Adobe Acrobat. Unfortunately this test was a nightmare to program for, and didn’t transfer over to Win10 RS3 easily. In the meantime we discovered an application that can automate this test, and we put it up against GIMP, a popular free open-source online photo editing tool, and the major alternative to Adobe Photoshop. We set it to load a large 50MB design template, and perform the load 10 times with 10 seconds in-between each. Due to caching, the first 3-5 results are often slower than the rest, and time to cache can be inconsistent, we take the average of the last five results to show CPU processing on cached loading.
Gaming Performance
For Z490 we are running using Windows 10 64-bit with the 1909 update.
Grand Theft Auto V
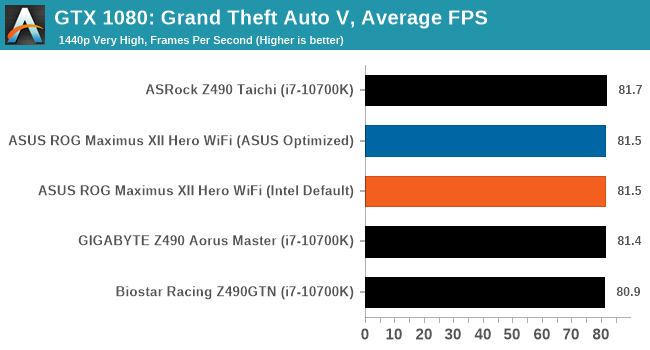
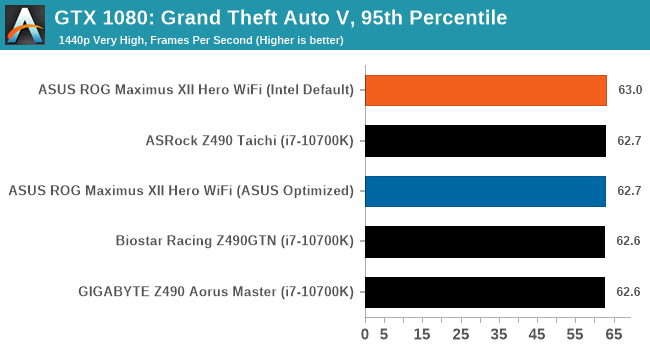
The highly anticipated iteration of the Grand Theft Auto franchise hit the shelves on April 14th 2015, with both AMD and NVIDIA in tow to help optimize the title. GTA doesn’t provide graphical presets, but opens up the options to users and extends the boundaries by pushing even the hardest systems to the limit using Rockstar’s Advanced Game Engine under DirectX 11. Whether the user is flying high in the mountains with long draw distances or dealing with assorted trash in the city, when cranked up to maximum it creates stunning visuals but hard work for both the CPU and the GPU.
For our test we have scripted a version of the in-game benchmark. The in-game benchmark consists of five scenarios: four short panning shots with varying lighting and weather effects, and a fifth action sequence that lasts around 90 seconds. We use only the final part of the benchmark, which combines a flight scene in a jet followed by an inner city drive-by through several intersections followed by ramming a tanker that explodes, causing other cars to explode as well. This is a mix of distance rendering followed by a detailed near-rendering action sequence, and the title thankfully spits out frame time data.
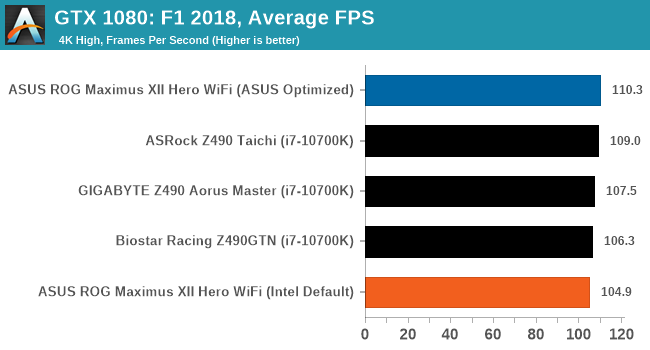
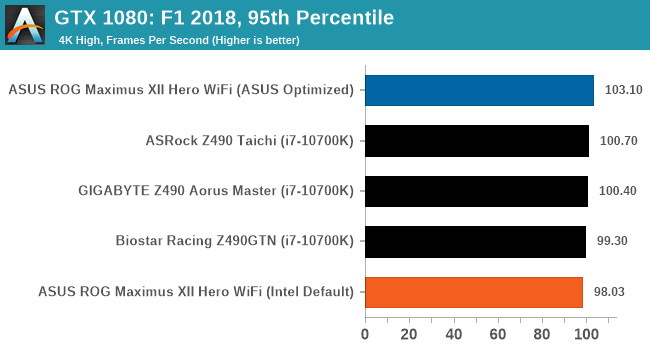
F1 2018
Aside from keeping up-to-date on the Formula One world, F1 2017 added HDR support, which F1 2018 has maintained; otherwise, we should see any newer versions of Codemasters' EGO engine find its way into F1. Graphically demanding in its own right, F1 2018 keeps a useful racing-type graphics workload in our benchmarks.
Aside from keeping up-to-date on the Formula One world, F1 2017 added HDR support, which F1 2018 has maintained. We use the in-game benchmark, set to run on the Montreal track in the wet, driving as Lewis Hamilton from last place on the grid. Data is taken over a one-lap race.
Strange Brigade (DX12)
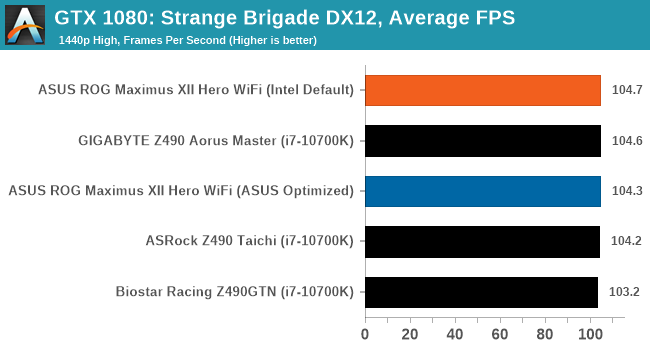
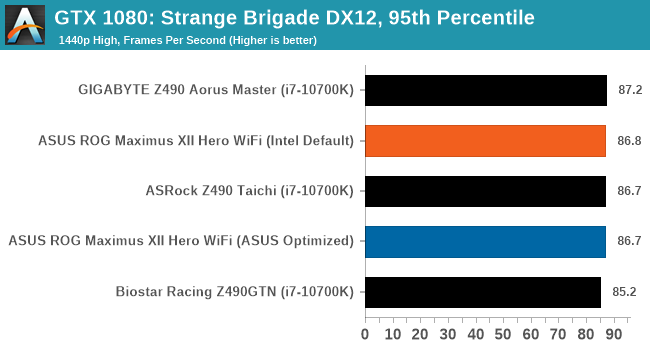
Strange Brigade is based in 1903’s Egypt and follows a story which is very similar to that of the Mummy film franchise. This particular third-person shooter is developed by Rebellion Developments which is more widely known for games such as the Sniper Elite and Alien vs Predator series. The game follows the hunt for Seteki the Witch Queen who has arose once again and the only ‘troop’ who can ultimately stop her. Gameplay is cooperative centric with a wide variety of different levels and many puzzles which need solving by the British colonial Secret Service agents sent to put an end to her reign of barbaric and brutality.
The game supports both the DirectX 12 and Vulkan APIs and houses its own built-in benchmark which offers various options up for customization including textures, anti-aliasing, reflections, draw distance and even allows users to enable or disable motion blur, ambient occlusion and tessellation among others. AMD has boasted previously that Strange Brigade is part of its Vulkan API implementation offering scalability for AMD multi-graphics card configurations.
Overclocking
Experience with the ASUS ROG Maximus XII Hero WiFi
Overclocking on LGA1200 platform can be as simple or complicated as you make it. The problematic part with overclocking the Intel Comet Lake processors comes from gauging CPU VCore voltages and thus the heat any overclocking over default settings can do. These chips, in particular, the Core i7-10700K and the bigger i9-10900K already run to high levels at stock settings. Any user intending to overclock with Comet Lake needs to factor in capable cooling, with a 240 mm recommended as the absolute minimum for the i7 model, and a 280 mm AIO as the minimum for the 10-core i9. Some of the extra performance available from Intel's Comet Lake comes when the processor is cooler, with Thermal Velocity Boost which is good for an additional 100 MHz in regards to turbo when kept under 70°C, which is no easy thing to do. Overclocking beyond the default settings also risks thermal throttling which chokes the processor down to try and reduce the overall heat, which can drastically drop performance.
One aspect ASUS tends to focus on with its ROG branded Maximus (Intel), and Crosshair (AMD) models is overclocking. The ROG Maximus XII Hero WiFi is no exception to this rule. It has a wide variety of options for users to tweak, prod, and ultimately configure to get a capable overclock. The ASUS ROG firmware itself is easy to use, with a long scroll down list of options starting with CPU, then onto memory settings, then further down is a vast host of voltage options. The CPU options are extensive with plenty of submenus which include power delivery tweaking which includes load-line calibration settings and a dedicated section to Intel's VF Curve settings, in which users can dial in less aggressive or overzealous settings at their whim.
There is an extensive selection of memory-related settings too including frequency, BLCK which overclocks the processor and PCIe also, as well as a list of preset memory overclocking profiles designed for users with high bin memory. Included in the memory latency settings is a long list of customizable primary, secondary, and tertiary timings for memory performance enthusiasts, as well as an option to favor Intel's XTU benchmark for competitive overclocking.
Overall overclocking with the ASUS Maximus XII Hero WiFi is one to consider carefully, as users may be tempted to use options which are simply not required. Users can change the primary voltage settings, including CPU VCore and DRAM voltage, as well as dial in the desired frequency. Due to the heat of Comet Lake processors, we wouldn't recommend going over 1.35 V without at least a high-end cooling solution such as a 280 mm AIO or 360 mm AIO, or even a custom water cooling loop with at least a 240 mm radiator.
Overclocking Methodology
Our standard overclocking methodology is as follows. We select the automatic overclock options and test for stability with POV-Ray and Prime95 to simulate high-end workloads. These stability tests aim to catch any immediate causes for memory or CPU errors.
For manual overclocks, based on the information gathered from the previous testing, starts off at a nominal voltage and CPU multiplier, and the multiplier is increased until the stability tests are failed. The CPU voltage is increased gradually until the stability tests are passed, and the process repeated until the motherboard reduces the multiplier automatically (due to safety protocol) or the CPU temperature reaches a stupidly high level (105ºC+). Our testbed is not in a case, which should push overclocks higher with fresher (cooler) air.
Overclocking Results
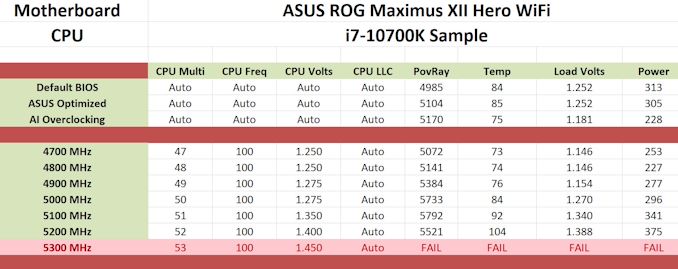
Although the ASUS ROG Maximus XII Hero WiFi doesn't technically have any preset overclocking profiles, ASUS has included two choices when entering POST from a freshly cleared BIOS. This includes Intel Default settings which will apply settings to Intel's specifications or ASUS optimized which essentially removes all of Intel's power limits. In our testing, the ASUS Optimized settings gained around 2.3% in POV-Ray performance, with a slightly lower power draw, and very marginal temperature differences. Using ASUS AI automatic overclocking function, we saw a more significant jump in performance of around 3.7%, with even lower CPU temperatures and a much lower overall power draw, with a maximum CPU VCore load voltage of 1.181 V; this is impressive.
Testing manual overclocks from 4.7 GHz to our maximum stable overclock achieved of 5.3 GHz, we noticed a gradual increase in POV-Ray performance. With the rise in CPU Core frequency and CPU VCore voltage comes more heat and power draw, which goes hand in hand. At our test of 5.2 GHz all-cores at 1.400 V, we did experience thermal throttling which dropped performance down to levels between what would be expected at 4.9 to 5.0 GHz. At our lower settings, including 4.7, 4.8, and 4.9 GHz, we noticed large amounts of VDroop with a lot of under voting. The overclocks, however, remained stable and as a direct consequence, we saw drastic drops to the heat output compared to other boards we've tested. As we went to 5.0 GHz and beyond, VDroop control tightened up, and the load voltage was much closer to the CPU Vcore settings entered into the BIOS.
Another thing we are adding to our Z490 motherboard reviews is DDR4-5000 XMP validation. We reviewed a kit of Corsair's Vengeance LPX DDR4-5000 at the beginning of the year, and although the ROG Maximus XII Hero WiFi doesn't officially support DDR4-5000, we tried anyway. Unfortunately, this didn't POST, and so far hasn't POSTed on any of the Z490 models we have tested so far.
Power Delivery Thermal Analysis
A lot more focus has been put onto power delivery specifications and capabilities, not just by manufacturers, but as a result of users demands. In addition to the extra power benefits from things like overclocking, more efficient designs in power deliveries and cooling solutions aim to bring temperatures down. Although this isn't something most users ever need to worry about, certain enthusiasts are bringing more focus onto each boards power delivery. The more premium models tend to include bigger and higher-grade power deliveries, with bigger and more intricate heatsink designs, with some even providing water blocks on ranges such as the ASUS ROG Maximus Formula series.
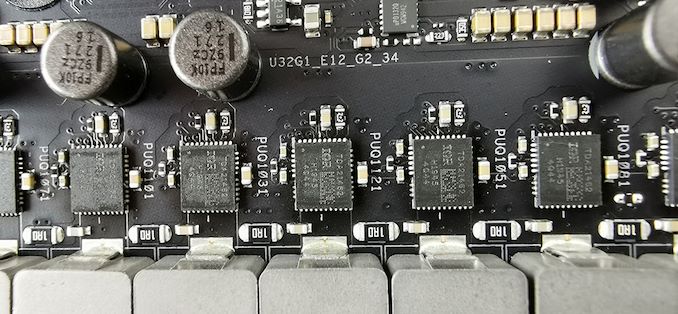
The ROG Maximus XII Hero WiFi uses a 16-phase design in 7+1 mode, with TDA21490 90 A Power stages
Testing Methodology
Our method of testing out if the power delivery and its heatsink are effective at dissipating heat, is by running an intensely heavy CPU workload for a prolonged method of time. We apply an overclock which is deemed safe and at the maximum that the silicon on our testbed processor allows. We then run the Prime95 with AVX2 enabled under a torture test for an hour at the maximum stable overclock we can which puts insane pressure on the processor. We collect our data via three different methods which include the following:
- Taking a thermal image from a birds-eye view after an hour with a Flir Pro thermal imaging camera
- Securing two probes on to the rear of the PCB, right underneath CPU VCore section of the power delivery for better parity in case a probe reports a faulty reading
- Taking a reading of the VRM temperature from the sensor reading within the HWInfo monitoring application
The reason for using three different methods is that some sensors can read inaccurate temperatures, which can give very erratic results for users looking to gauge whether an overclock is too much pressure for the power delivery handle. With using a probe on the rear, it can also show the efficiency of the power stages and heatsinks as a wide margin between the probe and sensor temperature can show that the heatsink is dissipating heat and that the design is working, or that the internal sensor is massively wrong. To ensure our probe was accurate before testing, I binned 10 and selected the most accurate (within 1c of the actual temperature) for better parity in our testing.
To recreate a real-world testing scenario, the system is built into a conventional desktop chassis which is widely available. This is to show and alleviate issues when testing on open testbeds which we have done previously, which allows natural airflow to flow over the power delivery heatsinks. It provides a better comparison for the end-user and allows us to mitigate issues where heatsinks have been designed with airflow in mind, and those that have not. The idea of a heatsink is to allow effective dissipation of heat and not act as an insulator, with much more focus from consumers over the last couple of years on power delivery componentry and performance than in previous years.
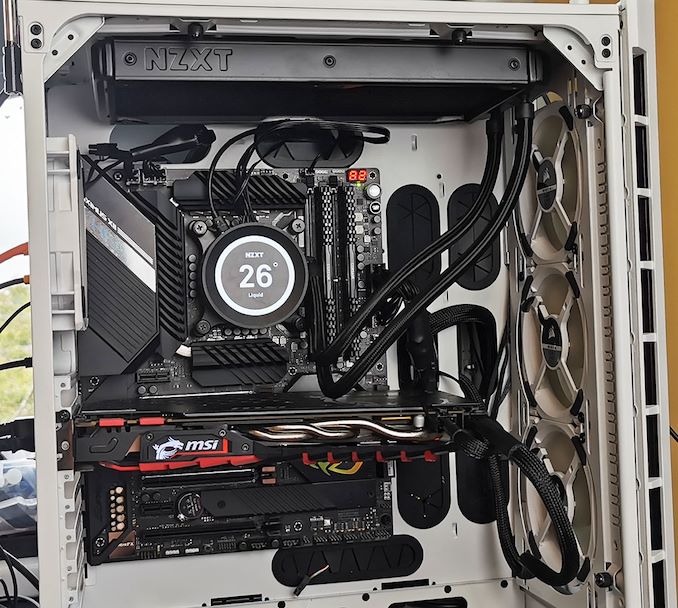
ASUS ROG Maximus XII Hero WiFi undergoing our VRM thermal testing (We test with the side panel on)
For thermal image, we use a Flir One camera as it gives a good indication of where the heat is generated around the socket area, as some designs use different configurations and an evenly spread power delivery with good components will usually generate less heat. Manufacturers who use inefficient heatsinks and cheap out on power delivery components should run hotter than those who have invested. Of course, a $700 flagship motherboard is likely to outperform a cheaper $100 model under the same testing conditions, but it is still worth testing to see which vendors are doing things correctly.
Thermal Analysis Results
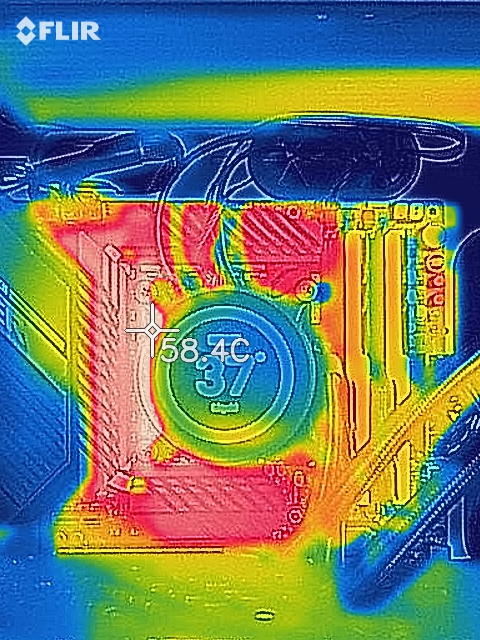
We measured 58.4°C on the hottest part of the PCB around the CPU socket and power delivery
The ASUS ROG Maximus XII Hero WiFi is equipped with a 16-phase power delivery with fourteen Infineon TDA21490 90 A power stages for the CPU, and two TDA21490 90 A power stages for the SoC. The power delivery is controlled by an ASP1405I 8-phase controller operating at 7+1, as ASUS is using teamed power stages for better efficiency, more consistent power throughput, and improved transient response. The Maximus XII Hero WiFi is using three heatsinks to cool the power delivery which is all interconnected via a nickel-plated copper heat pipe, with deep grooves in the aluminium fins designed to channel passive airflow.
Focusing on the thermal performance, the ASUS ROG Maximus XII Hero WiFi power delivery operates well within the guideline specifications of each part when subjected to our test method. We measured 58°C from the integrated VRM thermal sensor on the board, with a matching reading of 58°C from our first thermal probe. We saw a bit of variance compared to our second probe which we measured at 52°C, although we did pick up another consistent reading of 58.4°C from our FLIR thermal imaging camera.
Compared to the other models on test, it leaves us no doubt that the ROG Maximus XII Hero WiFi has plenty to offer for overclocks, with lots of potential headroom left. The ASRock model is running cooler due to its active cooled power delivery heatsink, but the GIGABYTE currently wins out in our power delivery thermal testing with its design.
ASUS ROG Maximus XII Hero WiFi Conclusion
With Intel’s processors going above 150 W and 200 W during their turbo periods by default, we are getting to a point now where motherboard optimized profiles are extending the times these high power modes are in operation. Out of the box, most motherboards are not running Intel recommended specifications, but instead the motherboard manufacturers own optimized settings. To that end, users have to understand even before turning on the system what their cooling requirements can be, which can be difficult.
ASUS’ solution to this question, given that they do not want to lose all the benefits that having an out-of-the-box optimized group of settings for a motherboard built beyond Intel’s specifications, is to give the user a choice on first boot: to choose Intel specifications, or ASUS’ Optimized settings. It looks a little something like this.
ASUS’ optimized settings in this case gave us extended turbo profiles, raising the power limits and power time for when the processor was in its turbo modes. As a result we saw a not-insignificant 2% gain in performance, at a slightly lower power, with ASUS’ Optimized settings rather than Intel defaults. In the land of motherboard operation, where most users see them as performing all the same, this becomes a factor in actual end-user performance worth noting.
As I pitched at the beginning of this review, although this is useful for the enthusiasts among us, for those that don’t know that the motherboard might be able to go beyond Intel’s settings, it might be a bit overwhelming, and they will chose Intel defaults by standard. Not all is completely lost here, given that the user still benefits from ASUS’ extended power delivery and chipset cooling. However, for $399, I wonder just how many non-enthusiasts would be stumped here.
The motherboard as it stands is an interesting bit of kit. It has fan headers coming out of every segment of the motherboard (it has eight), and offers some premium controller support, such as Aquantia 5G Ethernet, Intel’s AX201 Wi-Fi 6 module, a USB 3.2 Gen 2.2 (20 Gbps) port, plenty of additional RGB headers and support for liquid cooling, and three PCIe 3.0 x4 M.2 slots underneath the chipset heatsink for a unified cooling strategy. There’s also the enhanced SupremeFX audio and ESS ES9023 DAC as well.
In our performance metrics, the Hero scored well in power consumption, Boot Time, and was very competitive in our CPU/GPU benchmarks. We did indeed see benchmark differences when using ASUS’ Optimized settings over the Intel defaults, making it well worth enabling for all users, especially as we also saw a lower peak power reading at the wall.
For overclocking, our eight-core Core i7 chip did 5.1 GHz very easily, but started to throttle back at 5.2 GHz due to the chip overheating rather than anything on the motherboard. In our overclocked settings, the thermal readings both on the power delivery and behind the power delivery were well under 60ºC in a case, showing that this board has the strength to push a processor assuming the user has a good chip and sufficient cooling. For this generation it seems, for day-to-day overclock use, the limits are almost certainly the CPUs and not the motherboards.
At $399, the ASUS ROG Maximus XII Hero is on the expensive end of the market. There’s no immediate gimmick that makes this motherboard a must buy for a certain section of the audience, but it simply comes across as a polished design with a number of key controller upgrades that the cheaper boards lack. A polished design with a good cooling strategy is always worth looking at for the Core i7 and Core i9 unlocked processors, which is what this board will end up paired with.

