Original Link: https://www.anandtech.com/show/13840/tiny-at-200-usd-asus-rog-strix-z390-i-gaming-asrock-z390-phantom-gaming-itx-ac-review
Tiny at $200: ASUS Z390-I Gaming vs. ASRock Z390 Gaming-ITX/ac Review
by Gavin Bonshor on February 12, 2019 10:00 AM EST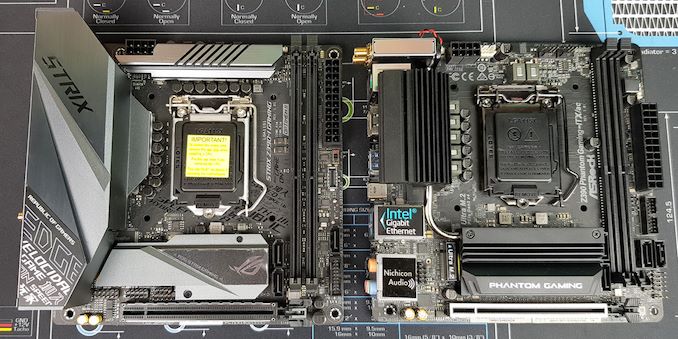
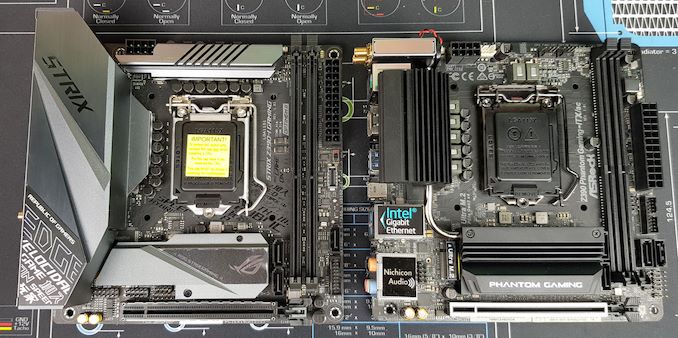
With the popularity of small form factor systems ever increasing, today we reviewing two of the most attractive and high-end mini-ITX motherboards on the Z390 chipset which sit happily in an optimum price bracket. Both the ASUS ROG Strix Z390-I Gaming and the ASRock Z390 Phantom Gaming-ITX/ac are around the $200 mark, which is a very popular enthusiast price point for small form factor high powered motherboards. Both motherboards also share similar features, including dual M.2 slots for storage and 802.11ac Wave 2 Wi-Fi modules. Nonetheless, there are differences between the two worth examining.
The mini-ITX form factor is an important market segment for users looking to build a system with a smaller footprint, but without sacrificing on performance. ASRock's X99E-ITX/ac motherboard, launched several years ago, showed that HEDT performance and small form factor can work hand in hand. At the launch of Intel's Z390 chipset, a total of six mini-ITX models made its way onto retail shelves at multiple price points. Two notable entries include the ASUS ROG Strix Z390-I Gaming ($210) and ASRock Z390 Phantom Gaming-ITX/ac ($190), both with premium controller sets and good quality power deliveries. The notion that smaller form factors negate users from building high-end gaming systems and offer enthusiast-grade performs is long gone.
Comparing at $200
With the two motherboards for our review, they are both agressive in features and capabilities. If users only take one line away from this review, here's the summary:
The ASUS board has our best ever overclock on a Z390 motherboard, along with support for 32GB DC memory modules. The ASRock board is the only Z390 motherboard with a built-in Thunderbolt 3 port. Both motherboards are extremely compeititive in all our benchmarks, even compared to larger ATX models.
The details of the how and why these boards might be central to your next system build are in the following pages.
The ASUS ROG Strix Z390-I Gaming Overview
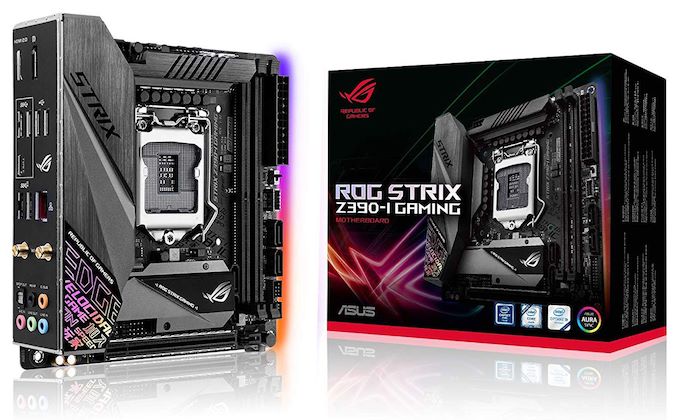
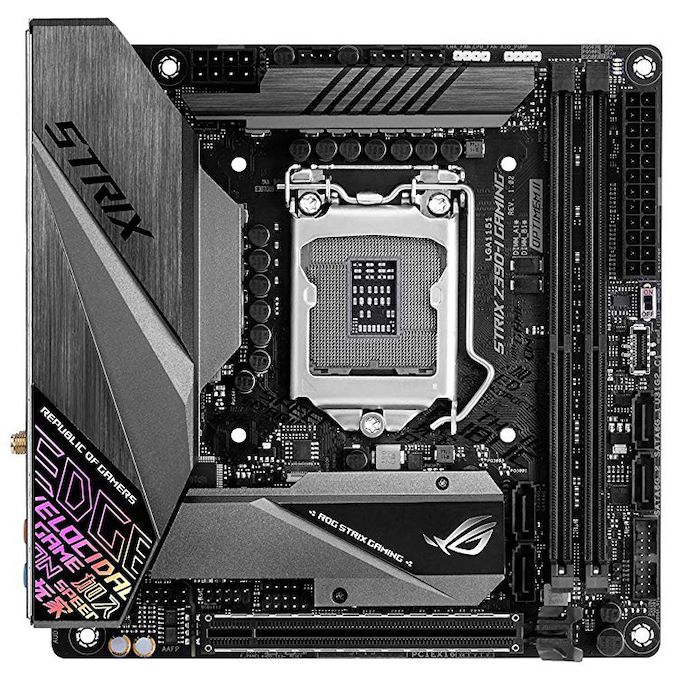
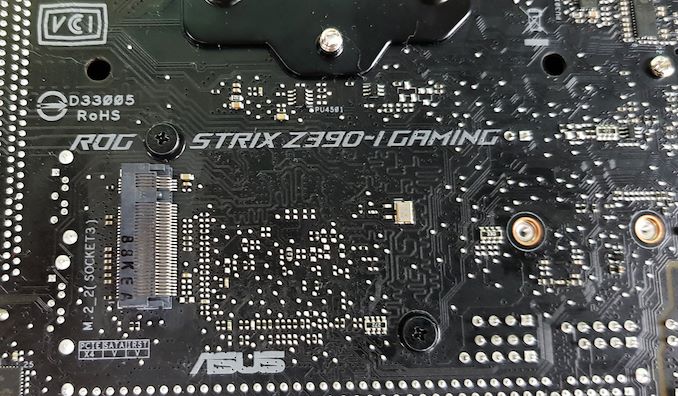
Starting out with the ASUS ROG model, the Strix Z390-I Gaming is a mini-ITX sized motherboard with a slight resemblance to the previous ROG Strix Z370-I model. When a socket gets a refresh, it allows manufacturers to make positive changes to the newer models and the Strix Z390-I Gaming does have a few upgrades to note; both visually and in the specifications. The ASUS ROG Strix Z390-I includes a gaming-themed rear panel cover with integrated rear panel IO shield as well as RGB LEDs along the right underside of the board. Included for hot running NVMe SSDs is an M.2 heatsink which also covers the chipset, with a second M.2 slot located on the rear of the PCB.
One of the biggest performance upgrades over the older model comes via the memory support, which is increased up to DDR4-4600. This makes the Z390-I Gaming one of the fastest advertised for memory from all the of the Z390 motherboards. One important aspect to note is that the Strix Z390-I is one of only three motherboards to include compatibility with the 32 GB G.Skill and ZADAKs Double Height DDR4 memory modules which we reviewed, and allows users to install up to 64 GB of system memory into a mini-ITX motherboard. Included in the controller set is a Realtek based ROG SupremeFX S1220A HD audio codec, an Intel I219-V Network controller, and an Intel 9560 Wave2 capable 802.11ac Wi-Fi adapter which also features Bluetooth 5.0. Along with just a handful of other Z390 models, the Strix Z390-I Gaming has HDMI 2.0 on the rear panel, as well as a single DisplayPort.
Touching on the performance, the ASUS ROG Strix Z390-I Gaming put in a good showing in our test suite with the fastest POST times of any Z370/Z390 board we've seen, with highly competitive results in most others. There weren't any pitfalls or anomalies shown, and the Strix Z390-I Gaming also put in a more than respectable effort in our overclock testing with our i7-8700K. We managed to achieve 5.1 GHz with a CPU VCore of 1.40 V, which was 100% stable - this is the first board in which that level of overclock has been stable.
One thing we noticed was that ASUS seems to have a less aggressive approach to thermal throttling and this showed in our POV-Ray testing at the top end of our testing. Voltage control throughout was pretty tight and the boards AI Optimized profile worked very well with a 5.0 GHz overclock achieved at between 1.20 and 1.35 V measured with CPU-Z.
ASUS ROG looks to have gone all-in features wise as it seems its crammed all the premium elements of its own ATX sized ROG Strix Z390-E Gaming model into a smaller package. With a current price of around $200 depending on the retailer, it seems to be a fair with what’s on offer and the level of performance. The ROG Strix-Z390-I is aimed at gamers and small form factor enthusiasts looking to build a high-performance mini-ITX based desktop PC; overclockers will be interested no doubt.
Board Features
The ROG Strix Z390-I Gaming is ASUS’s only mini-ITX motherboard on the Z390 chipset and represents its gaming-focused Strix brand. The mini-ITX form factor does provide some limitations such as only having one single full-length PCIe 3.0 x16 slot, as well as only two memory slots. The rest of the feature set however is similar to the larger ROG Strix Z390-E Gaming, with the same ROG SupremeFX S1220A HD audio codec taking care of audio and an Intel pairing consisting of the I219-V 1 GbE NIC and 9560 802.11ac 2T2R handling the networking capabilities.
| ASUS ROG Strix Z390-I Gaming ITX Motherboard | |||
| Warranty Period | 3 Years | ||
| Product Page | Link | ||
| Price | $210 | ||
| Size | Mini-ITX | ||
| CPU Interface | LGA1151 | ||
| Chipset | Intel Z390 | ||
| Memory Slots (DDR4) | Two DDR4 Supporting 32 GB (Double Height 64 GB) Dual Channel Up to DDR4-4600 |
||
| Video Outputs | 1 x HDMI 2.0a 1 x DisplayPort 1.2 |
||
| Network Connectivity | Intel I219-V Gigabit Intel 9560 802.11ac 2T2R |
||
| Onboard Audio | SupremeFX S1220A | ||
| PCIe Slots for Graphics (from CPU) | 1 x PCIe 3.0 x16 | ||
| PCIe Slots for Other (from PCH) | N/A | ||
| Onboard SATA | Four, RAID 0/1/5/10 | ||
| Onboard M.2 | 2 x PCIe 3.0 x4/SATA, RAID 0/1/5 | ||
| USB 3.1 (10 Gbps) | 2 x Type-A Rear Panel 1 x Type-C Header |
||
| USB 3.0 (5 Gbps) | 2 x Type-A Rear Panel 1 x Type-C Rear Panel 1 x Header (two ports) |
||
| USB 2.0 | 2 x Type-A Rear Panel 1 x Header (two ports) |
||
| Power Connectors | 1 x 24-pin ATX 1 x 8pin CPU |
||
| Fan Headers | 1 x CPU (4-pin) 1 x CPU/pump (4-pin) 1 x System (4-pin) |
||
| IO Panel | 2 x USB 3.1 G2 Type-A 1 x USB 3.1 G2 Type-C 2 x USB 3.1 G1 Type-A 2 x USB 2.0 Type-A 1 x Network RJ45 (Intel) 5 x 3.5mm Audio Jacks (SupremeFX) 1 x S/PDIF Output (SupremeFX) 2 x Intel 9560 Antenna Ports |
||
On the rear panel is a little less USB 3.1 G2 USB connectivity than expected. Most boards in the upper echelon tend to include a minimum of four USB 3.1 G2 ports, while the smaller form factor of the Strix Z390-I Gaming offers just three G2 Type-A ports. The single USB Type-C included on the rear panel is USB 3.1 G1 and even though ASUS has included a USB 3.1 G2 Type-C header, it wouldn't be unacceptable to expect it to be implemented on the rear as standard. For users looking to use the onboard graphics capabilities on supported 8th and 9th generation Intel Core processors, HDMI 2.0a and DisplayPort are present. As it stands, this is one of only a handful of motherboards on the entire Z390 chipset to include HDMI 2.0.
ASUS ROG Strix Z390-I Gaming Visual Inspection
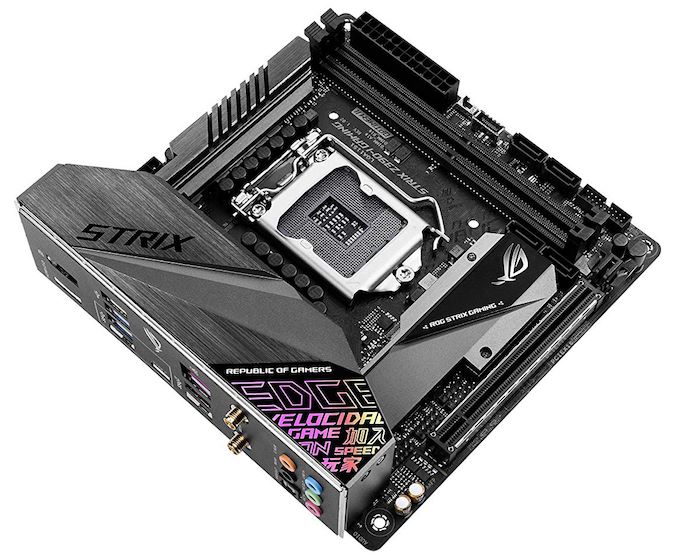
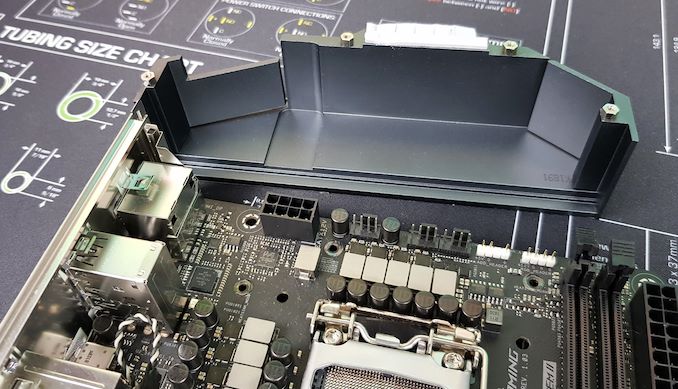
Looking at the design of ASUS ROG Strix Z390-I Gaming, it has a combined M.2 and chipset heatsink just above the armored full-length PCIe 3.0 x16 slot, similar to the previous ROG Strix Z370-I Gaming model. The newer Z390-I Gaming extends on the previous model's design with a full rear panel cover which includes the Strix branding at the top and holographic gaming inspired Edge sticker at the bottom. Another upgrade is the integrated rear panel IO shield. The metal rear panel cover which also doubles up as part of the power delivery heatsink, SoC power delivery heatsink, and the M.2 heatshield/chipset heatsink, All the heatsinks feature the metallic grey finish. The PCB itself is all-black and features some stylistic urban print resembling of the ROG Edge sticker on the rear panel cover. There is some RGB LED lighting integrated onto the board which emanates from the right-hand side of the board the back and ASUS has included a single RGB addressable and a standard RGB header for users to expand upon.
The mini-ITX form factor does bring limitations due to the size. This is apparent with the two memory slots and a single full-length PCIe 3.0 x16 slot. The memory slots support dual-channel memory with speeds of up to DDR4-4600 and up to 64 GB in total. The ROG Strix Z390-I Gaming is one of three ASUS Z390 models to be compatible with the double height double capacity G.Skill TridentZ DC RGB and ZADAK Shield DC RGB 32 GB modules which we reviewed and makes it a desirable option for users wishing to put 64 GB into a mini-ITX board.
Another direct consequence of limited space stretches to the headers with one USB 3.1 G1 and one USB 2.0 header present; both headers can support two ports on each. Also featured is a USB 3.1 G2 Type-C header. Another casualty of the small form factor is in the cooling support, as the Strix Z390-I has just three 4-pin headers available. These are divided into three sections at the top of the board; a CPU header, Pump/AIO header and a single header for system fans.
On the storage front, the ASUS ROG Strix Z390-I Gaming has four straight-angled SATA ports which have support for RAID 0, 1, 5 and 10 arrays. On the front of the board is an M.2 PCIe 3.0 x4 slot which has the benefit of an included heatsink. The second slot is located on the rear of the board and has support for M.2 PCIe 3.0 x4 drives, with both slots offering support for M.2 2280 drives. It is worth noting that if an M.2 drive is installed into M.2_1 and is running in SATA mode, it automatically disables the SATA_2 port.
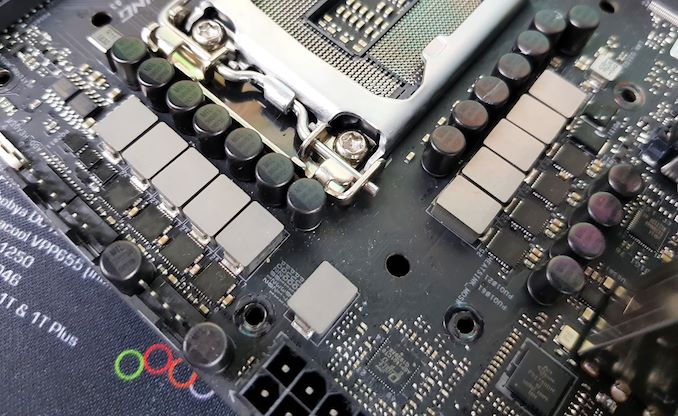
ASUS has been quite tight-lipped about the power delivery configurations for its Z390 models prior to launch. For this board, we can see that ASUS uses what looks like a 6-phase design. The ASP1401CTB PWM controller regulates a total of six ON Semiconductor NCP302045 45 A DrMOS power stages and the VCore looks to be actually running in a three-phase configuration with two sets of three NCP302045 power stages connected together. ASUS hasn’t used doublers and is running the VCore phases in parallel. The ROG Strix Z390-I Gaming uses 5K solid capacitors and a has a total of eleven 60 A inductors. The VCCIO and VCCSA section of the power delivery also the ON NCP302045 45 A DrMOS power stages. It's a slightly misleading setup and for what should be a relatively straight forward configuration, it seems to be more a lot more complicated than it needs to be.
| Z390 Motherboard Power Delivery Comparison | |||||
| Motherboard | Controller | H-Side | L-Side | Chokes | Doubler |
| ASUS ROG Strix Z390-I Gaming | ASP1401CTB (4+2) |
ON NCP302045 (6) |
11 | - | |
| ASRock Z390 Taichi | IR35201 (5+2) |
TI 87350D (12) ON FDPC5939SG (2) |
14 | IR3598 (6) |
|
| ASRock Z390 Taichi Ultimate | IR35201 (5+2) |
TI 87350D (12) ON FDPC5939SG (2) |
14 | IR3598 (6) |
|
| ASRock Z390 Phantom Gaming 9 | IR35201 (5+2) |
TI 87350D (12) ON FDPC5939SG (2) |
14 | IR3598 (6) |
|
| GIGABYTE Z390 Aorus Master | IR35201 (6+2) |
IR3553 (12) |
14 | IR3599 (6) |
|
| GIGABYTE Z390 Aorus Ultra | ISL69138 (6+1) |
SiC634 (12) |
13 | ISL6617A (6) |
|
| GIGABYTE Z390 Aorus Pro WiFi | ISL69138 (6+1) |
SiC634 (12) |
13 | ISL6617A (6) |
|
| GIGABYTE Z390 Aorus Pro | ISL69138 (6+1) |
SiC634 (12) |
13 | ISL6617A (6) |
|
| GIGABYTE Z390 Aorus Elite | ISL69138 (6+1) |
SiC634 (12) |
13 | ISL6617A (6) |
|
| GIGABYTE Z390 I Aorus Pro WiFi | IR35201 (6+2) |
IR3553 (6) |
8 | - | |
| GIGABYTE Z390 Gaming SLI | ISL69138 (5+2) |
PPak (10) |
12 | ISL6617A (5) |
|
| GIGABYTE Z390 Gaming X | ISL69138 (5+2) |
PPak (10) |
12 | ISL6617A (5) |
|
| GIGABYTE Z390 UD | ISL69138 (5+2) |
PPak (10) |
12 | ISL6617A (5) |
|
| MSI MEG Z390 ACE | IR35201 (6+2) |
ON4C029N (12) |
ON4C024N (12) |
13 | IR3598 (6) |
| Supermicro C9Z390-PGW | PXE1610 (6+1) PXM1310 (3+1) |
TDA21232 (6) TDA21240 (2) |
8 | - | |
The design of the power delivery heatsinks, and ASUS’s integration of the metal rear panel cover which doubles up as a heatsink, is quite an ingenious use of space. Not only does the rear panel omit plastic panels, but acts as a large surface for passive cooling and systems with high airflow could benefit. On the small heatsink, there isn’t much bulk or weight, but it seems more than capable of handling the SoC section of the power delivery.
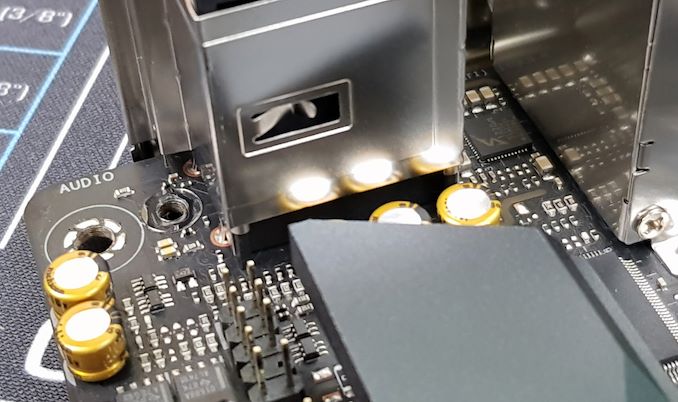
Sandwiched in between the rear panel audio ports and the Intel 9560 802.11ac Wave2 Wi-Fi adapter, is the cramped ROG SupremeFX S1220A HD audio codec. This is a rebranded Realtek ALC1220 HD codec which is found on most Z390 boards and is seemingly the standard for premium motherboards. The codec is surrounded by five gold Nichicon audio capacitors and the area does include physical PCB separation from the rest of the board; the S1220A codec itself isn’t isolated and doesn't include an EMI shield.
On the rear panel of the ASUS ROG Strix Z390-I Gaming is a preinstalled I/O shield which locks into place with the same screws that holds the rear panel cover in place. There is a varied selection of connections on offer with the USB connectivity being led by three USB 3.1 G2 Type-A and a single USB 3.1 G1 Type-C port. Other USB connections include two USB 3.1 G1 Type-A ports and two USB 2.0 ports which seems pretty weak for a board at this price point. Integrated graphics users can use the pair of video outputs which includes an HDMI 2.0a and DisplayPort 1.2 port. A total of five 3.5 mm colored audio jacks with a single S/PDIF optical output is handled by the SupremeFX S1220A HD audio codec, the single LAN port is powered by an Intel I219-V GbE NIC and two antenna ports is for the Intel 9560 802.11ac Wave2 Wi-Fi adapter which offers support for speeds of up to 1.73 Gbps; the Intel 9560 also offers Bluetooth 5.0 capability.
What's in The Box
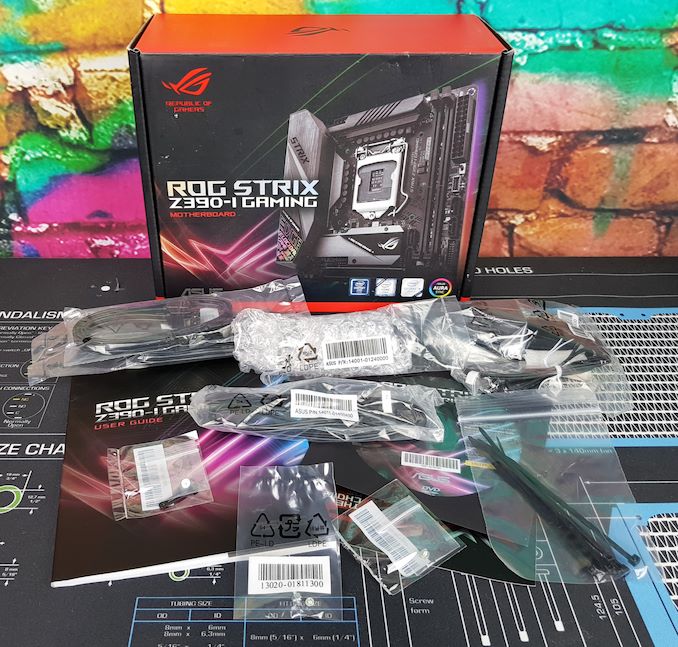
The ROG Strix Z390-I Gaming motherboard has a good selection of accessories including four SATA cables, black cable ties, and the 2T2R moving antenna required for using the boards 802.11ac Wi-Fi and Bluetooth 5.0. A nice touch is the inclusion of a 20% off voucher for Cablemods cable extensions and an 80 cm extension cable to help users better route RGB LED cables; good for helping to manage cables in tight spaces.
- Black cable ties
- 4-pin RGB 80 cm extension cable
- Intel 9560 802.11ac Dual Band Wi-Fi Moving Antenna (2T2R)
- 2 x M.2 screws and standoffs
- 1 x M.2 installation kit
- Driver and Software Installation CD
- Four SATA cables (two right-angled and two straight)
- 20% off Cablemods Voucher Code
- Sticker set including cable labels
- ROG thank you card
- User manual
The ASRock Z390 Phantom Gaming-ITX/ac Overview
Buy ASRock Z390 Phantom Gaming-ITX/ac on Newegg
The ASRock Z390 Phantom Gaming-ITX/ac is a mini-ITX motherboard representing its new gaming brand. The Phantom Gaming series made its debut on the Z390 chipset and directly replaces the previous Fatal1ty branding. ASRock has recently just introduced a range of new AMD based graphics cards and even DDR4 memory to the Phantom Gaming range. This gives users the opportunity to kit out a full system with matching components.
Possibly the Z390 Phantom Gaming-ITX/ac's strongest attribute is in the pricing as it has an MSRP of just $190 which with all the features on offer, puts some of the other ATX sized Z390 boards on notice. There are a lot of features on offer and it looks to be one of the most advantageous mini-ITX boards on the market in recent times.
Thunderbolt 3 Included
As it stands, the Z390 Phantom Gaming-ITX/ac is the only Z390 motherboard to include a rear panel Thunderbolt 3 USB Type-C port which makes this mini-ITX model stand out from a stacked model list of over 50+ Z390 motherboards. Some of the main features on the ASRock Z390 Phantom Gaming-ITX/ac's include dual M.2 ports, an Intel 9560 802.11ac MU-MIMO Wi-Fi adapter, and a single HDMI 2.0 video output on the rear panel. Other prominent features include dual channel DDR4-4500 memory support with up to a maximum of 32 GB over two memory slots. Some vendors have updated their Z390 motherboards QVL memory support lists to support the Samsung 32 GB UDIMMs, but the Phantom Gaming-ITX/ac as it currently stands isn’t one of them at the time of writing.
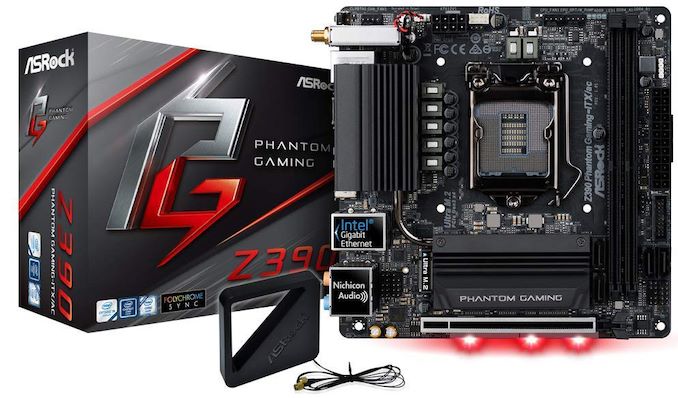
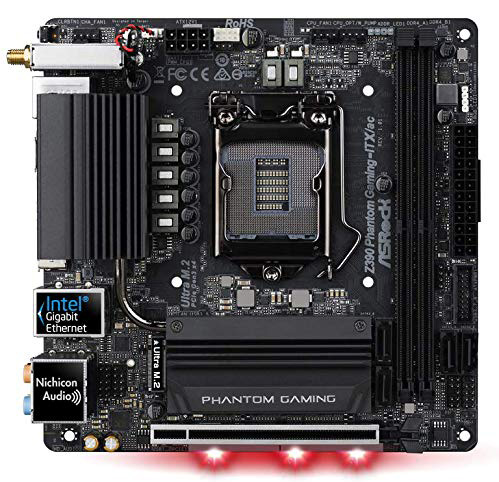
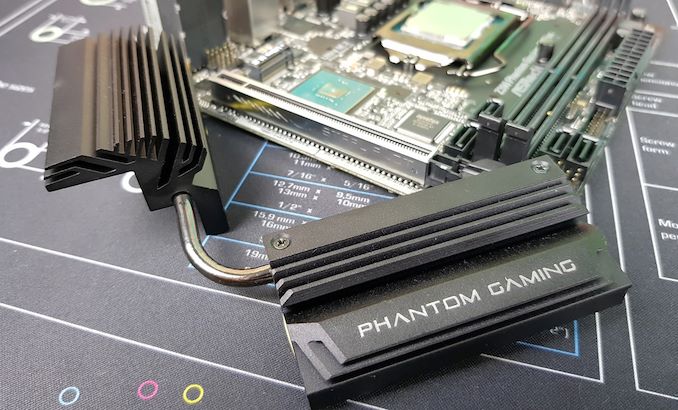
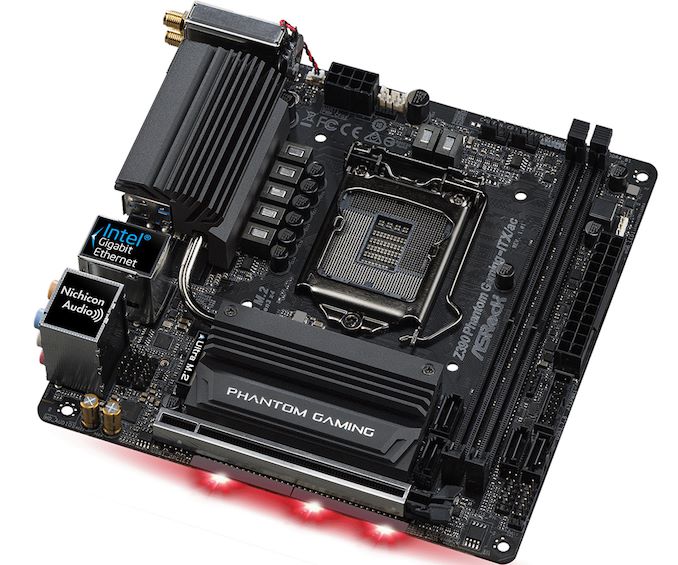
On the aesthetics of the Z390 Phantom Gaming-ITX/ac, ASRock keeps it simple with an all-black PCB and black metallic power delivery heatsink which extends around and across the M.2 slot and Z390 chipset heatsink; this is done using a 2 oz copper heat pipe. Lovers of RGB can customize the integrated LEDs at the bottom of the board and for users looking to expand, there’s an addressable and standard RGB header too. An exclamation point of how small mini-ITX is evident with just one Steel Slot clad full-length PCIe 3.0 x16 slot. Just above this is an M.2 slot which benefits from a heatsink. A second M.2 slot is located on the rear of the PCB, with the rest of the available storage options consisting of four SATA ports.
ASRock hasn’t just relied on its premium features to make things appealing to users, but the rear panel has plenty to touch on. There’s 3.5 mm audio inputs and an S/PDIF optical output due to using a Realtek ALC1220 HD audio codec and the Z390 Phantom Gaming-ITX/ac also offers a total of five USB 3.1 G2 ports: four Type-A and one Type-C Thunderbolt 3 port.
In our testing, the ASRock Z390 Phantom Gaming-ITX/ac performed consistently well and it trades blows with the similarly priced ASUS ROG Strix Z390-I Gaming at every avenue explored. Power consumption figures at idle within Windows 10 didn’t prove too efficient, but at full load, the Phantom Gaming ITX sized board did do better. Booting times in our non-UEFI POST time test were great and our gaming testing showed no anomalies.
With our overclock testing, the Z390 Phantom Gaming-ITX/ac excelled and aside from a very overzealous 5 GHz preset overclocking profile that plied our chip with too much voltage (1.50 V) on the VCore, everything seemed good. ASRock has intelligently set the firmware to correlate custom CPU VCore voltage adjustments with setting load line calibration or LLC to level 1. This means little to no VDroop experienced with just a slight variation to set and load voltages at 5.0 GHz and beyond.
The ASRock Z390 Phantom Gaming-ITX/ac is one of six boards from its new Phantom Gaming series, with this also being the smallest of the line-up. Unlike the other vendors on Z390, ASRock has two mini-ITX motherboards with the other coming in a non-gaming branded and less premium form, the ASRock Z390M-ITX/ac ($150). Currently in retail channels with a price tag of $190, the ASRock Z390 Phantom Gaming-ITX/ac offers lots of useful features and quality components at a more than acceptable price point. This is certainly attributed to the inclusion of a Thunderbolt 3 USB Type-C connector on the rear panel which makes this model a rarity; rare is appealing.
Board Features
The ASRock Z390 Phantom Gaming-ITX/ac is the company's highest quality Z390 mini-ITX motherboards. On the front of the board is a single ASRock Steel Slot full-length PCIe 3.0 x16 slot, with the board also encompassing two PCIe 3.0 x4 M.2 slots. The front slot comes with a preattached M.2 heatsink. The audio is handled by a Realtek ALC1220 HD audio codec, while the networking capabilities are taken care of with by an Intel I219-V GbE NIC and Intel 9560 802.11ac MU-MIMO Wi-Fi adapter; this also allows users to use Bluetooth 5.0 devices.
| ASRock Z390 Phantom Gaming-ITX/ac ITX Motherboard | |||
| Warranty Period | 3 Years | ||
| Product Page | Link | ||
| Price | $190 | ||
| Size | Mini-ITX | ||
| CPU Interface | LGA1151 | ||
| Chipset | Intel Z390 | ||
| Memory Slots (DDR4) | Two DDR4 Supporting 32 GB Dual Channel Up to DDR4-4500 |
||
| Video Outputs | 1 x HDMI 2.0 1 x DisplayPort 1.2 |
||
| Network Connectivity | Intel I219-V Gigabit Intel 9560 802.11ac 2T2R |
||
| Onboard Audio | Realtek ALC1220 | ||
| PCIe Slots for Graphics (from CPU) | 1 x PCIe 3.0 x16 | ||
| PCIe Slots for Other (from PCH) | N/A | ||
| Onboard SATA | Four, RAID 0/1/5/10 | ||
| Onboard M.2 | 2 x PCIe 3.0 x4/SATA | ||
| USB 3.1 (10 Gbps) | 4 x Type-A Rear Panel 1 x Thunderbolt 3 Type-C Rear Panel (Intel 6240) |
||
| USB 3.0 (5 Gbps) | 2 x Type-A Rear Panel 1 x Header (two ports) |
||
| USB 2.0 | 1 x Header (two ports) | ||
| Power Connectors | 1 x 24-pin ATX 1 x 8pin CPU |
||
| Fan Headers | 1 x CPU (4-pin) 1 x CPU/pump (4-pin) 1 x System (4-pin) |
||
| IO Panel | 4 x USB 3.1 GbE2 Type-A 1 x USB 3.1 GbE2 Type-C (Thunderbolt 3) 2 x USB 3.1 GbE1 Type-A 1 x Network RJ45 (Intel) 1 x PS/2 Combo Port 5 x 3.5mm Audio Jacks (Realtek) 1 x S/PDIF Output (Realtek) 1 x Clear CMOS Button 2 x Intel 9560 Antenna Ports |
||
ASRock has put a lot of emphasis on performance as it's using as much of the Z390 chipsets native USB 3.1 G2 as possible on the rear panel. This translates to four Type-A and a single Thunderbolt 3 Type-C present. This model opts for the more widely used Intel I219-V GbE NIC instead of the Realtek 2.5 GbE RTL8125AG gaming focused NIC that comes on other Phantom Gaming branded boards. The ASRock Z390 Phantom Gaming-ITX/ac model also uses an HDMI 2.0, a DisplayPort 1.2, with the Thunderbolt 3 Type-C port all offering users up to 4K Ultra HD support with supported processors featuring integrated graphics.
ASRock Z390 Phantom Gaming-ITX/ac Visual Inspection
The ASRock Z390 Phantom Gaming-ITX/ac uses a very simplistic black theme with an all-black PCB and black metallic heatsinks. For the heatsink, there are two elements that are connected with a plated copper heat pipe which not only cools the CPU VCore section of the power delivery but also the Z390 chipset too. What makes it interesting is ASRock has incorporated an M.2 heatsink into the chipset part which is a good use of space.
The Phantom Gaming branding is embossed onto the chipset section of the heatsink with silver lettering which has a classic looking contrast. Users looking for RGB can customize the three LEDs which are integrated at the bottom of the board on the rear. The Z390 Phantom Gaming-ITX/ac does have two RGB headers with one addressable and one standard header which gets support from ASRock’s Polychrome RGB software.
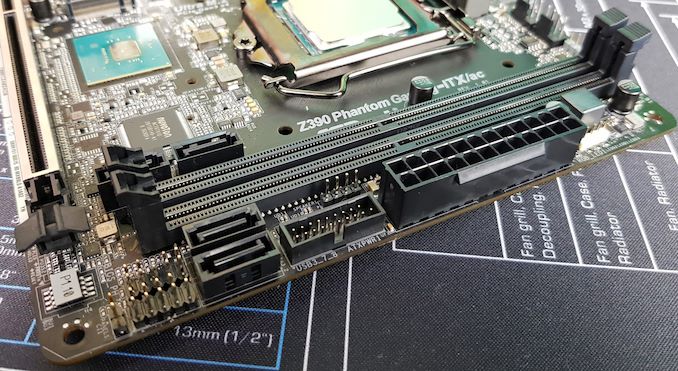
Storage wise there’s four straight-angled SATA ports with two located on either side of the RAM slots, who of which are just inside the DRAM slots which makes them difficult to access. Also, these ports have the heatsink right next to it, which means removing locking cables in this position is going to be very difficult indeed. In addition are two M.2 slots which both offer support for PCIe 3.0 x4 and SATA drives. The main slot is located just above the single full-length PCIe 3.0 x16 slot which can be accessed by removing the integrated M.2 heatsink. The second slot is located on the back of the board and both M.2 slots on the Z390 Phantom Gaming-ITX/ac support up to M.2 2280 drives. Using a SATA based drive in the primary M.2 slot on the front will disable the SATA_2 port.
One of the big improvements with the introduction of the Z390 chipset over the Z370 is memory compatibility, and the Z390 Phantom Gaming-ITX/ac benefits from this. The board has support for DDR4-4500 memory with two slots supporting up to a maximum of 32 GB. On the cooling front is a trio of 4-pin headers with them split into a CPU fan header, pump/AIO header and a single system fan header.
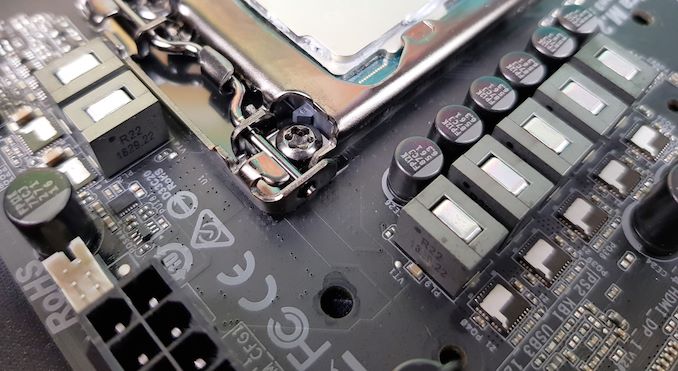
The power delivery on the ASRock Z390 Phantom Gaming-ITX/ac is one of the simplest and robust for a mini-ITX motherboard I’ve seen. Running as the central hub is an Intersil ISL69138 7-channel PWM controller which is operating in a 5+2 configuration. The CPU VCore section consists of five high-quality Intersil Smart Power ISL99227 power stages with direct metal contact which are rated at large 60 A. The other two are for the iGPU with two more ISL99227 power stages; the SoC/iGPU section of the power delivery doesn’t include a heatsink. Accompanying the power delivery is seven 60 A inductors and an array of 12K capacitors. Feeding power into the CPU from the power supply is a single 8-pin 12 V ATX power input.
| Z390 Motherboard Power Delivery Comparison | |||||
| Motherboard | Controller | H-Side | L-Side | Chokes | Doubler |
| ASUS ROG Strix Z390-I Gaming | ASP1401CTB (4+2) |
ON NCP302045 (6) |
11 | - | |
| ASRock Z390 Phantom Gaming-ITX/ac | ISL69138 (5+2) |
ISL99227 (7) |
7 | - | |
| ASRock Z390 Taichi | IR35201 (5+2) |
TI 87350D (12) ON FDPC5939SG (2) |
14 | IR3598 (6) |
|
| ASRock Z390 Taichi Ultimate | IR35201 (5+2) |
TI 87350D (12) ON FDPC5939SG (2) |
14 | IR3598 (6) |
|
| ASRock Z390 Phantom Gaming 9 | IR35201 (5+2) |
TI 87350D (12) ON FDPC5939SG (2) |
14 | IR3598 (6) |
|
| GIGABYTE Z390 Aorus Master | IR35201 (6+2) |
IR3553 (12) |
14 | IR3599 (6) |
|
| GIGABYTE Z390 Aorus Ultra | ISL69138 (6+1) |
SiC634 (12) |
13 | ISL6617A (6) |
|
| GIGABYTE Z390 Aorus Pro WiFi | ISL69138 (6+1) |
SiC634 (12) |
13 | ISL6617A (6) |
|
| GIGABYTE Z390 Aorus Pro | ISL69138 (6+1) |
SiC634 (12) |
13 | ISL6617A (6) |
|
| GIGABYTE Z390 Aorus Elite | ISL69138 (6+1) |
SiC634 (12) |
13 | ISL6617A (6) |
|
| GIGABYTE Z390 I Aorus Pro WiFi | IR35201 (6+2) |
IR3553 (6) |
8 | - | |
| GIGABYTE Z390 Gaming SLI | ISL69138 (5+2) |
PPak (10) |
12 | ISL6617A (5) |
|
| GIGABYTE Z390 Gaming X | ISL69138 (5+2) |
PPak (10) |
12 | ISL6617A (5) |
|
| GIGABYTE Z390 UD | ISL69138 (5+2) |
PPak (10) |
12 | ISL6617A (5) |
|
| MSI MEG Z390 ACE | IR35201 (6+2) |
ON4C029N (12) |
ON4C024N (12) |
13 | IR3598 (6) |
| Supermicro C9Z390-PGW | PXE1610 (6+1) PXM1310 (3+1) |
TDA21232 (6) TDA21240 (2) |
8 | - | |
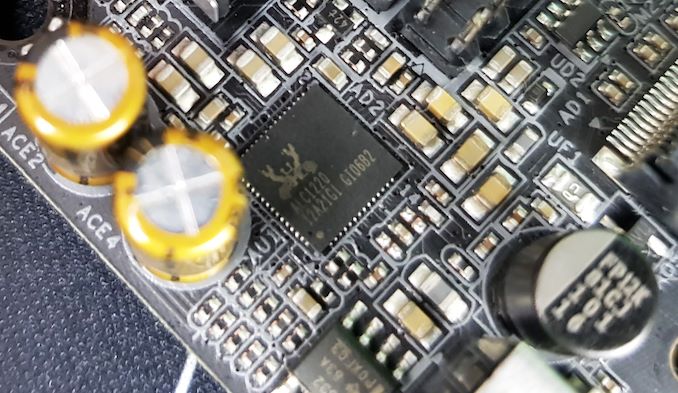
The Realtek ALC1220 HD audio codec on the Z390 Phantom Gaming-ITX/ac is flanked by a pair of gold Nichicon Japanese audio capacitors. On the PC, there is some physical separation from the audio PCB to the rest of the motherboard, but the ALC1220 codec itself doesn’t feature any isolation or EMI shielding.
Connections on the rear panel are diversified with four USB 3.1 G2 Type-A ports, two USB 3.1 G1 and desirable Thunderbolt 3 Type-C port; the Thunderbolt 3 port supports up to 4K resolution. Also present is a LAN port controlled by an Intel I219-V 1 NIC and there are two antenna adapters for the Intel 9560 802.11ac Wi-Fi adapter. Located on the rear is a handy clear CMOS button and users of legacy keyboards and mice can use the PS/2 combo port. Finishing off the Z390 Phantom Gaming-ITX/ac’s rear panel is five 3.5 mm color coded audio jacks and a S/PDIF optical output which is powered by a Realtek ALC1220 HD audio codec.
What's in The Box
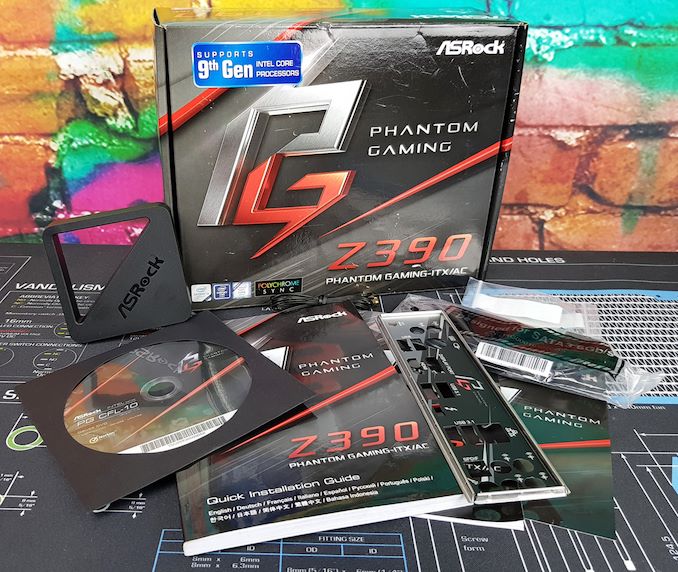
Inside of the packaging, ASRock has included four SATA cables with two featuring right-angled connectors and the remaining straight. Also included are two M.2 installation screws and an ASRock 2T2R 802.11ac adapter for use with the Wi-Fi. A driver installation disc, a software setup guide, and an installation manual make up the rest of the package.
- Rear panel shield
- Intel 9560 802.11ac Dual Band Wi-Fi Moving Antenna (2T2R)
- 2 x M.2 screws
- Driver and Software Installation CD
- Four SATA cables (two right-angled and two straight)
- 20% off Cablemods Voucher Code
- Software Setup Guide
- ASRock Phantom Gaming Postcard
- User manual
BIOS
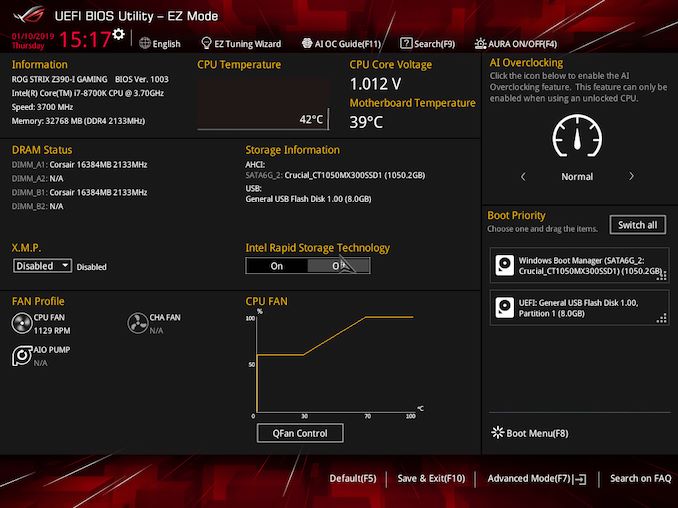
The ASUS Republic of Gamers is well-known for offering one of the most comprehensive UEFI BIOS experiences and the ROG Strix Z390-I Gaming looks to follow that trend. The ROG UEFI BIOS is uniform across the majority of its Strix models with a red accented background with grey central panels and white text throughout. Red and black have long been associated with the ROG brand, long before other vendors started releasing red and black themed gaming boards.
Accessing the BIOS can be done by pressing the Del key during POST. Once inside, the default splash screen automatically reverts to the EZ mode; a simple and intuitive set of options intended for novice users. At the top of the screen is the date and time with a set of subheadings which can either be clicked or accessed by pressing the corresponding keys. These include the language (English), an EZ Tuning Wizard, the AI OC Guide (F11), Search (F9) and an Aura RGB on/off switch (F4). Inside of the main grey panel is a basic set of information on the boards model number, the firmware version installed and information on the installed processor. Below is a DRAM status box which shows four available channels even though it’s a two slot board; this is for the double height DDR4 32 GB modules released by G.Skill and ZADAK in partnership with ASUS which allows users to install 64 GB of DDR4 memory.
Users can also enable the XMP 2.0 profile in the EZ Mode, as well as turn Intel Rapid Storage Technology on or off, set a boot priority if multiple drives or partitions are installed and select between the different AI Overclocking profiles. Also accessible is the QFan control utility for applying and customizing fan profiles. At the bottom of the screen is a Default (F5) for reverting settings back to stock, Save and Exit (F10) for applying settings and F7 which allows users to enter the advanced mode.
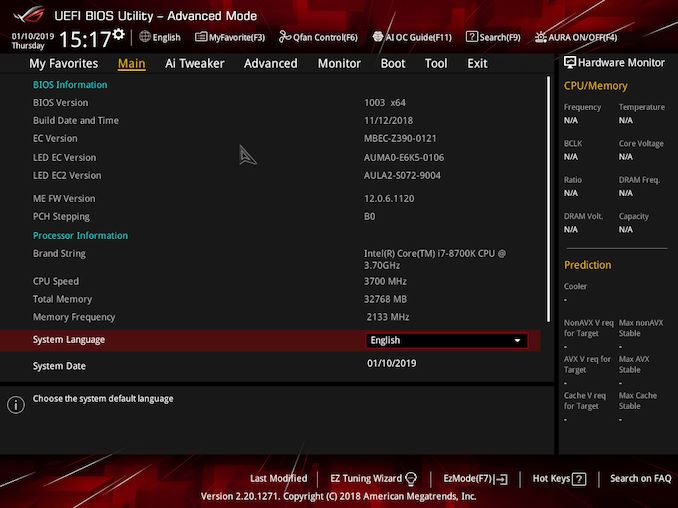
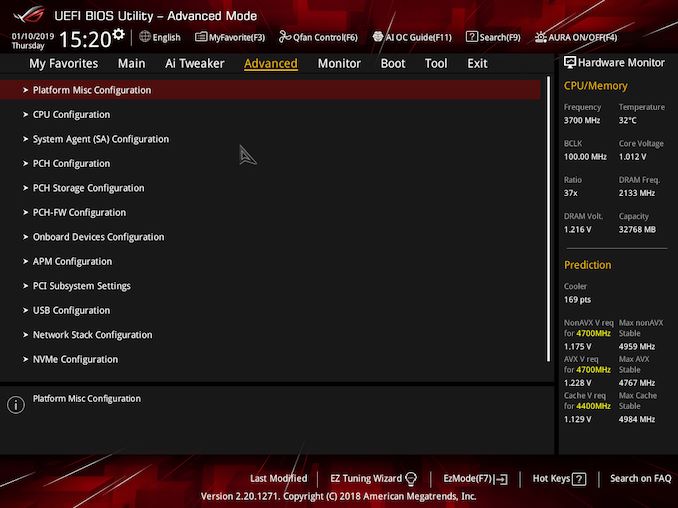
Upon entering the advanced mode brings up the main panel which lists more detailed information on the firmware, the installed processor and even the Z390 chipsets stepping number. Along the top is a set of menus which consist of My Favorites, Main, Ai Tweaker, Advanced, Monitor, Boot, Tool, and Exit.
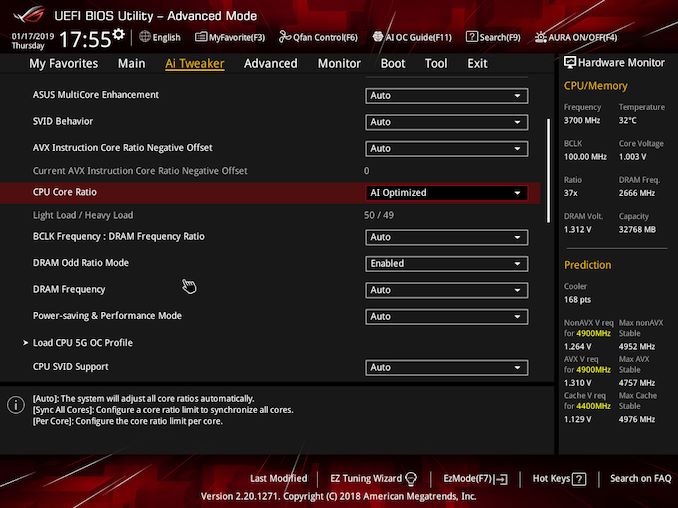
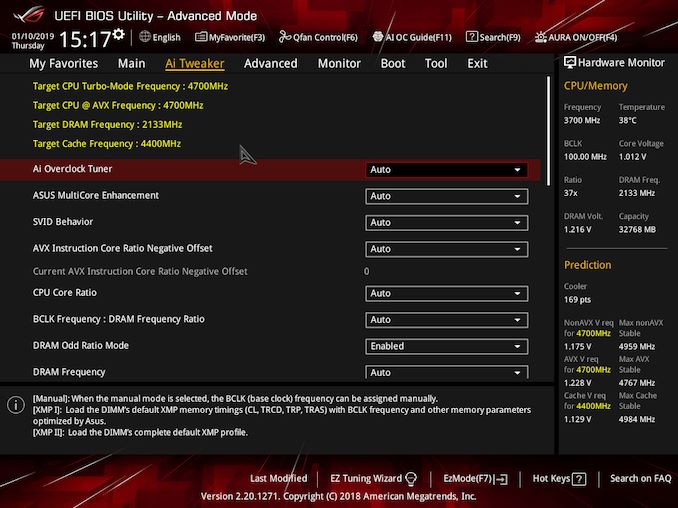
The Ai Tweaker section offers a wide variety of settings for users looking to do some overclocking. Users can select between the different Ai overclocking profiles pre-installed, or opt to customize their own. Users can also use the Ai Overclock Tuner to apply the XMP 2.0 memory profiles on compatible DDR4 kits. Settings like the CPU Core ratio, CPU Cache ratio, and CPU Core and Cache voltage which is linked can be altered here; all the settings to tweak memory is also found within the Ai Tweaker menu.
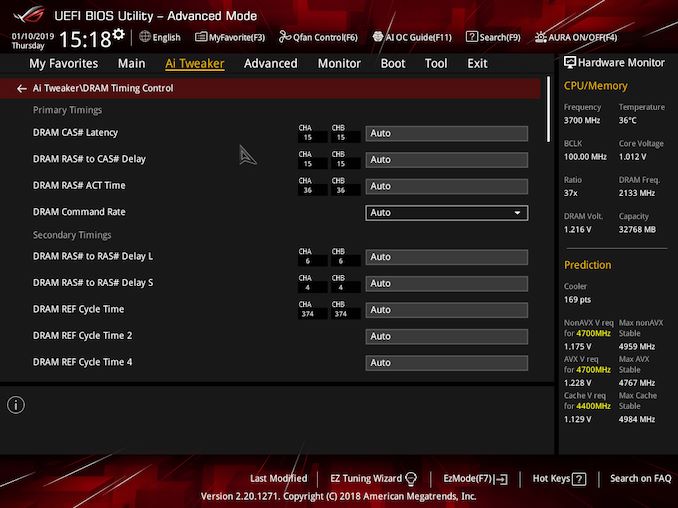
One thing ASUS does well is providing its users with a plethora of tweakable memory settings. One of the reasons extreme overclockers tend to like the ASUS ROG BIOS due to the sheer amount of options available for squeezing out every last MHz of components. Primary, secondary and tertiary timings can be altered here as well as plenty of voltage options relating purely to the memory.
Within the advanced section, users can change many different settings relating to the rest of the motherboards componentry including networking, audio, SATA, M.2 and USB ports. Users can change certain CPU power management settings including enabling and disabling Intel’s SpeedStep technology, Intel’s Speed Shift Technology, and enable or disable turbo mode. Users can even enable or disable the use of iGPU multi-monitor for users looking to use a discrete graphics card and use the integrated graphics for multiple monitors.
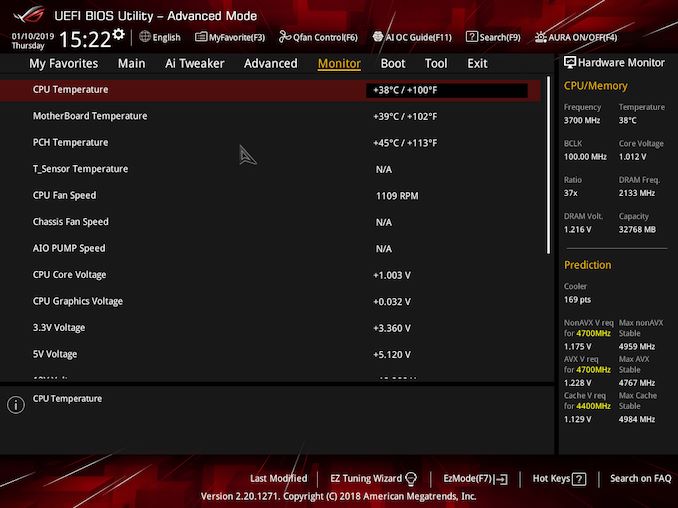
In the monitor section, users can check the temperatures from three different sensors on the board including the CPU, motherboard and the Z390 chipset. Users can also take stock of voltages on the CPU VCore, the iGPU graphics and fan speed on the three 4-pin fan headers the board includes. Users can also access the ASUS Qfan Tuning utility which allows users to set RPM limits on fans, select different fan profiles including standard, quiet and full speed. The AIO pump control on the dedicated pump/AIO header can also be enabled for tighter control of water flow.
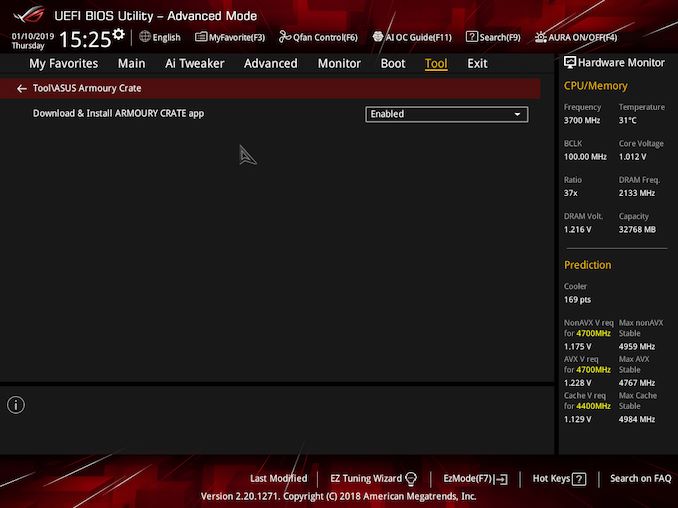
One of the most controversial elements during the launch of ASUS’s Z390 motherboards was the Armoury Crate application. To make installation simpler, ASUS introduced its Armoury Crate package which on first use and inside Windows, would download the full suite of ASUS drivers and software applications onto the system. At first, this was done without asking users for permission, but after a firmware update the Armoury Crate app can be enabled or disabled within the Tool section of the BIOS. I personally find it handy to have access to software that installs the drivers to get a system going useful, but with magnifying glasses on companies now with GDPR regulations at present, installing software with no option to opt out did cause some initial commentary.
The firmware on the ASUS ROG Strix Z390-I Gaming is well laid out, easy to use and is very responsive to mouse clicks and key presses. There are loads of overclocking settings that can be tweaked for the more ardent users and a colossal section of memory options for users to sink their teeth into. It should be noted that the majority of the settings on offer is something most users needn’t concern themselves with as they are for enthusiasts and overclockers looking to push their components to their limits. Unfortunately for users looking to customize RGB lighting within the BIOS, there are no options other than turning the LEDs on or off. This seems to be a current trend on Z390 models and RGB customization needs to be done with the ASUS Aura Sync RGB software.
Software
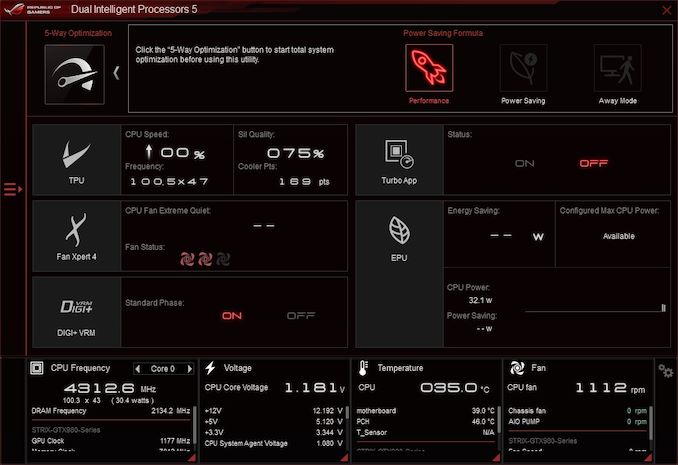
The ASUS ROG Strix Z390-I Gaming comes supplied with strong software support with the useful and comprehensive ASUS AI Software which is an amalgamation of many different features. Also supplied are the ASUS Overwolf Software, the ASUS ROG Aura Sync RGB customization utility and a ROG skinned version of the CPU-Z monitoring utility. All of the software has the usual red and black ROG gaming theme and is what distinguishes the focus the Strix Z390-I Gaming has for, gaming.
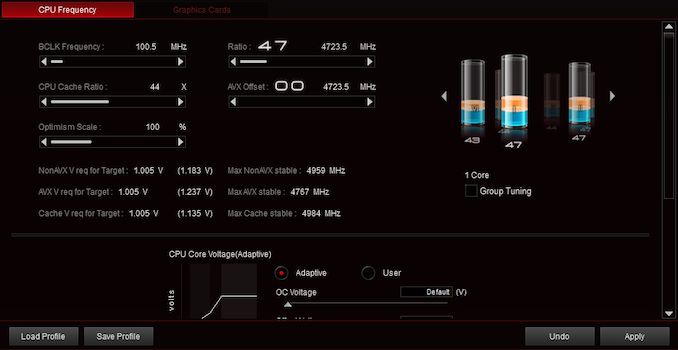
One of the most prominent features of the ASUS AI software is the sheer number of onboard features that can be accessed. ASUS specific features can be controlled within Windows including the Dual Intelligent Processors 5 technology which allows users to optimize the system using a set of criteria set by ASUS. Other features include TPU (Turbo Processing Unit) which boosts the processor's frequency and Fan Xpert 4 which offers fan profile customization. ASUS AI is a software hub for enthusiasts and users looking to keep a keen eye on system performance and attributes like temperature.
As with the other big motherboard vendors, ASUS rolls its software controlled overclocking feature into the main hub of the AI Suite much like MSI does with its Command Centre utility. Users can overclock the processor's core frequency and cache through both CPU ratio and the base clock frequency. When AVX workloads are present, systems can be put under intense load and ASUS does offer an AVX ratio offset within to protect overclocks from otherwise unstable and heavy work sets.
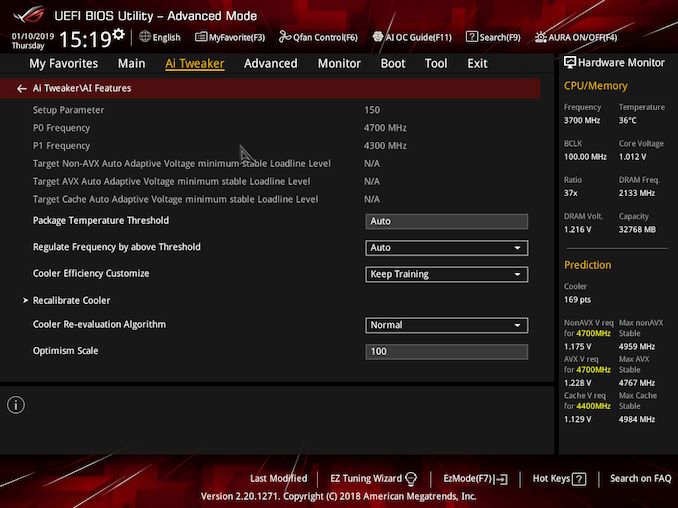
Another big feature ASUS has rolled into its arsenal is the Cooler Optimism Scale. What this does is give users a score and overclock rating based on what it believes is an optimized overclock for the cooler that is installed. Not only does this feature present itself in the AI Software, but it also features within the BIOS which I will touch upon in the overclocking section where I test the settings it recommends against other profiles/custom overclocking settings.
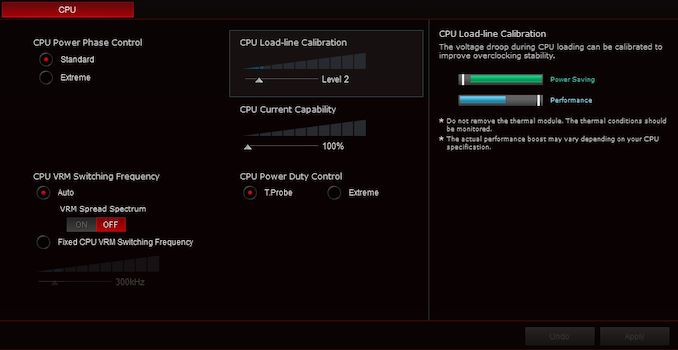
On top of an in-house fan utility representative of what’s available within the BIOS, ASUS also allows users to change its Digi+ VRM power phase control settings. A total of two profiles consisting of standard and extreme are available to select and CPU VRM switching frequency and VRM Spread Spectrum can be changed. The CPU power duty settings can also be defined by temperature or set to extreme with little to no limits imposed on processors; more of a feature used by overclocks than gamers.
While the Overwolf software is more for its overlay feature, the company made an SDK kit available so developers could create their own overlay inspired applications. The ASUS variant offers something similar with a wide variety of customizable overlays available with information including framerates. Users can even customize the GUI of the software and overlay with a multitude of downloadable skins from the store and even access a list of free-to-play games for download. In a similar set up to the FRAPs video capture software, an integrated video capture utility allows users to capture screenshots or footage in-game
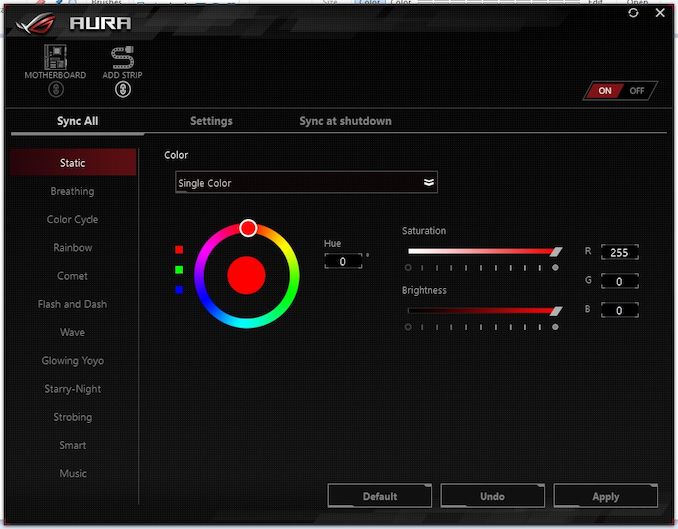
ASUS Aura Sync is software comes designed to allow users to customize RGB and is supplied with its line-up of motherboards with built-in RGB LED lighting and with RGB strip headers. There are multiple lighting effects which can be selected including static, rainbow, comet and glowing yoyo. Selecting the desired color can be achieved by using the color wheel or the corresponding individual RGB color codes. Users can also adjust the saturation and brightness of the RGB LEDs and sync or set each header individually, as well as having the option to switch them off altogether.
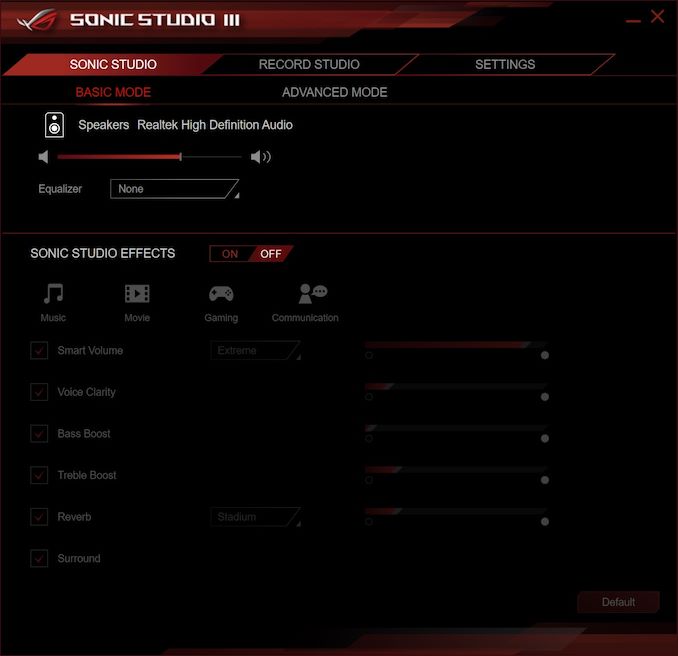
The ROG SupremeFX S1220A audio codec which is based on Realtek’s ALC1200 codecs on the Strix Z390-I Gaming is compatible with the ASUS Sonic Studio III software. Downloadable from the Microsoft store, it offers the usual audio customization settings including equalizer presets, room correction options and speaker configuration setup. A customized equalizer can be used to fine tune audio and users can alter playback experience as well as use the software to create audio recordings.
BIOS
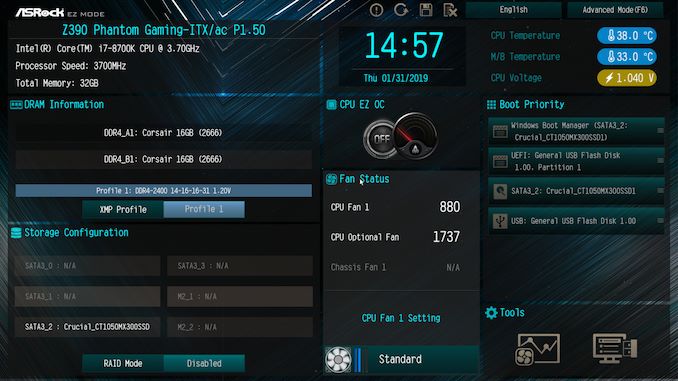
With the ASRock Z390 BIOS, consistency seems to be the aim of the game as the Z390 Phantom Gaming-ITX/ac firmware is very similar to the ASRock Z390 Taichi model which we reviewed at launch. Aside from differences in the specifications, the GUI on the EZ mode screen between both Z390 models is the same and is a good sign for users that demand familiarity. The EZ mode uses a turquoise styled shade of blue and black with greys, while the rest of the firmware uses white text on a Phantom Gaming red and black themed backdrop.
A swift press of the Del key during system POST reveals the EZ mode splash screen; a blocky and descriptive list of information such as installed CPU, memory and storage, as well as fan status for the three available 4-pin headers. Users can enable and disable RAID mode on the four SATA ports, as well as enable XMP 2.0 profiles on compatible memory. In the top left-hand panel is very basic information about the processor and memory, while the right-hand side has boot priority list which users can click and drag to rearrange which suits best. In the bottom right-hand side corner is a clickable tools menu which opens up the Instant Flash, Internet Flash, and FAN-Tastic Tuning utility. With the EZ OC tool, users can select between five different CPU overclocking profiles ranging from 4.5 GHz to 5.0 GHz.
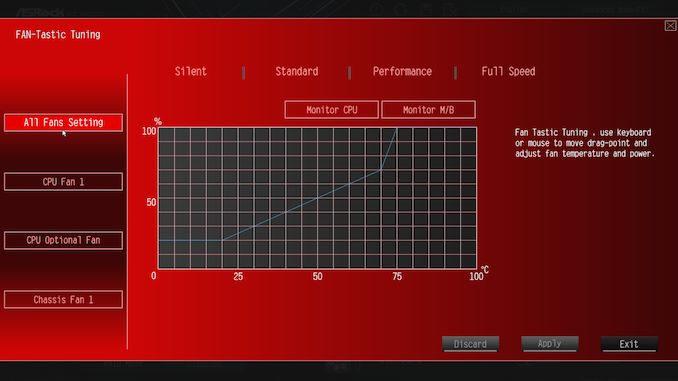
The FAN-Tastic Tuning utility offers fan profile customization with four different presets including silent, standard, performance and full speed. Users can also create their own fan curve profiles based on real-time CPU temperature. Each 4-pin header can be set up individually or all the fans can be synced to run based on the same profile
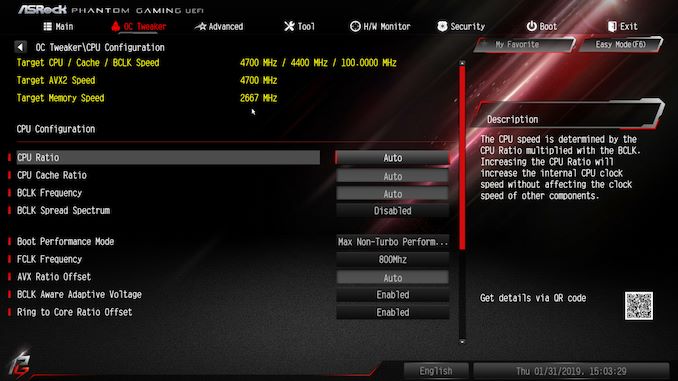
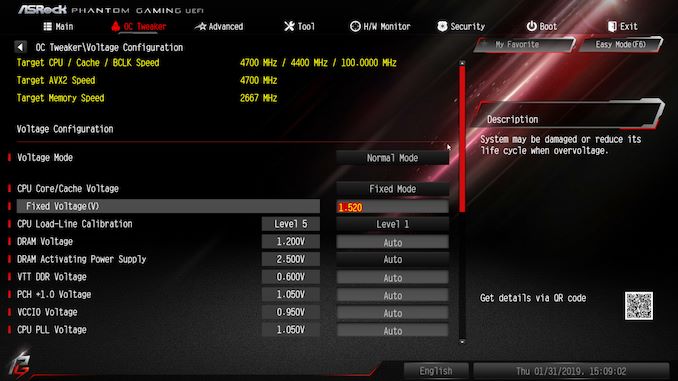
On the EZ mode splash screen, pressing the F6 key opens up the Advanced section. Along the top is a set of sub-headings each with their own range of options for users to customize including OC Tweaker, Advanced, Tool, H/W Monitor, Security, Boot, and Exit. The OC Tweaker is the ASRock UEFI BIOS’s ticket to overclocking and all of the preset overclocking profiles from 4.5 to 5.0 GHz can be applied, as well as the LN2 overclocking preset for extreme overclockers. There is a profile for tight timings with Samsung’s B Die memory and each of the main elements of overclocking are split into three main sections; CPU, DRAM, and Voltage configuration.
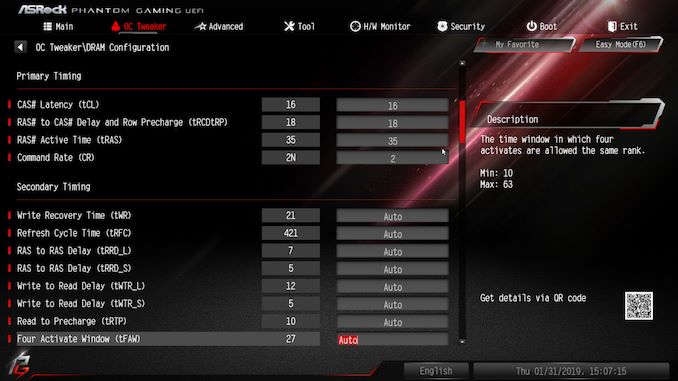
One big feature on the more premium Z390 models has been memory settings; there seems to be more than anyone could shake a stick at. The ASRock Z390 Phantom Gaming-ITX/ac is no different in this regard and the firmware has extensive options for enthusiasts and users looking to fine tune their memory to the maximum. These include frequency tuning through the memory dividers and base clock, primary, secondary and tertiary timings configuration and there are multiple voltages to go through.
The ASRock Z390 Phantom Gaming-ITX/ac has two main voltage modes for users to select between; normal mode and extreme mode. There isn’t too much to distinguish between the two and the latter is more suited to extreme overclockers. With the normal mode, up to a maximum of 1.52 V can be applied to the CPU VCore which is more than the maximum recommended for ambient cooling methods. The extreme mode allows users to go up to 2.0 V on the VCore which unless users are using extreme cooling methods such as liquid nitrogen, the normal mode offers more than needed.
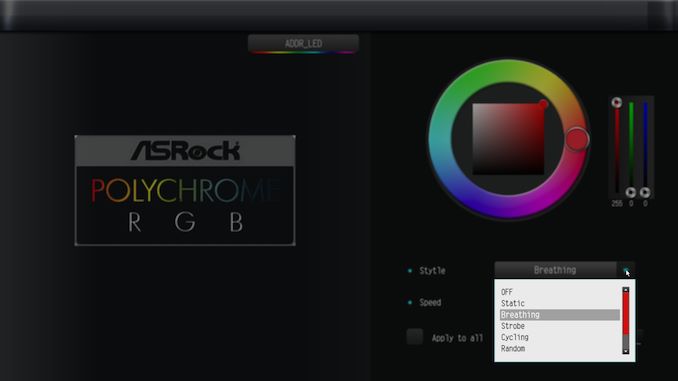
Although there are limited RGB LEDs integrated onto the board with just three LEDs underneath the full-length PCIe 3.0 x16 slot, ASRock Polychrome RGB does offer customization within the BIOS. Not only can the built-in LEDs be changed via the color wheel, but a slider with each individual code is featured on the right-hand side. The lighting effect can be changed as well as allowing for customization on the addressable RGB header and standard RGB header; they can be set individually or synced together for a more uniformed look.
Sometimes manufacturers get firmware right and the Z390 Phantom Gaming-ITX/ac is a shining example. There is RGB customization within with the ASRock Polychrome RGB utility, a basic but intuitive fan profile customization tool is present and there is plenty of options for overclocking installed components; too many for the normal user to make the most of. The ASRock Z390 Phantom Gaming-ITX/ac screams premium and keeps things separate from the general user and the enthusiastic overclocking who usually make abnormal demands such as higher voltage ranges and preset profiles to work from. To make a note, the ASRock firmware is easy to navigate around, and clicks and keypresses are responsive with no input lag.
Software
The ASRock Z390 Phantom Gaming-ITX/ac comes supplied with a pretty lightweight supplement of software with most useful utility in the list coming from the Phantom Gaming Tuning software. There isn’t much that can be specifically classed for ‘gaming’ so to speak, but there are the ASRock Polychrome RGB utility, ASRock’s Live Update, and App Shop software and a Realtek Audio control panel.
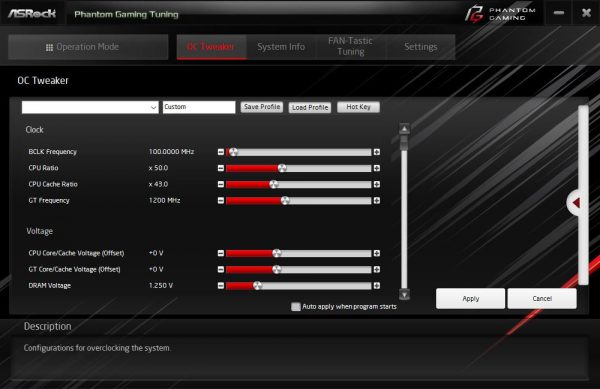
ASRock’s Phantom Gaming Tuning software is identical to the ASRock A-Tuning software we’ve previously seen in our ASRock Z390 Taichi review; the only difference being the new Phantom Gaming red and black themed skin. Users can use Phantom Gaming Tuning to overclock within Windows and tweak settings such as CPU VCore, CPU ratio, CPU cache ratio, and even DRAM voltage; unfortunately, there’s no option to alter memory frequency. Phantom Gaming Tuning also gives access to the FAN-Tastic Tuning for users looking to customize their own fan profiles or set the fans to one of the presets and have at it. All of the five predefined overclocking profiles ranging from 4.5 to 5.0 GHz can be applied with all that’s needed is a simple reboot; the software does prompt this after making key changes.
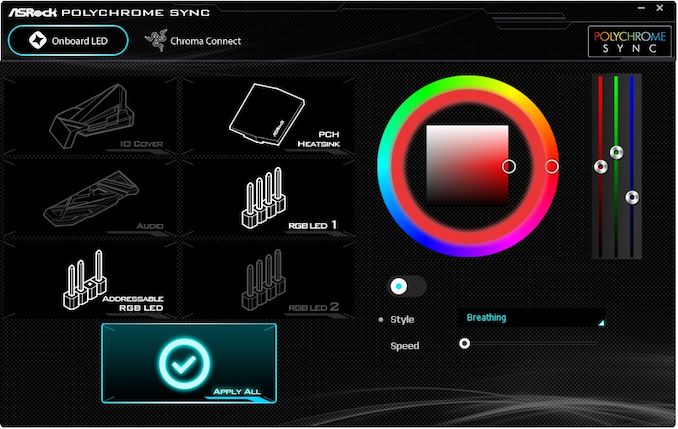
Users can customize the integrated RGB LEDs or strips installed into the two headers via the ASRock Polychrome Sync software. It’s available in the BIOS unlike on the ASRock Z390 Taichi and users can individually apply different colors and effects to different headers, or sync everything together. The software itself is generic throughout the range and is highlighted by depicting parts of the board that doesn’t have LED; nothing unusual however as most vendors recycle utilities and blank out options for different models.

Connecting to the RPC Service proved a task too far...
One of the biggest niggles and gripes in installing the generic Realtek HD Audio Manager is that it has to be downloaded directly from the Microsoft store and isn’t available on the disc, or via the official product page. The base Realtek driver for the ALC1220 codec can be downloaded, but software to make auditory adjustments to things like the equalizer, switch through the different sound effects and even enable Dolby functions do require software. In what is seemingly a common problem across the internet currently when downloading the Realtek Audio Manager is the Audio Console cannot connect to the RPC service.
It has been well documented online with a lot of suggested fixes around the issue; I encountered the issue and I spent at least an hour or two trying to find a workaround but to no avail. This is disappointing as it takes away some of the quality that the Realtek ALC1220 can offer and if it were an isolated incident, it wouldn’t be too bad. Allowing users to download alternative software via the product page or addressing RPC issue would go a long way to making many users overall experience one that’s fruitful. Unfortunately for us, we couldn’t install the Realtek Audio Console directly from the Microsoft App store without encountering this issue, even with three different Windows 10 installation attempts.
Test Bed
As per our testing policy, we take a high-end CPU suitable for the motherboard that was released during the socket’s initial launch, and equip the system with a suitable amount of memory running at the processor maximum supported frequency. This is also typically run at JEDEC subtimings where possible. It is noted that some users are not keen on this policy, stating that sometimes the maximum supported frequency is quite low, or faster memory is available at a similar price, or that the JEDEC speeds can be prohibitive for performance. While these comments make sense, ultimately very few users apply memory profiles (either XMP or other) as they require interaction with the BIOS, and most users will fall back on JEDEC supported speeds - this includes home users as well as industry who might want to shave off a cent or two from the cost or stay within the margins set by the manufacturer. Where possible, we will extend out testing to include faster memory modules either at the same time as the review or a later date.
While we have been able to measure audio performance from previous Z370 motherboards, the task has been made even harder with the roll-out of the Z390 chipset and none of the boards tested so far has played ball. It seems all USB support for Windows 7 is now extinct so until we can find a reliable way of measuring audio performance on Windows 10 or until a workaround can be found, audio testing will have to be done at a later date.
| Test Setup | |||
| Processor | Intel i7-8700K, 65W, $300, 6 Cores, 12 Threads, 3.7 GHz (4.7 GHz Turbo) |
||
| Motherboard | ASUS ROG Strix Z390-I Gaming (BIOS Ver 1003) ASRock Z390 Phantom Gaming-ITX/ac (BIOS P1.50) |
||
| Cooling | be quiet! Silent Loop 240mm AIO | ||
| Power Supply | Thermaltake Toughpower Grand 1200W Gold PSU | ||
| Memory | 2x16GB Corsair Vengeance LPX DDR4-2400 Ran at DDR4-2666 CL16-18-18-35 2T |
||
| Video Card | ASUS GTX 980 STRIX (1178/1279 Boost) | ||
| Hard Drive | Crucial MX300 1TB | ||
| Case | Open Test Bed | ||
| Operating System | Windows 10 RS3 inc. Spectre/Meltdown Patches | ||
Readers of our motherboard review section will have noted the trend in modern motherboards to implement a form of MultiCore Enhancement / Acceleration / Turbo (read our report here) on their motherboards. This does several things, including better benchmark results at stock settings (not entirely needed if overclocking is an end-user goal) at the expense of heat and temperature. It also gives, in essence, an automatic overclock which may be against what the user wants. Our testing methodology is ‘out-of-the-box’, with the latest public BIOS installed and XMP enabled, and thus subject to the whims of this feature. It is ultimately up to the motherboard manufacturer to take this risk – and manufacturers taking risks in the setup is something they do on every product (think C-state settings, USB priority, DPC Latency / monitoring priority, overriding memory sub-timings at JEDEC). Processor speed change is part of that risk, and ultimately if no overclocking is planned, some motherboards will affect how fast that shiny new processor goes and can be an important factor in the system build.
New Test Suite: Spectre and Meltdown Hardened
For the start of our Z390 reviews, we are using an updated OS, updated drivers, and updated software. This is in line with our CPU testing updates, which includes Spectre and Meltdown patches. As we are in the process of testing more Z390 boards, that data will be added in future reviews however at this point we only have Z370 on the old testing as a reference.
System Performance
Not all motherboards are created equal. On the face of it, they should all perform the same and differ only in the functionality they provide - however, this is not the case. The obvious pointers are power consumption, but also the ability for the manufacturer to optimize USB speed, audio quality (based on audio codec), POST time and latency. This can come down to manufacturing process and prowess, so these are tested.
For Z390 we are running an updated version of our test suite, including OS and CPU cooler. This has some effect on our results.
Power Consumption
Power consumption was tested on the system while in a single ASUS GTX 980 GPU configuration with a wall meter connected to the Thermaltake 1200W power supply. This power supply has ~75% efficiency > 50W, and 90%+ efficiency at 250W, suitable for both idle and multi-GPU loading. This method of power reading allows us to compare the power management of the UEFI and the board to supply components with power under load, and includes typical PSU losses due to efficiency. These are the real world values that consumers may expect from a typical system (minus the monitor) using this motherboard.
While this method for power measurement may not be ideal, and you feel these numbers are not representative due to the high wattage power supply being used (we use the same PSU to remain consistent over a series of reviews, and the fact that some boards on our test bed get tested with three or four high powered GPUs), the important point to take away is the relationship between the numbers. These boards are all under the same conditions, and thus the differences between them should be easy to spot.
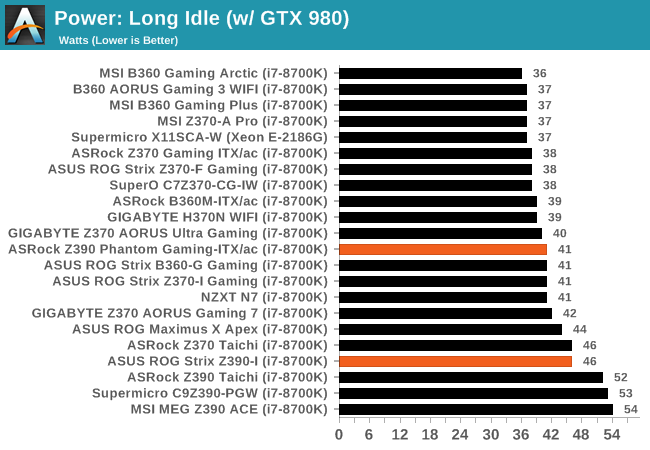
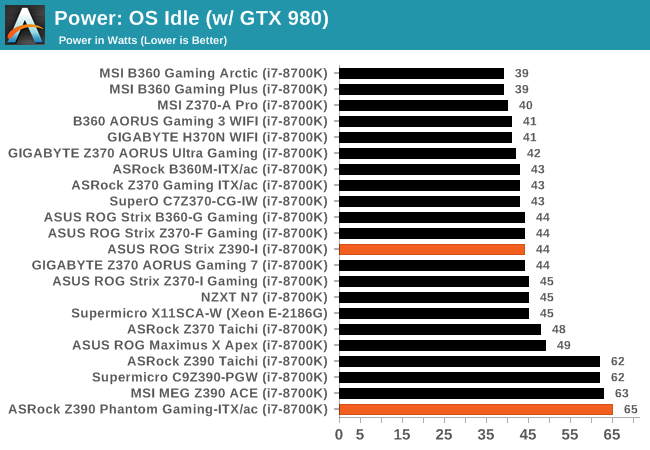
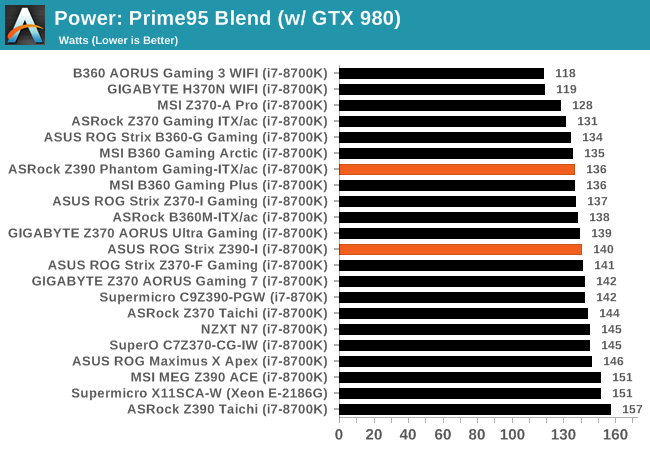
In a long idle power state, both the ASUS ROG Strix Z390-I Gaming and ASRock Z390 Phantom Gaming-ITX/ac perform well, however in an OS idle state, the Phantom Gaming board was very power hungry; the hungriest so far in our Z390 tests. At full load, both boards both performed competitively within 3% of each other and sit towards the middle of our graphs.
Non-UEFI POST Time
Different motherboards have different POST sequences before an operating system is initialized. A lot of this is dependent on the board itself, and POST boot time is determined by the controllers on board (and the sequence of how those extras are organized). As part of our testing, we look at the POST Boot Time using a stopwatch. This is the time from pressing the ON button on the computer to when Windows starts loading. (We discount Windows loading as it is highly variable given Windows specific features.)
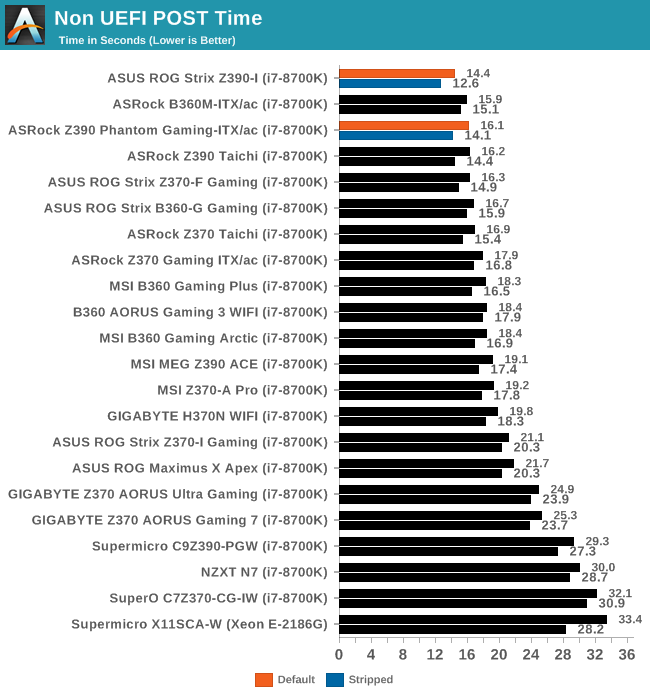
The ASUS ROG Strix Z390-I Gaming managed to record the fastest POST time from any of the LGA1151 motherboards tested so far, both at stock settings and with controllers disabled. Just behind it is the ASRock Z390 Phantom Gaming-ITX/ac by a couple of seconds, but still ahead of most of the boards previously tested.
DPC Latency
Deferred Procedure Call latency is a way in which Windows handles interrupt servicing. In order to wait for a processor to acknowledge the request, the system will queue all interrupt requests by priority. Critical interrupts will be handled as soon as possible, whereas lesser priority requests such as audio will be further down the line. If the audio device requires data, it will have to wait until the request is processed before the buffer is filled.
If the device drivers of higher priority components in a system are poorly implemented, this can cause delays in request scheduling and process time. This can lead to an empty audio buffer and characteristic audible pauses, pops and clicks. The DPC latency checker measures how much time is taken processing DPCs from driver invocation. The lower the value will result in better audio transfer at smaller buffer sizes. Results are measured in microseconds.
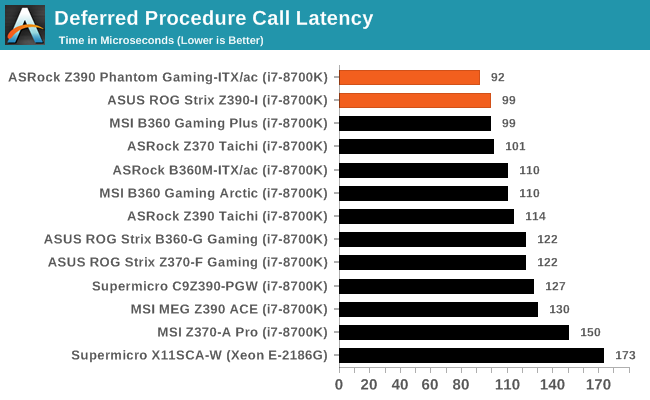
Not a single of the LGA1151 models we've tested thus far has been optimized for DPC latency, but both the mini-ITX sized boards on test managed to perform better than the rest of the pack. The Z390 Phantom Gaming-ITX/ac came out on top with the Strix Z390-I Gaming not too far behind.
CPU Performance, Short Form
For our motherboard reviews, we use our short form testing method. These tests usually focus on if a motherboard is using MultiCore Turbo (the feature used to have maximum turbo on at all times, giving a frequency advantage), or if there are slight gains to be had from tweaking the firmware. We put the memory settings at the CPU manufacturers suggested frequency, making it very easy to see which motherboards have MCT enabled by default.
For Z390 we are running an updated version of our test suite, including OS and CPU cooler. This has some effect on our results.
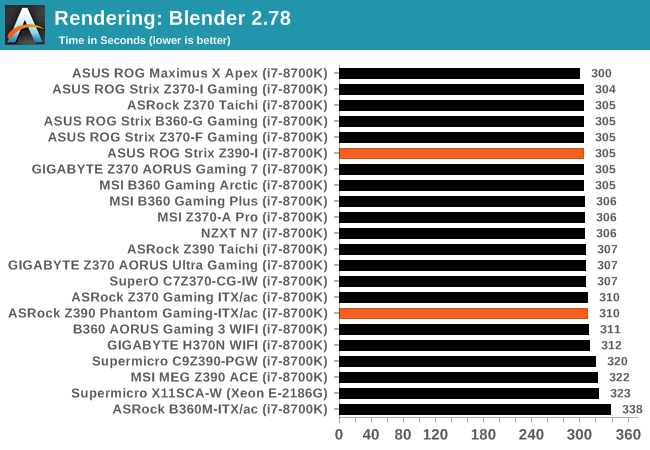
Rendering - Blender 2.78: link
For a render that has been around for what seems like ages, Blender is still a highly popular tool. We managed to wrap up a standard workload into the February 5 nightly build of Blender and measure the time it takes to render the first frame of the scene. Being one of the bigger open source tools out there, it means both AMD and Intel work actively to help improve the codebase, for better or for worse on their own/each other's microarchitecture.
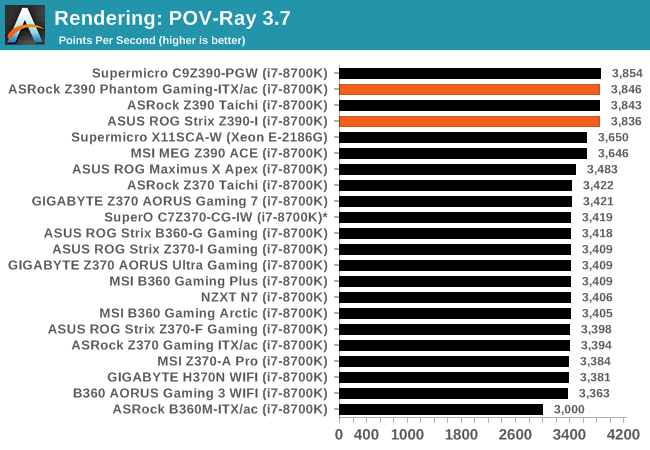
Rendering – POV-Ray 3.7: link
The Persistence of Vision Ray Tracer, or POV-Ray, is a freeware package for as the name suggests, ray tracing. It is a pure renderer, rather than modeling software, but the latest beta version contains a handy benchmark for stressing all processing threads on a platform. We have been using this test in motherboard reviews to test memory stability at various CPU speeds to good effect – if it passes the test, the IMC in the CPU is stable for a given CPU speed. As a CPU test, it runs for approximately 1-2 minutes on high-end platforms.
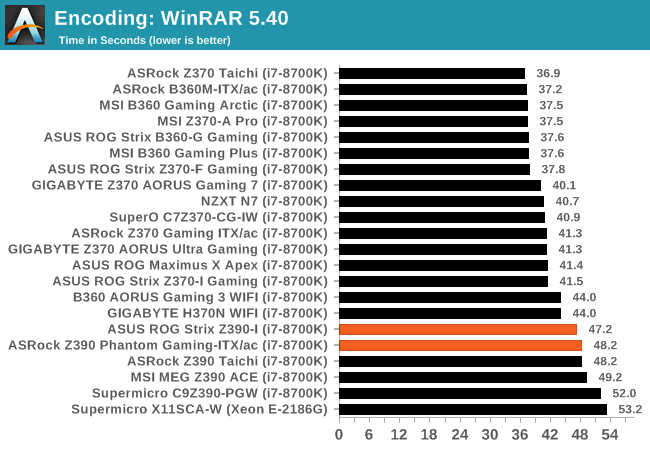
Compression – WinRAR 5.4: link
Our WinRAR test from 2013 is updated to the latest version of WinRAR at the start of 2014. We compress a set of 2867 files across 320 folders totaling 1.52 GB in size – 95% of these files are small typical website files, and the rest (90% of the size) are small 30-second 720p videos.
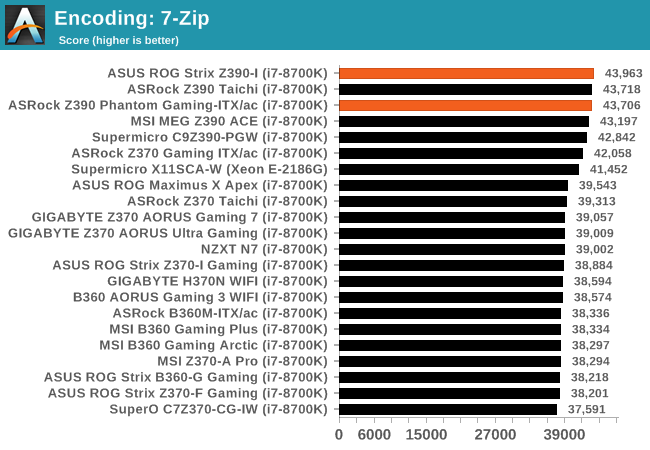
Synthetic – 7-Zip 9.2: link
As an open source compression tool, 7-Zip is a popular tool for making sets of files easier to handle and transfer. The software offers up its own benchmark, to which we report the result.
Point Calculations – 3D Movement Algorithm Test: link
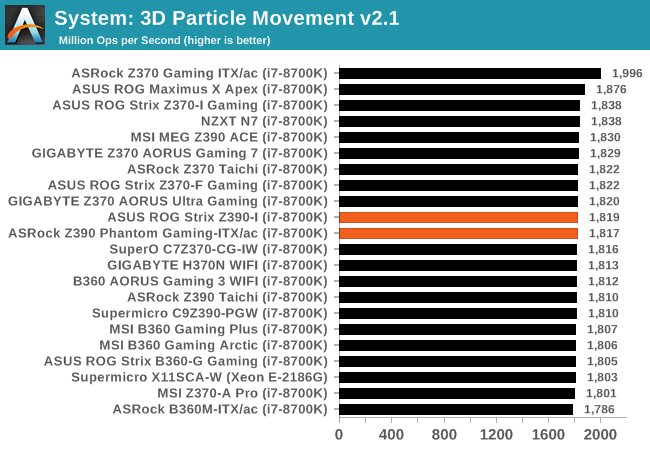
3DPM is a self-penned benchmark, taking basic 3D movement algorithms used in Brownian Motion simulations and testing them for speed. High floating point performance, MHz, and IPC win in the single thread version, whereas the multithread version has to handle the threads and loves more cores. For a brief explanation of the platform agnostic coding behind this benchmark, see my forum post here.
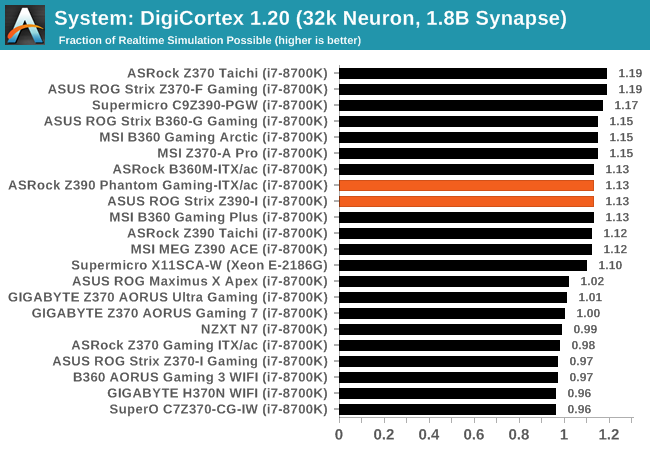
Neuron Simulation - DigiCortex v1.20: link
The newest benchmark in our suite is DigiCortex, a simulation of biologically plausible neural network circuits, and simulates activity of neurons and synapses. DigiCortex relies heavily on a mix of DRAM speed and computational throughput, indicating that systems which apply memory profiles properly should benefit and those that play fast and loose with overclocking settings might get some extra speed up. Results are taken during the steady-state period in a 32k neuron simulation and represented as a function of the ability to simulate in real time (1.000x equals real-time).
Gaming Performance
AoTS Escalation
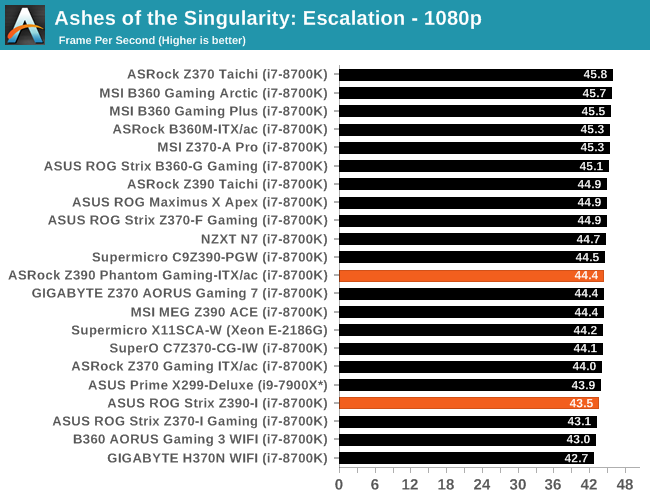
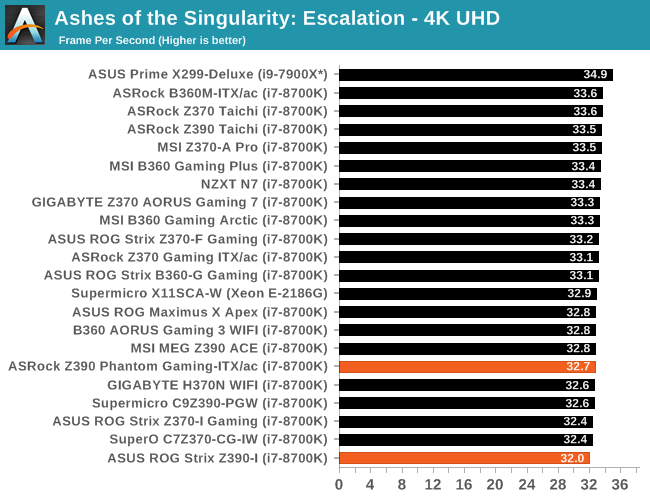
Ashes of the Singularity is a Real-Time Strategy game developed by Oxide Games and Stardock Entertainment. The original AoTS was released back in March of 2016 while the standalone expansion pack, Escalation, was released in November of 2016 adding more structures, maps, and units. We use this specific benchmark as it relies on both a good GPU as well as on the CPU in order to get the most frames per second. This balance is able to better display any systematic differences in gaming as opposed to a more GPU heavy title where the CPU and system don't matter quite as much. We use the default "Crazy" in-game settings using the DX11 rendering path in both 1080p and 4K UHD resolutions. The benchmark is run four times and the results averaged then plugged into the graph.

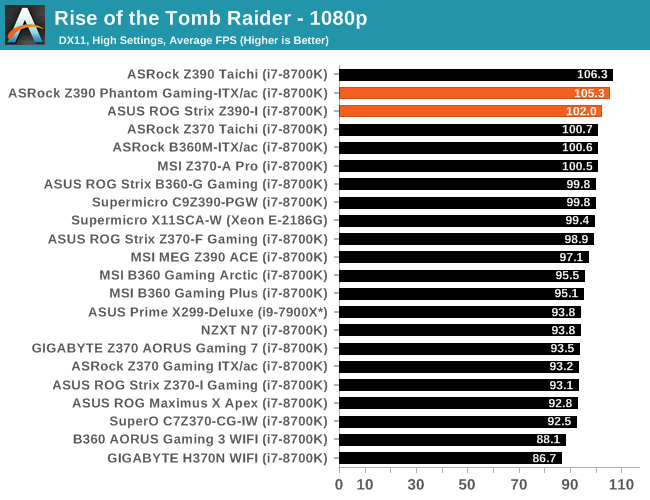
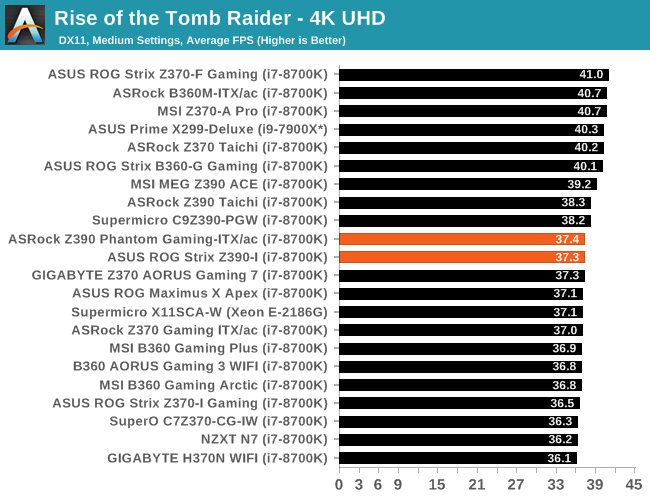
Rise of the Tomb Raider
Rise of the Tomb Raider is a third-person action-adventure game that features similar gameplay found in 2013's Tomb Raider. Players control Lara Croft through various environments, battling enemies, and completing puzzle platforming sections, while using improvised weapons and gadgets in order to progress through the story.
One of the unique aspects of this benchmark is that it’s actually the average of 3 sub-benchmarks that fly through different environments, which keeps the benchmark from being too weighted towards a GPU’s performance characteristics under any one scene.

Overclocking
Experience with the ASUS ROG Strix Z390-I Gaming
Our Z390 test bed Core i7-8700K processor might not be the highest-grade silicon around, but we do know it has limitations of 5.1 GHz on every board we’ve tested so far. It’s a somewhat dirty chip that likes to draw power and run hot, which makes running 5.1 GHz somewhat fruitless with good ambient cooling due to thermal throttling.
Overclocking on the ASUS ROG Strix Z390-I Gaming can be approached multiple ways; some simple, some intuitive and everything in between. One of the most alluring features within the BIOS comes via the Cooler Predictor inside the Ai Tweaker. What this does is calibrates the firmware to output a score based on the cooler that’s installed which then, in turn, outputs the blueprint for what it thinks is an achievable overclock. The option is there to recalibrate if you believe the firmware has it wrong, or the optimism scale can be edited a bit higher for slightly looser regulation to boost the score; this could lead to unstable overclocks as it’s essentially being told to take what it thinks and either add extra frequency and more CPU VCore to that.
Applying the predefined 5.0 GHz overclock can be done by simply selecting it from the Ai Overclock Tuner drop-down menu and selecting the profile. ASUS also offers an AI Optimized profile based on unknown criteria by the firmware. Manually overclocking the Strix Z390-I Gaming is as simple to do as it is on any other board of good quality. Users can change both the CPU and Cache ratio in 100 MHz increments e.g. x45, 46; altering the base clock is also possible but this does also overclock the IO and memory in addition to CPU core frequency. The CPU VCore and Cache voltages are linked and the ASUS ROG UEFI BIOS offers many voltages for voltages, eight different load line calibration settings for VDroop and provides many settings for overclocking memory.
Experience with the ASRock Z390 Phantom Gaming-ITX/ac
What you see is what you get with the ASRock Phantom Gaming UEFI BIOS, a simple and well laid out set of settings and options. For overclocking specifically, all of the overclocking options are presented in the OC Tweaker section, with options for CPU and Cache frequency, memory configuration and voltage controls all with their own individual sections. This is a positive and a negative in that when overclocking all the components at the same time (not recommended), bouncing around to different parts of the firmware could lead to confusion for users who aren’t as experienced. Having the primary settings such as CPU ratio, CPU VCore, DRAM frequency and relevant voltages on the same page can save time as all the information is in front of you. That being said, in each of the sections all the options and more are there for use and for memory overclocking, the BIOS holds extensive memory tweaking options.
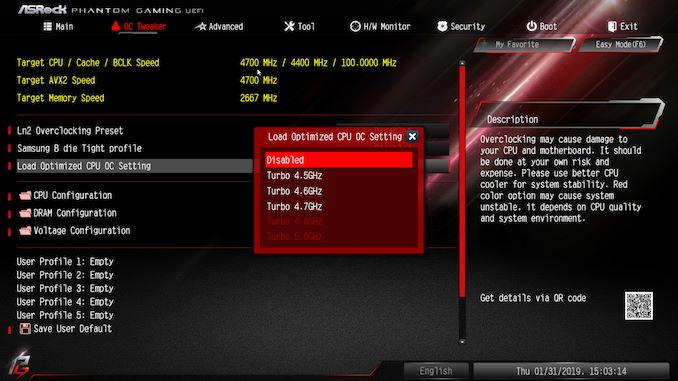
Loading up one of the five ASRock preset overclocks which include 4.5 to 5 GHz with the exception of 4.9 GHz, can be done with the aptly named Load Optimized CPU OC Setting drop-down menu. There are profiles for extreme overclockers which can be accessed by loading the Ln2 Overclocking preset and for owners of DDR4 using Samsung’s B-Die ICs, a profile for running tighter latency timings can be enabled. The primary differences between the normal and extreme voltage mode are it lifts restrictions on the CPU Vcore. At default the CPU Vcore limit maxes out at 1.52 V, whereas the limit is lifted and allows users to apply 2.0 V; extreme in this case means extreme overclocking and any user applying 2.0 V to their CPU would most certainly damage and at the very least, degrade the silicon quality.
The ASRock Phantom Gaming firmware is certainly well-equipped for overclocking and there’s plenty of useful options to go through and customize. The 5+2 power delivery is using some of the best power stages in the Intersil 99227’s and the VCore section heatsink certainly seems up to the task.
Overclocking Methodology
Our standard overclocking methodology is as follows. We select the automatic overclock options and test for stability with POV-Ray and OCCT to simulate high-end workloads. These stability tests aim to catch any immediate causes for memory or CPU errors.
For manual overclocks, based on the information gathered from the previous testing, starts off at a nominal voltage and CPU multiplier, and the multiplier is increased until the stability tests are failed. The CPU voltage is increased gradually until the stability tests are passed, and the process repeated until the motherboard reduces the multiplier automatically (due to safety protocol) or the CPU temperature reaches a stupidly high level (90ºC+). Our test bed is not in a case, which should push overclocks higher with fresher (cooler) air.
Overclocking Results
ASUS ROG Strix Z390-I Gaming
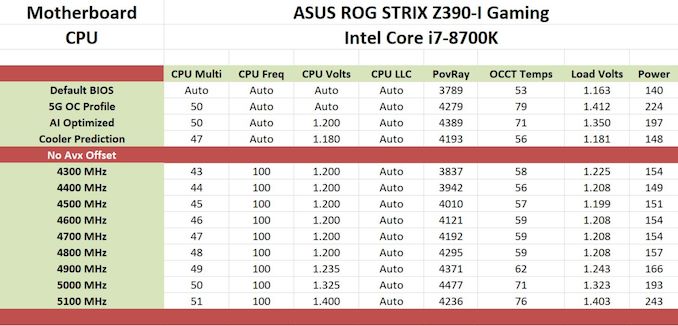
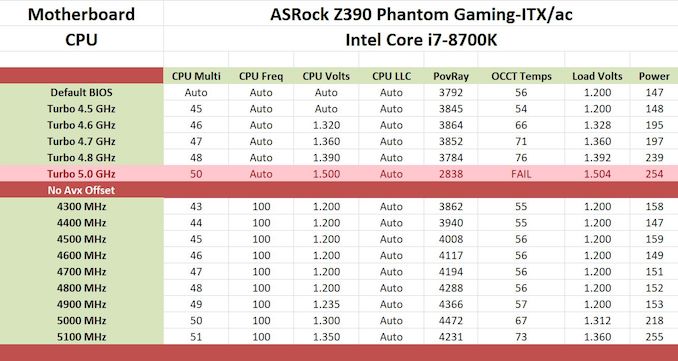
So far from the models we've tested, the ASUS ROG Strix Z390-I Gaming has one of the best 5.0 GHz profiles on Z390. At full load in our test suite, the maximum CPU VCore under load hit 1.412 V; this is good compared to other vendors/models that think 1.50 V is an acceptable level for users to apply to their processors. The AI Optimized profile proved the best profile of the bunch and was really surprised at how efficient it can be; ROG are well known in the overclocking circuit and the ASUS engineers clearly have a knack for this sort of thing. With the AI Optimized profile, the board achieved an automatic overclock of 5.0 GHz with an applied CPU VCore of 1.20 V in the BIOS, but would jump up to 1.35 V at full load; with 27 W less power draw and running 8°c cooler than the 5.0 GHz profile.
The results when manually overclocking also show that ASUS has a lower threshold for thermal throttling with good and consistent performance in POV-Ray. Performance only started to drop off slightly at 5.1 GHz with 1.403 V at load. The VDroop throughout the CPU ratios was tight and only ever so slightly undercut itself at 5.0 GHz; 1.325 V applied in the BIOS and 1.323 V at full load. The settings supplied by the Ai Tweaker's Cooler Prediction also worked well with a 100% stable overclock of 4.7 GHz at 1.180 V on the CPU VCore; it's an ingenious function and aims to take away some of the hard work of overclocking. Overclocking is fun, but to me it is and while squeezing every last bit of performance out without overzealously trying to compensate stability for too much VCore which as a result, does increase temperature and power draw.
ASUS has a tendency to cater for the art of overclocking well on their mid-range to high-end desktop motherboards and outside of the specific overclocking focused boards such as the ROG Maximus XI Apex and ROG Maximus XI Gene, the Strix Z390-I Gaming certainly delivers great overclocking performance with ambient cooling methods. The dismay of the supposed 6-phase which really translates into a 3-phase on the CPU section of the power delivery isn’t noticeable here and doesn’t detract anything from the actual performance.
ASRock Z390 Phantom Gaming-ITX/ac
Overclocking on the ASRock Z390 Phantom Gaming-ITX/ac was without fanfare and the most notable conclusion to draw from it was managing to achieve an overclock of 5.1 GHz at just 1.35 V; for reference, we needed 1.40 V on the ASUS ROG Strix Z390-I Gaming. Temperatures didn’t escalate above extreme levels, but we did incur some thermal throttling above 70°c. Using the five overclocking presets already loaded in from the firmware, the only reasonable settings came with the Turbo 4.5 GHz which used a maximum of 1.20 V on the VCore to achieve this at load. The other settings put more than 1.30 V on the VCore which for an overclock of 4.6 GHz and beyond, is just too much for what every Core i7-8700K should have the potential to achieve. On the 5.0 GHz profile, the Z390 Phantom Gaming-ITX/ac applied 1.50 V on the CPU VCore which not only throttled back massively due to the temperatures but went above and beyond the 85°C temperature limit on our OCCT stress test.
Applying manual overclocks with the ASRock Z390 Phantom Gaming-ITX/ac was painless and for users familiar with the layout of the firmware, will certainly appreciate the amount of fine-tuning that can be achieved. Performance in our POV-Ray benchmark proved consistent until thermal throttling became an issue at 5.1 GHz with 1.35 V and a power draw of 255 W at the wall.
The board has a very solid 5+2 power delivery which puts many ATX models in the same price range to shame quality wise; with the extreme settings, this mini-ITX motherboard would be more than ample for some extreme overclocking, not to mention the included support for DDR4-4500 memory out of the box.
The Conclusion of Z390 Mini-ITX
Republic of Gamers Versus Phantom Gaming
The ASUS ROG Strix Z390-I currently retails for $194 at Newegg which positions it as the most expensive Z390 mini-ITX motherboard available. It has plenty of good quality features, but for the price point, the useful software suite included and solid firmware helps to back up the value factor. Normally a mini-ITX model with a solid feature set is usually a sure-fire winner, but it really does feel like something is missing to make it stand out from the competition.
It's really hard to justify the price difference over the slightly cheaper ASRock Z390 Phantom Gaming-ITX/ac which retails for $180 at present on Newegg. Another note to consider is that the ROG Strix Z390-I Gaming supports the double height double capacity 32 GB DDR4 modules from G.Skill and ZADAK which allows users to put 64 GB into such a small form factor; that's a highly impressive feat within its own right and for users wanting that combination will want to look towards the ROG model. But the ASRock motherboard has Thunderbolt 3, which is that extra feature that the other boards simply don't have.
ASUS ROG Strix Z390-I Gaming
The ROG Strix Z390-I Gaming is the sole mini-ITX offering from ASUS with a marketing focus on gaming. It's one of four Z390 Strix branded mid-range models and when compared to its ATX sized siblings, the Strix Z390-I Gaming is essentially a cut-down version of the ROG Strix Z390-F; the differences being form factor (mini-ITX versus ATX), half the memory slots and fewer PCIe slots available which is a consequence of being small form factor.
With the grandeur that comes with being a premium model, the Strix Z390-I Gaming has plenty of features which aren't just suitable for gaming, but for enthusiasts too. These include a SupremeFX S1220A HD audio codec which is assisted by the Sonic Studio III software which offers lots of customization and quality. The storage capabilities also offer plenty for the form factor with two M.2 slots (one front, one rear) included and one with a heatsink that doubles up to cool the Z390 chipset also. A total of four SATA ports with straight angled connectors are present with support for RAID 0, 1, 5 and 10 arrays.
On the design front, ASUS drops a gimmicky plastic rear panel cover and integrates one that's full metal and mills it directly into the power delivery heatsink design which is simply brilliant. Touching on the power delivery itself, ASUS has unscrupulously advertised the CPU Vcore to be running in a 6-phase configuration, but upon further inspection, it seems as though it's operating with three sets of two which would technically mean a 3-phase; ASUS hasn't used doublers to achieve this. The setup wasn't actually that bad however, as it excelled in our testing.
Throughout our testing, this board proved very competent and competitive with its overclocking potential. With Z390, ASUS has brought a great new feature to the table with the Ai Optimized Cooler Predictor. With this users can rely on the board's firmware to work out what overclock is possible using the installed cooling; a panel with a set of expected frequencies at defined voltages are displayed and users can simply enter them manually to achieve them. Our testing proved that with our test bed, the predicted settings worked without issue and the AI Optimized profile managed to achieve 5.0 GHz with 1.35 V on the CPU VCore. In our test suite, good performance was shown to prove consistent and the ROG Strix Z390-I Gaming managed to achieve the quickest booting times in our UEFI POST time test.
ASRock Z390 Phantom Gaming-ITX/ac
The ASRock Z390 Phantom Gaming-ITX/ac represents its high-end gaming-centric small form factor option. With the Z390 Phantom Gaming-ITX/ac, one of the key features is that Thunderbolt 3 port. We also get integrated RGB LEDs, RGB expandability, and use of a Realtek ALC1220 HD audio codec.
Much of the appeal comes from its overall attention to detail on the power delivery with a solid 5+2 design centered around an Intersil ISL69138 7-channel PWM controller. The Intersil ISL99227 60 A power stages are some of the best around and it seems ASRock is looking to appeal to more than just gamers with a lot of extreme options and profiles within the Phantom Gaming firmware. Motherboards with two memory slots are very favorable for performance at higher frequencies and are something extreme overclockers tend to look for in a motherboard.
The overclocking performance solidifies the quality of the power delivery as we achieved an overclock on our Core i7-8700K of 5.0 GHz at 1.35 V. It's clear that the Z390 Phantom Gaming-ITX/ac is targeted at gamers and enthusiasts alike. Performance in our test suite showed persistently good performance with no abnormalities. The small form factor Z390 Phantom Gaming board recorded good POST times and good overall DPC latency.



_thumb.jpg)
_thumb.jpg)
_thumb.jpg)
_thumb.jpg)
_thumb.jpg)
_thumb.jpg)



_thumb.jpg)
_thumb.jpg)
_thumb.jpg)
_thumb.jpg)
_thumb.jpg)
_thumb.jpg)
