Original Link: https://www.anandtech.com/show/1375
Digital cameras are becoming more and more popular lately, and as a result, companies are constantly developing new cameras. In addition, the average price of digital cameras has been steadily declining as manufacturers come up with more efficient production standards. In fact, digital cameras have become so widely used that they have replaced 35mm cameras for many people. Each new camera boasts high resolution images and offers new features that are designed to make the experience more pleasant and rewarding for the user. Thus, we decided it was time to step in and offer some realistic reviews about these cameras. We are going to examine them in an efficient manner and provide you with the results of our experiences.
This guide is intended to provide you with some insight into the way we approach digital camera reviews. We define some important photography terms, outline our format, and describe our testing procedures for both camera performance and image quality. We look forward to giving you accurate and helpful reviews in the future.
Glossary
These are just some of the terms that we thought were particularly important to know before reading our articles. We will explain detailed features of individual cameras in our reviews.F-Stop: An f-stop number refers to the size of the aperture opening. Think of the aperture as working the same as our pupils. If there is too much light, our pupil must shrink down to limit the amount of light coming into our eyes. The opposite occurs if there is not enough light - our pupil will dilate to let in more light. This is the same type of process that a camera must employ in order to attain a proper exposure when taking a picture. Typical examples of f-stop numbers are between f/1.0 - f/22. If the number is higher, the opening will be smaller and will let in less light. If the number is smaller, the opening will be larger and will let in more light.
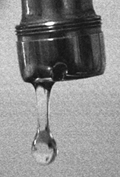
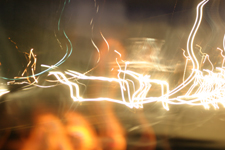
| Shutter speed: The shutter speed refers to how long a picture is exposed. In lower lighting conditions, you must use a slower shutter speed in order to allow enough light to give a good exposure. On the other hand, if you are outside on a bright day, you would have to use a much faster shutter speed for the same type of exposure. Typical shutter speeds range from slow (30 seconds) to really fast (1/4000th of a second). The speed of the shutter will greatly affect the way movement is captured on a picture. A fast shutter speed (anything above around 1/500th) will freeze fast action such as water dripping (top right), while slow shutter speeds can be used for numerous creative effects (bottom right). Slow exposures are commonly used when taking pictures of waterfalls to give them a silky look, for example. Shutter speeds and f-stops have an inverse relationship. In other words, changing the shutter speed to the next fastest setting, while changing the f-stop to the next lowest number, will retain the same exposure effect. |
|
Depth-of-field: The easiest way to explain depth-of-field is to use examples. A small depth-of-field produces a picture that has a specific focal plane in focus (below left). A large depth-of-field, on the other hand, produces a picture where the area in front of the focal point, the focal point, and the area past the focal point are all in focus (bottom right). Depth-of-field is dependent on the aperture setting of the camera. The larger the aperture opening (smaller f-stop number), the smaller depth-of-field that you will achieve; while the smaller the aperture opening (larger f-stop number), the greater the depth-of-field. A small depth-of-field is often desirable when you want to direct the viewer's eyes to a specific part of the picture. This effect is especially used in portraits where the background has a soft blurred look and the subject is focused. Famous photographers, like Ansel Adams, have popularized the use of extremely large depth-of-field, by using high f-stops, to take clear pictures where everything is in focus.
|
|
|
CCD: A CCD sensor is one of the two main types of image sensors in digital cameras. CCD stands for Charge Coupled Device. Digital cameras with CCD sensors are the most common type used, but they tend to be more expensive to manufacture. They also consume more battery power than CMOS sensor-based cameras.
CMOS: CMOS (complementary metal oxide semiconductor) is the other main type of image sensor. It is generally used in lower-end digital cameras because they are cheaper to manufacture. However, they are now being used for some professional digital cameras. They tend to be more efficient with battery power.
ISO: ISO is also referred to as the speed setting of a camera. Digital cameras offer a range of settings, typically from ISO 50-800. The higher the speed setting, the more sensitive the camera will be to light. Photographers select different speed settings depending on the lighting situation. This gives them more options when it comes to setting f-stop and shutter speeds. ISO is also used in film cameras to indicate the light sensitivity of a specific roll of film. Lower ISO settings tend to result in less grainy pictures while high ISO settings will generally produce a grainy effect.
Metering: Nearly all digital cameras have built-in light meters. This means that when you point the camera at the subject that you are trying to capture, your camera will automatically determine the f-stop and shutter speed that you should use. Most cameras also have a fully automatic mode where it will adjust these settings for you, allowing you to simply point and shoot.
Hot-shoe: This term refers to a slot found on the top of some cameras that provides the option of attaching an independent flash.
Aperture Priority: Aperture priority is a setting on most digital cameras that allows you to specify what aperture you want to use. The camera will automatically set the shutter speed accordingly to obtain a good exposure.
Shutter Priority: Shutter priority is just like aperture priority, except that you set the desired shutter speed and the camera will pick the correct aperture needed to provide a proper exposure.
Format
When we review digital cameras, we adhere to a specific format to make sure that we cover all the important aspects of each camera. The format is as follows:The Introduction: In this section, we introduce the camera and explain any background information that may be helpful to understand the rest of the article. This may include its competitors, previous models, new features, etc. We also will give the article a direction by posing a question. The rest of the article is then, in a sense, an attempt to answer that question.
The Specifications: Here, we will list all the major specifications of the camera in a table. It is designed to be a reference that quickly and easily lists the features of the camera that we are reviewing. Also included in this section is a list of the contents that come in the product's box.
The Design: In this section, we will take a look at the overall feel of the camera. We will discuss the construction of the body, the different features of the camera, the lens, the menu navigation system, and any other important design-related items.
The Battery: The battery section will contain the results of our battery test as well as a description of the battery source and our impression of its performance. A detailed description of our battery test is on the next page of this guide.
The Timing Tests: In this section, we put the camera through our three time tests and report the results. The three tests are: shutter lag, startup time, and disk write time. These tests are described in detail on the next page.
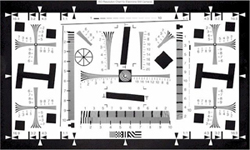
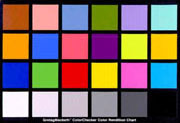
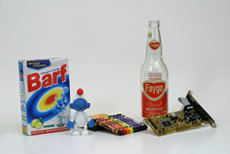
Image Quality Tests: Our image quality section is designed to test and analyze the camera in a studio setting. We test the camera's ability to resolve fine lines accurately using our ISO 12233 IEEE-approved resolution chart and to reproduce colors using our GretagMacBeth ColorChecker. We also include samples of our own studio test image taken at differing ISO settings to provide an evaluation of the camera's noise-handling ability. A simple flash test is done to see how well the camera's flash can depict skin tones accurately.
General Image Quality: Our samples page consists of everyday-type pictures (usually outdoors), providing our readers with full-resolution files to download and examine. We also crop out portions of the images to analyze for quality issues.
Conclusion: The conclusion is the section that ties everything together. We highlight the good and the bad of the camera and provide our impression of its performance. We end the article by answering the question that we posed in the Introduction.
Testing Procedures
The Battery Test
Our battery test is designed to report an ideal number of shots that a battery cycle will allow. The method is as follows:- Fully drain the camera's batteries (by shooting until dead)
- Recharge the battery to full capacity
- Reset the camera to factory default settings
- Set the camera to largest recording mode available (RAW if possible)
- Load the camera with a memory card
- Turn on LCD preview monitor (if available)
- Take 5 pictures without the flash
- Take 2 pictures with the flash
- Repeat process until memory card is full
- Turn off camera
- Turn on camera
- Delete all pictures with in-camera function (use in-camera format option every other time if available)
- Begin taking pictures where we left off until we can't take any more (i.e.we continue to take pictures without the flash, if the camera allows us, until the battery is fully dead)
Timing Tests
Our timing tests help to see how a camera performs from a technical standpoint. It is one of the ways that we are able to compare the performance of cameras in a strictly technical manner. We have three tests that we run on every camera: shutter lag, startup time, and disk write time. For all of our timing tests, we reset the camera to its default settings.Shutter Lag: UPDATE (7/22/04): We have updated our shutter lag test method to a more accurate one. For our new test, we start a stopwatch and perform 2 separate tests. For the first test, we pre-focus the camera on the stopwatch display and press the shutter button as soon as the stopwatch displays a new second. This first test will give us the time it takes the camera to actually take a picture after the shutter button is pressed. For the second test, we do not pre-focus the camera. Instead, we fully press the shutter button as soon as the stopwatch displays a new second. This records the time it takes the camera to focus and take a picture. We perform both of these tests 3 times and review the pictures. The 3 times for each test are averaged.
Our previous shutter lag test included the use of Ed Schwartz's Shutter Release Test.
Startup Time: In order to test a camera's startup time, we measure the amount of time it takes from the moment we turn on the power to the moment the camera is able to take a picture. We first disable the flash and auto-focus. We then turn the camera off and wait two seconds. We start a timer and turn on the camera at the same time. For some cameras, if you hold down the shutter release button, it will take a picture as soon as it can. For cameras like this, we simply hold down the trigger button and stop the timer as soon as the camera begins to take a picture. For other cameras, we press the shutter release button repeatedly as fast as we can until it takes a picture. We perform this test three times and calculate the average.
Disk Write Times: First, we set the camera to the highest quality setting (compressed). We take a picture and start the timer as soon as the "busy" light comes on, indicating disk activity. We stop the timer as soon as the light goes out. Again, we perform this test three times and record the average.
Image Quality Tests
In order to test image quality, we have devised three tests that will each focus on different points of quality. For all of our studio shots, we reset the camera to its default settings and turn off the flash.ISO 12233 IEEE Approved Resolution Chart: We use this chart to test the camera's ability to resolve fine lines.
| For this test, we use the camera's manual WB (white balance) if available. The camera is set to record at the highest quality setting. We use our default lighting setup (3-500 watt tungsten studio lights reflected off a white ceiling for even lighting). Then we take a look at the image and analyze the results. |
GretagMacBeth ColorChecker: This chart is used to test the camera's ability to represent realistic colors.
| For this test, we the use camera's highest quality setting (compressed). If the camera offers a manual white balance option, we take two pictures: one with Auto WB and one with manual WB. If the camera doesn't have an option for manual WB, we will use the Auto setting. Then we compare the results to the exact RGB color values to see how well the camera performs in comparison to the true colors. We use the same default lighting setup for the color test. |
|
Noise: For our noise test, we shoot a more practical scene that we have created in the studio. It is an image that we can recreate with all of our cameras as a means of comparison.
| For the noise test, we set the camera to the highest quality recording setting (compressed) and Manual WB (if available). We then take pictures using a range of different ISO settings to compare noise levels. In designing this scenario, we picked objects that we thought would test the camera's overall ability to represent detail, tonal range, and general image quality. Again, we use our default lighting setup for the studio shot. |
|
Built-in Flash
Our flash test is simply a picture of our hand to analyze the camera's tonal accuracy when using a flash.
|
We set the camera to a fully automatic mode and use the highest quality setting (compressed). The camera is positioned five feet from our hand. For this test, we use low ambient tungsten house lighting and the camera's built-in flash. The purpose of this test is to give an example of the camera's ability to replicate skin tones accurately with the flash. |

