Original Link: https://www.anandtech.com/show/13054/at-101-understanding-laptop-displays
AT 101: Understanding Laptop Displays & How We Test Them
by Brett Howse on July 10, 2018 8:00 AM EST
Everyone might have a different take on what they feel is the single most important factor to consider when purchasing a new laptop, but it would be hard to argue that the display quality shouldn't be near the top. There’s simply no other part of a notebook computer you’re going to use more. The good news is that display quality has improved immensely in recent years, with even some low-cost notebooks offering a good display.
For a while now we've been wanting to do some more fundamentals-driven articles – an introduction to various technologies for people who don't have 21 years of the computing industry crammed into their heads like we do – and given the importance of displays, this is a great place to start. This gives us the opportunity to cover what makes up the display stack in a notebook, how we test it, and what we’re looking for. There’s a tremendous amount of terminology which can be a bit overwhelming as well, and with the advancements in display tech, it’s worth defining the different display types and going over their strengths and weaknesses.
There’s no best display technology for everyone, although the industry has somewhat converged on just a couple of different options, but each has their own strengths and weaknesses.
Resolution
Probably the easiest place to start is display resolution. This is simply the number of pixels on the display, measured horizontally, and then vertically, so a laptop with a resolution of 1920x1080 is going to have 1920 horizontal pixels and 1080 vertical. Over time, there’s been a shift away from the lower resolution displays we were used to, and of course the advantage of a higher resolution is that you can end up with a sharper image and crisper text.
Common resolutions on laptops available today are:
- 1366x768 – WXGA
- 1920x1080 – Full HD or FHD
- 2560x1440 – Quad HD or QHD
- 3840x2160 – Ultra HD or UHD, sometimes also called 4K (although originally 4K was 4096x2160)
Those are the most common, although some devices offer different aspect ratios and unique resolutions as well. If you know the display size and resolution, you can also calculate the pixel density by dividing the diagonal resolution of a display by the diagonal size of the display in inches. Since only the display size is commonly measured by the diagonal, you’d have to convert the resolution from width and height using the Pythagorean theorem. The resulting value will be the display density in pixels per inch (PPI), or how many pixels per inch of display measured on the diagonal. The higher the PPI, the sharper the display.
But as with most things, there’s a cost to moving to a high-resolution display, and it’s not just the actual cost of the panel – although that will almost always be higher as well. Because pixel density is inversely proportional to how well a panel blocks its backlight – denser panels will block more light – increasing the pixel density of a display requires ramping up the strength of the backlighting system as well. And while that’s not an issue for desktop monitors because of their constant power source, for laptops it can have a significant impact on battery life.
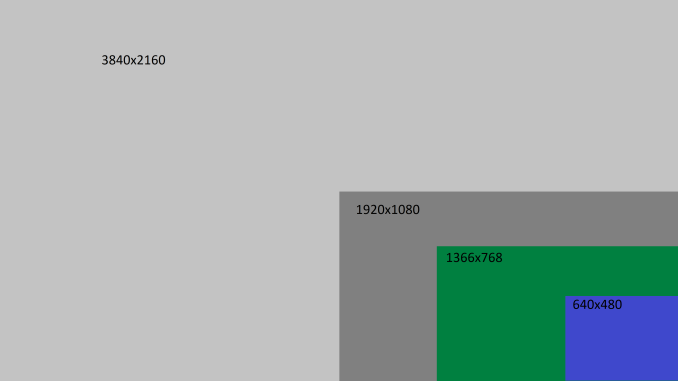
There’s also a cost in terms of software usability. Often, you’ll see an image such as this when comparing the different resolutions available.
If you were using your display at 100% scaling for each resolution, the image above would accurately provide you with an idea on what kind of desktop space you’d have available, but if you ran a typical 15-inch laptop with a 3840x2160 resolution at 100% display scaling, everything would be so tiny that it would be somewhat difficult to use, so Windows provides display scaling options to compensate.
Years ago, it was assumed by software developers that displays would be at or around 96 DPI (Dots per inch, which in this case is equivalent to PPI). As display technology has improved, we are now seeing many laptops offering much higher pixel densities than that. A 13.3-inch laptop with a FHD resolution is already well over the 96 PPI or a traditional display, offering 165 PPI, so Windows will scale images and text up to make it larger. However, older software can sometimes perform unexpectedly when scaling isn’t at 100%. This issue isn’t as bad as it used to be, with software being updated to address it and Windows 10 offering better scaling APIs and support, but it is likely never to be completely solved on Windows. For a deeper look into this issue specifically, check out our look at this from a couple of years back.
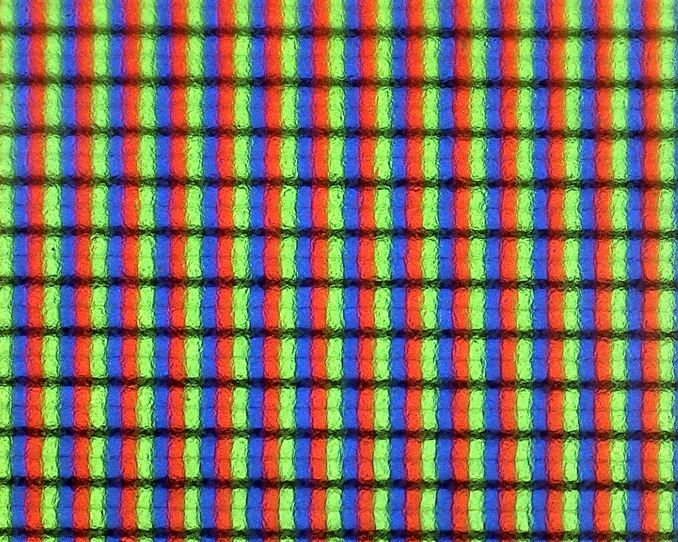
Subpixels on a 1920x1080 13.3-inch display - the haze is the anit-glare coating
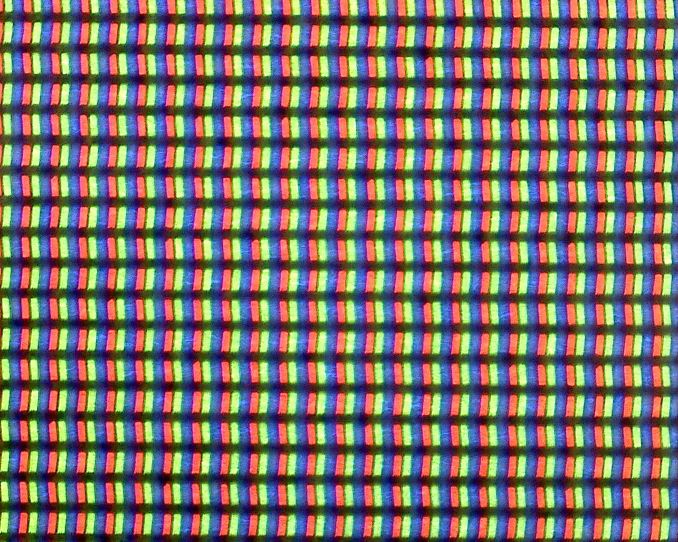
Subpixels on a 3200x1800 13.3-inch display - no haze means it is glossy
Still, even with the drawbacks, the advantages of a higher PPI display are often worth the costs, since the image sharpness is just so much better. This is certainly a case of diminishing returns though. Although a display with a 192 PPI resolution is going to look much better than a 96 PPI one, one that is 384 PPI is going to be less noticeable compared to the first jump, and for a higher cost. Smartphones often have much higher density displays than laptops, but the display is often held much closer to the eyes than a laptop would be. Smaller laptops with very high-resolution displays are going to look great, but the extra power usage of a UHD display on a small notebook might not make it the best fit.
Inspecting the Aspect Ratio
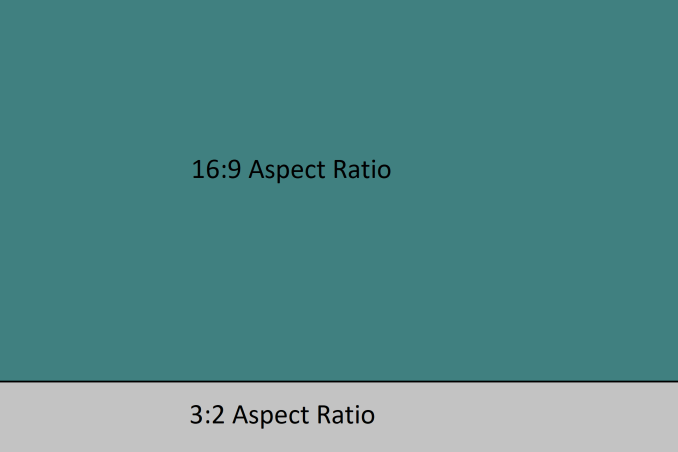
Aspect Ratio is simply the number of horizontal pixels per vertical pixel, expressed as a ratio. The most common aspect ratio on laptops today is 16:9, so for every nine vertical pixels, there are sixteen horizontal pixels. But that wasn’t always the case.
Likely the most common aspect ratios on all computers in years past was 4:3, which was a much more square aspect ratio than we see now. When the world moved to widescreen displays, computers moved to a common aspect ratio of 16:10, but when HD televisions adopted 16:9 as their standard, there was a trend for PC makers to adopt that as well, and it has won out for the time being.
However, much of the work done on a computer often requires additional vertical space, so the loss of 16:10 was mourned by many. At this point, pretty much only Apple consistently offers notebooks with this aspect ratio. You can see the advantage of having more vertical room though when you look at most web content, which is vertical scrolling. The move to 16:9 helped when watching HD video content, and somewhat with movies, although they are generally even wider aspect ratios than 16:9, but hasn’t always been a blessing on the PC.
Luckily, we’ve seen some movement back towards taller displays on notebooks as an option for those that aren’t big fans of 16:9. One of the first was Microsoft with the Surface Pro 3, which offered a 3:2 aspect ratio. On a convertible device like the Surface Pro, the taller aspect ratio also helps when switching the from a landscape view to a portrait view, which you’d do more often with a tablet, but even on laptops, the extra height offered by a 3:2 display is very welcome for most productivity tasks. There’s a smattering of laptops out there now that have adopted 3:2, and likely more on the way.
Panel Technology - TN, IPS, VA, & OLED
Liquid crystal displays more or less fall into three categories based on their manufacturer and the driving force behind the liquid crystal. All have their own strengths and weaknesses. Twisted nematic, or TN as it’s often called, is an older display technology. Later, In-Plane Switching, or IPS displays, were developed to combat some of the problems with TN, and a third major technology is the Vertical Aligned, or VA panel.
All LCDs are pretty much built the same, with a backlight, two polarizers, the liquid crystal, and the thin-film transistor which provides the current to the individual pixels. The major difference between the three display types is how the liquid crystal is used to block the backlight for each subpixel.
Generally, laptop displays refresh the image sixty times per second, or at 60 Hertz. Some gaming laptops offer refresh rates at 144 Hz or more, which provide a smoother experience, and both AMD and NVIDIA support variable refresh rates as well. The maximum refresh rate is impacted by the design of the LCD, and the various designs all have different limits and response times.
Twisted Nematic
Twisted nematic, or TN, is the earliest LCD design that’s still used in laptop displays. As the name suggests, the liquid crystal actually twists to allow light through. The design is very simple, with only a single transistor required to drive the process, and therefore it’s the least expensive display to manufacture as well. In addition to it being the lowest cost, it also can operate very quickly, so the TN display is still the panel of choice for many gamers because the panels can hit the high refresh rates like 144 Hz.
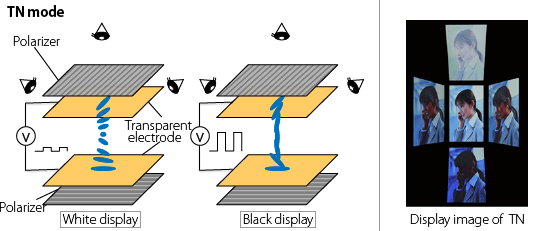
Image Source: Japan Display Inc.
While cost and speed are definite advantages of TN, they suffer from quite severe off-angle color shift and are really only usable when viewed directly. Large TN panels can exhibit the color shift even when viewed directly, because of the increasing angle of viewing (relative to the user) as the panel gets further from the center. Even when viewed directly, TN panels offer poor color accuracy as well. Due to these limitations, TN displays have fallen out of favor for most laptops, although they are still regrettably found in some budget devices, and gaming laptops where the higher refresh rate is of more importance than color reproduction.
In-Plane Switching
In-plane switching, or IPS, was developed to provide solutions to the off-angle viewing issues that plague TN displays. The liquid crystal rotates horizontally rather than twisting like a spring in TN, allowing more light through the further it’s rotated, which in turn varies with the amount of voltage applied. This process requires two transistors per subpixel though, which drives up the manufacturing cost. IPS displays are not as quick to operate as a TN one would be either, so driving them to very high refresh rates is difficult. But, this design does offer excellent off-angle viewing, as well as very accurate color reproduction.
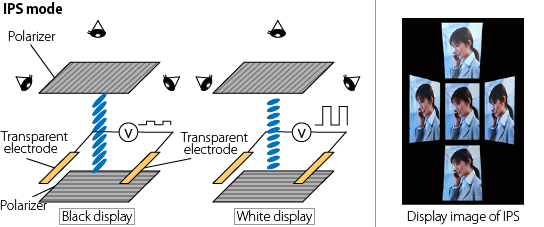
Image Source: Japan Display Inc.
And while IPS is a significant step up in quality over TN, it does have some limitations of its own. In particular, it can’t produce the highest contrast ratios, especially compared to Vertical Aligned panels that we’ll look at next. But IPS displays offer the widest viewing angle of any display technology, and keep their color accuracy intact even when viewed at an angle. This makes them ideal for laptops and tablets, and pretty much all quality laptops utilize IPS displays at this point, although this really only started in earnest in the last several years.
Although IPS is the generic class, several manufacturers have created their own version of IPS, such as Samsung’s Plane to Line Switching (PLS) or AU Optronics with their Advanced Hyper-Viewing Angle (AHVA) technology, which by the acronym sounds like it is a VA panel, but it’s actually an IPS design.
Vertical Alignment
The final display LCD display technology that is prevalent in the industry is the vertical alignment, or VA, panel. VA aligns the liquid crystal vertically when no voltage is applied, and with voltage, the crystals shift to the horizontal plane. This mechanism does have some drawbacks to viewing angles, but to counteract this, most VA panels use multi-domain vertical alignment (MVA) with the crystals rotating in different directions.
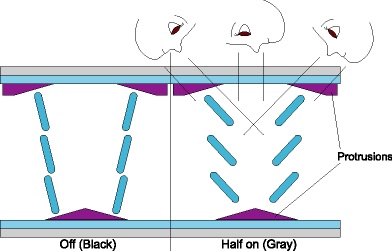
Image Source: Tom's Hardware Guide
The biggest advantage of VA displays is their contrast ratio capabilities, and modern VA panels can achieve 3000:1 or more contrast. With MVA technology the off-angle viewing is also much better than TN displays, although not as good as IPS displays, and where an IPS display can achieve 178° viewing angles on both the horizontal and vertical planes, a VA panel is going to be around 160° or so depending on the exact type of panel.
The main disadvantage of VA panels is the very slow response time, especially in the gray-to-gray.
VA panels can be found in some computer monitors, but most laptops utilize IPS because the strengths are more suitable to a portable device. VA is still widely used in televisions though, since you generally don’t view them at a very oblique angle, and the increased contrast ratio provides better black levels for movies.
Organic Light Emitting Diode
The final display technology that is available in laptops is organic light emitting diode, or OLED. Unlike all the LCD displays, OLED doesn’t require a backlight because the individual subpixels emit light. Because of this, OLED displays offer practically infinite contrast ratio, since the brightness of each subpixel can be varied on a subpixel-by-subpixel basis, and subpixels can be turned off completely.
OLED displays have been used quite a bit in smartphones, and you can even buy OLED televisions, but the technology has not been utilized very much in the PC space.
Although OLED displays offer a lot of advantages over LCD displays, OLED with an RGB (Red Green Blue) matrix of subpixels (aka RGB OLED) is quite expensive to build, especially on a larger panel. The amazing contrast and accurate color reproduction is a benefit, but the cost can be prohibitive. OLED also doesn’t use any power to display a black screen, but to get high brightness levels on a large panel showing a white image can use substantially more energy than a comparable LCD.
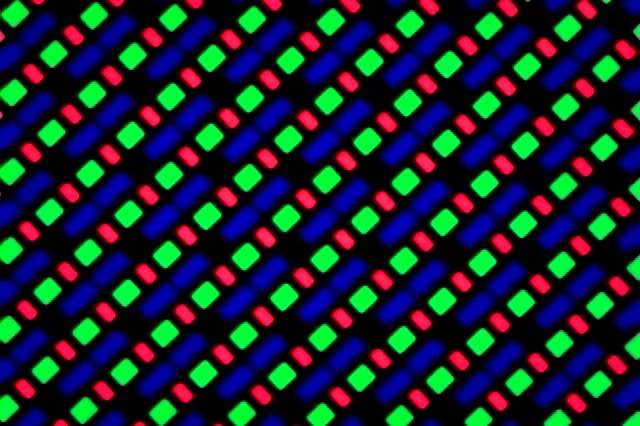
Microscopic view of the ThinkPad X1 Yoga OLED Display subpixel arrangement
Besides price, the other notable drawback to OLED is that the nature of the technology can limit the longevity of the display. As the subpixels are used to create light in either red, green, or blue, the subpixels themselves age and will dim over time. The different colors also age at different rates – with blue being the fastest to go – and to compensate, the subpixels may not be arranged in a true RGB pattern which can reduce the effective resolution of the device. Because of the different rates, there’s also a chance of burn-in if a static image is left on the display for a long period of time, a problem which in turn can be mitigated, though not entirely.
Currently televisions that use OLED are almost exclusively built on a different technology than what you’d see in smartphones and laptops. Right now, LG owns the OLED TV market and produces panels for everyone else using WOLED, which is a white OLED subpixel that is paired with color filters to convert said subpixels to red, green, or blue subpixels. This allows the panels to be manufactured for a cost that people can actually afford, and partially mitigates burn-in since all subpixels have a similar life-expectancy curve. However WOLED subpixels will still age faster or slower depending on how heavily they're used, so burn-in can still be an issue.
Samsung is reportedly looking into something similar, but will use a blue OLED as the base and quantum dots as the filter/converter. But neither of these technologies are used in laptops at the moment, so when you see an OLED TV for several thousand, and wonder why an OLED PC monitor is double the cost for a quarter the size, just know that all things are not created equally.
OLED also can have an issue with ghosting as well, although inserting black frames in between images can reduce that effect.
Due to the cost, high power usage, and aging issues, OLED is currently not ideal for use in laptops, and although it can be stunning to see in a laptop, it does have its drawbacks.
Building the Transistors
As we briefly touched on when going over the display technologies, the basic operation of a LCD display is that voltage is applied to the liquid crystal, which either twists or rotates it, allowing polarized light from the backlight through to the different subpixels which provide the red, green, and blue colors. In case you hadn’t noticed yet from all this discussion on color, what most of us are taught in elementary school on what the primary colors are is – while not entirely incorrect – not applicable to displays. Red, green, and blue are the primary colors for emissive (additive) light to give the widest range of color combinations, which is why subpixels are that color. If you were looking at subtractive colors, such as printing on white paper, you'd use cyan, magenta, and yellow.
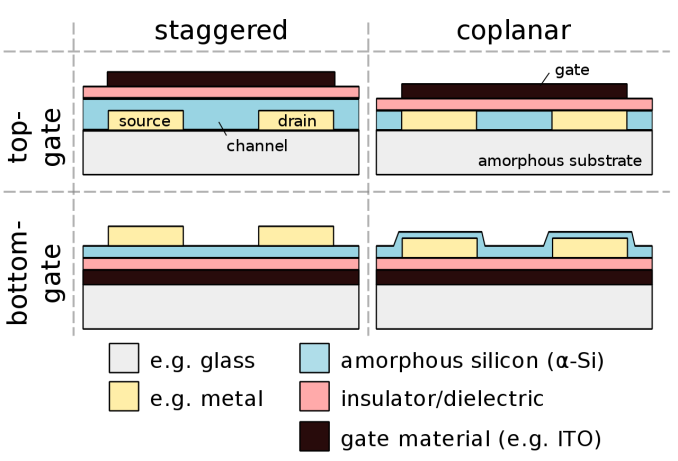 Thin-Film Transistor Construction - Source: Cepheiden
The basic function of an LCD is to twist an appropriate amount to provide varying levels of light through in order to combine red, green, and blue to make all of the colors you see on your display. To move the liquid crystal, voltage is required, and that voltage is provided through at least one transistor. Since transistors are semiconductors, manufacturers are somewhat limited in what they can use to build the matrix out of, and since you must shine a backlight through it, preferably the transistor will not block all of the backlighting.
Displays leverage a thin-film transistor, or TFT, to provide the matrix of transistors which control all of the subpixels. Traditionally, TFTs were generally made out of amorphous silicon (a-Si) which can be made much thinner than the more traditional crystalline silicon (c-Si) you’d find in an integrated circuit. This allows the backlight to shine through the TFT without being attenuated as drastically as it would be on a c-Si TFT.
While a-Si has served us well for a long, long time, as displays move up in pixel density, the amount of light blocked by the TFT gets to be a higher percentage, since you need more transistors in a given area to control the increased number of pixels. To combat this, manufacturers are developing new TFT materials which provide increased aperture for the backlight.
This is likely to be an ever-expanding list of materials, but materials which provide a higher aperture than a-Si are low-temperature polycrystalline silicon (LTPS) and indium gallium zinc oxide (IGZO). Sharp has been manufacturing IGZO displays for several years now, and LTPS is used in both laptops and smartphones.
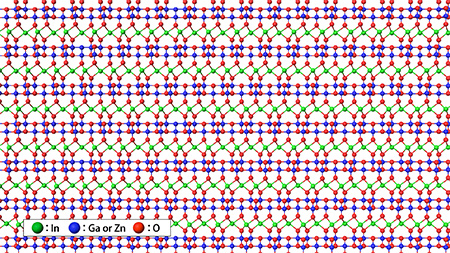
An image of the crystaline structure of IGZO - Source: Sharp
Of course, the major reason for the push to these technologies is to improve power efficiency. When you’re powered by a battery, any increases to the efficiency of the display can be dramatic, since the display backlight is often the highest power draw component of a laptop at idle (and laptops like to be idle). As an example, a Surface Book 2 15 with the display set to 100% brightness draws 7.65 W of power at idle. Of that, the display constitutes an amazing 6.22 W, or 81.3% of the power draw. By allowing more light through – via creating a thinner TFT – the net result is a reduction in power required for a backlight, improving its overall efficiency and generally providing a major benefit to a laptop's battery life.
There’s a lot of confusion here, and a common question you may see is if an IGZO or an IPS display is better, but IGZO is the TFT material, and IPS is the LCD type.
Lighting the Display
As far as backlighting goes, all modern laptop LCDs require a backlight. Laptops in turn generally rely on white LED backlighting, where the LEDs are located at the edges of the display, and the lighting from those LEDs is shone through a diffuser plate behind the display to provide a uniform backlight. This is most commonly referred to as an edge-lit display.
On larger displays where power draw isn’t as much of a concern, such as televisions, some manufacturers have moved to a full-array backlight, which puts the LEDs directly behind the display. This allows the individual LEDs to be dimmed to provide local dimming, which improves black levels quite dramatically, however it’s unlikely laptops will adopt this due to the extra thickness and power required. On high-end computer monitors, you may find a backlight made up of RGB lighting as well, but for the same reasons, laptops are unlikely to leverage this design.
The only display that doesn’t require a backlight is Organic Light Emitting Diode, or OLED, since the individual OLED subpixels emit their own light.
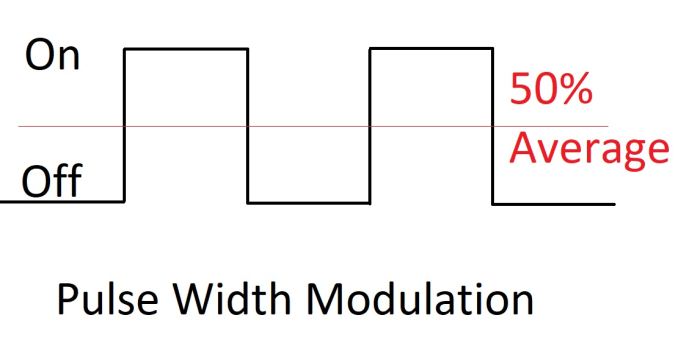
Backlighting brightness is typically controlled by using pulse-width modulation (PWM). A voltage is applied through a transistor that turns on and off quickly, and depending on how much time is spent in the on versus off position, various average voltage levels are achieved. This is called the duty cycle. A 50% duty cycle will have the voltage on for 50% of the time, and off for 50% of the time, and the average voltage will be half of the maximum.
The downside to PWM is that some people can be susceptible to the flickering that can occur, especially if the PWM frequency is too low. If a manufacturer is trying to save costs, they may utilize a cheaper PWM controller which operates at a frequency that is far too low. This can be more noticeable when the display is dimmed, since the amount of time the backlight is on in the duty cycle is much less. Laptops with a PWM frequency in the low hundreds of Hz can have a noticeable flicker, but quality controllers should operate at frequencies around 10 KHz or so, as to not make it noticeable to the human eye.
Color Space
A color space is a subset of entire visible light spectrum, and the reason that it’s a subset is that being able to reproduce the entire visible spectrum is technologically impossible at this time. Various color spaces will all target a different subset of colors, although they may overlap with each other. A color space is also known as a color gamut.
The most common color space on a PC today is sRGB, and almost all laptops and monitors target this color range. But in the past several years, we’ve seen more and more devices able to target a gamut with a wider range of colors, such as Adobe RGB, and there are advantages and disadvantages to using these wider gamuts on a PC.
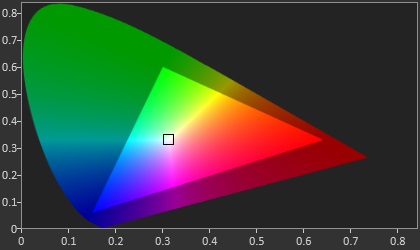
The sRGB Color Space - Source: SpectraCal
The sRGB, or standard Red Green Blue gamut is an RGB color space which is the standard used on all PCs and the Internet. If you look at an image on the internet, it’s more than likely an image within the sRGB color space. Windows defaults to using the sRGB color space for everything.
Other common gamuts used in the PC industry are the Adobe RGB gamut, developed by Adobe in 1998, and the P3 color space, both of which are wider than sRGB. Wider means that they cover a range of colors larger than the sRGB gamut.
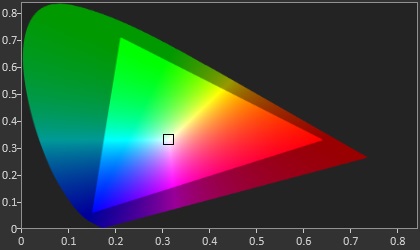
The Adobe RGB Color Space - Source: SpectraCal
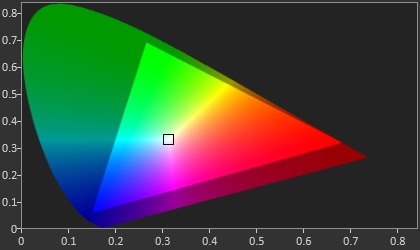
The P3 D65 Color Space - Source: SpectraCal
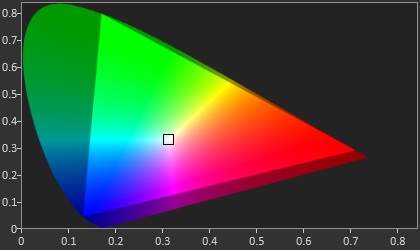
The BT.2020 HDR Color Space - Source: SpectraCal
But being wider isn’t always better, especially when using Windows as your operating system. Windows defaults to sRGB for pretty much everything, and doesn’t really have any sort of robust color management system (CMS) that can transform colors targeting one space into another. Applications can build and use their own CMS, but that’s at the application level only, and requires the developer to do much of the legwork. If you think of an sRGB color represented to be displayed on an 8-bit display, if you want to display 100% red you’d use 8,0,0 on that pixel so that red is on the maximum brightness (typically 255 or 1.0f). But if Windows opens a photo that was created as sRGB on a display that covers the P3 gamut, it will still tell the display to use 100% red, zero green, zero blue. But 100% red in sRGB is closer to 80% red in a P3 display, so the colors will be overblown, and the image won’t look correct.
 Incorrect color on the Left (Photos) vs correct color on the Right (Adobe Photoshop Elements)
To Microsoft's credit, Windows is getting better. But progress here is slow due to legacy matters and the need to avoid breaking existing software, so using wider color spaces on the desktop is still a dicey proposition.
The end result is that on a laptop, offering a wider gamut display can cause problems for most workloads. And for that reason, unless you do a lot of work in a color managed application like something from Adobe, it’s generally not ideal, unless your laptop has the ability to switch the color gamut the display uses through software.
Finally, there are even wider gamuts available, like the Rec. 2020 color space. But at the moment there’s no technology available in a laptop-sized implementation that can create all of the colors in that space.
White Point
The white point on a PC display is generally going to be D65, which corresponds roughly to sunlight at midday in western or northern Europe. When discussing the color temperature in Kelvin, D65 is close to 6504 K. When discussing a DCI-P3 display, the target white point is D63, which is more green than D65. In the PC space, you’ll generally be dealing with a P3 D65 gamut, rather than DCI-P3 which is used in the cinema. Though there are a few PCs, such as the Surface Studio, that can target either DCI-P3 or P3 D65.
How many bits?
Most displays are 8 bits-per-channel, meaning each red, green, and blue channel can have 256 (2^8) steps, which provides 16,777,216 (256 * 256 * 256) different color combinations. That sounds like a lot of colors, and it is, but on each channel there’s still a fairly large jump between steps, since red can only be 0-255, for example.
Less expensive displays may even reduce this more to 6-bit with Frame Rate Control (FRC) which uses temporal dithering which quickly switches between two colors to simulate the color in between to simulate the full 8-bit levels. Often TN displays are only 6-bit with FRC, and lower priced IPS such as e-IPS can also be 6-bit.
Meanwhile with the wider color gamuts available now, the jump in a color step for each increase from 0-255 can be even wider. So lower-bit panels are more susceptible to color banding on the display, which as the name implies, is a situation where distinct bands of colors appear when the intention is for a smooth gradient. This occurs when two colors next to each other are supposed to be slightly different, but end up looking exactly the same or more different than intended, since the display can’t create the color in-between. To counteract this, more bits are needed to represent smaller graduations from one step to the next, so often a wider gamut display will be 10-bit, or 8-bit with FRC. A true 10-bit display offers 1024 levels for each channel, which creates 1,073,741,824 different color options.
Although all modern GPUs support 10-bit, NVIDIA currently restricts 10-bit on OpenGL to their Quadro lineup, so applications using OpenGL like Adobe’s suite require a professional GPU.
High Dynamic Range
High dynamic range, or HDR, is one of the best new features to come to displays in quite some time. HDR brings a wider range of brightness levels, and requires a higher bit-depth as well, to keep the detail available in darker scenes. To provide that, displays certified for HDR have to achieve higher brightness levels than traditional displays as well, so it can be a large benefit.
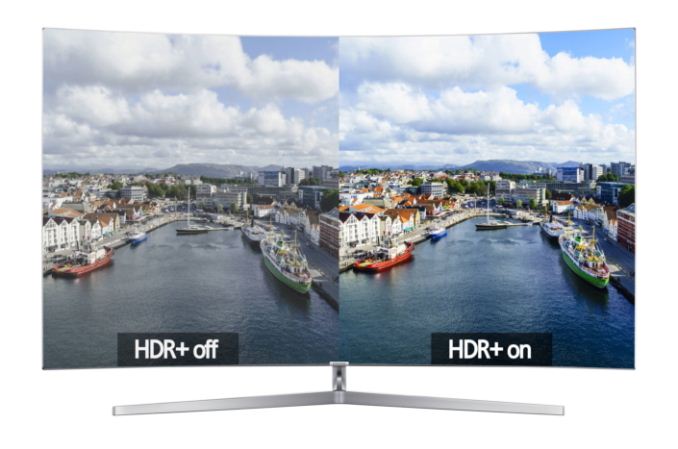 Source: Samsung
VESA has announced the DisplayHDR specification, which has three levels: DisplayHDR 400, 600, and 1000, which each level corresponding to the peak brightness of the display in nits.
There are two main competing HDR transport standards right now, although only one is available on the PC. HDR10 is a 10-bit format with static metadata for the HDR info, and Dolby Laboratories Dolby Vision is a 12-bit color depth with dynamic metadata which allows the mapping of the pixel data to the luminance to be adjusted frame by frame. PCs only support HDR10, and not only do you need an HDR monitor, you also need at least a Kaby Lake iGPU or newer, an NVIDIA 900 or newer series GPU, or AMD Radeon RX 400 series or higher, as well as DisplayPort 1.4 or HDMI 2.0.
There are only a couple of laptops on the market which offer an HDR display at the moment, but with the eDP connector and complete control over the product stack, HDR in a laptop is likely to be easier for the consumer to use. As of WIndows 10 version 1803, the built-in display needs to have a resolution of 1920x1080 or higher, with a recommended brightness of 300 nits or more. The device has to have integrated graphics with PlayReady hardware DRM for protected HDR, and of course the correct codecs for video which is generally going to be HEVC. Kaby Lake or newer support this. The nice thing will be consumers won't have to worry about any of this, since it will be up to the OEM to ensure everything is in order, rather than with a desktop system where the user has to make sure all of the i's are dotted and the t's are crossed to enable HDR.
There’s a lot of new HDR products coming to market soon, and when it becomes mainstream it’ll be a welcome benefit.
How We Test Displays
There’s a lot of variables to test when objectively evaluating the performance of a laptop display, including brightness, black levels, color accuracy, and more. To test these, we use different tools depending on what’s being tested.
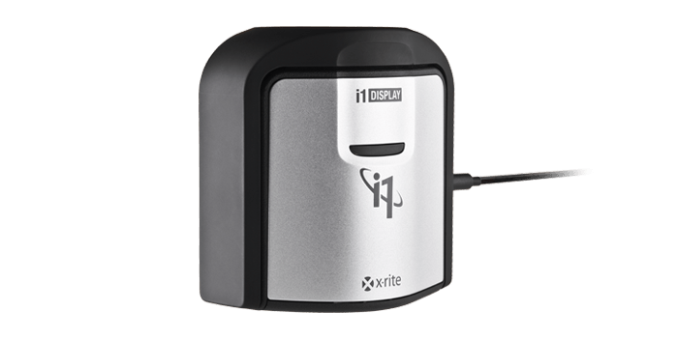
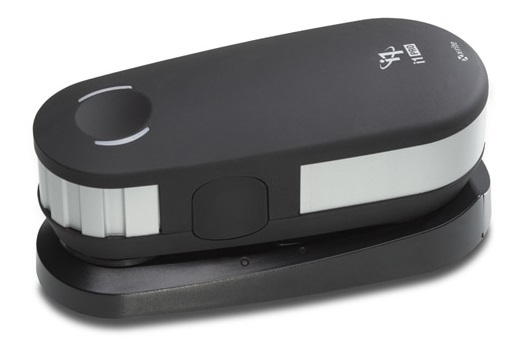
X-Rite i1Display Pro Colorimeter
When measuring brightness levels and contrast, we utilize the X-Rite i1Display Pro colorimeter. Colorimeters measures the light from the display through three filters. At this point you shouldn’t be surprised to hear that the filters are red, green, and blue. Colorimeters measure light and color similarly to the way your eye would. The advantage to using a colorimeter for testing contrast ratios is that with just three filters, there’s less noise when measuring black, so the accuracy of the black level is higher than with a spectrophotometer.
X-Rite i1Pro 2 Spectrophotometer
A spectrophotometer works in a similar way to a colorimeter, but instead of reading light in three bands, a typical spectrophotometer will have 31 filters to measure the entire color spectrum. They can measure a wider range of colors, generally with more accuracy. There are extremely good colorimeters on the market as well though, so as with most things, your mileage may vary. The disadvantage is less accurate readings on black, but we use the X-Rite i1Pro 2 spectrophotometer for all of our color readings including grayscale, saturations, and the Gretag Macbeth test.
SpectraCal CalMAN Suite
For the software suite, we leverage SpectraCal’s CalMAN suite, which is an incredibly powerful set of tools. We utilize a custom workflow to measure brightness, contrast, grayscale, gamma, gamut, saturation, and Gretag MacBeth. If desired the workflow can also be used to calibrate a display, and measure the display accuracy across the entire display, although we generally reserve that for monitor reviews.
Testing the displays
First, we measure the display’s brightness and black levels at both 100% brightness and 0% brightness. Contrast is presented with the display at 100% brightness, and a brighter display provides more options for use outdoors, but the brightness at 0% can be important too if you’re using the device in a very dark room, such as in bed. Some displays can go all the way down to less than 10 nits, while others bottom out much higher and would seem eye-searing in a dark room.
Next, the i1Display Pro is swapped out with the i1Pro 2, which is first calibrated and then placed on the center of the display. A 100% white image is shown and the brightness level is adjusted to 200 nits – or as close as can be had, since there’s not infinite steppings on the brightness levels. Once the brightness level is set, the display is run through the grayscale test which measures the accuracy of the white levels from 0 to 100% at 4-bit steps. Next, the gamut accuracy is tested, which is simply the 100% levels for red, green, blue, cyan, magenta, and yellow, along with white. We then do the saturation sweeps which measures all of the primary colors (red, green, and blue) as well as secondary colors (cyan, magenta, and yellow) with 4-bit steps between measurements. Finally, we test the Gretag Macbeth colorchecker which runs through colors that aren’t necessarily directly on the primary or secondary axis, and includes important colors such as skin tones.
The brightness and black levels are measured in candela per square meter (cd/m2) and because candela per square meter is a mouthful, we refer to it as the non-SI term nits, where 1 nit = 1 cd/m2. Contrast ratio calculation is the brightness level at 100% divided by the black level at 100%, and of course higher is better, since it means the LCD is doing a better job of blocking the backlight when the pixel is set to off.
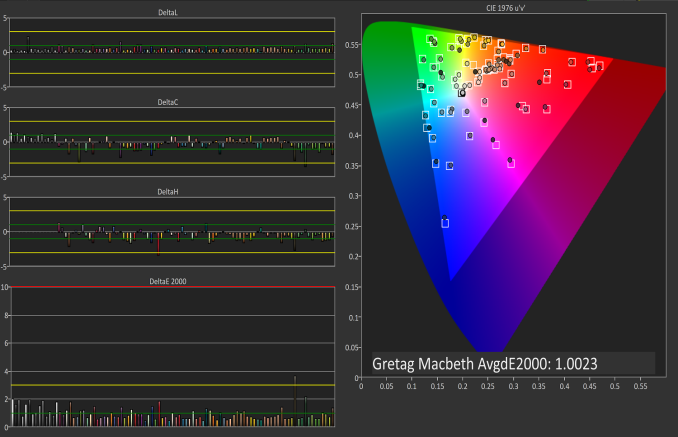 Gretag Macbeth results from the Microsoft Surface Studio in P3 D65 mode
SpectraCal CalMAN
The color accuracy measurements results are in Delta-E 2000 (dE2000), and Delta-E is a value that represents the distance between two colors. A dE2000 of 0 would mean that the colors are identical. A dE of 1.0 is the smallest color difference the human eye can see, but color is a complicated field and values above 1.0 aren’t necessarily noticeable either depending on where they fall in the spectrum. On our results, you’ll see a yellow bar at dE2000 of 3.0, and a green bar at 1.0. We’re generally looking for values under 3.0 to consider a display as accurate, but if it is under 1.0 it would be imperceptible.
Why we like manufacturers to calibrate displays at the factory
So we’ve gone over how we test displays, and what it means to be an accurate display. But, you may be wondering why one display is accurate and another is not, when both are IPS LCDs. The likely answer is that one of the manufacturers took the time to calibrate the display at the factory. The other possible answer is that one of them was just lucky in the panel lottery sweepstakes, but we’ve never run into a display that was accurate across the board that wasn’t calibrated.
There’s certainly a cost to calibrating the display on a laptop, but don’t assume that all premium devices have calibrated displays. The vast majority have no calibration at all. As of this writing, the only manufacturers who calibrated every display individually on every device they sell is Apple and Microsoft. We’ve seen other vendors offer calibration as well, such as Huawei and Lenovo, but not necessarily across their product lineup.
Sometimes manufacturers will do batch calibration, where they measure one or more displays from a batch, and calibrate them all with the same results. This is generally better than none at all, but obviously not as good as individual calibration.
There’s a couple of reasons why we prefer manufacturers to calibrate their displays at the factory. First, it saves the end user the cost and hassle of purchasing calibration equipment and creating their own profile, which is an obvious benefit. People who are doing color critical work may still want to calibrate, but their profiles should need to be far less aggressive than a device without hardware calibration. Second, creating ICC profiles to be applied to fix a display can cause banding, shade crushing, and gamma issues, especially in gaming. If the corrections are done in hardware, the software can’t interfere with it.

A factory calibrated display will offer an almost imperceptible level of error on colors like the MateBook X Pro
Professional monitors may have 3D Look Up Tables (LUTs) which allow the end user to calibrate it at the hardware level, and allow the display to render images in multiple color spaces, but laptops don’t have this hardware accessible to the end user. There’s a cost, but on a laptop that costs several thousand dollars, that cost should be paid for.
Final Words
Don’t think of this as an in-depth look at any of these topics. Each on its own could arguably require a full-length article, or more. Color management is a field unto itself, and we’ve only touched on the tip of the iceberg.
The display on a laptop is arguably the most important aspect, since it’s the one thing you will always be using. Other factors can be as important, such as the keyboard, battery life, and build quality, depending on application, but the display can make or break the experience.
Luckily the bar for display quality has gone up significantly in recent years. It’s difficult, but not impossible, to find a premium or business laptop without an IPS display now, and that alone has increased the usability of laptops considerably. Some gaming laptops may still offer TN displays with ultra-high refresh rates for the ultimate in gaming smoothness, but those same devices will generally be offered with a lower refresh rate IPS panel as an option as well. TN still has its advantages, but for most computing needs, IPS wins out.
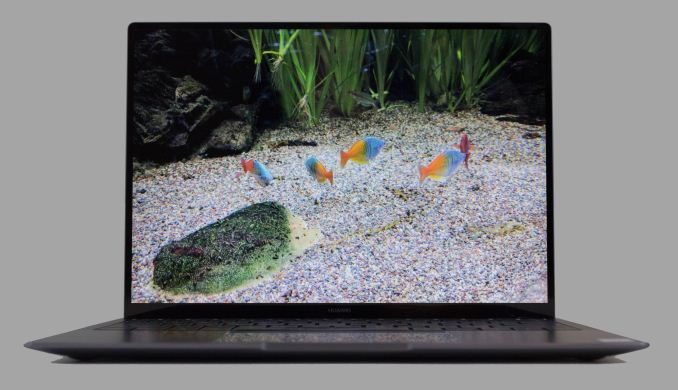
The Huawei MateBook X Pro features a 3000x2000 LTPS IPS Display
OLED still has some work needed before it will be a mainstream option in the laptop market. The main one is battery life. In our review of the Lenovo ThinkPad X1 Yoga we were able to test both the LCD model and the OLED model. The OLED version achieved only 59% of the battery life of the LCD version, which worked out to about 2.5 hours less. The OLED power problems are exacerbated by the amount of content on a PC which is white, such as most web browsing, word documents, spreadsheets, and more. This is the worst case scenario for OLED, and though some websites have dark modes, the majority do not. Windows does support a dark mode, but for most content it’s simply some chrome around the edges.With OLED there’s also issues with ghosting and burn-in which can be a problem on the PC because so much content like the taskbar is static.
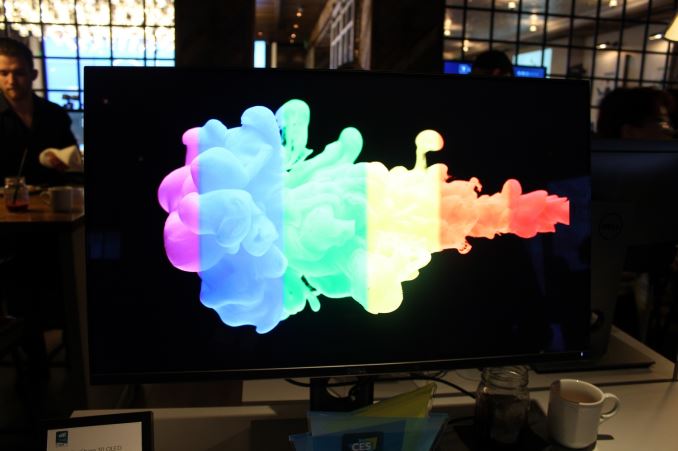
Dell's 30-inch OLED monitor shown at CES
We’ve also seen some nice strides in terms of efficiency upgrades on LCD panels, especially with high-resolution (high-density) displays, thanks to new materials being used to construct the underlying thin-film transistors. It’s likely that a lot of effort is being spent here by display manufacturers to continue to improve this. High resolution used to be a liability in terms of battery life, but laptops like the Huawei MateBook X Pro offer exceptional battery life and efficiency despite the 3000x2000 resolution, likely in a large part due to the LTPS TFT they are using. The MateBook X Pro is as efficient as the ASUS ZenBook 3 with the same CPU and only a 1920x1080 display.
We’re still at a point where Windows expects you to be using the sRGB color space, and displays – especially laptops without proper 3D LUTs that can be set to different gamuts – can be problematic. Some Adobe RGB-capable laptops like the Dell XPS 15 do have the ability to change the gamut in hardware though, so you can set it to Adobe RGB when working on photography, and then back to sRGB for the rest of the time. The lack of a proper color management system at the OS level in Windows means that if you don’t do this, colors will be blown out all across the system, from the wallpaper to the web browser. Microsoft has added a lot more functionality on transforms with their HDR stack though, so perhaps this will be solved eventually. This is one advantage Apple has held for a long time.
 Blown out colors on the Photos App vs Photoshop Elements
Finally, we went over how we test and why. Testing a display objectively is the only method we have available for an apples to apples comparison. Some people may prefer the colors to be a bit oversaturated, but they aren’t seeing the true image that they should. Once you’ve used an accurate display, it’s difficult to go back, and having a display calibrated at the factory is always the way to go. If Apple can afford to do it on a $399 iPad, certainly a laptop manufacturer can find it in their budget to calibrate a $2000 Ultrabook.
There’s a lot to look forward to with displays as well. High resolution is already here, but HDR and wider color spaces are going to change the game over the next couple of years. There’s no way to stop the march of technology.

