Original Link: https://www.anandtech.com/show/13008/ibuypower-element-gaming-pc-review-8086k-and-gtx-1080ti-inside
iBuyPower Element Gaming PC Review: i7-8086K and GTX 1080 Ti Inside
by Joe Shields on July 6, 2018 10:00 AM EST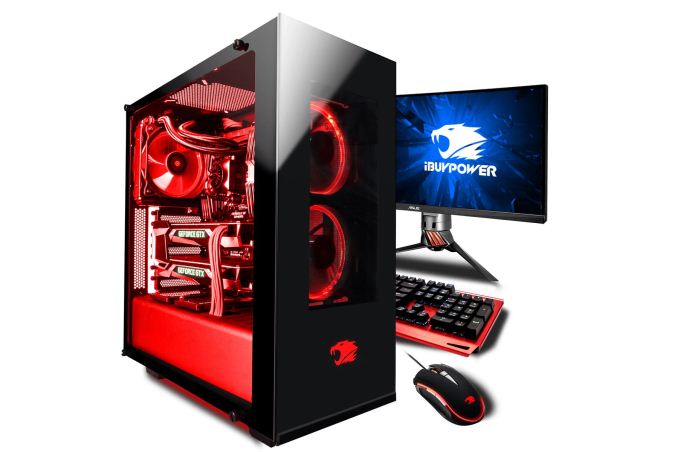
It has been a long while since AnandTech has reviewed full-sized systems, as most of our readers tend to build PCs for themselves. There is however quite a large contingent of PC users who buy off the shelves/website from companies like such as iBuyPower who build custom PCs. Today we are looking at a custom build using their Element chassis, which gives users a tempered glass chassis, some RGB bling, and some quite capable hardware inside with the latest Intel i7-8086K as well as an NVIDIA GeForce GTX 1080 Ti. Read on to see how it's built and how well it performs in our testing.
iBuyPower Element Overview
To coincide with Intel's Core i7-8086K launch, iBuyPower has kindly sent us a PC from their Element line of systems. The Element series of PCs hails from their signature line (which contains multiple different models such as Revolt 2, Noctis, and Snowblind) which includes the chassis we see below, one of their most popular they say. These systems offer a wide variety of options in processors from both AMD and Intel, along with video cards from NVIDIA and AMD, which gives users a lot of flexibility in choosing exactly what hardware they want. Along with the base components, iBuyPower has options for just about anything from hard drives and SSDs, motherboards, power supplies, heatsinks and CLC coolers, to different types of fans. If it can be used with the PC, its likely an option here.
If buying from one of their signature lines doesn't tickle your fancy, they offer an option to start from scratch with a custom builder allowing users to pick out each component starting by platform. There are literally dozens of options in cases, motherboards, processors, video cards, RAM, and cooling solutions to choose from. Users are even able to have iBuyPower do the overclocking for you with options for 10% and 20% overclocking (for an additional fee, of course). If the RGB LED implementations on the selected or built system isn't enough, they offer additional lighting and even RGB LED cable combs to like up your cable runs.
In the end, once a system is chosen be it fully custom or from their existing lines, it is built, an OS installed, and the system tested as it was requested to be configured. It is then packaged and shipped to the customer's home. These are a complete turn-key system solution for those who just do not want to be bothered with building a PC for whatever reason.
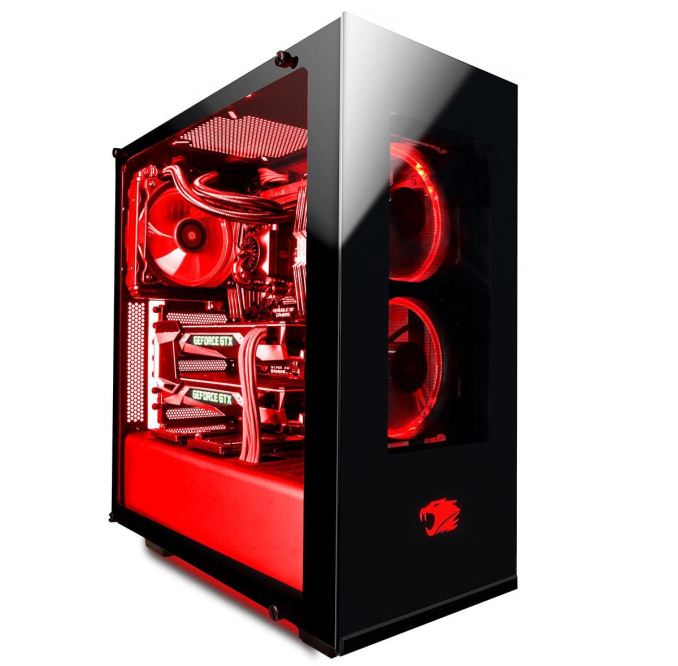
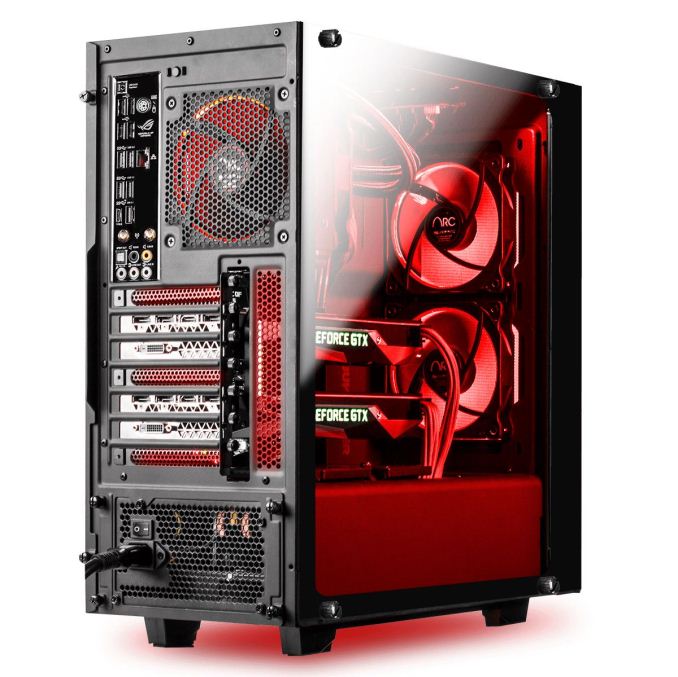
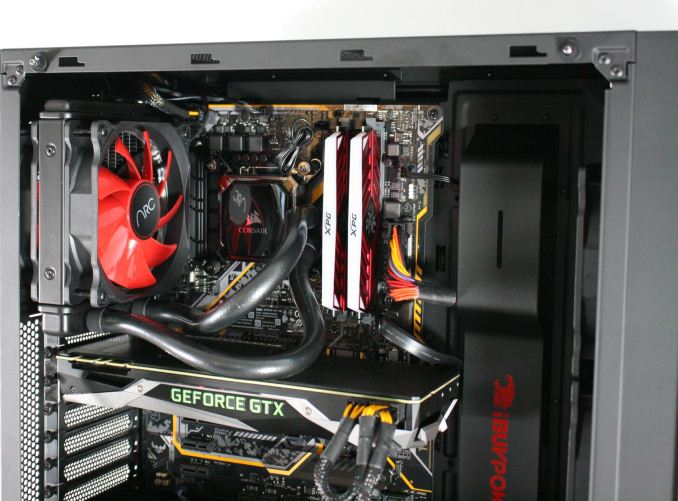
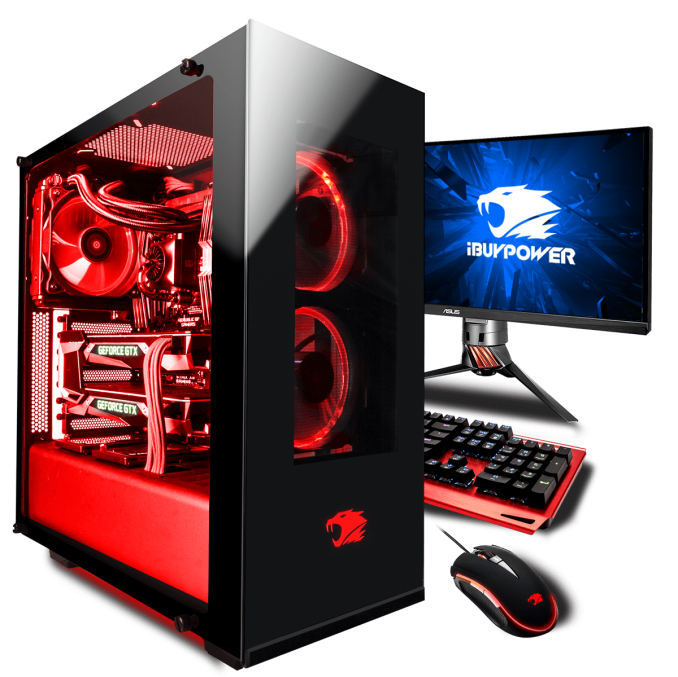
What we have today to look at is from their Element line, which consists of an ATX size chassis with two tempered glass panels showing off the hardware inside. The chassis itself is all black on both the outside and inside, with a red theme coming from the three Arc Halo fans as well as two LED strips on the bottom of the case. The styling of this chassis is fairly subdued and boxey, and outside of the tempered glass panels and numerous red LEDs, the chassis minimizes the use of other eye-catching design features. But if something more flashy is needed in the case, more lighting is able to be added through the motherboard.
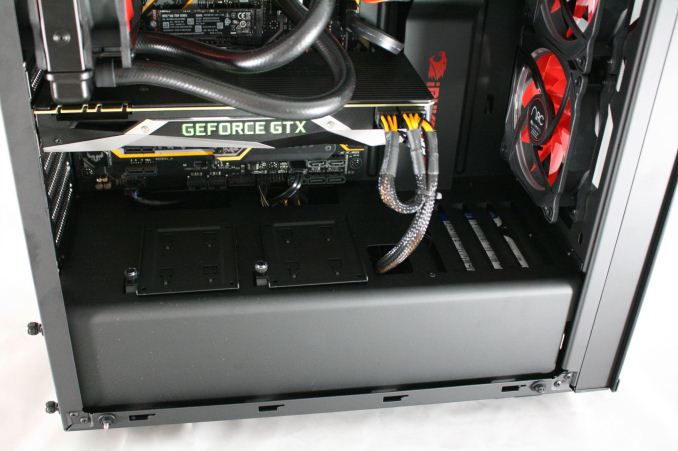
Inside the case, cable management was clearly a consideration as there are shrouds for the PSU/bottom of the case to hide the wires, along with other shrouds to the right of the motherboard also intended to hide unsightly cables. On top of the power supply tray are locations for two 2.5-inch drives, and there's an area for two more at the front of the case also hidden underneath the shroud. The Element will support a 120mm radiator in the rear fan slot, and there appears to be room for a 2x120/140mm in front with leaving the case as is.
Overall, build quality is good on the chassis with the panels lining up properly and going back on without hassle, thanks in part to the padded thumbscrews holding it on at each corner. Airflow in the case should be adequate with intake air coming from the top and bottom of the front panel going through a dust filter inside the case. Once in the case, the included fan on the rear will exhaust it out. There is also an option for up to a 140mm fan at the top of the case for even more airflow.
Hardware wise, iBuyPower shipped us a monster of a system, starting with Intel's latest and greatest i7-8086K CPU inside which they overclocked from the factory to 5 GHz on all cores and threads while keeping it cool is a 120mm CLC cooler from Corsair. The system shipped with an ASUS TUF Z370-Plus Gaming motherboard along with 2x8 GB DDR4 3000 CL16 ADATA Spectrix D41 RAM. For the video card a Founder's Edition NVIDIA GeForce GTX 1080 Ti was the weapon of choice. Storage for this build is using a 256 GB Intel 760D M.2 PCIe NVMe SSD and a 1TB Western Digital Caviar Blue hard drive for mass storage.
| iBuyPower Element Specifications (as configured) | |
| Warranty Period | 3 Years (Labor), 1 Year (Parts) |
| Product Page | LINK |
| Price | $2199 |
| Chassis | Element |
| CPU | i7-8086K @ 5 GHz (all cores/threads) |
| Motherboard | ASUS TUF Z370-Plus Gaming |
| Memory | ADATA Spextrix D41 2x8GB DDR4 3000 CL16 |
| Video Card | NVIDIA GeForce GTX 1080 Ti |
| Storage | Intel 760D 256 GB M.2 PCIe NVMe SSD Western Digital Caviar Blue 1TB HDD |
| Cooling | Corsair H60 CLC |
| Power Supply | 600W Thermaltake Smart Series |
As far as performance goes, the iBuyPower Element as configured was a straight up beast. Really, how could it not be with the flagship Z370 based CPU installed and overclocked as well as the fastest NVIDIA video card that's not named Titan.
Performance results in our testing showed the overclocked system outpacing a stock i7-8700K system, in most cases, with relative ease due to the increased clock speeds. Where we ran into issues was with thermal throttling in some testing such as POV-Ray. Here, the processor that should have a 700 MHz advantage with all core overclocking barely performed better than the i7-8700K at stock speeds. With the processor being so new, and working within a tight timeframe – iBuyPower shipped out the system almost as soon as they got their 8086Ks in stock – the crew over at iBuyPower did not have time to find the lowest stable voltage for the test system, so there is some fat that can be trimmed in this case. Systems shipped to the public will more than likely not exhibit this behavior as they will be properly tweaked when leaving the warehouse. A quick voltage adjustment later found this sample good at 5 GHz and 1.3V which prevented any thermal throttling and increased that score to where it should be.
Outside of that one-off issue, the system performed well in all testing. When choosing a processor like this with plans to overclock it, we would suggest going with a 2x120/140mm cooler for better results. In the end, the system performed as expected in our testing and with the GTX 1080 Ti by its side, pounded through the game testing as well.
Unboxing and Visual Inspection
Purchasing a boxed system from a builder like iBuyPower the device arrives at users houses fully assembled and ready to go. The only setup needed are plugging in the mouse and keyboard, internet, video cable, and power cable. Once plugged in it should be as simple as hitting the power button, walking through Windows configuration, and voilà its ready to install the games one wishes to play.
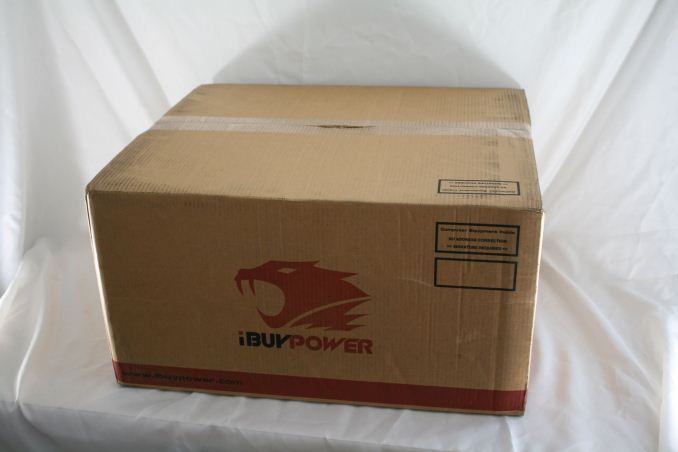
The iBuyPower PC arrived in a large box as seen above. The box is fairly nondescript outside of the iBuyPower logo and writing on four of the six sides. It is shipped in a box in a box manner to keep what is inside protected.
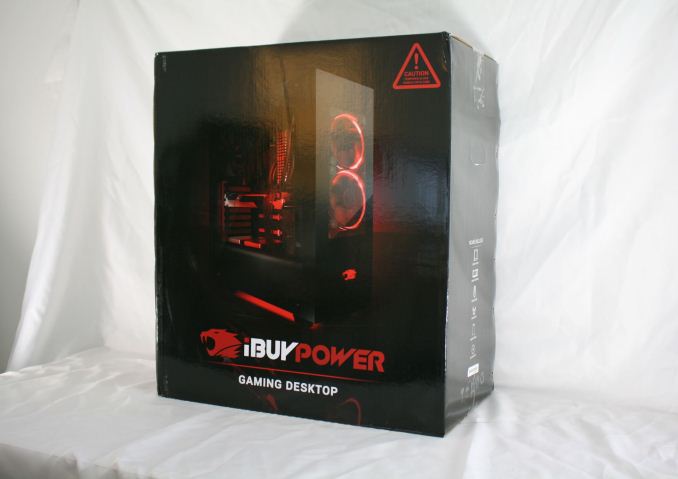
When opening up the box we are greeted with our first glimpse of the system in the form of an image on another box. This is more of what one would see on shelves with the system sitting securely inside. The PC sits in styrofoam shell protecting the PC inside.
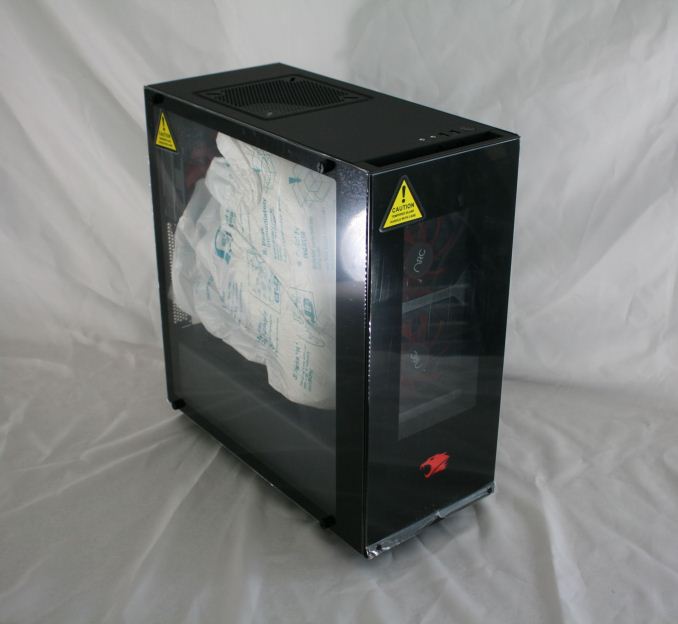
After we removed the PC from its box, we are left with what is pictured above. iBuyPower uses form-fitting materials inside to hold all the components in place while in transit. The tempered glass panels each have a protective film over it to prevent any damage to the glass itself.
Overall the system is packaged well and should handle the bumps and bruises of shipping with how the unit is enclosed. It has both box in box protection and sits suspended from the box panels and edges so it should arrive at the buyer's house as pristine as it left the factory.
iBuyPower Element i7 8086K
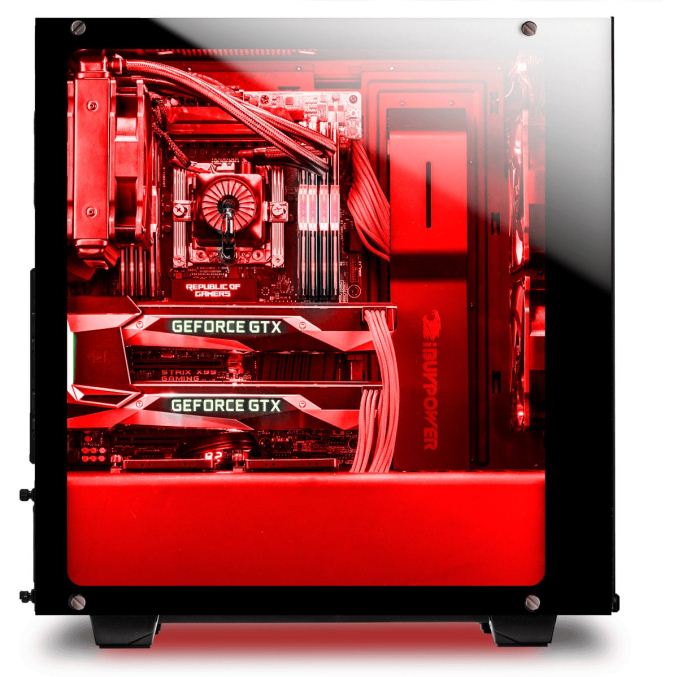
We'll first display some stock images and then poke around on the inside. The case used in the Element chassis uses two tempered glass panels with one on the front with their logo lit up, and one on the sides showing off the internals. Overall it's a good looking case without some of the curious angles we have seen in some designs. The simple design and use of tempered glass panels gives the case a more expensive appearance as opposed to acrylic sided cases. The bare chassis structure is sourced from NZXT while glass front and sides are custom pieces tooled in-house.
iBuyPower ships the case with 3 ARC RGB LED fans giving it a nice red glow out of the box. Internally, the ASUS TUF Z370-Pro Gaming motherboard and the ADATA Spectrix D41 RAM further illuminates the interior of the case, with the latter two customizable through the Aura Sync software. In regards to airflow, there is plenty of space on the top and bottom of the front panel to let cool air through a removable dust filter. The IO panel sits up at the top of the case for easy access and there is another fan location for additional airflow as well.
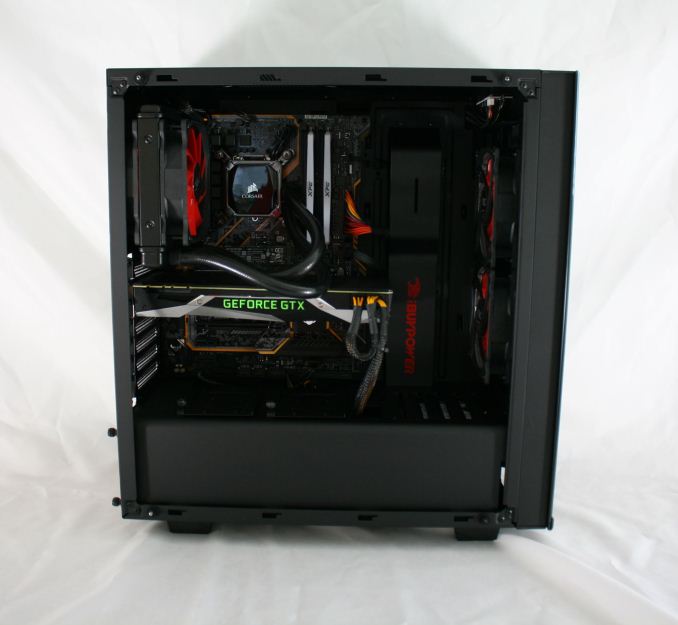
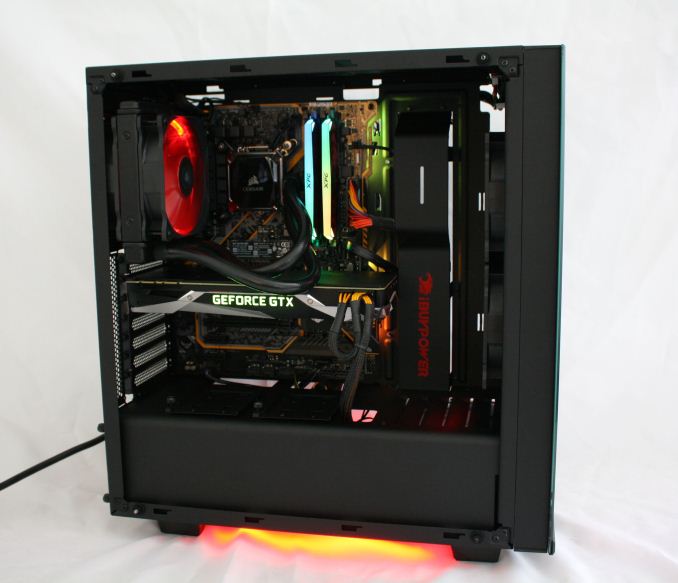
Taking the glass side panel off via four thumbscrews expose a fairly roomy interior with all the components housed inside. Our initial look shows the case will fit up to ATX sized motherboards and we can see a large shroud over the power supply to cover up unsightly cables. To the right of the motherboard and video card, we can see additional shrouds for cleaning up the cables mounted to the chassis as well as two 120mm fans for intake.
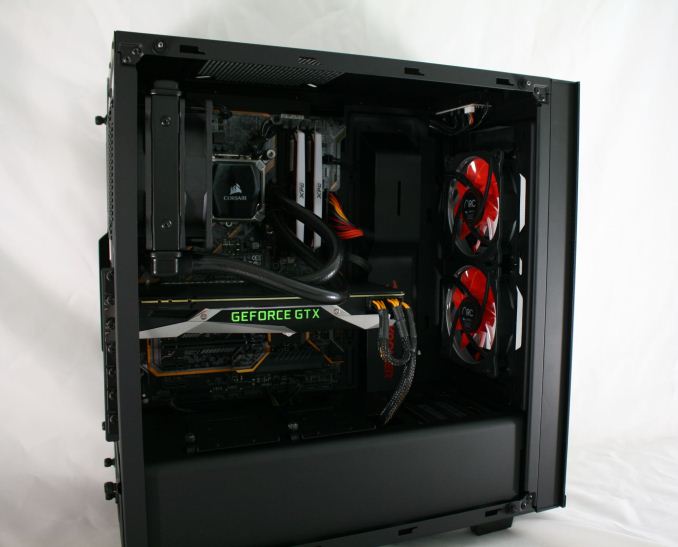
Twisting the case a bit to expose more of the front fans, we can see there is room for two 120mm fans as well as being able to support two 140mm fans or 2x120/2x140mm radiators. Between the front glass panel and the fans is a removable dust filter to help keep the inside of the case clean. Up top, there is room for a 120mm/140mm fan. Below the front fan mount locations we see the louvered top of the power supply shroud, and beneath that the 3.5-inch Western Digital Caviar Blue HDD this model came equipped with. Further below that is another 3.5-inch drive bay.
Sliding the case around again we are able to see a better shot of the rear 120mm fan mount which in this case has a Corsair H60 CLC unit mounted to cool the CPU. Shown in the top of this image are two of the four studs with rubber washers for attaching the tempered glass main panel.
This image more clearly shows the shroud covering up the power supply and most of its cables as well as the two 2.5-inch mount points on the left which are removable via thumbscrews. The shroud has cutouts for cables that attach to the bottom of the motherboard as well as a cutout to route PCIe power cables as well making the interior case aesthetic clean with plenty of places to hide and route the wires.
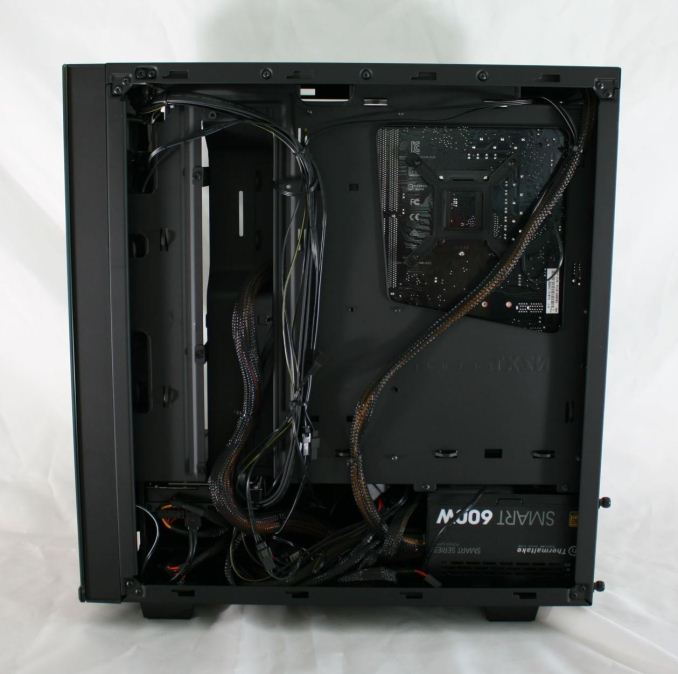
The back of the case has ample room for cables under the shroud as well as between the side panel and motherboard tray. There are multiple tie-down points for any other cables that also helps routing and cleaning up a jumble of wires. Routing the wires properly behind the tray can prevent side panel bulge we have seen on some other cases. There is a decent size trapazoid cutout exposing the back of the motherboard socket area for ease of mounting coolers.
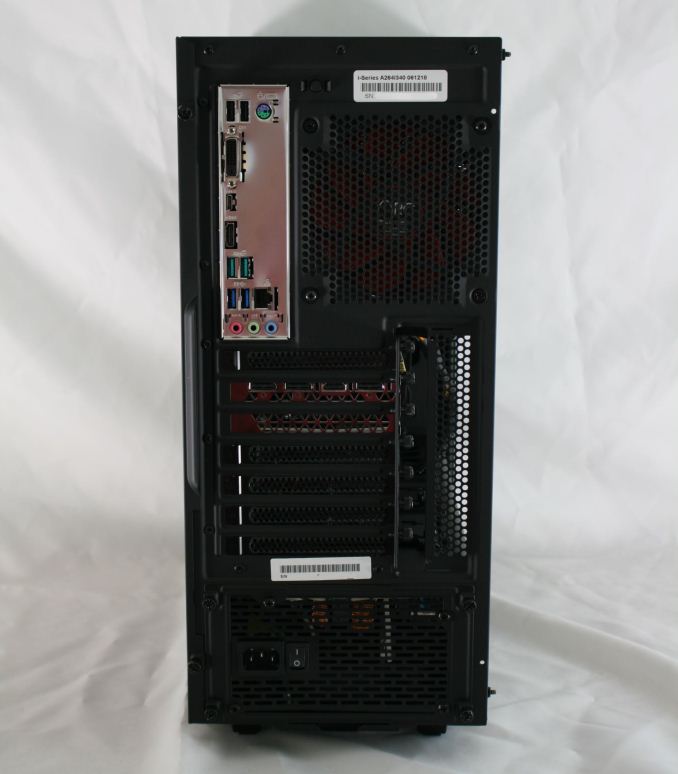
The back of the case shows the vented Thermaltake power supply at the bottom and just above that, seven expansions slots for additional PCIe cards are available.
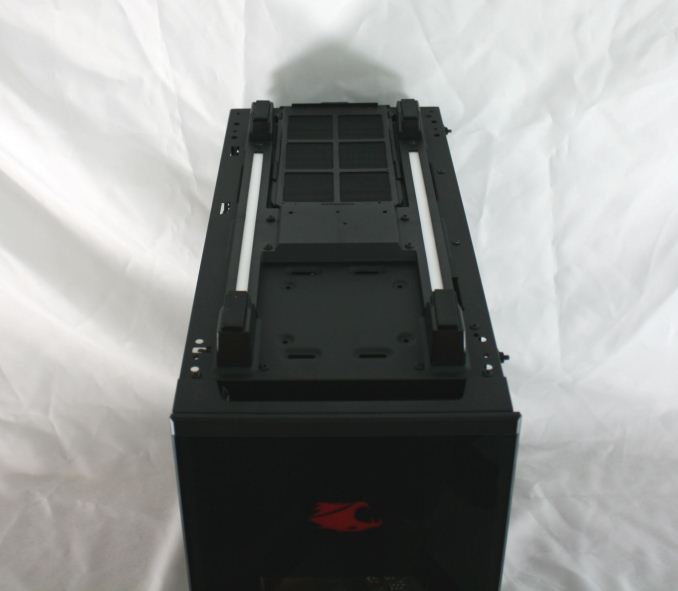
Flipping the case on its head, we are now able to see another removable dust filter, this time for the bottom mounted power supply. The white strips seen running along the length of the chassis are integrated RGB LED strips. The case stands on four feet raised up a bit over an inch from the bottom of the case which should allow for ample airflow (except perhaps on the most shag of carpets).
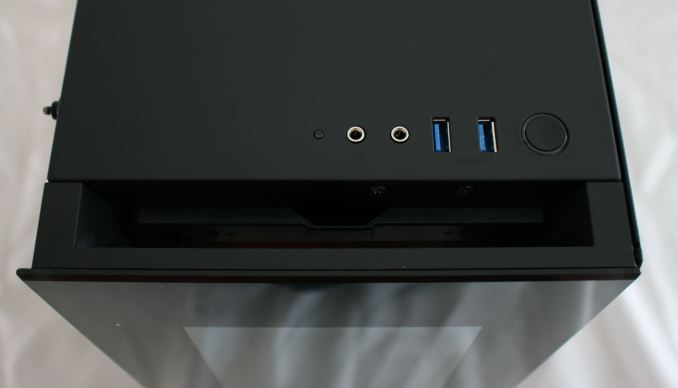
Last but certainly not least is the IO panel located on the top front part of the case. The panel consists of a power/reset button, two USB 3.0 ports, 3.5mm headphone and microphone jacks, as well as a HDD LED to display drive activity. I would like to have seen a USB 3.1 port of some sort here. The large gap in front of the IO area is where the air is able to come into the case and from the top is where one removes the front dust filter. There is a matching gap at the front bottom of the case for intake as well.
Overall, the chassis is well put together feeling sturdy even without the glass and other side panel removed. The tempered glass side and front panels have a black border on edges cleaning up the look so only the internals are exposed and not the frame of the chassis. There is plenty of room to route cables and shrouds to hide them, and iBuyPower did a pretty good job of tidying them up at the factory. iBuyPower's red LED implementation on the included fans and the strips on the bottom of the case cannot be changed, however, the LEDs on the ASUS TUF Z370-Plus Gaming motherboard as well as the ADATA RAM can be controlled through the ASUS AURA software. The case has ample airflow capabilities and can handle the heat without issue.
In the Box
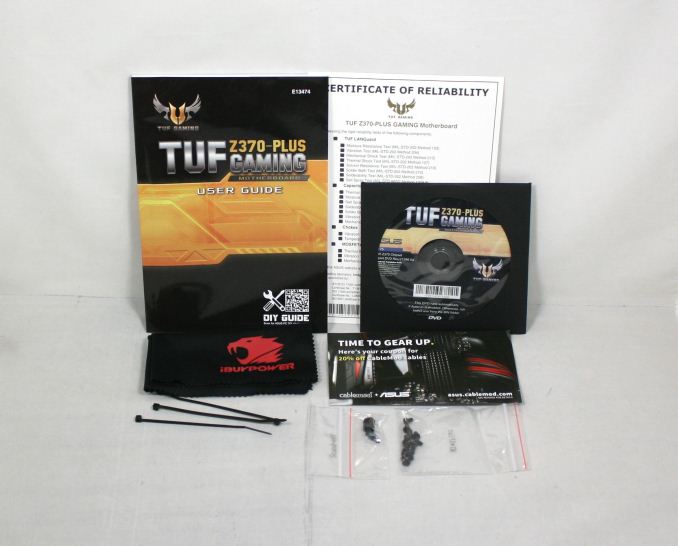
Inside the iBuyPower Box was a frosted bag which contained all the included accessories. We see an ASUS TUF Z370-Plus Gaming user guide, driver disk, some screws and zip ties. There isn't too much here, but in buying a complete system like this, there isn't much one needs to get started or extra. That said, I would like to have seen an extra SATA cable or two included to more quickly add SATA based storage.
BIOS
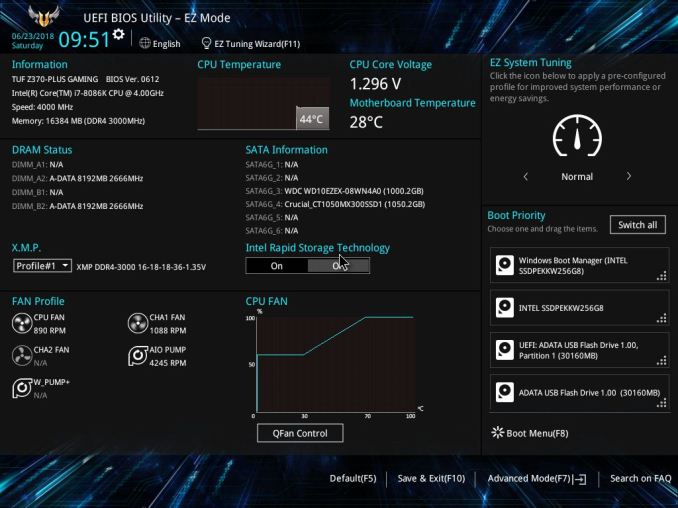
This particular setup from iBuyPower is using the ASUS TUF Z370-Plus Gaming motherboard from the TUF lineup. ASUS's TUF lineup used to be more of a premium type of motherboard with loads of built-in sensors and physical armor for protection, but has since seemed to become a bit tamer in its look as well as forgoing the plethora of sensors it used to have. That said, it is still a very capable board and seems to be able to handle a flat 5 Ghz i7-8086K without flinching. The BIOS includes both an EZ Mode (pictured below) as well as an advanced mode for further tweaking of the system.
The EZ Mode portion of the BIOS offers a view of the system in its current state as well as allowing a few options to be edited. It shares information such as motherboard BIOS version, installed CPU and Memory speeds as well as CPU and motherboard temperature and CPU Core Voltage. Users are able to enable XMP profiles for the memory, enable Intel Rapid Storage technology, change the boot order, and access to the QFan control for adjusting fan speeds and profiles as well. There is also an EZ System Tuning section for one-touch overclocking. Overall the EZ Mode is a useful tool for system status and high level information needed at a glance, but the advanced section is where most of the options reside.
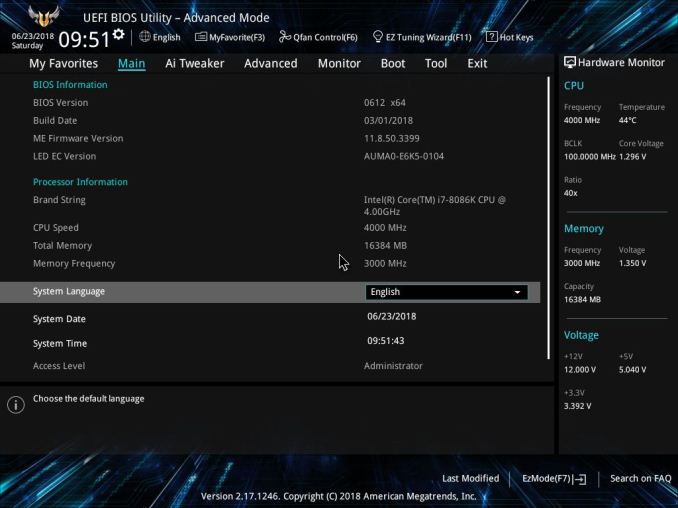
The Advanced section of the BIOS gives access to everything the BIOS has to offer from overclocking capabilities to enabling and disabling hardware. The BIOS has several headers across the top with each section housing a group of functions. The first section is labeled Main and is generally an informative tab disclosing information about the BIOS version and processor information. The only item that is editable is the system language.
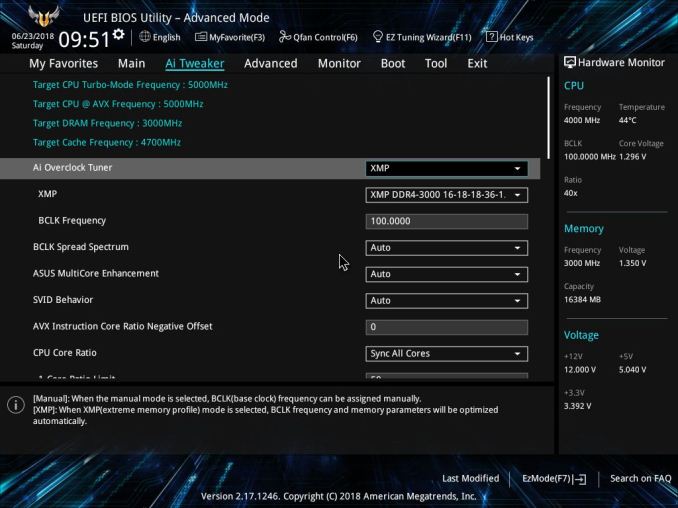
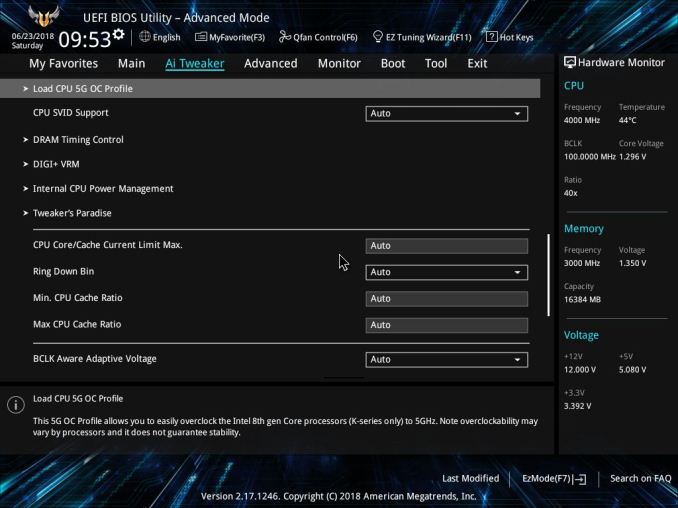
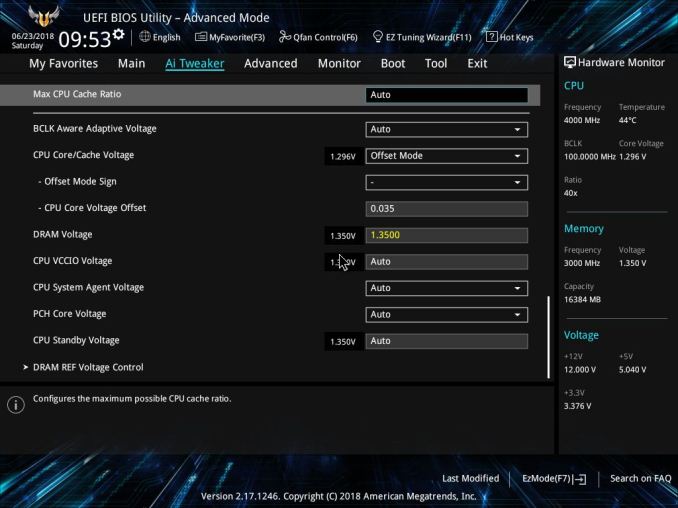
The Ai Tweaker section is where overclockers will find their home. This section houses everything needed to overclock the processor and get the most out of it including BCLK and CPU ratio as well as voltage adjustments and power options. Since this is coming in a system, it is likely some options are already raised from default (as seen in the screenshots). All CPU adjustments including BCLK and CPU ratio as well as voltages are all located under the Ai Tweaker heading.
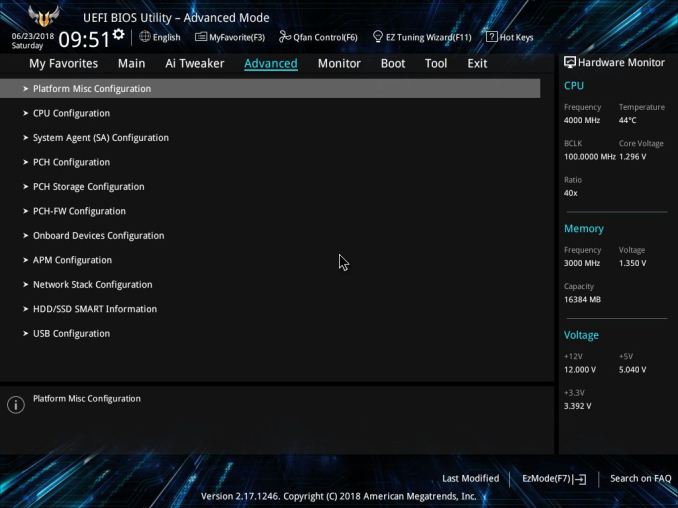
The Advanced section gives users options to adjust certain functions on the system from the storage configuration attached to the chipset to other onboard devices.
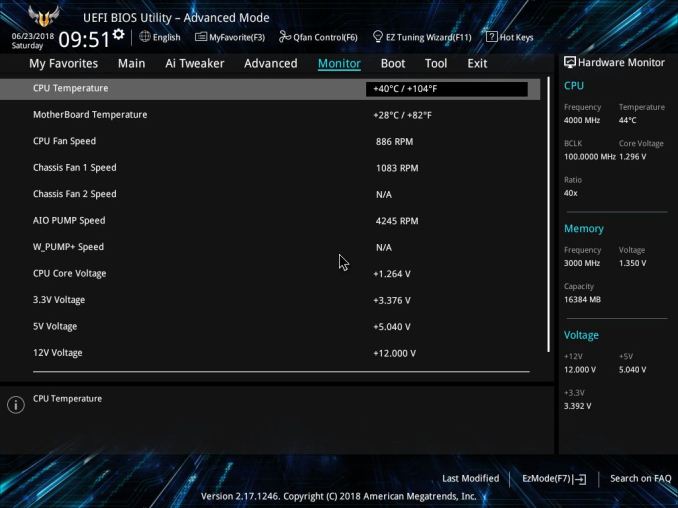
The Monitor section displays system information from temperatures to voltages on the processor and from the power supply. Users are able to access the ASUS QFan functionality in order to adjust fan speeds and create custom cooling profiles to balance performance and quiet.
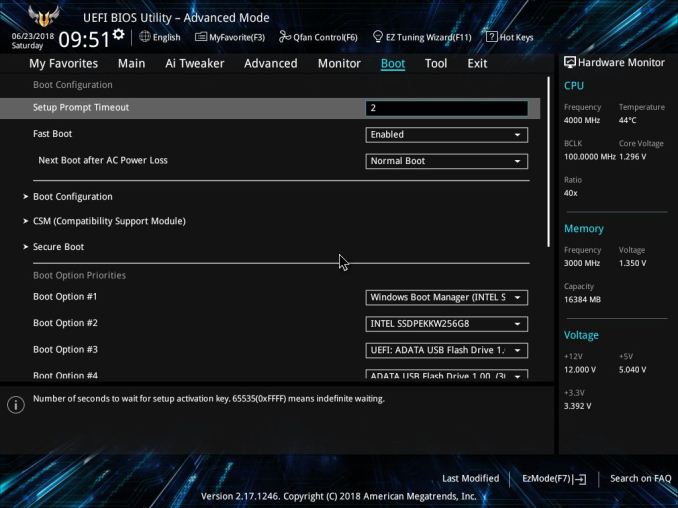
The Boot section is where users are able to adjust boot priorities as well as enable fast boot and other boot-time options.
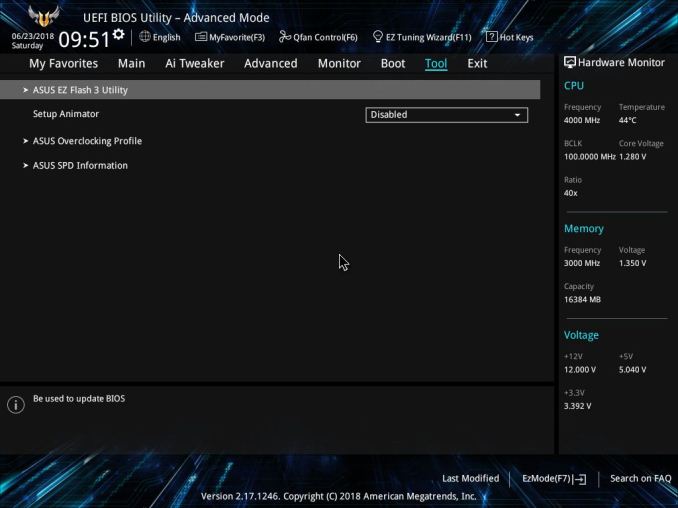
The Tool section is a landing pad for a couple of BIOS utilities that can help with BIOS flashing as well as a repository for any overclocking profiles. The ASUS EZ Flash 3 utility is used to flash the BIOS while the Overclocking profile will hold any BIOS settings for easy retrieval.
Software
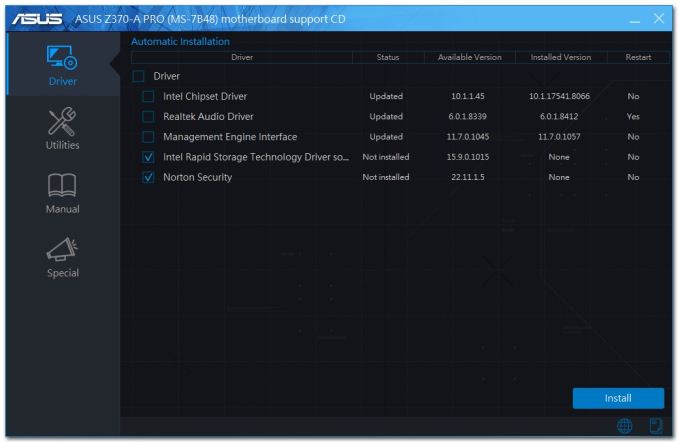
The ASUS TUF Z370-Plus Gaming motherboard used on the board includes a driver disk (though it says Z370-A Pro) that has all the drivers needed to get a user up and running in case of a system update or failure. It includes the chipset and realtek audio drivers, the Intel Management Interface along with Rapid Storage Technology drivers and a value add software piece in Norton Security. Being a pre-built, the drivers were already installed at the factory.
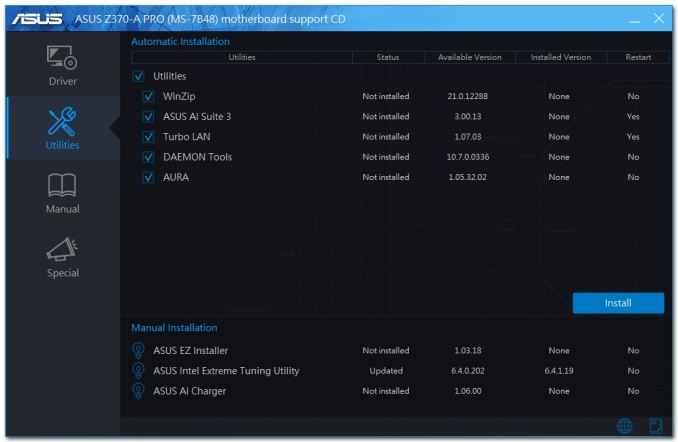
The disk also bundles ASA utilities such as AI Suite 3 - a complete app that is used to monitor and control the motherboard, Turbo LAN for network traffic management, as well as AURA to control lighting. The latest versions of these applications can be found online at the ASUS webpage for this motherboard.
System/Board Features
The iBuyPower Element systems are designed to be 'visually stunning, both inside and out' with good airflow in mind. The use of tempered glass on the front and side panel of the case along with the red LED fans and strip under the case, give the all black Element a red glow that will surely catch people's eyes. iBuypower offers the Element in four different versions, the Vein (AMD Ryzen based), Eternal R (Intel Z370 based), Void (Intel X299 based), and the VR (Intel Z370 based). Graphics card wise, the AMD solutions range from an AMD Radeon RX 550 up to a RX Vega 64 and on the NVIDIA side from the GeForce GT 1030 up to the flagship GTX 1080 Ti. Between the system/CPU options as well as video cards, there is likely a system configuration that will work for most anyone.
| iBuyPower Element with ASUS TUF Z370-Plus Gaming | |
| Warranty Period | 3 Years (Labor), 1 Year (Parts) |
| Product Page | LINK |
| Price | $2199 |
| Size | ATX |
| CPU Interface / CPU | LGA1151 / i7-8086K @ 5GHz |
| Chipset | Intel Z370 |
| Memory Slots (DDR4) | Four DDR4 Dual Channel Supporting 64GB Up to DDR4 4000 |
| Network Connectivity / Wi-Fi | 1 x Intel I219-V Gigabit LAN |
| Onboard Audio | Realtek ALC887 codecs 7.1ch surround |
| Video Outputs | 1 x DVI-D 1 x HDMI (1.4b) |
| PCIe Slots for Graphics (from CPU) | 1 x PCIe 3.0 x16 |
| PCIe Slots for Other (from PCH) | 1 x PCIe 3.0 x4 (full-length slot) 3 x PCIe 3.0 x1 |
| Onboard SATA | 6 x RAID 0/1/5/10 (from PCH) |
| Onboard SATA Express | None |
| Onboard M.2 | 2 x PCIe 3.0 x4 and SATA |
| Onboard U.2 | None |
| USB 3.1 | ASMedia 3142 2 x Type-A ports (back panel) |
| USB 3.0 | Chipset 1 x USB Type-C port (supports 3A output) 6 x (2 back panel, 4 through headers) |
| USB 2.0 | Chipset 6 x (2 back panel, 4 though headers) |
| Power Connectors | 1 x 24-pin ATX 1 x 8-pin CPU |
| Fan Headers | 1 x 4-pin CPU 2 x 4-pin Chassis |
| IO Panel | 1 x PS/2 Mouse/Keyboard port 1 x DVI-D 1 x HDMI 1 x LAN (RJ45) 1 x USB 3.0 Type-C 2 x USB 3.1 (teal blue) 2 x USB 3.0 (blue) 2 x USB 2.0 (black) 3 x audio jacks |
***For this specific review, the iBuyPower system hardware is different than the other datasets used. We wanted to test performance out of the box with the factory overclocked Core i7-8086K CPU (in this case iBuyPower set it to 5 GHz all cores) along with the included video card, a reference GTX 1080 Ti running at stock speeds.
AnandTech Test Bed
As per our motherboard testing policy, we take a high-end CPU suitable for the motherboard that was released during the socket’s initial launch and equip the system with a suitable amount of memory running at the processor maximum supported frequency. This is also typically run at JEDEC sub timings where possible. It is noted that some users are not keen on this policy, stating that sometimes the maximum supported frequency is quite low, or faster memory is available at a similar price, or that the JEDEC speeds can be prohibitive for performance. While these comments make sense, ultimately very few users apply memory profiles (either XMP or other) as they require interaction with the BIOS, and most users will fall back on JEDEC supported speeds - this includes home users as well as industry who might want to shave off a cent or two from the cost or stay within the margins set by the manufacturer. Where possible, we will extend our testing to include faster memory modules either at the same time as the review or a later date. It's also worth noting that for stock systems we test with multi-core enhancement disabled.
| Test Setup | |
| Processor | Intel i7 8700K (6C/12T, 3.7G, 95W) |
| Motherboard | MSI Z370-A Pro (BIOS 2.5) |
| Cooling | Corsair H115i |
| Power Supply | Corsair HX750 |
| Memory | Corsair Vengeance LPX 4x8GB DDR4 2666 CL16 Corsair Vengeance 4x4GB DDR4 3200 CL16 (used in 2x 4/8GB capacity on dual Channel Platform |
| Memory Settings | DDR4 2666 CL16-18-18-35 2T |
| Video Cards | ASUS Strix GTX 980 |
| Hard Drive | Crucial MX300 1TB |
| Optical Drive | TSST TS-H653G |
| Case | Open Test Bed |
| Operating System | Windows 10 Pro 64-bit |
Many thanks to...
We must thank the following companies for kindly providing hardware for our multiple test beds. Some of this hardware is not in this testbed specifically but is used in other testing.
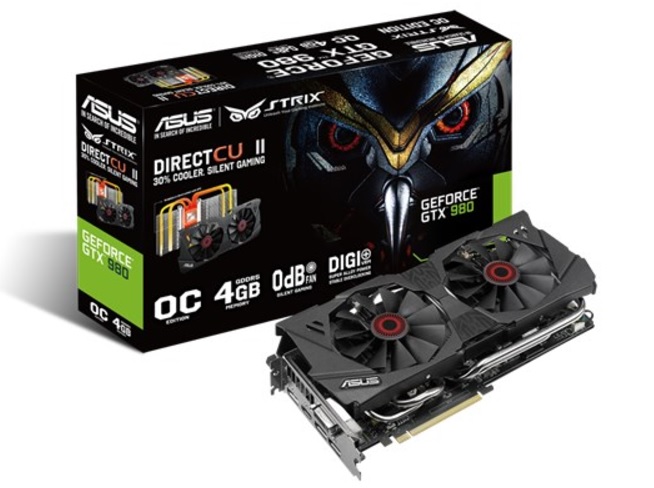
Thank you to ASUS for providing us with GTX 980 Strix GPUs. At the time of release, the STRIX brand from ASUS was aimed at silent running, or to use the marketing term: '0dB Silent Gaming'. This enables the card to disable the fans when the GPU is dealing with low loads well within temperature specifications. These cards equip the GTX 980 silicon with ASUS' Direct CU II cooler and 10-phase digital VRMs, aimed at high-efficiency conversion. Along with the card, ASUS bundles GPU Tweak software for overclocking and streaming assistance.
The GTX 980 uses NVIDIA's GM204 silicon die, built upon their Maxwell architecture. This die is 5.2 billion transistors for a die size of 298 mm2, built on TMSC's 28nm process. A GTX 980 uses the full GM204 core, with 2048 CUDA Cores and 64 ROPs with a 256-bit memory bus to GDDR5. The official power rating for the GTX 980 is 165W.
The ASUS GTX 980 Strix 4GB (or the full name of STRIX-GTX980-DC2OC-4GD5) runs a reasonable overclock over a reference GTX 980 card, with frequencies in the range of 1178-1279 MHz. The memory runs at stock, in this case, 7010 MHz. Video outputs include three DisplayPort connectors, one HDMI 2.0 connector, and a DVI-I.
Further Reading: AnandTech's NVIDIA GTX 980 Review
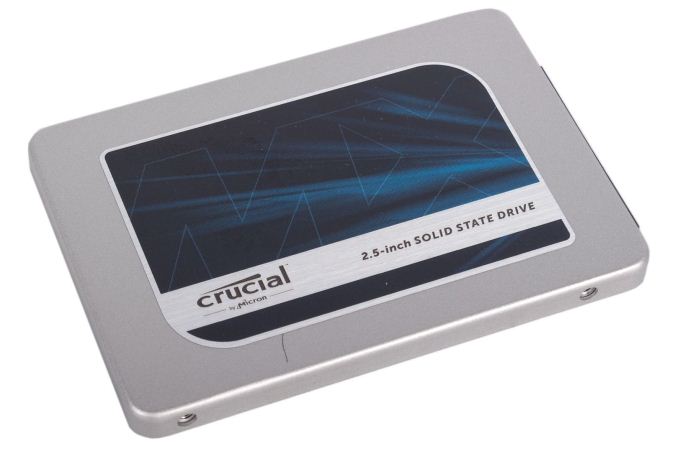
Thank you to Crucial for providing us with MX300 SSDs. Crucial stepped up to the plate as our benchmark list grows larger with newer benchmarks and titles, and the 1TB MX300 units are strong performers. Based on Marvell's 88SS1074 controller and using Micron's 384Gbit 32-layer 3D TLC NAND, these are 7mm high, 2.5-inch drives rated for 92K random read IOPS and 530/510 MB/s sequential read and write speeds.
The 1TB models we are using here support TCG Opal 2.0 and IEEE-1667 (eDrive) encryption and have a 360TB rated endurance with a three-year warranty.
Further Reading: AnandTech's Crucial MX300 (750 GB) Review
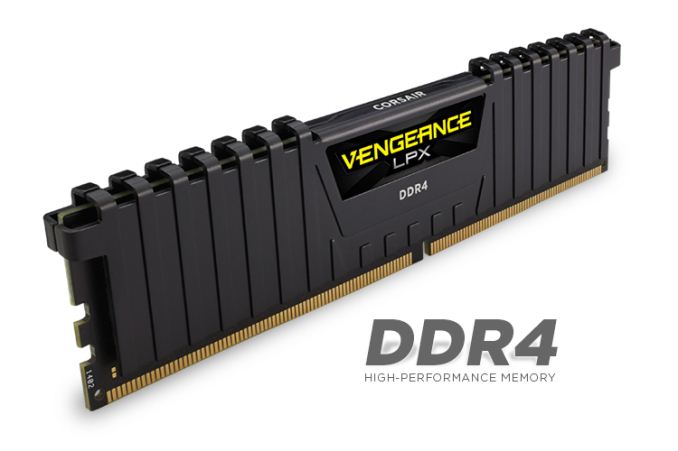
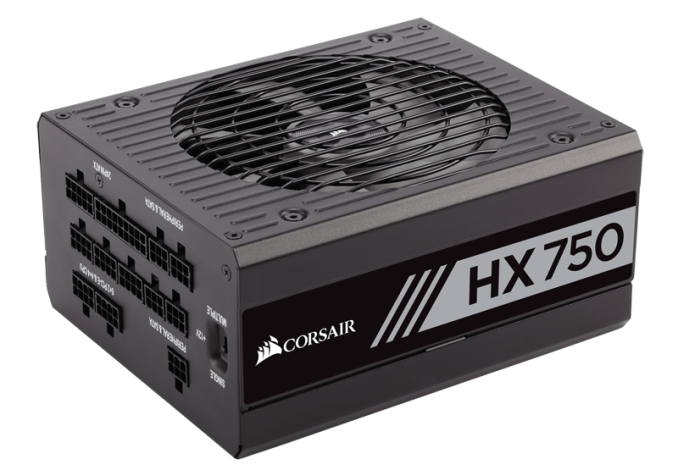
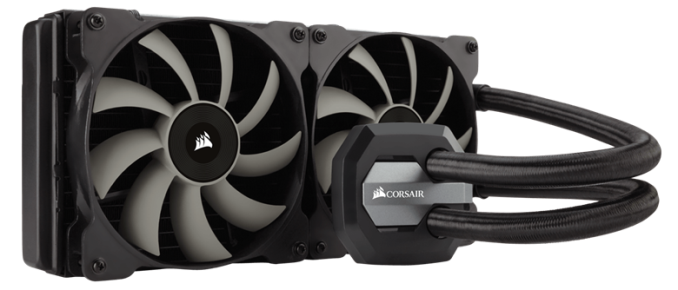
Thank you to Corsair for providing us with Vengeance LPX DDR4 Memory, HX750 Power Supply, and H115i CPU Cooler.
Corsair kindly sent a 4x8GB DDR4 2666 set of their Vengeance LPX low profile, high-performance memory for our stock testing. The heatsink is made of pure aluminum to help remove heat from the sticks and has an eight-layer PCB. The heatsink is a low profile design to help fit in spaces where there may not be room for a tall heat spreader; think a SFF case or using a large heatsink. Timings on this specific set come in at 16-18-18-35. The Vengeance LPX line supports XMP 2.0 profiles for easily setting the speed and timings. It also comes with a limited lifetime warranty.
Powering the test system is Corsair's HX750 Power Supply. This HX750 is a dual mode unit able to switch from a single 12V rail (62.5A/750W) to a five rail CPU (40A max ea.) and is also fully modular. It has a typical selection of connectors, including dual EPS 4+4 pin four PCIe connectors and a whopping 16 SATA power leads, as well as four 4-pin Molex connectors.
The 135mm fluid dynamic bearing fan remains off until it is 40% loaded offering complete silence in light workloads. The HX750 comes with a ten-year warranty.
In order to cool these high-TDP HEDT CPUs, Corsair sent over its latest and largest AIO in the H115i. This closed-loop system uses a 280mm radiator with 2x140mm SP140L PWM controlled fans. The pump/block combination mounts to all modern CPU sockets. Users are also able to integrate this cooler into the Corsair link software via USB for more control and options.
System Performance
Starting things off, let's take a look at low-level system performance. This gives us a look at some of the baser aspects of the system, including power consumption, audio quality, POST time and latency.
***For this specific review, the iBuyPower system hardware is different than the other datasets used. We wanted to test performance out of the box with the factory overclocked Core i7-8086K CPU (in this case iBuyPower set it to 5 GHz all cores) along with the included video card, a reference GTX 1080 Ti running at stock speeds.
Power Consumption
Power consumption was tested on the system while in a single GPU configuration with a wall meter connected to the relevant system/testbed's power supply. The Thermaltake power supply in the Element is Bronze rated, which means on US on a 120 V supply it hits ~82% efficiency > 60W, and 85%+ efficiency at 300W. This method of power reading allows us to compare the power management of the underlying motherboard and its ability to supply components with power under load, and includes typical PSU losses due to efficiency. These are the real world values that consumers may expect from a typical system (minus the monitor) using this motherboard.
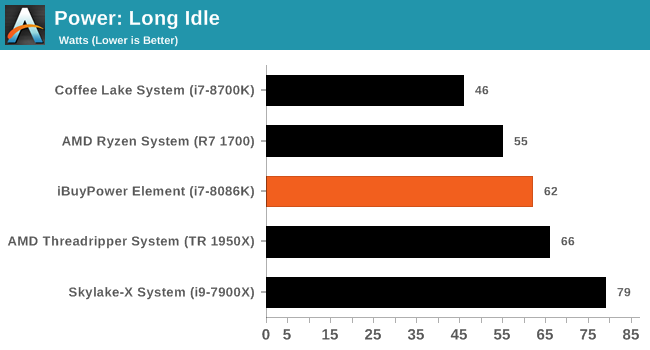
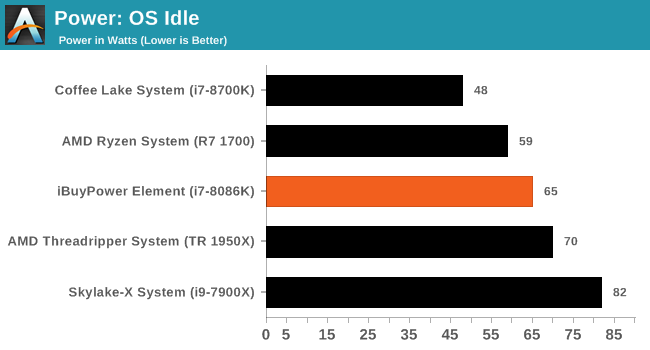
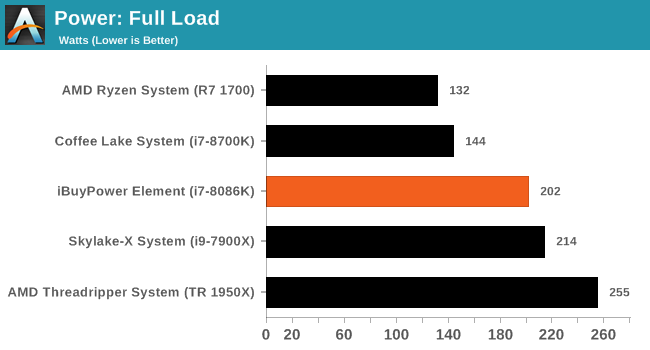
Looking at the power use on the iBuyPower system, we are able to discern the PC (as configured) uses 62W and 65W in Long Idle and OS Idle states respectively. This value places it around 15W above a stock configured i7-8700K system with our 750W Platinum-rated PSU. That said, idle loads will vary as the systems involved are not exactly alike. But clearly, a processor sitting at 5 GHz with raised voltage on idle will use more power.
The load tests show the iBuyPower system coming in at 202W, just slightly behind a stock Skylake-X system at 214W. Compare this to the stock i7-8700K which uses 144W in this testing (OCCT Blend) and we can see what is to be expected in the overclocked iBuyPower system which is using more due to the overclock and other system differences.
Non-UEFI POST Time
Different systems have different POST sequences before an operating system is initialized. A lot of this is dependent on the motherboard used, and POST boot time is determined by the controllers on board (and the sequence of how those extras are organized). As part of our testing, we look at the POST Boot Time using a stopwatch. This is the time from pressing the ON button on the computer to when Windows 10 starts loading. (We discount Windows loading as it is highly variable given Windows specific features.
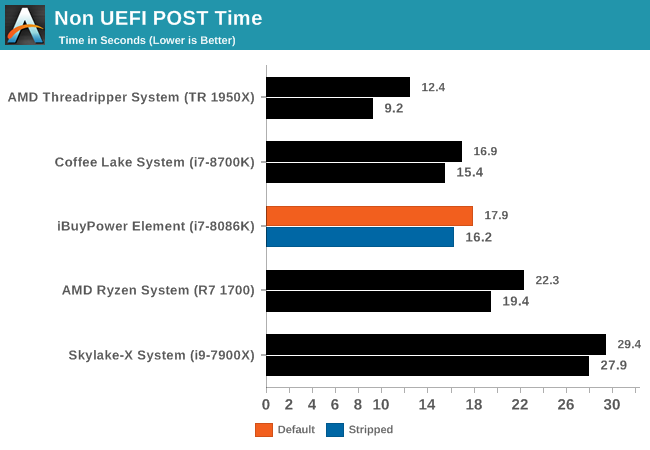
In the non-UEFI POST times, the iBuyPower Element system with the ASUS TUF Z370-Plus Gaming posted a fast boot time of 17.9 seconds out of the box, and 16.2 seconds when shutting down extras. This time puts it in the middle of results and close to its Z370 counterpart so there isn't anything out of the ordinary here.
Rightmark Audio Analyzer 6.2.5
Rightmark:AA indicates how well the sound system is built and isolated from electrical interference (either internally or externally). For this test we connect the Line Out to the Line In using a short six inch 3.5mm to 3.5mm high-quality jack, turn the OS speaker volume to 100%, and run the Rightmark default test suite at 192 kHz, 24-bit. The OS is tuned to 192 kHz/24-bit input and output, and the Line-In volume is adjusted until we have the best RMAA value in the mini-pretest. We look specifically at the Dynamic Range of the audio codec used on board, as well as the Total Harmonic Distortion + Noise.
Due to circumstances currently out of our control, we were unable to get RMAA results for this board, or any X299 board for that matter. The issue continues with Z370 as well. The problem does not lie with the board itself. Once (if) we are able to get it working properly, the space will be updated with data.
DPC Latency
Deferred Procedure Call latency is a way in which Windows handles interrupt servicing. In order to wait for a processor to acknowledge the request, the system will queue all interrupt requests by priority. Critical interrupts will be handled as soon as possible, whereas lesser priority requests such as audio will be further down the line. If the audio device requires data, it will have to wait until the request is processed before the buffer is filled.
If the device drivers of higher priority components in a system are poorly implemented, this can cause delays in request scheduling and process time. This can lead to an empty audio buffer and characteristic audible pauses, pops and clicks. The DPC latency checker measures how much time is taken processing DPCs from driver invocation. The lower the value will result in better audio transfer at smaller buffer sizes. Results are measured in microseconds.
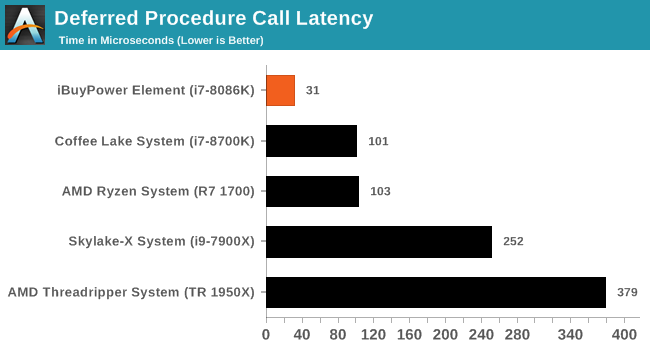
DPC Latency results for this system was the best we have seen so far by quite a longshot at 31µ. This result is repeatable (varies a bit in subsequent tests, but generally in the low 30s). This also means that we did not encounter any latency-induced sound issues here.
CPU Performance, Short Form
As with our motherboard reviews, for our first desktop review in quite a while, we use our short form testing method. These are a subset of tests focusing on CPU-sensitve workloads, which will offer us the best showcase of both the i7-8086K's capabilities, and whatever impact iBuyPower's factory overclocking had on top of this.
***For this specific review, the iBuyPower system hardware is different than the other datasets used. We wanted to test performance out of the box with the factory overclocked Core i7-8086K CPU (in this case iBuyPower set it to 5 GHz all cores) along with the included video card, a reference GTX 1080 Ti running at stock speeds.
Rendering - Blender 2.78: link
For a render that has been around for what seems like ages, Blender is still a highly popular tool. We managed to wrap up a standard workload into the February 5 nightly build of Blender and measure the time it takes to render the first frame of the scene. Being one of the bigger open source tools out there, it means both AMD and Intel work actively to help improve the codebase, for better or for worse on their own/each other's microarchitecture.
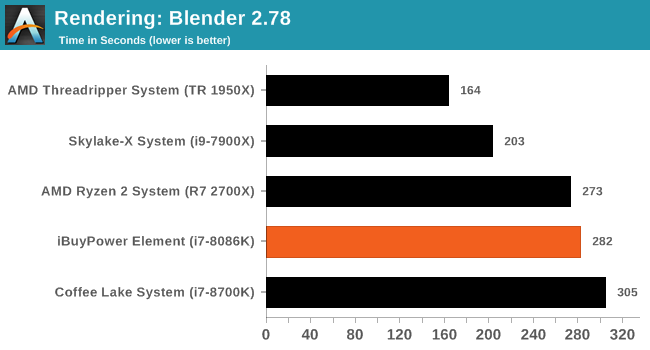
Our blender results show the iBuyPower and its i7-8086K at 5GHz all cores/threads easily surpassing our other results running at 4.3 GHz (all-core turbo). Though the results handily beat the rest, they could have been better had the voltage been tweaked more for the 5 GHz clock speed, as there was thermal throttling during this testing. As it stands, iBuyPower didn't have time to really tweak the brand new i7-8086K to its lowest value for the clock speed. At 5 GHz on an average i7-8086K, users are looking around 1.3V, and this is up to around 1.35V on load. That coupled with the 120mm AIO, 5 GHz is just about the top end out of the box unless the processor is an above average overclocker and manual tweaking is done.
Rendering – POV-Ray 3.7: link
The Persistence of Vision Ray Tracer, or POV-Ray, is a freeware package for as the name suggests, ray tracing. It is a pure renderer, rather than modeling software, but the latest beta version contains a handy benchmark for stressing all processing threads on a platform. We have been using this test in motherboard reviews to test memory stability at various CPU speeds to good effect – if it passes the test, the IMC in the CPU is stable for a given CPU speed. As a CPU test, it runs for approximately 1-2 minutes on high-end platforms.
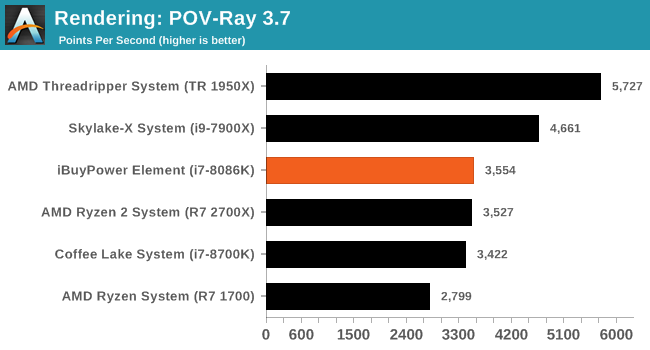
Our POV-Ray results are a bit tighter than expected with the iBuyPower system scoring 3,554, about 100 points higher than the stock 8700K system. That said, something to take away from this testing is the score should likely be higher. In overclock testing of our 8700K at 5 GHz, we are seeing POV-Ray scoring over 3,800 points. What happened here again is simply too much voltage and heat for the 120mm cooler to cope and the CPU throttled itself back a bit to around 4.5-4.6 GHz in this testing.
Compression – WinRAR 5.4: link
Our WinRAR test from 2013 is updated to the latest version of WinRAR at the start of 2014. We compress a set of 2867 files across 320 folders totaling 1.52 GB in size – 95% of these files are small typical website files, and the rest (90% of the size) are small 30-second 720p videos.
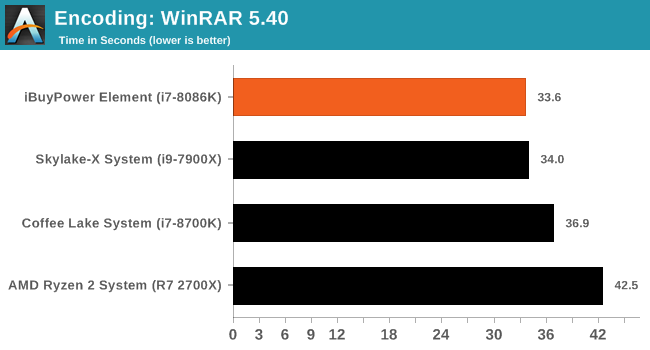
In our compression tests, the Z370-A Pro managed a result of 37.5 seconds. This result falls in line with all of our Spectre and Meltdown patched PCs which is around 3 seconds faster than the non-patched systems. We didn't see any throttling here in this benchmark as the CPU isn't hit quite as hard as Blender and POV-Ray
Synthetic – 7-Zip 9.2: link
As an open source compression tool, 7-Zip is a popular tool for making sets of files easier to handle and transfer. The software offers up its own benchmark, to which we report the result.
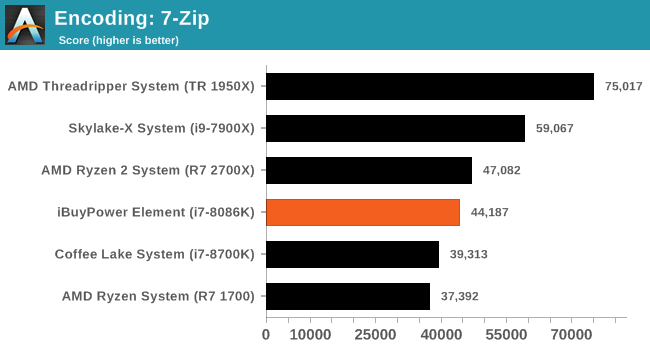
Moving on to 7-Zip, the iBuyPower machine takes the crown with its 5 GHz clock speed leading the way. In this benchmark, also not terribly stressful on the CPU, the clocks stayed pinned at 5 GHz.
Point Calculations – 3D Movement Algorithm Test: link
3DPM is a self-penned benchmark, taking basic 3D movement algorithms used in Brownian Motion simulations and testing them for speed. High floating point performance, MHz, and IPC win in the single thread version, whereas the multithread version has to handle the threads and loves more cores. For a brief explanation of the platform agnostic coding behind this benchmark, see Ian's forum post here.
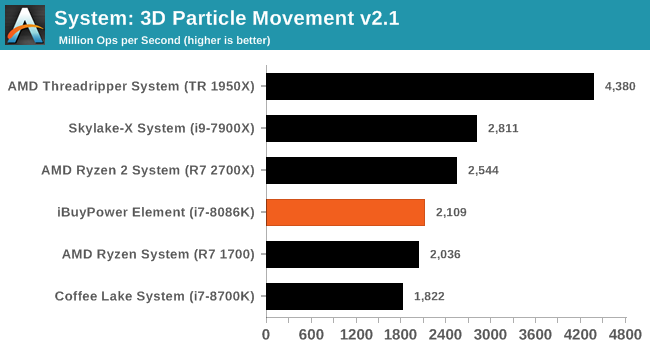
In 3DPM21, the IBuyPower Element system reached 2109 MOPS taking the performance crown because of the clock speeds.
Neuron Simulation - DigiCortex v1.20: link
The newest benchmark in our suite is DigiCortex, a simulation of biologically plausible neural network circuits, and simulates the activity of neurons and synapses. DigiCortex relies heavily on a mix of DRAM speed and computational throughput, indicating that systems which apply memory profiles properly should benefit and those that play fast and loose with overclocking settings might get some extra speed up. Results are taken during the steady state period in a 32k neuron simulation and represented as a function of the ability to simulate in real time (1.000x equals real-time).
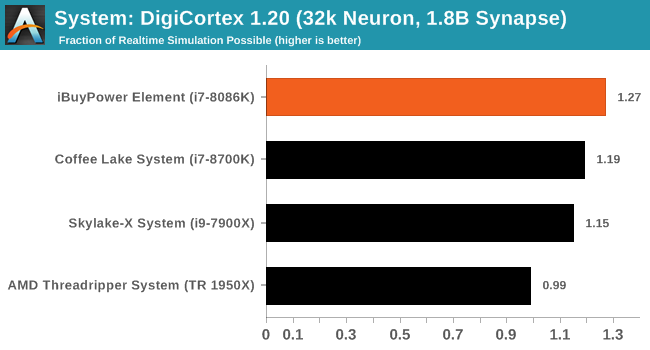
The DigiCortex results have the 5 GHz processor easily performing better than its lower clocked counterparts. Testing here showed no signs of throttling and takes a comfortable seat at the top because of it.
Gaming Performance 2018: AoTS Escalation, ROTR, Civ 6, Shadow of Mordor, and GTA V
The testing seen below will be a mish-mash of results designed to get readers a good idea of the general gaming performance of the iBuyPower system as configured from the factory. In this case, the system is configured with an i7-8086K running at 5 GHz all cores/threads along with a reference NVIDIA GTX 1080 Ti. Depending on the benchmark, we have put this system up against our motherboard review system consisting of a stock i7-8700K and a GTX 980 for AoTS:E and ROTR as well as that same system running a 1080 Ti for comparison. The rest of the data sets were sourced from a CPU review covering several modern AMD and Intel-based CPUs while using a GTX 1080. So while we do not have any direct comparisons to the Element, the data gathered here will show a good idea of overall performance in our testing with how this system is set up compared to others.
Ashes of the Singularity
Ashes of the Singularity is a Real Time Strategy game developed by Oxide Games and Stardock Entertainment. The original AoTS was released back in March of 2016 while the standalone expansion pack, Escalation, was released in November of 2016 adding more structures, maps, and units. We use this specific benchmark as it relies on both a good GPU as well as on the CPU in order to get the most frames per second. This balance is able to better display any system differences in gaming as opposed to a more GPU heavy title where the CPU and system don't matter quite as much. We use the default "Crazy" in-game settings using the DX11 rendering path in both 1080p and 4K UHD resolutions. The benchmark is run four times and the results averaged then plugged into the graph.
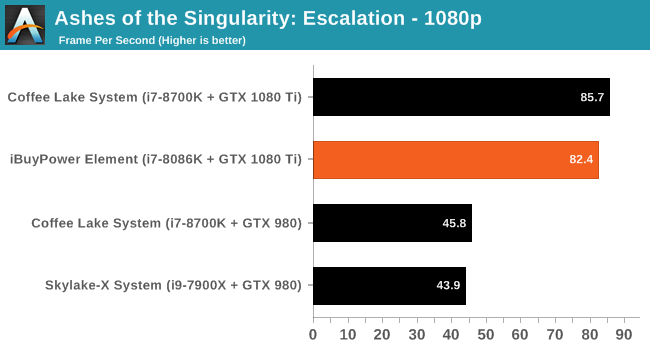
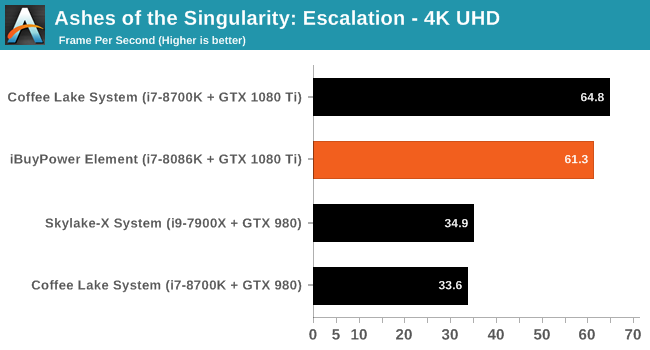
Our AOTSe results show the iBuyPower system managing 82.4 FPS at 1080p and 61.3 FPS when running 4K UHD. We can see the stock i7-8700K system managing a few more FPS, and this is likely due to how our OS is setup including the HPET timer, and other variables between systems.
Rise of the Tomb Raider
Rise of the Tomb Raider is a third-person action-adventure game that features similar gameplay found in 2013's Tomb Raider. Players control Lara Croft through various environments, battling enemies, and completing puzzle platforming sections, while using improvised weapons and gadgets in order to progress through the story.
One of the unique aspects of this benchmark is that it’s actually the average of 3 sub-benchmarks that fly through different environments, which keeps the benchmark from being too weighted towards a GPU’s performance characteristics under any one scene.
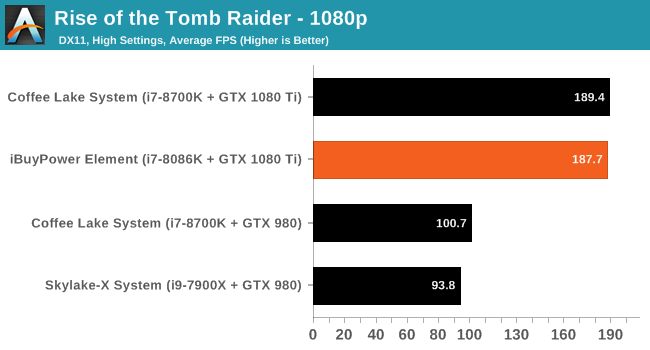
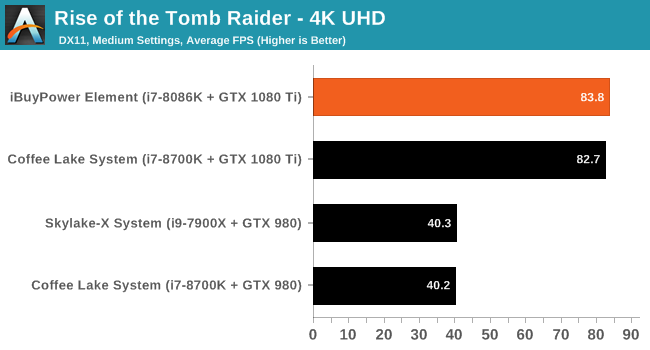
Rise of the Tomb Raider results show the iBuyPower system reaching 187.7 FPS in 1080p and 83.8 FPS in 4K. This compares well with the other 1080 Ti tests as they are close enough to be within the margin of error, especially given how GPU-bound this game is at these settings.
Civilization VI
For a look at a more CPU-bound gaming workload, we have Civilization 6. Originally penned by Sid Meier and his team, the Civ series of turn-based strategy games are a cult classic, and many an excuse for an all-nighter trying to get Gandhi to declare war on you due to an integer overflow. Truth be told I never actually played the first version, but every edition from the second to the sixth, including the fourth as voiced by the late Leonard Nimoy, it a game that is easy to pick up, but hard to master.
Benchmarking Civilization has always been somewhat of an oxymoron – for a turn based strategy game, the frame rate is not necessarily the important thing here and even in the right mood, something as low as 5 frames per second can be enough. With Civilization 6 however, Firaxis went hardcore on visual fidelity, trying to pull you into the game. As a result, Civilization can taxing on graphics and CPUs as we crank up the details, especially in DirectX 12.
Perhaps a more poignant benchmark would be during the late game, when in the older versions of Civilization it could take 20 minutes to cycle around the AI players before the human regained control. The new version of Civilization has an integrated ‘AI Benchmark’, although it is not currently part of our benchmark portfolio yet, due to technical reasons which we are trying to solve. Instead, we run the graphics test, which provides an example of a mid-game setup at our settings.
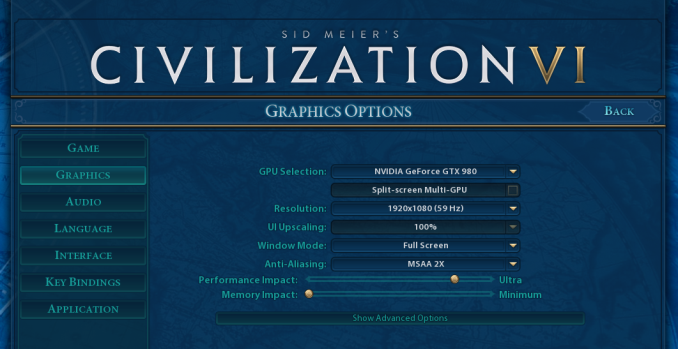
At both 1920x1080 and 4K resolutions, we run the same settings. Civilization 6 has sliders for MSAA, Performance Impact and Memory Impact. The latter two refer to detail and texture size respectively and are rated between 0 (lowest) to 5 (extreme). We run our Civ6 benchmark in position four for performance (ultra) and 0 on memory, with MSAA set to 2x.
For reviews where we include 8K and 16K benchmarks (Civ6 allows us to benchmark extreme resolutions on any monitor) on our GTX 1080, we run the 8K tests similar to the 4K tests, but the 16K tests are set to the lowest option for Performance.
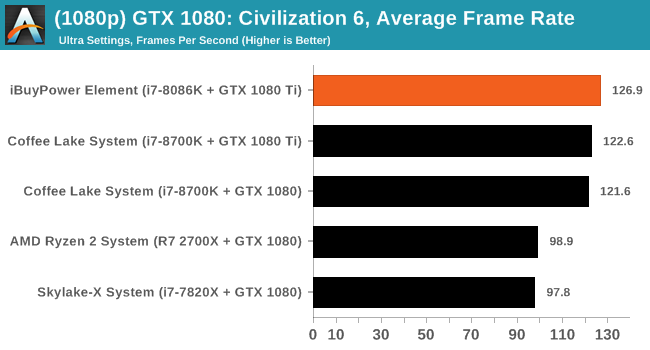
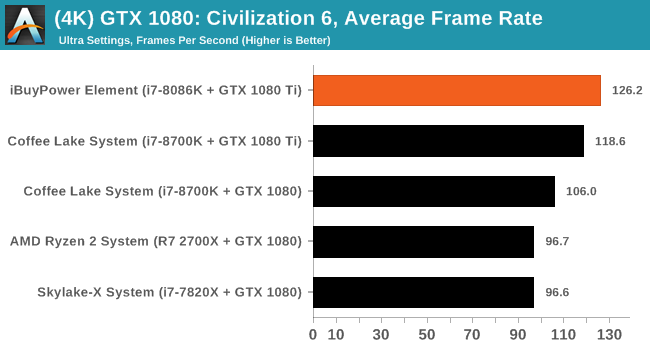
Moving on to Civ6, we have some interesting results here as we seem to be limited by the CPU at both 1080p and 4K resolutions achieving nearly the same results for each resolution. The FPS is seemingly capped by the CPU driving the GPU, even with a GTX 1080 and other, lesser CPUs in this test. We can see the higher clocked CPU in the iBuyPower PC manages to be a few FPS faster than the stock i7-8700K at each resolution.
Shadow of Mordor
The next title in our testing is a battle of system performance with the open world action-adventure title Middle Earth: Shadow of Mordor (SoM for short). Produced by Monolith and using the LithTech Jupiter EX engine and numerous detail add-ons, SoM goes for detail and complexity. The main story itself was written by the same writer as Red Dead Redemption, and it received Zero Punctuation’s Game of The Year in 2014.
A 2014 game is fairly old to be testing now, however SoM has a stable code and player base, and can still stress a PC down to the ones and zeroes. At the time, SoM was unique, offering a dynamic screen resolution setting allowing users to render at high resolutions that are then scaled down to the monitor. This form of natural oversampling was designed to let the user experience a truer vision of what the developers wanted, assuming you had the graphics hardware to power it but had a sub-4K monitor.
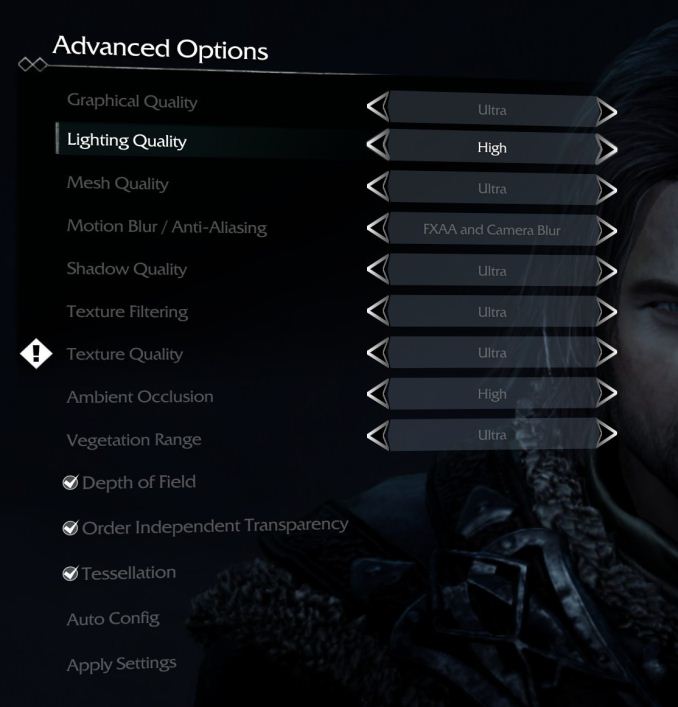
The title has an in-game benchmark, for which we run with an automated script implement the graphics settings, select the benchmark, and parse the frame-time output which is dumped on the drive. The graphics settings include standard options such as Graphical Quality, Lighting, Mesh, Motion Blur, Shadow Quality, Textures, Vegetation Range, Depth of Field, Transparency and Tessellation. There are standard presets as well.
We run the benchmark at 1080p and a native 4K, using our 4K monitors, at the Ultra preset. Results are averaged across four runs and we report the average frame rate, 99th percentile frame rate, and time under analysis.
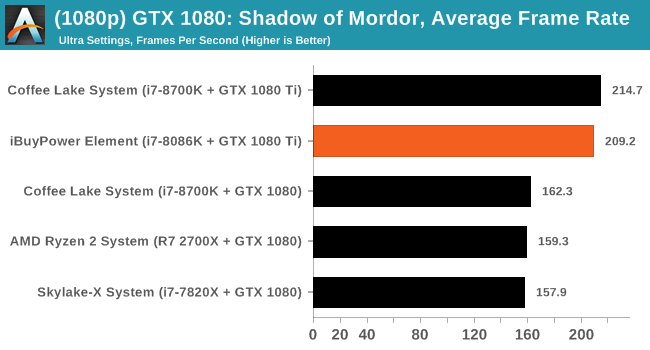
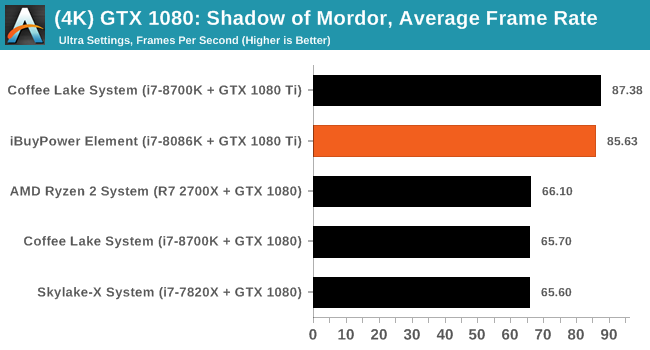
It doesn't take much to push high frame rates in Middle Earth: Shadow of Mordor, and the 1080 Ti on either systems breaking 200 FPS. The difference here at 1080p is around 5 FPS or a bit under 2.5% difference in favor of the AnandTech 1080 Ti system. When moving up to 4K resolution, the song remains the same as far as the result and approximate difference between the systems.
Grand Theft Auto
The highly anticipated iteration of the Grand Theft Auto franchise hit the shelves on April 14th 2015, with both AMD and NVIDIA in tow to help optimize the title. GTA doesn’t provide graphical presets, but opens up the options to users and extends the boundaries by pushing even the hardest systems to the limit using Rockstar’s Advanced Game Engine under DirectX 11. Whether the user is flying high in the mountains with long draw distances or dealing with assorted trash in the city, when cranked up to maximum it creates stunning visuals but hard work for both the CPU and the GPU.
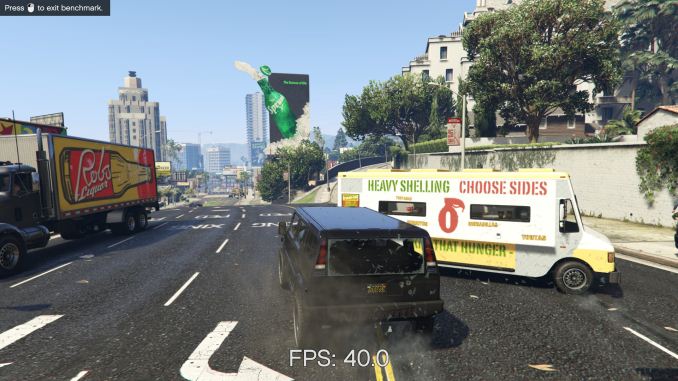
For our test we have scripted a version of the in-game benchmark. The in-game benchmark consists of five scenarios: four short panning shots with varying lighting and weather effects, and a fifth action sequence that lasts around 90 seconds. We use only the final part of the benchmark, which combines a flight scene in a jet followed by an inner city drive-by through several intersections followed by ramming a tanker that explodes, causing other cars to explode as well. This is a mix of distance rendering followed by a detailed near-rendering action sequence, and the title thankfully spits out frame time data.
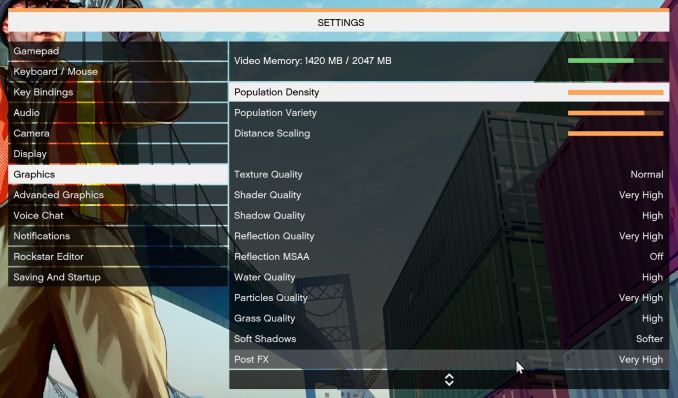
There are no presets for the graphics options on GTA, allowing the user to adjust options such as population density and distance scaling on sliders, but others such as texture/shadow/shader/water quality from Low to Very High. Other options include MSAA, soft shadows, post effects, shadow resolution and extended draw distance options. There is a handy option at the top which shows how much video memory the options are expected to consume, with obvious repercussions if a user requests more video memory than is present on the card (although there’s no obvious indication if you have a low end GPU with lots of GPU memory, like an R7 240 4GB).
To that end, we run the benchmark at 1920x1080 using an average of Very High on the settings, and also at 4K using High on most of them. We take the average results of four runs, reporting frame rate averages, 99th percentiles, and our time under analysis.
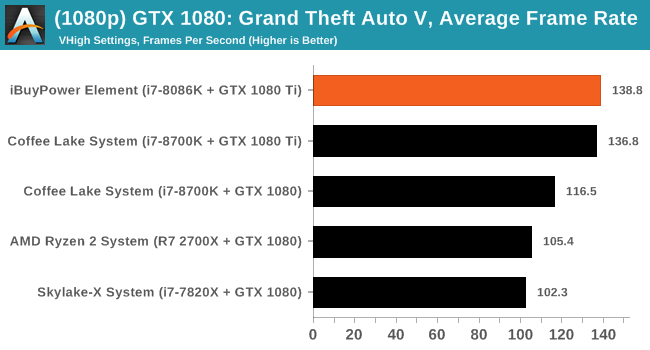
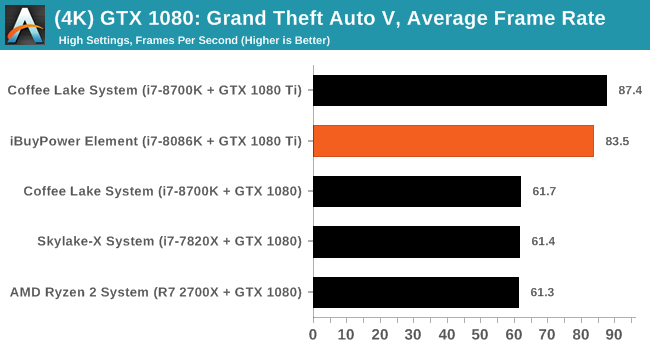
GTA V is a notoriously CPU heavy title at the lower resolutions and here we see the iBuyPower machine have about a 'run variance' size lead of 2 FPS (around 1.5%). A result we expected considering the similarities between the machines. The 4K results are a bit different with the Anandtech bench system around 4 FPS or ~5% quicker in this test.
Overall we have seen results a bit over the place. The problem we faced here is setting up the systems to be as close as possible but without degrading the integrity of the purchased system as that is how users will receive it out of the box. Surely some tweaking goes on, but for the most part if a user is buying a pre-built PC like this, most are not digging and tweaking OSs and memory timings, though that ability is there. In the end, the iBuyPower system fared well and was right around our reference system in all testing. Gaming temperatures were acceptable and we did not see any throttling in the iBuyPower system, but CPU temperatures when running AOTSe did hit 90C so the system is tapped out at its current settings. Clearly though, the i7-8086K (or i7-8700K) and 1080 Ti make a solid pair allowing users to get the most out of their graphics card and gaming experience.
Conclusion
iBuyPower and system builders like them present users with an expedient option for buying a custom PC, taking all the building and testing hassle away and just leaving the 'plug it in and play' portion for the user. iBuyPower gives potential buyers a broad array of options to choose from including the case, down to wire lighting so it can really be a one-stop shop for those who may not want to build or feel uncomfortable building their own PC.
The Element system we have runs for $2199. If someone decided to build a system like this themselves, the cost would be around $250 less, but of course it wouldn't be built, configured, and tested out of the box for you. It takes hours to install hardware properly and route cables neatly as well as additional time to set up your OS and system, including overclocking as you like it. In some cases that process can be rewarding, and in other cases the desired reward is saving that time – albeit at an additional expense – something that can be worthwhile even for those who can put together their own PC. There is also a matter of tech support which a system builder provides, but when building your own, users are generally left to fend for themselves and find homes in forums such as ours. This is the value system builders can bring to the user.
We saw in our performance testing the iBuyPower system performs as it should out of the box which is what is to be expected. The overclock to 5 GHz for all cores on the Core i7-8086K processor improves performance across the board, making quick work against the lower clocked stock i7-8700K. One item of note with overclocking this system is to be sure adequate cooling is selected. Though the 120mm CLC kept things under the throttling point after a bit of tweaking, it was already at the limits so a warmer than average room (my office is kept at ~22C) it may be a tipping point. Because of this overclocking further, expecting to pass a stress test under 90C was a reach. Cooler is usually better and I would recommend a 2x120/140mm CLC for this processor if you want it to run at 5 GHz with little worry.
So where does that leave us? As someone who has built PCs with my own hands for well over 20 years, it can be difficult to find a lot of value in any system builder. But taking a step back and putting myself in the other 90% of people's shoes who do not have the experience and the worry removed from building a system and getting it set up for you can be priceless. The amount of time it can save and still have a quality system on your desk can easily be worth the price premium. The website, though it can be intimidating with so many options, was easy to work through and build systems with. Users can select to choose within the framework of their signature lines or build a completely custom system using the substantial catalog of parts they offer. Be it an AMD, Intel, or NVIDIA fan, small form factor or full tower, iBuyPower can put together some great looking and performing PCs and have done so with the nicely configured Element we had to play with.

