Original Link: https://www.anandtech.com/show/1264
Thermaltake's Xaser III Skull Series - A Case For the Tough Guy
by Purav Sanghani on March 11, 2004 4:20 PM EST- Posted in
- Cases/Cooling/PSUs
Thermaltake has always been innovative with its entire product line, ranging from CPU heatsinks to its popular Hardcano series fan control modules. It's no wonder this company also strives in the case market.
The introduction of Thermaltake's Xaser line of cases brought about new and unique ideas in design and features. The original Xaser design was based on a few of Chenming series of desktop cases with added original features of its own, like the Hardcano fan control.
We first looked at a full sized Xaser III tower several months ago (you can read our review here). Since the Xaser III line made its debut, it has sent ripples through the case market as a high end enthusiast's dream. The most emphasized feature of the second series of Xasers is the totally screw-less design. Hold tight as we take an extensive look into what makes the VM3000A an attractive addition to Xaser's product line.
Design
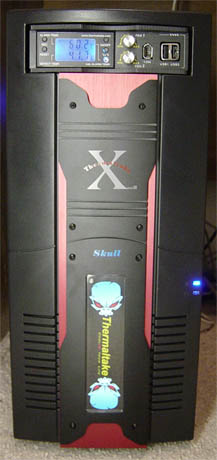
When we think of Thermaltake, the image that comes to mind is their trademark front bezel design. This particular model has a black front bezel to match the rest of the 0.8 mm SECC shell, with red brushed aluminum trim to give it a sleek look. It also sports a skull designed light with 3 modes, a flashing pattern that complements the VM3000A's strong looks, a constant On mode, as well as an Off mode. The inverter switch used to change between the 3 modes can be detached from the system if the light show is not to be used.The VM3000A features a swinging door, which conceals the drive bays as well as the power and reset buttons and LEDs. The buttons themselves are both flush to the plastic casing to prevent accidental shutdowns or resets. The entire front bezel can be removed easily by grabbing hold of the bottom side and pulling straight forward from the case.
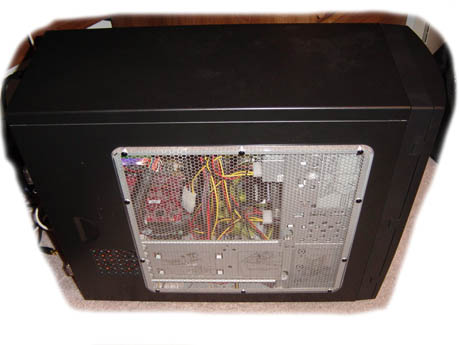
The side panels are also made from the same strong 0.8 mm SECC as the rest of the chassis, so bending is not a problem. The left panel has a plastic window, which is also shielded with its honeycomb design. Both panels are screw-less and can be removed and replaced easily. Both panels are EMI shielded to help protect the installed hardware from magnetic interference.
Hardcano
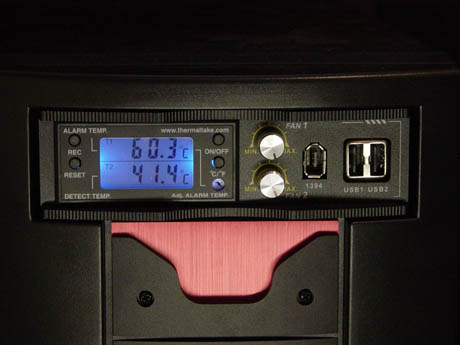
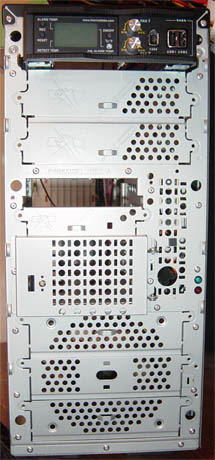
The VM3000A also features an updated design that includes an rheobus, which Thermaltake calls the Hardcano. This module can be removed just like, and can be replaced with, a normal 5-1/4" drive. The panel itself has an LED display with a 2 color backlight: blue for normal temperatures, and red for the alarm mode. The display shows the user specified alarm temperature on top and the current CPU temperature below. A temperature alarm can be set by an inset dial using a small flat screw driver. When the temperature rises past the set alarm, the Hardcano produces an audible alert along with the red backlight display. On the right half are 2 dials to control the speed of 2 case fans connected directly to the power supply. This number seems insufficient, since there are a total of 4 fans installed. There are also twin ports for USB and a port for firewire capabilities. A disadvantage to the included fire wire adapter cable is that it needs to be taken out externally through the back and plugged in to a fire wire card on the back panel.Though the Hardcano has a plethora of features, it also has an overabundance of wiring, especially for the USB ports. The bundle of wires to connect the USB ports to the motherboard are separated with their own plugs, which can be time consuming and frustrating to plug in and also confusing, since the labels are not standard.
Case Fans
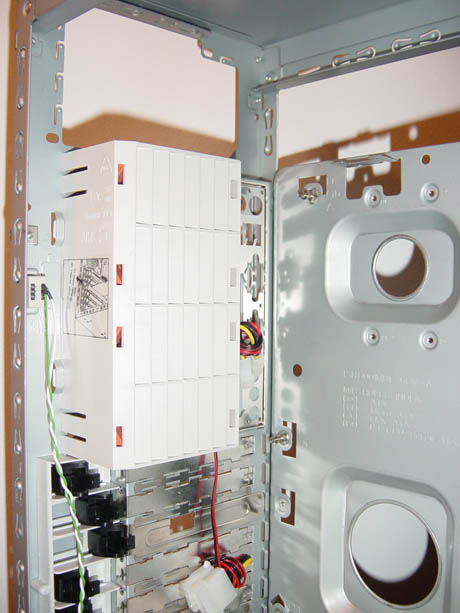
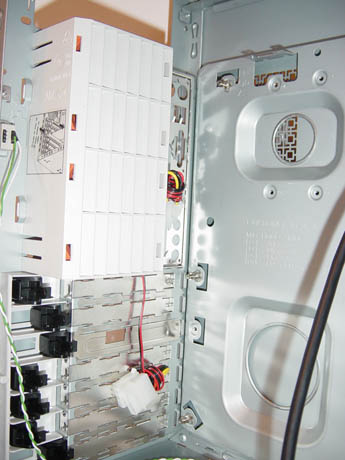
Lack of fans is not a problem for the VM3000A. The case comes with four 80mm fans colored in orange, which are strategically placed throughout the chassis. One sits on the swing bar to exhaust warm air from the add-on card section. Even though Thermaltake specifies it as a CPU cooling fan, it basically servers as an exhaust from add-ons like a video card.Another exhaust has been placed on the right side of the case at mid-height in a fold down module. This fan is mainly used for relieving heat from the hard drives mounted in that area. The last two 80mm fans are placed vertically in the back of the case within a plastic casing, which directs air from the CPU's heat sink outwards by way of properly aimed vents. Though the idea makes complete sense, the vents do not direct all warm air out the back. The case would strongly benefit from a small plastic vent to displace heat directly from the CPU.
Construction
The 0.8 mm SECC steel construction of the VM3000A makes for a solid and sturdy design that can handle the usual daily applications for a desktop case. The shell is fully EMI shielded as is the standard today. A minor weakness in using steel is the occurrence of sharp edges where the metal has been cut. The inside as well as the backside of the VM3000A have many sharp edges that could have been reduced by folding them over or sanding/smoothing them. In the dark, a hand in the wrong place could lead to a painful cut, or worse, a sliced cable.The front bezel itself is made of Acrylonitrile Butadiene Styrene plastic, which is low cost, yet very durable.
The VM3000A has security features like a key lock for the front panel, a special stopper for the right panel on the inside, rear side loops for a pad lock as well as electronic intrusion system support for motherboards that has this capability.
Expansion
The VM3000A was designed with a few things in mind. One of these is expandability. Hidden behind the front bezel are six 5-1/4" drive bays and four 3-1/2" bays. Since the top bay is used for the included instrument panel, five of the 5-1/4" drive bays remain to be utilized. There is a spot for a floppy drive and three 3.5" hard drives below that at middle height of the case's front end. The last three 5-1/4" bays are at the lower section. Another area where a hard drive can be mounted is the swing bar, which is new to this model. A spare drive can be mounted with screws via 4 holes. Being a desktop case, five 5-1/4" drive bays sounds excessive since 2-3 at most are used in a typical desktop rig. Instead, converting the lower 3 bays to 3-1/2" would make more sense, especially since hard drives are still the standard medium for storage.The swing bar also has a device that prevents the add-on cards from popping out of their slots. The casing that holds the 80mm fan in place also has 7 clips that, when the swing bar is in the closed position on the frame, holds full width add-on cards in place. Tiny features like this can help reduce many hardware problems.
Motherboard Tray
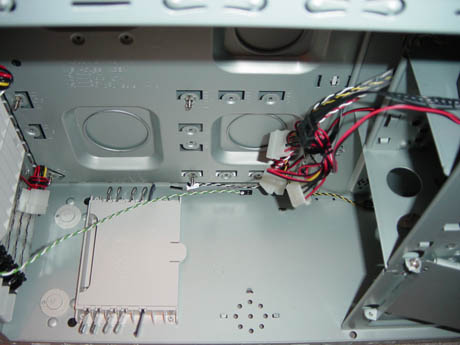
The motherboard is held in place by clips on the removable motherboard tray. This provides for quick installations or replacements and again, the need for no other tools but human hands. Removable motherboard trays have become standard in most, if not all, new well-constructed enclosures. This case, in particular, comes off completely as a separate part. A much more efficient design would have been to manufacture the motherboard tray as well as the entire back side of the case as one piece, keeping add-on cards on the motherboard itself when removing the tray. In this situation, the add-on cards would need to be removed prior to detaching the motherboard tray, which is very time consuming.The add-on cards are held by sliding clips that snap in place, locking the card in its slot on the motherboard. There is room for a total of 7 add-on cards, each with one of these black plastic clips to hold them in position.
Problems may arise when replacing the power supply while a motherboard is already in place. There is just enough room to install a power supply when the case is empty, let alone with the CPU heat sink along with wires and cables in the way. Swapping a power supply may require removal of the motherboard tray for easier access. Once installed though, the power supply is held in place by the machined out mounts on the right and backside of the case as well as a rubber stopper at the top.
Installation
The Thermaltake Xaser III VM3000A's main feature is its completely screw-less design. Though it can be difficult to deal with some screw-less features, such as drive mounting rails, Thermaltake has done a great job with the design and construction of its chassis.A combination of both plastic and metal snap-ins, clips, and brackets are used in the VM3000A to hold all hardware in place. Metal brackets have been provided with the package to add a new drive easily into one of its 7 usable bays. The brackets themselves are made of steel and are somewhat flexible to allow a drive to be locked in place. A downside to these brackets is that they can be easily bent out of shape if not properly handled.
The total time for installation was about 15 minutes for all of the necessary components. A small roadblock that we ran into was the lack of sufficient drive mounting rails. The package includes 5 pairs of rails, which seems incomplete in order to fill all 6 drive bays. The VM3000A, however, does have the traditional holes to mount various drives with screws. Again, the most time consuming portion of the installation was connecting all of the wires from the Hardcano module to the motherboard as well as all of the case fans to the power supply. The USB plugs that go to the motherboard are a bit frustrating to install. All wires are separated by their own plugs, where a better design would have been to group the wires together to end with a single easy install connector.
Benchmarking
We have a few heat and sound intensive tests lined up for the ThermalTake Xaser III Skull. The Heatsink reading is actually the temperature inside the heatsink. CPU temperature is recorded as a separate measurement. All temperature is recorded in degrees Celsius. The heat tests were each performed inside the closed case with the external temperature of 24.0 degrees Celsius, during a full system load. The fan speeds on the rheobus were all placed on high. Our test bed consisted of:Gigabyte GA-7VRX |
|
The thermal readings for the different components during operation were as follows:
| System On-Time | CPU | Heatsink | HDD | DDR | Northbridge | Southbridge | Power Supply | System Ambient |
| 10 | 52.1 | 37.3 | 28.9 | 34.2 | 39.2 | 39.1 | 29.4 | 29.9 |
| 30 | 53.4 | 38.9 | 29.7 | 36.6 | 40.4 | 39.9 | 31.6 | 30.4 |
Another important number when it comes to system cases is the noise level. A good case will have a very low decibel level on the outside. The ambient noise level was at about 51 dBA with the power supply fan disabled. We measured noise levels of the case combined with this ambient noise level 12" away from the case. Provided in the table are noise readings of cases that we have reviewed in the past.
| Case | dBA |
| Thermaltake Xaser III VM3000A - Skull | 55 |
| Kingwin KT-424 Aluminum | 55 |
| Thermaltake Xaser III Aluminum Fan Low | 52 |
| Cooler Master ATC-201A Aluminum | 53 |
| Kingwin KT-436-BK-WM Aluminum | 50 |
The 4 case fans seemed to increase the noise levels inside the case, but could barely be heard when the VM3000A was sealed. Though the included fans were extremely quiet, the CPU fan that we used boosted the noise level about 15 dBA. The motherboard was disconnected to allow us to measure the true ambient noise level inside the case.
Final Thought
The benchmarks prove that Thermaltake's Xaser III VM3000A is not the cream of the crop. It had a higher noise level compared to a handful of cases that we have reviewed in the past as well as a high degree of complexity in wiring. The Kingwin KT-424, which we reviewed back in August of last year, had a detachable lead bundle, which came off along with the motherboard when the tray was removed. Another overlooked featured, which was also included in the KT-424 and the KT-436, but not in the VM3000A, was the removable tray including the back panel of the chassis. In this case, we had to remove all add-in cards and all wiring in order to remove only the motherboard.On the other hand, the VM3000A has many strengths. Its well constructed screw-less design makes for effortless installations and even easier replacements using mounting rails, add-on card fasteners, and metal spacers (motherboard). The Hardcano itself is feature-packed with fan controls, USB and firewire ports, and a temperature alarm that keeps you well informed of potentially dangerous conditions.
While the few shortcomings, like sharp edges of the case's chassis, slightly complicated wiring, and a somewhat high price tag, may lower the VM3000A's overall attractiveness, its bold look and great features (like the Hardcano module and the standard 4 fan design along with the low noise levels) bring this Xaser III back in line with its counterparts.

