Original Link: https://www.anandtech.com/show/10041/gigabyte-z170x-ud5-th-motherboard-review-thunderbolt-3
The GIGABYTE Z170X-UD5 TH Motherboard Review: An Entry to Thunderbolt 3
by Ian Cutress on February 19, 2016 9:00 AM EST- Posted in
- Gigabyte
- Motherboards
- Thunderbolt
- Skylake
- Z170
- Thunderbolt 3
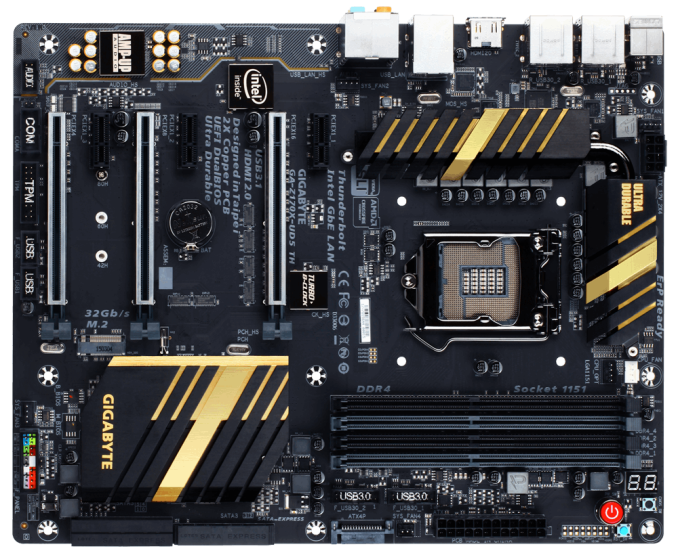
At the initial phase of Intel’s Skylake processor launch, a myriad of Z170 equipped motherboards were released to enable the platform. One of the prominent features of Z170 was the ability to support Thunderbolt 3 when the motherboard also used Intel’s Alpine Ridge Controller and was certified. GIGABYTE had the initial exclusive on the controller, but has had to wait for TB3 enabled devices to hit the market. While we’re still waiting, we tested the GIGABYTE Z170-UD5 TH motherboard, which comes in at $208 and is arguably one of the cheapest ways to get dual Thunderbolt 3 ports as standard.
Other AnandTech Reviews for Intel’s 6th Generation CPUs:
Skylake-K Review: Core i7-6700K and Core i5-6600K - CPU Review
Comparison between the i7-6700K and i7-2600K in Bench - CPU Comparison
Overclocking Performance Mini-Test to 4.8 GHz - Overclocking
Skylake Architecture Analysis - Microarchitecture
Z170 Chipset Analysis and 55+ Motherboards - Motherboard Overview
Discrete Graphics: An Update for Z170 Motherboards - PCIe Firmware Update
Price Check: Intel Skylake i7-6700K and i5-6600K - Skylake Price Check (2/16)
100-Series Motherboard Reviews:
Prices correct at time of each review
($500) The GIGABYTE Z170X-Gaming G1 Review
($250) The ASUS Maximus VIII Impact
($240) The ASRock Z170 Extreme7+ Review
($230) The MSI Z170 Gaming M7 Review
($208) The GIGABYTE Z170X-UD5 TH Review (this review)
($165) The ASUS Z170-A Review
To read specifically about the Z170 chip/platform and the specifications therein, our deep dive into what it is can be found at this link.
Going Thunderbolt 3
Since the launch of the initial Thunderbolt controllers, we have frequency postulated as to what the addition of the controller adds to the cost of the motherboard. Of course, the motherboard manufacturers pay Intel’s set pricing depending on how many units ordered and if there’s an exclusive contract. We were told at the launch of the Skylake ecosystem that the Thunderbolt 3 controller, Alpine Ridge, was costing GIGABYTE similar to the price of the ASMedia USB 3.1 controller – about $8-12. Typically this means by the time it gets to the end-user, after distribution and retailer markups and tax, it can be a $20-$25 add-on to the standard motherboard. We can see the effect: the GIGABYTE Z170X-UD5 on Amazon.com is listed as $202 MSRP and the UD5 TH is listed as $225 MSRP, or +$23. However, due to sales, stock, interest or other factors, the UD5 TH is currently (2/16) running at $208. At this price, the Z170X-UD5 TH comes in as one of the cheapest Thunderbolt 3 equipped motherboards you can by.
The Intel Alpine Ridge controller which enables Thunderbolt 3 is actually a multifunctional bit of silicon. As well as supporting TB3 over USB Type-C (meaning DisplayPort or storage), it can also support USB 3.1 at 10 Gbps over Type-C, HDMI 2.0 and Power Delivery 2.0. Each of these features needs to be enabled in hardware, so not all Alpine Ridge (AR) motherboards support all the features, which makes any AR implementation somewhat confusing. For example, in the Z170X-UD5 TH, the AR controller gives two Type-C ports, suitable for TB3, USB 3.1, and usually some form of fast charging (Amazon says 36W, but the GIGABYTE website does not confirm this). Technically this motherboard also has HDMI 2.0, but this is provided by a different chip (the MCDP2800, an LSPcon) entirely. Nice and simple, right?
Aside from all this, the low cost to Thunderbolt 3 is rather interesting. Users can either buy a TB3 equipped motherboard like this, or buy an add-in card which can cost $40+ and take up a slot on a motherboard (some motherboard bundles come with one). Typically Thunderbolt is seen as a premium interface, limited to high end storage, displays and docks, suggesting that anyone buying a PC with TB3 equipped is not going to be pinching pennies. Nevertheless, the Z170X-UD5 TH is a fully functioning motherboard for Skylake processors in its own right, and if the difference between the base model and the TB3 equipped version is only $6, it becomes one of those add-ons ‘in case I ever get a TB3 device’. Easy.
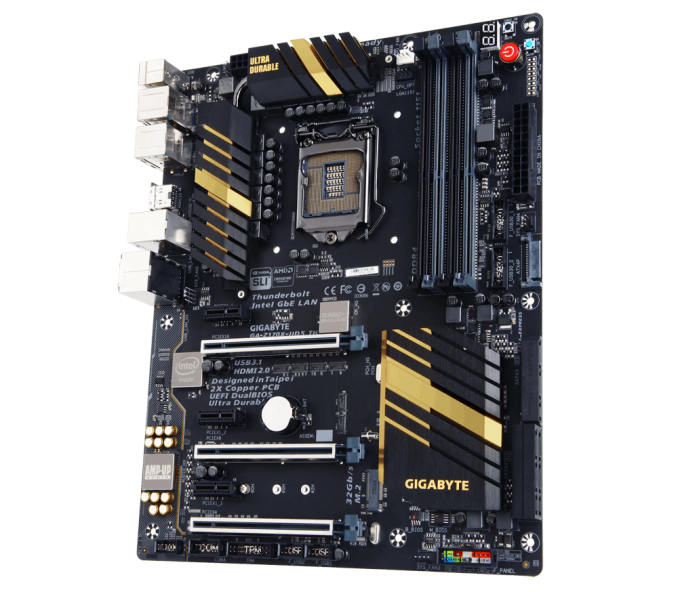
GIGABYTE Z170X-UD5 TH Overview
The motherboard as it stands is still in the mid-to-high end of GIGABYTE’s product stack. From the Ultra Durable line, the UD5 sits above UD3 and below UD7, enabling some features but not going overboard. The $210-$220 price point, while above the average selling price of a motherboard, is often a strong battleground for mainstream enthusiasts willing to spend >$900 on a full system build.
On the base specifications we get a single M.2 PCIe 3.0 x4 slot that also supports M.2 SATA, six SATA 6 Gbps ports with three SATA Express, Intel’s I219-V network controller and an upgraded audio solution through Realtek’s ALC1150 audio codec. The PCIe slots are split x8/x8 from the CPU for SLI or Crossfire, but also use one of GIGABYTE’s newer features in the form of a PCIe brace/guard. This has been equipped on motherboards above a certain value to assist in rigidity for heavy (>1kg) PCIe devices that might cause the slot to warp over time, or for when the system might be in motion with GPUs installed. There is a PCIe 3.0 x4 slot from the Z170 chipset as well with the guard, but this shares bandwidth with the M.2 slot (only one can be enabled at a time). The PCIe slots also have an extra power connection via a SATA connector to provide extra when two large GPUs are in use.
Like other GIGABYTE motherboards, a TPM and COM header come as standard, but this motherboard also gives two USB 3.0 headers from the chipset and another four ports on the rear from the chipset. Two USB 3.1 ports come in the form of the USB Type-C, and if that wasn’t enough USB ports there are a further four USB 2.0 on the rear and two USB 2.0 headers (headers are via a USB hub). For enthusiasts, a series of voltage check points are also provided.
On the software side, for whatever reason GIGABYTE removed the HD mode of their BIOS with the version we used; ultimately no massive loss, with the classic mode being arguably easier to use but not as aesthetically smooth in the lower resolution. The software is improved for Z170 with the App Center's new interface, giving easier access to a large number of GIGABYTE’s apps.
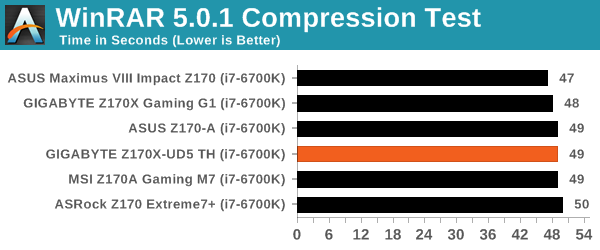
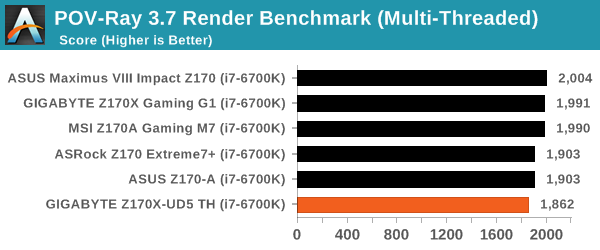
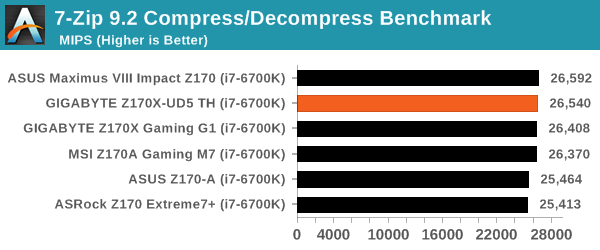
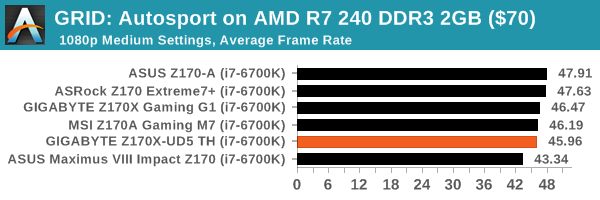
For performance, the Z170X-UD5 TH seemed to be a bit of a mixed bag. We’ve discussed MultiCore Turbo on Intel motherboards at length before (where the CPU Turbo mode is applied no matter what the CPU load is, giving better results at the expense of power), and it would seem that the UD5 TH applies this feature on select results but not all of them. For example, video encoding and 7-Zip encoding were MCT enabled, but WinRAR encoding and ray tracing were not. This affected our low end GPU in the gaming tests and our power draw test, but the more powerful GPUs were unaffected.
System level feature performance was also mixed – the default boot time for the Z170X-UD5H was the best we’ve seen so far on Skylake, along with idle power consumption, but deferred procedure call latency was poor, idle-to-load power draw was the highest we’ve seen and we were unable to get a reliable audio reading. USB 3.0 performance was reasonable, but for some reason we were unable to get a measure of the Alpine Ridge USB 3.1 performance (the same issue with previous AR equipped boards).
Quick Links to Other Pages
In The Box and Visual Inspection
BIOS
Software
System Performance (Audio, USB, Power, POST Times on Windows 7, Latency)
CPU Performance, Short Form (Office Tests and Transcoding)
Gaming Performance 2015 (R7 240, GTX 770, GTX 980)
Conclusions
Quick Board Feature Comparison
| Motherboard Comparison | ||
| GIGABYTE Z170X-UD5 TH | ||
| Socket | LGA1151 | LGA1151 |
| MSRP at Review | $209 | $230 |
| DRAM | 4 x DDR4 | 4 x DDR4 |
| PCIe Layout | x8/x8 | x8/x8 |
| BIOS Version Tested | F4 | 142 |
| MCT Enabled Automatically? | Yes | Yes |
| USB 3.1 (10 Gbps) | Intel Alpine Ridge 2 x Type-C |
ASMedia ASM1142 1 x Type-A 1 x Type-C |
| M.2 Slots | 1 x PCIe 3.0 x4 | 2 x PCIe 3.0 x4 |
| U.2 Ports | No | No |
| Network Controller | 1 x Intel 219-V | 1 x Killer E2400 |
| Audio Controller | Realtek ALC1150 | Realtek ALC1150 |
| HDMI 2.0 | Yes, via LSPcon | No |
GIGABYTE Z170X-UD5 TH Board Features
At the heart, the Thunderbolt 3 element here is going to be the most vital. Support for DisplayPort, up to 40 Gbps data rates over an active cable with TB3, and USB 3.1 at 10 Gbps in one port makes for interesting reading. Supporting HDMI 2.0 (HDCP 2.2) via integrated graphics is also worth noting.
| GIGABYTE Z170X-UD5 TH | |
| Warranty Period | 3 Years |
| Product Page | Link |
| Price | Amazon US |
| Size | ATX |
| CPU Interface | LGA1151 |
| Chipset | Intel Z170 |
| Memory Slots (DDR4) | Four DDR4, Supporting 64GB, Dual Channel, Up to 3800 MHz |
| Memory Slots (DDR3L) | None |
| Video Outputs | 2 x Thunderbolt 3 Type-C, supporting DP 1 x HDMI 2.0 via MCDP2800 |
| Network Connectivity | Intel I219-V |
| Onboard Audio | Realtek ALC1150 |
| PCIe Slots for Graphics (from CPU) | 2 x PCIe 3.0 (x16, x8/x8) |
| PCIe Slots for Other (from PCH) | 1 x PCIe 3.0 x4, shared with M.2 slot 3 x PCIe 3.0 x1 |
| Onboard SATA | Six, RAID 0/1/5/10 |
| Onboard SATA Express | Three, RAID |
| Onboard M.2 | 1x PCIe 3.0 x4 or SATA |
| Onboard U.2 | None |
| USB 3.1 | 2 x Type-C Intel Alpine Ridge Controller |
| USB 3.0 | 4 x Rear Panel 4 via headers |
| USB 2.0 | 4 x Rear Panel 4 via headers |
| Power Connectors | 1 x 24-pin ATX 1 x 8-pin CPU 1 x SATA for PCIe |
| Fan Headers | 1 x CPU (4-pin), 1 x CPU_OPT (4-pin) for WC 3 x SYS (4-pin), 1 x SYS (3-pin) |
| IO Panel | 1 x Combination PS/2 4 x USB 2.0 4 x USB 3.0 2 x Thunderbolt 3 Type-C (DisplayPort, USB 3.1, TB3) 1 x Network RJ-45 HDMI Audio Jacks |
| Other Features | Power/Reset Buttons TPM Header Voltage Check Points Front Panel Header Front Audio Header COM Port Header Clear CMOS Jumper Clear CMOS Button Two Digit Debug |
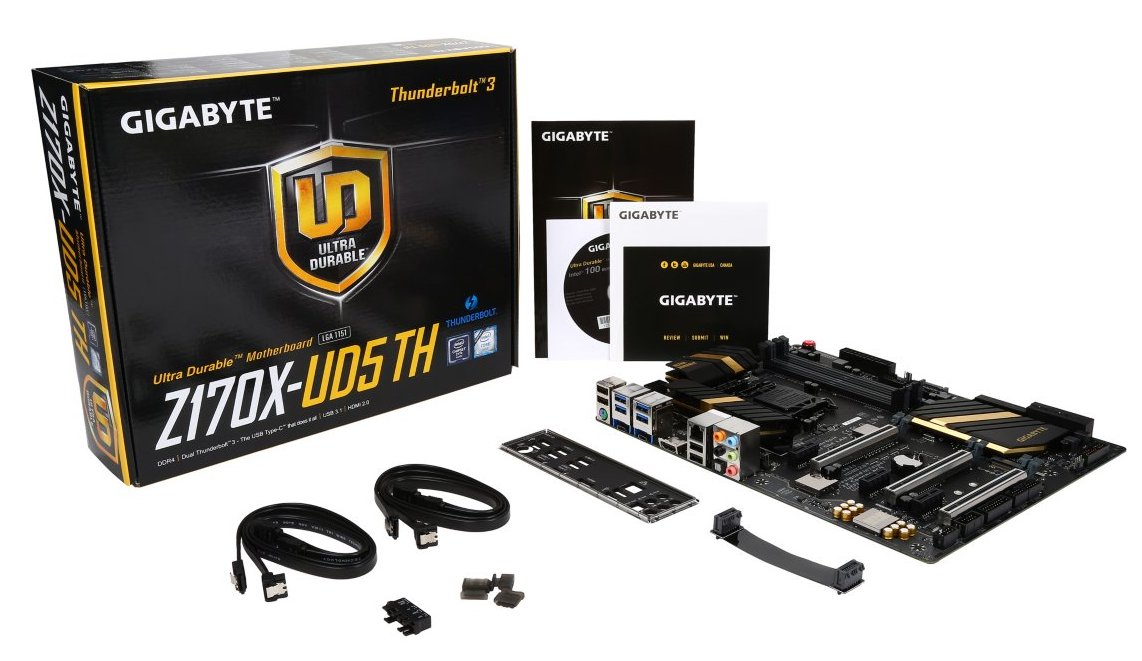
In The Box
We get the following:
Driver Disk
Manual
Quick Use Guide
Rear IO Shield
Two SATA cables
Easy Front Panel Connector
Port Guards
Flexi-SLI cable
At the ~$200 price point, there are at least two sorts of motherboards – those that are $160-ish base and are boosted up by contents, or $230-ish that are slimmed to meet a price point. The Z170X-UD5 TH is thin on box contents, firstly because it is from the base Ultra Durable line, but also because it may be trying to meet that price point. For example, only two SATA cables is a bit mediocre when the motherboard has six ports, but also at this price we are starting to see USB 3.1 front panel attachments being bundled. You can argue that this is because of the Thunderbolt 3 feature-set, but then I would also request a TB3 or Type-C cable to be included. Unfortunately these can be expensive as well.
Visual Inspection
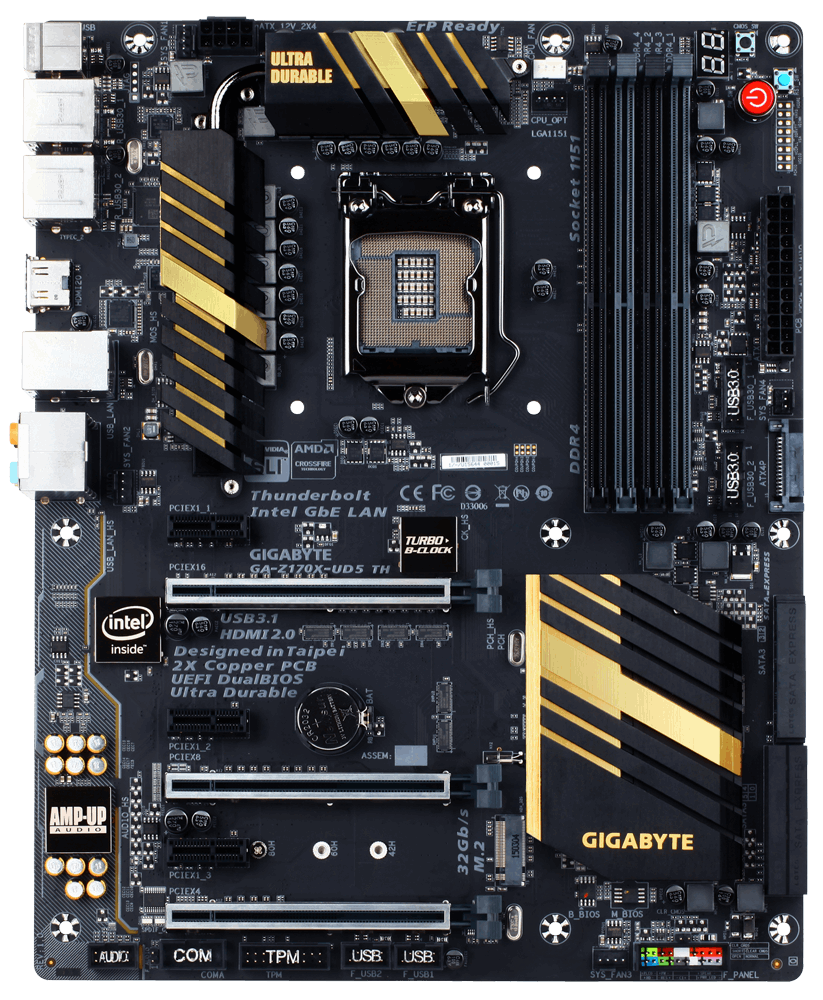
For the Z170 platform, GIGABYTE moved the majority of the Ultra Durable line, especially above $150, to a black and gold scheme. Other companies have toyed with gold in the past, either a dull gold or something more akin to copper, but the color here is certainly the right one which contrasts with the black in an aesthetically pleasing way. It has been postulated in the past that gold color schemes sell well in various parts of the world, although I can’t confirm this.
The Z170X-UD5 TH uses International Rectifier IR355x ICs, either 40A or 60A rated, with the high end chokes that are commonly associated with 60A variants (although we’ve seen 40A ICs with 60A chokes before). IR’s parts are often touted as being very efficient, which probably explains the minimal heatsink around the power delivery compared to some of the extended models we see elsewhere. The socket area is very clean, normally an attribute associated with overclocking motherboards, but it is clear that GIGABYTE is using a matte finish on top of the motherboard traces to enhance the aesthetic, along with ditching the Intel specification socket design motifs. The socket area has access to five of the six onboard fan headers – the CPU and WC 4-pin headers are above the socket next to the DRAM slots, a 4-pin SYS header is by the 8-pin power connector, another 4-pin SYS header is by the rear audio jacks and a final 3-pin SYS header is below the 24-pin ATX power connector. The last fan header is a 4-pin SYS header on the bottom of the motherboard next to the front panel header.
Moving clockwise around the motherboard, we have the four DDR4 memory slots using a single sided latch mechanism. This makes the memory easier to remove, especially in the presence of large graphics cards, but does require extra care when installing the memory to ensure both sides are fully in the slot. To the right of the memory are some of the out-of-case functional items – a power switch, a reset switch, a clear BIOS switch and a two digit debug. I tend to use these extensively in our reviews, and can be useful for debugging issues. Next to this is a series of voltage checkpoints, allowing enthusiasts to directly monitor system voltages when the software is not accurate enough. This typically only applies to extreme overclockers using sub-zero cooling, but it is a simple addition on most motherboard designs. Below this is the 24-pin power connector, a fan header, a SATA power connector to give more power to the PCIe slots, and two USB 3.0 headers.
Beside the large chipset heatsink are six SATA 6 Gbps ports, split into three pairs and supporting SATA Express. While no SATA Express devices exist, some front panel bays are starting to come to market that support USB 3.1 ports, suggesting that there might still be some use for these. With the storage ports is an M.2 slot between the bottom two large PCIe slots, and this M.2 slot supports SATA storage and up to PCIe 3.0 x4 based devices. This slot, in PCIe mode, is switched with the bottom PCIe slot which is PCIe 3.0 x4 from the chipset by default, meaning that only one of the two can be enabled in PCIe mode at one time.
Along the bottom of the motherboard is our front panel header, a fan header, two USB 2.0 headers, a TPM header, a COM header and the front panel audio header. The audio header is inside the audio guard zone, which represents PCB separation of digital and analog signals on the board for audio. This zone lights up using LEDs on the rear of the motherboard, but on the digital side to avoid interfering with the audio signal. The audio section itself encases the Realtek ALC1150 audio codec in an electromagnetic interference shield to reduce outside sources of noise but also uses filter caps to improve signal quality. Beside this zone is an EMI shield over the Intel I219-V network controller, although I doubt if that makes much difference to the performance and is purely for aesthetics.
The main PCIe slots also include a PCIe guard, helping the rigidity of the slots when in the presence of large/heavy graphics cards. Normally this is not a problem when the PC is stationary, but there are some horror stories online of PCIe slots being ripped out by large cards when in transport. This fix is designed to help that and reduce RMA issues. The board also has three PCIe x1 slots for good measure.
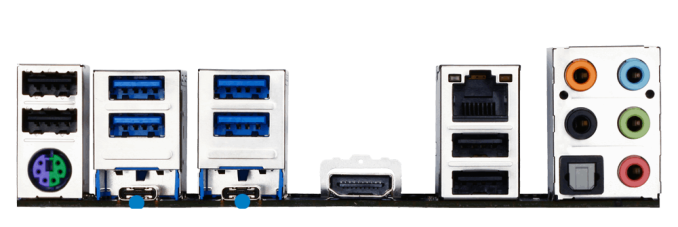
The rear panel, by virtue of the two Thunderbolt 3 ports both supporting displays, is filled with USB ports instead of the usual display adaptors. We do get a HDMI 2.0 / HDCP 2.2 enabled port, supported by an LSPCon in the form of the MDCP2800, as well as four USB 3.0 ports and four USB 2.0 ports. To round it all off is a PS/2 combination port, the Intel I219-V network port, and the Realtek ALC1150 audio jacks.
Test Setup
| Test Setup | |
| Processor | Intel Core i7-6700K (ES, Retail Stepping), 91W, $350 4 Cores, 8 Threads, 4.0 GHz (4.2 GHz Turbo) |
| Motherboards | GIGABYTE Z170X-UD5 TH |
| Cooling | Cooler Master Nepton 140XL |
| Power Supply | OCZ 1250W Gold ZX Series Corsair AX1200i Platinum PSU |
| Memory | Corsair DDR4-2133 C15 2x8 GB 1.2V or G.Skill Ripjaws 4 DDR4-2133 C15 2x8 GB 1.2V |
| Memory Settings | JEDEC @ 2133 |
| Video Cards | ASUS GTX 980 Strix 4GB MSI GTX 770 Lightning 2GB (1150/1202 Boost) ASUS R7 240 2GB |
| Hard Drive | Crucial MX200 1TB |
| Optical Drive | LG GH22NS50 |
| Case | Open Test Bed |
| Operating System | Windows 7 64-bit SP1 |
Readers of our motherboard review section will have noted the trend in modern motherboards to implement a form of MultiCore Enhancement / Acceleration / Turbo (read our report here) on their motherboards. This does several things, including better benchmark results at stock settings (not entirely needed if overclocking is an end-user goal) at the expense of heat and temperature. It also gives in essence an automatic overclock which may be against what the user wants. Our testing methodology is ‘out-of-the-box’, with the latest public BIOS installed and XMP enabled, and thus subject to the whims of this feature. It is ultimately up to the motherboard manufacturer to take this risk – and manufacturers taking risks in the setup is something they do on every product (think C-state settings, USB priority, DPC Latency / monitoring priority, overriding memory sub-timings at JEDEC). Processor speed change is part of that risk, and ultimately if no overclocking is planned, some motherboards will affect how fast that shiny new processor goes and can be an important factor in the system build.
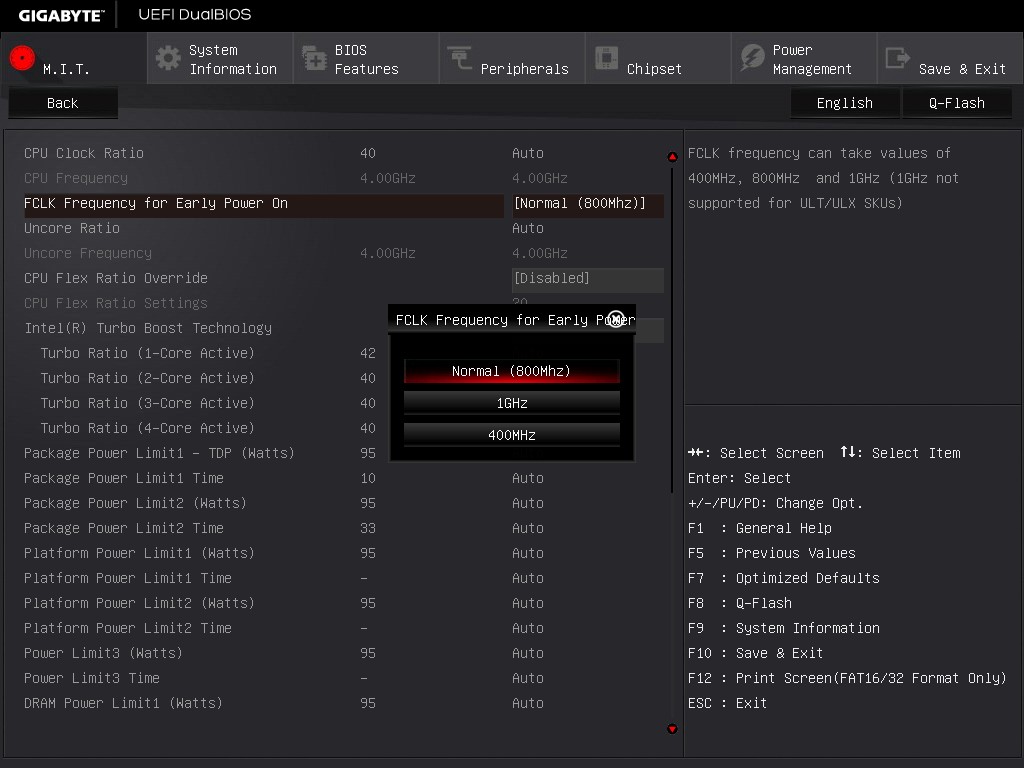
For reference, the GIGABYTE Z170X-UD5 TH, on our testing BIOS F4, MCT was enabled by default although seemed to work selectively on some of our tests but not others. Also, the FCLK 10x ratio for PCIe was present in the BIOS tested at the time of testing.
Many thanks to...
We must thank the following companies for kindly providing hardware for our test bed:
Thank you to AMD for providing us with the R9 290X 4GB GPUs.
Thank you to ASUS for providing us with GTX 980 Strix GPUs and the R7 240 DDR3 GPU.
Thank you to ASRock and ASUS for providing us with some IO testing kit.
Thank you to Cooler Master for providing us with Nepton 140XL CLCs.
Thank you to Corsair for providing us with an AX1200i PSU.
Thank you to Crucial for providing us with MX200 SSDs.
Thank you to G.Skill and Corsair for providing us with memory.
Thank you to MSI for providing us with the GTX 770 Lightning GPUs.
Thank you to OCZ for providing us with PSUs.
Thank you to Rosewill for providing us with PSUs and RK-9100 keyboards.
GIGABYTE Z170X-UD5 TH BIOS
A proportion of this page was posted with our GIGABYTE Z170X-Gaming G1 review due to similarities within the same generation of products. Text has been updated to match the specific features for this review.
The graphical BIOS has been a permanent competitive fixture in the modern motherboard market – the ability to do more with less and provide a seamless experience to both enthusiasts and new users is a point that manufacturers can provide both a selling point and that unique aspect that makes it stand above the crowd. The big four motherboard manufacturers have now all adopted the same philosophy of an easier mode for a front screen that sits above an Advanced mode which is more enthusiast focused.
While GIGABYTE does typically have an easy mode, called the startup guide, with its motherboards, for the Z170X-UD5 TH it was absent and we were left solely with the classic mode. With this mode, it should be pointed out that sometimes there is a disjoint when you enter between what you see and what the system thinks is selected – about 50% of the time it will show the first tab, MIT, rather than the one which is actually selected, System Information. Pressing left or right to select a tab usually fixes this.
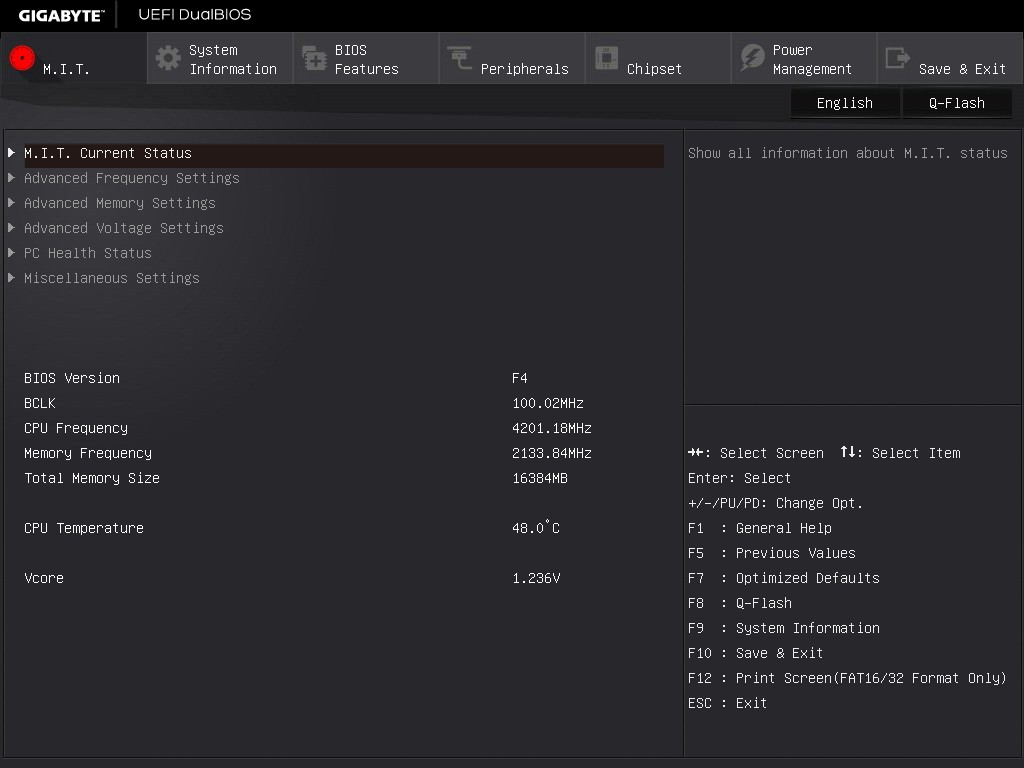
The first tab from the left is MIT, the intelligent tweaking menu that provides some information about the system but acts as the main hub for overclocking options. The three main menus here are Frequency, Memory and Voltage, which all do what they say and offer options relating to those features.
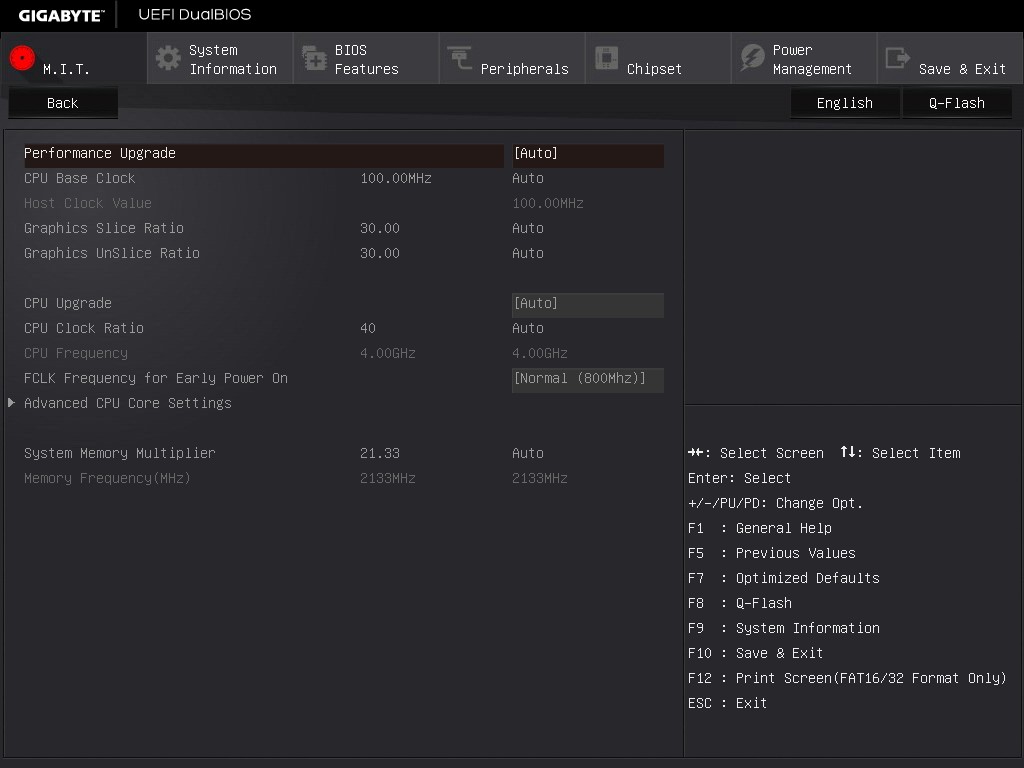
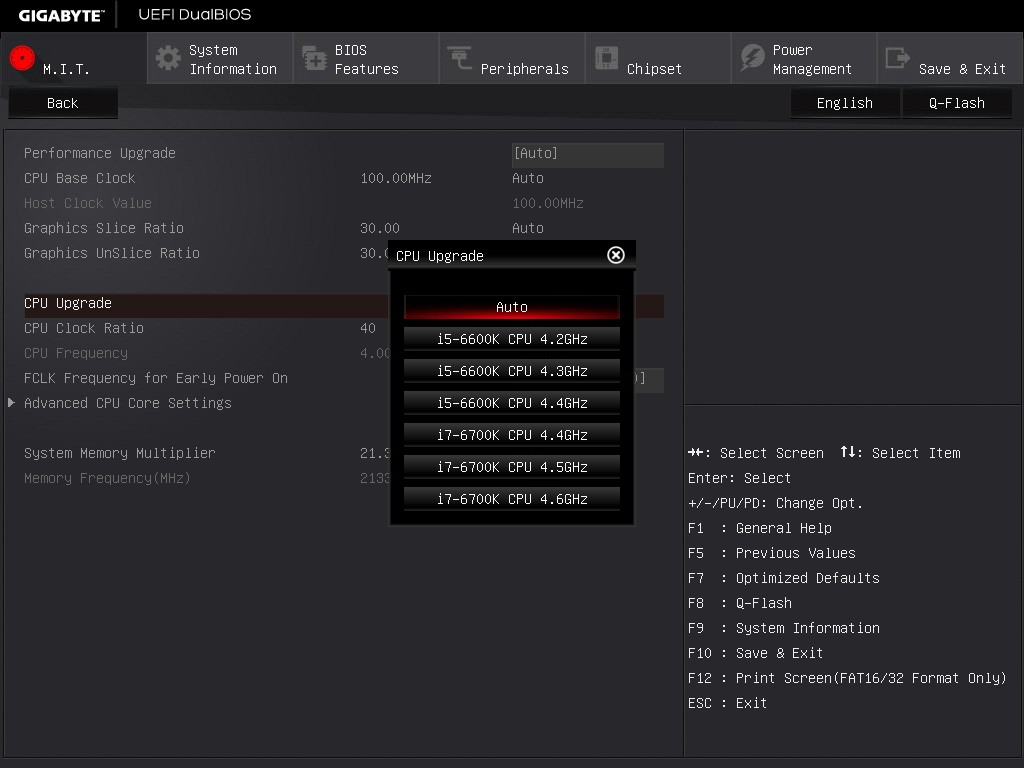
The Frequency sub-menu offers base-clock and multiplier options for the CPU, including FCLK and advanced core settings. For an extra element, the DRAM multiplier can be selected here also, such that as the base frequency is adjusted the user can see the effect on the memory frequency. Automatic overclock pre-sets are also here under the Performance Upgrade drop down and the CPU Upgrade drop down.
This latter option offers 4.2 GHz to 4.4 GHz for the i5-6600K and 4.4 GHz to 4.6 GHz for the i7-6700K. The downsides of using these options is that GIGABYTE doesn’t show the changes made to enable these (such as voltage or LLC), in which GIGABYTE is unique in that regard compared to the others of the big four manufacturers.
In our previous reviews, it was noted that a typical overclocker will want to adjust frequency and voltage often in the same sitting. With the GIGABYTE BIOS, that requires moving into this frequency menu for the first part, and navigating to different menus for the voltage. It would be ideal if the GIGABYTE BIOS duplicated some of those options, at least the CPU vCore and CPU Load-Line Calibration, to the frequency menu just as the memory multiplier has been duplicated.
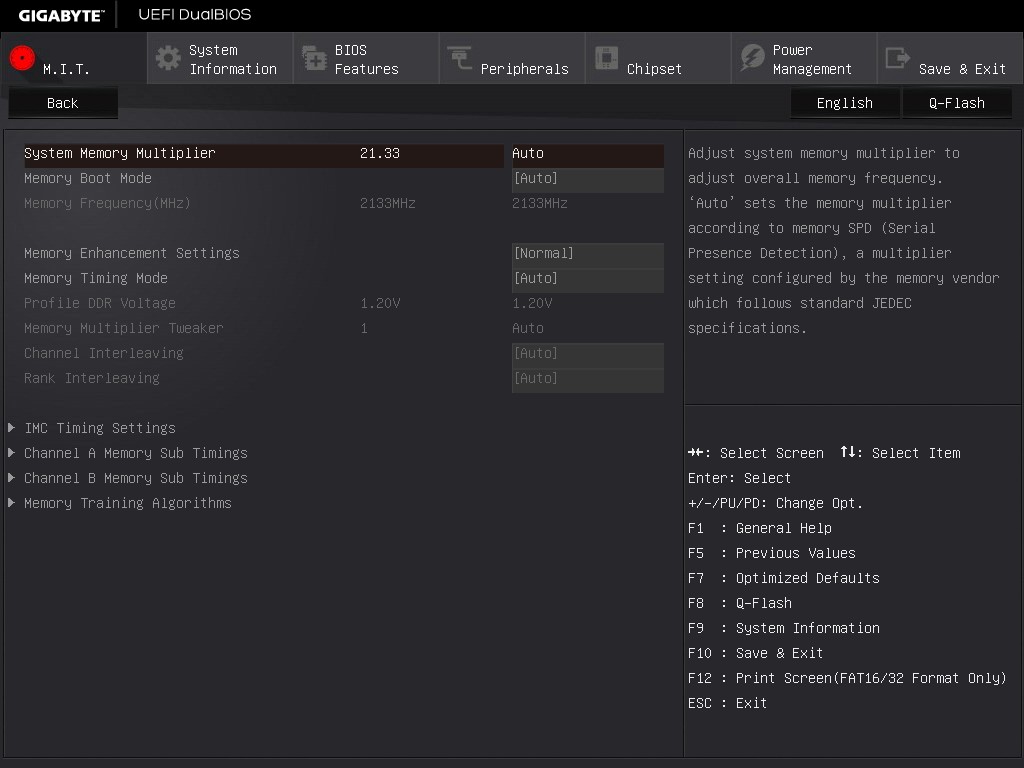
The Memory sub-menu gives options to enable XMP, adjust memory sub-timings but also implement a form of memory enhancement. To the best of my abilities, this seems to be an option that adjusts a number of tertiary sub-timings that might affect certain workflows. As with any overclocking, this is not guaranteed and your mileage may vary.
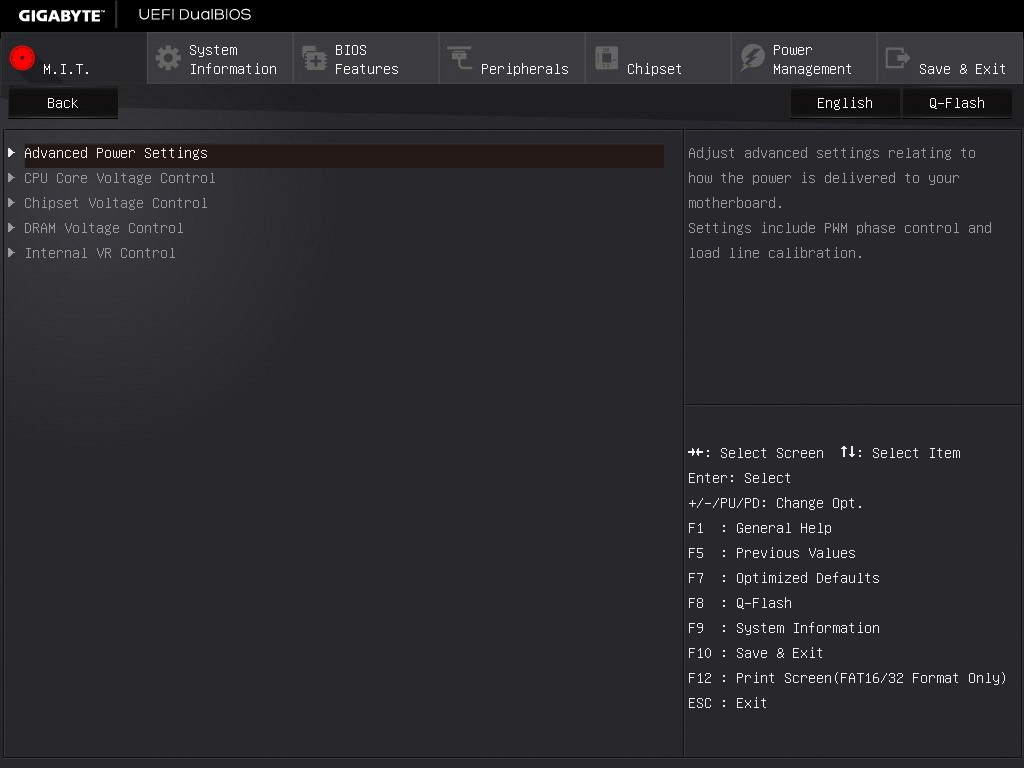
The Voltage sub-menu actually opens another set of sub-menu options, including power, core voltage and DRAM voltage. We’ve spoken to GIGABYTE about their method of doing it this way in the past, and the answer is to make options easier to find by separating them out – personally some of these options could be joined up and still fit on screen very easily, such as a ‘simple’ and ‘advanced’ voltage sub-menu that provides some options duplicated but the simple set is just the few that most overclockers will want to use.
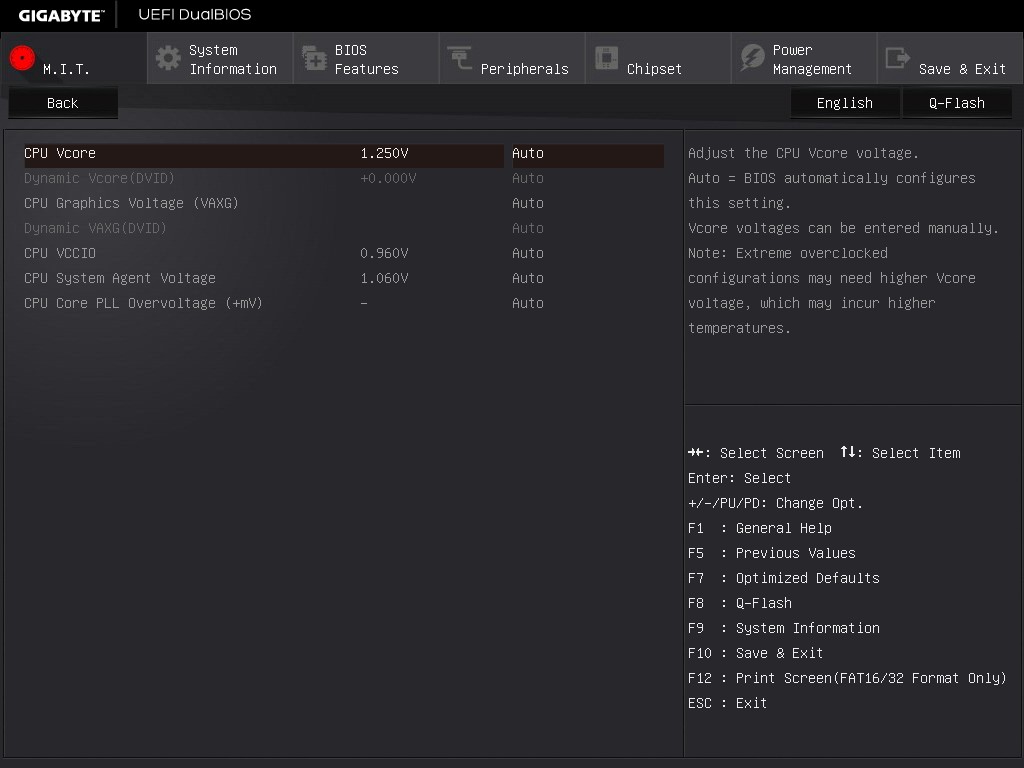
Nevertheless we find the processor load line calibration in the power settings menu, the processor voltage (CPU, GPU, Ring and PLL) in the Core Voltage Control, memory voltage in the DRAM menu and anyone extreme enough to enter the voltage regulation control can go nuts, with plenty of options that few engineers understand.
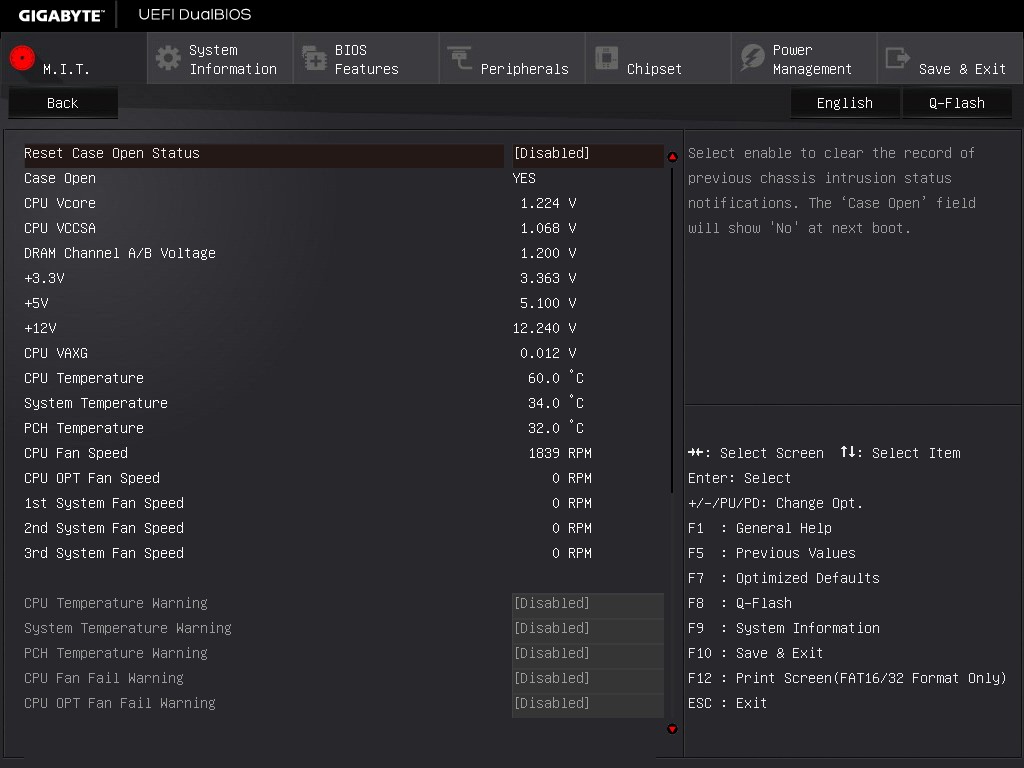
The MIT tab also offers a PC Health menu which contains all the sensor readings as well as the fan controls.
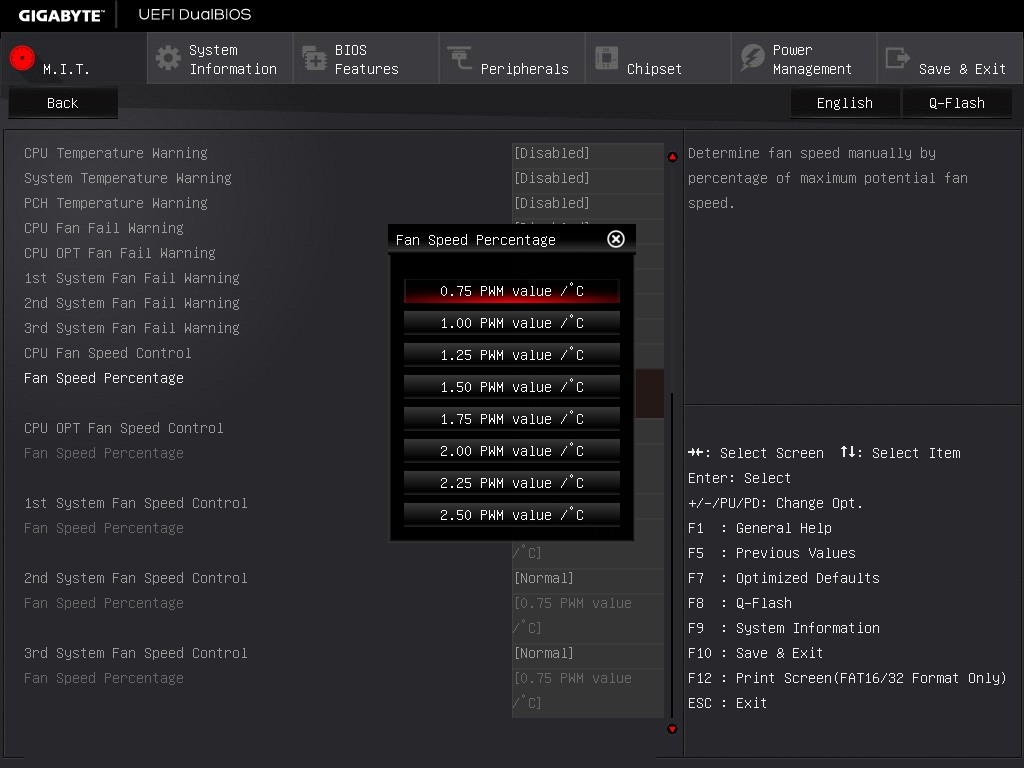
GIGABYTE is still lacking an interactive fan control option in the BIOS, while the other manufacturers have such a system with several points users can modify with a mouse. Instead from GIGABYTE we have a series of options relating to PWM/°C, which is a confusing metric if you do not understand fans. To explain it, basically the system can apply a value of 0 PWM to 255 PWM to the fan which relates to the fan voltage. This scale is not always linear, and what makes it frustrating is that the fan’s response is also non-linear to the voltage applied. Technically GIGABYTE could detect the fan RPM as a function of PWM and do the mathematics to provide gradients with actual RPM values, but instead we get basic PWM values. Just to put it into context, some fans are at 0 RPM until 40% PWM (40% of 255 is 102), and then shoot to 60% of their peak RPM speed. So at a gradient of 1 PWM value per degree, you would only see the fan turn on at 102 degrees, which by then it’s too late as the machine might have shut down due to overheating. Fan speed control is a very easy concept to fix, but for whatever reason is left like this.
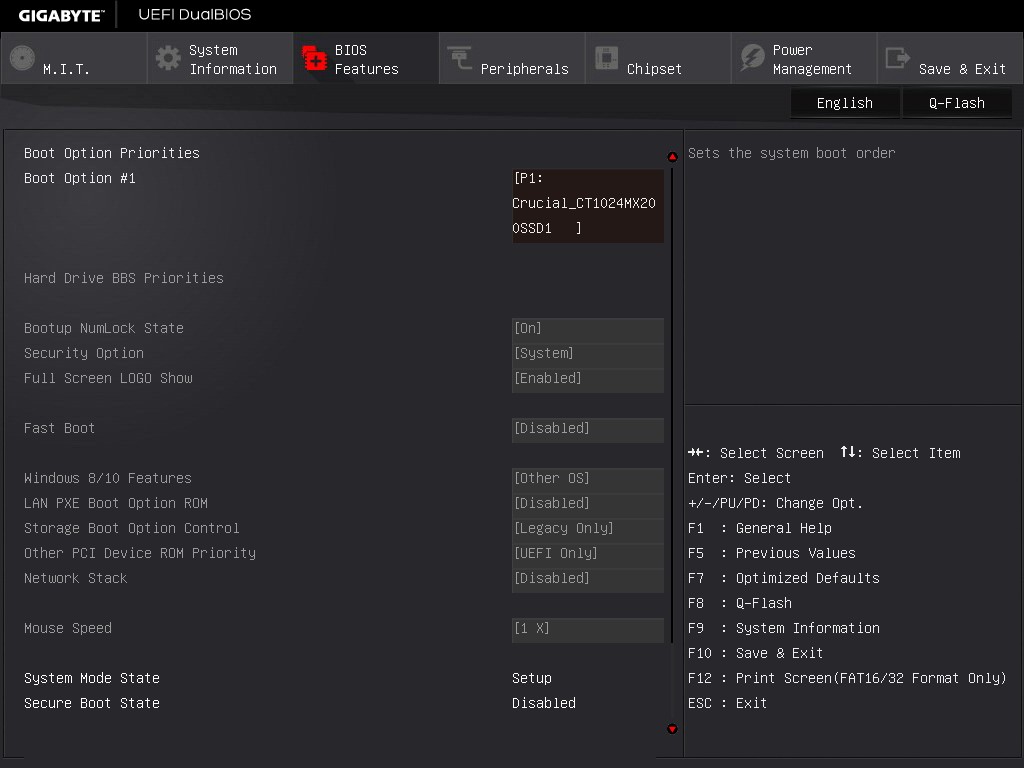
After MIT, the next important tab is the BIOS Features one which allows boot sequence adjustments as well as fast boot, Windows 10 and secure boot options. A newer option here is the Mouse Speed option, designed to assist mouse movement in the BIOS.
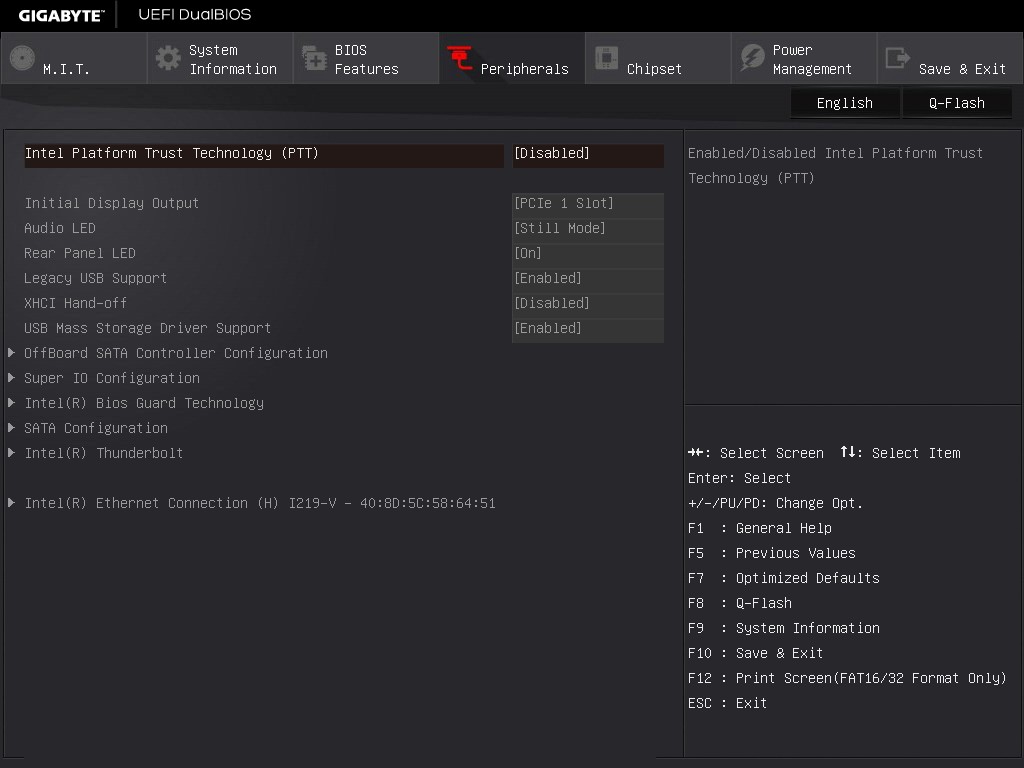
The Peripherals tab is where the extra controllers can be adjusted as well as the LED lighting, SATA Controller configuration (AHCI/RAID), NVMe support and Thunderbolt support.
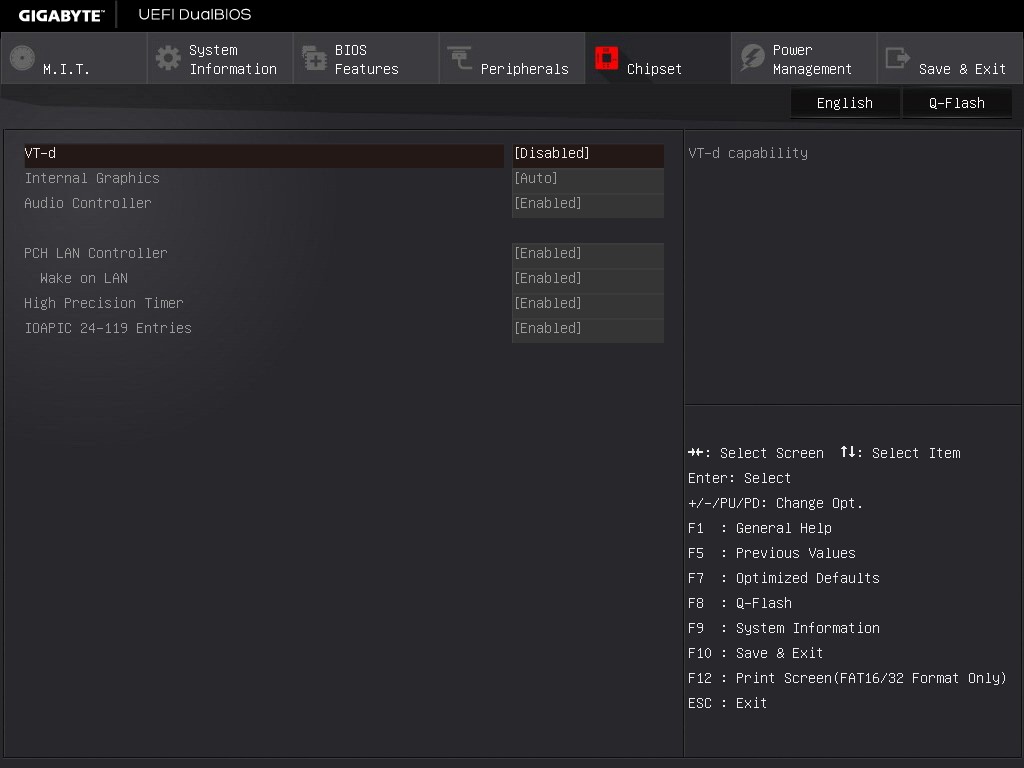
The Chipset tab is for integrated graphics and audio options, as well as virtualization through VT-d (which is disabled by default).
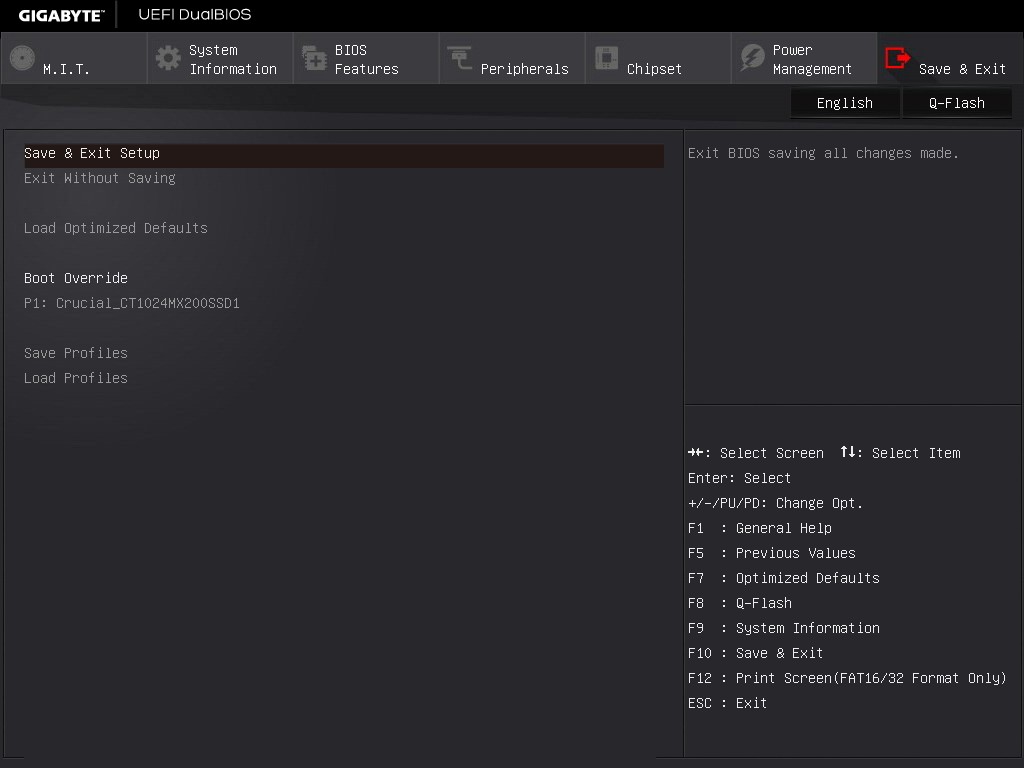
For boot override options, in order to boot from a single device for just one boot, these can be found in the Save and Exit menu.
A full series of images for this can be found in the BIOS gallery.
GIGABYTE Z170X-UD5 TH Software
A proportion of this page was posted with our GIGABYTE Z170X-Gaming G1 review due to similarities within the same generation of products. Text has been updated to match the specific features for this review.
I mentioned in the overview that GIGABYTE’s software stack has improved for the Z170 generation of motherboards, and that was no joke. Previously we had the high-contrast operations of APP Center and the small applications therein which might have strained the eyes of users as well as not making it easy to see what options were where. This changes for the Z170 platform, with a much smoother aesthetic and the options are split out into enough mini-applications that can be called on individually to increase loading time. This also enables GIGABYTE to update each mini-app independently of each other, giving smaller download updates, but it can also split up some of the apps to only appear on certain models of motherboard (such as the 3D OSD on the Gaming line).
GIGABYTE’s APP CENTER
We could call it the APP CENTER, because all caps are clearly needed or at least that’s what the title says, but here is GIGABYTE’s new interface for their more integrated options.
As a visual display, barring the poor attempt to implement shadows by flat pictures on the icons, this is a lot easier to digest than the previous implementation. Apps are also moved apart, splitting several options into different menus and making it easier to find what you want. The base preferences for the App Center menu offer color changes and an update schedule, which worked well during our testing.
If we go straight in to the updates, it offers what software is currently due for update along with a description and the size of the download. For software that is not currently installed in the system but is offered as part of the package (such as Norton Antivirus or Chrome), these are siphoned off into the ‘not installed’ menu, which is a good thing. A very good thing indeed.
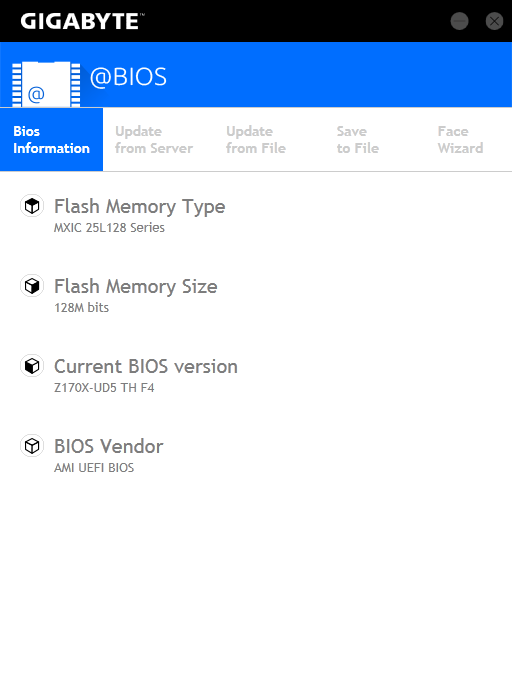
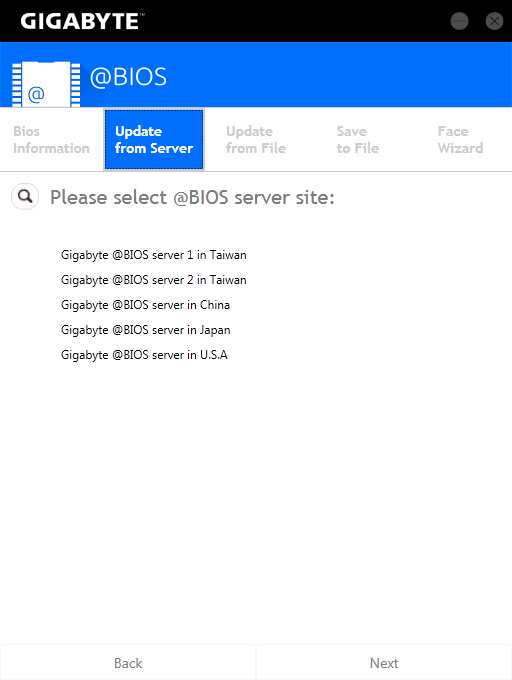
@BIOS is a stable of GIGABYTE’s software package, allowing updates either from a download or detecting what is new on their servers. Some vendors wrap this feature in with the App Center updates, which would perhaps be an idea for GIGABYTE to do so (or have two places where BIOS updates can be applied, in the App Center Updates and @BIOS).
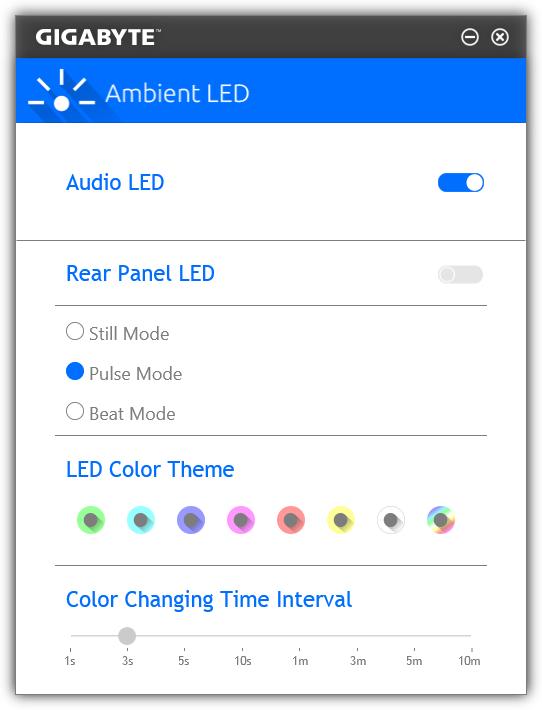
With the LEDs on the audio separation traces of the motherboard, GIGABYTE has enabled a 7-color system that can offer different modes that can be controlled through the Ambient LED App. The Still Mode keeps a constant color, whereas the Pulse Mode will bring the light on and off in a slow interval. The Beat Mode keeps tabs on the audio output and adjusts the intensity of the light accordingly. On top of all of these, the multi-color option can also cycle through the LED colors with an interval. Also, the LEDs can be turned off, as they may only appeal to a certain section of users.
Possible update suggestions for GIGABYTE to consider include the choice for a limited/custom set of colors, or to control the different LED colors independently around the motherboard. I would also offer the ability for custom time intervals (0.3 seconds on green, 2.2 seconds on red), or linking certain keys on the keyboard to different colors. That way for example, when playing a MOBA, MMO or FPS, when you activate a skill or select a weapon, the color of the system changes with that skill/weapon. If it could be hooked to change color or run a script of color with certain game events, then all the better. Time to get stabby on a knife round methinks, and make the system is red.
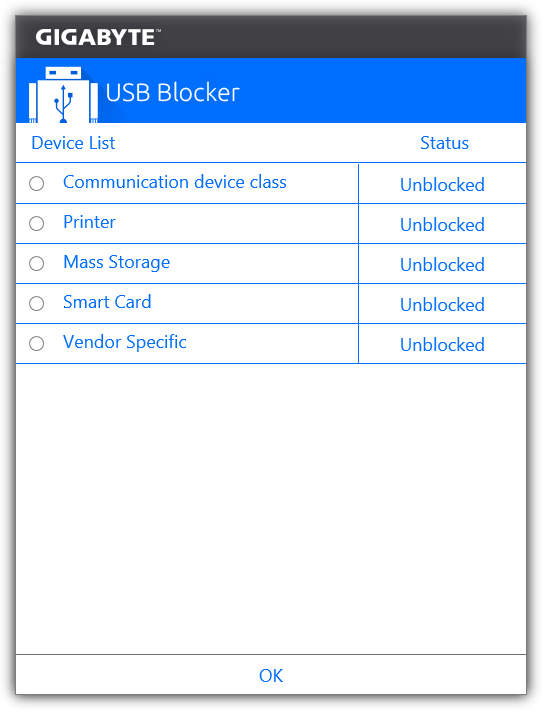
The USB Blocker app allows the administrator to block the use of certain USB devices to protect the system. This app is mainly for professional or public systems rather than a gaming rig, but is included here because it is easy for GIGABYTE to implement.
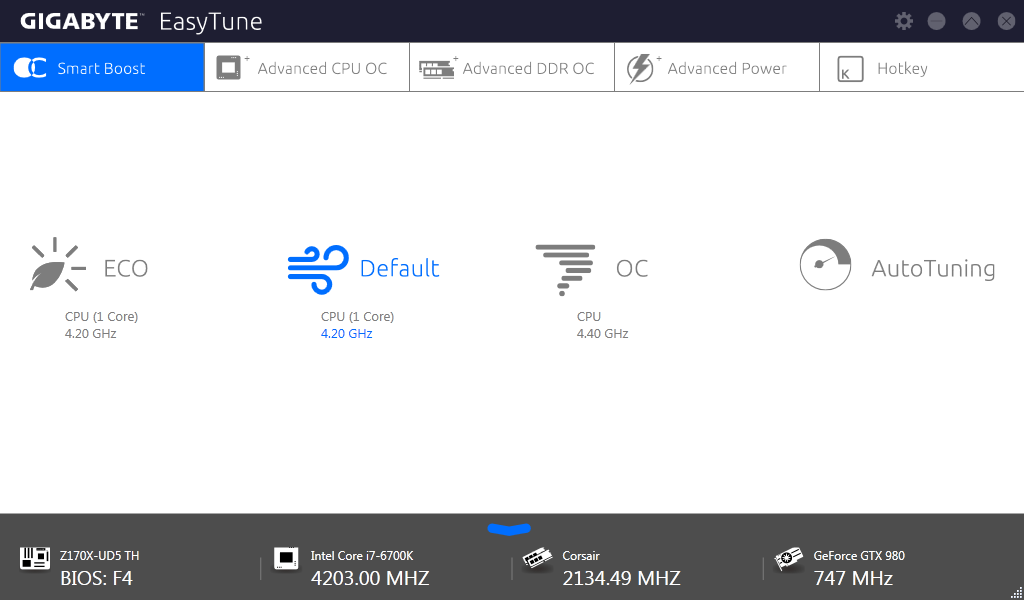
EasyTune is GIGABYTE’s graphical overclocking tool for Windows which offers this SmartBoost set of easy options alongside the deeper menus for manual overclocking. We tested both the OC option (a 4.4 GHz preset) and the AutoTuning overclock mode that tests for a peak frequency (we got 4.6 GHz) and both worked, although it is worth saying that the AutoTuning option is fairly basic with no room to select custom temperature ranges, voltage limits or stress test/stress test durations.
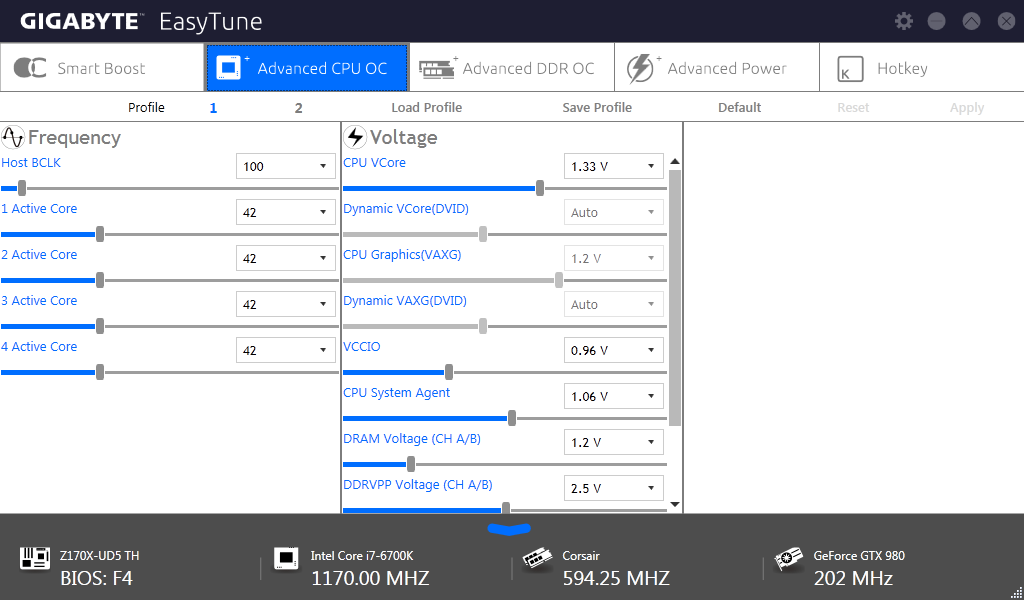
The other tabs in EasyTune give a similar set of options to the BIOS but with sliders and dropdowns. There is also a HotKey mode for users to apply an overclock on the fly. Users will have to download the GIGABYTE Tweaker tool if they want to adjust overclocks using a simple keyboard interface.
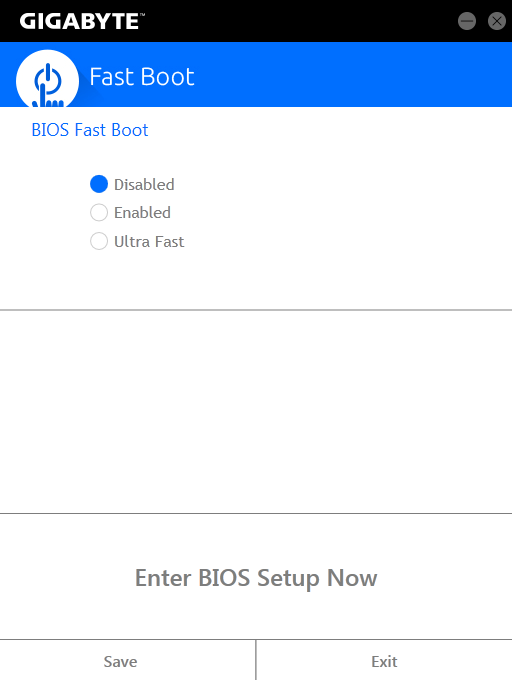
The Fast Boot software is something we use a fair bit, purely based on that ‘Enter BIOS Setup Now’ option which simplifies BIOS based overclocking without needing to break fingers or keyboards by hammering F2 during POST or entering the BIOS while in UEFI Quick Boot mode.
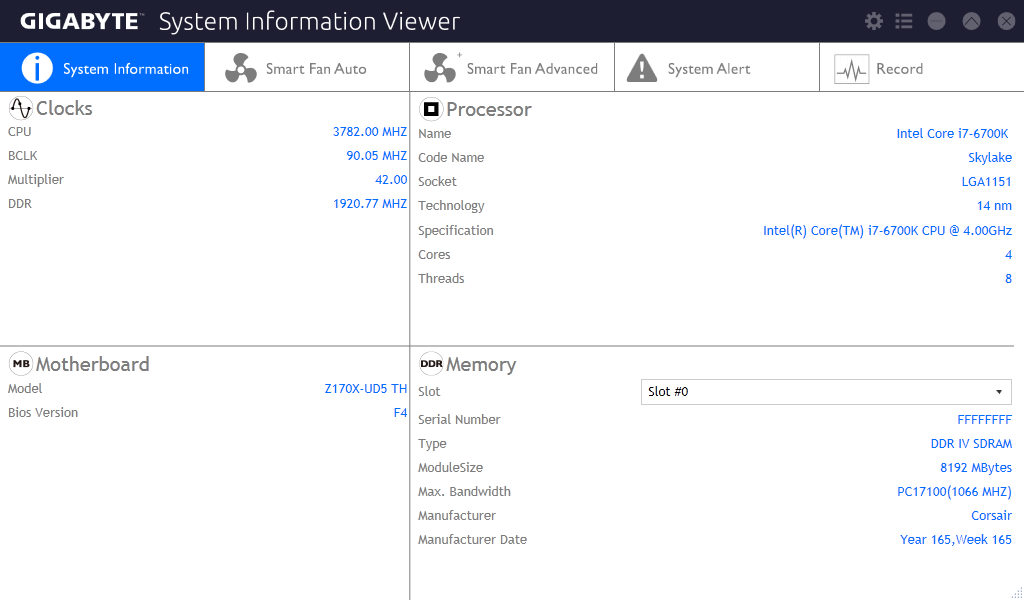
The System Information Viewer gives a breakdown of what is inside the system (we’re still waiting for a system browser, similar to MSI/ASRock), but also contains all the fan options as well.
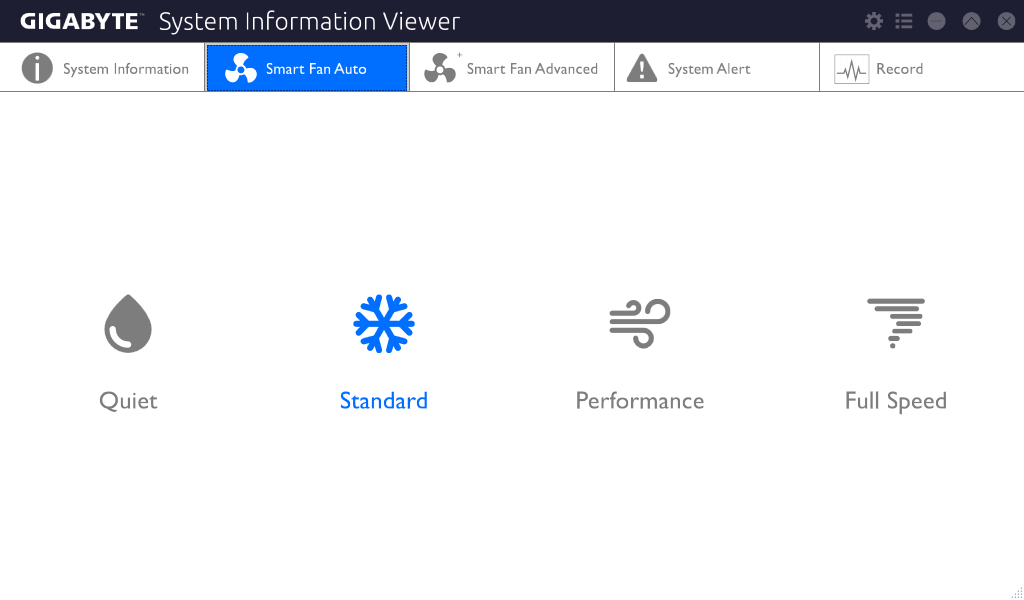
For a series of simple presets, GIGABYTE offers these four: Quiet, Standard, Performance and Full Speed. For anything more than this, we move to the Advanced tab:
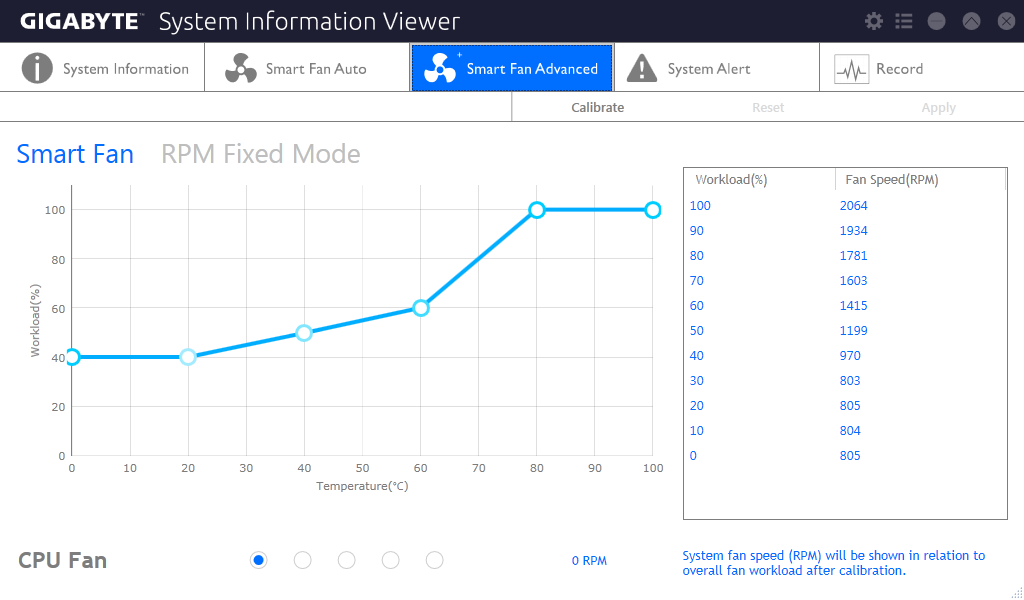
Through this we can test each fan for its fan RPM speed as a function of workload (that’s the PWM % value from the BIOS), and then configure a multiple point gradient for each of the fans. This is a great step up from what the BIOS offers, missing only one other feature worth suggesting to GIGABYTE - hysteresis. This means that if the system is running warm and slowly cools down, the fans stay running at a high workload to help cool the system down quicker until a threshold is met. So basically this means that as the system heats up it goes up the first gradient, and as the system cools down it goes down a different gradient.
Through this app we can also set the system alerts such that if one of the settings fluctuates beyond a safe range (e.g. temperature of the processor goes above 80) then a notification will appear. This software can also record the values of these sensors over time for a log file.
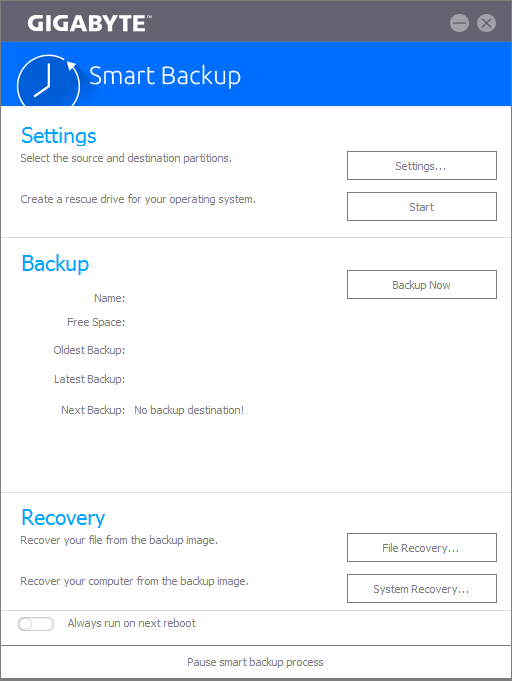
As part of the App Center, GIGABYTE has included a backup utility. This is good for keeping safe copies of hard drive partitions, or rescuing partitions to restore from an early date.
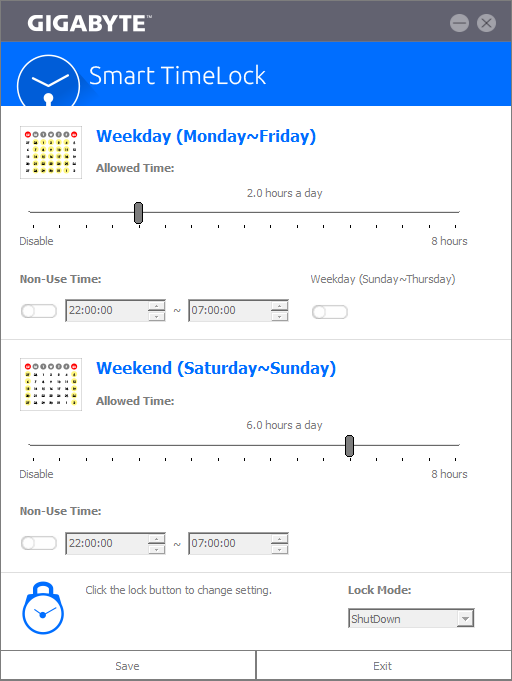
For parents that want to limit the time their children spend on the computer, or for users to limit their complete PC time, the TimeLock option will track the time the PC is on and take necessary steps to limit use after the allotted time. It doesn’t stop anyone rebooting the system with a Linux LiveCD though and accessing the internet through that.
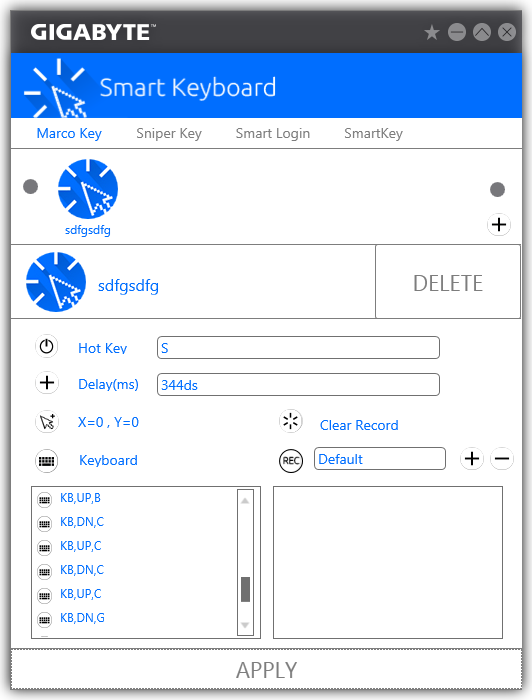
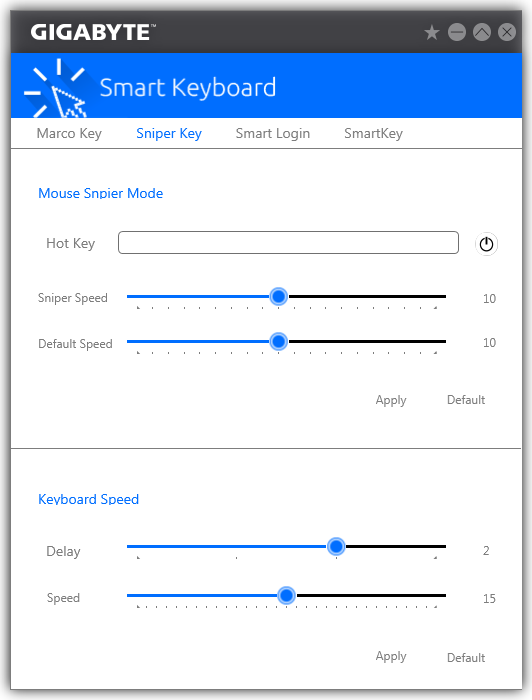
The Smart Keyboard functionality is akin to the macro generator and sniper key apps we saw in previous generations of GIGABYTE software. While it is nice to see, it only remains useful for very simple macros (or Marco, as the text says above in the image).
System Performance
Not all motherboards are created equal. On the face of it, they should all perform the same and differ only in the functionality they provide - however this is not the case. The obvious pointers are power consumption, but also the ability for the manufacturer to optimize USB speed, audio quality (based on audio codec), POST time and latency. This can come down to manufacturing process and prowess, so these are tested.
Power Consumption
Power consumption was tested on the system while in a single MSI GTX 770 Lightning GPU configuration with a wall meter connected to the OCZ 1250W power supply. This power supply is Gold rated, and as I am in the UK on a 230-240 V supply, leads to ~75% efficiency > 50W, and 90%+ efficiency at 250W, suitable for both idle and multi-GPU loading. This method of power reading allows us to compare the power management of the UEFI and the board to supply components with power under load, and includes typical PSU losses due to efficiency. These are the real world values that consumers may expect from a typical system (minus the monitor) using this motherboard.
While this method for power measurement may not be ideal, and you feel these numbers are not representative due to the high wattage power supply being used (we use the same PSU to remain consistent over a series of reviews, and the fact that some boards on our test bed get tested with three or four high powered GPUs), the important point to take away is the relationship between the numbers. These boards are all under the same conditions, and thus the differences between them should be easy to spot.
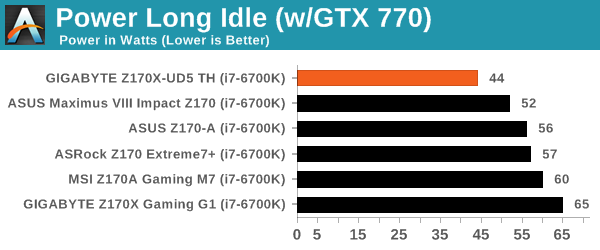
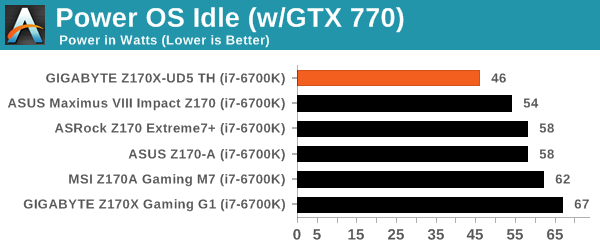
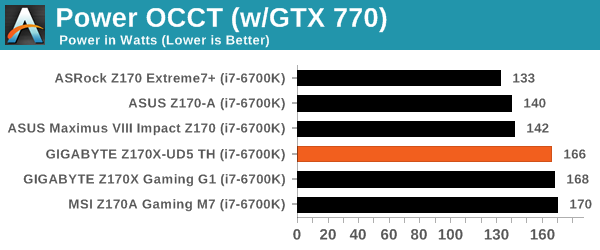
The GIGABYTE board is surprising low for idle loading, beating out the mini-ITX ROG model, but the load-to-idle delta of 122W is the highest we’ve seen from any Z170 motherboard so far.
Non UEFI POST Time
Different motherboards have different POST sequences before an operating system is initialized. A lot of this is dependent on the board itself, and POST boot time is determined by the controllers on board (and the sequence of how those extras are organized). As part of our testing, we look at the POST Boot Time using a stopwatch. This is the time from pressing the ON button on the computer to when Windows 7 starts loading. (We discount Windows loading as it is highly variable given Windows specific features.)
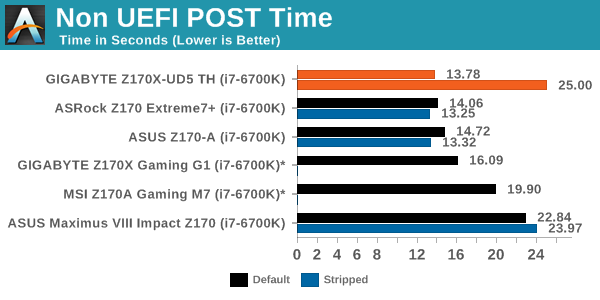
The GIGABYTE Z170X-UD5 TH also does really well in our POST time analysis, making the default POST time the fastest we’ve seen. Attempting to do a ‘stripped’ POST time through disabling controllers caused the system to take longer however.
Rightmark Audio Analyzer 6.2.5
Rightmark:AA indicates how well the sound system is built and isolated from electrical interference (either internally or externally). For this test we connect the Line Out to the Line In using a short six inch 3.5mm to 3.5mm high-quality jack, turn the OS speaker volume to 100%, and run the Rightmark default test suite at 192 kHz, 24-bit. The OS is tuned to 192 kHz/24-bit input and output, and the Line-In volume is adjusted until we have the best RMAA value in the mini-pretest. We look specifically at the Dynamic Range of the audio codec used on board, as well as the Total Harmonic Distortion + Noise.
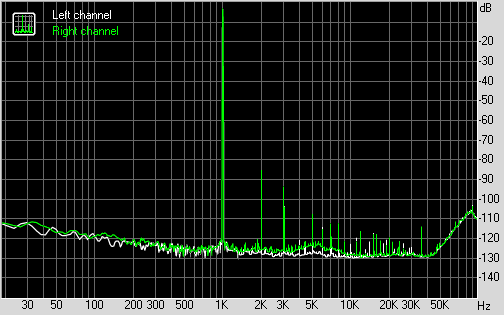
THD + N for Z170X-UD5 TH at 50% volume
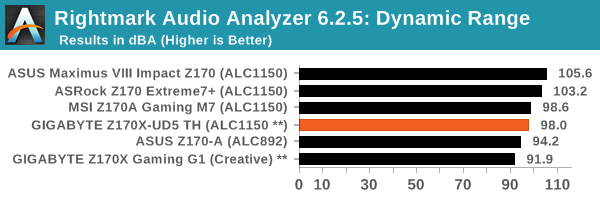
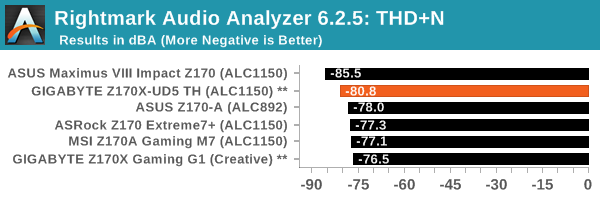
We’ve had issues with GIGABYTE’s premium audio interface and our testing in the past; either due to driver settings or the additional software, running the speaker volume at 100% causes a large amount of distortion in our signal resulting in very poor results. In fact, any volume over 67% caused this issue. We reduced the volume to 50% to take some measurements, with all the audio software tools uninstalled as much as possible, and we had some reasonable performance out of it in the end. Ultimately GIGABYTE has told us in the past that 100% volume in most circumstances is probably not a realistic interpretation of user experience, but I’m still not keen on the large amount of software interference and the user should be able to use the codec bare if wanted.
USB Backup
For this benchmark, we transfer a set size of files from the SSD to the USB drive using DiskBench, which monitors the time taken to transfer. The files transferred are a 1.52 GB set of 2867 files across 320 folders – 95% of these files are small typical website files, and the rest (90% of the size) are small 30 second HD videos. In an update to pre-Z87 testing, we also run MaxCPU to load up one of the threads during the test which improves general performance up to 15% by causing all the internal pathways to run at full speed.
Due to the introduction of USB 3.1, as of June 2015 we are adjusting our test to use a dual mSATA USB 3.1 Type-C device which should be capable of saturating both USB 3.0 and USB 3.1 connections. We still use the same data set as before, but now use the new device. Results are shown as seconds taken to complete the data transfer.
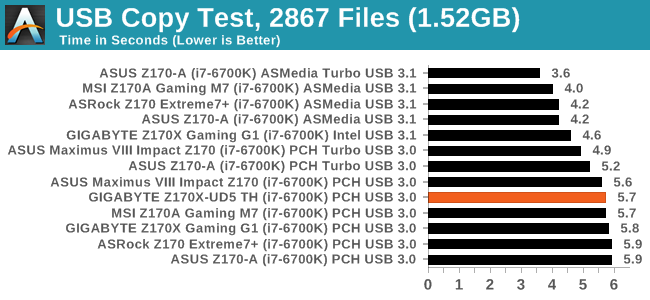
In USB 3.0 performance, the Z170X-UD5 TH runs a similar line to the other Z170 motherboards tested. Also like other Alpine Ridge motherboards, it breaks our test for USB 3.1 and we were unable to get a result. Our software indicates the copy being finished before it actually has finished (essentially reporting when the ‘send’ signal completes rather than the ‘received and correct’ signal comes back), reporting speeds in excess of USB 3.1 is capable of. This seems to be due to Alpine Ridge rather than anything else.
DPC Latency
Deferred Procedure Call latency is a way in which Windows handles interrupt servicing. In order to wait for a processor to acknowledge the request, the system will queue all interrupt requests by priority. Critical interrupts will be handled as soon as possible, whereas lesser priority requests such as audio will be further down the line. If the audio device requires data, it will have to wait until the request is processed before the buffer is filled.
If the device drivers of higher priority components in a system are poorly implemented, this can cause delays in request scheduling and process time. This can lead to an empty audio buffer and characteristic audible pauses, pops and clicks. The DPC latency checker measures how much time is taken processing DPCs from driver invocation. The lower the value will result in better audio transfer at smaller buffer sizes. Results are measured in microseconds.
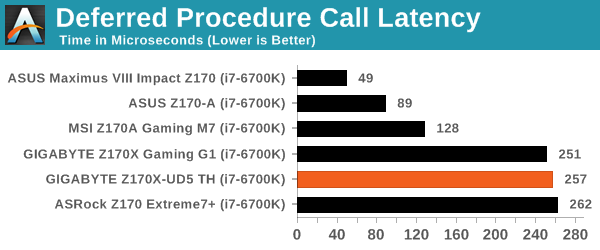
It would seem that some manufacturers are still feeling out DPC Latency on the platform, with ASUS going below 100 and almost everyone else hitting over 200. I expect this should get better over the life cycle of the platform.
CPU Performance, Short Form
For our motherboard reviews, we use our short form testing method. These tests usually focus on if a motherboard is using MultiCore Turbo (the feature used to have maximum turbo on at all times, giving a frequency advantage), or if there are slight gains to be had from tweaking the firmware. We leave the BIOS settings at default and memory at JEDEC (DDR4-2133 C15) for these tests, making it very easy to see which motherboards have MCT enabled by default.
Video Conversion – Handbrake v0.9.9: link
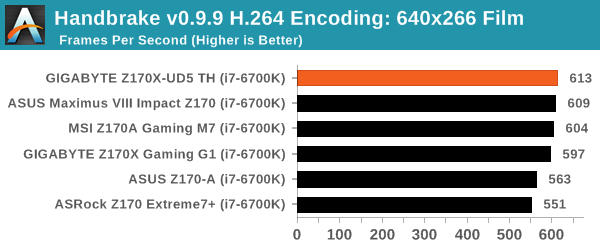
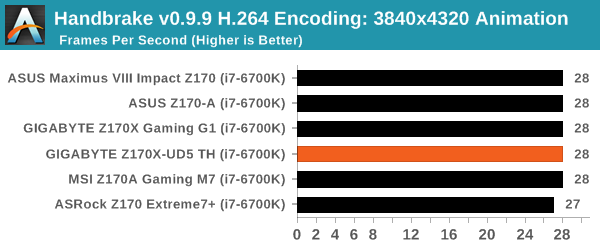
Handbrake is a media conversion tool that was initially designed to help DVD ISOs and Video CDs into more common video formats. For HandBrake, we take two videos (a 2h20 640x266 DVD rip and a 10min double UHD 3840x4320 animation short) and convert them to x264 format in an MP4 container. Results are given in terms of the frames per second processed, and HandBrake uses as many threads as possible.
Compression – WinRAR 5.0.1: link
Our WinRAR test from 2013 is updated to the latest version of WinRAR at the start of 2014. We compress a set of 2867 files across 320 folders totaling 1.52 GB in size – 95% of these files are small typical website files, and the rest (90% of the size) are small 30 second 720p videos.
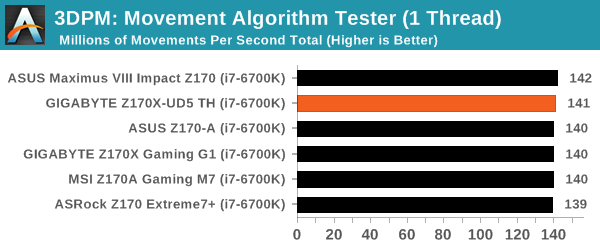
Point Calculations – 3D Movement Algorithm Test: link
3DPM is a self-penned benchmark, taking basic 3D movement algorithms used in Brownian Motion simulations and testing them for speed. High floating point performance, MHz and IPC wins in the single thread version, whereas the multithread version has to handle the threads and loves more cores. For a brief explanation of the platform agnostic coding behind this benchmark, see my forum post here.
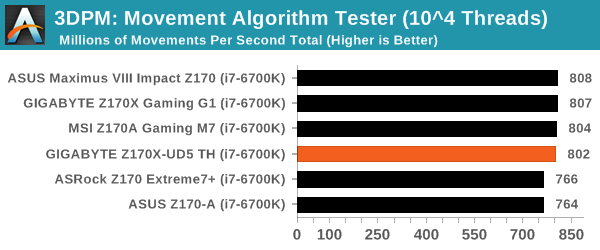
Rendering – POV-Ray 3.7: link
The Persistence of Vision Ray Tracer, or POV-Ray, is a freeware package for as the name suggests, ray tracing. It is a pure renderer, rather than modeling software, but the latest beta version contains a handy benchmark for stressing all processing threads on a platform. We have been using this test in motherboard reviews to test memory stability at various CPU speeds to good effect – if it passes the test, the IMC in the CPU is stable for a given CPU speed. As a CPU test, it runs for approximately 2-3 minutes on high end platforms.
Synthetic – 7-Zip 9.2: link
As an open source compression tool, 7-Zip is a popular tool for making sets of files easier to handle and transfer. The software offers up its own benchmark, to which we report the result.
Gaming Performance
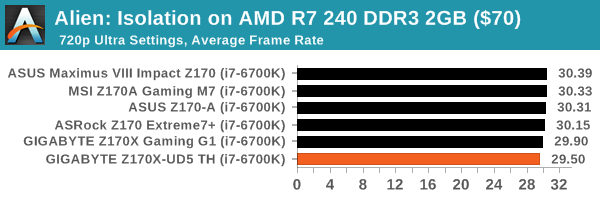
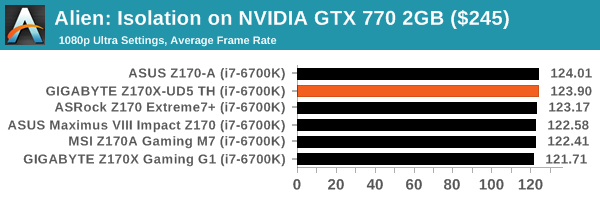
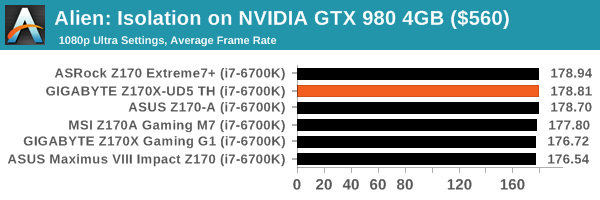
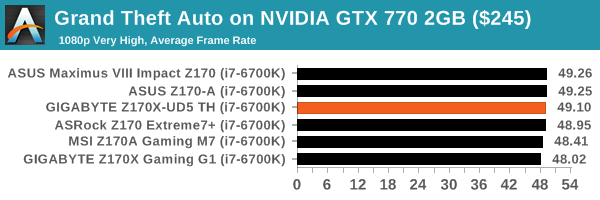
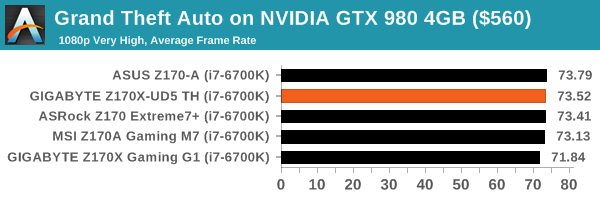
Our 2015 gaming results are still relatively new, but the issue of FCLK settings might play a big role here. At launch, the default setting for the communication buffer between the CPU and PCIe stack was 800 MHz, even though Intel suggested 1000 MHz, but this was because of firmware limitations from Intel. Since then, there is firmware to enable 1000 MHz, and most motherboard manufacturers have this - but it is unclear if the motherboard will default to 1000 MHz and it might vary from BIOS version to BIOS version. As we test at default settings, our numbers are only ever snapshots in time, but it leads to some interesting differences in discrete GPU performance.
Alien: Isolation
If first person survival mixed with horror is your sort of thing, then Alien: Isolation, based off of the Alien franchise, should be an interesting title. Developed by The Creative Assembly and released in October 2014, Alien: Isolation has won numerous awards from Game Of The Year to several top 10s/25s and Best Horror titles, ratcheting up over a million sales by February 2015. Alien: Isolation uses a custom built engine which includes dynamic sound effects and should be fully multi-core enabled.
For low end graphics, we test at 720p with Ultra settings, whereas for mid and high range graphics we bump this up to 1080p, taking the average frame rate as our marker with a scripted version of the built-in benchmark.
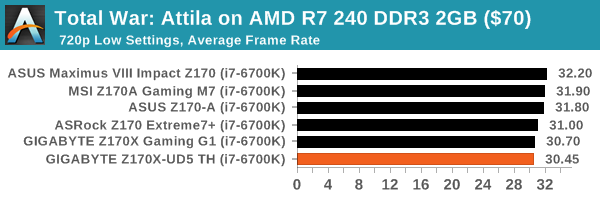
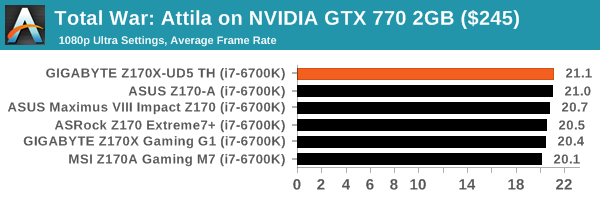
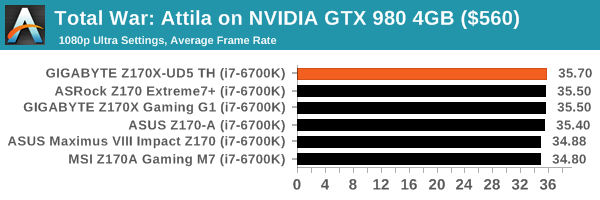
Total War: Attila
The Total War franchise moves on to Attila, another The Creative Assembly development, and is a stand-alone strategy title set in 395AD where the main story line lets the gamer take control of the leader of the Huns in order to conquer parts of the world. Graphically the game can render hundreds/thousands of units on screen at once, all with their individual actions and can put some of the big cards to task.
For low end graphics, we test at 720p with performance settings, recording the average frame rate. With mid and high range graphics, we test at 1080p with the quality setting. In both circumstances, unlimited video memory is enabled and the in-game scripted benchmark is used.
Grand Theft Auto V
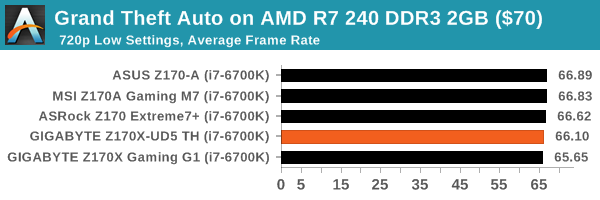
The highly anticipated iteration of the Grand Theft Auto franchise finally hit the shelves on April 14th 2015, with both AMD and NVIDIA in tow to help optimize the title. GTA doesn’t provide graphical presets, but opens up the options to users and extends the boundaries by pushing even the hardest systems to the limit using Rockstar’s Advanced Game Engine. Whether the user is flying high in the mountains with long draw distances or dealing with assorted trash in the city, when cranked up to maximum it creates stunning visuals but hard work for both the CPU and the GPU.
For our test we have scripted a version of the in-game benchmark, relying only on the final part which combines a flight scene along with an in-city drive-by followed by a tanker explosion. For low end systems we test at 720p on the lowest settings, whereas mid and high end graphics play at 1080p with very high settings across the board. We record both the average frame rate and the percentage of frames under 60 FPS (16.6ms).
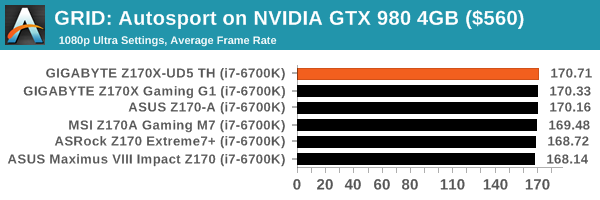
GRID: Autosport
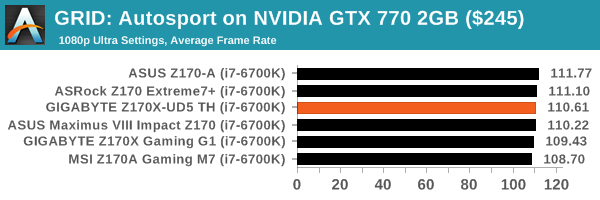
No graphics tests are complete without some input from Codemasters and the EGO engine, which means for this round of testing we point towards GRID: Autosport, the next iteration in the GRID and racing genre. As with our previous racing testing, each update to the engine aims to add in effects, reflections, detail and realism, with Codemasters making ‘authenticity’ a main focal point for this version.
GRID’s benchmark mode is very flexible, and as a result we created a test race using a shortened version of the Red Bull Ring with twelve cars doing two laps. The car is focus starts last and is quite fast, but usually finishes second or third. For low end graphics we test at 1080p medium settings, whereas mid and high end graphics get the full 1080p maximum. Both the average and minimum frame rates are recorded.
Middle-Earth: Shadow of Mordor
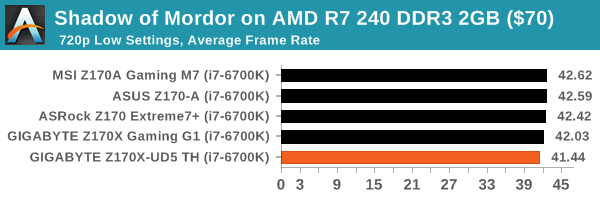
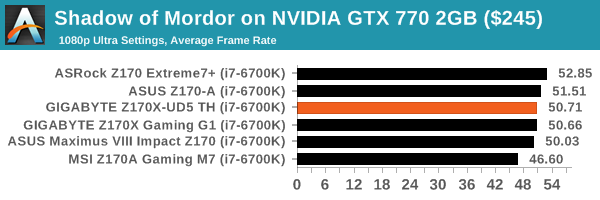
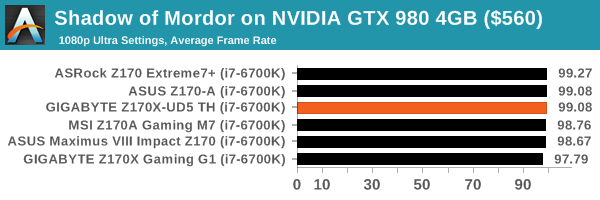
The final title in our testing is another battle of system performance with the open world action-adventure title, Shadow of Mordor. Produced by Monolith using the LithTech Jupiter EX engine and numerous detail add-ons, SoM goes for detail and complexity to a large extent, despite having to be cut down from the original plans. The main story itself was written by the same writer as Red Dead Redemption, and it received Zero Punctuation’s Game of The Year in 2014.
For testing purposes, SoM gives a dynamic screen resolution setting, allowing us to render at high resolutions that are then scaled down to the monitor. As a result, we get several tests using the in-game benchmark. For low end graphics we examine at 720p with low settings, whereas mid and high end graphics get 1080p Ultra. The top graphics test is also redone at 3840x2160, also with Ultra settings, and we also test two cards at 4K where possible.
The Thunderbolt 3 Bandwagon
One of the main reasons why some users buy certain motherboards is due to a specific feature. If you need to use a specific feature that only some models have, it guts out 98% of potential candidates at the first step. Typically most users will separate by compatibility and price first if they don’t need a certain specific feature, but it means that when we look for Thunderbolt 3 enabled motherboards, the Z170X-UD5 TH comes in at one of the cheapest models available and only $6 more than the non-Thunderbolt 3 variant.
As can be the issue with early adoption though is the lack of devices currently using the standard. We saw similar issue with the previous two generations of Thunderbolt, especially when it came to Windows compatibility (most devices ended up focused on Apple), or things like SATA Express that never took off. Perhaps SATAe is an odd-ball standard anyway, but it still stands to reason that TB3 devices are thin on the ground. Standard expectations will put it on the next generation MacBook Pro and Mac Pro devices, as well a display or two, but we are going to have to wait for other storage/hub options to come through. There’s also the issue of cabling – TB3 requires an active cable to reach 40 Gbps, whereas a cheaper passive cable will only be rated for 20 Gbps. Nonetheless, it comes back to that $6 difference; if you can use the ports for USB 3.1 in the meantime, then it can make it an easy decision to spend the extra for the price of a large double-shot coffee.
Moving away from the Thunderbolt 3 aspect and we have GIGABYTE’s main stream Ultra Durable brand motherboard sitting between the UD3 and UD7. This means it gets the UD black/gold branding, some upgraded power delivery, GIGABYTE’s new PCIe protection guard scheme to avoid slots being ripped out by large cards and storage options in M.2. The UD5 TH is also one of the few motherboards that will support HDMI 2.0 (HDCP 2.2), in this case using a LSPcon, when the integrated graphics are in play. It seems a little odd to be upgrading the integrated graphics options with a motherboard aimed at discrete GPU users, however GIGABYTE clearly sees a benefit here when non-GPU PCIe devices are in use instead.
There’s also some upgraded Realtek ALC1150 audio using PCB separation, filter caps and EMI shielding, with RGB LEDs underneath the motherboard on the digital side for users that want to pimp their rig. There’s another interesting choice in using an EMI shield for the Intel I219-V network controller, as this tends to make little difference in performance. There’s also the three SATA Express ports, but the only thing that can use them that is for sale is a USB 3.1 front panel bay which of course, sells separately.
In the performance metrics, the Z170X-UD5 TH does use MultiCore Turbo, but only on certain benchmarks – we saw video encoding and 7-Zip encoding were MCT enabled, but WinRAR encoding and ray tracing were not. This gave the performance a mid-range outing between those that do enable MCT and those that do not. For the system benchmarks, idle power and POST time were the best we’ve seen so far on Skylake, but load-to-idle delta and DPC Latency were nothing to write home about. GIGABYTE also implements their classic mode BIOS only here, avoiding the HD mode altogether, but the software package is easier to use and update than previous generations.
For users interested in water cooling, it is worth noting that EKWB has a CPU plus power delivery water block available for the Z170X-UD5 TH using G1/4 fittings at €118. For some of the markets that GIGABYTE aims for, having tie-ins with extra hardware manufacturers can be a good thing, especially for users wanting to expand designs beyond a simple cooler and memory.
There are a few oddities, such as HDMI 2.0 on a GPU focused motherboard, having three SATAe ports but no SATAe drives in the market, and having the M.2 slot muxed with the final PCIe slot rather than having them separate as is possible with the Z170 chipset. The first two of those most users will ignore anyway, but there is certainly an element of design here that warrants the price point. The GIGABYTE Z170X-UD5 TH is a good motherboard by most metrics. I have since handed it off to Ganesh to update one of his NAS/Thunderbolt testing systems, as it was one I had that would fit the bill. The board is one of the most appealing to those wanting to invest in Thunderbolt 3, as and when devices enter the market - especially if it is still only $6 more than the non-TH version, and that will most likely be the biggest draw.

