Original Link: https://www.anandtech.com/show/6523/streacoms-fc10-and-nano150-building-a-fanless-ivy-bridge-htpc
Streacom's FC10 and Nano150: Building a Fanless Ivy Bridge HTPC
by Ganesh T S on December 22, 2012 3:30 AM EST- Posted in
- Fanless
- HTPC
- Ivy Bridge
Introduction
HTPC enthusiasts often place a lot of emphasis on silent systems for obvious reasons. We have looked at systems with passive thermal solutions before, but never presented the build process for one. Back in May, we had covered Streacom's announcement of the fanless FC9 and FC10 chassis. With support for passive cooling of CPUs with a TDP of up to 95 W and a sleek industrial design, HTPC enthusiasts have been eagerly waiting for these units to hit the market. After some delays, Streacom finalized the design and started shipping the units to resellers in mid-November. We requested for samples of the FC10 chassis and the Nano150 PSU and Streacom's shipment reached us in the first week of December.
Dustin usually handles case reviews and Martin handles PSUs, but, with the Streacom components, we are going to take a different long term approach. We will be using the FC10 and the Nano150 as building blocks for a fully passive HTPC. We also intend the HTPC to act as a testbed for evaluating discrete HTPC GPUs.
The Streacom offerings introduced in May also included the FC9 which supports mITX and uATX motherboards. However, the FC9 supports half-height PCIe cards only. The FC10, on the other hand, supports up to two full height PCIe cards. Hence, we took the decision to go in for the FC10 despite our plans to use a mITX motherboard.
In today's piece, we will first check out the Streacom components in detail. Following that, we will take a brief look at the other components of our passive HTPC build. After that, we will go through the build process in detail and also present some thermal performance results. In the concluding section, we will have a sneak peek at what lies in store in the remaining parts of the HTPC series.
Passive Build Chassis & PSU
Streacom FC10 Premium HTPC ATX Chassis:
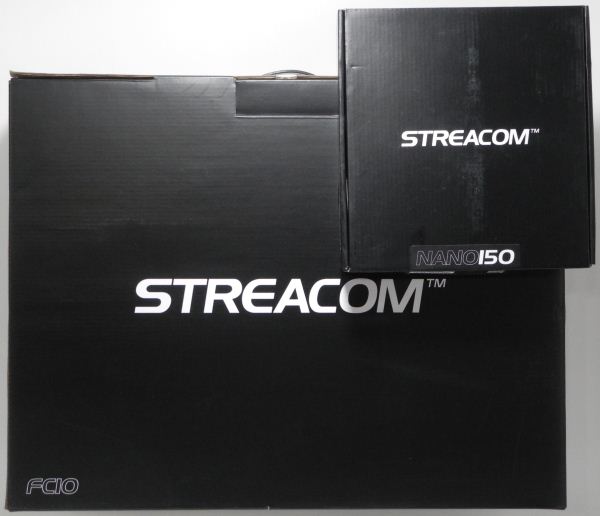
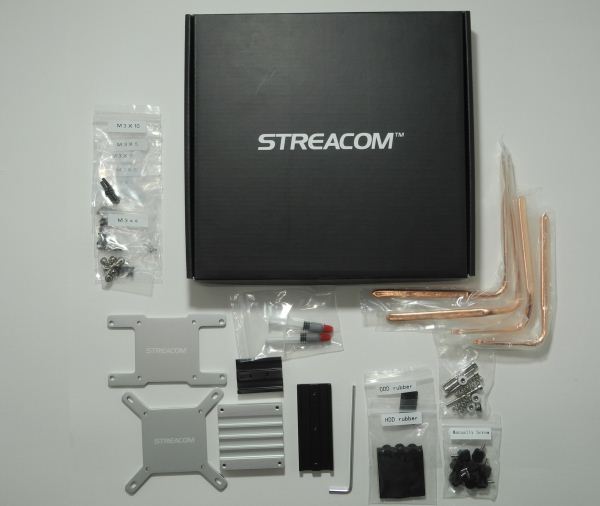
The FC10 comes in a plain, but, easy to carry around package. The sophisticated appearance of the package belies the fact that it just contains a computer case. The internals of the package are neatly laid out, with the heat conduction plates, pipes and other miscellaneous components in one box and a detailed assembly manual on top of it.
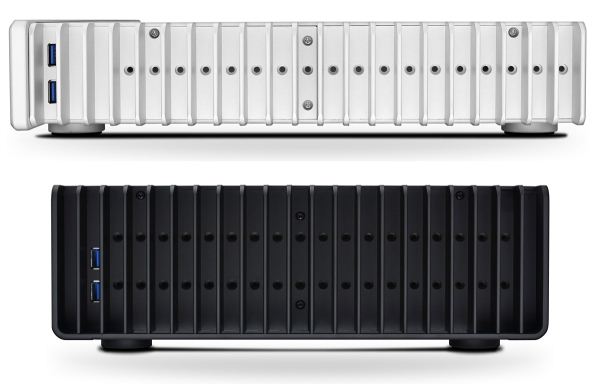
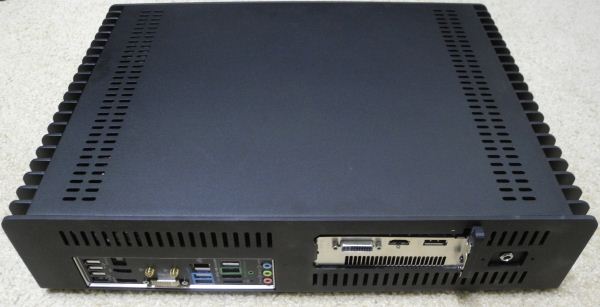
Describing the chassis itself as a thing of beauty would be an understatement. Our sample unit came in black (silver is also available). The chassis is made of solid aluminium and has a sandblasted finish lending it a premium look. After taking a look at the case, I can say that Streacom isn't exaggerating when they claim that the FC10 is a 'work of art combining form and function'.
The hard drive bays support up to 2 x 3.5" and 3 x 2.5" drives. There is also a slim slot loading optical drive slot. There are two USB ports on the side. We also have the option to add an IR receiver to the system. The unit also has a slot to place one of the Streacom PSUs which come in 150, 180 and 250W varieties. The chassis measures 435 x 319 x 100mm and weighs 5.4 Kgs.
The FC10 chassis cooling solution support both AMD and Intel CPUs.
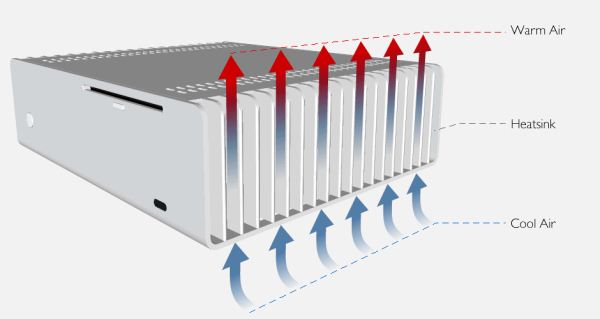
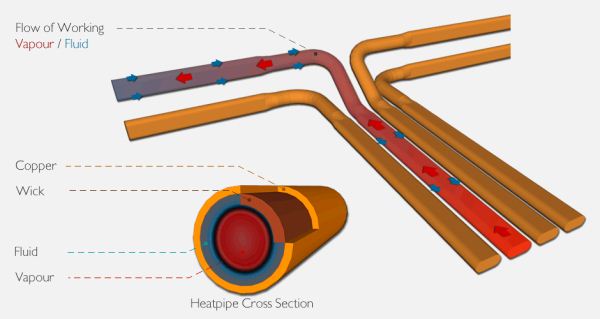
The cooling solution consists of two components, the fins on the chassis and the heat pipes to take the heat away from the processor surface.
The chassis fins contribute to the cooling through convection by natural airflow. The heat pipes contribute through cooling by phase change, i.e, liquid water in the heat pipes close to the processor evaporates and moves towards the chassis fins where it condenses and gets transported back closer to the processor.
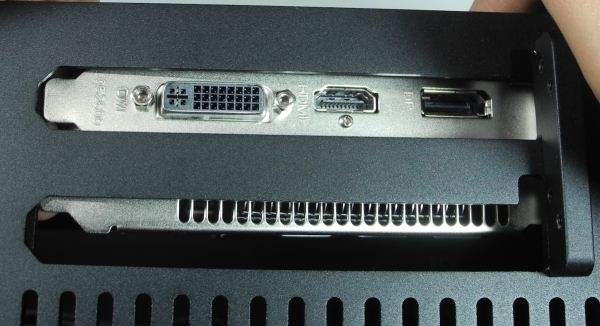
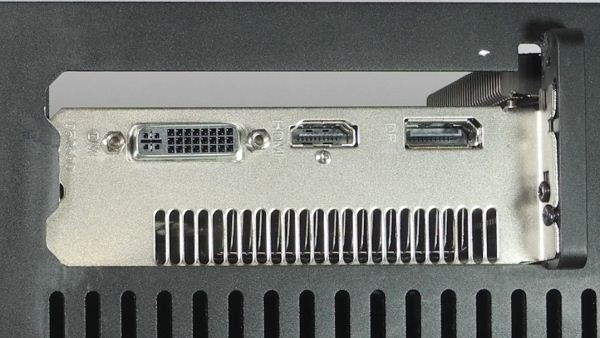
Inside the chassis, we have plenty of space and even two PCIe slots. The PCIe cards have to be mounted with flexible risers. Unfortunately, here is where we encountered our first issue with the FC10. Streacom went in for non-standard spacing between the two PCIe slots. This rules out the usage of dual-slot cards in the system. Streacom came back to us with the reasoning that having the 2 slots at the normal width would have left the dividing strip too thin and weak because of the all-aluminium chassis.
Dual Slot GPU Compatibility
One of our reasons for going with the FC10 fanless chassis was to use it as a HTPC GPU testbed too. I have long since held the view that any HTPC GPU worth its salt had to come in a passive version from at least one AIB vendor. In 2012, we are at a stage where the integrated GPUs in Trinity and Ivy Bridge are more than enough for average HTPC users.
In order for users to get any meaningful HTPC capability not provided by Trinity and Ivy Bridge, a moderately powerful GPU such as the AMD 7750 or the NVIDIA GT 640 is needed. Unfortunately, their passive versions come in dual slot varieties. Not ones to be deterred by the original chassis design, we set out to fix this 'issue' (even though it is a non-issue for the majority of the builders out there). With the help of a rotary tool, it was trivial to take out the offending metal strip and polish and buff the edges. We had a little bit of trouble aligning the second fin inside the chassis, but carefully screwing in the metal plate ensured that the GPU was mounted in a stable manner.
We will be looking at this configuration in detail in the third part of the series, but it should suffice to mention here that the arrangement worked fine in operation throughout. Another minor issue is the range of PSU ratings available. Users going in for a ATX board are not going to be happy with the maximum available 250 W PSU. Streacom indicated that ATX compatibility was mentioned only because the size of the chassis allowed it. However, they expect end-users to use either mITX or uATX motherboards only.
Nano150 Fanless PSU
The Nano150 fanless PSU consists of two major components, the power brick AC / DC adapter and the power delivery module which slots inside the chassis. The power brick output is rated for 12.5A at 12V and operates in the 100 - 240V / 50 - 60Hz range. The bundled power plug was of the EU variety. It isn't much of an issue as the power plug is detachable. In any case, travel adapters are quite cheap. An alternate power cable is probably the better way to go about it if you are not in the EU. In any case, local resellers are bound to include the correct power plug.
The power brick hooks up to the power delivery module through a hole in the chassis. The module plugs directly into the 24-pin ATX power connected on the motherboard. The add-on cable set plugging into the module includes a 4-pin power connector, a molex connector and two SATA power connectors.
HTPC Testbed Components
In choosing the Streacom FC10 and Nano150 as the chassis and PSU for our testbed, we were practically restricted to a mITX or uATX motherboard. There was a toss up between building a Trinity-based testbed and a Ivy Bridge-based testbed. In the end, the fact that Trinity emerged as being a capable madVR candidate (with software based decoding), and the fact that madVR recently introduced DXVA scaling (an upside for Intel since its offerings weren't fully madVR capable earlier, and something that we wanted to test out) persuaded us to go for an Intel-based testbed.
Processor:
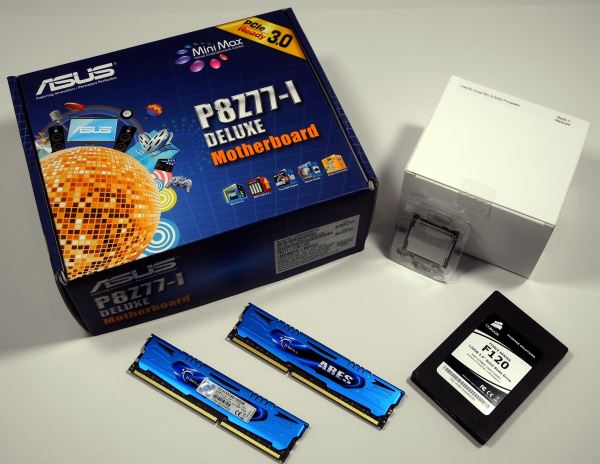
Intel's best GPU offering to date is the HD 4000, and the cheapest Ivy Bridge with the HD 4000 GPU is the Core i3-3225. The Core i3-3225 is a 2C/4T processor with a 55W TDP. It has a 3 MB L3 cache, and can run at 3.3 GHz. The HD4000 runs at 650 MHz by default, but, can turbo up to 1050 MHz when necessary. Like all other Ivy Bridge processors, we have support for DDR3-1600 memory.
Motherboard & Chipset:
The Asus P8Z77-I Deluxe is a Z77-based mITX motherboard with integrated dual-band Wi-Fi / Bluetooth and plenty of HTPC oriented features with Wi-Fi GO!, including the ability to interact with the PC using a mobile device, making it act as a DLNA media hub and so on. This video from Asus captures the capabilities included in the Wi-Fi GO! feature. Ian will be presenting a detailed review of the P8Z77-I Deluxe. However, in the context of our HTPC testbed, the motherboard fulfills all our primary requirement that at least one free PCIe slot be available for installation of a discrete GPU at a later point in time.
Asus also has a Wi-Di enabled model with an Intel Wi-Fi adapter instead of the Broadcom-based one in the P8Z77-I Deluxe.
Memory:
We had used the G.Skill Ares kit in our Trinity HTPC testbed, and given the fact that it can run even at 2133 MHz, we decided to use the same model for this system build also. As a refresher, the DRAM runs with a 9-11-10-28 latency configuration. We also decided to use only one module to give the system 4 GB of DRAM. The reason to not go in for 8 GB will be made clear in the next section.
Primary & Optical Disk Drives:
We used one of the old SSDs lying around, the Corsair F120 120GB. Our intent was to use the SSD only for the OS and program files, and leave all the media on a NAS in another location. Installing a hard drive for increased capacity was ruled out because we wanted a silent HTPC.
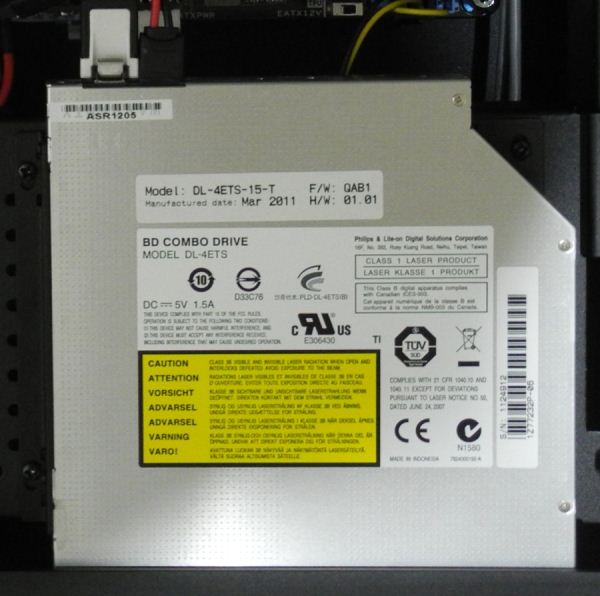
One of the constraints posed by the FC10 chassis was the fact that we could only use a slot-loading optical drive. Despite the fact that we wanted a silent system, we did make one concession and decided to install a ODD in the system. Some of our ASRock HTPC samples are now being used as headless systems for network testing, and we decided to take out a Blu-ray drive (Philips Lite-On DL-4ETS) from one of those and use it in our HTPC testbed.
Build Process
The FC10 chassis has limited external ports (only two USB 3.0 capable ports on the side panel other than the ODD button / power button and LED on the front panel). We don't have front panel audio, eSATA / Firewire ports or fancy LCD screens to connect to the main board. This is actually advantageous as it allows us plenty of room and resource efforts to direct towards assembling the cooling system. As we had mentioned earlier, Streacom is no newcomer to the fanless chassis bandwagon. In fact, their FC5 Evo Fanless chassis received good reviews. Unfortunately, the profile of the chassis, as well as the positioning of the screw slots for the heat pipe system meant that the choice of motherboards was extremely limited. Streacom touts extended motherboard compatibility as one of the strong points, and we were forced to test it out because of the design of the Asus P8Z77-I Deluxe motherboard.
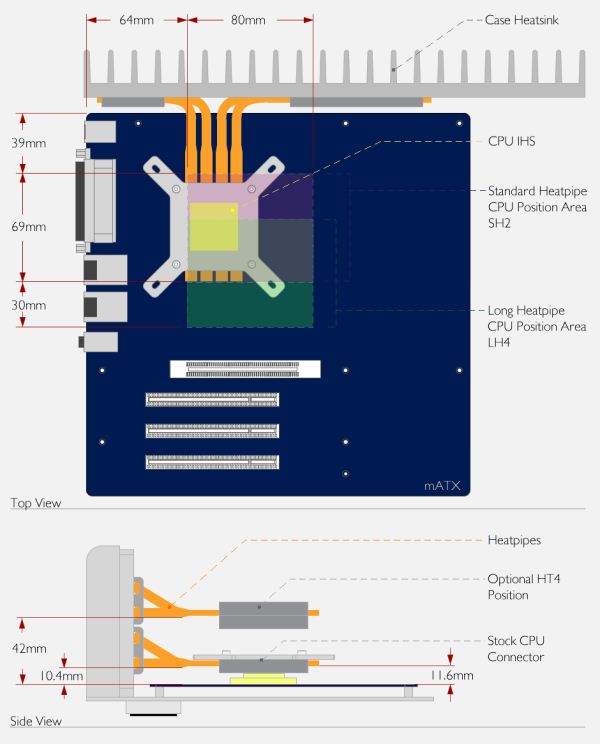
Improved Motherboard Compatibility with Dual Heat Sink Mounting Levels in the FC10 (Bottom) Compared to the FC5 (Top)
Streacom FC10 Motherboard Compatibility
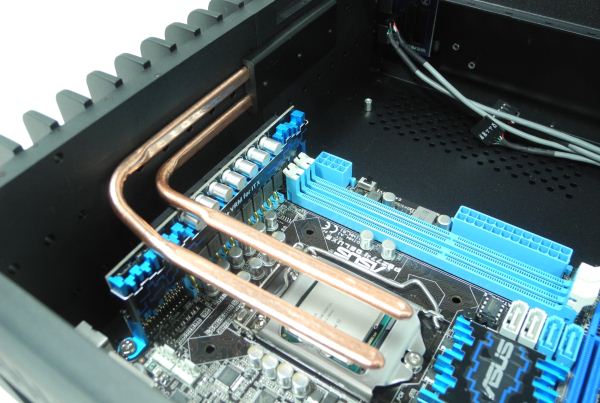
Most motherboards would be served fine with the lower set of screw slots for the heat pipes, but the Digi + VRM for ITX module on the motherboard blocked the path, as evident from the photograph below.
In order to raise the mounting height for the heat pipe blocks, it was necessary to use the Streacom HT4 Thermal Riser. This is a separate accessory needed only if the choice of motherboard makes it necessary. Streacom's US reseller, Perfect Home Theater delivered the HT4 to us on very short notice, and enabled us to proceed with the rest of the build.
Mounting the HT4 Riser
Streacom's website has user guides for all their products, but, unfortunately, the one uploaded for the HT4 wasn't current. Some time was lost in trying to assemble the riser following that guide, but Streacom finally came back with the updated version after we pointed out the error. The mounting process included spreading a generous dose of the supplied thermal paste on the processor and the base of the HT4 riser. The riser was then put on top of the processor. An interesting point to note here is that the contact surface between the processor and the riser is not entirely flat due to the presence of the copper heat pipes. We were a bit worried since the default assembly instructions (without the riser) indicated that the flat lower CPU mount would be placed on the processor. As we found out later, our fears were unfounded, and despite the not-so-flat riser being in contact with the processor, we had stellar thermal performance.
Streacom supplies both AMD and Intel-type upper CPU mounts. They have to manually be fitted with spring screws and are used to keep the lower part of the HT4 riser in place and in good contact with the CPU itself. After this, the heat pipes supplied with the FC10 chassis had to be arranged to align with the HT4's four copper segments. The FC10 also has thermal blocks (which have to be applied with thermal paste) into which the heat pipes have to be inserted before getting mounted on the side of the chassis (one of the segments is shown in the photograph above). After placement, the upper HT4 mount had to be fastened to the HT4 riser so as to sandwich the HT4's copper segments and the heat pipes together. It goes without saying that all points of contact had thermal paste applied liberally.
The FC10 chassis comes with a lower CPU mount (which has an appearance similar to that of the HT4 upper mount) which goes unused in the above configuration. We had unsuccessfully tried to use to the FC10 lower CPU mount instead of the HT4 upper mount (thanks to Streacom's original faulty user guide), and that explains the presence of thermal paste at unnecessary places in the above gallery. Even though it wasn't suggested, we applied thermal paste further on the upper side of the HT4 upper mount and placed the FC10's lower CPU mount on top of it.
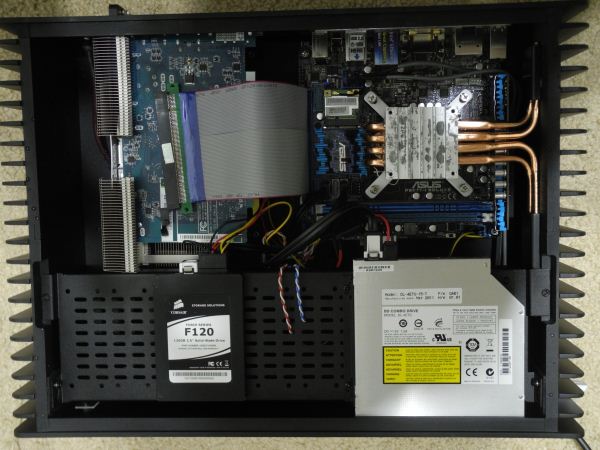
Mounting the SSD and ODD on the drive cage was fairly uneventful, except for some known issues with the ODD mounting. Since the same drive was mounted with all four screws in the ASRock HTPC drive cage, I think Streacom should pay a little bit more attention to the ODD brackets. The slimline notebook drive we used comes with a smaller SATA power connector, and we used an adapter to convert the full-size SATA power connector from the Nano150 PSU to the optical drive.
Before moving on to the thermal performance evaluation, it must be noted that we have mounted the Sapphire HD 7750 Ultimate in the PCIe slot and also connected a flexible PCIe riser to the motherboard. We wanted to test out whether the Nano150 would be able to power up such a configuration, and we were relieved to find that there were no issues. Another point to be noted is the capacitors in the Nano150 beneath the SATA data cable connected to the ODD. They abut into the space above the DIMM slot, and though we were able to fit in both the DRAM modules (with the heat sink of the DRAM module slightly scraping the capacitors), we decided to take the safe route by just installing one 4 GB DRAM module in the slot further away from the 24-pin connector.
Thermal Performance
Evaluation of the thermal performance of passive systems is absolutely essential because it is quite common for improperly designed thermal solutions to not prevent processors from reaching their maximum permissible junction temperature. Once this temperature is reached, thermal throttling is activated. The processor first reacts by lowering its operating frequency. If the cooling solution is bad, it might even result in the processor shutting itself down.
The Streacom OEM solution used in the Aleutia Relia wasn't very effective (though Streacom refused to comment on those results). However, their previous chassis / cooling solutions had always been effective in operation, and we weren't unduly worried about the FC10 with respect to this aspect. That said, we did carry out the same experiments performed with the Aleutia Relia, but restricted ourselves to room temperature (72 F = 22 C) tests only.
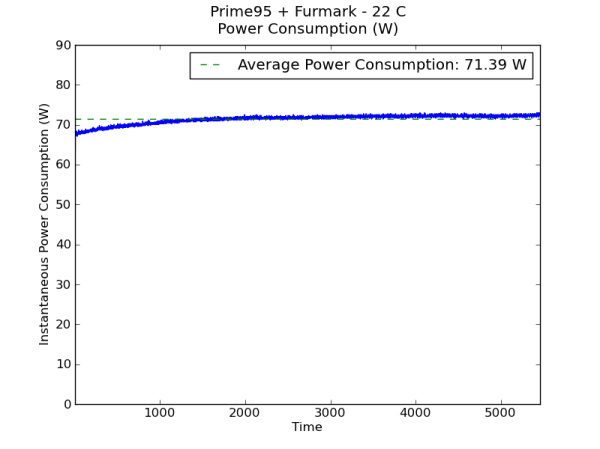
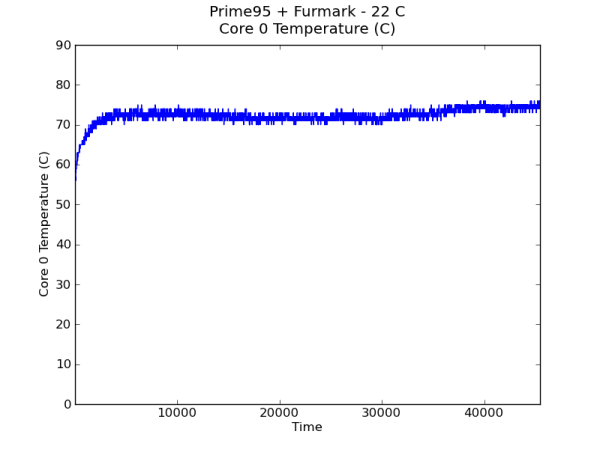
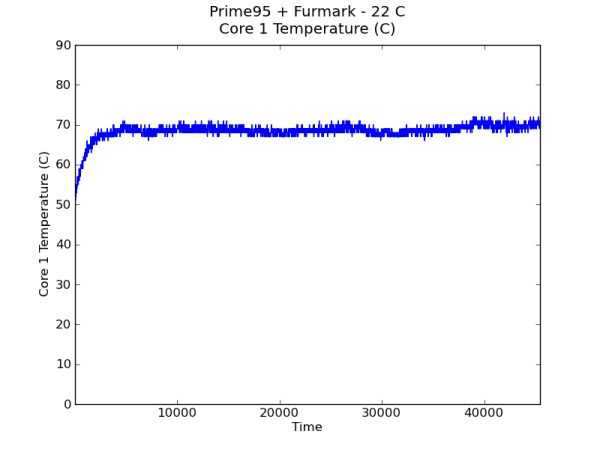
Our loading test consists of running Prime 95 in maximum power consumption mode along with Furmark in Stability Test mode. Instead of running the test for 20 minutes, we subjected the unit to 12 hours of stress continuously.
Power consumed at the wall was recorded for the first 90 minutes or so (and we found that it settled down to around 72 W beyond that). Unlike the Relia where thermal throttling was activated and resulted in power consumption at the wall going down after some time, we find that there is no thermal throttling at play in this system. The load and CPU frequencies were presented in the Relia review, but we won't present them here since the load stayed at 100% and the frequency of the cores was always at 3.3 GHz throughout the course of the stress test.
The CPU core temperatures are presented in the graphs above. Interestingly, the second core was always a couple of degrees cooler than the first core. The maximum junction temperature of the Core i3-3225 is 105 C, and the FC10 cooling mechanism was able to keep it at a safe temperature.
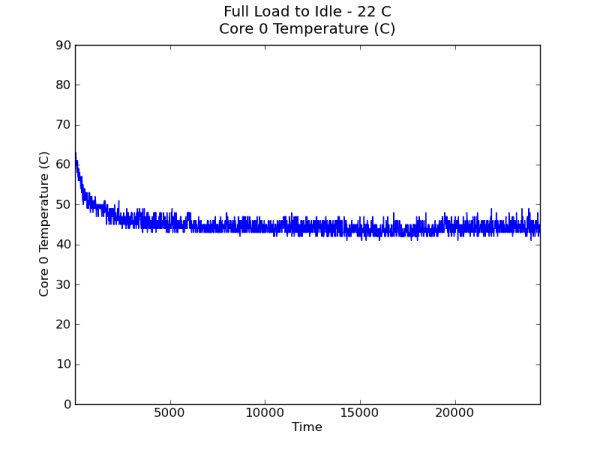
Another interesting aspect is how fast the unit is able to get back to the idle temperature after removal of the processor load. The graph below shows that the unit gets back to the idling temperature within 90 minutes.
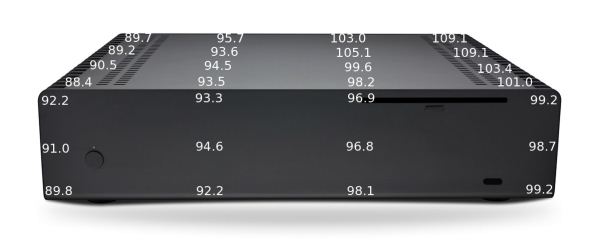
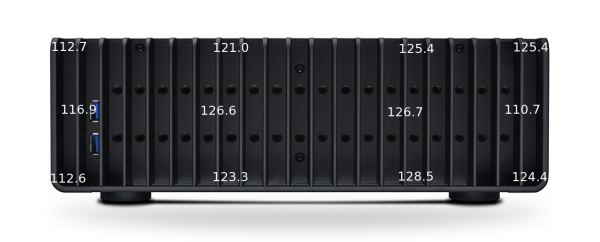
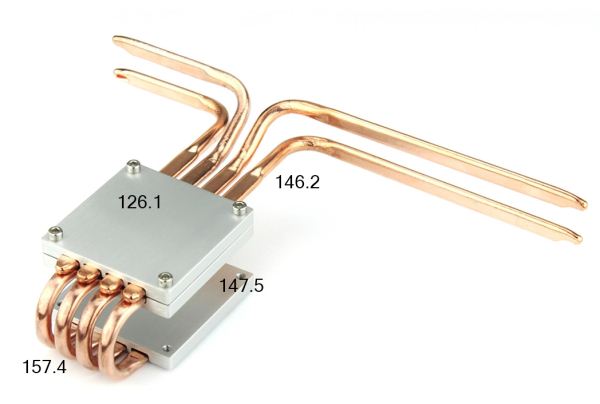
We conclude this section with a thermal profile of the case and the heat sink when the unit is being subjected to full load using Prime 95 and Furmark. All the temperatures are in Farenheit.
The temperature on the lower CPU mount noted above was actually on top of the FC10 upper CPU mount (Intel-type). All these values were recorded with the unit being kept in a still room with plenty of open space around it.
Concluding Remarks
Building a passive system might be more challenging compared to assembling an actively cooled one. However, the satisfaction of seeing a PC up and running without making even the slightest noise has to be experienced to be appreciated. The assembly of the Streacom FC10 was made more challenging than necessary, thanks to the faulty user guides uploaded initially. However, Streacom has fixed the problem now, and they have also posted a system builders guide for customers of their fanless cases. If one were to nitpick, it would be the PCIe slot spacing (which may leave some users with no option but to do a case mod) and the fact that only pico-PSUs are supported. The chassis could have been designed to accommodate a full-sized PSU (some excellent relatively high power fanless options are available from Seasonic) given that the current version is sized to even accept ATX motherboards.
We have used the Streacom FC10 chassis and the Nano150 PSU to successfully build a completely silent HTPC. In the next part of the three-part series, we will look at the performance of the PC for general workloads (synthetic benchmarks) and also its suitability for HTPC purposes (including decoding and rendering benchmarks as well as network streaming performance).
Thank You!
Thanks to Streacom, Perfect Home Theater, Asus, G.Skill and Intel for providing us with the testbed components for our three-part HTPC series.

