
Original Link: https://www.anandtech.com/show/457
Overclocking has always been an attention-getter in the PC enthusiast world. Motherboard manufacturers have taken notice of the growing do-it-yourself-er population and have even released special revisions of their motherboards specifically geared towards overclockers. This accomplishment is very impressive because, when you think about it, the majority of the profits that motherboard manufacturers could potentially make come from OEM deals and not from the PC enthusiast market. Just as motherboard manufacturers have realized, this market is a very fast paced one and by getting involved in it now they are opening their arms to an entirely new population of eager buyers.
AnandTech readers are already probably familiar with overclocking and its origins, but for those of you that aren’t, overclocking is the simple process of running any component of your system at a frequency that is higher than the component’s rated frequency. The most common form of overclocking involves increasing the frequency of your CPU, which is the topic at hand in this article.
Back in the days of the 386, overclocking could only be accomplished with the aid of some intense cooling measures. It wasn’t until the release of the 486 that overclocking became more mainstream, especially with the later releases of the CPU. AMD and Cyrix also had their periods of overclocking friendly time with their 5x86 chips that would plug directly into the socket on most 486 motherboards. For example, the AMD 5x86 running at 133MHz was the basis for many overclocking success stories during its time since increasing the Front Side Bus (FSB) frequency of your setup from 33MHz up to 50MHz and dropping the clock multiplier down to 3.0x would result in a reasonable overclock to 150MHz which was quite impressive at the time.
Fast forwarding to more recent times, the release of Intel’s Celeron changed the face of overclocking, at least with Intel CPUs, for quite some time. While the Celeron, running at 266MHz was often times able to be overclocked to 400MHz (by increasing the FSB frequency from 66MHz to 100MHz) which resulted in a very impressive 50% overclock, the biggest impact it had came from the fact that it was the first Intel CPU to feature a locked clock multiplier. From that point on, every single Intel CPU was manufactured with a locked clock multiplier that, to this date, has yet to be broken in a manner that has been publicized. The reason this affected the overclocking world so incredibly was because this limited the number of options you had for overclocking Intel CPUs Now, you could only rely on increasing the FSB frequency to overclock your CPU which is more difficult than simply increasing the clock multiplier because most of your motherboard runs off a multiplier or divider of your FSB frequency; therefore, increasing the FSB frequency overclocks much more than just your CPU.
Why would Intel be so determined to stop overclocking that they would resort to shipping multiplier locked CPUs? The answer to that trick question is that Intel wasn’t determined to stop overclocking, they were out to stop remarking.
In the grand scheme of things, the 1 – 2% of computer users that actually overclock doesn’t matter at all to Intel. However, the unscrupulous vendors that overclock CPUs and sell them as higher speed CPUs without first informing the customer that they are overclocked is what Intel has zero tolerance for. This process is known as remarking and it grew to a very big problem before the release of the Celeron. The advent of multiplier locking on CPUs took a big chunk of remarkers out of the game In addition, Intel’s strict enforcement of federal laws helped federal officials raid remarking facilities and their utilities that report to end users whether or not their CPU is running at an overclocked speed has made remarking Intel CPUs much more difficult than it once was.
On the other hand, AMD has never shipped a multiplier locked CPU.
The release of the AMD Athlon brought to light a new way to combat remarking without resorting to implementing a multiplier lock on the CPU. The Athlon featured the ability to be overclocked through the use of a feature connector on the PCB of the Athlon itself. Provided that someone would manufacture such a device, this would allow someone interested in overclocking to go out and buy one of these devices and attach it to their Athlon. Before these devices ever made it to production, an article on Tom’s Hardware Guide illustrated how to modify the Athlon’s PCB in order to change the clock multiplier and the core voltage. While this procedure wasn’t for the average overclocker that didn’t want to attempt the risky procedure to modify his/her Athlon it was perfect for the remarker, because if the job was done properly, the CPU appeared to naturally be at the higher clock speed.
Because of this oversight, AMD is now working to combat remarkers and is in the same position they have always been in with remarking since they have never implemented a clock multiplier lock on their CPUs. While it is very likely that AMD will eventually choose to implement a multiplier lock, the beauty of the Athlon now is that, with the aid of a little card, you can adjust the clock multiplier on the CPU and get even more out of this already powerful chip. Since there is currently only one motherboard available (the ASUS K7M) with support for FSB settings that are useful in overclocking the Athlon, this makes for the perfect opportunity to push the limits of the CPU.
Overclocking the Athlon – Two MethodsThere are two methods that can be used when overclocking the Athlon: increasing the FSB frequency on the motherboard or increasing the clock multiplier of the Athlon itself.
The latter requires either a physical modification to the chip or the use of an overclocking card attached to the feature connector on the Athlon’s PCB while the former requires a motherboard with adjustable FSB frequencies.
Increasing the FSB
The method of overclocking that we are most used to, courtesy of the multiplier locked Intel CPUs that we’ve had for such a long time, is accomplished by increasing the FSB frequency. Since the CPU derives its clock speed from the FSB frequency (CPU Clock = FSB x Clock Multiplier), increasing the FSB frequency will increase the CPU clock speed and thus overclock the CPU.
The major benefit of this method is that the overclocking can generally be accomplished without even taking the case off of your computer. Most motherboards allow for the FSB frequency to be adjusted in the BIOS setup utility (generally under the Chipset Features/Advanced Chipset setup or its own special Frequency Setup section) so with a few keystrokes you can be off and running at your overclocked speed.
The first misconception that must be cleared up is that the Athlon’s FSB actually runs at 100MHz and not at 200MHz. The EV6 bus transfers on both the rising and falling edges of the clock (instead of just the rising) and thus the effective transfer rate over the EV6 bus is equal to that of a 200MHz FSB, but the actual FSB frequency is 100MHz.
The downside to increasing the FSB frequency, as we briefly mentioned before, is the fact that most of the components on the motherboard derive their operating frequencies from the FSB frequency and increasing the FSB frequency will, in turn, increase their frequencies as well.
For example, the PCI bus operates at either 1/2 1/3, or 1/4 the speed of the FSB. The 32-bit PCI bus specification calls for an operating frequency of 33MHz, and if your FSB is set to 100MHz then, by using the 1/3 divider, the PCI runs at the appropriate 33MHz setting. Most PCI devices have no problem running at frequencies up to 37.5MHz, and there are usually very few problems until you get above a PCI bus frequency of 40MHz. If you take into account the fact that there is a ¼ PCI divider, achieving a PCI bus frequency greater than 40MHz would require you to have an FSB frequency greater than 160MHz.
The AGP bus is designed to run at 66MHz and operates on a fraction of the FSB frequency. This fraction is determined by the North Bridge of a chipset, which in the case of the AMD 750 chipset is the AMD 751 North Bridge controller. The 751 only supports the 2/3 and 1/1 AGP clock dividers, and most AGP cards have a problem working at frequencies above 83MHz. This means that for most AGP cards, a FSB frequency too far above 124MHz would be difficult to pull off.
The memory bus on the Athlon is currently designed to run at 100MHz; however, the tolerance level of the memory bus is normally dependent on the memory you use. For example if you use PC133 memory that is rated for operation at 133MHz, then you should not have any problem if your memory bus is running at 133MHz.
The Athlon’s EV6 system bus is designed to run at speeds of up to 200MHz, and according to those that we have spoken to that have a part in designing the future EV6 based motherboards, reaching that 200MHz goal isn’t a major problem, it is mainly an issue of implementing it on the motherboard rather than tweaking the chipset. So increasing the FSB frequency shouldn’t be limited by the EV6 bus anytime soon, although the motherboard may be the limiting factor in this case.
With that said, what frequencies are available for use with the current Athlon platform? The FIC SD11 was the first readily available Athlon motherboard to offer support for FSB frequencies other than 100MHz, with its 125MHz and 133MHz FSB settings. Unfortunately, neither of those settings were of any use since they would not boot at all. The real overclocker came with the ASUS K7M, which supports FSB frequencies from 100MHz to up 125MHz in 1MHz increments.
From our tests as well as the reports of hundreds of K7M owners that have been posting to online message boards and newsgroups, the consensus seems to be that 110MHz is the maximum FSB frequency the K7M will run at with any Athlon.
In order to illustrate the performance benefits of simply adjusting the FSB frequency, we took an Athlon 700 and installed it on one of our K7M test beds and increased the FSB frequency in 1MHz increments from 100MHz up to the maximum we were able to achieve, 110MHz.

The increase in FSB frequency seems to have little effect on the increase in performance under CC Winstone 2000. The performance increase gained from the 110MHz FSB setting over the 100MHz FSB setting is most likely because of the resulting 70MHz increase in clock speed of the CPU (770/110MHz vs 700/100MHz).

The performance improvement provided by increasing the FSB frequency to 110MHz is much more drawn out in SYSMark 2000 because of the higher scores, but the 7% performance increase it provides is mostly a result of the faster clock speed.

Quake III Arena enjoys the higher clock speed as well as the increased FSB frequency (which also means a faster memory bus) and produced close to a 9% performance increase just by increasing the FSB setting to 110MHz.

The 10% increase in clock speed and the 10% increase in FSB frequency resulted in an expected 8% increase in performance under Unreal Tournament. Nothing out of the ordinary here, but it's not bad considering it costs approximately $0 to increase your FSB frequency.

At 1024 x 768 x 32 the video card becomes more of a limitation and thus the performance increase is cut down to 5%.

Finally, in Expendable we see the same 8% increase in performance resulting from the 10% clock speed and FSB frequency increase.
Increasing the Clock Multiplier
The second option we talked about was increasing the clock multiplier. Increasing the clock multiplier can be done using one of two methods: by physically modifying the PCB of the Athlon yourself using the excellent tutorial written by Dr. Thomas Pabst of Tom’s Hardware or by purchasing an overclocking card that interfaces with the feature connector of the Athlon.
The latter is probably the most practical option because you aren’t physically modifying your Athlon at all and it is much less time consuming (and definitely less dangerous) to use an overclocking card than to solder new resistors and remove others from your Athlon’s PCB.
There are currently a number of devices out there that allow you to interface with the Athlon’s feature connector; these devices are commonly known as Gold Finger Devices because of the close resemblance of the feature connector on the Athlon to golden fingers. If you really want to get technical, the “golden fingers” aren’t actually golden fingers, they’re copper, but that’s way too nerdy for the scope of this article :)
Currently, all of the overclocking cards on the market can be considered to be passive overclocking devices since they refrain from using active electronics in order to accomplish the task of manipulating the core voltage and clock multiplier of the CPU. The downside to this unfortunate truth is that the current crop of cards do generate a decent amount of heat and draw more power than they need to whenever a low value is picked for any switch.
We will see the debut of an overclocking card that uses active electronics shortly, but, until then, we’ll be evaluating the currently available cards that are out on the market.
We took a look at four cards in particular, Outside Loop Computers’ Afterburner!, the K7 Overclock Card, the Ninja Micros FreeSpeed Pro and the Northwind GFD.
Outside Loop Computers – Afterburner
The Afterburner card is by far the most elegant and easy to use solution out of these four. Making use of three hex knobs, two for clock multiplier selection and one for voltage selection, the Afterburner is very easy to use and features the most simple setup of the group.
This ease of use and simplicity does come at a fairly hefty cost of $80.00, which will keep it from getting our hands down recommendation simply because your overclocking device isn’t something you’re going to be adjusting every day. After a bit of experimenting, it will just sit on your Athlon and you probably won’t touch it anytime in the future.
Because the card is so long (5” or 12.7cm: about the length of an Athlon), in order to prevent the card from actually touching the Athlon’s PCB, Outside Loop decided to outfit the card with an adhesive padding that sticks to the Athlon and keeps the card in place.
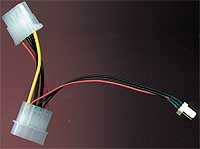 Power
is supplied to the card through the use of a 3-pin power supply connector much
like the ones you see on CPU fans. Outside Loop provides a 4-pin splitter cable
that connects to the 3-pin power input of the Afterburner and has two 4-pin
power connectors on the other end, one male and one female.
The Afterburner had no problem working with our MC1000 cooler on the Athlon; you just need to attach the card to the Athlon before securing the back plate onto the processor.
Outside Loop Computers provides a sheet of all possible settings with the Afterburner, although it would have been nice if they used some of the empty PCB space to display a silk screen of all possible settings.
As of the time of publication of this review, the Afterburner was in stock and was readily available. Although the demand for these cards is pretty high, Outside Loop Computers seems to be delivering on time.
If you have the money to spend, then the Afterburner is the best out of these four because of its ease of use, but if you factor in the pricey $80.00 cost, its allure dies quickly.
Mounting vertically on the Athlon’s feature connector, the K7 Overclock Card is one of the smallest cards we have seen. The K7 Overclock card uses two dip switch blocks in order to adjust the clock multiplier and core voltage of the Athlon.
The first dip switch block features 8 switches; the first four control the clock multiplier and the last four control the voltage. The second dip switch block features 4 switches which, along with the 4 switches from the first block, control the clock multiplier.
The second block features switches that are very easy to adjust because of their enlarged size. While the first block features switches that are considerably smaller, they are still very easy to hit but those with larger fingers may want to use the tip of a pen or a flat head screw driver to adjust the switches without hitting more than one at a time.
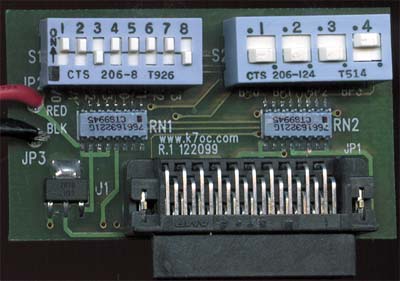
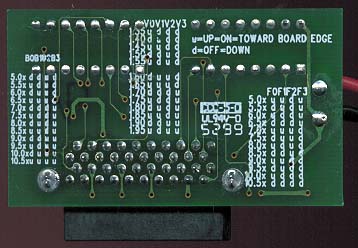
One of the problems with having so many switches (8 to control the clock multiplier alone) is that there is always the potential for an incorrect setting, so you’ll want to double check your settings before mounting it on the Athlon.
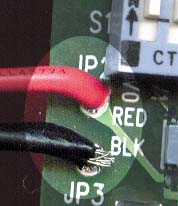 Power
is supplied to the card through the use of a 4-pin Y-splitter that is connected
directly onto the card itself. Unfortunately, the connection is not very well
done and the power cables aren’t of the best quality so you’ll want to be gentle
with the card as it wouldn’t be too surprising for the power cable to come loose
from the card. As you can see from the picture to the right, the connection
isn’t too secure.
Although the card mounts vertically, it had no problems working with the MC1000 cooler, which puts the Athlon in essentially a sandwich between the Peltier unit and the back plate.
One of the most useful features of the K7 Overclock Card is that it has all of the proper dip switch settings for the multiplier and voltage settings on the back of the PCB so you don’t have to deal with any instruction manuals or pieces of paper have the potential to be lost.
At the time of publication, the K7 Overclock Card seems to be having some supply issues. The ordering page states that the card is back-ordered until late January.
The $49 price tag of the K7 Overclock Card is much more affordable than the $80 of the Afterburner and can be purchased online through the K7 Overclock Card website. The company offers online ordering with VISA and MasterCard as the only credit card purchasing options. They even offer a full 30 day money back guarantee for a full refund of the purchase price minus shipping charges which isn’t a bad deal if you find out that the card doesn’t help you overclock as far as you’d like to go with your current setup.
Setting up the card may seem difficult the first time around, but the fact that all of the settings are diagramed on the back of the PCB is a very useful feature because everything you would need to know is on the card.
Ninja Micros FreeSpeed Pro
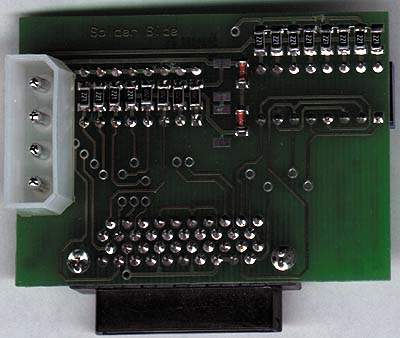
Like the K7 Overclock Card, the FreeSpeed Pro mounts vertically on the Athlon’s feature connector. The card is quite small, measuring in at 55mm wide x 40mm high (2.2” x 1.6”) and features two dip switch blocks.
The first block features 8 switches which control the clock multiplier. The next four dip switches on the second block control the voltage and the final four switches control the multiplier along with the first 8 switches.
The switches on both blocks are like those on the first block on the K7 Overclock Card: although they are fairly easy to adjust, those with larger fingers may have some problems changing the switch positions without hitting more than one switch.
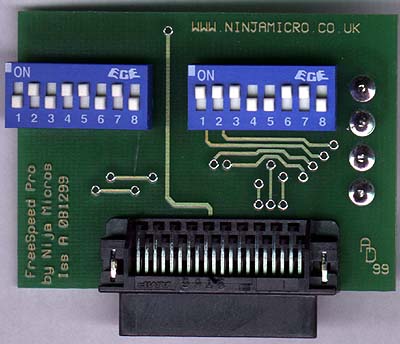
Once again, since there are a total of 16 switches on this card, the likelihood that of missing a switch setting is greater than if we had fewer possible settings (as is the case with the Afterburner). You will want to double check the settings on the FreeSpeed Pro before proceeding to power up your system.
Speaking of power, the best feature of the FreeSpeed Pro is that the 4-pin power connector is mounted directly to the card’s PCB, which is a huge improvement over the loosely connected power cables on the K7 Overclock Card. Since the power connector sticks out from the back of the card, you may have some problems if you have an exhaust fan at the back of your case, but, with a bit of care, you shouldn’t have too much trouble.
The one complaint that we had about this connector was the fact that Ninja Micros failed to include a Y-splitter for the power, meaning that you have to use up a power connector in order to power the board. At the same time, because the board will be installed on your CPU, which is a decent distance from your drive bays, you’ll need a Y-splitter cable with long extensions if you plan on making use of any of the split 4-pin power connectors.
Like all of the other cards, the FreeSpeed Pro shouldn’t have any problems being installed on a MC1000 equipped Athlon CPU.
According to Ninja Micros, they have not been having any problems with supplying the cards and, in their news posts, they provide up to date statistics on how many cards they have in stock as well as how many they are due to receive. They do have a contingency plan ready if they ever receive an order for a card and they happen to be out of stock of the cards. According to their news posts, they will not cash any check orders until the cards are ready and they will email the buyer with a lead time and ask them if they would like to cancel.
Currently they only accept payment by Check or Money Order (or cash if you feel like sending it in the mail) but they also have a very comprehensive list of international distributors, most of which accept credit cards. If you’re looking to get one of these puppies, you’ll probably be able to grab one from a number of places, including distributors in the US, Finland, Australia, Norway, Italy and a number of other countries.
The cost of a single card weighs in at a definitely hefty $65. While this is still cheaper than the Afterburner, it is a tad higher than what we would recommend paying if you can get the cheaper K7 Overclock Card, which is a slightly better option. One thing to keep in mind is that the $65 charge does include shipping and handling to anywhere in the world, which makes the amount a bit easier to accept.
However, if you are in a country where you can’t order something like the K7OC (for whatever reason) then the wide reach of Ninja Micros’ distributors will probably work to your benefit and you’ll probably just ignore the cost because, after all, a $65 card is better than nothing if you want to overclock your Athlon.
Northwind GFD
Like the last two cards, the Northwind Gold Fingers Device (GFD) mounts vertically , although it does stand noticeably higher than both the K7OC and the FreeSpeed Pro. The card measures in at 70mm wide x 51mm high (2.75” x 2.0”), slightly bigger than the K7OC and FreeSpeed Pro.
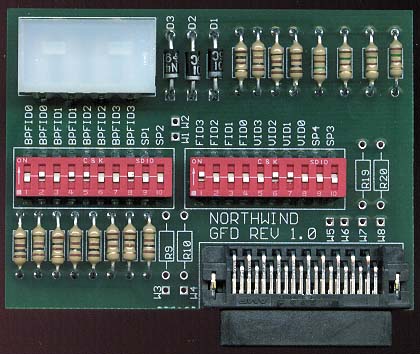
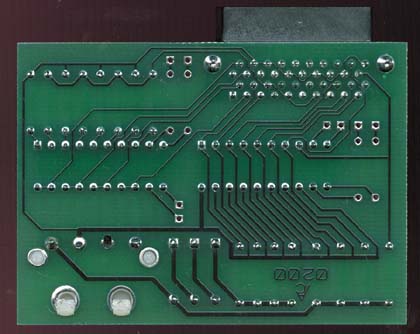
The card makes use of two dip switch blocks, each with a total of 10 switches for a combined total of 20 dip switches on the board itself. This is an increase from the 12 dip switches on the K7OC and the 16 switches on the FreeSpeed Pro. The extra switches can be used to control the L2 cache divider (1/1, 1/2 1/3, 1/5) if you purchase the cache kit with the card which allows you to manually connect wires from the card to the Athlon’s PCB in order to control the L2 cache frequency. The cache kit retails for $20.
This card is the only one that offers that option which would have been very useful had there not been the release of a program that can adjust the L2 cache divider ratio. We’ll talk about this program a little later. Even then, if you would like to adjust the speed of the L2 cache before the computer boots up, then you’ll need to do some manual work and purchase that L2 cache kit. It’s still a nice option from Northwind.
On the first block, the first 8 switches control the clock multiplier and the final 2 switches control the L2 cache ratio provided that you have purchased the cache kit, otherwise they are useless. On the second block, the first four switches control the clock multiplier, the next four control voltage, and the final two control the L2 cache ratio, once again, provided that you have purchased the cache kit.
The switches themselves are very difficult to adjust and you will most likely have to use the tip of a pen to adjust them. At the same time, the switches will probably wear out after extended use (we have seen it happen with switches of this style) so the long term reliability of this setup will be sacrificed because of that. Luckily, the switches aren’t something you’ll be adjusting on a daily basis, just be careful when you do simply because they could break easily.
Like the FreeSpeed Pro, the Northwind GFD has a 4-pin power connector mounted onto it. Unfortunately, they don’t provide a Y-splitter, so, unless you have one handy, this will take up one of the power connectors coming off your power supply. The mounting of the connector on this card is superior to that of the FreeSpeed Pro. Since it is mounted vertically, you won’t have to worry about having any power cables behind your CPU.
We didn’t have a problem using the Northwind GFD with the MC1000, but, if you have a case with a power supply mounted directly over the CPU such as some of the smaller InWin cases, the height of the card may prevent it from being installed properly. Be sure to check to see if you have more than a 51mm (2”) clearance above your Athlon CPU in your case before going for the Northwind GFD.
There don’t seem to be any shortages of the cards although Northwind does state that order processing can take 7 to 10 days. They currently accept Visa, MasterCard, American Express and Check/Wire transfers. If you wish to pay via a wire transfer you will have to add an additional $15 to your order.
The $55 price tag of the Northwind GFD puts it as the second cheapest card in the roundup, but, unless you would like to have the flexibility of the L2 cache kit add on for an additional $20, you’re probably going to want to go for either the K7OC or the FreeSpeed Pro, which are the only two that are in that price range. Other than the L2 cache kit, the Northwind GFD holds no advantages over its competitors and the very hard to manipulate dip switches can get quite annoying after a while.
If you do want the ability to adjust your L2 cache, then the Northwind GFD is your only option unless you feel like doing some solder work on your Athlon.
Our pick for the most economical and easy to use overclocking card out of these four goes to the K7 Overclocking Card because of its low cost and the full documentation of the settings on the back of the card.
However, the best card out of the bunch was the Outside Loop Computers Afterburner which was the most simple and easy to use card. The only major downside to this card is that it carries a large $80 price tag, which is simply too much for something like this.
The most available card is the Ninja Micros FreeSpeed Pro, which benefits greatly from the wide variety of distributors that carry the card.

The Athlon scales quite nicely as the clock speed increases, however as you hit the 2/5 L2 cache CPUs (Athlon 750 and above) we begin to notice that the scaling curve drops a bit.

A similar situation here, the scores scale fairly well but they do experience a bit of slowing down as the L2 cache drops down from a 1/2 to a 2/5 divider with the Athlon 750, 800 and the overclocked 850.
Performance is as expected in the four gaming tests, clock speed is very important here.


Overclocking the Athlon
So how far can the Athlon go?
Unlike AMD’s K6-X line of CPUs, the Athlon is actually a very good overclocker. The reason behind this is primarily because AMD has greatly improved the yields on the Athlon in comparison to the initial yields on the K6-2 and K6-III processors.
The transition from a 0.25-micron process to a cooler running and smaller 0.18-micron process was a very seamless one that took place very recently and helped to reduce the power consumption and heat dissipation of the Athlon CPUs.
Eventually, you’ll only be able to find 0.18-micron Athlon CPUs, but until then the majority of sub 750MHz Athlons are 0.25 micron chips (0.18-micron chips feature an 'A' at the end of their product code, 0.25-micron chips feature a 'C'). In spite of this, they are still fairly good overclockers.
Pushing the Athlon seems to be almost entirely dependent on luck of the draw. There have been numerous reports of Athlon 500s and 550s with 650MHz cores with 3.3ns (300MHz) L2 cache. It seems like the Athlon 500s and the 550s are the best value right now, especially since the 500s are on their way out and can be bought for under $200.
The 500s and 550s that we’ve seen generally hit around 650 – 700MHz, but there have been reports of those two chips hitting as high as 800MHz. The Athlon seems very tolerant to voltages in the 1.60v – 1.80v range (1.60v being its default core voltage), and most overclocks require an increase to around 1.70v in order to maintain stable operation.
The Athlon 600 is also a very good value at around $250 and you can expect pretty decent overclocking success with that chip, around 700 – 750MHz is what you can expect to hit with most Athlon 600s. However, as with all overclocking attempts, your mileage may vary.
Anything faster than the 600 starts dropping in value as the 650 approaches $300 in price and the 700 and higher chips are just too high in price and not as overclockable as we would like them to be. The 700 – 800MHz chips seem to max out at around 900MHz, which is a very difficult overclock to manage from what we’ve seen.
The 0.18-micron 750 and 800MHz chips had difficult running at speeds above 850MHz although we were able to get 900MHz out of both CPUs. Anything above 900MHz was a no-go, even 900MHz required quite a bit of cooling.
Since we are only dealing with a limited sample space of processors, your best bet to research how far you’ll be able to take your Athlon is to ask around on the message boards and newsgroups to see what other Athlon overclockers have been able to reach. The AnandTech Forums are just one of many places where you can go to get that kind of information.
Adjusting the L2 Cache Divider
Unlike the clock multiplier and voltage controls, the L2 cache divider is not controllable by the Athlon’s feature connector. This means that if you wish to adjust the speed of your L2 cache, even if you have an Athlon overclocking card, you’re going to have to resort to physically modifying your Athlon’s PCB.
Why would you want to adjust the L2 cache divider? By default, all Athlon CPUs running at 700MHz or below are set to a 1/2 L2 cache divider, meaning the L2 cache runs at 1/2 the speed of the core. Everything faster than 700MHz runs its L2 cache at 2/5 the CPU speed due to a lack of affordable and readily available L2 cache that can operate at speeds greater than 350MHz.
For example, let’s take an Athlon 500 equipped with 4ns L2 cache. Let’s say that the core of the Athlon 500 would have no problem hitting 600MHz, but using the 1/2 L2 cache divider that would put the L2 cache at 300MHz. Using our little formula for figuring out L2 cache speed in MHz (MHz rating = (1 / (4ns x 10^-9)) / 1000000) ) using the ns rating, we come up with the fact that 4ns L2 cache is theoretically capable of running at 250MHz. So at 600MHz, although the CPU itself can get up that high, the L2 cache would be the limiting factor as it might not be able to operate at this high of a frequency.
Now if we could adjust the L2 cache divider from 1/2 to 1/3, a divider supported by the Athlon (you can only use supported dividers, such as 1/2 1/3, 2/5), then the L2 cache would be running at 600MHz * 1/3 or 200MHz, below what it’s rated for. So you can see how being able to adjust the L2 cache divider can have its benefits towards overclocking. Until recently, you were only able to adjust the L2 cache divider by physically modifying the Athlon’s PCB.
An individual who goes by the name of H. Oda has been developing FSB related tweaking software for quite some time (i.e. SoftFSB), and is the author of WCPUID, a program that many people use to measure their actual clock speed and L2 cache frequency. H. Oda recently released the first version of WCPUA2 software that allows for the control of the L2 cache divider in Windows.
Here are some screenshots of the application running:
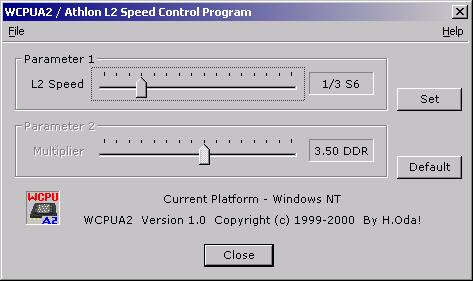
Here we have the 1/3 setting, which is very useful for overclocking.
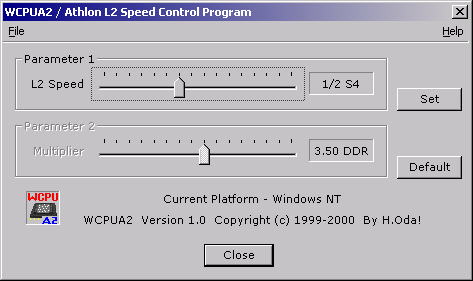
The 1/2 setting is often very useful if you happen to be lucky and have fast L2 cache that can handle the 1/2 divider.
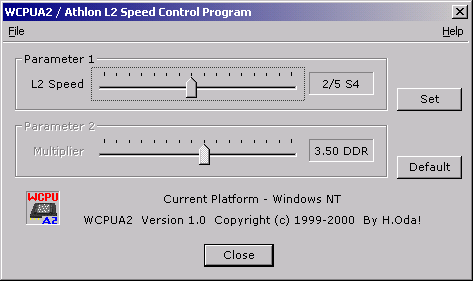
The 2/5 divider is what the 750MHz+ Athlons make use of.
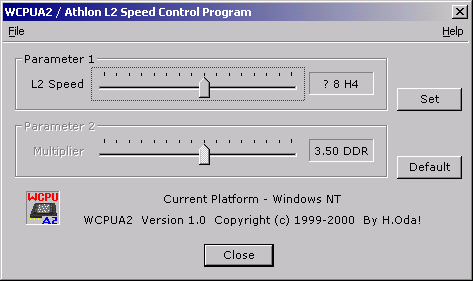
You can see here that WCPUA2 isn't completely finished, it has trouble detecting some of the other L2 cache dividers such as this one which should come up as 2/3.
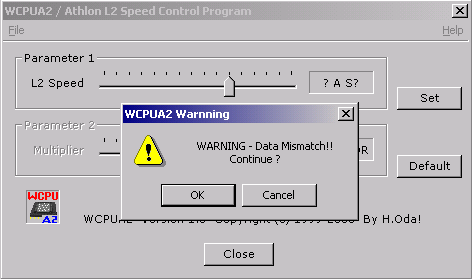
If the L2 cache divider you're selecting isn't available with your CPU then you'll get this error allowing you to back out. Clicking 'Ok' will lock up your system.
The main problem with using the WCPUA2 program is that it runs under the assumption that you can get into Windows properly in order to run the program. If your L2 cache won’t boot at the current divider and you need to switch to a lower divider in order for your system to merely start, then WCPUA2 isn’t that great of a solution for you. If you can boot into Windows but can’t run most of your applications reliably at the current divider, then the program becomes useful.
Keep an eye on H. Oda’s developments, because this particular piece of software has a great deal of potential. You can grab the installation file here.
The Test
|
Windows 98 SE Test System |
||||
|
Hardware |
||||
|
CPU(s) |
Intel Pentium III 700 |
Intel FC-PGA Pentium
III 550E |
AMD Athlon 700
|
|
| Motherboard(s) |
AOpen
AX6BC Pro-II
|
ABIT
BE6
|
Tyan Trinity 400 |
ASUS
K7M
|
| Memory |
128MB PC133 Corsair SDRAM |
128MB
PC133 Corsair SDRAM
|
128MB
PC133 Corsair SDRAM
|
|
| Hard Drive |
IBM Deskstar DPTA-372050 20.5GB 7200 RPM Ultra ATA 66 |
|||
| CDROM |
Phillips 48X |
|||
| Video Card(s) |
NVIDIA RIVA TNT2 Ultra 32MB (default clock - 150/183) |
|||
| Ethernet |
Linksys LNE100TX 100Mbit PCI Ethernet Adapter |
|||
|
Software |
||||
|
Operating System |
Windows 98 SE |
|||
| Video Drivers |
|
|||
|
Benchmarking Applications |
||||
| Gaming |
GT
Interactive Unreal Tournament 4.04 UTbench.dem |
|||
| Productivity |
BAPCo SYSMark 2000
Ziff Davis Content Creation Winstone 2000 |
|||

The Athlon at 850MHz comes out on top, just barely beating its overclocking competitor, the FC-PGA running at 733MHz.
For the most part, the Athlon and FC-PGA are just about on-par with one another in terms of performance here, and with their overall costs about the same we're going to have to look for other areas to differentiate the two in.

SYSMark 2000 is very SSE oriented which is why we see such a drastic change from the scores we just looked at under Content Creation Winstone 2000.
The increased clock speed, the 150MHz FSB setting and the 150MHz memory bus frequency keep the 550E running at 825MHz at the top of the list followed by two more overclocked FC-PGAs. Once again we see VIA's memory timing issues creep up as the slower FC-PGA 733 on a BX outpaces the 750 on VIA's Apollo Pro 133A.
In a close fourth place is the Athlon running at 850MHz which is doing quite well considering the degree of SSE optimization in SYSMark 2000.

The situation here is very similar to the SYSMark 2000 scores. The ASUS K7M being used here didn't seem to perform as well as our usual Gigabyte 7IX test platform most likely because of a lack of support for the Super Bypass feature. We were required to stick with the K7M in this test bed since it was the only motherboard we had available with FSB speeds between 100 and 110MHz.
With a Super Bypass enabled motherboard, the Athlon scores would be an additional 5 - 10% faster in this test.
An increased FSB frequency seems to help out here as the Athlon at 735/105 comes out on top of an Athlon running at 750/100. The same thing is the case with the Athlon at 770/110 versus the Athlon 800.
The two 133MHz FSB tests on the BX failed because of the increased AGP clock.

Unreal Tournament paints us a similar picture here. The increase in FSB frequency on the Athlon seems to help pretty well with the 700. We also have to take into account that with the 700, at its overclocked speeds, the L2 cache is still running at the 1/2 divider.


In Expendable the Athlon creeps up a few places to outpace the FC-PGA but the FC-PGA still comes in first place. We have seen this before and it is a repetitive call to AMD to release their Thunderbird with on-die L2 cache which was just recently announced.
With an on-die L2 cache you can expect the Athlon to pretty much dominate this suite of tests
Conclusion
The Athlon 500, 550, and 600 are all very cost effective overclocking contenders. With the success rate of getting each of these CPUs up to the 650 – 750MHz range increasing very rapidly, the investment in an overclocking card seems to be definitely worth it.
As more motherboards are released with overclocked FSB settings, the combination of that and Athlon overclocking devices will take overclocking and tweaking the Athlon to a new level. While the Athlon is still not as overclockable as Intel’s FC-PGA, it comes pretty close. As time goes on, the yields on the Athlon CPUs will continue to increase and the overclocking potential of these CPUs will definitely go up.
The advent of H. Oda’s WCPUA2 software that adjusts the L2 cache divider on the fly has made overclocking the Athlon even better, and if the rumors of being able to control the clock multiplier through software are true, then this could definitely take overclocking the Athlon to the next level. Unfortunately, there is a downside to all of this progress with overclocking on the Athlon platform.
The inevitable truth is that AMD will most likely have to pursue some sort of anti-remarking tactics in order to prevent remarked processors from being sold to consumers that aren’t aware of their overclocked state. Whether this comes in the form of multiplier locking or something else cannot be predicted, but in the end, something has to be done. Until then, let’s enjoy our finally overclockable Athlon CPUs.


