Original Link: https://www.anandtech.com/show/4493/gigabyte-z68xud3hb3-review
Gigabyte Z68X-UD3H-B3 Review
by Brendan van Varik on July 11, 2011 7:01 AM EST- Posted in
- Gigabyte
- Motherboards
- Sandy Bridge
- Z68
Gigabyte has released their Z68 lineup, and today I am going to look at the UD3H - a $170 Z68 board aimed at the mainstream consumer market. The Z68 based motherboards are very similar to the P67 equivalent but they have had a few extra features added. They include Virtu and SSD caching as well as allowing you to take advantage of the GPU built into your Sandy Bridge processor. Is it worth switching from P67 to Z68 for a few extra features? Well, after what I have seen, no, not really.
Visual Inspection
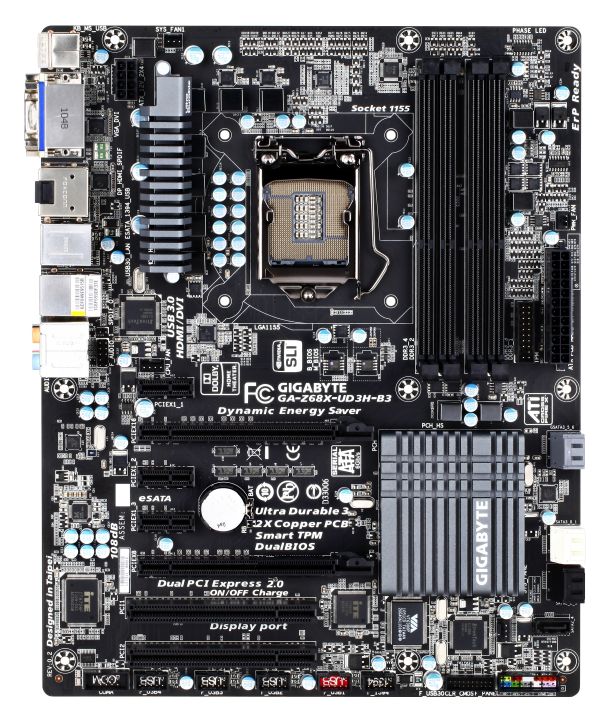
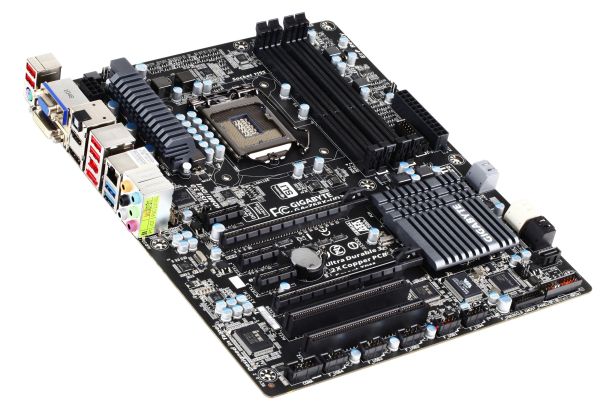
Just like most of Gigabyte's latest range, they have gone with the black and gray theme for this motherboard. In my eyes, it looks very classy and professional.
Gigabyte engineers have used their heads when it comes to the PCIe layout. There’s plenty of room for dual GPU configurations and there’s even a slot for breathing space when utilizing dual slot GPUs. From top to bottom, we have a PCIe 1x, 16x, 1x, 1x, another 16x and two PCI slots. When two GPUs are used, the PCIe 16x lanes run at 8x/8x.
As the PCH heatsink is small and passive, so if dual GPUs are utilized, there may be a heat conductance issue on to the heatsink if there is a lack of airflow. Some aftermarket graphics card coolers vent hot air into the case which will also cause the PCH to warm up if the chassis isn’t vented properly. In fact, when the board was put through its paces on the test bed, the PCH heatsink got very warm to the touch if there was no fan pointed at it.
There is a regular looking I/O panel. The picture above details the selection of connectivity options at the back of this motherboard. A PS/2 port which can be used for either a keyboard or a mouse but not both at the same time. There are a total of four USB 2 and two USB 3 ports, an eSATA 3Gb/s port as well as a FireWire port. The display ports include DVI, VGA, HDMI and a display port. The HDMI and DisplayPort connections carry audio. The single Ethernet port is controlled by the Realtek RTL8111E chip. You can use either the SPDIF or the typical audio connections for your sound.
With regards to the SATA connections, we have three (internal) SATA 3Gb/s connections and four SATA 6Gb/s ports. There is an eSATA port on the I/O of the motherboard which takes the total of SATA 3Gb/s ports to four. Two of the four SATA 6Gb/s ports are controlled by a separate controller – a Marvell 88SE917. These are colored gray and have support for RAID 0 and 1. The rest of the SATA ports are controlled by the Intel Z68 chipset and allow for RAID 0, 1, 5 and 10. You are able to create a RAID array across the SATA 3Gb/s and 6Gb/s ports although the performance may vary (according to Gigabyte).
After comparing to other motherboards, the SATA layout is a tad odd. On most motherboards, you would typically find a row of SATA connectors that are adjacent to each other and then color-coded accordingly. Even though it is only one port which points out of the board and the rest stick out of the side, it looks odd and it doesn’t make sense why this has been done.
A total of four fan headers can be used on this motherboard. There is one for the CPU cooler and three for chassis fans. The CPU fan header is not located in a familiar position as you’d find with other motherboards - it’s in the center board just above the PCIe 1x slot. The two system fans are on opposite sides of the board - one is located just above the VRM heat sink and the other is located just below the PCH heat sink. It would have made more sense to use the header located above the VRM heat sink as the CPU header and vice versa. The PWR fan header is located just above the 24pin power which just like SYS_FAN1 does not allow for speed control.
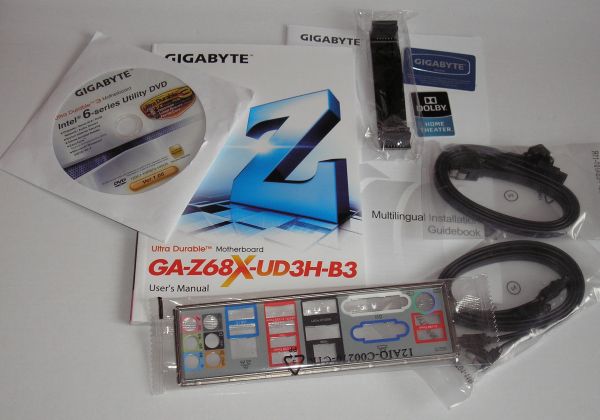
What is included in the box?
A user’s manual and a multilingual guidebook.
- Driver and utilities DVD
- 2x SATA 6Gb/s cables
- 2x SATA 3Gb/s cables
- A SLi bridge
- I/O shield
- 1x Gigabyte case sticker
- 1x DOLBY case sticker
You do not get many extras with this motherboard. In fact, it is pretty minimalist. Just like other manufacturers, Gigabyte have included the essentials to get your system up and running, and nothing more. If you want more accessories such as the 3.5” front panel with two USB 3.0/2.0 ports or a SATA bracket, you will have to buy the more expensive, higher end models.
Board Features
| Gigabyte Z68X-UD3H-B3 | |
| Market Segment | Performance |
| CPU Interface | LGA 1155 |
| CPU Support | Sandy Bridge i3/i5/i7 |
| Chipset | Z68 |
| Base Clock Frequency | 38.0 MHz to 400.0 MHz in 0.1 MHz intervals |
| DDR3 Memory Speed | 1333 MHz by default, 800-2133 MHz supported |
| Core Voltage | Auto, offset or fixed modes, 0.800 V to 1.800 V in 0.015 V intervals |
| CPU Clock Multiplier | Dependant on CPU |
| DRAM Voltage | Auto, 1.108 V to 2.464 V in 0.007V intervals |
| DRAM Command Rate | Auto, 1T-3T |
| Memory Slots |
Four 240-pin DDR3 DIMM slots in dual-channel Regular unbuffered DDR3 memory Up to 32GB total supported |
| Onboard Graphics |
1x D-Sub port 1x DVI-D port, supporting a maximum resolution of 1920x1200 *The DVI-D port does not support D-Sub connection by adapter. 1x HDMI port, supporting a maximum resolution of 1920x1200 1x DisplayPort, supporting a maximum resolution of 2560x1600p |
| Expansion Slots |
2 x PCI Express 2.0 x16 slots (x16/x0 or x8/x8) 3 x PCI Express 2.0 x1 slot 2 x PCI slots Supports ATI Crossfire Supports NVIDIA SLI |
| Onboard SATA/RAID |
2 x SATA 6.0 Gb/s ports supporting RAID 0/1/5/10 3 x SATA 3.0 Gb/s ports (blue) supporting RAID 0/1/5/10 2 x SATA 6.0 Gb/s ports (white) from Marvell 88SE9172 supporting RAID 0/1 1 x eSATA 3.0 Gb/s port |
| Onboard |
4 x SATA 3Gb/s connectors 4 x SATA 6Gb/s connectors 4 x Fan Headers (1x4-pin, 3x3-pin) 4 x USB 2.0 headers support additional 8 USB 2.0 Ports 1 x Front panel switch/LED header 1 x TPM module connector 1 x USB3.0/2.0 header 1 x IEEE 1394a header 1x SPDIF Out header 1x Serial port header 1 x Firewire/IEEE 1394 header 1 x Front panel audio header 1x Clearing CMOS jumer |
| Onboard LAN | 1 x Realtek RTL8111E chip (10/100/1000 Mbit) |
| Onboard Audio | Realtek ALC889 Codec, 2/4/5.1/7.1-channel, Dolby Home Theater, S/PDIF Out |
| Power Connectors |
24-pin EATX Power connector 8-pin EATX 12V Power connector |
| Fan Headers |
1 x CPU Fan (4-pin) 3 x SYS Fan (3-pin) |
| IO Panel |
1 x PS/2 keyboard/mouse port 1 x D-Sub port 1 x DVI-D port 1 x optical S/PDIF Out connector 1 x HDMI port 1 x DisplayPort 4 x USB 2.0/1.1 ports 1 x IEEE 1394a port 1 x eSATA 3Gb/s connector 2 x USB 3.0/2.0 ports 1 x RJ-45 port 6 x audio jacks (Center/Subwoofer Speaker Out/Rear Speaker Out/Side Speaker Out/Line In/Line Out/Microphone) |
| BIOS |
2 x 32 Mbit flash Use of licensed AWARD BIOS Support for DualBIOS™ PnP 1.0a, DMI 2.0, SM BIOS 2.4, ACPI 1.0b |
| Warranty Period | 3 Years |
Software
EasyTune6 is Gigabyte's take on the monitoring and overclocking software within Windows. When you open the software, the Tuner tab opens by default. It offers three different “Quick Boost” options which are described in greater detail within the overclocking section of this review.
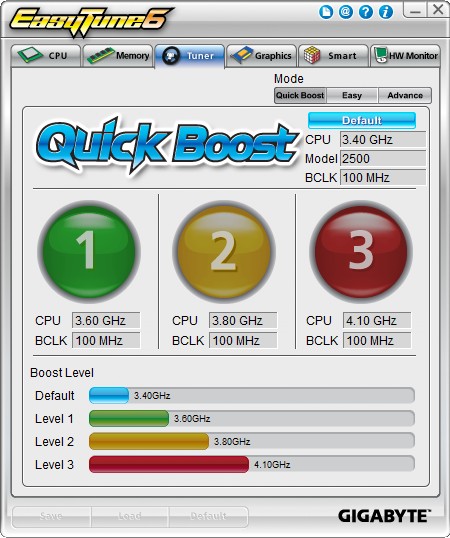
EasyTune6 does pretty much what you’d expect from this kind of software. It tells you everything about your CPU, memory, graphics card(s) as well as providing a hardware monitor and the ability to change your fan profiles.
EasyTune6 allows you to manually set fan profiles within Windows. The default is set at 27% when your CPU is at 20°c and 100% when it reaches 72°c. It increases as the temperature rises in order to try to keep the CPU temperature down. It’s simple really, if the CPU is still getting warmer with increased fan speeds, then the fan isn’t moving enough air so it speeds up more to bring the temperatures down. If all else fails and the CPU reaches 72°c or above, the fan will run at 100%.
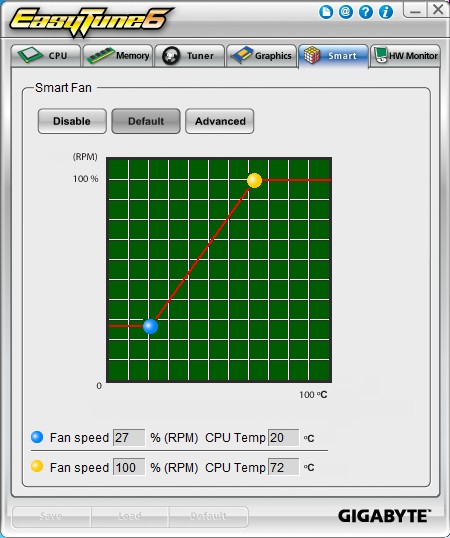
When you select the advanced option, you can manually adjust the settings of the two fans that are controlled by the CPU temperature. Unfortunately, you cannot change the speed of the CPU fan and SYS_FAN2 individually - both are controlled by the CPU temperature. SYS_FAN1 and PWR both run at 100%, no matter what. There is no control over those.
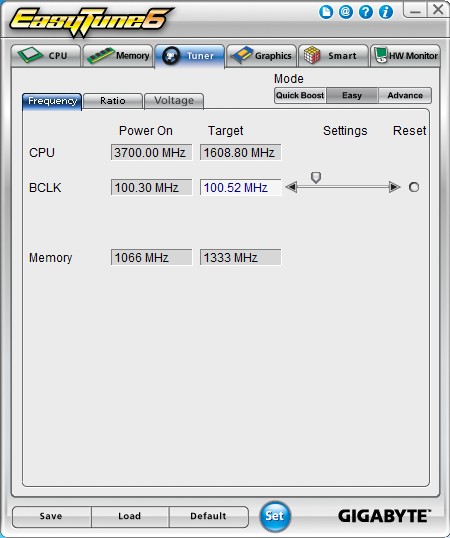
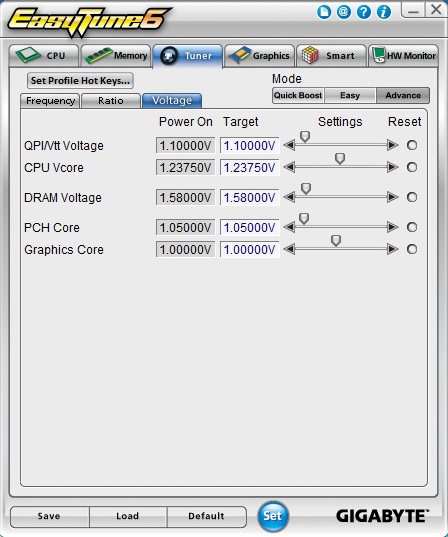
You can overclock your system from within Windows. EasyTune6 allows you to change most of the required settings. You can alter the BCLK, DRAM frequency, multiplier and the system voltages.
Note: There is a pretty big issue with the shipping (F2) BIOS on the board I received. If any memory settings were chosen (including XMP) rather than left at auto, the board would not engage more than a 1x turbo mode, even in single threaded performance. This issue has been addressed, and Gigabyte suggest that users upgrade to the latest BIOS, available from their website.
The Touch BIOS – no Graphical UEFI
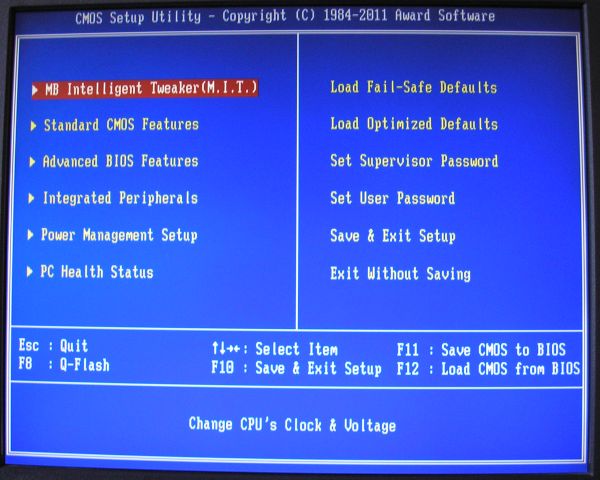
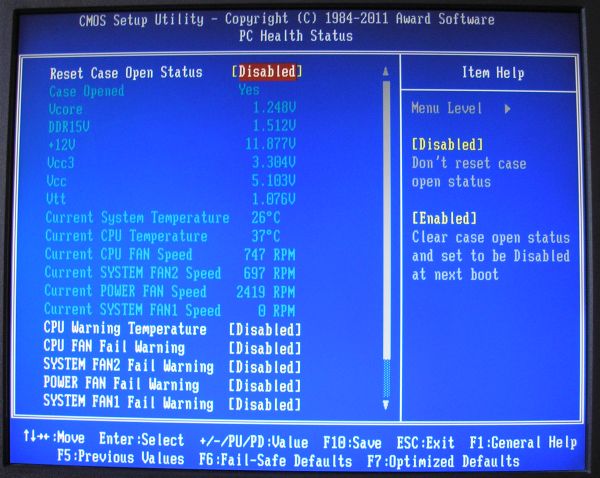
Gigabyte have yet to adopt a full graphical UEFI BIOS. In fact, they merely have a “hybrid” BIOS which adds support for 2.2TB+ hard drives. In order for the 2.2TB+ hard drives to be detected, you have to ‘activate’ them within Windows. You have to run a program to initialize the drives. For the rest, the layout is exactly like a five year old Gigabyte board I have laying around from the LGA775 age.
Unfortunately, this is about as interesting as it gets. It’s a shame that Gigabyte have yet to take on a full UEFI style but it may come in the not too distant future. On the plus side however, Gigabyte have put all of the features in their relative submenus that makes them easy to find. For example, all of the system clocks and overclocking features are located in the MB Intelligent Tweaker (M.I.T.) menu and the settings are under their respective menus in there too. This is relevant for all of the menus within this BIOS.
There are no options to change any of the system fan speeds within the BIOS. However, scrolling down in the PC Health Status part of the BIOS reveals a few options for the CPU fan control. When you select CPU Smart FAN Control and enable it, you can alter the CPU Smart FAN Mode. You can either let it automatically adjust the voltage of the fan or you can manually assign it. If you have a 3 pin fan, you can alter the voltage which will correspond to the speed of the fan or if you have a 4 pin fan, you can set it to PWM mode and the BIOS will take care of it for you. There are four different options which you can choose from whilst using the PWM function. They consist of Normal, Silent, Manual and Disabled.
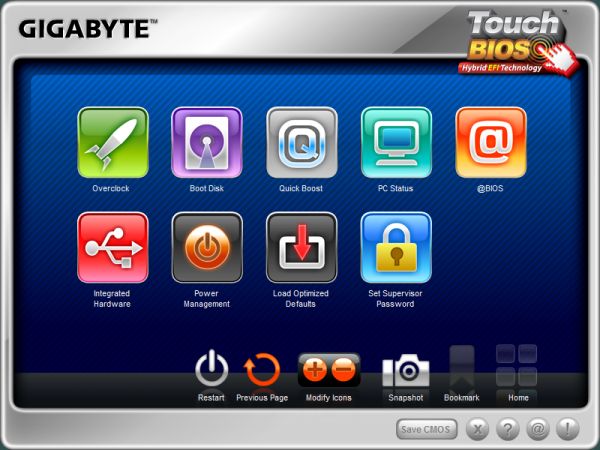
The TOUCH BIOS from within Windows
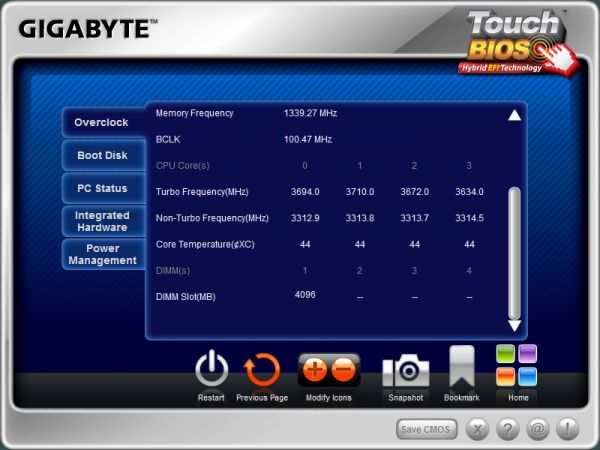
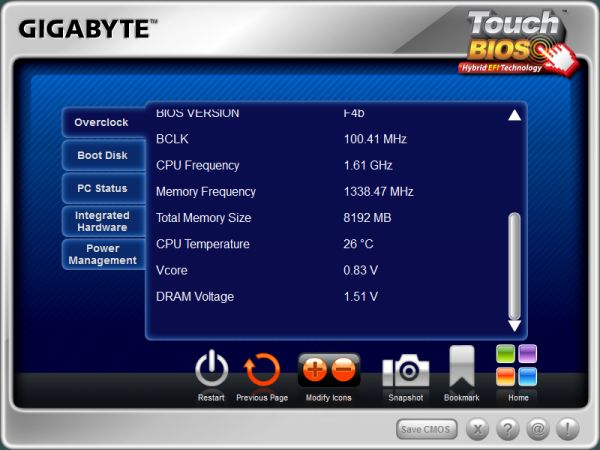
Above is the software, which you can use to change absolutely everything in the BIOS from within Windows.
The only obvious issue I found with it is in the M.I.T Status section of this software. It only registers one DIMM no matter which slot it is in but it does register that you are using the correct amount of RAM which is slightly odd.
Overclocking
Just like other manufacturers, Gigabyte have their own software which allows you to overclock your system automatically from within the OS. However, they all vary and some do better than others. We tested out Gigabytes’ offerings before we fiddled and tweaked within the BIOS.
When the EasyTune6 software loads, it loads the Tuner menu by default. There are three different “Quick Boost” options you can choose which consist of a 3.6, 3.8 and 4.1GHz core speed and are labeled 1, 2 and 3 respectively. All three options were tested and proven stable but I will write about the level 3 variable. There are a few things to note here. The voltages set are far too high for the clock speed. A core voltage of 1.4v is set. This particular CPU only requires 1.34v for 4.3GHz. This means there will be excess heat which could be avoided by using less voltage. No Load Line Calibration (LLC) is set during this overclocking procedure, which means the voltage droops to 1.33v when the CPU is highly stressed.
Thankfully, on the RAM side of things it does a little better. The RAM is set to 1866MHz with X.M.P timings and voltages. Our RAM is rated at 2000MHz which isn’t available for selection in the BIOS. There are two options – either 2133MHz or 1866MHz. The safer choice of 1866MHz was chosen to try and eliminate any possible RAM stability issues.
Unfortunately, the CPU core voltage isn’t displayed correctly by CPUZ which means you have to use the EasyTune6 software, which seems to do a better job although I wouldn’t rely on it entirely. The vDroop on this board is something which needs to be addressed. In the BIOS, there are ten levels of LLC, one being the weakest and ten being the strongest. There is no description in the BIOS of how they affect the voltage. When you use no LLC at all, the vDroop on 1.4v can dip right down to 1.33v which is a significant change in voltage. However, when you use level 5, so in the middle of min and max, it will increase the voltage to 1.45v which is far too much again. Gigabyte really do need to sort this out.
Given that the EasyTune6 software only offers a 4.1GHz overclock which uses too much voltage, I was eager to get on and see how well the motherboard overclocks if you set the speeds and voltages on your own accord.
First of all, I tested to see if the CPU would be stable at 4.3GHz with 1.34v just like it is in other motherboard testing. It was semi stable; LLC had to be set to level 3 in order to obtain complete stability. The voltages peaked at 1.36v which isn’t too serious.
After deciding it was stable enough, I pushed on and attempted to find the highest clock speed which could be used to run our benchmarks. The maximum overclock achieved was 102.1x47 which isn’t too shabby at all. The BCLK isn’t as impressive as other motherboards but as you have an unlocked multiplier, you might as well just take advantage of it instead of messing around with the BCLK.
When you push the overclock a touch too far, it sometimes fails to recover from a bad OC without manually simulating the boot cycles. By this, I mean turning the PC on and off by the PSU and letting the board power itself back on. It only takes a few attempts. The motherboard is designed to copy data from the secondary BIOS chip to the first one when the overclock fails in order to recover itself. All this does is restore the BIOS defaults which allows you to either try again or try something different.
Test Setup
| Processor |
Intel Core i5 2500K ES 4 cores, 4 threads, 6MB L3 |
| Motherboards | Gigabyte Z68X-UD3H-B3 ($170) |
| Cooling | Thermalright Ultra 120 eXtreme with one 120MM fan |
| Power Supply |
Silverstone 1000W Silver (Power Testing) OCZ ZX Series 1250w 80 PLUS Gold |
| Memory | Patriot Viper Extreme DDR3-2000MHz 9-11-9-27 2x4GB - 1.65v |
| Memory Settings | DDR3-1333MHz - 9-9-9-24 1T at 1.65v |
| Video Cards | XFX HD 5850 1GB |
| Video Drivers | Catalyst 10.12 |
| Hard Drive | OCZ Vertex 3 240GB |
| Optical Drive | Samsung SH-S223Q |
| Case | Dimastech Bench Table |
| Operating System | Windows 7 64-bit |
| SATA Testing |
OCZ Vertex 3 240GB Micron C300 |
| USB 2/3 Testing | Patriot 64GB SuperSonic USB 3.0 |
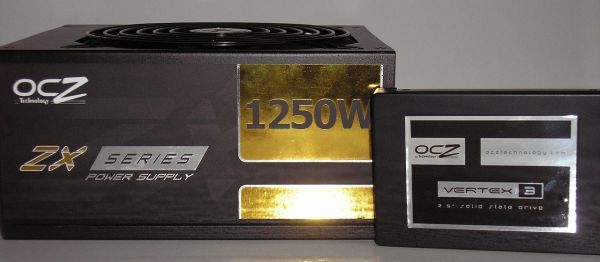
Before we go any further, I’d like to take the time to thank OCZ for making this review as well as future reviews possible – OCZ provided a ZX series 1250w Gold rated PSU (retails at $240) and a Vertex 3 240GB SSD (retails at $560).
Comparison to Previous Results
Where applicable, the results in this review are directly compared to the following chipsets and boards which we have reviewed previously:
Power Consumption
Power consumption was tested on the system as a whole with a wall meter connected to the power supply, while in a dual GPU configuration. This method allows us to compare the power management of the UEFI and the board to supply components with power under load, and includes typical PSU losses due to efficiency. These are the real world values that consumers may expect from a typical system (minus the monitor) using this motherboard.
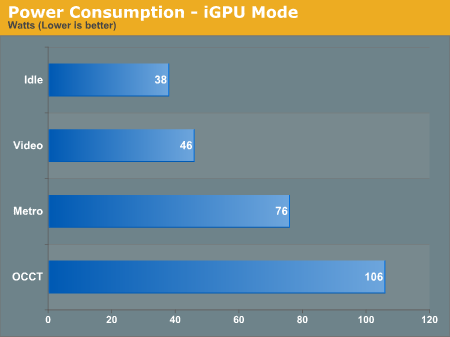
As this is my first review for AnandTech, Ian hasn't run any tests using his OCZ 1250W power supply yet, making any tests he has previously done with an older power supply not comparable to this motherboard.
CPU Temperatures
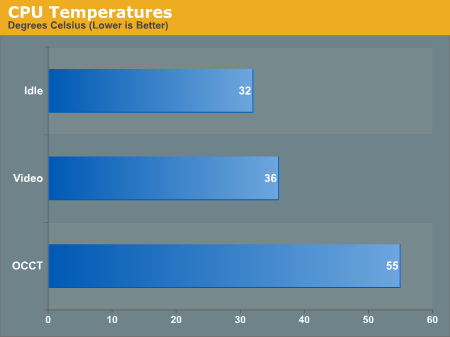
In a similar situation, Ian and I have different cooling setups (he is using a H50, I'm using a TRUE) for now, so I cannot compare these results to others and draw justifiable conclusions.
LAN Speed Test
LAN Speed Test is a freeware program designed for testing the network connection between two PCs on a home network. The speed of the transfer is limited by the lowest common denominator on the network, so if you have gigabit Ethernet capable computers but a 100 Mbit capable router, you are limit to 100 Mbit transfer. Note that this is really a formality – if a network port is rated at 1 Gbps, then chances are that it will hit at least 90+% of this value. The main test here is CPU usage, and how much is offloaded by the controller. For this test, we use LAN Speed Test to transfer a 1000 MB file across a home network with a 100 Mbps lowest common speed to the same machine each time, in a read/write scenario. CPU usage is taken as a visual max/average from task manager.
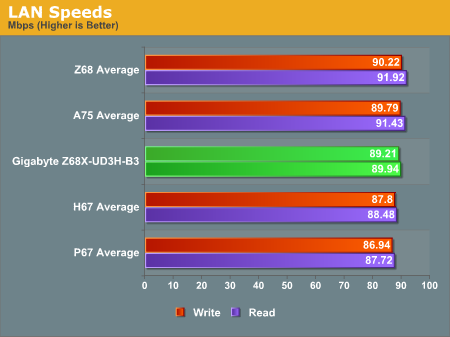
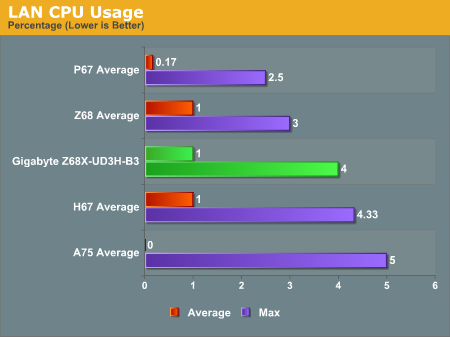
Good to see the Realtek controller doing its job properly here - the board is certainly a very strong contestant in the networking department.
DPC Latency
Deferred Procedure Call latency is a way in which Windows handles interrupt servicing. In order to wait for a processor to acknowledge the request, the system will queue all interrupt requests by priority. Critical interrupts will be handled as soon as possible, whereas lesser priority requests, such as audio, will be further down the line. So if the audio device requires data, it will have to wait until the request is processed before the buffer is filled. If the device drivers of higher priority components in a system are poorly implemented, this can cause delays in request scheduling and process time, resulting in an empty audio buffer – this leads to characteristic audible pauses, pops and clicks. Having a bigger buffer and correctly implemented system drivers obviously helps in this regard. The DPC latency checker measures how much time is processing DPCs from driver invocation – the lower the value will result in better audio transfer at smaller buffer sizes. Results are measured in microseconds and taken as the peak latency while cycling through a series of short HD videos - under 500 microseconds usually gets the green light, but the lower the better.
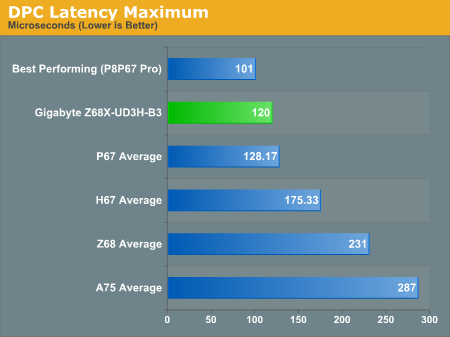
The Gigabyte performs very well - 120us is lower than almost all the other motherboards.
USB Speed
For this benchmark, we run CrystalDiskMark to determine the ideal sequential read and write speeds for the USB port using our 64GB Patriot SuperSpeed USB 3.0 drive. Then we transfer a set size of files from the SSD to the USB drive, and monitor the time taken to transfer. The files transferred are a 1.52 GB set of 2867 files across 320 folders – 95% of these files are small typical website files, and the rest (90% of the size) are the videos used in the Sorenson Squeeze test.
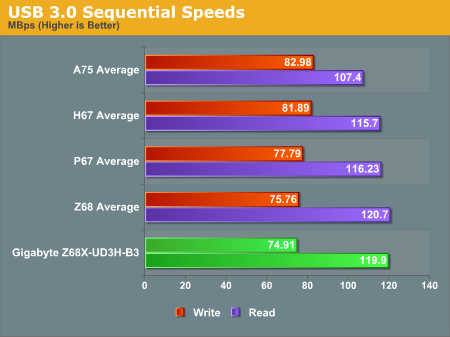
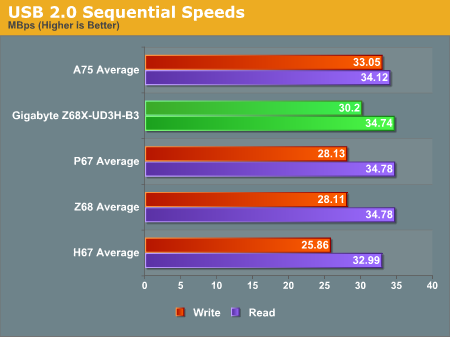
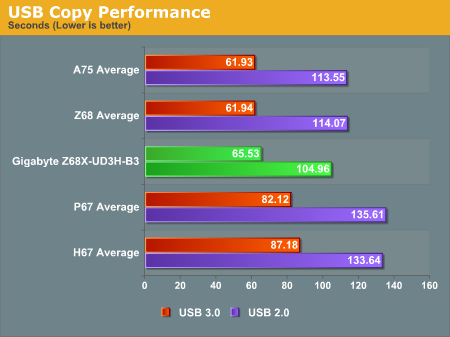
The USB2.0 speeds are more or less all the same. However, this board really shines when it comes to the write speeds. It’s on average 5MB/s faster than most of our boards we’ve tested and is only really contested by ASRocks’ XFast technology. The copy time is fairly average. On the USB3.0 side of things, the results are not anything spectacular.
SATA Testing
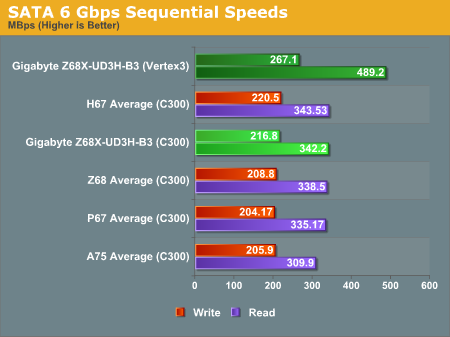
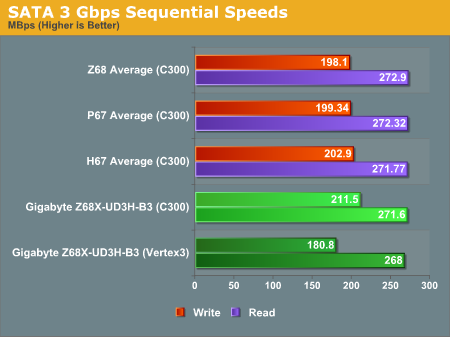
We also use CrystalDiskMark for SATA port testing. The operating system is installed on the SSD, and the sequential test is run at the 5 x 1000 MB level. This test probes the efficiency of the data delivery system between the chipset and the drive, or in the case of additional SATA ports provided by a third party controller, the efficiency between the controller, the chipset and the drive.
3D Movement Algorithm Test - link
The first benchmark ran is actually one which was written by our very own, Senior Editor – Ian Cutress. This first benchmark uses various algorithms for three-dimensional simulation and movement of independent particles. The algorithms both employ uniform random number generation or normal distribution random number generation, and vary in various amounts of trigonometric operations, conditional statements, generation and rejection, fused operations, etc. The benchmark runs through six algorithms for a specified number of particles and steps, and calculates the speed of each algorithm, then sums them all for a final score. This is an example of a real world situation that a computational scientist may find themselves in, rather than a pure synthetic benchmark. The benchmark is also parallel between particles simulated, and we test the single thread performance as well as the multi-threaded performance.
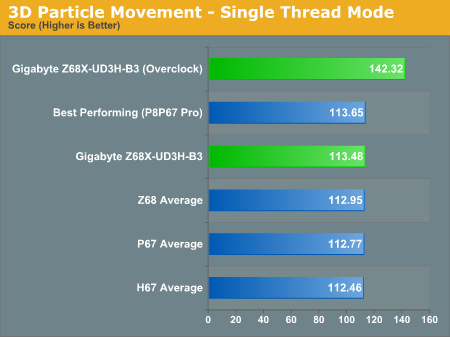
When we tested this motherboard using the single threaded benchmark, the UD3H did well - coming in at third place at both stock and overclocked speeds.
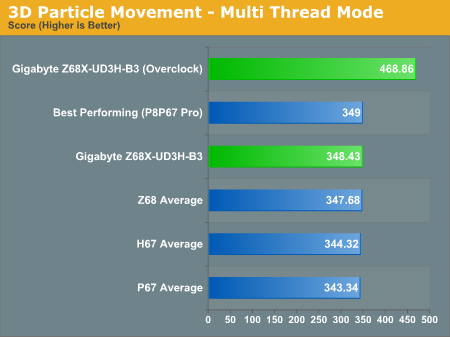
Using our multithreaded 3D Movement test with the CPU at stock settings, this is technically one of the fastest motherboards out of our database of Sandy Bridge motherboards. Sadly, it didn’t take top spot when the system was overclocked, which is probably down to the BCLK/multiplier limit of the board but it still performed above average.
WinRAR x64 3.93 - link
With 64-bit WinRAR, we compress the set of files used in the USB speed tests. WinRAR x64 3.93 attempts to use multithreading when possible.
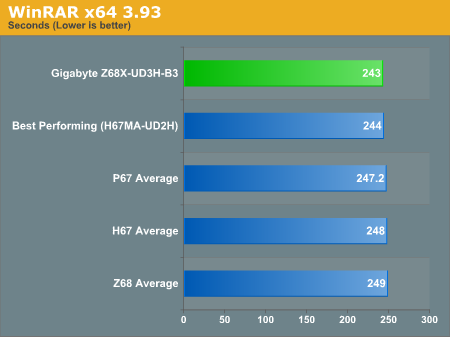
This is the fastest score we currently have on record.
FastStone Image Viewer 4.2 - link
FastStone Image Viewer is a free piece of software which allows quick viewing of flat images, as well as resizing, changing color depth, adding simple text or simple filters. It also has a bulk image conversion tool, which we use here. The software currently operates only in single-thread mode, which should change in later versions of the software. For this test, we convert a series of 170 files, of various resolutions, dimensions and types (of a total size of 163MB), all to the .gif format of 640x480 dimensions.
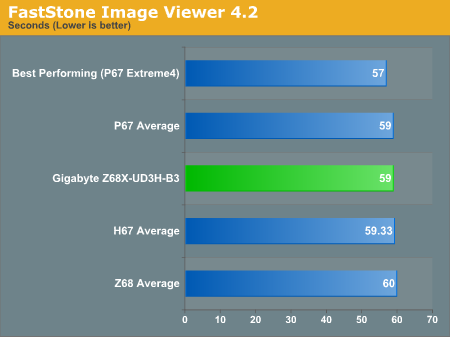
Neither a good nor a bad result - more or less bang in the middle here.
Sorenson Squeeze 6.0 - link
Sorenson Squeeze is a professional video encoder, complete with a vast array of options. For this test, we convert 32 HD videos, each a minute long and approximately 42 MB in size, to WMV 512KBps format. Squeeze can encode multiple videos at once, one for each thread.
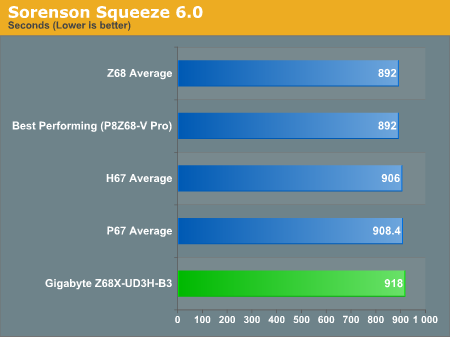
The second slowest score recorded whilst on the Sandy Bridge platform is quite unfortunate as this motherboard does do well in other aspects of our testing.
Dirt 2
Dirt 2 came to the PC in December 2009, developed by Codemasters with the EGO Engine. Resulting in favorable reviews, we use Dirt 2’s inbuilt benchmark under DirectX 11 to test the hardware. We test two different resolutions at two different quality settings using a discrete GPU, and an appropriate integrated GPU setting.
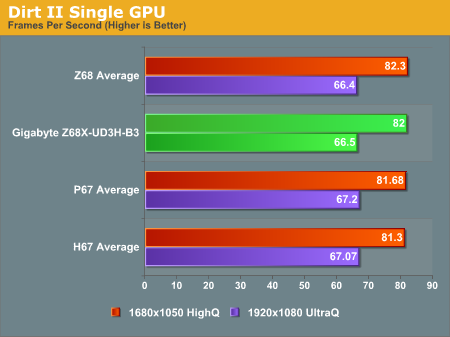
During the testing, I found out that the board performs slightly below average and comes nearer to the bottom of our graph when a 1920x1080 resolution was used. However, whilst testing the lower resolutions where games are more CPU dependent, the board does much better and it averages roughly in the middle.
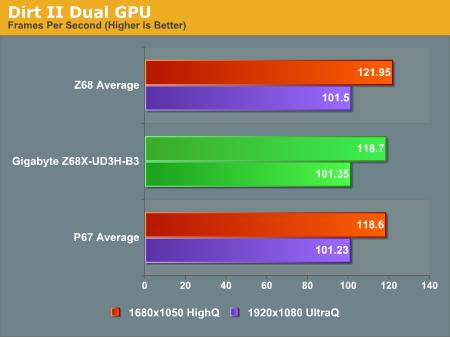
Dual GPU testing reveals that the board is more or less bang in the middle.
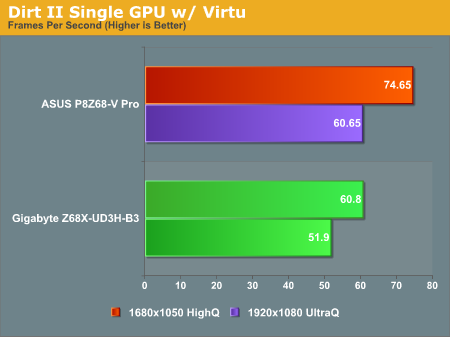
A poor show from Gigabyte. With almost a 20% difference between the ASUS P8Z68-V Pro and the UD3H in the 1680x1050 tests, and a 17% difference in the 1920x1080 tests, this is certainly a weak spot.
Metro 2033
Metro 2033 is the Crysis of the DirectX 11 world (or at least until Crysis 2 is released), challenging every system that tries to run it at any high-end settings. Developed by 4A Games and released in March 2010, we use the inbuilt DirectX 11 Frontline benchmark to test the hardware.
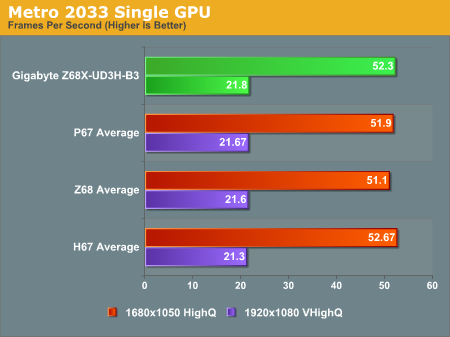
In both of the 1680x1050 and 1920x1080 tests, the Gigabyte Z68X-UD3H did very well with hardly any difference in scores.
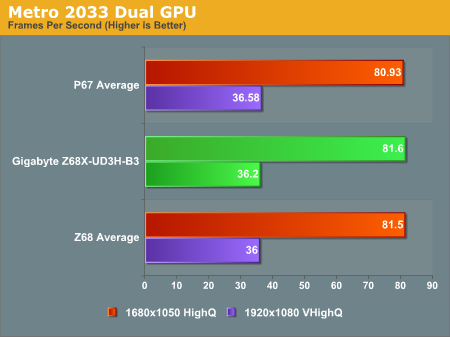
Just like in the DiRT2 tests, the dual GPU tests are some of the best we have seen thus far.
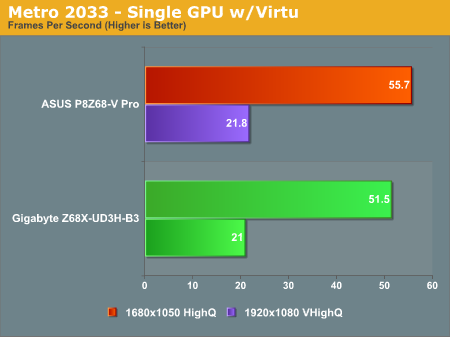
Just like in the DiRT2 tests, the UD3H is unable to produce results which compete against the ASUS P8Z68-V Pro.
iGPU tests
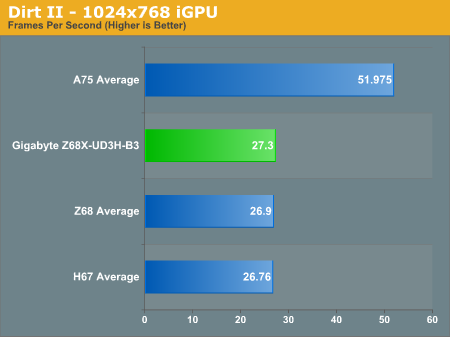
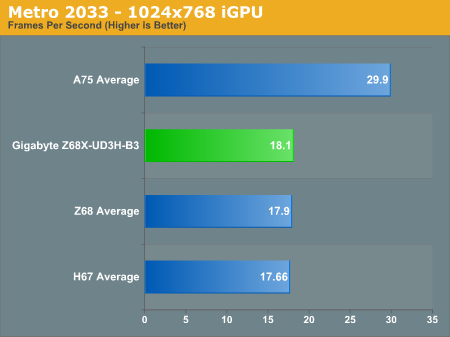
Top spot in both iGPU tests with an i5-2500K for the Gigabyte here, which is always good to see, but the strength of the Llano APU shines through.
The Gigabyte Z68X-UD3H offers 'bang for buck' performance. If you are still waiting to get on the Sandy Bridge bandwagon, you could consider this motherboard as it offers a large amount of features and performs fairly well compared to other, more expensive motherboards. However, if you already own a P67, then there is no point in switching over.
Being a Z68, it incorporates the best of both worlds from the H67 and P67 platforms. It includes a few features such as Virtu and SSD caching, which may prove to be very useful to those who require them. Gigabyte has produced a considerable number of products for the Z68 range to try and cater for all budget ranges.
Gigabyte has yet to adopt a full graphical BIOS. It is a shame, as some competitors now have a graphical UEFI BIOS on their entire range of motherboards. Gigabyte has chosen to keep a non GUI based BIOS because according to them, millions of users are already familiar with the current layout. According to the EFI specifications, support for a mouse within the EFI BIOS is not mandatory, so Gigabyte have decided to play the safe card. Maybe some time in the not too distant future, we will see Gigabyte adopt the GUI based UEFI BIOS.
Based on the benchmarks and performance figures seen in this review, it shows that you do not have to spend big amounts of money on a motherboard to get on to the Z68 platform. A motherboard that could arguably be aimed at the budget end of the spectrum has performed well - if you are wanting to invest into a Cougar Point Z68 platform and a Sandy Bridge CPU, you should consider the UD3H to see if it offers features you want.
The Gigabyte Z68X-UD3H-B3 is currently available (at time of writing) for $170 from Newegg.

