Original Link: https://www.anandtech.com/show/1128
ASUS A7V600: Feature-Laden – Value-Priced
by Wesley Fink on August 17, 2003 10:27 PM EST- Posted in
- Motherboards
It’s been several weeks since the VIA KT600 chipset for Athlon CPU’s began shipping, and the market has changed direction very quickly. We are no longer seeing reviews asking if the KT600 can beat nForce2 Ultra 400 – the consensus now seems to be that nForce2 Ultra 400 will remain the performance leader barring a major surprise. KT600 seems to have quickly settled into the "value chip" category, which is really amazing when you consider the feature set that is potentially available in the VIA design.
Due to the limitations of the Athlon architecture, there is no inherent reason why a dual-channel chipset would be the performance leader on the AMD Athlon platform. We have known this in theory since the original nForce made its appearance, but we have recently seen, with the single-channel nForce2 400, that single-channel can indeed compete effectively with the dual-channel nForce2 Ultra 400 in most performance areas. When we consider that nForce2 Ultra was designed to be a "value" chipset by NVIDIA, we can only wonder what a single-channel chipset, designed for top performance, could really do on the Athlon. This is a question, however, that we will probably never see answered in the marketplace. With Athlon64, a new socket, and a new Architecture due to debut next month, we do not expect to see new and improved solutions for Socket A Athlons.
So we are left with the very pleasant feature-rich VIA KT600 chipset that will likely not get the attention it otherwise deserves because it is not the single-channel chipset to finally compete with nForce2. In our testing, the KT600 is a solid, trouble-free chipset that is likely one of the best ever produced by VIA. The feature set is as excellent and contemporary – even to SATA RAID – as you could possibly want. But it is not the performance equal of nForce2 Ultra 400, and will likely get dismissed by shoppers.
It is in this climate that we take a look at a full-featured KT600 from one of the major players in the motherboard market. The ASUS A7V600 is loaded with features, and yet we see it selling in the "value" $70 to $100 price range. So do the features of the A7V600 make this the KT600 board to own?
ASUS A7V600: Basic Features
| Motherboard Specifications | |
| CPU Interface | Socket-462 |
| Chipset | VIA KT600 North Bridge VIA VT8237 South Bridge |
| Bus Speeds | up to 250MHz (in 1MHz increments) |
| Core Voltages Supported | up to 1.850V (in 0.050V increments) |
| AGP Voltages Supported | up to 1.8V (in 0.1V increments) |
| DRAM Voltages Supported | up to 2.85V (in 0.1V increments) |
| Memory Slots | Three 184-pin DDR DIMM Slots |
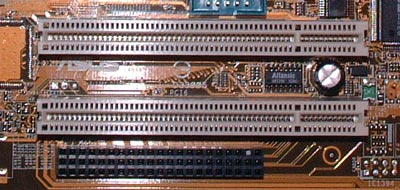
| Expansion Slots | One AGP 8X Slot Six PCI Slots One Wi-Fi (Wireless Fidelity) slot |
| Onboard IDE RAID | N/A |
| Onboard USB 2.0/IEEE-1394 | Eight USB 2.0 ports supported by VT8237 No IEEE-1394 FireWire |
| Onboard LAN | 3Com 3C940 Gigabit LAN |
| Onboard Audio | ADI AD1980 SoundMax 5.1 codec |
| Onboard Serial ATA | Two SATA connectors via VT8237 (RAID 0, 1, JBOD) |
| BIOS Revision | 1.004 Release BIOS (7/24/2003) |
One of the stand-out offerings on the A7V600 is the Wi-Fi slot. The slot is an ASUS proprietary design that allows connection of an ASUS wireless networking module. The optional module, when it becomes available, allows 11 Mbps transmission (with a fall-back to 5.5, 2, and 1Mbps) in the 2.4GHz band.
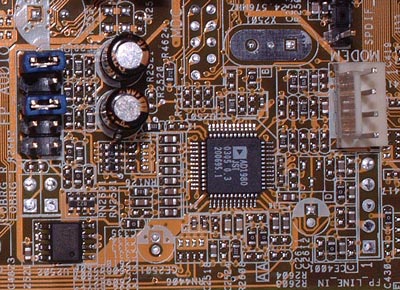
ASUS has included ADI SoundMax audio 5.1 audio on the A7V600. There is also a coaxial SPDIF out port included on the back I/O connections where we would normally see a second serial port. ADI SoundMax is the same audio chip used in ASUS 865/875 high-end motherboards. It is also used by Intel on their 865/875 motherboards. SoundMax is one of the more flexible AC ’97 2.2 compliant sound codecs. With SPDIF included on-board, you also have more quality audio options. ASUS has also provided an onboard connector for an optional second SPDIF adapter with both coax and optical I/O ports. Three mini-jack connections are used for standard audio, but like all 3-jack solutions, a 6-speaker setup will eliminate access to both microphone and line-out jacks by redefining the jacks as speaker connections. VIA would certainly prefer that manufacturers use their excellent VT1616 audio codec. However, with the KT600 so quickly becoming slotted as a value board, it is difficult to fault manufacturers who are looking for cost savings. The ADI SoundMax will be a fine solution for most users, but if you prefer a higher-end audio solution using a PCI audio card, the on-board Audio can be easily disabled.
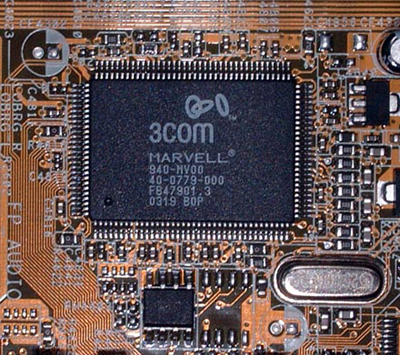
The 3Com gigabit LAN chip is used on the KT600 – the same chip used on the top-line Canterwood P4C800 Deluxe and Springdale P4P800 Deluxe. It is very unusual to see a gigabit LAN chip used in a motherboard selling in this price range, and GigaLAN on this ASUS makes it stand out over competing KT600 chipset boards.
![]()
It is surprising that ASUS did not include Firewire on the A7V600. This is likely a feature that also fell victim to last minute cost-cutting, since there are several available positions on the board. ASUS has included their stable of proprietary protection and security solutions, notably:
- C.O.P. (CPU Overheating Protection) – provides automatic shutdown at high CPU temperatures
- Crash-Free Bios2 – said to allow restoration of BIOS from support CD in the event of BIOS flash failure. This is the ASUS single-BIOS answer to those manufacturers now using dual BIOS.
- CPR – CPU Parameter Recall – reset of known good CPU values after rebooting from a failed overclock attempt
- EZ Flash BIOS – one of the original Windows-based flash utilities
- Q Fan – ability to monitor and adjust fan speeds for best performance and/or least noise
- Instant Music Lite – allows playback of audio files on a CD without booting into Windows
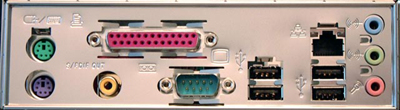
The A7V600 ports configuration is fairly complete, and includes PS/2 mouse and keyboard ports, one serial port, one coaxial SPDIF jack (in place of the normal second serial port), one parallel port, four USB 2.0 ports, one LAN port, and Mic In, Line In, and Line Out, which drive the onboard sound. There are no Firewire ports, but ASUS does include a game port connection and bracket, which will be important to some.
As with most KT600 motherboards we’ve seen, the ASUS A7V600 has native Serial ATA support courtesy of VIA’s new VT8237 South Bridge. The A7V600 supports RAID 0 (striping for Performance), 1 (Mirroring for security) & JBOD (literally, "Just a Bunch Of Drives"; a technique for Spanning or combining drives so that they appear as one drive). Since only two Serial ATA drives are supported, Raid 0+1, which requires four drives, is not supported. Once again, we find features on the low-priced KT600 boards that are not expected – Serial ATA and Serial ATA RAID. These features are certainly not native on the more expensive nForce2 Ultra 400 motherboards. Serial ATA and SATA RAID are features, however, on the recently introduced Intel 865/875 chipsets from the Pentium 4.
Another nice addition to VIA’s new Southbridge is the increase in V-link speed from 533MB/s to 1066MB/s. This is to keep VIA’s architecture competitive with SiS, who has featured their high-speed Mutiol connection between chipset components. As we said earlier, there is little that goes wanting in VIA’s new South Bridge, except the very important ability to perform at nForce2 Ultra 400 performance levels. The KT600 boards are loaded with up-to-date features, and provide some added value compared to nForce2 motherboards.
ASUS A7V600: Board Layout
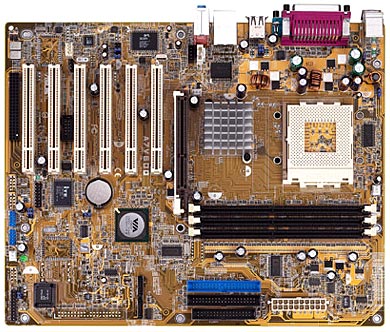
The A7V600 generally has a good layout, especially considering the price it is selling for. But as we have said in other reviews, we have yet to see the perfect board layout, and if we did, it would not likely meet the needs of some other end-users. In the end, while we can find consensus on many things related to board layout, there are others that depend on your actual case design.
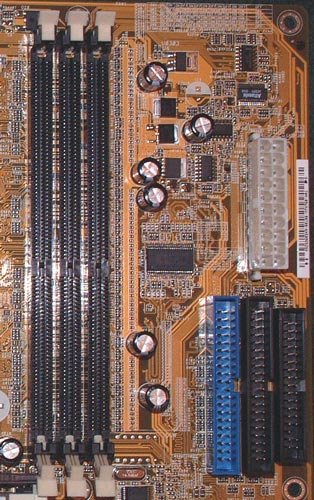
One location we are particular about is the ATX (20-pin) connector position, because the cable is very bulky and difficult to connect if poorly placed. The A7V600 ATX connector is located near the top right-hand side of the PCB to the right of the DIMM slots. This location is excellent because it keeps the bulky ATX wire bundle from obstructing the installation/uninstallation of the CPU HSF, memory modules, and any other components that you may decide to upgrade or install/uninstall after the board is mounted in the case. Since the secondary 4-pin 12V connector has appeared on recent nForce2 Ultra 400 boards, we were a little disappointed that ASUS did not include the 12V connector on the A7V600. However, a quick check of other KT600 boards found that almost all of them provide only the 20-pin ATX connector. With the fixed AGP/PCI option absent on all the KT600 boards that we have seen so far, we doubt that the extra 12V connector would make any difference in overclocking. AGP/PCI frequency will likely become a problem for KT600 boards long before we reach nForce2 overclock levels.
Serial ATA RAID is a feature provided by the VIA VT8237 Southbridge, and ASUS has implemented the standard two SATA connectors for regular Serial ATA, RAID 0, RAID 1, or JBOD. The connectors are placed so they are out of the way of other connectors on the board – at the middle of the board to the right. We have found that SATA connectors and cables can be quite fragile, so they are best when their location allows them to be disturbed as little as possible. ASUS places the SATA connectors well away from other connections, which should work very well.
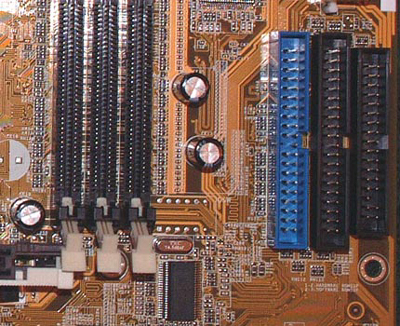
The Primary and Secondary IDE connectors are, in our opinion, best located above the midsection of the motherboard and to the right of the DIMM slots. This location allows the standard bundled IDE cables to reach the upper bays of an ATX case. This means that you will be able to install optical drives in the 1st and 2nd bays. This location also allows better air flow and case organization to be possible and allows the user to make use of the Slave connector on the bundled IDE cables. All in all, you can’t go wrong with this type of placement. Of course, this may or may not be true for your hard drives as well, but the more normal situation will be hard drives placed in bays to the right or top right of the motherboard. The above mid-right location usually works well here also, but we are much less picky about the locations of IDE RAID or SATA connections simply because the hard drives usually do not have the "reach" problem of top-bay optical drives.
The A7V600 floppy connection is also well placed with the IDE connectors in the above mid-right location. The best floppy connector location is more dependent on case design than most other connections – with some cases placing the floppy at the very top and others, at the very bottom of the external drive ‘stack’. The above midline-right location is safe for most case layouts, but you should look carefully at the case you own, or plan to buy, to be sure the floppy location will work well with your intended motherboard.
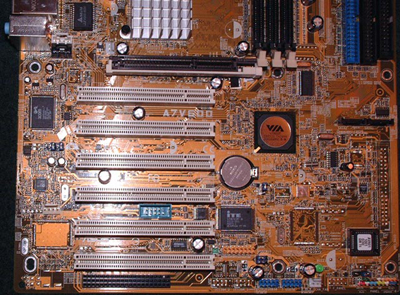
The ASUS A7V600 fortunately provides six PCI slots for expansion cards. However, like almost all 6-PCI slot designs, the three DIMM slots are crowded next to the AGP slot. This makes it difficult to impossible to add or remove a memory module without first removing the video card. We always seem to like six slots, and dislike tight DIMM slots, but you will usually have to choose one or the other with six PCI slots. Unplugging your VGA cable, then unscrewing your video card, and physically removing your video card from the AGP slot is a lot of work if you’re just trying to swap memory. You will have to decide what is more important.
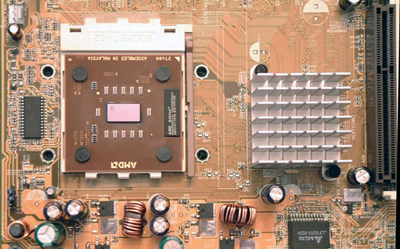
The Northbridge heatsink is the ASUS-preferred passive heatsink; we would have been surprised if ASUS used any other solution. Good arguments exist for both passive and active heatsink solutions. In the end, we can say that the large passive heatsink is effective in cooling the VIA Northbridge. The location also does not appear to interfere with any HSF solutions that you may choose for the CPU. There is plenty of room around the Socket 462.
Another pleasant surprise on the ASUS A7V600 was to see four mounting holes around the CPU socket. While this is not part of the current AMD specification, it is important to those who use water-cooling or extremely large and heavy air-cooling solutions. For most users, the four mounting holes don’t matter, but those who have invested heavily in expensive water-cooling solutions or top-line heatsinks from Swiftech, Alpha, and Thermalright will be happy to see this feature.
ASUS A7V600: BIOS and Overclocking
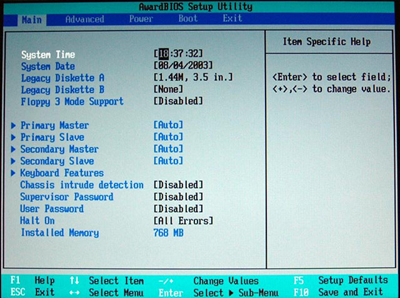
ASUS uses Award BIOS for the A7V600. If you’re familiar with the ASUS implementation of Award and AMI BIOS on their other motherboards, then you will be very comfortable with the BIOS arrangement. It’s a little different than the more common Award arrangement, but all the information and choices are there – they’re just arranged a little differently. Menu choices are across the top and as you navigate across the top choices, different on-screen menus appear. Many of the menus that are stand-alone in traditional Award BIOS are nested under other headings in this BIOS.
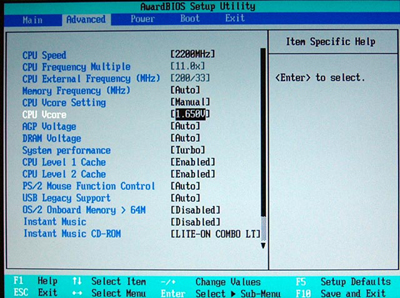
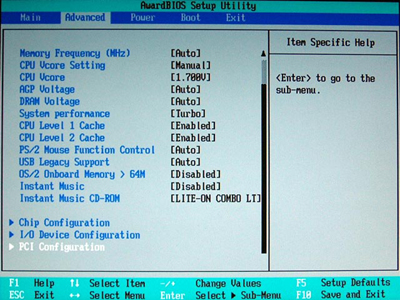
The Advanced Features menu is where you will spend most of your time, if you are tweaking for top performance. CPU speed allows the forced selection of 100, 133, 166, or 200 FSB speeds or the fully manual selection of FSB up to 250MHz. If manual is selected, then you can select a multiplier between 5.0 and 22.5 if you wish, and choose the FSB. Since there is no method to fix the AGP/PCI on any KT600 motherboard that we have tested, the CPU speed selection also shows the resulting PCI speed at the chosen FSB. In addition to FSB frequency, you can select memory frequency, voltages for CPU, Memory and AGP, and the System Performance option (Turbo or Optimal available).
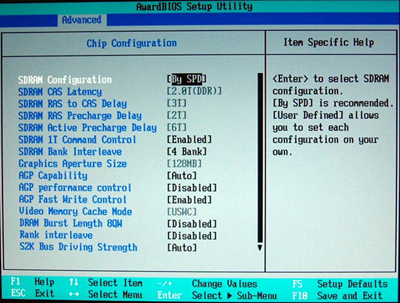
Scrolling down in Advanced Features reveals the Chip Configuration option, which is used for setting memory timings, graphics aperture size, and other performance tweaking options.
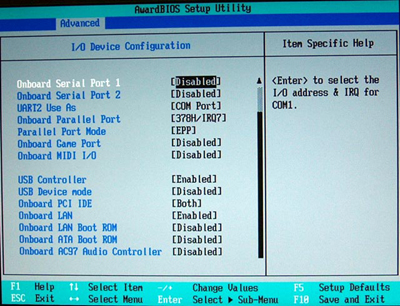
I/O device configuration is also available in this section of Advanced Features. You will find a complete range of options to enable/disable on-board devices and to adjust their settings.
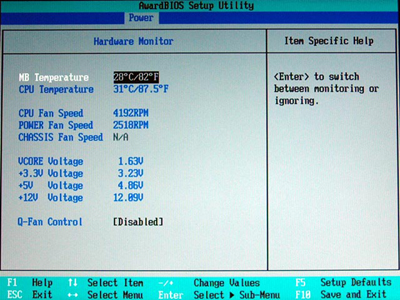
Under the Power option is the Hardware Monitor sub-menu. ASUS has a tradition of being innovators in options for monitoring the health of your PC, and you will not be disappointed in the options available here. There are readouts for Motherboard and System Temperatures, vCore, and CPU/Chassis/Power Fan speeds. You can also check vCore, and all major power rails. ASUS calls their fan control utility “Q-Fan”, and the options for Q-Fan setup are also found in this section.
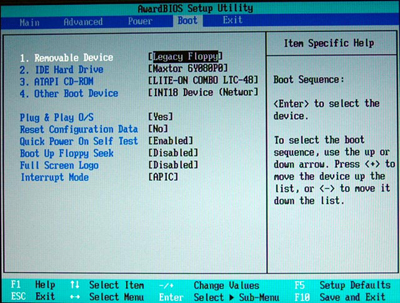
There are many available boot devices on the A7V600, so ASUS has included a Boot menu to manage your choices better. You can select the bootable device and set its priorities in this menu. For example, you can set the CD-ROM drive to boot first, and then the Floppy drive, and then the hard drive, and so forth. By using the "+" and "-" keys, you can navigate through the menu of boot choices.
All-in-all, the ASUS BIOS is very complete. The options for overclocking are generally good, with vDIMM settings to 2.85V, vCore to 1.85V, and vAGP to 1.8V. Other KT600 boards have been lacking vAGP settings, but frankly, we find them of limited usefulness in overclocking. They are present on this ASUS. There is no chipset voltage option, which is rare on motherboards, but some BIOS setups also use vAGP to control chipset voltage. We did not test this on the A7V600.
Despite the complete BIOS, there is one glaring omission on the ASUS A7V600 – there is no fixed PCI/AGP Frequency option. In fact, there has not been a PCI/AGP fix option on any KT600 board that we have tested so far. Frankly, this is why the VIA KT600 boards do not overclock well. It is also unforgivable given that all of VIA’s major competitors in all markets – NVIDIA, SiS, and Intel – offer PCI fix options in their current chipsets. This is just another example of why VIA has been losing market share so rapidly in the Athlon market. It is hard to believe that VIA continues to ignore this very critical Enthusiast feature in every chipset they make.
FSB Overclocking Results
The following setup was used on the ASUS A7V600 for FSB overclocking:| Front Side Bus Overclocking Testbed | |
| Processor: | Athlon XP 2500+ (Barton Core) |
| CPU Vcore: | 1.65V (default) |
| Cooling: | Thermalright SK-7 with 80mm Thermaltake Fan |
| Memory: | Two 256MB Corsair 3200LL at SPD |
| Power Supply: | Powmax 350W |
While we could boot into Windows XP at overclocked speeds as high as 220FSB, the highest stable FSB overclocking that we could achieve was 212MHz. Compared to nForce2 Socket A motherboards, this overclocking performance is mediocre. However, compared to other KT600 chipset boards, the A7V600 turns out to be one of the better overclockers. Once again, the reason for the poor overclocking compared to other chipsets is the lack of the option to fix PCI/AGP frequency on the KT600 and ASUS A7V600.
ASUS A7V600: Stress Testing
We performed stress tests on the ASUS A7V600 in these areas and configurations:1. Chipset and motherboard stress testing, which was conducted by running the FSB at 212MHz; and
2. Memory stress testing, which was conducted by running RAM at 400MHz with two DIMM slots filled, and at 400MHz with three DIMM slots filled at the lowest memory timings possible.
Front Side Bus Stress Test Results:
As standard practice, we ran a full range of stress tests and benchmarks to ensure the ASUS A7V600 was absolutely stable at each overclocked FSB speed. These stress tests included Prime95 torture tests, which were run in the background for a total of 24 hours.In addition, we ran several other tasks - data compression, various DX8 and DX9 games, and apps like Word and Excel - while Prime95 was running in the background. Finally, we ran our benchmark suite, which includes ZD Winstone suite, Unreal Tournament 2003, SPECViewperf 7.0, and Gun Metal Benchmark 2. While we were able to boot and run some tests at speeds as high as 218MHz FSB at default voltage, 212MHz was the highest overclock that we were able to achieve with the ASUS without encountering any reliability issues.
Memory Stress Test Results:
The memory stress test is very simple, as it tests the ability of the A7V600 to operate at its officially supported memory frequency (400MHz DDR) at the lowest supported memory timings that our Corsair TwinX LL modules support:| Stable Dual DDR400 Timings (2/3 banks populated) |
|
| Clock Speed: | 200MHz |
| Timing Mode: | Turbo |
| CAS Latency: | 2.0 |
| Bank Interleave: | 4 |
| RAS to CAS Delay: | 3T |
| RAS Precharge: | 6T |
| Precharge Delay: | 2T |
| Command Rate: | 1T |
The A7V600 did not exhibit the lowest timings that we have seen on a KT600 board. However, ASUS provides charts that show some DDR400 modules are only recommended for one DIMM operation, while others can support three DDR400 DIMMs. Our Corsair 3200LL V1.2 DIMMs were not listed on either chart. Nonetheless, we were still able to achieve stable operation with two DIMMs at 2-3-6-2 timings. Keep in mind here that six is the lowest RAS Precharge setting available on this KT600 board, so these settings were only slightly slower than the fastest timings that could possibly be set. Despite several attempts, we could not get stable performance at 2-2-6-2, even with Turbo turned off. We should point out that this latest V1.2 of Corsair 3200LL has SPD timings of 2-3-6-2, and not 2-2-6-2 like the now-discontinued V1.1. However, we checked V1.2 at 2-4-2-2 timings with several nForce2 boards in dual-channel mode, and it performed fine at those aggressive timings in the nForce2 Ultra 400 boards. The memory controller of the KT600 chipset is obviously a different design than the nForce2 Ultra 400 controller. However, also keep in mind that lower memory timings do not always translate into the fastest memory performance. Lowest memory timings is just one means of comparing motherboards. It is most useful when comparing boards based on the same chipset.
Filling all three available memory banks is much more strenuous on the memory subsystem than testing two banks filled. In fact, on the ASUS A7V600, we were doing something ASUS does not recommend. While ASUS makes it clear that the A7V600 is designed to support a maximum of two DDR400 DIMMs (and only one DIMM with some brands), we wanted to determine for ourselves if three DDR400 DIMMs could work at 400MHz. While three DDR400 DIMMs would not work at CAS2, with or without Turbo timings or other timings adjustments, the three DIMMs did work at DDR400 by slowing CAS slightly to 2.5:
| Stable DDR400 Timings (3/3 banks populated) |
|
| Clock Speed: | 200MHz |
| Timing Mode: | Turbo |
| CAS Latency: | 2.5 |
| Bank Interleave: | 4 |
| RAS to CAS Delay: | 3T |
| RAS Precharge: | 6T |
| Precharge Delay: | 2T |
| Command Rate: | 1T |
We were pleased to see that the ASUS ran with stability using three DDR400 DIMMs. We did have to slow the CAS timing a bit for stable performance, so you should keep this in mind if you plan to run three DDR400 DIMMs against ASUS’ current recommendations. It’s worth stating again that the real world performance difference between aggressive memory timings and more relaxed memory timings, such as SPD, are often very small.
We tested all these memory timings using several stress tests and general applications to guarantee stability. Prime95 torture tests were successfully run at the timings listed in the above charts. We also ran Sciencemark (memory tests only) and Super Pi. None of the three stress tests created stability problems for the ASUS A7V600 at these memory timings.
While the A7V600 was very stable in our tests, it required slightly slower memory timings than we have needed for other KT600 motherboards.
ASUS A7V600: Tech Support and RMA
For your reference, we will repost our support evaluation procedure here:
The way our Tech Support evaluation works is first, we anonymously email the manufacturer's tech support address(es), obviously not using our AnandTech mail server to avoid any sort of preferential treatment. Our emails (we can and will send more than one just to make sure we're not getting the staff on an "off" day) all contain fixable problems that we've had with our motherboard. We allow the manufacturer up to 72 (business) hours to respond, and then we will report whether or not they responded within the time allotted, and if they were successful in fixing our problems. In case we don’t receive a response before the review is published, any future responses will be added to the review, including the total time it took for the manufacturer to respond to our requests.
The idea here is to encourage manufacturers to improve their technical support as well as provide new criteria upon which to base your motherboard purchasing decisions. As motherboards become more similar everyday, we have to help separate the boys from the men in as many ways as possible. As usual, we're interested in your feedback on this and other parts of our reviews, so please do email us with your comments.
ASUS' RMA policy is pretty straight forward, as follows:
"Please provide the following information so that we may process your request for warranty repair service. Once we have obtained that information from you, we will issue an RMA # and provide the proper shipping instructions. Please read and provide all of the information below. We cannot complete your request, if all of the information below is not
PLEASE PROVIDE US WITH:
1. THE MODEL & SERIAL NUMBER OFF OF YOUR PRODUCT model (name of product) serial# (10 digits/characters long, no dashes).
2. YOUR FULL NAME/NAME OF COMPANY (Only provide company name if the shipping address is to a company).
3. YOUR SHIPPING ADDRESS (no PO boxes please).
4. YOUR DAYTIME PHONE/FAX NUMBER.
ASUS Computer International (USA) is a warranty repair service center. Please contact place of purchase for credit, refund, upgrade, or advance replacement. Asus does not provide these services under any circumstances.
ASUS Does not cover physical damage. Please refer to page 2 of your users manual. There is a $15.00 fee to replace a broken socket. There is a $40.00 fee to repair all other physical damage. If a product is not repairable, the product will be sent back to the customer. If a product is sent in with physical damage and is not accompanied with a payment, the product will be rejected and customers will not be reimbursed for shipping charges. A payment can be made by check, money order (payable to ASUS), or a credit card#. The payment must be sent in with the damaged product. Customers from Canada must make payments with a credit card#."
This is a fairly straightforward RMA policy, with nothing unusual that stands out. As is the norm with motherboard manufacturers, you're required to provide quite a bit of information in regards to exactly what has to be RMA’d. Everything else is self-explanatory.
Even after their web site redesign in the past few months, ASUS still hasn't listed any real type of RMA policy on their web site. Anandtech has been critical of ASUS on this issue for months now, but still, nothing has changed.
ASUS' tech support response time did not improve from the last time that we looked at an ASUS motherboard. At that time, ASUS had missed our 72-hour deadline. The same pattern was repeated this time around, with ASUS completely missing our 72-hour deadline yet again. After so many missed tech support emails, it's clear that your expectation with ASUS should be this: your technical problem may get a reply some day! We'll let you know how long it takes ASUS to respond to this email. Hopefully, ASUS won't take more than 11 days to respond, like they did the last time we tracked an email to conclusion.
UPDATE 8/22/03: Asus finally replied to our Tech Support email request 18 calendar days after it was sent.
While ASUS' RMA policy isn't too different from other top-tier motherboard makers, their tech support is still severely lacking, if not the worst in the industry. We sincerely hope that Asus takes these issues seriously, and finally, make efforts to fix a problem that has driven away many potential customers.
Performance Test Configuration
| Performance Test Configuration | |
| Processor(s): | AMD Athlon XP 3200+ (400MHz FSB) |
| RAM: | Two 256MB Corsair PC3200 TwinX LL v1.1 or 1.2) Modules (SPD rated) |
| Hard Drive(s): | Maxtor 120GB 7200 RPM (8MB Buffer) Western Digital 120GB 7200 RPM Special Edition (8MB Buffer) |
| Bus Master Drivers: | NVIDIA nForce version 2.03 (January 30, 2003) VIA 4in1 Hyperion 4.47 (May 20, 2003) |
| Video Card(s): | ATI Radeon 9800 PRO 128MB (AGP 8X) |
| Video Drivers: | ATI Catalyst 3.6 |
| Operating System(s): | Windows XP Professional SP1 |
| Motherboards: | ASUS A7V600 (KT600) @ 200.0 MHz FSB Soltek NV400-L64 (nForce2 400 SC) @ 200.5MHz FSB DFI NFII Ultra LanParty (nForce2 Ultra 400) @ 201.35 MHz FSB Gigabyte 7VT600 1394 (KT600) @ 202.78MHz FSB Gigabyte 7NNXP (nForce2 Ultra 400) @ 202.77MHz FSB Epox 8KRA2+ (KT600) @ 202.44MHz FSB |
All performance tests that ran on nForce2 400 (SC)/nForce2 Ultra 400 (DC) motherboards utilized two 256MB Corsair TwinX LL PC3200 (v1.1 or 1.2) modules, set to SPD timings in DDR400 mode. Dual-channel mode was used on nForce2 Ultra 400 boards. Two DIMMs working as single-channel were used on the nForce2 400 Soltek NV400-L64 board.
All performance tests that ran on the KT600-based motherboards used two 256MB Corsair TwinX LL PC3200 (v1.1 or 1.2) Corsair modules in DDR400 mode. KT600 memory timings did vary slightly among the motherboards, with the ASUS A7V600 requiring a Ras-to-Cas of three for stable operation, and other KT600 boards requiring a Ras-to-Cas setting of 2. 4-bank interleave and the highest available timing option (Turbo or Ultra) was used.
Performance tests were run with the ATI 9800 PRO 128MB video card with AGP Aperture set to 128MB with Fast Write enabled. The ATI 9800 PRO is the new AnandTech video card standard for reviews.
Additions to Performance Tests
Benchmark testing is dynamic, and we have added several new benchmarks to our standard Test Suite.1) ZD Labs Internet Content Creation Winstone 2003 – This benchmark has just been updated by ZD Labs and includes many new features in the Benchmark Suite, such as Media Encoding. It also uses the most up-to-date versions of Multimedia Creation software, which is rapidly changing as new software tools are released.
2) ZD Labs Business Winstone 2002 – ZD Labs Business Winstone has been around for many years and is a widely quoted Benchmark for measuring system performance. It basically provides a similar benchmarking suite to Sysmark 2002 Office Productivity.
3) Gun Metal DirectX Benchmark 2 – This demo/benchmark from Yeti Labs is one of the first DX9 game-based benchmarks available. Unlike some older benchmarks, such as Quake 3 that generate insane FPS ratings in the 300’s, we see performance numbers in the 30 to 40FPS range with current DX9 cards.
To give AnandTech readers a feel for how some of the newer benchmarks compare to the more familiar benchmarks used in past reviews, we have posted results for both the new benchmarks and Sysmark 2002 and all the games that have been a part of our standard benchmark suite.
New Hardware
With the release of DirectX 9 late in 2002, the availability of Benchmarks to test DX9, and the availability of DX9-supporting video cards from both nVidia and ATI, we are now using the ATI Radeon 9800 PRO for all hardware tests.Content Creation and General Usage Performance
Media Encoding and Gaming Performance
High End Workstation Performance - SPEC Viewperf 7.0
High End Workstation Performance - SPEC Viewperf 7.0 (continued)
Final Words
If your goal is top-notch Athlon performance, you should not be looking at the ASUS A7V600 or any KT600 board that we have tested. However, if you are looking for a solid and reliable Athlon board with the latest features, then the ASUS A7V600 should definitely be on your shopping list. There is no doubt that the KT600 boards, in general, and the ASUS A7V600, in particular, bring great value to the mix.Boards based on the single-channel nForce2 400 chipset cost about the same and perform much better than the KT600. Our concern with the nForce2 400, however, is that it is only available from a few manufacturers. It is also stripped of features when compared to most KT600 boards. Perhaps this is where the KT600 scores a win, because the feature set of the KT600 is even better and more contemporary than the top-of-the-line nForce2 Ultra 400 boards that we have evaluated.
There is also the nagging question of what VIA is thinking these days. With almost a year to bring a competent top-performing Athlon chipset to market, we are shocked to see that VIA is now the only chipset manufacturer refusing to implement a PCI/AGP frequency lock option in their designs. NVIDIA, SiS, and Intel all provide this option in their current chipsets. If VIA plans to continue marketing AMD and Intel chipsets in the future, they will have to add the AGP/PCI lock feature to be competitive with other chipset manufacturers. In addition, it is perplexing at the very least that almost a year after the nForce2 introduction, VIA is still not able to produce a board that performs as well. We can only hope that VIA has some major surprises in the works for Athlon64 and Intel Prescott, or we will see the VIA name relegated to the bargain basement.
The ASUS A7V600 is feature-laden, and an excellent value at its selling price. It is the only KT600 board that we have tested to provide Gigabit LAN and a slot for a wireless transmitter. It is not a blistering performer, even compared to other KT600 boards, but it is a solid and trouble-free motherboard, and one of the best overclockers among the KT600 boards. If your needs are best served by the latest top-notch features in a solid, reliable board from a top-tier manufacturer, then the ASUS A7V600 is your choice. Did we also say it’s available at a bargain price?


