Original Link: https://www.anandtech.com/show/6850/asus-maximus-v-formula-z77-rog-review
ASUS Maximus V Formula Z77 ROG Review
by Ian Cutress on March 25, 2013 2:30 PM EST- Posted in
- Motherboards
- Asus
- ROG
- Z77
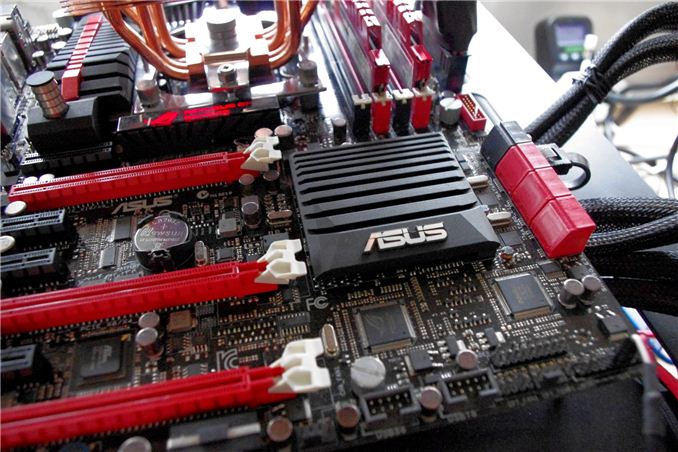
The motherboard market is tough – the enthusiast user would like a motherboard that does everything but is cheap, and the system integrator would like a stripped out motherboard that is even cheaper. An overclocker would like a minimalist setup that can push the limits of stability, and the gamer would like an all singing, all dancing everything. The ASUS Maximus V Formula is designed to cater mainly to the gamer, but also to the enthusiast and the overclocker, for an all-in-one product with a distinct ROG feel. With the combination air/water VRM cooling system, a mini-PCIe combo card with dual band WiFi and an mSATA port, one of the best on-board audio solutions and the regular array of easy-to-use BIOS/Software, ASUS may be onto a winner – and all they ask for is $270-300.
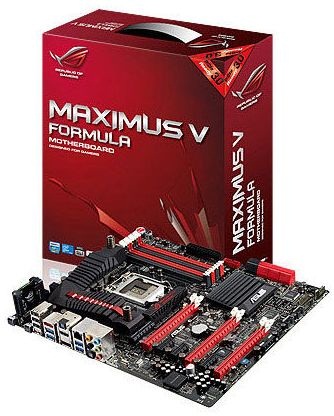
Overclocking for Z77 – Why Focus on Extreme Overclockers?
The motherboard market shrank in 2012, with reports suggesting that from the 80 million motherboards sold in 2011, this was down to 77 million worldwide in 2012. In order to get market share, each company had to take it from someone else, or find a new niche in an already swollen industry. To this extent, after the success of the ROG range, the top four motherboard manufacturers now all have weapons when it comes to hitting the enthusiast or power user with an overclocking platform. These weapons are (with prices correct as of 3/7):
$400 – Gigabyte Z77X-UP7 (our review)
$379 – ASUS Maximus V Extreme
$290 – ASUS Maximus V Formula
$225 – ASRock Z77 OC Formula (our review, Silver Award)
$200 – ASUS Maximus V Gene
$190 – MSI Z77 MPower (our review)
There are two main differentiators between the low (<$300) and the high (>$350) end. The first is the inclusion of PLX PEX 8747 chip, to allow 3-way or 4-way GPU setups. We covered how the PLX chip works in our 4-board review here, but this functionality can add $30-$80 onto the board (depending on the bulk purchase order of the manufacturer and the profit margins wanted). The second is usually attributed to the functionality and power delivery – the 32x IR3550s used on the Gigabyte Z77X-UP7 costs them a pretty penny, and the extensive feature list of the ASUS ROG boards usually filters through.
In the past there have been attempts at pure overclocking boards, such as the Gigabyte X58A-OC, which was entirely stripped of all but the necessary components for pushing overclocks under sub-zero conditions for competitions. The board itself was cheaper due to the functionality not present, but it did not provide a rock solid home system for many users. The ASUS ROG range, as we reviewed in 2012, has been releasing motherboards for both gaming and overclocking for several years, trying (and succeeding) with the mATX Gene, ATX Formula and Extreme. All three of these boards continuously push both the gaming and OC frontiers, with a slight gaming focus on the Formula and an OC focus on the Extreme, but all boards cross over into each other’s territory very easily.
Each product has to be considered as either the ‘Halo’ product or one for general sale – a halo product can often get away with being for a specific group of users as long as it is advertised effectively and brought to the attention of the forum enthusiasts that may invest in the company’s other products. It also has to be the halo, not second best! If a product is aimed at the general markets, then it has to cater on all fronts to several groups. Our recent run of reviews have been for motherboards aimed at overclockers, with one or two focusing on the ultra extreme overclockers that use sub-zero temperatures to break records. This is a very small market (<4000 active at last estimate), so the hope would be to filter down the hype of a product into the consumer range of products. This is unless the product is also aimed at the other markets – features for gamers, design for enthusiasts, and prices that please the self-builders or system integrators. If a motherboard can match more markets and do it well (the important phrase), there may be some hope for it to break even.
Our fourth ‘overclock oriented’ motherboard for review is one of the aforementioned products that aim for several categories. The ROG motherboard range from ASUS has always gone for the ‘improve everything’ strategy, trying to make the board better for everyone on all fronts. As a result, we get three products for them – the mATX Gene for more entry level products, the Formula for gamers and enthusiasts, and the Extreme that has a more overclocking edge to the setup. All of the boards cross into each other’s fields very easily, with minor deviations depending on the market segment. That being said, as mentioned in our X79 review, ASUS reported that out of their X79 ROG range, the most expensive Extreme board was the best seller, with many different groups buying it for the high-end appeal. Today we are looking at the Maximus V Formula (MVF), a Z77 product with directions towards the enthusiast (with its integrated air/water power delivery heatsink cooler) and the gamer (improved on-board audio with headphone amplifier), but still with the ROG overclocking abilities.
ASUS Maximus V Formula Overview
In my last review of an ROG Formula board, I critiqued that it felt too much like it was middle of the pack with respect to the cheaper/smaller Gene or the beefier/expensive Extreme – it did not sit right and the brand could have been fine with just the other two products. Fast forward a few months, and ASUS release the Maximus line of Z77 ROG motherboards, and the Maximus V Formula (MVF) gets a different look entirely, pushing it out into a field of its own.
At this point I should point out that the MVF comes to the table as the most expensive Z77 motherboard without a PLX 8747 chip. The MVF still supports 3-way GPU setups with an Ivy Bridge at x8/x4/x4 (and an additional x4 from the chipset), although users requiring x8 bandwidth for a RAID card are limited to one GPU or looking at a X79/AMD/Z77 PLX instead, and the Z77 PLX boards start around $280. We reviewed a set of four PLX boards in August 2011 from Gigabyte, ASRock, EVGA and ECS, as well as the ASUS P8Z77 Premium and Gigabyte Z77X-UP7 in separate reviews, ranging from $280-$400.
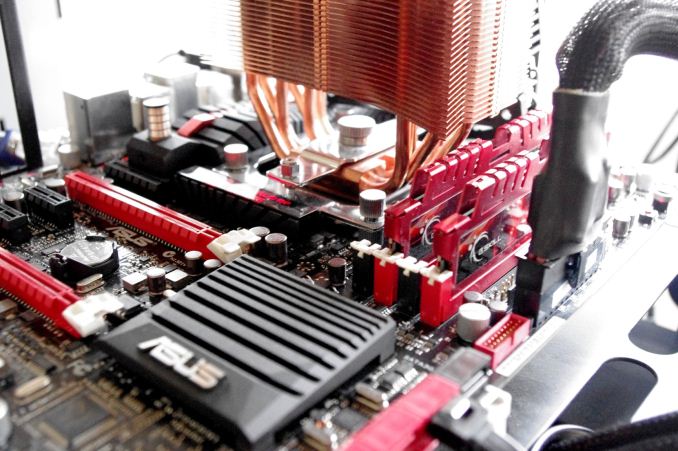
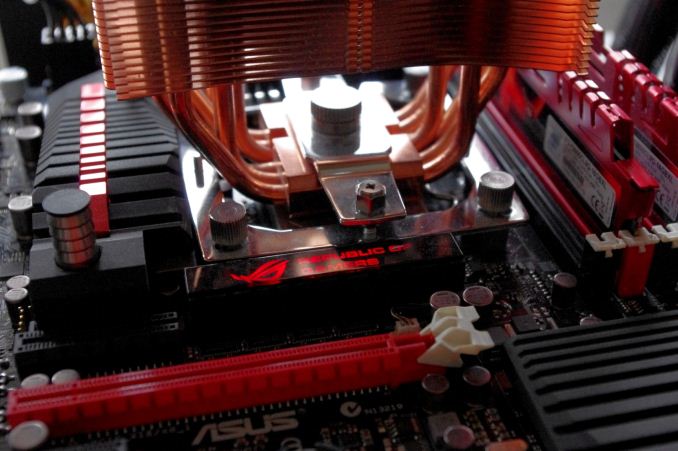
The MVF we have had in for testing attacks the market on several fronts, most noticeable at first (visually) is the combination air + water power delivery heatsink, dubbed ‘Fusion Thermo’. While we first technically saw this on the ASRock Z77 OC Formula, but the MVF has been on the market longer and should be heralded accordingly. The idea with this technology is that water cooling setups can take advantage of the combination heatsink to cool additional components, potentially increasing overclocks should the VRM temperatures become the limiting factor in low air-flow scenarios.
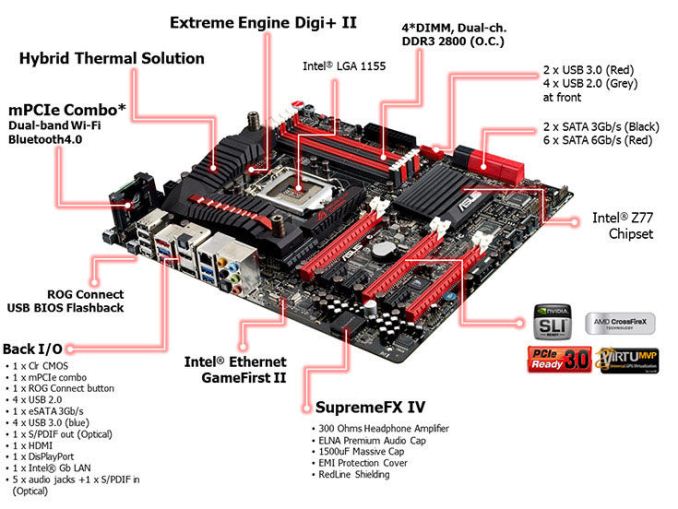
Another main aspect to the MVF is the audio, which ASUS are calling the SupremeFX IV (compared to the SupremeFX III on the Gene and the Realtek ALC898 on the Extreme). SupremeFX is ASUS’ line of continually adjusting the environment the audio codec lives in – when Realtek or Creative release a codec, it is listed in terms of signal-to-noise ratio (SNR) and total harmonic distortion (THD) in a perfect environment. This would mean an anechoic chamber, no electrical noise from other components, and perfect input/output setups. The real world is not so forgiving, especially on a motherboard – so what may be rated as 110 dB(A) SNR comes through as 80 dB(A) SNR in real world. The SupremeFX line tries to improve the surroundings of the codec by giving it its own motherboard layer for routing, up-to-date DACs, electrical shielding, premium caps for output capability, and an onboard headphone amplifier for driving high impedance headphones. The codec is rated to 110 dBA SNR (THD+N at 1kHz is 95 dB) output and 104 dBA input, and our peak testing results give an excellent result. ASUS’ addition of a headphone amp is also rated at 120 dB SNR (THD+N at 1 kHz is -117 dB). Ultimately the underlying codec is a Realtek ALC898, which ASUS seem keen not to mention directly, but the SupremeFX IV environment gives it the best chance to perform. The audio is also supported by DTS Ultra PC II and DTS Connect.
ASUS always wants to equip the user with what the think is the best, and as such we get an Intel 82579V network port, alongside a Dual Band Wifi Module, for network connectivity. The WiFi module fits into the rear IO of the motherboard, and also comes with a mini-PCIe slot for an mSATA drive. Video outputs for Virtu MVP users come through a HDMI and DisplayPort connectors, and extra USB 3.0 from ASMedia allows ASUS to deploy its USB 3.0 Boost software for increased bandwidth. Overclockers get an LN2 mode switch to increase voltage options in the BIOS, a Slow Mode switch to keep the CPU in an idle power state (for taking screen shots and reducing the possibility of a BSOD after a benchmark run), Q-LED to detect which parts of the system are being tested on POST, a debug LED for a specific POST error, power/reset buttons, GPU.DIMM post for equipment BIOS detection, and Probelt for multimeter observations.
We have extensively tested the ASUS ROG features in the past; however ASUS is a company that likes to update. With the MVF we get an improved GameFirst II network management interface, Fan Xpert II, Extreme Digi+ II (power delivery management) and all the associated overclock oriented profiles, features and adjustment options. T-Topology is also built in as per standard now on ASUS motherboards, giving potential gains with multi-DIMM configurations pushing high frequencies, along with ROG Connect features to allow overclocking via a different device. As always, the ROG Forums are on hand to help users push the limits or answer questions.
In our testing, the MVF comes up alongside the best in terms of performance and efficiency, out of all the motherboards we have tested. The MVF benefits from MultiCore Turbo/Enhancement (MCT) which gives the CPU the top turbo bin when XMP is enabled, like many Z77 products we have tested. In our memory agnostic 3DPM test the MVF comes top out of all the boards with MCT, which also helps in our compression/video editing benchmarks. Overclocking results some of the best we have seen on Z77, easily hitting a massive 5.0 GHz with our review sample without issues, and seemingly would go beyond this given a better cooling environment. ASUS is increasing the levels of manual overclock options in the BIOS, with CPU Level UP giving three different speeds to choose as well as a Gamer OC mode. BIOS options for overclocking, as always with ASUS, are top notch, and we were able to push our RAM harder and further with our CPU in the MVF than in any other Z77 motherboard.
Visual Inspection
Like every other ROG board we have tested, the MVF is a visually busy product, with a large portion of the PCB being used by components, some of which are ASUS exclusive – the PCIe combo card and EPU being the prime examples. As a result, sub-zero overclockers will have a hard time insulating the socket area from moisture and cold – the presence of the power filter caps and close proximity of the VRM coolers may be detrimental in that regard. The socket area itself is limited directly to Intel specifications (as shown by the white box around the socket), although I had no issues fitting a Thermalright TRUE Copper on board. Browsing the ROG forums leads me to suggest that users of larger air coolers (Noctua NH-D14, Prolimatech Megahalems and the Thermalright Silver Arrow) will have no issue fitting them to the motherboard, although certain series of memory may provide a z-height issue.
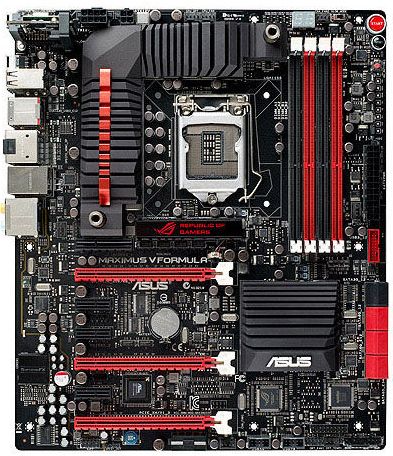
The combination air/water power delivery cooling system is one of the most prominent features on board, and like the ASRock Z77 OC Formula, incorporates a heatpipe to connect the heatsinks for air cooling, and a channel for the water cooling setup to pass through. The channel itself is 10mm outside diameter, so a 3/8” inside diameter barb setup plus clamps are needed for compatibility. The channel is constructed from copper, with electroplated nickel barbs, all surrounded by anodized alumin(i)um heatsink fins – important to know if you are mixing metals in your water cooling setup. Now I know most users stay with air cooling, and enthusiasts who deal with water cooling tend to practice without a PC before building their first setup (I should be ashamed to admit I have never built my own custom loop), so the MVF may not be an immediate choice for first time PC builders. However, the MVF is aimed both at those initial purchases, and at the enthusiasts and system builders/integrators that will customize their chassis and system every which way they can to produce and offer a premium product. Almost every boutique chassis builder offers a water cooled ROG system in their lineup with good reason.
For the rest of us who want to air cool, the motherboard has 8 four-pin fan headers in all (backwards compatible with three-pin fans of course). Six can be found around the CPU socket: two CPU fan headers above the socket, two to the bottom left of the power delivery heatsink, one to the top right between the two-digit LED debug and power buttons, and another beside the 24-pin ATX power connector. The final two are all along the bottom of the board. It is worth pointing out that very few motherboards on the market deal entirely with 4-pin headers, which allows for a finer control of the fans. Control of the fans is provided by the excellent Fan XPert II software provided as part of the package, which is currently the best software fan control solution on the market today. We cover this later in the review.
Moving clockwise around the board, we get our regular set of four memory slots, which thankfully exhibit a single sided latch design. (This makes it easier for reviewers to change memory when a GPU is installed.) Above the memory is a two-digit debug, as well as power/reset buttons. Having both of these options here rather than at the bottom of the board is good for overclockers testing four-way GPUs outside of a case, though in my testing setup I forgot 50% of the time the two digit debug was there as it was obscured by my memory. Between the two-digit debug and the power buttons is actually a small switch labeled ‘SLOW MODE’ – this allows overclockers to reduce the CPU multiplier down to 16x after the benchmark has finished (many world record scores have been lost because a system crashed between the benchmark finishing and time to get a screenshot/validation – this switch solves the issue!).
Down the right hand side we get a GO Button, for a one button overclock to preset conditions chosen in the BIOS. Below this are the ProBelt voltage measurement pads, allowing users to hook up multimeters to find exact voltage values of the equipment. This is becoming a regular feature on high end motherboards, although I prefer it when there are direct attachment pins available, such as on the ASRock Z77 OC Formula, rather than those here. Continuing down is the 24-pin ATX power connector, USB 3.0 header (chipset) and SATA ports – two SATA 3 Gbps in black (chipset), two SATA 6 Gbps in red (chipset) and four more SATA 6bps in red (ASMedia). The chipset heatsink nearby is passive and styled similarly to the Fusion Thermo VRM heatsink.
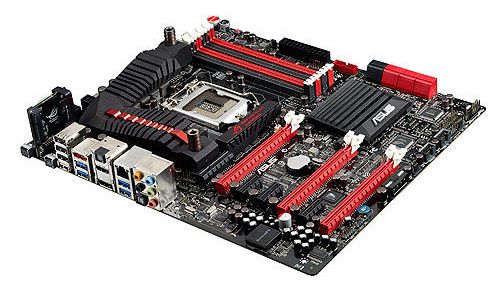
Along the south side of the motherboard (from left to right) is a front panel audio port, a 4-pin molex power connector (for VGA power), two fan headers, two USB 2.0 headers, a TPM header, a temperature sensor header and the front panel header. The addition of the VGA power connector sometimes occurs on non-PLX enabled boards, and personally I would prefer a SATA power connection or a 6-pin PCIe connector rather than a 4-pin molex connection; I would also prefer it not on the south side of the board. The temperature sensors are part of ASUS’ package to aid overclockers, and as such there are three sets of pins on board that overclockers can attach sensors to.
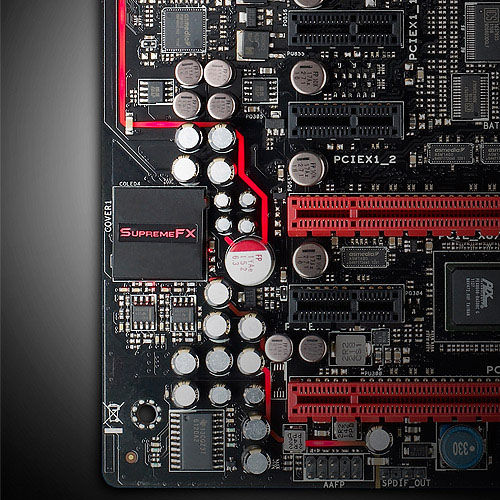
As mentioned in the overview, the SupremeFX IV audio solution on the MVF is one of the major selling points. As part of the audio evolution on ROG motherboards, the SupremeFX brings changes missing from regular audio solutions, such as:
- Physical PCB separation of audio and other components (shown by the red line) for less electrical interference
- Low resistance ELNA capacitors to reduce amplitude loss and RFI
- A high buffer (1500microF) capacitor for additional amplitude gain when required
- Aluminum cap to reduce electromagnetic interference
- High fidelity TI 6120A2 300 ohm headphone amplifier (front panel audio only)
- DTS Ultra PC II and DTS Connect
Ultimately the underlying codec is a Realtek ALC898, which ASUS seem keen not to mention directly, but the SupremeFX IV environment gives it the best chance to perform near to the rated specifications, unlike standard onboard audio that may incur a 30dbA loss due to the local environment.
On a side note, I conversed with a member of ASUS’ audio team (our good friend and former Senior Editor Rajinder Gill) regarding the decision to use Realtek over either Creative or anyone else. He mentioned that while internally they have tested with other audio solutions from manufacturers well known in audio circles, it was very problematic when it came to issues and needing driver updates. One of these companies they were testing with quoted an 18 month cycle for updates and fixes, compared to a Realtek turnaround time of 4-8 weeks. This is mainly due to the difference in size of the R&D divisions of these companies – Realtek are huge in comparison to the rest (selling 100 million+ codecs per year), so when a component is going to be put in a variable scenario with a million different combinations, having those regular update patterns makes sure everyone is happy. No-one buys a motherboard with the audio not working for their particular setup, and is then told to wait 18 months for a fix, so ASUS was not willing to put this on anyone in the motherboard segment. Something like the ASUS Xonar Essence STX is more suited for a custom build, and even then when that product was released many users had initial issues – three years on and the major issues for the majority of users are fixed.
In terms of PCIe configuration, the MVF uses a smaller PLX switch to increase the PCIe lane count from the chipset. For GPU configurations, we have access to a PCIe 3.0 x16, x8/x8 or x8/x4/x4. Placing a device in the second or third red PCIe slots adjusts the lane allocation in the standard Z77 way. There are also four black PCIe 2.0 slots on board – three x1 and an x4 at the top, which may be limited in thickness due to the proximity of the power delivery coolers.
The Rear IO panel takes advantage of ASUS’ PCIe combo card. As seen on other Z77 models, this card uses lanes routed up past the CPU to make use of a WiFi/BT card and give access to an mSATA slot:
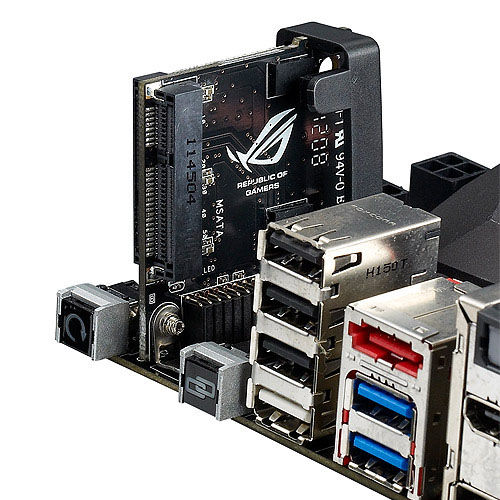
I am typically a big fan of integrated WiFi on board, and ASUS has the best solution so far that does not use up any PCIe slots. The WiFi module is a dual band 802.11 a/b/g/n Broadcom affair with dual stream (up to 300 Mbps) capabilities. Hopefully in the future this will become a WiDi enabled 3T3R device, perhaps even AC as years go on (and prices comes down/standards ratified).

The rest of the Rear IO comes in the form of a ClearCMOS button, ROG Connect button, four USB 2.0 ports (one ROG Connect enabled), two USB 3.0 from the chipset, two USB 3.0 from an ASMedia controller, an eSATA 3 Gbps port, HDMI, DisplayPort, an optical SPDIF output and input, an Intel 82579V NIC and audio jacks.
Board Features
| ASUS Maximus V Formula | |
| Price | Link |
| Size | E-ATX (305mm x 257mm) |
| CPU Interface | LGA-1155 |
| Chipset | Intel Z77 |
| Memory Slots |
Four DDR3 DIMM slots supporting up to 32 GB Up to Dual Channel, 1066-2800 MHz |
| Video Outputs |
HDMI DisplayPort |
| Onboard LAN |
Intel 82579V Integrated Broadcom Dual Band 802.11 b/g/n |
| Onboard Audio |
SupremeFX IV - advanced Realtek ALC898 - SNR: 110 dBA - THD+N: 95 dB @ 1 kHz -TI6120A2 300 ohm headphone amp - EMI Shielding - 1500uF filtering - DTS Ultra PC II + Connect |
| Expansion Slots |
3 x PCIe 3.0 x16 (x16, x8/x8, x8/x4/x4) 1 x PCIe 2.0 x4 3 x PCIe 2.0 x1 1 x mPCIe 2.0 x1 (on Combo Card) |
| Onboard SATA/RAID |
2 x SATA 6 Gbps (Chipset), RAID 0, 1, 5, 10 2 x SATA 3 Gbps (Chipset), RAID 0, 1, 5, 10 1 x mSATA 3 Gbps (Chipset, on Combo Card) 1 x eSATA 3 Gbps (Chipset, rear IO Panel) 4 x SATA 6 Gbps (ASMedia), RAID 0, 1 |
| USB |
4 x USB 3.0 (Chipset) [2 back panel, 2 onboard] 8 x USB 2.0 (Chipset) [4 back panel, 4 onboard] 2 x USB 3.0 (ASMedia) [2 back panel] |
| Onboard |
6 x SATA 6 Gbps 2 x SATA 3 Gbps 1 x USB 3.0 Header 2 x USB 2.0 Headers 8 x Fan Headers 1 x Front Panel Audio Header 1 x Front Panel Header 1 x Slow Mode Switch 1 x LN2 Mode Switch 3 x Thermal Sensor Connectors 8 x Voltage Measurement Points Power/Reset Buttons Go! Button mPCIe Combo Header |
| Power Connectors |
1 x 24-pin ATX Power Connector 1 x 8-pin CPU Power Connector 1 x 4-pin Molex VGA Power Connector |
| Fan Headers |
2 x CPU (4-pin) 3 x CHA (4-pin) 3 x OPT (4-pin) |
| IO Panel |
mPCIe Combo Card Clear CMOS Button ROG Connect Button 4 x USB 2.0 4 x USB 3.0 1 x Intel GbE 1 x eSATA 3 Gbps Audio Jacks Optical SPDIF Output/Input |
| Warranty Period | 3 Years |
| Product Page | Link |
The MVF is feature filled, with 8 fan headers 10 SATA ports total (including 1 mSATA/1 eSATA), 6 USB 3.0, Q-LED and overclocking options. Our direct comparison is to the ASRock Z77 OC Formula, which uses a Broadcom NIC rather than an Intel, has no WiFi, no mSATA, no eSATA, basic ALC898 audio only, has no TPM, supports only up to x8/x8, and has fewer x1 slots. The Z77 OC Formula compared to the MVF does have the upper hand on some hardware fronts – it has two more USB 3.0, two more USB 2.0, a PS/2 combination port, onboard buttons for quick overclocking, PCIe disable switches and two BIOS chips.
ASUS Maximus V Formula BIOS
The most important feature in a BIOS design is responsiveness – if an option does not change immediately, or the user has to wait around, no-one is going to like it regardless of what options you put in. This is unfortunately a poignant truth; discussing with manufacturers about why certain features are not implemented in modern graphical BIOSes brings up the issue of responsiveness - if it will not respond quickly, it cannot go in. So while it might be nice to have an OS-like or Android-like BIOS system that is highly interactive, it might not work as fast as you would like. Surely this should not be an issue – we are dealing with systems built around the latest super fast CPUs, so why should choosing an option in the BIOS be slow? This is all down to the rather legacy way we still deal with the BIOS along with the boot services and old start up POST sequence. The UEFI 2.1 standard does not actually define a user interface, but rather the Human Interface Infrastructure (HII). When reading the HII spec, it makes designing a UEFI sound boring - as simply a list of forms and verbose markup languages alongside static images, which is not ideal if you have to fit everything into a 64 Mbit package and make it look amazing. It makes me wonder how exactly MSI put those games into the early P67 BIOSes.
ASUS tell me they have tested many different ways on how to represent their data. Of course one design does not please everyone perfectly, and it is hard to add in everything that everyone would like due to the human interaction factor, and the need for everything to work in an instant. As a result, what you see is what you get – a form based interface with static images, but at least it looks better than most! ASUS also like to keep options neat and tidy, offering the extreme enthusiasts the ability to tinker, as well as improving compatibility with different types of memory, RAID card et al.
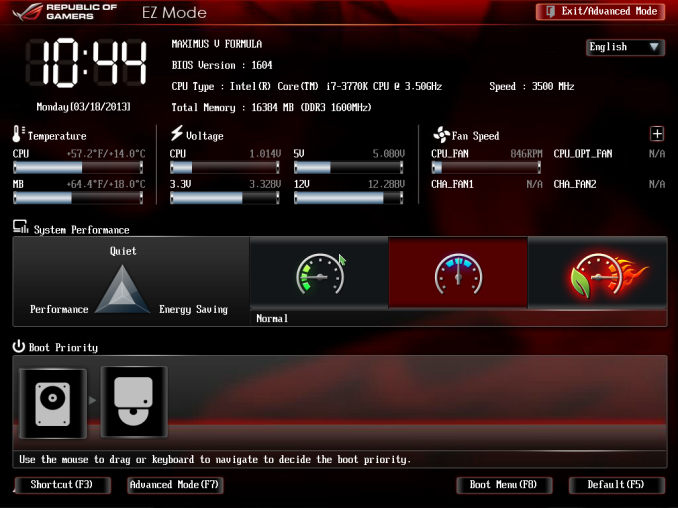
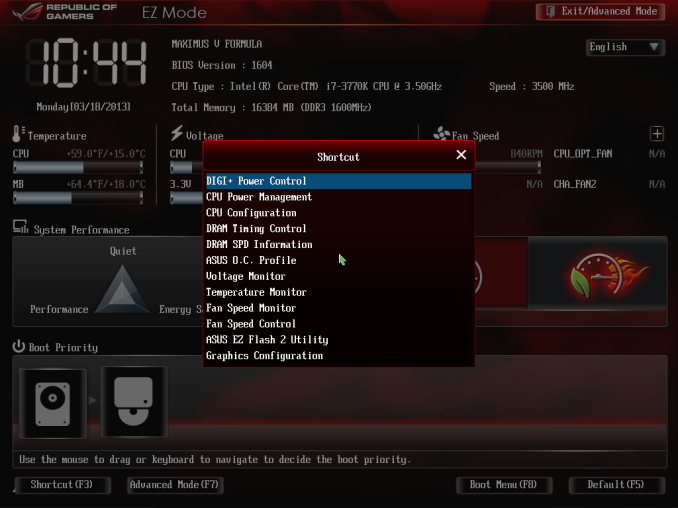
Being an ROG board, first entry into the BIOS is usually to advanced mode, but stepping back out a bit brings us the ROG version of EZ Mode:
The ROG version is essentially a red themed ASUS BIOS, with different text colors, ROG icons, and a red styled background. We get the important info in EZ mode, such as motherboard in use, BIOS version, CPU name and speed, Memory amount and speed, temperatures, voltages, fan speeds and boot priority. ASUS adds in a trio of buttons for system performance – from left to right we have energy saving, normal, or performance. Along the bottom are a series of quick menus, such as shortcuts to areas of advanced mode and straight to the boot menu. In order to change language, the option is on the top right, although a button on the bottom would also be preferable.
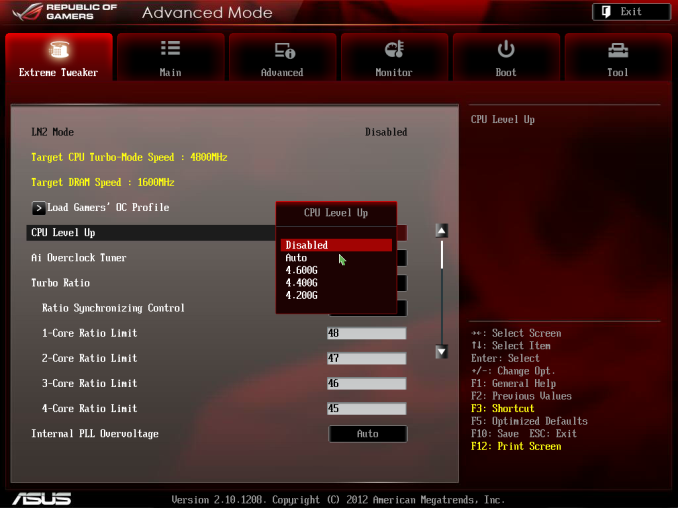
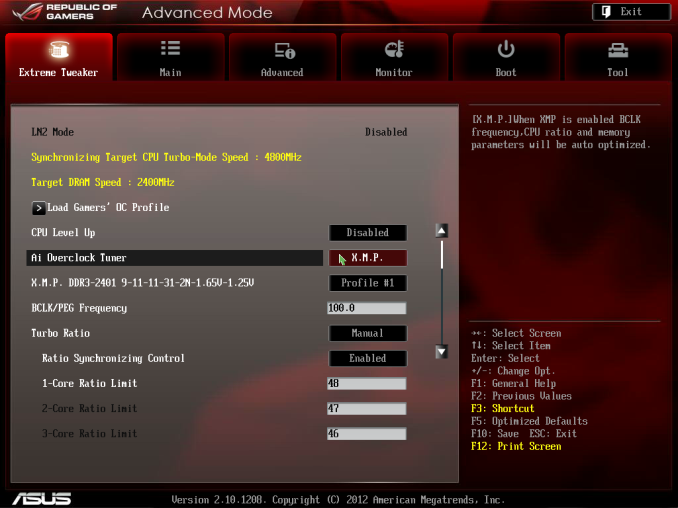
Moving into the Advanced Mode we come across Extreme Tweaker, also known as the ASUS overclocking options. Almost similar to what we saw in the ASRock Z77 OC Formula, albeit a lot more varied – in order we have the automatic OC options, CPU and memory options, sub menus for DRAM timings and DIGI Power Control, voltage options and finally skew options.
If you cast your mind back to the BIOS of the ASUS ROG X79 Rampage IV Extreme, we had overclock profiles that catered for different mind sets – the gamer, the overclocker, and the extreme overclocker. The MVF is a little more reserved here, offering a single “Gamers’ OC Profile” and three/four different options via CPU Level Up when you power the system out of the box. The Gamers’ OC Profile gives a staggered multiplier overclock across core loading (48/47/46/45), whereas the CPU Level Up options go for a fixed speed overclock (4.6 GHz, 4.4 GHz, 4.2 GHz) – though neither of them deal with memory.
Manual overclockers can set the AI Overclock Tuner option to ‘Manual’ or ‘XMP’, which gives the user access to adjusting the CPU BCLK and multiplier frequencies on both a per-core and all-core basis. There are additional options for various benchmarking improvements (Xtreme Tweaking/SPI Booster), but all voltage and power options must be performed further down the list.
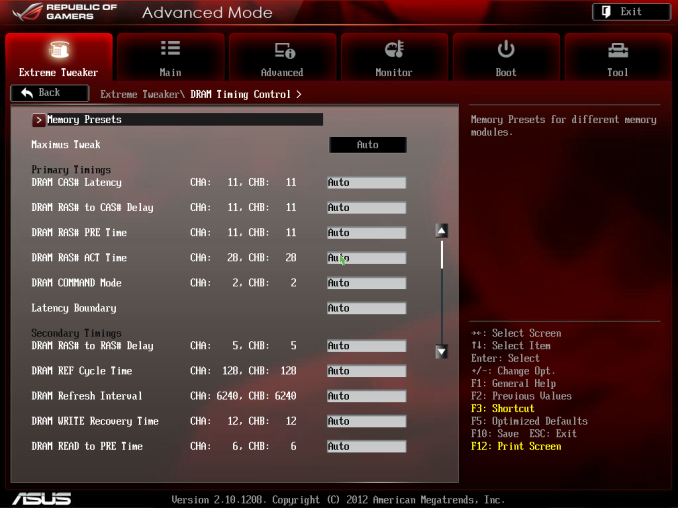
Underneath the memory selection are a set of four options – DRAM Timing Control, GPU.DIMM Post, CPU Power Management and DIGI Power Control. The first gives the user access to the subtimings for the memory:
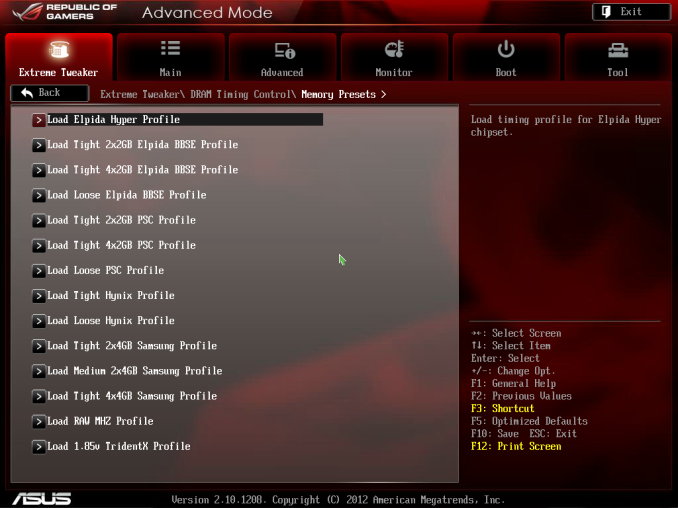
There is also a submenu for ASUS recommended sub-timings if you happen to own particular high end memory kits:
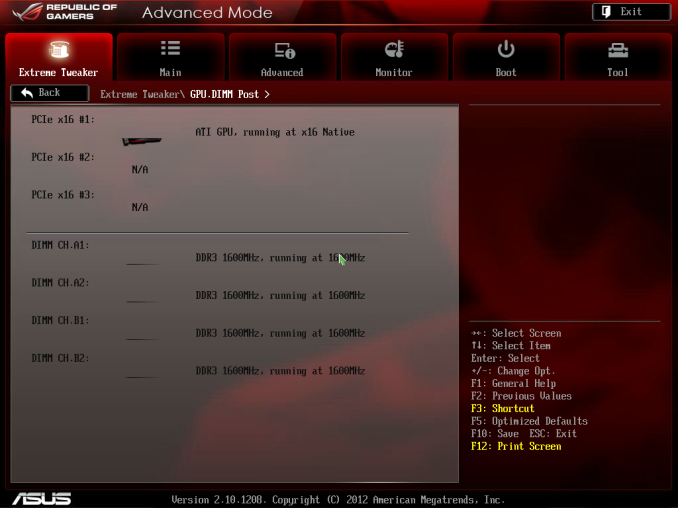
The GPU.DIMM submenu in Extreme Tweaker is a useful feature to determine what GPUs and memory the system actually recognizes at POST. Thus if a memory stick has failed, or a GPU is running at the wrong lane allocation, it can all be checked here without fiddling around for a couple of hours determining what is wrong.
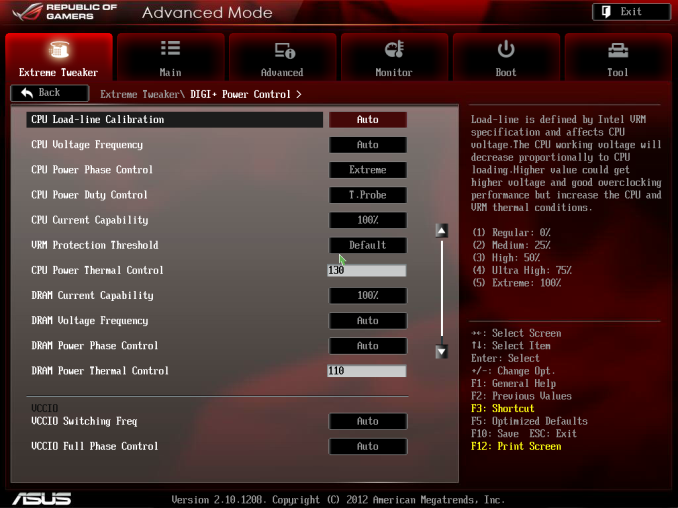
The CPU Power Management submenu offers options to enable/disable SpeedStep and Turbo Mode, and the DIGI Power Control contains our regular array of ASUS options for Load Line Calibrations, Phase Control, Current Capabilities and Voltage Frequencies, for CPU, DRAM and VRM options.
Users have access to the ROG forums for extended guides on overclocking the MVF – we will cover our basic overclocking strategy later in the review.
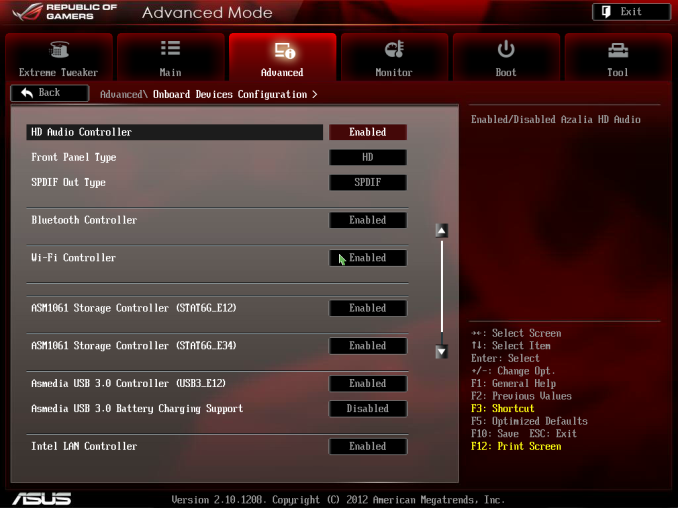
Aside from overclocking, we have our usual array of BIOS options for controller and component settings. In the Advanced menu there is access to SATA configurations (for RAID or IDE, AHCI by default), Intel RST, Intel SRT, iGPU configuration, forced PCIe lane speed settings, USB configurations, Controller (USB 3.0/SATA 6 Gbps/WiFi/BT/LAN/Audio) settings and LED control. The last one is particularly useful if the onboard lights are a distraction in the evenings.
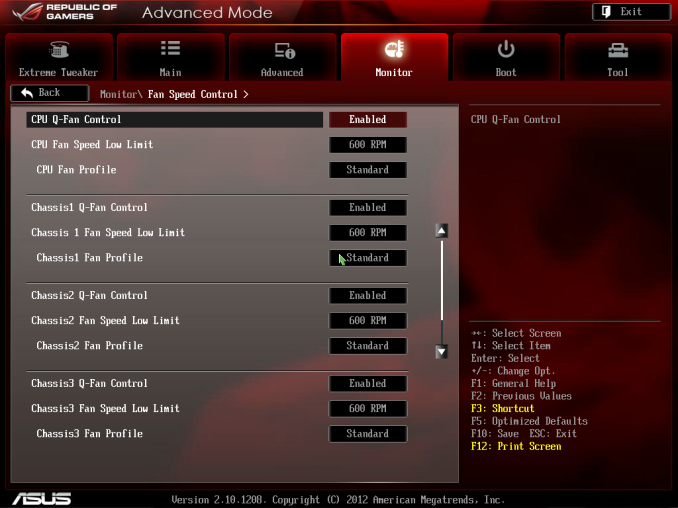
The BIOS also offers the wide array of monitoring menus, for voltages, temperatures (both included and optional sensors) and fan speeds. The fan control settings are in the Monitor -> Fan Speed Control menu:
The fan controls in the BIOS are better than fan controls on most motherboards overall, however the ASUS package offers better fan control in the software package. More on that in the software section of this review.
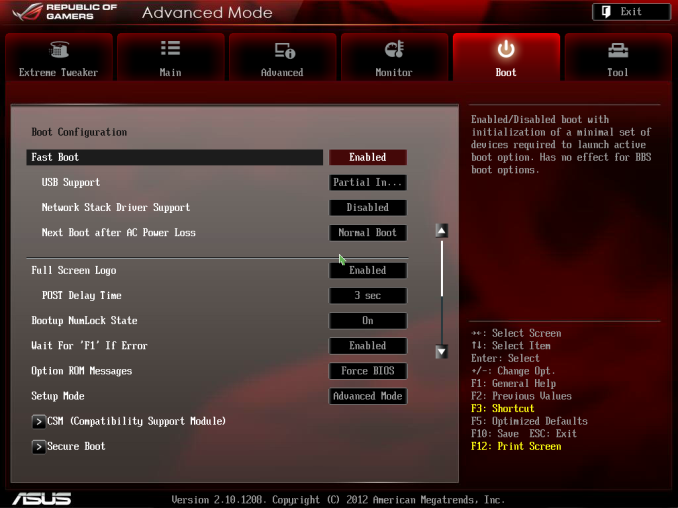
The Boot menu of the BIOS offers fast boot options, as well as boot order changes. As ASUS has migrated to the CAP BIOS system, this should allow the motherboard to take full advantage of the fast booting options that Windows 8 offers, along with compatible hardware. Fast booting into Windows 8 is great for those that use it.
The MVF BIOS also offers an EZ Flash Tool to update the BIOS, a series of OC Profiles to enable enthusiasts to save settings, a Go Button file to enable a one push overclock, and an SPD information tool.
Overall, the ASUS BIOS is well laid out and offers a wide variety of functionality. In direct comparison to the ASRock Z77 OC Formula BIOS, I would give the nod on looks to the ASRock. The ASRock offers a nice background (subjectively speaking), more detailed icons, more Auto-OC options, a few little quirky tools and more content on the screen due to the smaller font size. The ASUS in contrast caters well for the overclocker wanting to push the boundaries with the wide variety of options.
ASUS Maximus V Formula Software
In the past couple of years, I have often touted ASUS software as one of the better solutions on the market, covering most of the bases in terms of what software should be doing as part of the motherboard package. This typically falls under the heading of AI Suite II, an all-in-one toolbar for the separate optional menus that can vary between the product line or to accommodate new functionality. The ROG motherboards, like the MVF, usually get the best versions of the software first, along with a themed skin to complete the experience.
The first anyone sees of the package is from the Install DVD, which splits the package into two halves between drivers and software. Each of the halves offers a two click Install-All, although users can select which options not to install before proceeding with the automatic installation. The system will install the options with a sufficient number of reboots, although after the final reboot the system will not load up the DVD again – users will have to reload the DVD to access the software half after the driver half and vice versa.
I did come across a minor issue with my Install CD, which is not entirely representative of all end user experiences – part of the software suite failed to install based on a bad disk. It would cause errors that would influence the system in undefined ways, such as missing half of AI Suite, or not allowing me to install various GPU drivers. In order to solve this, I had to go online and download AI Suite in its entirety and install the latest version therein; the rest of the disk installed without a hitch after this. I could have had a bad disk, but anyone could get a bad disk. Unfortunately it has the ability to taint the experience somewhat, especially on the side of the person trying to fix the problem.
After installation of the drivers and software, several utilities automatically run as window loads, along with applying an ROG desktop theme with backgrounds, icons and mouse pointers. After staring at the standard Windows 7 desktop for over 60+ motherboard reviews these past couple of years, any change seems like a good change! The following icons are also placed on the desktop:
![]()
CPUID ROG CPU-Z
Much like the themed CPU-Z versions we have seen from EVGA and Gigabyte, ASUS also have a version which we saw with the X79 ROG range. For non-enthusiasts, CPU-Z is essentially a system verification utility – it tells the user what the system is running in terms of CPU, motherboard, memory, and what speeds all these components are running at. CPU-Z is the basic tool used by enthusiasts to verify their system to others, either by screenshots or uploading a submitting a verification request to the CPU-Z servers.
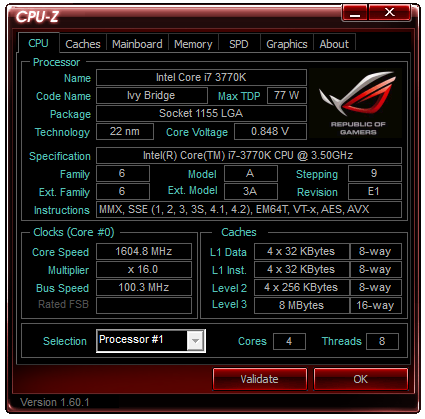
When extreme overclocking, it is often standard to have two CPU-Z windows open showing the CPU and Memory tabs open in order for screenshots to verify what model and speed is being used during testing. We also use it in our AT overclock testing, to verify turbo modes are being accurately applied and reported load CPU voltages.
ASUS PC Diagnostics
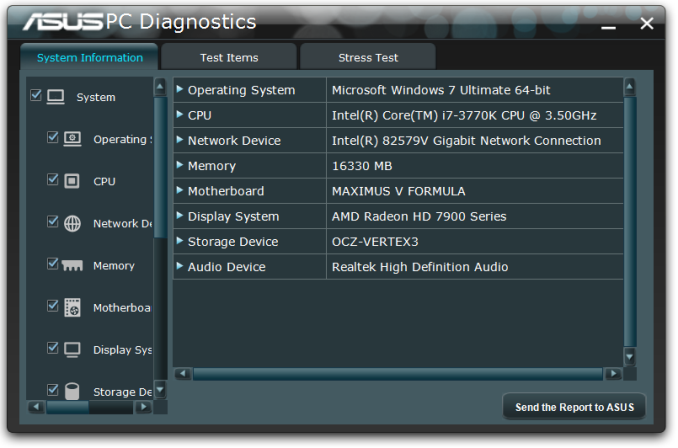
Have you ever had an issue with a system, only for the manufacturer’s support team to request that you download, install and run a third-party program such as AIDA and submit the test file to them? A couple of motherboard manufacturers are now attempting to streamline this process by using their own software – ASUS has created PC Diagnostics for this reason.
The software allows users to submit a report of what their system is direct to ASUS, along with all the extra info ASUS may need to collect (chipset driver versions, for example). The software also offers a small test section in order that the system is capable of the basic tasks.
ASUS MemTweakIt
Tools to adjust memory options while in the OS are few and far between. In the spirit of tweaking and competition, part of the ROG package is MemTweakIt – software to adjust as many memory sub-timings as is possible in the OS. It also incorporates a DRAM Efficiency Score for ASUS users to compare how ‘tight’ their memory timings are compared to others.
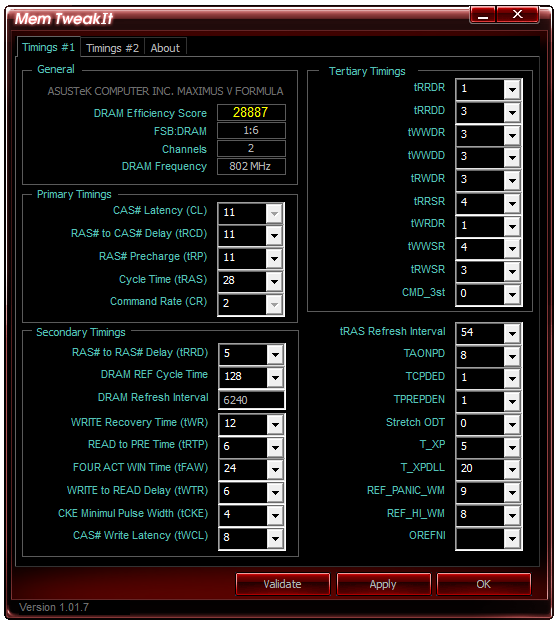
We used MemTweakIt in our overview of Ivy Bridge memory performance as a synthetic base to predict optimal % improvements (as it is very easy to show synthetically better memory in read/write speeds, but that often does not translate into real world improvements). For the most part, the MemTweakIt score did represent a good indicator of memory kit difference for cherry picked benchmarks.
ASUS EZ Update
One critical point of software packages I have been calling manufacturers out on recently is the ability for the software package to update itself. MSI are currently leading the field with this and their LiveUpdate software which queries MSI servers for the latest BIOS, driver and software updates, downloads them automatically, and then installs them. ASUS’ version of this software is EZ Update, a basic interface for a simple job.
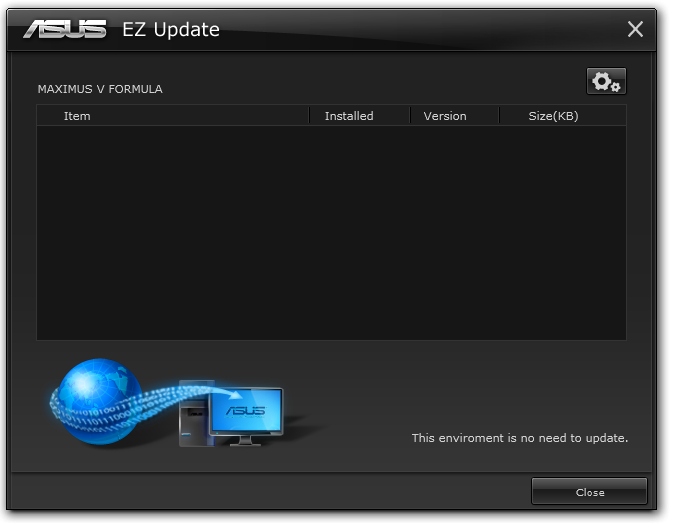
While nice in principle, I never got it to actually work – I installed old versions of software and drivers and tried to get EZ Update to get the newer files, but it always returned ‘This environment is no need to update’ [sic].
ASUS AI Suite II
The bulk of ASUS’ software process is encapsulated within AI Suite II, which comes in the form of a bar menu to load the different packages:
CPU Level Up
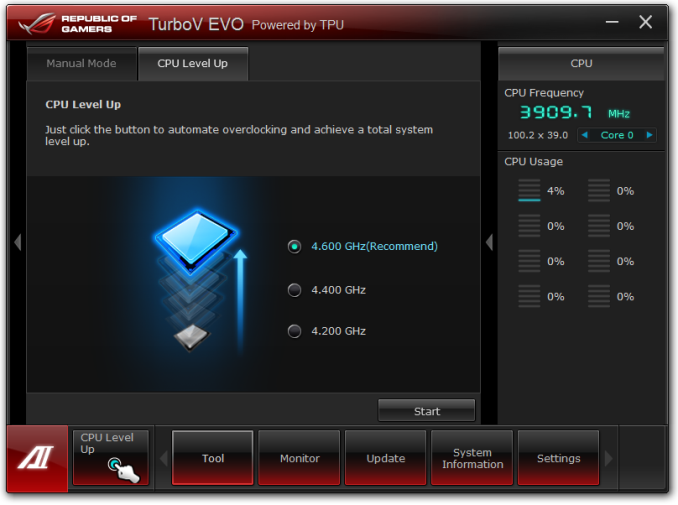
The automatic overclocking tool for ASUS is CPU Level Up, part of the TurboV EVO functionality. It gets a special place on the AI Suite II menu bar as the focus of an ROG motherboard like the MVF is overclocking.
On our i7-3770K sample, CPU Level Up offers three speeds similar to the BIOS – 4.2 GHz, 4.4 GHz and 4.6 GHz. In order to apply these, the system restarts – it is worth noting that none of these options affect the memory or BCLK settings. I prefer this ten-fold over the previous system of ‘Fast’ and ‘Extreme’ overclock options, although ASUS have a way to go to offer the level of automatic overclock settings that ASRock do on the Z77 OC Formula. We tested this CPU Level Up options (successfully) in the overclocking section of this review.
TurboV Evo
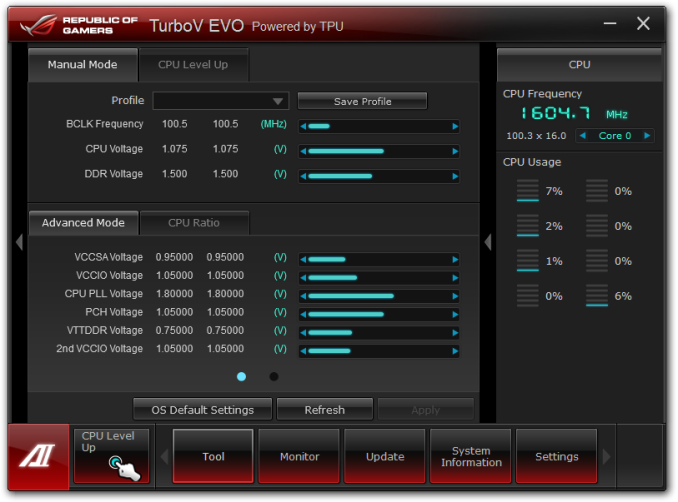
The manual mode of TurboV Evo is as the name suggests – the manual overclocking tools for the operating system. Like the BIOS, our options extent to BCLK, voltages and multipliers, with Power Management in the DIGI+ Power Control menu.
The options are well laid out, but I could find two ways to improve what we get. Firstly, I am a user that prefers to type voltages and values, rather than rely on sliders. Secondly, ASUS need something similar to Gigabyte TweakLauncher (GBTL) for extreme overclockers. GBTL is a simple small program with no GUI per se but allows extreme users to apply a setting instantly with minimal instability – ASUS could do with this (!).
DIGI+ Power Control
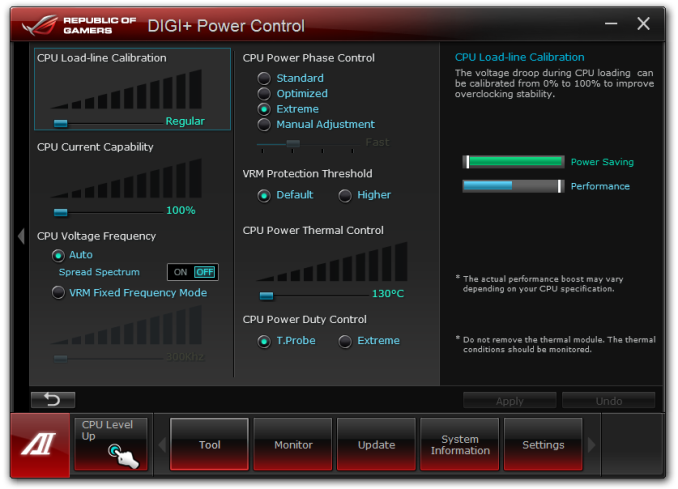
ASUS like to actively promote their all-digital power delivery solution, where users can adjust the CPU voltage response (similar to throttle response in cars) and current capabilities in CPU, DRAM and VRMs. For the regular user not accustomed to overclocking, this menu has no relative meaning, although for extreme users it allow an extra level of control, whereby affecting options such as voltage frequency will improve overclocking potential under sub-zero conditions. Another benefit for DIGI+ is thermal control, allowing to push the boundaries further still.
Energy Processing Unit (EPU)
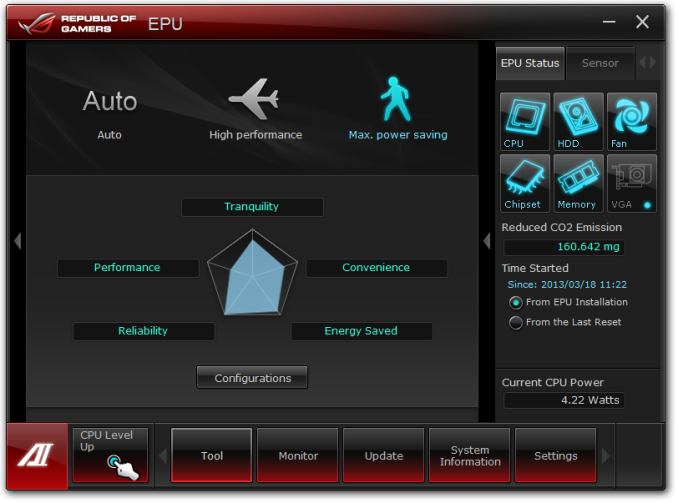
Typically high powered enthusiasts have little to care about regards the power of their system – whether they consume 850W or 800W is of no concern, they want the best. However a business user may consider saving power to decrease office related costs on utilities. Now a business user wouldn’t necessarily buy an ROG board (the extra cost would outweigh any savings made), but the energy saving utilities ASUS offers span the entire product line, top to bottom. So it is there if you need it.
ASUS Fan XPert II
One of the big marketing points for the MVF is the obscene level of fan control that the software offers. Fan XPert II lays the smackdown at the feet of all other motherboard manufacturers in terms of fan control. I regularly rant about fan controls, and to summarize:
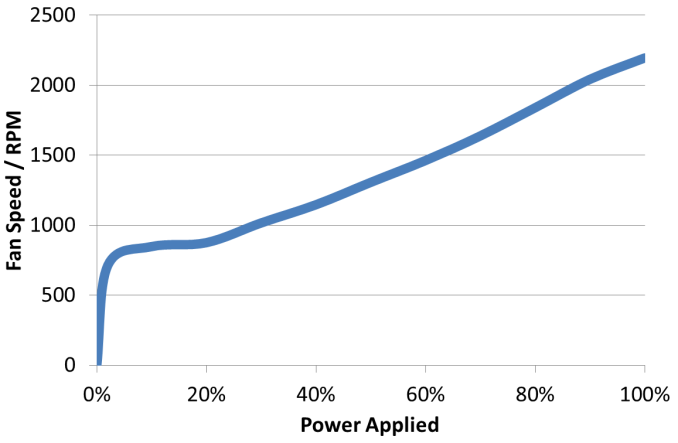
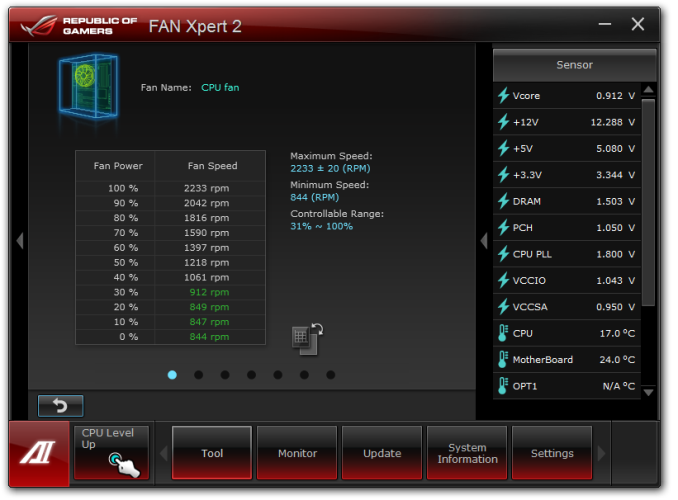
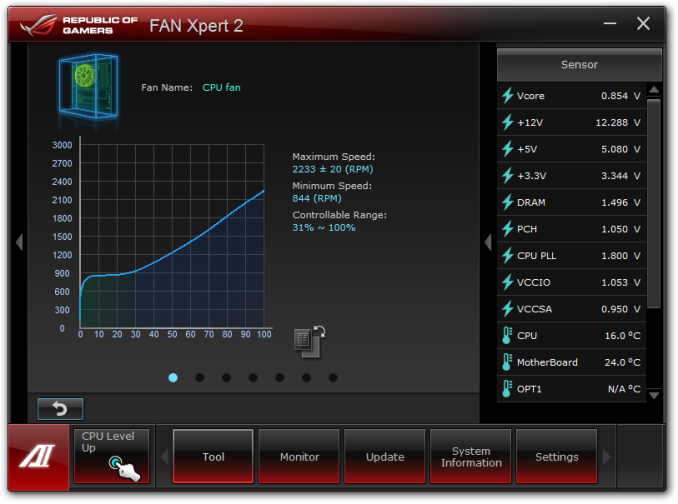
A common mistake is that a PC fan increases its speed proportional to the power applied. The assumption says that if I apply 50% power to my fan, it will run at 50% RPM. Reality is not that simple – a fan has a threshold power rating, such that below the power it will spin at a nominal RPM. Take for example my CPU fan:
Below the threshold power of 20% (so from 2%-20%), the fan spins at ~800 RPM (~30% of max). From 20% to 100% power, the fan speed increases roughly linearly with power applied.
Most motherboard manufacturers do not recognize this – it is very easy (even with a 3-pin fan header) to obtain a graph like this. The only thing that affects the granularity of the graph is the fan controller used (anywhere from 2+ power points). With a graph like this, the manufacturer can have software to let the user select the intended fan speed as a percentage of the max, and interpolate what power is required to make the fan spin at that RPM.
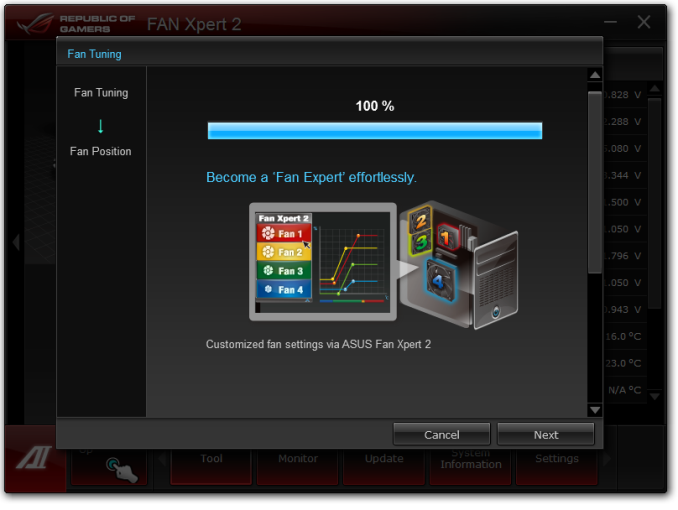
Fan XPert II starts with testing all the fans plugged into the motherboard:
The testing gives the system a set of fan curves such that it has access to the following data:
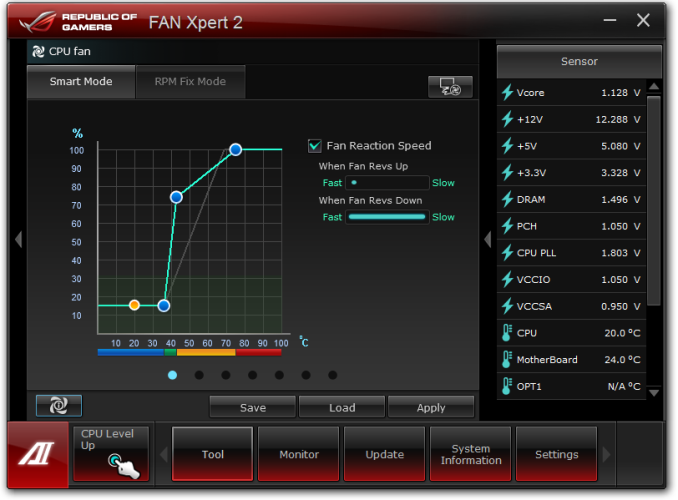
This means that when ASUS offers a variation of fan modes (Silent, Standard, Turbo) they can apply the right power at the right time. It also allows for manual adjustments to do what they promise:
This graph shows a fan speed percentage against CPU temperature. The fan speed percentage calculated from the fan profiles tested above, rather than what most manufacturers do – just apply that percentage of the power and accept whatever fan speed comes out. It would be akin to asking for a 25m swimming pool, and getting a 30m swimming pool ‘because the company starts at 5m and then puts in what you want’. OK, perhaps a bad analogy, but so many companies are doing it wrong. So I am glad ASUS are doing it right. ASRock are getting there, albeit slowly, and I feel other motherboard manufacturers might be having a rethink on how they manage their fan headers.
The only step up now is how the system polls the temperature readings, as some areas of the system may want to read from one particular sensor rather than the other, or as a function of fractions of multiple sensors. ASUS keeps this technology for their Sabertooth line of motherboards due to their 10+ temperature sensors.
One final point I would like to make on Fan XPert II – unfortunately ASUS limit the manual fan graph above to a three point gradient, rather than manually allowing the user to select multiple points. Also the issue of hysteresis, whereby when the system cools down we want the fan to still spin fast to cool the system down quicker – ASUS have sort of tried to do this with the ‘Fan Reaction Speed’ options listed in the image above, however this does not provide a quantifiable solution as much as the rest of the package does. What we need is a forward and backward fan curve for each fan, such that the system can react appropriately and the user can control the fan speeds (and audible noise) both up and down the spectrum.
Probe II + Sensor Recorder
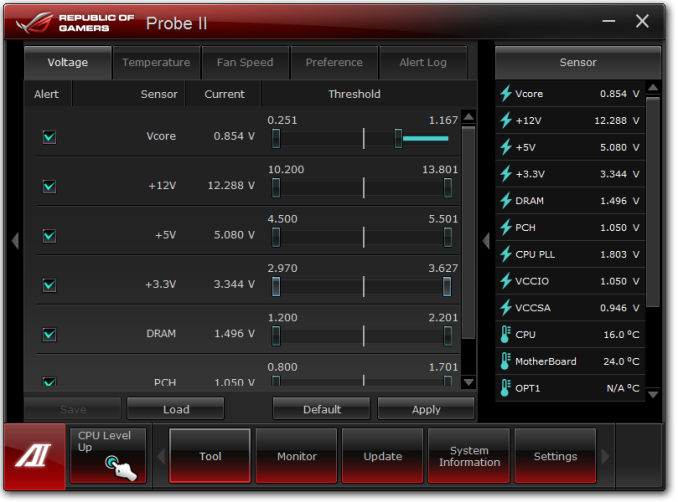
Part of the ASUS package tells you when temperatures are too high, or voltages spike, with a tooltip from the toolbar. This is Probe II in action, which allows users to customize the highs and lows that cause this message.
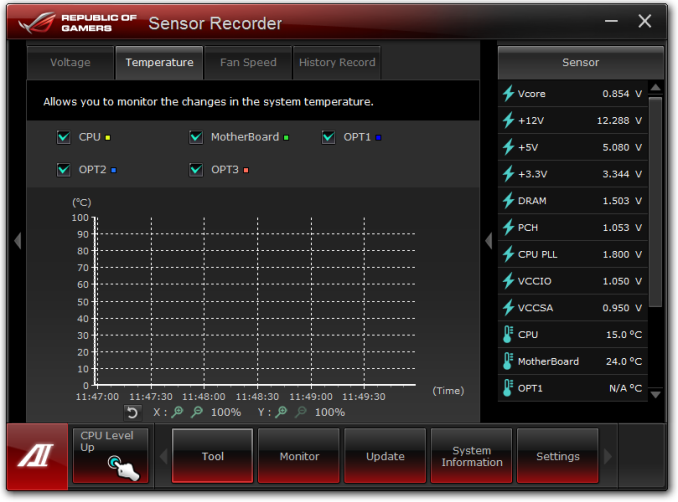
In the image above, the VCore notification for high CPU voltage has been decreased. In a similar vein to Probe II is the Sensor Recorder software, allowing users to monitor over time how the system reacts to loading and/or environment changes.
ASUS AI Charger+ and USB Charger+
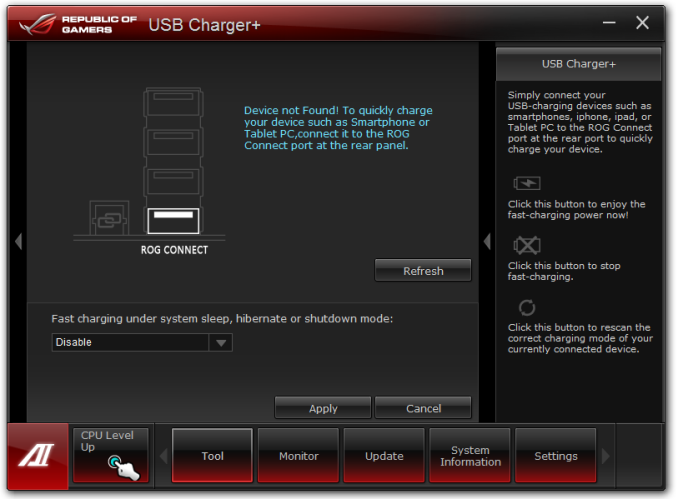
Another feature rapidly gaining traction is the ability for USB ports to increase the level of current to the device attached. This allows devices such as tablets, phones and others to charge quicker if they adhere to various charging standards. AI Charger+ works from the USB 3.0 ports to any BC1.1 compliant device, and USB Charger+ controls the ROG Connect port for any device. Both tools allow for quick charging under sleep states or when the PC is turned off, although for best performance the device should be plugged in while the system is on before it goes into sleep modes. It should be noted that while other manufacturers offer quick charging capabilities, these often only extend to Apple devices - ASUS want to cater for all USB devices as necessary.
USB 3.0 Boost
As time goes on, protocols and the way devices interact evolves. Devices get faster, protocols change, and the way these devices talk to each other becomes more and more important. One of the important components in all of this is the operating system and the driver being used to navigate the data. If the OS or driver is old, the data transfer can be non-optimal due to the limited methods of communication, especially compared to the newest standards available. Thus when we pair Windows 7 with USB 3.0, there are improvements to be had.
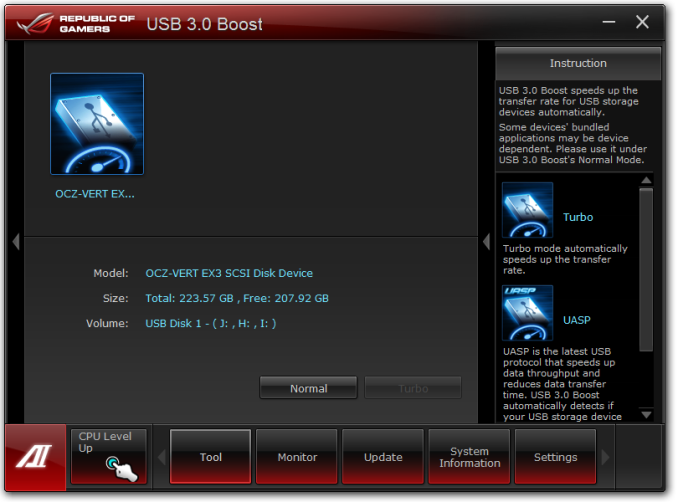
ASRock have their XFast USB, which implements and injects an improved protocol driver into the OS and massively speeds up bulk transfers at the expense of latency. ASUS’ method is USB 3.0 Boost – giving updated drivers for chipset derived USB 3.0 ports and UASP protocol for capable controller ports with appropriate device s attached. UASP is an updated list of commands to help round trip latencies and bandwidth, providing up to an order of magnitude quicker transfers and small transfer sizes, as we tested in our P8Z77-V Pro review.
ASUS Update
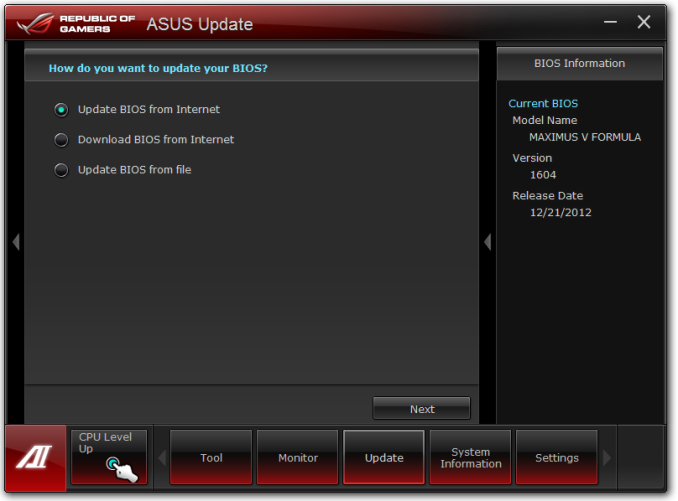
Users not willing to play around in the BIOS for BIOS updates can do so via the software interface in AI Suite. The software will search the ASUS servers for the latest BIOS revision, download it and install it as required.
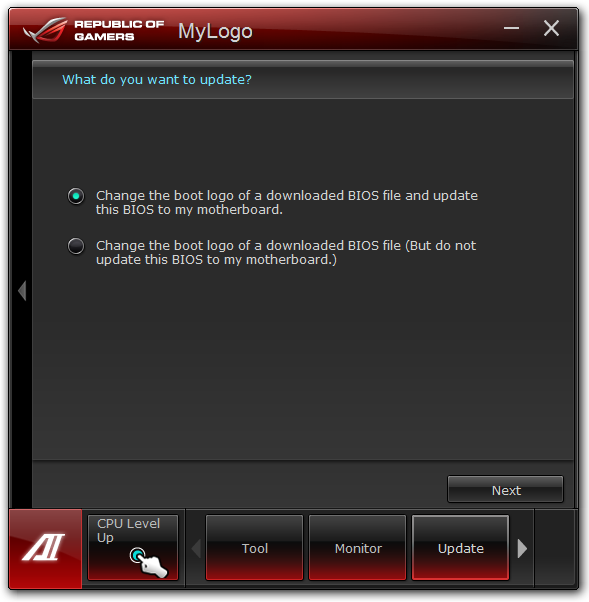
ASUS MyLogo
Ever wanted to update the image shown during POST? I did for a family system build once and it was well received. Similarly, clan gamers can all have the same POST screens and show off who they game for during the brief two to five second blip when the image is seen. The ASUS MyLogo software does this relatively easily in a few clicks.
USB BIOS Flashback
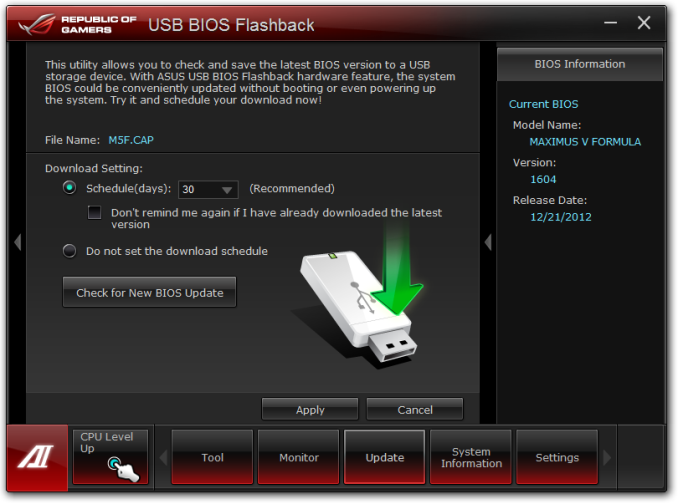
Among the wealth of ASUS features that make proper sense to enthusiasts to include on everything is USB BIOS Flashback. This feature allows the user to update the BIOS via USB without a CPU, memory or a GPU installed. While it is predominantly a hardware feature, the software element in AI Suite allows a user to prepare a USB with a BIOS file without worrying about renaming the file.
ASUS GameFirst II
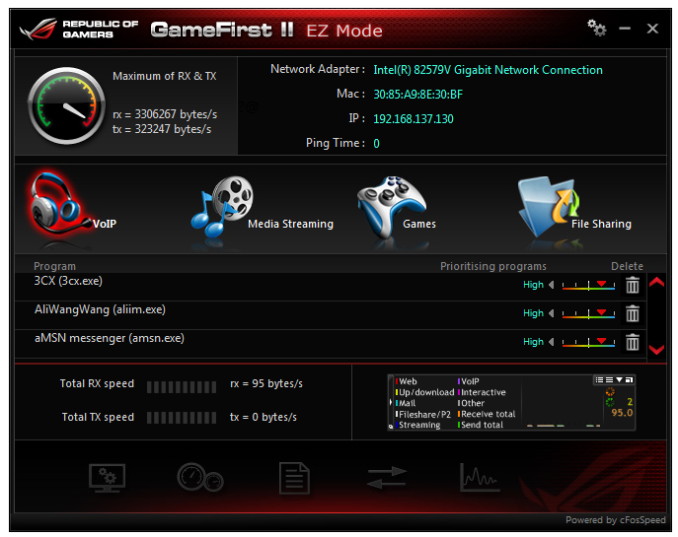
The final element of the ASUS software to mention is GameFirst II, the network management tool. Built from the same software license that a couple of other manufacturers use, GameFirst II has a few additional customizations not available elsewhere:
GameFirst II is designed to change the priority of different software with relation to the network interface – either wired, wireless, or multiples/combinations of both. Thus a gamer can, with a single click, give games priority over media streaming, or VOIP priority over file sharing.
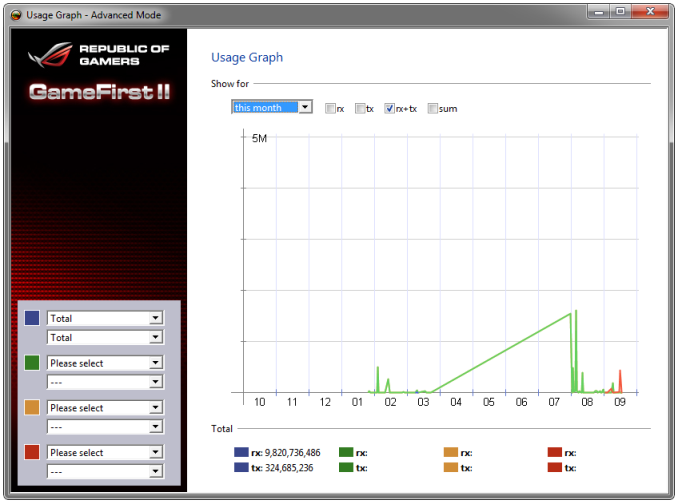
The advanced features of GameFirst II are similar to those of other manufacturers that use the license – traffic shaping, adapter control, usage limits and protocol management, albeit with an ROG skin.
ASUS Maximus V Formula In The Box
I am always impressed when a motherboard manufacturer can elbow in a decent set of extra kit in with a SKU. With motherboard margins getting tighter as the total motherboards being sold in 2012 was lower than 2011, it gets harder and harder to find the perfect package. Some golden rules exist – a decent set of SATA cables (at least ½ the number of SATA ports), antenna if WiFi is included, a USB 3.0 panel/bracket if there are at least two USB 3.0 headers on board, and ideally both a rigid SLI and CrossFireX cable if the motherboard is multi-GPU capable. For the high end products, we want something that differentiates the product line, such as a themed USB 3.0 panel, perhaps a gaming related keychain, or motherboard standoffs for overclocking oriented boards.
The ASUS MVF costs a pretty penny for a non-PLX enabled board, despite the wealth of features on board. In terms of in-the-box contents, this translates to:
Rear IO Shield
User Guide
Driver Disk
ROG Door Sign
Cable Labeling Stickers
Six SATA Cables
Flexi-SLI Bridge
WiFi/mSATA Combo Card
RF Cables and Antenna for WiFi
ROG Connect Cable
Q-Connectors for Front Panel
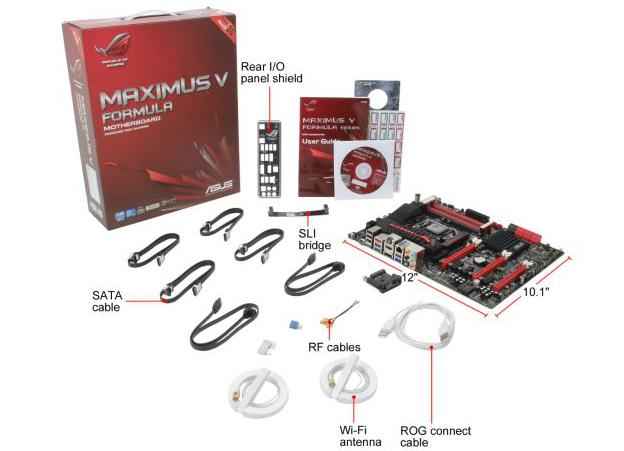
This is a typical ROG Gene/Formula gamut of box contents, and satisfies most of my in-the-box criteria listed above. Aside from the door sign, there is nothing ROG labeled, though using the ROG Connect cable is an obvious sign of an ROG board. I am becoming a big advocate of systems that include plastic standoffs for overclock testing, like the ASRock Z77 OC Formula, so it would be nice to see some here.
ASUS Maximus V Formula Overclocking
Note: Ivy Bridge does not overclock like Sandy Bridge. For a detailed report on the effect of voltage on Ivy Bridge (and thus temperatures and power draw), please read Undervolting and Overclocking on Ivy Bridge.
Experience with ASUS Maximus V Formula
As luck would have it, conditions were perfect for overclock testing on the MVF. Ambient temperatures were low, giving an idle CPU temperature of 15°C on our open test bed and TRUE Copper cooler.
Automatic overclocking options are found both in the OS and BIOS, and for the most part the options (and the results of those options) were the same. While there was not as many options to choose from compared to the ASRock Z77 OC Formula, all the options worked without much of an issue. A couple of points concerned me however – voltages for various clock speeds seemed high (in order to make sure more processors hit the speeds), and no memory OC took place.
Manual overclocking took advantage of our Z77 and i7-3770K overclocking experiences. The MVF accurately applied our selected BIOS voltage at load, and eventually reached 5.0 GHz at 1.400 volts stable under our testing conditions, hitting only 87°C under OCCT load. We tried for 5.1 GHz, although even at 1.500 volts PovRay was not stable and temperatures hit 99°C. The only other motherboard to hit 5.0 GHz stable in our testing was the Z77 MPower, although air testing is always limited by temperatures. This is one area of testing in our reviews we wish to change in the future, to using chilled water.
Methodology:
Our standard overclocking methodology is as follows. We select the automatic overclock options and test for stability with PovRay and OCCT to simulate high-end workloads. These stability tests aim to catch any immediate causes for memory or CPU errors.
For manual overclocks, based on the information gathered from previous testing, starts off at a nominal voltage and CPU multiplier, and the multiplier is increased until the stability tests are failed. The CPU voltage is increased gradually until the stability tests are passed, and the process repeated until the motherboard reduces the multiplier automatically (due to safety protocol) or the CPU temperature reaches a stupidly high level (100ºC+). Our test bed is not in a case, which should push overclocks higher with fresher (cooler) air.
Automatic Overclock:
CPU Level Up software in the OS offers three settings – 4.2 GHz, 4.4 GHz and 4.6 GHz. These options are mirrored in the BIOS with two additional settings – CPU Level Auto and Gamers’ OC.
Results were as follows:
Overall, I personally found the voltages a little high, especially for CPU Level 1+2. The Gamers’ OC option is a great one button tool to get a nice overclock across the board.
Manual Overclock:
For manual overclocking we used the BIOS, starting at our nominal 4.4 GHz and 1.100 volt starting point. Given our previous overclocking experience, the following settings were also changed:
CPU Voltage Frequency: 500 kHz
CPU Power Phase Control: Extreme
CPU Power Duty Control: Extreme
CPU Current Capability: 140%
For every setting we tested stability using a PovRay run and five minutes of OCCT. While not an extensive stability test by any means, it allows us to quickly evaluate every setting on every motherboard in a similar fashion.
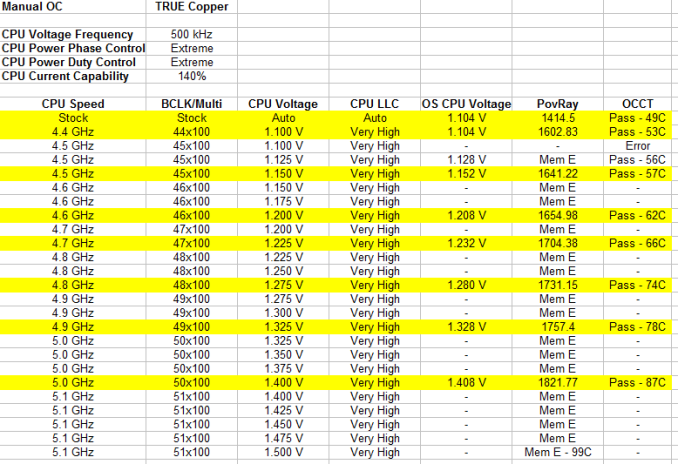
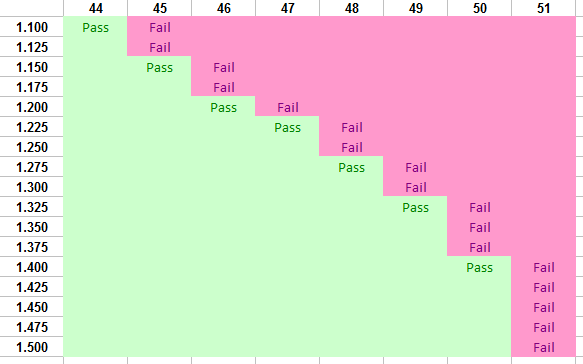
Hitting 5.0 GHz at 1.400 volts on our CPU is great. It is a shame we could not get 5.1 GHz, though I am sure under the right water cooling setup it would be possible.
Memory Overclocking
One common thought of ASUS boards is usually memory compatibility and the ability to push certain memory kits. ASUS spend a lot of time ensuring that those purchasing the high end memory kits can use them and push them to their limits (regardless of what real world effect it may have). For our memory testing I take a G.Skill 2x4 GB 2666 11-13-13 1.65 V kit and see where it goes.
Like all Z77 motherboards, the MVF handled XMP gracefully. Moving up a strap to 2800 C11 also provided no issue, being completely stable. What came next surprised me – the system successfully booted at DDR3-2933 C11! At this speed I was near to either the limit of the memory or that of the CPU IMC, having hit DDR3-2950 for overclock competitions. I nudged the BCLK up using TurboV EVO, managing to get DDR3-2962, a new personal record. At this point after a few seconds the system crashed spectacularly, suggesting that perhaps some more voltage or setting tweaks could get the DDR3-2933 stable. The MVF is the best Z77 motherboard we have tested for peak memory speeds so far under our methodology (I do not doubt that a memory enthusiast could do better!).
Many thanks to...
We must thank the following companies for kindly providing hardware for our test bed:
Thank you to OCZ for providing us with the 1250W Gold Power Supply and USB testing SSD.
Thank you to G.Skill for providing us with the memory kits.
Thank you to ASUS for providing us with the AMD GPUs and some IO Testing kit.
Thank you to ECS for providing us with the NVIDIA GPUs.
Test Setup
Power Consumption
Power consumption was tested on the system as a whole with a wall meter connected to the OCZ 1250W power supply, while in a dual 7970 GPU configuration. This power supply is Gold rated, and as I am in the UK on a 230-240 V supply, leads to ~75% efficiency > 50W, and 90%+ efficiency at 250W, which is suitable for both idle and multi-GPU loading. This method of power reading allows us to compare the power management of the UEFI and the board to supply components with power under load, and includes typical PSU losses due to efficiency. These are the real world values that consumers may expect from a typical system (minus the monitor) using this motherboard.
While this method for power measurement may not be ideal, and you feel these numbers are not representative due to the high wattage power supply being used (we use the same PSU to remain consistent over a series of reviews, and the fact that some boards on our test bed get tested with three or four high powered GPUs), the important point to take away is the relationship between the numbers. These boards are all under the same conditions, and thus the differences between them should be easy to spot.
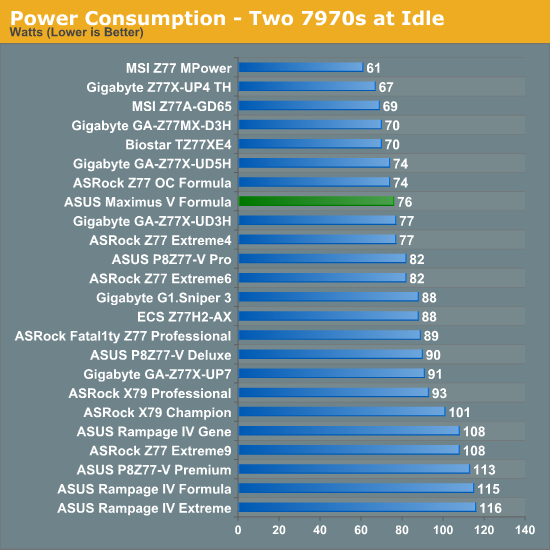
Out of the OC motherboards we have tested, the MSI Z77 MPower and ASRock Z77 OC Formula have been very efficient compared to almost every other board tested. The Gigabyte Z77X-UP7 came fairly low down in our power tests due to the number of power phases as well as the PLX chip onboard. The ASUS MVF follows the MSI and ASRock and stays in the top half for power consumption.
POST Time
Different motherboards have different POST sequences before an operating system is initialized. A lot of this is dependent on the board itself, and POST boot time is determined by the controllers on board (and the sequence of how those extras are organized). As part of our testing, we are now going to look at the POST Boot Time - this is the time from pressing the ON button on the computer to when Windows starts loading. (We discount Windows loading as it is highly variable given Windows specific features.) These results are subject to human error, so please allow +/- 1 second in these results.
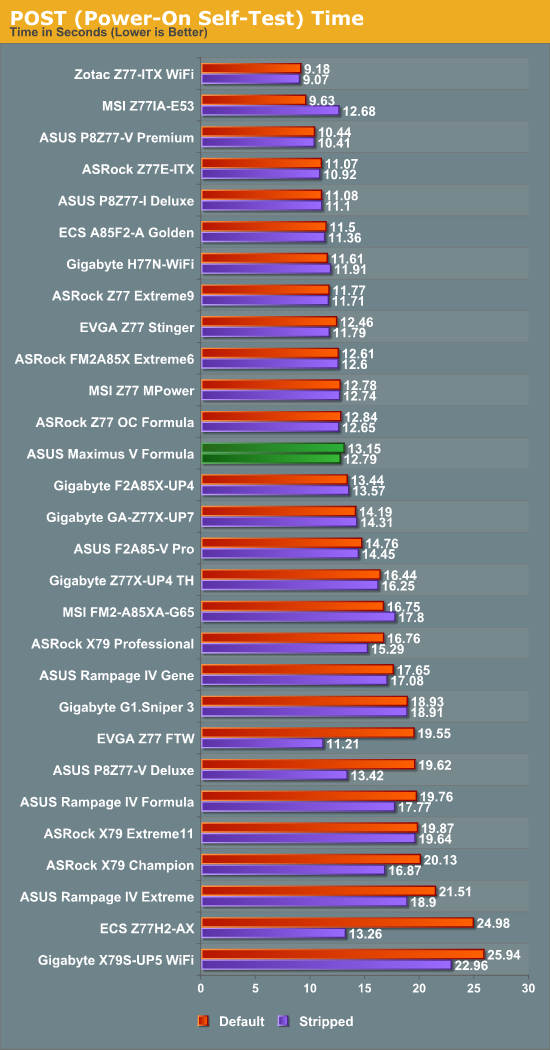
Out of the Z77 OC boards we have tested, MSI, ASRock and ASUS all hover around the 13 second mark for Windows 7 POST with dual 7970s and the Gigabyte UP7 is a second behind.
Rightmark Audio Analyzer 6.2.5
In part due to reader requests, we are pleased to include Rightmark Audio Analyzer results in our benchmark suite. The premise behind Rightmark:AA is to test the input and output of the audio system to determine noise levels, range, harmonic distortion, stereo crosstalk and so forth. Rightmark:AA should indicate how well the sound system is built and isolated from electrical interference (either internally or externally). For this test we connect the Line Out to the Line In using a short six inch 3.5mm to 3.5mm high-quality jack, turn the OS volume to 100%, and run the Rightmark default test suite at 48 kHz, 96 kHz and 192 kHz. We look specifically at the Dynamic Range of the audio codec used on board, as well as the Total Harmonic Distortion + Noise.
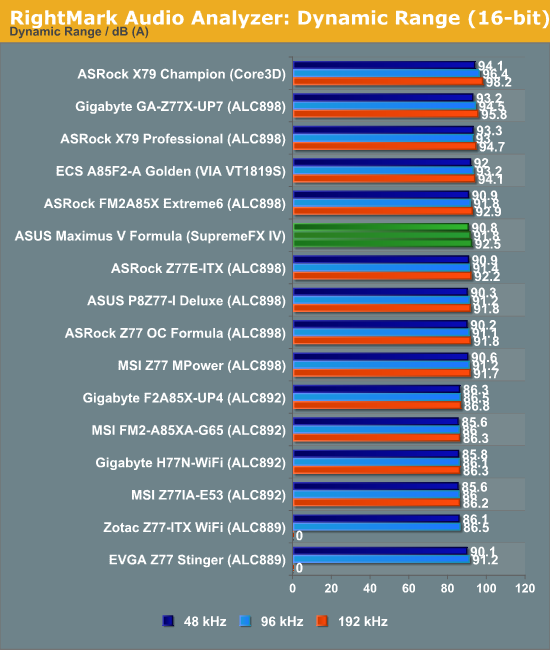
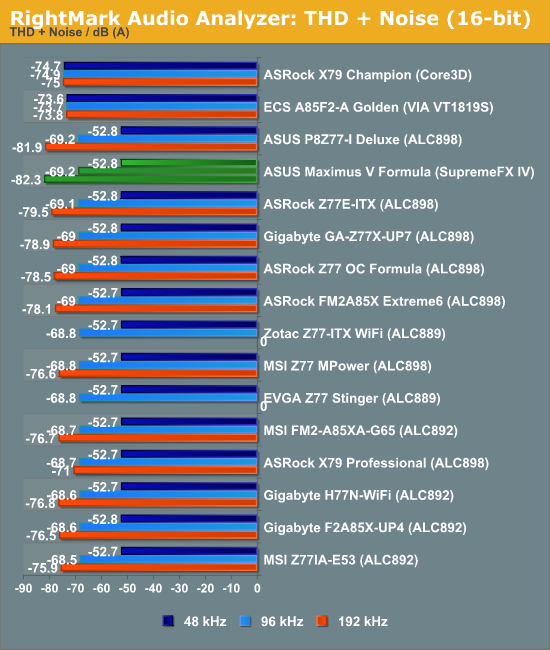
As part of our audio testing, ASUS spent a day with me discussing their audio setup. The majority of the talk has already been mentioned in the review, but a small part of it related to how we test audio. Audio is a very subjective experience, and very difficult to quantify in such a way that X > Y for all scenarios – especially so for me, as I will always admit to being tone deaf and singing karaoke like a deaf horse with a throat infection, So our RMAA results should always be taken with a pinch of salt.
Because our test uses the Line-In and Line-Out of the motherboard audio, we are ultimately limited to the lowest factor in this test. Thus if either the only either output or input has an advantage, the whole system comes across bad due to the part without the enhancement. Also regarding out testing, typically we do not modify any sound settings except volume, although there are enthusiasts that will tweak everything to the hilt. It is this tweaking that lets the audio solution ultimately shine, and get better numbers than what we do here.
ASUS rate their SupremeFX IV solution at 110dBA output with -95 dBA THD+N, which just so happens to be the rating the codec provider gives in their whitepaper. Specifically the codec is rated 110dBA SNR output and 104 dBA SNR input, which is far away from the results we achieved above. Talking with ASUS, we took heed from the advice on the RMAA website regarding setting up the test for the ASUS Xonar D2 sound card. This involves specifically changing the input/output quality in driver settings, as well as testing at 24-bit rather than the default 16-bit.
With these settings, we achieved a Dynamic Range value of 103.3 dBA SNR, and -86.5 dBA THD+N. Ultimately the best value we could get with our equipment was going to be 104 dBA, due to the input recording specifications having that maximum value, so to get 103.3 dBA input from an up-to 110 dBA SNR output as a premium result is something rather special.
USB 3.0 Backup
For this benchmark, we run CrystalDiskMark to determine the ideal sequential read and write speeds for the USB port using our 240 GB OCZ Vertex3 SSD with a SATA 6 Gbps to USB 3.0 converter. Then we transfer a set size of files from the SSD to the USB drive using DiskBench, which monitors the time taken to transfer. The files transferred are a 1.52 GB set of 2867 files across 320 folders – 95% of these files are small typical website files, and the rest (90% of the size) are the videos used in the WinRAR test.
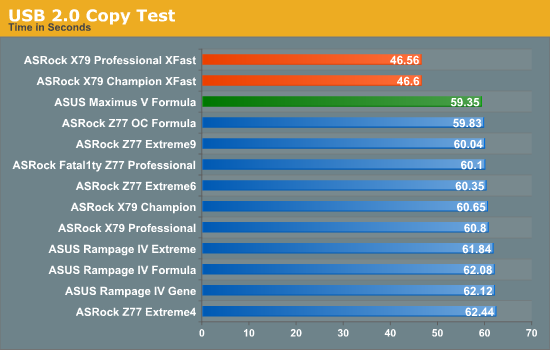
The ASUS MVF does a great job in our USB 2.0 test, beating almost every other motherboard (minus XFast), and coming top in our copy test by almost half a second from the ASRock Z77 OC Formula.
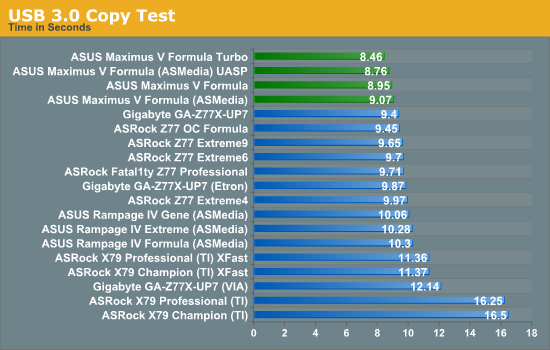
Similarly in the USB 3.0 testing, the copy test is where the MVF lives, with all variants competing for top spot.
DPC Latency
Deferred Procedure Call latency is a way in which Windows handles interrupt servicing. In order to wait for a processor to acknowledge the request, the system will queue all interrupt requests by priority. Critical interrupts will be handled as soon as possible, whereas lesser priority requests, such as audio, will be further down the line. So if the audio device requires data, it will have to wait until the request is processed before the buffer is filled. If the device drivers of higher priority components in a system are poorly implemented, this can cause delays in request scheduling and process time, resulting in an empty audio buffer – this leads to characteristic audible pauses, pops and clicks. Having a bigger buffer and correctly implemented system drivers obviously helps in this regard. The DPC latency checker measures how much time is processing DPCs from driver invocation – the lower the value will result in better audio transfer at smaller buffer sizes. Results are measured in microseconds and taken as the peak latency while cycling through a series of short HD videos - less than 500 microseconds usually gets the green light, but the lower the better.
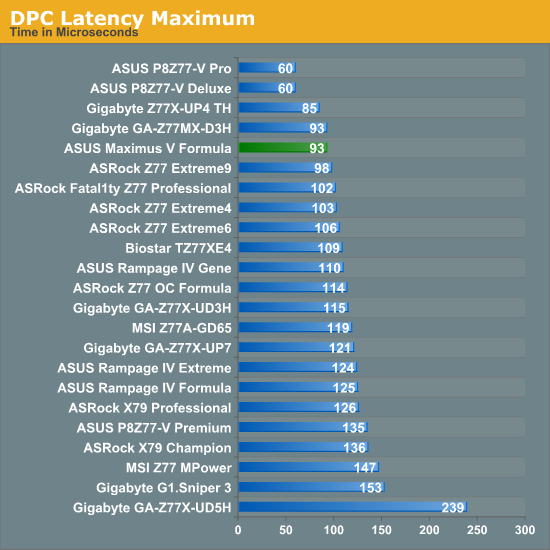
The MVF hits under 100 microseconds for DPC Latency, which is a great result, however it comes at a cost. As is usual for the high end all-singing all-dancing motherboards, DPC is horribly affected by monitoring software, which jumps up the queue in processor priority. With AI Suite enabled, the peak DPC Latency rises to ~1200.
Readers of our motherboard review section will have noted the trend in modern motherboards to implement a form of MultiCore Enhancement / Acceleration / Turbo (read our report here) on their motherboards. This does several things – better benchmark results at stock settings (not entirely needed if overclocking is an end-user goal), at the expense of heat and temperature, but also gives in essence an automatic overclock which may be against what the user wants. Our testing methodology is ‘out-of-the-box’, with the latest public BIOS installed and XMP enabled, and thus subject to the whims of this feature. It is ultimately up to the motherboard manufacturer to take this risk – and manufacturers taking risks in the setup is something they do on every product (think C-state settings, USB priority, DPC Latency / monitoring priority, memory subtimings at JEDEC). Processor speed change is part of that risk which is clearly visible, and ultimately if no overclocking is planned, some motherboards will affect how fast that shiny new processor goes and can be an important factor in the purchase.
For reference in this review, the ASUS Maximus V Formula does use MultiCore Turbo when XMP is enabled.
3D Movement Algorithm Test
The algorithms in 3DPM employ both uniform random number generation or normal distribution random number generation, and vary in various amounts of trigonometric operations, conditional statements, generation and rejection, fused operations, etc. The benchmark runs through six algorithms for a specified number of particles and steps, and calculates the speed of each algorithm, then sums them all for a final score. This is an example of a real world situation that a computational scientist may find themselves in, rather than a pure synthetic benchmark. The benchmark is also parallel between particles simulated, and we test the single thread performance as well as the multi-threaded performance.
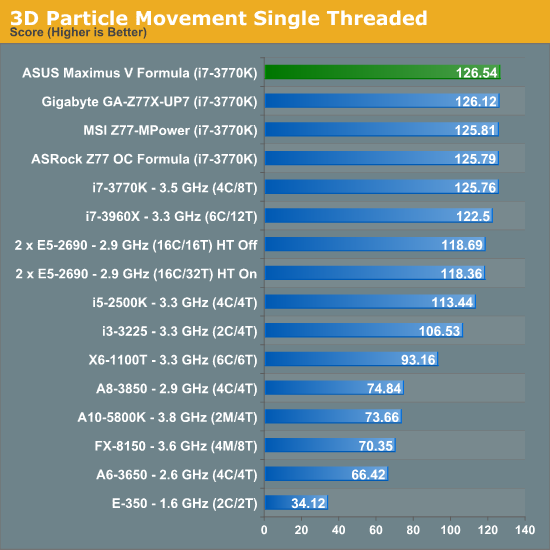
The MVF takes a nice lead in single threaded 3DPM, showing efficiency when not memory limited.
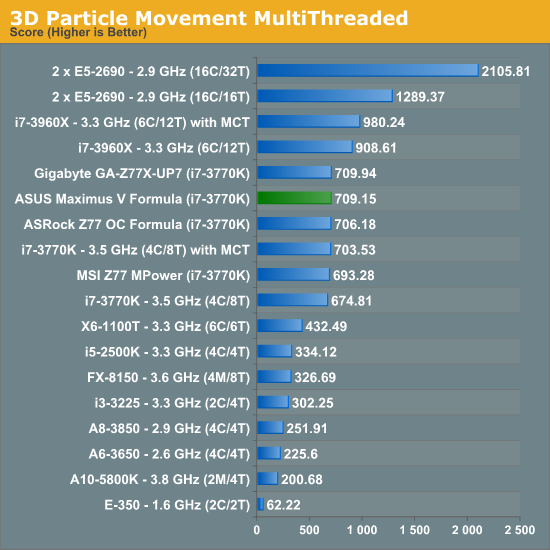
Still a good showing from the MVF in multithreaded 3DPM – clearly ahead of the ASRock and MSI, and only 0.1% behind the Gigabyte UP7.
WinRAR x64 3.93 - link
With 64-bit WinRAR, we compress the set of files used in the USB speed tests. WinRAR x64 3.93 attempts to use multithreading when possible, and provides as a good test for when a system has variable threaded load. If a system has multiple speeds to invoke at different loading, the switching between those speeds will determine how well the system will do.
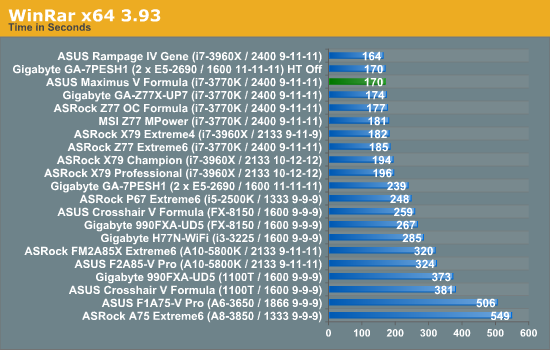
The ASUS MVF again shows efficiency, championing over the other OC motherboards by a noticeable about.
[Please note we are moving to a newer version of WinRAR shortly – 3.93 is still being used due to the number of results we have, and we are slowly retesting the older platforms.]
FastStone Image Viewer 4.2 - link
FastStone Image Viewer is a free piece of software I have been using for quite a few years now. It allows quick viewing of flat images, as well as resizing, changing color depth, adding simple text or simple filters. It also has a bulk image conversion tool, which we use here. The software currently operates only in single-thread mode, which should change in later versions of the software. For this test, we convert a series of 170 files, of various resolutions, dimensions and types (of a total size of 163MB), all to the .gif format of 640x480 dimensions.
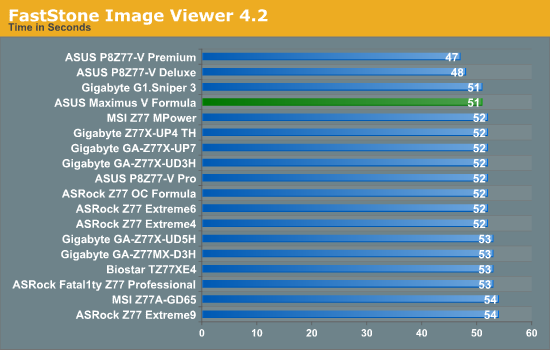
FastStone does not usually offer much in variation, although there is a clear split with the ASUS motherboards usually at the top, followed by Gigabyte then ASRock. MSI only have a few data points with no correlation (yet).
Xilisoft Video Converter
With XVC, users can convert any type of normal video to any compatible format for smartphones, tablets and other devices. By default, it uses all available threads on the system, and in the presence of appropriate graphics cards, can utilize CUDA for NVIDIA GPUs as well as AMD APP for AMD GPUs. For this test, we use a set of 32 HD videos, each lasting 30 seconds, and convert them from 1080p to an iPod H.264 video format using just the CPU. The time taken to convert these videos gives us our result.
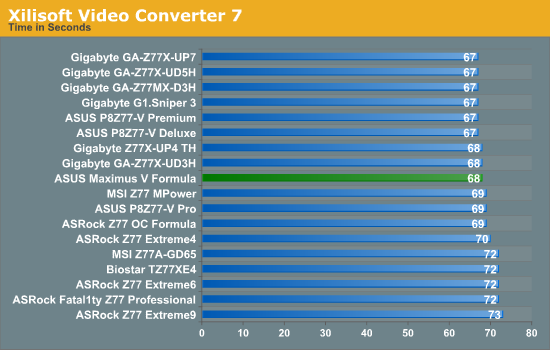
In a similar set of events to FastStone, XVC shows Gigabyte and ASUS performing highly, with MSI then ASRock competing at the slightly slower speeds.
x264 HD Benchmark
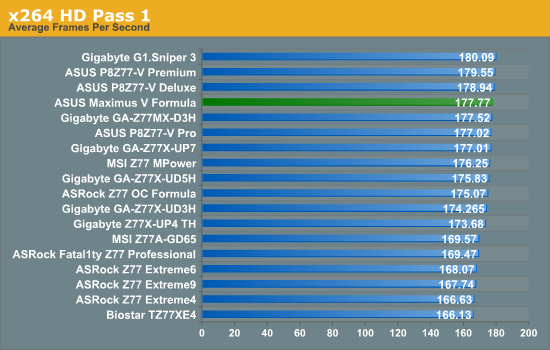
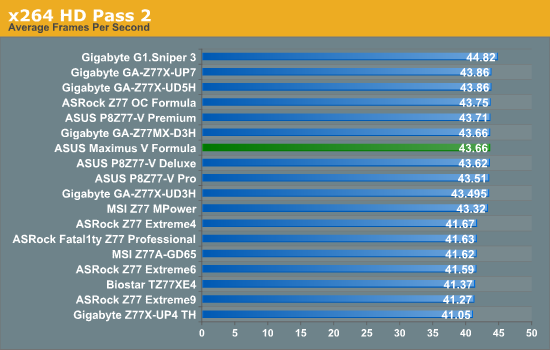
The x264 HD Benchmark uses a common HD encoding tool to process an HD MPEG2 source at 1280x720 at 3963 Kbps. This test represents a standardized result which can be compared across other reviews, and is dependant on both CPU power and memory speed. The benchmark performs a 2-pass encode, and the results shown are the average of each pass performed four times.
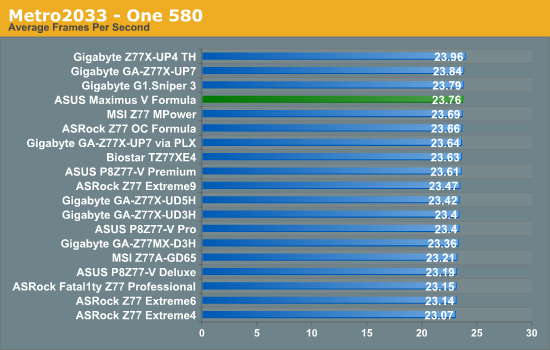
Metro2033
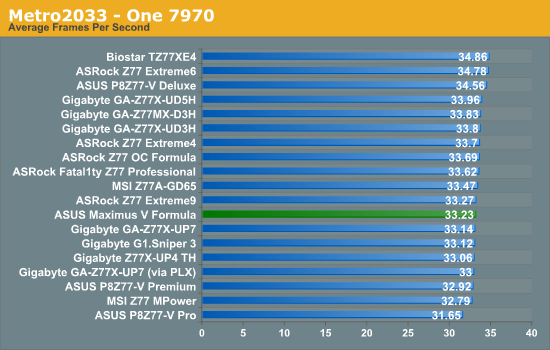
Metro2033 is a DX11 benchmark that challenges every system that tries to run it at any high-end settings. Developed by 4A Games and released in March 2010, we use the inbuilt DirectX 11 Frontline benchmark to test the hardware at 2560x1440 with full graphical settings. Results are given as the average frame rate from 4 runs.
Dirt 3
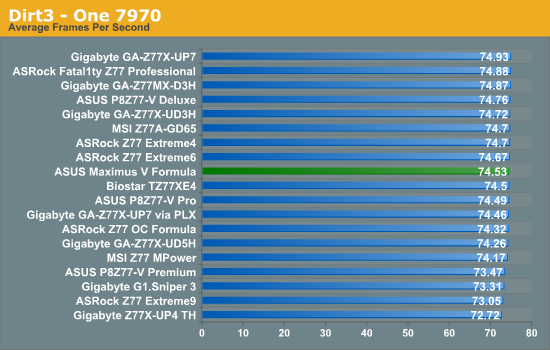
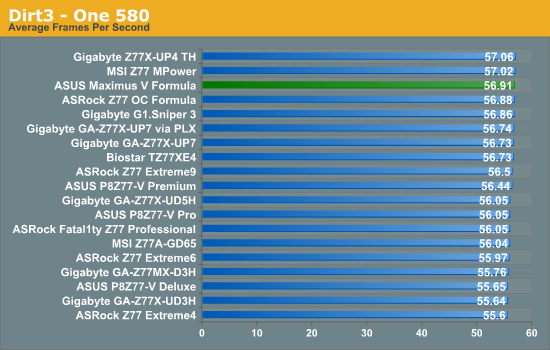
Dirt 3 is a rallying video game and the third in the Dirt series of the Colin McRae Rally series, developed and published by Codemasters. Using the in game benchmark, Dirt 3 is run at 2560x1440 with Ultra graphical settings. Results are reported as the average frame rate across four runs.
Gaming Conclusion
The MVF does not take top spot in any of our gaming benchmarks, consistently performing between near-top and the middle, however always within statistical variation of those top FPS results. In Dirt3 using three 7970s, the difference between the Gigabyte Z77X-UP7 and MVF/MPower is down to the PLX chip of the UP7, enabling PCIe 3.0 x16/x8/x8 compared to the PCIe 3.0 x8/x4/x4 of the MVF/MPower. The ASRock Z77 OC Formula performs worse in this test as the third card is powered by four PCIe lanes from the chipset rather than the CPU, which incur a significant delay, despite an x8/x8/x4 setup.
Final Words
When I published my review of the ASRock Z77 OC Formula, I praised it as the best board ASRock have ever made. I gave it a Silver Award due to its ease of use, the styling, the level of equipment, and the price which left me feeling all warm and fuzzy inside. Within days of the review being published, ASUS gave me a call. At this time, they were the only manufacturer out of the top four that had not committed any motherboard to my Z77 OC motherboard roundup (Z77 OC Formula, Z77 MPower, Z77X-UP7). So when I gave the ASRock Z77 OC Formula a Silver Award, they quickly wanted to point out just how good the Maximus V Formula was in comparison, and got around to sending me one for review.
As part of this review, ASUS was also keen for me to experience the features of the Maximus V Formula. Our good friend Rajinder Gill, now an audio engineer with ASUS, visited me with several sets of headphones from £70 to £1000 to experience the SupremeFX IV audio system on the Formula, as well as discuss the features on the range. Being no stranger to motherboard flaws and design, Rajinder and I talked at length about the pros and cons of the motherboard industry, motherboard audio, feeling, options, settings, BIOS versions, and how a review should be felt and written, not just a bunch of synthetic tests with a score and a [insert random award] type scenario. For reference on the audio (I cite my comment in the review about the fact that I will always admit to being tone deaf and singing karaoke like a deaf horse with a throat infection), using the high quality headphones with SupremeFX IV and the headphone amplifier makes a distinct difference to the richness of the audio. I rather unsurprisingly felt the biggest difference using a $2 set of headphones in the front audio connectors of the MVF vs. a regular ALC898.
As for the MVF as a package, we have a lot of good points to consider. The MVF is a well built product that performs well but also overclocked like a beast on our setup, both for processor and memory. It hits the high notes in the benchmarks for both performance and efficiency. In the package we get built in WiFi, an Intel NIC, a total of 10 SATA ports, a combination air/water VRM cooler for enthusiasts, the best ALC898-based audio package on a motherboard to date, and not to forget all the fan headers.
The BIOS and software package from ASUS has always been one of the best in our current generation of products, and the ROG feel puts an extra gloss on everything that you use. Extreme overclockers will find the multitude of options that they want here, as well as cooling enthusiasts that must have control over all their fans (and software that actually understands how fans work!).

There are some areas ASUS can improve on where the competition are perhaps getting a minor but noticeable lead. ASRock may not have an EZ mode BIOS, but the Z77 OC Formula offers more automatic overclock options, as well as a better experience due to the enhanced visuals. ASRock also include some plastic standoffs in the package for overclockers to quickly set up a motherboard rather than resting it on a box. Gigabyte has Gigabyte TweakLauncher, a simple GUI overclocking tool for every setting that can be changed in an instant. Both ASRock and Gigabyte have two BIOSes on board in case something goes wrong, and ASRock + MSI have easier to use voltage read points. I also prefer MSI’s method of more VGA power via a 6-pin PCIe connector rather than the 4-pin molex. Gigabyte also includes the OC Touch buttons, which are great for those extra few MHz.
Price wise, the MVF is $290 with AC3 with the package, but has been $270-$300 without in the past eight weeks. Compared to the ASRock Z77 OC Formula ($240, $225 on promo), MSI Z77 MPower ($210, $190 on promo) and the Gigabyte Z77X-UP7 ($400), the Maximus V Formula from ASUS does come along as the most expensive Z77 motherboard without a PLX 8747 chip.
The main competition is from the ASRock Z77 OC Formula of course, which can be $30-$75 cheaper depending on the sales. The ASUS does offer that little bit more – audio, performance at stock/efficiency, software, memory overclocking. The ASUS is definitely more the gamers’ motherboard than the ASRock, which was built more for overclocking - as such the ASRock gives easier voltage read points, more automatic OC options and two BIOSes. As a gamer, I would choose the ASUS due to the software package and the audio capabilities. As a casual competitive overclocker, it is a tough call – I personally had an easier experience with the ASRock, and it would be cheaper to replace if I thrashed and broke it, but I achieved more with the ASUS when pushing the limit. If I am going after scores where I need to be on that limit, the ASUS is the weapon of choice.
The ROG brand from ASUS always produces motherboards worth having. Giving the Formula the SupremeFX IV over the Gene and Extreme puts it into a SKU class of its own which it needed. On the basis of previous reviews, it is hard not to give the Maximus V Formula from ASUS anything but a Silver Award:

ASUS Maximus V Formula
Editor’s Choice Silver Award
The ASUS Maximus V Formula competes in a tough arena with rivals armed to the teeth, and comes out the other side with everything intact ready to fight another day. The competition doesn’t get tougher than this.

