Original Link: https://www.anandtech.com/show/4833/asus-f1a75i-deluxe-review-llano-and-miniitx
ASUS F1A75-I Deluxe Review – Llano and Mini-ITX
by Ian Cutress on October 1, 2011 5:30 PM EST- Posted in
- Motherboards
- Asus
- A75
In a world where space is at a premium, the smaller motherboards get, and yet still retain full functionality, never ceases to amaze me. With desktop Llano processors taking the integrated graphics crown, an all-in-one mini Llano system becomes ever more appealing. To support this, ASUS have sent us their premium mini-ITX motherboard for review, which I have put through the bench suite.
Overview
We have had a number of ASUS boards through our hands this year, all of which give a comfortable feeling of design we have come to expect from ASUS, and their mini-ITX is no different. The package includes Bluetooth, integrated wireless (and antenna), as well as extra onboard USB 3 and a variety of video outputs, all in a tiny form factor.
One of the surprising bits about this package is that the install CD offers Google Chrome 11 as an install, perhaps suggesting that ASUS and Google have a software distribution partnership, like ASUS and Norton have had for a while.
I had severe trouble overclocking this motherboard when in AHCI mode, with a distinct refusal to boot into Windows beyond a base frequency of 107 MHz. Using software, I was able to bring this up to 110 MHz when on the integrated graphics. When using a discrete GPU, I still could not get past this 107 MHz bootable limit, but could reach 120 MHz using software quite easily. In IDE mode, the overclocking worked flawlessly at 140 MHz, which is quite a feat.
When I initially started testing the board, the only benchmark that was out of place was our DPC Latency test. Every five seconds or so, it would jump to between 1000-3000 microseconds. After about a week (!) of to and fro with ASUS trying to find the cause of the issue, which they had trouble replicating, I found that their software AI Suite II was the culprit. This software, when installed, will become part of the startup sequence - but when turned off, the DPC Latency reduced to a normal level. Note, most users wont actually notice a DPC Latency of 3000.
As I was testing this board with a pre-release BIOS, it stands to assume that ASUS may iron out these discrepancies by the time the board comes to market. With that in mind, combined with a 3 year warranty, the F1A75-I Deluxe should be a reasonable package for any Llano user if it hits a reasonable price point - ASUS have told me an expected RRP of $145.
Visual Inspection
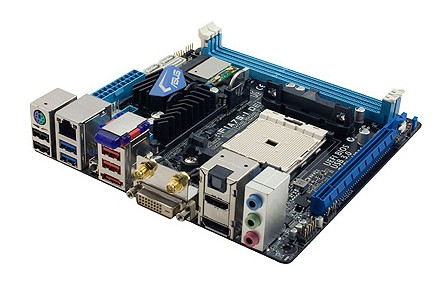
When you combine a mini-ITX with the standard AMD CPU retention bracket, it does not leave a lot of room for a motherboard manufacturer to fit in a ton of extras. As we can see from the board below, ASUS have packed in almost every square millimeter with routing, resistors, and anywhere that is left is advertising motherboard features. The F1A75-I Deluxe comes in the black and gradated blue scheme we have come to expect from ASUS, with a single PCIe x16, and two DDR3-1866 DIMM slots.
The four onboard SATA 6 Gbps ports are 180 degree angled, so users with locking SATA cables can easily detach the cables individually, and to the right of these we find the front panel connectors. While I initially thought this is an odd position, it actually works rather well, and a lot better than some other front panel placement solutions I have encountered.
The board has two fan connectors, both four pin, one for the CPU and another general chassis fan. Despite the top end CPU pumping 100W power at stock, these two fan headers do not cover the three I would prefer for my all-in-one water cooling, or if I wanted more low power fans inside a small case. ASUS have told me that two fan-headers cater for the majority of users in a miniITX chassis, with one for the CPU and one for another fan - there is apparently some request for more headers on the board, but the PCB real estate is an ever present consideration.
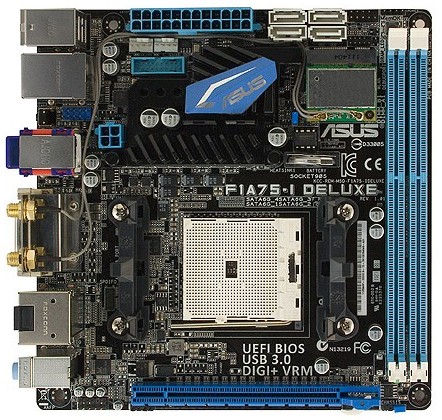
One thing of note is that ASUS have routed the integrated wireless cables to the back panel for the end user. I have had some mini-ITX boards that require the user to route them, which could end up a mess. ASUS have done a good thing here and kept them the ideal length, as well as neat and tidy. We have seen the wireless card stick out perpendicular to the board on various mini-ITX boards before, to increase board real estate, but ASUS have gone with the low profile approach. The tallest bits on the board are the back panel and the battery, so with some low profile memory and a low profile CPU cooler, this could be a great board for a tiny chassis, as long as you do not need the PCIe slot.
Other features include ASUS’ Dual Intelligent Processor design, the TPU and EPU, designed to aid overclocking for performance and configure energy modes for low power usage. As a result, we only see one 4-pin 12 V connector on this board, suggesting ASUS are not necessarily aiming at the high powered Llano users, but more on the low powered ones and then building the functionality around such a processor.
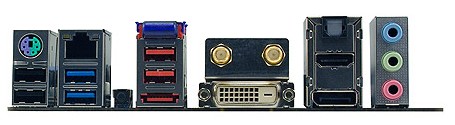
On the back panel is a PS/2 connector, four USB 2.0 ports, two USB 3.0 ports, Realtek Gigabit Ethernet, a clear CMOS button (always a handy addition), Bluetooth, an eSATA 6 Gbps port, DVI-D/HDMI/DisplayPort connectors, an Optical S/PDIF output, two antenna connectors for the wireless module, and a triplet of audio jacks.
BIOS
The ASUS UEFI is becoming pretty entrenched in our reviews of ASUS boards now as one of the better UEFI implementations currently available. As I write, ASUS are still on the release BIOS for the F1A75-I Deluxe, which is what I have here, and it works as it should with no issues.
I should point out that as this board has not been released, the BIOS is technically still not an official release. This will most likely change in the near future.
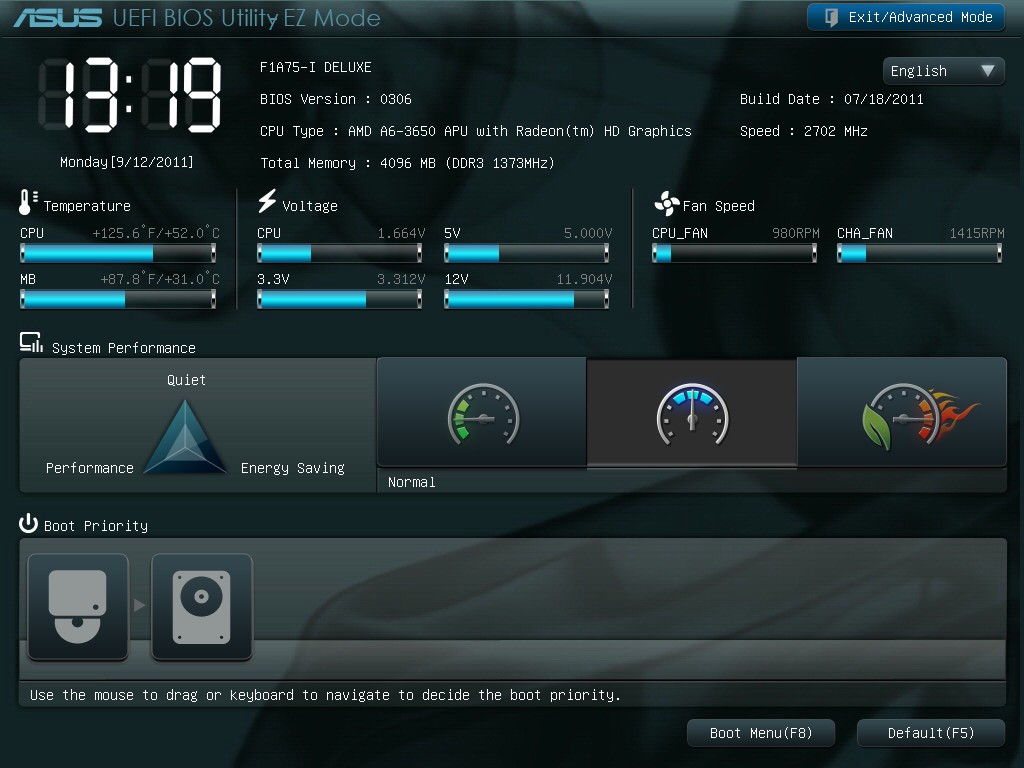
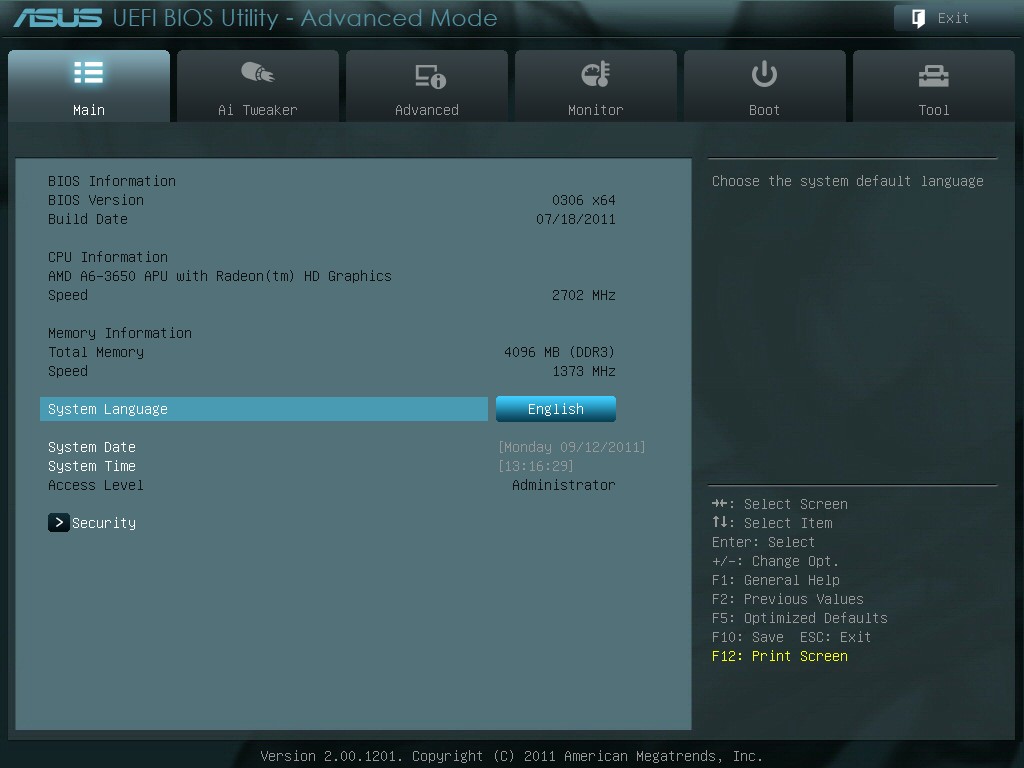
The front page represents the easy mode of BIOS tuning, detailing all the important information every manufacturer should give on the front page – the board name, the BIOS version, the CPU and CPU frequency, total memory and speed, temperatures, voltages and fan speeds. The system performance option allows users to apply preset ASUS settings for low power, standard, or enhanced performance. Also, users can adjust the boot priority using the drag and drop icons at the bottom, or boot from a selected device with a double click. One thing I did notice is that my USB device that was selectable later on in the BIOS was not present in this boot priority menu.
For more detailed options, users must navigate to the advanced mode, which gives a more standard BIOS feel to it.
The AI Tweaker menus give the overclock options. Left on automatic (in normal power mode on the easy BIOS screen), these will default to stock settings – including my memory at DDR3-1333 and CL9, despite it being rated much faster. With memory being an important factor in Llano graphics, and the A75 platform, currently released processors will support DDR3-1600 or DDR3-1866 - there is rather an elaborate way of implementing XMP on this board, by selecting the DOCP profile and navigating through a submenu.
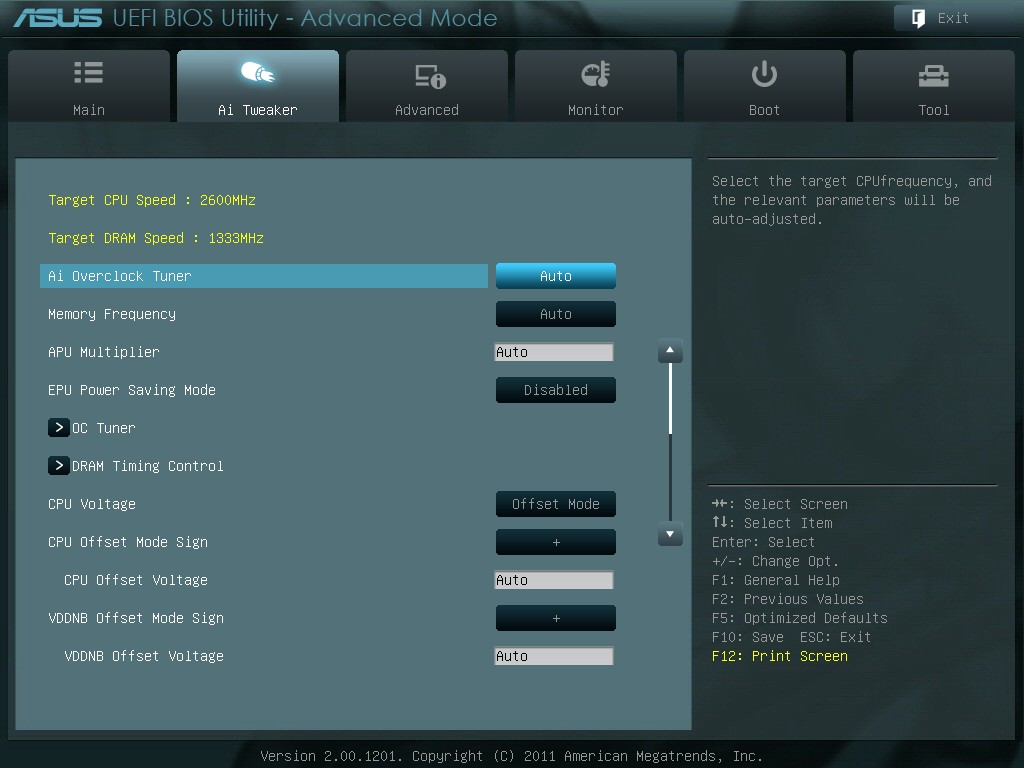
Along with the overclock and memory options, all of which are fully featured, the voltage section allows either an offset to be applied, or a selectable value. There are no options to change any of the integrated graphics clock settings, however. This has to be done in the operating system using Catalyst software.

The fan settings for the two onboard headers are adjustable through the UEFI or in the operating system – any setting made in the UEFI will make its way into the OS software for manual graphic manipulation.
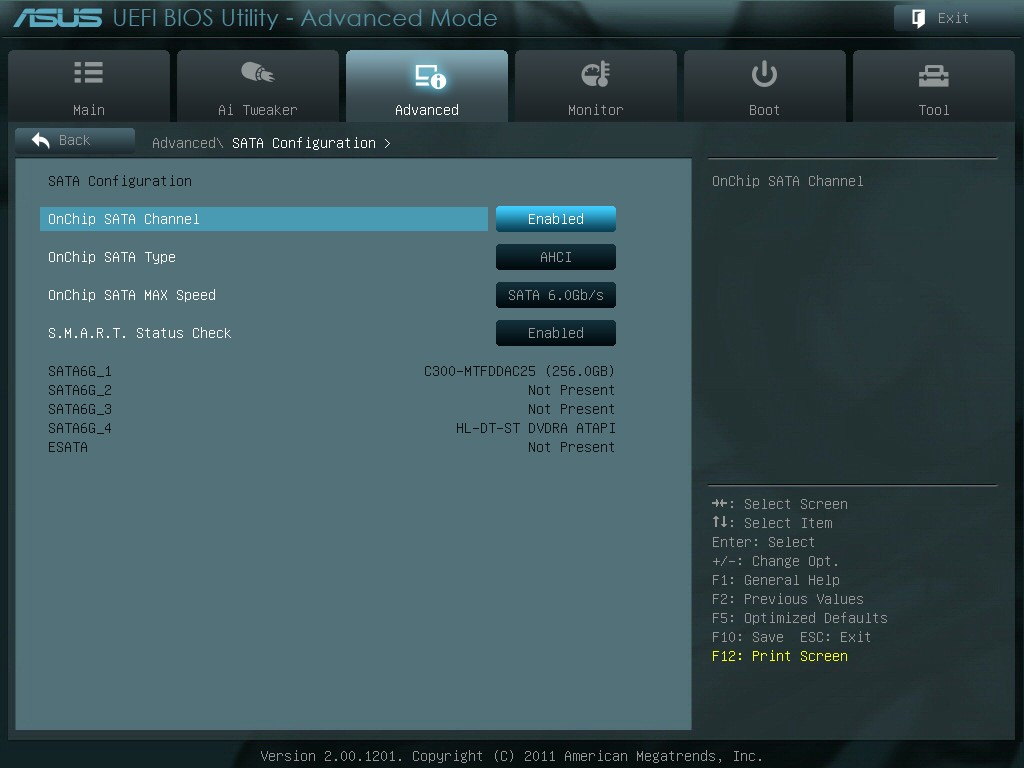
On default settings, the SATA configuration will revert to IDE mode. I can see that there are various reasons for being in IDE mode automatically for compatibility, though I would hazard a guess and say the users of this board will most likely be using relatively newer SATA drives and an AHCI compatible operating system, meaning I would prefer AHCI by default and the extra performance it gives.
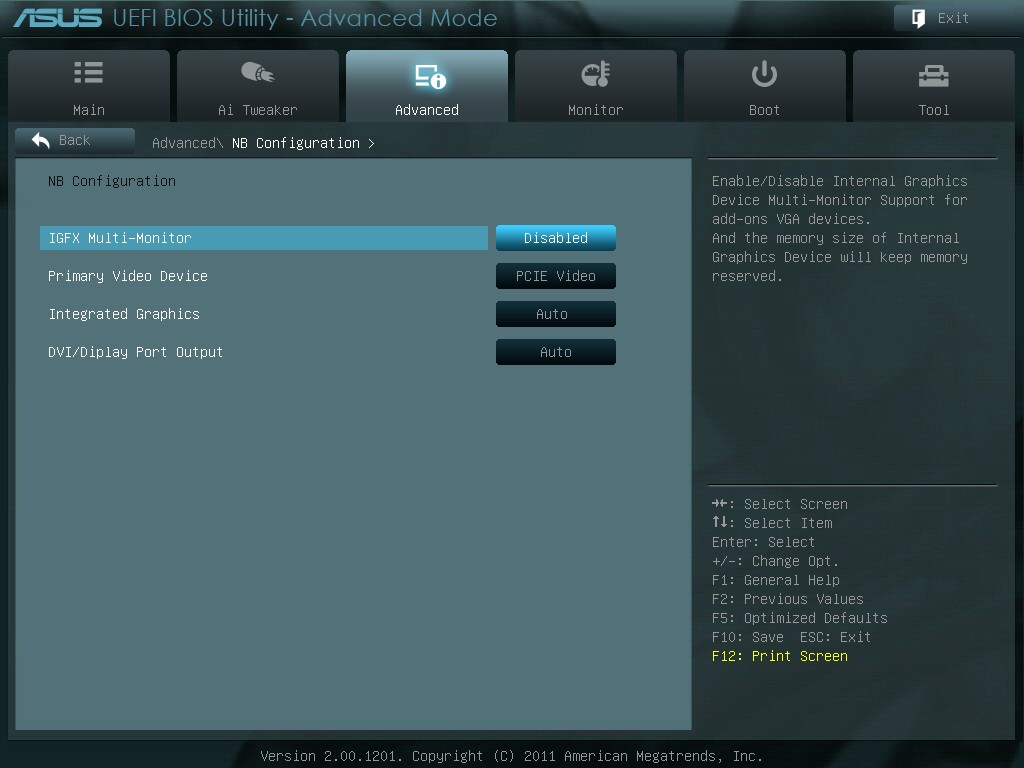
The integrated graphics part of the BIOS can force the on chip graphics, even when a discrete GPU is present (presumably for GPU simulation/OpenCL), or when the discrete GPU can be put into CrossFireX with the integrated graphics for improved performance. Here we can also set the memory reserved for the integrated GPU, in predefined levels up to 2 GB.


Overclocking
If this board were to have a serious issue, from the perspective of functionality beyond specifications, it would be the overclocking.
In terms of automatic overclocking features, the BIOS has the OC Tuner option, and the OS has software which enables a ‘Fast’ OC and an ‘Extreme’ OC. In my experience, the OC Tuner and ‘Fast’ options performed similarly, giving a 3% overclock in the base clock from 100 MHz to 103 MHz. Memory frequency similarly received a 3% bump, rather than applying the inbuilt XMP profiles which I would have expected.
The ‘extreme’ preset is a more aggressive form of overclock, configuring and testing the system until a suitable maximum is reached. When this button is clicked (for a non-black edition Llano CPU), the base clock is adjusted up 1 MHz at a time, stress tested for a short time, and at every multiple of 10 MHz the system restarts. On previous platforms, I have had no issue with this preset – usually it has applied more voltage than ideal, but it works well in the majority of situations. Here however, there is a slight problem. After going up to 110 MHz, the system rebooted, and failed to recover. Upon loading Windows, it would blue screen (with the characteristic of a failed overclock), and end up in restart loop. In the end, I manually had to reduce the BIOS speed to 107 MHz to get a successful OS start up.
In terms of manual overclocking, this is fairly straight forward. I manually increased the CPU voltage to 1.5 V, the memory voltage to 1.65 V, and adjusted the base clock. However, I could not get the machine to boot above 107 MHz. No matter what settings I used (included a set which ASUS gave me involving adjusting the CPU current limits), the 107 MHz barrier would not be breached.
Overclocking in the operating system was a different matter altogether. Using the ASUS Suite II software, when using a discrete GPU, I could happily adjust the base clock to 120 MHz under stock voltage and it was stable through 2D and 3D tests. Unfortunately this setting is not kept between boots, and requires manual application every time. While using the integrated graphics, using this method, I could not go beyond 110 MHz.
As a result of this situation it is almost impossible to recommend this board as an overclocking board. Due to the design and low profile nature, I would be happier running this board at stock, but users will have to manually adjust the memory speed to something more useful for the Llano processor.
Update:
I approached ASUS with this issue regarding the overclocking. They suggested that I may get a better overclock when using IDE mode for my SATA ports rather than my default of using AHCI to keep the SATA port testing equivalent.
In IDE mode, overclocking is a different story. While on the discrete GPU, I was able to boot at 140 MHz no trouble, effectively moving from 2600 MHz to 3640 MHz, with all settings in the BIOS on auto. 145 MHz caused similar OS booting issues to AHCI mode beyond 105 MHz, but a 40% overclock is a brilliant result to get.
Using DDR3-2133 MHz memory (9-11-9), at 140 MHz, the BIOS settings gave me a choice of DDR3-1866 and DDR3-2240 speeds on their respective dividers. With the memory subtimings set at auto, only DDR3-1866 worked, with 9-9-9 subtimings being applied automatically. I was able to boot at DDR3-2240 if I loosened the subtimings, but DDR3-1866 CL9 represents a standard Llano kit that people would buy and it managed this easily.
By using ASUS’ recommended settings, and bumping up the CPU voltage beyond that given at 140 MHz by the Auto setting, I was unable to improve on 140 MHz as an overclock, which leaves 140 MHz a good benchmark for this processor.
In terms of pure throughput, this 3640 MHz setting gave a boost in 3DPM from 66.27 to 93.42 in single threaded mode, and from 224.68 to 315.21 in multithreaded mode.
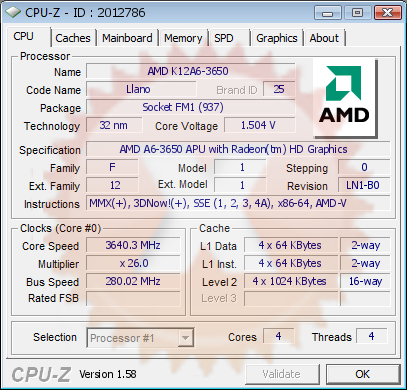
(CPU-Z does not correctly record the Bus Speed yet,
however the overall Core Speed is correct.)
Board Features
| ASUS F1A75-I Deluxe | |
| Market Segment | Small Form Factor |
| Size | Mini-ITX |
| CPU Interface | FM1 |
| CPU Support | Desktop Llano |
| Chipset | A75 |
| Base Clock Frequency | 100 MHz by Default, 90 to 300 MHz in 1 MHz increments |
| DDR3 Memory Speed | 1333 MHz by Default, 800 MHz to 1866 MHz supported |
| Core Voltage | 0.800 V to 1.700 V in 0.0125V increaments |
| CPU Clock Multiplier | CPU Dependent, Fixed unless Black Edition processors used |
| DRAM Voltage | 1.35 V to 2.30 V in 0.1 V increments |
| DRAM Command Rate | 1 or 2 |
| Memory Slots |
Two DDR3-DIMM Maximum 8 GB, Non-ECC Unbuffered 800 MHz to 1866 MHz selectable |
| Expansion Slots |
1 x PCIe x16 1 x mini-PCIe |
| Onboard SATA/RAID |
4 x SATA 6 Gbps (RAID 0, 1, 10) 1 x eSATA 6 Gbps |
| Onboard |
4 x SATA 6 Gbps 2 x Fan Headers 1 x USB 2.0 header 1 x USB 3.0 header 1 x S/PDIF Out header 1 x Front Panel Connector 1 x Front Panel Audio Connector 1 x MemOK! Button 1 x Clear CMOS Jumper 1 x Wireless 802.11 b/g/n |
| Onboard LAN | RealTek RTL8111E Gigabit Fast Ethernet Controller |
| Onboard Audio |
Realtek ALC892 8-Ch High Definition audio CODEC DTS Surround Sensation UltraPC |
| Power Connectors |
1 x 24-pin ATX 1 x 4-pin 12V |
| Fan Headers |
1 x CPU (4-pin) 1 x CHA (4-pin) |
| IO Panel |
2 x USB 3.0 Ports 4 x USB 2.0 Ports 1 x PS/2 Port 1 x Gigabit Ethernet 2 x Antenna 1 x Clear CMOS button 1 x Optical SPDIF output 3 x Audio Jacks HDMI/DisplayPort/DVI-D Video Outputs 1 x eSATA 6Gbps Bluetooth Module 1 x Optical SPDIF output |
| BIOS Version | 07/18/2011 |
| Warranty Period | 3 Years |
ASUS have used the Realtek NIC/Audio combo for this board. We are not short of USB ports, especially on the back panel for such a small board. As mentioned before, I would have preferred another fan header, but with such a large retention bracket for the processor, there is not much space to fit on much else unless ASUS built upwards for the wireless card.
In The Box
User Manual
I/O Shield
2 x Locking SATA 6Gbps
2 x Wifi Antenna(s)
1 x Remote Controller
1 x USB Wireless Adapter
The additions to this board are not that substantial – there is no additional USB 3.0 bracket or a couple more SATA cables. Instead, an extra bit of kit I have never seen before has been added – the remote controller.
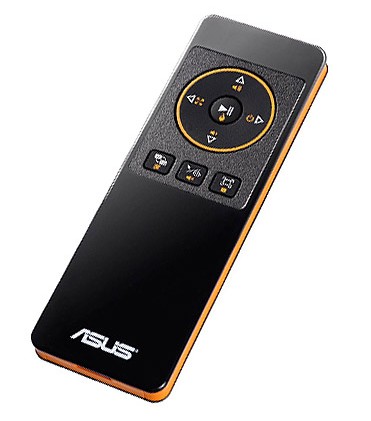
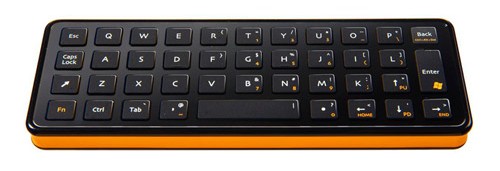
I am not sure if this is ASUS made, or a licensed bit of kit, but using the USB wireless adapter, the user can use the remote controller for moving the cursor around or turn it upside down for the keyboard. Rather than use any fancy gyroscope detection, imagine just moving the mouse using the arrow keys on the keyboard with the mouse moving at constant speed – that’s what using this tool is like. When I have been using the keyboard, from three feet away from the wireless connector, only about 80% of the key presses go through if I take my time to type – less if I type at my normal pace. The controller itself is not ergonomic enough to fit easily to hand, and does not feel robust enough to take the daily strains that a standard controller might take. The keyboard layout is a bit odd from the standard QWERTY, with the I and K keys being on different lines. Ultimately, I could only see myself using this bit of kit for DVD menus or selections.
Update: I asked ASUS the reasoning of such a bit of kit. They have told me that they went this route instead of a general WMCE remote, and users have specified text input as a main addition required. The key fitting for ASUS was for it to have similar dimensions to a smart phone, and make it easy to hold with palms and using thumbs to type.
The antenna that come with the package are substantial in size and are also magnetized at one end, allowing the user to connect them together to hang in one place, or have a board to magnetize them to. Perhaps best to keep them away from any mechanical hard drives, though.
Software
The installation disc that comes with the board uses ASUS’ easy style installation for both drivers and software. Previously, we have encountered ASUS partnering with Norton to provide a version on the CD – this is still available. However, this time ASUS have also partnered with Google to provide a build of Chrome 11, which is a more than welcome bit of software.
The installation itself is straight forward – select ‘Install All’ and you can select/deselect certain software for an automatic installation, with automatic reboots as necessary. One point of difference I found was in the estimated time to completion – with the drivers, the software predicted 33 minute to completion, whereas it only took 10 minutes including restarts. Similarly with the software, 34 minutes were predicted, but it only took seven.
The software itself focuses around three packages – ASUS Suite II, which we have encountered before on previous boards; ASUS WebStorage, a tool for file and folder distribution and synchronization within the ASUS cloud; and ASUS Vibe, a radio/game utility.
ASUS Suite II
As I have covered with the P8Z68-V Pro and Brendan has with the P8P67, the Suite II software covers a lot of the motherboard functionality in one easy to use package. Here is where the user can set an overclock, define fan profiles, adjust power saving settings, monitor onboard sensors, and update the BIOS.
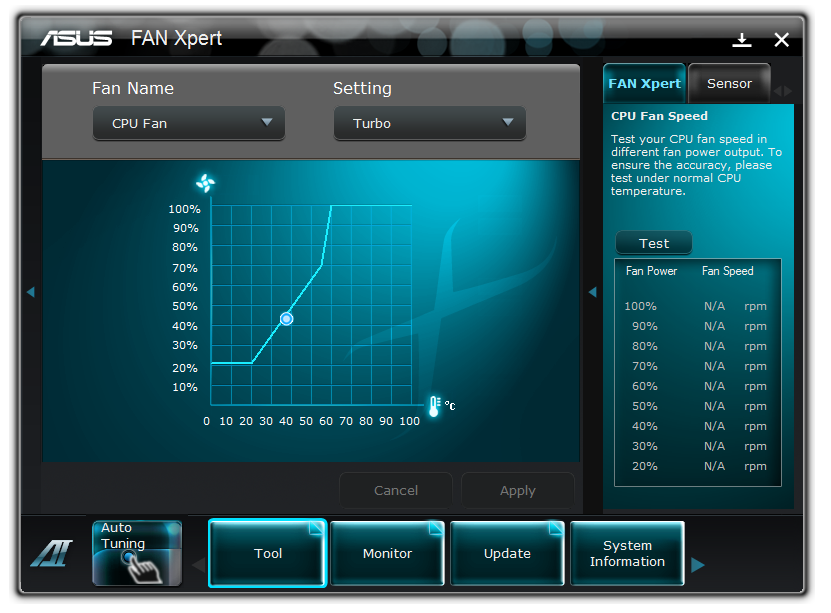
As we have covered the software before, I will briefly state that it all works from what I tested, including the fan settings which offers user manipulation of fan speed gradients. The only issue I have with it is that overclock settings are not saved between reboots – either in the form of BIOS changes, or reapplied when booting back into the operating system.


ASUS WebStorage
The new bit of software in the ASUS arsenal is WebStorage.

By creating an account online, the user gets a small amount of free storage (2GB) which they can use to synchronize folders to the cloud. Users can upgrade to unlimited storage for a monthly fee, and share links to files. Through the mobile app, users can sync music with the cloud as well. The full online site can be found at https://www.asuswebstorage.com/navigate/features/.
Ultimately, this service is offered with or without the purchase of the motherboard, but the software looks as if it is now coming with future products.
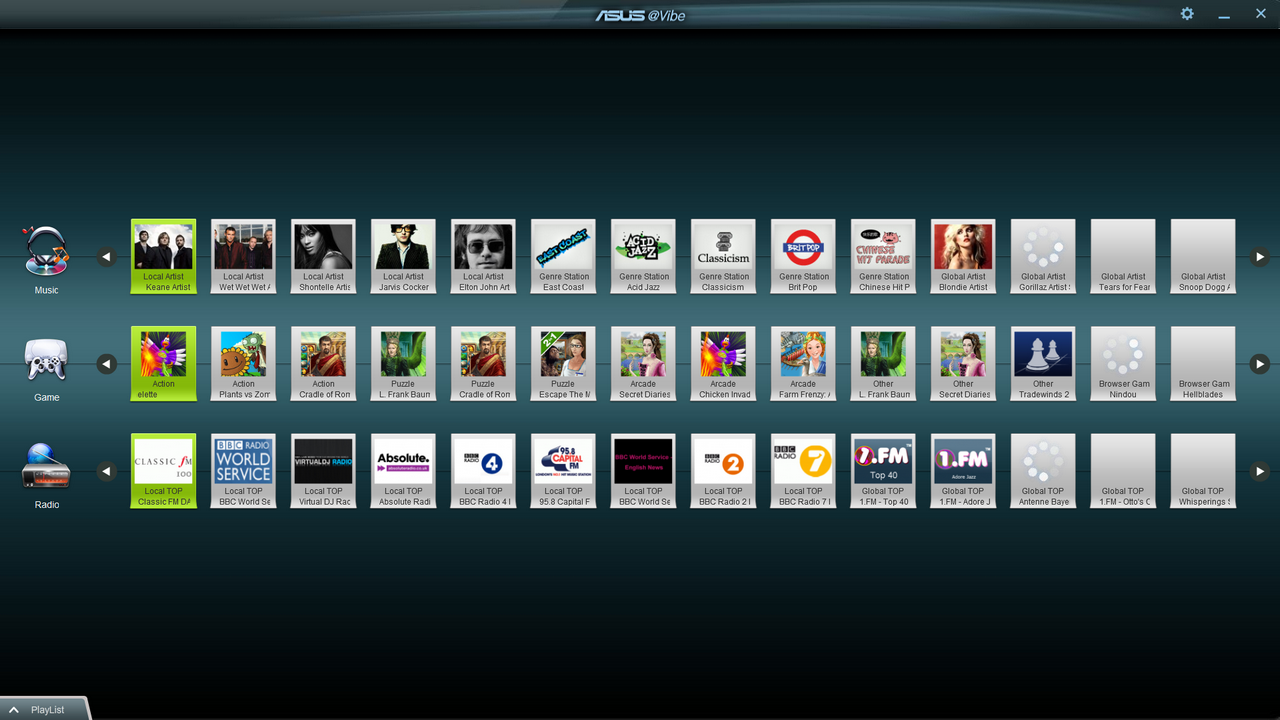
ASUS Vibe
I touched on ASUS Vibe previously in my look at the E35M1-I Deluxe – Vibe is a simple piece of software which provides one click access to music stations, radio stations and game demos. The radio stations are amazingly synced to your location - I got links to an array of BBC radio stations as I am in the UK. They are all run within the software window itself, but the games require downloading.
Test Setup
| Processor |
AMD Llano A6-3650 4 Cores, 4 Threads, 2.6 GHz |
| Motherboards | ASUS F1A75-I Deluxe |
| Cooling | Corsair H50-1 |
| Power Supply | Silverstone 1000W 80 PLUS Silver |
| Memory |
G.Skill RipjawsX DDR3-1866 9-10-9 28 2x4GB Kit 1.5V Patriot Viper Xtreme DDR3-2133 9-11-9 27 2x4 GB Kit 1.65V |
| Memory Settings | DDR3-1866 |
| Video Cards |
XFX HD 5850 1GB ECS GTX 580 1536MB |
| Video Drivers |
Catalyst 10.12 / 11.8 NVIDIA Drivers 280.26 |
| Hard Drive |
Micron RealSSD C300 256GB OCZ Vertex3 240GB |
| Optical Drive | LG GH22NS50 |
| Case | Open Test Bed - CoolerMaster Lab V1.0 |
| Operating System | Windows 7 64-bit |
| SATA Testing |
Micron RealSSD C300 256GB OCZ Vertex3 240GB |
| USB 2/3 Testing | Patriot 64GB SuperSonic USB 3.0 |
As part of our test setup, we are slowly migrating to newer drivers for our discrete GPU tests, as well as updating the tests appropriately. However, as it is only fair to test like for like, comparisons will only be made with results achieved with the same drivers.
Comparison to Other Reviews
Where applicable, the results in this review are directly compared to the following chipsets and boards which we have reviewed previously:
Note: The main comparison point for the ASUS F1A75-I Deluxe for us is the ASRock A75 Extreme6 we have already tested. As a result of that review, which was run with DDR3-1333 settings to compare to Sandy Bridge boards, I have been asked to run future Llano reviews at DDR3-1866, which Llano supports natively. For logistical reasons, there is also a CPU discrepancy, where today we are using an A6-3650 (2.6 GHz, 320 SP IGP), and in the A75 Extreme6, an A8-3850 (2.9 GHz, 400 SP IGP) was used. In analysing the results, these factors will be taken into account.
Power Consumption
Power consumption was tested on the system as a whole with a wall meter connected to the power supply, while in a dual GPU configuration. This method allows us to compare the power management of the UEFI and the board to supply components with power under load, and includes typical PSU losses due to efficiency. These are the real world values that consumers may expect from a typical system (minus the monitor) using this motherboard.
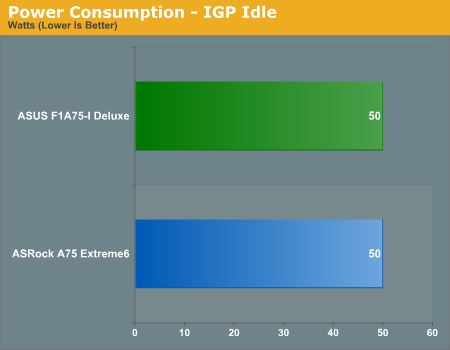
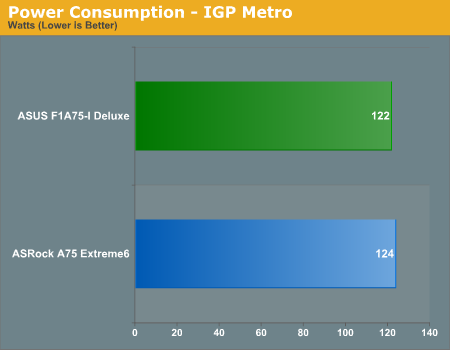

The only board to compare the F1A75-I Deluxe to is the A75 Extreme6 board I reviewed a few months ago. Both boards perform similarly.
CPU Temperatures
With most users running their boards on purely default BIOS settings, we are running at default settings for the CPU temperature tests. This is, in our outward view, an indication of how well (or how adventurous) the vendor has their BIOS configured on automatic settings. With a certain number of vendors not making CPU voltage, turbo voltage or LLC options configurable to the end user, which would directly affect power consumption and CPU temperatures at various usage levels, we find the test appropriate for the majority of cases. This does conflict somewhat with some vendors' methodology of providing a list of 'suggested' settings for reviewers to use. But unless those settings being implemented automatically for the end user, all these settings do for us it attempt to skew the results, and thus provide an unbalanced 'out of the box' result list to the readers who will rely on those default settings to make a judgment.
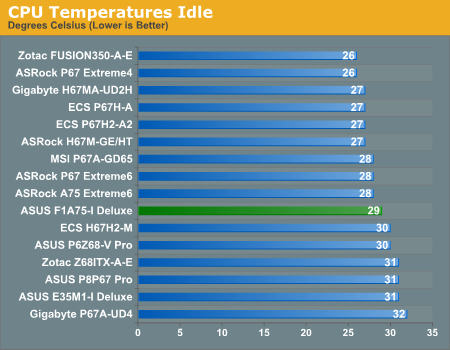
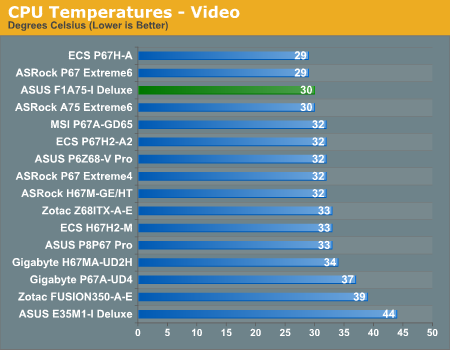
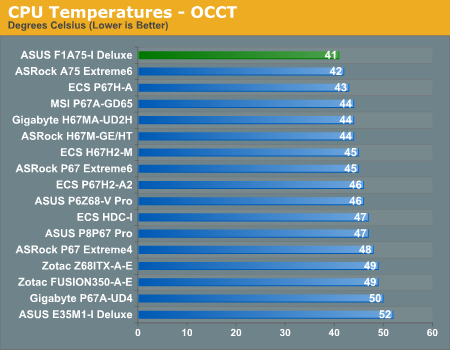
Compared to the board we have tested, the F1A75 Deluxe does well on CPU temperatures, even compared to the low powered Fusion boards with passive cooling, and the Sandy Bridge boards.
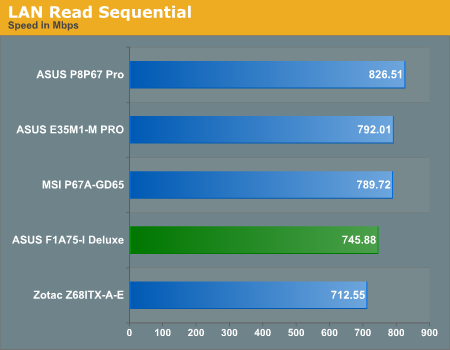
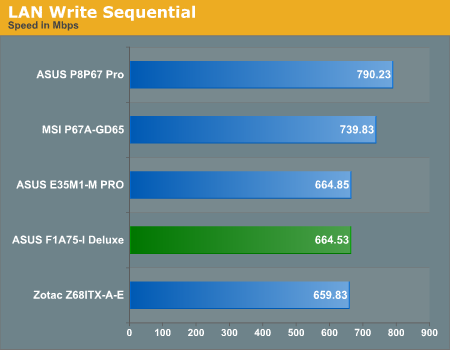
LAN Speed Test
LAN Speed Test is a freeware program designed for testing the network connection between two PCs on a home network. The speed of the transfer is limited by the lowest common denominator on the network, so if you have gigabit Ethernet capable computers but a 100 Mbit capable router, you are limited to 100 Mbit transfer. Note that this is really a formality – if a network port is rated at 1 Gbps, then chances are that it will hit at least 90+% of this value. For this test, we use LAN Speed Test to transfer a 1000 MB file across a home network with a 1 Gbps lowest common speed to the same machine each time, in a read/write scenario.
USB Speed
For this benchmark, we run CrystalDiskMark to determine the ideal sequential read and write speeds for the USB port using our 64GB Patriot SuperSpeed USB 3.0 drive. Then we transfer a set size of files from the SSD to the USB drive, and monitor the time taken to transfer. The files transferred are a 1.52 GB set of 2867 files across 320 folders – 95% of these files are small typical website files, and the rest (90% of the size) are the videos used in the Sorenson Squeeze test.
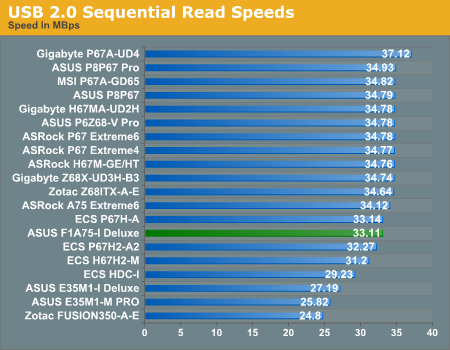

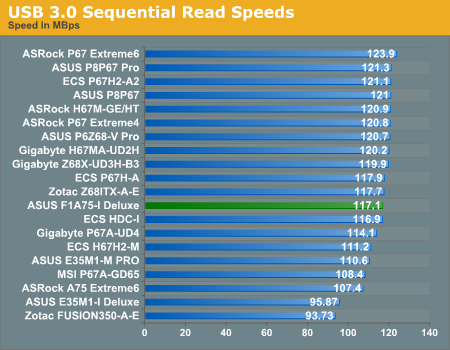
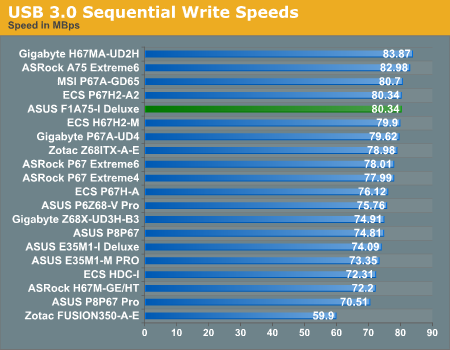
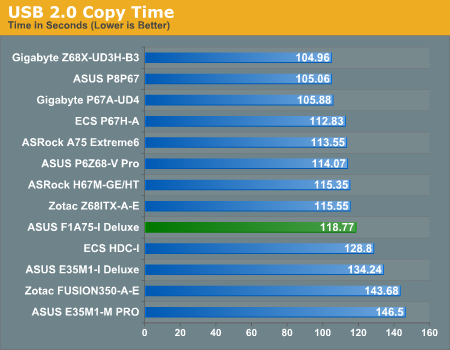
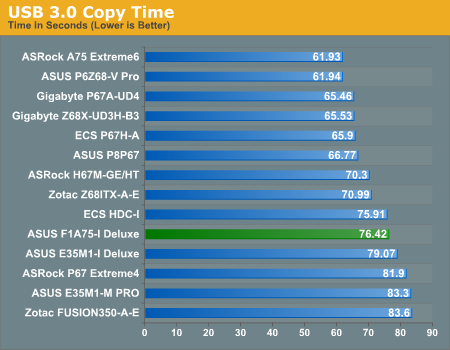
The F1A75-I Deluxe stands out in the USB 2.0 sequential writing performance test, but nothing particularly stands out in the other results.
SATA Testing
We also use CrystalDiskMark for SATA port testing. The operating system is installed on the Micron RealSSD C300, which is rated at 355 MB/s read and 215 MB/s write, and the sequential test is run at the 5 x 1000 MB level. This test probes the efficiency of the data delivery system between the chipset and the drive, or in the case of additional SATA ports provided by a third party controller, the efficiency between the controller, the chipset and the drive.
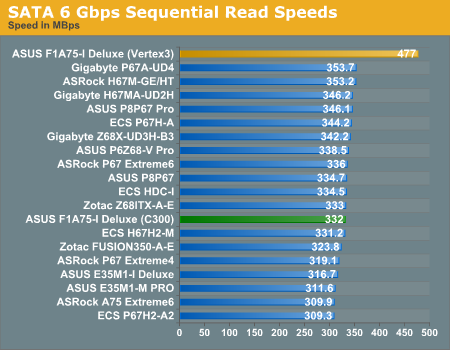
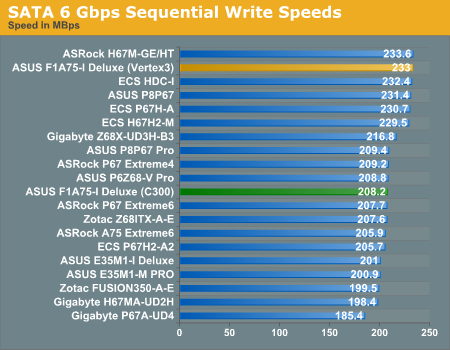
The SATA ports perform relatively standard in our sequential testing.
DPC Latency
Deferred Procedure Call latency is a way in which Windows handles interrupt servicing. In order to wait for a processor to acknowledge the request, the system will queue all interrupt requests by priority. Critical interrupts will be handled as soon as possible, whereas lesser priority requests, such as audio, will be further down the line. So if the audio device requires data, it will have to wait until the request is processed before the buffer is filled. If the device drivers of higher priority components in a system are poorly implemented, this can cause delays in request scheduling and process time, resulting in an empty audio buffer – this leads to characteristic audible pauses, pops and clicks. Having a bigger buffer and correctly implemented system drivers obviously helps in this regard. The DPC latency checker measures how much time is processing DPCs from driver invocation – the lower the value will result in better audio transfer at smaller buffer sizes. Results are measured in microseconds and taken as the peak latency while cycling through a series of short HD videos - less than 500 microseconds usually gets the green light, but the lower the better.
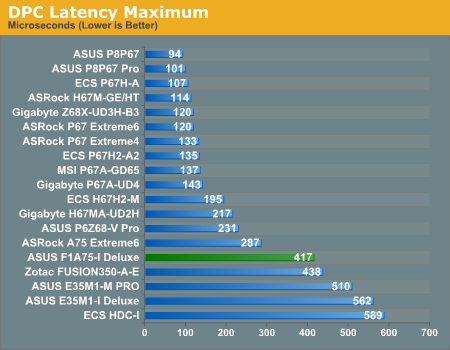
My initial findings gave a DPC Latency reading around 1000 microseconds, and would randomly jump to 3000 microseconds. Eventually I was able to track down my source of the issue - the ASUS AI Suite II software, which automatically starts up on boot when installed. When this software is turned off, my DPC latency would reduce to a sub 500 microsecond level. Note, many users wont actually notice a 3000 microsecond latency - after speaking with ASUS, they seem to have had some issues replicating this issue. However, there is a quick fix if it is an issue for any user. I would also like to note that this issue may be fixed in later BIOS versions when the board comes to market.
3D Movement Algorithm Test - link
The algorithms in 3DPM employ either uniform random number generation or normal distribution random number generation, and vary in various amounts of trigonometric operations, conditional statements, generation and rejection, fused operations, etc. The benchmark runs through six algorithms for a specified number of particles and steps, and calculates the speed of each algorithm, then sums them all for a final score. This is an example of a real world situation that a computational scientist may find themselves in, rather than a pure synthetic benchmark. The benchmark is also parallel between particles simulated, and we test the single thread performance as well as the multi-threaded performance.
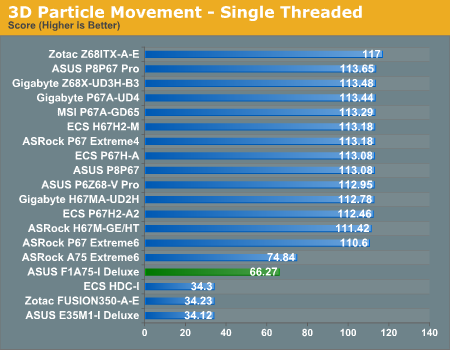
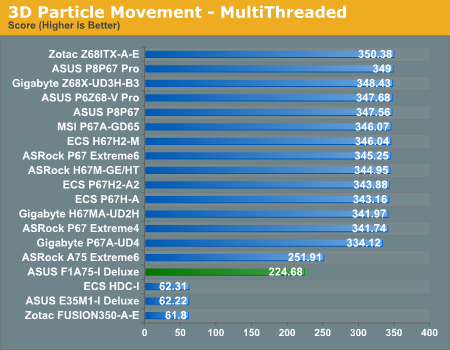
As the 3DPM benchmark is mainly CPU driven, the A6-3650 used in this review performs worse than the A8-3850 used in the A75 Extreme6 review as expected.
WinRAR x64 3.93 - link
With 64-bit WinRAR, we compress the set of files used in the USB speed tests. WinRAR x64 3.93 attempts to use multithreading when possible.
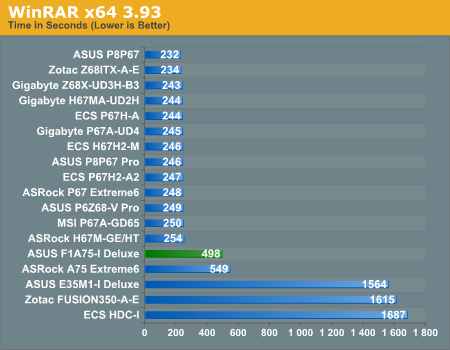
As requested in our A75 Extreme6 review, we ran the memory at DDR3-1866 for the F1A75-I Deluxe benchmark testing. In this case, despite the lower clock speed of the A6-3650 used, the increased memory gave a significant boost to the WinRAR compression time.
FastStone Image Viewer 4.2 - link
FastStone Image Viewer is a free piece of software I have been using for quite a few years now. It allows quick viewing of flat images, as well as resizing, changing color depth, adding simple text or simple filters. It also has a bulk image conversion tool, which we use here. The software currently operates only in single-thread mode, which should change in later versions of the software. For this test, we convert a series of 170 files, of various resolutions, dimensions and types (of a total size of 163MB), all to the .gif format of 640x480 dimensions.
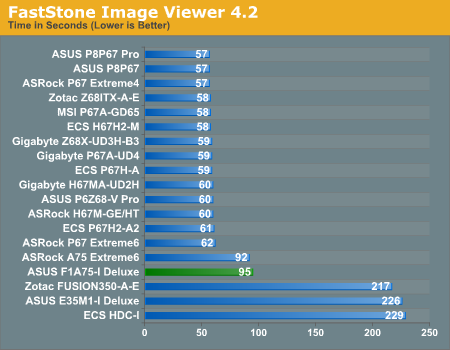
For FastStone, it seems that memory does not play that much of a role, so the F1A75-I Deluxe falls behind the Extreme6 due to clock speed.
Sorenson Squeeze 6.0 - link
Sorenson Squeeze is a professional video encoder, complete with a vast array of options. For this test, we convert 32 HD videos, each a minute long and approximately 42 MB in size, to WMV 512KBps format. Squeeze can encode multiple videos at once, one for each thread.
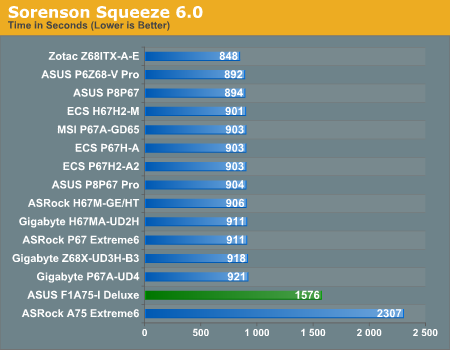
Video editing is where the improved DDR3-1866 memory setting used with the F1A75-I Deluxe is a tour-de-force, beating the higher clock speed, but slower memory A75 Extreme6 setup.
Metro2033 IGP
Metro 2033 is a challenging DX11 benchmark that challenges every system that tries to run it at any high-end settings. Developed by 4A Games and released in March 2010, we use the inbuilt DirectX 11 Frontline benchmark to test the hardware at 1024x768 with medium settings. Results are given as the average frame rate from 10 runs.
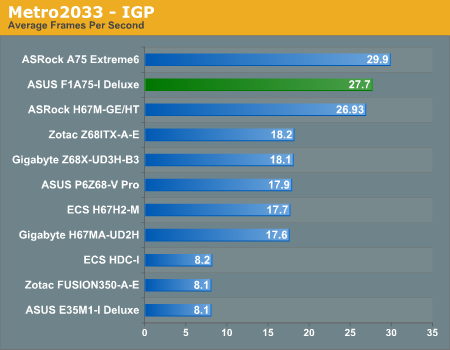
Despite the increase in memory, the 320 SP IGP in the A6-3650 gives fewer frames than the 400 SP IGP in the A8-3850 of the A75 Extreme6.
Dirt2 IGP
Dirt 2 is a racing game released in September 2009, published by Codemasters. We use the inbuilt benchmark at 1024x768 and medium settings, and the results shown are the average frame rate from 4 runs.
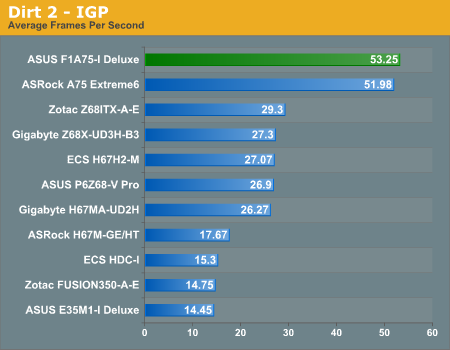
In the EGO engine, faster memory rules here over processing power, giving the A6-3650 at DDR3-1866 a lead.
Left4Dead2
Left4Dead 2 is a classic Steam FPS Shooter. It changes very quickly from GPU to CPU bound over a certain limit - our test is a time demo taken from a run through of the first level.
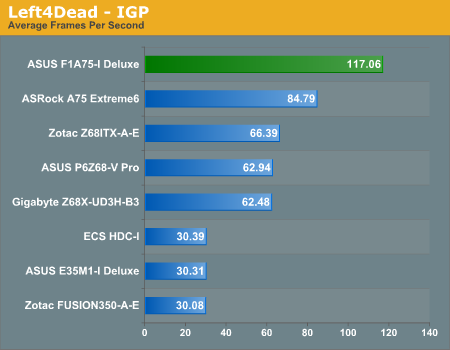
While the game is GPU bound, memory obviously plays a role.
Final Words
ASUS mini-ITX boards always have the potential for greatness within them. A strong background in hardware design with support and software to match is part of ASUS’ strategy to be number one when it comes to motherboards on the global scale.
The F1A75-I Deluxe was sent to me unexpectedly along with another board I had requested, but I chose to review this one first, as I am a big fan of the mini-ITX format. If we look at the design of the board and the low profile, ASUS is making a push here to the small form factor Llano arrangements niche with aplomb. The styling works, with everything laid out neatly, especially the wifi module and connectors to the back panel. I would have liked a couple more fan headers, but ASUS are clearly aiming at the lower powered Llano processors with this design – strap on a low powered CPU and a low profile cooler, some low profile memory and stick it in a case for maximum effect.
The BIOS as far as I can tell is rock solid, though overclocking leads a little to be desired, with the board not getting into Windows beyond 107 MHz in AHCI mode. This again would suggest more towards a low powered setup, especially with extra energy saving technologies like the ASUS EPU. However in IDE mode, the board would happily run at 140 MHz (3640 MHz total), leading me to suggest that if AHCI is not a concern, then IDE mode would be the way to go.
The software works for the most part, and you cannot fault the fan controls. I would have liked more in the box, especially as I do not find the extra wireless controller appealing in terms of ergonomics or functionality, but the wireless antenna work for me, especially if you have somewhere to magnetize them to (preferably not a mechanical hard drive!).
Performance wise, we can see the difference extra memory speed makes – when comparing the A8-3850 at DDR3-1333 and A6-3650 at DDR3-1866, where the Sorenson Squeeze test comes in over 700 seconds faster. However, there are no big surprises here in most of the benchmarks. Only the DPC Latency test gives cause for concern, when AI Suite II was running. This will not affect most users at all, and I would hazard at a guess that those who it would affect have a larger budget for a more powerful platform anyway.
As I was testing this board with a pre-release BIOS, it stands to assume that ASUS may iron out some of these discrepancies by the time the board comes to market. ASUS will offer the F1A75-I Deluxe with a three year warranty, and I am told should be released with at $145, indicating a $30 premium over the full ATX size ASUS F1A75-V Pro.


