Original Link: https://www.anandtech.com/show/4347/nzxt-h2-not-quite-quiet
NZXT H2: Not Quite Quiet
by Dustin Sklavos on May 26, 2011 2:43 AM EST- Posted in
- Cases/Cooling/PSUs
- mid-tower
- NZXT
Introducing the NZXT H2
When we saw the NZXT H2's prototype at CES, we were impressed. The case isn't just unusually austere for NZXT, it's genuinely attractive and feature rich. More than that, it's a case designed with silence in mind for the crowd not willing to pony up for bigger, badder cases like SilverStone's Raven series or Antec's P183. With even the updated Sonata IV sporting a daunting $169 asking price, could the NZXT H2 be the silent case frugal builders have been waiting for?
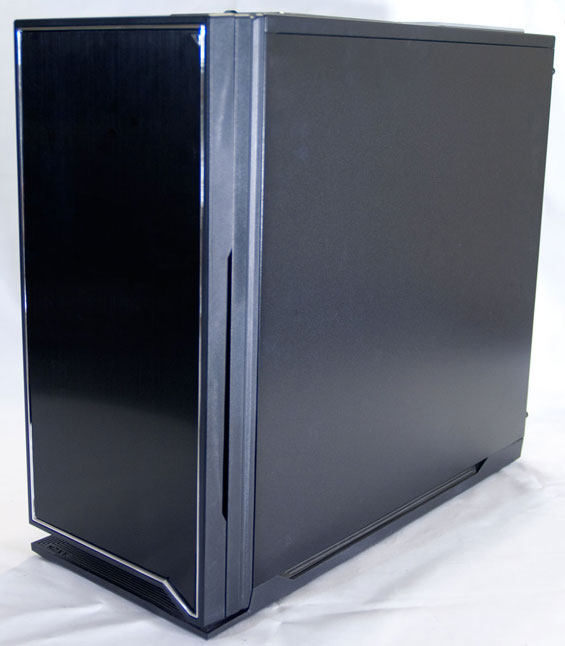
Without a doubt, the NZXT H2 (vowels need not apply) is a fairly attractive piece of kit. As an enthusiast I personally tend towards more modest looking enclosures like this one, so it's nice to see this kind of design trickling down. The H2 has an MSRP of just $99 and comes in white and black models; I really like the white one (just because a computer's white doesn't mean it wishes it was sporting an Apple logo), but the black one is certainly appealing too. But more than color, the H2 offers a lot of features for the frugal builder's dollar.
| NZXT H2 Specifications | ||
| Motherboard Form Factor | ATX, Micro ATX, Mini ITX | |
| Drive Bays | External | 3x 5.25" |
| Internal | 8x 3.5"/2.5" | |
| Cooling | Front | 2x 120mm intake fan |
| Rear | 1x 120mm exhaust fan | |
| Top | 1x 140mm fan mount | |
| Side | - | |
| Bottom | 1x 120mm fan mount | |
| Expansion Slots | 7 | |
| Front I/O Port | - | |
| Top I/O Port | Mic and headphone jacks, 1x USB 3.0, 3x USB 2.0, hot-swap tray, fan controller | |
| Power Supply Size | Standard ATX | |
| Clearance | 170mm (PSU), 11" (Expansion Cards)/12" if HDD tray is removed, 170mm (CPU HSF) | |
| Weight | 19.62 lbs. | |
| Dimensions | 20.47" x 8.46" x 18.35" | |
| Price | $99 | |
If you don't need all the hard drive trays installed, you can definitely get away with a 12" graphics card, but it's still going to be a tight fit as you'll see later. Likewise, there isn't really a hard limit as to how long a power supply can be in this enclosure, but at a certain point it's going to cover up the holes in the motherboard tray you'll need for routing cables.
In and Around the NZXT H2
I have to admit, I was fairly smitten with the NZXT H2 the first time I saw it at CES—though interestingly, NZXT wouldn't even let us take photos at the time. It doesn't seem to be that often that manufacturers try to engineer cases that are, frankly, this quiet. Antec has more or less cornered this market with the P183 and Sonata series, and those aren't cheap cases. With the H2, NZXT has sought to do what we hope every manufacturer would do: take cues from the competition and try to innovate. I'm liable to keep bringing up the P183 during this review, and there's a reason for that: I feel like the H2 is an inexpensive alternative to that case.


The comparison starts with the front door of the case, which has a lot of attractive, sharp angles to it and a single clear triangle at the top that the white indicator LED shines through. As far as lighting goes, that's really it, too. The white LED is bright but not overwhelmingly so; this is a very modest design. When you open the front door, you'll see the inside of it lined with noise-dampening foam. It hides two case fans and three 5.25" bays, and everything is hard plastic. The bay covers are extremely easy to remove by using the small sliders on the right side of each. Likewise, the two 120mm fans in the front can be removed by squeezing the tabs on the side and sliding them out. NZXT uses contacts on the fan housings and the case itself to power the fans, resulting in a clean and cable-less design. Behind the fans are the internal hard drive trays. All in all it's a very elegant solution.
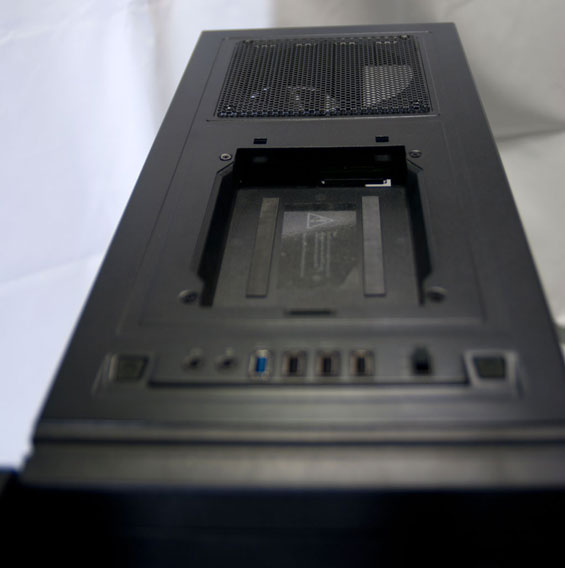
Where the H2 does diverge from the competition is the top control and I/O panel. These are becoming more and more popular lately and I absolutely welcome them; a lot of us keep our cases next to or under the desk, so having the ports and buttons on top just seems more logical. NZXT carefully but smartly packs the top of the case with a lot of useful features: a USB 3.0 port (routed from the back with a cable), three USB 2.0 ports, the usual mic and headphone jacks, a three-stage fan controller, and a hot-swap drive bay. The bay has a removable cover, though I would've been happier if the cover simply opened instead of coming off entirely. Behind it is the 140mm fan grille, which can be covered with a magnetic shield when not in use. Internally, NZXT also provides additional connections for more fans to use the integrated fan controller.
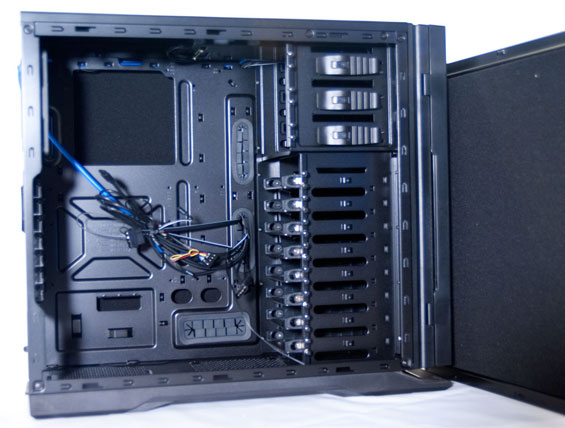
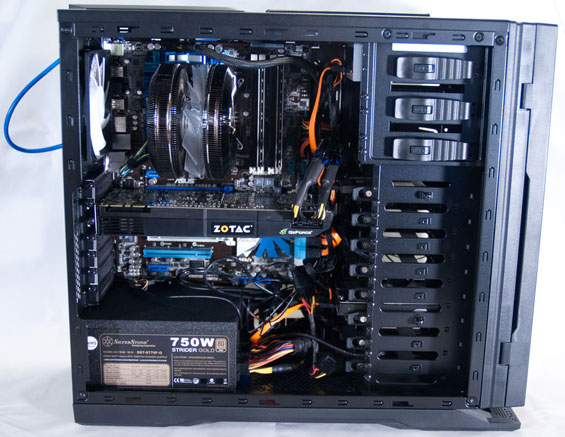
When you open up the H2 you'll find a relatively spacious design that seems geared largely towards ease of use and assembly. While I wound up running into more than a couple of quirks when actually installing the testbed into the case, this is generally a smart design that takes a lot of the better cues from the competition. The drive bays are all tool-less, and there are rows of thumbscrews mounted into the case itself to ensure you never have to go hunting for any new ones. There are really more thumbscrews than you should need, but it's such a welcome change of pace to even have a place for them that I wish more manufacturers followed NZXT's lead. Both side panels are also lined inside with noise dampening foam, and there's 25mm of clearance behind the motherboard tray for cable routing.
Everything else should be pretty familiar: the motherboard cutout for heatsink backplanes is becoming a standard in modern cases (you'd think Intel would take the hint that maybe the pushpins just aren't working out when the entire enclosure and heatsink industries are working around the issue), and the rubber-lined cable access holes are appreciated. Likewise, the expansion slots all have removable covers with grilles for ventilation, which is a welcome find in a case at this price range. All in all, the H2 is promising.
Assembling the NZXT H2
Starting with the motherboard, I was a little disappointed not to find stand-offs already in place. I've seen a couple of manufacturers build them right into the tray (which is frankly ideal), and at a point in the industry where pretty much everyone has standardized on mounting hole placement in motherboards this would've been nice. On the flipside, though, NZXT includes a socket with a phillips head that makes installing the stand-offs substantially easier. Getting the I/O shield and motherboard in was fairly painless, though I do wish NZXT had made the heatsink cutout in the motherboard tray a little wider: if you visit the gallery you'll see the backplate for our heatsink is slightly covered up.


There are two steps in computer assembly that I hate more than anything else: connecting the case headers to the motherboard, and routing the 12V AUX cable (which we'll get into in a bit). The headers for the buttons and LEDs are already irritatingly small and standardized in the most consumer-unfriendly way, but NZXT inexplicably opts not to use the traditional color-coding. The cables in the headers are black, and black with white stripes. My mental shortcut has always been "the color is the positive, the white is the ground". I looked at these cables and was instantly confused, and thus reacted in the same fashion most other white guys do in that situation: anger and fear. If the power LED hadn't been split into two separate headers with a "+" and "-" on them I would've had no idea at all how NZXT had color-coded these. It's completely unnecessary, as the case lacks a window so no one will see if your case headers are a matching black or not.
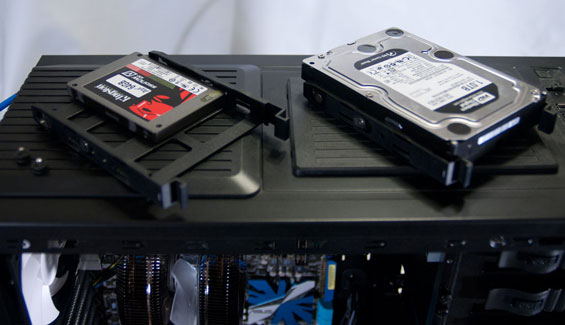
Installing the drives took a little bit of work, but nothing unreasonable or unusual. Removing the covers for the 5.25" bays is a breeze, but note that they aren't entirely toolless: while the main side has plastic studs that snap in and lock the drive into place, the other side isn't secured at all, so you'll probably want to use thumbscrews to keep it from wobbling. The 3.5" drive trays can be a little fussy since you have to basically flex them to snap the studs into the drive's mounting holes, but I found it fairly easy to jimmy the drive in and out of the tray with a small flathead screwdriver. The trays also have mounting holes in the bottom for 2.5" drives, but you'll need to screw those in manually, which is par for the course for almost any enclosure.
![]()
When you install expansion cards, you're going to note that there are some potential clearance issues. Our GeForce GTX 580 butted up against the cables connecting our SSD; we were able to get everything in, but it was a tight fit. If you use a longer card you're going to have to sacrifice a couple of drive bays to get it. Since NZXT offers you a staggering eight that shouldn't be a serious problem, but it's something to keep in mind. Likewise, because of this clearance trouble, side-mounted SATA ports on motherboards are going to be somewhat cramped.
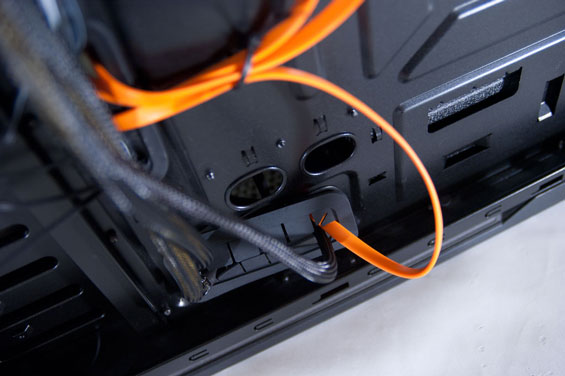
Finally, installing the power supply and wiring the insides resulted in a couple of nagging issues. I had a little trouble lining up the power supply correctly, but that's not a big deal. This is where I discovered that the rubber linings for the mounting holes in the motherboard tray aren't actually secured to it in any way. Routing the main power cable to the motherboard inevitably requires using at least a little force, and routing all of these cables through the rubber lining actually caused the rubber lining to come off. Thankfully the holes themselves are rounded off so they aren't going to start cutting the cables (or you), but a little glue here would've been appreciated.
And of course, getting the auxiliary 12V cable plugged into the motherboard has alwats been an exercise in bloodletting. I love Zalman's CPU coolers and have been a big fan for years, but I've tended to colloquially refer to having to "make sacrifices to Zalman the Blood God." This is because whenever I've had to work in a case with low clearance (like the H2), I've inevitably carved up my hands on Zalman's heatsinks like a moron while trying to install the auxiliary 12V cable. Clearance between the top of the motherboard and the top of the case appears to be particularly low in the H2, and I'm not sure how end users are supposed to do this with any kind of ease with a 140mm fan installed.
Ultimately the assembly went fairly well, though. Most users may want to simply remove the rubber linings from the motherboard tray altogether, and I can't stress enough how much easier a modular power supply can make your life; that's just true of any build in any case.
Testing Methodology
For testing ATX cases, we use the following standardized testbed in stock and overclocked configurations to get a feel for how well the case handles heat and noise.
| Full ATX Test Configuration | |
| CPU |
Intel Core i7-875K (95W TDP, tested at stock speed and overclocked to 3.8GHz @ 1.38V) |
| Motherboard | ASUS P7P55D-E Pro |
| Graphics Card | Zotac NVIDIA GeForce GTX 580 (244W TDP) |
| Memory | 2x2GB Crucial Ballistix Smart Tracer DDR3-1600 |
| Drives |
Kingston SSDNow V+ 100 64GB SSD Western Digital Caviar Black 1TB SATA 6Gbps Samsung 5.25" BD-ROM/DVDRW Drive |
| CPU Cooler | Zalman CNPS9900 MAX with Cooler Master ThermalFusion 400 |
| Power Supply | SilverStone Strider Gold 750W 80 Plus Gold |
A refresher on how we test:
Acoustic testing is standardized on a foot from the front of the case, using the Extech SL10 with an ambient noise floor of ~32dB. For reference, that's what my silent apartment measures with nothing running, testing acoustics in the dead of night (usually between 1am and 3am). A lot of us sit about a foot away from our computers, so this should be a fairly accurate representation of the kind of noise the case generates, and it's close enough to get noise levels that should register above ambient.
Thermal testing is run with the computer having idled at the desktop for fifteen minutes, and again with the computer running both Furmark (where applicable) and Prime95 (less one thread when a GPU is being used) for fifteen minutes. I've found that leaving one thread open in Prime95 allows the processor to heat up enough while making sure Furmark isn't CPU-limited. We're using the thermal diodes included with the hardware to keep everything standardized, and ambient testing temperature is always between 71F and 74F. Processor temperatures reported are the average of the CPU cores.
For more details on how we arrived at this testbed, you can check out our introductory passage in the review for the IN-WIN BUC.
Last but not least, we'd also like to thank the vendors who made our testbed possible:
Thank You!
We have some thanks in order before we press on:
- Thank you to Crucial for providing us with the Ballistix Smart Tracer memory we used to add memory thermals to our testing.
- Thank you to Zalman for providing us with the CNPS9900 MAX heatsink and fan unit we used.
- Thank you to Kingston for providing us with the SSDNow V+ 100 SSD.
- Thank you to CyberPower for providing us with the Western Digital Caviar Black hard drive, Intel Core i7-875K processor, ASUS P7P55D-E Pro motherboard, and Samsung BD-ROM/DVD+/-RW drive.
- And thank you to SilverStone for providing us with the power supply.
Noise and Thermal Testing, Stock
Our stock settings for the testbed should provide a reasonable thermal load without causing too much work for the NZXT H2. Here we'll get to see both how well the sound-proofing works out, and if we have to make any sacrifices in performance for it. We tested with the fan controller at each setting.
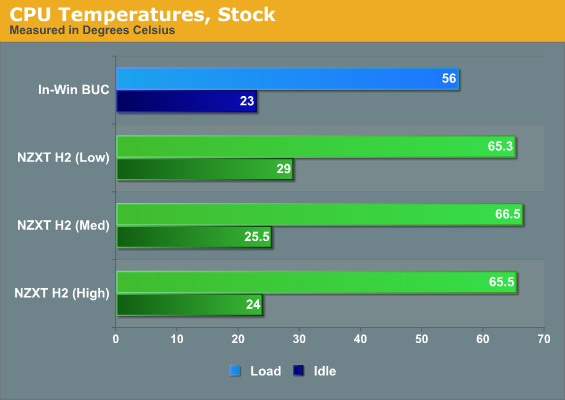
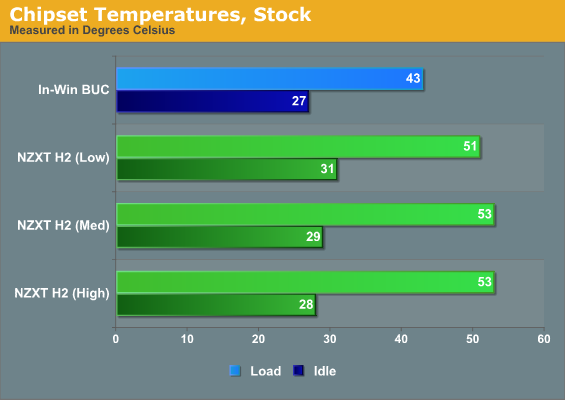
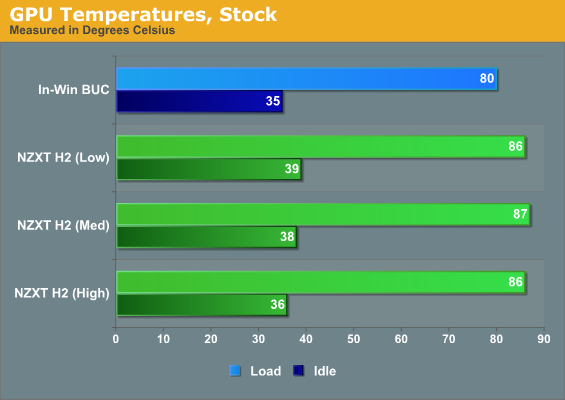
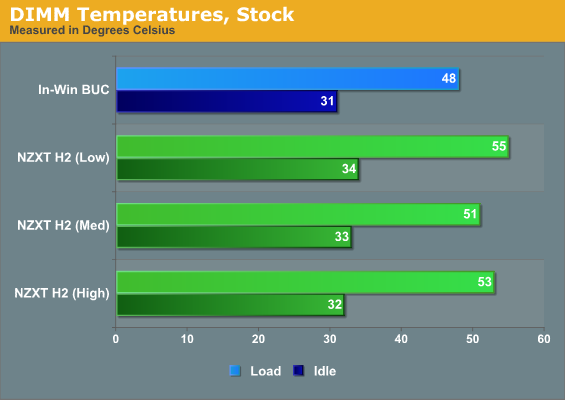
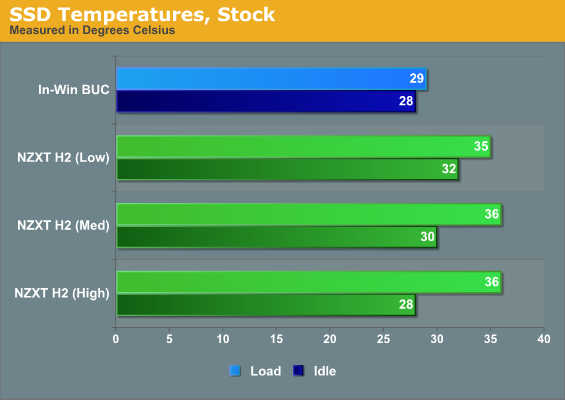
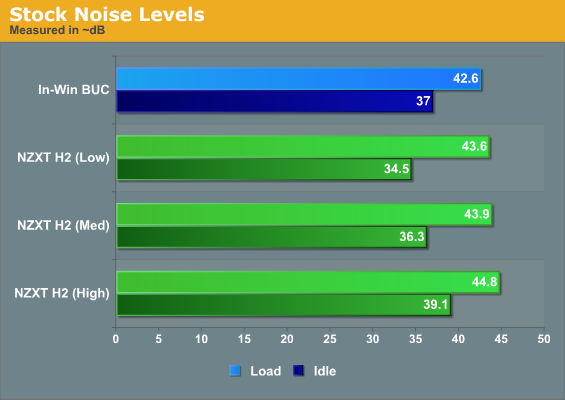
Already we run into some problems with the H2, and it seems odd when it competes with the In-Win BUC which has virtually no sound-proofing installed at all. NZXT's design should operate like a well-refined positive pressure design, but if you check out other reviews online you're going to see many of the other reviewers ran into the same problem I did and placed the blame squarely in one place, a place where it really needs to be: the intake fans are suffocating.
Without a steady supply of fresh, cool air, everything inside the H2 has to work harder. So while the sound-dampening does its job fine while the system is idling, the instant you crank things up, the Zalman CNPS9900 on the processor and the GeForce GTX 580's fan both have to work double-time and virtually negate the quiet fans and sound-dampening of the H2.
You'll see that while idle temperatures consistently go down as you raise the fan speed, under load the H2 just can't cope with the heat and temperatures largely level off. You're better off leaving the case fans at the lowest setting. Meanwhile, the In-Win BUC proves just how much smart thermal management can do for noise levels.
Noise and Thermal Testing, Overclocked
Unfortunately, the picture doesn't get any rosier when we test the NZXT H2 at overclocked settings. Once again we tested with the fan controller at all three levels.
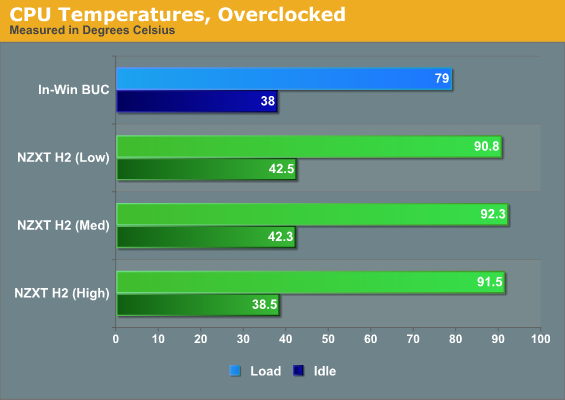
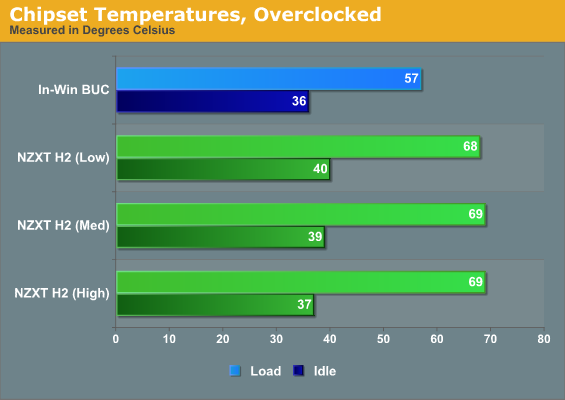


With our testbed overclocked, the H2 is able to run quieter than the In-Win BUC and seems to reach the best compromise between heat and noise at the medium setting (so glad I didn't just test low and high), but the H2 roasts, with the processor hitting a scorching 90C under load. It's quieter yes, but core temperatures get uncomfortably high in the process.
Conclusion: A Good Rough Draft
The test results for the NZXT H2 are disappointing. This is a case I was particularly looking forward to checking out because it looked like quite a find: quiet, efficient cases can be hard to come by at the $99 price point. More than that, the H2 is very feature rich, relatively easy to assemble, and just generally pleasant to look at. It's a far cry from the types of cases we're used to seeing down here. The H2 had a lot of hype behind it, and I've visited a lot of forums where people were really excited about it. It undoubtedly has a few followers already and that's fair.
Which is why it's such a drag that NZXT dropped the ball on the thermals. My results and general feelings towards the H2 seem to fall into consensus with other reviewers, that the H2 has a lot of promise but it would really need some modification to live up to its potential. Antec's P180 went through a few revisions over its lifetime, and I'd like to see NZXT revise the H2 by adding ventilation around the front door so the intake fans aren't suffocating. Getting more air into the enclosure would mean the internal fans won't have to work as hard, and that allows the sound-proofing NZXT installed to do its job. It's a win-win all around, and comparing the H2 to In-Win's BUC really proves that: a system is quieter when the fans don't have to work as hard.
I want to be clear, the H2 has a lot of great features and can be assembled without much trouble. It's nice to look at, and if you don't stress it too hard, it can run very quietly. Unfortunately it has a hard time hanging with other cases in terms of thermal performance, and as a result that takes its toll on the noise NZXT was trying to fight. This is a really solid starting point for NZXT's engineers to work from, and while I might hesitate to recommend the H2 as it is, the case is just one revision away from being a stellar option for budget builders who just want a little piece and quiet.
I'd love to see what NZXT could do with another crack at it. In the meantime, a bit of modding should help alleviate some of the issues we've uncovered, but right now it isn't quite ready for mass consumption.


