Original Link: https://www.anandtech.com/show/2394
ASUS Maximus Extreme - the Extreme Benchmarker's Choice?
by Rajinder Gill on December 10, 2007 8:00 AM EST- Posted in
- Motherboards
Introduction
Irrespective of cost versus performance ratios, even the smallest gains are more than enough to convince the enthusiastic front line benchmarkers and PC enthusiasts that DDR3 based motherboards are a justified purchase. However, finding the right motherboard to fill the role of extreme benchmarking can be a challenge to say the least. Out of the box, nearly all motherboards that fall into the mid/low-end of the market are unsuitable for extreme benchmarking - unless the user applies voltage modifications to them. Let's not forget the risks of voltage modifications; often users push the components used on the budget-oriented offerings far past their specifications, which seriously reduces component life spans. In addition to this, most moderately priced motherboards lack or do not provide full control over some of the chipset registers that are needed to fine tune system stability/performance at break-neck Front Side Bus (FSB) and CPU speeds.
 |
Using sub-zero cooling methods can enable most Intel 65nm processors to scale well past 4GHz (chilled water/phase cooling), and even 5GHz using liquid Nitrogen. Even though processor cooling does make up a large part of the overclocking equation, there's more than just low operating temperature and high voltage requirements to guarantee success. The board must have stable and clean voltage delivery circuits for the CPU, Northbridge, and memory. The motherboard PCB should be at least a six layer design (with excellent trace routing) to minimize signal inductance and crosstalk. Selection of high quality transistors, resistors, and capacitors can also be critical; low tolerance, low drift, and low noise components are required to ensure accurate and stable power delivery under heavy load conditions.
Lastly, optimized board layouts and onboard device cooling options are needed, to satisfy both extreme benchmarkers and gaming enthusiasts simultaneously (this is another challenge). Manufacturers cannot afford to base a motherboard around extreme users alone. Yes, this segment is a growing industry, but the number of sales generated by this niche group will never cover the invested time/R&D for manufacturing the product. Whichever way we look at the options, there has to be component and board layout compromises to meet several different market opportunities.
ASUS caters to this upper-end niche market with its ROG (Republic Of Gamers) product line. As the ROG motherboard line has evolved, ASUS has tried to satisfy the extreme users and gaming enthusiasts alike with excellent board layouts, stable operation across a wide variety of conditions, and unlocking additional BIOS tweaking functions not found on their other motherboards. The ROG boards that bear the 'Extreme' suffix after their name are generally the ones that ASUS provides with the best components and widest range of voltage and BIOS options. The Maximus Extreme we are reviewing today shares many of the engineering principles employed on the Maximus Formula that we tested last month. The most obvious difference between the two boards is that the Extreme version features DDR3 support, as opposed to DDR2 on the Maximus Formula. We expect that overall FSB limits on both boards will be similar due to the same overall circuit topologies employed in most key areas of the board.
With that said, DDR3 support opens up the possibility of increased benchmarking scores. As such, we expect users who buy this product will want to push the board hard, so not only will we provide a subset of the standard AnandTech benchmark suite, but also some extreme cooling results to see where this board fits in to ASUS' diverse product line. Now, let's move on to the fun….
ASUS Maximus Extreme Board Layout and Features
 |
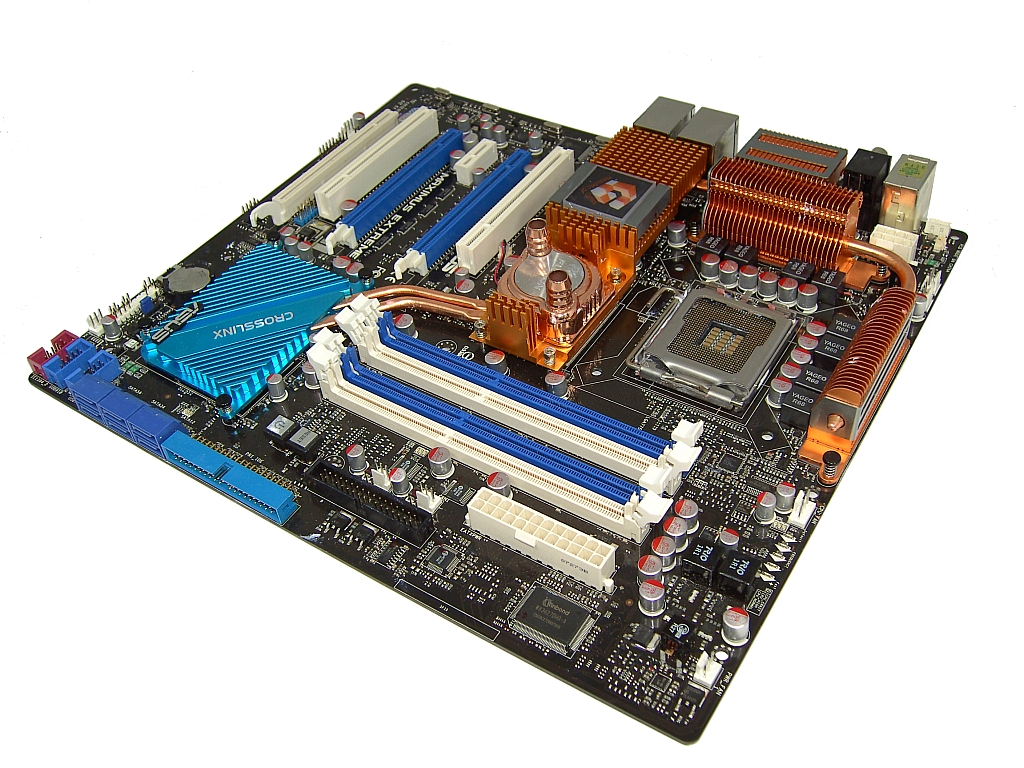
ASUS has extended the width of this board slightly past standard ATX measurements to allow for better overall DIMM socket placement. Note the close proximity of the DIMM slots to the Northbridge, allowing for better signal transfer potential at high DDR3 speeds. For those using smaller non-tower PC cases, the additional width over conventional ATX boards is around 4cm. This is worth keeping in mind if space is already an issue.
Eight well-placed fan headers are available at key areas of the board with a decent level of control via the BIOS or ASUS' AI software suite. We also find ASUS' Volt Minder LED system for the CPU, Northbridge, and Southbridge areas. As this board is ASUS' current flagship product, we also find a wired LCD diagnostic poster and additional items like the LED lit ROG logo on the Northbridge heatsink. The OPT fan headers are also controllable, by use of the supplied thermal probes, which can be attached to areas of the board at the users discretion.
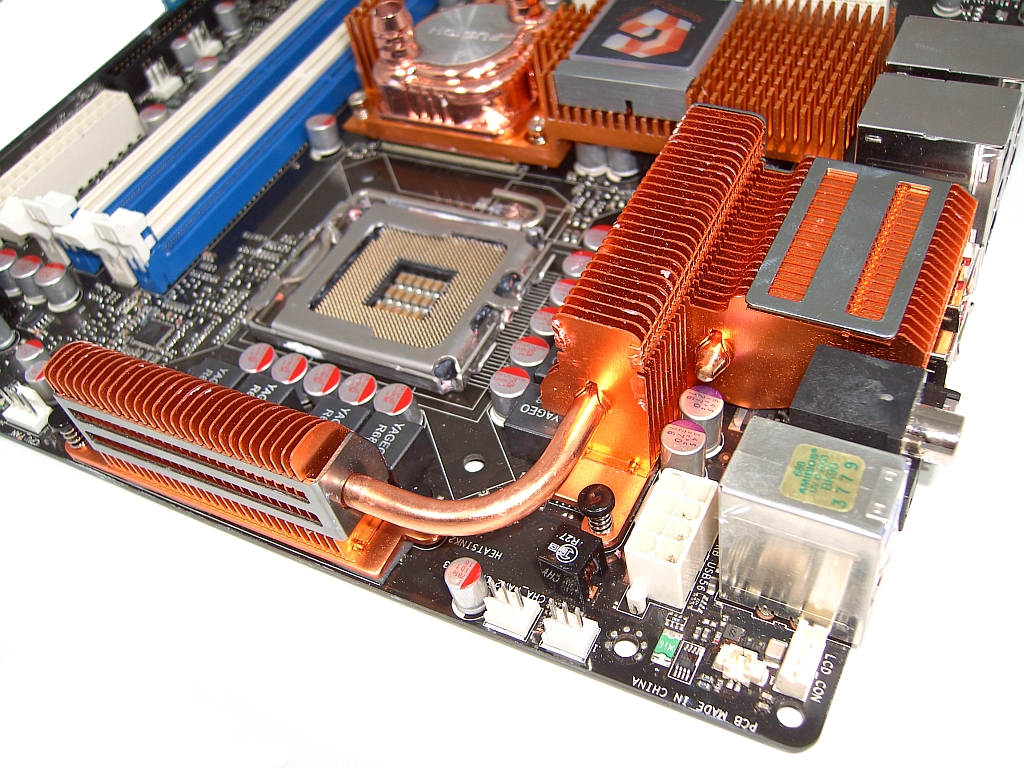 |
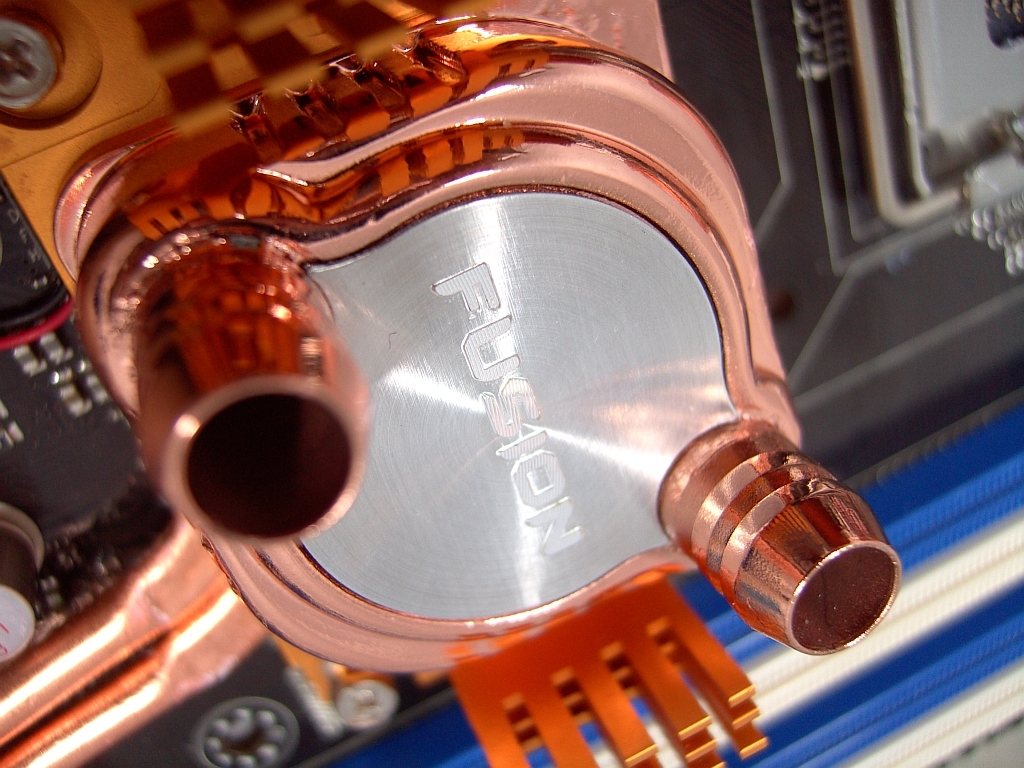
The EPS 12V connector is near the CPU socket area. An internal S/PDIF pin-out and the connector for the LCD poster is located at the top left hand corner of the board (lower right of the picture). CPU voltage comes via the 8-phase ADP 3228 PWM controller (4 MOSFETs per phase for a total of 32 MOSFETs). The PWM cooling heatsink is large enough to dissipate heat under high Vcore and heavy processor loading; however, the central MOSFETs do not have good heatsink contact as the board bows slightly under the pressure of a CPU cooler, pulling the central MOSFETs away from the sink. If you plan to push high levels of Vcore, it may be prudent to use additional non-conductive thermal paste over the central MOSFETs to ensure heat transfer. Again, ASUS has chosen to use a hybrid heatsink/water block combination for the Northbridge cooling solution. We approached this combo with a little trepidation after our experience with water-cooling the NB on the Maximus Formula last month.
This time, we used screw fitting hose clamps, rather than the supplied spring clamps to ensure that our 1/2" tubing would not work loose during testing. ASUS has assured us that ROG boards will be shipping with screw-type hose fittings in the future. We also removed the entire heatsink assembly to check for contact between the heatsink and Northbridge HIS (Integrated Heat Spreader). The thermal pads ASUS uses form a very secure bond to the Northbridge at ambient temperatures; as a result, we had to use a hair dryer to heat the board plus 40 degrees to work the block loose. We advise users not to force the heatsink assembly away from the board. We have seen examples of Northbridge chips pulled off boards by over-zealous users - a quick way to kill a board without a chance for an RMA if a problem arises in the future.
IHS to heatsink contact was a lot better on this board than our first Maximus Formula sample (something later fixed in shipping boards). We still decided it best to remove the stock cooling pad with an acetone based cleaner and use a good thermal paste instead, as the paste has a lower thermal resistance than thermal pads allowing for better thermal transfer. A combination of air- and water-cooling for the Northbridge brings the best results. The X38 chipset does seem to be heat sensitive; temperatures in excess of 45-50C can cause system instability.
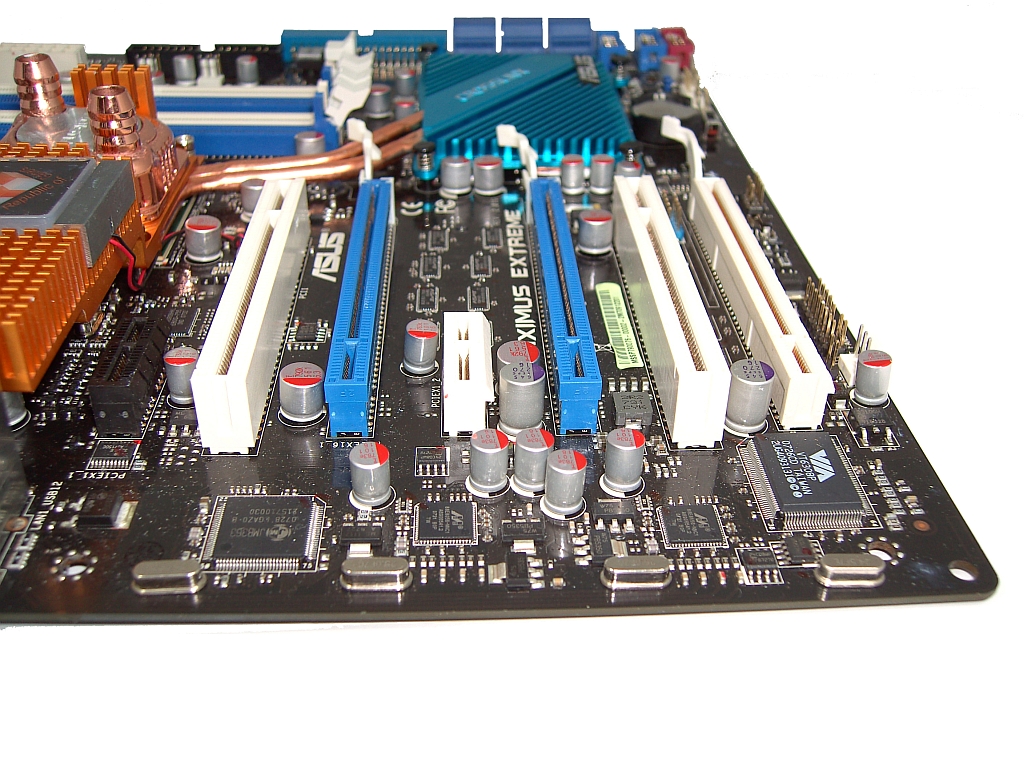 |
Any board that uses the x38 chipset is bound to have 2 X PCI-E 2.0 slots. ASUS has gone a step further and used a bridge chip to allow a third PCI-E 1.1 slot running at x8 speed. The exciting upshot for users is the potential to run Tri-Fire (future drivers permitting), albeit with the PCI-E slots running in 16x-16x-8x mode. The obvious side effect is this configuration leaves little room between the PCI-E slots. Users who wish to use full-coverage water blocks to cool their graphics cards will need to either modify their PC cases or use GPU-only water blocks.
The top PCI-E x1 slot is for the supplied SupremeFX II soundcard, featuring the ADI 1988B 8-channel High Definition Audio CODEC. Two PCI slots are available, though in the case of using dual graphics cards the top PCI slot is the only port that may be used. Finally, an onboard USB connector is located above the lowest PCI-E port.
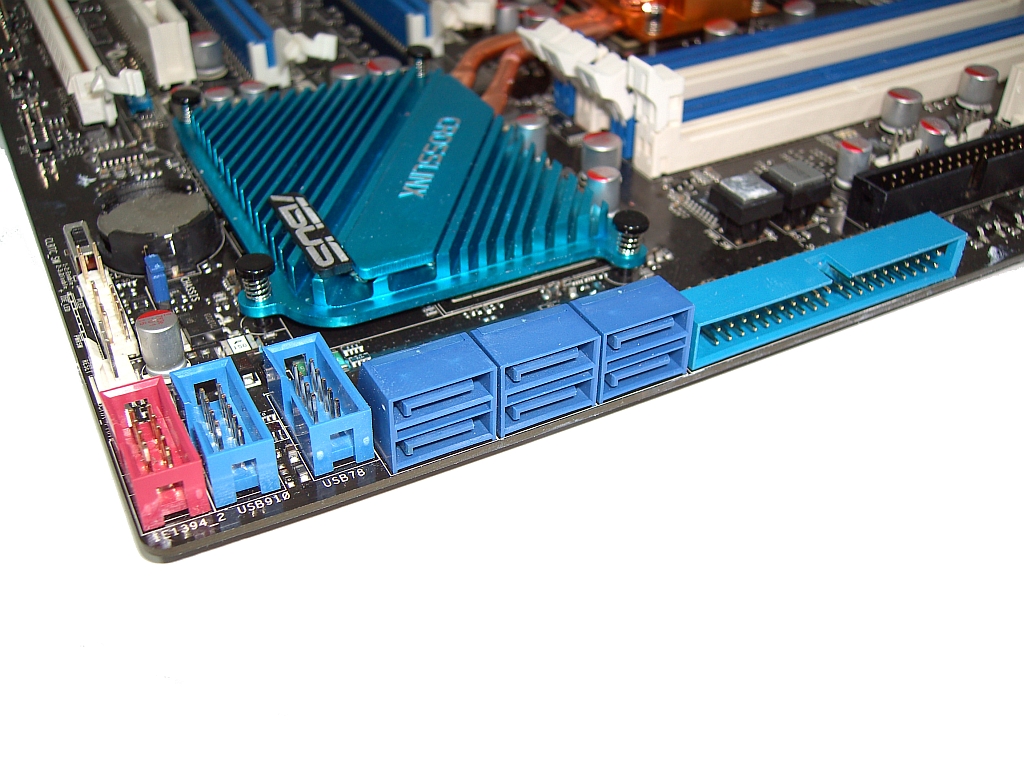 |
The Intel ICH9R Southbridge provides us with six SATA ports. Below the ports, we find two USB connectors and an IEEE 1394a port. The IDE connector sits above the SATA connectors, remaining accessible even when using long graphic cards in the top PEG slot.
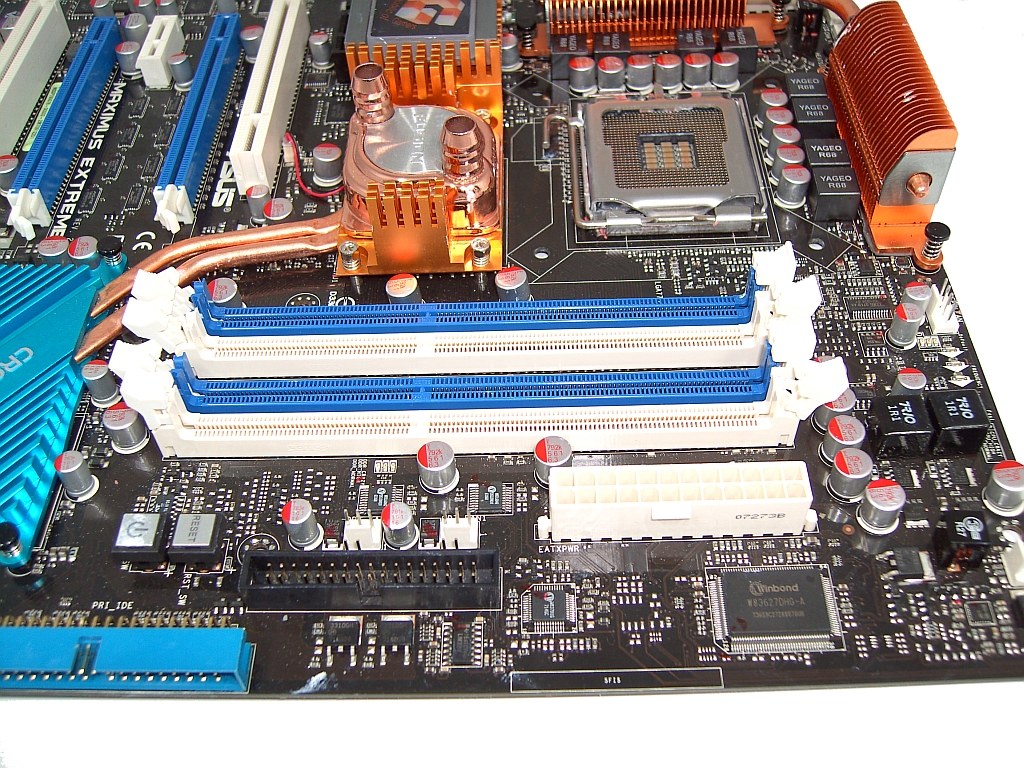 |
We have four (almost) centrally placed DIMM slots for memory, offering full support for 8GB. ASUS uses this memory slot layout to minimize the potential of inductance and signal crosstalk, a wise decision based upon the potential speed that DDR3 brings to the table. The floppy drive connector sits just in front of the DIMM slots. To the right of this we have the 24-pin ATX 12V connector. As mentioned earlier, the added width of this motherboard ensures plenty of room around all peripheral connectors on the right side of the board. The power and reset switches are just behind the IDE connector, keeping them exposed for use even when multiple graphics cards are present.
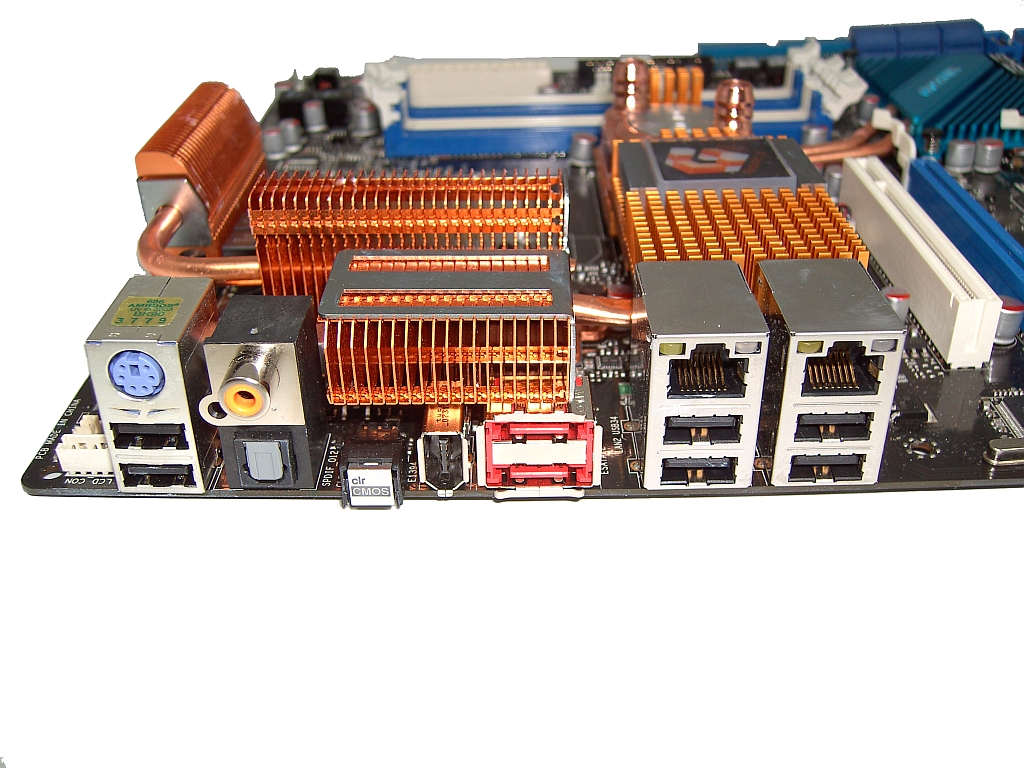 |
The rear IO panel features a PS/2 keyboard port with two USB slots directly underneath; users with a PS/2 mouse will need a PS/2 to USB adaptor. A Coaxial S/PDIF output is also present, together with a TOSLINK output. To the right we have the Clear CMOS button, making it easy to clear the CMOS even after installing the board in a case. There is a rear FireWire port, dual Gigabit LAN (featuring teaming support), and four additional USB ports. In addition, ASUS also provides two e-SATA ports on the rear IO plate.
Test Setup
| ASUS Maximus
Extreme Standard Testbed |
|
| Processor | Intel Core 2 Quad
Q6600 Quad-core, 2.4GHz, 2x4MB Unified Cache, 9x Multiplier, 1066FSB |
| CPU Voltage | 1.200V |
| Cooling | Thermalright 120 Extreme |
| Power Supply | OCZ 1000W |
| Memory | Corsair CM3x1024-1800C7D (4GB) |
| Memory Settings | 4-4-4-12 1N (DDR3-1066 Base) |
| Video Cards | MSI HD X2900 XT 512MB |
| Video Drivers | ATI Catalyst 7.10 |
| Hard Drive | Western Digital 7200RPM 750GB SATA 3/Gbps 16MB Buffer |
| Optical Drives | Plextor PX-B900A, Toshiba SD-H802A |
| Case | CoolerMaster Stacker 830 Evo |
| BIOS | 0803 |
| Operating System | Windows Vista Home Premium 32-bit |
| . | |
| ASUS Maximus
Extreme Quad-Core Overclocking / Benchmark Testbed |
|
| Processor | Intel Core 2 Extreme QX6800 Quad-core, 2.93GHz, 2x4MB Shared Cache, 11x Multiplier, 1066FSB |
| CPU Voltage | 1.275V |
| Cooling | Swiftech Apogee GTX, Thermochill PA120.3 radiator, dual Laing DDC Ultra pumps in series, 1/2" ID (3/4" OD) Tygon tubing, 3x Panaflo 120x38mm fans @ 7-12v in push configuration |
| Power Supply | OCZ Pro Xstream 1000w, PCP&C 1200w |
| Memory | OCZ DDR3 PC3-14400 (DDR-1800) Platinum Edition (2G/4GB) |
| Memory Settings | 4-4-4-12 1N (DDR3-1066 Base) |
| Video Cards | MSI 8800 Ultra (660/1050 for Overclocking) |
| Video Drivers | NVIDIA 169.09 |
| Hard Drive | Western Digital 7200RPM 250GB - WD2500KS |
| Optical Drives | Plextor PX-755A |
| Case | CoolerMaster Stacker 830 Evo |
| BIOS | 0803 |
| Operating System | Windows XP Professional SP2 |
| . | |
We decided to use our base QX6800 CPU with our standard tests run on the 9x multiplier to simulate the attractively priced Q6600 CPU and to match previous benchmark results. In this section of testing, we aim to remain within realistic cooling capacity temperatures and current CPU stepping capabilities. This better shows an overall picture of motherboard performance potential using widely available parts. With such a vast array of overclocking BIOS functions at our disposal, we decided to stick with a single operating system environment.
We selected Microsoft Windows XP SP2 due to its maturity, taking away some of the time burden looking for possible software level conflicts that may exist on a newer OS (though we ventured to run our standard Vista test suite for the non-overclocking benchmarks). This does not mean the board cannot work with Vista when overclocking; we are just trying to eliminate possible downtime on non-motherboard/BIOS related issues. There's also the fact that a vast majority of overclocking enthusiasts have not switched to Vista (yet).
We ran 1280x1024 resolution game benchmark tests in order to cross-compare CPU MHz related gains in our board specific tests. We utilize new drive images on each board in order to minimize any potential driver conflicts. Our 3DMark results utilize the standard benchmark resolution for each program. We run each benchmark five times, throw out the two low and high scores, and report the remaining score to reflect a repeatable average. We limited our standard Vista test suite to a few benchmark results to indicate the general performance of this board when compared to current P35 motherboards.
Since the ASUS Maximus Extreme is for the overclocker and gamer as opposed to your typical internet browsing activities, we decided to take a different look at this board and focus on overclocking for this particular article with results compared to the P35/X38 motherboards we have reviewed recently. Memory timings used for the tests are as follows: 9x266 = 4-4-4-12 1N, 9x333 = 5-5-5-15 1N and 9x400 = 6-6-6-15 1N.
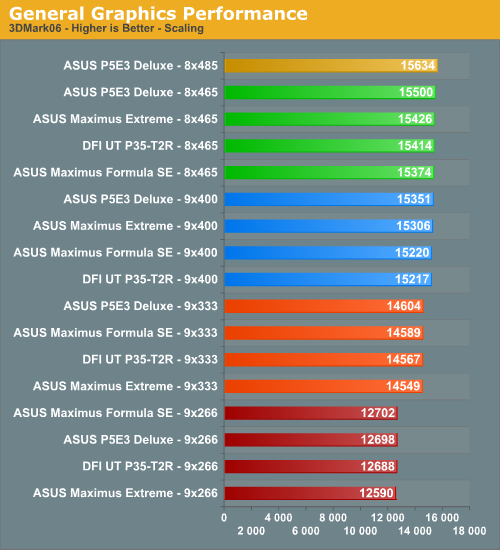
Synthetic Graphics Performance
The 3DMark series of benchmarks developed and provided by Futuremark are among the most widely used tools for benchmark reporting and comparisons. Although the benchmarks are very useful for providing apples-to-apples comparisons across a broad array of GPU and CPU configurations, they are not a substitute for actual application and gaming benchmarks.

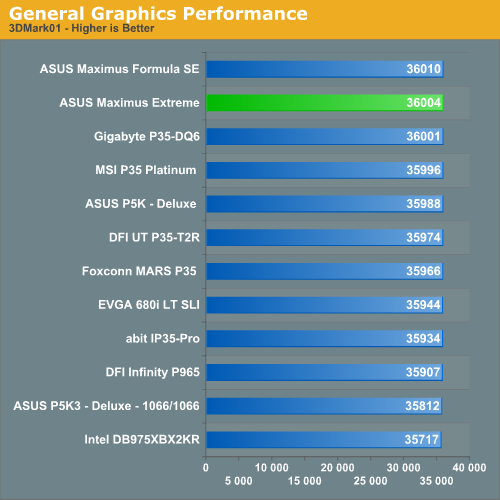
In our 3DMark06 test, the ASUS Maximus Extreme board did not exhibit any issues during repeated testing in this CPU/GPU intensive test. In the more memory and CPU sensitive 3DMark01 benchmark, we were surprised to see our Maximus Extreme board scoring near the top considering the latency penalties of running DDR3 at 1066. The overall differences in performance are not noticeable in either 3DMark unless you are looking to reach the top of the ORB. That of course requires some serious overclocking, which this board is capable of doing.
General System Performance
The PCMark05 benchmark by Futuremark is useful for determining overall system performance for the typical home computing user. This tool provides both system and component level benchmarking results utilizing subsets of real world applications or programs. We consider the PCMark05 benchmark to be both synthetic and real world in nature, and it provides for consistency in our benchmark results.
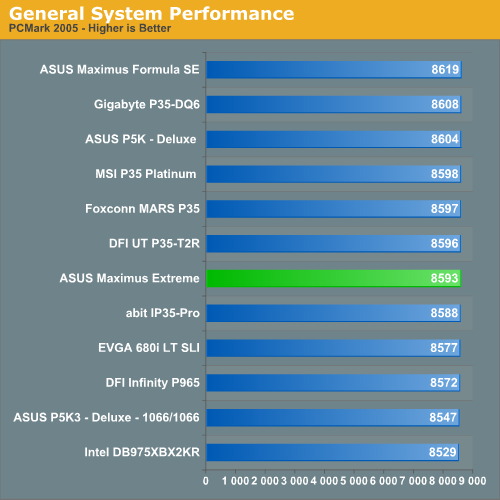
Our PCMark05 scores mimic the results from our 3DMark benchmarks with differences between the boards not exceeding 2%. The ASUS Maximus Extreme board finishes in the middle of the pack with the memory test scores handicapping the board. While based on actual application usage, we will see if these PCMark05 results mirror our own application testing.
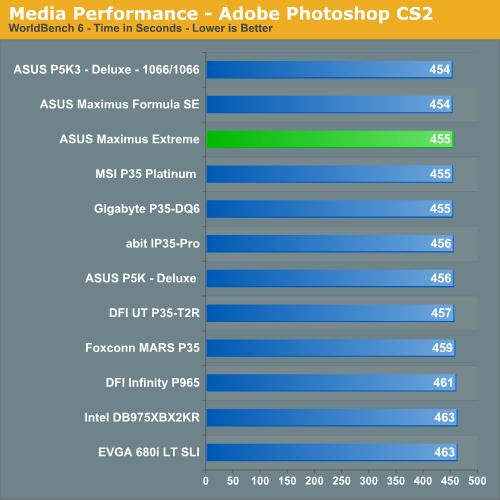
Media Performance
We will take a brief look at general media performance with our test suite that includes Adobe Photoshop CS2 and Adobe Photoshop Elements 5.0. We utilize the PC WorldBench 6.0 Test for measuring platform performance in Adobe's Photoshop CS2. The benchmark applies an extensive number of filters to the test image and heavily stresses the CPU and storage systems. The scores include the full conversion process reported in seconds, with lower numbers indicating better performance.
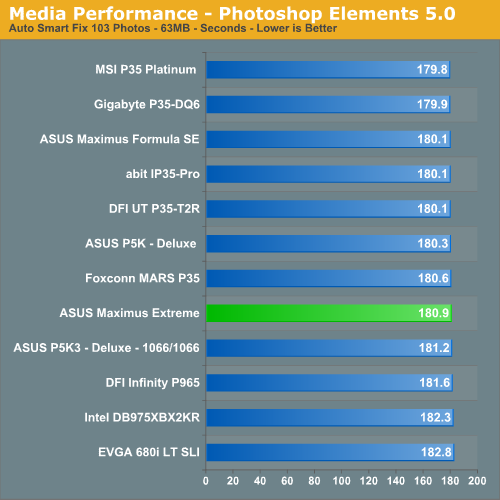
Our next test is one recommended by Intel, but the test itself appears to be fair and results are very repeatable. This test simply measures the amount of time required to fix and optimize 103 different photos weighing in at 63MB. We measure time in seconds, with lower times resulting in better performance.
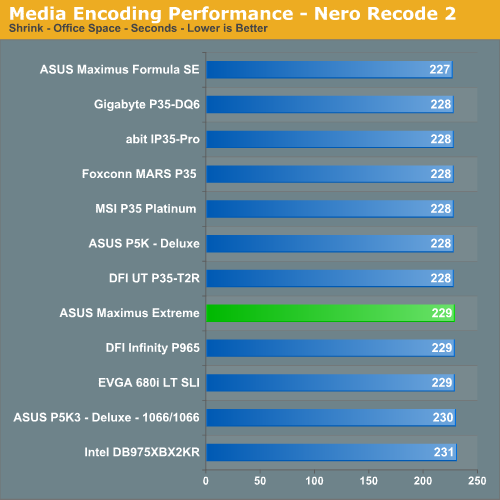
Media Encoding Performance
We are utilizing Nero Recode 2 for our video encoding test. The scores reported include the full encoding process and are in seconds, with lower numbers indicating better performance.
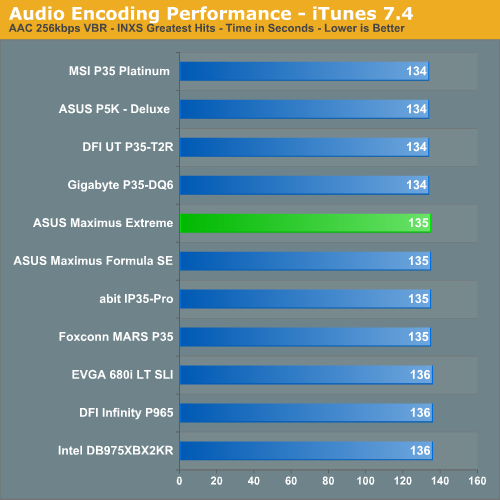
Audio Encoding Performance
We will utilize iTunes 7.4 for our audio encoding tests, as it is one of the most utilized audio applications available due to the immense popularity of the iPod. As in previous articles, we are using an INXS Greatest Hits CD for testing, which contains 16 tracks totaling 606MB of songs. We use iTunes to convert our WAV files into an ACC compatible format. We utilize the 256kbps and variable bit rate option.
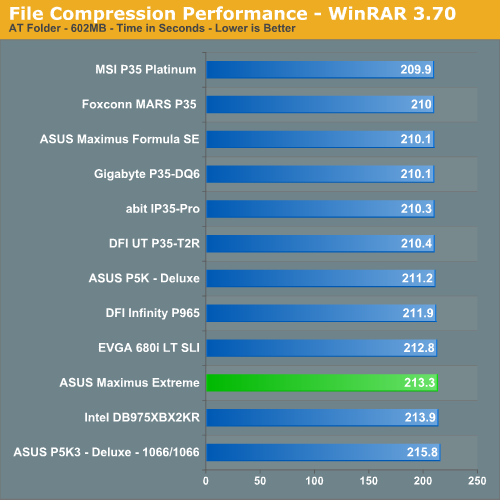
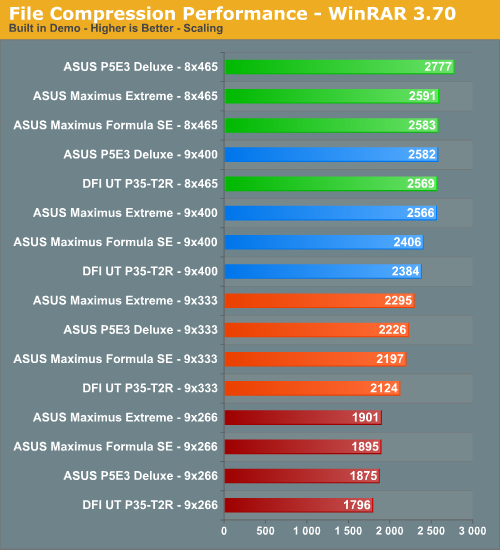
File Compression Performance
Another CPU crunching utility is WinRAR 3.70, which provides for computationally intensive file compression. Our test folder contains 444 files, 10 subfolders, and 602MB worth of data. The WinRAR test utilizes default settings and we defragments the hard drive before each test
Performance Summary
Yet again, the ASUS Maximus Extreme performs well in tests that do not depend on fast CPU/memory throughput. The latency/throughput penalty with DDR3 running at 1066 speeds does come into play in our Photoshop Elements and WinRAR tests. However, the overall differences between the boards are minimal.
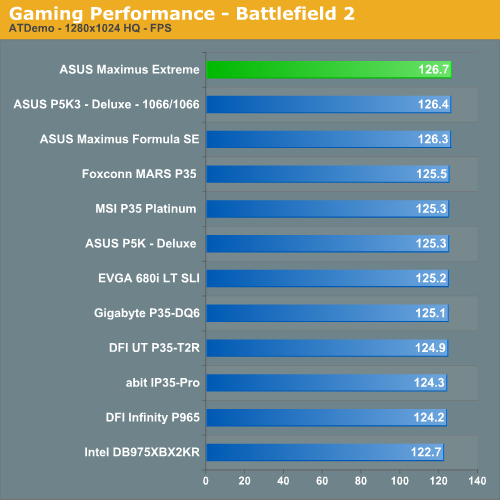
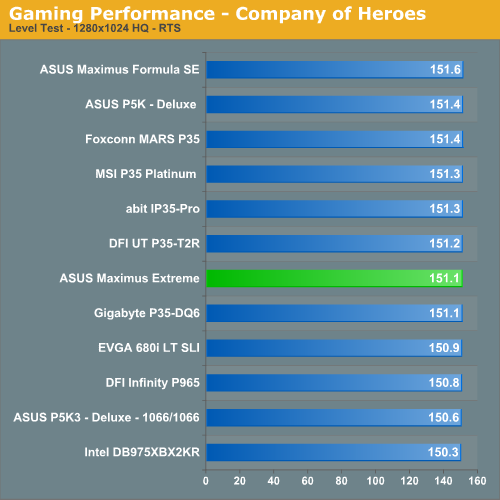
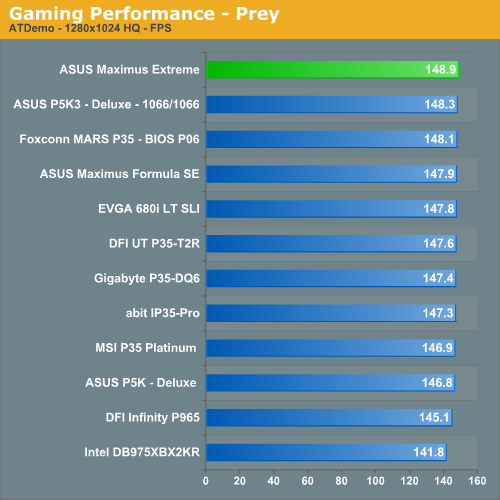
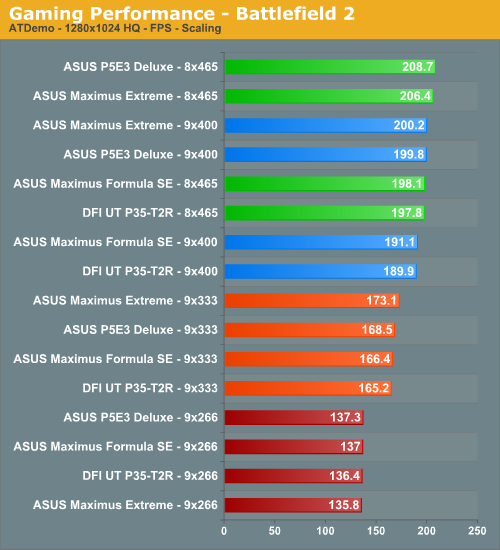
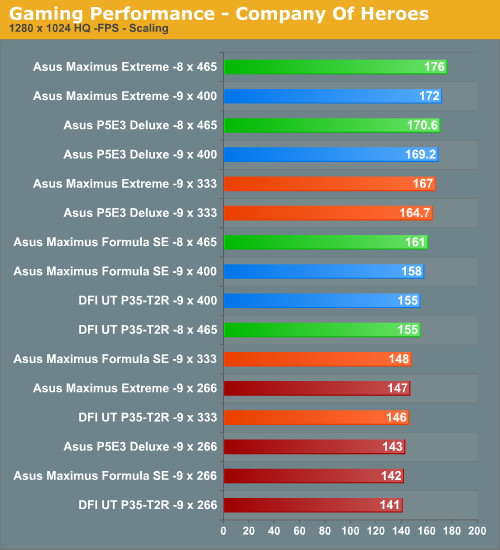
Gaming Performance
As usual, we tested gaming performance with a variety of current games. We ran our benchmarks at a 1280x1024 resolution with high quality settings.
Gaming Summary
The ASUS Maximus Extreme generated very good scores in our gaming tests with first place results in two of the tests. Our initial tests with the latest game releases (UT3, Crysis, Hellgate: London, Call of Duty 4) show the Maximus Extreme performing the same or slightly better than the DDR2 equipped boards.
XP - Everest Cache and Memory Bandwidth
 |
 |
 |
 |
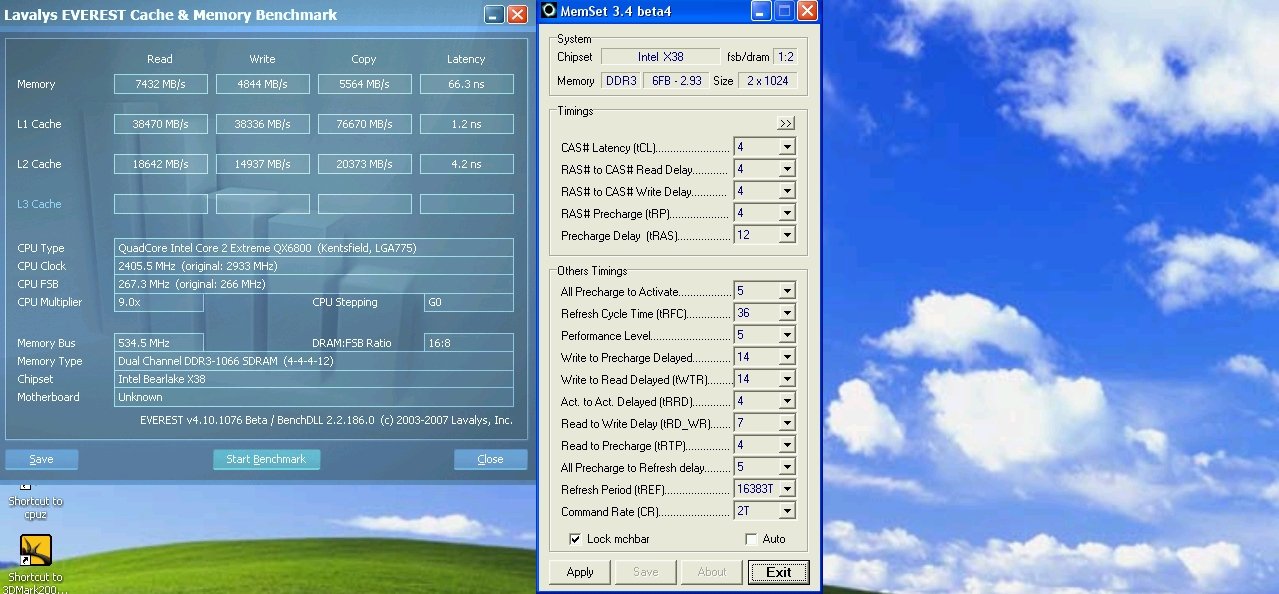
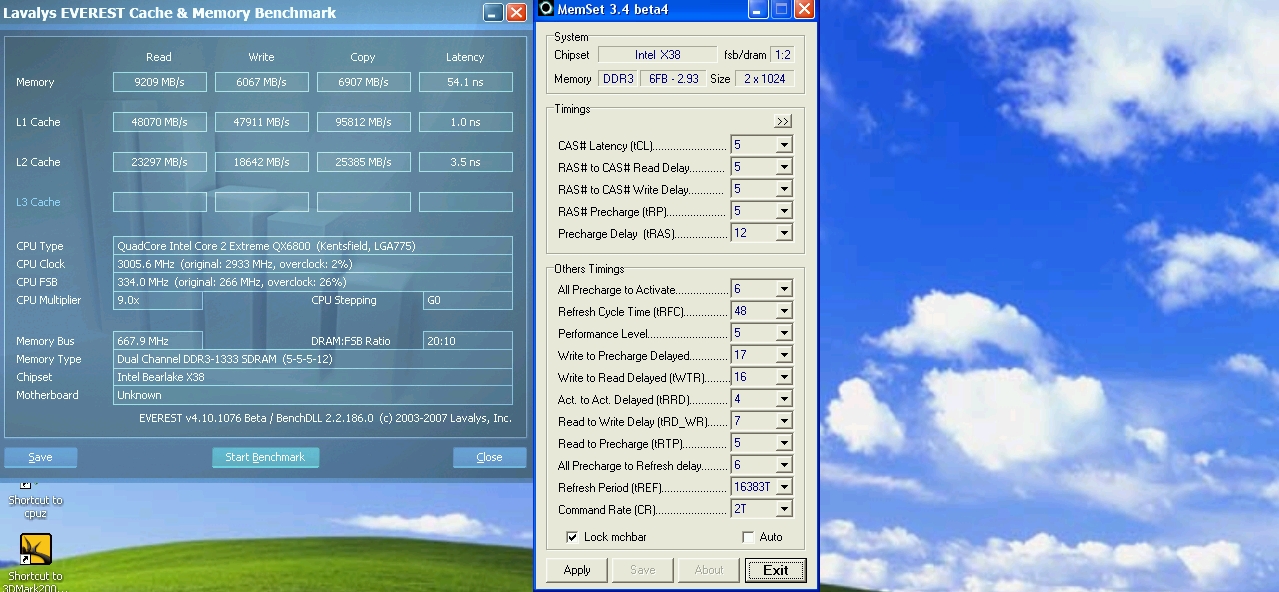
In the top 2 screenshots we ran 2GB of DDR3 memory at DDR2 timings just to get an idea how memory speed scaling effects synthetic latency and bandwidth figures. Obviously, nobody will purchase DDR3 modules and run them at DDR2 speeds, but we do so here just to provide a comparison. Our screenshots show that DDR3 does not really begin to attain latency figures under 50ns until speeds of ~1600Mhz and a Cas latency of 6 are applied. The X38 chipset seems to provide best latency and memory bandwdith figures with a Performance Level (tRD) of 6 or 7. In turn, using a tRD of 6 or 7 limits us of memory speeds between 1600-1800Mhz. The best performance actually comes in around DDR1800 with Cas 7-7-7 timings with a tRD of 7 at 1N command rate. There is more than a monetary premium to pay on this kind of performance though - higher voltages to both the Northbridge and memory. If building a PC for long term use, then DDR31600 at 400FSB should be attainable with low voltages to all key areas of the board, ensuring lower chances of hardware failure.
XP Overclocking Benchmarks
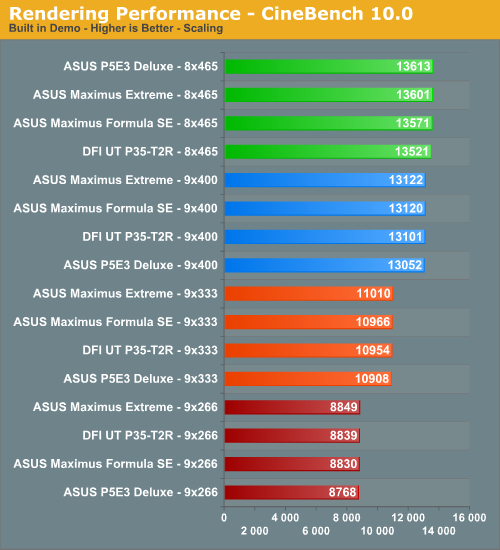
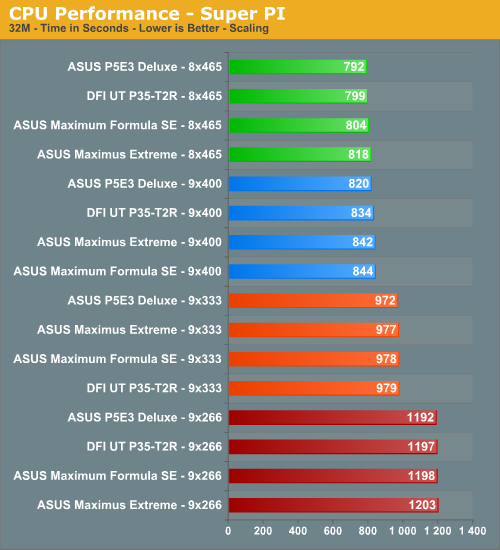
Thoughts on basic overclocking
The Maximus Extreme fares well in all our 3D based tests. Obviously, the performance gains are not huge, as you never get double the performance for double the price. Results between the P5E3 Deluxe and the Maximus Extreme are tight, so choosing either board for a daily system is not going to offer significant advantages at this level of overclocking. Benchmarks such as Super Pi 32M really benefit from very tight secondary RAM timings - often far beyond the capabilities of complete system stability - so take the largely un-tuned results here with a pinch of salt. The board is stable up to around 465 FSB with 65nm quad processors. For those who are interested in Folding@Home, 450 FSB is the real limit.
Although not shown here, we did run some Vista based stability testing with 4GB of memory. Results were very promising: full 4GB stability at DDR3 1700-1800 with 1N command rate also came in around 445-450FSB. Users who buy this board with 24/7 use in mind will generally be avid gamers. For this purpose, the X38 boards are marginally faster than their P35 based counterparts are. Also remember, with X38 boards the option of dual - or in this case triple - graphics cards can provide a level of future proofing. Especially as gaming engines are becoming more complex, dual GPUs will be necessary to play games at high-res with maximum detail settings for the near future.
If the sole reason for choosing this board is the additional DDR3 performance gains (albeit small), then top-end DDR3-1800 modules will be necessary to realize any benefits. At speeds below DDR3-1600 to DDR3-1333, CA 6 to CAS5 performance with DDR3 will show results close to DDR2-1150 at CAS5. If you prefer dual graphics cards without the added expenditure hit of DDR3 memory, there are a couple of DDR2 X38 boards to chose from. The ASUS Maximus Formula fills the role admirably for more advanced overclockers or the Gigabyte GA-X38-DQ6 is a nice alternative.
Important BIOS Functions
We have picked out a few of the more important BIOS functions for a breakdown of their use and application. The "Advanced Tweaker" BIOS screen has quite a few secondary memory timing options; for the most part these can be left to board/SPD default values. We are providing the best "bang for the buck" manual settings below.
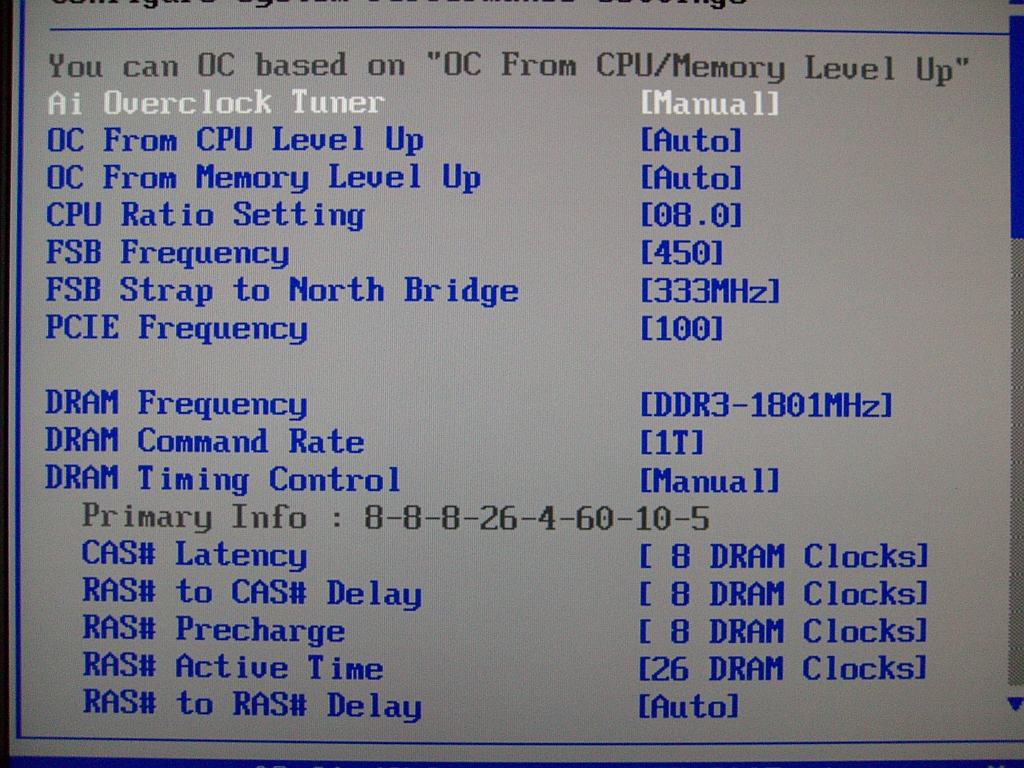 |
AI Overclock Tuner: Set this function to manual for overclocking; the Auto function enables preset overclocks automatically when the system is under load.
OC from CPU Level Up: ASUS enabled overclock profiles based upon the processor type in use; for manual overclocking, leave this function at Auto. If low level automatic preset overclocking is preferred, select either the CPU type or "Crazy" mode. Setting either of the latter two options adjusts all board voltages to preset values. The preset values themselves can be higher than is absolutely necessary for the applied overclock. The Auto overclock functions can be useful for beginners who are getting to grips with overclocking, with the option to move to manual overclocking later. We suppose this guarantees stability via a somewhat brute force approach. For long-term use, we recommend using a manually set overclock.
FSB Strap to Northbridge: Unlike older chipsets, performance hits of using the higher MHz Northbridge straps are virtually non-existent. Synthetic latency and read figures across any of the 266/333 or 400 straps are almost identical. There are small variances in overall stability, for quad processors running over 400FSB - the 333 and 400 straps worked better for us. For benching with dual-core CPUs, we found the 266 strap allowed us sufficient overhead to run the board up to 550 FSB. Between 550-575 FSB, we were limited to the 333 and 400 NB straps depending on memory timings. The 200 NB setting offers inadequate FSB potential to consider it worthy of use with Intel's latest processors.
PCI-E Frequency: If the ICH9R SATA ports are used then a setting around 115 MHz is safe, though scores do not seem affected by the minimal 15MHz overclock. We noticed anything over 118MHz would cause problems with the drives or even the POST routines. Benchmarkers as usual are best off using an IDE drive, turning off all the peripherals, and then trying to maximize the bus speed.
DRAM Frequency: The available dividers for the 266/333/400 NB straps are:
| NB Staps and Dividers | |
| 266 | 4:5/2:3/1:2 |
| 333 | 1:1/5:6/5:8/1:2 |
| 400 | 1:1/3:4/1:2 |
DRAM Command Rate: Sets either 1N or 2N memory timing. Our test sample is perfectly capable of holding 1N command rate at up to DDR3-1840Mhz. The synthetic performance advantage of 1N over 2N is around ~1.8ns (1-3%). As the board has no issue using 1N at high speeds, it becomes almost mandatory to set 1N for all overclocking.
DRAM Timing Control: Set this to Manual to obtain control of all primary and secondary memory timing ranges. The BIOS shows primary and secondary timings above both respective timing sections. Users may wish to enter the shown timings manually for each setting and then experiment with tighter timings where possible. The board defaults are generally tight enough for 24/7 use. For benchmarking, Memset allows access to setting ranges that are not accessible in BIOS. We look at a few timing ranges below.
RAS To RAS Delay: The BIOS generally defaults to 4 for this setting; for benchmarking, we have used 3. At high FSB speeds, a setting of 5 may provide more stability with the counter effect of a small loss in performance.
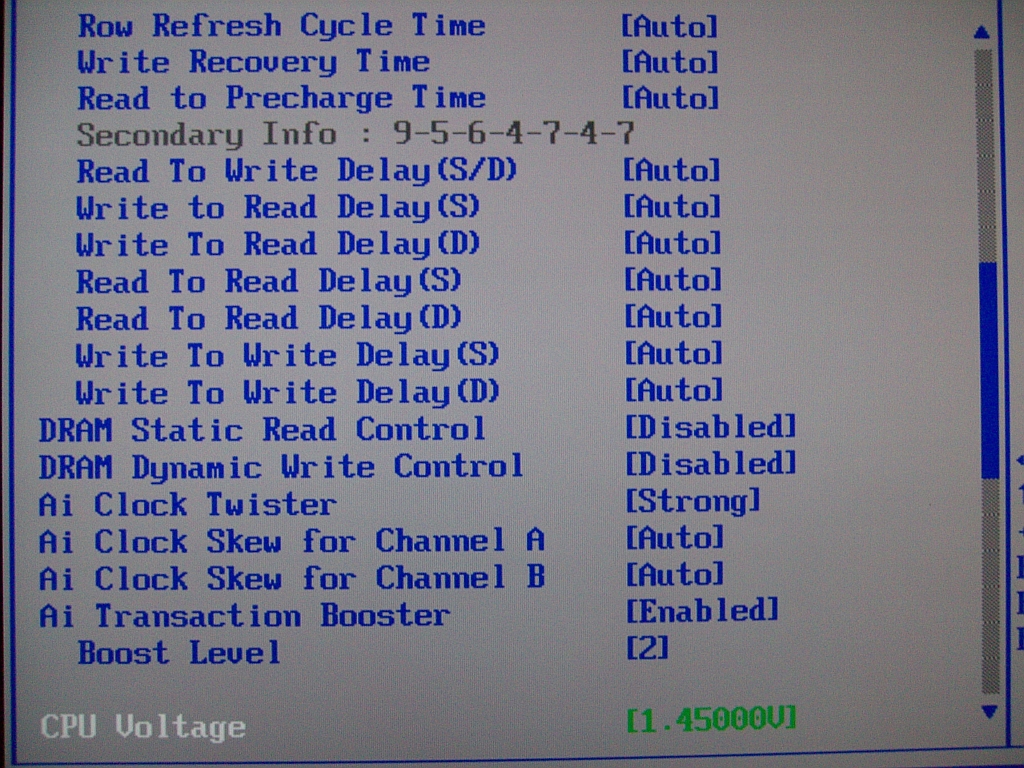 |
Row Refresh Cycle Time - aka TRFC: For benchmarking TRFC can be set as low as 45-50; if shooting for stability values of 60 and above are fine. A lower setting gives big gains in bandwidth and can affect benchmarking scores quite drastically.
Write Recovery Time: Default value here is 8. This setting works fine over a broad range of FSB and memory speeds. If stability issues are experienced, it may be worth experimenting with a setting of 9. Lower is tighter and gives small gains in memory write performance.
Read to Precharge Time: A range of 3-6 is usable. For stability testing with high RAM speeds in excess of DDR3-1700, 1N command rate may require a setting of 6. For benchmarking, values as low as 3 are possible, though stability will be dependent on the benchmark in question. A setting of 3 applied via Memset is best.
DRAM Static Read Control and DRAM Dynamic Write Control: Both these functions are best set to 'Disabled' for overclocking. We could not substantiate any significant memory bandwidth or latency gains using the 'Enabled' setting. Further, setting 'Enabled' may actually hinder overclock success.
AI Clock Twister: We recommend use of the "Strong" setting wherever possible. Setting "Weak" reduces overall bandwidth and access latency.
Transaction Booster: Ranges here are from 1-8 (1-3 are usable changes in BIOS), with either the "Enabled" or "Disabled" setting. A setting of 1 with "Enabled" selects the default tRD level for the NB strap and memory divider combination. Each digit increase to the Transaction Booster with the "Enabled" setting will subtract 1 from Performance Level, providing us with higher memory bandwidth and lower access latency. The "Disabled" function inreases tRD (tRD +1) and/or tRD phases with each additional digit over 1, meaning an upward scale increase or boost is less aggressive with Transaction Booster set to "Disabled".
AI Clock Skew Channel A and Channel B: Timing unison between both channels of memory is essential for stability. PCB trace length variance between Channel A and Channel B can lead to an offset of signaling between both Channels. Delaying Channel A or advancing Channel B may be required to realign clock timing at high memory speeds - thus improving stability. Generally, we used either a delay of 50-100ps on Channel A with Channel B set to "Normal". Alternately, we can advance Channel B by 50-100ps with Channel A set to "Normal". Users may need to experiment between various levels of "Skew" to find optimal settings.
BIOS, Continued
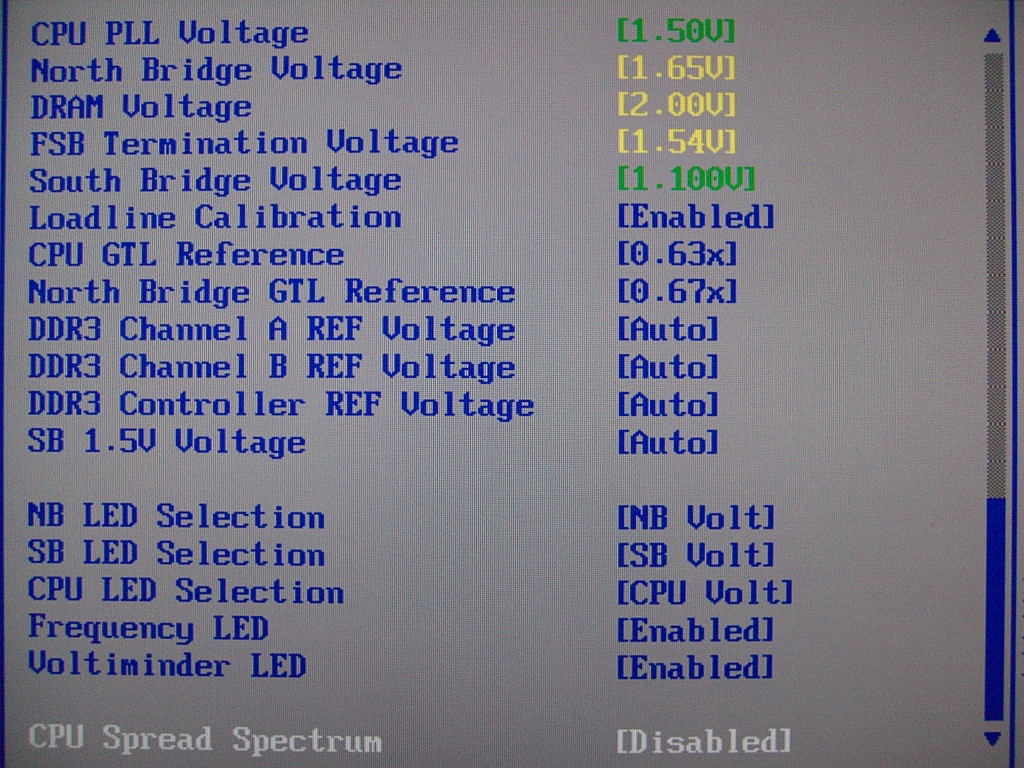 |
CPU PLL Voltage: Scale range is 1.5-3V in 0.02V increments. Stock is 1.5V, and although overvolting can bring increases to FSB limits, we do not recommend using past 1.75V for long-term use.
North Bridge Voltage: Scale range is 1.25V-2.05v. NB temperatures greatly affect stability, and temps over 47C are prone to failures during longer Prime torture test runs. We recommend active cooling of the NB for overclocking. A combination of air- and water-cooling generates the best results when using the stock ASUS water block and heatsink combo. Voltages around 1.61V-1.65V are required for overclocking past 440FSB.
DRAM Voltage: ASUS provides us with a 1.5V-3.04V scale. The 0803 BIOS does overvolt by around 0.05V, and users are advised to subtract this value from the BIOS setting to stay within warranty voltages for memory. (Yes, we said that with a straight face!)
FSB Termination Voltage: Voltage scale runs from 1.2V-2V. Quad-core CPU overclocking is especially dependent upon VTT and GTL voltage ratios. We found a setting of 1.54V to be a sweet spot on our board for speeds over 440FSB.
Loadline Calibration: Available options are Auto, Disabled, and Enabled. Use "Enabled" for overclocking. This function reduces Vcore voltage sag. With Loadline Calibration "Enabled", we measured a load droop of around 0.02V using the 0803 BIOS.
CPU GTL Reference: This setting is a derivative or ratio of the applied VTT voltage. A setting of 0.63x provides the most headroom for overclocking quad-core processors.
Northbridge GTL Reference: A value of 67% generally provides the best level of stability on this motherboard.
DDR3 Controller REF Voltage: This setting works off a principal percentage of DRAM voltage - 50%. Altering either Channel A or B values away from DDR3_REF generally creates instability issues. There may however be gains in applying an overvolt to DDR3 Controller REF Voltage if attempting to reach high FSB/memory speeds.
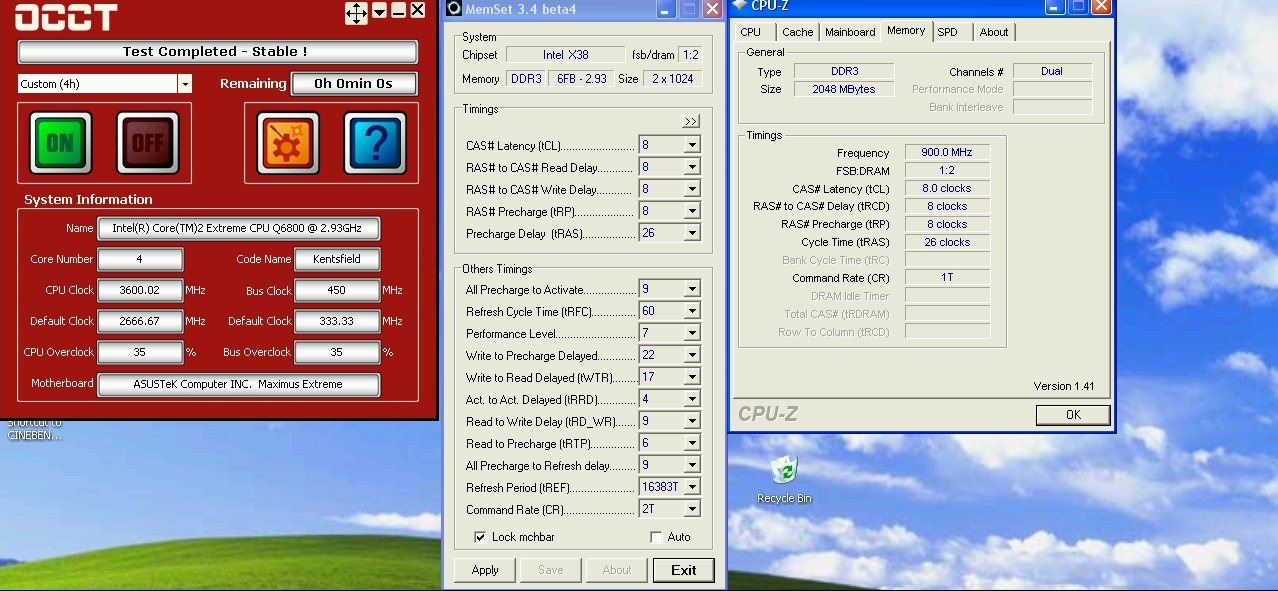
450FSB Stability Test and BIOS settings
In order to provide users with a starting point for a decent overclock we provide our BIOS settings, together with a 4-hour pass of OCCT @ 8x450FSB with our QX6800 processor.
 |
| 450FSB Quad-Core BIOS Settings | |
| CPU Settings | |
| CPU Feature Ai Overclock Tuner | [Manual] |
| OC From CPU Level Up | [Auto] |
| OC From Memory Level Up | [Auto] |
| CPU Ratio Setting | [8.0] |
| FSB Frequency | [450] |
| FSB Strap to North Bridge | [333MHz] |
| PCI/E Frequency | [110] |
| DRAM Settings | |
| DRAM Frequency | [DDR3-1801MHz] |
| DRAM Command Rate | [1T] |
| DRAM Timing Control | [Manual] |
| CAS# Latency | [8] |
| RAS# to CAS Delay | [8] |
| RAS# Precharge | [8] |
| RAS# Active Time | [26] |
| RAS# To Ras# Delay | [4] |
| Row Refresh Cycle Time | [60] |
| Write Recovery Time | [9] |
| Read To Precharge Time | [6] |
| Read To Write Delay(S/D) | [9] |
| Write To Read Delay(S) | [5] |
| Write To Read Delay(D) | [6] |
| Read To Read Delay(S) | [4] |
| Read To Read Delay(D) | [7] |
| Write To Write Delay(S) | [4] |
| Write To Write Delay(D) | [7] |
| DRAM Static Read Control | [Disabled] |
| Dram Dynamic Write Control | [Disabled] |
| Ai Clock Twister | [Strong] |
| Transaction Booster | [Enabled] |
| Boost Level | [2] |
| Voltage Settings | |
| CPU Voltage | [1.43125v] |
| CPU PLL Voltage | [1.5V] |
| North Bridge Voltage | [1.61v] |
| DRAM Voltage | [2.06v] |
| FSB Termination Voltage | [1.54v] |
| South Bridge Voltage | [Auto] |
| Loadline Calibration | [Enabled] |
| CPU GTL Reference | [0.63x] |
| North Bridge GTL Reference | [0.67x] |
| DDR2 Channel A REF Voltage | [Auto] |
| DDR2 Channel B REF Voltage | [Auto] |
| DDR2 Controller REF Voltage | [DDR2_REF] |
| SB 1.5V Voltage | [Auto] |
Extreme cooling results
| ASUS Maximus
Extreme Dual-Core Overclocking / Benchmark Testbed |
|
| Processor | Intel Core 2 Duo Q6850 Dual-Core, 3.00GHz, 4MB Shared Cache, 9x Multiplier, 1333FSB |
| CPU Voltage | 1.300V |
| Cooling | Various - Dual Rotary Cascades made by LittleDevil and Johann |
| Power Supply | OCZ Pro Xstream 1000w, PCP&C 1200w |
| Memory | OCZ DDR3 PC3-14400 (DDR-1800) Platinum Edition (2G/4GB) |
| Memory Settings | 4-4-4-12 1N (DDR3-1066 Base) |
| Video Cards | MSI 8800 GTX |
| Video Drivers | NVIDIA 169.09 |
| Hard Drive | Western Digital 7200RPM 250GB - WD2500KS |
| Optical Drives | Plextor PX-755A |
| Case | Dimastech benching table |
| BIOS | 0803 |
| Operating System | Windows XP Professional SP2 |
| . | |
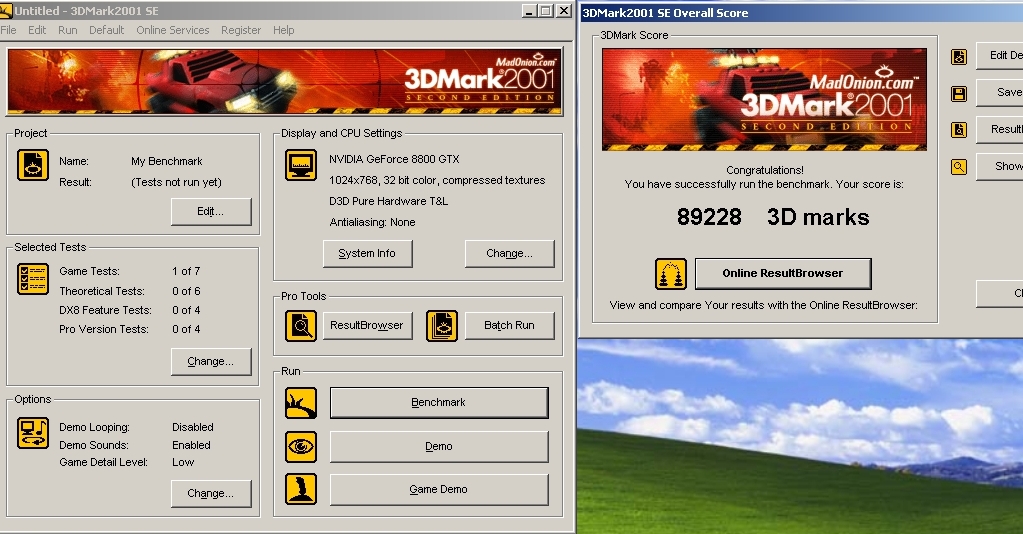
3D Mark 2001SE CPU @ 4.88GHz GPU @ 861/1000
 |
3D Mark 2003 CPU @ 4.88GHz GPU @ 861/1000
 |
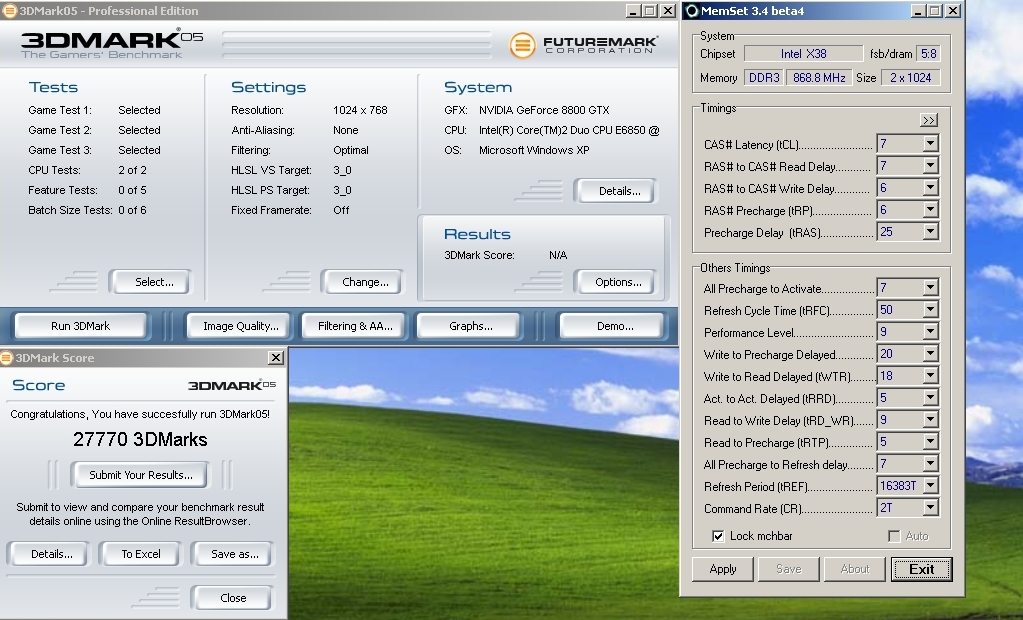
3D Mark 2005 CPU @ 4.88GHz GPU @ 861/1000
 |
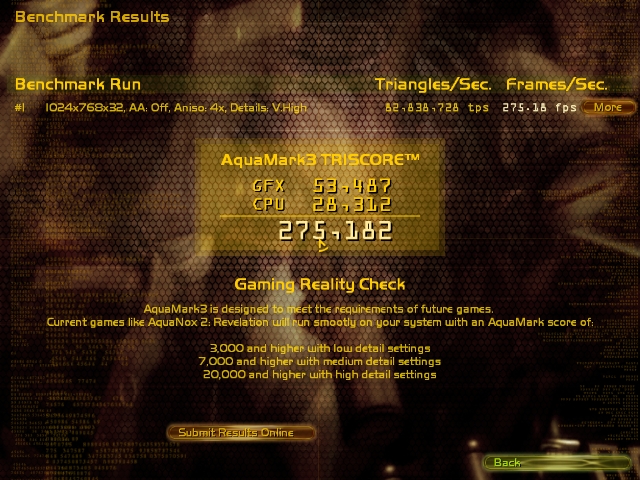
Aquamark 3 - CPU @ 5.084GHz GPU @ 840/1000
 |
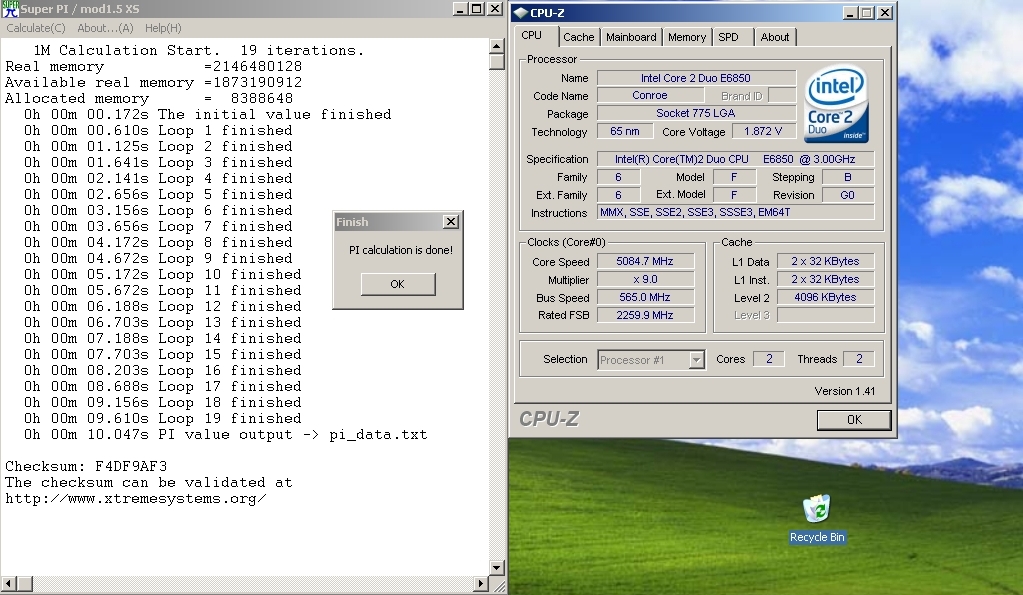
Super Pi 1M - CPU @ 5.084GHz
 |
The 266 Northbridge strap worked up to 550FSB for us; at higher FSB speeds, we used the 333 strap and the 5:8 memory divider. The lowest Performance Level (tRD) we managed to hold stable over 560FSB on both the 333 and 400 straps was 9. VNB on our test board needed to be at least 1.71V and up for runs over 540FSB. RAM was another area we did not stress too far. The board overvolts VDIMM by around 0.05V, so we try to stay under 2.2V even for short sprint benchmarks.
The extreme cooled benchmarking was the one area we thought this board would really excel, and initial testing was very promising. We had no problems booting up at 9x570FSB within the first 10 minutes of each benching session. As time progressed, we found that we had to drop the FSB levels in order for the board to remain stable. Initially, our E6850 CPU was showing no signs of error during 3D benchmark testing at 565FSB (5.085GHz). Ten minutes later, any attempts to repeat or improve our scores proved futile. We checked cascade evaporator temps and contact, to ensure that inadequate cooling under heavy load didn't cause the decrease in stability.
Ambient temperatures in our test area were 8C, providing both the CPU and GPU cascades with plenty of support under heavy load. We checked our findings with a few extreme benchmarkers, to see if this "cold-bug" issue only occurred on our sample motherboard. Unfortunately, the answers we received in reply all suggested similar issues. The first boot into XP over 5GHz CPU speed is no problem, but subsequent re-boot attempts are limited to CPU speeds under 4.95GHz. The issue itself does not appear to be limited to particular CPUs either; we have heard examples of 45nm QX9650's succumbing to the same problem. It is probable that this issue involves PWM overvoltage and/or over-current protection. Benchmarks like Super Pi 1M still are fine at higher FSB speeds, while a slightly heavier load like Aquamark 3 fails after the initial attempt.
In this case using less Vcore than the absolute threshold for the circuit to trip may actually help achieve better stability. In our case, the only workaround for this situation was to bench for 10 minutes at a time, shut the board down, let everything return to ambient temperatures and then start again. If this issue is common, users with LN2 will be again hunting for modifications/BIOS fixes and perhaps even board revisions to enable true extreme benchmarking. Due to this constant on/off procedure and the attendant time constraints, we were not able to fine-tune the board to its full capabilities. Still, we are satisfied with our results.
Final Thoughts
The release of the Maximus Formula/Extreme boards meant the P35 Blitz Extreme became an EOL (End Of Life) product rather quickly. Because of this, users were eagerly awaiting a board that could surpass the performance of the Blitz Extreme - without needing modifications. We were hoping that the ASUS Maximus Extreme was going to be the board to fulfill the needs of today's extreme benchmarkers. It comes very close, but in our opinion it still needs another round of refinements in the BIOS and board components to capture this market.
Our benchmarking results of the Maximus series have shown users with top-end water-cooling or cascade that ASUS has two boards to choose from, without suffering from the loss of any major tweaking or performance options on lower priced boards. Despite using DDR2 and a few component changes, the ASUS Maximus Formula is not too far off in performance results from its more expensive cousin, and is currently surpassing the Maximus Extreme in terms of available CPU speed when using sub-zero cooling methods.
Those who use LN2, or other methods of extreme cooling with capable processors, will have to modify either motherboard in order to attain higher levels of stable CPU speeds. With 45nm processors scaling so well, it has become commonplace to see LN2 and dry ice cooling allow speeds well in excess of the 4.9GHz CPU wall that manifests itself on our test board after initial boot up.
We have to commend ASUS in providing excellent component compatibility (out of the box), though we expected as much, because most of the issues have already been solved in the earlier released Maximus Formula board. ASUS directly ported in many of the BIOS fixes on the Formula board into the Maximus Extreme BIOS code. The latest BIOS, 0803, is a very mature and capable release in all around testing with a wide variety of components.
 |
Both Gigabyte and DFI are planning revised DDR3 boards based on the upcoming X48 chipset to compete in this same niche market. Until the release of new X48 products, ASUS continues to dominate this sector. Preliminary reports from several competitors suggest that ASUS is the only company that will be using a PCI-E bridge chip to provide the additional x8 slot for Tri-Fire capability. In fact, the untested Tri-Fire potential of the Maximus Extreme may prove to be a solid design choice and help ensure a longer life span for their Extreme series lineup.
Early testing of the upcoming X48 based P5E3 Premium from ASUS has shown small gains over current X38 boards when pushed hard, bearing in mind that these gains are only memory sub-timing related. Although these gains will probably be miniscule in actual applications, consumers of these products generally want the fastest option available. After all, that is what this end of the industry is all about - potential speed improvements to improve benchmark results or added performance for high-end gaming. The rub here is that the pre-release BIOS for the P5E3 Premium has more tweaking options than the current Maximus series and provides slightly better performance. This leaves us a little confused as to which board the extreme user will gravitate towards.
In order to establish a true pedigree for the ROG hierarchy, a systematic product tier needs to be clearly established. Users should know without confusion exactly what each board is able to accomplish. Perhaps we are overshadowing the Maximus Extreme too much with these statements. However, after early testing of the Premium X48 series, we can only wonder what ASUS has planned for the next ROG lineup to improve upon the new Premium lineup.
Summing it all up, if you need a water-cooled Northbridge, the potential of Tri-Fire, and a board that offers superb stability and performance, we would choose this board in a heartbeat. For an air-cooled solution, the ASUS P5E3 Deluxe offers almost the same levels of flexibility with a very extensive feature set. Even though ASUS reduced a few voltage ranges and changed components on the P5E3 Deluxe, overclocking with air and most water-cooling setups will not fully expose any deficiencies with the Deluxe board.
For DDR2 users who employ extreme cooling for benchmarking, the Maximus Formula is a little slower at the same processor speed, but provides a little more overhead for CPU MHz scaling. In the end, we think ASUS almost nailed the upper-end performance market with this board. We do not hesitate recommending this board if it suits your needs and cannot wait to see what the next ROG series brings us in the way of performance and features.


