Original Link: https://www.anandtech.com/show/1097
After having examined Gigabyte's 8KNXP Ultra yesterday, today we bring you yet another 875P review, this time from ASUS.
 ASUS
has, in part, made a name for themselves by having a great track record for
reliability, time to market, and cutting edge features. ASUS has produced some
problematic desktop motherboards in the recent past (e.g. P4S8X and the P4T533
to an extent), but all in all enthusiasts and OEMs alike look at ASUS as the
industry leader in the desktop market (next to Intel perhaps).
ASUS
has, in part, made a name for themselves by having a great track record for
reliability, time to market, and cutting edge features. ASUS has produced some
problematic desktop motherboards in the recent past (e.g. P4S8X and the P4T533
to an extent), but all in all enthusiasts and OEMs alike look at ASUS as the
industry leader in the desktop market (next to Intel perhaps).
This is why today we take a look at ASUS' latest creation, the P4C800 Deluxe. Based on Intel's latest chipset, the 875P, the P4C800 Deluxe is capable of dual channel DDR400 operation and has a few neat tricks up its sleeves that should delight many users. Read on to find out exactly what you can gain by purchasing the ASUS P4C800 Deluxe...
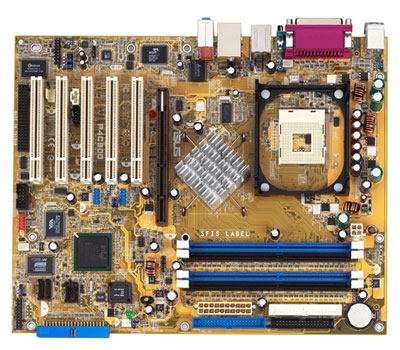
ASUS P4C800 Deluxe Rev. 1.03: Basic Features
| Motherboard Specifications |
|
|
CPU
Interface |
Socket-478 |
|
Chipset |
Intel
82875P MCH (North Bridge) Intel 82801EB ICH5 (South Bridge) |
|
Bus
Speeds |
up
to 300MHz (in 1MHz increments) |
|
Core
Voltages Supported |
up
to 1.60V (in 0.0125V increments) |
|
I/O
Voltages Supported |
N/A |
|
DRAM
Voltages Supported |
up
to 2.85V (in 0.1V increments) |
|
Memory
Slots |
4
184-pin DDR DIMM Slots |
|
Expansion
Slots |
1
AGP 8X Slot 5 PCI Slots |
|
Onboard
RAID |
Promise
PDC20378 Controller |
|
Onboard
USB 2.0/IEEE-1394 |
Eight
USB 2.0 supported through South Bridge VT6307 IEEE-1394 FireWire Controller |
|
Onboard
LAN |
3COM
3C940 Gigabit LAN (no CSA bus) |
|
Onboard
Audio |
Analog
Devices AD1985 Controller |
|
Onboard
Serial ATA |
Two
SATA connectors via Promise PDC20378 Controller Two SATA connectors via ICH5 (non-RAID version) |
|
BIOS
Revision |
1003 |
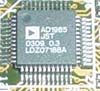
Apparently ASUS has a close relationship with Analog Devices, as they have now standardized on AD sound controllers for at least one series of ASUS motherboards. That one series (and possibly many more) is the Analog Devices AD1985 controller. We are fond of this controller because it has the ability to do several things in software that no other sound solutions can provide, namely dynamically switch its MIC, Line-in and Line-out ports if a user happens to plug their speakers into the wrong audio jacks. Analog Devices calls this technology "Jack Sensing", and in all honestly it's quite an overdue technology, but still a welcome feature nonetheless. Apparently Realtek has an identical technology ready for mass production (dubbed the ALC655, the same controller Gigabyte's 875P series of motherboards uses). Oddly enough Realtek has also named this technology "Jack Sensing". A weird coincidence indeed.
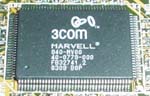
The LAN chip is powered by 3COM 3C940 Gigabit LAN chip, which unfortunately does not utilize Intel's own CSA bus technology. As you can see from our Intel 875P chipset article, CSA does indeed aid in Gigabit performance. We honestly don't know why ASUS opted not to include CSA expect to say that it may have decreased ASUS' time to market and/or costs to produce a non-CSA solution.
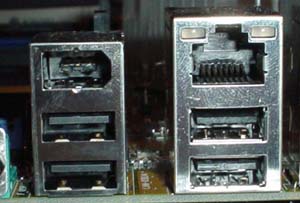
The P4C800 Deluxe's I/O configuration is fairly nice actually, and includes two PS/2 ports, one serial port, one parallel port, one optical out port, four rear USB 2.0 ports, one rear FireWire port, a Gigabit LAN port, and Mic In, Line In, and Line Out, which drive the onboard sound. We love the versatility of the I/O ports on the P4C800 Deluxe, with the highlights being the FireWire, optical out and Gigabit ports. Certainly a unique and useful combo at the moment.
As with all 875P/ICH5/R motherboards, there are two Serial ATA connectors located just below the South Bridge. As you know the ICH5 controls these two connectors, and allows a stream of 266MB/s of data instead of the slower, PCI bus constrained 133MB/s. Read through our 875P chipset review to understand the benefits of placing the Serial ATA controller in the South Bridge as compared to a separate PCI Serial ATA controller.
The P4C800 Deluxe's IDE/Serial ATA drive support is excellent. As usual, there are the standard IDE connectors, dubbed the Primary and Secondary IDE connectors, which support two channels each and therefore up to four IDE drives total. There's one additional IDE connector powered by the Promise PDC20378 controller. This specific Promise controller supports just two IDE channels, meaning a max of two hard drives (no optical drives allowed) can be connected. This same Promise PDC20378 controller also powers two Serial ATA connectors (not the two ICH5-bound Serial ATA connectors), which allows users to connect one SATA drive to each connector. All in all you should be able to connect four SATA and six IDE drives to this motherboard, though we can't imagine what desktop user would have the need for ten drives in one case as the heat, noise, and maintenance required would be quite severe. Though, the drive capability of the P4C800 Deluxe is perfect for small database workstations/servers and the like.
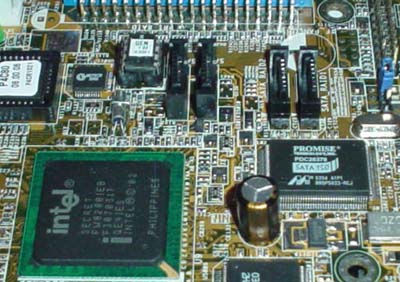
The new ICH5 South Bridge gives the P4C800 Deluxe its USB 2.0 support. You should have no trouble activating eight (instead of just six) independent USB 2.0 ports via the four rear USB 2.0 ports as well as via a 4-port USB 2.0 bracket that you can plug into the onboard USB 2.0 header located just below the right corner of the AGP8X slot.
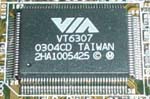
IEEE 1394 FireWire support is also included with this motherboard, powered by a PCI-bound controller from VIA dubbed the VT6307. This controller is capable of supporting two IEEE 1394 FireWire ports; one of them can be found with all the other I/O ports, while the second FireWire port can be activated by simply plugging in a one-port bracket (which comes bundled with the P4C800 Deluxe) into a red header located at the bottom of the motherboard. For more information on VIA's VT6307 controller visit this web page.
ASUS P4C800 Deluxe: Board Layout
The ASUS P4C800 Deluxe's layout was pretty solid for the most part, with only minor annoyances that we think are worth elaborating on.
Looking at the positioning of the ATX (20-pin) connector, we see that ASUS placed it on the right-hand side of the motherboard. This is the best place to position an ATX connector, as the thick wires won't obstruct the installation/uninstallation of the HSF or passive North Bridge heatsink, as well as any other components that you may decide to modify or uninstall. Unfortunately, the ATX connector isn't located high enough; the ideal position would be at the very top, right-hand corner of the motherboard, perhaps just over the DIMM slots.
ASUS places the ATX12V connector in quite unique (but nice) location; on the right-hand side of the motherboard just to the left of the DIMM slots. We are pleased with this location as the ATX12V cable will not get in the way of uninstalling the CPU HSF. The ATX12V connector positioning is especially important since the vast majority of ATX12V cables that come attached to PSU's are almost always exactly the same length, unlike PSU ATX (20-pin) cables that can vary greatly in length.
We're happy that ASUS positions the Primary and Secondary IDE connectors to the right of the DIMM slots and above where the video card would be installed. We've experienced what a hassle it can be to have the Primary and Secondary IDE connectors placed on the lower portion of the motherboard. It makes it much more difficult for IDE cables to reach to the highest bays of a large-sized ATX case if the Primary and Secondary IDE connectors are placed below the mid-section of the motherboard. However, what may be of some issue is the Floppy connector's location, which is actually higher up on the PCB than the Primary and Secondary IDE connectors. This is a problem because if you plan on installing a Floppy drive, your Floppy cable is going to get tangled up with your Primary and/or Secondary IDE cables. This isn't an issue if you never plan on changing any components in your computer every again, but for those that plan on upgrading or changing the hardware in their computer before they scrap it, this is an issue.
ASUS is also able to layout the P4C800 Deluxe well enough so that the DIMM connectors are placed just far enough away from the video card that it doesn't become a hassle to uninstall the video card if we want to install or uninstall memory. Those of you that frequently upgrade and maintain your hardware know how annoying cramped DIMM connector space can be, or any cramped space in general.
One thing we think is worth mentioning is the size of the P4C800 Deluxe's passive North Bridge heatsink, which is at least twice the size of passive 845PE North Bridge heatsinks we've seen in the past. Despite its size, the 875P heatsink was between warm and fairly hot when touched during full load. Serious overclockers may want to install an active North Bridge heatsink instead of the large passive one that comes with the P4C800 Deluxe.
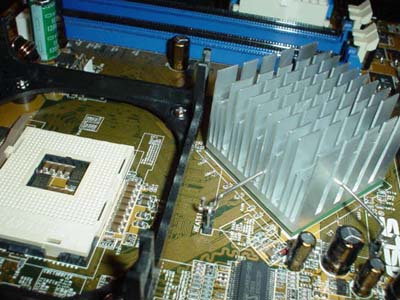
One other issue we noticed with the P4C800's North Bridge heatsink was the way it was angled such that it made it difficult to uninstall our retail Intel HSF. In fact we were forced use to use a flat head screwdriver to uninstall the HSF, it was impossible to do with our bare hands. This is even more of an issue with the bigger, better copper HSFs out there, which probably won't fit in the ASUS P4C800 Deluxe due to the North Bridge heatsink's location.
Last up is the location of the USB 2.0 and IEEE 1394 FireWire headers. There are two USB 2.0 headers on the P4C800 Deluxe, the first being located between PCI slots 1 and 2 and the second USB 2.0 header located between PCI slots 2 and 3. This is good positioning as there is little chance that your USB 2.0 bracket will get tangled up with any other wires/cables or hardware components. The same excellent positioning is applied to the IEEE 1394 FireWire header, which is located at the very bottom middle portion of the PCB, an inch or so to the right of the 5th PCI slot where your FireWire bracket will be placed if you decide you need more than just the rear FireWire port.
ASUS P4C800 Deluxe: BIOS and Overclocking
This time around ASUS decides to go with the well known AMI BIOS setup. In fact, we noticed this particular BIOS setup was reminiscent of Intel's D845PEBT2 BIOS setup.
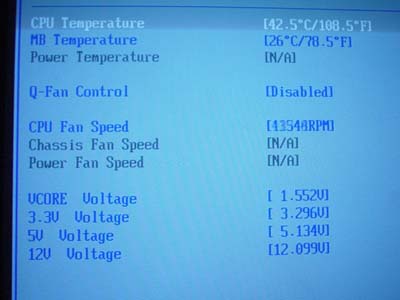
The P4C800 Deluxe's Hardware Monitor section contains a fairly abundant array of readings and options. The first few readings are of CPU, Motherboard, and Power temperatures, three separate fan speed readings (CPU, Chassis, and Power), Vcore and finally the PSU readings (all rails). In addition, we see that ASUS includes a "Q-Fan Control" option in this section to regulate CPU fan speed depending on exactly what task your system is performing. Within Q-Fan are ratio options that regulate exactly how slow or fast you want your CPU fan to spin; these ratios range from 0/16 to 15/16. The default ratio is 11/16. We decided to see exactly how effective this option would be with the ratio set to 5/16. At this ratio we found that, in general, the CPU fan was noticeably quieter, though this was with the system laid out on a lab table and not inside an ATX case where the noise level would have made less difference. We will be conducting noise tests on various components in the near future.
In the Chipset section there is the usual list of DRAM timing options available for tweaking system performance. These include CAS Latency, Precharge to Active, Active to Precharge, Active to CMD, and Memory Acceleration mode. That last option is new to us (and probably related to the 875P chipset itself), but leaving it on the default "Auto" setting is the fastest performance you're going to get out of this option. As usual we set the other DRAM timings to CAS 2/2T/5T/2T, and experienced no issues as you will soon see in the Stress Testing section of this review.
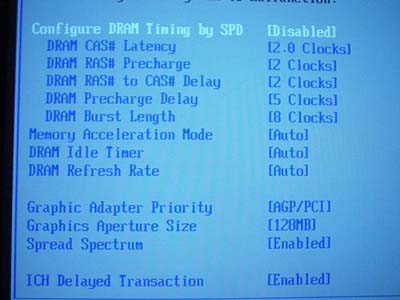
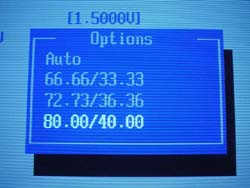
The memory frequency options available in the Jumperfree Configuration section include only dual DDR266 and dual DDR333 options using a 533MHz FSB processor. With an 800MHz FSB processor your memory frequency options include one higher frequency, dual DDR400 frequency. These most definitely aren't the most abundant memory frequency options we've ever seen, but they're quite acceptable for average desktop users. What's nice about these options, though, is that overclockers will be able to get well over 200MHz FSB while not being limited by too high a memory speed. In other words, you can run at 200MHz FSB with your memory set to dual DDR266 mode and not have to worry about your memory maxing out for quite some time.
One of the more important BIOS overclocking options available is the FSB adjustments, which are available in 1MHz increments all the way up to 300MHz FSB. This is unnecessarily high, but nice to have even if you won't ever be able to fully take advantage of a 300MHz FSB as long as there isn't an official memory spec beyond DDR400. We explain some basic fundamentals to understanding FSB frequency and its relationship to memory frequency in the FSB overclocking section.
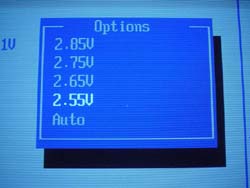
There are several VDIMM control options to choose from within the Jumperfree Configuration section of the P4C800 Deluxe BIOS. In total, VDIMM is adjustable as high as 2.85V in 0.1V increments, with the default value being 2.55V. Memory performance fanatics will be very pleased with these options, while your average desktop enthusiast will simply be mildly happy that they have wide flexibility to adjust VDIMM.
ASUS was kind to all those crazy overvolters out there and decided to include VAGP adjustments in 0.1V increments as high as 1.8V. This has little meaning to the average desktop user but can be very useful for the overclockers and enthusiasts out there that like to really take things to the max.
The Vcore adjustments available in the P4C800 Deluxe's BIOS aren't all that stellar from an overclocker's point of view, but perfectly acceptable from anyone else's point of view. Vcore is adjustable as high as 1.60V in 0.0125V increments, and while overclockers might be put off by this they'll at least be pleased to know that, as per tradition, ASUS overvolts Vcore between 0.052-0.058V, meaning if you had a 1.50V processor set to default voltage in the P4C800 Deluxe, it would actually be running between 1.552V and 1.558V. So in the end, actual Vcore can reach as high as 1.658V, sometimes dipping as low as 1.652V when the value "1.6V" is saved to CMOS.

There is a very useful AGP/PCI lock present in the P4C800 Deluxe's BIOS under the Jumperfree Configuration section. Knowledgeable users know that 99% of all Intel chipset-based motherboards come with this AGP/PCI lock, so this will be no surprise to them. This is a critical feature to modders and overclockers out there, so don't worry you're getting everything you've asked for.
FSB Overclocking Results
This is just the second review since we switched our FSB Overclocking Testbed, and so far we've had no complaints. The following is the setup we used for FSB overclocking on the P4C800 Deluxe:
| Front
Side Bus Overclocking Testbed |
|
|
Processor: |
Pentium
4 2.4GHz (800MHz FSB) CPU - HT Disabled |
|
CPU
Vcore: |
1.525V
(default) |
|
Cooling: |
Intel
Retail HSF & Thermal Pad |
|
Power
Supply: |
Enermax
350W |
We were pleased that the ASUS P4C800 was able to reach 243MHz FSB using the above overclocking setup. As shown in our Gigabyte 8KNXP Ultra review, 240MHz FSB and higher is not out of the question from an 875P motherboard, and we're sure things will get even better as more BIOSes and board revisions come along. For now, the primary concern is not how high your FSB can go but how high your memory can go before your FSB bandwidth outstrips your memory bandwidth. There's no point in overclocking your FSB to 243MHz if your memory is running at 133MHz; your memory needs to be running synchronously with your FSB (e.g. 243MHz FSB with 243MHz memory frequency) to maximize the performance of your system. Otherwise there's very little point to FSB overclocking besides the fact that it raises the core clock speed of your CPU, which is never bad. As we mentioned in our Gigabyte 8KNXP Ultra review, we will be running several different FSB/Memory frequency combinations to see exactly what scenario is best suited for maximum performance.
ASUS P4C800 Deluxe: Stress Testing
We managed to stress test the P4C800 Deluxe in several different areas and configurations, including:
- Chipset and motherboard stress testing was conducted by running the FSB
at 243MHz.
- Memory stress testing was conducted by running RAM at 333MHz and 400MHz in dual DDR operation at the most aggressive timings possible.
Front Side Bus Stress Test Results
As usual we ran a large load of stress tests and benchmarks to ensure the P4C800 Deluxe was absolutely stable at each overclocked FSB speed we experimented with. We ran our usual array of stress tests, including Prime95 torture tests, which were run in the background for a total of 48 hours. We also proceeded to run lots of other tasks such as data compression, various DX8 games, and light apps like Word and Excel while Prime95 was running in the background. Finally, we reran our entire benchmark suite, which includes Sysmark 2002, Quake3 Arena, Unreal Tournament 2003, SPECviewperf 7.0, and XMPEG. In the end, 243MHz FSB was the highest overclock we were able to achieve with our conservative overclocking setup without encountering any reliability problems.
Memory Stress Test Results
This first memory stress test tests how well the P4C800 Deluxe is able to handle dual DDR333 operation, which has been more than validated by Intel for this 875P motherboard. In other words, this should be a breeze for any motherboard that claims to be dual channel DDR400 compatible (or dual DDR333 compatible for that matter), though results will vary of course. Anyway, here were the timings we were able to achieve at the following settings:
| Stable
Dual DDR333 Timings |
|
|
Clock
Speed: |
166MHz |
|
Timing
Mode: |
N/A |
|
CAS
Latency: |
2.0 |
|
Bank
Interleave: |
N/A |
|
Precharge
to Active: |
2T |
|
Active
to Precharge: |
5T |
|
Active
to CMD: |
2T |
|
Command
Rate: |
N/A |
This certainly isn't anything surprising, as a dual channel DDR400 motherboard should have no issues running in dual channel DDR333 mode with the two additional banks filled. These are the most aggressive timings possible, and you certainly won't see better DRAM timings than this from any 875P motherboard on the market.
Now on to the more strenuous scenario of four memory modules running in dual DDR400 mode with all banks filled:
| Stable
Dual DDR400 Timings |
|
|
Clock
Speed: |
200MHz |
|
Timing
Mode: |
N/A |
|
CAS
Latency: |
2.0 |
|
Bank
Interleave: |
N/A |
|
Precharge
to Active: |
2T |
|
Active
to Precharge: |
6T |
|
Active
to CMD: |
2T |
|
Command
Rate: |
N/A |
CAS2/2T/6T/2T with four banks filled and running at 400MHz isn't bad at all. Thankfully, this 875P-based board was able to run at similar timings compared to other 875P and SiS 655 motherboards we've tested in the past. This is encouraging to see as DDR400 is becoming more and more mainstream by the day.
As usual, we ran several memory stress tests and general apps to make sure all these timings were stable. We started off by running Prime95 torture tests; a grand total of 24 hours of Prime95 was successfully run at the timings listed in the above charts. We also ran Sciencemark (memory tests only) and Super Pi. Neither stress test was able to bring the P4C800 Deluxe to its knees.
ASUS P4C800 Deluxe: Tech Support and RMA
For your reference, we will repost our support evaluation procedure here:
The way our Tech Support evaluation works is first we anonymously email the manufacturer's tech support address(es), obviously not using our AnandTech mail server to avoid any sort of preferential treatment. Our emails (we can and will send more than one just to make sure we're not getting the staff on an "off" day) all contain fixable problems that we've had with our motherboard. We then give the manufacturer up to 72 hours to respond over business days and will report not only whether they even responded within the time allotted but also if they were successful in fixing our problems. If we do eventually receive a response after the review is published, we will go back and amend the review with the total time it took for the manufacturer to respond to our requests.
The idea here is to encourage manufacturers to improve their technical support as well as provide new criteria to base your motherboard purchasing decisions upon; with motherboards looking more and more alike every day, we have to help separate the boys from the men in as many ways as possible. As usual, we're interested in your feedback on this and other parts of our reviews so please do email us with your comments.
ASUS's RMA policy is pretty straight forward as follows:
Dear Sir/Madam
Please provide the following information so that we may process your request for warranty repair service. Once we have obtained that information from you, we will issue an RMA # and provide the proper shipping instructions. Please read and provide all of the information below. We cannot complete your request, if all of the information below is not provided.
Thank you,
ASUS Computer InternationalPLEASE PROVIDE US WITH:
- THE MODEL & SERIAL NUMBER OFF OF YOUR PRODUCT model (name of product) serial# (10 digits/characters long, no dashes).
- YOUR FULL NAME/NAME OF COMPANY (Only provide company name if the shipping address is to a company).
- YOUR SHIPPING ADDRESS (no PO boxes please).
- YOUR DAYTIME PHONE/FAX NUMBER.
ASUS Computer International (USA) is a warranty repair service center. Please contact place of purchase for credit, refund, upgrade, or advance replacement. Asus does not provide these services under any circumstances.
ASUS Does not cover physical damage. Please refer to page 2 of your users manual. There is a $15.00 fee to replace a broken socket. There is a $40.00 fee to repair all other physical damage. If a product is not repairable, the product will be sent back to the customer. If a product is sent in with physical damage and is not accompanied with a payment, the product will be rejected and customers will not be reimbursed for shipping charges. A payment can be made by check, money order (payable to ASUS), or a credit card#. The payment must be sent in with the damaged product. Customers from Canada must make payments with a credit card#.
This is a fairly cut and dry RMA policy, with nothing too special that stands out. As is the norm with motherboard makers, you're asked for quite a bit of information in regards to exactly what has to be RMAed. Everything else is self-explanatory.
Even after a recent web site redesign in the past few months, ASUS still hasn't listed any real type of RMA policy on their web site. We've been critical of ASUS on this issue for months now, and still nothing has changed.
ASUS's tech support response time did not improve from the last time we looked at an ASUS motherboard. At that time ASUS had yet again missed our 72 hour deadline. In fact, after the previous ASUS review was published, we kept track of that email to see how long it would take ASUS to respond; in the end it took ASUS 267 hours and 13 minutes to respond to that email. The same pattern was repeated this time around, with ASUS yet again completely missing our 72 hour deadline. After many missed tech support emails, it's clear ASUS isn't in some sort of slump, this is tradition! We'll let you know how long it will take ASUS to respond to this email when we take a look at another ASUS motherboard in a future review. Hopefully, ASUS won't take more than 11 days to respond like they did the last email.
While ASUS' RMA policy isn't too different from the other top tier motherboard makers, their tech support is still severely lacking, if not the worst in the industry. Hopefully these issues can be remedied in the near future.
The Test
| Performance Test Configuration |
||
| Processor(s): | Intel
Pentium 4 3.00GHz (800MHz FSB) - HT enabled |
|
| RAM: | 2
x 256MB Corsair PC3200 TwinX Modules 1 x 512MB Corsair PC3200 XMS Module |
|
| Hard Drive(s): | Western
Digital 120GB 7200 RPM Special Edition (8MB Buffer) |
|
| Bus Master Drivers: |
845PE: Intel INF Update v4.04.1012 and Intel Application Accelerator
v2.3 875P: Intel INF Update v5.00.1012, no 875P IAA available at time of publishing |
|
| Video Card(s): | ASUS
V8460 Ultra NVIDIA GeForce4 Ti 4600 |
|
| Video Drivers: | NVIDIA
Detonator 41.09 |
|
| Operation System(s): | Windows
XP Professional SP1 |
|
| Motherboards: | ABIT
IC7-G (875P) ABIT BH7 (845PE) ASUS P4C800 Deluxe (875P) Gigabyte 8KNXP Ultra (875P) MSI 875P Neo-FIS2R (875P) Soyo P4I875P DRAGON 2 (875P) |
|
All performance tests run on the 875P-based motherboards utilized two 256MB Corsair TwinX PC3200 modules set to CAS 2/2T/5T/2T timings running in dual channel DDR400 mode. Any other performance-enhancing timings (like Command Rate or Bank Interleave) were enabled in 875P-based motherboards that contained such timings.
All performance tests run on the ABIT BH7 (845PE) motherboard utilized one 512MB Corsair XMS PC3200 module set to CAS 2/2T/5T/2T timings and running at 400MHz DDR. Optimal settings were loaded in the BH7 BIOS before memory timings were altered to CAS 2/2T/5T/2T and saved to CMOS.
Unfortunately we were unable to find a SiS 655 motherboard (and that includes the Gigabyte SINXP1394 used in our 800MHz FSB preview) that could run an 800MHz FSB CPU, with or without HT enabled. We were also unable to find an E7205, 850E, or SiS R658 motherboard that could run these same 800MHz FSB processors. There's a possibility that your motherboard vendor will release a BIOS update to enable 800MHz FSB support on these boards, but we've been told this is highly unlikely, so don't hold your breath. Therefore, users should not expect their current SiS 655, SiS R658, E7205, or 850E motherboard to run an official 800MHz FSB Pentium 4 processor.
Content Creation & General Usage Performance
For our Content Creation & General Usage performance we continue to use SYSMark 2002. The applications benchmarked include:
- Internet Content Generation: Adobe Photoshop 6.01, Adobe
Premiere 6.0, Microsoft Windows Media Encoder 7.1, Macromedia Dreamweaver
4, and Macromedia Flash 5
- Office Productivity: Microsoft Word 2002, Microsoft Excel 2002, Microsoft PowerPoint 2002, Microsoft Outlook 2002, Microsoft Access 2002, Netscape Communicator 6.0, Dragon NaturallySpeaking Preferred v.5, WinZip 8.0, and McAfee VirusScan 5.13
For more information on the methodology and exactly what SYSMark does to generate these performance scores check out BAPCo's SYSMark 2002 Whitepaper.
|
|
Media Encoding & Quake III Arena Performance
4/17/2003 Update: Previously, all 875P scores showed 60.8 fps, which is incorrect. We've corrected this error with the real scores.
|
|
Unreal Tournament 2003 Performance - High Detail
|
|
High End Workstation Performance - SPEC Viewperf 7.0
The latest version of SPEC Viewperf proves to be an excellent stress test for memory bandwidth and overall platform performance as you're about to see. The benchmarks included version 7 of the benchmark suite are:
3ds max (3dsmax-01)
Unigraphics (ugs-01)
Pro/Engineer (proe-01)
DesignReview (drv-08)
Data Explorer (dx-07)
Lightscape (light-05)
For more information on the tests run visit SPEC's page on the new Viewperf benchmark.
|
|
|
High-End Workstation Performance (continued...)
|
|
|
Final Words
After reading this review I'm sure most of you are wondering when this motherboard will be available and at what price. What we know for certain is that the ASUS P4C800 Deluxe is in mass production now, and has in fact already trickled into the U.S. retail channel. In other words, you should be able to purchase the P4C800 Deluxe in the U.S. any day now, while most of the rest of the world may have to wait another few days to a week or so. This motherboard isn't exactly cheap at a suggested selling price of $199, but it's not really all that expensive compared to other 875P motherboards, and certainly better than any $199 desktop motherboard not based on the 875P chipset. This price is actually quite attractive for what you're getting, and will only fall in the coming weeks/months.
By now you've probably already concluded that as a high-performance desktop motherboard the ASUS P4C800 Deluxe is undeniably impressive. The features, performance, and price point the ASUS P4C800 Deluxe offers are hard to beat in its class, so you will certainly want to consider this motherboard before you go out and build that high-end Pentium 4 system, that much is certain. Many other motherboard makers have their 875P solutions ready to go, the only question you need answered is whether the ASUS P4C800 is the best value for your high-end Pentium 4 desktop system. Hopefully we'll have answered that question as we go through more 875P motherboards in the next few days. Until then stay tuned for more news and reviews of 875P and eventually 865 motherboards soon...


