Original Link: https://www.anandtech.com/show/9626/msi-z170a-gaming-m7-review
The MSI Z170A Gaming M7 Review: The Step Up to Skylake
by Ian Cutress on September 21, 2015 12:30 PM EST- Posted in
- Gaming
- MSI
- Motherboards
- Skylake
- Z170
June, July and August in 2015 have all been a roller coaster of desktop and processor news. Intel officially launched the Broadwell processors at Computex, with NVIDIA also entering the GTX 980 Ti graphics card into the market for 4K gaming. AMD soon followed with the Fury X and Fury graphics cards featuring high bandwidth memory, and then Intel’s Skylake processors burst through the door, along with Z170 motherboards giving more desktop options and dual-channel DDR4 memory to remain a focal point for the rest of the year. The first Z170 motherboard up on deck is the MSI Z170A Gaming M7 from MSI, a $230 mid-high push into the gaming-focused market.
Other AnandTech Reviews for Intel’s 6th Generation CPUs and 100-Series Motherboards
Skylake-K Review: Core i7-6700K and Core i5-6600K - CPU Review
Comparison between the i7-6700K and i7-2600K in Bench - CPU Comparison
Overclocking Performance Mini-Test to 4.8 GHz - Overclocking
Skylake Architecture Analysis - Architecture
Z170 Chipset Analysis and 55+ Motherboards - Motherboard Overview
Discrete Graphics: An Update for Z170 Motherboards - PCIe Firmware Update
To read specifically about the Z170 chip/platform and the specifications therein, our deep dive into what it is can be found at this link.
MSI Z170A Gaming M7 Overview
Most users, if offered, would like a desktop that could do almost anything - instantaneous access to data, no-lag graphics, infinite memory, a billion cores and a system that would do what you wanted without lifting a finger. Back in reality, we have seen how the design of the Z170 chipset on the Skylake platform can afford many different configurations by virtue of its 26 high-speed IO lanes, split between six SATA 6 Gbps and 20 PCIe 3.0 lanes. Having 20 PCIe lanes means that functionality based on PCIe, such as USB 3.1, M.2, SATA Express, networking, and other things you can’t think of is possible – and therein offers a wide range in possible motherboard configurations for Skylake. There are a few caveats with the PCIe lanes in what can go where, but for example we can have three PCIe 3.0 based storage drives in an Intel RAID configuration, or a motherboard manufacturer could strap in six network controllers and 14 dual-port SATA controllers with port multipliers. When it comes to the Gaming M7 from MSI, there is a big hint of using that extra chipset bandwidth, along with a set of new MSI features.
For the quick overview, MSI implements an x8/x8 configuration for graphics with a PCIe 3.0 x4 slot from the chipset allowing for up to dual SLI when all slots are populated or tri-CrossFire. The main GPU slots have a PCIe guard to prevent heavy graphics cards exerting pressure on the slot. The motherboard has two PCIe 3.0 x4 slots, two SATA Express ports and two USB 3.1 10 Gbps ports on the rear panel. These USB 3.1 ports are split between one type-A and one type-C, and they use the ASMedia ASM1142 controller. Networking is given by a Killer E2400 NIC, and also on the rear panel there are two HDMI ports with a DisplayPort. Audio comes via an upgraded Realtek ALC1150 solution.
MSI specific features, apart from the styling, involve the new Game BOOST dial in the bottom right of the motherboard which allows for a range of automatic overclocking. MSI’s audio package includes the Nahimic audio application, designed to improve the audio output, but as you will read in this review my conclusion is not that favorable.
MSI’s BIOS package is updated to include a nice EZ mode, providing a bounty of information without needing to move into advanced mode – although that has a style update as well. For those interested in Windows 7, MSI does include a mode to allow you to install it – see later in the review. The software package includes (aside from Nahimic’s software) an XSplit license, although MSI’s portion is unchanged since the last generation, focusing on ECO Center, Command Center and Live Update as the main areas, as well as RAMDisk software and home cloud software. MSI also offers a link to Steelseries’ Engine 3 software for their peripherals.
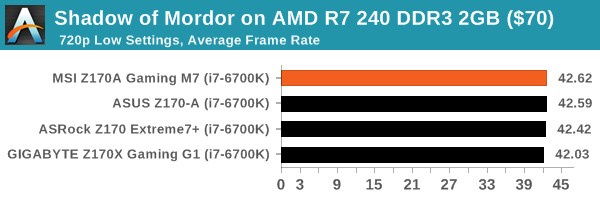
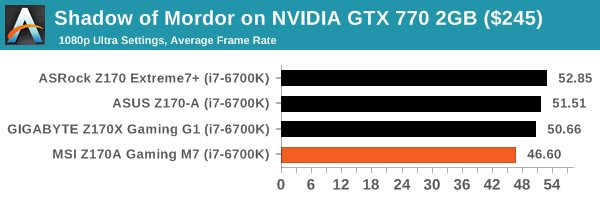
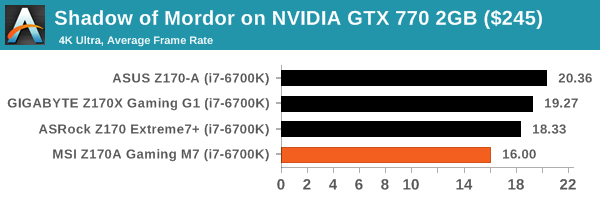
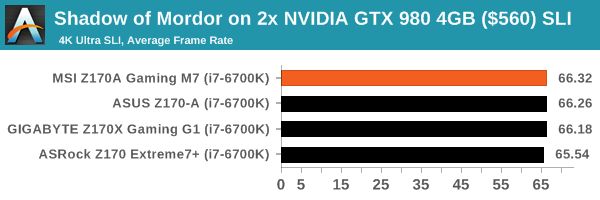
For performance comparison, as our first motherboard review there might be an issue as it would top all of our charts and we would have to base comparative performance on itself. As a result, we also have two other motherboards pre-tested with reviews incoming for those. Compared to these, due to the MultiCore Enhancement being enabled, the MSI wins in CPU performance, but at the expense of power consumption at load. DPC Latency is middling, and the audio performance of the ALC1150 is below expectations, as is the POST time. USB 3.0/3.1 speed came out on top. Gaming benchmarks showed few issues, except with a GTX 770 on Shadow of Mordor for an unknown reason.
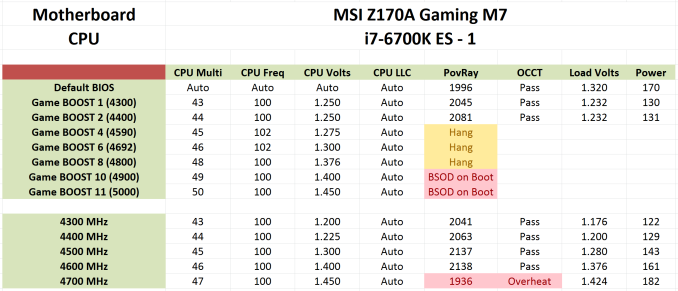
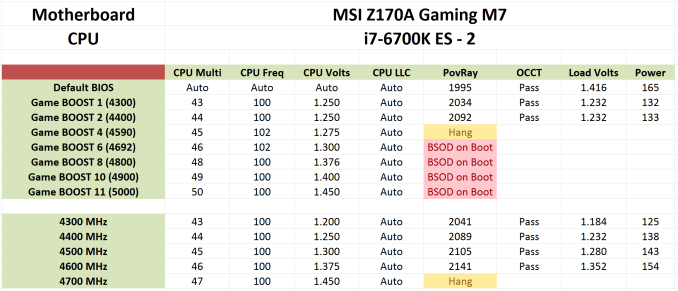
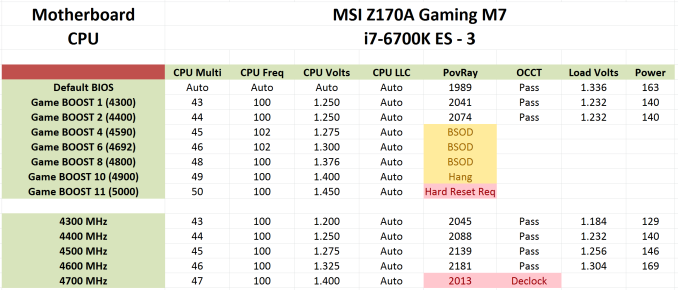
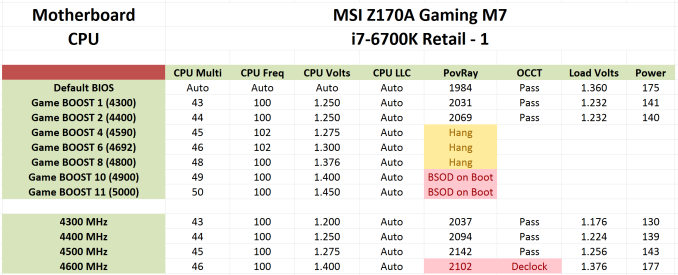
We used this board in our overclocking comparison of our Skylake i7-6700K samples, and as shown below while the Game BOOST didn’t go far, we hit 4.6 GHz in reasonable fashion. That being said, we have hit 4.7 GHz/4.8 GHz with the same CPUs in other boards. This could be a function of early BIOSes, as the platform is still new.
Overall, the downsides of the M7 are the marketing tools that add little – the Killer NIC struggles to be a defining factor for any product and the Nahimic software is certainly not on my wish list, nor is the added cost of the license which is part of the MSRP. On the up-tick, the MSI has a nice feature set catering for extra functionality, such as USB 3.1 and M.2 with a side order of Game BOOST and an updated BIOS to match. Extra PCIe support and a good red/black style is also a positive point, along with dual HDMI. It’s a fun board to look at, and using the motherboard for our Skylake testing was not much of an issue. A review is only ever a snapshot in time, so using a beta BIOS for this review and testing before launch is not always going to show the fully optimized outlay, so we will wait and see what happens with other MSI Z170 boards in the future.
Quick Links to Other Pages
In The Box and Visual Inspection
BIOS
Software
System Performance (Audio, USB, Power, POST Times on Windows 7, Latency)
CPU Performance, Short Form (Office Tests and Transcoding)
Gaming Performance 2015 (R7 240, GTX 770, GTX 980)
Conclusions
Quick Board Feature Comparison
| Motherboard Comparison | ||
| MSI Z170 Gaming M7 | ||
| Socket | LGA1151 | LGA1151 |
| MSRP at Review | $230 | $230 |
| DRAM | 4 x DDR4 | 4 x DDR4 |
| PCIe Layout | x8/x8 | x8/x8 |
| BIOS Version Tested | 142 | 142 |
| MCT Enabled Automatically? | Yes | Yes |
| USB 3.1 (10 Gbps) | ASMedia ASM1142 1 x Type-A 1 x Type-C |
ASMedia ASM1142 1 x Type-A 1 x Type-C |
| M.2 Slots | 2 x PCIe 3.0 x4 | 2 x PCIe 3.0 x4 |
| U.2 Ports | No | No |
| Network Controller | 1 x Killer E2400 | 1 x Killer E2400 |
| Audio Controller | Realtek ALC1150 | Realtek ALC1150 |
| HDMI 2.0 | No | No |
MSI Z170A Gaming M7 Overclocking
Experience with MSI Z170A Gaming M7
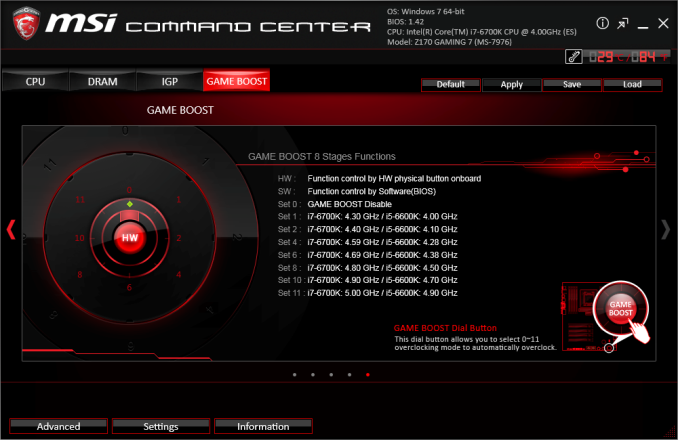
In previous generations, MSI had the OC Genie – a one button overclock that was an easy application of a few multipliers, though nothing taxing the system. After some requests for a multi-level overclock function, they have introduced the Game BOOST dial.
This is an 8-stage dial. Though there is a story behind the dial. I actually got a sneak preview of this feature near the end of development for the Z170 series, and at the time this was a dial that did many things – loading OC profiles, safe booting, memory safe booting, applying specific settings, and all that jazz. In other words, extremely complicated and designed solely for MSI’s internal engineers/overclockers, because no-one is going to remember which position does what. After a few hours of discussions, going ever up the chain of command at MSI’s motherboard division, I convinced the engineers that something simpler was needed. If the dial purely increased the overclock with each step, this is something everyone could understand.
As a last minute change to the design, MSI went for this idea. There’s also a nod to Spinal Tap in the design, because this dial goes to eleven (it even says 11 on the PCB). While technically there are only 8 steps when turning, including zero, the overclock is staggered in a non-linear way for 0-1-2-4-6-8-10-11. Sure it could have gone to 8 or 10, “but this one goes to 11, which is better”. Some people might say it is a silly idea, and chastise the design for being irregular, but it at least shows that there is room to be something other than emotionally rigid functionality in a motherboard feature.
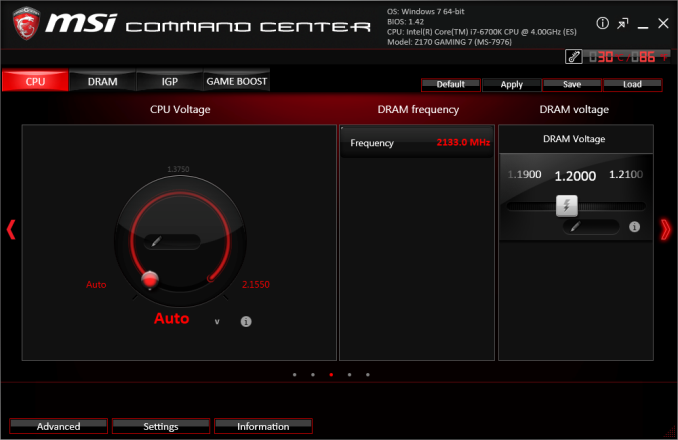
Turning the dial and resetting the system applies the overclock, and for manual overclocking there is the advanced mode in the BIOS or the software. The onboard software from MSI still offers a dial for voltage which STILL goes to 2.1+ volts, which is an insane number that even their internal liquid nitrogen overclockers do not use. Come on MSI, change the dial to something sensible and offer an expanded OC dial behind a disclaimer that widens the range. Just in case.
Methodology
Our standard overclocking methodology is as follows. We select the automatic overclock options and test for stability with PovRay and OCCT to simulate high-end workloads. These stability tests aim to catch any immediate causes for memory or CPU errors.
For manual overclocks, based on the information gathered from previous testing, starts off at a nominal voltage and CPU multiplier, and the multiplier is increased until the stability tests are failed. The CPU voltage is increased gradually until the stability tests are passed, and the process repeated until the motherboard reduces the multiplier automatically (due to safety protocol) or the CPU temperature reaches a stupidly high level (100ºC+). Our test bed is not in a case, which should push overclocks higher with fresher (cooler) air.
Overclock Results
Because the M7 was used in our main Skylake review, we tested all of our CPUs on it, hence all the results. In future other motherboards will only be tested on one or two (it actually takes a long time to do these with stability tests at each stage). But we can see some consistency here – Game BOOST tends to fail quite early on (seemingly not enough voltage, or a load line calibration issue), but all the processors manually hit 4.5-4.6 GHz.
Board Features
| MSI Z170A Gaming M7 | |
| Warranty Period | 3 Years |
| Product Page | Link |
| Price | Amazon US |
| Size | ATX |
| CPU Interface | LGA1151 |
| Chipset | Intel Z170 |
| Memory Slots (DDR4) | Four non-ECC DDR4 Up to 64GB Dual Channel, Up to 3600 MHz |
| Memory Slots (DDR3L) | None |
| Video Outputs | 2x HDMI (4096x2160@24, 1600p60) DisplayPort (4K60, 1600p60) |
| Network Connectivity | Killer E2400 |
| Onboard Audio | Realtek ALC1150 |
| PCIe Slots for Graphics (from CPU) | 2 x PCIe 3.0 (x16, x8/x8) |
| PCIe Slots for Other (from PCH) | 1 x PCIe 3.0 x4/x2 4 x PCIe 3.0 x1 |
| Onboard SATA | Six, RAID 0/1/5/10 |
| Onboard SATA Express | Two |
| Onboard M.2 | 2x PCIe 3.0 x4 or SATA, RAID 0/1, NVMe Support |
| Onboard U.2 | None |
| USB 3.1 | 1 x Type-A 1 x Type-C ASMedia ASM1142 Controller |
| USB 3.0 | 2 x Rear Panel 4 via headers |
| USB 2.0 | 3 x Rear Panel 4 via headers |
| Power Connectors | 1 x 24-pin ATX 1 x 8-pin CPU |
| Fan Headers | 2 x CPU (4-pin) 3 x CHA/SYS (4-pin) |
| IO Panel | 1 x Combination PS/2 3 x USB 2.0 (Hotkey/BIOS Flashback) 2 x USB 3.0 1 x USB 3.1 Type-A 1 x USB 3.1 Type-C 1 x Network RJ-45 2 x HDMI DisplayPort Audio Jacks Clear CMOS Button |
| Other Features | Power/Reset Buttons TPM Header Two-Digit Debug Display Game BOOST Dial Slow Mode Switch Front Panel Header Front Audio Header |
The struggle between Killer and Intel as the network controller of choice is starting to drag on. This is the new variant of the Killer NIC, the E2400 claims to have better UDP performance for gaming than before, and along with its network prioritization software is often cited as a cheaper bundle than the Intel NIC on its own. But many users prefer Intel for overall performance, reliability and option set. Ultimately most people choosing this board are not going to notice much difference between the two, unless they end up with a specific issue with it, or they have a particular need for one over the other.
Because the board uses an x8/x8 configuration with an x4 from the chipset, rather than x8/x4/x4 from the CPU directly, two-way SLI should work at all times with two identical NVIDIA cards capable of doing so and even with a card in the third slot. I would expect most motherboard manufacturers to do this, although from our big motherboard preview it is clear that some are not. So a plus one for MSI here.
In The Box
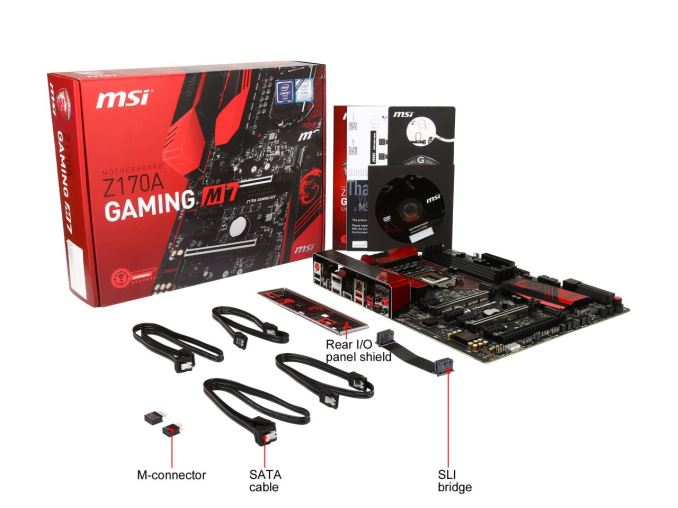
We get the following:
Driver Disk
Rear IO Shield
Manual
Four SATA Cables
One Flexi SLI bridge
M-Connectors
MSI Door Hanger
MSI Badge
XSplit License
To what extent should a gaming product have gaming paraphernalia in it? The M7 has a door hanger (which seems aimed at a particular age bracket still in education), an MSI badge (which was pilfered by my intern during testing for the back of his smartphone), and a short term XSplit license for game broadcasting. Non gamers will find the contents rather dull for $230 - other motherboards in this price range will also bundle in a USB 3.1 front panel, so there is that to consider.
Visual Inspection
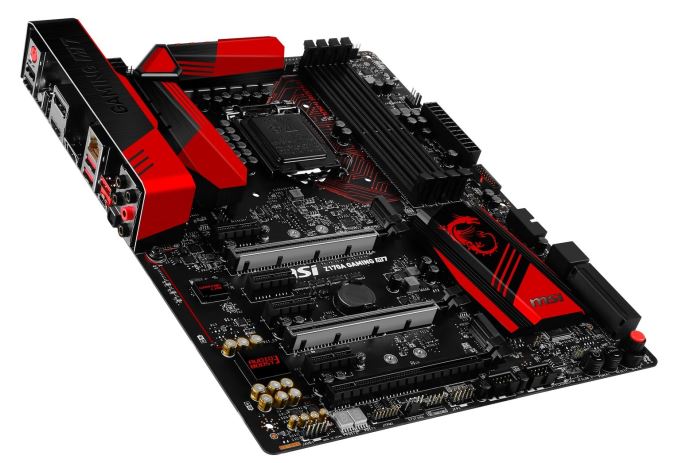
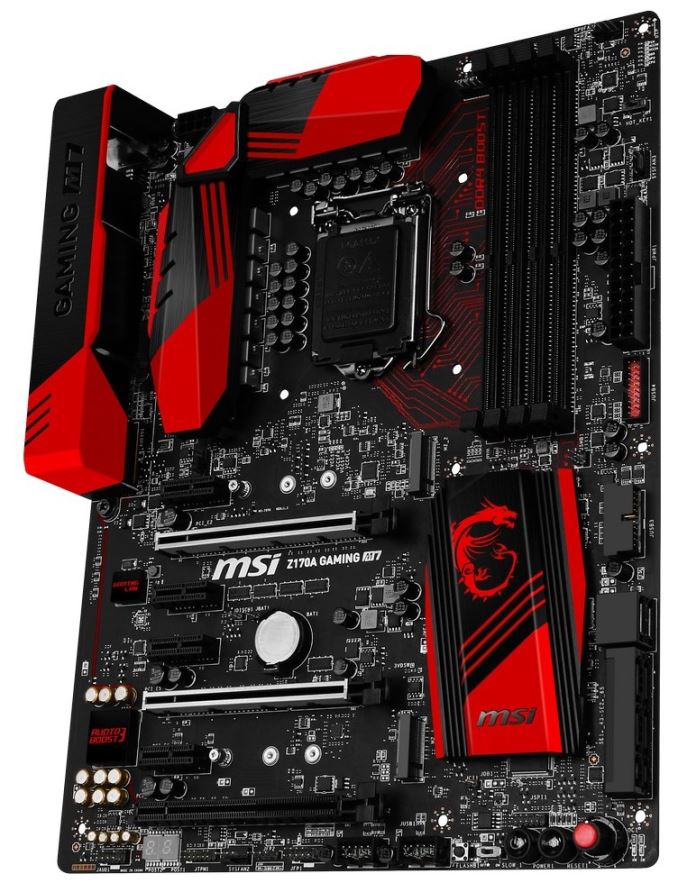
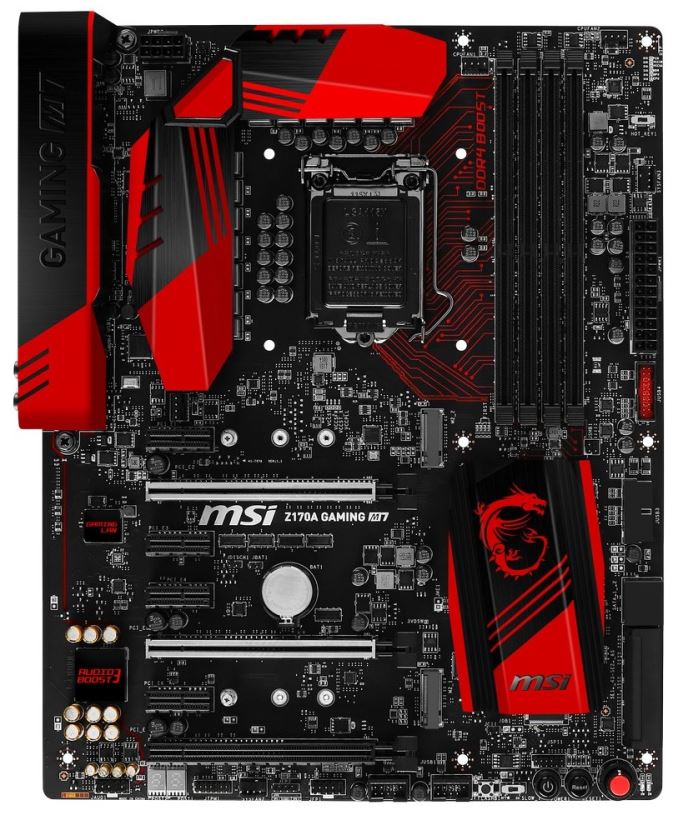
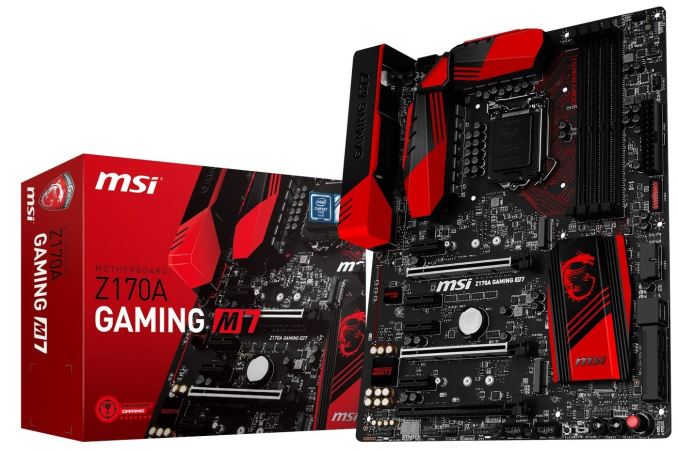
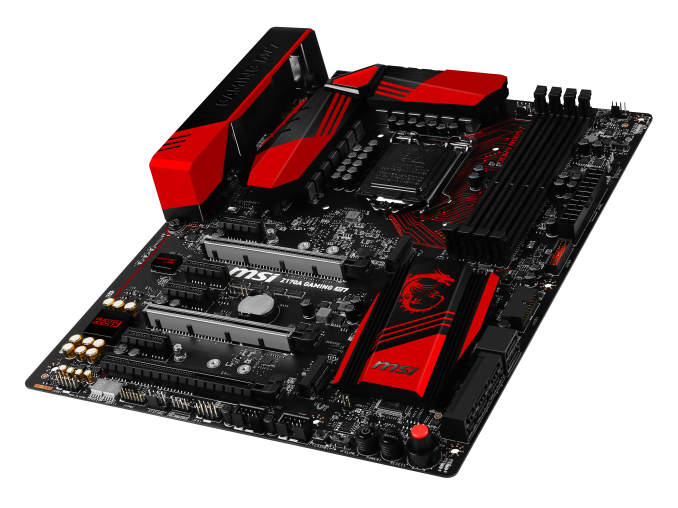
MSI deserves some credit when it comes to actually looking at the Z170A Gaming M7 – taking it out of its box and there is a sense of polish to the product in the way it looks. The shade of red used fits in well with the black on the PCB that matches the black on the PCIe slots, SATA ports and other heatsinks. The decals are of high quality, and the pseudo-traces in red from the CPU to the DRAM make it feel a little futuristic.
On the top down view, it is clear that the socket area does not have the brash white of the Intel recommended distance motif around it, so as not to remove the aesthetic. Around the socket itself, there are four of the five fan headers within easy access – two 4-pin CPU headers to the top and right, one 4-pin SYS just above the PCIe 3.0 x1 slot and a 4-pin SYS above the 24-pin ATX power connector. The final 4-pin SYS header is at the bottom of the board.
Part of the cost of the board will have gone towards the power delivery here – as Skylake moves the voltage regulation from the CPU back onto the motherboard, there is more scope to customize the power delivery that feeds into the processor. Technically the CPU can run on as little as four power phases (or three for the daring), but there will be a number of 8-12 or 16+ in the product stacks. Here MSI uses a 12 phase design with their Titanium capacitors, for example.
Down the right hand side is a HotKey switch, used for resetting MSI’s HotKey functionality. Below the power connector is a USB 3.0 header with red inside, indicating its fast charging capabilities. Below this is another USB 3.0 header but at the same angle as the SATA ports as to not interfere with a PCIe card that might be installed. The SATA ports are split between a block of two and a block of four, with that four part of the two SATA Express ports but can also be used purely as just SATA ports.
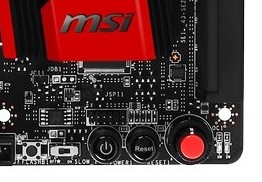
Along the bottom are the power and reset buttons, along with the Game BOOST dial. As noted in the overclocking section, this dial goes up to 11. Beside this there is a slow mode switch, the BIOS Flashback button, two USB 2.0 headers, the front panel header, a fan header, the TPM header and the two digit debug display. So it is interesting that the front panel header is so far along the bottom of the board – in most cases, it is better to find it closer to the SATA ports.
The PCIe slots for GPUs are clearly marked with their protective shielding. The purpose behind this shielding is to increase the rigidity of the plastic PCIe connector. According to the motherboard companies who deal with returns, the PCIe connectors can be bent when large video cards are subject to excess forces (imagine shipping a PC with the cards installed). The shielding is designed to help that in some respects as some graphics cards move close to (and beyond) the 1kg mark, especially if large copper water cooling plates are attached. It amounts to a fix for a ‘minor’ issue, though it would be interesting to see actual force diagrams and videos relating to how this protection works, given that it is fixed only to several small points on the PCB.
On the left hand side of the board is the audio solution, an upgraded Realtek ALC1150 audio package that we commonly see on motherboards around this price point. This means an electromagnetic interference shield, filter caps and PCB separation between digital and analog signals. For MSI it also involves enhanced corrosion protection of the rear IO audio ports. Near to the audio codec shield is a shield covering the gaming network controller, the Killer E2400. It surprises me that this controller has a shield, when in previous generations of the Killer NIC one is not needed. Quite apart from which, I’m unsure as to what benefits a shielded NIC would have, and we would have to see if it is similar to other motherboards indicating an issue with the NIC or if this is just an MSI design choice.
The rear panel for the Gaming M7 consists of a combination PS/2 port, two USB 2.0 ports beneath this, a ClearCMOS button, a third USB 2.0 port but is at right angles and used for MSI’s overclocking/monitoring software to a smartphone/tablet app, DisplayPort, dual HDMI 1.4b, the Killer network port, two USB 3.0 at 5 Gbps (in red), a USB 3.1-A at 10 Gbps and a USB 3.1-C at 10 Gbps. Finally we have the audio ports.
Test Setup
| Test Setup | |
| Processor | Intel Core i7-6700K (ES, Retail Stepping), 91W, $350 4 Cores, 8 Threads, 4.0 GHz (4.2 GHz Turbo) |
| Motherboards | MSI Z170A Gaming M7 |
| Cooling | Cooler Master Nepton 140XL |
| Power Supply | OCZ 1250W Gold ZX Series Corsair AX1200i Platinum PSU |
| Memory | Corsair DDR4-2133 C15 2x8 GB 1.2V or G.Skill Ripjaws 4 DDR4-2133 C15 2x8 GB 1.2V |
| Memory Settings | JEDEC @ 2133 |
| Video Cards | ASUS GTX 980 Strix 4GB MSI GTX 770 Lightning 2GB (1150/1202 Boost) ASUS R7 240 2GB |
| Hard Drive | Crucial MX200 1TB |
| Optical Drive | LG GH22NS50 |
| Case | Open Test Bed |
| Operating System | Windows 7 64-bit SP1 |
Readers of our motherboard review section will have noted the trend in modern motherboards to implement a form of MultiCore Enhancement / Acceleration / Turbo (read our report here) on their motherboards. This does several things, including better benchmark results at stock settings (not entirely needed if overclocking is an end-user goal) at the expense of heat and temperature. It also gives in essence an automatic overclock which may be against what the user wants. Our testing methodology is ‘out-of-the-box’, with the latest public BIOS installed and XMP enabled, and thus subject to the whims of this feature. It is ultimately up to the motherboard manufacturer to take this risk – and manufacturers taking risks in the setup is something they do on every product (think C-state settings, USB priority, DPC Latency / monitoring priority, overriding memory sub-timings at JEDEC). Processor speed change is part of that risk, and ultimately if no overclocking is planned, some motherboards will affect how fast that shiny new processor goes and can be an important factor in the system build.
For reference, the MSI Z170A Gaming M7, on our testing BIOS v142, MCT was enabled by default. Also, the FCLK 10x ratio was not present in the BIOS tested at the time of testing.
Many thanks to...
We must thank the following companies for kindly providing hardware for our test bed:
Thank you to AMD for providing us with the R9 290X 4GB GPUs.
Thank you to ASUS for providing us with GTX 980 Strix GPUs and the R7 240 DDR3 GPU.
Thank you to ASRock and ASUS for providing us with some IO testing kit.
Thank you to Cooler Master for providing us with Nepton 140XL CLCs.
Thank you to Corsair for providing us with an AX1200i PSU.
Thank you to Crucial for providing us with MX200 SSDs.
Thank you to G.Skill and Corsair for providing us with memory.
Thank you to MSI for providing us with the GTX 770 Lightning GPUs.
Thank you to OCZ for providing us with PSUs.
Thank you to Rosewill for providing us with PSUs and RK-9100 keyboards.
MSI Z170A Gaming M7 BIOS
When MSI launched their second graphical BIOS/UEFI interface, it was quickly praised as implementing more ‘user experience’ than some of the other options on the market. At the time it used more color, different icon placement, and something a bit more than just tabs at the top of the screen. Fast forward a few years and MSI still had the same base layout for Z97 motherboards. There were minor updates – an XMP button, a proper overclocking menu layout, some help menus and fan controls, but it still had the same look and feel when other manufacturers were implementing ‘Easy Mode’ and a few other features to separate the common tools in the BIOS from some of the more esoteric. Now, MSI joins that crowd.
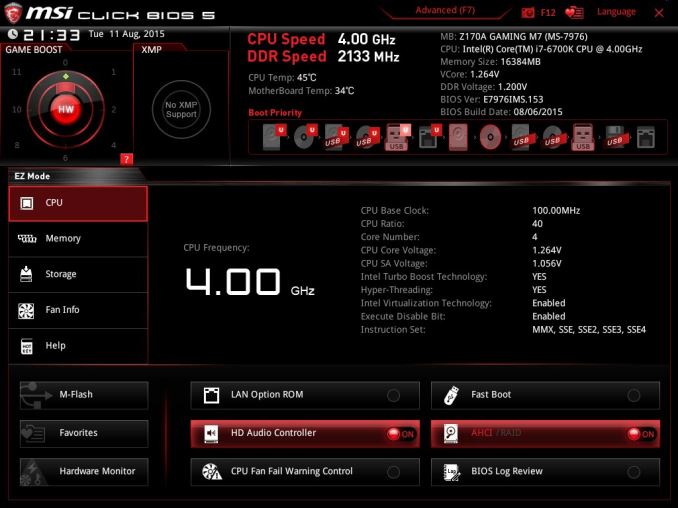
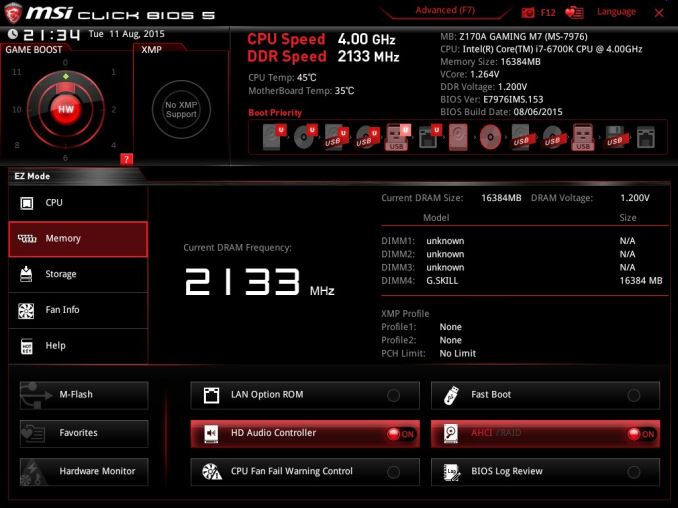
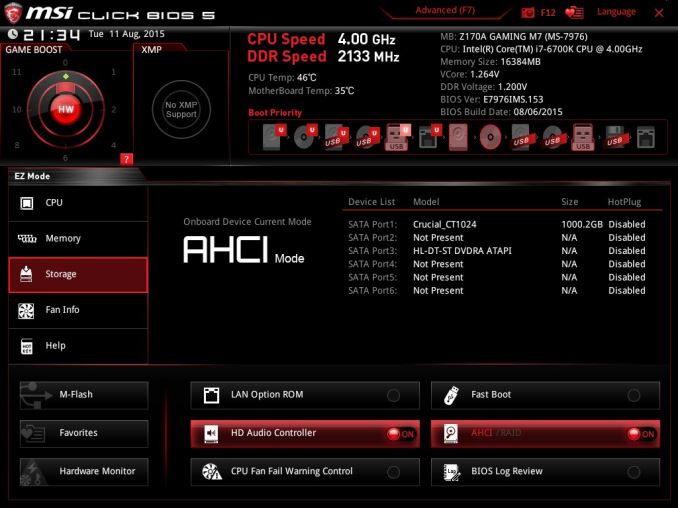
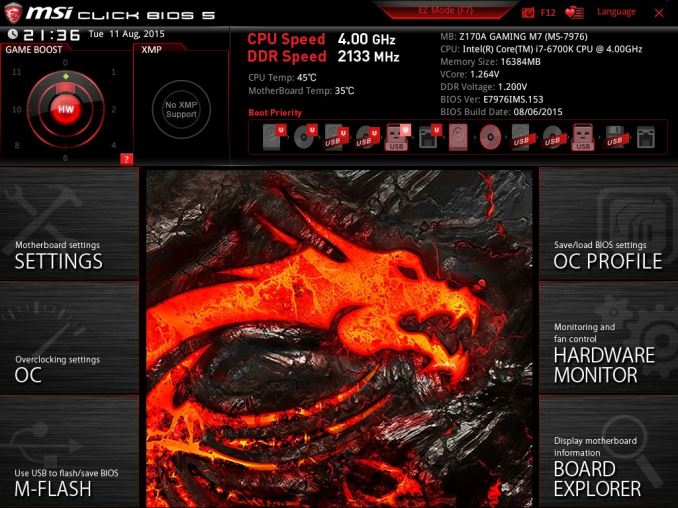
We still have the ClickBIOS nomenclature, but this at first glance looks like a nice ‘Easy Mode’. A BIOS gets plus points for system information on screen one – the motherboard, the processor, the speeds, voltages, BIOS version, temperatures and fan speeds. Rather than apply a thick layer, MSI separates easy mode into a few options on the left, so we have CPU info above, as well as memory info giving a per-module rundown:
Storage:
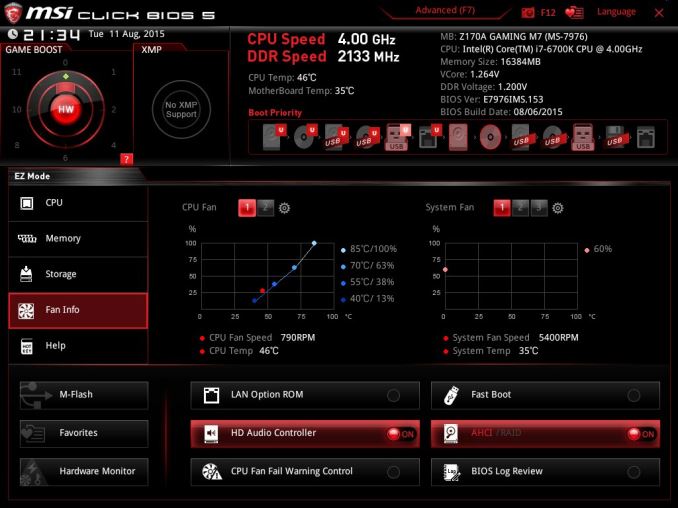
As well as fan controls:
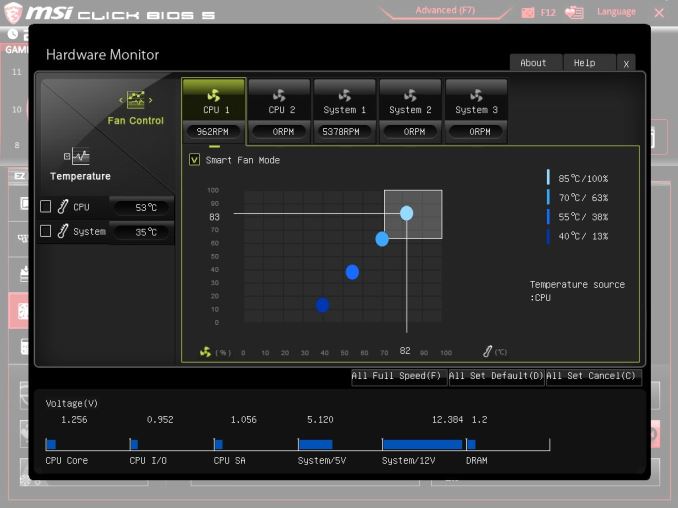
In the top left of the screen is MSI’s Game Boost button, so users can apply the auto-overclocks without opening the case and moving the wheel on the motherboard. Next to this is an XMP button for a one-shot XMP enable. In the fan screen above the fan gradients are not adjustable directly but there is a settings cog next to the fan numbers to take the user to the fan adjustment menu:
This fan adjustment menu is similar to previous MSI BIOSes, which when released was a nice touch giving users a graphical control over their fans.
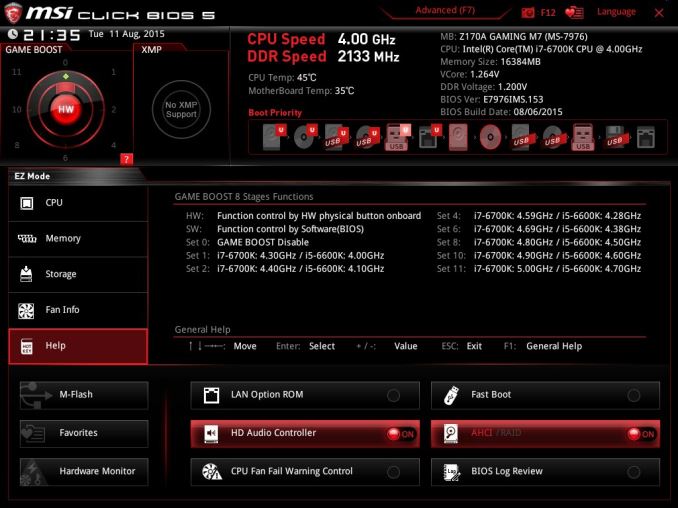
Elsewhere in the easy mode is a help guide to show what settings the Game Boost does:
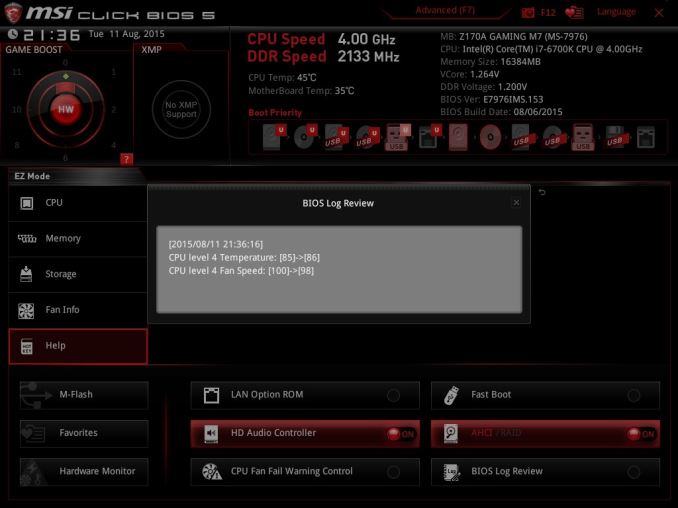
We also get a favorites menu, an option to flash the BIOS and the hardware monitor, which is another link to the fan control. MSI also links to the ‘BIOS Log Review’, which brings up a list of BIOS changes since entry, similar to what we have seen on other motherboards.
Pressing F7 moves into the advanced mode, which gets a lick of color by virtue of the Gaming brand design.
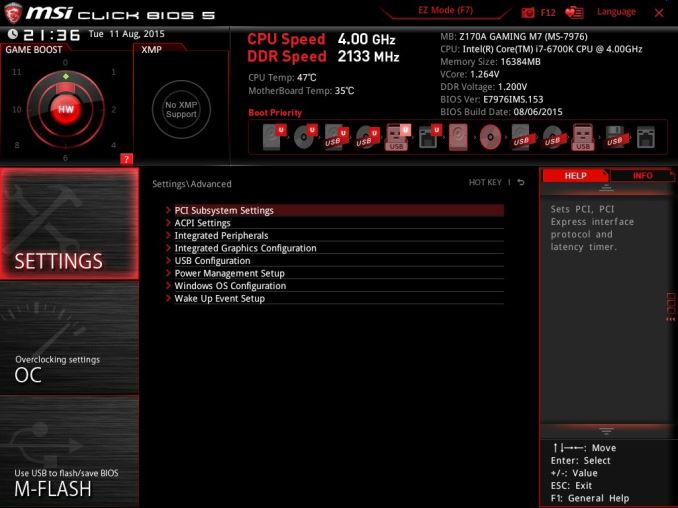
As far as the advanced mode goes, it runs in line with previous MSI BIOSes we have seen before. Each of the buttons around the sides gives access to different sub menus:
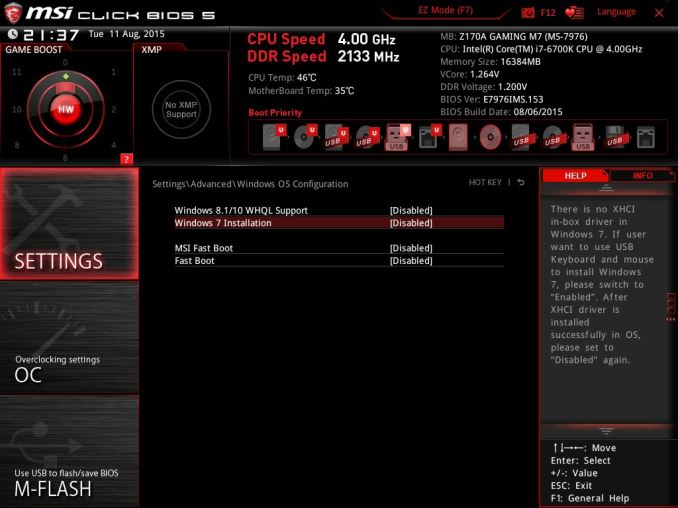
Nothing much out of the ordinary here. Although it is worth pointing out how to install Windows 7 on this motherboard – the option is in “Settings/Advanced/Windows OS Configuration”:
Put ‘Windows 7 Installation’ to enabled, and this will allow the user to use a USB mouse/keyboard during install. It is worth noting that Win7 has to be installed via a CD/DVD in this context as data-based USB drives are disabled. Normally we install an OS via a USB, and while the installation program for Win7 does start up, it refuses to find any OS version to install in an odd twist whereby the BIOS can read the USB stick but the USB stick can’t read itself.
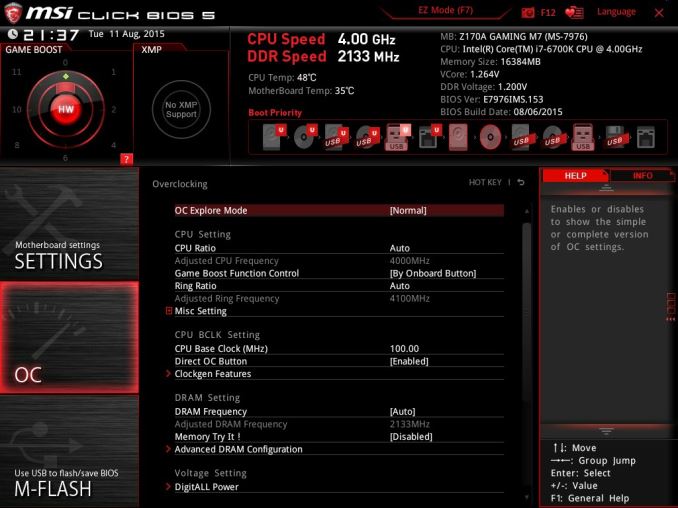
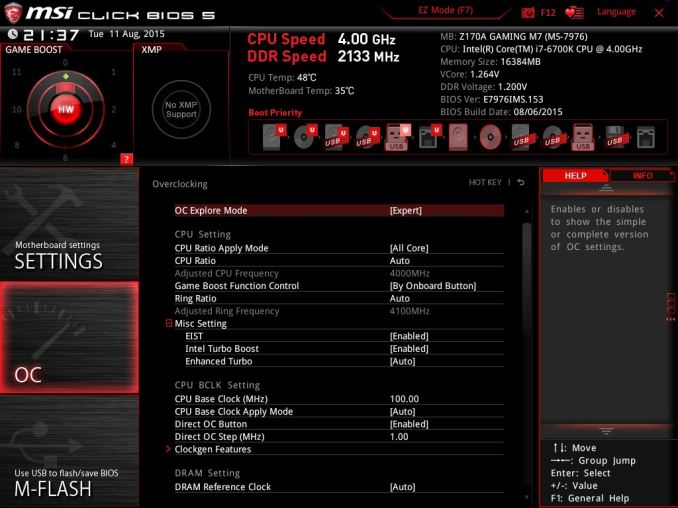
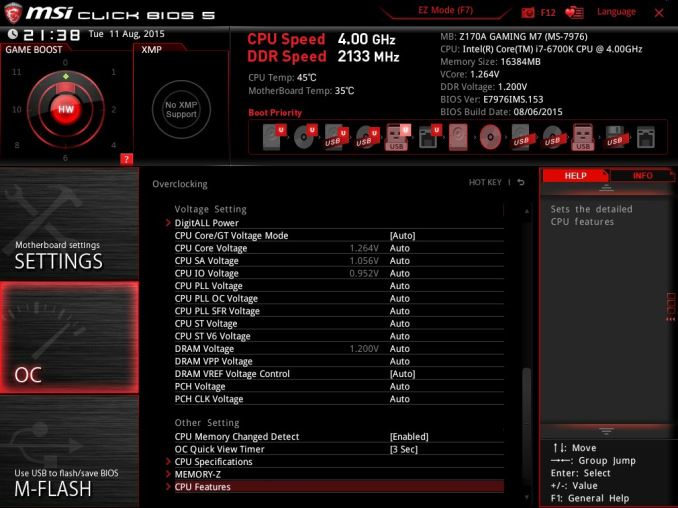
The overclock menu retains the new option we saw on Z97 by offering a ‘Normal’ and ‘Expert’ mode for those that understand the processor to a deeper layer by giving more options. Typically we recommend most users stay with the CPU multiplier and CPU voltage settings, which gives great overclocks for most – however extreme (sub-zero) overclockers always want more control.
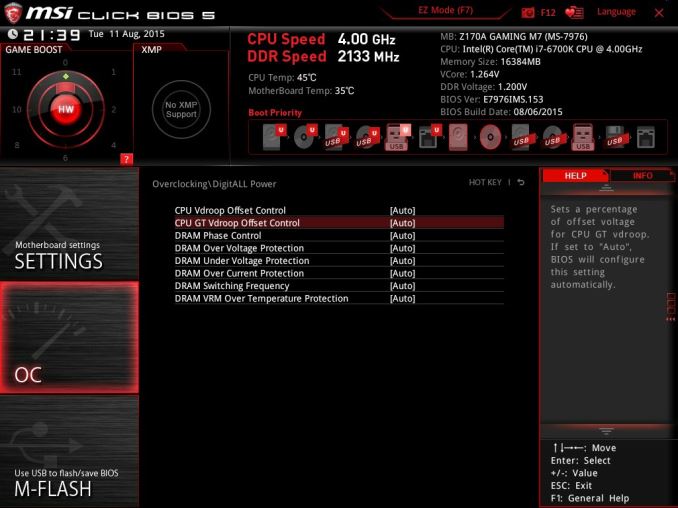
I’m going to point out a continual issue I have with MSI motherboards, and it relates to the VDroop control / load-line calibration.
The concept of this feature is to maintain a constant voltage across the processor (because drawing current causes a drop), and it helps with stability. Current processor design has an amount of voltage drop when the processor is being used heavily, in order to keep power consumption reasonable for the cooling used. However, for overclocking stability it can be adjusted with great benefit.
Other motherboard manufacturers understand this, and make the concept of this easy to understand. ASRock shows a graph of voltage drop with CPU load and five gradients, allowing a user to choose a gradient. ASUS has a series of options from Auto to Low to Extreme, with a recommended setting listed on the side. GIGABYTE also does something similar. With MSI, it makes no sense to anyone apart from the MSI engineer.
Here the VDroop Offset control comes in Low to High, but the values next to these names differ from +0% to +12.5% up to +100%. For anyone not an MSI engineer, +100% would automatically sound like ‘doubling’ the CPU voltage. This would mean 1.2 volts to 2.4 volts, which is crazy. This is clearly not what MSI is doing, but whatever that option does, +100% is the wrong way to describe it to an end user, especially one experimenting with overclocking for the first time.
I’ve emailed MSI many times about this, over many years, and even discussed it face to face, but it is very clear I am not being understood correctly. Sometimes I get an email back explaining what VDroop is. I know what VDroop is, but I don’t know what this control does because it is badly explained and the numbers mean nothing without context. ‘It should relate to load line level’ is the closest I have to a meaningful quote on this matter from MSI, but still no-one has explained the difference in pure scientific terms what going from +12.5% to +25% does, or what +25% even adjusts and to what degree. It clearly doesn’t add +25% to voltage, which is the only option VDroop is directly related to, so it might refer to some form of internal resistance. Well without a baseline, there’s no indication if +25% or +75% will go from a bad overclock to a good overclock or a quick VRM shutdown followed by the smell of smoke.
So I imagine that this option is fully understood by MSI engineers, and MSI’s internal overclockers who work on the motherboard and BIOS teams. But not everyone is an engineer, and there is a disconnect between the engineers and the teams that deal with users and the media in explaining certain features. Sometimes I receive critical feedback about MSI not overclocking as much as other motherboards – if this option was easier to understand, it might make a difference.
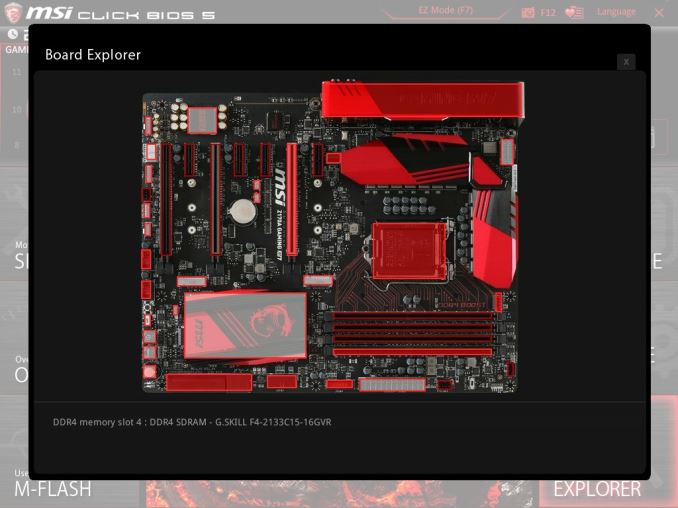
Ranting aside, the rest of the BIOS falls in line with flashing tools, fan controls, and Board Explorer:
MSI Z170A Gaming M7 Software
In line with everything else in the motherboard space, MSI’s software package also gets an iterative update with the new Z170 platform. In previous years, we have heralded MSI for providing some of the best automatic update software available for motherboards with Live Update 6, which continues in the Z170 package. On the other side of the spectrum, we’ve criticized MSI for offering a 2.1+ volt user-facing setting for the processor in software with virtually no safety fence as even sub-zero overclockers do not go that high. Perhaps somewhat ambivalently, this is still true with Z170 as well.
The first thing noticeable with an installation from the driver disk is that MSI puts in a dragon based logo background:
In a gaming product, implementing a custom background design on installation is a no-brainer. This sort of background appeals to a wide range of users who would be buying this motherboard, and it is such as easy near-zero cost value-add to a system bundle I am surprised that not many other motherboard manufacturers do it.
Live Update
The Live Update tool maintains its previous display aesthetic, and is available to regularly check for updates and showing what drivers/utilities are available online that can be updated to the next version. In recent versions of this software MSI has included the size of the download as well as the current/online versions to allow users to make a more informed choice.
We had no issues with this software, and it still remains one of the easiest update tools from motherboard manufacturers to use.
Eco Center
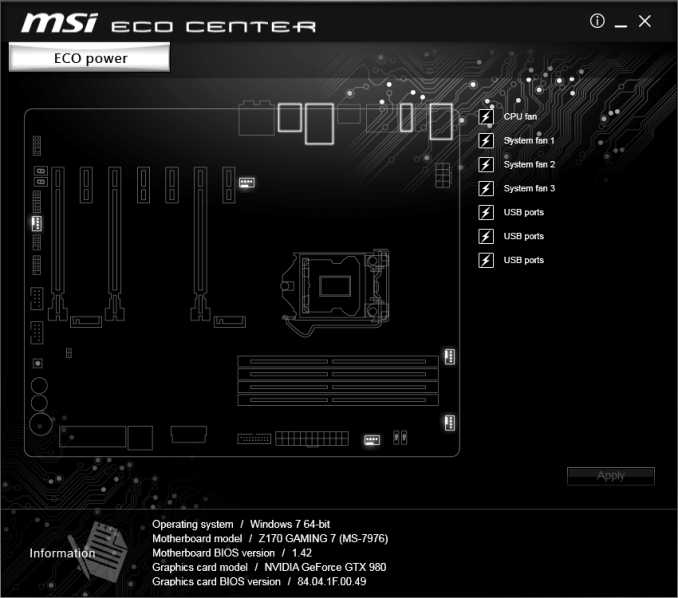
MSI’s ECO line of motherboards has pushed one of the internal philosophies to promote low powered environments. This means disabling as much of the system as necessary when not in use – USB ports, slots and system fans are the usual focus points here, even if we are talking milliwatts when idle for a desktop system. The Gaming M7 does not have as much control as the dedicated ECO boards, but the software is included nonetheless.
XSplit
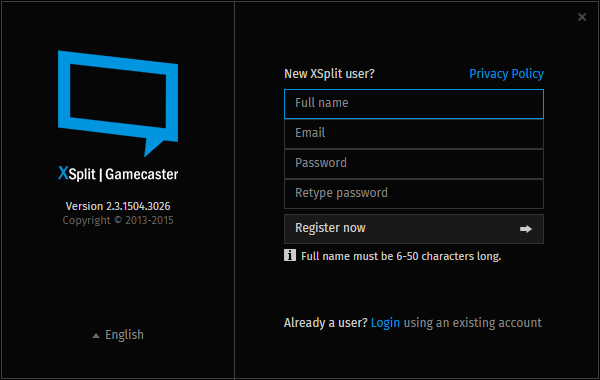
One of the value adds that MSI has included in its gaming range is a short-term license to the XSplit software, used for streaming games and other things to a larger audience. By buying these licenses in bulk, MSI can get an extreme volume discount and add them to their gaming motherboards (whether they are used or not). Given the nature of the market MSI is going for, this is a nice add-on.
Fast Boot
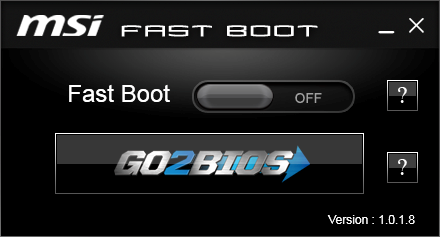
One of the tools I love to see in motherboard software packages is a fast boot / restart in BIOS mode option. This is partly selfish – when testing the system it makes it easier to enter the BIOS through this method rather than repeatedly pressing F2/Del during a long POST sequence, but it can yield benefits for those who like to fine tune their system over several months.
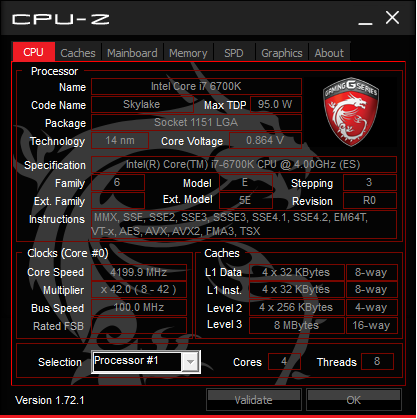
Customized CPU-Z
CPU-Z is a shareware tool used by some enthusiasts to get details about their processor and system, but also to verify overclocks and the whole package is used as a verification tool when it comes to competitive overclocking, featuring in screenshots. As a result, the developers of CPU-Z allow manufacturers to develop skins (for a fee) for the software and distribute as necessary. MSI went in with this for the gaming range.
M-Cloud
Having a personalized home storage cloud, as opposed to just having home storage, is starting to become a thing. As a result, some motherboard manufacturers have started to include software to make this possible using their products – typically this software is just a skinned variant of a licensed package.
RAMDisk
MSI’s RAMDisk utility has been part of the package for a couple of years, with the concept being that users with large amounts of DRAM might want to partition some of it into a quick read/write cache valid when the system is in use. In the last generation we lamented the fact that the tool needed to enable a RAMDisk before you could adjust the size – this changes with Z170, and it becomes a separate software element in its own right.
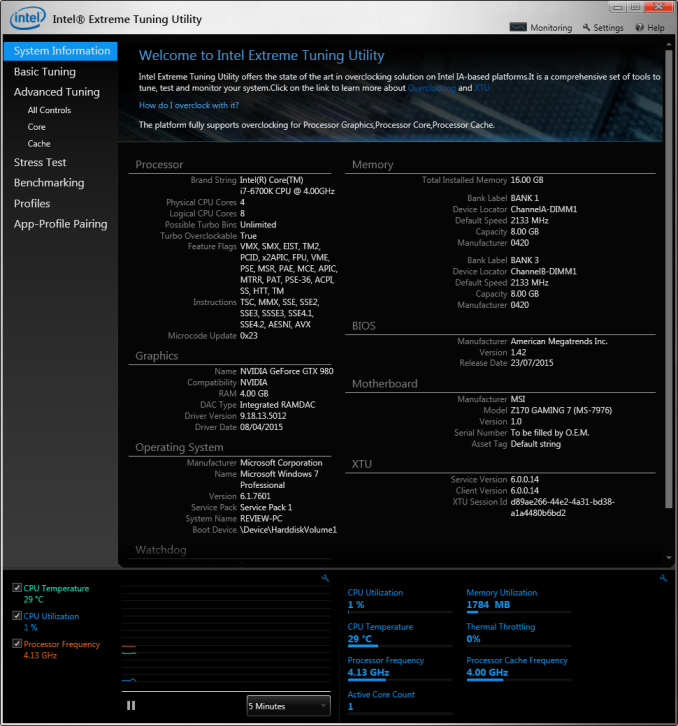
Intel XTU for MSI
The Extreme Tuning Utility from Intel is now an easy gateway to allow users to both overclock and benchmark their system. Some motherboard manufacturers include it with their driver packages, although anyone with a modern Intel based system can download it and see more information about what they have.
MSI Command Center
The previous implementations of MSI’s software have focused around the Command Center, with the idea that the other tools would all be accessed through this hub. For Z170 that idea has sort of melted away, leaving Command Center as a tool for overclocking, fan adjustment and monitoring.
From previous versions of the software, not a lot has changed. RAMDisk as mentioned above has been removed into its own package, and the Game Boost functionality has been updated for the new automatic overclock tool.
My main criticism of this tool is still here – the voltage overclock dial still shows ‘2.1 volts’ as the maximum to which the CPU can be placed. This is despite the fact that this voltage will cause the system to shutdown and potentially damage the processor, the motherboard or something else. Not even sub-zero overclockers go this high, so it boggles the mind that this is even shown to the user without the requirement to confirm an advanced mode for anything above 1.4 volts.
Killer Networking
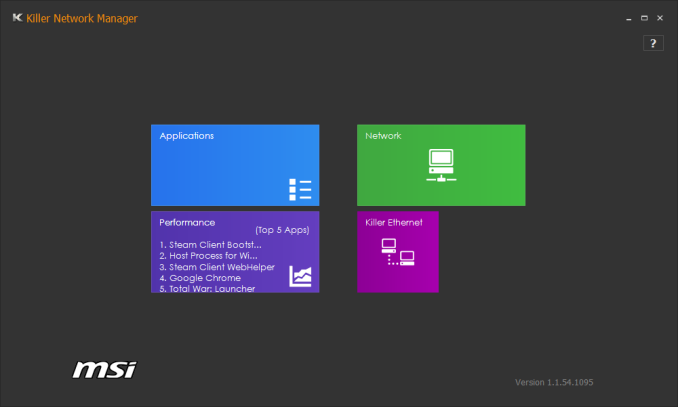
For their gaming line, MSI has repeatedly used the Killer networking controllers which come with their own management software. In the past, we have been critical of this choice, given that it doesn’t make much difference than other prioritization software on the market and some users have argued that other solutions in the market are more consistent or have less processor usage.
At AnandTech, we have agreed with some of those claims. The software itself is difficult to use and provides a poor user experience, not helping the user make much sense of what exactly is going on. Companies like MSI have used Killer as a marketing tool in a repertoire to pull in casual gamers by saying it has hardware focused on improving the gaming experience, cherry picking benchmarks that may or may not be relevant to the user.
For full disclosure, we recently had a meeting with Mike Cubbage, the CEO of Rivet Networks that now runs the Killer brand and products. Mike was a co-founder of Bigfoot, the original inventors of the Killer network cards, and was part of the team when it was purchased by Qualcomm. That team has now spun back out from Qualcomm into a wholly separate company called Rivet Networks which will now manage the Killer portfolio and product line. Our discussions with Mike went into great detail regarding the product line, the user base, OEM relationships, marketing, presentation and usage models – needless to say I thought both sides benefitted from the deep and honest discussions going both ways. Both Mike and I want to keep in touch regarding how the Killer range is being branded, how it develops and how to test it properly from both perspectives, and I have proposed an interview with Mike somewhere down the line later this year, especially discussing some of the concerns and conclusions that end-users have with the Killer feature set and perception. I put it to Mike that there is a lot of work to be done given the current state of Killer, especially with the launch of the Skylake platform.
Nahimic Audio
So here is the big one for MSI. Gaming audio has been a ‘hot topic’ for motherboard OEMs, with several of them trying to develop the best solutions to provide a better, immersive experience for users that do not invest any extra. The goal here is to improve the base line for casual users, rather than overstep how an enthusiast might approach this.
Nahimic is an audio company with a history in developing 360-degree systems for the French military, specializing is audio locality perception. The deal with MSI is a step into the PC industry for Nahimic, whereby MSI licenses a package from Nahimic designed to boost the quality of regular audio and both companies work together for future add-ons.
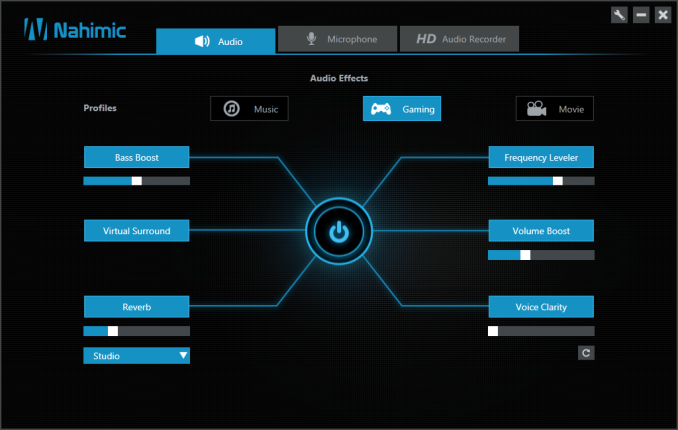
The Nahimic software is simple enough – a big on/off button in the middle with a number of preset profiles as well as sliders around the sides. The software also allows for some microphone improvements on noise cancellation as well as a screen recorder.
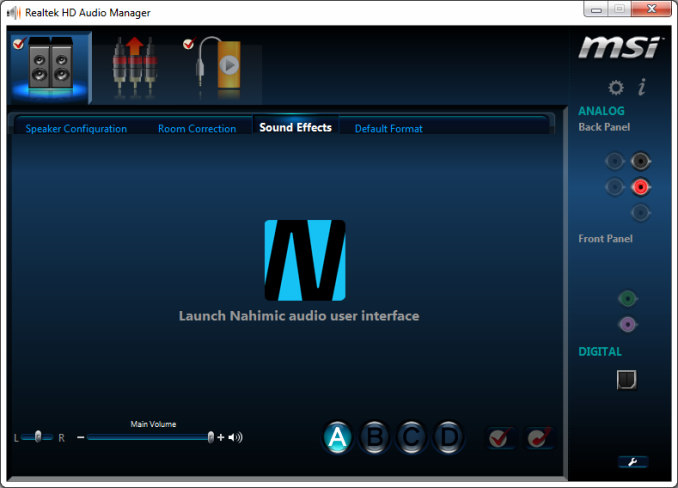
I met with Nahimic at the MSI booth back in Computex, as well as having a couple of demos both at the booth and MSI’s headquarters later in the week. Before either of those demos took place, I saw the screen above in the standard Realtek audio manager software.
This is the sound effects tab in the audio manager, which I’m sure a number of readers here could navigate to on their own systems given the large percentage of PCs come with Realtek audio. In this tab should be the graphics equalizer, both as a series of presets (Rock, Pop, Metal) and a number of sliders so users can configure various frequency ranges for their own unique tastes. With an MSI system geared towards the Nahimic software, this control is gone.
Now I am by no means an audiophille. I have no high end audio equipment – a $100 set of Sennheiser headphones is the most I have ever spent on improving my audio experience. Despite this, I still go for lossless audio where possible, ripped from as good a source as possible after it comes out of the hands of the music producer for the band I am listening to. I then configure my graphic equalizer settings depending on my mood – sometimes I want a strong bass line, other times I want a more high-end and euphoric, or I want a profile that can make a fast guitar solo crisper than usual. Finding the best EQ is kind of like the holy grail, and for a few users is very important.
So the fact that the Nahimic partnership has removed it, from before I’ve even tested the software, rang some alarm bells. In our review sample for this board, it auto-installed the Nahimic software from the CD – but when I went to uninstall it, the Realtek Audio Manager still wouldn’t give me back my EQ settings, meaning that the Nahimic partnership with MSI goes as far as editing the Realtek audio package as well. This is another tower bell ringing in my head.
So we get to the part where we test the software, to see what it actually does. At the MSI booth at Computex, all Nahimic did was play a video file that showed the software and had pre-recorded the difference in the audio settings that Nahimic provides (which you couldn't confirm there and then). This made the test somewhat fallacious, because we’re listening to pre-recorded adjusted audio, rather than the adjustments made by Nahimic being done in real-time. There was no reference sound track to compare it to either, making the determination difficult. I spoke with the CEO of Nahimic there and then, asking where my EQ settings were – I wasn’t given a straight answer by any means.
So later in the week I tested the software at MSI’s headquarters during my tour there. MSI allowed me to use my own music, which I know and love, as well as fully adjust the software settings in the Nahimic interface. My conclusions were startling.
For full disclosure, I pulled up some of my more recent favorite music that I listen through YouTube and via my own files: Through The Fire and The Flames by Dragonforce, You Shall Know My Name by Arch Enemy, Defenders by Dragonforce, Decimator by Strapping Young Lad and Synthetic by Spineshank. Make of my music tastes what you will. I normally listen to these on one of the following EQ profiles: 1, 2, 3.
It didn’t take me long to realize what exactly Nahimic was doing here. They have no hardware on the motherboard – it’s purely a software interface. What we are dealing with here is not anything special; we have a glorified graphics equalizer dressed up in special branding!
Anyone with access to Realtek’s EQ API could design a basic interface like this. Even the settings give it away: Bass Boost affects the low end; Frequency Leveler makes sure there are no harsh changes between frequency ranges; volume boost is a general all-frequency lift; voice clarity affects the mid-range. The other two are for variants in Realtek’s API regarding environment and speaker placement.
All I can do at this point is express my amazement and disbelief. This is an incredibly basic adjustment of Realtek’s own settings which have been repackaged and sold to MSI in the name of gamer enhancement, at extra cost to the end user, as a marketing tool, and the cost of CPU processing time. Either way Nahimic is the winner here, managing to convince some VP at MSI that they need this across their entire range and that they need a big deal to promote both companies. So MSI is paying Nahimic for something they could do very easily themselves (or outsource to an audio/software developer and retain the rights), and Nahimic is more than happy to take their money.
Of course, I mentioned this to MSI there and then during my demo at HQ, almost breaking the headphones when I took them off just because of how stunned I was. If it was to be my professional opinion that this software is what I think it is, the ramifications are mind boggling - stating that the Nahimic software is just an EQ interface variant that costs both MSI and the end-user. The responses I got back from MSI about my opinion were along the lines of the long-term partnership with Nahimic, developing the brand, and providing the casual user with a better experience. It did not matter that I pointed out they could do this themselves at much less cost, or that they will alienate users who do want full EQ control – something about ‘developing the experience with additions in the future’ was repeated.
So don’t get me wrong here – MSI is free to go and spend their money on whatever they want, license any software and settings and provide it on their products. My words here are quite strong, and perhaps hide the sharpness and anger with which I came to my conclusion when I experienced the software. I don’t like seeing people being taken for a joyride, especially when there are alternatives.
My conclusions of the software at the time I tested it were passed up the MSI chain, but there was no immediate concern about my explanations, so I doubt they will do anything about my suggestions any time soon. So if they want to keep the Nahimic software rather than develop an in-house version, then so be it. I know some users will say that perhaps this is a nothing issue – few people customize their audio output the way that I do, and this is a quick and easy interface for everyone to use. I’d respond by saying that they have gone down from 10 sliders in the EQ to 6 in the Nahimic interface, and that license cost comes through to the product. An in-house solution could allow for both situations to be had. At the very least, I would suggest that they re-enable the EQ settings in the Realtek software, though I might imagine that disabling these would be a part of the agreement MSI has with Nahimic (to Nahimic's benefit).
System Performance
Not all motherboards are created equal. On the face of it, they should all perform the same and differ only in the functionality they provide - however this is not the case. The obvious pointers are power consumption, but also the ability for the manufacturer to optimize USB speed, audio quality (based on audio codec), POST time and latency. This can come down to manufacturing process and prowess, so these are tested.
Power Consumption
Power consumption was tested on the system while in a single MSI GTX 770 Lightning GPU configuration with a wall meter connected to the OCZ 1250W power supply. This power supply is Gold rated, and as I am in the UK on a 230-240 V supply, leads to ~75% efficiency > 50W, and 90%+ efficiency at 250W, suitable for both idle and multi-GPU loading. This method of power reading allows us to compare the power management of the UEFI and the board to supply components with power under load, and includes typical PSU losses due to efficiency. These are the real world values that consumers may expect from a typical system (minus the monitor) using this motherboard.
While this method for power measurement may not be ideal, and you feel these numbers are not representative due to the high wattage power supply being used (we use the same PSU to remain consistent over a series of reviews, and the fact that some boards on our test bed get tested with three or four high powered GPUs), the important point to take away is the relationship between the numbers. These boards are all under the same conditions, and thus the differences between them should be easy to spot.
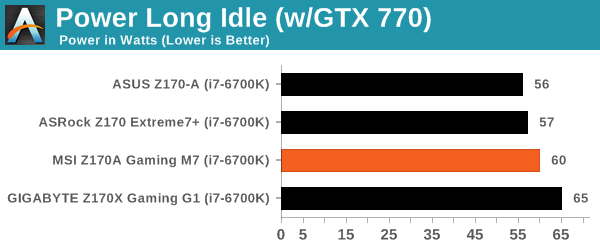
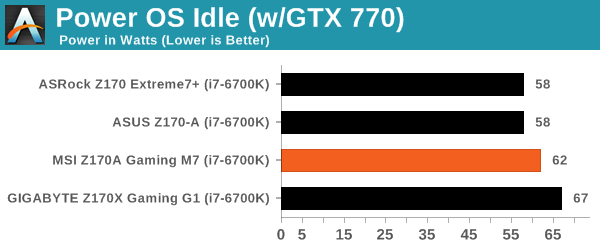
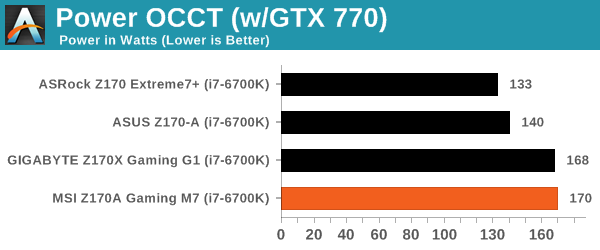
The MSI comes in on the latter end of our power testing, which might be related to the early BIOS used at the time of testing as well as the implementation of MultiCore Turbo similar to the Gaming G1. We did note that these early BIOSes do tend to implement a high stock voltage under load as well.
Windows 7 POST Time
Different motherboards have different POST sequences before an operating system is initialized. A lot of this is dependent on the board itself, and POST boot time is determined by the controllers on board (and the sequence of how those extras are organized). As part of our testing, we look at the POST Boot Time using a stopwatch. This is the time from pressing the ON button on the computer to when Windows 7 starts loading. (We discount Windows loading as it is highly variable given Windows specific features.)
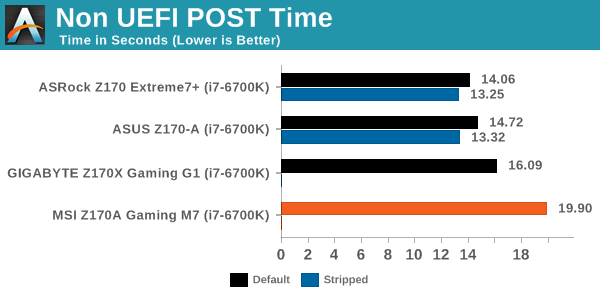
Similarly, the early BIOS versions are unlikely to be optimised for POST. In this circumstance, a stripped BIOS caused some issues that exacerbated the POST time.
Rightmark Audio Analyzer 6.2.5
Rightmark:AA indicates how well the sound system is built and isolated from electrical interference (either internally or externally). For this test we connect the Line Out to the Line In using a short six inch 3.5mm to 3.5mm high-quality jack, turn the OS speaker volume to 100%, and run the Rightmark default test suite at 192 kHz, 24-bit. The OS is tuned to 192 kHz/24-bit input and output, and the Line-In volume is adjusted until we have the best RMAA value in the mini-pretest. We look specifically at the Dynamic Range of the audio codec used on board, as well as the Total Harmonic Distortion + Noise.
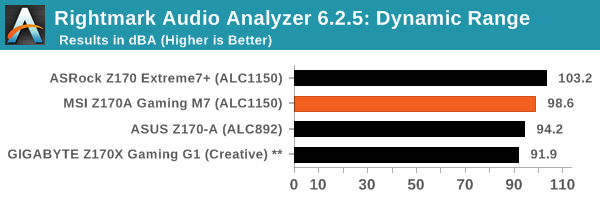
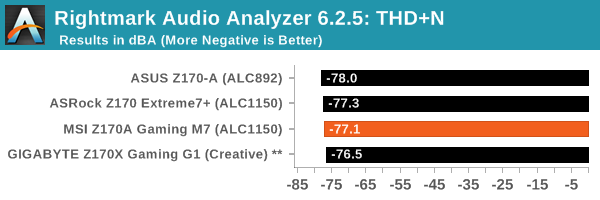
From the outset it seems that we will have a range of audio codecs being used on Z170, especially when each of the main manufacturers might have some additional software enhancements over the top. For example, the Creative featureset of the G1 can never be fully turned off, making a hardware analysis of the audio output difficult to the extent of being semi-meaningless. I fear this will only get more difficult as time goes on.
USB Backup
For this benchmark, we transfer a set size of files from the SSD to the USB drive using DiskBench, which monitors the time taken to transfer. The files transferred are a 1.52 GB set of 2867 files across 320 folders – 95% of these files are small typical website files, and the rest (90% of the size) are small 30 second HD videos. In an update to pre-Z87 testing, we also run MaxCPU to load up one of the threads during the test which improves general performance up to 15% by causing all the internal pathways to run at full speed.
Due to the introduction of USB 3.1, as of June 2015 we are adjusting our test to use a dual mSATA USB 3.1 Type-C device which should be capable of saturating both USB 3.0 and USB 3.1 connections. We still use the same data set as before, but now use the new device. Results are shown as seconds taken to complete the data transfer.
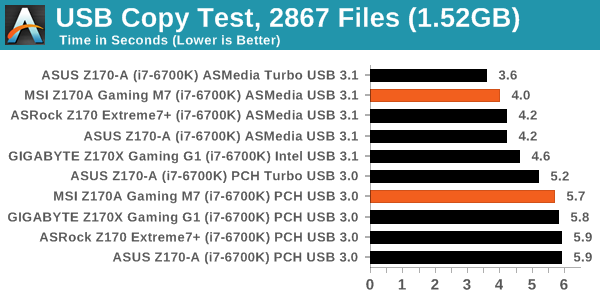
USB 3.0 (or USB 3.1 at 5 Gbps) is provided by the chipset/PCH, meaning we should see some consistency there, but the USB 3.1 at 10 Gbps can either be supplied by ASMedia or Intel, which might produce a spread of results.
DPC Latency
Deferred Procedure Call latency is a way in which Windows handles interrupt servicing. In order to wait for a processor to acknowledge the request, the system will queue all interrupt requests by priority. Critical interrupts will be handled as soon as possible, whereas lesser priority requests such as audio will be further down the line. If the audio device requires data, it will have to wait until the request is processed before the buffer is filled.
If the device drivers of higher priority components in a system are poorly implemented, this can cause delays in request scheduling and process time. This can lead to an empty audio buffer and characteristic audible pauses, pops and clicks. The DPC latency checker measures how much time is taken processing DPCs from driver invocation. The lower the value will result in better audio transfer at smaller buffer sizes. Results are measured in microseconds.
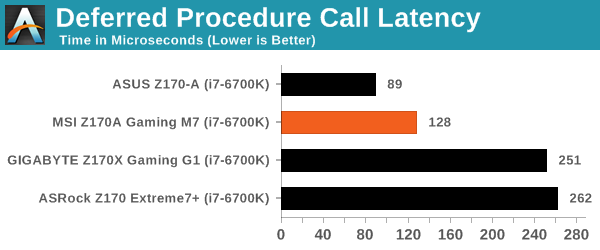
Ideally we hope for a drop in DPC Latency with each generation, however it does take a few months for it to level out as we've seen on Z97 and X99. In this case, the M7 does reasonable out of the box.
CPU Performance, Short Form
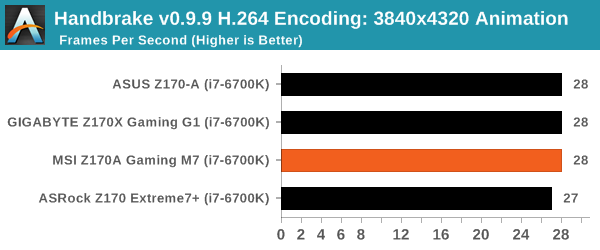
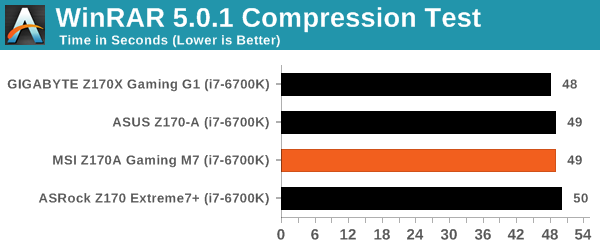
For our motherboard reviews, we use our shortform testing method. These tests usually focus on if a motherboard is using MultiCore Turbo (the feature used to have maximum turbo on at all times, giving a frequency advantage), or if there are slight gains to be had from tweaking the firmware. We leave the BIOS settings at default and memory at JEDEC (DDR4-2133 C15) for these tests, making it very easy to see which motherboards have MCT enabled by default.
Video Conversion – Handbrake v0.9.9: link
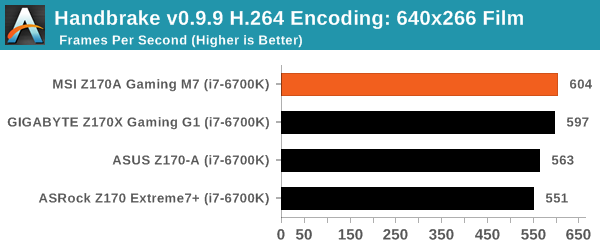
Handbrake is a media conversion tool that was initially designed to help DVD ISOs and Video CDs into more common video formats. The principle today is still the same, primarily as an output for H.264 + AAC/MP3 audio within an MKV container. We test two files, one with small frame sizes (640x266 24 FPS film running for 2h20) and one with super large frame sizes (double-UHD, 3840x4320 at 30 FPS animation short) to show where certain processor designs give better boosts for large frames which might not be obvious in small frame environments.
Compression – WinRAR 5.0.1: link
Our WinRAR test from 2013 is updated to the latest version of WinRAR at the start of 2014. We compress a set of 2867 files across 320 folders totaling 1.52 GB in size – 95% of these files are small typical website files, and the rest (90% of the size) are small 30 second 720p videos.
Point Calculations – 3D Movement Algorithm Test: link
3DPM is a self-penned benchmark, taking basic 3D movement algorithms used in Brownian Motion simulations and testing them for speed. High floating point performance, MHz and IPC wins in the single thread version, whereas the multithread version has to handle the threads and loves more cores. For a brief explanation of the platform agnostic coding behind this benchmark, see my forum post here.
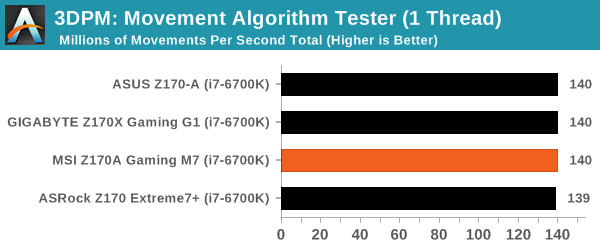
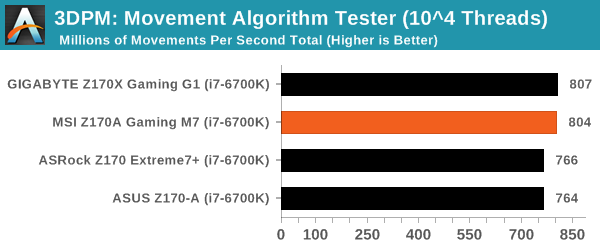
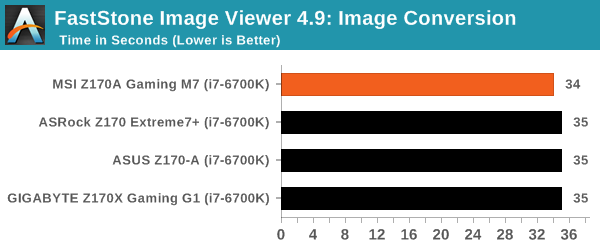
Image Manipulation – FastStone Image Viewer 4.9: link
FastStone is the program I use to perform quick or bulk actions on images, such as resizing, adjusting for color and cropping. In our test we take a series of 170 images in various sizes and formats and convert them all into 640x480 .gif files, maintaining the aspect ratio. FastStone does not use multithreading for this test, and thus single threaded performance is often the winner.
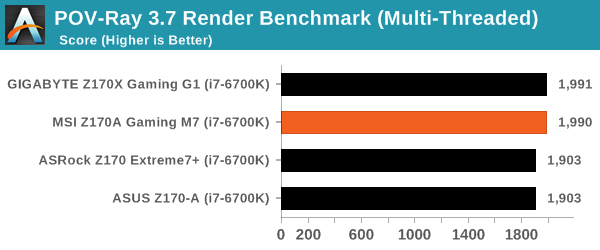
Rendering – POV-Ray 3.7: link
The Persistence of Vision RayTracer, or POV-Ray, is a freeware package for as the name suggests, ray tracing. It is a pure renderer, rather than modeling software, but the latest beta version contains a handy benchmark for stressing all processing threads on a platform. We have been using this test in motherboard reviews to test memory stability at various CPU speeds to good effect – if it passes the test, the IMC in the CPU is stable for a given CPU speed. As a CPU test, it runs for approximately 2-3 minutes on high end platforms.
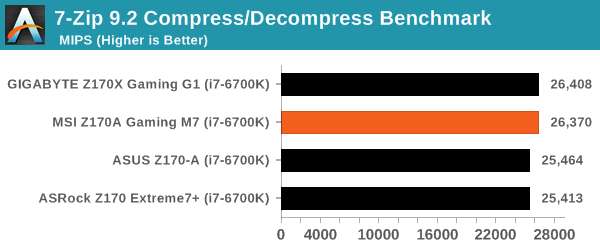
Synthetic – 7-Zip 9.2: link
As an open source compression tool, 7-Zip is a popular tool for making sets of files easier to handle and transfer. The software offers up its own benchmark, to which we report the result.
Gaming Performance 2015
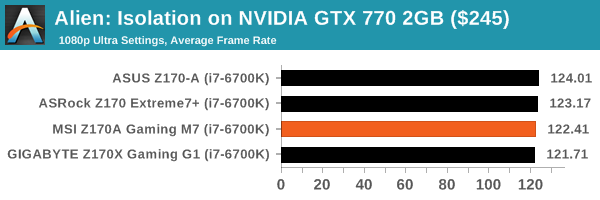
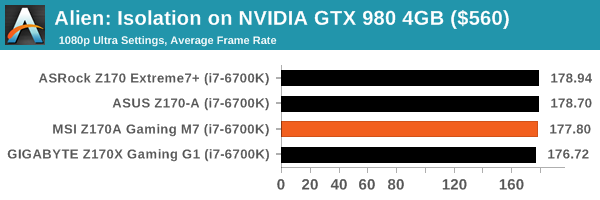
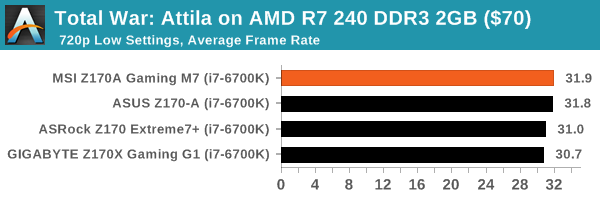
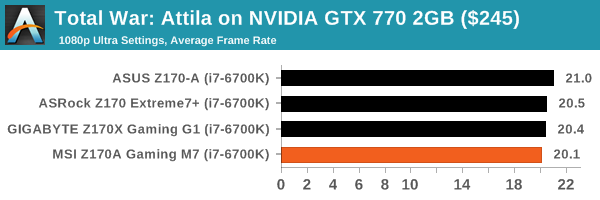
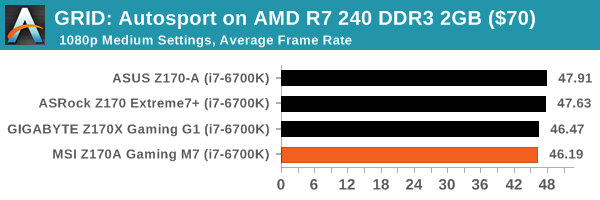
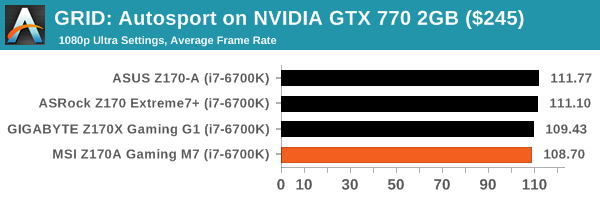
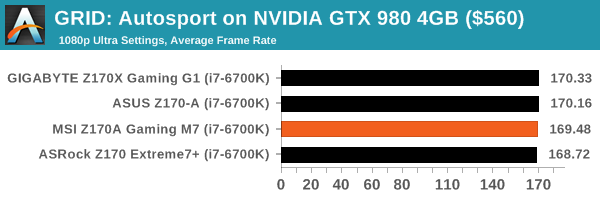
Our 2015 gaming results are still relatively new, but the issue of FCLK settings might play a big role here. At launch, the default setting for the communication buffer between the CPU and PCIe stack was 800 MHz, even though Intel suggested 1000 MHz, but this was because of firmware limiations from Intel. Since then, there is firmware to enable 1000 MHz, and most motherboard manufacturers have this - but it is unclear if the motherboard will default to 1000 MHz and it might vary from BIOS version to BIOS version. As we test at default settings, our numbers are only ever snapshots in time, but it leads to some interesting differences in discrete GPU performance.
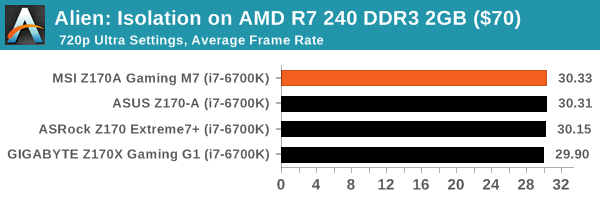
Alien: Isolation
If first person survival mixed with horror is your sort of thing, then Alien: Isolation, based off of the Alien franchise, should be an interesting title. Developed by The Creative Assembly and released in October 2014, Alien: Isolation has won numerous awards from Game Of The Year to several top 10s/25s and Best Horror titles, ratcheting up over a million sales by February 2015. Alien: Isolation uses a custom built engine which includes dynamic sound effects and should be fully multi-core enabled.
For low end graphics, we test at 720p with Ultra settings, whereas for mid and high range graphics we bump this up to 1080p, taking the average frame rate as our marker with a scripted version of the built-in benchmark.
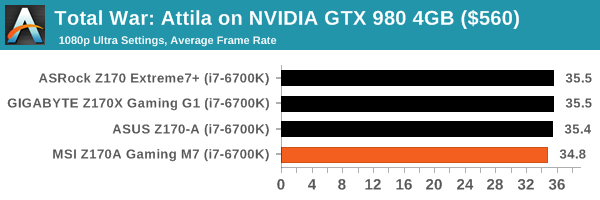
Total War: Attila
The Total War franchise moves on to Attila, another The Creative Assembly development, and is a stand-alone strategy title set in 395AD where the main story line lets the gamer take control of the leader of the Huns in order to conquer parts of the world. Graphically the game can render hundreds/thousands of units on screen at once, all with their individual actions and can put some of the big cards to task.
For low end graphics, we test at 720p with performance settings, recording the average frame rate. With mid and high range graphics, we test at 1080p with the quality setting. In both circumstances, unlimited video memory is enabled and the in-game scripted benchmark is used.
Grand Theft Auto V
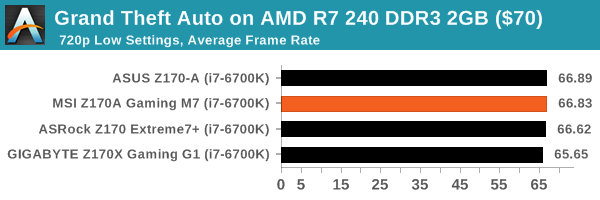
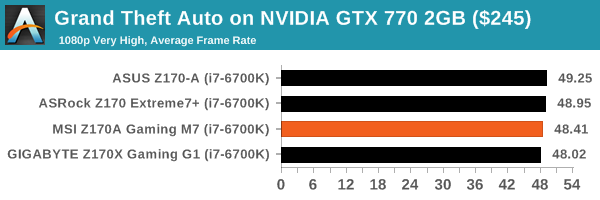
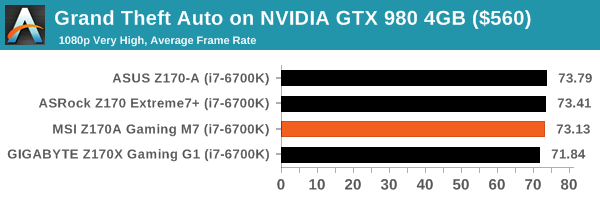
The highly anticipated iteration of the Grand Theft Auto franchise finally hit the shelves on April 14th 2015, with both AMD and NVIDIA in tow to help optimize the title. GTA doesn’t provide graphical presets, but opens up the options to users and extends the boundaries by pushing even the hardest systems to the limit using Rockstar’s Advanced Game Engine. Whether the user is flying high in the mountains with long draw distances or dealing with assorted trash in the city, when cranked up to maximum it creates stunning visuals but hard work for both the CPU and the GPU.
For our test we have scripted a version of the in-game benchmark, relying only on the final part which combines a flight scene along with an in-city drive-by followed by a tanker explosion. For low end systems we test at 720p on the lowest settings, whereas mid and high end graphics play at 1080p with very high settings across the board.
GRID: Autosport
No graphics tests are complete without some input from Codemasters and the EGO engine, which means for this round of testing we point towards GRID: Autosport, the next iteration in the GRID and racing genre. As with our previous racing testing, each update to the engine aims to add in effects, reflections, detail and realism, with Codemasters making ‘authenticity’ a main focal point for this version.
GRID’s benchmark mode is very flexible, and as a result we created a test race using a shortened version of the Red Bull Ring with twelve cars doing two laps. The car is focus starts last and is quite fast, but usually finishes second or third. For low end graphics we test at 1080p medium settings, whereas mid and high end graphics get the full 1080p maximum.
Middle-Earth: Shadow of Mordor
The final title in our testing is another battle of system performance with the open world action-adventure title, Shadow of Mordor. Produced by Monolith using the LithTech Jupiter EX engine and numerous detail add-ons, SoM goes for detail and complexity to a large extent, despite having to be cut down from the original plans. The main story itself was written by the same writer as Red Dead Redemption, and it received Zero Punctuation’s Game of The Year in 2014.
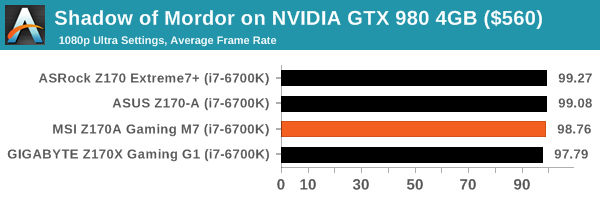
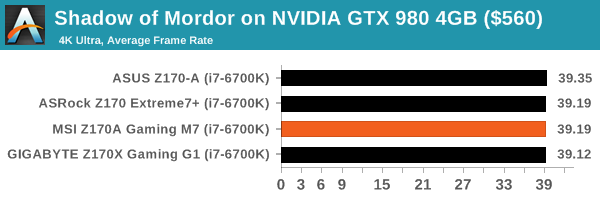
For testing purposes, SoM gives a dynamic screen resolution setting, allowing us to render at high resolutions that are then scaled down to the monitor. As a result, we get several tests using the in-game benchmark. For low end graphics we examine at 720p with low settings, whereas mid and high end graphics get 1080p Ultra. The top graphics test is also redone at 3840x2160, also with Ultra settings, and we also test two cards at 4K where possible.
MSI Z170A Gaming M7 Conclusion
Of the motherboards we received for review before the launch of Skylake, we had a reasonable mix of the regular price bands, from $160 to $250, and even up at the top for $500. These more mid-range price bands are typically where most motherboard manufacturers duke it out for sales, despite the fact that the bulk of sales is usually below this. At $160-$300, it allows the manufacturers to stretch in terms of technical prowess and their view of the market.
The MSI Z170A Gaming M7 comes in at $230, arguably at the higher end of most people's budgets but enough to satisfy the enthusiast space. From a hardware perspective, the M7 focuses on its key marketing points towards gaming, such as the Killer E2400 network port, Nahimic audio software, easy overclocking functionality and new easier to use BIOS interface for new users. Other features come in as well - metallic guards to strengthen the PCIe slots when heavy graphics cards are in place, USB 10Gbps ports in 3.1-A and 3.1-C, dual M.2 slots that run at PCIe 3.0 x4 mode and SATAe connectivity.
Negative points off the bat start with the Nahimic audio software. It completely cuts out the EQ, even when you uninstall it - a big no-no from anyone who genuinely likes to customize their sound quality. Most of the features the Nahimic software provides are essentially EQ adjustments anyway, leaving me to wonder why MSI is paying through the nose for license fees (and passing that cost to the buyer) rather than doing basic modifications to the Realtek software that comes free with the codec. Additional to this, even with the Nahimic implementation disabled, audio performance in our tests did not set the world alight. Power consumption at load (at stock) was a little high as a result of the motherboard applying more voltage to the processor than expected. This might be related to the MultiCore Enhancement used.
Also to note is that our overclock testing, perhaps due to the beta BIOS versions we were using at the time, seem to be behind some other products. But because a review is a snapshot in time, we perhaps shouldn't hold it against the board unless other MSI motherboards in the future perform similarly. Also, at $230, one might have expected either a second network port (wireless or wired) or at least an Intel network controller. For most users that care about the network controller, Killer comes across more of a marketing checkbox compared to the control normally attributed to the Intel network ports.
Where the MSI Z170A Gaming M7 wins comes down to our BIOS implementing MultiCore Enhancement by default, resulting in a better stock performance. As a result, all our base processor tests but the MSI ahead. The new EZ mode in the BIOS is a good design worth playing around with, as well as MSI having the best driver/software update software for motherboards we've ever seen. This becomes more useful given that later BIOSes should become available as time goes on.
At the end of the day, MSI might struggle to sell this for $230 MSRP. The market will have other motherboards to play with that offer more features with less marketing buzz (Killer/Nahimic) at the same price or lower, perhaps pushing users towards the Gaming M5 and below. There are some take home positives, such as the new easy overclock tool and the drive towards catering for their intended market, though pushing it in to a higher than expected price band may drop it off some build lists sooner than MSI would have hoped for. As we test more motherboards, we should be able to develop a taste for the ecosystem as a whole and understand how each of the motherboard manufacturers are approaching the Skylake platform.

