Original Link: https://www.anandtech.com/show/5090/antec-p280-when-enthusiasts-are-engineers
Antec P280 Review: When Enthusiasts Are Engineers
by Dustin Sklavos on November 15, 2011 10:20 AM EST- Posted in
- Antec
- Cases/Cooling/PSUs
- P280
Antec's existing Performance One series, peaking with the P183 and P190, has become a standard for silent, high performance computing. These enclosures have been extremely popular from the word "go," and for a long time the P180 and its descendants have been easy recommendations. But you could argue the designs are starting to feel a little outdated, and while Antec's recent Solo II was an interesting step forward, it felt like a tentative one.
The new P280, on the other hand, is a major evolution. Intended not as a refresh of the P183 but to exist alongside it, the P280 features some radical changes for Antec in terms of design while lowering the cost of entry for the entire line. Is it a smart evolution, or did Antec's engineers split too many decisions in trying to appeal to both silent computing and high performance markets?
Speaking candidly, I think any enthusiast worth his or her salt was more than a little interested when Antec first announced the P280. The Performance One line has practically been an institution for a long time, but Antec's engineers have gone back to the drawing board with the P280 in a very big way, implementing a host of new ideas while adopting some of the modern design cues brought forth by vendors like Corsair and SilverStone. I had a chance to meet with Antec's representatives, including one of the designers of the P280, and it's pretty clear where they were coming from when they made this case: as enthusiasts first who had the opportunity to design the case they wanted to see and use.
| Antec P280 Specifications | ||
| Motherboard Form Factor | XL-ATX, ATX, Micro ATX, Mini ITX | |
| Drive Bays | External | 3x 5.25" |
| Internal | 6x 3.5"/2.5", 2x 2.5" | |
| Cooling | Front | 4x 120mm fan mount (two in the front, two internal behind the drive cage) |
| Rear | 1x 120mm Antec TwoCool exhaust fan | |
| Top | 2x 120mm Antec TwoCool exhaust fans | |
| Side | - | |
| Bottom | - | |
| Expansion Slots | 9 | |
| Front I/O Port | Mic and headphone jacks, 2x USB 2.0, 2x USB 3.0 | |
| Top I/O Port | Power and reset buttons | |
| Power Supply Size | ATX | |
| Clearance | 13" (Expansion Cards), 180mm (CPU HSF), 300mm (PSU) | |
| Weight | 22.3 lbs. (10.2 kg) | |
| Dimensions | 20.7" x 9.1" x 22.1" (526mm x 231mm x 562mm) | |
| Price | MSRP $139 | |
I'll concede that I haven't been wholly impressed by Antec's enclosures as of late, but the P280 is a completely different beast. It has the DNA of the Performance One series, but internally you'll find a design that diverges radically from its predecessors, and your first clue should be the nine expansion slots. Antec calls the P280 a "super mid-tower," but at this point the lines between a mid-tower and full tower have been so heavily blurred that each enclosure should be taken on a case by case basis (pun wholly intended.) The fact is, the P280 is big, but it has a lot going for it.
In and Around the Antec P280
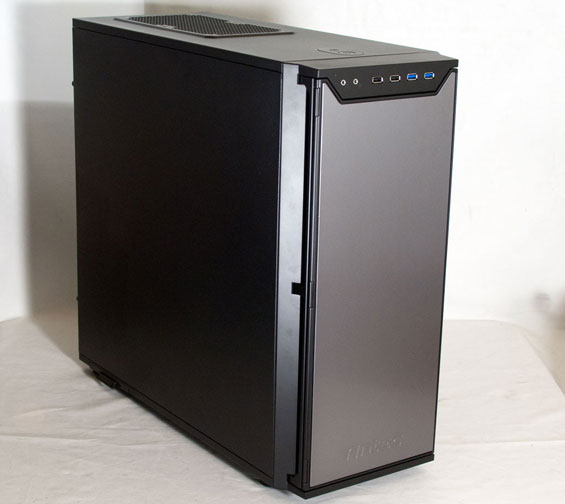
Just from looking at it, you can tell an awful lot has changed from the P183 to the P280. Antec kept the gunmetal gray finish for the door along with the double-hinge that allows you to keep it open, but everything else has moved, and that doesn't even begin to scratch the surface of what's changed internally.
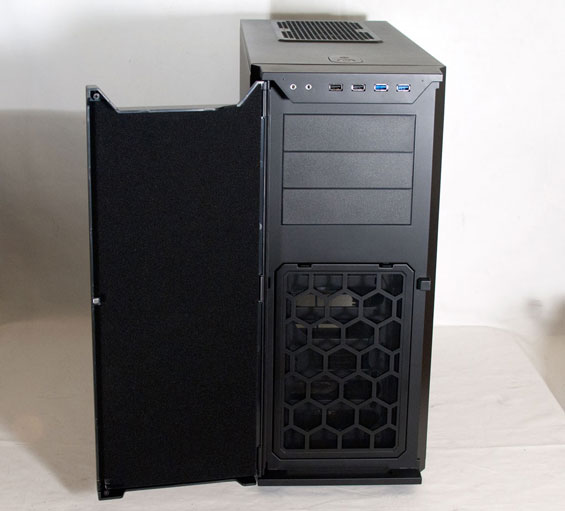
But for starters, Antec's updated their port cluster. I'm not going to cry big buckets of tears over USB 3.0 gradually usurping eSATA as the port of choice for high speed data transfer, and Antec wisely places two USB 2.0 and two USB 3.0 ports at the top of the enclosure, above and outside of the door. Recognizing that users were also tired of having to open the front door just to power the enclosure on, their engineers also moved the power and reset buttons to the top of the case. The net result? Almost everything you need is still on the outside, while the door remains in place to muffle noise and hide the 5.25" drive bays.
One thing I'm not as happy to see is the pair of 120mm exhaust fans on the top of the enclosure, but I recognize this as a concession for 240mm radiators and for what it's worth, Antec includes a copious amount of space inside the enclosure for exactly that purpose. The "spoiler" from the P182 is gone (having fallen by the wayside with the P183), and instead are just two exhaust fans wired to speed switches on the back of the enclosure.
When you get to the back, you'll see a very healthy nine expansion slots; the P280 supports XL-ATX motherboards, but honestly I'm a big fan of having these slots available in the first place. For larger multi-GPU configurations these can help space out the video cards better, and given the opportunity I'd definitely use the lion's share of them. There are the two usual rubber-lined grommet holes for the increasingly rarefied external liquid cooling radiator, but at the top there are also three switches for the Antec TwoCool fans installed in the exhaust positions as well as an opening for the switch for a fourth fan. Each of the fans functions in both a low and a high speed, and the P280 was tested with both fan speeds.
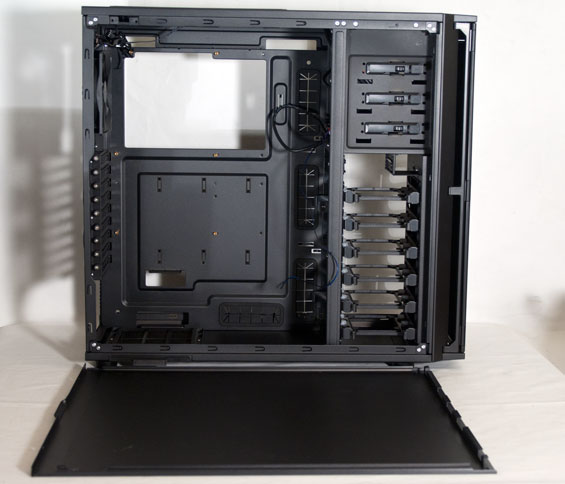
Pop the P280 open, though, and you may find yourself stunned at just how much has changed. The P180s are fantastic cases, but they're notoriously difficult to actually assemble. The P280, on the other hand, inherits a lot of the nicer features of Corsair's line and is geared towards being as easy to work with as possible. Toolless locking mechanisms for the 5.25" drive bays are in place, as well as six drive trays that can support both 3.5" and 2.5" drives, with silicone grommets for the 3.5" drives to minimize vibration. Above them is a small cage designed to toollessly mount a pair of 2.5" SSDs.
Where things have really changed is in the motherboard tray. There's now a massive cutout in the tray to maximize compatibility with aftermarket cooling, and rubber-lined holes surround the tray for routing cables to the back (where Antec has substantially increased the amount of space over the P180 line.)
Where the P280 excels is in the details. One of the two more interesting innovations is a molex-powered set of four 3-pin fan headers at the top and back of the case. While some users may be more inclined to use the on-board fan control of their non-Gigabyte motherboards (seriously Gigabyte, get with the program), this was actually a nice touch for the included TwoCool fans which have their own controls.
The other is a pair of internal 120mm fan mounts behind the drive cage. The idea is that by placing these mounts behind the cage, they're kept further away from the opening (and thus their sound is muffled more) while still being able to pull air in through the front ventilation. End users can employ either this pair or the outer pair on the other side of the drive cage, or even both for a push-pull configuration. It's a slick idea.


Finally, Antec opted to employ foam padding on the inside of the door but use a polycarbonate in the side panels. The result is an enclosure that maintains some of the acoustic dampening qualities of the P180 line while moving things forward a bit.
I'll be candid: I was more than a little psyched to test out the P280 after the Antec reps showed it to me and walked me through the design. This is a major departure from what I'm used to seeing from Antec, but it's a major departure in all the right ways. While some people may be a little peeved at losing the dual chamber design of the P180 line, I'm not particularly bothered by it. That dual chamber design is part of what made assembling the P180 series such a nightmare and I'm not sure it's even necessary anymore, but we'll see.
Assembling the Antec P280
If you ever dreaded assembling or working in Antec's P180 series, the P280 is going to seem like a breath of fresh air. The interior is incredibly spacious, but not just that...Antec has produced an enclosure that is nearly as easy to work inside as any of Corsair's (still the standard for ease of assembly as far as I'm concerned.)
The two side panels are held on by thumbscrews and are extremely easy to remove. From there, Antec has included six mounting screws for the motherboard and includes the rest in a kit with the enclosure. Our I/O shield snapped into place easily enough, and the board went in without any fuss. Wiring things up was a little bit trickier; it would've been nice if Antec had routed the cables through the motherboard tray in the first place and bound the motherboard headers together, but once you do it yourself the inside feels a lot cleaner.
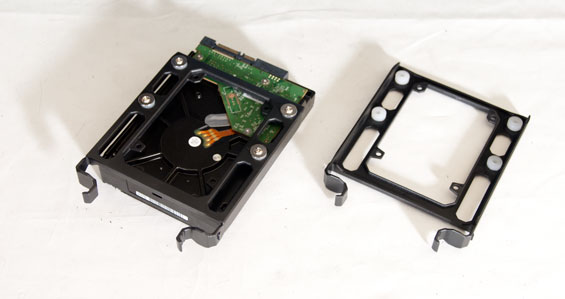
As for mounting drives, that's more of a mixed bag. I had to pretty much jimmy the optical drive in, applying force until it eventually just went all the way in. On the flipside, the toolless locking mechanism is incredibly secure (although you can still use screws if you're so inclined.) This is still a big improvement over having to manually attach rails to the ODD. The 3.5" drive trays are sturdy enough, though remember to stash the screws in a safe place for when you want to add additional drives. Where things do get a bit tricky is in the 2.5" toolless cage: SSDs slide in pretty firmly (I'd really recommend against putting a mechanical drive in here), but it doesn't feel super secure, and you'll want to route cables through the cage ahead of time as it's difficult to access the back of the drive from the other side. There's no locking mechanism either, just the pressure of the cage on the sides of the SSD, although you can use a screw to mount them in place. If you're not a fan of this approach (and I wouldn't fault you), it's worth mentioning 2.5" drives can also be mounted on the drive trays.

Mounting the power supply and video card was easy enough; there's a healthy amount of space inside the enclosure, and things lined up just fine. Where Antec has made their biggest gains, however, is in cable organization. The P180 really pioneered cable management back in the day but by modern standards it's pretty dire. That's not the case with the P280, where there's nearly enough space behind the motherboard tray to stand up a molex connector on its side. Wiring up the P280 was very easy, with copious space above the tray for the AUX 12V line, and plenty of space around the motherboard to squeeze in the side-mounted SATA cables. I also plugged the three included fans into the set of headers in the back of the case, and routing the single molex power cable was a breeze.


Honestly, the P280 is just tremendously roomy and easy to work in, the polar opposite of its predecessor. With the tremendous amount of space behind the motherboard tray, sliding the back panel on required none of the force it usually does with most other enclosures. This is a design that was clearly put together by engineers who also happened to be enthusiasts, and it really shows.
Testing Methodology
For testing ATX cases, we use the following standardized testbed in stock and overclocked configurations to get a feel for how well the case handles heat and noise.
| Full ATX Test Configuration | |
| CPU |
Intel Core i7-875K (95W TDP, tested at stock speed and overclocked to 3.8GHz @ 1.38V) |
| Motherboard | ASUS P7P55D-E Pro |
| Graphics Card | Zotac NVIDIA GeForce GTX 580 (244W TDP) |
| Memory | 2x2GB Crucial Ballistix Smart Tracer DDR3-1600 |
| Drives |
Kingston SSDNow V+ 100 64GB SSD Western Digital Caviar Black 1TB SATA 6Gbps Samsung 5.25" BD-ROM/DVDRW Drive |
| CPU Cooler | Zalman CNPS9900 MAX with Cooler Master ThermalFusion 400 |
| Power Supply | SilverStone Strider Gold 750W 80 Plus Gold |
A refresher on how we test:
Acoustic testing is standardized on a foot from the front of the case, using the Extech SL10 with an ambient noise floor of ~32dB. For reference, that's what my silent apartment measures with nothing running, testing acoustics in the dead of night (usually between 1am and 3am). A lot of us sit about a foot away from our computers, so this should be a fairly accurate representation of the kind of noise the case generates, and it's close enough to get noise levels that should register above ambient.
Thermal testing is run with the computer having idled at the desktop for fifteen minutes, and again with the computer running both Furmark (where applicable) and Prime95 (less one thread when a GPU is being used) for fifteen minutes. I've found that leaving one thread open in Prime95 allows the processor to heat up enough while making sure Furmark isn't CPU-limited. We're using the thermal diodes included with the hardware to keep everything standardized, and ambient testing temperature is always between 71F and 74F. Processor temperatures reported are the average of the CPU cores.
For more details on how we arrived at this testbed, you can check out our introductory passage in the review for the IN-WIN BUC.
Last but not least, we'd also like to thank the vendors who made our testbed possible:
Thank You!
We have some thanks in order before we press on:
- Thank you to Crucial for providing us with the Ballistix Smart Tracer memory we used to add memory thermals to our testing.
- Thank you to Zalman for providing us with the CNPS9900 MAX heatsink and fan unit we used.
- Thank you to Kingston for providing us with the SSDNow V+ 100 SSD.
- Thank you to CyberPower for providing us with the Western Digital Caviar Black hard drive, Intel Core i7-875K processor, ASUS P7P55D-E Pro motherboard, and Samsung BD-ROM/DVD+/-RW drive.
- And thank you to SilverStone for providing us with the power supply and SATA power cable.
Noise and Thermal Testing, Stock
Despite being very enthusiastic about the design of the Antec P280, I had real concerns about performance in practice. I'm just not a fan of negative pressure designs; historically I've seen positive pressure cases produce better thermal results. Antec's reps even asked me about my experiences there, but thankfully the P280 can be configured that way and then some. I also don't like the two exhaust fans in the top; I've never liked top exhaust fans in cases, as it's always seemed like a great way for noise to leak out. So suffice to say, I entered the actual testing of the P280 with some trepidation.
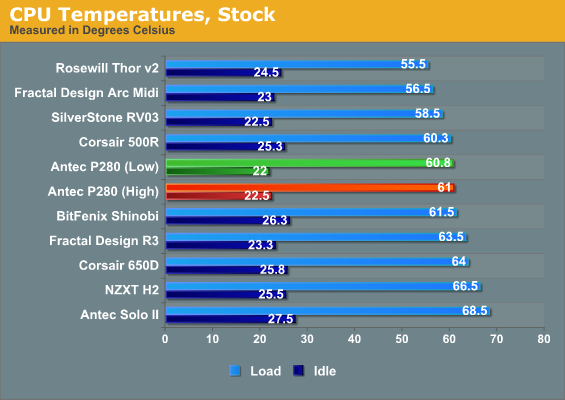
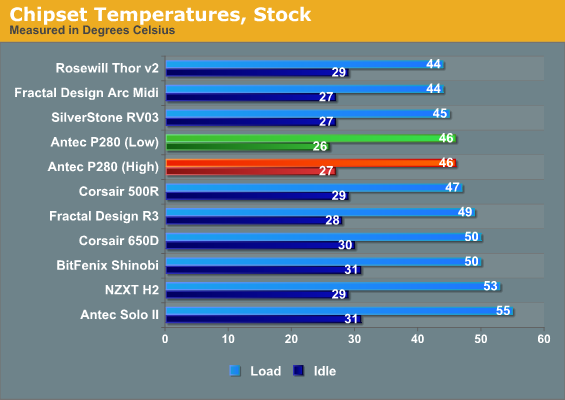
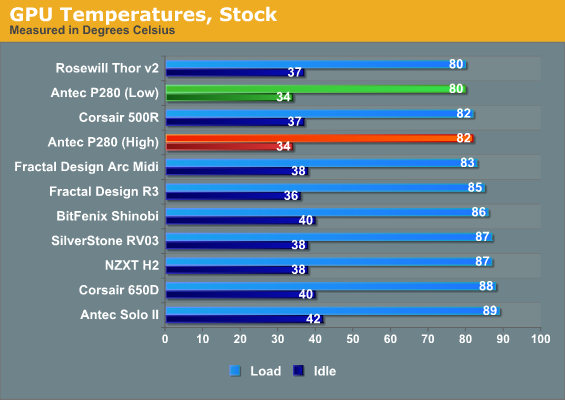

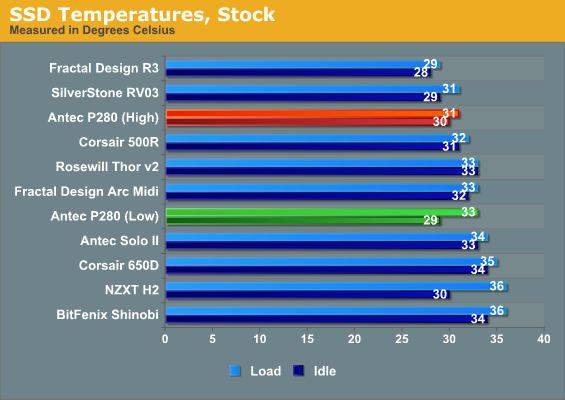
Performance for the P280 is for the most part middle-of-the-road. I think its biggest competitor is probably the up and coming Fractal Design Define R3. What's worth noting is the very minimal impact running the fans at low speeds seems to have had on the enclosure's performance.
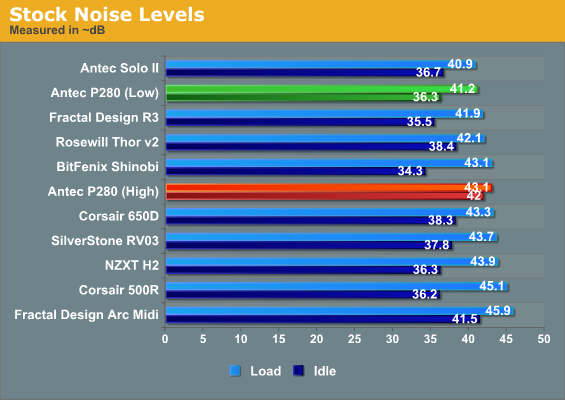
Turning down those fans results in one of the quietest cases we've tested under load, though the results are within the margin of error compared to Fractal Design's Define R3. When we let them ramp up, though, no amount of sound dampening can really save the P280. Thankfully running them at low barely affects thermals, and as a result we get decent performance from a quiet case. So far Antec is on the right track.
Noise and Thermal Testing, Overclocked
Here's where we separate the men from the boys. Our overclocked test bed has proven to be very stressful on "less prepared" enclosures, and this is hopefully going to produce some more decisive results. So far, Antec's P280 has put in a strong performance, offering decent thermals with low acoustics, but it's still competing pretty squarely with Fractal Design's Define R3, an enclosure that costs between $30 and $40 less. The R3 lost a lot of steam in our overclocked testing, though. Can the P280 pick up the slack?
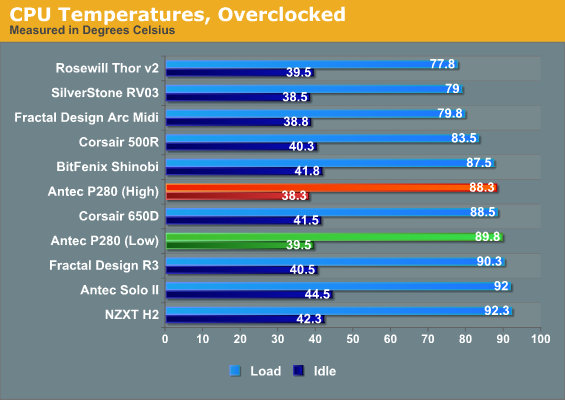
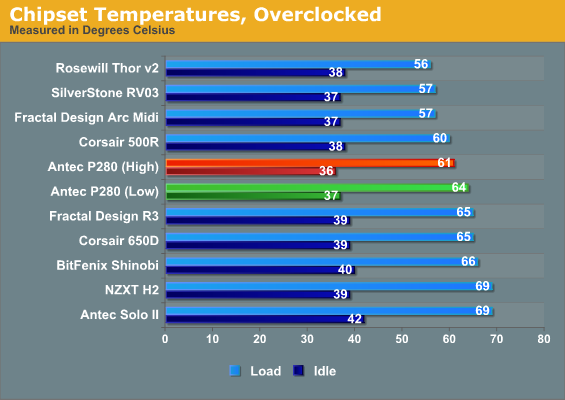
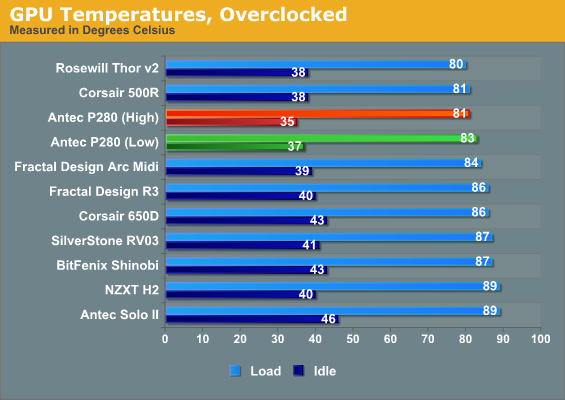
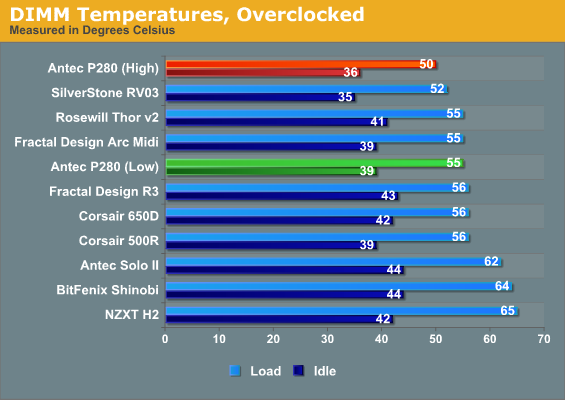
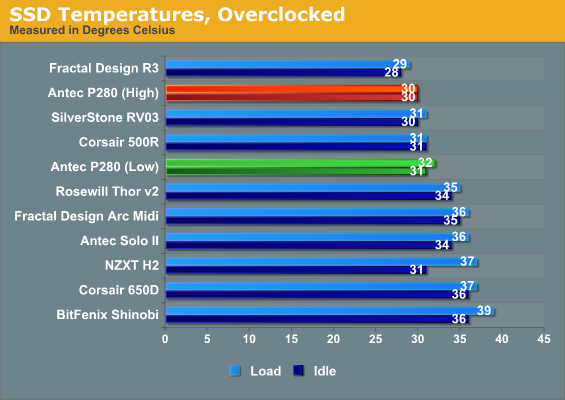
Unfortunately, while most of the other components are running pretty frosty, the P280 has a hard time dealing with the substantially increased thermal load of the overclocked i7-875K. What we can glean from the results is that it's able to mostly manage overall ambient temperature, and the GeForce GTX 580 runs nice and cool compared to some of the other cases, but the processor may just not be getting enough cool air running through it. The P280 supports 240mm radiators, and getting one in there may not be a bad idea.

Once again it's hard to justify running the fans at their high setting. At their low setting the P280 is nice and quiet at idle, though load performance is dicier. Once again the P280 is in the same general ballpark as Fractal Design's up and comer.
Conclusion: A Matter of Time and Preference
It was probably unreasonable to expect better thermals out of the Antec P280. The enclosure isn't a homerun, at least not in its stock configuration, but it's most definitely a strong base hit. While competing with Corsair's Carbide 500R and Obsidian 650D means taking a look at what your priorities are, it really invites direct comparison to Fractal Design's Define R3, an enclosure that many enthusiasts found themselves recommending over the incumbent P180 series.
That comparison is a tough one. The Fractal Design enclosure is cheaper, has more room for 3.5" drives, and I'm frankly more enamored with the acoustic dampening in it than I am with Antec's P280. Having those internally covered mounts is a nice touch, giving the end user more flexibility with how they want to configure the R3. On the other hand, I like the looks of the P280 more. The enclosure is bigger and easier to work in, and has more room for expanding the system inside. There's plenty of space for mounting a good, thick 240mm radiator at the top, cable routing is slightly better, and the two internal fan mounts invite experimentation. Antec's P280 also has better ventilation in the front for taking in fresh air. Test results suggest a close match up, but I just get a better feeling from the P280. It's a situation where I can easily see some users going for the Define R3 and some users going for the P280; if it were my money, I'd personally spend the extra dosh on the P280, but I wouldn't dream of faulting anyone for choosing the Define R3 instead.
Antec's engineers made an awful lot of changes when they designed the P280, and it's fantastic to see the kind of innovation here that I used to expect fairly regularly from them. They took a lot of the best ideas from existing designs and applied some of their own, and the result is an enclosure that in many ways feels like a grand experiment. If you like tinkering with your system, I probably couldn't recommend the P280 enough. If you were in the market for a silent performance case in the sub-$200 range, either the Define R3 or P280 would serve you well (going north of $200 means picking up my personal favorite, the SilverStone FT02.)
The P180 saw two important revisions in its lifetime, with the P182 and P183 both improving somewhat on their predecessor's designs. I think the P280 is an excellent first draft that I could happily recommend, but what I'm really curious to see is where Antec opts to revise the design. There are a lot of good ideas here and the more adventurous users will probably have a lot of fun with it. I'm not entirely certain this was the enclosure you were waiting for, but it's definitely a strong step forward and certainly worth considering.


