Original Link: https://www.anandtech.com/show/4072/silverstone-gd04-htpc-case-cool-not-quiet
SilverStone GD04 HTPC Case: Cool, Not Quiet
by Dustin Sklavos on December 25, 2010 12:00 AM EST- Posted in
- Cases/Cooling/PSUs
- HTPC
- SilverStone
- GD04
Introducing the SilverStone GD04
My media center PC was far from old and decrepit, but I wound up with an opportunity to both rebuild it into something faster and cut a profit this month and went for it. Choosing a case for the new build was a difficult decision; the old CoolerMaster Elite 360 case I used still ranks among my favorites for budget machines, but the lack of any kind of vibration-dampening optical drive mounting resulted in my blu-ray/HD-DVD drive progressively producing more and more noise. I decided to go for something sexier, something more suited to being an HTPC case, and after doing a fair bit of research I picked up the SilverStone GD04.
The GD04 is remarkably attractive if you're into that minimalist look (I am); there's a sister GD05 model that has a full 5.25" drive bay instead of just an opening for the optical drive tray, but rather than have unsightly electrical tape covering up the activity LED on the drive I opted to bury it in the case with the GD04. Otherwise the two models are functionally identical, so a lot of what's said in this review will likely apply to the GD05. This case has also been around for a couple years but doesn't seem to have been refreshed by SilverStone; if it ain't broke, don't fix it, right?
| SilverStone GD04 Specifications | ||
| Motherboard Form Factor | Micro ATX, Mini ITX | |
| Drive Bays | External | 1x 5.25” (partially covered by bezel) |
| Internal | 2x 3.5” or 2.5" | |
| Cooling | Front | - |
| Rear | - | |
| Top | - | |
| Side | 1x 120mm intake (left), 2x 120mm intake (right) | |
| Bottom | - | |
| Expansion Slots | 5 (4 main, 1 accessory) | |
| Front I/O Port | 2x USB 2.0, 1x Headphone, 1x Mic | |
| Power Supply Size | Standard ATX | |
| Weight | 12.21 lbs. | |
| Dimensions | 5.91” x 17.32” x 12.72” | |
In and Around the GD04
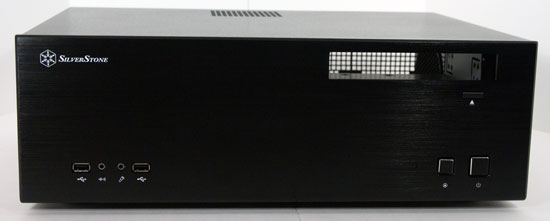
A jaunt around the GD04 reveals a case that at least appears to be well-suited to its task. Most of the case is constructed with steel, but the front bezel is an attractive brushed aluminum and again, the case comes in silver or black depending on your taste. Personally, I think black goes with everything.


The front bezel is nice and spare, featuring the two USB ports, microphone and headphone jacks, the power and reset buttons, a power LED, the optical drive bay, and a SilverStone logo. There's a lot of negative space here and it's appreciated; the GD04 is going to look like it belongs in your home theater setup. When you look at the sides, you'll see the three 120mm intake fans: one on the left, two on the right. This is a positive pressure case, designed to bring in air through the sides then push it out through ventilation in the top and the back. There's also a vent on the bottom of the case, beneath where the power supply's intake fan would typically be, that stays unobstructed as a result of the reasonably tall standoffs.
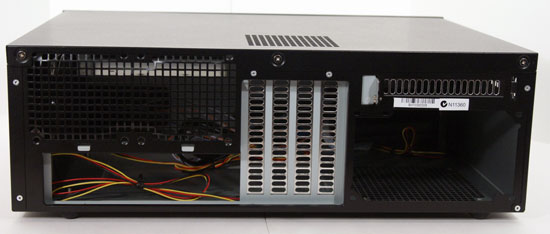
The rear of the case features four expansion slots, the power supply bay, and a fifth expansion slot above it presumably meant for extra USB ports or an eSATA bracket. There's also ventilation above the port cluster that could support additional cooling, if you wanted to add a couple 80mm fans.


Assembly of the GD04 is done by removing the top panel and it's here that you first realize this is not going to be a tool-less affair: the panel is fastened with three Philips head screws, and these are only the first of many you'll need to use when you start putting your HTPC together in this case.
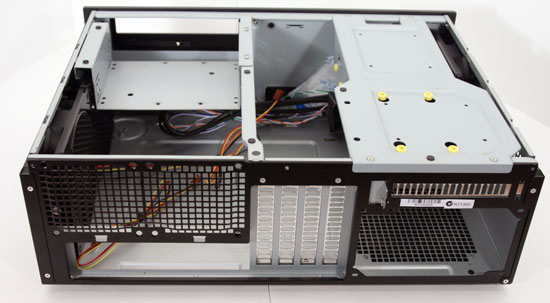
Once you get the top off, there are three additional pieces that can be and in fact need to be removed: the optical drive tray, the hard disk drive mount, and the crossbar. Removing all of these parts requires a grand total of ten screws, and you'll want to keep those in a safe place. That said, the inside of the GD04 is actually remarkably spacious, but people with long power supplies should be forewarned: something as long as the spare Corsair HX750 I had won't fit, as trying to install it results in it butting squarely up against the intake fan on the left side.
What's also worth noting is the low clearance beneath the optical drive tray. While stock coolers for most AMD processors will work fine, the Zalman CNPS7000 cooler I'm using in my build is only a few millimeters from scraping the bottom of the tray. You're going to want to use either the stock or a low profile cooler like a Scythe Shuriken (or, if you don't mind the scant clearance, the Zalman CNPS7000) when assembling a machine in the GD04.
Assembling an HPTC in the GD04
When building in most cases, the assembly is fairly self-explanatory. The SilverStone GD04? Not so much. Installing my hardware in the GD04 actually resulted in my consulting the instructions that come with the case fairly frequently, and there's a reason why: SilverStone specifies a very specific order for installing components to keep cable routing fairly clean and easy.
![]()
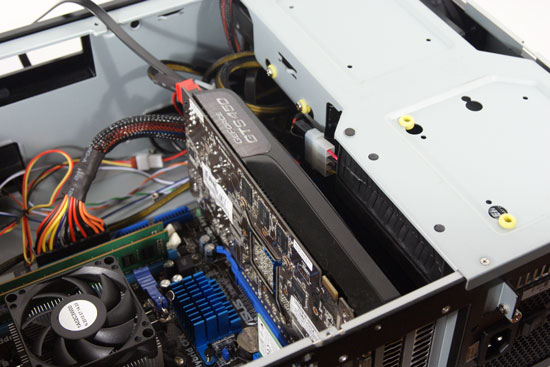
The first thing you'll need to do is remove the trays and the crossbar, and for sanity's sake the motherboard should probably go in before the power supply does. SilverStone actually includes rubber standoffs that adhere to the bottom of the power supply, as there's a centimeter or so worth of empty space between where the unit mounts and the bottom of the case. You'll want to connect whatever cables you can and install your expansion cards, because the next step involves putting the crossbar back in.
It's at this point that you should also note the 120mm fans all come with three-pin connectors and are intended to be plugged into and controlled by the motherboard. That would be fine, but most MicroATX boards don't come with that many fan control headers (to say nothing of MiniITX), not to mention how mediocre most motherboard implementations of fan control are. SilverStone includes an adapter that allows you to plug all three headers into a single molex connector, but that also means the fans are running at full bore all the time, and you'll see why that's a problem later on. Mercifully, the fans have built-in internal grates that keep bunched up cables from getting caught in the fan blades.


After you've replaced the crossbar, you'll need to mount the hard drive or drives into the mounting tray. The tray actually supports up to three drives total: two 3.25" and a 2.5". It's probably easiest to just install one big storage drive - this is a media center case after all. The 2.5" bay does make using an SSD as an OS drive easy, however. Installing the optical drive is also pretty simple, and there's some give on it so you can line it up properly with the opening in the front. I've read that one or two users on NewEgg had to shave off part of the tray opening for their builds, but the combination Blu-ray/HD-DVD drive I have fit perfectly and without issue.
If you follow the instructions that come with the GD04, assembly actually goes fairly smoothly. The main problem is really just what a nuisance all the tiny screws can be. I understand going entirely toolless may be a convenience not available for a case this size designed for this task, but I can't help but feel like this whole ordeal could've been easier.
Thermal and Noise Testing
In testing the SilverStone GD04, I actually added components you're not going to see in the gallery but wound up needing just to keep the noise level down: the Zalman CNPS7000, which with the included FanMate controller was kept running at a low setting, and a Xigmatek Mono-Cool fan controller, the only controller I could find on NewEgg that fit into an expansion slot instead of a drive bay. The Xigmatek controller has headers for three fans, making it seem perfectly tailored to this task. Noise was measured using an Extech SL10 sound meter, while temperatures were measured conventionally using HWMonitor. The test system specs are as follows:
| Test Configuration | |
| CPU | AMD Athlon II X4 640 |
| Motherboard | ASUS M4A78LT-M AM3 MicroATX |
| Graphics Card | EVGA GeForce GTS 450 |
| Memory | 2x2GB DDR3-1333 |
| Drives |
LG HD-DVD/Blu-ray/DVDRW Combo Drive 1x Western Digital Caviar Blue 640GB |
| CPU Cooler | Zalman CNPS7000 |
| Power Supply | PC Power & Cooling 500W |
These aren't loud components to begin with, but remember: this is a media center case with three 120mm fans, and at least in my apartment it's going to be out in the open. Silence is paramount for a build like this. To generate load temperatures and noise, I ran 3DMark06 in a loop with Prime95 in the background and left it running for fifteen minutes at a time. The system was tested with the fan controller at its lowest and highest settings, and the sound meter was positioned one foot away from the tower, on a tripod, pointed directly at the side of the case.
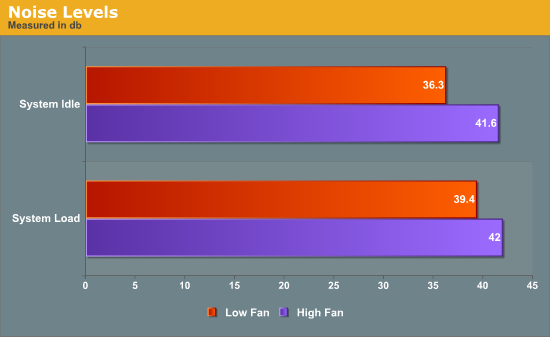
While the fan noise wouldn't be a major issue for a normal PC that's probably going to be hidden under or near a desk, a media center PC really does need to run quieter than this. The first time I powered it up I was actually alarmed at how loud it was, and even though the character of the noise is a low whooshing, it's nonetheless very audible. Not good. So how are the thermals, then?
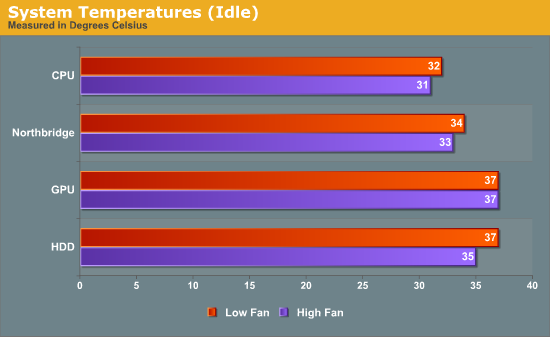
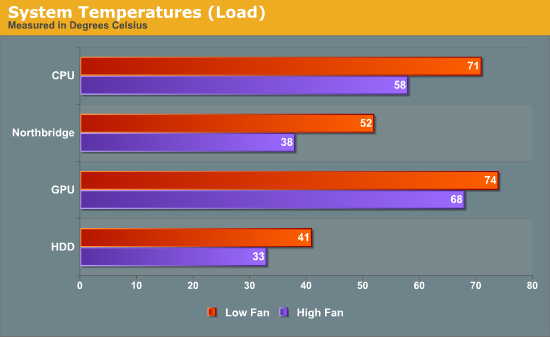
Thermals are actually pretty decent; remember this is a heavy artificial load being placed on the system. With the fans running at full bore everything's actually pretty good, but at low speed the processor's temperature becomes a bit worrying. Odds are good in actual use the CPU won't get this hot, but it's still not ideal. The idle temperatures are excellent at least.
Conclusion: Good, With Caveats
First, let's be clear, the SilverStone GD04 isn't a poorly designed case; on the contrary, it's actually very well designed. Aesthetically it has a nice minimalist feel to it, and at no point did I ever feel like any of the parts used in its assembly were particularly cheap. It's solid, the feet don't feel like they're going to peel off at the first sign of trouble, and the internal design is fairly smart given the generally small overall character of the case. It's not the smallest case I've built in, but it maximizes both the space it gives you and the cooling power it can have within that space. Which is part of the problem.
Three 120mm fans at high speeds make noise, and that's a real concern when you're dealing with a media center case. For other builds it may not be as big of an issue, but if the GD04 is going to be sitting in your living room it needs to draw as little attention to itself as possible. So while the LED on the front is a low key blue, in a quiet room the case in a typical configuration is going to be very audible. Having to go back and buy a fan controller to keep noise down to a reasonable level wasn't what I had in mind when I bought this case. You could probably get better results by carefully selecting your motherboard, or you might even swap out the default fans for something quieter (or disable one or two fans), but that all adds to the cost as well and may have undesirable results.
Everything else about it is at least understandable: while a more tool-less approach would've been appreciated, it's not absolutely necessary and more of a convenience. I do appreciate how solid the case feels overall, and I can't stress this enough: it feels sturdy and you don't end up feeling ripped off by the $99 price tag it typically commands (shopping around may find you a better deal). That price is actually a good deal lower than what you'll spend for many other HTPC cases, so if you don't need an LCD front panel or anything fancy it's a fine choice. Just know that when you order the GD04 you're going to want to factor in the cost of an additional fan controller, and it's probably going to be the Xigmatek I used since that was the only expansion slot-mounted fan controller I could find on NewEgg. That adds another ten bucks to the price of the case.
At the end of the day I can recommend the GD04 with that caveat: if you think noise in a quiet room will be an issue you're going to want to buy a suitably quiet CPU cooler and a fan controller or a motherboard with enough fan headers and decent fan control. Other than that, the thermals are reasonable, the case looks good, and the price is right. Just keep your screwdriver handy.


