Original Link: https://www.anandtech.com/show/12640/amd-ryzen-delidding
Delidding The AMD Ryzen 5 2400G APU: How To Guide and Results
by Gavin Bonshor on May 10, 2018 8:00 AM EST- Posted in
- CPUs
- Guides
- APUs
- Ryzen
- Ryzen 3 2200G
- Ryzen 5 2400G
- Delidding
- Delid
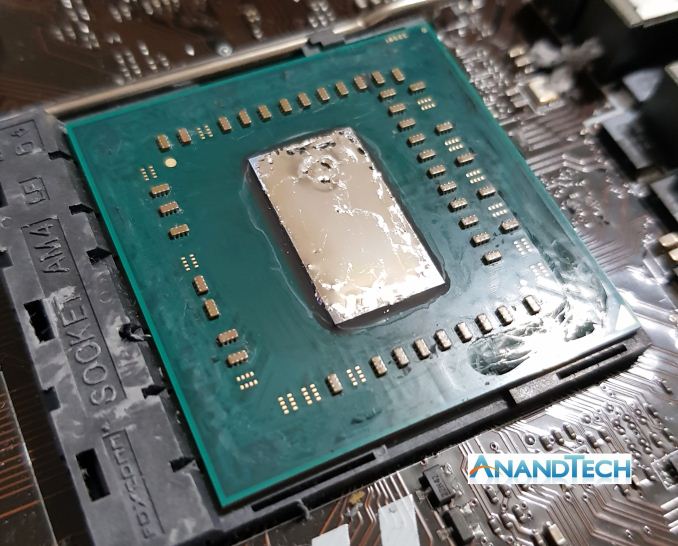
Delidding is a process with the aim being to reduce CPU core temperatures on processors with a less-than-ideal thermal interface between the silicon and headspreader. The benefits of delidding a design with such an interface lead to having a cooler system, or the ability perform extra overclocking with a larger delta for thermal headroom. However, delidding a processor does carry risk, such as potentially damaging the CPU when done incorrectly and certainly voiding the warranty. In this article, we have produced a How-To guide for delidding one of the latest desktop processors: AMD's Ryzen 5 2400G APU.
What is Delidding?
Most modern processors are manufactured with the integrated heat spreader (IHS) on top of the package, and attached to the package with a layer of glue. Between the CPU and the headspreader is a thermal interface material (TIM). The TIM is designed to transfer the heat away from the processor into the headspreader and eventually into a CPU cooler. The quality of the TIM used on modern processors can vary greatly, from a layer of cheap thermal paste to direct indium-tin soldering between the silicon die and the IHS.
 Visual representation of a regular CPU versus a delidded CPU (Thanks to EKWB)
When a manufacturer decides how to package their processors, the type of TIM used is an important part of that decision. Not only does it have to be sufficient to be suitable to last 10+ years, it also has to make sure that the processor works within specifications for that time, after plenty of heat cycles. The method also has to scale - some processor families are manufactured on the scale of tens of millions, so the process has to be quick. It also has to cost appropriately per unit. Saving a single cent per unit over ten million units is a $100k saving.
A lot of discussion on the internet on this topic revolves around why the cheaper implementations do not spend $0.10 more for a better solution, especially on a $1999 product (or why a flagship product has a cheap implementation). Ultimately a fine balance has to be made - a standard TIM 'goop/paste' has sufficient longevity but lower performance, while a direct soldering has the best performance but might not withstand mulitple years of cycling.
| 'Paste or Solder as Default' Chart AnandTech |
||||
| Intel | Year | AMD | ||
| Paste | Ivy Bridge | 2012 | ||
| Vishera | Soldered | |||
| Trinity | Paste | |||
| Paste | Haswell | 2013 | - | - |
| Soldered | Ivy Bridge-E | |||
| Soldered | Haswell-E | 2014 | Kaveri | Paste |
| Paste | Broadwell | 2015 | Kaveri-R | Soldered |
| Carrizo | Paste | |||
| Paste | Skylake | |||
| Soldered | Broadwell-E | 2016 | Bristol Ridge | Paste |
| Paste | Kaby Lake | 2017 | Ryzen CPU | Soldered |
| Paste | Skylake-X | |||
| Paste | Kaby Lake-X | Threadripper | Soldered | |
| Paste | Coffee Lake | 2018 | Ryzen APU | Paste |
| Ryzen 2nd Gen | Soldered | |||
By delidding a processor, a user can replace the TIM between the die and IHS. Normally this is done to remove a cheap goopy paste solution and place a better interface, ultimately upgrading to the higher performance variant, or what some might argue should be the standard. Delidding a processor therefore works best on solutions that have the cheapest TIM implementation.
Buy Ryzen 5 2400G APU on Amazon.com
For our guide here, we have chosen to delid one of our Ryzen 2000 series APUs. While the AMD Ryzen 2000 series APUs have proven to be budget friendly light gaming workhorses, the extreme overclocker and engineer Roman ‘Der8auer’ Hartung has created and marketed a specific add-on kit/delidding tool for use in delidding the Ryzen 2000 series APUs. This is called the Delid Mate 2, which we will use today.
The conceptual idea of delidding has primarily been attributed for non-soldered CPUs, which has historically been the way that Intel has built its processors. Almost all modern mainstream Intel CPUs. such as the Intel Core i7-4770K, i7-6700K and even the newest i7-8700K use a thick goopy paste to create contact between the CPU and the IHS. For AMD's line up, the APU processors use a similar method - so the new Ryzen 2000 series APUs and the Bristol Ridge APUs.
It should be noted that all of AMDs performanced based desktop chips such as Ryzen and Threadripper all use indium-tin solder, and do not need to be delidded. Similarly, Intel's HEDT processors are often not delidded.
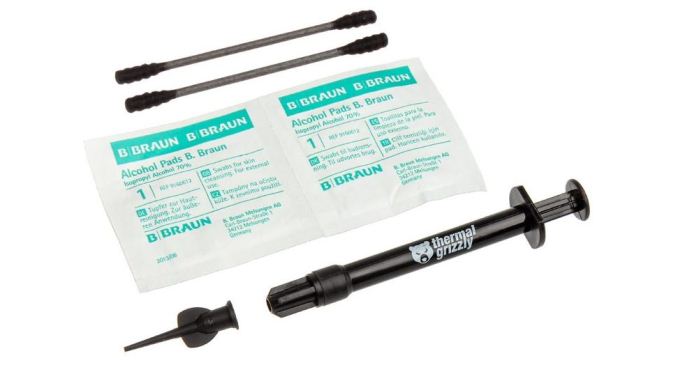
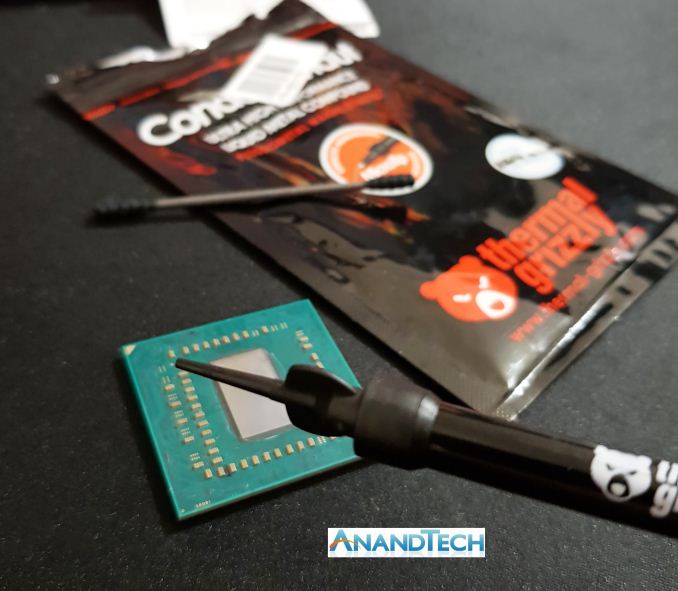
Thermal Grizzly Conductonaut Liquid Metal ($16) to replace the paste-based TIM
The idea is that replacing the cheap inefficient pre-applied paste with a thinner layer of better quality paste or liquid metal with a higher performance (measured in W/mK, Watts per Kelvin-meter) not only improves thermal conductivity and thermal heat transfer from the die, to IHS, to cooling plate, but could also allow for a quieter system as the fans do not have to work as hard.
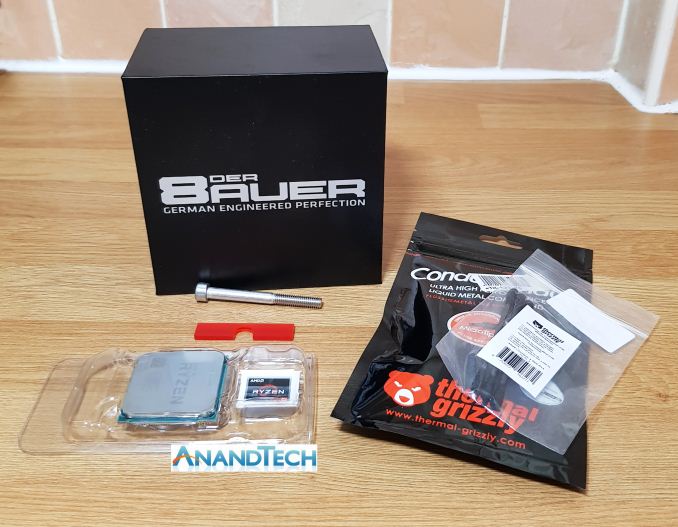
Not the usual kind of 'chip' I cook up in the kitchen
What Are the Benefits?
The Ryzen 2000 series of APUs are great products for the price, and there are a couple of notable reasons why delidding one could be beneficial. The biggest application where thermals are more important are in tight spaces such as in small form factor PCs or in home theatre PCs that specialise in small form factors and quiet systems. In HTPCs, delidding would reduce the pressure on the small coolers in play, as welll as reducing noise from any fans.
Another application in delidding would be to extract every last drop of available headroom from it, whether that’s running a capable Ryzen APU past its non-delidding capabilities to increase frame rates within games, or even to shave off time in rendering video projects; the benefits are applicable to most scenarios with higher clock speeds.
In our results, shown on the last page, we saw a 12ºC reduction in temperatures when the system was fully loaded at stock frequencies, and an 11ºC reduction when overclocked to 4.1 GHz. Due to the nature of the manufacturing process, we managed another +100 MHz on the overclock as well.
What Are the Biggest Risks Involved?
First of all, the biggest risk in delidding a processor is damaging the processor during the process. The last thing that any user would want would be to destroy their brand-new chip with a dodgy slip of the wrist. Older methods of delidding processors involved using a hammer and a vice, potentially causing the CPU to fly off and hit the wall when too much power was applied (yes, I have done this personally).
The other equally big risk in delidding a processor is it instantly voids the warranty, which removes any attached rights as a consumer to returning if it goes wrong, or if it somehow dies in the process. This alone presents the biggest consequence from delidding and it shouldn’t be done on any component which cannot be afford to be replaced; RMA fraud is not condoned and will not get a further mention other than this one.
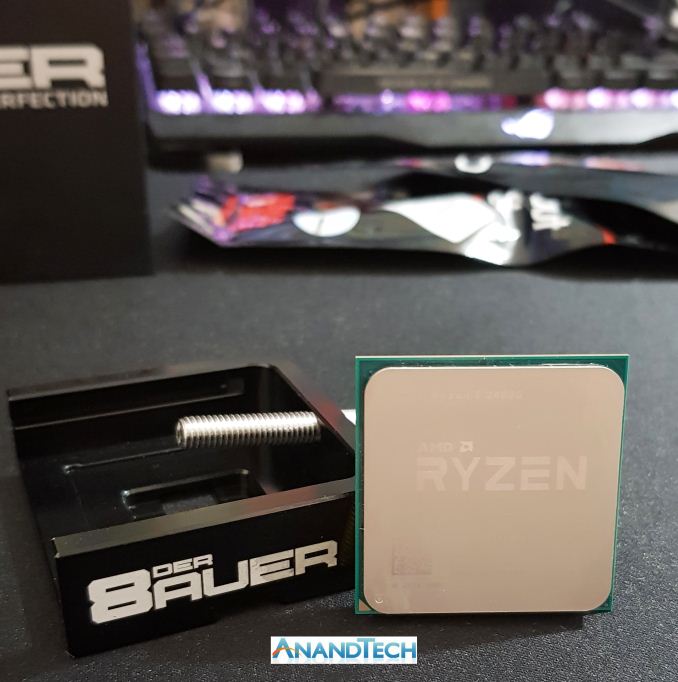
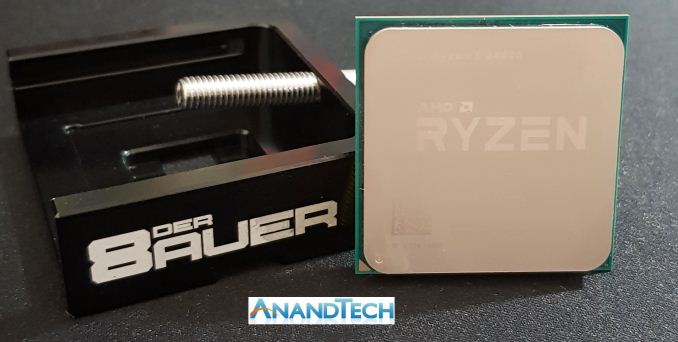 The Der8uaer Delid Die Mate 2 ($46) delidding tool with one of our Ryzen 5 2400G APUs
What Tools Do I need To Safely Delid My Ryzen 2000 Series APU?
There have been many methods that used to delid and remove the IHS from the package. The market is such that there are now specially manufactured tools for the process, such as the Der8auer Delid Die Mate 2, or 3D printed tools, including one created by a user by the name of Chri. Other methods and conspicuously risky ones at that include the hammer and vice method and cutting which involves separating the glue from the heat spreader. The risks involved with this mean one tiny miscalculation with pressure and cutting depth can ‘nick’ the die which would render the silicon potentially useless and dead.
My method to delid the Ryzen 5 2400G ($169) is to use the Der8auer Delid Die Mate 2 which retails for around $48 at Amazon. While other methods do seem somewhat attractive and ultimately cheaper, the cost of dead silicon outweighs the cost of the tools associated. I have used the Der8auer range of tools for years including the first Delid Die Mate and the Delid Die Mate X for X299 chips.
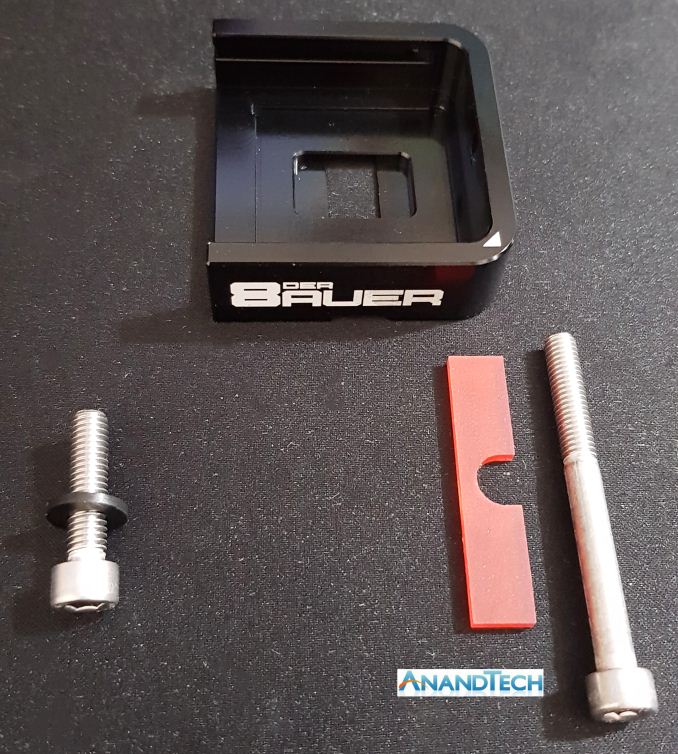
Der8auer Delid Die Mate 2 with stock screw on left, and the AMD add-on kit on the right
While the above tool was specifically manufactured with the aim of delidding Intel based Kaby Lake, Coffee Lake and even the older Sky Lake processors, an additional AMD kit is available. The kit consists of a longer M6 x 60 mm hexagon threaded bolt and an acrylic adapter to ensure the bolt doesn’t touch the pins. By virtue of AMD using a pin-grid array socket on its processors (i.e. pins on the bottom), it makes the process all that more risky.
The Tools and Materials Used to Delid the Ryzen 5 2400G
- AMD Ryzen 5 2400G APU ($169)
- Der8auer Delid Die Mate 2 ($46)
- Der8auer Delid Die Mate 2 AMD Kit ($8)
- Thermal Grizzly Conductonaut Liquid Metal ($16)
- Thermal Grizzly Liquid Metal Applicators ($8) – In case spares were needed, but not essential
Delidding The AMD Ryzen 5 2400: Delidding The APU
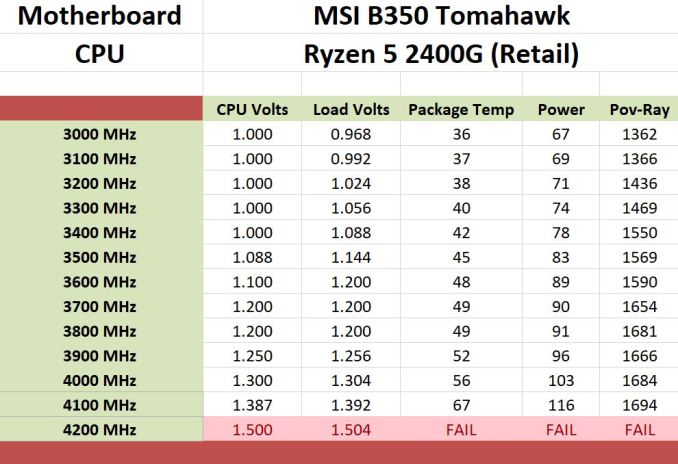
To show if delidding the Ryzen 2000 series APUs yielded much benefit in terms of thermal performance and overclocking headroom, I selected the best overclocking chip for delidding from a CPU core frequency standpoint out of a pool of four APUs. The best one was our retail Ryzen 5 2400G chip, which managed 4.1 GHz with 1.387 volts applied in the BIOS (on our MSI B350I Pro AC motherboard).
Our Ryzen 2000 Series APU Overclocking Guide with results can be found here: link
For delidding, we purchased the Der8auer Delid Die Mate 2 delidding tool, and the Delid Die Mate 2 AMD Kit. This to our knowledge is the safest method to ensure the APU is not damaged during the delidding process and the Delid Die Mate 2 is manufactured from good quality anodized aluminum; much sturdier than a 3D printed acrylic one which relies on the quality of materials used to print. Ensuring the delidding process has minimal risks means a safe delid without damage which is ultimately is much cheaper than a dead piece of silicon, one which cannot be RMA’d due to voiding the warranty outright. The actual procedure for delidding the Ryzen 5 2400G ($169) is exactly identical to the Ryzen 3 2200G ($99) in every single way.
Step 1 – Ensuring the Tools Are Ready for the Job

Standard bolt on the left with AMD Kit on the right
The process in removing the IHS from the 2400G die is very simple (using the right tools), although it can be daunting to first timers and non-experienced users. The first step is ensuring the tools contents are correct and there is no present damage to the components; doing this is essential as any imperfections or cracks in the metal could cause the tool to break in operation and could destroy the chip.
Step 2 – Putting the Chip in the Tool
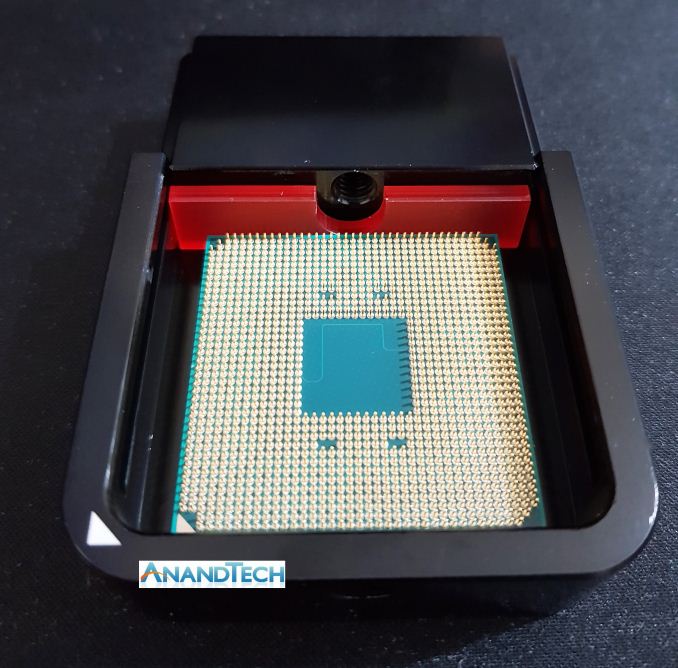
Making sure the chip is placed into the tool the correct way allows the tool can do its job properly; putting a case fan the wrong way around in a chassis wouldn’t give the right thermal dynamics to effectively cool a system, doing the same with a processor in a delidding tool wouldn’t be right either.
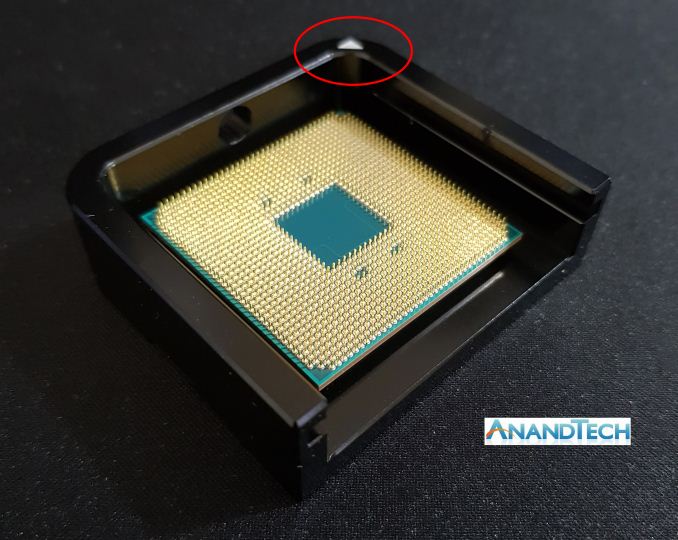
The way to make sure the chip is in the correct way is to line up the triangle indicator on the corner of the processor itself with the triangle indicator on the tool, the same way you would when installing a processor into a motherboard.
Step 3 – Assembling the Die Mate 2 with the AMD Kit Correctly
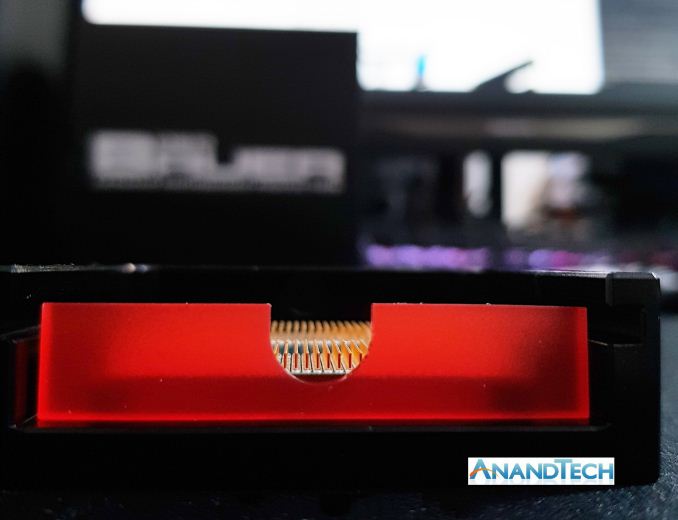
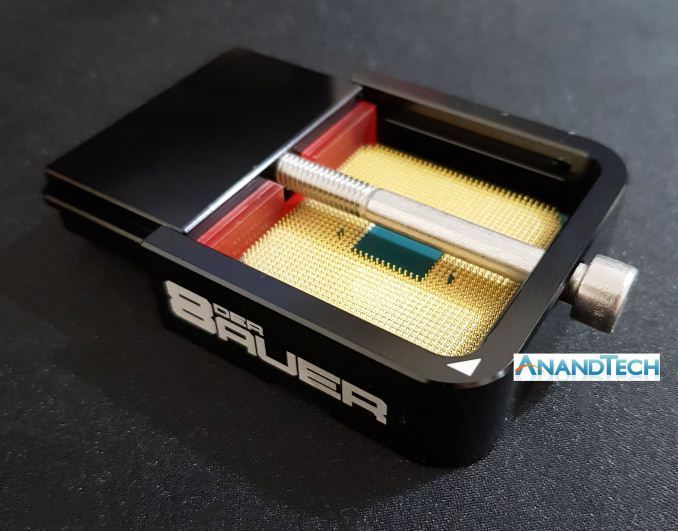
With the Ryzen 3 2200G ($99) or Ryzen 5 2400G ($169) correctly placed in the Delid Die Mate 2 tool, the next step is slotting in the red acrylic adapter at the open end of the tool; the U-shaped groove needs to be facing upwards as this is where the threaded bolt sits to protect it from touching and potentially damaging the pins on the chip.
Step 4 – Slotting in The Delidder
The Der8auer Delid Die Mate 2 as standard comes in three main components, the part that holds the chip, the part that removes the IHS from the chip, and an adjustable clamp to hold the chip in place. The clamp isn’t used when delidding the AMD Ryzen 2000 series APUs due to the chip using pins. Lining up the grooves in the black block of aluminum with that of the other part of the tool is essential and for ease of use, it can only be placed in one particular way.
Step 5 – Inserting the Threaded Bolt from the Delid Die Mate 2 AMD Kit
This is where the included acrylic adapter comes to use to prevent the bolt from hitting any pins and thus avoiding damage. The M6 x 60 mm threaded bolt screw included in the AMD kit is paramount and using the regular one supplied with the tool itself wouldn’t be adequate to delid a Ryzen 2000 series APU. The aim is to secure the bolt into the correctly sized slot on the Delid Die Mate 2 tool so that it’s ready to be used.
Step 6 – The Nitty Gritty: Applying Force and Twisting the Nut
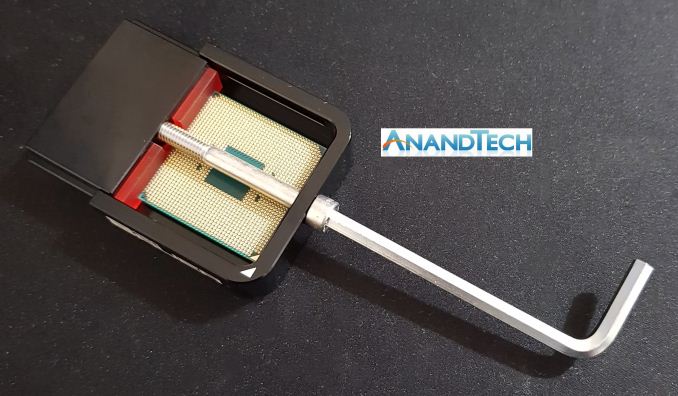
The Delid Die Mate 2 comes included with an Allen key which is required to screw the bolt with enough pressure to ‘pop’ the heat sink off safely. Both the standard supplied bolt and the one with the AMD kit share the same M6 sizing making the key usable on both threaded screws. With the bolt in place and the Ryzen 5 2400G ($169) safely installed into the tool, it’s a case of simply twisting the Allen key until the loud popping sound is heard.
Do not be alarmed however, the crunch or popping sound is rather loud and resembles the same kind of crunch when installing a new Intel processor into a new motherboard, only much, much louder.
Step 7 – Safely Removing the Screw from The Tool
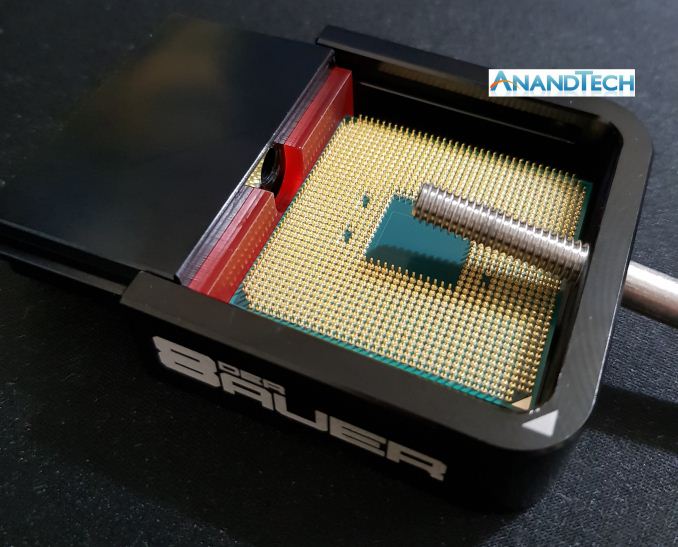
Once the ‘hard’ part has been completed, removing the threaded screw safely is as important as it was installing. When removing the screw, it’s a good idea to angle the screw as in the image and ensure your have two hands available when removing the screw. The best way to achieve this is loosen the bolt by using the Allen key until it’s loose enough to screw by hands. The consequence of losing grip on the bolt while removing it could result in pin damage don’t want the end of the screw to scrape or even touch the pins.
Step 8 – Checking the Delid Was Successful
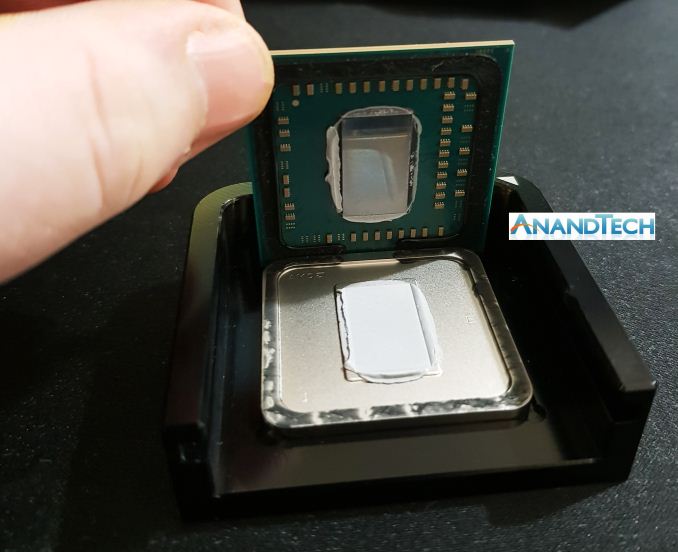
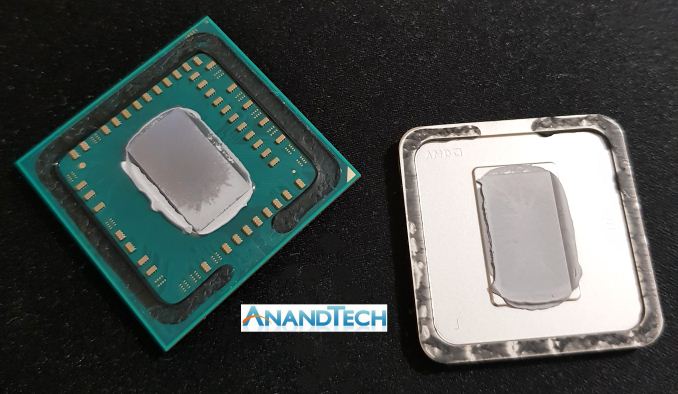
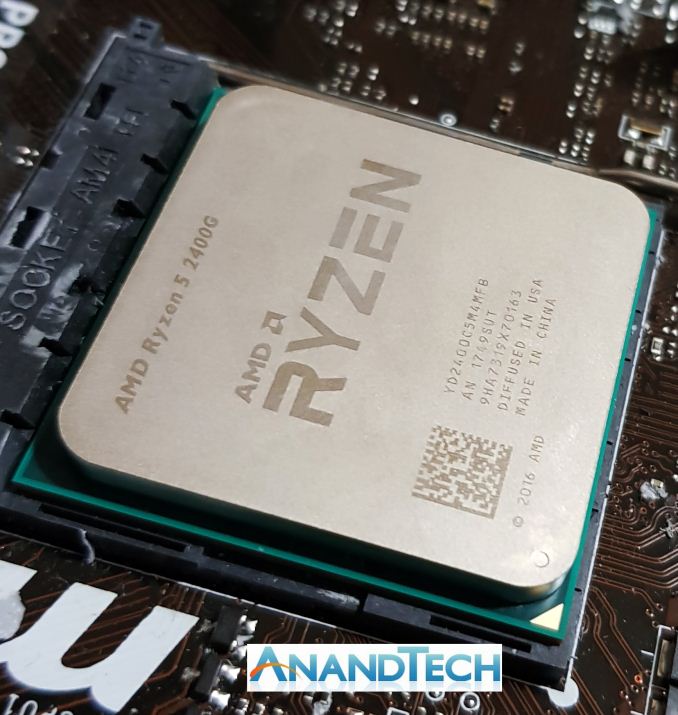
If all the steps have been followed correctly, the result should be a clear one, a freshly delidded Ryzen 3 2200G or Ryzen 5 2400G APU. With the aluminum Die Mate 2 block removed and the adapter, the chip itself should be loose from the IHS and should be ambulatory.
Now that the Ryzen 5 2400G has been successfully delidded without any damage, it’s now time to prepare it for use on the test bench to see what/if there are any thermal benefits, as well as available overclocking headroom as a result of this process.
Delidding The AMD Ryzen 5 2400: Preparing The APU For Use
Now that the Ryzen 5 2400G has been successfully delidded without any damage, it is now time to prepare the Ryzen 5 2400G ($169) for use; in our case, on the test bench to see what/if there are any thermal benefits of changing the stock paste applied, as well as available overclocking headroom as a result of this process.
Step 9 – Removing the Glue from the IHS and CPU
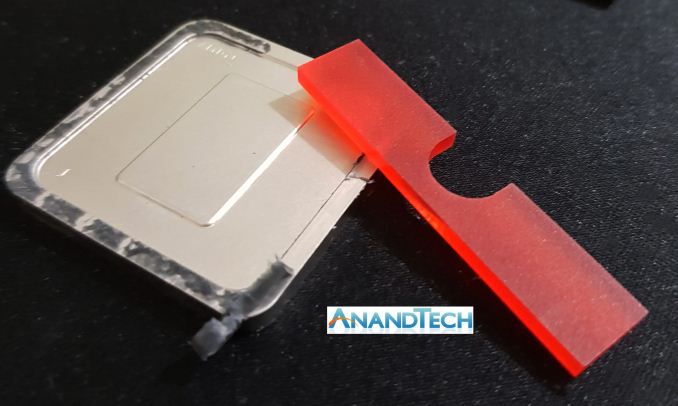
The next step is to remove the black glue that was holding the IHS to the CPU package. Both the CPU package and the IHS is likely to have this glue, as a delid is often not a clean separation. The picture above shows the black stuff.
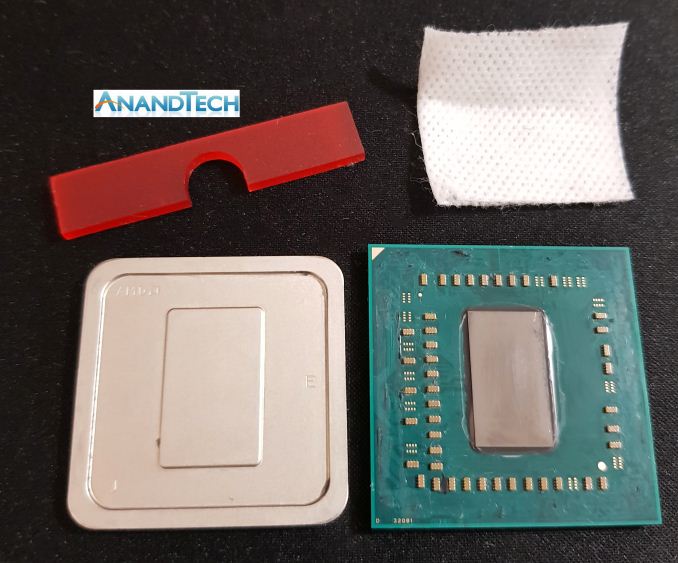
Not only does the included acrylic adapter with the Delid Die Mate 2 AMD kit act as a layer of protection for the CPU pins on the Ryzen 2000 series APUs, but as the acrylic itself is softer than silicon, it can be used safely to remove the glue from both the IHS and chip.
Step 10 – Cleaning The APU
It’s a good idea once the glue has been removed and scraped from the IHS and APU, that both surfaces are cleaned to remove any residue from the thermal paste and glue themselves. A single alcohol wipe comes included with the Thermal Grizzly Conductonaut Liquid Metal ($16) which is good as it will remove all traces of thermal paste from the die.
Step 11 – Applying Liquid Metal Thermal Paste to the Die and Heat Spreader
Once both surfaces are clean, it’s time to update the TIM. The best user-applicable TIM is based on liquid metal: a compound designed to embed and fuse itself between the CPU die and the heat spreader. For our testing, we use Thermal Grizzly Conductonaut, designed especially for this use case, however others are available (such as CoolLaboratory LIQUID Pro).
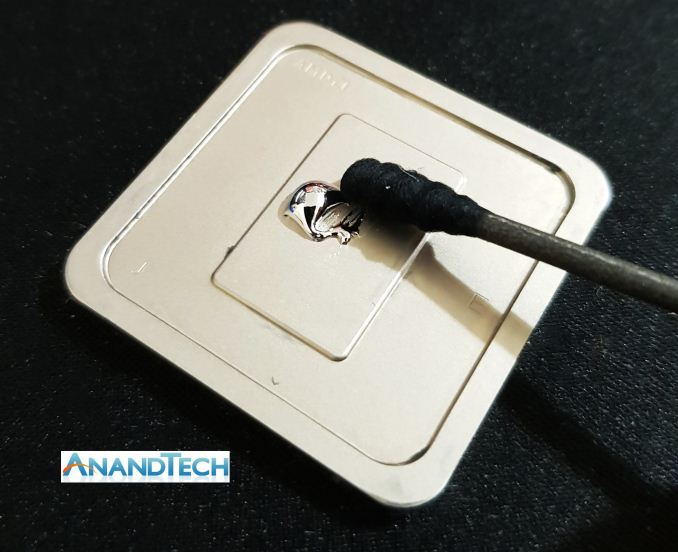
As per the instructions, apply a liberal amount of the liquid metal to both the IHS and the die. The trick is to start with a small amount and use the included black Q-tip provided to patiently spread the liquid metal across the surface. Only the die surface area needs covering and this is important as liquid metal is highly conductive and if any were to get on any of the other components around the silicon die of the chip, it’s likely to short out and die making the whole process futile and fruitless.
Liquid metal can be tricky to use and apply, but the method is to be persistent as takes a little bit of time for the liquid metal to stick, but once it does, it’ll start spreading much easier. The key is to start small, slowly and most importantly, carefully when applying liquid metal. Another caveat is using too much: if you use too much, when you place the heat spreader back on the CPU, the excess will escape due to the pressure. If this happens and it touches the other components, when powered on it will short out and most likely fry your chip. If you have lots of dark puddles, you can simply use the Q-tip to remove excess or if you manage to get it around outside of the raised section of the IHS or on the SMDs, pure acetone (not containing aqua) is the easiest method of removing it.
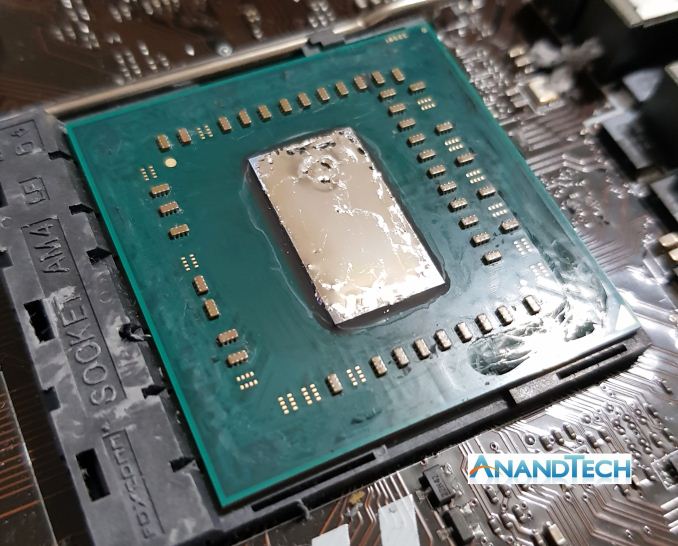
Nearly ready, some excess liquid metal needs removing before adding the IHS
Step 12 – Adding the Heat Spreader and Installing the APU In the Socket
The best way of applying the liquid metal to the die of the Ryzen 5 2400G (or Ryzen 3 2200G) is doing it while the processor is out of the socket. This is to avoid any mishaps during application as liquid metal can be a very horrible substance to remove, although using acetone works wonders. The next step is placing the IHS back onto the heat spreader with as little movement once it is in place as physically possible. When delidding Intel processors that use a lane grid array socket such as LGA 1150 or LGA 1151 is the socket has a retention bracket which holds the IHS down in place; AMD PGA sockets do not have this function.
Some users can also apply a new silicon glue around the edge of the IHS to connect it to the package. This can make this stage of the process easier, however it does add additional height to the overall chip, potentially making the new TIM less effective.
Step 13 – Installing the CPU Cooler with Care, Precision and Patience
While the thought of delidding a CPU is daunting, for me personally, the hardest part when delidding an AMD Ryzen 2000 series APU is safely installing the CPU cooler without breaking that seal of liquid metal between the die and IHS. One wrong jerk could or misplacement could get liquid metal on one of the SMDs unknowingly which wouldn’t be visible until it was too late. After applying standard thermal paste between the IHS and cooler, while keeping the IHS straight, it’s a good idea to place the cooler on top without applying too much pressure but lining it up with the mounts so that the tightening applies the pressure as opposed to using body weight.
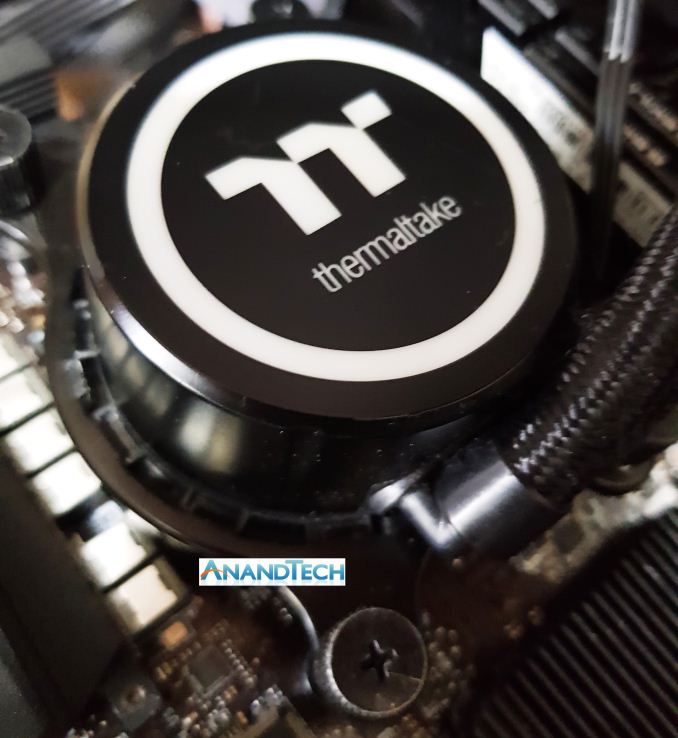
The cooler for our AMD motherboard test setup is the Thermaltake Floe Riing RGB 360 AIO which is considered as a high-performance CPU cooler and should in theory, provide a nice reduction in temperatures over non-delidded; the rationale is that the better the cooler, the lower the temperatures. When attaching the cooler to the APU and motherboard, I found placing it on top gently and centered worked well, while simultaneously screwing in two of the thumbscrews in a diagonal method to each other at the same time. This applies even amounts of pressure, or as even as you’re going to get to ensure the liquid metal isn’t disturbed too much. Installing the other two thumb screws finishes the installation process.
The most important attributes to take into consideration throughout the whole process when delidding a CPU/APU and installing is patience and care. TAKE YOUR TIME - it is not a sprint, but a marathon and one slight mistake can kill a chip.
Delidding The Ryzen 5 2400G Results and Conclusion
There has been a lot of hype since the launch of the Ryzen 2000 series APUs and in our Ryzen 5 2400G review, it’s noted that in multiple scenarios they outperform the competing Intel counterparts second to none in pixel rendering tests such as gaming, mainly thanks in no small part to the integrated iGPU featuring Vega cores. The aim of today’s testing with our best Ryzen 2000 series APU from a purely CPU frequency-based standpoint was to ascertain whether delidding makes a noticeable improvement to thermal performance, as well as determining if any extra headroom in CPU core frequency is made available.
As per our regular motherboard testing methodology when we find the max stable overclock, testing was done following the same procedure. Following on from the testing done in our Ryzen 2000 series APU overclocking guide, the aim in this was to continue with simple overclocking to push the core frequency.
To start, here are our initial overclocking results with the retail chip as sold:
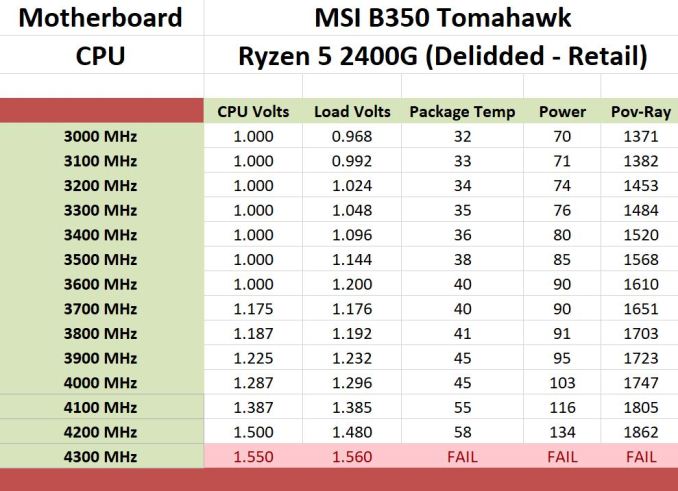
After delidding the chip, replacing the paste with a liquid metal TIM, we achieved the following results:
Not only are the thermal properties improved from delidding and having the IHS slavered up with Thermal Grizzly Conductonaut liquid metal compound but operating at the previously unstable frequency of 4.2 GHz was made possible after delidding. Even at 4.2 GHz with the 2400G delidded, the temperatures hit the same levels as 4.0 GHz non delidded which is quite impressive. Even more monumental was the system managed to boot into Windows 10 at a clock speed of 4.3 GHz, although the system wouldn’t just hang when OCCT was fired up, it would crash completely meaning that even with a good AIO CPU cooler and being de-lidded, no more than 4.2 GHz was stable with this particular chip.
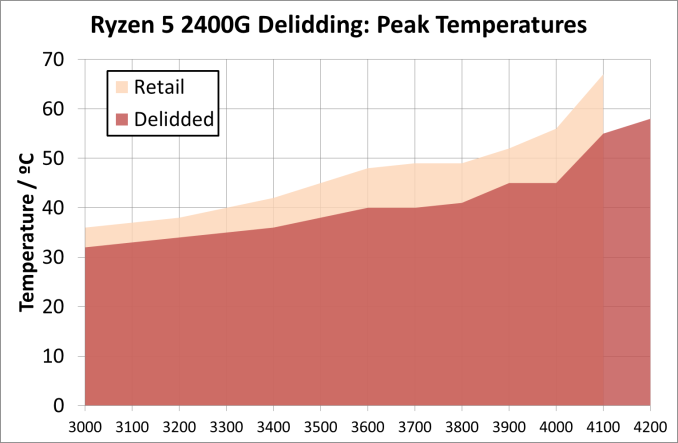
The best way to represent some of this data is in graphs. First up is the main one, temperature:
This is a clear representation showing the decrease in CPU temperature after the delidding process. The higher the frequency, the bigger the overall difference!
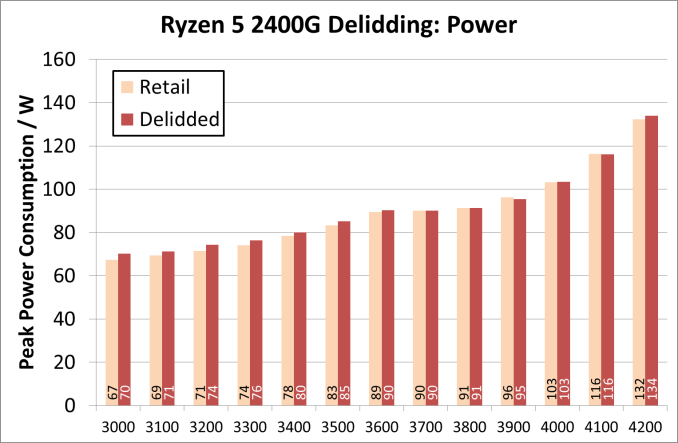
For power consumption, there was almost zero difference. This is to be expected: the chip will still consume the same amount of power with a standard temperature window. The cooler still has to remove the heat energy, however it is now being transferred better to the cooler through the new TIM.
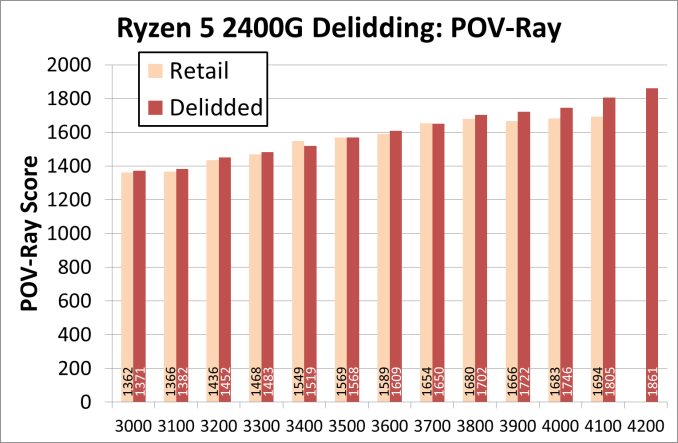
The interesting result here is POV-Ray. We use POV-Ray in our overclock testing as it is usually very good if there are cache and memory errors associated with the high frequency. However here we see that beyond about 3.8 GHz, the retail processor has trouble getting more performance at a higher frequency, likely due to the CPU reaching thermal limits and the frequency mechanisms having to compensate. The end result is 'sustained' performance at higher frequencies. Due to the delid process, this was not an issue through to 4.2 GHz. Having the extra thermal headroom ultimately gave both more frequency and better sustained performance.
Is Delidding the Ryzen 2400G Worth it? Risk Versus Reward
As previously stated, the primary use where I could see delidding a Ryzen 2000 series APU viably applicable would be in a situation where cooling restrictions are in place such as a small form factor system or a HTPC. The benefits of the reduction in temperature would allow for a more svelte and slim line cooler to be used without pushing towards the maximum operating temperature.
Another less but pertinent use would be for performance users wanting faster clock speeds, although at a cost of voiding the warranty, potentially damaging and killing the chip itself during the process, and the added cost of the tools, it could be a price too much in retrospective which could be spent on a better CPU to begin with. Some vendors in the EU such as Caseking are actually selling pre-delidded Ryzen 3 2200G and Ryzen 5 2400G chips with their own warranties at an additional cost, which is often a better idea than manually performing the process and shelling out for the extra tools. That’s all good, providing this option is available to the user, although so far, I have yet to be able to find a large vendor offering this service in the US.

