Original Link: https://www.anandtech.com/show/12542/overclocking-the-amd-ryzen-apus-guide-results
Overclocking The AMD Ryzen APUs: Guide and Results
by Ian Cutress & Gavin Bonshor on April 16, 2018 2:30 PM EST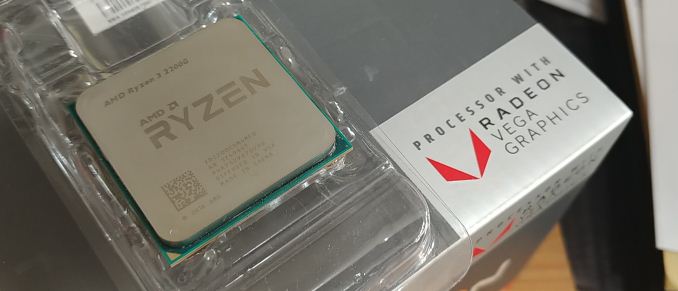
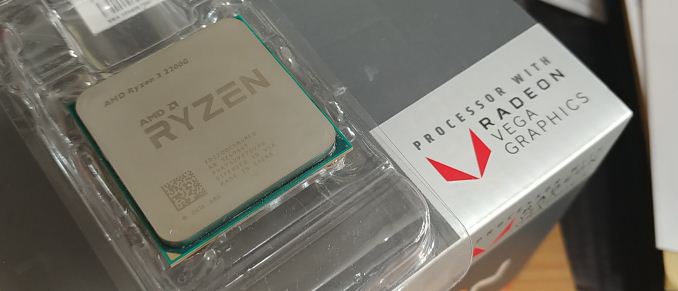
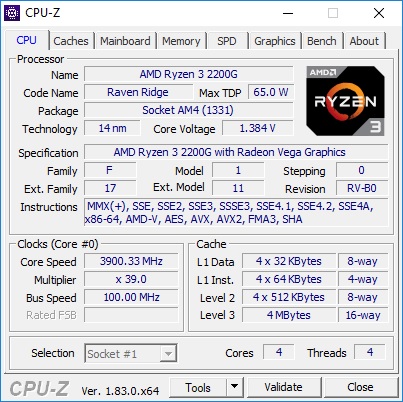
With AMD’s new launch of Raven Ridge APUs, the Ryzen 3 2200G ($99) and Ryzen 5 2400G ($169), AMD holds the current integrated graphics apex when directly compared against Intel’s current SKU list. One of the most intriguing aspects of AMDs new Ryzen 2000 series desktop APU solutions is the fact that they are unlocked, offering a potential performance boost to both the core, the graphics, and the memory. In this article, we examine overclocking both our launch CPUs, a pair of retail CPUs, as well as going through each of the methods to overclock from each motherboard vendor.
The Benefits of Overclocking an APU
The basic reasoning behind CPU overclocking is to increase the clock frequency of the processor from the manufacturers default speeds with the aim to increase the compute performance of your system. This can have a couple of advantages, including decreasing video rendering time and improving gaming performance in titles that rely on raw CPU horsepower to drive up the frame rates.
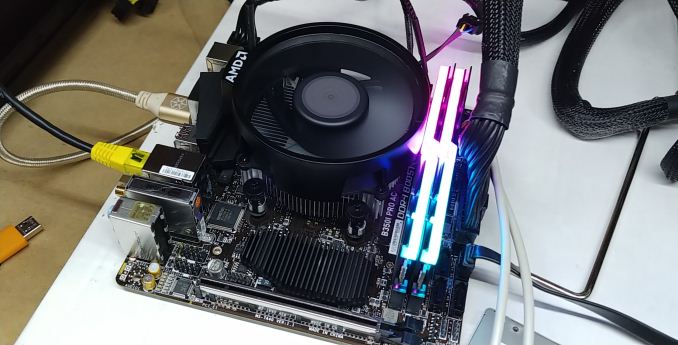
A standard APU setup: MSI B350I Pro AC motherboard, AMD stock cooler, G.Skill memory
With APU overclocking, the added element of overclocking is in the integrated graphics, and there is also focus on the DRAM. For a Ryzen APU, overclocking the Vega graphics cores could really benefit a user struggling to make steady frame rates in certain titles and thus could potentially make the new budget focused AMD Ryzen 2000 series APUs an even better option than previously thought. The integrated graphics inside a CPU are often crying out for more memory bandwidth - compared to high-end discrete graphics, that have north of 200 GB/s of bandwidth, an APU sometimes has to deal with 12.5 GB/s (in a badly configured system) up to around 50 GB/s (dual-channel and overclocked) - so driving up the DRAM speeds and decreasing latencies has obvious knock on effects for the gaming experience.
Overclocking Used To Mean A Lot More
Back in the annals of history, where single and dual core systems ruled the desktop, overclocking had major performance advantages. When all the commands from the desktop have to be funneled through a single core, increasing that core had a direct impact on performance: 30% boost gave +30% performance - it was all direct an proportional. When desktops migrated to dual core, some of the extra could be offloaded onto that second core, but there was still competition for resources. In this era, especially with chips like the Core 2 Duo E2160, overclocks of +100% on a daily system were not impossible. When throughput is limited by the core, overclocking has an impressive result, and at this time the core frequency also had to match.
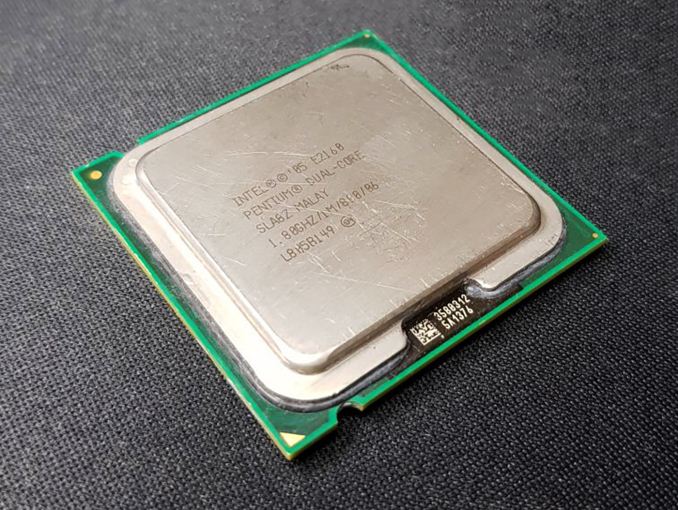
An E2160, from 2005 2006. A 1.8 GHz base frequency,
was able to reach 4.2 GHz stable 24/7.
Today, overclocking does not have the same amount of excitement: extra work is offloaded, and more content is multi-threaded. In order to get that same performance boost gain, the workload has to be embarassingly parallel, such as ray tracing or specific video codec transcoding. The days of +100% overclocks are gone as well, with most high-end processors only offering +20% at most.
But the issue here isn't really that: a decade ago, it was possible to overclock a $200 processor and make it perform like one that sold for $999. Anyone with a Core i7-920, pushing that 2.6 GHz processor to 4.0+ GHz to act like a Core i7-970, knows what this is all about. As we've seen with the Core i3-7350K review or the Pentium G3258 review, even with a chip that can overclock, there is one thing you cannot get: more cores. If a four-core processor gives you raw performance, no matter how much that dual-core is overclocked (in a 24/7 system), it has trouble meeting the quad-core in those pure throughput tests.
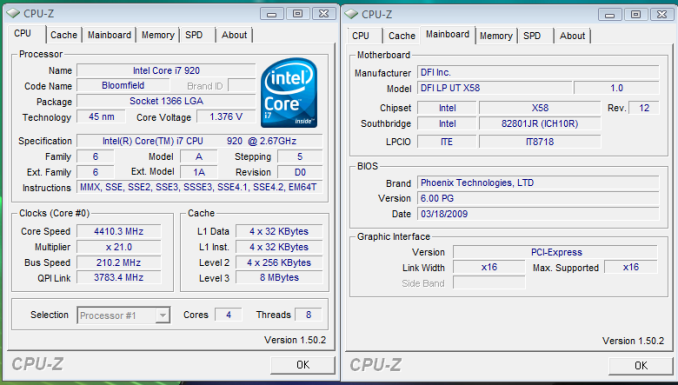
Overclocking the i7-920 to 4.4 GHz, from our 2009 article, using a DFI X58 motherboard
However, the advent of integrated graphics has changed this, albeit on the low-end. For a budget gamer that cannot invest in a discrete GPU, having a decent integrated graphics system would seem ripe for a nice overclock. Boosting single core frequencies help with games targeted at this audience, especially those built on DX9 or DX11, while overclocking the integrated graphics allows more premium pixels to be pushed in the pipeline. For Ryzen APUs, overclocking the DRAM has the double benefit: better deep memory latency and bandwidth for the integrated graphics, but it also has a direct impact on AMD's Infinity Fabric, allowing the cores to talk to each other faster.
Overclocking an APU can be a challenge, but as this article will demonstrate, there are substantial real world benefits. It means that even budget builders, using the stock air coolers that AMD provides (which are substantially better than the Intel counterparts, as shown in our review), can get tangible benefits in user experience.
A side note: there are professional overclockers - people actually make money from doing this.
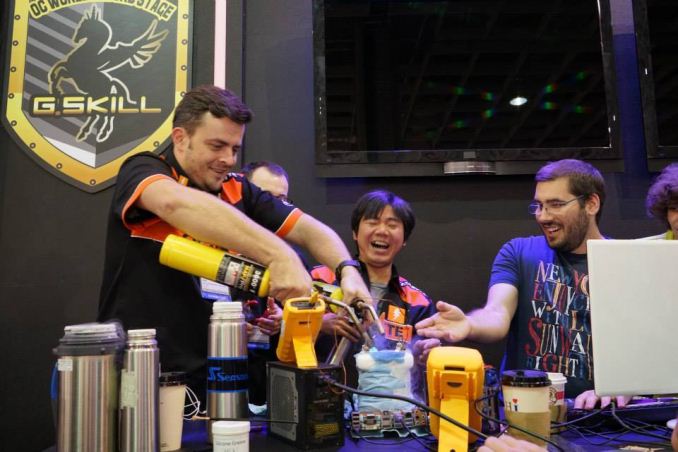
The GIGABYTE team at a G.Skill overclocking event at Computex. Dino, HiCookie, and Sofos are all well known in the competitive overclocking community, and work for GIGABYTE.
Just as with car tuning, there are people in the industry (usually tied to motherboard manufacturers or retailers) that use their skills to get the best overclocked systems possible. These people either sell chips already pre-tested, build systems for clients that are pre-overclocked, or help design the components that the rest of us use. Some business, such as those in financial trading, also rely on heavily overclocked system to do their work, and hire overclockers to design and maintain those systems.
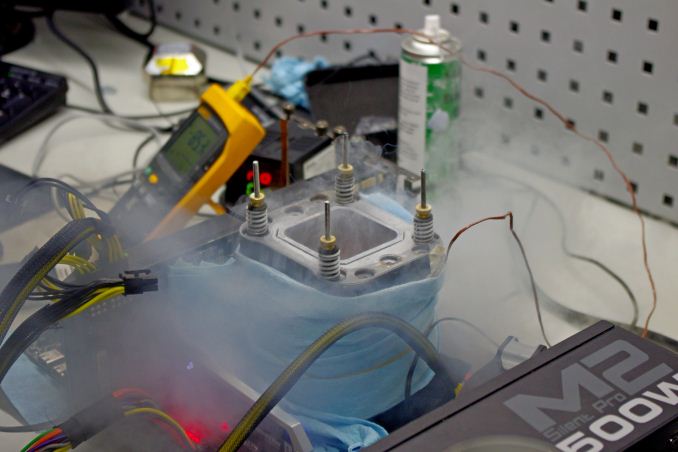
An extreme overclocking setup with Liquid Nitrogen to break world records
Most of these individuals have made names for themselves through competing in overclocking tournaments, first as amateurs, and holding world records. As with any activity, knowing what to do, and experience, are often key elements in succeeding.
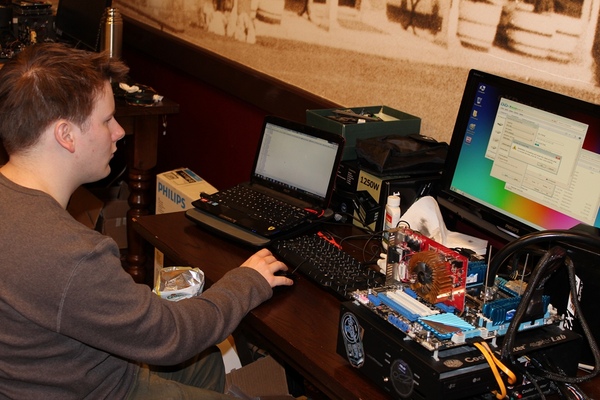
Ian in 2011 at an Overclocking Meet, using an i7-2600K at 5.3 GHz on water with -5ºC ambient
to push an old AMD GPU for gold cups
AnandTech has at least three writers on staff (Ian, Joe, and I) that have spent *way* too much time competing in overclocking leagues, using sub-zero coolants, and holding world records.
Related Reading
- Marrying Vega and Zen: The AMD Ryzen 5 2400G and 2200G Review
- Battle of The CPU Stock Coolers! 7x Intel vs 5x AMD, plus an EVO 212
- AMD Tech Day at CES: 2018 Roadmap Revealed
- AMD and Partners Slash Prices on Select Ryzen & Ryzen Threadripper CPUs
- The AMD Zen and Ryzen 7 Review: A Deep Dive on 1800X, 1700X and 1700
The Basic Principles of Overclocking
At the entry level of overclocking, we rely on two things: frequency and voltage. For a given component to work at a frequency, it has to have enough voltage to remain stable: switching transistors require power, and transistors that switch faster require more power. As the frequency and voltage are tuned to go beyond the on-package specifications, the component transfers that electrical energy into thermal energy, which means that the component has to be appropriately cooled. For the most part, overclocking comes down to these three factors: frequency, voltage, and cooling.
Before overclocking any component, it’s a good idea to first acclimate yourself with the key principles behind overclocking. Not only does this save unnecessary time spent deep-diving into the realms of the unknown, but overclocking components past their limits can not only cause effects on the longevity of the parts, but it can also actually cause damage beyond repair (in extreme cases, death of the components). The last thing you really want is to do break something, so here's a handy hardware guide to go with AMD’s new Ryzen 2200G ($99) and Ryzen 5 2400G ($169).
Selecting the Right Cooler and Power Supply
For the most part, users will mention the benefit to overclocking, as if it’s the holy grail, is to attain the ultimate performance. However, there are some downsides - the main pitfall to overclocking is that a higher frequency requires an increase in CPU voltage to ensure stability. Increases in CPU voltage will put an extra level of pressure on cooling performance, as more volts equals more heat, and more heat will usually mean more noise in the way of cooling fans having to work harder. If silence is a key attribute in a system, then more noise can be annoying.
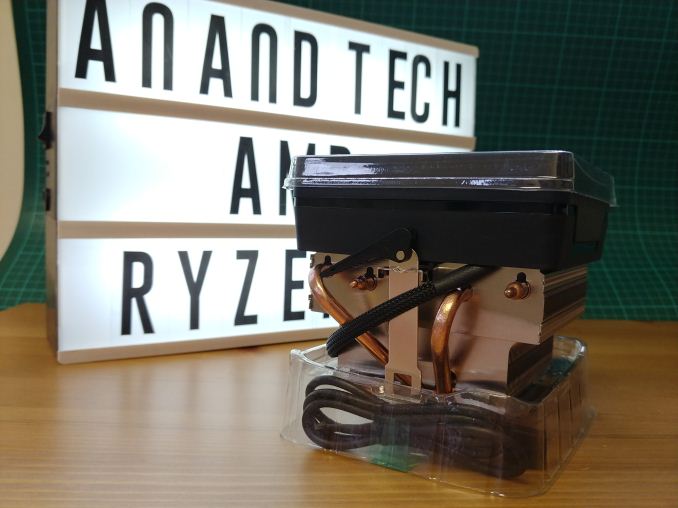
The new Wraith Prism RGB stock cooler on AMD's high end CPUs
Choosing the right CPU cooler for a 24/7 system is a necessary evil as a more expensive offering will add to the overall budget of the system. Selecting a sizable air cooler, like a Noctua NH-U14S, can offer better overclocking headroom compared to a stock cooler (AMD Wraith is very good as a bundled cooler, but there are better options). For the extreme air cooling, Ian uses Thermalright TRUE Copper coolers for his open-air testing, which weigh about 2 kg, along with Delta fans that come in at 72 dB - not something for daily use! Aside from air cooling, other options include liquid based closed loop coolers, such as the newly announced NZXT Kraken 360mm AIO with a large radiator surface area. With the bigger liquid coolers, the fans can often be run at lower speeds, which aids in reducing noise. The extreme end of liquid cooling is building a custom water cooling loop, as Dustin did back in 2013 (read here).
Once you have selected a suitable cooler, getting familiar with the BIOS on the chosen motherboard is paramount to achieving a successful overclock. When it comes to overclocking the Ryzen 3 2200G ($99) or the Ryzen 2400G ($169) APUs, the concepts on how to overclock are identical. There will be some differences however, based on the slightly higher core clock of 100 MHz at base, with a 200 MHz increase at boost on the Ryzen 5 2400G ($169). Other distinctions come in the way of the Vega cores with the 2400G sporting 192 more streaming processors and a higher base frequency of 1250 MHz, as opposed to a base frequency of 1100 MHz on the cheaper 2200G. This comes down to how AMD separates its chips - the ones that perform better after manufacturing are put up for sale as the premium component - the premium components are typically the better performers when overclocking as well.
When it comes to the Ryzen 2000 series APUs, both of the components feature a base TDP (thermal design power) of 65W, which is related to the peak power consumption when the processor is at its base frequency - the one that the CPU manufacturer guarantees. This number is also there for cooling companies to design their products to be able to dissipate this much heat. However, as overclocking does ratchet up the power consumption, the high-end processors can peak at 250W or more - so having a stable power supply is also a key component for an overclocked system.

Seasonic's PRIME Titanium Series got an AnandTech Recommended award
The easiest thing to remember when selecting the right power supply for the task at hand, is quality over quantity. This means selecting a good quality unit, using quality components and having a good 80 PLUS rating, is better over something cheap and cheerful that uses a high wattage value as a visual grab. A good quality $150 80 PLUS Titanium 500W unit will out perform and provide better power stability over a very cheap $50 Power Supply rated at 1000W. The cheap non-branded power supplies are generally best avoided, and often fail to meet their ‘rated’ total power output. In relation to the Ryzen 2000 Series APUs, a solid 80 PLUS Bronze 500W branded unit is more than enough and will allow extra headroom if you wish to add a discrete graphics card into your build down the line.
Tracy does some amazing power supply reviews, detailing performance, efficiency, and even thermal losses in stressful environments. They are worth the read, or head over to our Best PSU guide to see our most recent preferred options on the market.
How To Overclock Options: BIOS or Software (Ryzen Master)?
Back in March of 2017, AMD launched its Ryzen 7 1700 ($299), 1700X ($309) and 1800X ($349) CPUs. This has brought them back into the performance desktop segment, which was reaffirmed by its Q4 Fiscal Year results for the end of last year. Along with this launch, AMD introduced its Ryzen Master software, which allows the user to overclock within software, creating a universal interface regardless of the motherboard vendor.
Having done various amounts of testing over the last couple of weeks on the Ryzen 3 2200G ($99) and Ryzen 5 2400G ($169), one common thing across most of the motherboards that I’ve used (at time of writing) is the uncertainty that the settings being applied in the BIOS would actually translate to the settings being applied in Windows. Ryzen Master arguably fixes that with its unified interface. However, most professionals prefer to use the BIOS.
BIOS issues are often numerous and unique to certain products and firmware versions. For example, we had issues such as specific memory straps on some boards not working at all, or some boards not having the required options to tune the iGPU frequency, or even the fact that some boards had a hard voltage limit. With AMD Ryzen Master, the latest version on hand at the time of testing (ver 1.2.0.0540) allowed for up to 1.55 volts on the CPU core, so any UEFI BIOSs with maturity limitations within the BIOS can be bypassed.
I reached out to AMD, and they have stated that all their ODM partners are updating their AM4 platforms. The updates are currently being rolled out now and that better fine tuning and improved configurations for overclocking the core frequency, the iGPU and even better memory support are already underway.
Although the AMD Ryzen Master software is very intuitive, and it offers a wide variety of options for basic overclocking as well as giving a user-friendly interface, overclocking through the BIOS is usually the more preferred choice. The main reason for this is that the settings in the BIOS are applied at a hardware level before the operating system is loaded - often changing settings after the OS has loaded can introduce instability. That being said, where previously it was once frowned upon to use software to overclock the processor, the AMD Ryzen Master utility is probably one of the most comprehensive pieces of software for what a general user would want. We go into the software in detail later in this review.
For this review, in our final results, the BIOS was used where applicable with Ryzen Master being used as a backup in case of issues, or lack of available options such as voltage limitations or the omitted settings such as graphics core clock settings.
Testing an Overclock: Is Stability Binary, or a Scale?
Once the system has the desired/attempted overclock applied, the next step is ensuring that the overclock is stable. A stability test is a simple way of pressuring your components, usually under maximum load, to see whether or not your settings remain stable. Stability testing often goes above and beyond regular system loading, ensuring that it is a good indicator of measuring temperatures of components as it is highly unlikely that the system will reach that level of compute pressure (workloads like rendering and transcoding video will push those stability boundries). Stress testing can also aid in diagnosing certain issues: depending on the system, an unstable system might show compute errors, a blue screen, or shut down immediately. Experience will often dictate what these mean, whether the DRAM frequency is too high, or there is not enough voltage, or the thermal performance of the cooler is insufficient. For anyone that has experienced a dying video card, showing green lines across a game, can identify with this almost 'trial-and-error' approach to solving stability issues.
One of the key discussions with overclocking forums and topics is 'how stable is stable?'. After dissecting the issue over several years, users fall into two broad categories: stability is either binary, or stability is a scale.
For users that see stability as binary, a system is either completely stable in 100% of situations, or unstable. For these users, stability testing can go on for days, and they can use a wide variety of high-pressure, high-compute workloads to expose every edge case possible. Even if that edge case might never be hit during the working life of the processor for their given workload, if the system does not remain stable, it isn't.
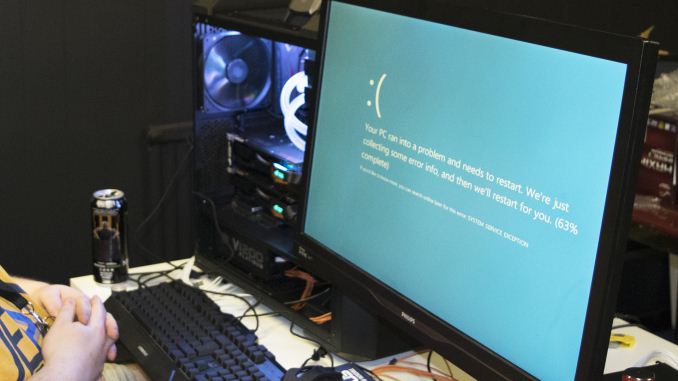
Stability testing can require seeing this a lot
For users that see stability as a sliding scale, the system can be 'stable enough'. The stability tests that these users perform are not as substantial or as long as the binary users, however these users often know the lengths at which they will use the system: there is no need to be 144 hours Power Virus stable for a system used to play Counter Strike. For our overclocking testing, because we have deadlines, we have to fall into this category (and the binary stability users aren't too keen on this category). Sliding scale users might experience a stability issue, every now and again - depending on the threshhold that could be once-a-week, once-a-month, or once-a-year.
(ed: I'm in the sliding scale camp, for what it is worth. I find it amusing to note that DRAM bit-errors, unaffected by overclocking, can happen on the scale of one per GB per four years (or less). That's about a worse case scenario, but it translates to about one bit-error per three months in a system with 16GB. that is something that can't be controlled by stability testing. Hopefully it occurs in DRAM that isn't being used.)
There are multiple programs and utilities designed for stressing components - some are designed specifically for CPU, some are for memory, and others that test multiple components or graphics. Understanding what the stress test is doing is as important as the stress test itself, as it helps to debug a system that is not stable. It is often recommended, for the sake of debugging, that each component that is overclocked is stress tested individually, as well as overclocking one component at a time. The deep end looks tempting, layering on the overclocks at stage one, but a user could overclock the all the CPU, the memory, and the graphics, only to encounter issues and not know which of the components is causing the instability.
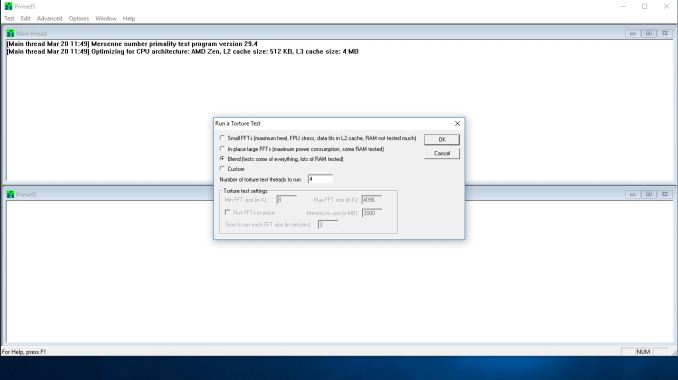
For the purposes of overclocking on AMD’s Ryzen 2000 series APUs, the Ryzen 3 2200G ($99) and Ryzen 5 2400G ($169), I chose two main tools: Prime95 and Furmark.
Prime95 focuses on the CPU frequency and/or memory stability testing. The stress test computes multiple variations of FFTs (Fast Fourier Transforms) and ensures that the CPU floating point capabilites are pushed as hard as can be. Other options in Prime95 focus on the memory too, as the torture test itself can be configured to allocate more memory, but still computing FFTs.
Another popular tool is MemTest86, which is a more intensive memory stability checker. MemTest86 is also used to detect memory failures in bad memory, but this is usually more extreme.
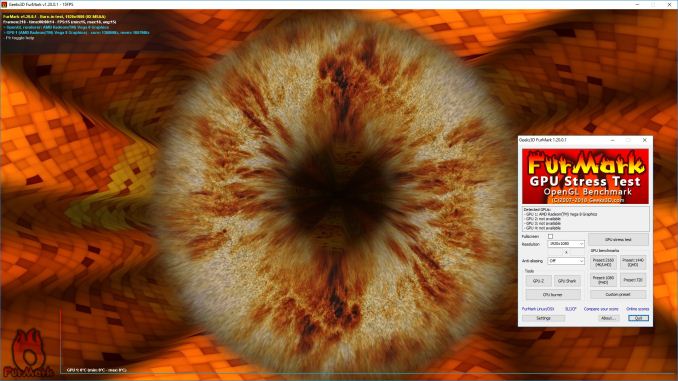
To test for stability on the Vega cores of APUs, we use Furmark. Furmark is a commonly used graphics card stability testing utility is tasked with the job. It is an OpenGL benchmark which uses fur rendering, which in turn puts immense pressure on the graphics card or in this case, the integrated GPU.
During the stress testing, aside from monitoring the CPU core frequency and integrated graphics, another important element is monitoring the temperatures. The two main ways of temperature detection are physical and software. Professional overclockers often use the physical method, using specialist tools designed to cope with sub-zero temperatures to which the thermistors inside the CPU or GPU are not capable of detecting properly.
Using software is often the method most people use, especially for daily systems, although it requires confidence that the values are reported accurately. Having a range of software available for monitoring GPU, CPU, and even memory temperatures, is important: instability issues from thermals can occur just as much as voltage. In the case of overheating, the system can simply turn off. Some users also have IR thermal tools, or thermal cameras, to note how the power delivery is performing, and if the heatsinks on the power delivery are sufficient and not causing thermal throttling on the performance.
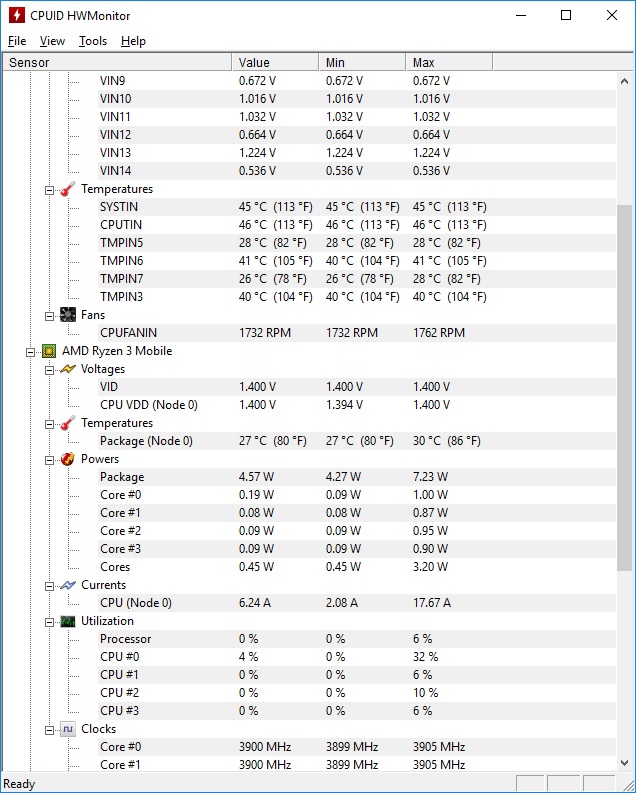
There are a couple of applications that do a good job in monitoring temperatures, such as CoreTemp, but the most comprehensive freeware version we tend to use is HWMonitor. This tool is created by the same company that does CPU-Z / CPUID. HWMonitor gives real-time temperature information from all the sensors on board, as well as voltages and fan speeds.
Most processors have a TJMax, or thermal limit, before the system switches off. For our Ryzen 3 2200G APU, this happened at around 95c reported within HWMonitor as the package temperature. From the stock temperatures, this potentially gives a lot of headroom with good cooling.
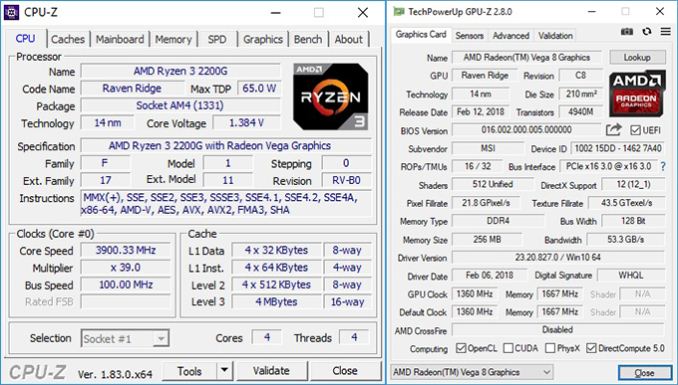
Another pair of useful monitoring applications are CPUID's CPU-Z software, and TechPowerUp's GPU-Z.
CPU-Z gives information on the firmware of the processor and offers real time information on things such as CPU frequency, baseclock, memory speeds and timings. GPU-Z displays information pertaining to the graphics side, which in the case of the 2200G are the 8 Vega compute units, the GPU core frequency, the memory frequency, the BIOS information, and even GPU load and fan speeds can be displayed, as well as information relating to compatible support such as DirectX 12.
Test Bed and Setup
For our testing, we have our usual test setup and peripherals. The CPUs in play number four: we have two samples from the launch (listed as retail) and two from retail, and each pair split with one 2400G and one 2200G. When analysing the BIOSes of each motherboard company, we used one motherboard from each, however the overclocking results at the end were done on the MSI B350I Pro AC motherboard. This motherboard is not a particularly overclocking focused motherboard, but more indicative of the price range that an APU buyer will be interested in.
| Test Setup - Ryzen 3 2200G and Ryzen 5 2400G | ||||
| Processors | AMD Ryzen 3 2200G ($99) Four Cores, Four Threads 3.50 GHz Base 3.70 GHz Boost Vega 8 Integrated Graphics 8 CUs = 512 SPs 1100 MHz Tested Launch Sample Tested Retail Sample |
AMD Ryzen 5 2400G ($169) Four Cores, Eight Threads 3.60 GHz Base 3.90 GHz Boost Vega 11 Integrated Graphics 11 CUs = 704 SPs 1250 MHz Tested Launch Sample Tested Retail Sample |
||
| Motherboard | MSI B350I Pro AC GIGABYTE AX370-Gaming 5 ASUS Prime X370-Pro ASRock X370-Gaming ITX/ac |
|||
| Cooling | Thermaltake Floe Riing RGB 360 AMD Wraith Stealth Automatic fan profile determined from the CPU Fan Header |
|||
| Thermal Paste | Cooler Master Mastergel Nano | |||
| Power Supply | Thermaltake Toughpower Grand 1200 W Gold PSU | |||
| Memory | G.Skill Ripjaws V 2x8 GB, 1.35V DDR4-3600 17-18-18 (XMP) DDR4-2933 for Stock |
|||
| Hard Drive | Crucial MX300 1 TB | |||
| Case | Open Test Bed | |||
Many thanks to our usual partners for assisting with the hardware for this article, such as AMD with the processors, the motherboard vendors for their samples, G.Skill for the memory, and Crucial for the storage.
What's In This Article
Over the next few pages, we will go through the BIOSes of each of the four main motherboard manufacturers, identifying where the overclocking options are. We will also approach the Ryzen Master tool, which is likely to be the first port of call to users new to overclocking. We also have the results from overclocking all four of our APUs: our two launch-day samples as well as two retail samples. The two different CPUs were benchmarked at their peak results, comparing the out-of-the-box performance to our best stable overclocks, to see if overclocking these APUs actually gives notable results.
Testing and Core by Gavin Bonshor
Additional Commentary by Ian Cutress
How to Overclock With MSI UEFI BIOS
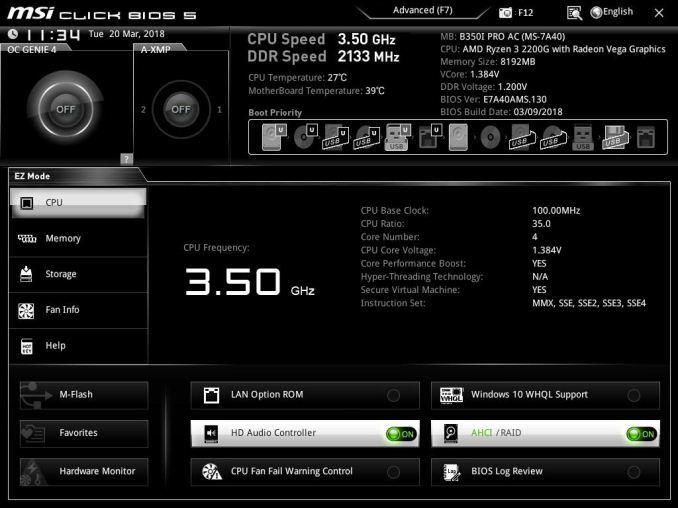
The MSI UEFI BIOS is aesthetically pleasing and is easy to navigate around. The core features between the board being used for testing today, the MSI B350I Pro AC, and other models in their AM4 line up such as the X370 XPOWER GAMING TITANIUM are the same, with the same options for adjusting CPU core voltage, DRAM voltage and for the iGPU. It needs to be noted that the GFX Core voltage and CPU NB/SoC voltages are linked together; only one of them needs to be adjusted.
Hitting the Del key during system POST will get you into the first screen. The first screen is what MSI call ‘EZ mode’ which offers the basic panels for making minor adjustments.
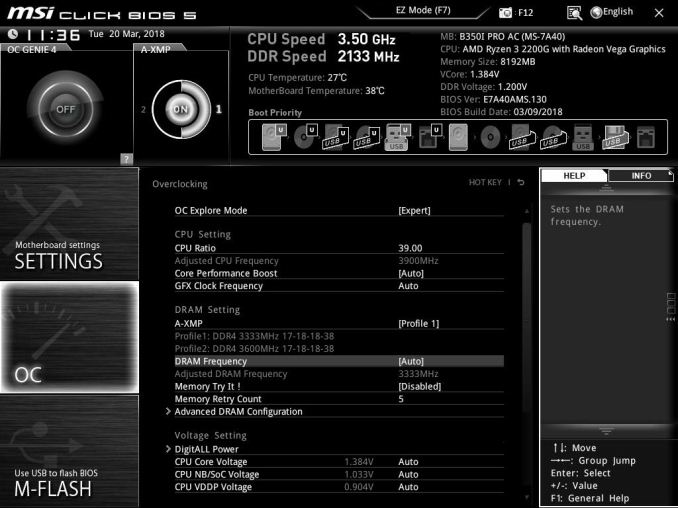
Pressing F7 opens up the advanced section.
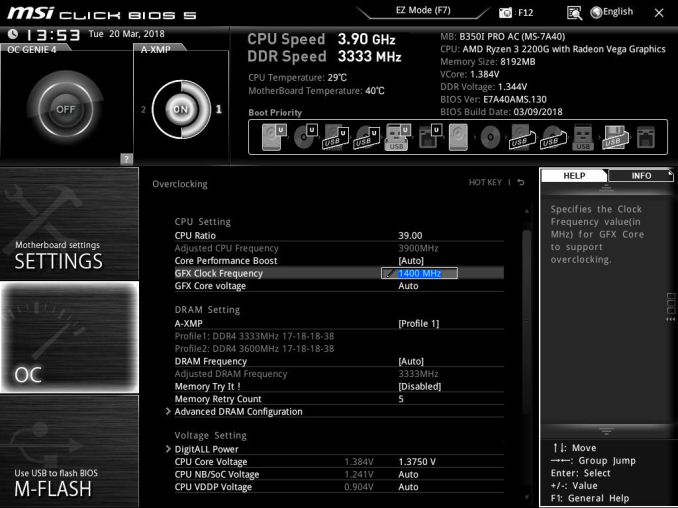
This offers high-level tabs for settings, OC and M-Flash. The overclocking panel is on the left, giving rise to the voltage parameters, CPU frequency multipliers, memory frequency, and the iGPU options.
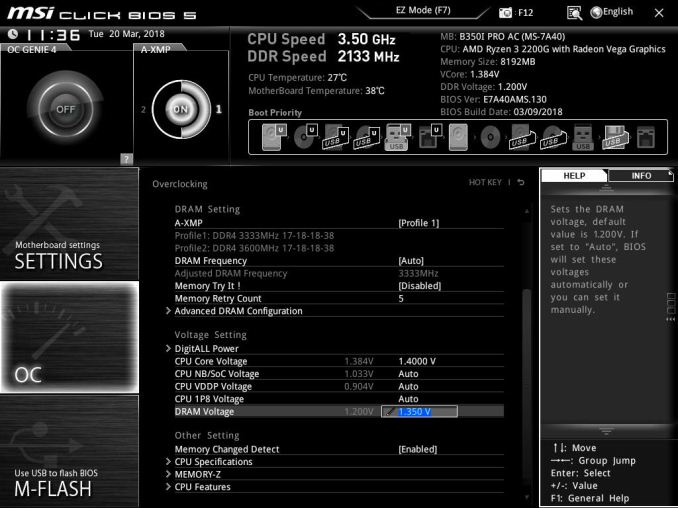
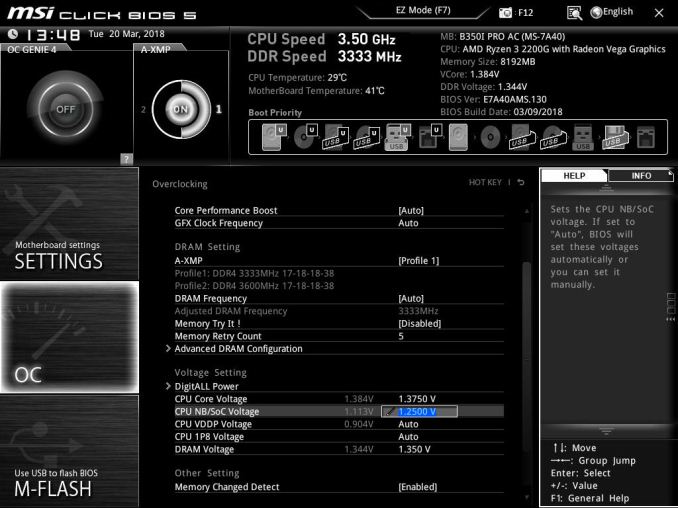
On this particular board, all the options that need to be changed are all featured on the entry screen when the OC tab is selected. The CPU ratio can be adjusted by pressing +/- keys or by typing in a value. Voltage is in the Voltage Setting category a few options down, and is by default set to auto. For memory, XMP (shown as A-XMP) was set to profile 1 to enable DDR4-3333 mode.
The CPU core voltage options in the BIOS can only apply a maximum of 1.4 volts. Users looking to apply more can use the AMD Ryzen Master Utility which will allow for up to 1.55 V, although this is too much for ambient cooling and we would not recommend it. For our testing, this was set to 1.375 volts to match with our test setup and methodology settings. The memory voltage was manualy set to 1.35 volts to ensure it matched the specifications of our G.Skill Ripjaws DDR4’s first XMP profile.
Overclocking the graphics on our AMD Ryzen 3 2200G APU was also as easy as the rest, with the only settings needing changing is the GFX clock frequency, which we set to 1375 MHz.
When it comes to setting the voltages for the integrated graphics processor, the SoC voltage and the graphics voltage are linked, so changing one changes the other.
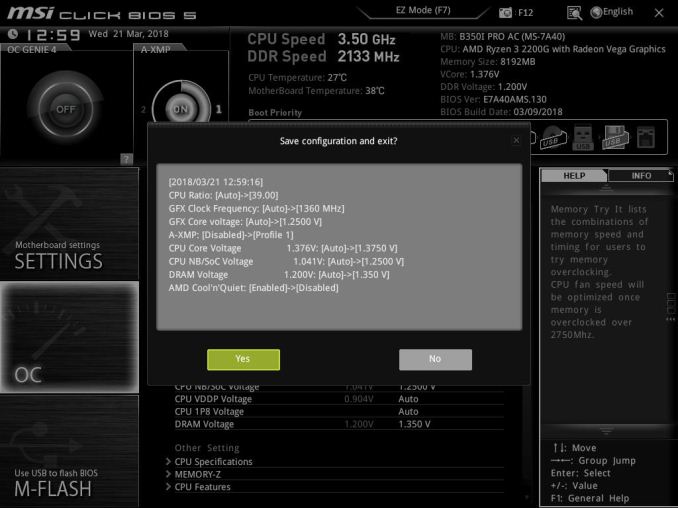
Once the settings are chosen, pressing F10 will bring up a summary of the changes made since the system was booted. Selecting yes will cause the system to reboot with the new settings.
Note: AMD’s Cool’n’Quiet function is automatically disabled on MSI motherboards when the CPU ratio is changed. Also, when OC explore mode is set from normal to expert, it opens up a setting called memory retry count. This is handy when manually overclocking memory as it will attempt to POST with a set variable amount, which automatically defaults at 5.
How to Overclock With GIGABYTE UEFI BIOS
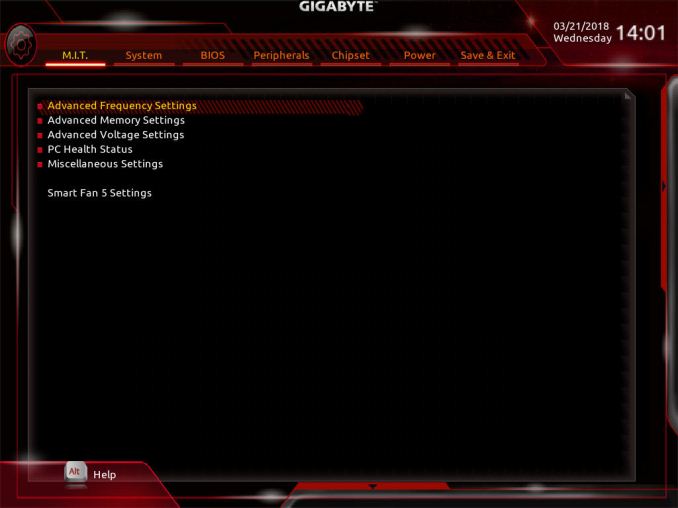
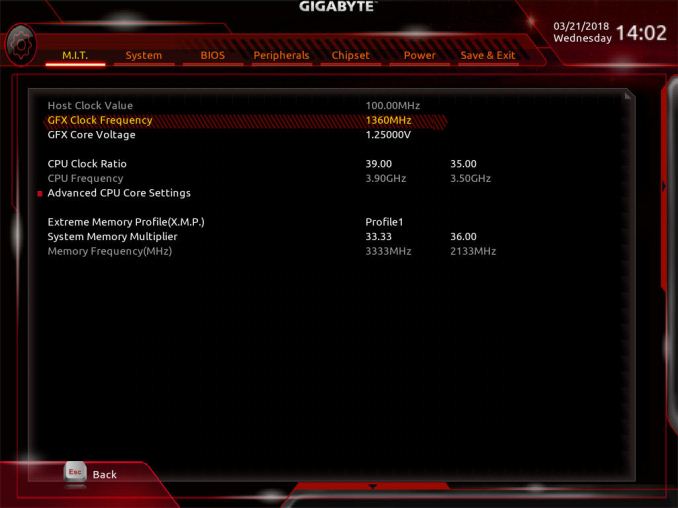
The GIGABYTE AX370-GAMING 5 BIOS uses more menus than most other BIOS implementations. Upon POST, the M.I.T screen is the entry point and it is here where the overclocking sub-menus are located.
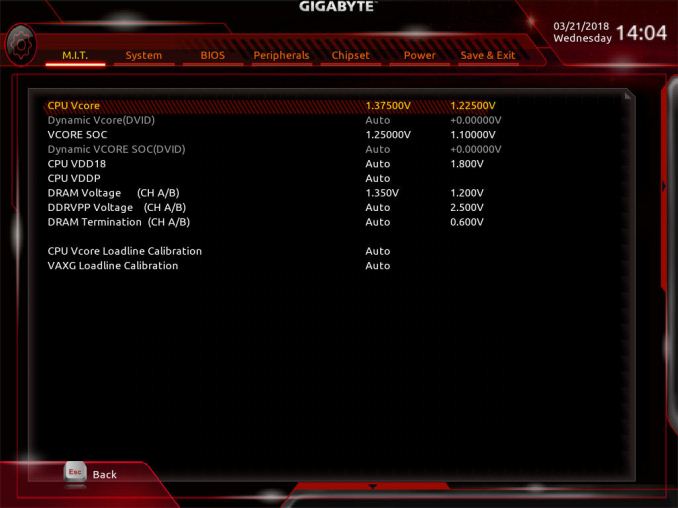
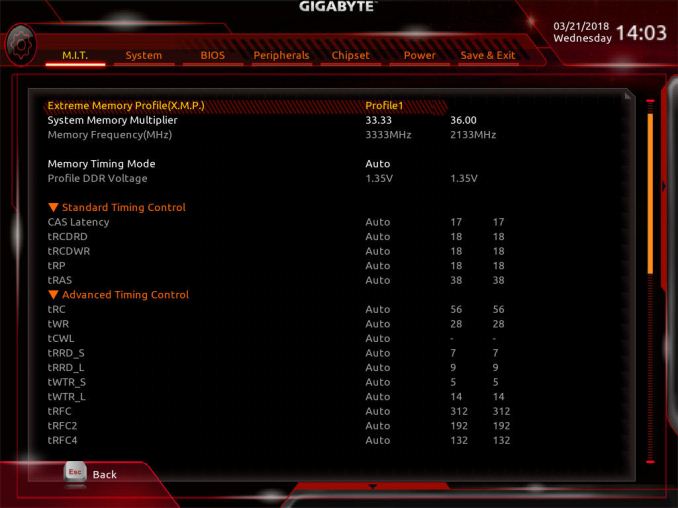
The main settings are in the top three sub sections; advanced frequency settings, advanced memory settings and advanced voltage settings.
One thing I like (ed: I don't) about the GIGABYTE UEFI BIOS when overclocking is having the required settings to overclock one specific item in one particular area. In the advanced frequency menu, here is everything frequency related: CPU ratio, memory, and integrated graphics. Perhaps a little odd was also seeing the graphics voltage here as well, rather than only in the graphics menu.
The advanced voltage section provides all the voltages (except graphics), including the CPU and DRAM options. Users can also adjust the load line calibration. As with the MSI BIOS, once you adjust the voltage using the +/- keys it automatically sets it to 1.4V, which I feel is a tad too high for a 3.90 GHz overclock.
Even though the SoC voltage and GFX core voltage are essentially the same thing due to the fact that they are linked, they had to be set separately to the same value within this particular BIOS. Forgetting to change one doesn’t make any difference but setting both to the same value ensures peace of mind.
When applying the XMP profile in the advanced memory sub-menu, users can manually change the memory frequency (or strap) while keeping the latency timings applied as specified by the XMP profile.
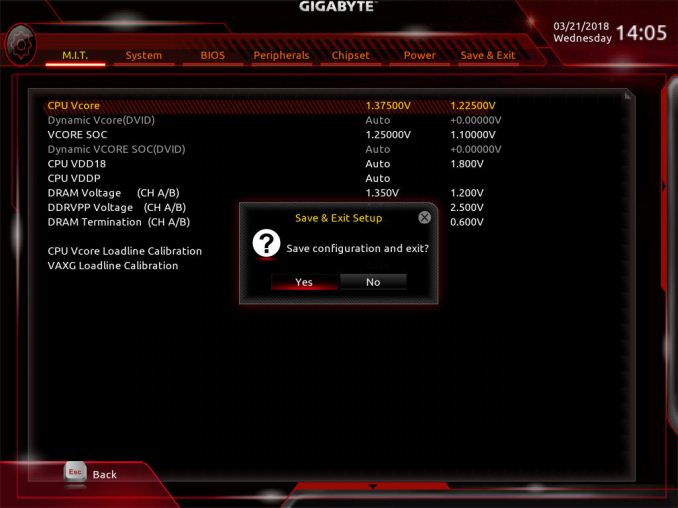
Once the settings are configured, pressing F10 brings up the pop up to save and exit. Unlike some of the other motherboards, there is no confirmation window with the settings changed here: it is just a click yes and go.
How to Overclock With ASUS UEFI BIOS
Depending on which ASUS motherboard that is being used, whether that’s one such as the ASUS Prime X370-Pro (featured here) or a more gaming focused Republic of Gamers branded option, the only real differences come through the GUI and theme. The settings themselves remain the same and the ASUS BIOS offers both basic and advanced modes.
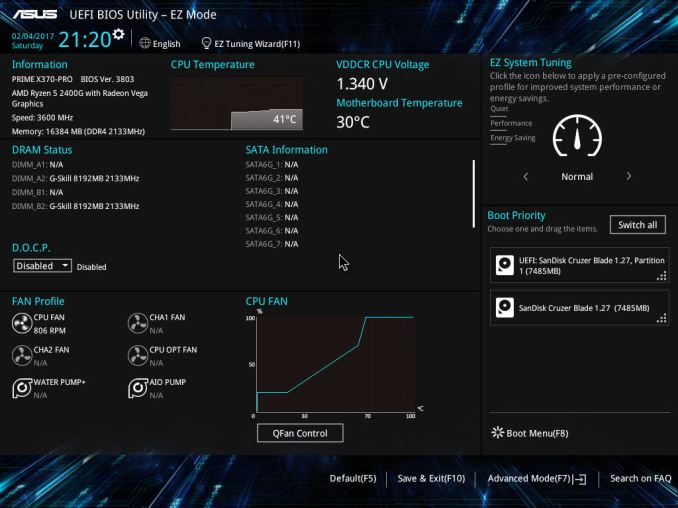
After entering the BIOS, the basic mode splash screen will appear. Here users can enable XMP (DOCP, Direct Overclock Profile), adjust fan profiles, and apply some 'EZ Tuning' for automatic overclocks that can be hit or miss. Pressing F7 enters the advanced mode.
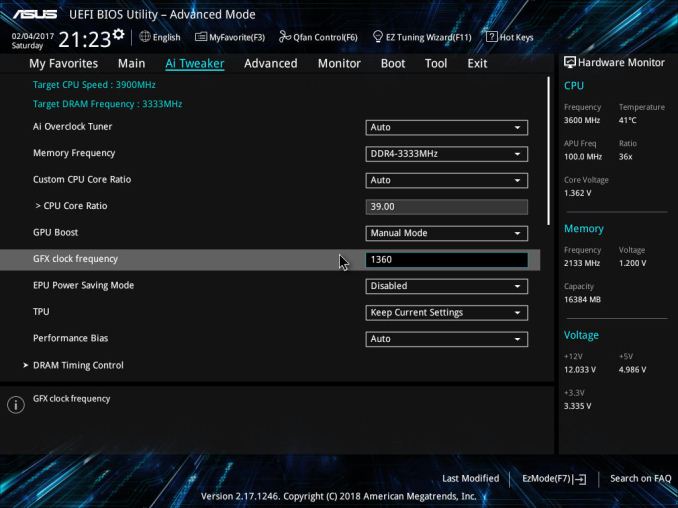
Once into the advanced section of the BIOS, all the overclocking related settings can be found in the AI Tweaker section. One interesting thing that was found within this particular BIOS was when XMP was enabled, it would remove access to the iGPU settings. Unfortunately we weren't able to determine if this was an isolated issue or whether it’s a more widespread across the entirety of the ASUS AM4 board range.
Changing the 'CPU Core ratio' to 39.00 will translate to 3.9 GHz. Due to the removal of the iGPU options when XMP enabled, the memory was changed manually within the BIOS; the easiest way to do this is to set the frequency and leave the sub-timings on auto, then manually adjusting the sub-timings to fit the module's rating.
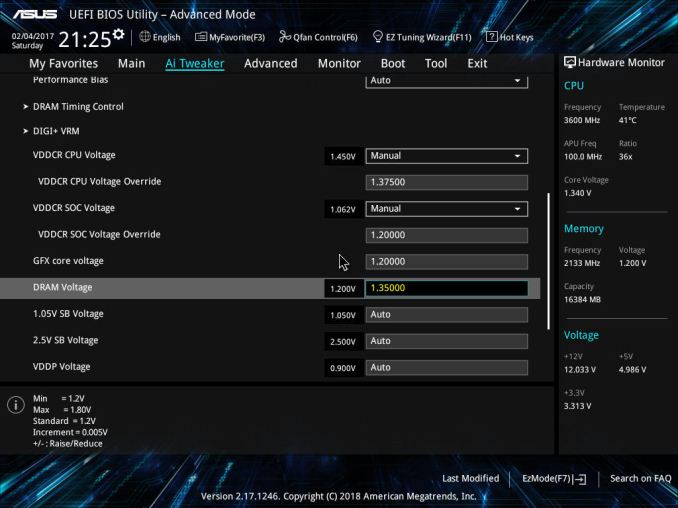
To open up the integrated graphics options, setting the GPU Boost option to manual mode is required. This gives the GFX clock frequency option (note the lack of capital letters, perhaps this option was rushed in), while the voltage options are further down the list.
All the the voltage options further down. ASUS makes it a little confusing here, by not having the standard names for a few of these options - ASUS calls the CPU core voltage 'VDDCR CPU Voltage', for example. In each case for this sub-section, the manual mode option needs to be selected to offer the manual input for voltages. It is worth remembering to set the DRAM voltage if the timings were set manually.
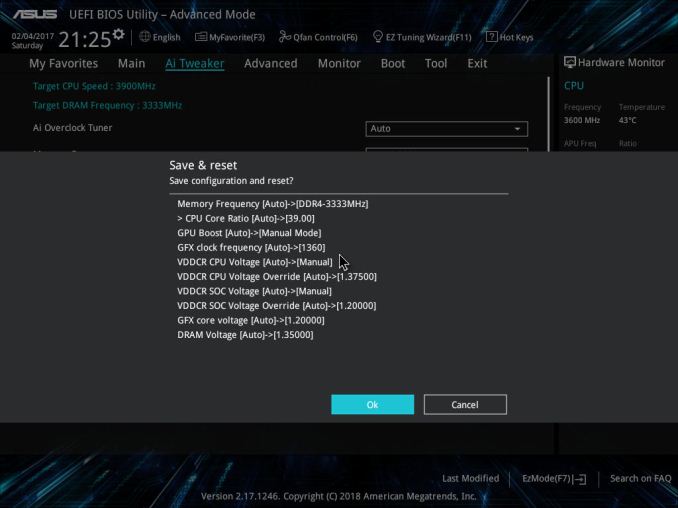
Once all the settings are entered, pressing F10 will bring up the save and reset box where the user can evaluate and comb over the changes made.
Many thanks to Lawrence Timme - due to not having an appropriate ASUS AM4 motherboard to hand (we somehow ended up with no ASUS boards with video outputs), he kindly provided the screenshots for this section.
How to Overclock With ASRock UEFI BIOS
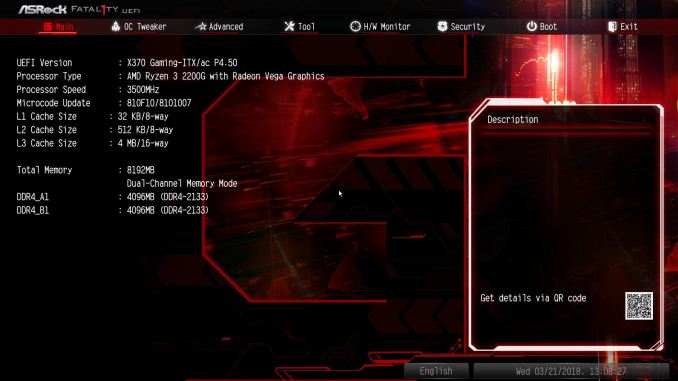
The ASRock BIOS design and layout is consistent throughout the AM4 motherboard range. Everything was present on our motherboard, except the ability to change the settings of the integrated graphics. The only options for overclocking the graphics were in the way of SoC voltage, and even then, it could only be set as an offset value, not a true value. This is a little disappointing given that the ASRock X370 Gaming-ITX/ac hasn’t got any hard issues within the BIOS for the graphics, but on the plus side, everything else is done well.
Upon entering the BIOS, the initial menu screen offers information about the board including the installed components including the processor. It is not an easy mode, and the information is very limited. Everything needed for overclocking is in the OC Tweaker menu.
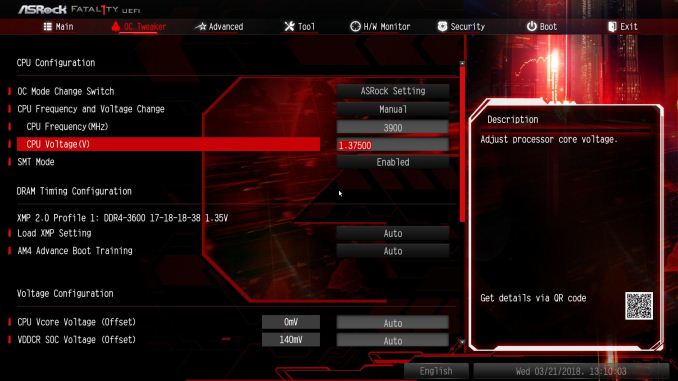
In the OC Tweaker menu, changing the 'CPU Frequency and Voltage Change' from auto to manual opens up the frequency and voltage options. At the top is the frequency, while down the bottom is the voltage. Starting with frequency, rather than offer a CPU ratio, ASRock just offers a plain frequency, and clearly does the multiplier manually.
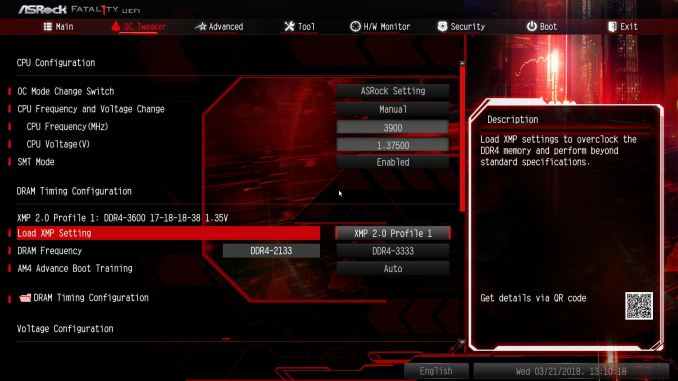
When it comes to applying the XMP profile, unlike the MSI board in our data testing in this article, the ASRock board only opens up a single XMP profile, the standard DDR4-3600 CL16 that the sticks are rated for. Enabling XMP and then changing the memory frequency to the setting that’s required is easy enough, as the value goes up in increments and can be adjusted using the + or – keys on a numpad. Alternatively, if the user presses enter a long list via a drop-down menu appears.
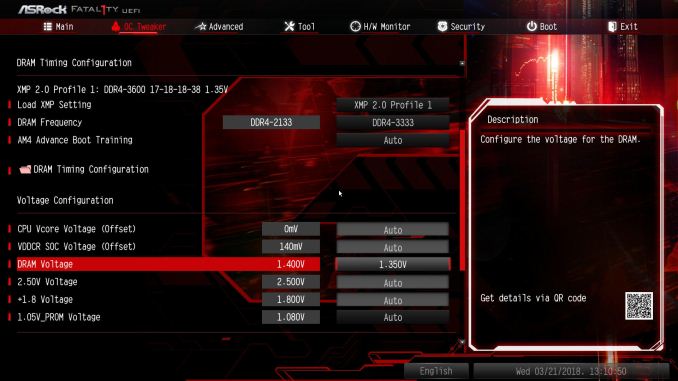
Further down the same page, options are present for changing the offset values to the SoC voltage or VDDCR. Just below these is the DRAM voltage, which when we enabled XMP automatically set the value to 1.4 volts, rather than 1.35 for which our kit is rated, which was a little odd.
Pressing F10 and selecting yes saves the settings and reboots the system. Unfortunately the options changed to not appear as in some other vendors Save and Exit popups.
Note – To overclock the integrated graphics on this board, users will need to install the AMD Ryzen Master overclocking utility within Windows. We go into Ryzen Master on the next page.
How to Overclock With AMD Ryzen Master
The AMD Ryzen Master overclocking software utility is specifically designed for the overclocking of AMD Ryzen processors, which includes the high-performance desktop variants such as the Ryzen 7 1700, as well as the Ryzen 2000 series APUs and the HEDT Ryzen ThreadRipper processors. It is highly recommended to download the latest available version directly from the AMD website before continuing. AMD also provides a Ryzen Master Software PDF Guide, which gives the following:
The AMD Ryzen processor supports an operating mode allowing enthusiast users to directly control the operating condition of the processor to precisely tune the performance and power consumption to the extent of their specific and unique system capabilities (current and cooling) and environmental conditions (ambient temperature). This is done by allowing the user to program or run utilities to directly set the precise voltage and frequency at which the CPU operates so that the maximum performance can be achieved. This is called the Overclocking Mode. This mode still uses the processor’s control methods for the external power supplies and internal clock generators and divisors thereby simplifying the implementation and eliminating any needs for voltage regulator overrides or external clock generators. This mode allows overclocking-capable motherboards to use the same voltage regulator controllers and the same BIOS to support normal operation and overclocking.
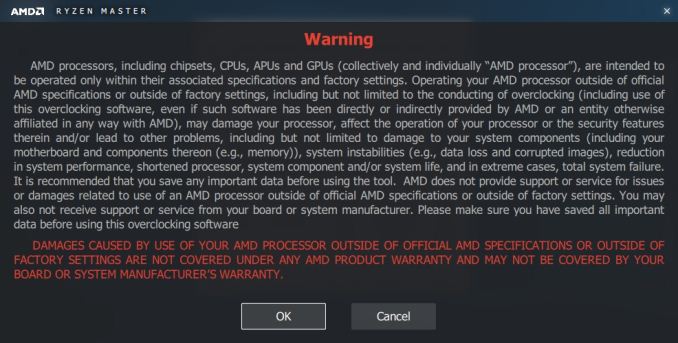
Once the disclaimer has been accepted, everything is ready to go.
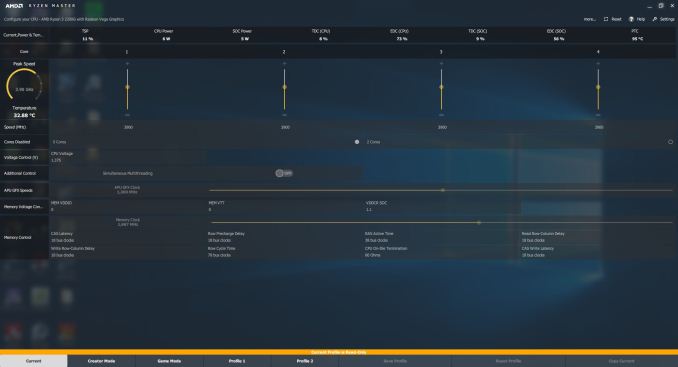
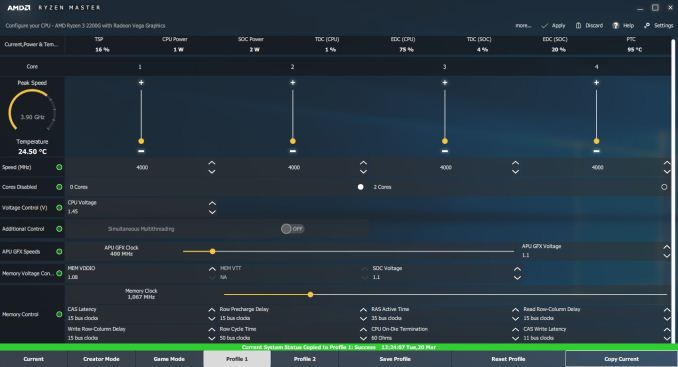
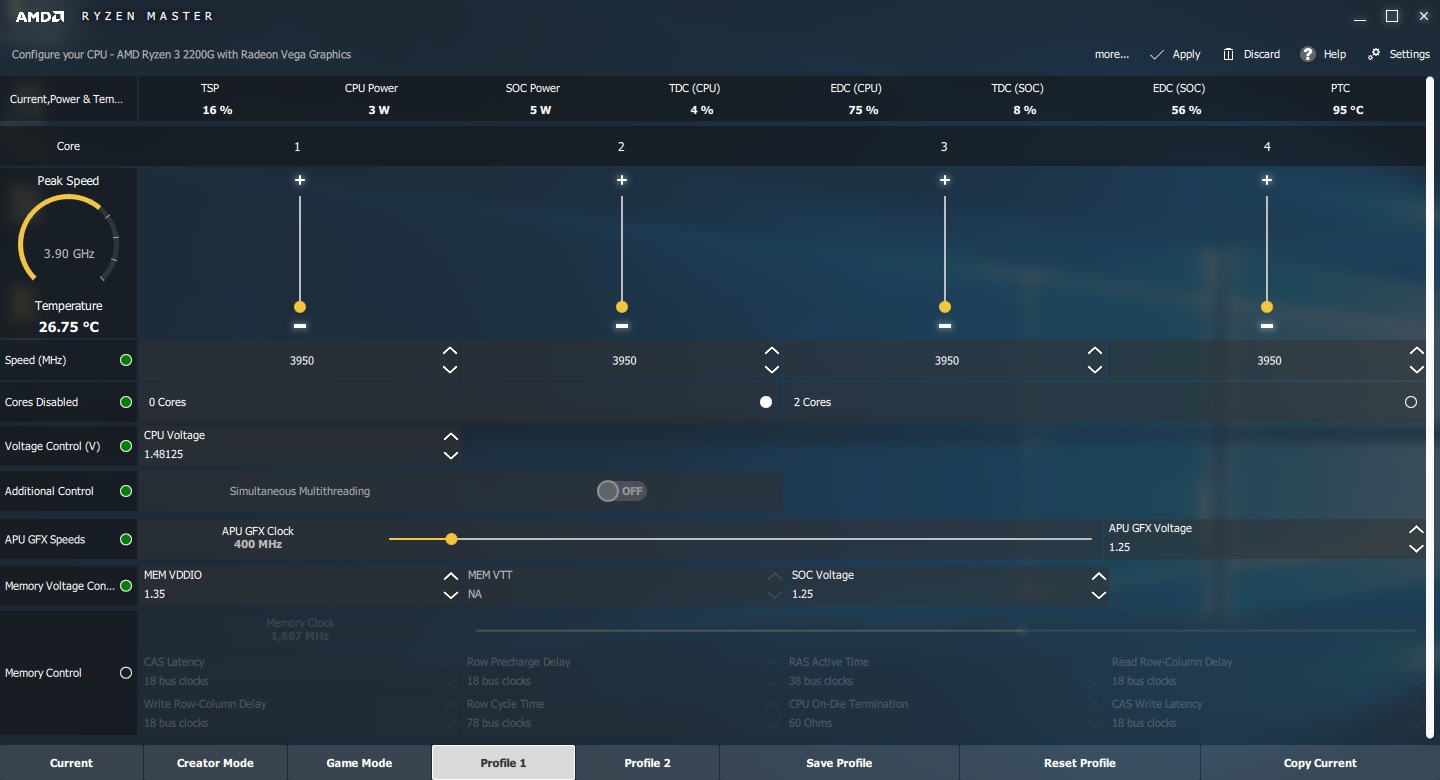
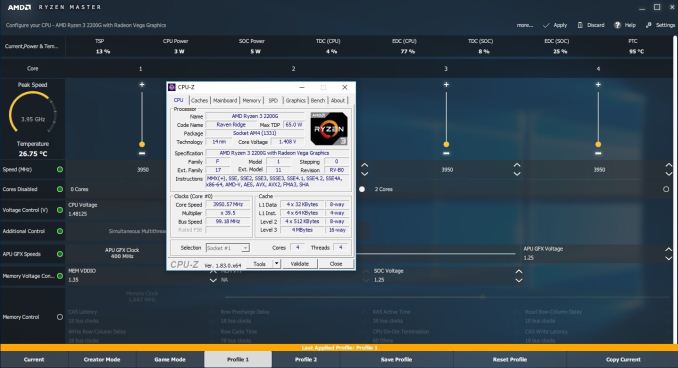
The entry screen looks something like this for Ryzen Master 1.2. Starting with the bottom, and from left to right, the menu tabs are 'current' (shows the already applied settings), Creator and Game modes, Profiles for the user to create and customize their own overclocks, and then options to save/reset/copy the profile.
Along the top of the display are the outputs of various onboard sensors, such as power and limits. Below this, each of the cores on the processor has a slider up and down for users to change the frequency, with the peak speed and temperature shown on the left. The third/fourth option down is the CPU voltage, adjusted with up and down buttons, and two below this are the integrated graphics options, followed by the memory voltage controls and then the memory frequency controls. Adjusting the memory typically requires a reboot.
For the purpose of overclocking to match the settings in our testing methodology, we used Ryzen Master on the MSI B350I Pro AC motherboard to set 3.90 GHz on the CPU core, 1360 MHz on the Vega based iGPU cores and DDR4-3333 on our dual channel kit of memory. All of the basic and principle settings can be changed within Ryzen Master, without even having the need to enter the BIOS, although one thing that Ryzen Master cannot do is enable an XMP profile: you can manually enter the relevant settings to match the rated speed. The SoC and APU GFX voltage share the same rail for both uncore and graphics, so setting both is paramount to ensuring stability when overclocking integrated graphics on your APU; 1.25V is AMDs maximum recommended safe SoC voltage.
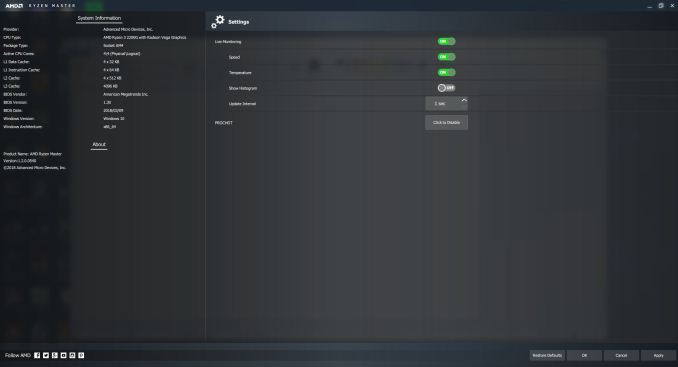
On the top section of the Ryzen Master Utility main screen and after clicking settings, a completely new panel opens offering a couple of new options with a couple of switches. Here a user can turn off live monitoring (the setting isn’t always recommended if other software is in play). Users can also individually turn off the speed, temperature, and adjust the live monitoring functions. Disabling PROCHOT is not recommended as this removes the thermal safeguards and is more commonly associated with extreme overclockers; disable at your own risk!
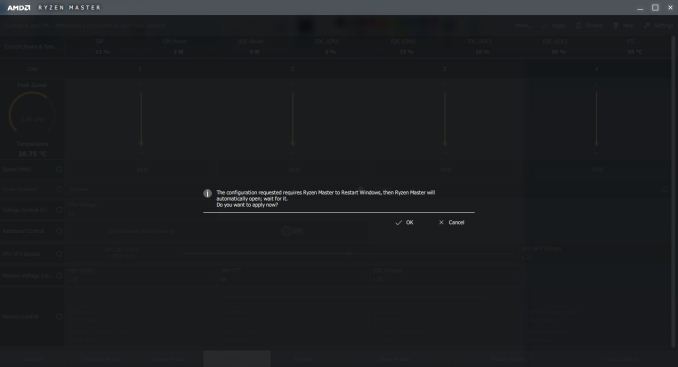
Once all the settings and values have been selected, clicking apply will bring up an option requesting that Ryzen Master will need to reboot your system to apply the settings. This is mainly focused for voltages, memory settings and grpahics parameters. Slight changes to the settings shouldn’t trigger this, although anything that will require a reboot will bring this up.
Once the system has rebooted, assuming all is stable, Ryzen Master will pop up as part of the Windows loading sequence asking to be enabled. Clicking OK will run the utility and will then apply and finalize the settings.
Having a utility such as CPU-Z by CPUID is a very handy tool which will show Realtime information regarding CPU Frequency, although actual voltages can sometimes be a little off to what it’s set. This can be for many different reasons such as power states including AMDs own Cool’n’quiet feature being enabled. Once the settings are in place, stress testing is required. Providing everything is stable and temperatures are within the recommended values and no close to hitting the TJMax, everything should be good to go.
This would be a good time to save your profile, although saving them at intervals and overclocking each component such as memory, iGPU, and CPU, one at a time and running some form of stability test in-between is recommended.
Overclocking Methodology
To achieve the overclocks on our test setup, only a small selection of the settings were changed.
Overclocking the CPU
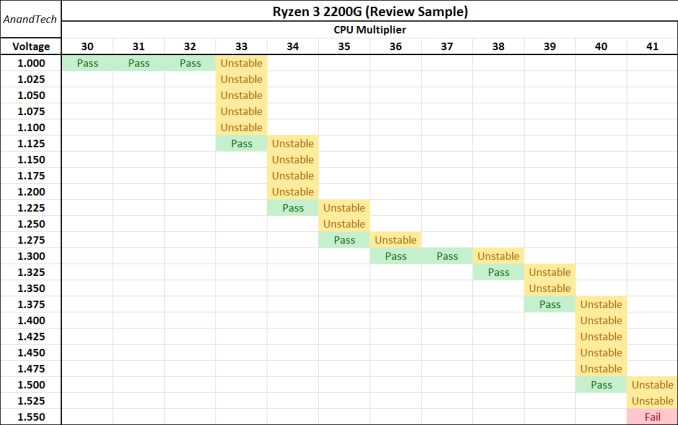
Firstly, we adjust the CPU ratio. The APUs have a 'base frequency' of 100 MHz, and to get the final frequency, the CPU ratio acts like a multiplier (it is often called the CPU multiplier as well). For our testing, to show some underclocking as well as overclocking, we start with a CPU ratio of 30x on all cores. This gives us a floor frequency of 3.0 GHz to start with, and we get a stable voltage and work up from there. At 3.0 GHz, we adjust the CPU voltage to find the lowest setting that remains stable for our testing.
Now the CPU testing rises up like a staircase. If the CPU is stable, raise the ratio by one, and retest stability. If the system is not stable, then add +0.025 volts to the CPU, and retest. Repeat until stable. When stable, raise the ratio again. Repeat until the stress tests hit a thermal limit.
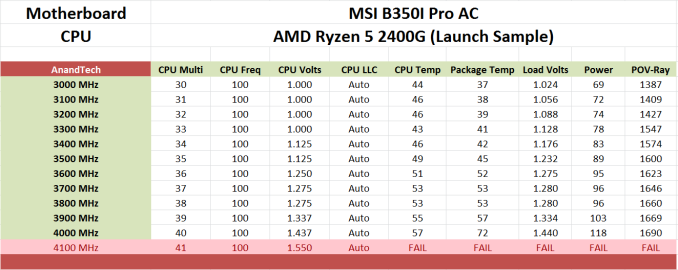
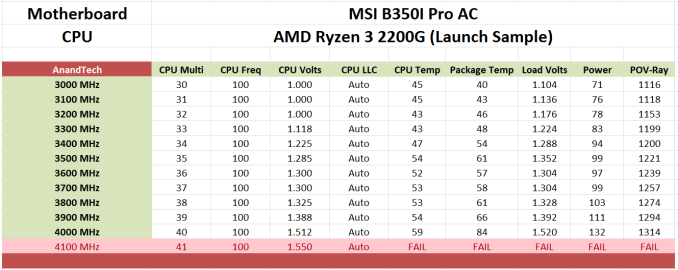
As a result, we get this nice graph when it comes to testing:
The last fail at the end was due to temperature - the Ryzen family of processors, due to the manufacturing process, seem to have a distinct hard limit on CPU frequency. This hard limit means that a lot of voltage is required just to move up one on the frequency ratio - we can see here that the jump from 39x to 40x required six more stops on the voltage curve. At this point, it would be prudent to select the 39x multiplier for more of a 24/7 daily system, which for the Ryzen 3 2200G is a reasonable core overclock, especially as we test will all CPU cores at this frequency.
Overclocking the Memory
The performance of the memory overclock is dependent on two things: the capability of the memory controller in the processor, and the capability of the memory itself. Either one can present a limit to overclocking, and it can be difficult to diagnose which on is a limit without testing with either a different memory kit or a different CPU.
The memory controllers of the Ryzen APUs are rated to DDR4-2933 out of the box, meaning that with verified memory, the system should happily run at this speed under 'JEDEC' sub-timings (JEDEC being the standard). Memory manufacturers sell memory faster than this, and the easiest way to 'overclock' the APU is by buying a memory kit that has a high speed. Users can then install the kit, and use the BIOS to apply the memory profile (because high speed kits are not enabled automatically). As long as the memory controller in the processor can handle the memory, all is well. However these high-speed memory kits are often very expensive.
Memory comes with two main parameters: frequency and sub-timings. For daily overclocking, DDR4 is quite reasonable in that most memory kits have roughly the same sub-timings, but differ more in frequency, and it is easier to adjust the frequency. Sub-timings are complicated, but AnandTech posted a big analysis on this in 2010. It is worth a read to get a more detailed look:
Everything You Always Wanted to Know About SDRAM (Memory): But Were Afraid to Ask
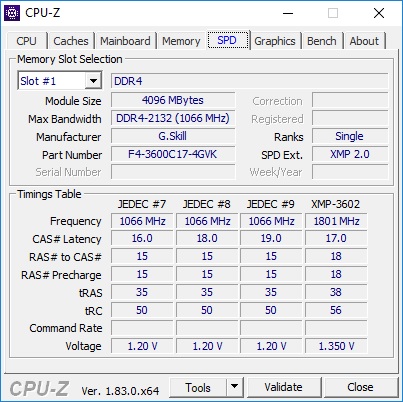
For our memory overclocking, we are using G.Skill's DDR4-3600 memory kit, with 17-18-18 sub-timings. For each of our processors in our stack that would do this out of the box, it would instantly giving a sizeable boost from the rated DDR4-2933 or from any cheap DDR4-2400 memory kit. Our G.Skill kit actually offers two different XMP profiles on-board, one with DDR4-3333 and the other at DDR4-3600, with the same latency timings.
For the DDR4 standard, three different memory voltages are defined. The regular voltage for most memory kits is 1.20 volts, while high-speed memory kits are given 1.35 volts. There are also low powered kits at 1.05 volts. Overclocking the memory is similar to that on the CPU - the memory ratio/multiplier can be adjusted in conjuction with the voltage. However unlike a CPU, thermal limits of the memory are not often the limiting factor, but the ability of the memory itself or the memory controller on the processor. This can be hard to determine - for most daily overclocks we recommend a safer voltage around 1.35-1.40 volts and to work within those means. Pushing too much voltage through the memory controller is not something that the processor can recover from as easily, like an unstable CPU overclock.
In our testing, due to a limitation on the integrated memory controller on our Ryzen 3 2200G ($99) samples, we would need to push voltages beyond levels considered safe at DDR4-3600, so we opted to go with the first profile with speeds of DDR4-3333. While all of the other settings in regards to memory were left untouched, the only one that was changed was the DRAM voltage, (called VDDIO voltage on the board we used). It was changed to match the specifications of the applied XMP profile, just to ensure the voltage remains stable during operation.
Overclocking the Graphics
When it comes to gaming, the GPU frequency is likely to matter the most, As with the other two parts of the processor, the main goal here is frequency and voltage. Overclocking the GPU is a little different for frequency, as the options allow for a 1 MHz granularity, rather than dealing with ratios or multipliers. It comes down to pushing the frequency, adjusting the voltage, finding the stability point, and repeating. In this case we usually raise the GPU voltage by 50 MHz each time, then dialling the overclock back when we hit a hard limit.
I managed to push the integrated Vega cores on our Ryzen 3 2200G sample to 1360 MHz, with a maximum recommended SoC/GPU voltage of 1.25V. Coming from a 1100 MHz turbo frequency, this is almost a 25% overclock. Other overclocks have been reported to hit higher, some even reaching 1450MHz in some cases. The limiting factors in integrated graphics usually come down to the capabilities of the chip and the power delivery mechanism: some motherboards are not geared towards integrated graphics, due to the regular Ryzen processors not having any, and as such built more towards discrete graphics solutions.
Note - As with all overclocking on the Ryzen 2000 series APUs, we would recommend the processes to be done individually with stress and stability testing done at each stage, etc. CPU overclock, stability test, RAM overclock, stability test, graphics overclock, stability test and so forth. This way allows for a process of elimination to be carried out if one of the overclocks fails during stability testing, although this isn’t an exact science, it is more than likely that the last changed setting is the one that needs adjusting in relation to the component you’re currently overclocking.
Some Results from CPU Overclocking
For each of our CPUs, we used the method listed up top to see the limits in CPU frequency. One of the concerns with readers that follow the tech press quite closely is that for launch day reviews the CPU manufacturer might send out 'golden samples' - processors that overclock very well. The danger here is that they might not be representative of what a user will get, and the journalist might give the product a favorable review when the retail situation is actually quite different.
Most manufacturers that sample the press, either CPU, motherboard, DRAM, power supplies, do some level of internal testing on samples before sending them out. There is no point shipping a 1200W power supply around the world that is dead on arrival, for instance. Every time we get an MSI motherboard, it comes with a certificate of pre-testing: someone in the PR team has put in a chip, run a few basic 3DMark tests, and given it a tick. That makes common sense - it saves time and money for all concerned.
The issue comes with pre-launch hardware. Normally a section of the tech press (not all, and how many depends on the company involved) get access to the hardware in advance. Sometimes, in order to be timely with articles, these are engineering samples and not full retail products. Big companies are likely to test these samples before leaving in more ways than one: if they know that 80% of the products can overclock to a certain frequency, they are going to make sure that none of the other 20% are sent out: the goal of the PR is to put the product in the best possible light. It is up to the tech press and the journalist to determine how much weighting they should give to a single, solitary overclock score (in our view, not much if any). If a journalist is raving about overclock performance from testing one processor, something should fire up a red flag. But is that the fault of the manufacturer that sampled, or the journalist?
Obviously the best way to solve this is to get a retail sample. Some tech press who don't get samples will buy it and then test, although that misses the boat on 'day one' reviews (some media don't care much about day one reviews). As stated above, sending out untested retail samples, even if they were available to the PR team early, might not be the best way for the PR team to 'showcase' the product, especially if it ends up DoA. There will be some testing, and we cannot get away from it.
So for this article, we decided to have our small run of processors. We have two that came from AMD before the launch, and obtained two after the launch in sealed retail boxes. There was a small difference, but not a big one by any means.
Launch Samples
Both CPUs were tested in the MSI B350I Pro AC.
Both of our luanch samples hit 4.0 GHz, although the Ryzen 3 2200G required a lot more voltage to get there. The Ryzen 5 2400G also had lower power consumption across the board, and lower temperatures, despite having two threads per core. This shows that it was the better binned chip from AMD.
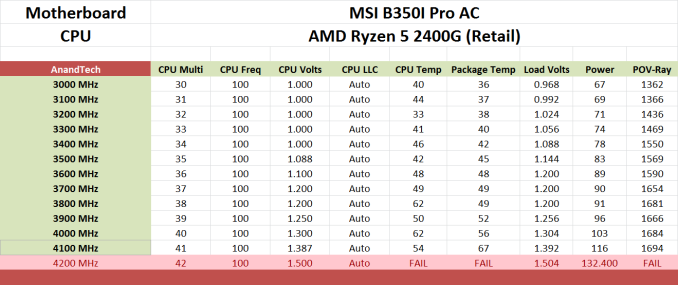
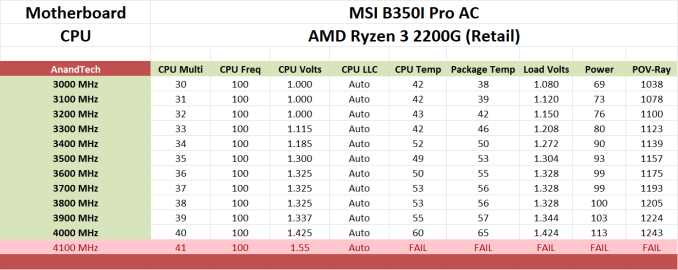
Retail Samples
Both CPUs were tested in the MSI B350I Pro AC.
Overclocking Results
So from our test setup, we tested one each of the CPUs at both 'stock' and our 'max overclock' setting, combining the peak CPU, DRAM, and graphics frequency all into one overclock. This means we are comparing the following:
| Overclocked vs Stock | |||||
| Processors | Ryzen 3 2200G 4C / 4T Vega 8 Graphics |
AMD Ryzen 5 2400G 4C / 8T Vega 11 Graphics |
|||
| CPU | Stock | 3.50 / 3.70 GHz | 3.60 / 3.90 GHz | ||
| Overclock | 3.9 GHz All-Core | 4.0 GHz All-Core | |||
| DRAM | Stock | DDR4-2400 | DDR4-2400 | ||
| Overclock | DDR4-3333 C17 | DDR4-3333 C17 | |||
| Graphics | Stock | 1100 MHz | 1250 MHz | ||
| Overclock | 1360 MHz | 1400 MHz | |||
Users quick on the ball will see that we've run DDR4-2400 as our 'stock' memory frequency. This is ultimately what would be chosen if a user did not even apply any profile whatsoever, and simply put the memory in the system right out of the box. Anecdotally, we still see a number of users failing to enable their high-speed memory, because it requires that extra selection of XMP which is not easily detailed by the memory vendors (to be fair, it would be impossible to list every BIOS version and directions on how-to for new users). Having seen a close friend who I thought knew how to do this, we're going to use the opportunity to show the uplift of overclocking the memory from 'out-of-the-box' to a proper overclock as well.
Power Consumption
For our power consumption metrics, we use a Prime 95 blended torture test on fixed threads and Furmark blender GPU burn-in at 1080p to generate a strong and consistent load. Then pull the power figure from a power consumption monitor at the wall to get the power consumption. For the idle test, a consistent and base stable figure is taken whereas with load, a peak value is taken instead. The values were taken after 10 minutes, both idle with the OS in a stable and idle state with no foreground applications running, with the figures being taken under load after exactly 10 minutes with Prime95 and Furmark running simultaneously.
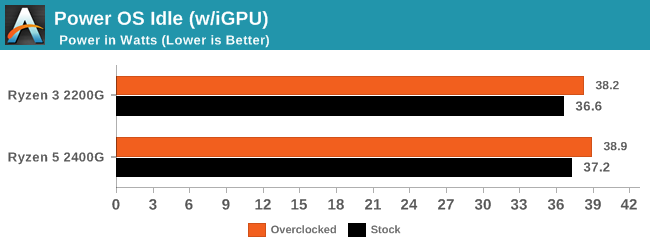
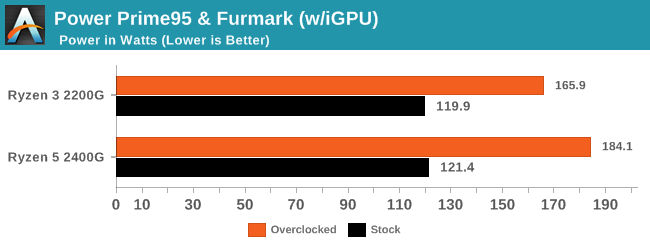
As expected, the idle power numbers do not change that much with overclocking, however at load we see the Ryzen 3 2200G gain another 46W and the Ryzen 5 2400G gain another ~63W. This essentially almost doubles the power consumption of the Ryzen 5, which as we see below requires good cooling.
Temperatures
Considered to be as important as power consumption, temperature can be the difference between a completely stable and quiet system, and one that's riddled with instability. At idle state, the package temperature was recorded with HWMonitor after 10 minutes of idleness, with room temperature being monitored via an electronic room thermometer. The room temperature was deducted from the package to give the delta temperature. At load, the peak temperature was taken from HWMonitor with the current room temperature being deducted to give the delta temperature.
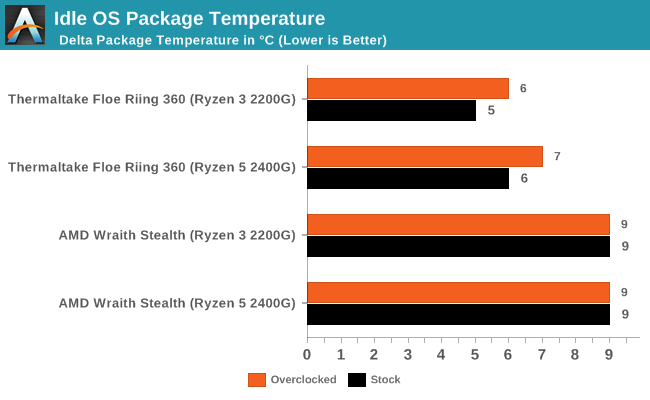
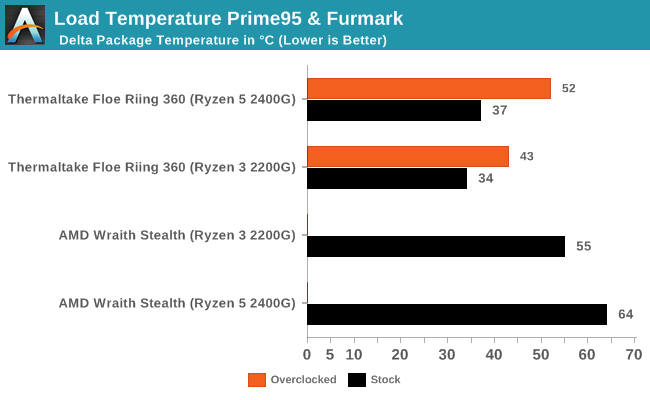
*No overclocked values for AMD Wraith Stealth - the system rebooted due to temperature limits
At idle, both the Thermaltake Floe Riing RGB 360 AIO cooler and the provided stock AMD Wraith Stealth CPU cooler remain within a reasonable distance of each other, but under load when overclocked the Wraith failed to deliver with both Prime95 and Furmark applied; the system would hang and crash. The AMD Wraith Stock cooler is absolutely fine for smaller overclocks, but for big overclocks, then a decent air tower or good AIO CPU cooler is paramount to getting the most from the APUs.
Rendering – POV-Ray 3.7.1b4: link
The Persistence of Vision Ray Tracer, or POV-Ray, is a freeware package for as the name suggests, ray tracing. It is a pure renderer, rather than modeling software, but the latest beta version contains a handy benchmark for stressing all processing threads on a platform. We have been using this test in motherboard reviews to test memory stability at various CPU speeds to good effect – if it passes the test, the IMC in the CPU is stable for a given CPU speed. As a CPU test, it runs for approximately 2-3 minutes on high end platforms.
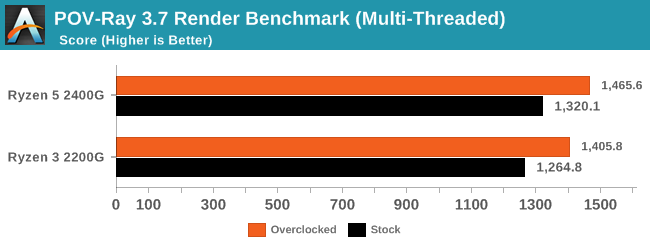
In both cases, our peak productivity benchmark shows a performance gain of just over 11% when overclocked.
Rendering - Blender 2.78: link
For a render that has been around for what seems like ages, Blender is still a highly popular tool. We managed to wrap up a standard workload into the February 5 nightly build of Blender and measure the time it takes to render the first frame of the scene. Being one of the bigger open source tools out there, it means both AMD and Intel work actively to help improve the codebase, for better or for worse on their own/each other's microarchitecture.
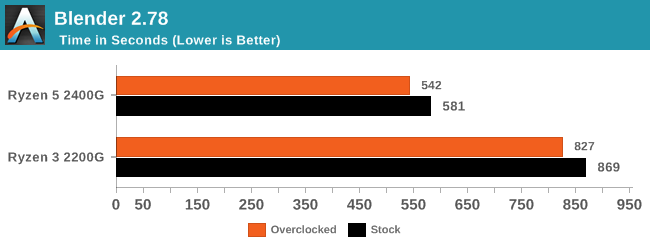
Blender is slightly more consevative, with a 7% increase in performance.
Compression – WinRAR 5.0.1: link
Our WinRAR test from 2013 is updated to the latest version of WinRAR at the start of 2014. We compress a set of 2867 files across 320 folders totaling 1.52 GB in size – 95% of these files are small typical website files, and the rest (90% of the size) are small 30-second 720p videos.
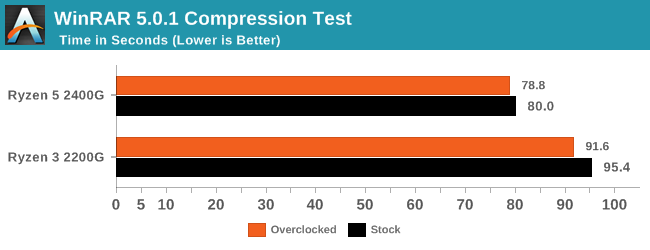
WinRAR is normally memory dependent here, but something else seems to be the bottleneck.
Synthetic – 7-Zip 9.2: link
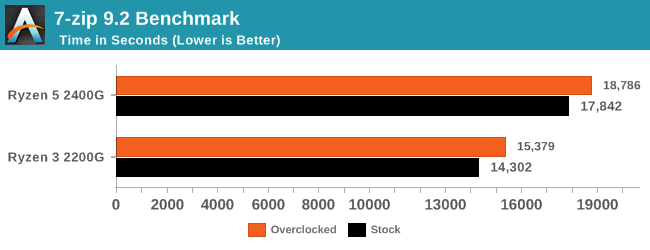
As an open source compression tool, 7-Zip is a popular tool for making sets of files easier to handle and transfer. The software offers up its own benchmark, to which we report the result.
Point Calculations – 3D Movement Algorithm Test: link
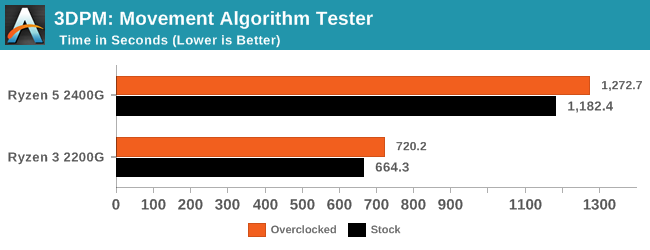
3DPM is a self-penned benchmark, taking basic 3D movement algorithms used in Brownian Motion simulations and testing them for speed. High floating point performance, MHz, and IPC win in the single thread version, whereas the multithread version has to handle the threads and loves more cores. For a brief explanation of the platform agnostic coding behind this benchmark, see my forum post here.
IGP Gaming - Civilization 6
First up in our Ryzen 2000-series APU stock vs overclocked gaming tests is Civilization 6. Originally created by legendary Sid Meier who has a strong lineage in my eyes, mainly thanks to many childhood hours spent on Railroad Tycoon. Civilization 6 continues a long line of previous versions of the Civilization franchise, which has been critically acclaimed for allowing the player to take control of various nations to create their own empire, conquer the world and if you're lucky, watch legendary peace symbol Ghandi declare nuclear war!
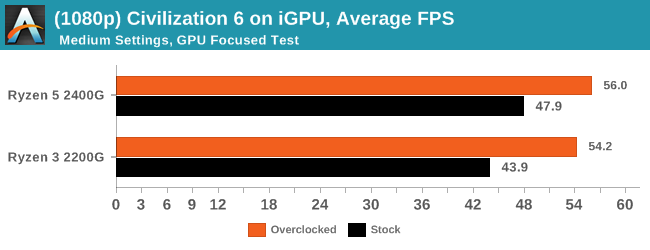
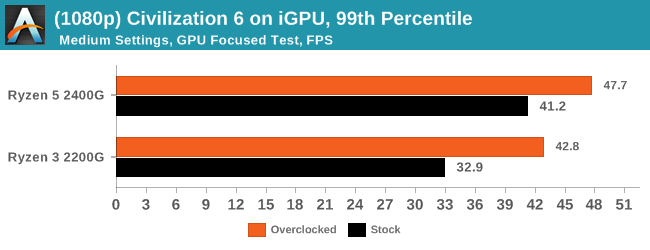
With an overclock on all three major contributing factors to performance on the Ryzen 3 2200G APU, memory, iGPU and CPU frequency, a total increase of around 23% performance in average frame rates was present in Civilization 6 at medium settings at a 1920x1080 resolution. What is most interesting is the 99th percentile frame rates improve by 30%, showing that an average overclock on all three elements can boost performance so well in such a CPU heavy title.
Gaming - Total War: WARHAMMER 2 at 720p
Not only is the Total War franchise one of the most popular real-time tactical strategy titles of all time, but Sega delve into multiple worlds such as the Roman Empire, Napoleonic era and even Attila the Hun, but more recently they nosedived into the world of Games Workshop via the WARHAMMER series. Developers Creative Assembly have used their latest RTS battle title with the much talked about DirectX 12 API, just like the original version, Total War: WARHAMMER, so that this title can benefit from all the associated features that comes with it. The game itself is very CPU intensive and is capable of pushing any top end system to their limits.
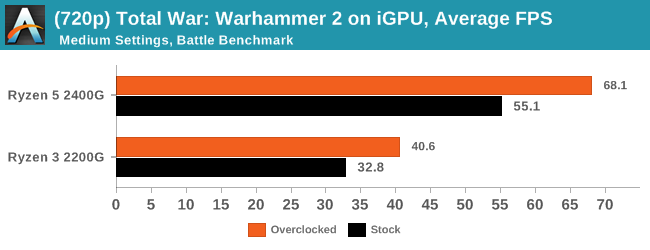
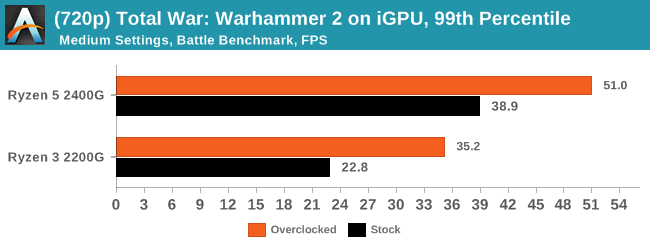
For the 2200G, the most sizable benefit for an overclock was in the lower resolution 99th percentile frame rates - moving from 23 FPS to 35 FPS is a sure-fire way of getting a smoother result.
Gaming - Total War: Warhammer 2 at 1080p
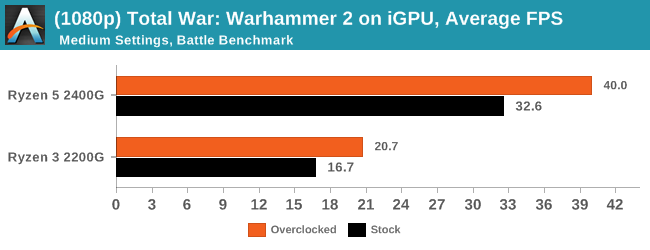
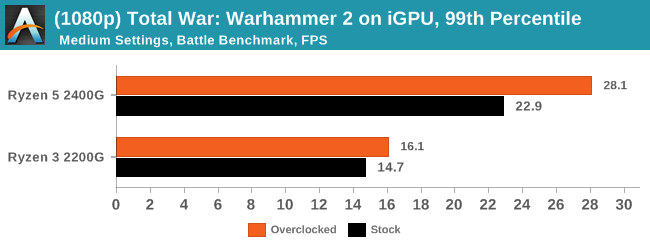
Because of the small numbers, it is perhaps hard to see that the Ryzen 3 2200G gets a 24% increase in 1080p performance. This is carried through with the Ryzen 5 2400G, which gets a 26-31% increase in frame rates and pencentile numbers at both 720p and 1080p.
Discrete Gaming: Shadow of Mordor
The next title in our testing is a battle of system performance with the open world action-adventure title, Middle Earth: Shadow of Mordor (SoM for short). Produced by Monolith and using the LithTech Jupiter EX engine and numerous detail add-ons, SoM goes for detail and complexity. The main story itself was written by the same writer as Red Dead Redemption, and it received Zero Punctuation’s Game of The Year in 2014.
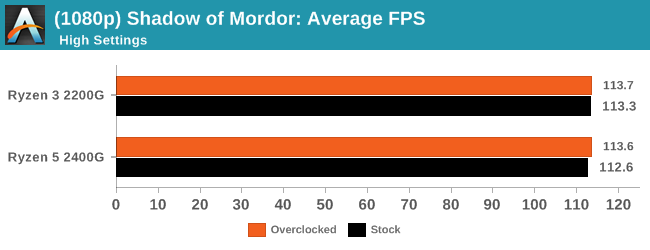
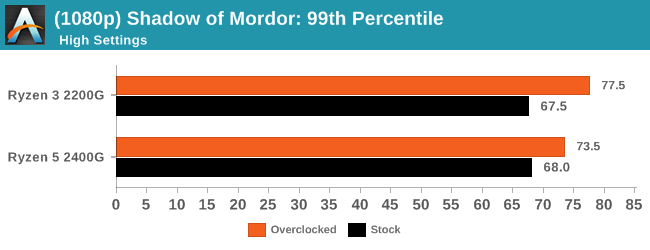
For our discrete gaming titles, it was kind of expected that the average frame rates might not move, but here we see the Ryzen 3 2200G get a nice boost in 99th percentile numbers. Shadow of Mordor, particularly one scene in our test, seems very receptive to quad-core CPUs to the point where any more cores or threads seems to perform worse. We've seen it in other tests, and when overclocked, we see the Ryzen 3 2200G take the lead in the percentile graph.
F1 2017
Released in the same year as the title suggests, F1 2017 is the ninth variant of the franchise to be published and developed by Codemasters. The game is based around the F1 2017 season and has been and licensed by the sports official governing body, the Federation Internationale de l’Automobile (FIA). F1 2017 features all twenty racing circuits, all twenty drivers across ten teams and allows F1 fans to immerse themselves into the world of Formula One with a rather comprehensive world championship season mode.
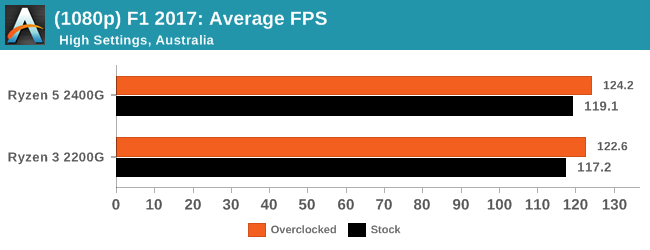
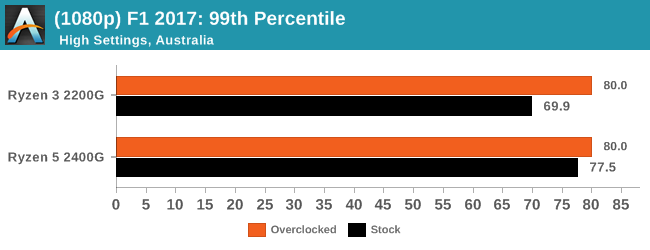
Codemasters' EGO engine has historically been very memory receptive, especially for 99th percentile numbers. Here we see a good jump for the Ryzen 3 2200G again when the system is overclocked.
Overclocking The Ryzen 2000 Series APUs: The Conclusion
If we go back to our Ryzen 2000 Series APU review, it is clear that the Ryzen 3 2200G ($99) and Ryzen 5 2400G ($169) are true winners when it comes to building a gaming system on a budget, without making too much of a sacrifice, especially when focusing on popular gaming titles that do not require ultimate horsepower. Puting the Zen architecture with a good amount of Vega cores is mouthwatering for budget aficionados, as Intel offers nothing for this performance at this price. From an overclocking perspective, the Ryzen 2000 series does have more to offer, providing the system is well-rounded enough and capable of doing so; the APUs may be fully unlocked, but the system will need a B350/X370 chipset board to progress above the defaulted stock specifications.
In our testing, a consistent jump in performance was apparent when the CPU frequency, integrated graphics frequency, and memory, were all overclocked. We have already seen and delved into how memory scales on Ryzen CPUs, but with the capability of increasing and overclocking the Vega cores on the iGPU proves very fruitful in gaming. The only caveat with overclocking comes through extra power consumption and heat, but even with a modest overclock of 3.9 GHz on the 2200G, pushing memory up to DDR4-3333, and the integrated graphics to 1360 MHz, temperatures are well within the recommended guidelines when using a big cooler. This might be a drawback however, as the cooler bundled with the APUs was not up to the task of such a heavy push.
There are reports of the Ryzen 2000 series APUs going further than our sample was able to achieve. In each case our limit was on the temperatures, so we have a future article planned on delidding the processors and testing the difference to see if it is worth popping the heatspreader off to get a few more degrees off. As it stands, overclocking the Ryzen APUs has many benefits, and although they'll never reach the performance of processor at double the cost, for the market they are intended, an extra 7-30% (depending on the benchmark) is quite handy to have.
Overclocking is Dead: Long Live Overclocking
If we go back to the previous decade, processors such as the Q6600 were a prime example of when tweaking more than just the multiplier was required to get a decent overclock: the base clock was paramount in making extra performance. At the time, for that chip at least, the core multiplier was down at x9, and a base clock of 266 MHz gave the chip a frequency of 2.4 GHz. The only way to push the CPU frequency beyond that was by increasing the base clock.
The times where base clock overclocking was an important tuning factor to increasing performance has now changed. There have been times since where going +/- 10 MHz have been possible since, although that depended on the rest of the system (PCIe, chipset, DRAM) remaining stable. The only real need for base clock overclocking is in a competitive nature, where people compete against each other to see who has the bigger overclock. Being able to tune that important extra frequency on the CPU and memory can be the difference between a world record score or 30th place.
Even with AMD’s Zen core architecture, there has been the question popping up around on reddit and various communities about whether or not it’s worth overclocking purely with the multiplier or adding in some base clock tuning. The fact that the majority of the motherboards currently available on the AM4 socket do not have external clock generators means that extreme base clock tuning isn’t possible, and doesn’t give much weight to the users that want it. But the upside is that it is a lot easier for mainstream users to overclock especially processors like the Ryzen CPUs and Ryzen APUs.
Is Overclocking the Ryzen 2000 Series APUs Worth it?
The Ryzen 2000 series really can benefit from being pushed beyond the rated specifications by overclocking. Even within the safe parameters as specified by AMD in terms of voltages, the gains when the CPU core clock, graphics frequency, and memory are all pushed equate to a nice jump in performance. This can be the difference between playing at a decent frame rate and the game chopping around. Sure, the Ryzen series as a whole can benefit from an overclock, but for integrated gaming, overclocking the integrated graphics can a difference if the user requires the extra performance but doesn’t want to be burdened with the extra cost of upgrading.

