Original Link: https://www.anandtech.com/show/11885/the-asrock-z270-supercarrier-motherboard-review
The ASRock Z270 Supercarrier Motherboard Review: 4-way SLI and 5 Gigabit Ethernet on Kaby Lake
by E. Fylladitakis on September 29, 2017 9:00 AM EST- Posted in
- ASRock
- Motherboards
- SLI
- Aquantia
- Z270
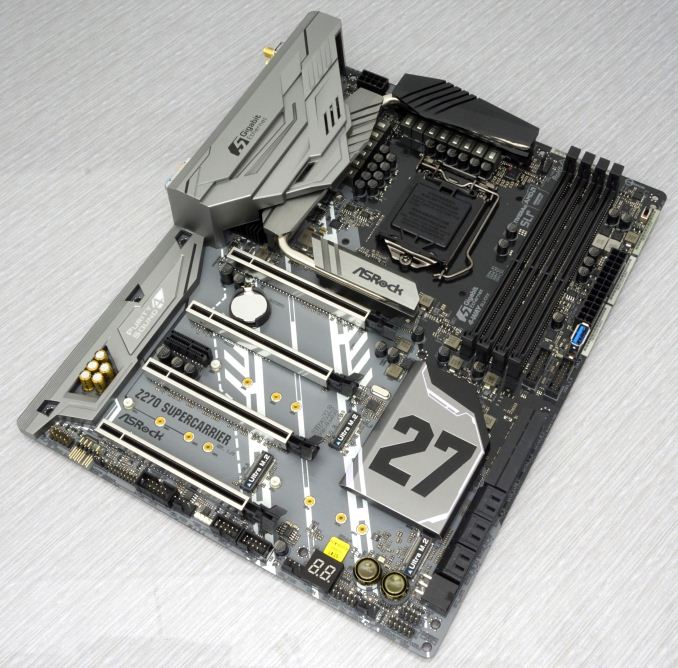
Ever since Intel released the Z270 chipset earlier this year, we reviewed several motherboards based on it, ranging from the low-cost Mini ITX ECS Z270H4-I Durathon 2 to the advanced gaming motherboards from Asus and GIGABYTE. As literally dozens of Z270-based motherboards were released, we could not possibly review them all and we centered our choices on products that we believed to be of interest to the largest portion of our readers. However, someone could argue that even though the top-tier market is relatively small, it also consists of the most knowledgeable and demanding users, who cannot fulfill their wants and needs with a mainstream motherboard.
In this review, we are having a look at the ASRock Z270 Supercarrier, a top-tier motherboard designed for professional designers and elitist gamers. Despite its typical ATX dimensions, the Z270 Supercarrier is loaded to the hilt, with a tremendous number of connectors and several features that cannot be found on mainstream motherboards. While the price tag will drive every casual/mainstream user away instantly, the Z270 Supercarrier is one of the few choices with a LGA1151 CPU socket available for professional designers and gamers who are not satisfied with one or two GPUs.
The ASRock Z270 Supercarrier Overview
A simple glance at the list of this motherboard’s features is likely to leave most people in awe. If we were to single out the highlights of the Z270 Supercarrier, these would be the 14-phase CPU power circuitry, the four PCIe ×8 slots for full-size graphics cards and the AQUANTIA 5 Gbps network controller, all of which are features that cannot be found on mainstream motherboards. The number of supported storage devices is immense, with three PCIe ×4 M.2 slots, six SATA connectors and two SATA Express connectors. Each SATA connector may also be used as two standard SATA ports, bringing the maximum number of regular SATA devices up to 10 if no SATA Express devices are installed. There are no U.2 connectors and this is one of the very few features that the Z270 Supercarrier is lacking. This problem can be easily tackled with the use of proper M.2 to U.2 adapters.
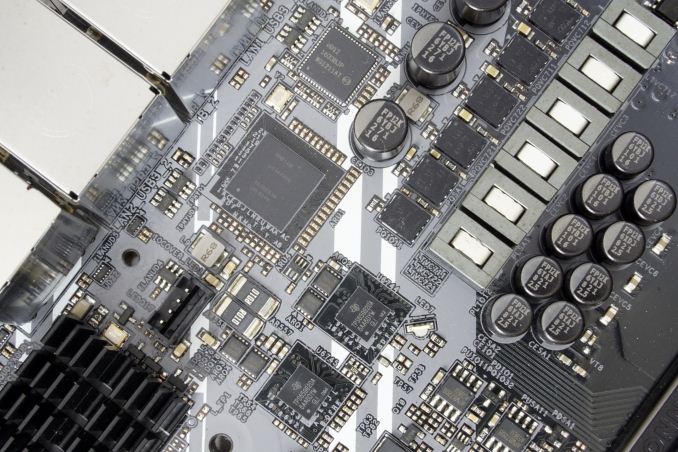
The ASRock Z270 Supercarrier also has very interesting controllers installed. The “Purity Sound 4” onboard audio has a popular ALC1220 audio controller supplied by Realtek at its heart, supported by a Texas Instruments NE5532 headset amplifier and other hardware. It has not one, not two, but three different LAN controllers. The first is the Aquantia AQC108 5 Gbps controller, which is one of the highlights of this motherboard. Intel supplies the other two Gigabit controllers (I219V and I211AT), as well as the wireless LAN module (AC3160). We also found several controllers from ASMedia on the Z270 Supercarrier for additional USB, SATA, and Thunderbolt ports.
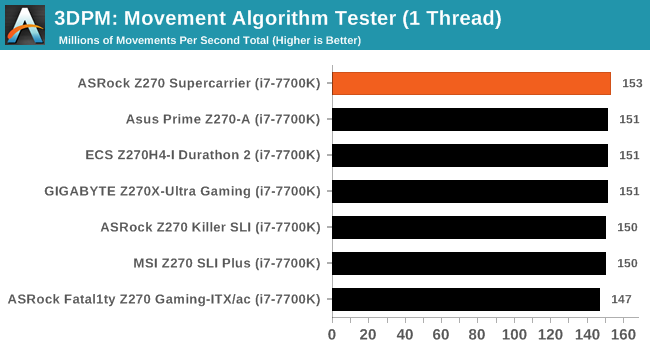
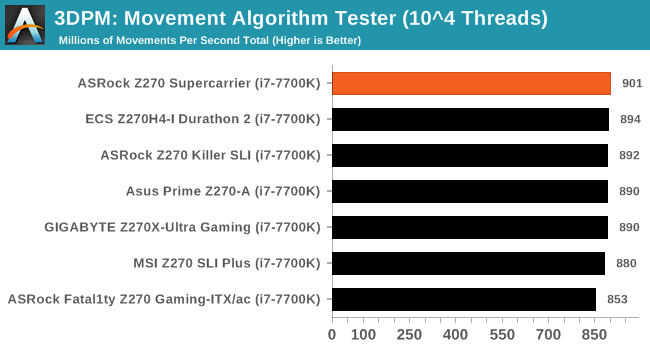
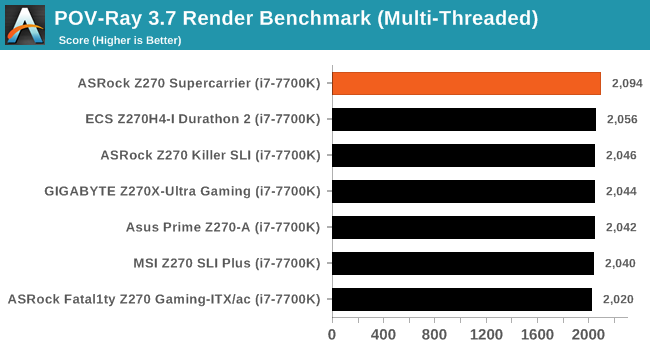
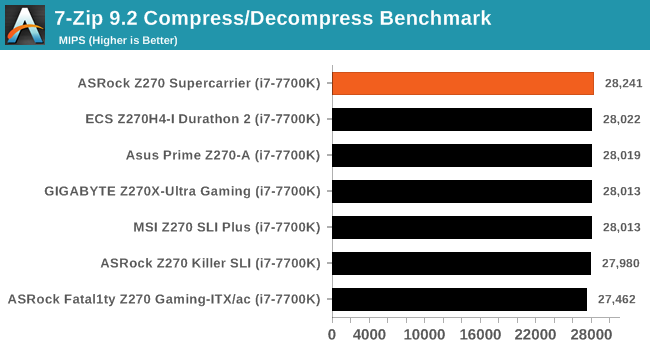
In summary, the ASRock Z270 Supercarrier is a motherboard primarily designed to entice professional designers, users who usually are seeking to build 3-way and 4-way SLI systems with a lot of storage devices. That is a very limited segment of the market and ASRock’s engineers are clearly trying to expand it by adding features that would also tempt gamers and overclockers with very large budgets. Even in its default configuration, the ASRock Z270 Supercarrier manages to outperform every other Z270-based motherboard that we have tested to this date, while it also displayed very promising overclocking capabilities during our testing. At this point we should mention that the higher overall performance does not come from any magic tricks but, as we found out during our testing, by ASRock’s engineers “cheating” and setting the CPU’s Turbo multiplier at 45 by default, allowing a 7700K processor to reach 4.5 GHz without tweaking any BIOS settings or other options.
Quick Board Feature Comparison
| Motherboard Comparison | ||
| ASRock Z270 Supercarrier | ||
| Socket | LGA1151 | LGA1151 |
| MSRP at Review | $349 | $140 |
| DRAM | 4 x DDR4 | 4 x DDR4 |
| PCIe Layout | ×8/×8/×8/×8 | x8/x8 |
| BIOS Version Tested | 1.11 | 2.00 |
| MCT Enabled Automatically? | No | Yes |
| USB 3.1 (10 Gbps) | Intel JHL6540 | None |
| M.2 Slots | 3 x PCIe 3.0 x4 | 2 x PCIe 3.0 x4 |
| U.2 Ports | No | No |
| Network Controller | 1× AQC218 / 1 x Intel I219-V / 1 x Intel I211-AT | 1 x Intel I219-V |
| Audio Controller | Realtek ALC1220 | Realtek ALC892 |
| HDMI 2.0 | No | No |
Other AnandTech Reviews for Intel’s 7th Generation CPUs and 200-Series Motherboards
($110) The ECS Z270H4-I Durathon 2 Review
($140) The ASRock Z270 Killer SLI Review
($140) The MSI Z270 SLI PLUS Review
($159) The ASRock Z270 Gaming-ITX/AC Review
($170) The Asus Prime Z270-A
($170) The GIGABYTE Z270X-Ultra Gaming
The Intel Core i7-7700K (91W) Review - CPU Review
The Intel Core i5-7600K (91W) Review - CPU Review
The Intel Core i3-7350K (60W) Review - CPU Review
Our Latest Best CPU Recommendations
In comparison to the older Z170 boards, the new Z270 board on the base specifications are hardly any different. The Z270 ones have four extra PCIe lanes configurable on the chipset, potentially new audio and new networking controllers, and Intel Optane Technology Support. Although four extra PCIe lanes do sound like a huge difference, it is an important upgrade for the implementation of native M.2 slots (on Z170-based motherboards, this usually meant disabling some other device/port on the motherboard). Also, note that Intel Optane drives should still function on other chipsets as drives; the Z270 only allows them to enable their “smart caching” technology.
The Intel Optane Memory (SSD) Preview: 32GB of Kaby Lake Caching
Individual motherboard manufacturers will be sprinkling on new features onto their Z270 products to aid the transition and provide other tangible benefits over the old platform. To read specifically about the Z170 chip/platform and the specifications therein, our deep dive into what it is can be found at this link.
A Small Note on USB Naming
One thing that we should note is that the advent of the Z270 chipset brought a change on the naming of the USB ports. What we knew as USB 3.0 ports are now being dubbed as “USB 3.1 Gen 1” and the 10Gbps ports are now called “USB 3.1 Gen 2”. We first encountered this change while reviewing the MSI Z270 SLI Plus a few months ago but it seems that most of the manufacturers are following suit, rewriting their websites and reprinting their manuals. Users need to be extra careful when very high bandwidth connectors are essential.
ASRock Z270 Supercarrier Visual Inspection
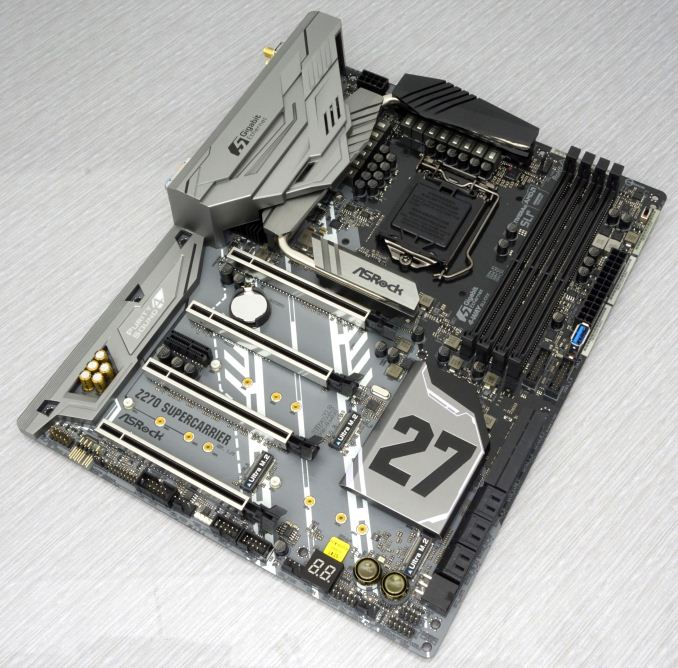
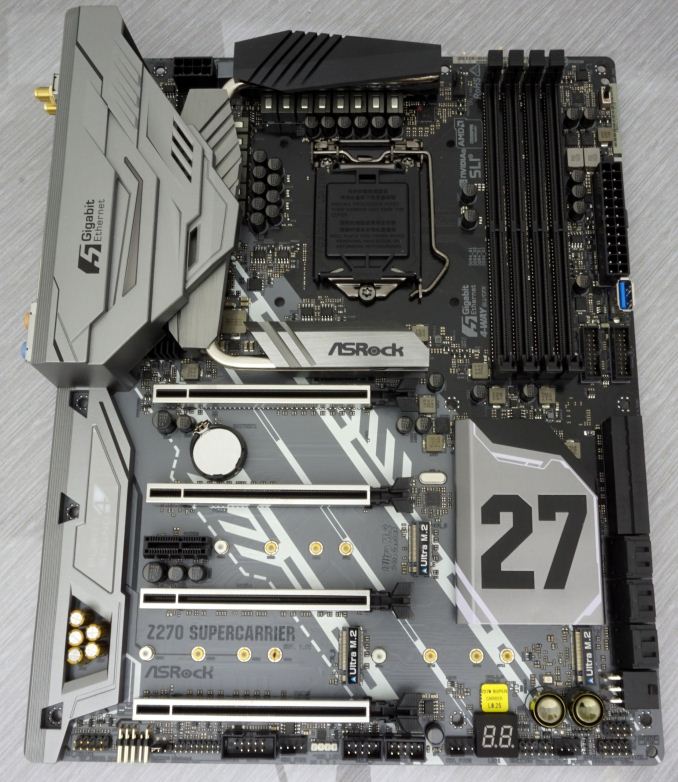
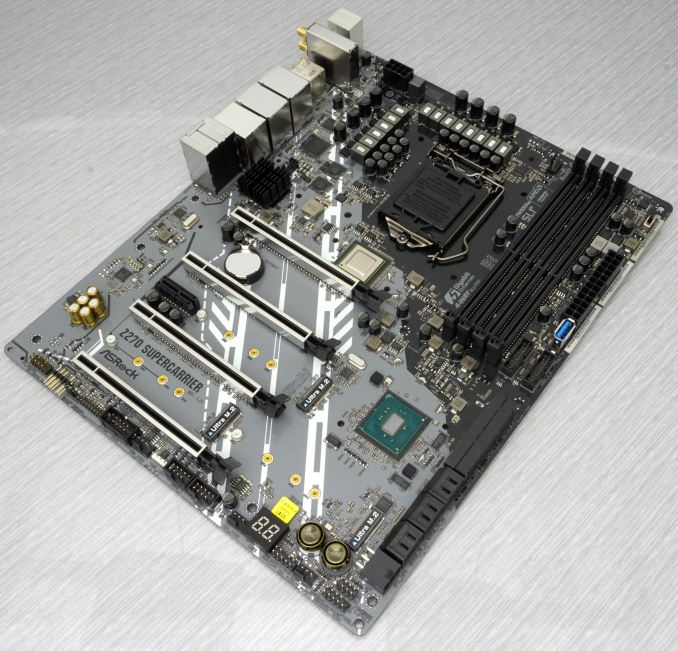
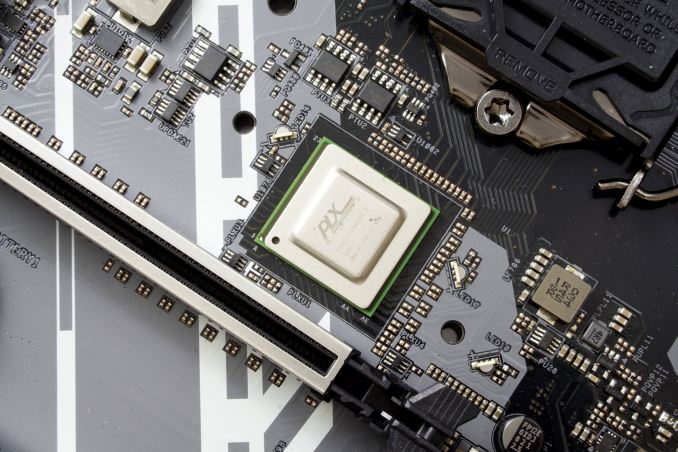
ASRock certainly allocated a lot of resources on the aesthetic design of the Z270 Supercarrier, most likely in an effort to make the motherboard more appealing towards gamers, as aesthetics hardly matter for the largest percentage of professionals. The PCB is half black, half grey, with white stripes vaguely forming the shape of an aircraft carrier’s flight deck. A large “27” is embossed onto the chipset’s heatsink, most likely as a reference to the Z270 chipset. There are three heatsinks surrounding the CPU socket, two on the VRM circuitry and one for the Broadcom PEX 8747 chipset that provides the extra 48 PCIe lanes that this motherboard needs. Two heatsinks are silver and the top heatsink is black. There is also a plastic silver frame covering the rear I/O ports, the sound circuitry, most of the motherboard’s controllers and part of the vertical VRM heatsink. Although this frame can be easily mistaken for metal, it is plastic and serves no other purpose than that of an aesthetic enhancement.
There are five PCIe slots on the Z270 Supercarrier. Four of them are full-length PCIe slots which, thanks to the presence of the Broadcom PEX 8747 chip, can support up to four PCIe ×8 devices. If two or three graphics cards are installed, the Z270 Supercarrier supports ×16/×16 and ×16/×8/×8 configurations respectively. These four full-length PCIe slots feature a metallic brace that doubles as an extra mechanical support for heavy graphics cards and as an aesthetic improvement. The fifth PCIe slot is a typical PCIe ×1 slot, powered from the chipset. The placement of the PCIe x1 right beneath the second full-length PCIe ×16 slot allows the installation of a card with single and dual GPU configurations. However, it cannot be used with triple and quad SLI configurations, except in the off chance that the graphics card installed in the second PCIe slot needs only one expansion slot or liquid cooling is used with single slot water blocks.
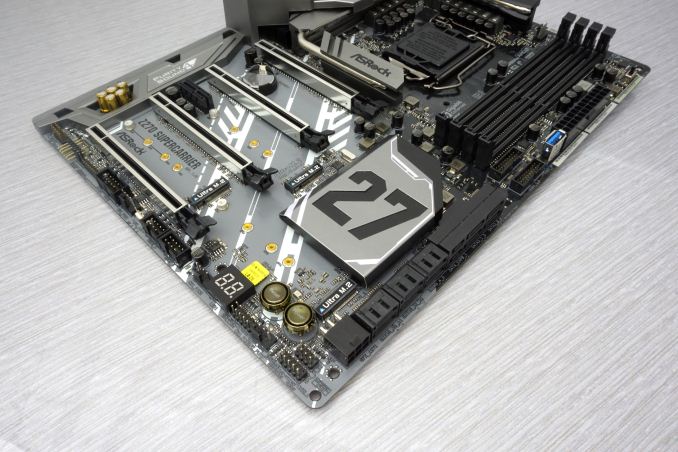
The motherboard’s designers did what they could to make the Z270 Supercarrier as functional as possible, placing almost all of the ports and connectors across the edges of the motherboard. The only exception are the M.2 device slots. There are three PCIe ×4 M.2 slots on the Z270 Supercarrier, one between the second and third graphics card slots and two across the space between the third and fourth graphics card slots. All three M.2 slots support devices up to 80 mm long (2280) and all three can concurrently operate in PCIe ×4 mode. If SATA M.2 devices are installed, however, the M.2 slots share lanes with the normal SATA ports and up to four SATA ports may be disabled (one if a SATA device is installed on the M.2_1 or M.2_3 slots, two if a SATA device is installed on the M.2_2 slot). The Z270 has two SATA Express connectors and two standard SATA 6 Gb/s connectors that are provided by the Intel Z270 chipset, plus an extra four SATA 6 Gb/s connectors provided by an additional ASMedia ASM1061 controller. The two SATA Express connectors may also be used as four standard SATA 6 Gb/s connectors. Beneath the SATA connectors, there is an additional PCIe 6-pin 12V connector that has to be used for multi-GPU configurations, so triple and quad SLI system builders need to take into consideration that an additional PCIe 6-pin cable will be required from the PSU.
There also is a great number of headers across the right and bottom edge of the Z270 Supercarrier. Right below the 24-pin ATX power connector, we can see a full-size Type-A USB 3.0 port and two USB 3.0 headers for up to four extra USB 3.0 ports. The two USB 3.0 headers are provided via an additional ASMedia ASM1074 controller, not from the chipset. There are also two USB 2.0 headers at the bottom edge of the motherboard, right in the middle. A COM port header can be seen towards the left, which may be a rare sight nowadays but remains necessary for many professionals. At the bottom left corner of the motherboard, we spotted two front panel audio headers, one vertical and one right-angled. There are three fan headers across the bottom edge of the motherboard for case fans. For the CPU, there is a fan header to the right of the top heatsink for a fan and one at the top left corner of the motherboard for either a fan or a liquid cooling pump.
ASRock also placed a debug LCD on the Z270 Supercarrier that can save users a lot of time if something goes wrong. It is a simple two-digit LCD and the error codes are being listed in the manual. Next to the debug LCD, we find two golden switches, one for power and one for reset. Another small switch can be found at the top right corner of the motherboard and can be used for the enabling of DRAM XMP profiles without having to enter the BIOS. We can also notice that there are two BIOS chips, one for the main BIOS and one serving as a backup, just in case something goes wrong during a BIOS flash or for users that need to quickly swap between BIOS versions or settings.
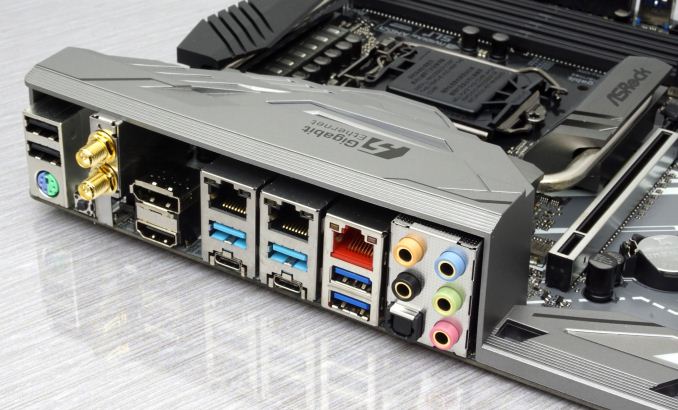
The rear panel of the ASRock Z270 Supercarrier is home to a lot of surprises as well. At the top, we start with a combo PS/2 port and two USB 2.0 ports, with the company obviously trying to maximize the motherboard’s compatibility with legacy devices. Right next to the USB 2.0 ports we can discern a tiny button that can be used to clear the CMOS if overclocking or other BIOS settings go awry. Moving downwards, we find the Intel AC3160 WiFi/Bluetooth antenna connectors, followed by a DisplayPort 1.2 and a HDMI 1.4a monitor connectors. ASRock did not bother installing an HDMI 2.0 port on the Z270 Supercarrier as they do not expect that anybody will be using it without at least one powerful graphics card installed.
The following two blocks have one Intel Gigabit LAN port, one USB 3.0 port and one USB 3.1 Type-C port each. The Type-C ports are provided via an Intel JHL6540 controller. The third block has a red LAN port, marking the AQUANTIA 5 Gbps controller, plus two USB 3.0 ports. Finally, the last block is home to five 3.5 mm gold-plated audio jacks and an optical SPDIF connector.
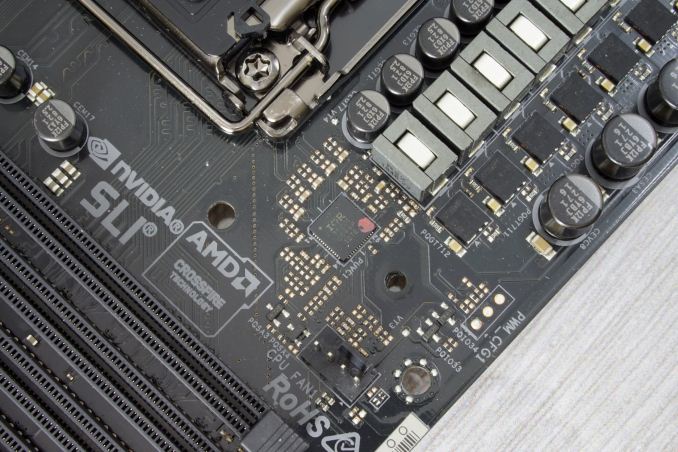
The Z270 has a 14-phase CPU power circuitry, making it by far the best power circuitry that we have seen on a Z270 motherboard up to this date. The controller is an International Rectifier IR35201, the same as that we found on the ASRock Fatal1ty Z270 Gaming-ITX/ac. This controller can handle up to eight phases, so ASRock had to install an additional six dual MOSFET drivers to double the number of phases. Therefore, the IR35201 is set to a 4+2 configuration that is being doubled to 8+4 phases. The additional two phases are the VCCIO and VCCSA and are controlled by a uPI controller. Nichicon supplies all of the solid-state capacitors on this motherboard, including the special “audio” golden capacitors of the audio circuitry.
ASRock Z270 Supercarrier Board Features
A quick look at ASRock’s website easily reveals that they intended the Z270 Supercarrier to be for professional designers and content editors. That, however, is a very narrow segment of the market, so the company’s engineers tried to add features that would also entice gamers and enthusiasts with larger budgets. The main highlight of the Z270 Supercarrier is the presence of four PCIe ×8 slots that allow for triple and quad SLI configurations, for either productivity or gaming. Other than that, ASRock has also added a very powerful CPU circuitry and advanced controllers that would appeal to gamers, as well as extensive storage device support that is needed by professionals. Despite the sheer number of features and supported devices, the dimensions of the Z270 Supercarrier are those of a standard ATX motherboard, ensuring compatibility with a far greater number of PC cases over an E-ATX design.
| ASRock Z270 Supercarrier | |
| Warranty Period | 3 Years |
| Product Page | Link |
| Price | Link |
| Size | ATX |
| CPU Interface | LGA1151 |
| Chipset | Intel Z270 |
| Memory Slots (DDR4) | Four DDR4 Supporting 64GB Dual Channel Up to DDR4-3733+ |
| Memory Slots (DDR3L) | None |
| Video Outputs | HDMI 1.4a DisplayPort 1.2 |
| Network Connectivity | AQC108 / Intel I219-V / Intel I211-AT |
| Onboard Audio | Realtek ALC1220 |
| PCIe Slots for Graphics (from CPU) | 4 × PCIe 3.0 via PEX 8747 (×16/×16, ×16/×8/×8, ×8/×8/×8/×8) |
| PCIe Slots for Other (from PCH) | 1 × PCIe ×1 |
| Onboard SATA | Six, RAID 0/1/5/10 |
| Onboard SATA Express | Two |
| Onboard M.2 | 3 × PCIe 3.0 (x4) |
| Onboard U.2 | None |
| USB 3.1 | Two Type-C (Intel JHL6540) |
| USB 3.0 | 4 x Type-A Rear Panel 4 × via headers 1 × Type-A onboard |
| USB 2.0 | 2 × Rear Panel 4 × via headers |
| Power Connectors | 1 x 24-pin ATX 1 x 8-pin CPU 1 x 6-pin GPU |
| Fan Headers | 1 x CPU (4-pin) 1 x Pump/Aux (4-pin) 3 x System (4-pin) |
| IO Panel | 4 x USB 3.0 (USB 3.1 Gen 1) 2 x USB 2.0 2 x USB 3.1 Type-C/Thunderbolt 3 1 x CMOS Reset Button 3 x Network RJ-45 1 x DisplayPort 1.2 1 x HDMI 1.4a 1 x Combo PS/2 5 x 3.5 mm Audio Jacks 1 x Optical SPDIF Out Port |
| Other Features | WiFi/BT Onboard Supports Intel® Optane™ technology Front Audio Header w/ TI NE5532 amplifier COM port header RGB lighting Dual LAN with Teaming |
In The Box
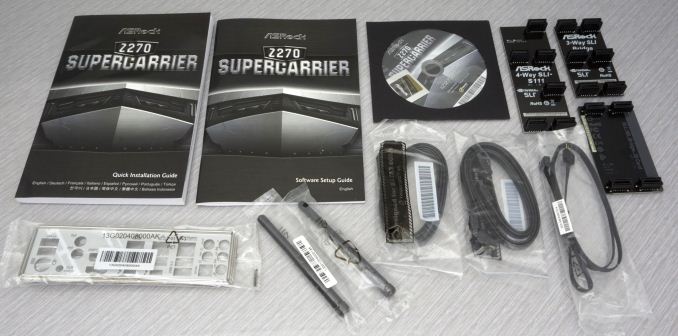
We get the following:
- Driver Disk
- Quick Installation Guide
- Software Setup Guide
- Rear I/O Shield
- Four black SATA cables (two straight, two with a 90° connector)
- SLI HB bridges (2-way, 3-way, and 4-way)
- RGB strip cable
- Wireless antennas
- Case badge
The items bundled alongside with the Z270 Supercarrier begin with a standard manual, a drivers/software DVD, a metallic I/O shield, a case badge, and four SATA cables; ordinary items that can be found accompanying almost any motherboard. However, we also find an extra cable for external RGB strips, two wireless antennas, and three HB SLI bridges. The HB SLI bridges are specially designed so as to support the NVIDIA GTX 1080 GPUs. However, we found the inclusion of typical antennas strange, as they often are the cause of space issues behind a case. A single wired antenna such as the one ASRock supplies with the Z270 Gaming-ITX/ac would have been much more convenient.
ASRock Z270 Supercarrier Overclocking
Experience with ASRock Z270 Supercarrier
Although the main target group of the Z270 Supercarrier are professionals, most of which are unlikely to do any overclocking at all, ASRock included a wealth of overclocking options and advanced circuitry to support it. This was probably an effort to make the Z270 Supercarrier a competitive option for enthusiastic gamers with large budgets. No matter the reason, the Z270 Supercarrier does have both the hardware and the software to support extensive overclocking. The power circuitry is excellent and the BIOS is very flexible, with the voltage and frequency options having excellent range and step.
Methodology
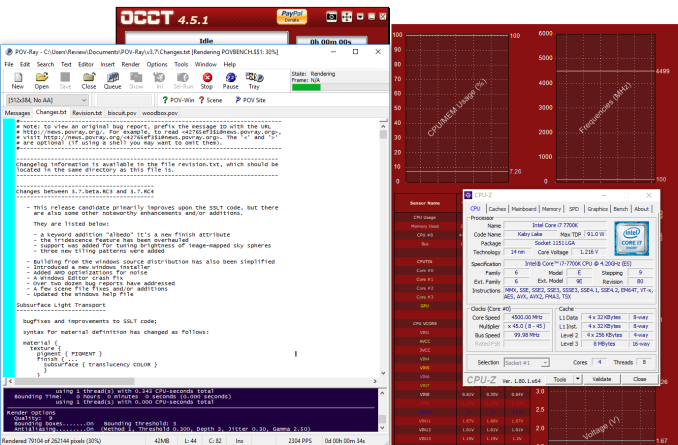
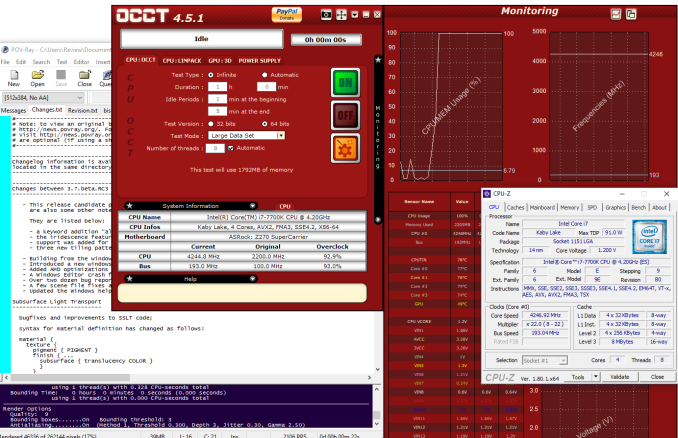
Our standard overclocking methodology is as follows. We select the automatic overclock options and test for stability with PovRay and OCCT to simulate high-end workloads. These stability tests aim to catch any immediate causes for memory or CPU errors.
For manual overclocks, based on the information gathered from previous testing, starts off at a nominal voltage and CPU multiplier, and the multiplier is increased until the stability tests are failed. The CPU voltage is increased gradually until the stability tests are passed, and the process repeated until the motherboard reduces the multiplier automatically (due to safety protocol) or the CPU temperature reaches a stupidly high level (100ºC+). Our test bed is not in a case, which should push overclocks higher with fresher (cooler) air.
Overclock Results
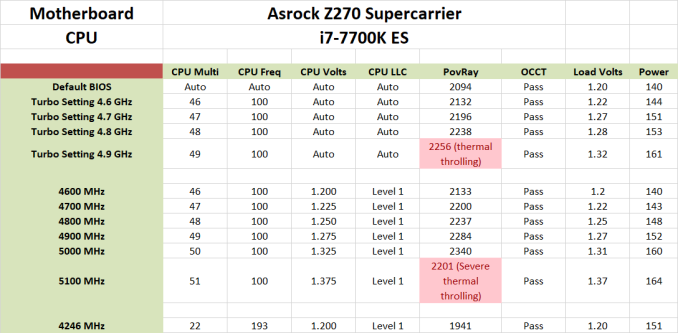
At this point we should again mention that the ASRock Z270 Supercarrier has multi-core turbo enabled by default, which is common, but also has a default turbo multiplier of ×45 rather than ×44, essentially overclocking our 7700K CPU to 4.5 GHz by default.
Testing the automated overclock options proved that ASRock’s overclocking presets will work fine for users that do not want to concern themselves with detailed settings. The automated setting however are, as expected, a little too generous with the voltage. Our system was working fine with the Turbo CPU setting up to 4.8 GHz but any further than that would raise our processor’s temperatures too high and trigger thermal throttling. Better cooling solutions and a lucky CPU pick can yield much better overclocking results if done manually. Manual control allowed us to reach a fully stable overclock of 5.0 GHz. Ultimately, what limited us was the thermal performance of our CPU and not the motherboard.
The ASRock Z270 Supercarrier also handles high BCLK frequencies very well. We managed to reach a fully stable frequency of 193 MHz with virtually minimal tweaking. Note that the newer motherboard designs decouple the CPU bus from the rest of the frequency domains in order to allow for these high BCLK overclocks, meaning that the performance of other components and the system’s overall bandwidth remains unaffected. On the contrary, frequency misalignments can cause an overall performance drop. Thus, this technique is useless to users who have unlocked CPUs and should be used only to overclock locked CPUs.
The ASRock Z270 Supercarrier Test Bed
Readers of our motherboard review section will have noted the trend in modern motherboards to implement a form of MultiCore Enhancement / Acceleration / Turbo (read our report here) on their motherboards. This does several things, including better benchmark results at stock settings (not entirely needed if overclocking is an end-user goal) at the expense of heat and temperature. It also gives, in essence, an automatic overclock which may be against what the user wants. Our testing methodology is ‘out-of-the-box’, with the latest public BIOS installed and XMP enabled, and thus subject to the whims of this feature. It is ultimately up to the motherboard manufacturer to take this risk – and manufacturers taking risks in the setup is something they do on every product (think C-state settings, USB priority, DPC Latency/monitoring priority, overriding memory sub-timings at JEDEC). Processor speed change is part of that risk, and ultimately if no overclocking is planned, some motherboards will affect how fast that shiny new processor goes and can be an important factor in the system build.
The ASRock Z270 Supercarrier has the multi-core acceleration enabled by default, plus an extra CPU multipler for good measure. The FCLK frequency is set to 800 MHz by default as well and all current/temperature limiters are enabled and set to their default settings. The only safety setting that is disabled by default is the reliability stress restrictor.
| Test Setup | |
| Processor | Intel Core i7-7700K (ES, Retail Stepping), 91W, $340 4 Cores, 8 Threads, 4.2 GHz (4.5 GHz Turbo) |
| Motherboards | ASRock Z270 Supercarrier |
| Cooling | Alphacool Eisbaer 240 |
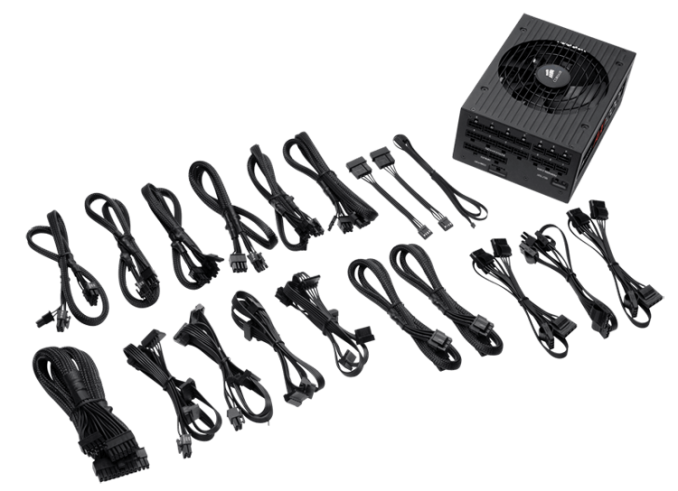
| Power Supply | Corsair AX1200i Platinum PSU |
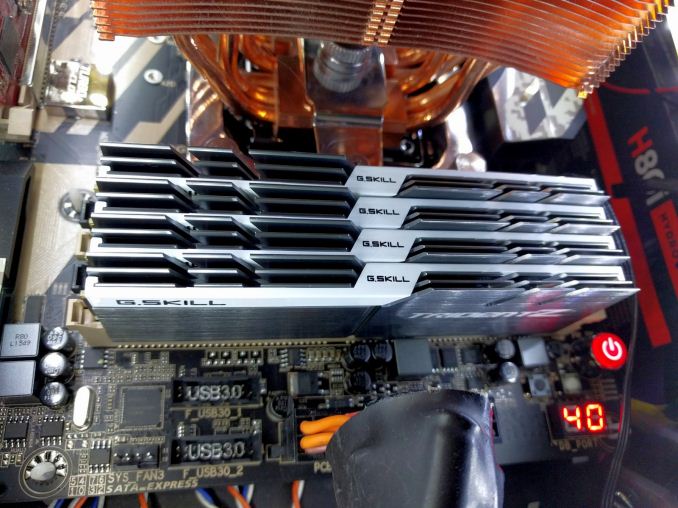
| Memory | G.Skill DDR4-2400 C15 2x16 GB 1.2V |
| Memory Settings | XMP @ 2400 |
| Video Cards | MSI GTX 770 Lightning 2GB (1150/1202 Boost) |
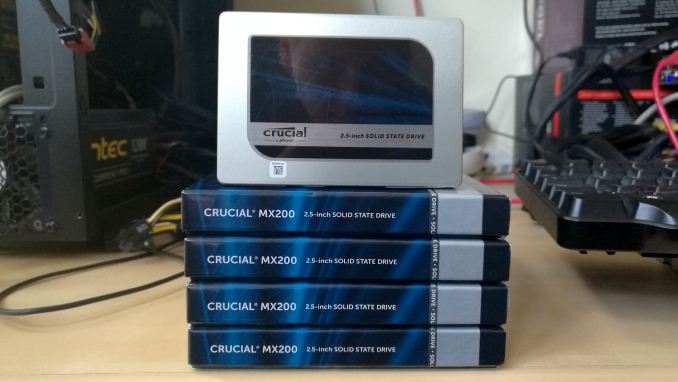
| Hard Drive | Crucial MX200 1TB |
| Case | Open Test Bed |
| Operating System | Windows 7 64-bit SP1 |
Thank you to Crucial for providing us with MX200 SSDs. Crucial stepped up to the plate as our benchmark list grows larger with newer benchmarks and titles, and the 1TB MX200 units are strong performers. Based on Marvell's 88SS9189 controller and using Micron's 16nm 128Gbit MLC flash, these are 7mm high, 2.5-inch drives rated for 100K random read IOPs and 555/500 MB/s sequential read and write speeds. The 1TB models we are using here support TCG Opal 2.0 and IEEE-1667 (eDrive) encryption and have a 320TB rated endurance with a three-year warranty.
Further Reading: AnandTech's Crucial MX200 (250 GB, 500 GB & 1TB) Review
Thank you to Corsair for providing us with an AX1200i PSU. The AX1200i was the first power supply to offer digital control and management via Corsair's Link system, but under the hood it commands a 1200W rating at 50C with 80 PLUS Platinum certification. This allows for a minimum 89-92% efficiency at 115V and 90-94% at 230V. The AX1200i is completely modular, running the larger 200mm design, with a dual ball bearing 140mm fan to assist high-performance use. The AX1200i is designed to be a workhorse, with up to 8 PCIe connectors for suitable four-way GPU setups. The AX1200i also comes with a Zero RPM mode for the fan, which due to the design allows the fan to be switched off when the power supply is under 30% load.
Further Reading: AnandTech's Corsair AX1500i Power Supply Review
Thank you to G.Skill for providing us with memory. G.Skill has been a long-time supporter of AnandTech over the years, for testing beyond our CPU and motherboard memory reviews. We've reported on their high capacity and high-frequency kits, and every year at Computex G.Skill holds a world overclocking tournament with liquid nitrogen right on the show floor.
Further Reading: AnandTech's Memory Scaling on Haswell Review, with G.Skill DDR3-3000
ASRock Z270 Supercarrier BIOS
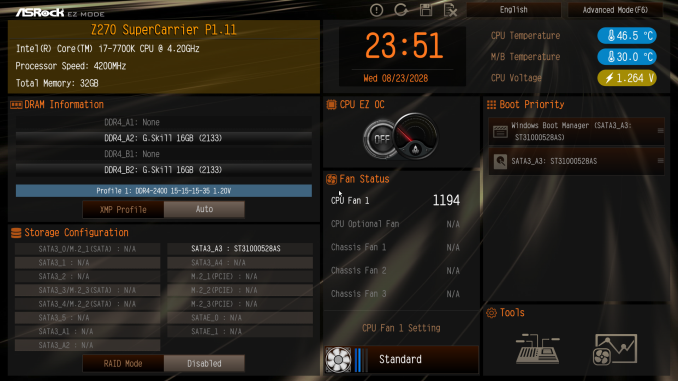
The BIOS of the ASRock Z270 Supercarrier is graphical, and features control via the mouse, and direct internet access for updates or contacting ASRock’s support department. It defaults to the “EZ Mode", a simplistic single page that hosts only basic configuration settings and informative dials. From this page, the user can switch the boot device priority, engage DRAM XMP profiles, change the fan speed setting and engage pre-programmed CPU overclocking profiles. There is also a simplistic automatic overclock option, allowing the user to switch between “Off” and “Tubo”. No, we are not the ones who spelled this wrong.
Upgrading the BIOS, device identification, and fan speed tuning tools are also accessible through the icons found at the bottom right corner of EZ Mode. The “Instant Flash” tool can be used to flash a BIOS that is already stored into a local disk drive and the “Internet Flash” will access and check ASRock’s servers for a newer BIOS version. The “System Browser” tool brings up an image of the motherboard and its rear I/O panel, where the user can “explore” the board using the mouse pointer. The tool will display information on the device that is attached/connected on the port or slot that the pointer is placed on. Finally, the “FAN-Tastic” tuning tool brings up a red screen where the thermal profile of the cooling fans connected to the motherboard’s headers can be either selected from four pre-programmed presets or be manually programmed.
Users can enter the “advanced” mode that allows access to all of the BIOS options and features by pressing the F6 key. The full BIOS has all of its settings arranged under eight major tabs, with the bulk of the tweakable settings and options under the “OC Tweaker” and “Advanced” tabs.
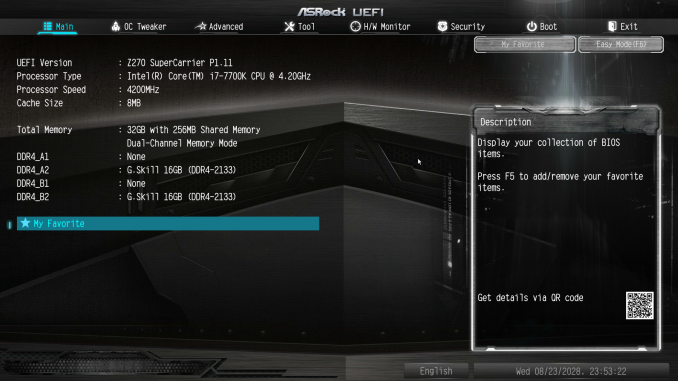
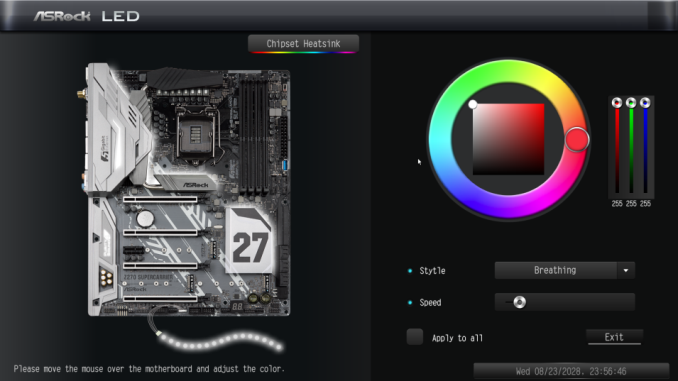
The first tab is the “Main” Tab and only includes system information and a list of settings that have been flagged by the user as “Favorite”. Skipping down to the fourth tab, the “Tools” tab that is, we find the same tools that are accessible via the “EZ mode” screen, plus a few more: the “UEFI Tech Service”, which is practically sends a direct message to ASRock’s customer support from inside the BIOS, the “AURA RGB LED” that allows for the programming of both the onboard LEDs and the optional strip connected to the motherboard’s header, and the “Network Configuration” submenu that allows the user to manually set up the system’s IP rather than having DHCP do it automatically. There is also an option to backup the BIOS from the main to the auxiliary memory chip, which can be useful for the users who want to keep both of the BIOS chips up to date.
The fifth tab, dubbed “H/W Monitor”, initially appears to be a purely informative screen. However, scrolling down the page reveals the fan settings, allowing the user to choose pre-programmed or program new thermal profiles for the cooling fans connected on the motherboard’s headers. The “FAN-Tastic” tuning tool is also accessible via this screen. In the three last tabs, we find typical BIOS options that have to do with the system’s security and boot options, options that we do typically see programmed into any motherboard BIOS. That leaves us with just two tabs, the “OC Tweaker” and the “Advanced” tabs, each of which holds many submenus and numerous sub settings.
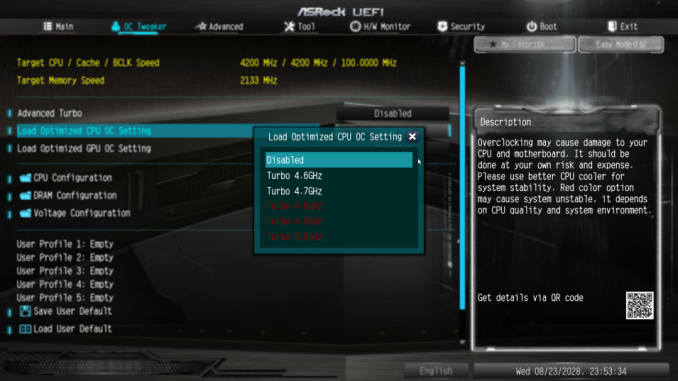
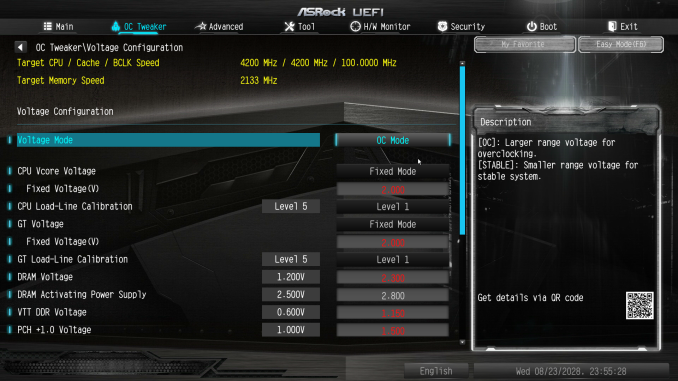
The “OC Tweaker” tab initially offers only three tweakable options. The first is the “Advanced Turbo” mode that concurrently overclocks the CPU and GPU via presets. The other two are the “CPU OC setting” and “GPU OC setting”, which offer the same presets as the “Advanced Turbo” option does but only affect the CPU or GPU respectively. Up to five manual configuration profiles can also be saved/loaded through this screen.
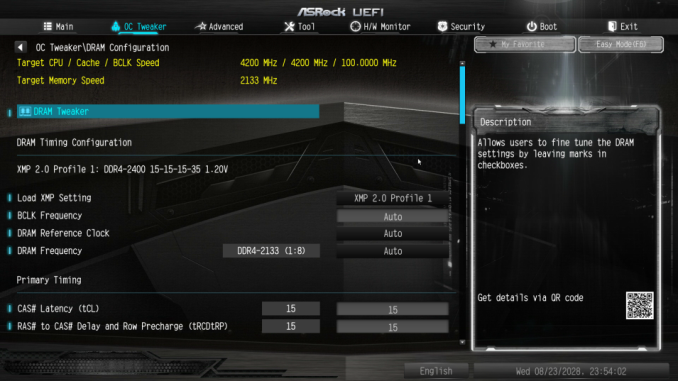
A host of frequency, timing and voltage settings can be found under the three submenus here. The first submenu hosts all of the CPU settings, the second the DRAM settings, and the third all voltage configuration settings.
The “CPU Configuration” submenu includes all of the CPU-related options, such as the multiplier, BCLK frequency, Intel-specific features and power limits. The “DRAM Tweaker” begins with the XMP settings and basic RAM timings, but the BCLK frequency appears in this submenu as well. As the user begins scrolling down, the menu expands to “primary”, “secondary”, “third”, “fourth” and “advanced” timings, offering a ridiculous number of possible timing adjustments that even seasoned overclockers will not be fiddling with. Finally, the “Voltage Configuration” submenu allows for the manipulation of the CPU, DRAM, PCH and other voltage lines. The voltage adjustment steps are very fine, at 5 mV for most of the options here, and the range is exceptional as well. Actually, the range of most voltage options is so great that we do not recommend manual adjustments by users without at least some overclocking experience, as some of these settings could kill components outright.
The “Advanced” tab includes all of the configuration options for the motherboard’s features and onboard devices. Once again there is a “CPU Configuration” submenu, with the options that ASRock probably assumed that they are not relevant for overclockers. Most of these options control features of the CPU, such as hyper threading and virtualization, as well as power saving states. Among these options lies the disabling of thermal throttling, which may be used by experienced overclockers but can be very dangerous.
The “Chipset Configuration” submenu includes advanced options for the chipset’s link speeds and iGPU, and allows the disabling of the onboard audio and LAN devices. The rest of the submenus are straightforward, with the “Storage Configuration” including the SATA control options, the “Super I/O” the settings for the PS/2 and serial ports, etc. There is nothing out of the ordinary in any of these submenus.
ASRock Z270 Supercarrier Software
Despite the motherboard’s class and price, ASRock made no effort to develop a software package any more advanced than what comes with their mainstream motherboards. The driver DVD has a very basic automated installer software with five tabs. The first tab lists all of the drivers and software that are compatible with this motherboard, plus Google’s Chrome Browser and Toolbar, even though these have their own tab. There is an “Install all” option that automatically installs everything, without leaving any room for the user to select what should be installed and what not. The “Utilities” tab is practically empty, with only the “Restart to UEFI” software to be found here, a simple shortcut that restarts the PC and automatically enters the BIOS. Manuals and guides can be found under the Information tab and, finally, the company’s contact information is all that can be seen under the Contact tab.
The core software package that accompanies the ASRock Z270 Supercarrier, and practically all of ASRock’s motherboards today, is the ASRock App Shop. This application doubles as a software “shop” and as an updates installer. Extra software packages that can enhance the system’s devices, offer more options, and even some basic games can be downloaded and installed.
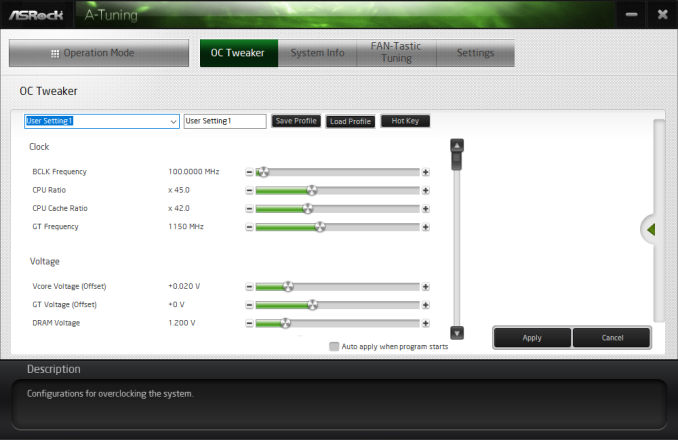
ASRock’s A-Tuning utility is the software package that allows for overclocking, fan tuning and monitoring via the OS. In its “OC Tweaker” tab we found many of the settings that are accessible via the BIOS screen, allowing for casual overclockers to experiment with minimal risk, as the settings reset when the system restarts. It is also handy for people who do not want a permanent overclock forced via the BIOS but prefer to boot with stock settings and force an overclock whenever they want or after the OS has booted.
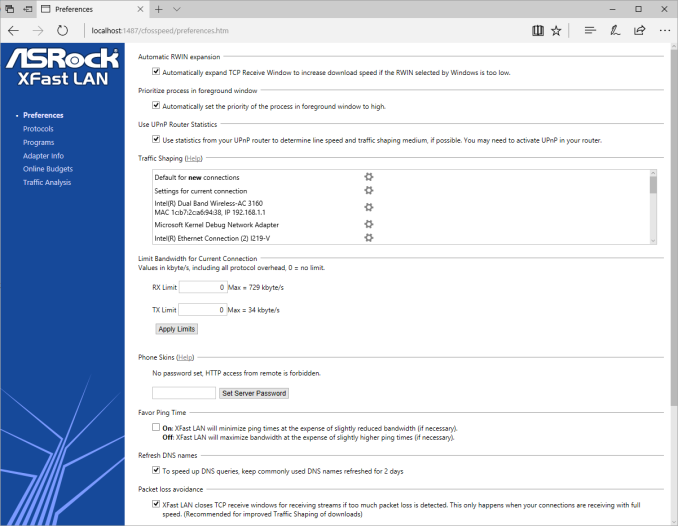
The ASRock XFast LAN technically is the well-known cFos software with ASRock’s skin. This software allows the user to prioritize network traffic according to his/her needs. For example, it can be set to prioritize the traffic of a specific game/application over a downloading/file sharing app or server. This is particularly useful for applications where seamless network traffic can be vital, such as, for example, when there are IP security cameras connected to the computer and they should not be disturbed by the downloading of a large OS update or other files.
System Performance
Not all motherboards are created equal. On the face of it, they should all perform the same and differ only in the functionality they provide - however this is not the case. The obvious pointers are power consumption, but also the ability for the manufacturer to optimize USB speed, audio quality (based on audio codec), POST time and latency. This can come down to manufacturing process and prowess, so these are tested.
Power Consumption
Power consumption was tested on the system while in a single MSI GTX 770 Lightning GPU configuration with a wall meter connected to the Corsair AX1200i power supply. This power supply is Platinum rated, and as I am on a 230-240 V supply, leads to ~75% efficiency > 50W, and 90%+ efficiency at 250W, suitable for both idle and multi-GPU loading. This method of power reading allows us to compare the power management of the UEFI and the board to supply components with power under load, and includes typical PSU losses due to efficiency. These are the real-world values that consumers may expect from a typical system (minus the monitor) using this motherboard.
While this method for power measurement may not be ideal, and you feel these numbers are not representative due to the high wattage power supply being used (we use the same PSU to remain consistent over a series of reviews, and the fact that some boards on our test bed get tested with three or four high powered GPUs), the important point to take away is the relationship between the numbers. These boards are all under the same conditions, and thus the differences between them should be easy to spot.
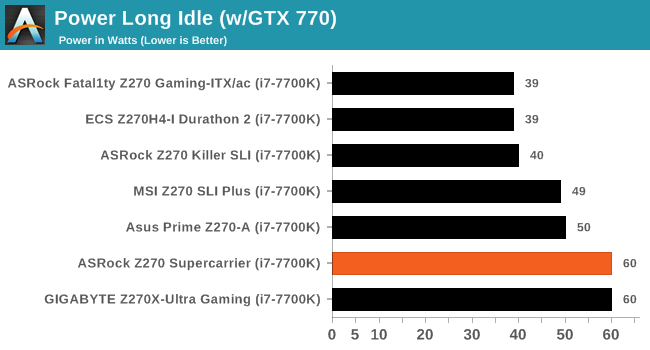
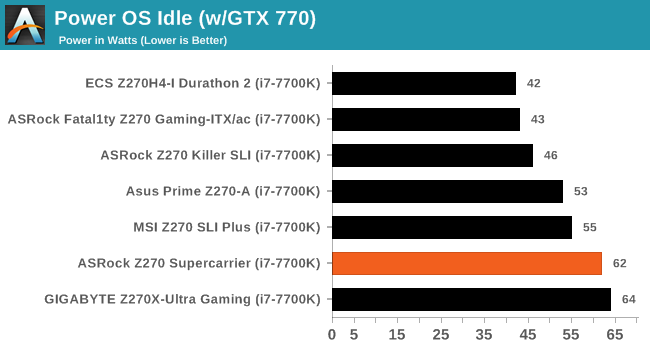
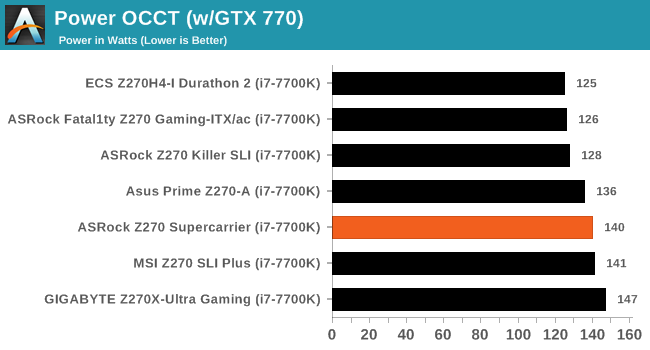
Although the energy consumption of the ASRock Z270 Supercarrier appears to be on the high side, it actually is lower than what we initially expected it to be. With the many controllers, components and RGB lighting that this motherboard features, we expected it to significantly surpass the energy consumption of mainstream ATX motherboards based on the same chipset. The Z270 Supercarrier however matches the energy consumption of $130-180 ATX motherboards and even outperforms a few of them.
Non UEFI POST Time
Different motherboards have different POST sequences before an operating system is initialized. A lot of this is dependent on the board itself, and POST boot time is determined by the controllers on board (and the sequence of how those extras are organized). As part of our testing, we look at the POST Boot Time using a stopwatch. This is the time from pressing the ON button on the computer to when Windows 7 starts loading. (We discount Windows loading as it is highly variable given Windows specific features.)
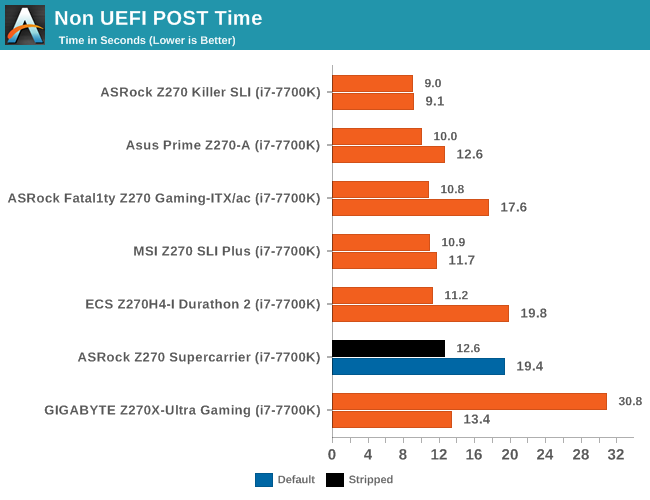
Booting times are not the ASRock Z270 Supercarrier’s best subject. The motherboard has a default boot time of 19.4 seconds, which is relatively high. It can be shortened down to 12.6 seconds by enabling quick boot and disabling the extra SATA/USB controllers. Hopefully, for the users that this motherboard is intended, some extra seconds during boot will not really matter.
Rightmark Audio Analyzer 6.2.5
RightMark:AA indicates how well the sound system is built and isolated from electrical interference (either internally or externally). For this test, we connect the Line Out to the Line In using a short six inch 3.5mm to 3.5mm high-quality jack, turn the OS speaker volume to 100%, and run the Rightmark default test suite at 192 kHz, 24-bit. The OS is tuned to 192 kHz/24-bit input and output, and the Line-In volume is adjusted until we have the best RMAA value in the mini-pretest. We look specifically at the Dynamic Range of the audio codec used on board, as well as the Total Harmonic Distortion + Noise.
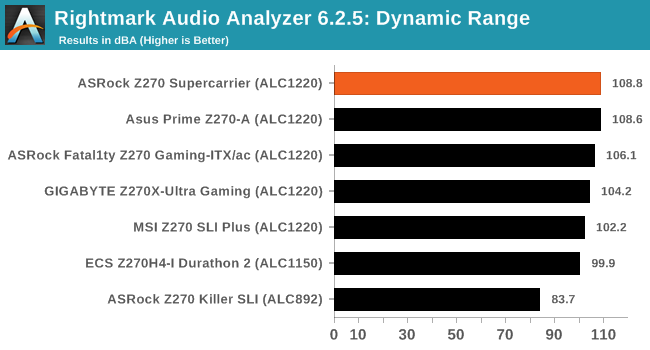
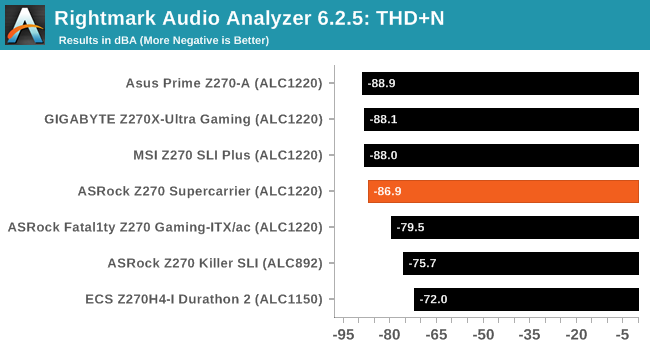
ASRock did a great job implementing the Realtek ALC1220 on the Z270 Supercarrier. The dynamic range is exceptional, reaching 108.8 dB(A), surpassing that of every Z270 motherboard that we have tested to this date. The THD + Noise reading was -86.9 dB(A), slightly lower than that of the gaming-class Z270 motherboards from Asus and GIGABYTE, hinting that ASRock’s shielding is inferior, even if only slightly.
USB Backup
For this benchmark, we transfer a set size of files from the SSD to the USB drive using DiskBench, which monitors the time taken to transfer. The files transferred are a 1.52 GB set of 2867 files across 320 folders – 95% of these files are small typical website files, and the rest (90% of the size) are small 30 second HD videos. In an update to pre-Z87 testing, we also run MaxCPU to load up one of the threads during the test which improves general performance up to 15% by causing all the internal pathways to run at full speed.
Due to the introduction of USB 3.1, as of June 2015 we are adjusting our test to use a dual mSATA USB 3.1 Type-C device which should be capable of saturating both USB 3.0 and USB 3.1 connections. We still use the same data set as before, but now use the new device. Results are shown as seconds taken to complete the data transfer.
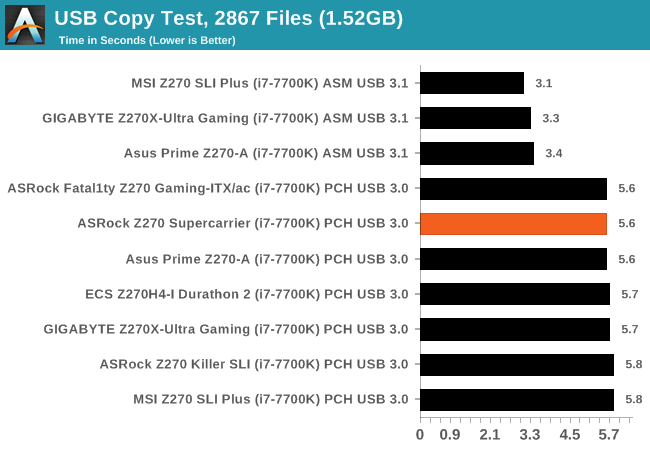
The USB 3.0 performance of the ASRock Z270 Supercarrier is unsurprising and directly in line with any Z270-based motherboard that we have tested. Unfortunately, we could not assess the performance of the USB 3.1 controller as Intel’s controllers seem to (still) be incompatible with our USB 3.1 Type-C device, dismounting the device during testing or giving us false readings.
DPC Latency
Deferred Procedure Call latency is a way in which Windows handles interrupt servicing. In order to wait for a processor to acknowledge the request, the system will queue all interrupt requests by priority. Critical interrupts will be handled as soon as possible, whereas lesser priority requests such as audio will be further down the line. If the audio device requires data, it will have to wait until the request is processed before the buffer is filled.
If the device drivers of higher priority components in a system are poorly implemented, this can cause delays in request scheduling and process time. This can lead to an empty audio buffer and characteristic audible pauses, pops, and clicks. The DPC latency checker measures how much time is taken processing DPCs from driver invocation. The lower the value will result in better audio transfer at smaller buffer sizes. Results are measured in microseconds.
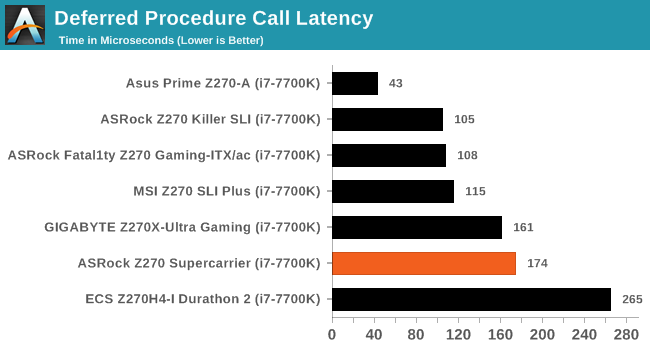
DPC latency usually is not ASRock’s strongest topic and, with a reading of 174 μs, the Z270 Supercarrier is no exception. It is not a bad performance figure, nor the worst reading that we have seen on a Z270-based motherboard, but it is higher than what we expected to see from a motherboard of this class.
CPU Performance, Short Form
For our motherboard reviews, we use our short form testing method. These tests usually focus on if a motherboard is using MultiCore Turbo (the feature used to have maximum turbo on at all times, giving a frequency advantage), or if there are slight gains to be had from tweaking the firmware. We leave the BIOS settings at default and memory at JEDEC for these tests, making it very easy to see which motherboards have MCT enabled by default.
Video Conversion – Handbrake v1.0.2: link
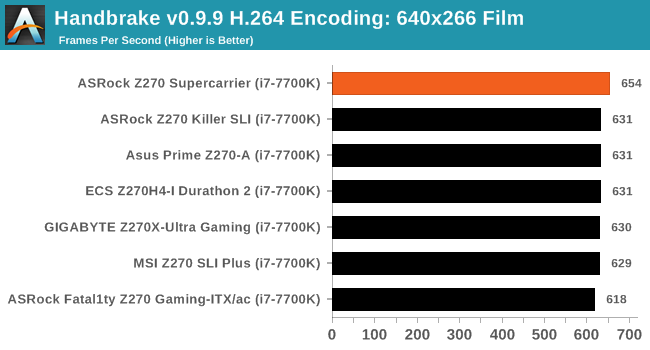
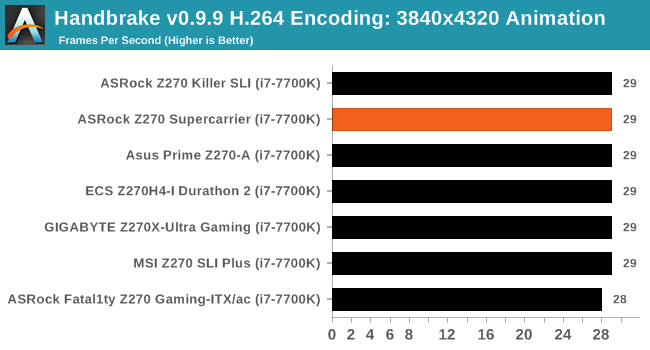
Handbrake is a media conversion tool that was initially designed to help DVD ISOs and Video CDs into more common video formats. For HandBrake, we take two videos and convert them to x264 format in an MP4 container: a 2h20 640x266 DVD rip and a 10min double UHD 3840x4320 animation short. We also take the third video and transcode it to HEVC. Results are given in terms of the frames per second processed, and HandBrake uses as many threads as possible.
Compression – WinRAR 5.4: link
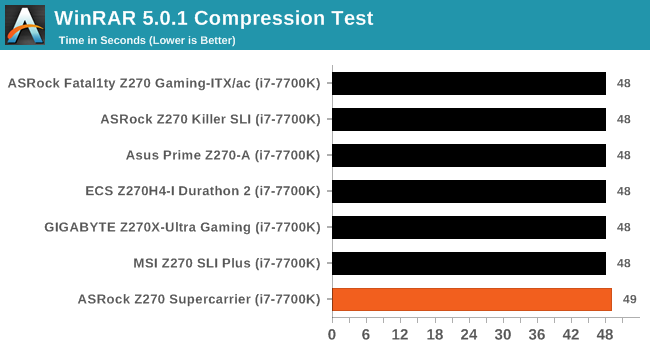
Our WinRAR test from 2013 is updated to the latest version of WinRAR at the start of 2017. We compress a set of 2867 files across 320 folders totaling 1.52 GB in size – 95% of these files are small typical website files, and the rest (90% of the size) are small 30 second 720p videos.
Point Calculations – 3D Movement Algorithm Test v2.1: link
3DPM is a self-penned benchmark, taking basic 3D movement algorithms used in Brownian Motion simulations and testing them for speed. High floating point performance, MHz and IPC wins in the single thread version, whereas the multithread version has to handle the threads and loves more cores. For a brief explanation of the platform agnostic coding behind this benchmark, see my forum post here. We are using the latest version of 3DPM, which has a significant number of tweaks over the original version to avoid issues with cache management and speeding up some of the algorithms.
Rendering – POV-Ray 3.7.1b4: link
The Persistence of Vision Ray Tracer, or POV-Ray, is a freeware package for as the name suggests, ray tracing. It is a pure renderer, rather than modeling software, but the latest beta version contains a handy benchmark for stressing all processing threads on a platform. We have been using this test in motherboard reviews to test memory stability at various CPU speeds to good effect – if it passes the test, the IMC in the CPU is stable for a given CPU speed. As a CPU test, it runs for approximately 2-3 minutes on high end platforms.
Synthetic – 7-Zip 9.2: link
As an open source compression tool, 7-Zip is a popular tool for making sets of files easier to handle and transfer. The software offers up its own benchmark, to which we report the result.
Gaming Performance
The issue of FCLK settings might play a big role here. At launch, the default setting for the communication buffer between the CPU and PCIe stack was 800 MHz, even though Intel suggested 1000 MHz, but this was because of firmware limitations from Intel. Since then, there is firmware to enable 1000 MHz, and most motherboard manufacturers have this - but it is unclear if the motherboard will default to 1000 MHz and it might vary from BIOS version to BIOS version. As we test at default settings, our numbers are only ever snapshots in time, but it leads to some interesting differences in discrete GPU performance.
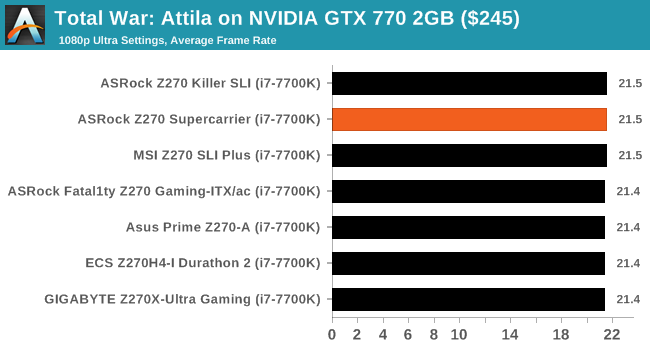
Total War: Attila
The Total War franchise moves on to Attila, another The Creative Assembly development, and is a stand-alone strategy title set in 395AD where the main storyline lets the gamer take control of the leader of the Huns in order to conquer parts of the world. Graphically the game can render hundreds/thousands of units on screen at once, all with their individual actions and can put some of the big cards to task.
For low-end graphics, we test at 720p with performance settings, recording the average frame rate. With mid and high range graphics, we test at 1080p with the quality setting. In both circumstances, unlimited video memory is enabled and the in-game scripted benchmark is used.
GRID: Autosport
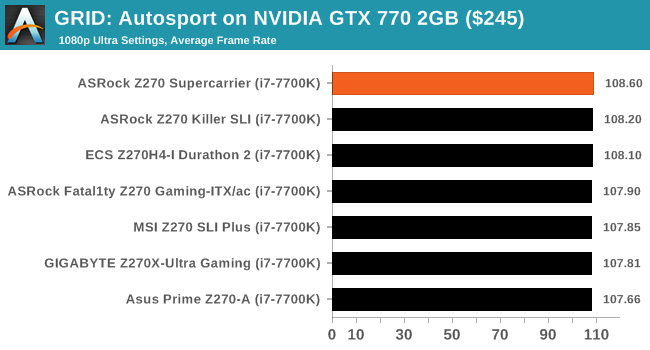
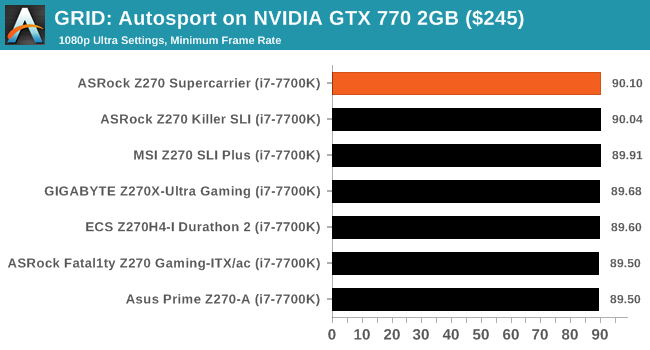
No graphics tests are complete without some input from Codemasters and the EGO engine, which means for this round of testing we point towards GRID: Autosport, the next iteration in the GRID and racing genre. As with our previous racing testing, each update to the engine aims to add in effects, reflections, detail, and realism, with Codemasters making ‘authenticity’ a main focal point for this version.
GRID’s benchmark mode is very flexible and, as a result, we created a test race using a shortened version of the Red Bull Ring with twelve cars doing two laps. The car is focus starts last and is quite fast, but usually finishes second or third. For low-end graphics, we test at 1080p medium settings, whereas mid and high-end graphics get the full 1080p maximum. Both the average and minimum frame rates are recorded.
ASRock Z270 Supercarrier Conclusion
The Z270 Supercarrier is ASRock’s Intel Z270 chipset flagship motherboard, designed to support up to quad SLI/Crossfire-X graphics card configurations and an extensive number of storage devices. It is a motherboard primarily intended to tempt designers & content creators that usually require very high graphics processing power and storage capacity. Nevertheless, in an attempt to expand the potential market of the motherboard as much as possible, ASRock included features and options that would be of interest to other users with large budgets, such as enthusiasts who want to build very powerful and overclocked gaming PCs.
It is the extra Broadcom PEX 8747 chipset that adds extra PCIe lanes which allows for both the inclusion of four full length PCIe slots, plus for a more extensive storage device configuration. The Z270 Supercarrier has three M.2 PCIe ×4 slots that do not share any lanes with any PCIe card slot, allowing for full operation alongside a fully populated set of PCIe slots. There are two SATA Express and two SATA 6 Gbps ports provided by the Z270 chipset, plus four additional SATA 6 Gbps ports provided by the ASMedia ASM1061 controller, with the ASMedia controller connected to the Broadcom PEX 8747 chipset. The Z270 Supercarrier also has an extensive number of USB device ports and internal headers, allowing for a maximum of six USB 2.0 devices, nine USB 3.0 devices, and two USB 3.1 Type-C devices. It also has COM and TPM headers, which are often useful for professional systems.
ASRock installed three different wired network controllers on the Z270 Supercarrier, plus one wireless controller. The AQUANTIA 5 Gbps controller makes sense on such a motherboard that is trying to differentiate itself from the crowd. Although 5/10 Gbps equipment is currently very difficult to acquire, the controller will be there for when such devices become more readily available. The Intel’s Gigabit I219-V controller is also a sensible choice, as it is a proven high-performance interface that maximizes compatibility with current equipment. What we found excessive is the third wired network controller, the Intel Gigabit I211-AT, a controller that is optimized for efficiency over performance. It does support Dual LAN via teaming but, ironically, teaming is unsupported under Windows 10. We feel that ASRock could have installed something else in the place of the I211-AT that could be more useful than a third network interface.
In terms of quality, ASRock made very few compromises. The used components are some of the best that are available for commercial motherboards and the circuitry of the Z270 Supercarrier is the best that we have seen on any Z270 motherboard to this date. ASRock’s engineers thought of the layout well, making the Z270 Supercarrier an easy motherboard to work with, especially considering that they managed to place all of this hardware on an ATX PCB. Aesthetics are a subject that lies in the eye of the beholder, and also a subject that hardly matters for most professionals, yet ASRock’s engineers did try to make the Z270 Supercarrier an aesthetically appealing motherboard with a unique paint job and RGB lighting.
The problem with the Z270 Supercarrier is that the high retail price risks making it unattractive to the group of users it is primarily targeted at. The advantage that the Intel Z270 chipset has now, and until it is replaced by another cost-effective solution, is the combination of competitively priced motherboards and processors. A Z270 motherboard that retails for $350 is treading deep into the territory of newer socket X299 and socket X399 platforms, where the CPU and/or DRAM can be more expensive but are substantially better for productivity purposes. The Z270 Supercarrier could be a practical choice for gamers who want to build triple and quad SLI systems, as higher core frequencies have an advantage over multiple cores in today’s games, yet still they would take a risk with future titles that could be optimized for processors with more than 4 cores.

