Original Link: https://www.anandtech.com/show/11517/flir-one-pro-review
FLIR ONE Pro Thermal Camera Review
by Ganesh T S on June 6, 2017 8:45 AM EST- Posted in
- Gadgets
- Thermal Imaging
- FLIR
- USB-C
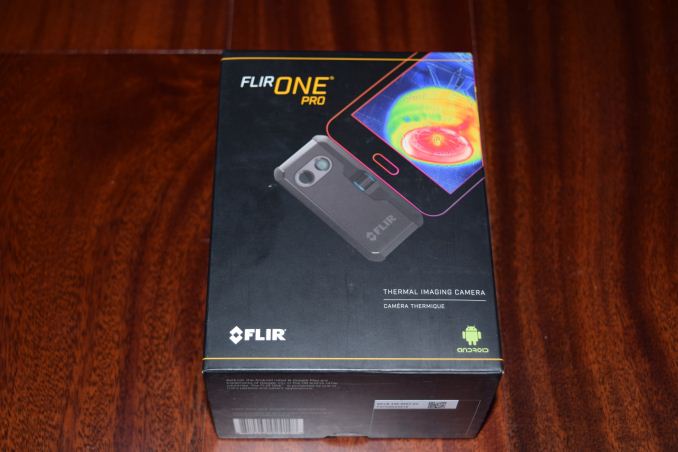
We had written about the launch of the third-generation FLIR ONE along with the FLIR ONE Pro (and other professional thermal imagers) as part of our 2017 CES coverage. Today, FLIR is officially putting up the 3rd Gen. FLIR ONE and the FLIR ONE Pro for sale. Both are devices that plug into a mobile device (Android or iOS), turning them into versatile thermal cameras. While the FLIR ONE caters to DIY folks and home owners, the FLIR ONE Pro serves the market segment that requires advanced features (including contractors, home inspectors, plumbers etc.) As part of the press, we were provided a preview sample of the Android version of the FLIR ONE Pro.
Introduction
The costs associated with thermal imaging systems have restricted their usage and kept it out of reach of the average consumer / impulse-buy territory. However, advancements in this field over the last few years have made the prices of such system more palatable to non-professional users. These have also contributed to the integration of thermal imaging features in extremely compact systems (including integration into smartphones such as the CAT S60). Thanks to the advent of smart mobile devices, the costs associated with the storage, control and user-interface for these systems could be taken out for most markets.
FLIR made one of the first forays into this space with the first-generation iOS-only FLIR ONE. Seek Thermal entered the fray to cater to Android users, before FLIR themselves released an Android version of the FLIR ONE. Since then, we have had both FLIR and Seek Thermal announce a host of new products with higher resolution sensors. Before going into the technical details of the latest set of products, some readers might appreciate a recap of the basics of thermal imaging that we covered in our review of the Seek Thermal camera.
Thermal Imaging Basics
All materials emit infrared energy and the intensity is a function of its temperature. In simple terms, the higher the temperature, the greater the intensity. Thermal imaging systems utilize a sensor to convert the emitted infrared energy into electrical impulses for further processing. In general, these sensors are called bolometers - they are made of materials whose electrical resistance is dependent on the temperature. The heating is triggered by the power of the incident electromagnetic radiation. Note that bolometers can be used for any type of electromagnetic radiation, though they are typically best suited for infrared and microwave frequencies. A microbolometer is a particular type of bolometer suitable for infrared wavelengths, making them suitable for use in thermal imaging systems. The microbolometer used in the FLIR ONE Pro is the FLIR Lepton 3, and it responds to long-wave infrared radiation (wavelenghts between 8 and 14 microns).
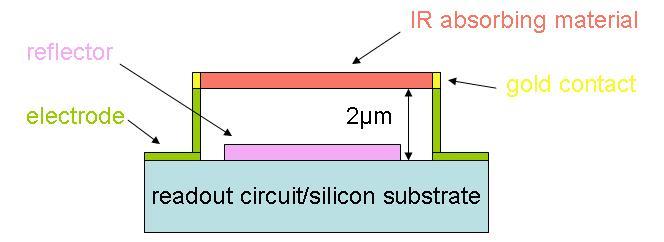
A microbolometer consists of an array of pixels. The Lepton 3 (PDF) has a 160 x 120 array (for around 19.2K thermal pixels). Each pixel has multiple layers, as shown in the cross-sectional diagram below.
"Cross-sectional microbolomter". Licensed under Public Domain via Wikipedia
Depending on the manufacturer, the manufacturing procedure and absorbing materials can differ. Amorphous silicon and vanadium oxide (VO) are the two commonly used infrared radiation detecting materials. Despite being lower in performance and longevity compared to amorphous Si, VO is preferred as it has been around for quite some time (more mature) compared to a-Si. The Lepton 3 sensor also uses VO as the IR radiation detecting material. The pixel array in the microbolometer is usually encapsulated in a vacuum to increase the life of the device. The construction of the microbolometer also determines the supported temperature range. The FLIR ONE Pro / Lepton 3 combination can detect temperatures between -20 C and +400 C.
As one of the graphs in the a-Si link above shows, we have also seen a decrease in the dimensions of the individual pixels. While older devices had a pixel pitch of 45 um, newer devices such as the Lepton 3 have a pixel pitch of just 12 um. With decreasing pixel size, the number of pixels per unit area increases to provide higher resolution images.
Unlike regular cameras (which use regular glass or plastic lenses), thermal cameras can't use materials that reflect thermal radiation. The commonly used materials for thermal lenses are germanium, zinc selenide, zinc sulphide, silicon, and chalcogenide glass. The FLIR ONE Pro uses a silicon doublet lens.
The FLIR ONE Pro
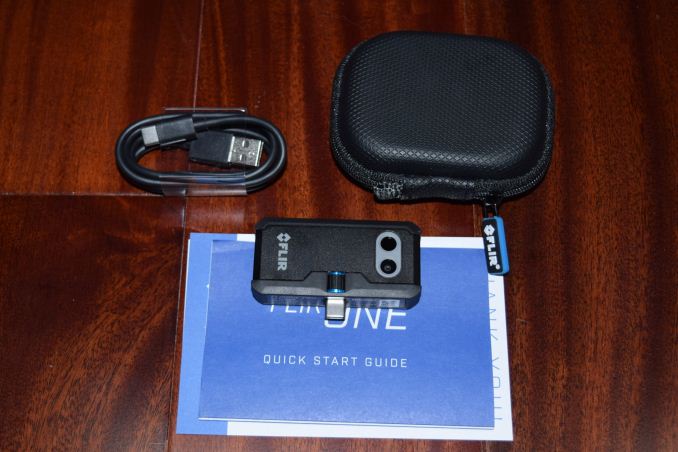
The FLIR ONE Pro comes with a compact carrying case that can also hold the USB-C charging cable. The unit can operate up to 1 hour on a single charge (though that duration drops down drastically if one takes videos). Charging the unit from 0 to 100% takes around three-quarters of a hour. The design is rugged. FLIR claims that the unit has been drop-tested up to 1.8m.
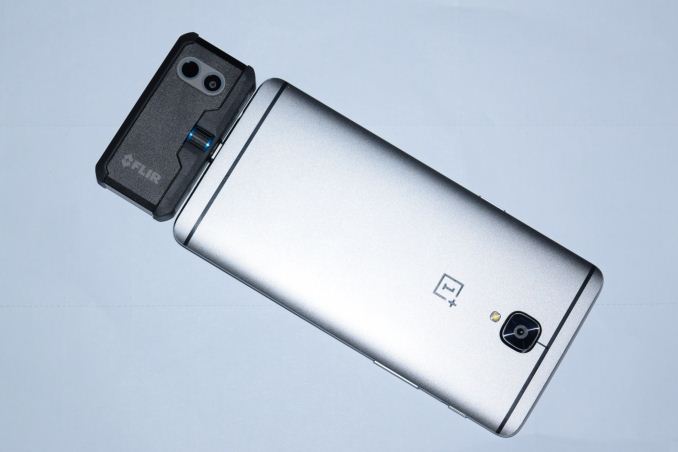
The rectangular unit has dimensions of 68mm x 34mm x 14mm, and weights approximately 37 grams. In addition to the 160x120 Lepton 3 sensor inside the unit, the FLIR ONE Pro also includes a 1440x1080 visible image sensor. The field of view is 55 degrees (horizontal) and 43 degrees (vertical). As with all consumer thermal imaging cameras, the video frame rate is capped at 9 Hz.
The OneFit connector is controlled by the wheel just below the USB-C male connector. Adjusting it (clockwise / anti-clockwise rotation) allows the USB-C connector to extend out by up to 4mm. This allows protective phone cases to be used while operating the FLIR ONE Pro. The USB-C connection obviously solves the orientation issue that plagued the previous generation FLIR ONE for Android when used with certain mobile phones.
The Android apps (FLIR One and FLIR Tools) control / bring out many of the operational features (such as MSX, spot temperature meters, post processing of generated radiometric JPEGs etc.). The next section covers the two Android apps in detail.
Usage Impressions
The presence of a USB-C connector ensures that the FLIR ONE Pro is compatible with a wide range of Android phones. Like the previous generation FLIR ONE, the unit has an explicit button to turn the device on or off. The button includes a light indicator (flashing orange while booting up, green when active). The FLIR One app needs to be installed before thermal images or videos can be taken.
As mentioned in the previous section, the FLIR ONE Pro includes a 1440x1080 image sensor for capturing visible images. Even though the thermal sensor itself is only 160x120, FLIR's patented MSX blending algorithm combines the HD image from the image sensor with the thermal sensor's output. The result is a thermal image with a perceived resolution closer to that of the image sensor, rather than the thermal one. It must be noted that the number of radiometric data points in the result is still limited by the Lepton 3's resolution of 160x120.
The FLIR ONE Pro also includes additional signal processing technology (termed as VividIR in FLIR's marketing) to further enhance the image clarity. We found that the thermal images created by the FLIR ONE Pro were definitely of much better quality compared to what we got with the second generation FLIR ONE. But, it is not clear how much of that is due VividIR in particular.
The FLIR One Android App
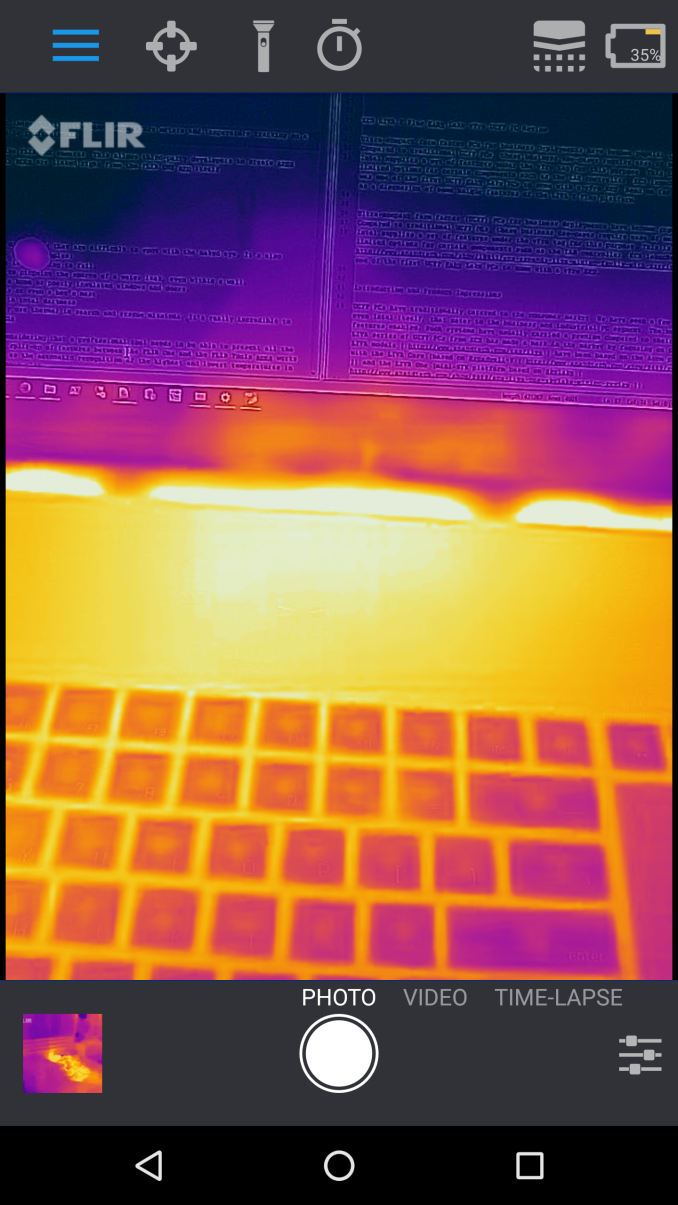
The home screen of the FLIR One app is divided into four panes, with a direct link to the gallery of recorded media in the local device, and three links to online content. The drop down menu provides the more interesting options. The Camera menu takes us directly to the preview pane.
The viewfinder icon brings up the temperature meter. There are three different types (spot, rectangle, and circle), and users can create up to three of each. The flashlight icon turns on the phone's LED flash (useful for capturing visible and MSX images in dark environments). There is also a timer for triggering the capture (instant, 3s, and 10s are the available options).
Adjacent to the battery level indicator, we have an icon to trigger the shutter and clear the image data on the screen (I used it to get rid of apparent app glitches). Other options in the photo mode include the option to view either the visible image, blended MSX one, or the thermal image alone in the preview pane. The palette can also be changed (9 different options are available, as seen in the above gallery). The IR scale brings up a temperature range scale to one edge of the preview pane, with the default setting extremes being the highest and lowest temperatures in the scene. This can be changed by the user. Parallax adjustment allows proper MSX blending based on the proximity of the subject. An option is also available to flip the captured image in the preview itself. The gain settings can also be adjusted if necessary (low gain is needed to see very high temperatures).
While the MSX and VividIR features deliver great image quality, the spot temperature meters and temperature tracking on a region basis help provide actionable information to professionals.
The FLIR Tools Android App
Professional use-cases often require post-processing of the gathered images. Fortunately, the pictures saved by the FLIR ONE Pro are radiometric in nature. This means that pixels have associated data with them (in this case, temperature). FLIR Tools is a program provided by FLIR to process radiometric JPEGs. I had tried using it on a PC with the thermal images from the previous generation FLIR One, but, it wasn't successful. FLIR now has an Android version of the software.
While FLIR Tools has multiple use-cases (including control and discovery of advanced thermal imaging equipment using Bluetooth etc.), our testing was limited to post processing of thermal images captured via the FLIR One app.
The app allows generation of a PDF report from any radiometric JPEG. The report includes a list of measurements activated via the on-screen editing options. The editing options include adjustment of parallax, palette, and measurements (spot, rectangular, and circular regions). Unlike the FLIR One app which is restricted to three of each region type, FLIR Tools can be used to add as many measurements as one wants, and the resulting image can be saved.
FLIR also has a developer program and SDKs for the FLIR ONE cameras. This allows third-party developers to create apps that can utilize the FLIR ONEs. A few high-quality apps are linked right from the FLIR ONE app itself.
Sample Thermal Images
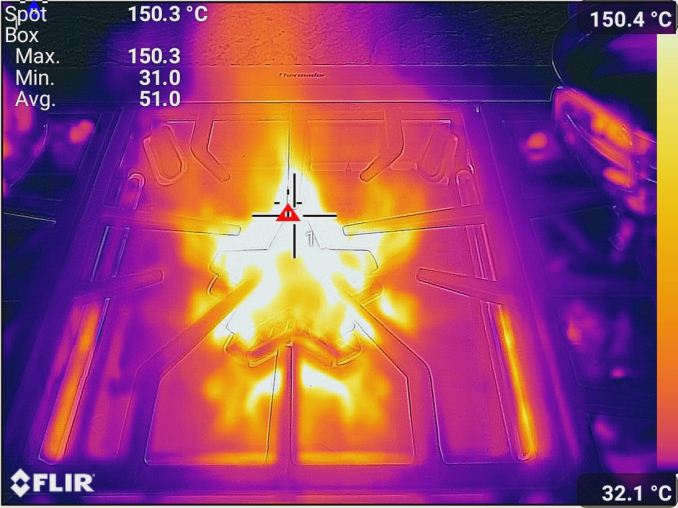
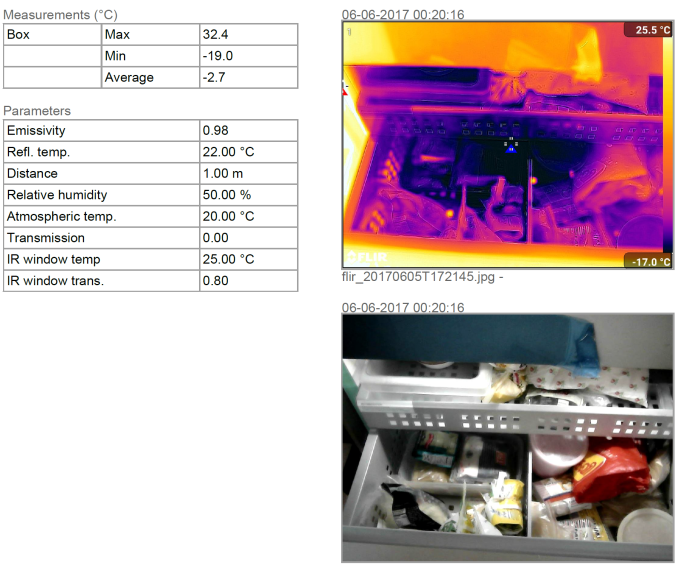
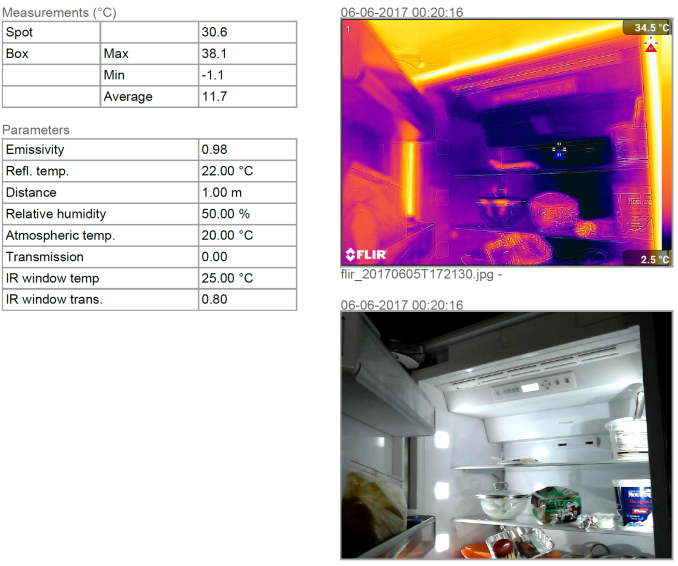
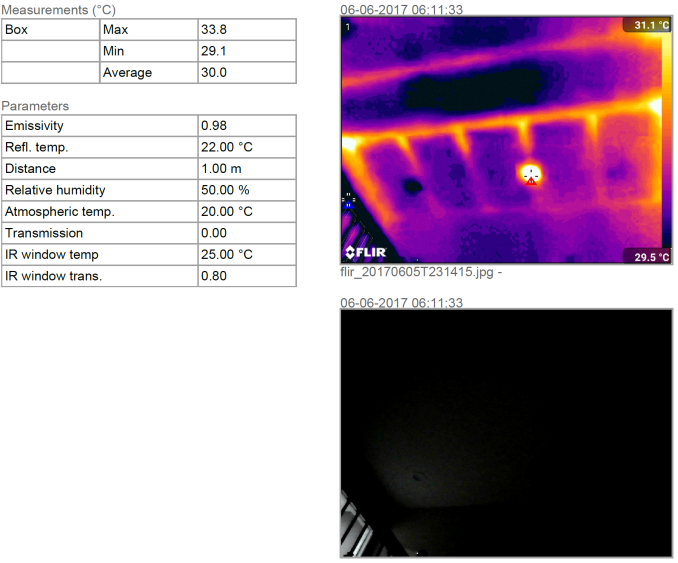
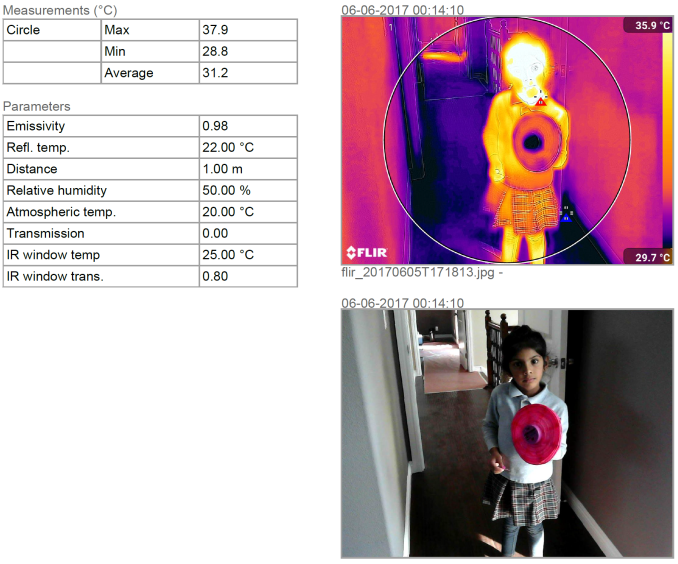
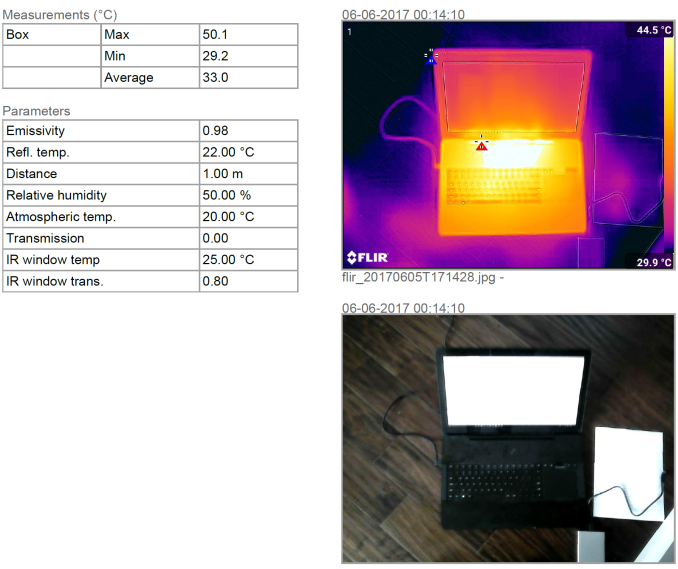
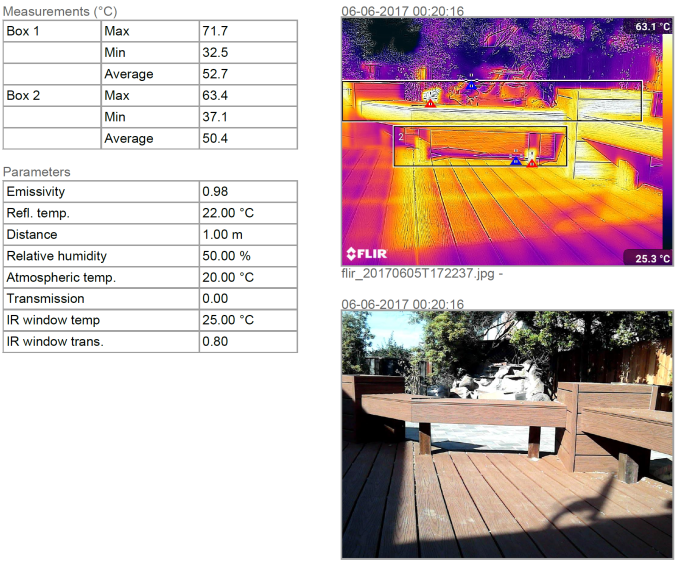
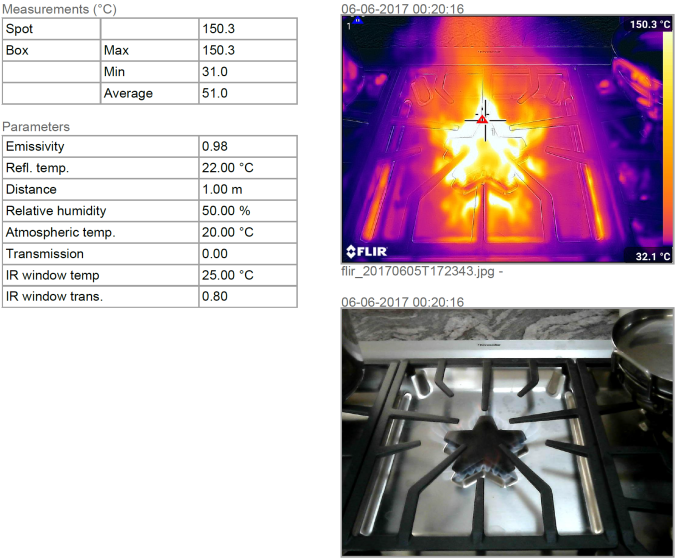
Some sample thermal images (with annotations added using FLIR Tools) are provided below in the form of screenshots from the generated PDF report. We can see that the FLIR ONE Pro is able to track temperatures ranging from -17C to 150C.
Freezer Compartment
Refrigerator Compartment
Ceiling from Staircase Base in a Dark Room
Child
Notebook under Use
Composite Deck in the Sun
Open Flame on a 16000 BTU Natural Gas Cooktop Burner
We can also see the versatility of the FLIR Tools app, which allows tracking of multiple regions in the deck sample above. The ceiling shot (in the dark) also shows the wooden rafters standing out in the thermal image. Temperatures are fairly accurate, with the human skin temperature correctly being identified.
Concluding Remarks
FLIR is making two affordable thermal imagers available for sale today. While the FLIR ONE caters to the casual users, the FLIR ONE Pro caters to power users and professionals. Thermal imagers are especially effective for diagnosing issues around the home or job site that are difficult to spot with the naked eye. Examples include spotting an overloaded circuit or identifying a switch that is beginning to fail and determining the exact location of plumbing issues like clogged pipes or water leaks (that are not readily visible). Identification of insulation issues is an oft-cited example. But, in addition, it can also be used to identify critter nesting areas, or even lost pets. A smartphone along with either the FLIR ONE or the FLIR ONE Pro can help in all these cases and more.
The FLIR ONE Pro hardware build quality is excellent, and there is really nothing to complain about in that aspect. The majority of the user experience falls back on the app side. The FLIR One Android app's user interface could be a bit more simple, but, considering that a professional tool needs to be able to present all the tweaks and knobs to the end-user, it makes sense. The split-up of features between the FLIR One and the FLIR Tools apps works well. We would like some features in the latter (such as the automatic recognition of the highest and lowest temperatures in the frame) to be available in the FLIR ONE's preview pane also.
FLIR requires verified online accounts for the usage of the new FLIR One app and the FLIR Tools app. However, the two accounts are distinct ones. FLIR indicated that they plan to have a single sign-on program in the future, but, consumers need separate accounts for now.
It is mandatory to be connected to the Internet when first launching the FLIR One app. Thankfully, subsequent usage doesn't require the user to be online (though the beta app that we used kept pushing a sign-in error notification even after disconnecting the FLIR ONE Pro from the smartphone). The app was also a little bit flaky - the remaining battery charge indication would occasionally show some obviously wrong values, and the UI would sometimes get garbled up. But, these issues were quite rare, and I am quite sure that FLIR will be updating the app regularly before the first set of units ship to the consumers later this month.
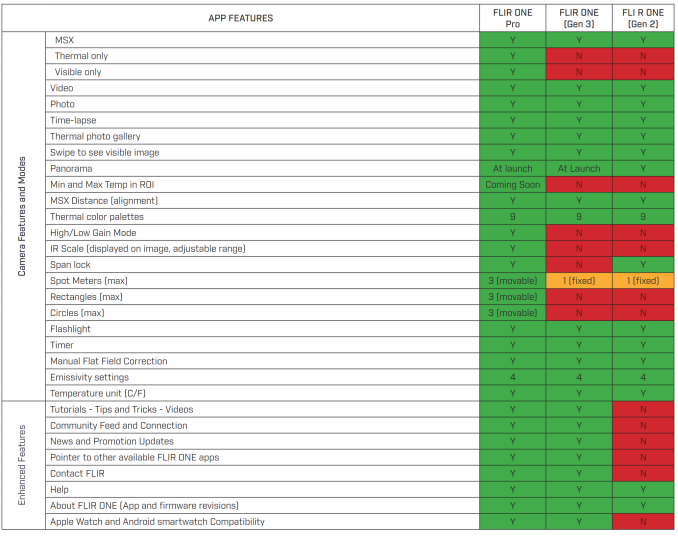
Moving on from the aspects that need improvement, we have to give credit to FLIR for OneFit adjustable connector feature that enables usage of the add-on module even with mobile devices enclosed in cases. The USB-C connector for the Android version solves the orientation issue that consumers faced with the previous generation FLIR ONE units. The built-in battery ensures that the add-on does not negatively affect the battery life of the mobile device. The new features of the FLIR One app are also welcome. Though I am not a big fan of the social aspects of the app (such as the community feeds etc.), I am sure some customers might appreciate the feature. The smartwatch compatibility of the app (that allows the mobile device to be placed in slightly inaccessible locations, while still being able to get a preview from the thermal imager and trigger recording on a smartwatch) is also very useful. Even though the new FLIR One app is compatible with all of the FLIR ONE units in the market, the features activated in the app are dependent on the hardware. The following table provides a detailed summary of how the app behavior varies with the device.
The 3rd Gen. FLIR ONE is priced at $200 (compared to the $250 launch price of the previous generation), while the FLIR ONE Pro comes in at $400. FLIR indicated that a micro-USB Android version of both devices will also become available later this summer. The closest competitor to the FLIR ONE Pro (in terms of target market and feature set) is Seek Thermal's CompactPRO. It boasts a much higher thermal sensor resolution (320 x 240) compared to the Lepton 3 (160 x 120) in the FLIR ONE Pro. However, it doesn't have a camera for the visible spectrum, and lacks the advanced blending features such as FLIR's MSX. With the Seek Thermal CompactPRO being priced close to $500, we believe that the FLIR ONE Pro has a significant edge despite sporting a sensor with just a quarter of the pixels.

