Original Link: https://www.anandtech.com/show/1146
ASUS P4P800S-E: Standing Out in the Crowd
by Evan Lieb on September 14, 2003 10:45 PM EST- Posted in
- Motherboards
With IDF coming up this week and the SARS-delayed Computex scheduled for the last week of September, there are tons of companies waiting in line to introduce their latest technology and products. Computex will have the most enthusiast-oriented product announcements later this month, with a big emphasis on Taiwanese manufacturers (motherboard makers, chipset makers, etc.). ASUS will be one of the many companies ready to introduce their latest products, in hopes of getting the media excited about their latest products to drive sales as high as possible. Depending on how the announcement is coordinated, companies can derive a sizable portion of sales by introducing something new or unexpected at a big event like Computex. This is what ASUS and other manufacturers hope to accomplish later this month.
ASUS announced their 848P motherboard in the middle of last month to a rather neutral reception. Intel’s 848P chipset went relatively unnoticed when it was introduced the weeks prior to ASUS’ 848P motherboard press release, so users were understandably unexcited when they heard about an 848P motherboard. However, this wasn’t too surprising, considering the 848P’s specs; a single channel DDR400 chipset aimed at the value market. This chipset, unlike older single channel DDR motherboards based on the 845PE chipset, supports 800MHz FSB Pentium 4 processors. Essentially, the 848P chipset is an 865PE chipset with one channel disabled. Not too many enthusiasts of any market segment would seemingly be interested in a product like this. However, from what we’ve gathered so far, 848P motherboards will be specifically built as cheap products with tremendous price/performance value. Indeed, this is what we have seen with the ASUS P4P800S-E and why we are reviewing it today.
Read on to learn more about how the ASUS P4P800S-E stands out in a sea of clone desktop motherboards…
ASUS P4P800S-E: Basic Features
| Motherboard Specifications | |
| CPU Interface | Socket-478 |
| Chipset | Intel 82848P MCH (North Bridge) Intel 82801ER ICH5R (South Bridge) |
| Bus Speeds | up to 400MHz (in 1MHz increments) |
| Core Voltage | up to 1.950V (in 0.0125V increments between 1.55V and 1.60V; in 0.0250V increments after 1.60V) |
| DRAM Voltage | up to 2.85V (in 0.1V increments) |
| Chipset Voltage | N/A |
| AGP Voltage | up to 1.80V (in 0.05V increments) |
| Memory Slots | 3 X 184-pin DDR DIMM Slots |
| Expansion Slots | 1 X AGP 8X Slot 5 X PCI Slots |
| Onboard IDE RAID | N/A |
| Onboard USB 2.0/IEEE-1394 | Eight USB 2.0 ports supported by ICH5R VIA VT6307 IEEE 1394 FireWire (up to 2 ports) |
| Onboard LAN | Intel PRO/1000CT 10/100/1000 (CSA bus) |
| Onboard Audio | Analog Devices AD1985 AC’97 codec |
| Onboard Serial ATA | Two SATA connectors via ICH5R (RAID 0 & RAID 1) |
| BIOS Revision | 1001b7 |

Click to enlarge.

Click to enlarge.
ASUS and Analog Devices have been close friends for a while now, both cooperating on the development of sound solutions. Therefore, it isn’t surprising to see that ASUS utilizes an Analog Devices AD1985 AC’97 codec for the P4P800S-E’s onboard sound. The AD1985 codec is not capable of higher quality sound at 24 bit/96KHz sampling rates, but it is capable of outputting adequate quality when an analog speaker system is utilized using an analog out port.

Click to enlarge.
The P4P800S-E uses a LAN controller from Intel, dubbed the PRO/1000CT. The PRO/1000CT is more than your standard 10/100 Fast Ethernet adapter, and therefore, will serve more than just users who have basic broadband needs. The PRO/1000CT is the only onboard adapter we know of that is capable of using Intel’s dedicated GbE (Gigabit Ethernet) bus known as CSA (Communications Streaming Architecture). GbE is capable of speeds of up to 1000Mbps, and that means that users and corporations alike will find GbE to be very useful for transferring a large amount of information between networks and server clusters, among other such system configurations. Home users have much less of a need for GbE, as the vast majority of home and home office users never need to transfer anywhere in the range of the possible throughput a GbE network offers. Still, there are always some users who will find a need for GbE networks in their homes. If you’re one of those types of people, then you have every reason to love the fact that the P4P800S-E comes with an onboard 10/100/1000 GbE adapter. The GbE adapter travels through Intel’s CSA (Commutations Streaming Architecture) bus and ends up increasing throughput rates, compared to onboard 10/100/1000 GbE adapters that travel through the often clogged PCI bus. We demonstrated this very fact in a review a few months ago.
The P4P800S-E’s I/O ports are pretty standard for a value motherboard, save for a few additional niceties. The basic I/O ports that come with the P4P800S-E are two PS/2 ports, one parallel port, one serial port, four USB 2.0 ports, and Mic in, Line in, and Line out, which drive the onboard sound. Some of the additional I/O that are only common among high-end desktop motherboards include one rear IEEE 1394 FireWire port, one 10/100/1000 GbE (Gigabit Ethernet) port, and one optical out port. It is unheard to have these features on a value motherboard. At the least, we’re happy to say that a top tier motherboard maker like ASUS is leading the way in this department.

Click to enlarge.
The onboard IEEE 1394 FireWire is powered by a VIA VT6307 controller, capable of supporting a maximum of two ports. We would have preferred the VIA VT6306 because it adds an extra port, which some users will find useful if they happen to have several FireWire devices. Unfortunately, ASUS does not include an IEEE 1394 FireWire bracket to make use of the onboard FireWire header. This isn’t surprising, considering ASUS has to cut costs somehow to keep the motherboard price so low.
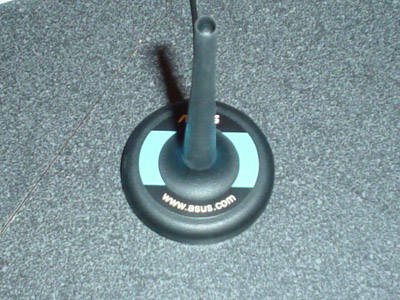
The most interesting and unique feature that the P4P800S-E brings to the table is wireless 802.11b 11Mbps capability. By plugging in the bundled 802.11b card into the P4P800S-E motherboard and connecting the dipolar antenna twist-on connector (the AP, otherwise known as the Access Point) to the antenna connector, your P4P800S-E powered system will be able to connect wirelessly to the Internet. This is all a very simple procedure that ASUS outlines in the WiFi guide to wireless connectivity that comes bundled with the P4P800S-E.
We certainly think that ASUS is going down the right path when it comes to making WiFi standard among value motherboards. 802.11b at 11Mbps is more than enough for the average Internet user. Including an 802.11g card (at 54Mbps) might have been a better option for those people who transfer large files, but 802.11b will by no means hold back anyone looking for a fast Internet experience with fast download times.
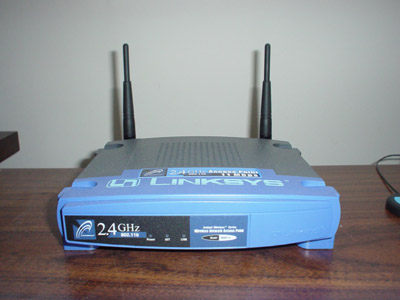
Unfortunately, one of the downsides of the bundled AP is its lack of range to other devices (this won’t concern users who will be using their ASUS AP for just their motherboard). Using a Dell 600m Centrino laptop with an Intel PRO 2100 card, we were able to keep excellent signal integrity only 10 feet away from the ASUS AP. For regular laptop users who move around their living quarters quite a bit, this limited range will be a big drawback. This is exactly why some people will opt for a more powerful AP. In our case, we used a Linksys WAP11 AP, which uses an identical 802.11b standard for transferring data as the ASUS AP. The Linksys WAP11 AP had a much longer range of connectivity compared to ASUS’ AP, about 75 feet in total. Since we were constrained by the dimensions of our testing lab, we may have been able to receive excellent signal integrity beyond those 75 feet. Still, it’s clear that a standalone AP like the Linksys WAP11 is a much better choice if you want to have maximum range on your laptop. If you’re someone who works in a small office or apartment and won’t be moving your laptop more than a few feet from your ASUS AP, then you will be more than satisfied with the P4P800S-E’s bundled AP.
We’d like to caution users that there are some devices in your home that may interfere with your ASUS AP. One common product that tends to hamper wireless signal integrity is 2.4GHz cordless phones. If you encounter signal issues, we suggest that you try and set up your ASUS AP as far away from your 2.4GHz cordless phone as possible. Another remedy for stopping signal interference may be to simply replace your 2.4GHz cordless phone with a 900MHz cordless phone, which does not have as much of an issue with interference.
ASUS P4P800S-E: Board Layout
The P4P800S-E’s general layout isn’t too shabby, though there are a few layout choices with which we take issue.
Click to enlarge.
The P4P800S-E’s ATX connector location is on the preferable side of the motherboard, but is placed too low on the board for it to be a useful location. Unfortunately, standard PSUs often do not have an extra long ATX cable, and this becomes a problem with motherboards that have their ATX connectors located on the left-hand portion of the motherboard. This placement noticeably increases clutter and most likely will obstruct the installation/uninstallation of the CPU HSF, memory modules, and other components in that area. Of course, if you’re like most enthusiasts, you’ll be using a high-quality PSU with an extra-long ATX connector, and have nothing to worry about. Still, it’s difficult to overlook the fact that the vast majority of ATX cases come with standard PSU’s that have short cables, including the ATX cable.

Click to enlarge.
Thankfully, ASUS places the Primary and Secondary IDE connectors on the upper right-hand portion of the board, well above its mid section. We have always preferred this type of positioning because it makes it much easier to route the IDE cables that come bundled with all motherboards nowadays. Not only does the Primary and Secondary IDE connector’s location (high up on the motherboard) guarantee much less case clutter and better air flow, it avoids the possibility of not being able to use the top two drive bays of your computer case. Having used a countless number of motherboards that had the Primary and Secondary IDE connector locations much lower on the board, I can say first hand how ridiculous your computer will look if the top one or two bays aren’t filled with an ATAPI (optical) drive, such as a CD-RW or DVD-ROM.
One big negative aspect about the P4P800S-E’s layout is the location of the Floppy connector. Instead of being placed at the bottom of the motherboard, the P4P800S-E’s Floppy connector is located above the Primary and Secondary IDE connectors. This causes a big problem because all modern computer cases place the Floppy drive bay in the middle portion (or slightly below) of the case. This means that you’ll have to route your Floppy cable through your IDE cables, which can cause case havoc in terms of neatness, and even some airflow issues. This is quite a minor issue though, especially if you could care less about how neat the inside of your case is. There will be some enthusiasts that like to tinker and upgrade their computers frequently however, and so this Floppy connector location will be an additional annoyance.

Click to enlarge.
A positive layout decision for any motherboard is the location of its DIMM connectors. Users who upgrade and tinker their systems frequently will be quite pleased to see that the P4P800S-E’s DIMM connectors have no chance of colliding with an AGP video card when placed in the open position. This makes it possible for users to install or uninstall memory modules easily without having to uninstall their video card. We’ve detailed on countless occasions what a waste of time it can be to uninstall your video card. First you have to unscrew your video card, then you have to unplug your VGA cable, and finally you have to physically uninstall the video card from its AGP slot. All of this would be necessary just to upgrade or uninstall some memory modules. Thankfully, ASUS’ engineers didn’t overlook this common problem.

Click to enlarge.
Fortunately, ASUS places their North Bridge heatsink parallel to the edge of the board instead of at a 45 degree angle. This is a better location because it allows users to install the high powered copper CPU HSFs on the market without having to modify physically the North Bridge heatsink. In addition, this positioning helps with video card enthusiasts looking to add extra cooling to the backside of their video cards PCB, as the North Bridge heatsink will have no chance of colliding with the video card.
ASUS P4P800S-E: BIOS and Overclocking
ASUS uses an AMI BIOS for the P4P800S-E, something that is starting to become more common among ASUS desktop motherboards.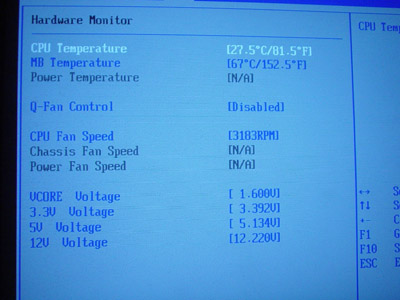
The P4P800S-E’s PC Health section, simply called the “Hardware Monitor” in this BIOS version, contains such readings as CPU, motherboard, and Power temperatures, CPU, Chassis, and Power fan speeds, Vcore, and PSU readings (all rails). This is a fairly bland collection of monitoring values. Adding in a VAGP and/or VDIMM reading would have been quite nice, and even a battery voltage reading of some type would have been useful. One excellent addition to the P4P800S-E, and one that is becoming more and more standard among Pentium 4 motherboard BIOSes, is the option for adjusting the CPU’s fan speed. ASUS calls this capability “Q-Fan Control”. Q-Fan is able to adjust the CPU’s fan speed in 16 different levels. This was very useful in quieting the stock HSF that came with the 3.0C processor that we received from Intel.
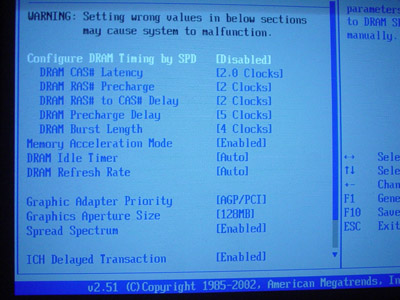
The P4P800S-E’s Advanced Chipset Features section is a bit more unconventional among the latest 800MHz FSB motherboards. Still, all the standard memory timing adjustments are available for tweaking; CAS Latency, RAS Precharge, RAS to CAS Delay, and Precharge Delay. We also see MAM (Memory Acceleration Mode) present in this section. We highly suggest that users enable this option, as there is no reason to leave it disabled knowing for a fact that it improves performance on an average of about 4%.
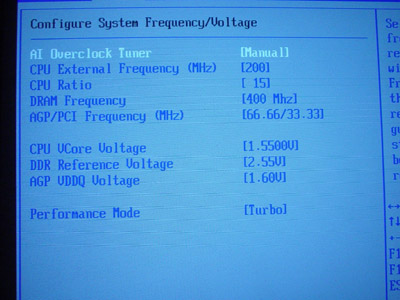
In the JumperFree section, we see options for FSB tuning, CPU ratios (which won’t be usable unless you know someone with a very rare unlocked engineering sample CPU), DRAM frequency, AGP/PCI frequencies, Vcore, VDIMM, VAGP, and a Performance Mode option. Overall, this is a very nice assortment of the most vital BIOS options that the vast majority of P4P800S-E users need to know about. Let’s go into more details about each of these options, shall we?
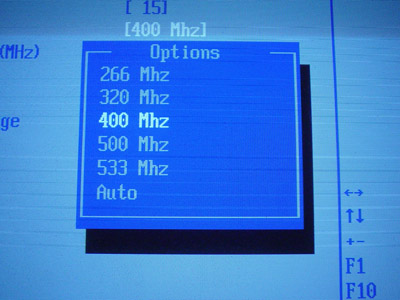
The P4P800S-E offers a standard arrangement of DRAM frequency options: DDR266, DDR320, and DDR400. However, two unconventional options have been added to the P4P800S-E’s range of DRAM adjustments, namely DDR500 and DDR533 speeds. As you’ll soon see in the Stress Testing section of this review, DDR500 and higher speeds are attainable, but at a cost.
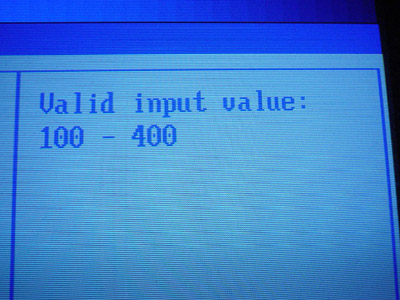
Luckily, ASUS does not skimp out on the FSB options. Once you enter the “JumperFree Configuration” section, you’ll see an “AI Overclock Tuner” option that, when set to Manual, will allow FSB adjustments up to 400MHz in 1MHz increments, among many other options. A value of 400MHz FSB is more than enough for the most adventurous overclockers in the world. AnandTech’s own labs have barely been able to get past just 300MHz FSB, and even at this speed, it’s impossible to keep reliably.
The P4P800S-E’s VDIMM range is very good. VDIMM is adjustable up to 2.85V in 0.1V increments staring from 2.55V. As Wesley Fink proved in his Holy Grail Memory articles (Part 1 and Part 2), 2.85V is more than enough for the best high-speed memory modules on the market, especially from memory manufacturers such as OCZ and Corsair. Because the Pentium 4’s FSB bandwidth is so large at overclocked FSB speeds (between 1000MHz FSB and 1200MHz FSB mostly), having too low a VDIMM BIOS option will hinder the amount of bandwidth your memory modules can feed to your system. Therefore, it’s good to see at least 2.85V as an option on the ASUS P4P800S-E. High-speed memory (such as PC3700, PC4000, and PC4200 modules) needs it.
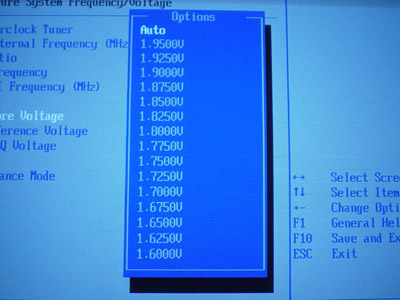
The P4P800S-E’s Vcore range is excellent. Vcore is adjustable all the way up to 1.950V in 0.0125V increments between 1.55V and 1.60V, and in 0.0250V increments after 1.60V. Hardcore overclockers would have preferred 0.0125V increments instead of 0.0250V after 1.60V because of the flexibility it offers their cooling solution, but this is a minor setback at worst. Overall, there’s no reason why anyone would be disappointed with such a high Vcore as 1.950V. Just make sure never to set your Pentium 4 CPU at this high of a value; otherwise, it’ll die within days or weeks, or if you’re very lucky, a couple months. However, some overclockers will find that adjusting Vcore is not necessary with the P4P800S-E because, as per tradition, ASUS overvolts their boards. In the P4P800S-E’s case, idle Vcore fluctuates between 1.584V – 1.600V.
The ASUS P4P800S-E’s VAGP range is standard among Intel chipset-based motherboards. ASUS allows VAGP adjustments up to 1.80V in 0.1V increments. This type of voltage is well over spec, and is all you’ll ever need when you venture into video overclocking territory. We’d suggest 1.6V if you’re serious about video overclocking but want your motherboard to last. Otherwise, you can take a risk and set your VAGP to 1.8V. Just don’t expect everything to run dandily for too long.
As with all motherboards based on the latest Intel chipset, the ASUS P4P800S-E comes with an AGP/PCI lock. For overclockers, you’ll want to keep this option set to its default “Auto” setting, unless you’re really keen on AGP/PCI tuning. If you are one of these types of AGP/PCI overclockers, you probably aren’t going to be satisfied with the limited adjustability of the P4P800S-E, with only three options available: 66.66MHz/33.33MHz, 72.73MHz/36.36MHz, and 80.00MHz/40.00MHz. Still, the vast majority of performance users and overclockers will be quite satisfied with what the ASUS P4P800S-E offers in this category.
Interestingly enough, we’ve yet to see any motherboards based on the latest Intel chipsets (865PE, 875P, etc.) that have a BIOS option for chipset voltage tuning; i.e. North Bridge voltage tampering. This can be a very useful option for overclockers looking to squeeze every last ounce of performance from their motherboard. We would personally be pleased in at least seeing the availability of such an option in the near future with Intel chipset-based motherboards. Overclockers certainly won’t have any gripes with such a feature.
FSB Overclocking Results
For FSB overclocking, the following setup was used on the P4P800S-E:| Front Side Bus Overclocking Testbed | |
| Processor: | 2.4C Pentium 4 (800MHz FSB) |
| CPU Vcore: | 1.525V (default) |
| Cooling: | Thermalright SK-900U with 120mm Thermaltake Fan |
| Memory: | Two 256MB Corsair 3200LL at SPD |
| Power Supply: | Enermax 350W |
We weren’t surprised to see the P4P800S-E hit a relatively unexciting 262MHz FSB with the above overclocking setup. Compared to FSB overclocks from motherboards such as the DFI PRO875, ASUS P4C800-E, ABIT IC7-G, Gigabyte 8KNXP, and other motherboards, the P4P800S-E’s FSB overclock is considerably worse. Quite frankly, there’s no other way to say this — serious and hardcore overclockers will not think twice about the P4P800S-E, and will instead look at the four motherboards mentioned above for the best overclocking performance available on the P4 market.
For the casual or occasional overclocker, however, the P4P800S-E is a superb choice.
ASUS P4P800S-E: Stress Testing
We performed stress tests on the ASUS P4P800S-E in these areas and configurations:1. Chipset and motherboard stress testing, conducted by running the FSB at 262MHz.
2. Memory stress testing, conducted by running RAM at 400MHz with all three DIMM slots filled and at 500MHz with one DIMM slot filled, all at the lowest memory timings possible.
Front Side Bus Stress Test Results:
As standard practice, we ran a full range of stress tests and benchmarks to ensure that the ASUS P4P800S-E was absolutely stable at each overclocked FSB speed. These stress tests included Prime95 torture tests, which were run in the background for a total of 24 hours.In addition, we ran several other tasks: data compression, various DX8 and DX9 games, and apps, like Word and Excel. Moreover, Prime95 was running in the background. Finally, we ran our benchmark suite, which includes ZD Winstone suite, Unreal Tournament 2003, SPECviewperf 7.0, and Gun Metal Benchmark 2. While we were able to boot and run some tests at speeds as high as 287MHz FSB and at default voltage on the P4P800S-E, 262MHz was the highest achievable overclock attainable without encountering any reliability issues.
Memory Stress Test Results:
Filling all three available memory banks is more strenuous on the memory subsystem than testing just one bank, which is why we’ve skipped our usual single bank testing with this review and went straight to this often asked about memory configured. Here were our results:| Stable DDR400 Timings (3/3 banks populated) |
|
| Clock Speed: | 200MHz |
| Fast Command: | N/A |
| CAS Latency: | 2.0 |
| Bank Interleave: | N/A |
| RAS to CAS Delay: | 3T |
| RAS Precharge: | 5T |
| Precharge Delay: | 2T |
| Command Rate: | N/A |
Except for RAS to CAS delay, we see that the P4P800S-E is an exceptionally well-performing motherboard in terms of memory capability. CAS 2-3-2-5 with three banks filled is quite excellent, to say the least. Luckily, this isn’t a rare occurrence, but is worth mentioning because there have been far too many good motherboards that have been crippled due to poor main memory implementation.
This will be our first motherboard review where we stress test a motherboard to see how far out of spec main memory will run at. In this case, we’re testing to see how well the P4P800S-E operates at DDR500 using one 256MB OCZ PC3700 GOLD module. The FSB was set to 250MHz in this scenario.
| Stable DDR500 Timings (1/3 banks populated) |
|
| Clock Speed: | 250MHz |
| Fast Command: | N/A |
| CAS Latency: | 2.5 |
| Bank Interleave: | N/A |
| RAS to CAS Delay: | 3T |
| RAS Precharge: | 7T |
| Precharge Delay: | 3T |
| Command Rate: | N/A |
Normally, we wouldn’t say that CAS 2.5-3-3-7 memory timings are good, but at 500MHz DDR, it’s an unfortunate reality. These relaxed memory timings are absolutely necessary because of the incredibly out of spec DDR500 memory speed the P4P800S-E is operating at. DDR500’s performance usefulness is relatively limited when these types of high memory timings are necessary. However, DDR500 does hold a slight advantage over DDR400 operating at lower (faster) latencies. So for memory performance fanatics out there, the impressive results with the P4P800S-E is satisfying.
We were able to reach a memory speed of DDR525 with our OCZ PC4000 GOLD module, but our RAS to CAS delay had to be raised from 3T to 4T, which actually made DDR525 operation slower than DDR500 operation on the P4P800S-E.
We tested all these memory timings using several stress tests and general applications to guarantee stability. Prime95 torture tests were successfully run at the timings listed in the above charts. We also ran Sciencemark (memory tests only) and Super Pi. None of the three stress tests created stability problems for the ASUS P4P800S-E at these memory timings.
ASUS P4P800S-E: Tech Support and RMA
For your reference, we will repost our support evaluation procedure here:The way our Tech Support evaluation works is first we anonymously email the manufacturer's tech support address(es), obviously not using our AnandTech mail server to avoid any sort of preferential treatment. Our emails (we can and will send more than one just to make sure we are not getting the staff on an “off” day) all contain fixable problems that we have had with our motherboard. We then give the manufacturer up to 72 business hours to respond and then we will report whether or not they responded within the time allotted, and if they were successful in fixing our problems. In case we don’t receive a response before the review is published, any future responses will be added to the review, including the total time it took for the manufacturer to respond to our requests.
The idea here is to encourage manufacturers to improve their technical support as well as provide new criteria upon which to base your motherboard purchasing decisions. As motherboards become more similar every day, we have to help separate the boys from the men in as many ways as possible. As usual, we are interested in your feedback on this and other parts of our reviews, so please do email us with your comments.
We are pleased to announce that ASUS has finally included a clear, readable RMA policy on their web site. After much writing on this subject in the past, we’re pleasantly surprised to see some progress being made in terms of ASUS’ customer support. We’ve reposted ASUS’ RMA policy for your convenience:
Dear Sir/Madam
Please provide the following information so that we may process your request for warranty repair service. Once we have obtained that information from you, we will issue an RMA # and provide the proper shipping instructions. Please read and provide all of the information below. We cannot complete your request, if all of the information below is not provided.
Thank you,
ASUS Computer International
PLEASE PROVIDE US WITH:
ASUS Computer International (USA) is a warranty repair service center. Please contact place of purchase for credit, refund, upgrade, or advance replacement. Asus does not provide these services under any circumstances.
- THE MODEL & SERIAL NUMBER OFF OF YOUR PRODUCT model (name of product) serial# (10 digits/characters long, no dashes).
- YOUR FULL NAME/NAME OF COMPANY (Only provide company name if the shipping address is to a company).
- YOUR SHIPPING ADDRESS (no PO boxes please).
- YOUR DAYTIME PHONE/FAX NUMBER.
ASUS Does not cover physical damage. Please refer to page 2 of your users manual. There is a $15.00 fee to replace a broken socket. There is a $40.00 fee to repair all other physical damage. If a product is not repairable, the product will be sent back to the customer. If a product is sent in with physical damage and is not accompanied with a payment, the product will be rejected and customers will not be reimbursed for shipping charges. A payment can be made by check, money order (payable to ASUS), or a credit card#. The payment must be sent in with the damaged product. Customers from Canada must make payments with a credit card#.
This is a fairly clear RMA policy without too much extra fluff that could confuse some end users. Read through the following procedures to access ASUS’ RMA information via the web:
- Click the “contact ASUS” hyperlink on their North American (U.S.) web page.
- Here, you will find several international contact listings, including the North American contact information, which will read Asus Computer International (AMERICA).
- Click on their http://helpdesk.asus.com hyperlink, which will connect you to their support website.
- In the lower left hand corner, there will be a hyperlink that reads “ASUS RMA Online”, and three options will appear.
- Go to the option that reads “issue a new RMA online”, where you will be immediately taken to their online RMA form.
ASUS’ tech support is also available on the same website as their RMA and warranty information. The ASUS tech support email address is [email protected], or you can try and reach ASUS at (502) 995-0883 in the U.S. Press “3” on your phone for full access. One positive aspect of ASUS’ tech support is their phone line hours, which are 5:30 AM to 5:00 PM (Pacific Standard Time). Unfortunately, their tech support email response time is still as poor as ever, missing our 72-hour deadline for the umpteenth time in a row. We’re delighted ASUS has improved their RMA situation, but their tech support must improve before we are thoroughly impressed.
Performance Test Configuration
| Performance Test Configuration | |
| Processor(s): | Intel Pentium 4 3.0C (800MHz FSB) |
| RAM: | 2 X 256MB Corsair PC3200 TwinX LL v1.2) Modules (SPD rated) |
| Hard Drive(s): | Western Digital 120GB 7200 RPM Special Edition (8MB Buffer) |
| Bus Master Drivers: | Intel INF Update v5.00.1012 Intel IAA for 875P RAID not installed for consistency of Test Results) |
| Video Card(s): | ATI Radeon 9800 PRO 128MB (AGP 8X) |
| Video Drivers: | ATI Catalyst 3.6 |
| Operating System(s): | Windows XP Professional SP1 |
| Motherboards: | ABIT IC7-G (875P) @ 200.56MHz FSB ABIT IS7-G (865PE) @ 200.78MHz FSB ASUS P4C800-E (875P) @ 200.50MHz FSB ASUS P4P800S-E (848P) @ 200.65MHz FSB Gigabyte 8KNXP (875P) @ 200.66MHz FSB |
All performance tests that were run used two 256MB Corsair LL TwinX PC3200 Version 1.2 modules set to SPD timings of 2-2-3-6. All tests were with PAT automatically enabled. This was verified using CPUZ 1.18C to make certain Performance Mode was identified as “enabled” before every benchmark run. All other settings were left at default or “auto”.
Content Creation and General Usage Performance
Media Encoding and Gaming Performance
High End Workstation Performance - SPECviewperf 7.0
High End Workstation Performance - SPECviewperf 7.0 (continued)
Final Words
After taking a long, hard look at the ASUS P4P800S-E, we’ve come to the conclusion that it is, without a doubt, one of the best value Pentium 4 motherboards on the market. ASUS says that once the P4P800S-E hits the retail channel, it’ll sell for about $100 a pop. Not bad at all considering the onboard GbE Ethernet, IEEE 1394 FireWire, and WiFi capability right out of the box. Even the ABIT IS7, which won our Editors Choice Gold Award last June, can’t offer the value that the ASUS P4P800S-E brings to the table.At the same time, however, the ASUS P4P800S-E shouldn’t be considered from a hardcore enthusiasts’ perspective. That is, enthusiasts looking to squeeze every last drop of performance from their motherboard, whether in stock or overclocked mode, will want to consider other options than the P4P800S-E. This could be any of ABIT’s latest P4 motherboards (their IS7, IS7-G, IC7, or IC7-G) or any of ASUS’ latest P4 boards (their P4C800/E Deluxe/non-Deluxe models or P4P800 Deluxe/non-Deluxe models). Gamers and workstation users will also feel the same way as hardcore overclockers do, because the ASUS P4P800S-E does lag noticeably behind its dual channel DDR counterparts (865PE and 875P chipsets) in these applications.
It is worth reiterating, however, that the ASUS P4P800S-E offers tremendous value at approximately $100. If you would like your P4P800S-E and other wireless devices (such as a laptop) to connect wirelessly to the Internet, and you have some need for IEEE 1394 FireWire and GbE (Gigabit) Ethernet, the ASUS P4P800S-E is without a doubt your perfect motherboard. The P4P800S-E’s office, content creation, and DivX performance is virtually on par with other, more expensive dual channel DDR motherboards, adding further value to this motherboard.
We look forward to reviewing other 848P boards like the P4P800S-E in hopes of finding another price/performance gem.


